DigiClock 1 - Alarm clock radio TECHNISAT - Free user manual and instructions
Find the device manual for free DigiClock 1 TECHNISAT in PDF.

| Product type | Clock radio |
| Brand | TechniSat |
| Model | DigiClock 1 |
| Dimensions (L x H x D) | 20.5 x 8.5 x 6 cm |
| Weight | 800 g |
| Power supply | DC 5 V / 1 A (mains adapter included) |
| Power consumption | Operation max. 5 W, standby < 1 W |
| FM reception range | 87.5 - 108 MHz |
| Speaker output | 2 W RMS |
| Display | LED with 6 brightness levels |
| Alarm | Programmable dual alarm (buzzer or FM radio) |
| Snooze function | Yes, 10 minutes |
| USB port | 5 V / 0.5 A for charging devices |
| Backup batteries | 2 x AAA (not included) for time backup |
| Antenna | Wired, must be fully extended |
| Radio presets | 20 stations (P01 - P20) |
| Care and cleaning | Disconnect before cleaning; use a soft, dry or slightly damp cloth; do not use solvents |
| Safety | Do not open the device; do not expose to water; use only with the supplied adapter |
| Operating ambient temperature | 0 °C to 35 °C |
| Box contents | Clock radio, mains adapter, instruction manual |
Frequently Asked Questions - DigiClock 1 TECHNISAT
User questions about DigiClock 1 TECHNISAT
0 question about this device. Answer the ones you know or ask your own.
Ask a new question about this device
Download the instructions for your Alarm clock radio in PDF format for free! Find your manual DigiClock 1 - TECHNISAT and take your electronic device back in hand. On this page are published all the documents necessary for the use of your device. DigiClock 1 by TECHNISAT.
USER MANUAL DigiClock 1 TECHNISAT
-
Czas
-
PORT USB (5V/0,5A)
-
AM
-
DC IN
-
PM
-
Pokrywa baterii
-
ALARM WŁĄCZONY
-
SNOOZE (drzemka)
1.2 Widok z góry
natural_image
Pure electrical circuit lines without any symbolsnatural_image
Pure diagram of a device layout with no text, numbers, or symbols1.1 Front and rear view
PL
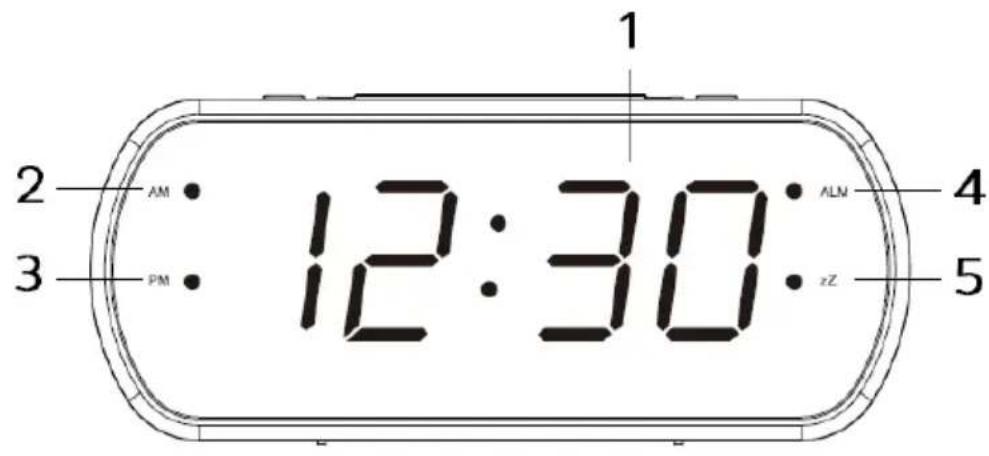
- Time
- AM
- PM
- ALARM ON
-
SNOOZE
-
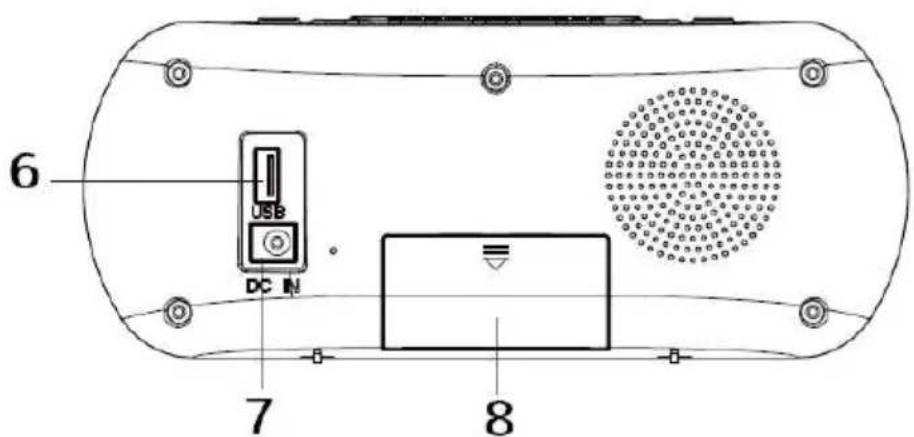
PORT USB (5V/0,5A)
-
DC IN
- Battery cover
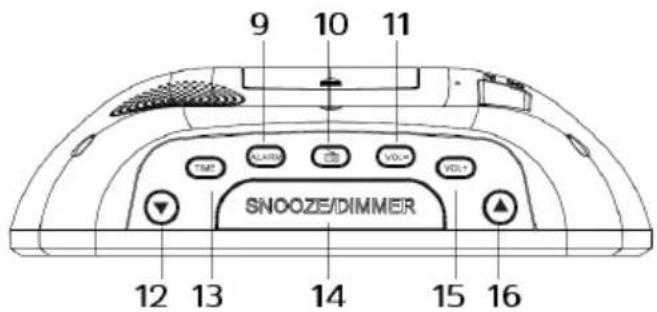
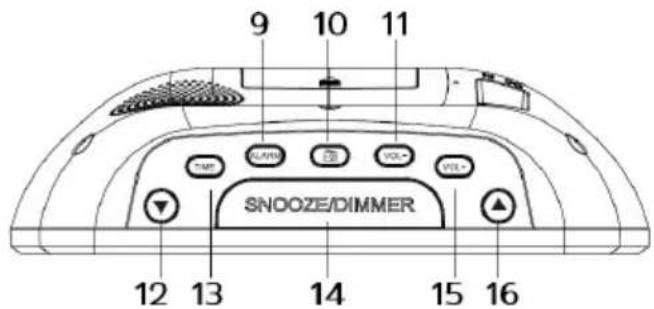
1.2 Top view

-
Alarm setting (short press)
-
TIME
Activate/deactivate the alarm (long press)
-
SNOOZE/DIMMER
-
FM Radio
15.
1
- Volume -
16.
- Down
2 Safety advice
2.1 Foreword
Dear Customers!
Thank you for choosing a radio alarm clock from TechniSat.
These operating instructions are designed to help you become familiar with the features of your new device and use them optimally. It will help you use the radio safely and for its intended purpose. It is intended for any person who installs, operates, cleans or disposes of the device.
Keep the manual in a safe place for future use.
TechniSat Team
2.2 Characters and symbols used
In this manual:

Indicates a safety instruction that, if not followed, could cause serious injury or death. Observe the following signal words:
DANGER - Serious injury resulting in death.
WARNING - Severe injury resulting in death.
CAUTION - Injury.

It indicates the caution to be observed to avoid device malfunctions, data loss/misuse or unintended operation. It also describes further functions of the device.

Warning of electrical voltage. Follow all safety instructions to avoid electric shock. Never open the device.
On a device:

Indoor use - devices marked with this symbol are suitable for indoor use only.

Your device is CE marked and meets all required EU standards.

This appliance has been designed and manufactured with high-quality materials and components that are suitable for post-new use. The symbol of the crossed-out wheeled waste container indicates that the product is subject to separate collection in accordance with Directive 2012/19/EU of the European Parliament and of the Council and in accordance with Directive 2006/66/EC of the European Parliament and of the Council, and informs that electrical and electronic equipment and batteries and accumulators, after their useful life, must not be disposed of with other household waste. The user is obliged to return it to the collector of waste electrical and electronic equipment and batteries and accumulators forming a system for the collection of such waste, including an appropriate store, local collection point or municipal unit. Waste equipment can have a harmful impact on the environment and human health due to its potential content of hazardous
substances, mixtures and components. The household plays an important role in contributing to the reuse and recovery, including recycling, of waste equipment. At this stage, attitudes are formed that influence the preservation of the common good, which is a clean environment. Households are also one of the largest users of small equipment and rational management of this equipment affects the recovery of recyclable materials. In case of improper disposal of this product, penalties may be imposed in accordance with national legislation. At the end of the product's life cycle, it should not be disposed of in the garbage of normal household waste, but at a collection point for used electrical and electronic equipment. This is indicated by the symbol on the product, user manual or packaging. Materials are recyclable according to the label. By reusing, recycling or otherwise recycling old equipment, you are making an important contribution to environmental protection.
2.3 Intended
TechniSat DIGICLOCK 1 is designed to receive UKW radio broadcasts.
The device is intended for private use and is not suitable for commercial purposes.
2.4 Safe handling of the product
Observe the following instructions to minimize safety hazards, avoid damage to the device and contribute to environmental protection.
Read all safety instructions carefully and keep them for future reference. Always follow all warnings and instructions in this manual and on the back of the device.

DANGER!
Never open the device!
Touching live components is life-threatening!

WARNING!
Danger of suffocation! Do not leave packaging and its parts in the care of children. Danger of suffocation from foils and other packaging materials!

To ensure proper use of the device and avoid damage to the device and personal injury, please follow all the instructions below:
- Do not attempt to repair the device yourself. Repairs should only be carried out by trained specialists. Contact our customer service centers.
- The device should only be operated under specified environmental conditions.
- Do not expose the device to dripping or splashing water. If water enters the device, turn it off and contact the service center.
- Do not expose the device to heat sources beyond normal operating conditions.
- In case of noticeable defects in the device, unusual odors or smoke, significant malfunctions, or damage to the casing, contact the service center immediately.
- The device should only be operated at the specified power voltage. Never attempt to operate the device at a different voltage..
-
If the device is damaged, it must not be operated.
-
Do not use the device near bathtubs, showers, pools, or flowing/spraying water. There is a risk of electric shock and/or equipment damage.
- Foreign objects, such as needles or coins, must not enter the device. Do not touch the connection terminals with metal objects or fingers, as this may cause a short circuit.
- The device is not intended for use by individuals (including children) with limited physical, sensory, or mental capabilities, or those lacking experience and/or knowledge, unless they have received supervision or instructions on using the device from a person responsible for their safety.
- Making changes to the device is strictly prohibited.
TechniSat hereby declares that the radio device type DIGICLOCK 1 complies with Directive 2014/53/EU and RoHS. The full text of the EU Declaration of Conformity is available at the following website:
TechniSat disclaims responsibility for damages to the product caused by external factors, wear and tear, improper handling, unauthorized repairs, modifications, or accidents.

Reservations are made for changes and errors in print. Copying and reproduction only with the consent of the publisher. The latest version of the manual is available in PDF format in the download area on the main TechniSat website at www.technisat.pl.
2.4.2 Service advice

This product is quality tested and covered by a statutory warranty period of 24 months from the date of purchase. Please keep the receipt or invoice as proof of purchase. In the case of warranty claims, the customer is responsible for covering the shipping cost directly to the manufacturer

In case of questions, information, or any issues with this device, our technical helpline is available from Monday to Friday, between 8:00 AM and 4:00 PM at the following phone number: +71 310 41 48.

Gwarant, within the scope of the provided warranty, undertakes to rectify any defects in the product at their own expense. The rectification of defects will be carried out through the replacement of the defective product with a new one, free from defects, or through its repair.

use the warranty, the buyer is obligated to report the product's defect at the point of sale where the product was purchased and deliver the defective product there. The product should be delivered in its entirety.

e warranty does not cover product defects caused by the buyer or arising
from:
- the use or installation of the product in a manner inconsistent with the user manual,
- improper storage or maintenance of the device,
- repairs or modifications to the product carried out by unauthorized persons,
- exposure to liquids or foreign objects entering the device,
- atmospheric discharges and voltage fluctuations in the power supply network.
Warranty provisions do not exclude, limit, or suspend the rights of buyers (consumers) arising from the applicable statutory provisions (warranty).
Detailed information about the product, including the principles and procedures for warranty claims, obtaining an RMA number, is available by phone at 71 310 41 48 or via email at serwis@technisat.com on weekdays, between 8:00 AM and 4:00 PM. Online service requests at: www.serwis.technisat.com
3 Device description
3.1 Content set
Please check if the package includes:
1x TechniSat DIGICLOCK 1
1x User Manual
1x Power Adapter
The radio features the following special characteristics:
- Reception of FM radio programs.
- FM reception range of 87.5–108 MHz (analog).
- LED display.
- 2W speaker.
- Programmable alarm with snooze function.
- USB port for charging mobile phones (0.5A max).
3.3 Preparing device fo operation
3.3.1 Setting up a wire antenna
The number and quality of received stations depend on the reception conditions at the installation location. Excellent reception can be achieved with a wire antenna.
Set up the wire antenna by stretching it along.
i Precise positioning of the wire antenna is often crucial, especially in peripheral FM reception locations.
i Start your initial search near the window in the direction of the transmitter mast. Reception may be limited during inclement weather.
i Avoid touching the wire antenna while playing stations. This can lead to
reception interference and sound loss.
3.3.2 Power connection

WARNING!
Lay the power cable in such a way that no one can trip over it.
Connect the power plug of the DIGICLOCK 1 device's power supply to the wall socket (100-240V \~ 50/60 Hz).
Before connecting the device (power supply) to the wall socket, make sure that the operating voltage of the device corresponds to the local mains voltage.

Unplug the power plug from the socket when not in use. Pull on the plug (power supply), not the cable. Disconnect the device from the power before a storm. If the device will not be used for an extended period, such as before a long journey, disconnect it from the power. The heat generated during operation must be dissipated through proper air circulation. Therefore, do not cover the device or place it in a closed cabinet. Ensure free space around the device with a width of at least 10 cm.
3.4 General features of the device
3.4.1 Device power on
To ensure good FM reception, please fully extend the wire antenna located at the back of the device.
Connect the power supply to the DC IN power input (7).
Press the FM Radio button.

e device should only be used with the included power supply.

he device will not be used for an extended period, please disconnect the power supply from the wall socket.
3.4.2 Device power off
To turn off the device, please press the FM Radio button again. The device will return to displaying the time.
3.4.3 Volume adjustment
Adjust the volume by pressing the Volume buttons.
- Volume + for louder
- Volume - for quieter.
4 Time setting
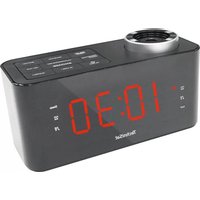
To ensure the clock works correctly, it should be set before the first use. After turning on the radio's power, the LCD display is in clock display mode and shows 0:00.
To access the time settings, the radio receiver should be in standby mode. While playing FM, there is no possibility to change the displayed time. To access the time settings, please:
Turn off the radio by pressing the FM Radio button.
The radio is now in standby mode. The current time is displayed on the screen.
Please press the TIME button to begin changing the time.
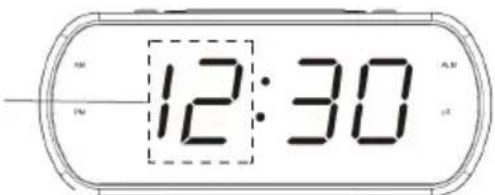
Next use the buttons ▲ and ▼ to set minutes.
Pressing the TIME button again will confirm the selection and end the time-setting process.
If there is no activity for about 10 seconds, the device will return to displaying the time (standby mode).
The saved time settings are lost in case of power loss.
5 FM reception
To ensure good FM reception, please fully extend the wire antenna located at the back of the device. Press the FM Radio button.
The radio is now in FM playback mode.
5.1 Manual scan
Using the up ▲ or down ▼ buttons, you can set the next available station.
Holding down the up ▲ or down buttons or a longer duration during scanning will stop the scanning at the current frequency.
If the reception is too weak and there is noise on the received station, try improving reception by adjusting the position of the telescopic antenna
To ensure maximum FM tuner reception, fully extend the wire antenna to
achieve the best FM radio reception.
5.2 Auto scan
To initiate automatic radio station search, press and hold the FM Radio button for 3 seconds.
The device will automatically search and save radio stations. During scanning, the display shows the number of found radio stations."
The unit uses the AUTO SEARCH function during auto search, which automatically saves the first 20 strong FM stations found to the favorites list. The first strong radio stations found will be saved in presets, starting with 1 and ending with 20.
After the scanning is complete, the up ▲ or down button will be used to change favorite programs (P01-P20).
For the best FM reception, fully extend the wire antenna. Avoid proximity to speakers or other electrical devices.
5.3 Recal a saved channel
To recall previously saved stations, press the up ▲ or down buttons individually or select the appropriate program number (P01 - P20).
The number of programs available on the favorites list depends on the reception quality.
6 Alarm function
The radio receiver allows you to set two alarms at pre-determined times. It can function as an alarm clock or play a radio station.
6.1 Alarm settings
i setting and deactivating the alarm can only be done in standby mode.
Please switch the device to standby mode by turning it off with the FM Radio button.
To start setting the alarm, press the ALARM button.
Next, use the ▲ and ▼ buttons to set the hour.
Please press the ALARM button to confirm the hour setting.
Then next, use the ▲ and ▼ buttons to set the minutes.
Press the ALARM button to confirm and enter the alarm sound settings.
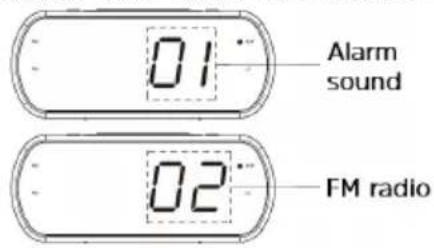
Using the ▲ and ▼ buttons, please select the type of alarm.
01 - beep, 02 - waking up with FM radio.
Then, please confirm the selection with the ALARM button.
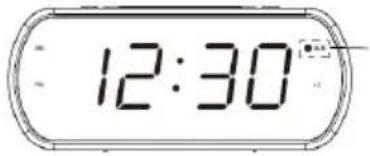
6.2 Turning off alarm
The alarm will be automatically activated after configuring the alarm settings. The readiness of the alarm is indicated by the lit ALM LED.
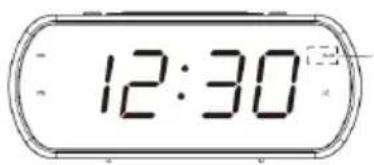
To deactivate the alarm function, please press and hold the ALARM button until the ALM LED goes out. The alarm will not be activated.
6.3 Snooze function
To activate the snooze function during the alarm, please press the SNOOZE/ DIMMER button. The alarm will be silenced for 10 minutes. After 10 minutes, the alarm will be triggered again.
To turn off the alarm, press any button (except SNOOZE/DIMMER). The alarm will be turned off and will re-activate after 24 hours.
If the user doesn't turn off the alarm, it can sound for 10 minutes for the beep option (01) and one hour for the FM radio option (02).
7 Brightness adjustment
Press the SNOOZE/DIMMER button to adjust the 6 levels of display brightness
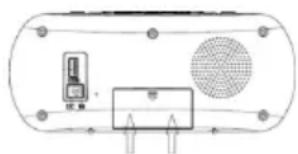
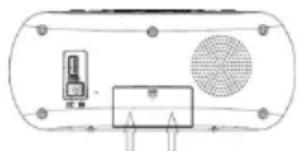
8 Battery installation
Turn the device to open the battery compartment at the back.
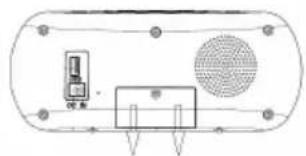
natural_image
Pure electrical circuit lines without any symbolsCarefully remove the battery compartment cover. When inserting batteries (2 x AAA, 1.5V), please pay attention to the correct polarity.
Carefully close the battery compartment cover, ensuring that the cover's locking clips fit into the housing.
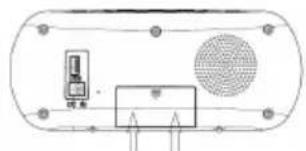
natural_image
Pure electrical circuit lines without any symbolsInstalling batteries (2 x AAA, 1.5V) will maintain the time even during a power outage. The clock time will not be preserved if the battery is depleted. Batteries are not included in the package.
9 Cleaning
To avoid the risk of electric shock, do not clean the device with a wet cloth or under running water. Before cleaning, pull out the mains plug and turn off the device!
Do not use any of the following: Salt water, insecticides, solvents containing chlorine or acid (sal ammoniacal).
Clean the housing with a soft cloth moistened with water. Do not use methylated spirits, thinners, etc.; they may damage the surface of the unit.
10 USB
Use the original charging cable (USB) from the external device and plug the USB plug into the USB socket on the back of the DiGICLOCK 1.
The external device can be charged with a maximum current of 0.5 A at 5 V.
11 Troubleshooting
If the device does not work as intended, check it based on the following table.
| Symptom Możliwa przyczyna | |
| The device does not turn on. | The device is not powered. |
| There is no sound. Turn up | the volume. |
| FM reception is poor Remove | ve the antenna completely. Change the position of the antenna or the device itself |
| The device is not working, the device has crashed. | Disconnect the device from the mains and reconnect the device to the mains. |
| Noises can be heard. There | is a cell phone or other device emits interfering radio waves in the vicinity of the device. Remove the cell phone or device from the vicinity of the radio. |
12 Technical data
| Source FM | |
| Power supply DC 5.0 V /1A | |
| Frequency UKW: 87,5 - 108 MHz | |
| Power consumption Max. during operation | : 5W, standby: < 1W |
| Output power 2 W RMS | |
| Ambient humidity During operation: 30-80% | |
| Ambient temperature During operation: 0 ~ 35 °C | |
| USB 5V/ 0,5A (max.) | |
| Weight (kg) 800g | |
| Dimensions (Width x Height x Depth) 20 | 5 x 8,5 x 6 cm |
13 Technical specifications of the power supply
| Supplier DONGGUAN REYI POWER ELECTRONICSCO., LTD | |
| Model RY050100EU | |
| Input voltage AC 100-240 V | |
| Input frequency 50-60 Hz | |
| Output voltage DC 5,0 V | |
| Output current 1,0 A | |
| Output power 5,0 W | |
| Average efficiency in operation mode 74,16% | |
| No-load power consumption 0,063 W | |
PL
TechniSat

TechniSat DIGICLOCK 1
1 Fotos
natural_image
Pure electrical circuit lines without any symbolsDE
natural_image
Pure diagram of a device layout without any text, numbers, or symbolsnatural_image
Pure electrical circuit lines without any symbolsnatural_image
Pure technical diagram of a cylindrical device with internal components and mounting holes (no text or symbols)-
Време
-
USB ПОРТ (5V/0.5A)
-
AM 7. DC IN
-
PM
natural_image
Pure technical diagram of a device interior with no text, numbers, or symbolsBG
natural_image
Pure diagram of a device layout with no text, numbers, or symbols-
Čas
-
PORT USB (5V/0,5A)
-
AM 7. DC IN
- PM 8 Kryt baterie
- ALARM ZAPNUT
- SNOOZE (zdřimnutí)
1.2 Pohled shora

natural_image
Pure electrical circuit lines without any symbolsC S
natural_image
Pure diagram of a device layout with no text, numbers, or symbols-
USB PORT (5V/0.5A)
-
Aeg
- AM 7. DC IN
- PM 8 Akukate
- ALARM ON
- SNOOZE (uinak)
1.2 Vaade ülevalt

natural_image
Pure electrical circuit lines without any symbolsET
natural_image
Pure diagram of a device inside a rounded rectangle with no text, numbers, or symbols-
PORT USB (5V/0,5A)
-
Temps
- AM 7) DC IN
- PM 8 Couvercle de la batterie
- ALARME MARCHE
- SNOOZE (sieste)
1.2 Vue d'en haut

natural_image
Pure electrical circuit lines without any symbolsF R
natural_image
Pure diagram of a device layout with no text, numbers, or symbolsnatural_image
Pure electrical circuit lines without any symbolsH U
natural_image
Pure electrical circuit lines without any symbols-
Čas
-
VRATA USB (5 V/0,5 A)
-
AM 7. DC IN
- PM 8 Pokrov baterije
- VKLOPLJEN ALARM
- SNOOZE (dremež)
natural_image
Pure electrical circuit lines without any symbolsSL
Previdno odstranite pokrov predala za baterije.
Pri vstavljanju baterij (2 x AAA, 1,5 V) pazite na pravilno polarnost.
Previdno ponovno zaprite pokrov predala za baterije, tako da se pritrdilni ušesi pokrova vstavita v ohišje.
natural_image
Pure diagram of a device layout with no text, numbers, or symbols-
PORT USB (5V/0.5A)
-
Timp
- AM 7. DC IN
- PM 8 Capacul bateriei
- ALARMĂ PORNITĂ
- SNOOZE (somn)
1.2 Vedere de sus

natural_image
Pure electrical circuit lines without any symbolsRO
natural_image
Pure diagram of a device layout with no text, numbers, or symbolsnatural_image
Pure electrical circuit lines without any symbolsN L
natural_image
Pure electrical circuit lines without any symbols-
Čas
-
PORT USB (5V/0,5A)
-
AM 7. DC IN
- PM 8 Kryt batérie
- ALARM ON
- SNOOZE (zdriemnutie)
1.2 Pohl'ad zhora

- Nastavenie budíka (krátke stlačenie) 13. ČAS
Zapnutie/vypnutie budíka (dlhé stlačenie 14. SNOOZE/DIMMER
- Rádio FM15 . Hlasitost'+
- Hlasitost' - (volume-) 16. UP (hore)
- Dole
natural_image
Pure electrical circuit lines without any symbolsSK
Opatrne odstráňte kryt priestoru pre batérie.
Pri vkladaní batérií (2 x AAA, 1,5 V) dbajte na správnu polaritu.
Opät' opatrne zatvorte kryt priestoru pre batériu tak, aby upevňovacie úchyty krytu zapadli do krytu.
natural_image
Pure diagram of a device layout with no text, numbers, or symbols- Laikas
- USB PRIEVADAS (5V/0,5A)
- AM 7. DC IN
- PREMJERAS 8 Akumuliatoriaus dangtelis
- |JUNGTAS ALIARMAS
- SNOOZE (snausti)
natural_image
Pure electrical circuit lines without any symbolsLT
natural_image
Pure diagram of a device layout without any text, numbers, or symbols-
USB PORTS (5V/0,5 A)
-
Laiks
- AM 7. DC IN
- PREMJERMINISTRS 8 Akumulatora väks
- ALARM ON
- SNOOZE (snaudiens)
1.2 Skats no augšas
natural_image
Pure electrical circuit lines without any symbolsLV