DigiClock 3 - Alarm clock radio TECHNISAT - Free user manual and instructions
Find the device manual for free DigiClock 3 TECHNISAT in PDF.

| Product type | Clock radio |
| Brand | TechniSat |
| Model | DigiClock 3 |
| Dimensions (W x H x D) | 155 x 63 x 79 mm |
| Power supply | AC 230 V ~ 50 Hz, 5 W |
| Backup batteries | 2 x AAA (not included) |
| Display | LED 1.2" |
| Radio reception | FM 87.5 - 108 MHz |
| Audio power | 0.5 W RMS |
| Station memory | 10 presets |
| Time projection | Yes, with focus and FLIP 180° function |
| Alarm | Dual alarm (buzzer or radio) with snooze function |
| Sleep timer | 10 to 90 minutes |
| Volume control | Yes, via dedicated buttons |
| Backlight | 2 brightness levels |
| Antenna | Wire antenna |
| Warranty | 24 months (statutory warranty) |
| Maintenance and cleaning | Clean with a dry, soft cloth. Do not use abrasive products. |
| Safety | Do not open the device, avoid water and heat sources. |
| Spare parts / repairability | Backup batteries replaceable by user. For any other repair, contact customer service. |
Frequently Asked Questions - DigiClock 3 TECHNISAT
User questions about DigiClock 3 TECHNISAT
0 question about this device. Answer the ones you know or ask your own.
Ask a new question about this device
Download the instructions for your Alarm clock radio in PDF format for free! Find your manual DigiClock 3 - TECHNISAT and take your electronic device back in hand. On this page are published all the documents necessary for the use of your device. DigiClock 3 by TECHNISAT.
USER MANUAL DigiClock 3 TECHNISAT
Operating instructions
DIGICLOCK 3
Radio alarm clock with LED display and projector
TechniSat
1 Safety instructions
1.1 Foreword
Dear customers,
Thank you for choosing a TechniSat radio alarm clock.
These operating instructions are intended to help you familiarise yourself with the functions of your new device and use them optimally. It will help you to use the radio alarm clock safely and in accordance with its intended use. It is intended for anyone who installs, operates, cleans or disposes of the appliance.
Keep the operating instructions in a safe place for future reference.
TechniSat team
1.2 Symbols and symbols used
In this manual:

Indicates a safety instruction, failure to follow which may cause serious injury or death. Observe the following signal words:
DANGER - Serious injury resulting in death.
WARNING - Severe personal injury that could lead to death.
NOTE - Injuries.

It indicates the note to be observed in order to avoid device malfunctions, data loss/misuse or unintended operation. It also describes further functions of the device.

Warning against electrical voltage. Observe all safety instructions to avoid electric shock. Never open the appliance.
On the device:

Indoor use - appliances marked with this symbol are suitable for indoor use only.

Your device is CE marked and meets all required EU standards.

This appliance has been designed and manufactured using high-quality materials and components that are recyclable. The symbol of the crossed-out wheeled bin indicates that the product is subject to separate collection in accordance with the European Parliament Directive and Council 2012/19/EU and in accordance with Directive 2006/66/EC of the European Parliament and of the Council and informs that electrical and electronic equipment and batteries and accumulators, after their useful life, must not be disposed of with the
other household waste. The user is obliged to hand it over to a collector of waste electrical and electronic equipment as well as batteries and accumulators setting up a system for the collection of such waste, including to an appropriate shop, local collection point or municipal unit. Waste equipment can have a harmful impact on the environment and human health due to its potential content of hazardous substances, mixtures and components. The household plays an important role in contributing to the reuse and recovery, including recycling, of waste equipment. At this stage, attitudes are formed that influence the preservation of the common good, which is a clean environment. Households are also one of the largest users of small equipment and rational management of this equipment affects the recovery of secondary raw materials. In the event of improper disposal of this product, penalties may be imposed in accordance with national legislation. At the end of the product's life cycle, it should not be disposed of in the
rubbish from normal household waste but to the collection point for waste electrical and electronic equipment. This is indicated by the symbol on the product, user manual or packaging. Materials are recyclable according to the label. By reusing, recycling or otherwise recycling your old equipment, you are making an important contribution to environmental protection.
1.3 Purpose
The TechniSat DIGICLOCK 3 is designed to receive FM radio broadcasts. The device is intended for private use and is not suitable for commercial purposes.
1.4 Safe handling
Observe the following instructions to minimise safety risks, avoid damage to the equipment and contribute to environmental protection.
Read all safety instructions carefully and keep them for future reference. Always observe all warnings and instructions in this manual and on the back of the appliance.

DANGER!
Never open the appliance!
Touching live components is life-threatening!

WARNING!
Danger of suffocation! Do not leave packaging and its parts in the care of children. Danger of suffocation from foil and other packaging materials!

To ensure the correct use of the appliance and to avoid damage to the appliance and personal injury, all the following instructions must be followed.
- Do not repair the appliance yourself. Repairs should only be carried out by trained professionals. Contact
our customer service centres.
- The device must only be operated under the environmental conditions specified for it.
- Do not expose the appliance to dripping or splashing water. If water enters the appliance, switch it off and notify the service department.
- Do not expose the unit to heat sources that heat up the unit in addition to normal use.
- In the event of a noticeable defect in the appliance, odour or smoke, significant faults or damage to the housing, contact the service centre immediately.
- The device may only be operated at the specified mains voltage. Never attempt to operate the unit at any other voltage.
- If the unit is damaged, it must not be operated.
- Do not use the unit near bathtubs, showers, swimming pools or flowing/splashing water. There is a risk of electric shock and/or damage to the equipment.
- Foreign objects, e.g. needles, coins, etc. must not fall into the device. Do not touch the connection contacts with metal objects or fingers. This may cause a short circuit.
- The appliance is not intended for use by persons (including children) with reduced physical, sensory or mental capabilities, or lack of experience and/or knowledge, unless they have received supervision or instruction on the use of the appliance from a person responsible for their safety.
- It is forbidden to make changes to the device.
- Never look directly or with optical instruments into the light beam of the projector. Risk of damage to your eyesight!
1.4.1 Legal guidelines

TechniSat hereby declares that the radio device type DIGICLOCK 3 (76-4903-00) complies with Directive 2014/53/EU and RoHS. The full text of the EU Declaration of Conformity is available at the following web address:
TechniSat is not responsible for damage to the product caused by external influences, wear and tear or improper handling, unauthorised repairs, modifications or accidents.

Subject to changes and printing errors. Copying and reproduction
only with permission of the publisher. The latest version of the manual is available in PDF format in the download area on the TechniSat homepage at www.technisat.pl.
1.4.2 Service information

This product is quality tested and comes with a statutory warranty period of 24 months from the date of purchase. Please keep your invoice receipt as proof of purchase. In the event of warranty claims, the cost of postage directly to the manufacturer will be paid by the customer.

For questions and information or if you have a problem with this device, our technical hotline is available: Monday. - to Friday, from 8:00 a.m. to 4:00 p.m. on telephone number: +71 310 41 48.

The guarantor, within the scope of the granted guarantee, undertakes to remove at its own expense any defects in the product. The removal of defects will take place by replacing the defective product with a new, defect-free one or by repairing it.

In order to make use of the guarantee, the purchaser is obliged to report the defectiveness of the product at the point of sale where the product was purchased and to deliver the defective product there. The product should be delivered complete.

The warranty does not cover product defects caused by the purchaser or resulting from:
- use or install the product in a manner inconsistent with the instructions for use,
- improper storage or maintenance of the appliance,
- repairs or modifications to the product carried out by unauthorised persons,
- ingress of liquids or foreign bodies,
- lightning strikes and power line surges

The provisions of the guarantee do not exclude, limit or suspend the rights of purchasers (consumers) under generally applicable law (warranty).

To obtain detailed information on a Product, including the rules and procedures for the guarantee procedure, the assignment of an RMA number, it is possible to by telephone 71 310 41 48 or email serwis@technisat.com, on working days, 8 a.m. to 4 p.m. Service requests ON-LINE via www.serwis.technisat.com.
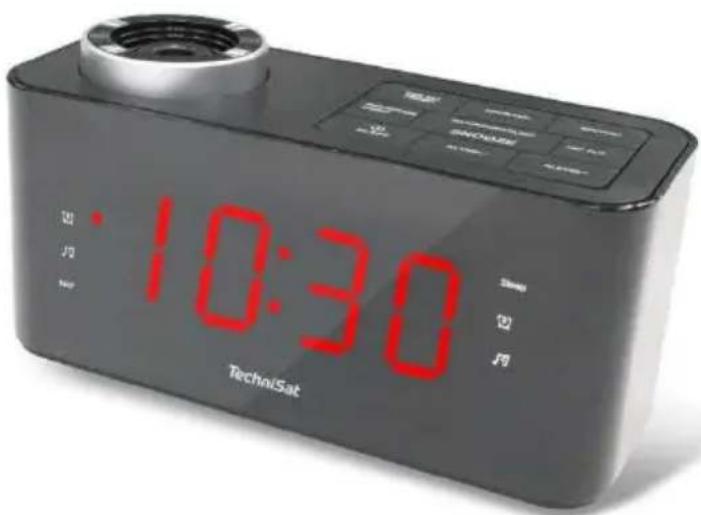
2 Description of the device
2.1 Contents of the device
Please check that the following are included: 1x
TechniSat DIGICLOCK 3
1x User manual
2.2 Special features
The radio has the following special features:
- FM radio reception.
- UKW reception range 87.5-108 MHz (analogue).
- LED display.
- RMS audio power 0.5W.
- Programme memory of 10 for FM stations.
- LED projector with FLIP function
2.3 Preparing the device for operation
2.3.1 Setting up a wire antenna
The number and quality of stations received depends on the reception conditions at the installation site. Excellent reception can be achieved with a wire antenna.
Position the wire antenna lengthways.
i Accurate positioning of the wire antenna is often important, especially in peripheral FM reception areas.
Start your first search at the window towards the transmitter mast. In bad weather reception may be limited.
Do not touch the wire antenna during station playback. This may lead to reception interference and sound fading.
2.3.2 Connection to power supply

WARNING!
Do not touch the plug with wet hands, risk of electric shock!

NOTE!
Arrange the network cable so that no one trips over it.
Plug the mains plug of the DIGICLOCK 3 into a mains socket (AC 230V \~ 50Hz).
Before connecting the appliance to a wall socket, ensure that the operating voltage of the appliance corresponds to the local mains voltage.

Pull the plug out of the socket when not in use. Pull the plug, not the cable. Unplug the device before a storm. Unplug the appliance if it is not going to be used for a long time, e.g. before embarking on a long journey. The heat generated during operation must be dissipated by adequate air circulation. Therefore, do not cover the appliance
nor place it in a closed cabinet. Ensure a clear space of at least 10 cm around the appliance.

The radio alarm clock is powered by alternating current. Use two AAA-size batteries to keep accurate time during mains power failure.
Insert the batteries, matching the polarity markings (+/-) in the battery compartment. Replace all batteries with new ones at the same time. Remove all batteries when the device will not be used for a long period of time.
2.4 Device functions
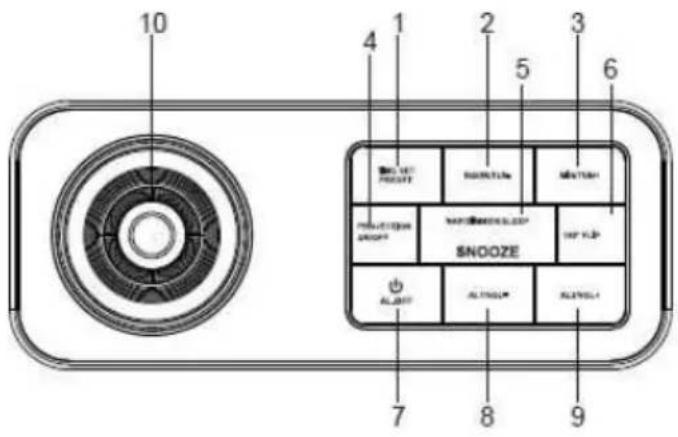
- TIME SET PRESET
- HOUR/TUN-
- MIN/TUN+
- PROJECTION ON/OFF
- NAP/DIMMER/SLEE
P/SNOOZE
- 180 FLIP
- AL.OFF
- AL1/VOL-
- AL2/VOL+
-
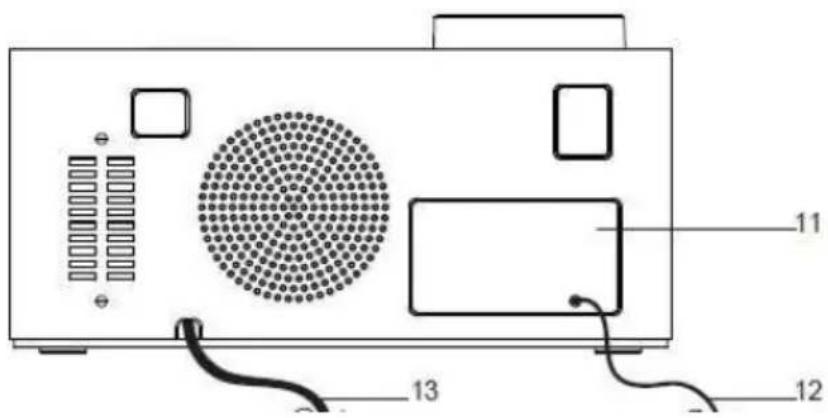
Focus wheel
-
Battery cover
-
Antenna cable
- Power cable
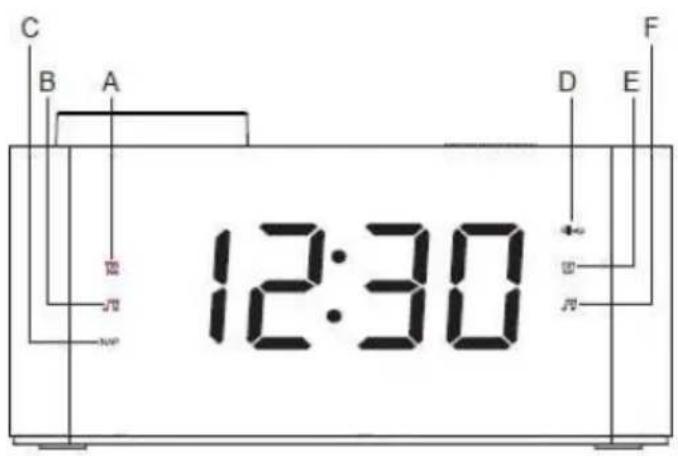
A. Alarm 1 Buzzer
B. Alarm 1 Radio
C. NAP (Timer)
D. SLEEP
E. Alarm 2 Buzzer
F. Alarm 2 Radio
2.4.1 Setting the correct time
To set the correct time, switch off the unit by pressing the AL.OFF button (2).
Then press the TIME SET PRESETbutton(1) for longer.
To set the time, press the HOUR / TUN- button (2).
To set the minutes, please use the MIN / TUN+ button (3).
To confirm the set time, press the TIME SET PRESETbutton(1).
2.4.2 Automatic tuning
Switch the radio alarm clock on using the AL.OFF button (2).
To start the automatic station search, press the HOUR / TUN- (2) or MIN / TUN+ (3) button longer.
The radio alarm clock will start automatically searching the band, which will stop at the first station found.
2.4.3 Manual radio tuning
To set the correct reception frequency, please use the HOUR / TUN- (2) and MIN / TUN+ (3) buttons. Each time they are pressed, the frequency is changed by 0.1 MHz.
2.4.4 Save stations to favourites
To save a station to the favourites list, press the TIME SET PRESET button (1) longer.
The programme number will blink on the screen. Using the HOUR / TUN- (2) or MIN / TUN+ (3) buttons, set the desired number and save the programme by confirming with TIME SET PRESET (1).
2.4.5 Calling a programme from the radio programme list
Press the TIME SET PRESET button (1).
Each successive press changes the number of the favourite programme one position upwards.
2.4.6 Alarm setting
To set the alarm, switch off the radio alarm clock by pressing the button AL.OFF (2).
After switching off the device, please press AL.1 / VOL- (8) or AL.2 / VOL+ (9). The time setting will flash on the display.
You can choose whether you want the device to operate in mode during the alarm: Radio or Buzzer. The LED with the bell symbol is the option with buzzer. The LED with the note symbol is the option with radio. Press AL.1 / VOL-button. (8) or AL.2 / VOL+ (9) to select the desired mode.
If you have already selected the alarm mode you can now set the alarm time.
Press HOUR / TUN- (2) to set and MIN / TUN+ (3) to set the minutes.
Press AL.1 / VOL- (8) or AL.2 / VOL+ (9) depending on whether you have
set Alarm number 1 or Alarm number 2 to save the alarm time.
2.4.7 Alarm activation and deactivation
When the radio alarm clock is switched off, you can choose whether to operate the device in mode during the alarm: Radio or Buzzer. The LED with the bell symbol is the option with the buzzer. The LED with the note symbol is the option with radio. Press AL.1 / VOL- (8) or AL.2 / VOL+ (9) to select the desired mode.
To cancel the alarm, press AL.1 / VOL- (8) or AL.2 / VOL+
(9) until the red indicator next to the bell and note symbol disappears.
When the alarm is activated, in order to deactivate it, press the button
AL.OFF (2).
2.4.8 Snooze function
During the alarm, pressing the NAP/DIMMER/SLEEP/SNOOZE button
EN
(5) will switch off for 10 min. During the snooze period, the LED located next to the bell and note symbol blinks.
After 10 minutes, the alarm will sound again.
To switch off the alarm completely, press the AL.OFF button (2), the LED symbolising the alarm type will stop blinking.
The alarm will sound again the next day at a set time.
2.4.9 Setting the switch-off timer
The switch-off timer is set when the radio alarm clock is switched on.
By pressing theNAP/DIMMER/SLEEP/SNOOZEButton (5), you have the option of changing the time after which the unit automatically switches off.
The following settings are available: 10, 20, 30, 40, 50, 60, 70, 80, 90 min and OFF (timer off).
When the switch-off timer is activated, a red LED on the radio screen will light up to indicate the timer.
2.4.10 Changing the volume
While listening to the radio, please press AL.1 / VOL-(8) to decrease the volume.
While listening to the radio, please press AL.2 / VOL+ (9) to increase the volume.
2.4.11 Changing the intensity of the LED display backlight
Two screen brightness settings are available.
To change the brightness, press and hold the SLEEP/SNOOZE button (5).
NAP/DIMMER/
Pressing the NAP/DIMMER/SLEEP/SNOOZButton again for a longer tim(5) will return to the previous LED intensity.
2.4.12 Time projection
To activate the time projection, please press the
PROJECTION ON/ OFF
button (4). The time will be projected and will be visible on the ceiling.
To adjust the focus of the displayed time, please adjust accordingly Focus knob (10).
Pressing the PROJECTION ON/OFFbutton (4) again will switch off the screen projection.
2.4.13 FLIP function
To reverse the time displayed on the ceiling by 180o during projection, please press the 180 FLIP button (6).
3 Specification
Frequency range: FM 87.5-108 MHz
Power source: AC 230V \~ 50 Hz, 5W
LED display: 1,2"
Device dimensions: 155x63x79mm
Batteries: 2x AAA for memory backup*
Output power: 0.5W
Favourite stations list: 10 positions
Time projection function: YES FLIP
function: Yes
Projector light source: LED
NOTE: Battery power is only used to maintain the unit's memory in the event of a power failure (e.g. time memory). Batteries not included.
4 Manufacturer
TechniSat Digital Sp. z o.o.
ul. Poznańska 2,
Siemianice 55-120 Oborniki
Śląskie
Customer Service Office
tel: +48 71 310 41 41, e-mail: biuro@technisat.com
Open Monday to Friday from: 8:00-16:00
Betriebsanleitung
DIGICLOCK 3
- AJA EELSEADISTUS
- HOUR/TUN-
- MIN/TUN+
- PROJEKTSIOON SISSE/VÄLJA
- UINUMINE/DIMMER/
UNE/NOOZE - 180 FLIP
- AL.OFF
- AL1/VOL-
- AL2/VOL+
- Fookusratas
- Akukate
- Antennikaabel
- Toitekaabel
A. Häire 1 helisignaal
B. Häire 1 raadio
C. NAP (taimer)
D. SLEEP
E. Häire 2 helisignaal
F. Alarm 2 Raadio
- HEURE RÉGLAGE PRÉRÉGLAGE
- HOUR/TUN-
- MIN/TUN+
- PROJECTION ON/OFF
- SIESTE/DIMINUTION
/SOMMEIL/SNOOZE
- IŠ ANKSTO NUSTATYTAS LAIKAS
- HOUR/TUN-
- MIN/TUN+
- PROJEKCIJOS LJUNGIMAS / IŠJUNGIMAS
- SNAUDIMAS /
IŠJUNGIMAS / MIEGAS
/ SNAUDIMAS
- 180 FLIP
- AL.OFF
- AL1/VOL-
- AL2/VOL+
- "Focus" ratas
umuliatoriaus dangtelis
- Antenos kabelis
- Maitinimo kabelis
A. 1 aliarmo signalo garsinis signalas
B. 1 pavojaus signalas Radijas
C. NAP (laikmatis)
D. SLEEP
E. Aliarmo 2 garsinis signalas
F. Aliarmas 2 Radijas
-
IESTATĪTAIS LAIKS
-
HOUR/TUN-
-
MIN/TUN+
-
PROJEKCIJAS IESLĘGŠANA/IZSLĘGŠANA
-
SNAUDIENS/DIMPERIS/MIEGS/NAKTS SNAUDIENS
-
180 FLIP
-
AL.OFF
-
AL1/VOL-
-
AL2/VOL+
-
Fokusa ritenis
-
Akumulatora vāks
-
Antenas kabelis
-
Barošanas kabelis
- TIJD INSTELLEN VOORINSTELLING
- UUR/TUN-
- MIN/TUN+
- PROJECTIE AAN/UIT
- DUTJE/DIMMER/SLA
APJE/SLAAPJE
- 180 FLIP
- AL.UIT
- AL1/VOL-
- AL2/VOL+
- Focuswiel
- Batterijdeksel
- Antennekabel
- Stroomkabel
A. Alarm 1 Zoemer
B. Alarm 1 Radio
C. NAP (timer)
D. SLAAP
E. Alarm 2 Zoemer
F. Alarm 2 Radio
- TIMP SETAT PRESET
- ORA/TUN-
- MIN/TUN+
- PROIECTIE PORNIT/OPRIT
- SOMN/DIMINEATĂ/S OMN/SOMNOROASĂ
- 180 FLIP
- AL.OFF
- AL1/VOL-
- AL2/VOL+
- Roata de focalizare
- Capacul bateriei
- Cablu de antenă
- Cablu de alimentare
A. Alarma 1 Buzzer
B. Alarma 1 Radio
C. NAP (cronometru)
D. DORMITI
E. Alarma 2 Buzzer
F. Alarma 2 Radio
- ČASOVÁ PREDVOL'BA
- HOUR/TUN-
- MIN/TUN+
- ZAPNUTIE/VYPNUTIE PROJEKCIE
- ZDRIEMNUTIE/ STLMENIE/SPÁNOK/D RIEMANIE
- 180 FLIP
- AL.OFF
- AL1/VOL-
- AL2/VOL+
- Zaostrovacie koliesko
- Kryt batérie
- Anténny kábel
- Napájací kábel
A. Bzučiak alarmu 1
B. Alarm 1 Rádio
C. NAP (časovač)
D. SLEEP
E. Bzučiak alarmu 2
F. Alarm 2 Rádio
- ČASOVNO NASTAVITEV PREDNASTAVITEV
- HOUR/TUN-
- MIN/TUN+
- VKLOP/IZKLOP PROJEKCIJE
- DREMEŽ/DIMER/SP
- 180 FLIP
- AL.OFF
- AL1/VOL-
- AL2/VOL+
- Fokusno kolo
- Pokrov baterije
- Kabel antene
- Napajalni kabel
ANJE/DREMANJE
A. Alarm 1 Buzzer
B. Alarm 1 Radio
C. NAP (časovnik)
D. SLEEP
E. Alarm 2 Buzzer
F. Alarm 2 Radio
- ČASOVÁ PŘEDVOLBA
- HOUR/TUN-
- MIN/TUN+
- ZAPNUTÍ/VYPNUTÍ PROJEKCE
- ZDŘÍMNUTÍ/ZTLUME NÍ/SPÁNEK/DŘÍMOTA
- 180 FLIP
- AL.OFF
- AL1/VOL-
- AL2/VOL+
- Zaostřovací kolečko
- Kryt baterie
- Anténní kabel
- Napájecí kabel
A. Bzučák alarmu 1
B. Alarm 1 Rádio
C. NAP (časovač)
D. SLEEP
E. Bzučák alarmu 2
F. Alarm 2 Rádio