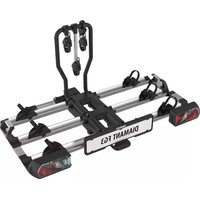
Diamant SG2 FixMatic - Bike rack Pro-User - Free user manual and instructions
Find the device manual for free Diamant SG2 FixMatic Pro-User in PDF.

| Product type | Bike rack for 2 bikes |
| Brand | Pro-User |
| Model | Diamant SG2 FixMatic |
| Net weight | 17 kg |
| Maximum load capacity | 60 kg |
| Material | Steel and aluminium |
| Capacity | 2 bikes |
| Attachment | On trailer coupling (ball) |
| Power supply | 7-pin or 13-pin plug (lighting) |
| Tilting | Yes, for trunk access |
| Recommended maximum speed | 130 km/h |
| Maintenance | Clean with warm water and soft cloth |
| Safety | Safety straps included, check before each trip |
| Spare parts | Available from Tradekar customer service |
| Compliance | European usage approval |
| Warranty | Not specified |
| Delivery contents | Bike rack, safety straps, storage bag, instructions |
Frequently Asked Questions - Diamant SG2 FixMatic Pro-User
User questions about Diamant SG2 FixMatic Pro-User
0 question about this device. Answer the ones you know or ask your own.
Ask a new question about this device
Download the instructions for your Bike rack in PDF format for free! Find your manual Diamant SG2 FixMatic - Pro-User and take your electronic device back in hand. On this page are published all the documents necessary for the use of your device. Diamant SG2 FixMatic by Pro-User.
USER MANUAL Diamant SG2 FixMatic Pro-User
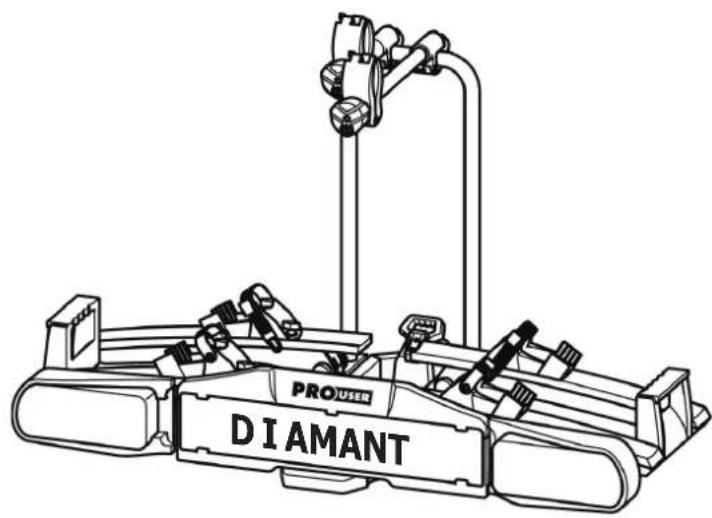
Bicycle carrier DIAMANT SG2 / SG3 FixMatic
Manual de instrucciones DIAMANT SG2 / SG3 FixMatic
text_image
PRODANT DIAMANTFIX4BIKE® ONLY
text_image
Diagram showing two stick figures with crossed and check symbols, indicating correct and incorrect actions.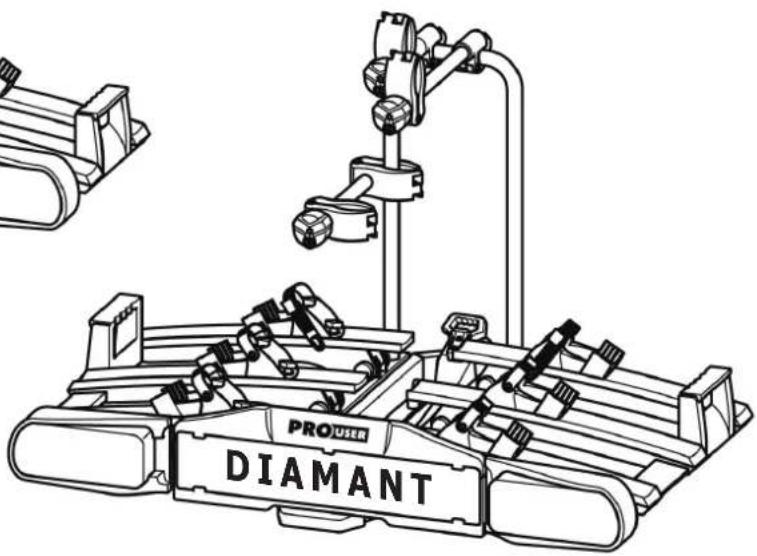
natural_image
Technical line drawing of a robotic vehicle labeled 'DIAMANT' with no visible text or symbols beyond the label.NL Gebruiksaanwijzing......2
D Bedienungsanleitung......21
F Manuel de l'opérateur...... 41
GB Operating instructions......61
ES Manual de instrucciones...... 81
CZ Návod k obsluze....101
DIAMANT FixMaticSG2
Artikelnr. 91875
DIAMANT SG3 Fixmatic
Artikelnr. 91876
Inhoud
text_image
Technical diagram of a device with labeled parts including a battery pack, clamps, and a cloth cover.A=fietsendrager
B=2sleutels
natural_image
Two stick figures with crossed and check symbols, one marked with a 'X' and the other with a checkmark (no text or labels)Veiligheidsadviezen
text_image
Technical diagram showing mechanical assembly with labeled components and directional arrows indicating motion or movement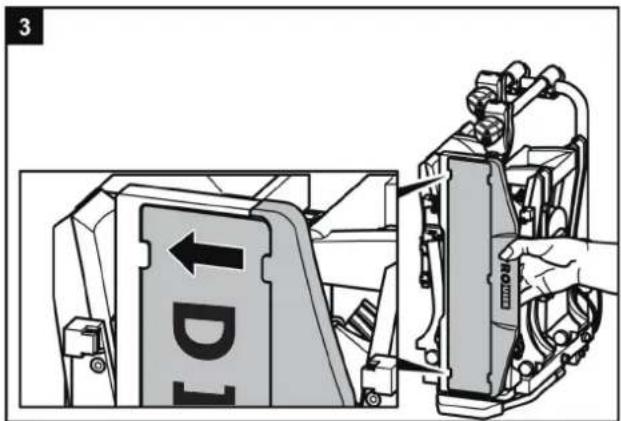
text_image
3 D1Montageengebruik
natural_image
Illustration of a hand gripping a curved object, possibly a tool or device (no text or symbols present)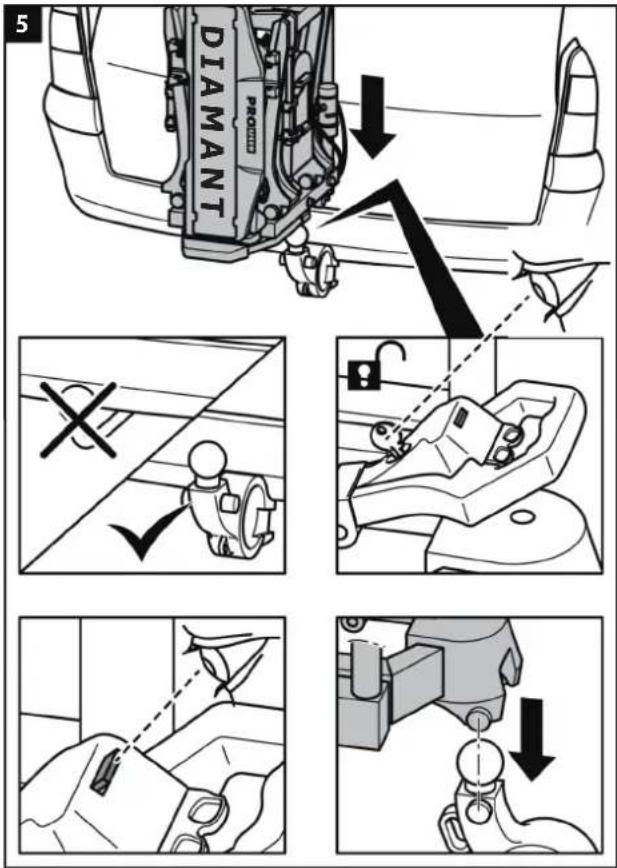
text_image
DIAMANT PROV 5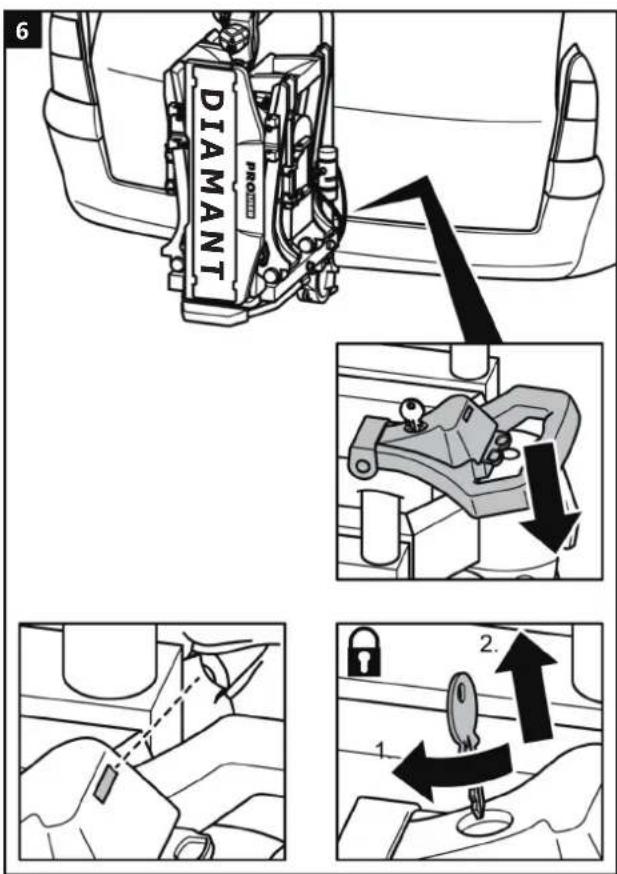
text_image
DIAMANT PROD 6 1 2.WAARSCHUWING!

natural_image
Mechanical assembly diagram showing a lever mechanism with a black arrow indicating rotational motion (no text or symbols present)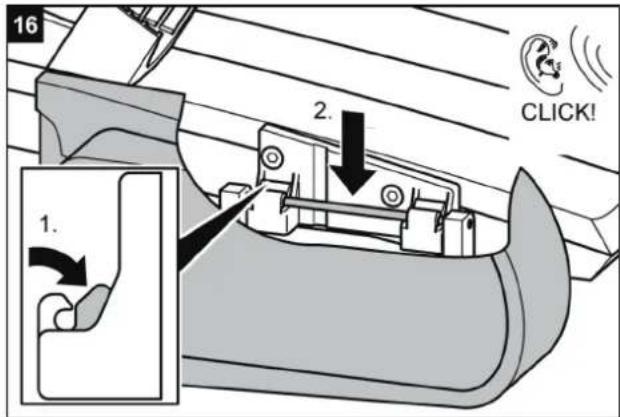
text_image
16 2. 1. CLICK!WAARSCHUWING!

natural_image
Line drawing of a car with a lever and bucket, showing no text or symbolsLETOP!

text_image
Push to release
natural_image
Mechanical assembly diagram showing a lever mechanism with an arrow indicating motion (no text or symbols present)
natural_image
Mechanical assembly diagram showing a lever mechanism with a black arrow indicating direction (no text or symbols present)natural_image
Illustration of a hand operating a mechanical device with tools (no text or symbols visible)text_image
DIAMANT A E PROCTOConsumentenhelpdesk&support
Telefoon:+31(0)345470998
text_image
1/L 6/54 2/54G 7/58L 5/58R 3/31 4/R 2/54G 7/58L 3/31 1/L 6/54 5/58R 4/Rtext_image
Exploded view diagram of a vehicle's internal components with numbered parts for identificationnatural_image
Two stick figures with crossed and check symbols, no text or labels presentDIAMANT SG2 FixMatic
Artikelnr. 91875
DIAMANT SG3 Fixmatic
Artikelnr. 91876
Inhalt
text_image
PROD A B C D E PRODA=Fahrradträger
B=2Schlüssel
C=2SicherheitsgurtefürVorderräder,DIAMANTSG2
(3SicherheitsgurtefürVorderräder,DIAMANTSG3)
text_image
Diagram showing two stick figures with crossed and check symbols, possibly indicating correct or incorrect actions.Sicherheitshinweise
text_image
Technical diagram showing mechanical assembly with labeled components and directional arrows indicating motion or movement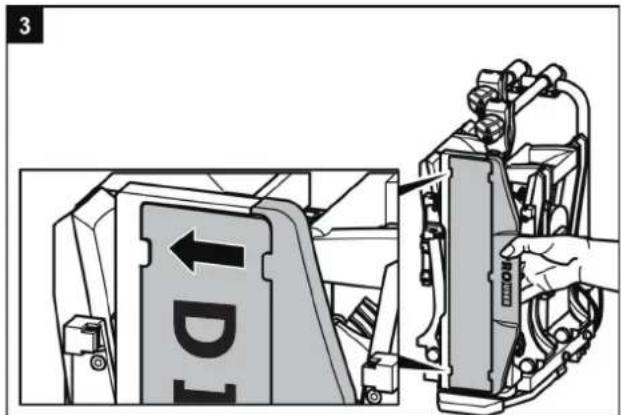
text_image
3 DMontageundBenutzung
natural_image
Illustration of a hand gripping a curved object with a circular element, no text or symbols present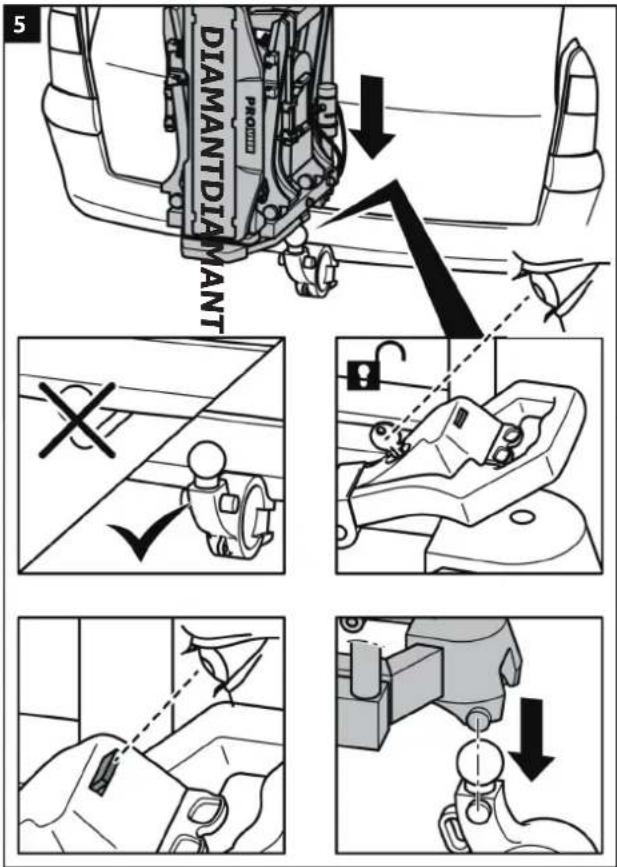
text_image
DIAMANT DIA MANT PRO X Y DIA MANT DIA MANT DIA MANT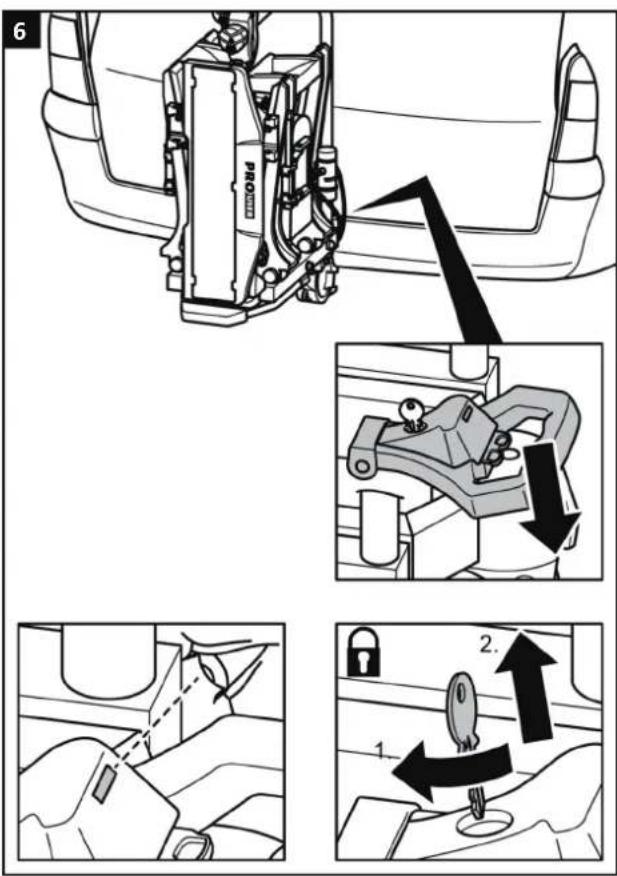
text_image
6 PRO 2. 1.WARNUNG!

text_image
11 DIAMANT PRODUTERWARNUNG!

natural_image
Mechanical assembly diagram showing a lever mechanism with a black arrow indicating rotational motion (no text or symbols present)
text_image
16 2. 1. CLICK!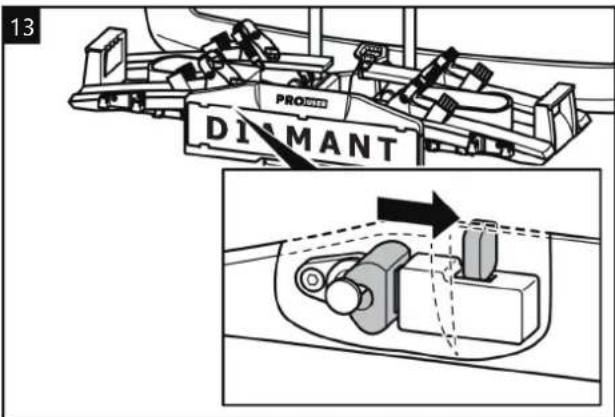
text_image
13 PRODANT DIMANTWARNUNG!

text_image
Diagram showing a hand using a tool to adjust or install a mechanical component, labeled with numbers 1, 2, and 3.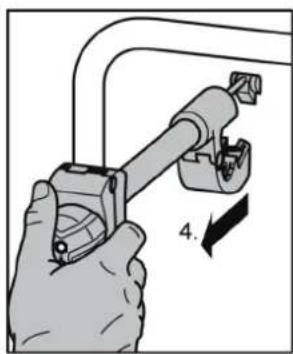
natural_image
Hand holding a tool with a bracket, showing a mechanical component and a numbered arrow (no text or symbols present)3
text_image
Diagram illustrating bicycle wheel turning process with labeled steps 1 and 2 showing tool path and angle measurement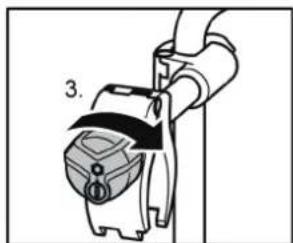
natural_image
Diagram of a mechanical device with a labeled component (no text or symbols present)
natural_image
Line drawing of a car with a lever and mechanical device, no text or symbols presentACHTUNG!

text_image
Push to release
natural_image
Mechanical assembly diagram showing a lever mechanism with an arrow indicating motion (no text or symbols present)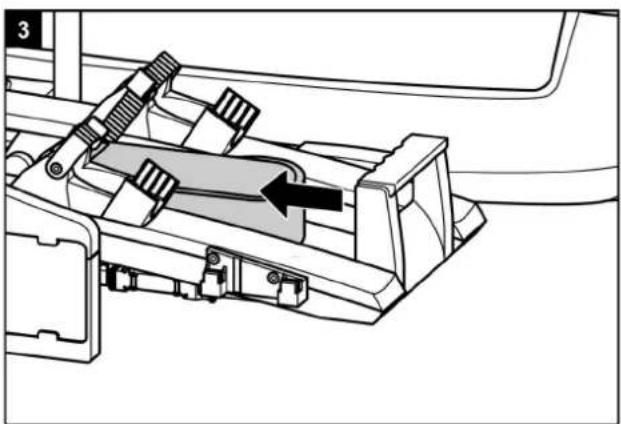
natural_image
Mechanical assembly diagram showing a lever mechanism with a black arrow indicating direction (no text or symbols present)natural_image
Illustration of a hand using a tool to lift a mechanical component (no text or symbols visible)text_image
DIAMANT A E PAKACCOReinigungundPflege
text_image
1/L 6/54 2/54G 7/58L 5/58R 3/31 4/R 2/54G 7/58L 3/31 1/L 6/54 5/58R 4/Rtext_image
Diagram showing two circular electrical connectors with numbered internal components, likely for circuit or signal labeling.text_image
Exploded view diagram of a vehicle's internal components with numbered parts for identificationtext_image
Diagram showing two stick figures with crossed and check symbols, possibly indicating correct or incorrect actions.DIAMANT SG2 FixMatic
Article n° 91875
DIAMANT SG3 Fixmatic
Article n° 91876
Sommaire
text_image
Technical diagram of a device with labeled parts including a battery, clamps, and a cushion coverA=Porte-vélo
B=2clés
text_image
Safety warning symbol with pictograms and checkmark signs, indicating incorrect safety rulesConsignesdesécurité
text_image
Technical diagram showing mechanical assembly with labeled components and directional arrows indicating motion or movement
text_image
3 D1natural_image
Illustration of a hand gripping a curved object, no text or symbols present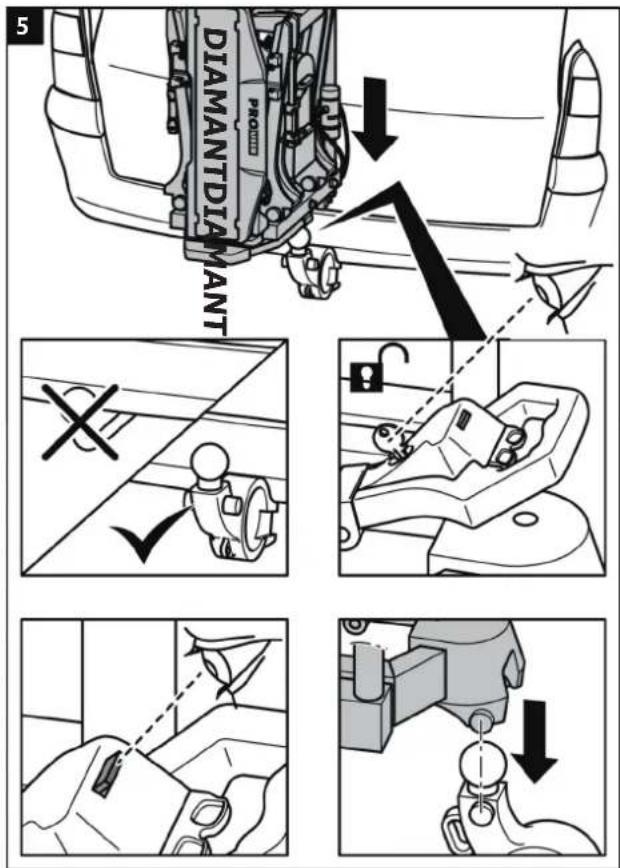
text_image
DIAMANT MANT PROD DIAMANT MANT X ↓ ↓ ↓ ↓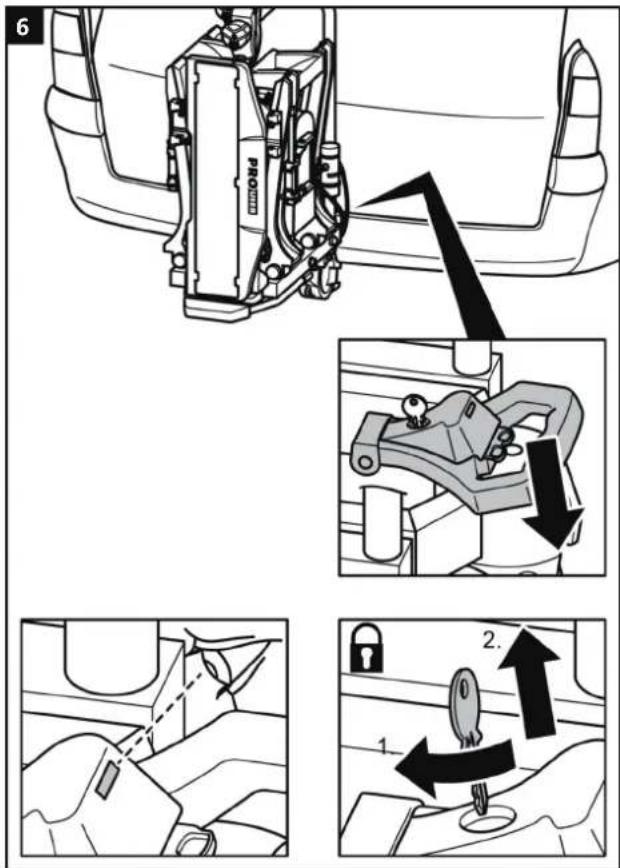
text_image
Diagram illustrating car seatbelting and locking mechanism with labeled steps 1 and 2AVERTISSEMENT!

natural_image
Mechanical assembly diagram showing a lever mechanism with a black arrow indicating rotational motion (no text or symbols present)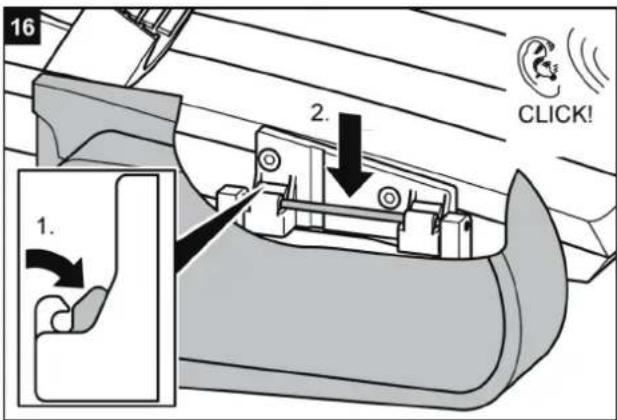
text_image
16 2. 1. CLICK!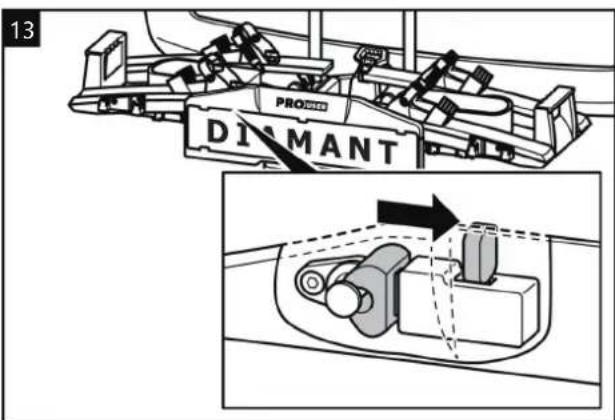
text_image
13 PRODANT DISMANTAVERTISSEMENT!

text_image
Diagram illustrating bicycle wheel assembly steps with labeled instructions for manual and mechanical handling.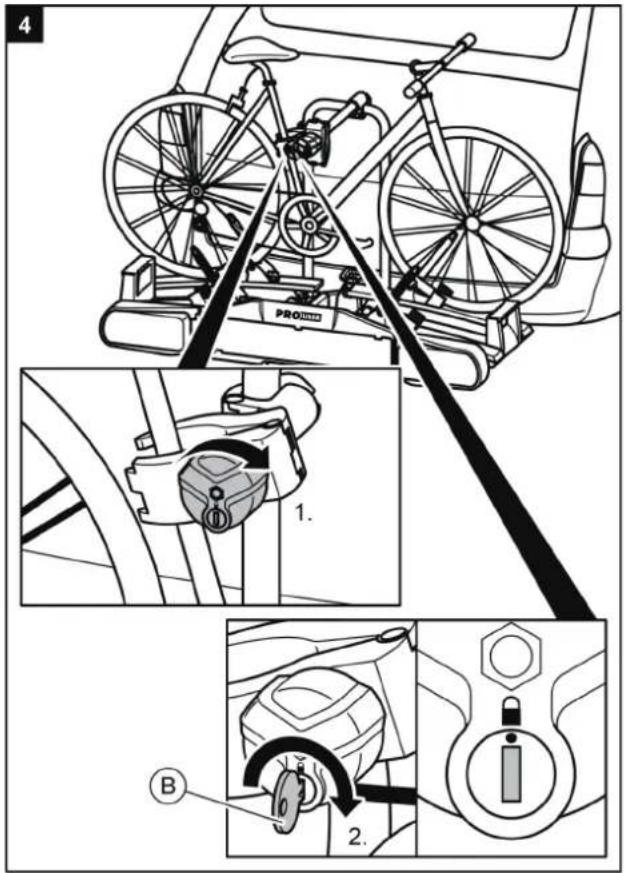
natural_image
Line drawing of a car with a lever and mechanical device, no text or symbols presentATTENTION!

text_image
Push to release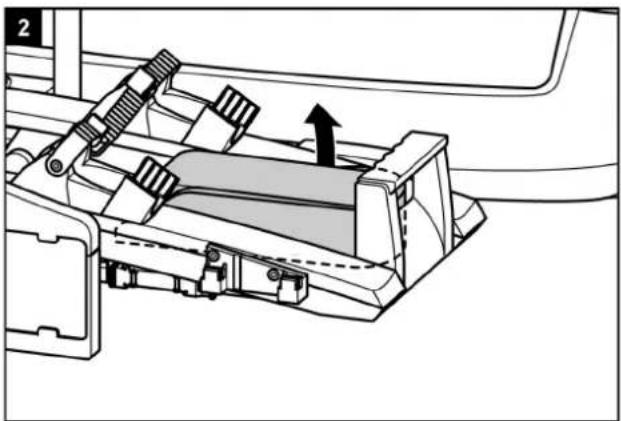
natural_image
Mechanical assembly diagram showing a lever mechanism with an arrow indicating motion (no text or symbols present)
natural_image
Mechanical assembly diagram showing a lever mechanism with a black arrow indicating direction (no text or symbols present)natural_image
Illustration of a hand using a tool to adjust or install a mechanical component (no text or symbols visible)Arrimageduporte-vélodanslesacde stockage

text_image
DIAMANT A E PROLOTNettoyageetentretien
text_image
1 DIAMANT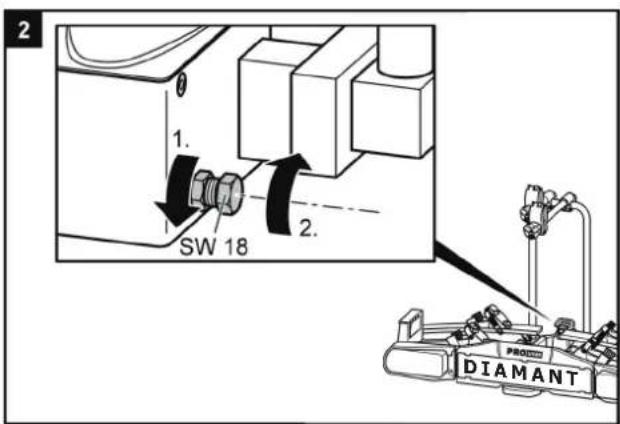
text_image
2 1. SW 18 2. DIAMANT
text_image
3 1. 2.Miseauxdéchets
text_image
1/L 6/54 2/54G 7/58L 5/58R 3/31 4/R 2/54G 7/58L 3/31 1/L 6/54 5/58R 4/Rtext_image
Diagram showing two circular electrical connectors with numbered pins, likely for circuit or signal labeling.text_image
Exploded view diagram of a vehicle's internal components with numbered parts for identificationBicycle carrier DIAMANT SG2 / SG3
Operating instructions
text_image
PROUSER DIAMANT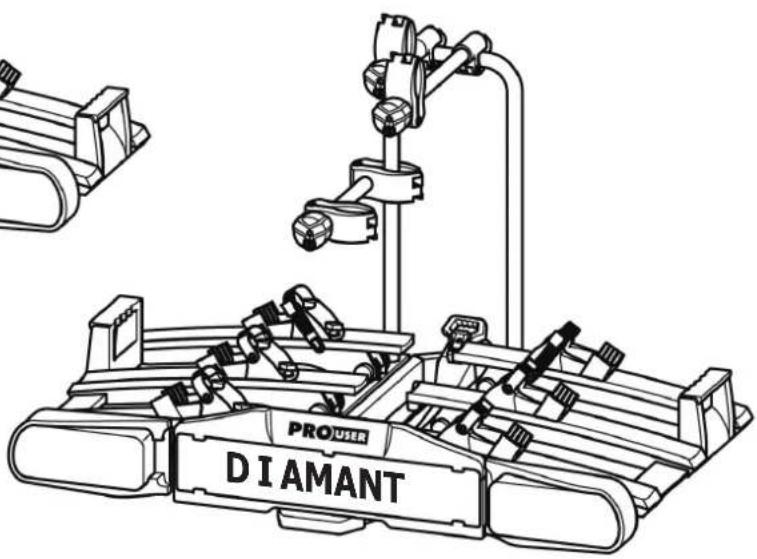
natural_image
Technical line drawing of a robotic vehicle with labeled components (PROSTER, DIAMANT) and no readable text or symbols beyond branding.FIX4BIKE® ONLY
text_image
Safety warning symbol with crossed and check signs, indicating incorrect safety conditionsDIAMANT SG2 FixMatic
Item no. 91875
DIAMANT SG3 Fixmatic
Item no. 91876
Contents
Information on these operating instructions....63
Foreword....63
Obligations regarding these fitting instructions....63
Proper use....63
Safety instructions – Explanation of the categories....63
Scope of delivery....64
Technical data....64
Coupling requirements....64
Safety instructions....64
Before first use....66
Fitting the registration plate to the bicycle....66
Fitting and use....27
Fitting the bicycle carrier to the trailer coupling....67
Mountingbic ycles....70
Tiltingthebicyclec arrier, access to the luggage space....73
Dismantling the bicycle carrier....74
Carrying the bicycle carrier without the transport bag....75
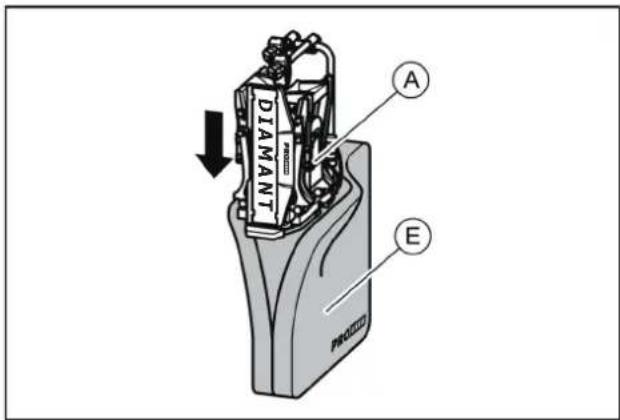
Stowing the bicycle carrier in the transport bag....75
Cleaning and care....75
Maintenance....76
Adjustment of the quick-fastener....76
Disposal....76
Contact....76
Appendix....77
Plug assignment....77
Sparepartsoverv iew - Exploded drawing....78
Sparepartsoverv iew - Table....79
Effective: 09/2021
Informationontheseoperating instructions
Foreword
Thesefittinginstructionswillassistyouwiththe
•properand
•safe
fittingoftheDIAMANTbicyclecarrier.
Obligationsregardingthesefitting instructions
Everypersonwho
•fits,
•cleansor
•disposesof
thisbicyclec arriermusthavetakennoteofand understoodthecompletecontentsofthesefitting instructions.
Keep these fitting instructions ready-to-hand and safe at all times. Hand these fitting instructions when removing or passing on the bicycle carrier.
Proper use
The bicycle carrier DIAMANT SG2 is used for the transport of max. two bicycles.
The bicycle carrier DIAMANT SG3 is used for the transport of max. three bicycles.
It must be mounted only on trailer couplings which meet the requirements specified in the chapter "Coupling requirements". The permissible carrying capacity of the bicycle carrier must not be exceeded under any circumstances
Proper use also includes the observation of all information provided in these fitting instructions, and in particular the safety instructions. Any other form of use constitutes improper use, and can result in personal injury or material damage.
Tradekar Benelux BV accepts no liability for damage resulting from improper use.
Safetyinstructions—Explanationofthecategories
Youwillfindintheseins tructionsthefollowingcategories ofsafetyinstructions:
WARNING!

Personalinjurypossible: InstructionsundertheheadingWARNING! warnofpotentiallyimpendingdanger. Failuretoavoidsuchdangermayresultin seriousorevenfatalinjuries
CAUTION!

Personal injury or material damage possible: Instructions under the heading CAUTION warn of position by impending danger.
Failuretoavoidsuchdangermayresultin slighttorminorinjuries.
Theproductorothernearbyobjectsmaybe severelydamaged.
ATTENTION!

Personal injury or material damage possible: Instructions under the heading ATTENTION warn of a potentially harmful situation.
Failuretoavoidsuchsituationsmayresultin damagetotheproductorothernearby objects.
NOTE!

Otherinstructions: Usefultip.Facilitatestheoperationorfittingof theproductorservesforbetterunders tanding.
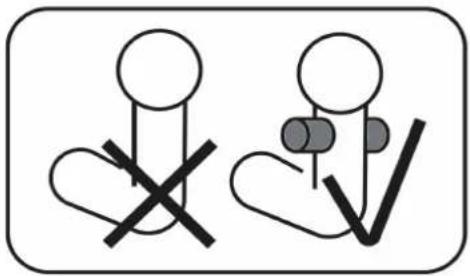
Thesafetys ymboluseddoesnotreplacethetextofthe safetyinstruction.
Readthesafetyinstructionandfollowitex actly!
text_image
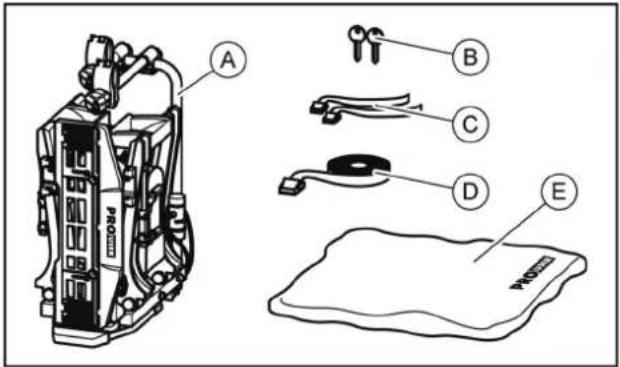
Technical diagram of a mechanical device with labeled parts including a battery, clamps, and a textured base.A=Bicyclecarrier
B=2keys
C=2safetystrapsforfrontwheels,DIAMANTSG2
(3safetystrapsforfrontwheels, DIAMANTSG3)
D=1Safetystrapforbicycle frame
E=Transportbag
Technicaldata
| DIAMANT SG2 | DIAMANT SG3 | |
| Item no.: | 91734 | 91735 |
| Material: | Steel Aluminium | Steel Aluminium |
| Weight: | 17 kg | 21 kg |
| Carrying capacity, max.: | 60 kg | 60 kg |
Themax.carryingcapacityofthebicyclecarrierandthe permissiblebearingloadofthetrailercouplingmustnotbe exceeded.
The bicycle carrier and load must not exceed the permissible overall weight, or the permissible axle load of the vehicle.
ExamplesforDIAMANTSG2
| Max. bearing load Trailer coupling | Weight Bicycle carrier | Max. carrying capacity on bicycle carrier |
| 50 kg | 17 kg | 33 kg |
| 60 kg | 17 kg | 43 kg |
| 75 kg | 17 kg | 58 kg |
| 90 kg | 17 kg | max. 60 kg ! |
ExamplesforDIAMANTSG3
| Max. bearing load Trailer coupling | Weight Bicycle carrier | Max. carrying capacity on bicycle carrier |
| 50 kg | 21 kg | 29 kg |
| 60 kg | 21 kg | 39 kg |
| 75 kg | 21 kg | 54 kg |
| 90 kg | 21 kg | max. 60 kg ! |
CouplingrequirementsScopeofdelivery
WARNING!

Personalinjuryispossibleduetobreakageof thetrailercoupling.
The coupling could break if the bicycle carrier is fitted to a coupling made of too soft material.
- Fitthebicyclecarrieronlytoacoupling madeofsteelSt52,greycastironGG52or higherquality.
- Neverfitthebicyclecarriertoacoupling madeofaluminium,otherlightmetalsor plastic.
Fitthebicyclecarrieronlytotrailercouplingswiththe followingproperties:
Material:......min.steelSt52orgreycastironGG52
D-value: >7,6kN
Notetheinstructionsofthecouplingmanufacture.
FIX4BIKE® ONLY
natural_image
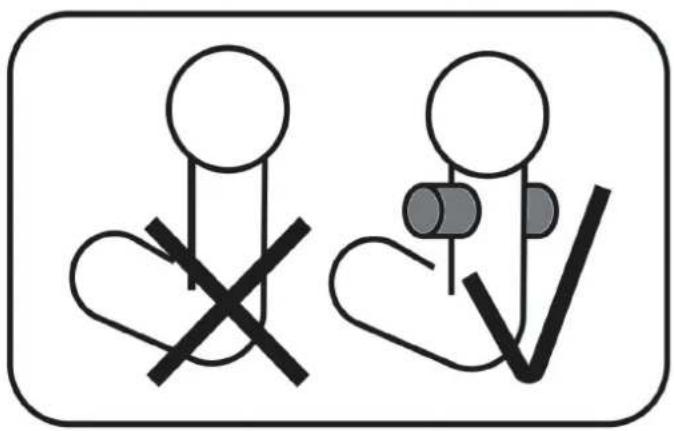
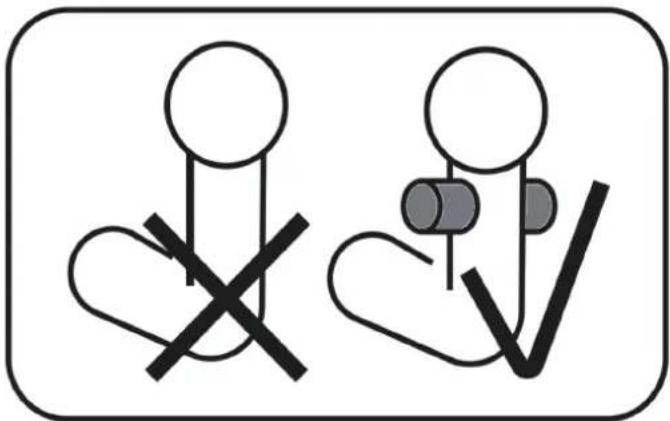
Two stick figures with crossed and check symbols, one marked with a 'X' and the other with a checkmark (no text or labels)Safetyinstructions
ollowthefittinginstructionscarefully.Failuretofollowthe instructionscanleadtopersonalinjuriesandmaterial damage.
If you are not sure about correct fitting, ask your dealer or the manufacturer for further information.
Neitherthemanufacturernordealer reliable for damages which are due to improper use or fitting.
Checkthebicyclecarrierandtheloadregularly:youare requiredtodosoandmaybeheldliableincaseof damage.
NOTE

Europeanoperatingapprovalhasbeen obtainedforthisbicyclecarrier. This is suppliedwiththecarrier,andmustbecarried whenusingthecarrier.
NOTE

Thelegalregulationsandprovisionsonthe transportofgoodsonthebackofyourvehicle applywhendrivingwithamountedbicycle carried.
WARNING!

Personal injury or materialdamagedueto changed vehicle drivingcharacteristics. Drivingwiththe bicyclecarrierfittedwillaffect the driving characteristicsofyourvehicle.
- Adjust yourspeedtothenewdriving characteristics.
•Neverexceedaspeedof130km/h.
- Avoidsuddenandjerkysteering movements.
- Remember that your vehicle is longer than usual.
WARNING!

Personal injury or material damaged due to overloading.
Exceedingthemax.carryingcapacityofthe bicyclecarrierorthepermissiblebearingload ofthetrailercouplingorthepermissible overallweightcanleadtoseriousaccidents.
- Observetheinformationonthemax. carryingcapacity,permissiblebearingload andpermissibleoverallweightofyour vehicle.Neverexceedthesespecifications.
WARNING!

Personal injury or material damageduetoloss of thebicycles.
Carryingbicycleswithoutusingthesafety strapscanleadtoaccidents.
- Beforethestartofeveryjourney,checkthe correctandfirmattachmentofthestrap aroundthebikesandtheU-shapedbracket ofthecarrier(seeStep10).
- Beforethestartofeveryjourney,checkthe correctandfirmattachmentofbothstraps aroundthefrontwheel,andthestrap aroundtherearwheelofthebicycle.
•Tightenthestrapsifnecessary.
- Beforethestartofeveryjourney,checkthat thestrapsarenotwornordamaged.
- Wornordamagedstrapsmustbereplaced withundamagedstrapsbeforethestartof thejourney. Thestrapsusedmustbe approvedbyTradekarBeneluxBV.
WARNING!

Personal injury or material damaged ueto incompletely fitted bicycle carrier.
Drivingwithafoldedbicyclecarriercanleadto accidents.
Themoving partsofbicyclecarrierconstitute asourceofdangerifnotproperlyfitted.
- Removethebicyclecarrierifitisnot needed.
- Neverdrivewithafoldedbicyclecarrier.
WARNING!

Personal injury or material damaged due to projecting parts.
Partsprojectingbeyondtheedgeofthe vehicleorbicyclecarriercancausepersonal injuryormaterialdamagewhendriving.
- Fitonlysuchpartswhichdonotproject beyondtheedgeofthevehicleorbicycle carrier.
WARNING!

Personalinjuryormaterialdamagedueto tarpaulins.
Tarpaulinsincreasetheairresistance. They canbecomelooseandflyaboutleadingto seriousaccidents.
•Neverusetarpaulinsorcovers.
WARNING!

Personal injury or material damage due to loss of the bicycles.
After the attachment, the carrier first settles properly into the coupling after driving several kilometres.
- Check the attachment of the carrier for secure attachment after driving several kilometres.
- Redo the attachment if it is loose.
WARNING!

Personal injury or material damage due to the breaking off of the bicycle carrier.
Driving with a mounted bicycle carrier over difficult terrain can lead to the carrier breaking off.
- Do not use the bicycle carrier when driving over difficult terrain.
Only suitable for use on the hitch of a passenger car
ATTENTION!

Material damage due to opening tailgate.
The tailgate could impact against the bicycle carrier and be damaged.
- Switch off electric tailgates and operate them manually.
- Fold down the bicycle carrier before opening the tailgate.
ATTENTION!

Material damage due to hot exhaust gases.
Damage can be caused to the bicycle carrier or the bicycles if the exhaust pipe is too close.
• Fit an exhaust deflector if necessary.
Beforefirstuse
Fittingtheregistrationplatetothe bicyclecarrier
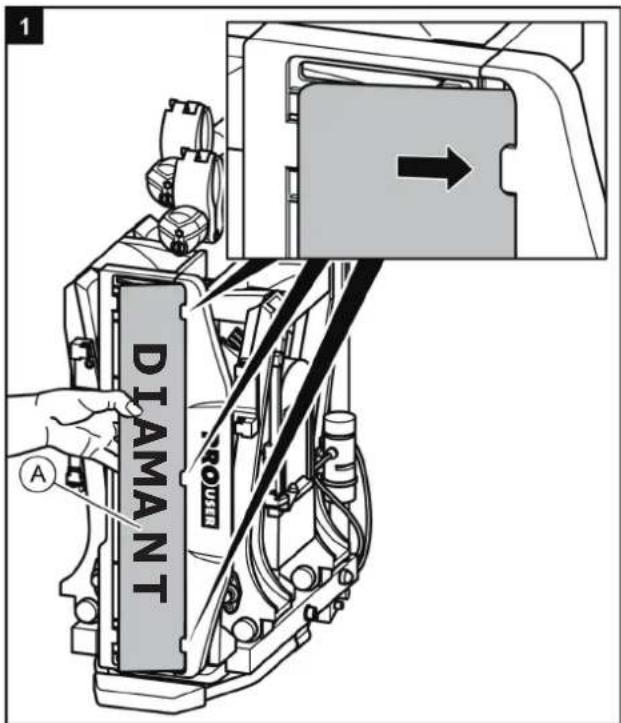
text_image
DIAMANT
text_image
Technical diagram showing mechanical assembly with labeled components and directional arrows indicating motion or movement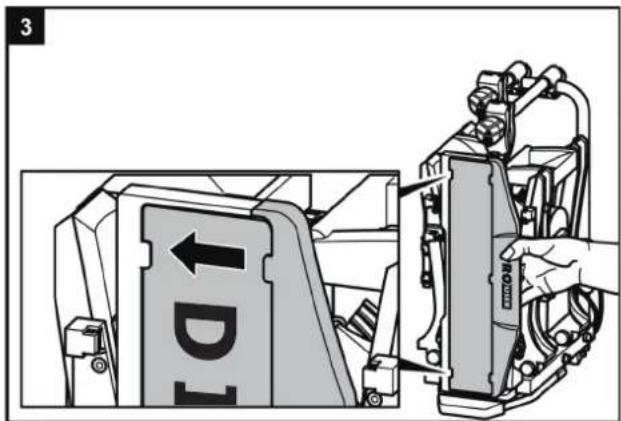
text_image
3 1DFittinganduse
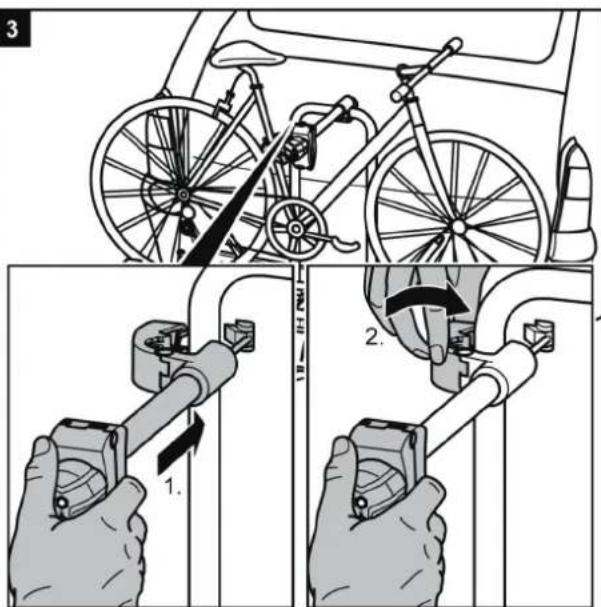
Fittingthebicyclecarriertothetrailer coupling
• Parkyourvehicleonalevelsurface.
• Applythehandbrake.
WARNING!

Personal injury or material damaged due to damaged bicycle carrier.
Damageofthecarrier, e.g. bybentparts, cracksorscratches, preventthesafe operationofthecarrier.
- Donotfitthebicyclecarrierifitisdamaged inanyway.
- Proceedingsdescribedinthechapter "Maintenance".
WARNING!

Personal injury or material damageduetoloss of the bicycle carrier during the journey.
Afaultyordefectiveconnectionbetweenthe bicyclecarrierandtrailercouplingcanleadto thedetachmentofthebicyclecarrier.
• Replacethetrailercouplingif itisdamaged.
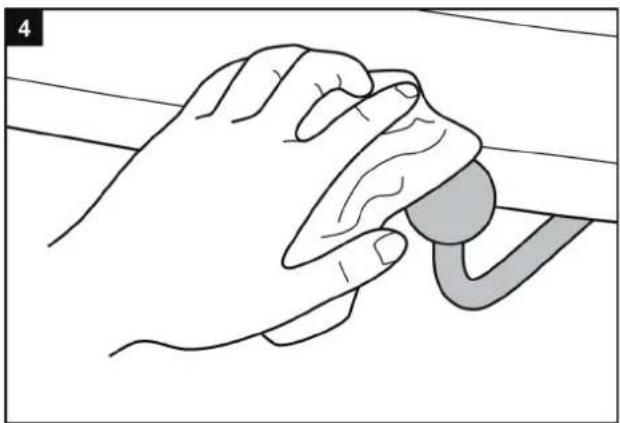
- Cleanthetrailercouplingofdirt,dustand grease.
NOTE

Thereisoftenalayerofpaintonthecoupling ball.
Forthebestpossibleattachmentofthebicycle carrier, this paint coatings should be carefully removed. Not the instruction of the coupling manufacturer.
natural_image
Illustration of a hand gripping a curved object, possibly a tool or device (no text or symbols present)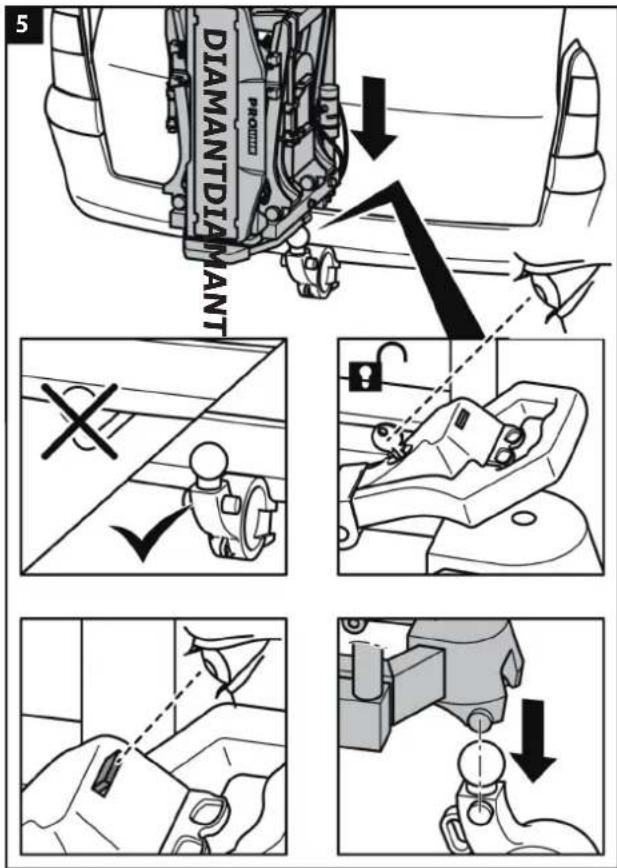
text_image
DIAMANDIA MANT
text_image
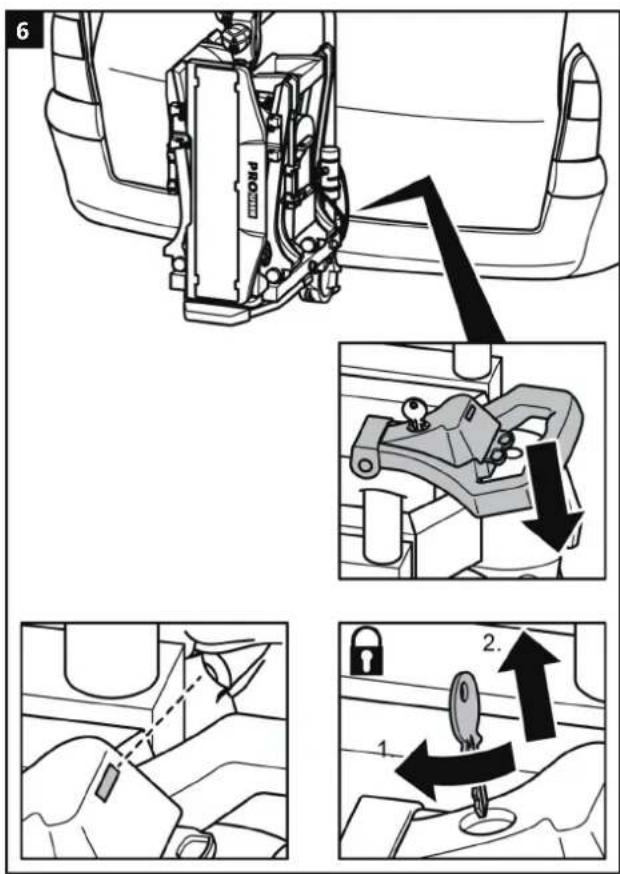
Automotive safety diagram showing gear shift and lock mechanism with numbered instructionsWARNING!

Personalinjuryormaterialdamagedueto unsecurebicyclecarrier. Iftheleverisnotsecuredbylocking,the bicyclecarriercouldbecomedetachedfrom thevehicleduringthejourney
- Lockthebicyclecarrier.
- Checkthatyouhavelockedtheleverand removedthekey.
Lockingthebicyclecarrieralsopreventsits possiblelossbytheft.
WARNING!

Personalinjuryormaterialdamageduetoloss ofthebicyclecarrierduringthejourney. A loose connection between the bicycle carrier and trailercoupling can lead to detachment of the bicycle carrier.
- Checkthebicyclecarrierforsecure attachment.
- Repeatsteps4to8intheeventofaloose connection.Ifthisbringsaboutno improvement,thequick-fastenermayneed tobeadjusted,seechapter"Maintenance".
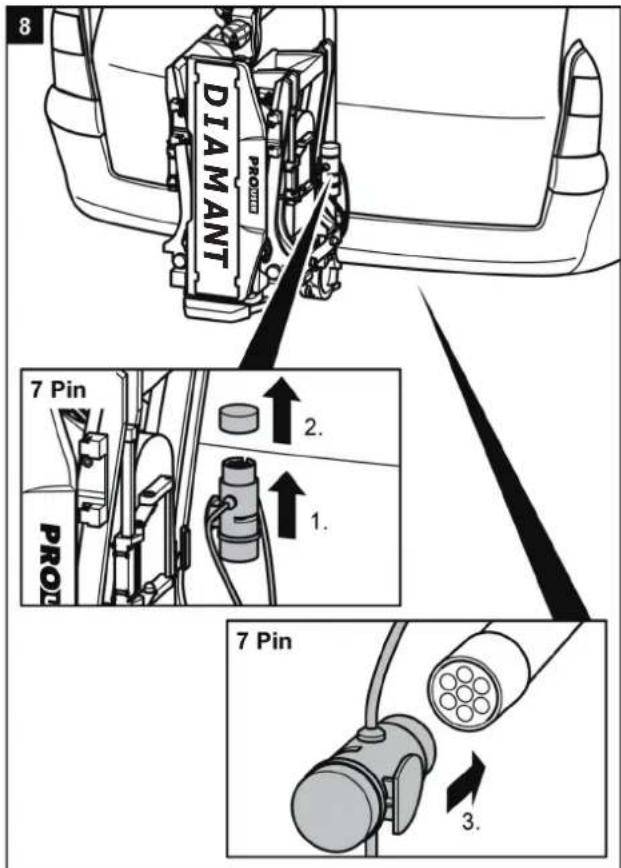
text_image
DIAMANT 7 Pin PRO 2. 1. 7 Pin 3.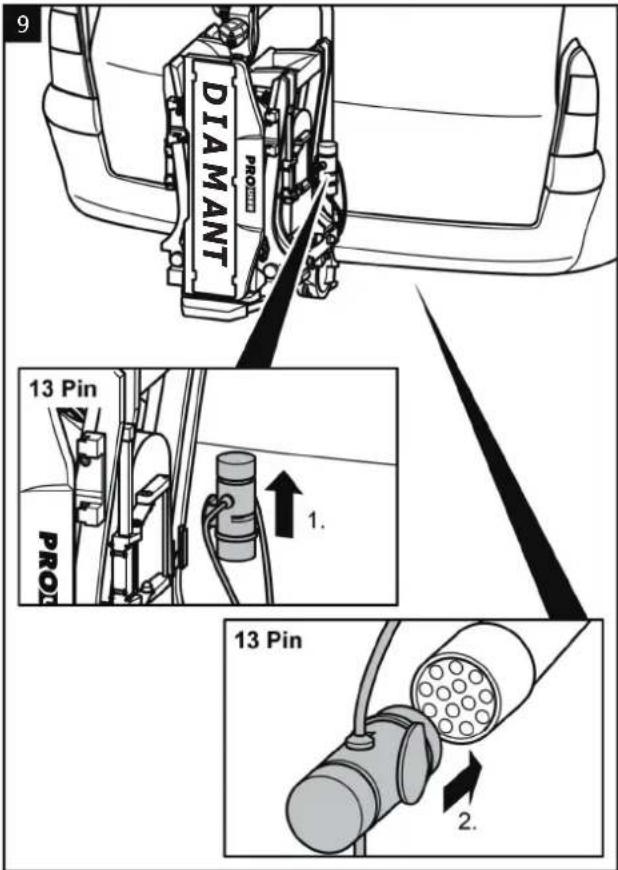
text_image
DIAMANT 13 Pin PRO 13 Pin 2.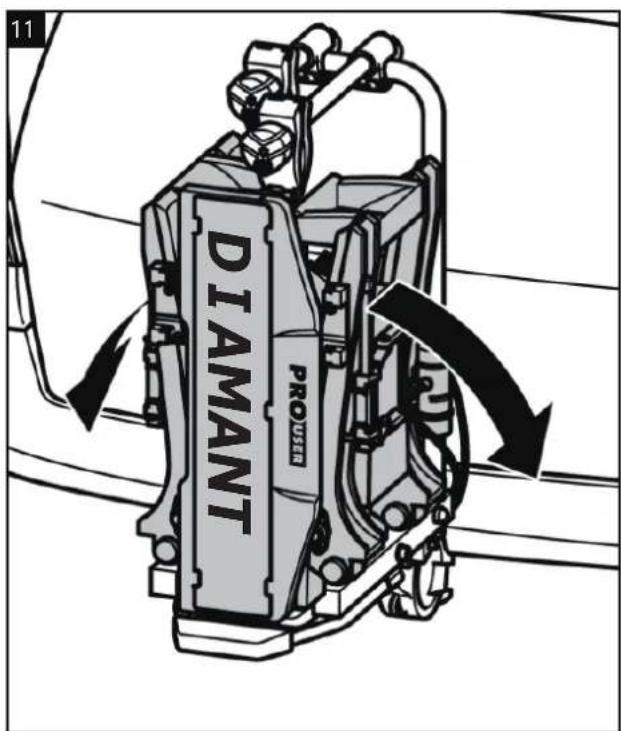
text_image
11 DIAMANT PROVETRWARNING!

Personalinjuryormaterialdamagedueto unsecureregistrationplateholder. Iftheregistrationplateholderisnotsecured bythelockingbolt, itcouldbecomedetached duringthejourney.
- Withdrawthelockingbolt.
- Folddowntheregistrationplateholderuntil itisheardtoengage.
- Releasethelockingboltandallowitto engageintheholeintheregistrationplate holder.
natural_image
Mechanical assembly diagram showing a lever mechanism with a black arrow indicating rotational motion (no text or symbols present)
text_image
16 2. 1. CLICK!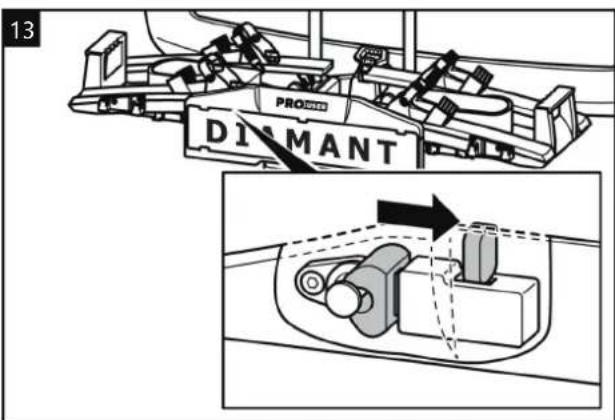
text_image
13 PRODANT DISMANT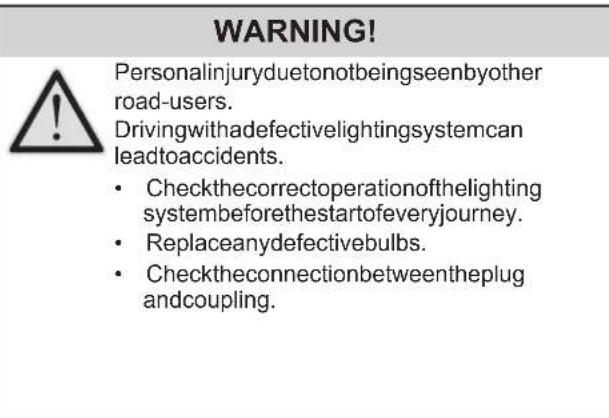
text_image
WARNING! Personalinjuryduetonotbeingseenbyother road-users. Drivingwithadefectivelightingsystemcan leadtoaccidents. • Checkthecorrectoperationofthelighting systembeforethestartofeveryjourney. • Replaceanydefectivebulbs. • Checktheconnectionbetweentheplug andcoupling.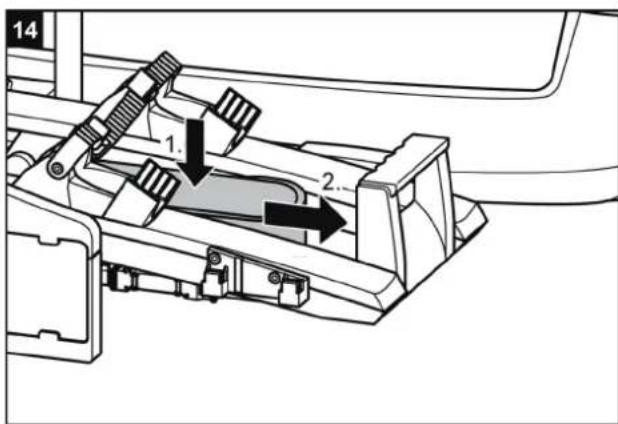
text_image
14 1. 2.Mountingbicycles
ATTENTION!

Personalinjuryormaterialdamagepossible duetolooseparts. Improperlytightenedpartsonthebicyclescan becomelooseduringthejourney.
- Remove all parts not firmly attached to the bicycle, such as bicycle pumps, panniers, navigation devices or batteries.
NOTE

Inordertoimprovethedrivingcharacteristics ofyourvehicle,mounttheheavierbicyclefirst. Ifcarryingonlyonebicycle,thisshouldbe mountedintherailclosesttotherearofthe vehicle.
text_image
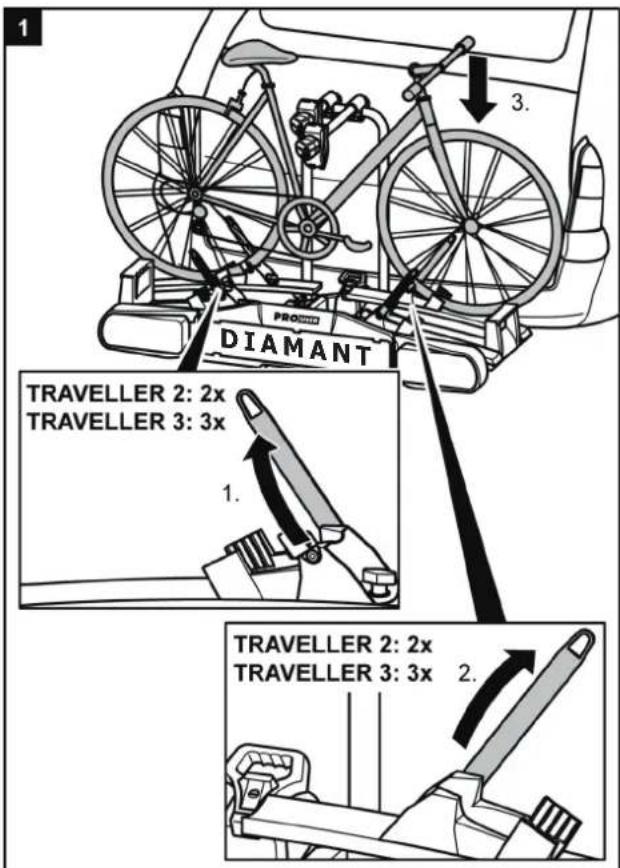
1 PRO DIAMANT 3. TRAVELLER 2: 2x TRAVELLER 3: 3x 1. 2. TRAVELLER 2: 2x TRAVELLER 3: 3x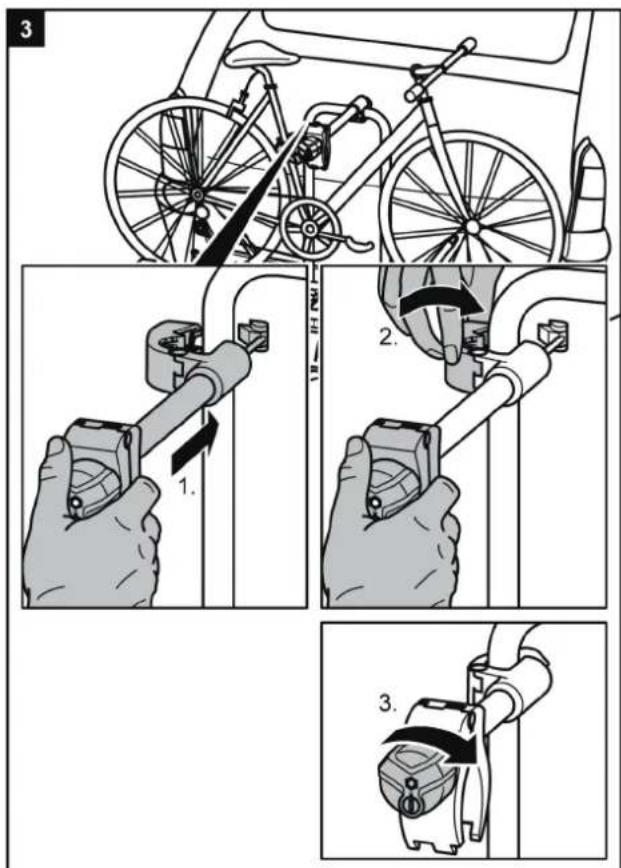

text_image
4 PRO 1. Do not over tighten B 2.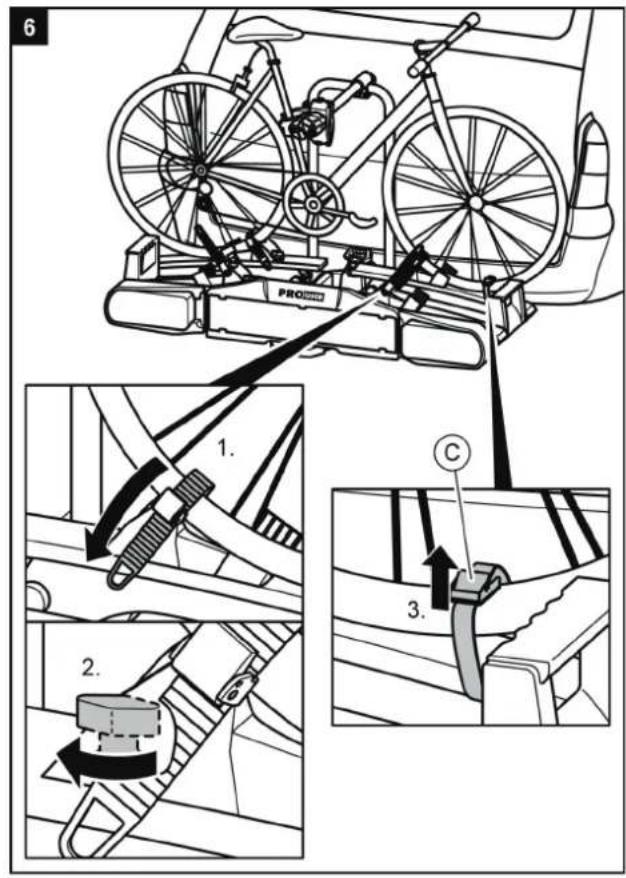
text_image
6 1. 2. 3.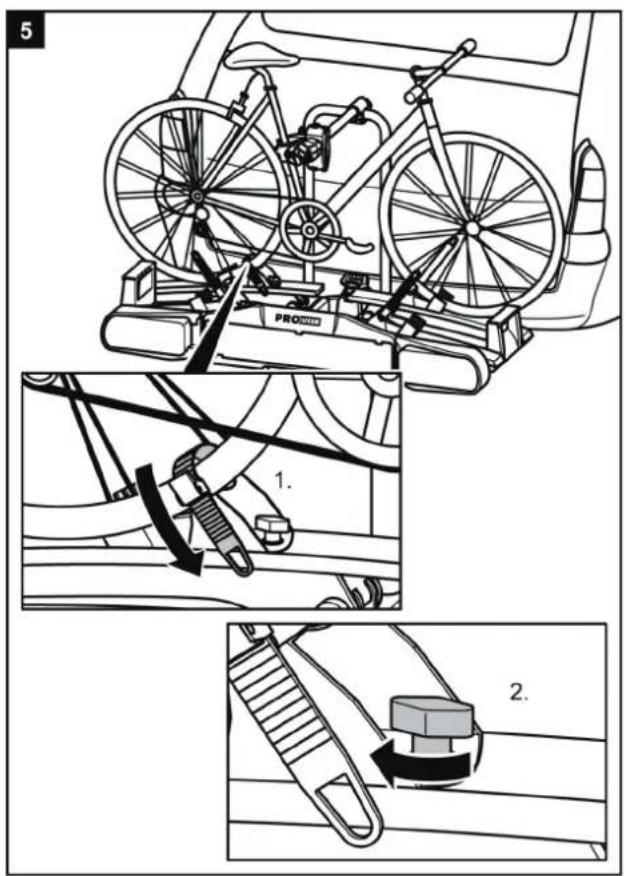
text_image
5 PRO 1. 2.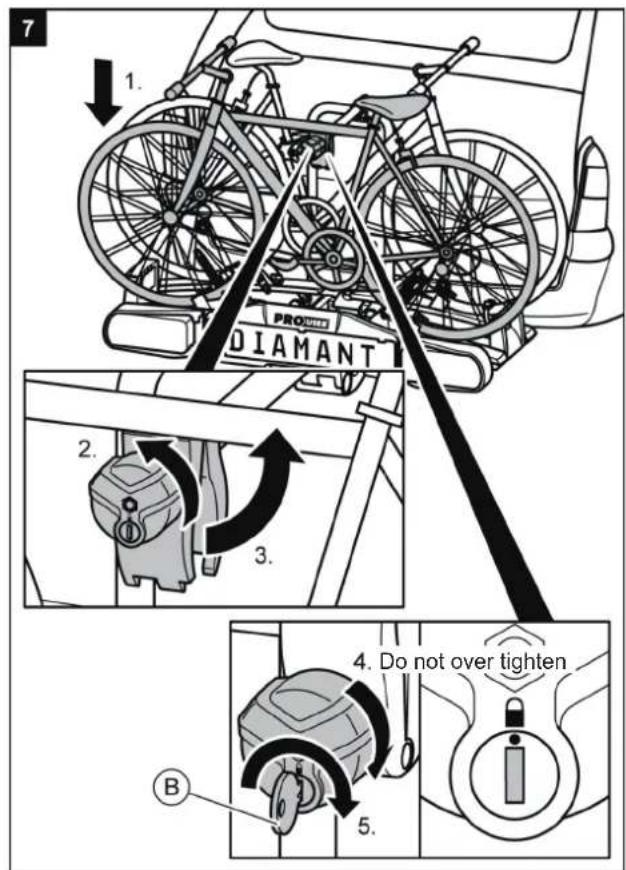
text_image
7 1. PRO DIAMANT 2. 3. 4. Do not over tighten B 5.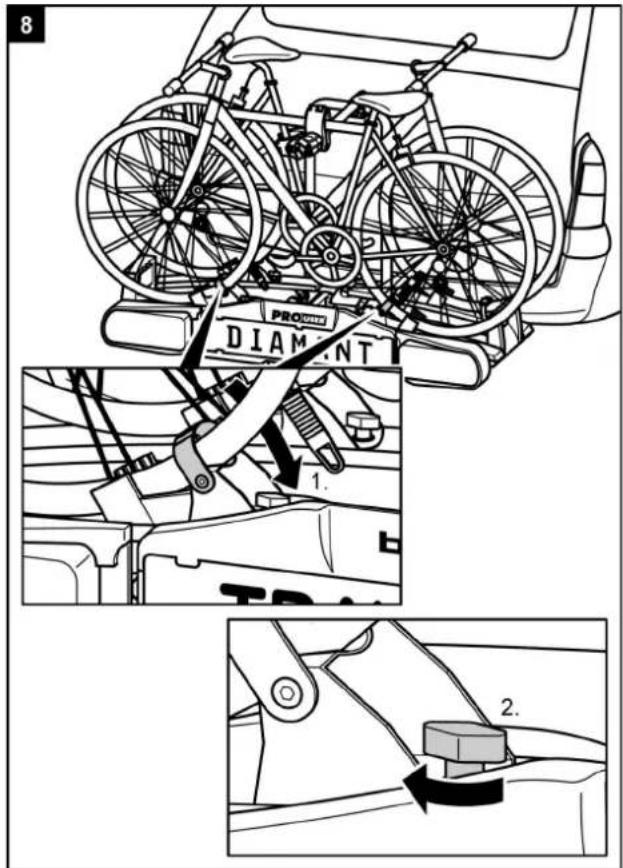
text_image
8 PRO DIAM NT 1. 2.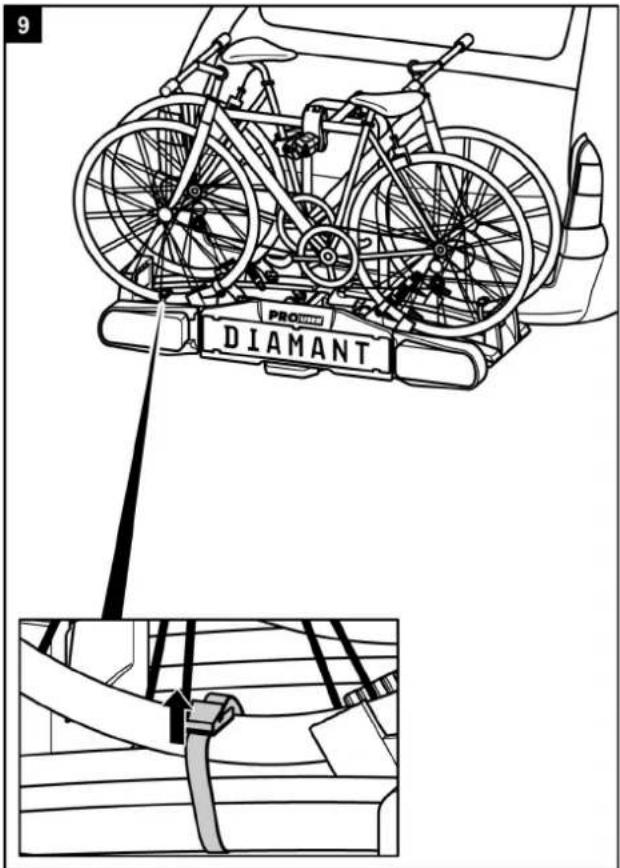
text_image
9 PRO DIAMANT
text_image
10 DWARNING!

Personal injury or material damageduetoloss of the bicycles.
Carryingbicycleswithoutusingthesafety strapscanleadtoaccidents.
- Beforethestartofeveryjourney,checkthe correctandfirmattachmentofthestrap aroundthebikesandtheU-shapedbracket ofthecarrier(seeStep10).
- Beforethestartofeveryjourney,checkthe correctandfirmattachmentofbothstraps aroundthefrontwheel,andthestrap aroundtherearwheelofthebicycle.
•Tightenthestrapsifnecessary.
• Before the start of every journey, check that the straps are not worn or damaged.
• Wornordamagedstrapsmustbereplaced with undamagedstrapsbeforethestartof thejourney. Thestrapsusedmustbe approvedbyTradekarBeneluxBV.
WARNING!

Personalinjuryormaterialdamageduetoloss ofabicycleduringthejourney.
Alooseconnectionbetweenthebicyclecarrier andbicyclecanleadtodetachmentofthe connectionandlossofthebicycle.
- Checkthebicyclesforsecureandcomplete attachment.
- Repeatsteps1 to 10 of this chapter in the event of a loose connection.
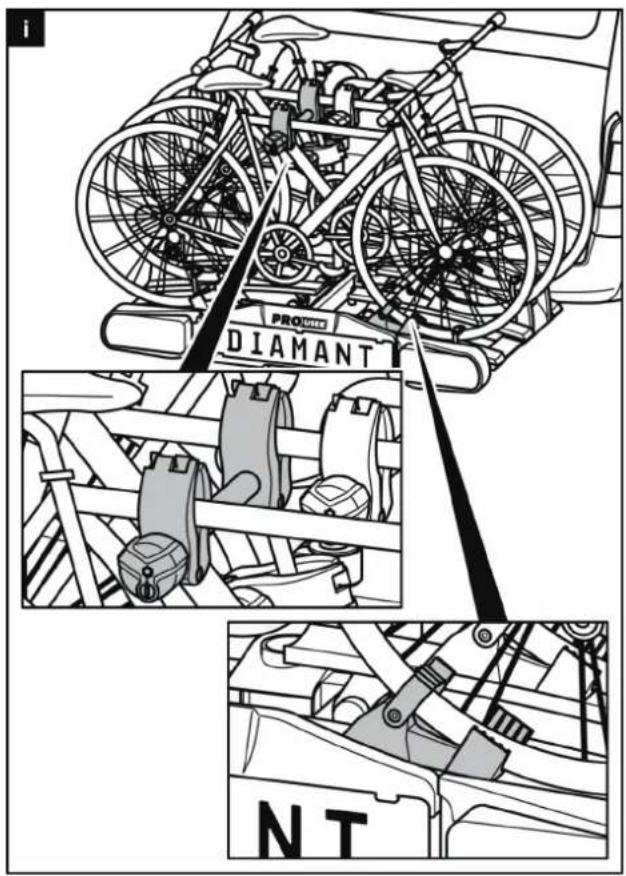
DIAMANTSG3: Assemblyofathirdbicycle
NOTE

The assembly of a third bicycle is done using the freewheel stoppersonthetyresas with the attachment of the first second bicycles. The third bicycle is additionally connected to the centre bicycle framework with the shortlock bracket.
text_image
PROVATE DIAMANT NT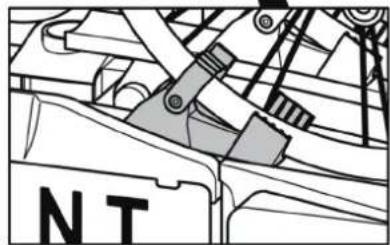
natural_image
Mechanical assembly diagram showing a linkage mechanism with no visible text or symbolsWARNING!

Personalinjuryormaterialdamageduetoloss ofthebicyclecarrierduringthejourney. Carryingbicycleswithoutusingthesafety strapscanleadtoaccidents.
Alooseconnectionbetweenthebicyclecarrier and bicycle can lead to detachment of the connection and loss of the bicycle.
• Carefullyobserveallwarningsonpage70.
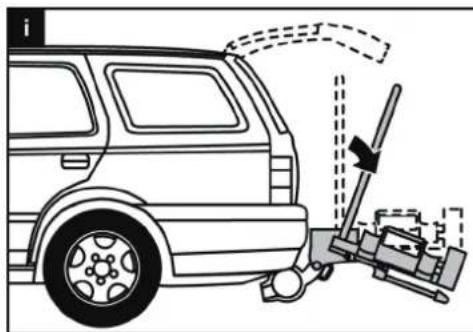
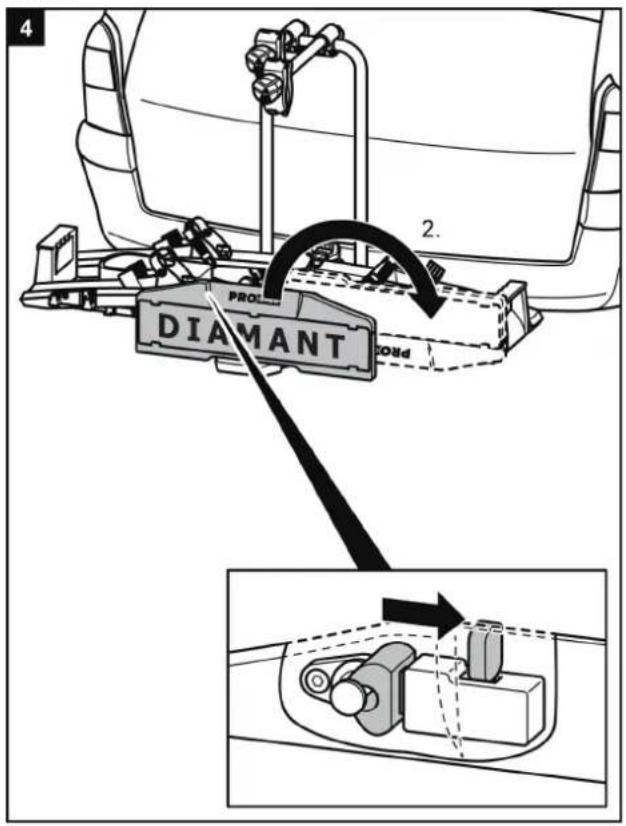
Tiltingthebicyclecarrier,accesstothe luggagespace
natural_image
Line drawing of a car with a lever and mechanical device, no text or symbols presentATTENTION!

Materialdamageduetoopeningtailgate. Thetailgatecouldimpactagainstthebicycle carrierandbedamaged.
- Switchoffelectrictailgatesandoperate themmanually.
- Folddownthebicyclecarrierbefore openingthetailgate.
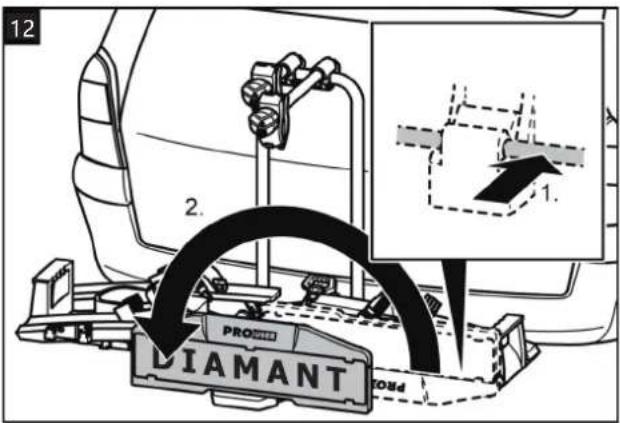
text_image
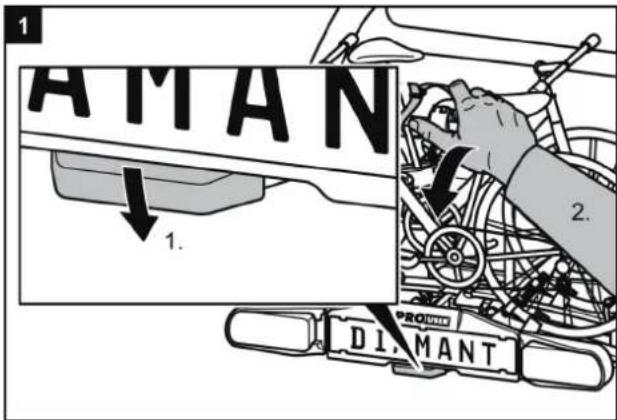
1 AMAN 1. 2. DIMANTCAUTION!

Personalinjuryormaterialdamagedueto suddenfoldingdownofthecarrier. Bodypartsorobjectsunderorinfrontofthe carrierwhenitisfoldeddownmaybetrapped.
- Makesurethatthereisnothingunderthe carrier.
- Keepallbodyparts, and particularly your head, clear, and maintain as suitable safety distance.
- HoldthecarrierbytheU-bracketwhen foldingitdown.Withyourfootloosenthe lockingdevice(1.)andthentiltthecarrier downwardwithyourhand (2.)
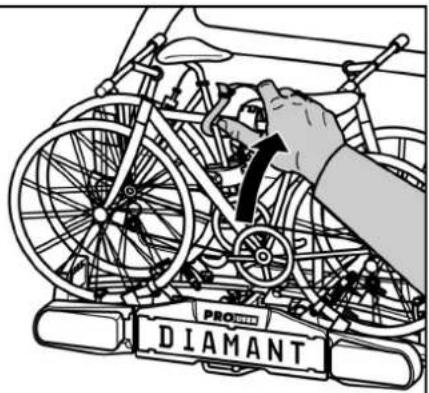
CAUTION!

Personal injury or material damage possible when folding up the carrier.
Bodypartsorobjectsbetweenthecarrierand thevehiclewhenitisfoldedupmaybe trapped.
- Makesurethatthereisnothingbetween thecarrierandthevehicle.
- Removeanyobjectsbetweenthecarrier andthevehicle.
2

text_image
PRO DIAMANTWARNING!

Personalinjuryormaterialdamagepossible duetolossofthebicyclecarrierduringthe journey.
Abicyclecarrierwhichisnotfoldedupcan resultindetachmentofthecarrierorthe coupling.
- Foldthecarrierupbeforethestartofthe journey.
- Checkthatthebicyclecarrieriscorrectly engagedandtherotaryknobissetto "locked".Lockthecarrierifnecessaryas describedaboveandsettherotaryknobto "locked".
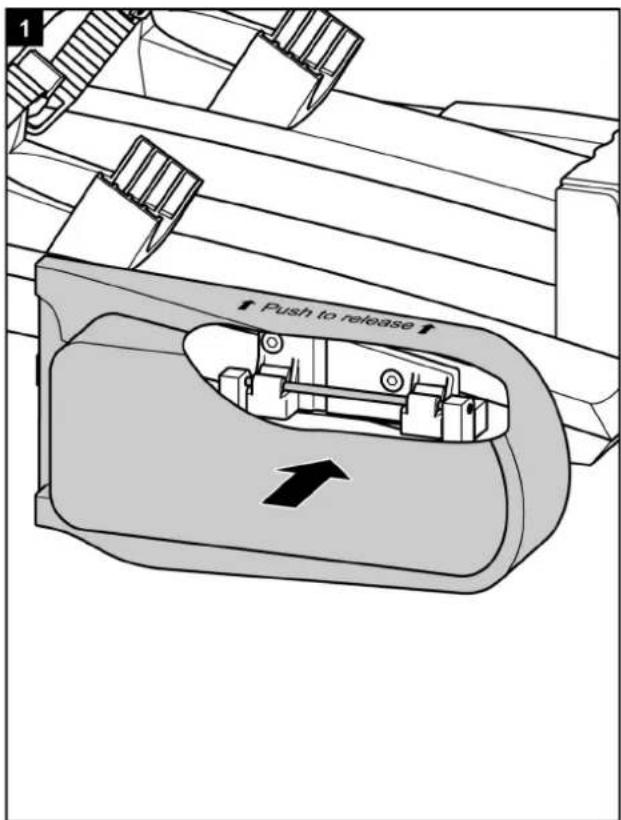
Dismantlingthebicyclecarrier
text_image
1 ■ Push to release ■
natural_image
Mechanical assembly diagram showing a lever mechanism with an arrow indicating motion (no text or symbols present)
natural_image
Mechanical assembly diagram showing a lever mechanism with a black arrow indicating direction (no text or symbols present)Firstreleasethelockingboltbehindtheregistrationplate holder.
text_image
4 PROS. DIAMANT SOND 2.Todismantlethebicyclecarrier, proceedinthereverse ordertofitting
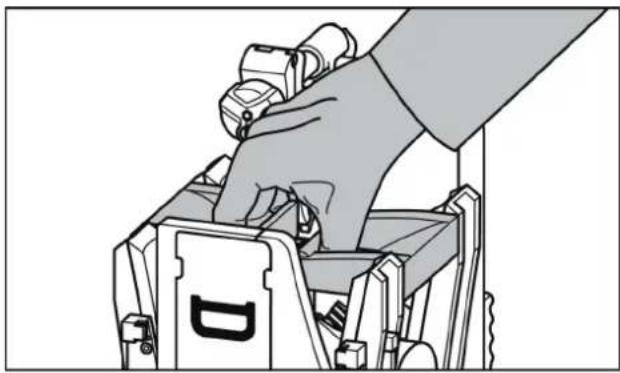
Carryingthebicyclecarrier
natural_image
Illustration of a hand using a tool to adjust or install a mechanical component (no text or symbols visible)Stowingthebicyclecarrierinthe transportbag
text_image
DIAMANT A E PROCTOCleaningandcare
The bicycle carrier can be cleaned with a mild cleaning agent, with warm water and/or as soft cloth.
Firstremoveanycoarsedirtanddust.Donotuseany solventsorsimilarcleaningagents,sincethesecan damagethebicyclecarrier.
Leavethebicyclecarriertodryonitsown.Donotuseany electricaldriersorotherheatingequipmenttospeedup thedryingprocess.
Cleanthebicyclecarrierregularlywhenusedincoastal areasorinwinterconditionsinorde rtowashoffanysalt andprolongtheservicelifeofthebicyclecarrier.
Storethebicyclecarrierinadryandprotectedareawhen notusedforextendedperiods(e.g.overwinter)inorderto prolongtheservicelifeofthebicyclecarrier.
Maintenance
Check the bicycle carrier for wear before the start of every journey. Defective metal parts and straps in particular must be replaced.
Please refer to our customer service for the replacement of parts.
Any modification of original parts and materials or the construction of bicycle carrier can adversely affect its safety and serviceability.
The steel parts of the bicycle carrier are protected in the works against corrosion by a powder-paint coating. If this paint coating is damaged, please have the damage rectified professionally as soon as possible.
Under normal conditions and use, the bicycle carrier only requires cleaning, and is otherwise maintenance-free.
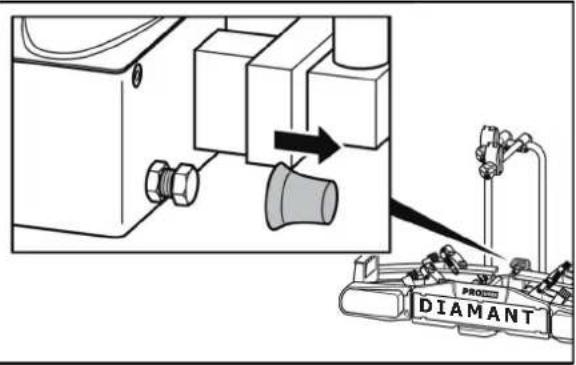
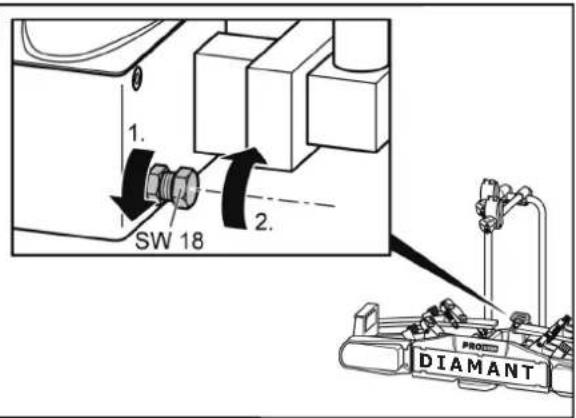
Adjustmentofthequick-fastener
Carry out this maintenance operation only if the bicycle carrier cannot be fitted firmly to the trailer coupling, as described in the chapter "Fitting".
- Remove the bicycle carrier from the trailer coupling, as described under "Dismantling".
- Remove the dust protection cap.
- Loosen the locking nut slightly, as shown in the illustration.
- Screw in the setting screw one quarter of a turn.
• Tighten the locking nut. - Check whether the carrier is now firmly seated on the trailer coupling, as described under "Fitting". If not, repeat the above steps.
1
text_image
DIAMANT2
text_image
1. SW 18 2. PROD DIAMANT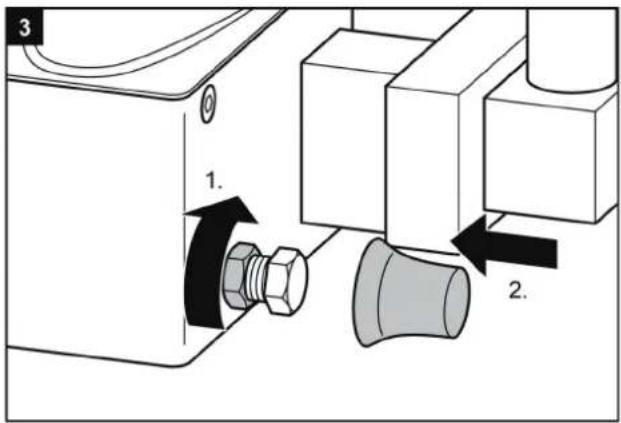
text_image
3 1. 2.Disposal
Local regulations must be observed for the disposal of the product.
The packaging should also be sorted by type and disposed of in the relevant collection containers.
Further information is available from your communal disposal point.
Contact
Tradekar Benelux BV
Ohmweg 1
4104 BM CULEMBORG
Netherlands
Telephone: +31 (0)345 470 990
Telefax: +31 (0)345 470 991
E-mail: info@tradekar.com
Consumer helpdesk & support
Telephone: +31 (0)345-470998
(Monday till Friday 8:30-12:30)
E-mail: service@tradekar.com
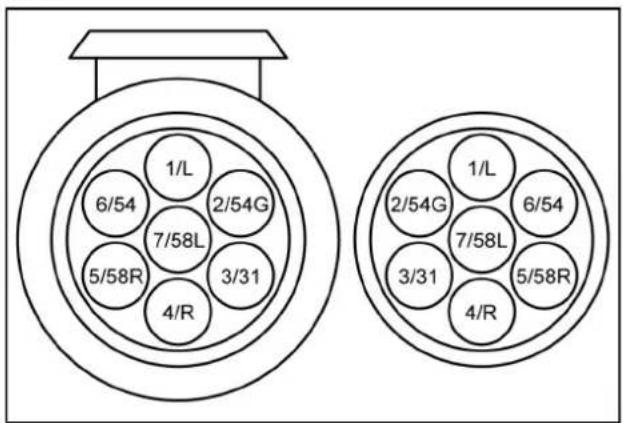
7/13pinconnector
Thisbikecarrierisequippedwithalightingsystem.This systemcanbeconnectedtothetowbarpowersocketof yourcar.Seeingthattherearedifferentkindsofsockets thatrequiredifferentkindsofplugs,thiscarriercomeswith theusual7-pinplugandthe13-pinplug(Jaegers).Asa result,thecarriercanbeusedwithanytowbar! Bothplugsareinonehousing.Pleasecovertheplugyou don'tusewiththesuppliedcover.
This information is only for theretrofitting by as specialised dealer. A retrofitting by nontrained persons is not permitted.
7Pin
text_image
1/L 6/54 2/54G 7/58L 3/31 5/58R 4/R 2/54G 7/58L 1/L 3/31 5/58R 4/R| 1/L | Blinker left | yellow |
| 2/54G | Rear fog light | blue |
| 3/31 | Earth | white |
| 4/R | Blinker right | green |
| 5/58R | Taillight right | brown |
| 6/54 | Brake light | red |
| 7/58L | Taillight left | black |
13Pin

text_image
Diagram showing two circular electrical connectors with numbered pins, likely representing a multi-pin connector or socket layout.| 1 | Blinker left | yellow |
| 2 | Rear fog light | blue |
| 3 | Earth | white |
| 4 | Blinker right | green |
| 5 | Taillight right | brown |
| 6 | Brake light | red |
| 7 | Taillight left | black |
| 8 | Reserving light | grey |
| 9 | Not assigned | |
| 10 | Not assigned | |
| 11 | Not assigned | |
| 12 | Earth | |
| 13 | Not assigned |
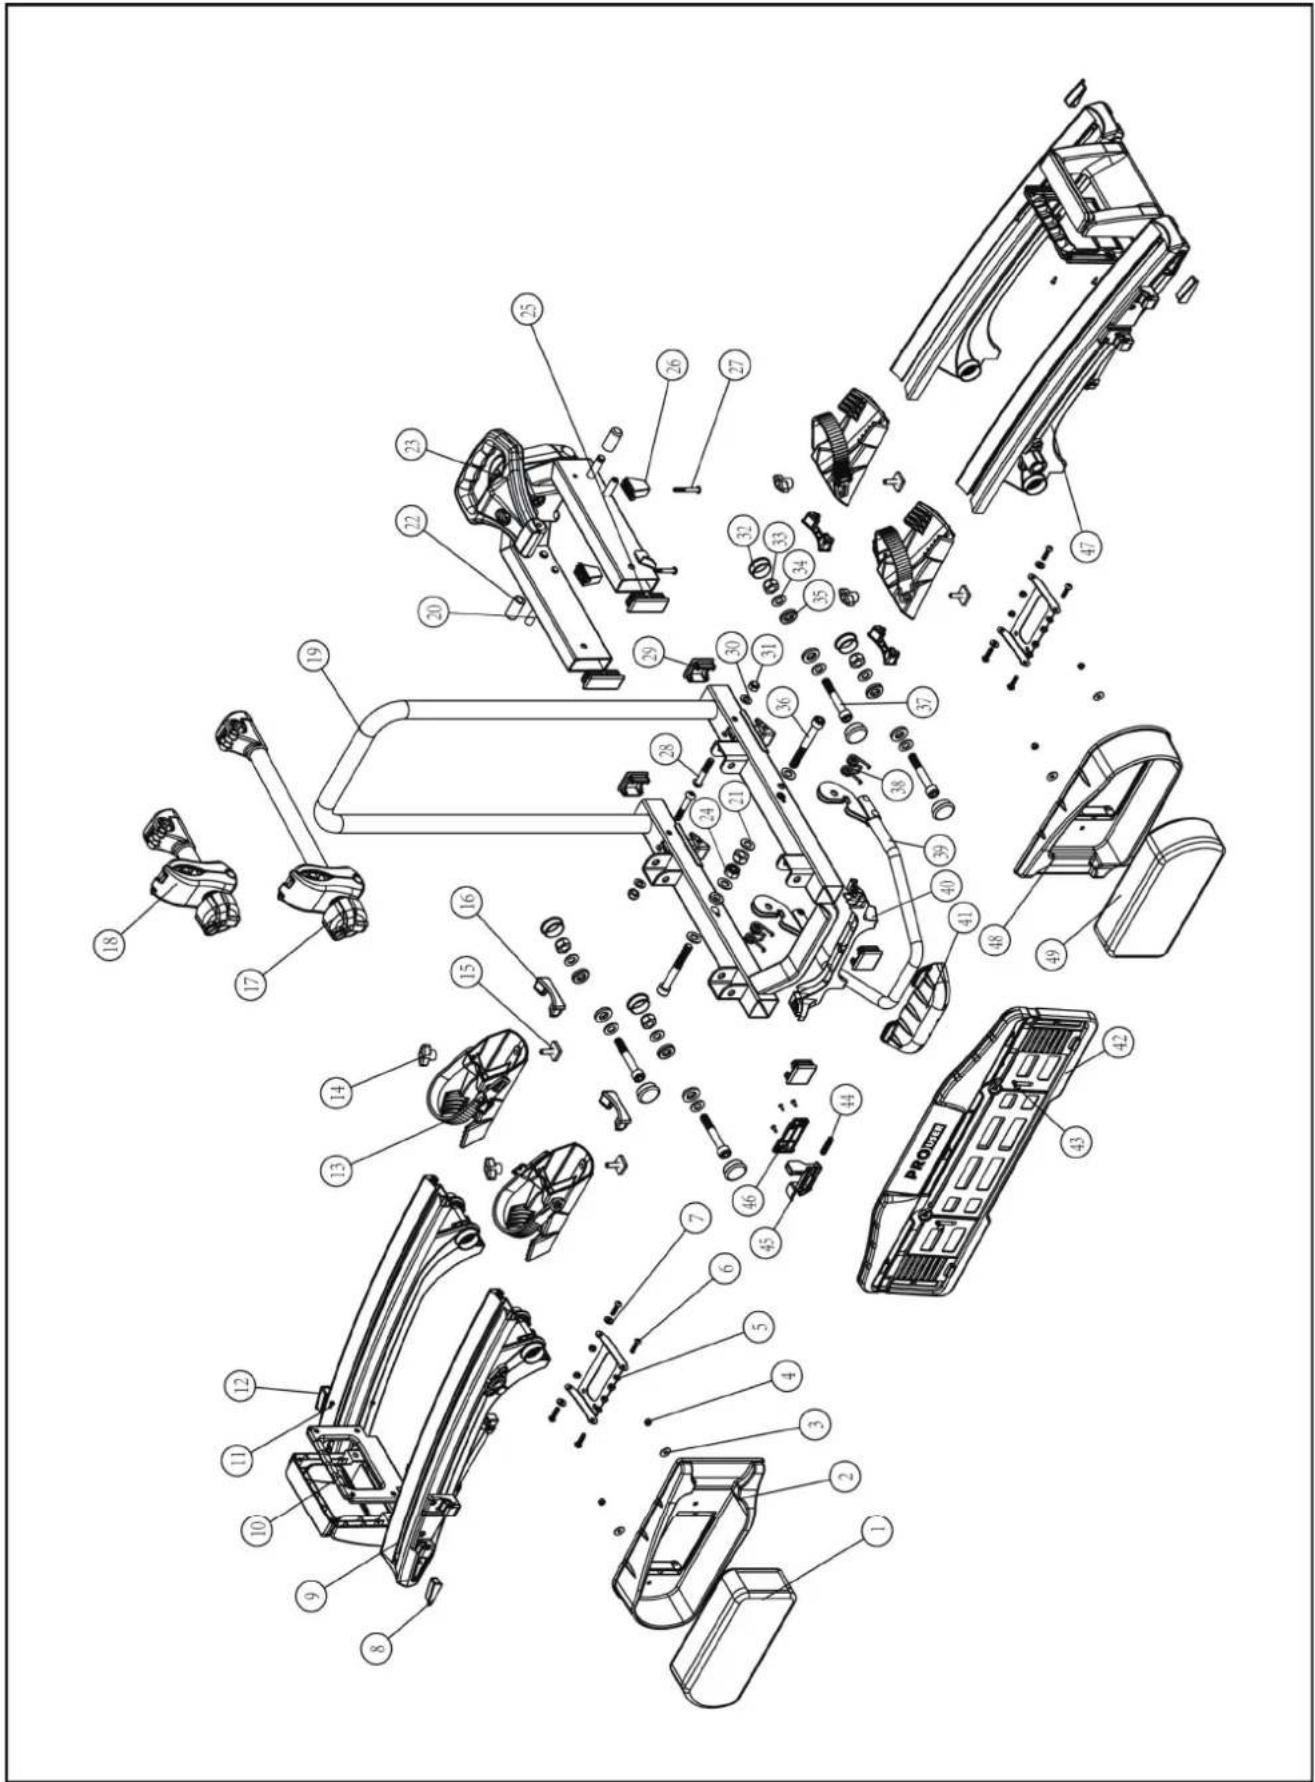
text_image
Exploded view diagram of a vehicle's internal components with numbered parts for identification| Pos. | Quantity | Designation |
| 1 | 1 | Replacement glass left |
| 2 | 1 | Lamp guard left |
| 3 | 4 | Washer M5 |
| 4 | 4 | Capped nut M5 |
| 5 | 2 | Lamp countersink |
| 6 | 1 | Replacement glass right |
| 7 | 4 | "Screw M5 x 20 mm" |
| 8 | 4 | Cover cap handle bracket |
| 9 | 1 | Lamp locking mechanism left |
| 10 | 2 | Carrier handle cover |
| 11 | 4 | Wheel rail |
| 12 | 1 | Lamp locking mechanism right |
| 13 | 4 | Wheel blocker with tension belt |
| 14 | 4 | Wing nut M6 |
| 15 | 4 | "Setting screw M6 x 20mm" |
| 16 | 4 | "End cap aluminium rail interior" |
| 17 | 1 | Lock bracket long |
| 18 | 1 | Lock bracket short |
| 19 | 1 | Carrier table bracket and U-bracket |
| 20 | 2 | Locking pin M10 |
| 21 | 2 | Washer M10 |
| 22 | 2 | Bearing pad |
| 23 | 1 | Base frame with quick release |
| 24 | 2 | "Self-locking nut M10" |
| 25 | 4 | "Stopper 60mm x 25mm" |
| 26 | 3 | Foot plastic |
| 27 | 3 | Screw foot M6 x 40mm |
| 28 | 2 | "Allen wrench M8 x 45mm" |
| 29 | 4 | "Stopper for no. 19, 35mm x 35mm" |
| 30 | 2 | Washer M8 |
| 31 | 2 | "Self-locking nut M8" |
| 32 | 8 | Cover cap hinge |
| Pos. | Quantity | Designation |
| 33 | 4 | "Self-locking nut M10" |
| 34 | 4 | Washer M10 |
| 35 | 4 | Inner pane M10 |
| 36 | 2 | "Allen wrench M10 x 80mm" |
| 37 | 4 | "Allen wrench M10 x 80mm" |
| 38 | 2 | "Spring for locking no. 39" |
| 39 | 1 | Fold up locking mechanism |
| 40 | 1 | "Kick plate for locking mechanism" |
| 41 | 1 | "Carrier table left complete" |
| 42 | 2 | Registration plate lock |
| 43 | 1 | Registration plate bracket |
| 44 | 1 | Bolts |
| 45 | 1 | "Registration plate bracket- locking mechanism" |
| 46 | 1 | Holder locking mechanism |
| 47 | 1 | "Carrier table right complete" |
| 48 | 1 | Lamp guard right |
| 49 | 1 | Lamp complete right |
Portabicicletas DIAMANT SG2 / SG3 FixMatic
natural_image
Two stick figures with crossed and check symbols, one marked with a 'X' and the other with a checkmark (no text or labels)DIAMANT SG2 FixMatic
text_image
Technical diagram of a mechanical device with labeled parts A through E, including a component labeled PROD. and a textured base.A=Portabicicletas
B=2Llaves
C=2cinchasdeseguridadpararuedasdelanteras, DIAMANTSG2
(3cinchasdeseguridadpararuedasdelanteras, DIAMANTSG3)
D=1cinchadeseguridadparaelcuadrodelabicicleta
natural_image
Two stick figures with checkmarks and a checkmark, no text or symbols presenttext_image
DIAMANT A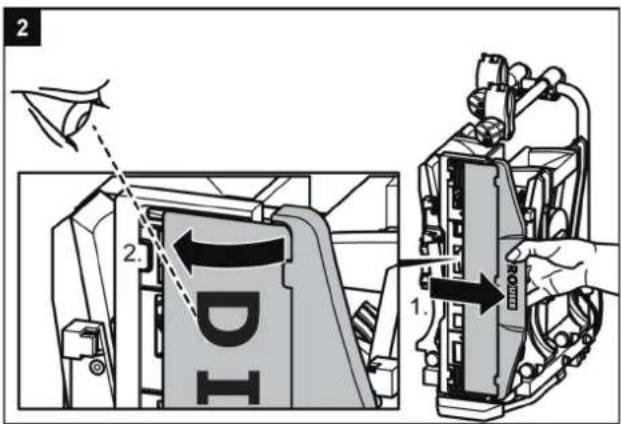
text_image
Technical diagram showing mechanical assembly with labeled components and directional arrows indicating motion or movement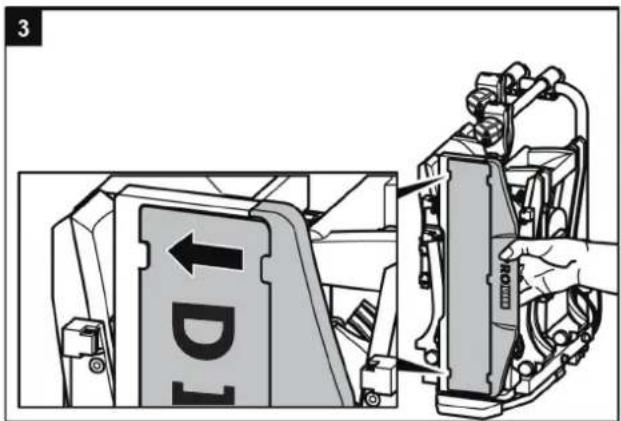
text_image
3 D1Montajeyuso
natural_image
Illustration of a hand gripping a curved object with a circular element, no text or symbols present
text_image
DIAMANT DIAMANT PROG 5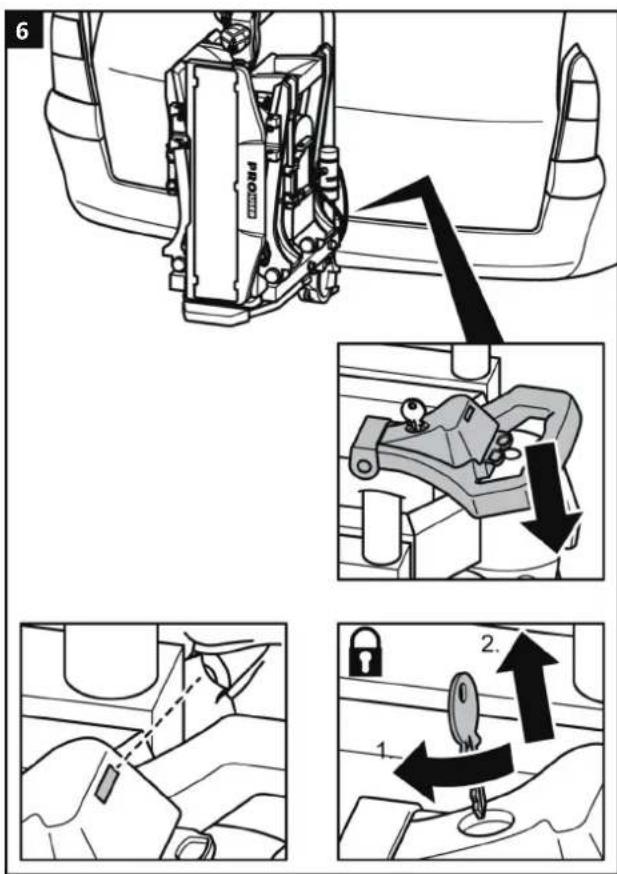
text_image
Automotive seatbelt diagram showing mechanical assembly and safety instructions with numbered steps¡ADVERTENCIA!

Dañospersonalesomaterialesacausade portabicicletassinasegurar.
natural_image
Mechanical assembly diagram showing a lever mechanism with a black arrow indicating rotational motion (no text or symbols present)
text_image
16 2. 1. CLICK!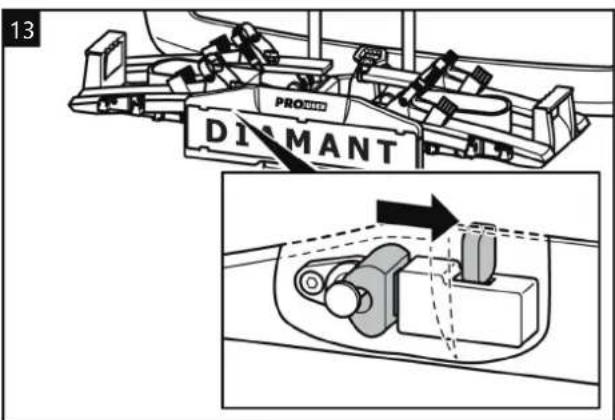
text_image
13 PROD DIMANT¡ADVERTENCIA!

text_image
Diagram illustrating bicycle wheel assembly steps with labeled instructions for each step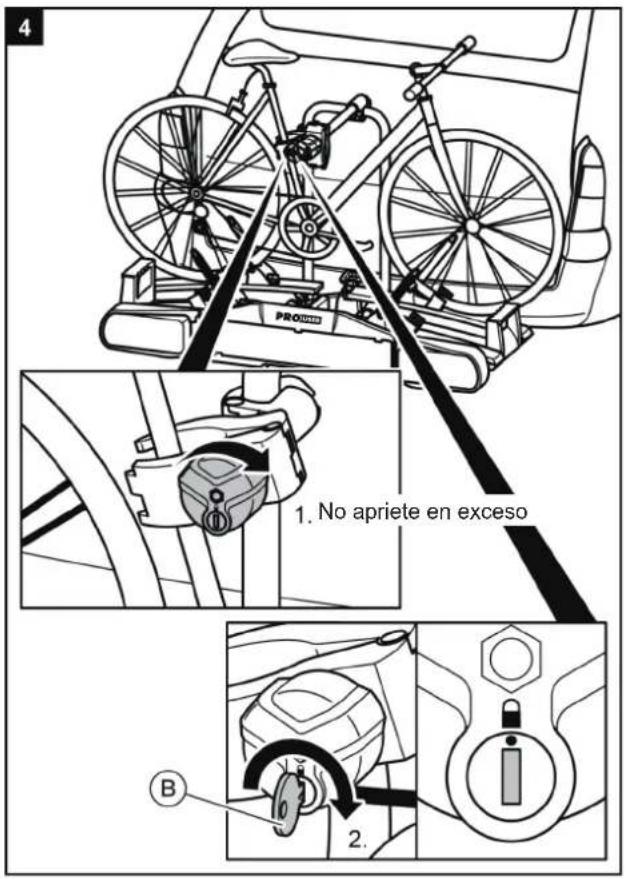
natural_image
Line drawing of a car with a mechanical device and directional arrow indicating motion (no text or symbols)¡ATENCIÓN!

text_image
1 ■ Push to release ■
natural_image
Mechanical assembly diagram showing a lever mechanism with an arrow indicating motion (no text or symbols present)
natural_image
Mechanical assembly diagram showing a lever mechanism with a black arrow indicating direction (no text or symbols present)text_image
4 2. PRO: DIAMANT OLDnatural_image
Illustration of a hand using a tool to lift a mechanical component (no text or symbols visible)text_image
DIAMANT A ECuidadoylimpieza
text_image
1 DIAMANT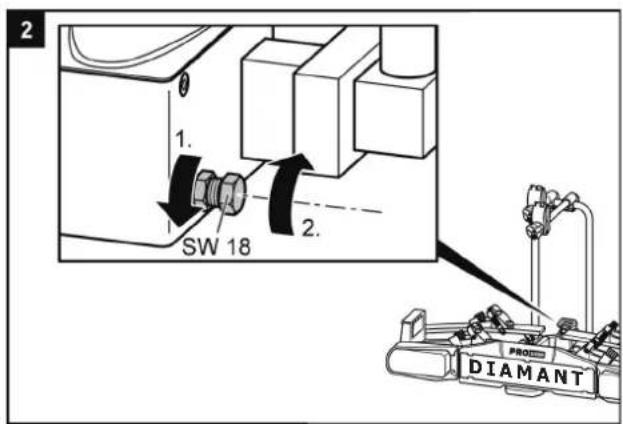
text_image
2 1. SW 18 2. DIAMANT
text_image
3 1. 2.Eliminación
text_image
1/L 6/54 2/54G 7/58L 3/31 5/58R 4/R 2/54G 7/58L 1/L 3/31 6/54 5/58R 4/Rtext_image
Diagram showing two circular electrical connectors with numbered pins, likely for circuit or signal labeling.text_image
Exploded view diagram of a vehicle's internal components with numbered parts for identificationtext_image
Diagram showing two stick figures with checkmark and cross symbols, likely indicating a verification or rejection process.DIAMANT SG2 FixMatic
č. výr. 91875
DIAMANT SG3 Fixmatic
č. výr. 91876
Obsah
text_image
Technical diagram of a mechanical device with labeled parts including a motor, clamps, and a textured base.A=nosič jízdníchkol
B=2klíče
text_image
Diagram showing two stick figures with crossed and check symbols, likely indicating correct or incorrect actions.Bezpečnostnípokyny
text_image
Technical diagram showing mechanical assembly with labeled components and directional arrows indicating motion or movement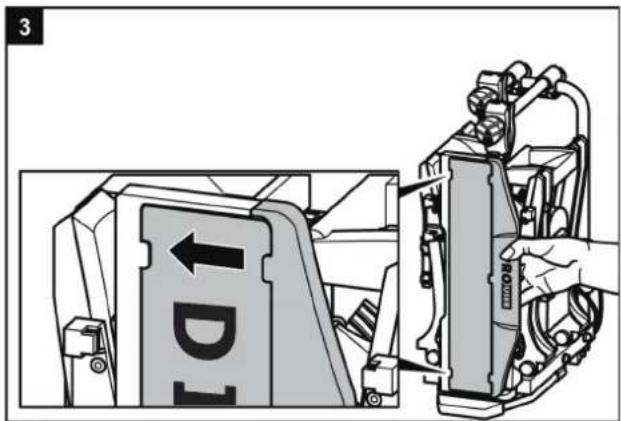
text_image
3 D1Montáž apoužití
natural_image
Illustration of a hand gripping a circular object with a curved handle, no text or symbols present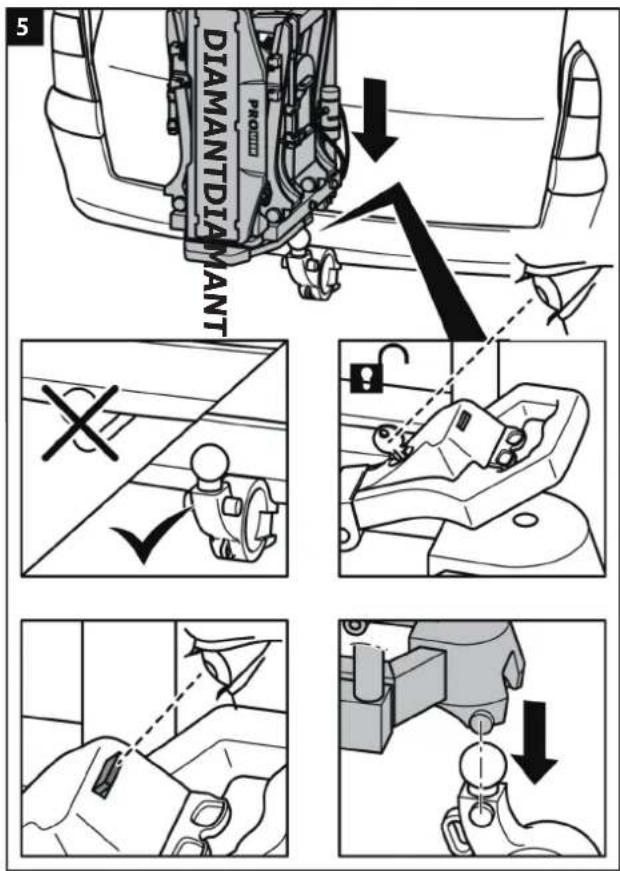
VAROVÁNÍ!

text_image
13 PRODANT DISMANT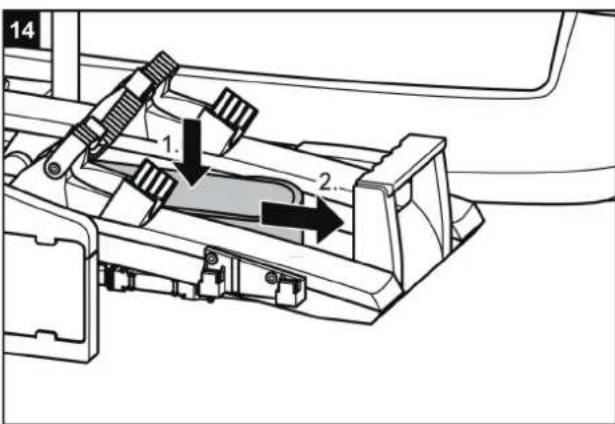
text_image
14 1. 2.
natural_image
Mechanical assembly diagram showing a lever mechanism with a black arrow indicating rotational motion (no text or symbols present)
text_image
16 2. 1. CLICK!VAROVÁNÍ!

text_image
Diagram illustrating bicycle wheel assembly steps with labeled instructions for tool manipulation and adjustment.
text_image
4 PRO 1. Neutahujte B 2.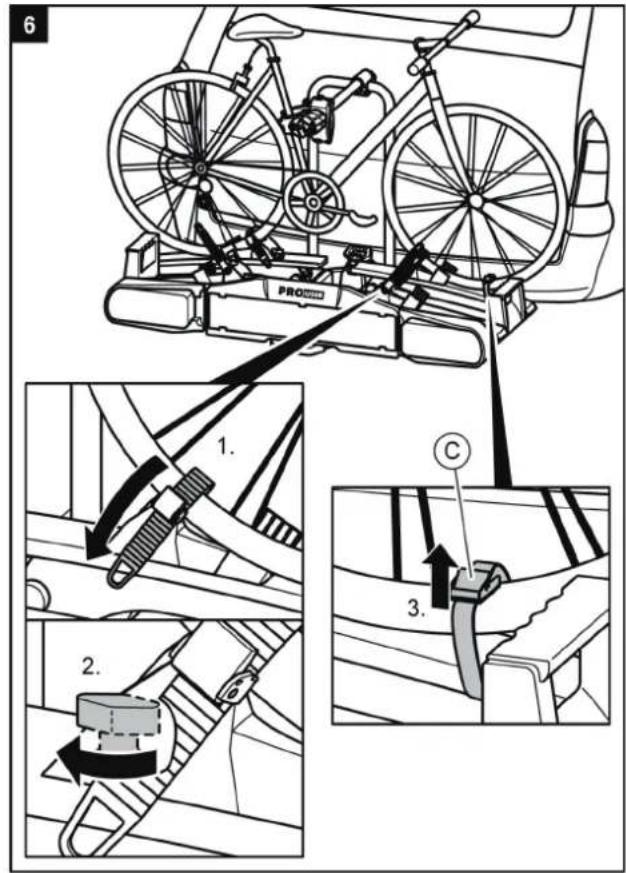
text_image
6 PRO 1. 2. 3.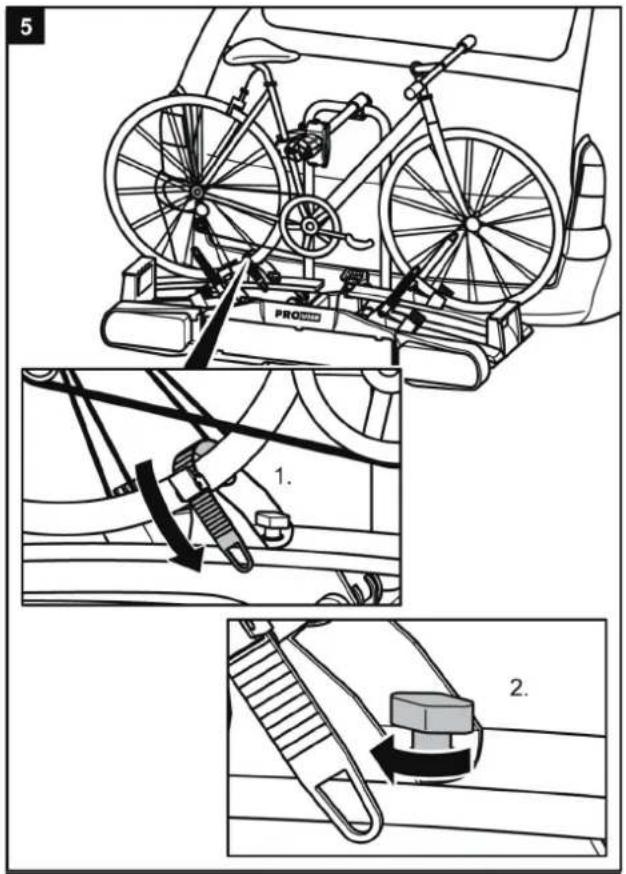
text_image
5 PRO 1. 2.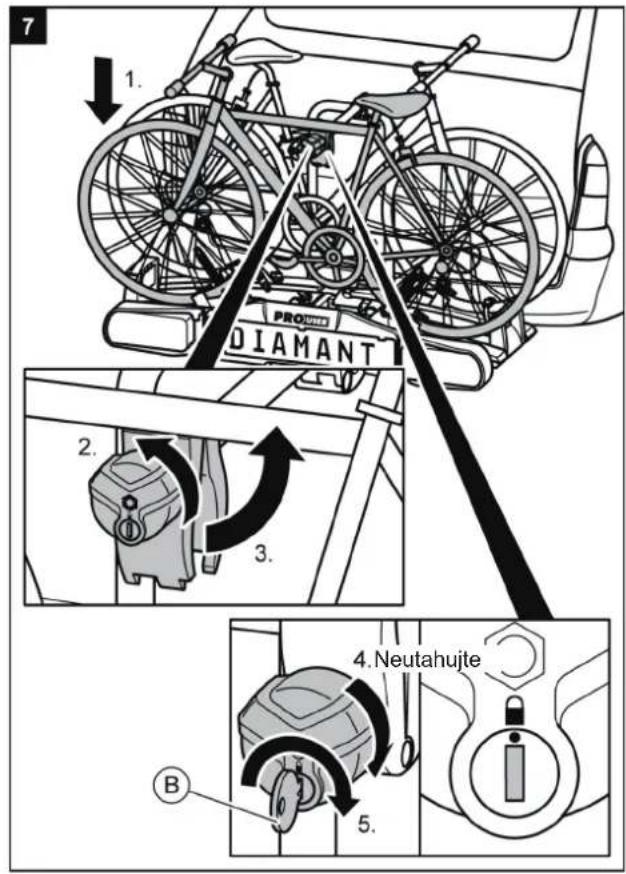
text_image
7 1. PROKLA DIAMANT 2. 3. 4. Neutahujte B 5.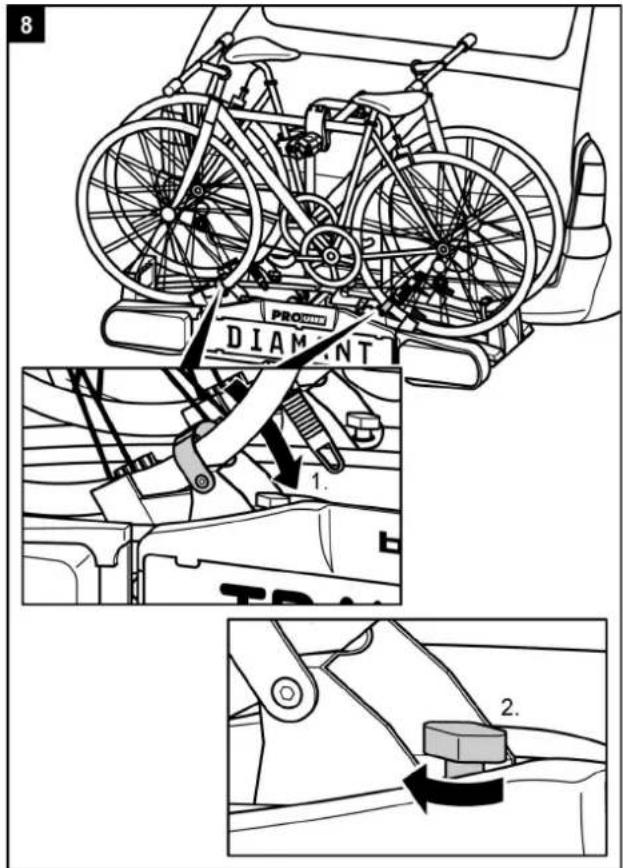
text_image
8 PRO DIAMNT 1. 2.
text_image
9 PRO DIAMANT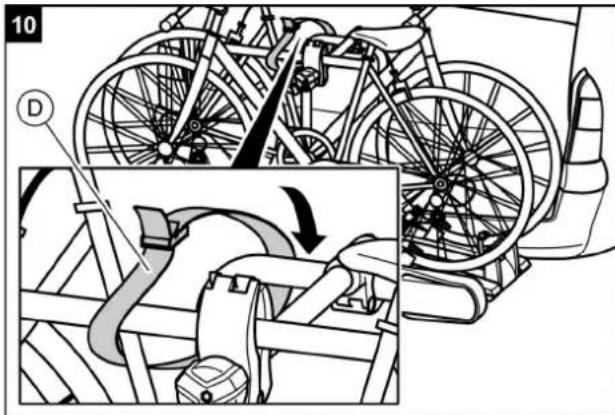
text_image
10 DVAROVÁNÍ!

natural_image
Line drawing of a car with a lever and bucket, showing no text or symbolsPOZOR!

text_image
Push to release
natural_image
Mechanical assembly diagram showing a lever mechanism with an arrow indicating motion (no text or symbols present)
natural_image
Mechanical assembly diagram showing a lever mechanism with a black arrow indicating direction (no text or symbols present)text_image
4 2. PRO: DIAMANT OLDnatural_image
Illustration of a hand using a tool to lift a mechanical component (no text or symbols visible)text_image
DIAMANT A EČištěníaošetřování
text_image
1/L 6/54 2/54G 7/58L 3/31 5/58R 4/R 2/54G 1/L 7/58L 6/54 3/31 5/58R 4/Rtext_image
Diagram showing two circular electrical connectors with numbered internal components, likely for circuit or signal labeling.text_image
Exploded view diagram of a vehicle's internal components with numbered parts for identification© Tradekar 91875-91876/22A

Tradekar Benelux BV
Ohmweg 1
+31 (0)345-470990
4104 BM CULEMBORG
info@tradekar.com
The Netherlands
www.pro-user.eu