Alustar - Bike rack Pro-User - Free user manual and instructions
Find the device manual for free Alustar Pro-User in PDF.
| Product type | Roof rack bike carrier |
| Brand | Pro-User |
| Model | Alustar |
| Category | Bike carrier |
| Net weight | 3.6 kg |
| Maximum load | 15 kg |
| Main material | High-quality aluminum |
| Number of bikes transported | 1 |
| Attachment to roof bars | U-bolts and wing nuts |
| Bike attachment | Locking arms with integrated anti-theft knob |
| Compatible frame diameter | Up to 80 mm |
| Compatible roof bar dimensions | Up to 50 x 45 mm |
| Recommended maximum speed | 120 km/h |
| Mounting type | On roof bars |
| Recommended maintenance | Water jet cleaning, regular check and lubrication |
| Spare parts | Original replacement parts available |
| Warranty | 2 years |
| Manufacturer | Tradekar International BV, Netherlands |
| After-sales service | Tel. +31 (0)345-470998, email service@tradekar.nl |
| Off-road use | Not suitable |
Frequently Asked Questions - Alustar Pro-User
User questions about Alustar Pro-User
0 question about this device. Answer the ones you know or ask your own.
Ask a new question about this device
Download the instructions for your Bike rack in PDF format for free! Find your manual Alustar - Pro-User and take your electronic device back in hand. On this page are published all the documents necessary for the use of your device. Alustar by Pro-User.
USER MANUAL Alustar Pro-User
UK: Assembly instruction and safety regulations
| T | a | b | l | e | o | f | c | o | n | t | e | |||
| • | I | n | t | r | o | d | u | c | t | i | o | n | ||
| • | I | m | p | o | r | t | a | n | t | i | n | f | o | |
| • | Mounting the bike carrier | 17 | ||||||||||||
| • | Mounting of the bike carrier on the roofbar | 18 | ||||||||||||
| • | Mounting of the bike on the bike carrier | 19 | ||||||||||||
| • | S | a | f | e | t | y | r | e | g | u | l | a | t | |
| • | Maintenance | 2 | 1 | |||||||||||
| • | G | u | a | r | a | n | t | e | e | |||||
| Table | des | matières | Page | |||||||||||||||||||||||||||||||||||||||||||||||||||||||||||||||||||||||||||||||||||||||||||||||||||||||||||||||||||||||||||||||||||||||||||||||||||||||||||||||||||||||||||||||||||||||||||||||||||||
| • | I | n | t | |||||||||||||||||||||||||||||||||||||||||||||||||||||||||||||||||||||||||||||||||||||||||||||||||||||||||||||||||||||||||||||||||||||||||||||||||||||||||||||||||||||||||||||||||||||||||||||||||||||
| • | Informations | 22 | ||||||||||||||||||||||||||||||||||||||||||||||||||||||||||||||||||||||||||||||||||||||||||||||||||||||||||||||||||||||||||||||||||||||||||||||||||||||||||||||||||||||||||||||||||||||||||||||||||||||
INTRODUCTIE
VEI LIGHEIDVOORSCHRIFTEN
The Pro-User ALUSTAR bike carrier is part of the family of bike carriers manufactured by Tradekar International BV.
Aluminium bike carrier for mounting on roof-racks
Safe and reliable bike carrier for the transportation of 1 bicycle
Suitable for mounting in standing position
With stable V-model wheel holder of high grade aluminium
Fit for roof-racks with a maximum tube profile of 50× 45mm
Fast assembly by means of plastic wing nuts
Mounting of the bicycles with pivot screw and lockable tog nut
Fit for bicycles with a maximum frame width of 80mm
IMPORTANT INFORMATION
Read these instructions carefully before using the product for the first time.
Do not use this product until the manual and safety regulations are read and are entirely clear.
The assembly and installation of the bike carrier can only be done according this instruction manual.
The steps that are mentioned and the safety regulations for assembly, handling and use of the bike carrier need to be followed! The slightest non conformity can lead to incorrect assembly or wrong use.
The maximum permissible load for the carrier itself may be 15kg . The net weight of the carrier is 3,6kg .
Keep these instructions in your car.


Read the following safety- and operating instructions carefully and act accordingly before using the bike carrier.
CONSUMER HELPDESK & SUPPORT
+31 (0) 345-470998 (Monday till Thursday 8:30-12:30)
service@tradekar.nl
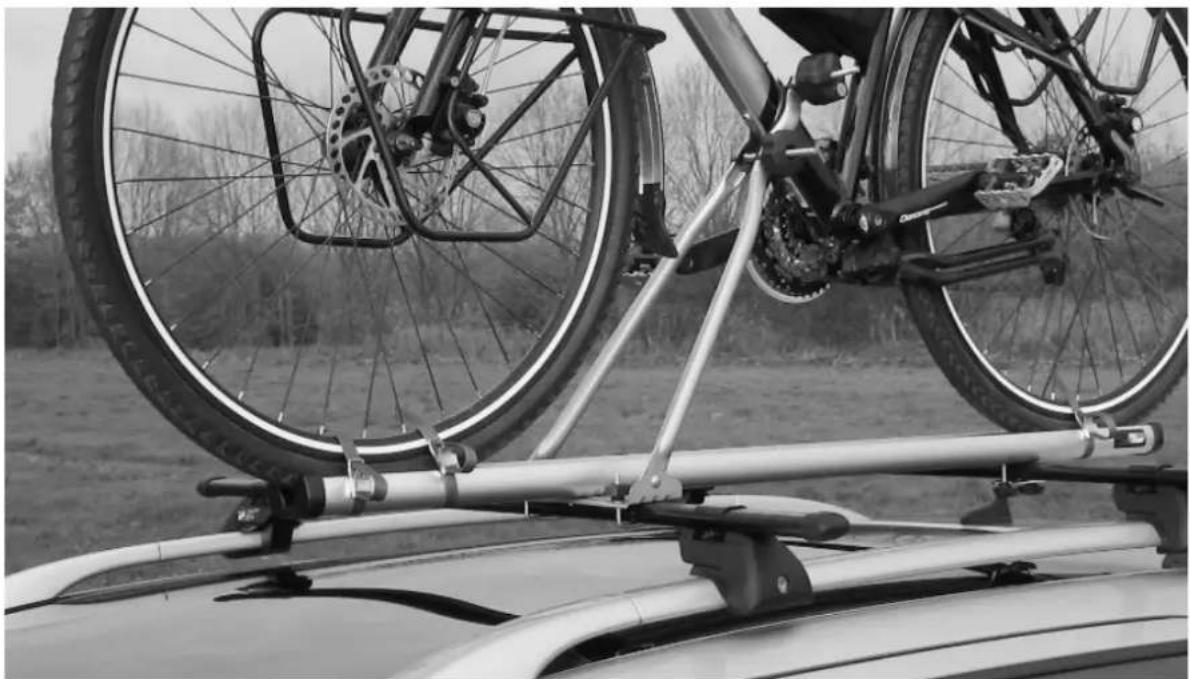
MOUNTING THE BIKE CARRIER
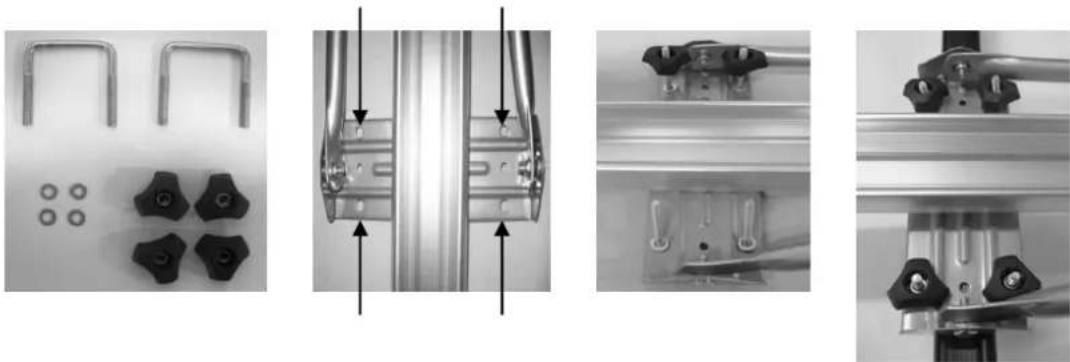
Parts:
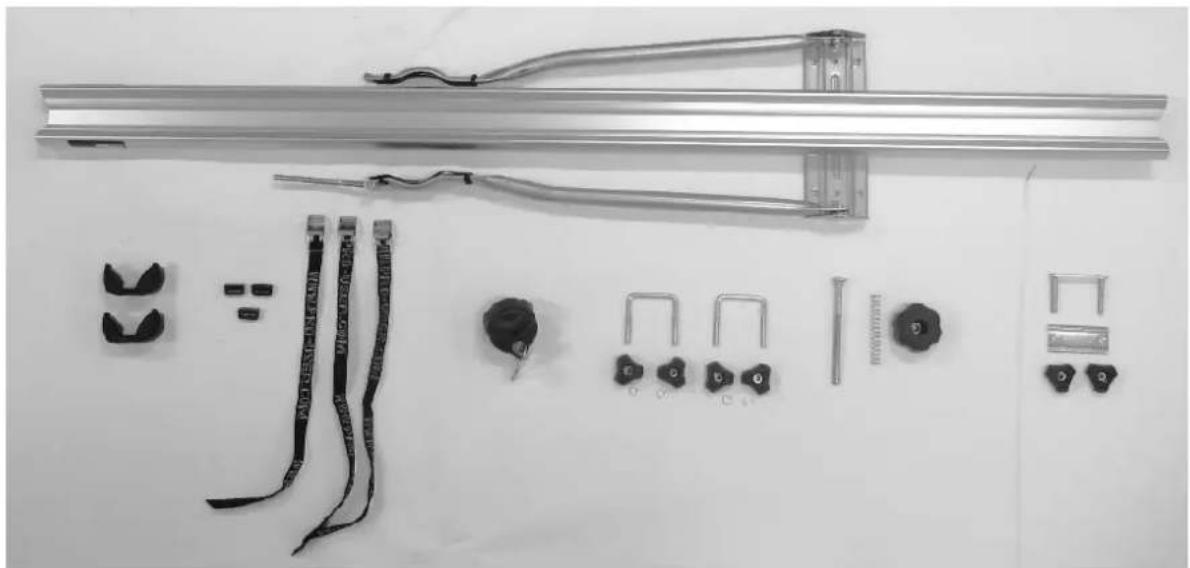
Assembly:
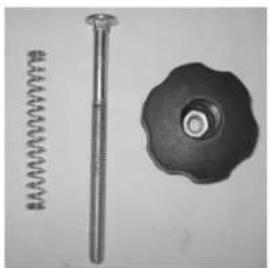
Step 1
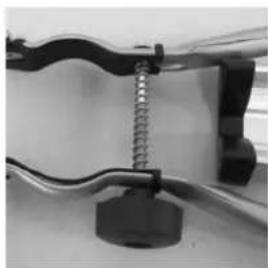
Mount the black plastic rotary knob with the screw and spring on the mounting frame, through the pre-drilled holes (photo 1-3).
Then mount the lockable tog nut on the pivot screw on top of the mounting frame (photo 4).
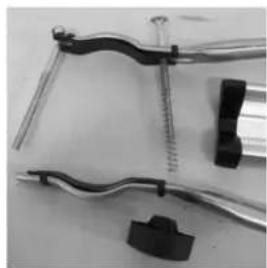
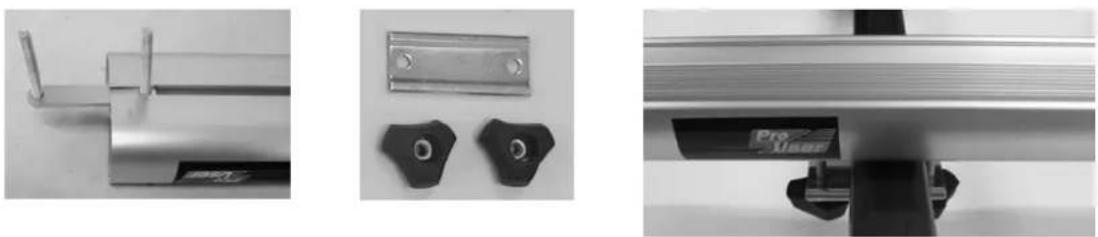
Step 2
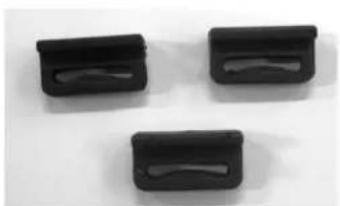
Turn the rail around. Take off the two end caps of the rail and slide two strap holders on the front side (that's the side where the mounting frame is pre-mounted) into the rail. At the back side of the rail, slide in the double slidescrews followed by the last strap holder. Put the end caps back on.
The bike carrier is now ready for fixing the roofbar of the car.
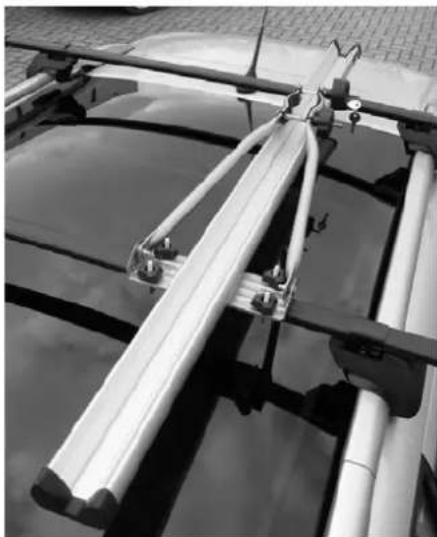
MOUNTING OF THE BIKE CARRIER ON THE ROOFBAR
Step 1
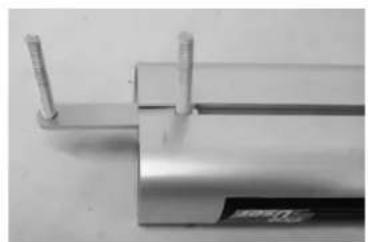
Put the bike carrier on the roofbar of the car. Make sure that the fixation-frame (Bracket with two "arms") is right above the first (front) tube. Place the two double slide screws from bottom to top over the tube of the roofbar and through the holes of the fixation-frame. Put washer and plastic wing nuts on each screw and tighten them so the bike carrier can not move on the tube anymore
Step 2
Place the double slide screw over the back tube of your roof-rack. Mount the bottom plate against the bottom of the tube and place the screws through the pre-mounted holes of the bottom plate. Put washer and plastic star knob on each screw and tighten them so the bike carrier can not move on the roof-rack anymore.
Important: Please make sure that all wing nuts have been well tightened and the bike carrier can not move on the roofbar.
The bike carrier is now ready for use!
MOUNTING OF THE BIKE ON THE BIKE CARRIER
Step 1
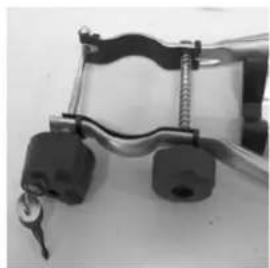
Lift your bike with the front wheel towards the front onto the rail of the bike carrier and tilt the mounting frame upwards so you can attach the frame clamp around the frame tube of your bike. Fasten the plastic rotary knob. Tilt the pivot screw over the frame and fasten the lockable tog nut. Lock the clamp with the key and keep it somewhere safe.
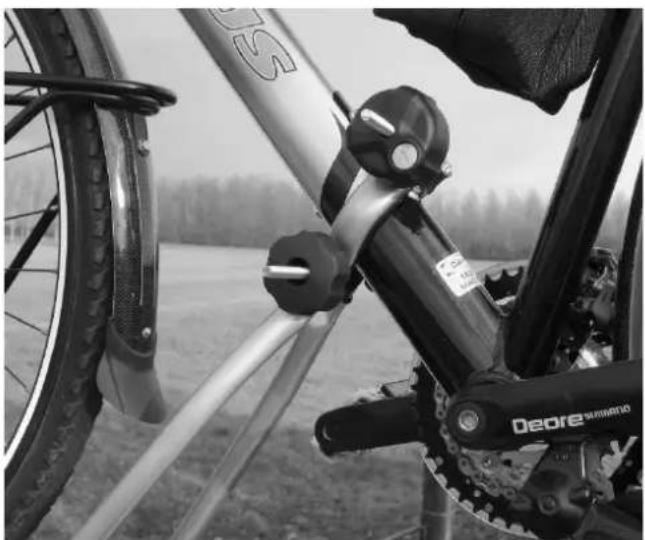
Step 2
Fasten the bike with the black straps. Slide each strap through the special strap holders, which you have attached in the rail previously. Tighten each strap around the wheels of your bike.
Make sure you fasten the front wheel of your bike with two straps!
SAFETY REGULATIONS
The first time you start driving with the bike carrier on your roof, check all the connections carefully after a short distance of driving. Keep checking the connections every time you drive with the bike carrier.
Every time before you start driving, make sure you mounted the bike carrier the proper way and ALWAYS use all the straps around the wheels.
Driving with a bike carrier on the roof of a car will influence the behaviour of the car. So adapt your speed (max 120km/h) and try to avoid sudden extreme movements with your steering wheel or brakes. Also keep in mind that the driving behaviour of your car will also change at side winds and curves.
ATTENTION: Watch the extra height of your car when driving into parking garages, tunnels etc.
Mind the instructions of your car dealer and dealer of your roof-rack carefully and always follow them through. Especially mind the maximum carrying weight of the roof of your car, given to you by your car dealer.
No parts of the bicycle, like steering wheel or pedals, should stick out over the roof.
Make sure that no parts of the bike can get lost during driving (batteries, pumps, basket, saddlebags, etc.). Always remove these before driving!
Dismount the bike carrier in case you don't use it. This for the safety of other traffic participants as well as for the savings of energy.
Dismount the bike carrier before using the carwash.
The bikecarrier is not suitable for "off road" use.
In case of defects or problems please contact your Pro-User supplier.
Weight of the bike carrier: 3,6kg.
Maximum carrying weight of the bike carrier: 15kg
MAINTENANCE
Always store the bike carrier clean and dry after use. If necessary spray with the water hose to remove mud and other filthy stuff.
Check the bike carrier regular if there is any damage. Damaged or worn parts need to be replaced immediately. Use only original replacement parts.
The nuts and bolts of the bike carrier need to be checked regular, if necessary tighten them again.
If there is a damage on the powder coating of the bike carrier this need to be treat with paint immediately.
Rotating and moving parts need to be oiled regularly.
GUARANTEE
This product is covered by a 2 year warranty. Please note that our guarantee covers reasonable use of the bike carrier, it does NOT cover any damage caused by misuse. This also applies to a malfunction or failure of the bike carrier that has been caused by poor or incorrect installation. To ensure the validity of the guarantee please carry out maintenance in accordance with the maintenance section. Warranty claim without proof of purchase is not possible. We reserve the right to make a call out and/or repair charge for any work required to be undertaken to rectify faults that are outside of the company's control i.e. incorrect or poor fitting, misuse, accidental damage, etc.