FSM-432 MKIII - Guitar amp HUGHES & KETTNER - Free user manual and instructions
Find the device manual for free FSM-432 MKIII HUGHES & KETTNER in PDF.
User questions about FSM-432 MKIII HUGHES & KETTNER
0 question about this device. Answer the ones you know or ask your own.
Ask a new question about this device
Download the instructions for your Guitar amp in PDF format for free! Find your manual FSM-432 MKIII - HUGHES & KETTNER and take your electronic device back in hand. On this page are published all the documents necessary for the use of your device. FSM-432 MKIII by HUGHES & KETTNER.
USER MANUAL FSM-432 MKIII HUGHES & KETTNER
Hughes & Kettner® TECHNOLOGY OF TONE
FSM-432 MK III
MIDI Board
Manual 1.2
FSM-432 MK III MIDI Board
1 General
The development of the Hughes & Kettner FSM-432 MK III is based on the FSM-432 MK II which you might know if you have ever used the Hughes & Kettner SwitchBlade or CoreBlade. Optimised for the Hughes & Kettner GrandMeister 36, the MK III version however offers all functions of the FSM-432 MK II, so it can be used not only for GrandMeister 36, but also for SwitchBlade, CoreBlade, and TubeMeister 36
Like its forerunner, the FSM-432 MK III comes with a 7-pin MIDI cable. Used with one of the above-mentioned Hughes & Kettner amps (SwitchBlade, CoreBlade, TubeMeister 36, GrandMeister 36), you do not need an external power source for the FSM-432, because phantom power is provided through the amp's 7 pin MIDI In socket. If you wish to use a 5-pin MIDI cable, you will however need a wall wart. For such cases, the FSM-432 provides an innovative mains port that accepts any AC or DC adapter rated for 9 to 15 volts and providing at least 250 mA.
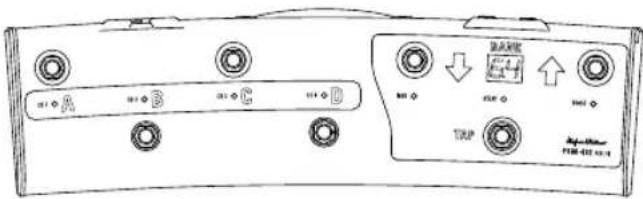
If the FSM-432 MK III is connected correctly, it will run through the following starting sequence, once switched on: The display shows the version number, all LEDs light up from left to right. After this, the display will either change to "1", if the FSM-432 is in Preset Mode or "Sb", if the FSM-432 is in Stompbox Mode (read more about the two modes and their functions in section 3.1). The LED below the button A lights up continuously in both modes. The FSM-432 is now ready to operate.
2 Handling Basics of the FSM-432
Those who know the MK II version of the FSM-432 can skip this section and continue reading in chapter 3. If you don't know the FSM-432 yet, please read these instructions carefully to learn more about the handling basics of all FSM-432 versions.
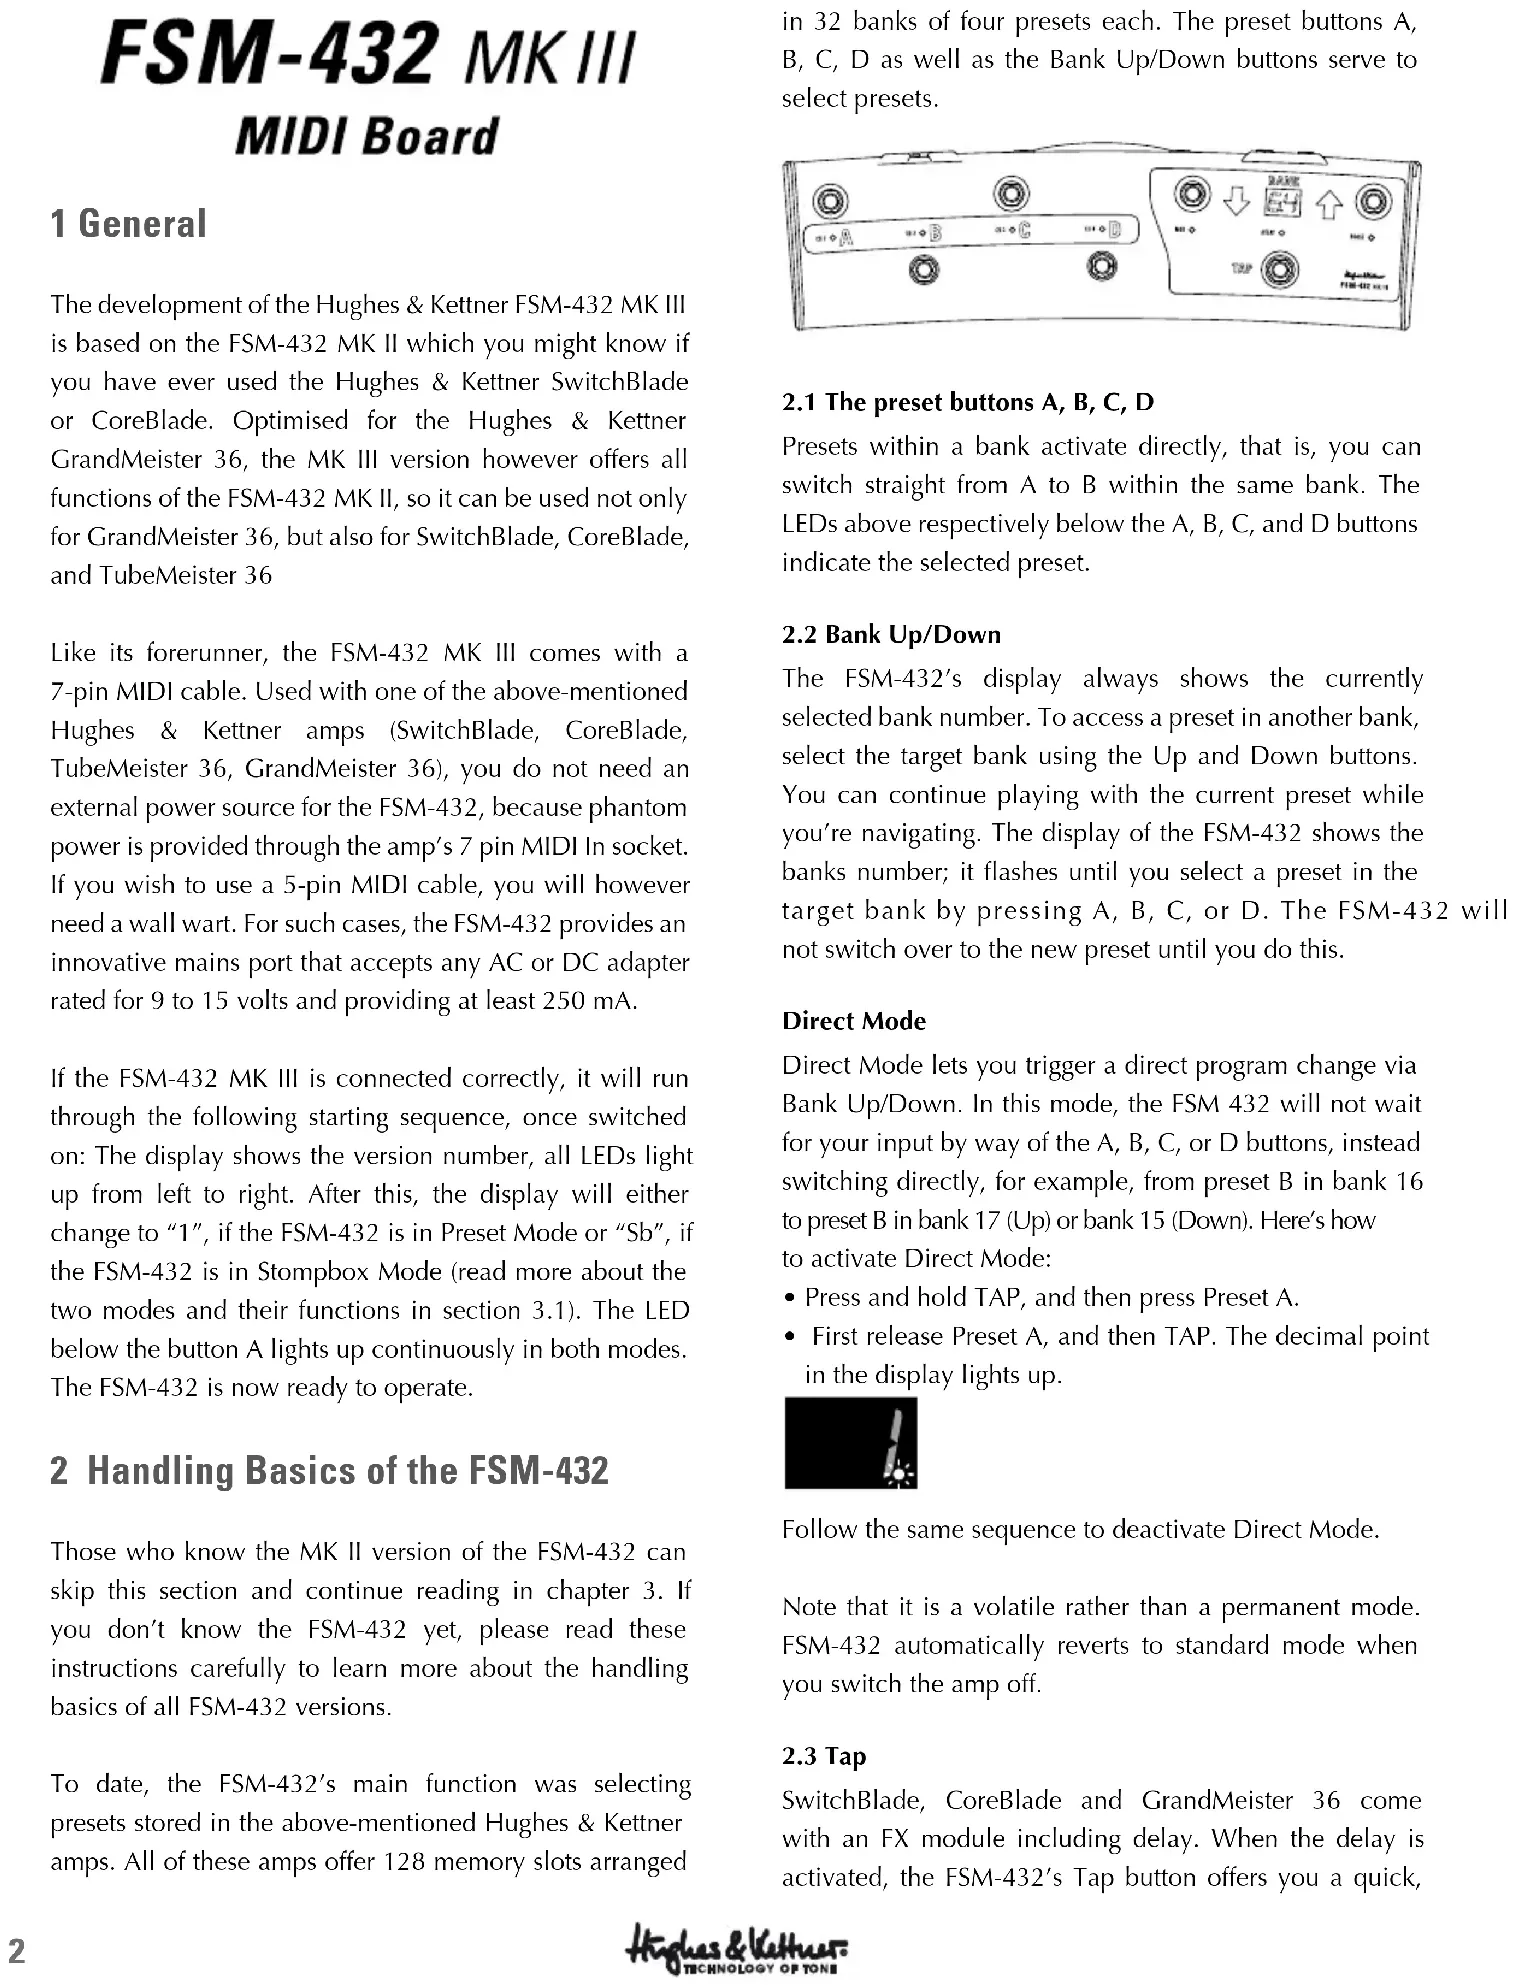
To date, the FSM-432's main function was selecting presets stored in the above-mentioned Hughes & Kettner amps. All of these amps offer 128 memory slots arranged in 32 banks of four presets each. The preset buttons A, B, C, D as well as the Bank Up/Down buttons serve to select presets.
2.1 The preset buttons A, B, C, D
Presets within a bank activate directly, that is, you can switch straight from A to B within the same bank. The LEDs above respectively below the A, B, C, and D buttons indicate the selected preset.
2.2 Bank Up/Down
The FSM-432's display always shows the currently selected bank number. To access a preset in another bank, select the target bank using the Up and Down buttons. You can continue playing with the current preset while you're navigating. The display of the FSM-432 shows the banks number; it flashes until you select a preset in the target bank by pressing A, B, C, or D. The FSM-432 will not switch over to the new preset until you do this.
Direct Mode
Direct Mode lets you trigger a direct program change via Bank Up/Down. In this mode, the FSM 432 will not wait for your input by way of the A, B, C, or D buttons, instead switching directly, for example, from preset B in bank 16 to preset B in bank 17 (Up) or bank 15 (Down). Here's how to activate Direct Mode:
- Press and hold TAP, and then press Preset A.
- First release Preset A, and then TAP. The decimal point in the display lights up.

Follow the same sequence to deactivate Direct Mode.
Note that it is a volatile rather than a permanent mode. FSM-432 automatically reverts to standard mode when you switch the amp off.
2.3 Tap
SwitchBlade, CoreBlade and GrandMeister 36 come with an FX module including delay. When the delay is activated, the FSM-432's Tap button offers you a quick,
convenient way of adjusting delay time: Simply tap your foot on the Tap button in time with the beat to match delay time to the tempo.
Note: In combination with the above-mentioned Hughes & Kettner amps, the FSM-432 can also be used for programming presets. Please consult the particular amp's manual for detailed information on this.
3 What's New?
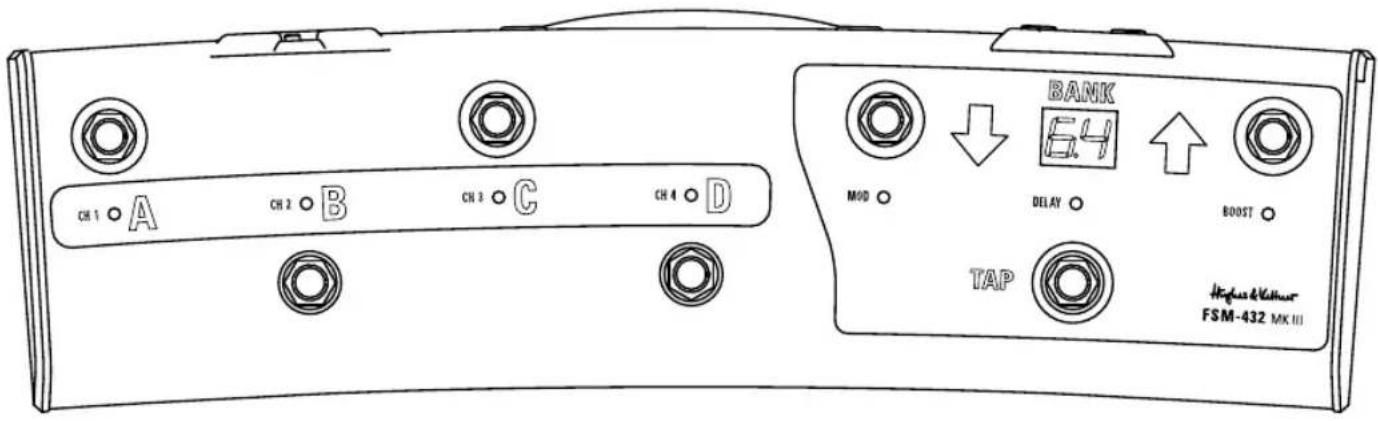
The most eye-catching alteration is the new ergonomic shape of the die-cast case. Accordant to the radius of your foot's motion, the FSM-432 MK III is slightly bent. The distance between the now staggered buttons has been extended to avoid accidental operating errors.
Particularly for the use with the GrandMeister 36, the FSM-432 MK III offers some new technical features and connections:
3.1 Mode switch: Preset/Stompbox
The sliding switch above the MIDI connections on the rear side of the footswitch determines if the FSM-432 MK III is operating in Preset Mode or Stompbox Mode.
If you move the sliding switch to "Stompbox Mode", the display shows "Sb". In this mode, the FSM-432's buttons do not serve to select presets, but to switch channels directly. In addition, modulation FX, delay and boost can be independently activated and deactivated at the push of a button. So in this mode, the GrandMeister 36 operates just like any common amplifier used with external FX pedals and stomp boxes.
The four buttons A, B, C, D are now firmly assigned to the GrandMeister's four channels Clean, Crunch, Lead and Ultra. GrandMeister 36 automatically "remembers" the Gain, Volume, Bass, Mid, Treble, Resonance und Presence settings for every channel without having to store them manually. This procedure relates to the Stompbox Mode only. It is completely independent from the sound presets of the Preset Mode and will therefore not erase or overwrite any of these presets.
Heads Up: You can store sound settings even when you're in Stompbox Mode: Just press Store for longer than 3 seconds, and the amp will store the current sound settings in the lastly selected preset in the Preset Mode before connected to these inputs. For instance, you can control the reverb of the amp's FX module using an expression
switching to the Stompbox Mode. If you do not wish to overwrite the lastly selected preset, you can easily select a new memory slot. To do so, move the mode switch over to Preset Mode, press the Store button briefly and then select a memory slot using the Up/Down buttons and the preset buttons A, B, C, or D. You can learn more about this procedure in the GrandMeister 36 manual.
In the Stompbox Mode, the internal effects, the FX loop, and the noise gate function as global controls. That is, the amp settings for effects, FX loop, and noise gate are valid for all channels. Modulation FX, Delay and Boost can be switched on and off separately using the Mod, Delay and Boost buttons. Reverb is accessible using an additional footswitch or expression pedal connected to the FSM-432 (see section 3.3).
3.2 MIDI In
The "MIDI In" of the MFS-432 MK III is necessary for the use of GrandMeister 36 in combination with the GrandMeister iPad™ app and a MIDI interface. Connect the MIDI In of your FSM-432 with the MIDI output of the interface and the MIDI Out of the FSM-432 with the amp's MIDI input. The amp's MIDI output should be connected with the interface's MIDI input. Learn more about this feature in the manual of the GrandMeister iPad™ app.
You can also use the MIDI In to connect other MIDI devices that can send program changes. In this case, the FSM-432 serves as a true MIDI merger forward MIDI information from MIDI In to MIDI Out.
3.3 Control 1 and Control 2
Use and mode of operation
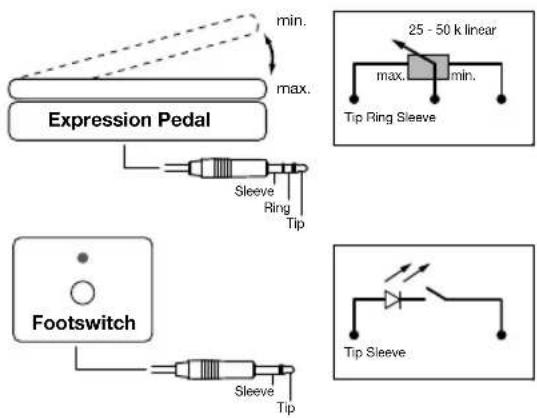
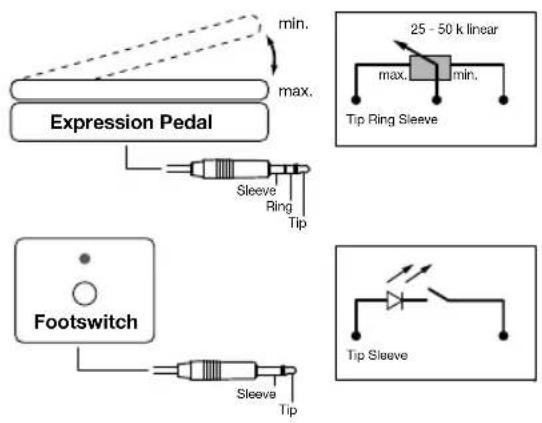
You can connect either expression pedals or single footswitches to these two 6.3 mm (1/4") jack plugs (see Picture 2), both of which you can assign additional control functions for the GrandMeister 36 to, so all of the amp's programmable functions can be remote controlled.
GrandMeister 36 is assigned to a controller number (that is: a function). The following chart shows all functions and the corresponding controller numbers. According to the following instructions the controller numbers can be assigned to the two inputs Control 1 and Control 2. The parameters of the assigned functions can now be controlled via external expression pedals or footswitches connected to these inputs. For instance, you can control the reverb of the amp's FX module using an expression
pedal. You can also switch the noise gate on and off with an external footswitch or change the amount of gain while playing without having to take your hands off your guitar. The most useful functions are the remote control of the Boost (without changing presets) using a foot switch as well as controlling Volume with an expression pedal. As you can see in the chart, assigning controller number 07 to one of the Control inputs and connecting an expression pedal to it will let you remote control the volume. The switching function of the Boost can be remote controlled assigning controller number 64 to the other Control input and connecting a footswitch to it.
Heads Up: Generally all functions can be controlled with both an expression pedal and a foot switch. The control type of each function determines which one of the two makes more sense to use. Continuous functions or functions with a control range of more than two sectors are predestined for the use of an expression pedal. For mere switching functions (two sectors: on/off) it makes more sense to use a foot switch. If you assign a controller number with more than two sectors to a foot switch, then you can only switch between the first and the last sector. If you use an expression pedal, the control range of the pedal will be divided in equal parts by the number of sectors of the assigned function.
For example, if you assign controller number 31 (channel switching, 4 sectors) to a foot switch, you can only switch between the first sector (Clean channel) and the last sector (Ultra channel). Using a expression pedal, you can switch all four channels: each channel occupies a quarter of the pedal's control range.
List of controller numbers and relating function of the GrandMeister 36:
| 1 Modulation Intensity | |
| 4 Delay Time, 10 ms-steps (double steps), 5 ms to 1360 ms | |
| $ 7 | V o l u m e |
| 9 Mute ON/OFF (2 sectors). The ON status remains active until the amp channel is changed, the volume parameter is changed or the amp is re-started. | |
| 12 Mod-FX type | |
| 20 Gain (soft) | |
| 21 Bass | |
| 22 Mid | |
| 23 Treble | |
| 24 Resonance | |
| 25 Presence | |
| 26 Modulation speed (always for the active modulation effect, 64 steps) | |
| 27 Delay feedback | |
| 28 Delay volume | |
| 29 Reverb volume | |
| 30 Power soak switching (5 sectors) | |
| 31 Channel switching (4 sectors) | |
| 52 Mod-FX On/Off | |
| 53 Delay On/Off | |
| 54 Reverb On/Off | |
| 55 FX-Loop On/Off | |
| 56 Gain (hard) | |
| 57 Volume (hard) | |
| 63 Noise gate On/Off | |
| 64 Boost On/Off | |
Heads Up: The note "soft" for controller n (Volume) and 20 (Gain) refers to the softening of the change in value once you move the expression pedal. This helps to avoid abrupt volume changes in case of a remarkably large difference between the value of the controlled parameter stored in the preset and the expression pedal's starting position. If you chose to use such abrupt volume changes e.g. as a stylistic device, you can do so by assigning controller numbers 56 (Gain) and 75 (Volume) instead.
Assigning controller numbers
The assignation of functions (controller numbers) to the two Control inputs works as follows:
- Control 1:

To access the edit mode, press and hold the buttons Tap and D simultaneously until the display shows the controller number and the dot behind the second digit starts flashing. You can now change the controller numbers using the Up/Down buttons. Store the selected controller number by pressing D. The dot stops flashing, and the FSM-432 returns to normal mode.
- Control 2:

Press and hold Tap and C until the display shows the controller number and the dot behind the first digit starts flashing, then release them. Change the controller number analogue to the proceeding for Control 1. Store and exit with button C.
4 Additional Functions
The FSM-432 MK III offers even more functions. If you
press and hold Tap in combination with one of the four preset buttons, you can access the following features:
- TAP + A = Bank direct mode
- TAP + B = Changeover to Stompbox Mode without using the mode switch. To return to the Preset Mode, press and hold TAP + B again or switch the FSM-432 off and then back on.
- TAP + C = Edit controller number for Control 2, see chapter 3.3. Factory default is controller number 64 (Boost).
- TAP + D = Edit controller number for Control 1, see chapter 3.3. Factory default is controller number 07 (Volume).
You can access some additional features, if you press and hold certain button combinations while switching the GrandMeister 36 on using the "Power On" toggle:
- "Power On" + A = Change the MIDI channel of the FSM-432 with the Up and Down buttons. Store and exit with button A.
- "Power On" + TAP + Up = Factory reset of the FSM-432. Press and hold TAP and Up until the display shows a double eight incl. decimal point. Then release the buttons. The individual segments of the display will flash consecutively to indicate the successful factory reset. After this, the starting sequence (see chapter 1) follows.
- "Power On" + TAP + Down = Special function for troubleshooting. In case operating your pedal doesn't effect any changes on the amp, this mode can be used to test the two Control inputs' proper functioning. The display shows the position of the pedal in the context of its total control range in percent (0-99%). The LEDs light up from left to right with an increasing value.
| Technical Data FSM-432 MK III | |
| Controller inputs 1 and 2 6.3 mm (1/4") stereo jack | |
| Midi In 5-pin MIDI connector | |
| Midi Out Phantom powered 7-pin MIDI connector | |
| External power supply (optional) | AC or DC 9-15 V / min. 250 mA |
| Dimensions 460 x 134 x 70 mm | |
| Weight 1,7 kg / 3,7 lbs. | |
All trademarks mentioned are the property of the respective owners.
FSM-432 MK III MIDI Board
1 Allgemeines
(cf. illustration page 14)
3.1 Selettore Mode: Preset/Stompbox
2.1 Los botones Preset A, B, C, D
3.1 Interruptor Mode: Preset/Stompbox
International Inquiries:
Fax: +49 - 68 51 - 905 200
hkinternational@hughes-and-kettner.com
www.hughes-and-kettner.com

facebook.com/hughesandkettner
Copyright 09/2013 by Music & Sales GmbH.
Subject to change without notice.