SmartVide 6 - Other kitchen appliances Sammic - Free user manual and instructions
Find the device manual for free SmartVide 6 Sammic in PDF.
| Product Type | Sous vide cooker |
| Brand | Sammic |
| Model | SmartVide 6 |
| Operating Temperature | 5°C to 95°C (41°F to 203°F) |
| Temperature Display Resolution | 0.01°C / 0.1°F |
| Time Resolution | 1 minute |
| Maximum Cycle Duration | 1 minute to 99 hours |
| Display | 3.5-inch color TFT |
| Allowable Ambient Temperature | 5°C to 40°C (41°F to 104°F) |
| Power Supply | 120V/60Hz/1, 208-240V/50-60Hz/1 or 230V/50-60Hz/1 |
| Protection Rating | IP-X1 (according to UNE-EN 60529) |
| Safety Standards | CE (2006/42/EC, 2014/35/EU, 2014/30/EU), UL 197, CSA C22.2 109, NSF/ANSI 4 |
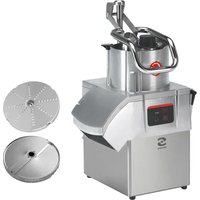
| Main Functions | Sous vide cooking, timer programming, core probe, Bluetooth connectivity, firmware update |
| Maintenance and Cleaning | Renew water daily; clean with a damp cloth; protective grid dishwasher-safe; do not immerse the appliance |
| Safety | Minimum water level protection float, automatic shut-off, cooling fan |
| Spare Parts and Repairability | Temperature probe, heating element, agitator motor, switch, fuses, power cable, fan; replacement only by an authorized Sammic technical service |
| General Information | Designed for professional use (hotels, restaurants, caterers). Use only with water. Do not use non-Sammic accessories. |
Frequently Asked Questions - SmartVide 6 Sammic
User questions about SmartVide 6 Sammic
0 question about this device. Answer the ones you know or ask your own.
Ask a new question about this device
Download the instructions for your Other kitchen appliances in PDF format for free! Find your manual SmartVide 6 - Sammic and take your electronic device back in hand. On this page are published all the documents necessary for the use of your device. SmartVide 6 by Sammic.
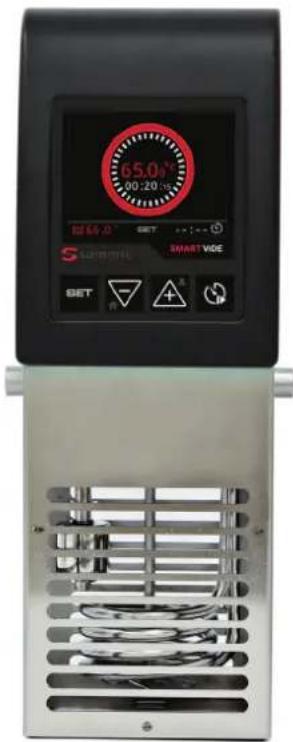
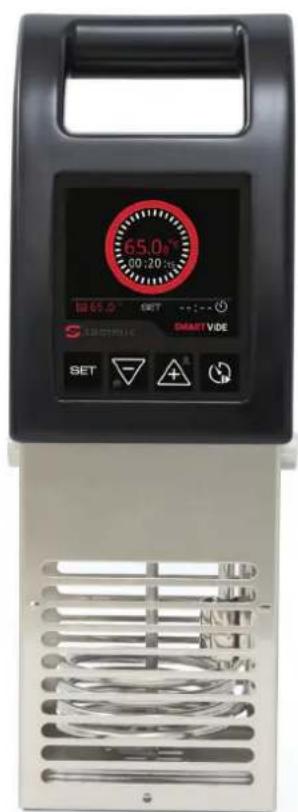
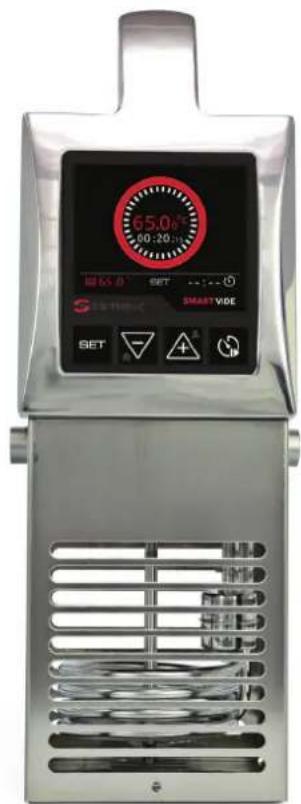
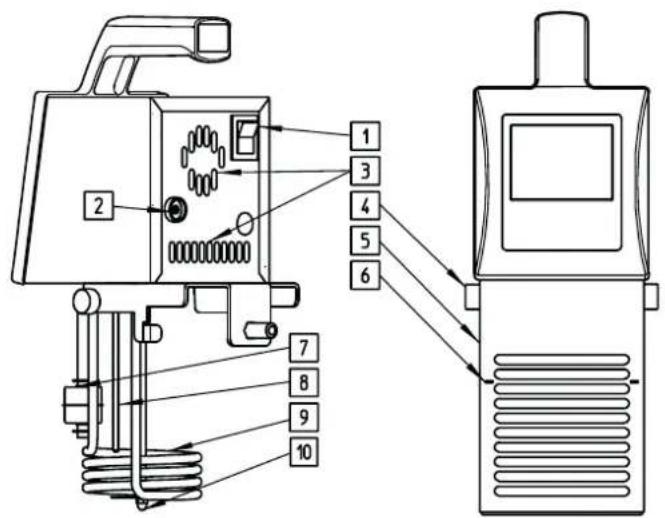
USER MANUAL SmartVide 6 Sammic
- Switch
- Connection jack for needle probe
- Ventilation area
- Knurl grid holder
- Protective grille
- Minimum level indicator
- Float, minimum level guard
- Water temperature sensor
- Heater resistances
- Stirrer motor
MODELS
This manual describes the installation, operation and maintenance of the SmartVide 5/7/9 sous-vide cooker. The model reference and its characteristics appear on the name plate attached to the machine.
These appliances have been designed and manufactured in accordance with the following standards:
European directives and standard (versions at 230V 50/60Hz)
Machine Directive: 2006/42/EC
Low Voltage Directive 2014/35/EC
Electromagnetic Compatibility Directive: 2014/30/EC
Protection level in accordance with standard UNE-EN 60529:IP-X1
Standards applicable in America
(Versions at 120V 60Hz)
Safety standards for machines UL 197, CSA C22.2 109 Edition
Hygiene and materials standards NSF/ANSI Standard 4
IMPORTANT SAFETY PRECAUTIONS
To reduce the possibility of accidents (short circuits, injuries or fires, etc.), and ensure the best functioning and the proper maintenance of the machine, it is necessary to carefully read and follow these instructions. Keep these instructions and ensure that all users of the machine read them before use. Also keep the warranty and the declaration of conformity.
- Misuse of the equipment may cause injury.
- The surface of the heating element is subject to residual heat after use. Keep hands away.
- Switch the equipment off and disconnect the power before changing accessories or approaching moving parts.
- Clean the device after each use, following the instructions below.
- Avoid water getting inside the device and never submerge it in water. If this happens, proceed as follows:
- Leave the device inside the container and do not touch the container.
- Unplug from the power socket.
- Remove the device from the container and try to empty as much of the liquid inside as possible.
- Do not reconnect the device and contact an authorised service technician.
- If the power supply is damaged and a new one must be installed, only a Sammie authorised technical service can replace it.
- This appliance is not to be used by people (including children of 8 years and over) with limited physical, sensorial or mental capabilities, or that lack the experience or knowledge, unless they have been supervised or instructed in the use of appliance by a person responsible for their safety and understand the dangers it entails. Do not allow children to play with the appliance. The cleaning and maintenance to be performed by the user must not be performed by unsupervised children.
- Only people qualified in sous-vide cooking may cook using this method. It is vitally important to follow procedures that minimise the risk of formation of anaerobic bacteria.
- This machine is for supervised use. Never leave the machine running unsupervised.
- Comfort or familiarity with the product (based on its repeated use) should not replace strict compliance with the safety regulations. Be alert, pay attention to what you are doing and use common sense when operating the appliance.
-
Do not use the appliance while you are tired or under the influence of drugs, alcohol or medication. If you use the machine incorrectly or in an unsafe manner, you may suffer personal or material damages.
-
The models cited in the manual have been designed for use in hotels, restaurants, catering and commercial applications.
-
The manufacturer is not responsible when the product is used incorrectly or differently than the use mentioned above. Such as sanitary use, chemical use, use in explosive atmospheres, etc.
-
Any accessories used must be designed for the specific model and the SAMMIC brand. Any accident caused by non-SAMMIC accessories will be the responsibility of the user.
START-UP AND INSTALLATION
Location
- Use this appliance in a ventilated kitchen at an ambient temperature no higher than 40^ .
- Do not block nor obstruct the ventilation slits.
- Do not place the appliance next to or near sources of heat.
Electric connection
Before plugging the appliance in, make sure that the mains voltage coincides with the voltage indicated on the name plate attached to the machine. CAUTION: THE EARTH CONNECTION IS OBLIGATORY. DANGERE OF ELECTROCUTION.
Never connect the device if the protective grill is not in place. See Fig. A
Start-up
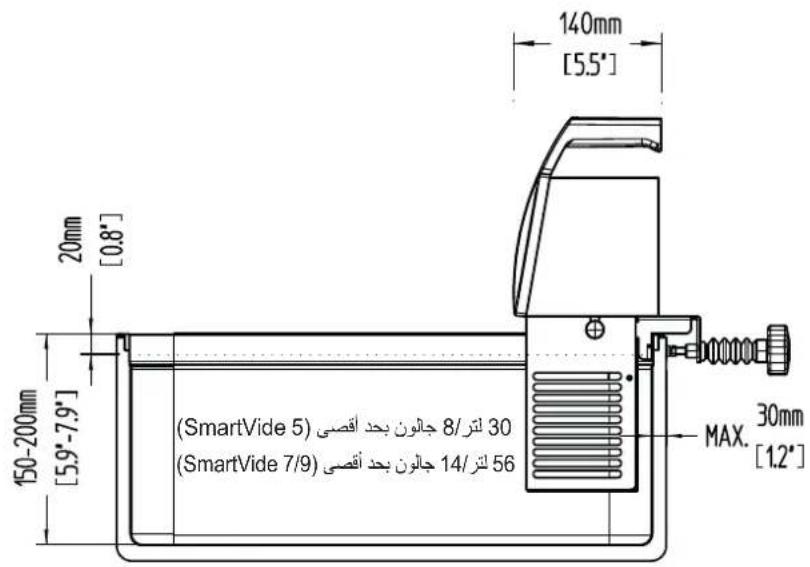
Preparing the container: Place a suitable container on a flat, level, rigid, non-combustible surface, preferably near a sink or drain for emptying. When the working temperature of the water exceeds 60^ , it is very important to use a lid to avoid excess steam. Thus you will prevent heat loss and protect the appliance from moisture. See Fig. B
Securing the device: Hold the appliance firmly and secure it with sufficient stability to the container. Ensure that the switch and socket are within your reach while using the appliance. See Fig. B
Filling the container with water: This appliance is designed only for sous-vide cooking at a low temperature with water. We recommended using decalcified soft water. Take into account the maximum and minimum fill levels for the water. See Fig. B
Never start up the device without water. The appliance has a float guard to detect the minimum water level. Always check that the float guard is working before using the unit. Check this manually by taking the machine out of the container vertically, for example.
Start-up: Connect the appliance and switch it on using the switch at the rear and set the desired temperature. Check that the stirrer is spinning. After heating the water to the desired temperature, place the vacuum packed food in the cooking bath. Parts of the bath and lid can get very hot during use. Take great care when touching them! Use cloths or oven gloves!
Use the timer function to programme the desired time. Once the programmed time has been reached an alarm will sound. Press any button to stop the alarm and remove the food from the bath.
Cleaning
The water in the container must be changed daily and the appliance cleaned periodically.
To avoid electric shocks that can cause serious personal injury, switch the appliance off and unplug it before cleaning.
- Never let water get inside the appliance.
- Never clean the appliance under running water or submerge it in water.
- Do not use: abrasive cleaning products such as ammonia, bleach, etc. solvents, metal scourers, gritty detergent.
- Clean the immersion parts of the appliance with soapy water and a cloth or sponge and dry with soft cloth. Use your hand to check that the float moves, without forcing it. Use a dry cloth to clean the parts that are not immersed.
- You can clean the protective grille periodically in the dishwasher.
Maintenance
Before every use, check that the low level float is working properly.
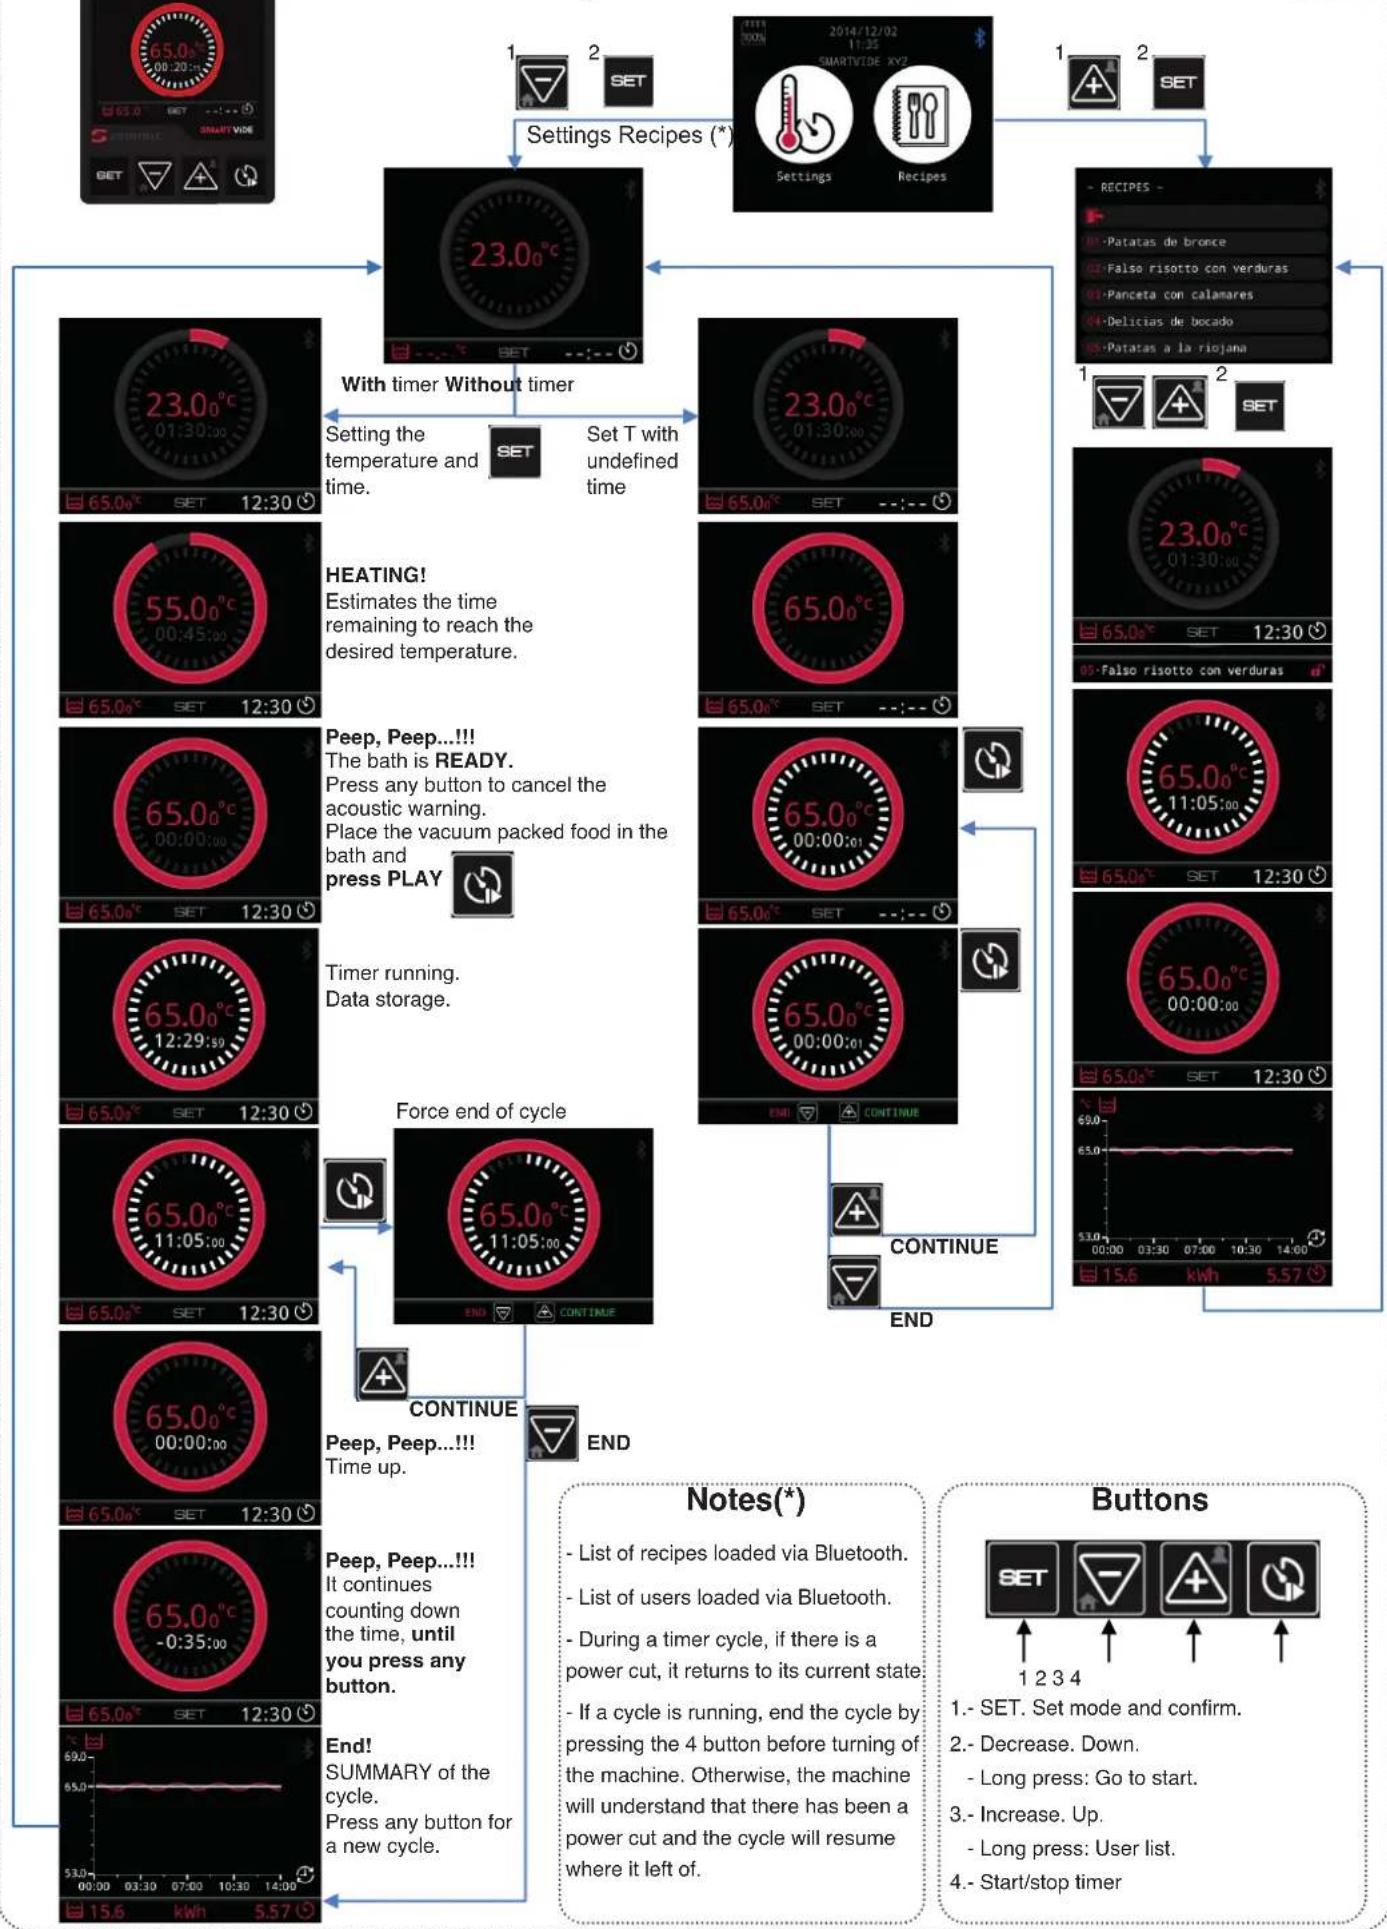
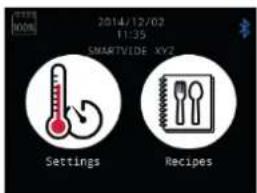
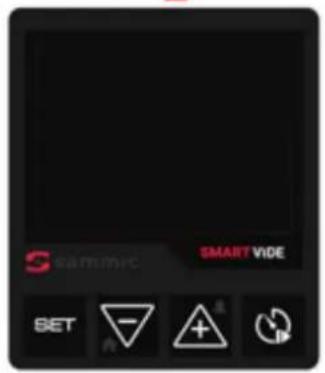
Working with the SmartVide
Working with the needle probe
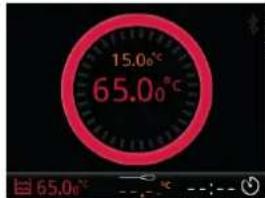
Connect the needle probe to the machine.
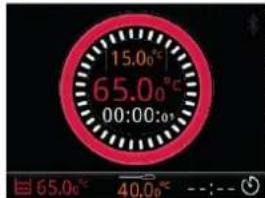
SET set temperature of the needle probe at which we want it to warn us. Press PLAY to store data.
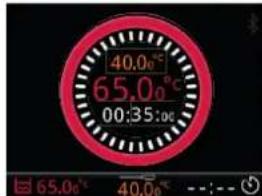
Peep, Peep...!!! It has reached the temperature. Indicates the time passed. Press any button to cancel the acoustic warning.
Press END to finish the cycle.
End!
SUMMARY of the cycle.
Press any button for a new cycle.
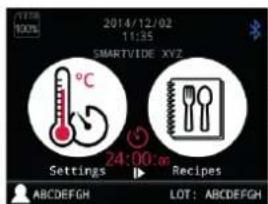
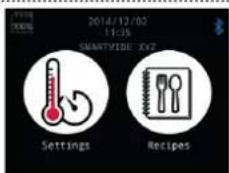
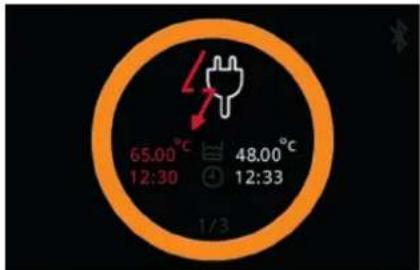
Properties
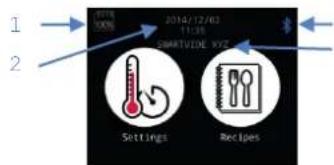
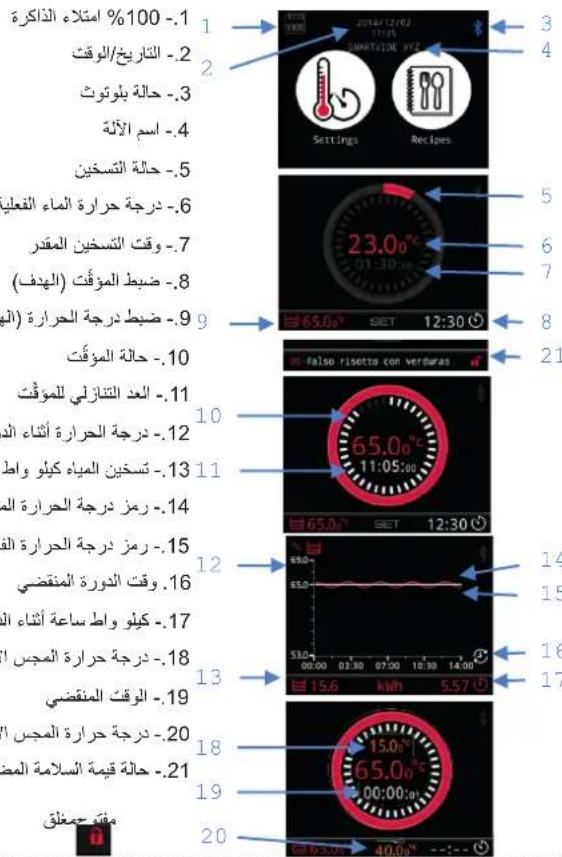
3 1.-% 100 memory full
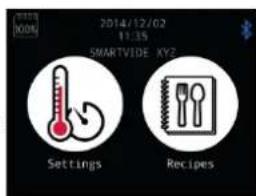
4 2.-Date/time
3.-Bluetoothstatus
4.-Machine name
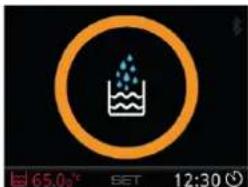
5.- Heating status
5 6.-Actual water temperature
6 7.- Estimated heating time
8.- Timer SET (target)
8 9.- Temperature SET (target)
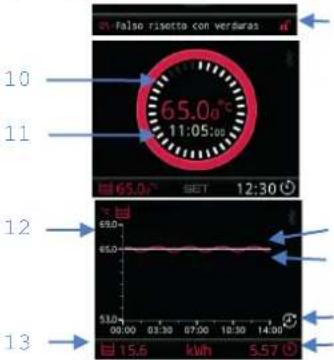
2110.- Timer status
11.-Timer countdown
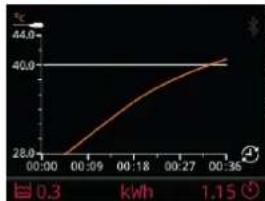
12.- Temperature during the cycle
13.-Water heating kWh
14.- SET temperature graph
15.- Real temperature graph
15.16.- Cycle time elapsed
17. - kWh during the cycle
1618.- Actual needle probe temperature
19.- Time elapsed
20.- SET needle probe temperature
21. SET value safety status

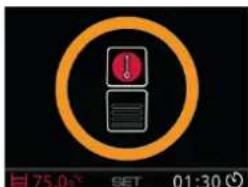
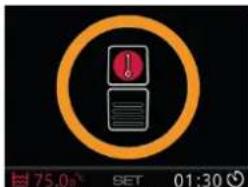
Fault warningWarnings

Probe
Water temperature

Stirrer motor Heater
resistances
Note: Call a Technical Service
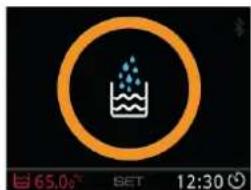
Water needed. Fill.
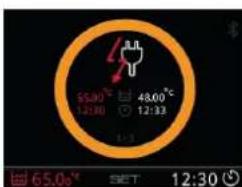
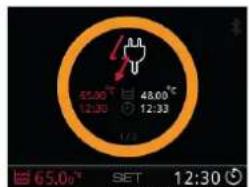
Power cut during the cycle. Indicates time and temperature before and after the power cut
Overheating cab
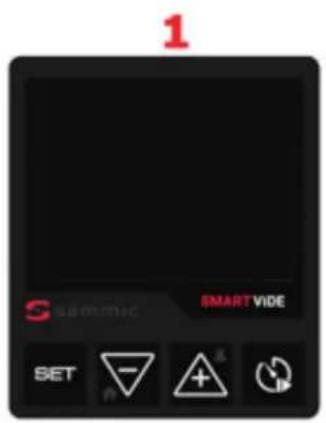
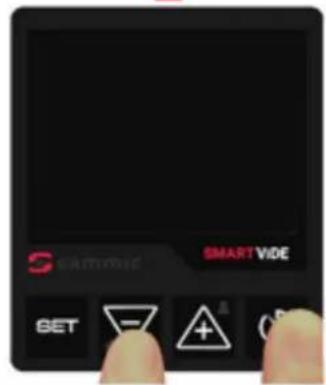
Change ^/^ (out of cycle)
1.- Machine off
2.- Holding down the SET button, switch on the machine.
3.- Change of unit.
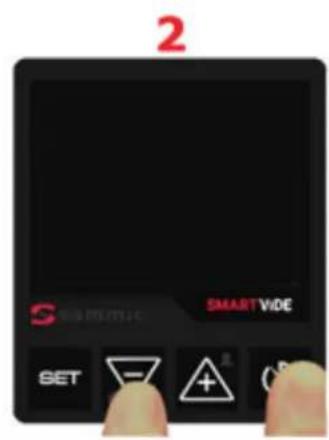
Reset Calibration
1.- Machine off
2.- Push and hold "SET", "-" and "+" switch the machine on.
3.- Hold for 10 seconds until the machine makes a different noise.
4.- Turn off and on again.
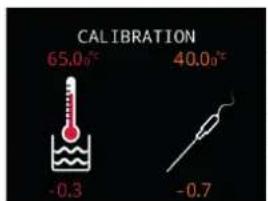
Calibration
1.- Machine off
2.- Holding down the - and + buttons, switch on the machine.
3.- CALIBRATION screen in ^ C
4.- Adjust the value with SET and the - and + buttons.
5.- Turn off and on again.
1.- In the App, set the SET necessary parameters.
2.- Send via Bluetooth to the SmartVide.
3.- Press Play to start it.

Sound off.
1.- Machine off
2.- Holding down the " -" button, switch on the machine.
3.-Sound off.
FIRMAWARE UPDATE: Update software on the SmartVide
Follow the instructions below to update the software of SmartVide 5, 7 and 9 devices.
1.- Machine off
2.- Hold “-” and “Timer” while starting the device.
3.- Hold the buttons until the BOOTLoader screen appears.
4.- The screen will go off after 5 seconds. The machine is ready to begin the software update process.
5.- Open the Sammic SVide Bootloader app on the mobile device.
6.- Start the search and choose the desired SmartVide 5/7/9 machine.
7. Download the latest version of the Firmware.
8.- Update Firmware. The process will take a few minutes.
9.- Upon completion of the update process, close the app and switch the SmartVide device off. The machine is now ready to operate with the latest version.


TROUBLESHOOTING FAQ
The machine does not switch on
- Make sure the mains voltage is the same as the voltage indicated on the nameplate on the device.
- Check the power cable. If it is damaged and a new cable needs to be fitted, it must only be replaced by a Sammic approved technical service.
- Check the machine switch. If it is damaged and a new cable needs to be fitted, it must only be replaced by a Sammic approved technical service.
- Check the fuses in the electronic panel of the device. This verification must only be carried out by a Sammic approved technical service.
- Check the start-up, first disconnecting the cooling fan. This verification must only be carried out by a Sammic approved technical service.

Water needed warning
- Add more water to the container. Take into account the maximum and minimum fill levels for the water.
- If the warning persists after adding water (check it is above the minimum level), the level detector float may be blocked or damaged. Switch off and disconnect the device then check that the float moves without forcing it.
- Check that the level detector cables are correctly fitted to the electronic panel. This verification must only be carried out by a Sammic approved technical service.
Power cut warning during the cycle.
- If the power is cut during a cycle with a defined time, (either the machine is switched off or there is a power cut), when power is restored, the temperature and time before and after the cut will be displayed. Press any button to dismiss the warning.

Warning of overheating inside the cabin
- Check that the place of use is ventilated and the ambient temperature is less than 40^ .
- Check that the device is not close to or near sources of heat.
- When the working temperature of the water exceeds 60^ it is extremely important to use a lid, to avoid excess steam.
- Check the ventilation slots are free from obstacles.
- Check the operation of the fan. To do so, switch off the machine and leave it to cool for five minutes. Switch it on again and check that the fan turns. If it does not turn, it needs to be replaced with a new one.

Water temperature probe fault warning
- Check that the probe cables are correctly fitted in the electronic panel. This verification must only be carried out by a Sammic approved technical service.
- If the probe is damaged and a new one needs to be fitted, the replacement must only be carried out by a Sammic approved technical service.

Stirrer motor fault warning
- Make sure the mains voltage is the same as the voltage indicated on the nameplate of the device.
- Check that the motor cables are correctly fitted to the electronic panel. This verification must only be carried out by a Sammic approved technical service.
- If the motor is damaged and a new one needs to be fitted, the replacement must only be carried out by a Sammic approved technical service.
| Heater resistance fault warning ·Make sure the mains voltage is the same as the voltage indicated on the nameplate of the device. ·Check that the resistance cables are correctly fitted in the electronic panel. This verification must only be carried out by a Sammic approved technical service. ·Check the condition of the resistance ·If it is damaged and a new one needs to be fitted, the replacement must only be carried out by a Sammic approved technical service. | |
| Sammic app cannot find SmartVide devices | ·Check that the Bluetooth of the mobile device meets the following minimum requirements: IOS 8 / Android 5.0 / Bluetooth Smart (4.0) ·Check the Bluetooth connection is activated on the mobile device. ·Check that the location function is activated on the mobile device (settings -> privacy -> location) to use Bluetooth Low Energy technology. |
| The Sammic app finds Sammic devices but cannot pair with the desired device. | ·Check that the SmartVide device is not paired with another mobile device or a SmartVide Track. |
| When pairing with the SmartVide device, the blue Bluetooth icon does not come on. | ·Check the name of the machine paired in the app corresponds to the desired SmartVide device. |
| If the problem persists after carrying out all these checks | ·Reset the machine. Carefully follow the steps indicated in the RESET section. Caution! This process will erase the list of recipes and the history of the records stored on the SmartVide device. ·If the problem persists, contact a Sammic authorised technical service centre. |
| PROPERTIES SMARTVIDE 5 SMARTVIDE 7/9 | ||||||
| Operating temperature 5°C to 95°C / 41°F to 203°F 5°C to 95°C / 41°F to 203°F | ||||||
| Display resolution 0.01°C | 0.1°F 0.01°C / 0.1°F | |||||
| Time resolution 1 min 1 min | ||||||
| Cycle duration 1 min - 99 h | 1 min - 99 h | |||||
| Display 3.5" colour TFT | 3.5" colour TFT | |||||
| Permitted ambient temperature 5°C to 40°C / 41°F to 104°F 5°C to 40°C / 41°F to 104°F | ||||||
| Maximum capacity 30 lt. / 8 gal | gal 56 lt. / 14 gal | |||||
| Power supply | 120V/60Hz/1 | 208-240V/50-60Hz/1 | 230V/50-60Hz/1 | 120V/60Hz/1 | 208-240V/50-60Hz/1 | 230V/50-60Hz/1 |
| Current | 10A | 7A | 7A | 12A | 9A | 9A |
| Power | 1,200W | 1,600W | 1,600W | 1,400W | 2,000W | 2,000W |
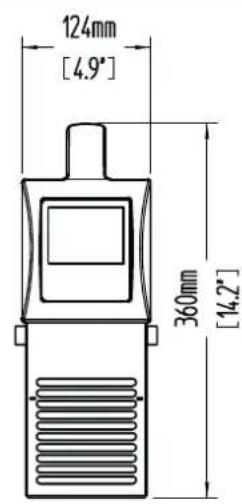
| Dimension (Width x Depth x Height) | 116mm x 128mm x 330mm / 4.6" x 5" x 13" | 124mm x 140mm x 360mm / 4.9" x 5.5" x 14.2" | ||||
| Net weight | 3.1 kg / 6.8 lb. | 3.6 kg / 7.9 lb. - 4.1 kg / 9 lb. | ||||
Jaaa aae aee ae aee aee aee aee aee
.(BOOTLoader)
alj 5 aai 4
Samnic SVide Bootloader -5
1
2

3

4
y
A
SET
L 1542 1542 1542 1542 1542 1542 1542 1542 1542 1542 1542 1542 1542 1542 1542 1542 1542 1542 1542 1542 154

111...
(04) END Inaiol

124
j j
ccll 0
法一. 完全顺

Dall jaojssll
aaii aessy Jaaai:
#
1 1
Suai jia laoli elai
()
1
()SET 2
N
y
1
1j+2-
yfall yjdy jyall 3
+3-2yjll()SET
5

Lj(1)SET
SmartVide
aljui (jai) Play lai

a. all 15
1
Jia, Jia, Jia, Jia, Jia, Jia, Jia, Jia, Jia, Jia, Jia, Jia, Jia, Jia, Jia, Jia, Jia, Jia, Jia, Jia, Jia, Jia, Jia, Jia, Jia, Jia, Jia, Jia, Jia, Jia, Jia, Jia, Jia, Jia, Jai
60 60
jaiy jay jn jaiy gaiy jaiy jaiy duiy, jil jil jil jil jil jil plis
#
jaiall jaiall jai 15i 15i 15i 15i 15i 15i 15i
y 1
a a a a a a a a a a a a a a a a a a a a a a a a
gall clal cJyjua Jieyi gao, gssll gjia yue elpnsly j
y 1
y j 1
J 1
jll 1000000000000000000000000000000000000000
pall paa aal lal allll
i 1
- jai ci jia g jiae aea poaai nnae iie aai jiaai
A 1
aaln aaln 1
m : x = 1 或 3x + 4y + 1 = 0
1
aill 1g, clll g, jaiy g, jaiy
Aannll Cbiial, Aiiinall
Lalol all o 1dolall g jolll lolll
yglal ygjglal jglal
zilbu li: jiao: jia
Jalalil Jilll jss
abw y allswy jj j j j j j j j j j j j j j j j j j
SAMMIC
8 10
aJ111 100
a 1
jglly jy JbBn Pnn 2. iiaial jalzall
J 1
y
S AOB = S COD + S BDO - S CDO
j 1
()()
a 1
jieall jiaic a
Cusul 1g jgSll g yall cui iiai jaiip
i 1
.
- S : S !
SmartVide 5/7/9
Sous-Vide
piaea
AR