
KG745.9 - Lawn mower KRESS - Free user manual and instructions
Find the device manual for free KG745.9 KRESS in PDF.

| Product type | Cordless lawn mower |
| Brand | Kress |
| Model | KG745.9 |
| Power supply | Lithium-Ion battery 40 V Max (2 x 20 V Max) |
| Battery type | Lithium-Ion |
| Recommended battery | KAB04 (4.0 Ah) |
| Recommended charger | KAC04 (4.0 A) |
| Cutting width | 37 cm |
| Cutting height | 20 – 70 mm |
| Number of cutting height positions | 6 |
| Grass catcher capacity | 40 L |
| Front wheel diameter | 150 mm |
| Rear wheel diameter | 200 mm |
| No-load speed | 2900 / 3400 rpm |
| Machine weight (tool only) | 13.95 kg |
| Sound pressure level (L_pA) | 79.5 dB(A) |
| Sound power level (L_wA) | 92.4 dB(A) |
| Vibration (a_h) | < 2.5 m/s² |
| Motor type | Brushless |
| Mulching function | Yes (insert included) |
| Bag fill indicator | Yes (float) |
| Handlebar storage | Foldable for vertical storage |
| Safety | Lock button + activation lever, safety stop |
| Maintenance | Cleaning with damp cloth, sharpening and balancing the blade |
| Warranty | Consult the dealer |
Frequently Asked Questions - KG745.9 KRESS
User questions about KG745.9 KRESS
0 question about this device. Answer the ones you know or ask your own.
Ask a new question about this device
Download the instructions for your Lawn mower in PDF format for free! Find your manual KG745.9 - KRESS and take your electronic device back in hand. On this page are published all the documents necessary for the use of your device. KG745.9 by KRESS.
USER MANUAL KG745.9 KRESS
natural_image
Side view of a Kress lawn mower with attached blade and wheels (no visible text or symbols)| 40V Cordless Brushless Push Mower | EN | P03 |
| 40V Bürstenloser Akku-Schubmäher | D | P20 |
| Tondeuse manuelle sans balais sans fil 40 V | F | P37 |
| Tosaerba a spinta a batterie da 40 V senza spazzole | IT | P54 |
| Cortacésped manual de 40V sin escobillas y sin cable | ES | P71 |
| 40V Snoerloze Borstelloze Maaier | NL | P88 |
| 40 V batteridrevet håndplæneklipper | DK | P105 |
| Аккумуляторная бесщеточная несамоходная газонокосилка 40 В | RU | P122 |
| Skjutbar gräsklippare 40V sladdlös med borstlös motor | SV | P139 |
KG745 KG745.X
TABLE OF CONTENTS
Introduction....3
Component List....4
Product Safety....6
Assembly & Operation....10
Transportation....13
Maintenance....14
Cleanning....15
Storage....15
Troubleshooting....16
Technical Data....18
Environmental Protection....19
Declaration of Conformity....19
INTRODUCTION
Dear Customer,
Thank you for buying this Kress product. We are dedicated to developing high quality products to meet your landscaping requirements.
The Kress brand is synonymous with premium quality service. Over the years of your products life, if you have any questions or concerns about your product, please contact your location of purchase or our Customer Service Team for assistance.
We are confident you will enjoy working with your Kress product for years to come.
INTENDED USE
This product is intended for domestic lawn mowing.

COMPONENT LIST
- SWITCH LEVER
- UPPER HANDLE
- BAG HANDLE
- SAFETY FLAP
- GRASS COLLECTION BAG
- LOWER HANDLE LOCK COVER
- CUTTING HEIGHT ADJUSTMENT KNOB
- FRONT CARRY HANDLE
- BATTERY PACK COVER
- REAR CARRY HANDLE
- HANDLE KNOB, LOWER
- LOWER HANDLE
- CABLE CLIP
- HANDLE KNOB, UPPER
- LOCK-OFF BUTTON
- GRASS BAG INDICATOR
-
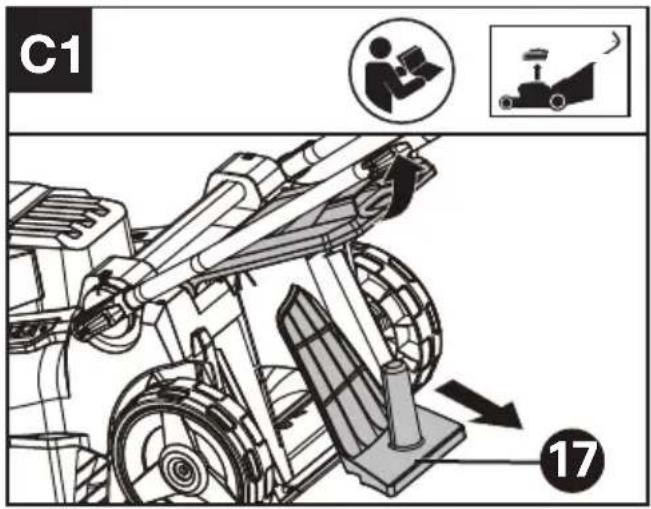
MULCHING INSERT (SEE FIG. C1)
-
BATTERY PACK*(SEE FIG. E)
- BLADE BOLT (SEE FIG. L1)
- BLADE (SEE FIG. L1)
* Not all the accessories illustrated or described are included in standard delivery.
ORIGINAL INSTRUCTIONS PRODUCT SAFETY GENERAL POWER TOOL SAFETY WARNINGS

WARNING Read all safety warnings, instructions, illustrations and specifications provided with this power tool. Failure to follow all instructions listed below may result in electric shock, fire and/or serious injury.
Save all warnings and instructions for future reference.
The term "power tool" in the warnings refers to your mains-operated (corded) power tool or battery-operated (cordless) power tool.
1) Work area safety
a) Keep work area clean and well lit. Cluttered or dark areas invite accidents.
b) Do not operate power tools in explosive atmospheres, such as in the presence of flammable liquids, gases or dust. Power tools create sparks which may ignite the dust or fumes.
c) Keep children and bystanders away while operating a power tool. Distractions can cause you to lose control.
2) Electrical safety
a) Power tool plugs must match the outlet. Never modify the plug in any way. Do not use any adapter plugs with earthed (grounded) power tools. Unmodified plugs and matching outlets will reduce risk of electric shock.
b) Avoid body contact with earthed or grounded surfaces, such as pipes, radiators, ranges and refrigerators. There is an increased risk of electric shock if your body is earthed or grounded.
c) Do not expose power tools to rain or wet conditions. Water entering a power tool will increase the risk of electric shock.
d) Do not abuse the cord. Never use the cord for carrying, pulling or unplugging the power tool. Keep cord away from heat, oil, sharp edges or moving parts. Damaged or entangled cords increase the risk of electric shock.
e) When operating a power tool outdoors, use an extension cord suitable for outdoor use. Use of a cord suitable for outdoor use reduces the risk of electric shock.
f) If operating a power tool in a damp location is unavoidable, use a residual current device (RCD) protected supply. Use of an RCD reduces the risk of electric shock.
3) Personal safety a) Stay alert, watch what you are doing and use common sense when operating a power
tool. Do not use a power tool while you are tired or under the influence of drugs, alcohol or medication. A moment of inattention while operating power tools may result in serious personal injury.
b) Use personal protective equipment. Always wear eye protection. Protective equipment such as dust mask, non-skid safety shoes, hard hat, or hearing protection used for appropriate conditions will reduce personal injuries.
c) Prevent unintentional starting. Ensure the switch is in the off-position before connecting to power source and/or battery pack, picking up or carrying the tool. Carrying power tools with your finger on the switch or energising power tools that have the switch on invites accidents.
d) Remove any adjusting key or wrench before turning the power tool on. A wrench or a key left attached to a rotating part of the power tool may result in personal injury.
e) Do not overreach. Keep proper footing and balance at all times. This enables better control of the power tool in unexpected situations.
f) Dress properly. Do not wear loose clothing or jewellery. Keep your hair and clothing away from moving parts. Loose clothes, jewellery or long hair can be caught in moving parts.
g) If devices are provided for the connection of dust extraction and collection facilities, ensure these are connected and properly used. Use of dust collection can reduce dust-related hazards.
h) Do not let familiarity gained from frequent use of tools allow you to become complacent and ignore tool safety principles. A careless action can cause severe injury within a fraction of a second.
4) Power tool use and care
a) Do not force the power tool. Use the correct power tool for your application. The correct power tool will do the job better and safer at the rate for which it was designed.
b) Do not use the power tool if the switch does not turn it on and off. Any power tool that cannot be controlled with the switch is dangerous and must be repaired.
c) Disconnect the plug from the power source and/or remove the battery pack, if detachable, from the power tool before making any adjustments, changing accessories, or storing power tools. Such preventive safety measures reduce the risk of starting the power tool accidentally.
d) Store idle power tools out of the reach of children and do not allow persons unfamiliar with the power tool or these instructions to operate the power tool. Power tools are dangerous in the hands of untrained users.
e) Maintain power tools and accessories. Check for misalignment or binding of moving parts, breakage of parts and any other condition that may affect the power tool's operation.
If damaged, have the power tool repaired before use. Many accidents are caused by poorly maintained power tools.
f) Keep cutting tools sharp and clean. Properly maintained cutting tools with sharp cutting edges are less likely to bind and are easier to control.
g) Use the power tool, accessories and tool bits etc. in accordance with these instructions, taking into account the working conditions and the work to be performed. Use of the power tool for operations different from those intended could result in a hazardous situation.
h) Keep handles and grasping surfaces dry, clean and free from oil and grease. Slippery handles and grasping surfaces do not allow for safe handling and control of the tool in unexpected situations.
5) Battery tool use and care
a) Recharge only with the charger specified by the manufacturer. A charger that is suitable for one type of battery pack may create a risk of fire when used with another battery pack.
b) Use power tools only with specifically designated battery packs. Use of any other battery packs may create a risk of injury and fire.
c) When battery pack is not in use, keep it away from other metal objects, like paper clips, coins, keys, nails, screws or other small metal objects, that can make a connection from one terminal to another. Shorting the battery terminals together may cause burns or a fire.
d) Under abusive conditions, liquid may be ejected from the battery; avoid contact. If contact accidentally occurs, flush with water. If liquid contacts eyes, additionally seek medical help. Liquid ejected from the battery may cause irritation or burns.
e) Do not use a battery pack or tool that is damaged or modified. Damaged or modified batteries may exhibit unpredictable behaviour resulting in fire, explosion or risk of injury.
f) Do not expose a battery pack or tool to fire or excessive temperature. Exposure to fire or temperature above 130 °C may cause explosion.
g) Follow all charging instructions and do not charge the battery pack or tool outside the temperature range specified in the instructions. Charging improperly or at temperatures outside the specified range may damage the battery and increase the risk of fire.
6) Service
a) Have your power tool serviced by a qualified repair person using only identical replacement parts. This will ensure that the safety of the power tool is maintained.
b) Never service damaged battery packs. Service of battery packs should only be performed by the manufacturer or authorized service providers.
LAWNMOWER SAFETY WARNINGS
a) Do not use the lawnmower in bad weather conditions, especially when there is a risk of lightning. This decreases the risk of being struck by lightning.
b) Thoroughly inspect the area for wildlife where the lawnmower is to be used. Wildlife may be injured by the lawnmower during operation.
c) Thoroughly inspect the area where the lawnmower is to be used and remove all stones, sticks, wires, bones, and other foreign objects. Thrown objects can cause personal injury.
d) Before using the lawnmower, always visually inspect to see that the blade and the blade assembly are not worn or damaged. Worn or damaged parts increase the risk of injury.
e) Check the grass catcher frequently for wear or deterioration. A worn or damaged grass catcher may increase the risk of personal injury.
f) Keep guards in place. Guards must be in working order and be properly mounted. A guard that is loose, damaged, or is not functioning correctly may result in personal injury.
g) Keep all cooling air inlets clear of debris. Blocked air inlets and debris may result in overheating or risk of fire.
h) While operating the lawnmower, always wear non-slip and protective footwear. Do not operate the lawnmower when barefoot or wearing open sandals. This reduces the chance of injury to the feet from contact with the moving blade.
i) While operating the lawnmower, always wear long trousers. Exposed skin increases the likelihood of injury from thrown objects.
j) Do not operate the lawnmower in wet grass. Walk, never run. This reduces the risk of slipping and falling which may result in personal injury.
k) Do not operate the lawnmower on excessively steep slopes. This reduces the risk of loss of control, slipping and falling which may result in personal injury.
I) When working on slopes, always be sure of your footing, always work across the face of slopes, never up or down and exercise extreme caution when changing direction. This reduces the risk of loss of control, slipping and falling which may result in personal injury.
m) Use extreme caution when reversing or pulling the lawnmower towards you. Always be aware of your surroundings. This reduces the risk of tripping during operation.
n) Do not touch blades and other hazardous moving parts while they are still in motion. This reduces the risk of injury from moving parts.
o) When clearing jammed material or cleaning
the lawnmower, make sure all power switches are off and the battery pack is disconnected. Unexpected operation of the lawnmower may result in serious personal injury.
SAFETY WARNINGS FOR BATTERY PACK
a) Do not dismantle, open or shred cells or battery pack.
b) Do not short-circuit a battery pack. Do not store battery packs haphazardly in a box or drawer where they may short-circuit each other or be short-circuited by conductive materials. When battery pack is not in use, keep it away from other metal objects, like paper clips, coins, keys, nails, screws or other small metal objects, that can make a connection from one terminal to another. Shorting the battery terminals together may cause burns or a fire.
c) Do not expose battery pack to heat or fire. Avoid storage in direct sunlight.
d) Do not subject battery pack to mechanical shock.
e) In the event of battery leaking, do not allow the liquid to come into contact with the skin or eyes. If contact has been made, wash the affected area with copious amounts of water and seek medical advice.
f) Keep battery pack clean and dry.
g) Wipe the battery pack terminals with a clean dry cloth if they become dirty.
h) Battery pack needs to be charged before use. Always refer to this instruction and use the correct charging procedure.
i) Do not maintain battery pack on charge when not in use.
j) After extended periods of storage, it may be necessary to charge and discharge the battery pack several times to obtain maximum performance.
k) Recharge only with the charger specified by Kress. Do not use any charger other than that specifically provided for use with the equipment.
I) Do not use any battery pack which is not designed for use with the equipment.
m) Keep battery pack out of the reach of children.
n) Retain the original product literature for future reference.
o) Remove the battery from the equipment when not in use.
p) Dispose of properly.
q) Do not mix cells of different manufacture, capacity, size or type within a device.
r) Keep the battery away from microwaves and high pressure.
SYMBOLS
 | To reduce the risk of injury, user must read instruction manual |
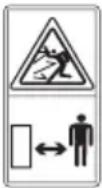 | WARNING – Beware of thrown objects – keep bystanders away |
 | WARNING – Keep hands and feet away from the blades |
 | WARNING – Disconnect battery before maintenance |
 | Blade continues to rotate after the machine is switched off. Wait until all machine components have completely stopped before touching them |
 | Wear protective gloves |
 | Remove battery from the socket before carrying out any adjustment, servicing or maintenance |
 | Batteries may enter water cycle if disposed improperly, which can be hazardous for ecosystem. Do not dispose of waste batteries as unsorted municipal waste. |
 | Do not burn |
 | Li-Ion battery This product has been marked with a symbol relating to ‘separate collection’ for all battery packs and battery pack. It will then be recycled or dismantled in order to reduce the impact on the environment. Battery packs can be hazardous for the environment and for human health since they contain hazardous substances. |
 |
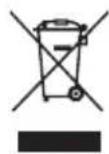
Waste electrical products must not be disposed of with household waste. Please recycle where facilities exist. Check with your local authorities or retailer for recycling advice.
EN
NOTE: Read instruction handbook before operation this machine.
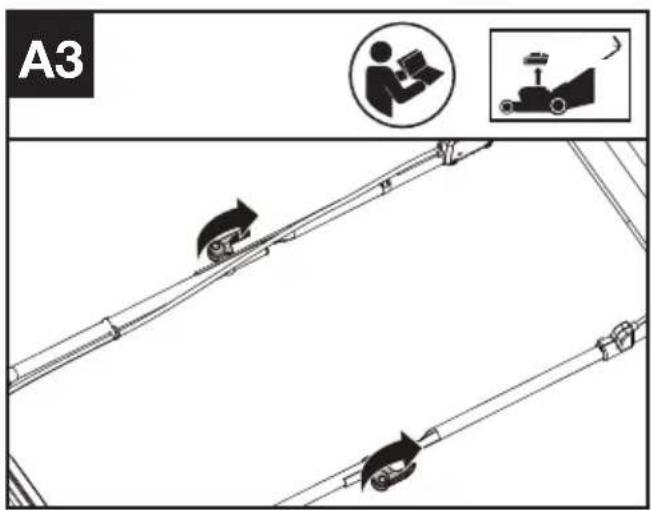
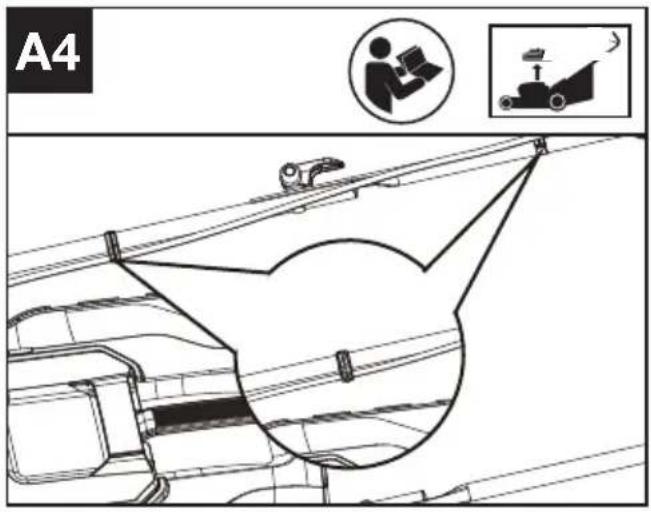
ASSEMBLY
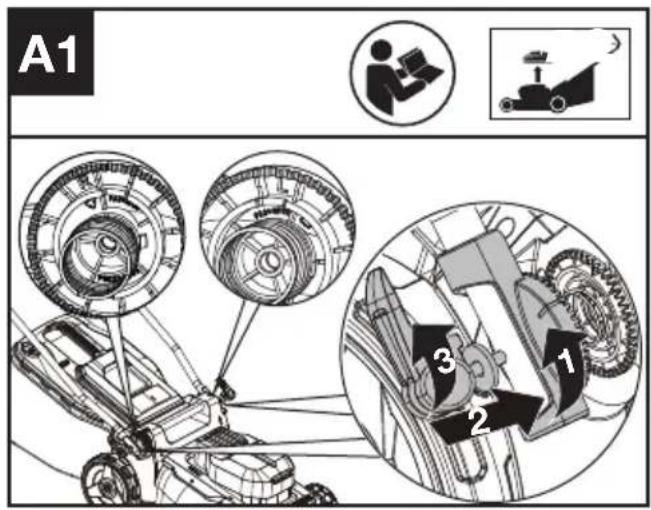
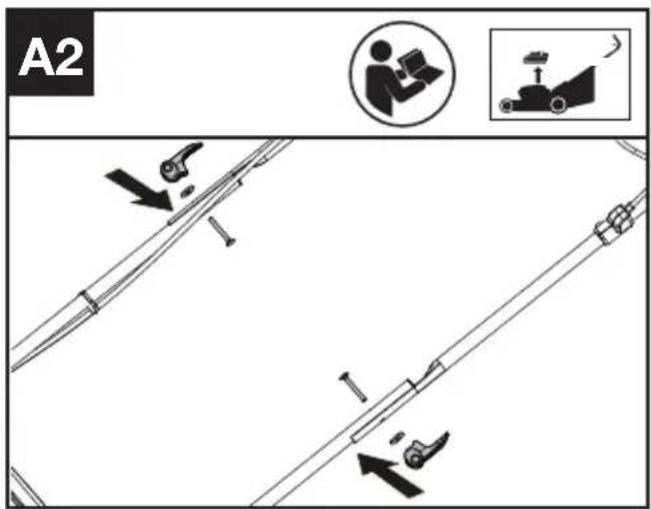
Assembling the handle bar. (See Fig. A1, A2, A3, A4) NOTE: Choose the appropriate height and tighten the handle knobs.
EN
A3


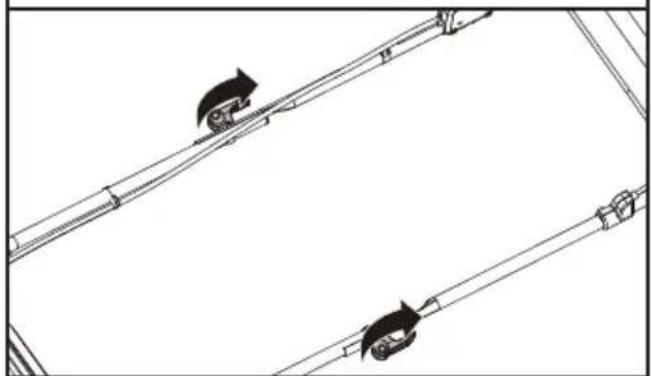
natural_image
Diagram of two parallel tracks with directional arrows indicating motion (no text or symbols)
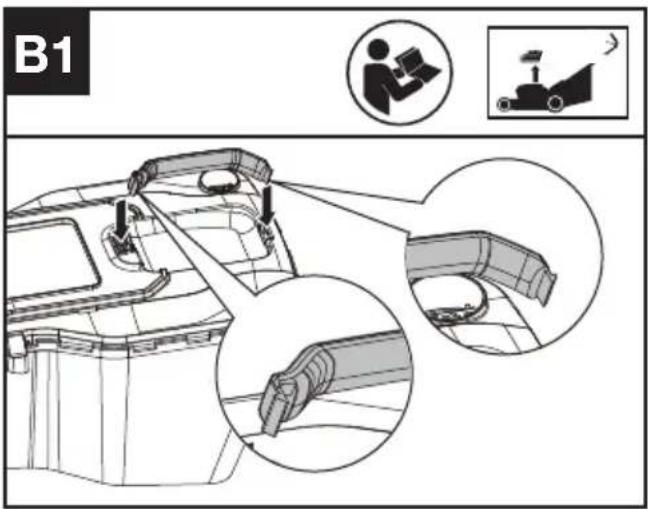
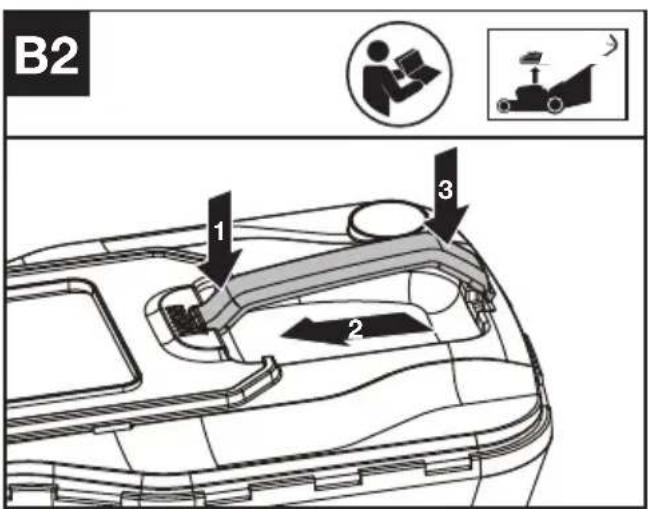
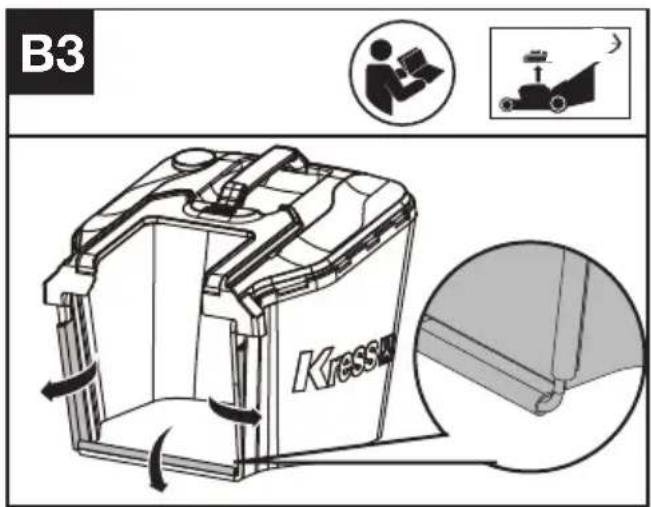
Assembling grass collection bag.(See Fig. B1, B2, B3)
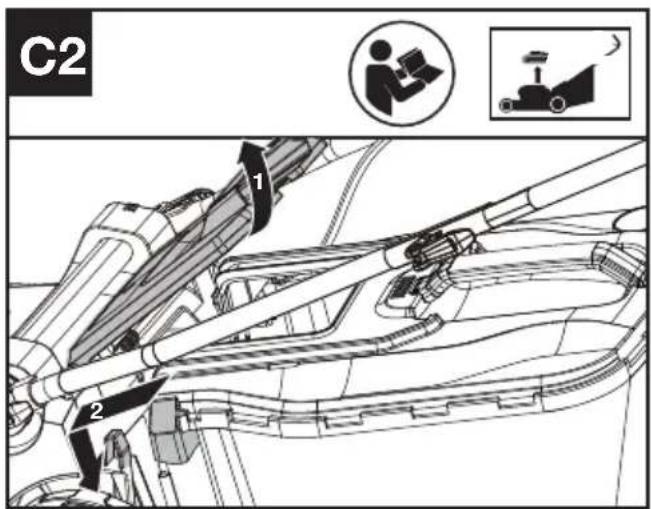
Fitting grass collection bag to the mower. (See Fig. C1, C2)
NOTE: Depress the grass collection bag slightly to ensure that it is completely installed.
NOTE: Take the mulching insert out of the mower before fitting the grass collection bag.
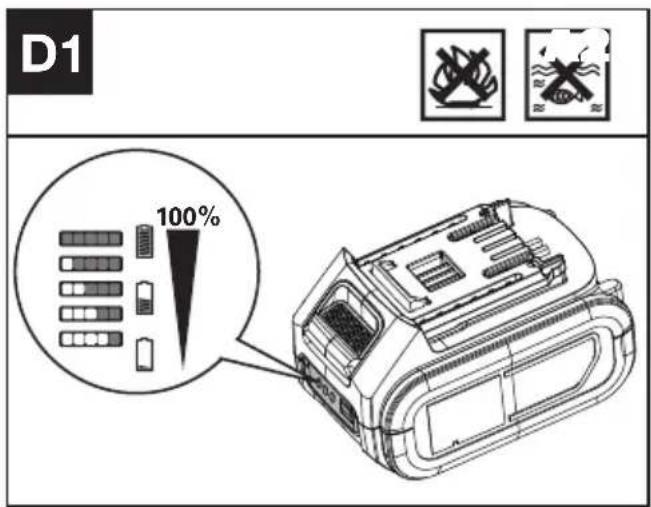
Checking the battery charge condition.(See Fig. D1) NOTE: Fig. D1 only applies for the battery pack with battery indicator light.
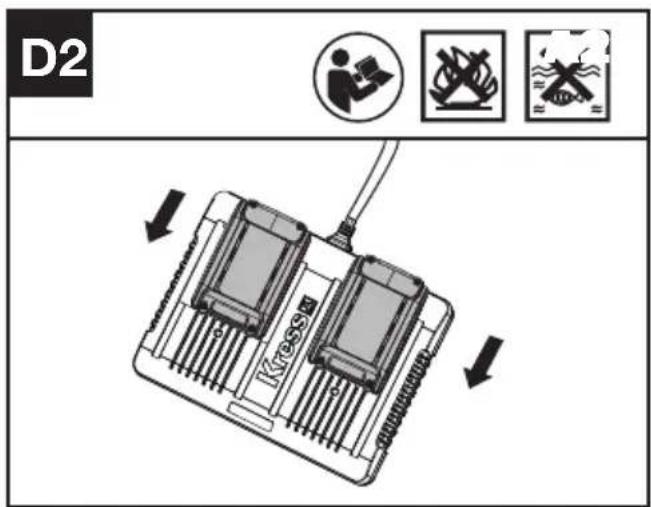
Charging the battery pack.(See Fig. D2)
NOTE: The batteries are shipped uncharged. Each battery must be fully charged before the first mow. Always fully charge the two batteries at same time. More details can be found in charger's manual.
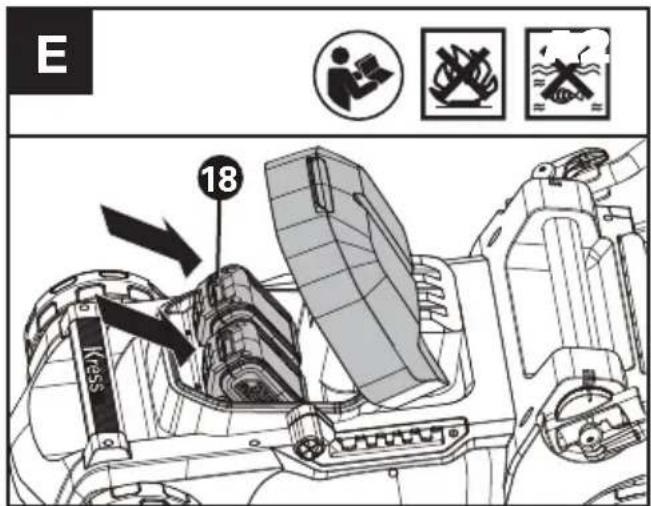
Fitting/removing battery.(See Fig. E)
NOTE: This machine will only run when 2 batteries are installed.
Please always use two batteries with the same capacity and fully charge the two batteries.
When you use two batteries with different power, the machine will only run to the lower common denominator.
OPERATION
Starting & stopping (See Fig. F1, F2)
For starting, press and hold the Lock-off button, and pull the switch lever.
For stopping, release the switch lever.
Grass Bag Filling Indicator(See Fig. H1)
Empty status: flap floats (a)
Fully status: flap falls down (b)
0%
a
100%
b
Removing/emptying grass collection bag.(See Fig. H2)
WARNING! Always check the safety flap close the discharge outlet before using. Never lift the safety flap when the mower is being used without fitted grass collection bag.
EN
Adjusting the Cutting Height(See Fig. G)
WARNING! Stop, release switch lever and wait until the motor stops before adjusting height. The blades continue to rotate after the machine is switched off, a rotating blade can cause injury. Do not touch rotating blades.
- Mow across the face of slopes, never up-and-down. Exercise extreme caution when changing direction on slopes. Do not mow excessively steep slopes. Always maintain good footing.
- Release switch lever to turn mower "OFF" when crossing any graveled area (stones can be thrown by the blade).
- Set mower at highest cutting height when mowing in rough ground or in tall weeds. Removing too much grass at one time can cause circuit breaker to trip, which stops mower.
- If a grass bag is used during the fast growing season, the grass may tend to clog up at the discharge opening. Release switch lever to turn mower "OFF". Remove the grass bag and shake the grass down to the back end of the bag. Also clean out any grass or debris which may be packed around the discharge opening. Replace the grass collection bag.
- If mower should start to vibrate abnormally, release switch lever to turn mower "OFF". Check immediately for cause. Vibration is a warning of
trouble. Do not operate mower until a service check has been made.
- ALWAYS RELEASE SWITCH LEVER TO TURN MOWER "OFF" WHEN LEAVING IT UNATTENDED EVEN FOR A SHORT PERIOD OF TIME.
CUTTING AREA
The cutting area can be affected by several factors, such as cutting height, lawn humidity, grass length and density. Besides, starting and stopping the mower too many times during operation will reduce the cutting area.
The table below gives the relationship between cutting conditions and cutting area.
| Cutting conditions Cutting area (maximum) | ||
| Grass conditions | Cutting height | 4.0 Ah battery |
| Very thin, dry grass | cut 7cm to 5cm | up to 400 m^2 * |
| Thin, dry grass | cut 7cm to 3cm | up to 200 m^2 * |
* Used with two fully charged battery packs.
TIPS:
1) It is recommended to mow your lawn more frequently, walk at normal pace, and not to start/stop the mower too often during operation. Please always use the same two batteries and charge the two batteries at same time.
2) For best performance, please ensure use a fully charged battery pack and always cut off 1/3 or less of the grass height.
3) Walk slowly when cutting long grass, so as to have more effective cutting and properly discharge the clippings.
4) Avoid cutting wet grass, otherwise it will stick to the underside of the deck and the clippings cannot be collected or discharged properly.
5) A higher cutting height shall be applied to new or thick grass and it will extend the battery duration.
For Battery tools
The ambient temperature range for the use and storage of tool and battery is 0 °C-45 °C (32 °F-113 °F).
The recommended ambient temperature range for the charging system during charging is 0 °C-40 °C (32 °F-104 °F).
TRANSPORTATION
Transporting the mower
- Switch off the mower and remove the battery.
-
When transporting your mower by hand, hold the middle of carry handle to make sure that your machine is parallel to the ground.
-
When transporting your mower in a vehicle, secure and position it to prevent movement or damage.
Transporting the battery
- Ensure the battery is in a safe condition.
- Use non-conductive packaging when transporting the battery.
- The contained Li-Ion batteries are subject to the dangerous goods legislation requirements.
Transport batteries only when the battery housing is undamaged. Pack up the batteries in such a manner that cannot move around in the packaging.
MAINTENANCE

WARNING! Stop the mower before removing the grass bag.
NOTE: To ensure long and reliable service, perform the following maintenance procedures regularly. Check for obvious defects such as a loose, dislodged or a damaged blade, loose fittings, and worn or damaged components. Check that the covers and guards are all undamaged and are correctly attached to mower. Carry out any necessary maintenance or repairs before operating mower. If the mower should happen to fail despite regular maintenance, please call our customer helpline for advice.
BLADE SHARPENING
KEEP BLADE SHARP FOR BEST MOWER PERFORMANCE.
WEAR PROPER EYE PROTECTION WHILE REMOVING, SHARPENING, AND INSTALLING BLADE.
Sharpening the blade twice during a mowing season is usually sufficient under normal circumstances.
Sand causes the blade to dull quickly. If your lawn has sandy soil, more frequent sharpening may be required.
REPLACE BENT OR DAMAGED BLADE IMMEDIATELY.
WHEN SHARPENING THE BLADE:
- Make sure blade remains balanced.
- Sharpen blade at the original cutting angle.
- Sharpen cutting edges on both ends of blade, removing equal amounts of material from both ends.
NOTE:
- Be sure the mower is turned off.
- Place the mower in stand up storage mode.
TO SHARPEN BLADE IN A VISE (SEE Fig. J)
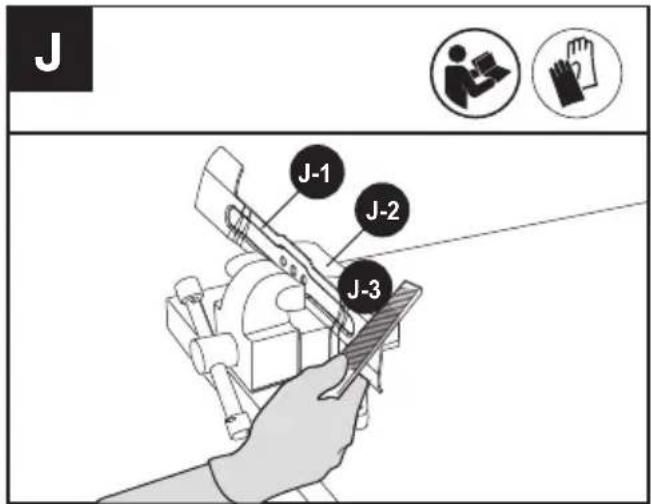
- Be sure the switch lever is released, the blade has stopped before removing the blade.
- Remove blade from mower. See instructions for removing and attaching blade.
- Secure blade J-1 in a vise J-2.
- Wear safety glasses and be careful not to cut yourself.
- Carefully file the cutting edges of the blade with a fine tooth file J-3 or sharpening stone.
- Check balance of blade. See instructions for blade balancing.
- Replace blade on mower and tighten securely. Refer to instructions below.
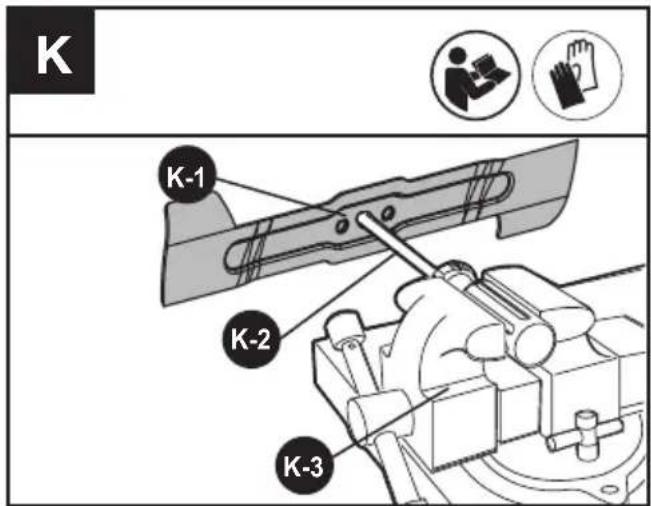
BLADE BALANCING (SEE Fig. K)
Check balance of blade by placing center hole in blade K-1 over a nail or screwdriver shank K-2, clamped horizontally in a vise K-3. If either end of the blade rotates downward, file that end. Blade is properly balanced when neither end drops.
BLADE MAINTENANCE (See Fig. L1, L2)
Renew your metal blade after 50 hours mowing or 2 years, whichever is the sooner-regardless of condition.
Follow these procedures to remove and replace the blade. You will need garden gloves (not provided)
and a spanner wrench (not provided) to remove the blade. Hold the blade (20) and unscrew the blade bolt (19) counter-clockwise using a spanner wrench, and then remove blade.
To re-assemble, position the blade (20) with the cutting edges towards the ground. Then securely tighten the blade bolt (19).
CLEANING
- Switch off the mower and remove the battery.
- Do not use aggressive detergents or solvents. Clean the machine after use with a damp cloth dipped in mild detergent.
- Keep battery connection free of dirt and debris, and clean with a soft and dry brush or cloth.
- Do not spray water onto the motor and electrical components.
- Do not use pressure washer to clean your machine.
STORAGE
- Remove the battery pack from the mower before storage.
- Store the mower and the battery in a dry and secure place that is inaccessible to children and other unauthorized people.
Remove the cutting attachment if no use for a
long time.
- Store the battery only within a temperature range between 0 °C (32 °F) and 45 °C (113 °F). As an example, do not leave the battery in the car in summer time.
Stop the mower. Clean the exterior of the machine thoroughly using a soft brush and cloth. Do not use water, solvents or polishes. Remove all grass and debris, especially from the ventilation slots.
Turn the machine on its side and clean the blade area. If grass cuttings are compacted in the blade area, remove with a wooden or plastic implement. Store the machine in a dry place. Do not place other objects on top of the machine.
To aid storage, release the handle knobs, and fold the upper handle as shown in Fig. I1 & I2.
TROUBLESHOOTING
The following table gives problems and actions that you can perform if your machine does not operate correctly.

WARNING: Switch the machine off and remove the battery prior to any troubleshooting.
| Problem Solution | |
| 1. Mower doesn't run when switch lever is activated. | A. Check to make sure the button on switch housing is being completely pushed.B. Release Switch Lever to turn mower off. Turn mower over and check that blade is free to turn. If not free, return to an authorized servicer. Blade should turn freely.C. Has battery been fully charged? Plug in charger and wait for green light to come on. |
| 2. Motor stops while mowing. A. | Release Switch Lever to turn mower off. Turn mower over and check that blade is free to turn. If not free, return to an authorized servicer. Blade should turn freely.B. Raise cutting height of wheels to highest position and start mower.C. Has battery been fully charged? Plug in charger and wait for green light to come on.D. Avoid overloading the mower. Slow down the cutting pace by pushing mower slower or raise the cut height. Or both. |
| 3. Mower runs but cutting performance is unsatisfactory, or does not cut entire lawn. | A. Has battery been fully charged? Plug in charger and wait for green light to come on.B. Release Switch Lever to turn mower off. Turn mower over and check: Blade for sharpness - Keep blade sharp. Deck and discharge chute for clogging.C. Wheel height adjustment may be set too low for grass condition. Raise cutting height. |
| 4. Mower is too hard to push. A. | Raise cutting height to reduce deck drag on grass. Check each wheel for free rotation. |
| 5. Mower is abnormally noisy and vibrates. | A. Release Switch Lever to turn mower off. Turn mower on side and check blade to ensure it has not been bent or damaged. If blade is damaged, replace with a replacement blade. If the underside of the deck is damaged return mower to an Authorized service center.B. If there is no visible damage to the blade and the mower still vibrates: Release Switch Lever to turn mower off, and remove the blade. Rotate blade 180 degrees and retighten. If mower still vibrates, return the mower to an authorized service center. |
| 6. Battery charger LED's not on. | A. Check plug connection.B. Replace charger. |
| 7. Battery charger LED does not flip to green. | A. Battery needs to be diagnosed. Take to authorized service center. |
| 8. Mower not picking up clippings with the Grass Collection Bag. | A. Remove mulch plate when bagging.B. Chute clogged. Release Switch Lever to turn mower off. Clear chute of grass clippings.C. Too much cut grass. Raise cutting height of wheels to shorten length of the cut.D. Bag full. Empty bag more often. |
| 9. When mulching there are clippings visible. | A. Too much cut grass. Raise cutting height of wheels to shorten length of the cut. Do not cut off more than 1/3 of total length.B. Check blade for sharpness. Always keep blade sharp. |
| 10. Low or diminished run-time after many uses. | A. Return to Authorized Service location - may need new battery. |
| 11. The battery charger LED flashes red and the battery can't be charged. | A. The battery overheats after continuous use. Remove battery from the charger and allow it to cool to 42°C or less. |
EN
TECHNICAL DATA
Type KG745 KG745.X (745 - designation of machinery, representative of brushless push mower)
| KG745 KG745.X** | |
| Rated voltage | 40V =Max.(2x20V Max.)*** |
| No load speed | 2900 / 3400 RPM |
| Cutting diameter 37 cm | |
| Cutting height | 20-70 mm |
| Cutting height positions | 6 |
| Front wheel diameter | 150 mm |
| Rear wheel diameter | 200 mm |
| Grass collection capacity | 40 L |
| Battery type Lithium-on | |
| Machine Weight (bare tool) | 13.95 kg |
** X=1-999,A-Z,M1-M9 they are only used for different customers, there are no safe relevant changes between these models.
*** Voltage measured without workload. Initial battery voltage reaches maximum of 20 volts. Nominal voltage is 18 volts.
SUGGESTED BATTERIES AND CHARGERS
| Battery Amp Charger Amperage | ||
| KAB04 4.0 Ah KAC04 4.0 A |
We recommend that you purchase your accessories from the same store that sold you the tool. Refer to the accessory packaging for further details. Store personnel can assist you and offer advice
NOISE INFORMATION
| A weighted sound pressure L | _pA =79.5 dB(A) |
| K_pA | 3 dB(A) |
| A weighted sound power L | _wA =92.4 dB(A) |
| K_wA | 3 dB(A) |
| Wear ear protection | |
VIBRATION INFORMATION
| Typical weighted vibration a | _h < 2.5 m/s^2 |
| Uncertainty K = 1.5 m/s^2 |
WARNING: The vibration emission value during actual use of the power tool can differ from the declared value depending on the ways in which the tool is used dependant on the following examples and other variations on how the tool is used:
How the tool is used and the materials being cut or drilled.
The tool being in good condition and well maintained. Using the correct accessory for the tool and ensuring it is sharp and in good condition.
The tightness of the grip on the handles and if any anti-vibration accessories are used.
And the tool is being used as intended by its design and these instructions.
This tool may cause hand-arm vibration syndrome if its use is not adequately managed.
WARNING: To be accurate, an estimation of exposure level in the actual conditions of use should also take account of all parts of the operating cycle such as the times when the tool is switched off and when it is running idle but not actually doing the job. This may significantly reduce the exposure level over the total working period.
Helping to minimise your vibration exposure risk. ALWAYS use sharp chisels, drills and blades Maintain this tool in accordance with these instructions and keep well lubricated (where appropriate) If the tool is to be used regularly then invest in anti vibration accessories.
Plan your work schedule to spread any high vibration tool use across a number of days.
ENVIRONMENTAL PROTECTION

Waste electrical products must not be disposed of with household waste. Please recycle where facilities exist. Check with your authorities or retailer for recycling advice.
DECLARATION OF CONFORMITY
We, Positec Germany GmbH Postfach 32 02 16, 50796 Cologne, Germany
On behalf of Positec declare that the product Description Battery powered Lawn Mower Type KG745 KG745.X (745 - designation of machinery, representative of brushless push mower) Function cutting grass
Complies with the following Directives: 2006/42/EC, 2014/30/EU, 2011/65/EU & (EU) 2015/863, 2000/14/EC amended by 2005/88/EC
2000/14/EC amended by 2005/88/EC:
- Conformity Assessment Procedure as per
- Measured Sound Power Level
- Declared Guaranteed Sound Power Level
Annex VI
92.4 dB (A)
96 dB (A)
The notified body involved Name: TÜV Rheinland LGA Products GmbH (Notified body 0197) Address: Tillystraße 2-90431 Nürnberg
Standards conform to EN 62841-1, EN IEC 62841-4-3, EN ISO 3744, EN IEC 55014-1, EN IEC 55014-2
The person authorized to compile the technical file, Name Marcel Filz Address Positec Germany GmbH Postfach 32 02 16, 50796 Cologne, Germany

2022/08/29 Allen Ding Deputy Chief Engineer, Testing & Certification Positec Technology (China) Co., Ltd 18, Dongwang Road, Suzhou Industrial Park, Jiangsu 215123, P. R. China
INHALTSVERZEICHNIS
Einführung......20
Komponenten....21
D
KOMPONENTEN
natural_image
Diagram of a Kress sensor module with two connectors and wiring, showing directional arrows (no text or symbols)natural_image
Technical line drawing of a lawn mower with mechanical components and close-up insets showing gear assembly (no text or symbols)12


natural_image
Line drawing of a motorcycle chassis with wheels and suspension components (no text or symbols)TIPPS FÜR DAS MÄHEN
18, Dongwang Road, Suzhou Industrial
Park, Jiangsu 215123, P. R. China
SOMMAIRE
Introduction......37
LISTE DES COMPOSANTS
- LEVIER DE COMMUTATION
- POIGNÉE SUPÉRIEURE
- POIGNÉE DU BAC DE RÉCUPÉRATION
- RABAT DE SÉCURITÉ
- SAC DE COLLECTE DE L'HERBE
- COUVERCLE DE VERROUILLAGE DE LA POIGNÉE INFÉRIEURE
- LEVIER DE RÉGLAGE DE LA HAUTEUR DE COUPE
- POIGNÉE DE TRANSPORT AVANT
- COUVERCLE DE LA BATTERIE
- POIGNÉE DE TRANSPORT ARRIÈRE
- BOUTON DE VIS, INFÉRIEUR
- POIGNÉE INFÉRIEURE
- SERRE CABLE
- BOUTON DE VIS, SUPÉRIEUR
- BOUTON DE VERROUILLAGE
- INDICATEUR DE REMPLISSAGE DU SAC À HERBE
-
INSERT DE PAILLAGE (VOIR FIG. C1)
-
BATTERIE *(VOIR FIG. E)
- BOULON DE LA LAME (VOIR FIG. L1)
- LAME (VOIR FIG. L1)
natural_image
Diagram of two identical mechanical components on parallel rods, with no text or symbols present.
MAINTENANCE DE LA LAME (VOIR FIG. L1, L2)
INFORMATIONS RELATIVES AU BRUIT
INFORMATIONS RELATIVES AUX VIBRATIONS
18, Dongwang Road, Suzhou Industrial
Park, Jiangsu 215123, P. R. China
INDICE
Introduzione....54
Elenco Dei Componenti....55
ELENCO DEI COMPONENTI
-
LEVA DI AVVIAMENTO
-
IMPUGNATURA SUPERIORE
-
IMPUGNATURA DEL CONTENITORE ERBA
-
ALETTA DI SICUREZZA
-
SACCO RACCOLTA ERBA
-
COPERTURA DEL BLOCCO DELLA MANIGLIA INFERIORE
-
LEVA DI REGOLAZIONE DELL'ALTEZZA DI TAGLIO
-
MANIGLIA DI TRASPORTO FRONTALE
-
COPERCHIO DEL PACCOBATTERIA
-
MANIGLIA DI TRASPORTO POSTERIORE
-
IMPUGNATURE, INFERIORE
-
MANIGLIA INFERIORE
-
SERRACAVO
-
IMPUGNATURE, SUPERIORE
-
PULSANTE DI BLOCCO
-
INDICATORE DI RIEMPIMENTO DEL RACCOGLITORE
-
INSERTO PER LA PACCIAMATURA (VEDERE FIG. C1)
-
BATTERIA *(VEDI FIG. E)
- BULLONE DELLA LAMA (VEDI FIG. L1)
- LAMA (VEDI FIG. L1)
NOTE: Read instruction handbook before operation this machine.
MONTAGGIO
natural_image
Diagram of a two-pin electronic device with connectors and wiring, showing directional arrows (no text or symbols)18, Dongwang Road, Suzhou Industrial
Park, Jiangsu 215123, P. R. China
ÍNDICE
Introducción....71
Lista De Componentes....72
2015/863, 2000/14/EC amended by 2005/88/EC
18, Dongwang Road, Suzhou Industrial
Park, Jiangsu 215123, P. R. China
TABLE OF CONTENTS
Inleiding....88
NL
ONDERDELENLIJST
-
SCHAKELHENDEL
-
BOVENSTE HANDVAT
-
HENDEL VOOR DE GRASBAK
-
VEILIGHEIDSKLEP
-
GRASOPVANGZAK
-
ONDERSTE HENDELVERGRENDELINGSKAP
-
INSTELHENDEL MAAIHOOGTE
-
VOORSTE DRAAGGREEP
-
AFSCHERMING ACCUPACK
-
ACHTERSTE DRAAGGREEP
-
SCHROEFKNOP, ONDERSTE
-
ONDERSTE HANDGREEP
-
ELEKTRICITEITSSNOERKLEMMEN
-
SCHROEFKNOP, BOVENSTE
-
VERGRENDELINGSKNOP
-
INDICATOR VULNIVEAU GRASZAK
-
MULCHING-OPZETSTUK (ZIE AFB. C1)
-
ACCU *(ZIE FIG. E)
- BLADBOUT (ZIE FIG. L1)
- BLAD (ZIE FIG. L1)
natural_image
Diagram of a wireless router with two connectors and cable, showing directional arrows (no text or symbols)ONDERHOUD VAN HET MES (Zie Fig. L1, L2)
Positec Technology (China) Co., Ltd 18, Dongwang Road, Suzhou Industrial Park, Jiangsu 215123, P. R. China
GEBRUIK VOLGENS BESTEMMING
Introduktion....105
Komponentliste....106
KOMPONENTLISTE
-
KOGEHÅNDTAG
-
∅VERSTE HÅNDTAG
-
HÅNDTAG TIL GRÆSBOKS
-
SIKKERHEDSKLAP
-
POSE TIL GRÆSOPSAMLING
-
DÆKSEL TIL LÅS TIL NEDRE HÅNDTAG
-
HÅNDTAG TIL INDSTILLING AF SKÆREH∅JDE
-
FRONTBÆREHÅNDTAG
-
BATTERIDÆKSEL
-
BAGBÆREHÅNDTAG
-
NEDRE FINGERSKRUE
-
NEDRE HÅNDTAG
-
KABELKLEMME
-
∅VRE FINGERSKRUE
-
LÅSEKNAP
-
INDIKATOR FOR FYLDT GRÆSFANGER
-
BIOKLIPBLOK (SE FIG. C1)
-
BATTERIPAKKE*(SE FIG. E)
- BLADBOLT (SE FIG. L1)
- BLAD (SE FIG. L1)
VEDLIGEHOLDELSE AF BLADET (Se Fig. L1, L2)
Beskrivelse Battery powered Lawn Mower
18, Dongwang Road, Suzhou Industrial
Park, Jiangsu 215123, P. R. China
СОДЕРЖАНИЕ
Введение....122
RU
СПИСОК КОМПОНЕНОВ
RU
18, Dongwang Road, Suzhou Industrial Park, Jiangsu 215123, P. R. China
INNEHÅLLSFÖRTECKNING
Introduktion....139
Komponenter....140
Produktsäkerhet....142
Montering & Hantering....146
Transport....149
Underhåll....150
Rengöring....151
Förvaring....151
Felsökning....152
Tekniska Data 153
Miljöskydd....154
KOMPONENTER
- BRYTARARM
- ÖVRE HANDTAGET
- GRÄSUPPSAMLARHANDTAG
- SÄKERHETSFLIK
- GRÄSUPPSAMLINGSSÄCK
- LÅSHÖLJE NEDRE HANDTAG
- JUSTERINGSSPAK FÖR KLIPPHÖJD
- FRÄMRE BÄRHANDTAG
- BATTERIHÖLJE
- BAKRE BÄRHANDTAG
- NEDRE SKRUVKNOPP
- NEDRE HANDTAG
- KABELKLÄMMA
- ÖVRE SKRUVKNOPP
- LÅSKNAPP
- GRÄSUPPSAMLARE FYLLNADSINDIKATOR
-
MULCHING INSATS (SE BILD C1)
-
BATTERIPAKET *(SE FIG. E)
- BLADBULT (SE FIG. M1)
- BLAD (SE FIG. M1)
BLADUNDERHÅLL (Se Fig. L1, L2)
18, Dongwang Road, Suzhou Industrial
Park, Jiangsu 215123, P. R. China


- TABLE OF CONTENTS
- INTRODUCTION
- INTENDED USE
- COMPONENT LIST
- ORIGINAL INSTRUCTIONS PRODUCT SAFETY GENERAL POWER TOOL SAFETY WARNINGS
- Save all warnings and instructions for future reference.
- LAWNMOWER SAFETY WARNINGS
- SAFETY WARNINGS FOR BATTERY PACK
- ASSEMBLY
- OPERATION
- CUTTING AREA
- TIPS:
- For Battery tools
- TRANSPORTATION
- Transporting the mower
- Transporting the battery
- MAINTENANCE
- WARNING! Stop the mower before removing the grass bag.
- BLADE SHARPENING
- WHEN SHARPENING THE BLADE:
- NOTE:
- TO SHARPEN BLADE IN A VISE (SEE Fig. J)
- BLADE BALANCING (SEE Fig. K)
- BLADE MAINTENANCE (See Fig. L1, L2)
- CLEANING
- STORAGE
- TROUBLESHOOTING
- TECHNICAL DATA
- SUGGESTED BATTERIES AND CHARGERS
- ENVIRONMENTAL PROTECTION
- DECLARATION OF CONFORMITY
- INHALTSVERZEICHNIS
- KOMPONENTEN
- TIPPS FÜR DAS MÄHEN
- SOMMAIRE
- LISTE DES COMPOSANTS
- MAINTENANCE DE LA LAME (VOIR FIG. L1, L2)
- INFORMATIONS RELATIVES AU BRUIT
- INFORMATIONS RELATIVES AUX VIBRATIONS
- INDICE
- ELENCO DEI COMPONENTI
- MONTAGGIO
- ÍNDICE
- ONDERDELENLIJST
- ONDERHOUD VAN HET MES (Zie Fig. L1, L2)
- GEBRUIK VOLGENS BESTEMMING
- KOMPONENTLISTE
- VEDLIGEHOLDELSE AF BLADET (Se Fig. L1, L2)
- СОДЕРЖАНИЕ
- СПИСОК КОМПОНЕНОВ
- INNEHÅLLSFÖRTECKNING
- KOMPONENTER
- BLADUNDERHÅLL (Se Fig. L1, L2)
Brand : KRESS
Model : KG745.9
Category : Lawn mower