UNO UP - Baby bed Kindercraft - Free user manual and instructions
Find the device manual for free UNO UP Kindercraft in PDF.
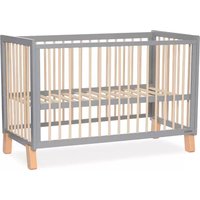
| Product type | Convertible baby crib (co-sleeper) |
| Brand | Kindercraft |
| Model | UNO UP |
| Dimensions (approx.) | L 92 x W 65 x H 80 cm |
| Weight | 12 kg |
| Power supply | None (non-electric) |
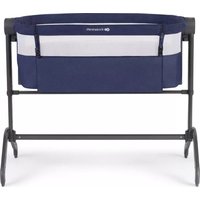
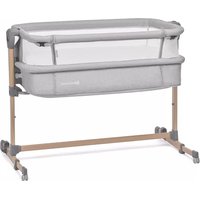
| Main functions | 6 adjustable heights, co-sleeper mode, removable side barrier, swivel wheels with brakes |
| Care and cleaning | Frame: damp cloth. Cover: machine washable at 30°C, gentle cycle. Do not bleach, iron, or tumble dry |
| Safety | Co-sleeper safety straps, wheel lock, do not use if child can sit/stand |
| Spare parts | Available from 4Kraft |
| Warranty | 24 months (extendable to 120 months) |
| Material | Steel, fabric |
| Maximum incline | 2 levels |
| Number of positions | 6 |
| Wheels | 2 swivel wheels with brakes |
Frequently Asked Questions - UNO UP Kindercraft
User questions about UNO UP Kindercraft
0 question about this device. Answer the ones you know or ask your own.
Ask a new question about this device
Download the instructions for your Baby bed in PDF format for free! Find your manual UNO UP - Kindercraft and take your electronic device back in hand. On this page are published all the documents necessary for the use of your device. UNO UP by Kindercraft.
USER MANUAL UNO UP Kindercraft
natural_image
Black circular play button icon with triangle symbol (no text or numbers)Watch manual
VIDEO!

youtube.com/kinderkraftofficial

kinderkraft.com
UNO UP
CZ DĚTSKÁ POSTÝLKA
DE KINDERBETT
EN BABY COT
ES CAMA INFANTIL
FR LIT BÉBÉ
HU GYEREKÁGY
IT LETTINO PER BAMBINI
NL BABY BED
PL ŁÓŻECZKO DZIECIĘCE
PT BERÇO INFANTIL
RO PĂTUȚ PENTRU BABELUȘ ȘI COPII
RU ДЕТСКАЯ КРОВАТКА
SK DETSKÁ POSTIELKA
CZ NÁVOD K OBSLUZE
natural_image
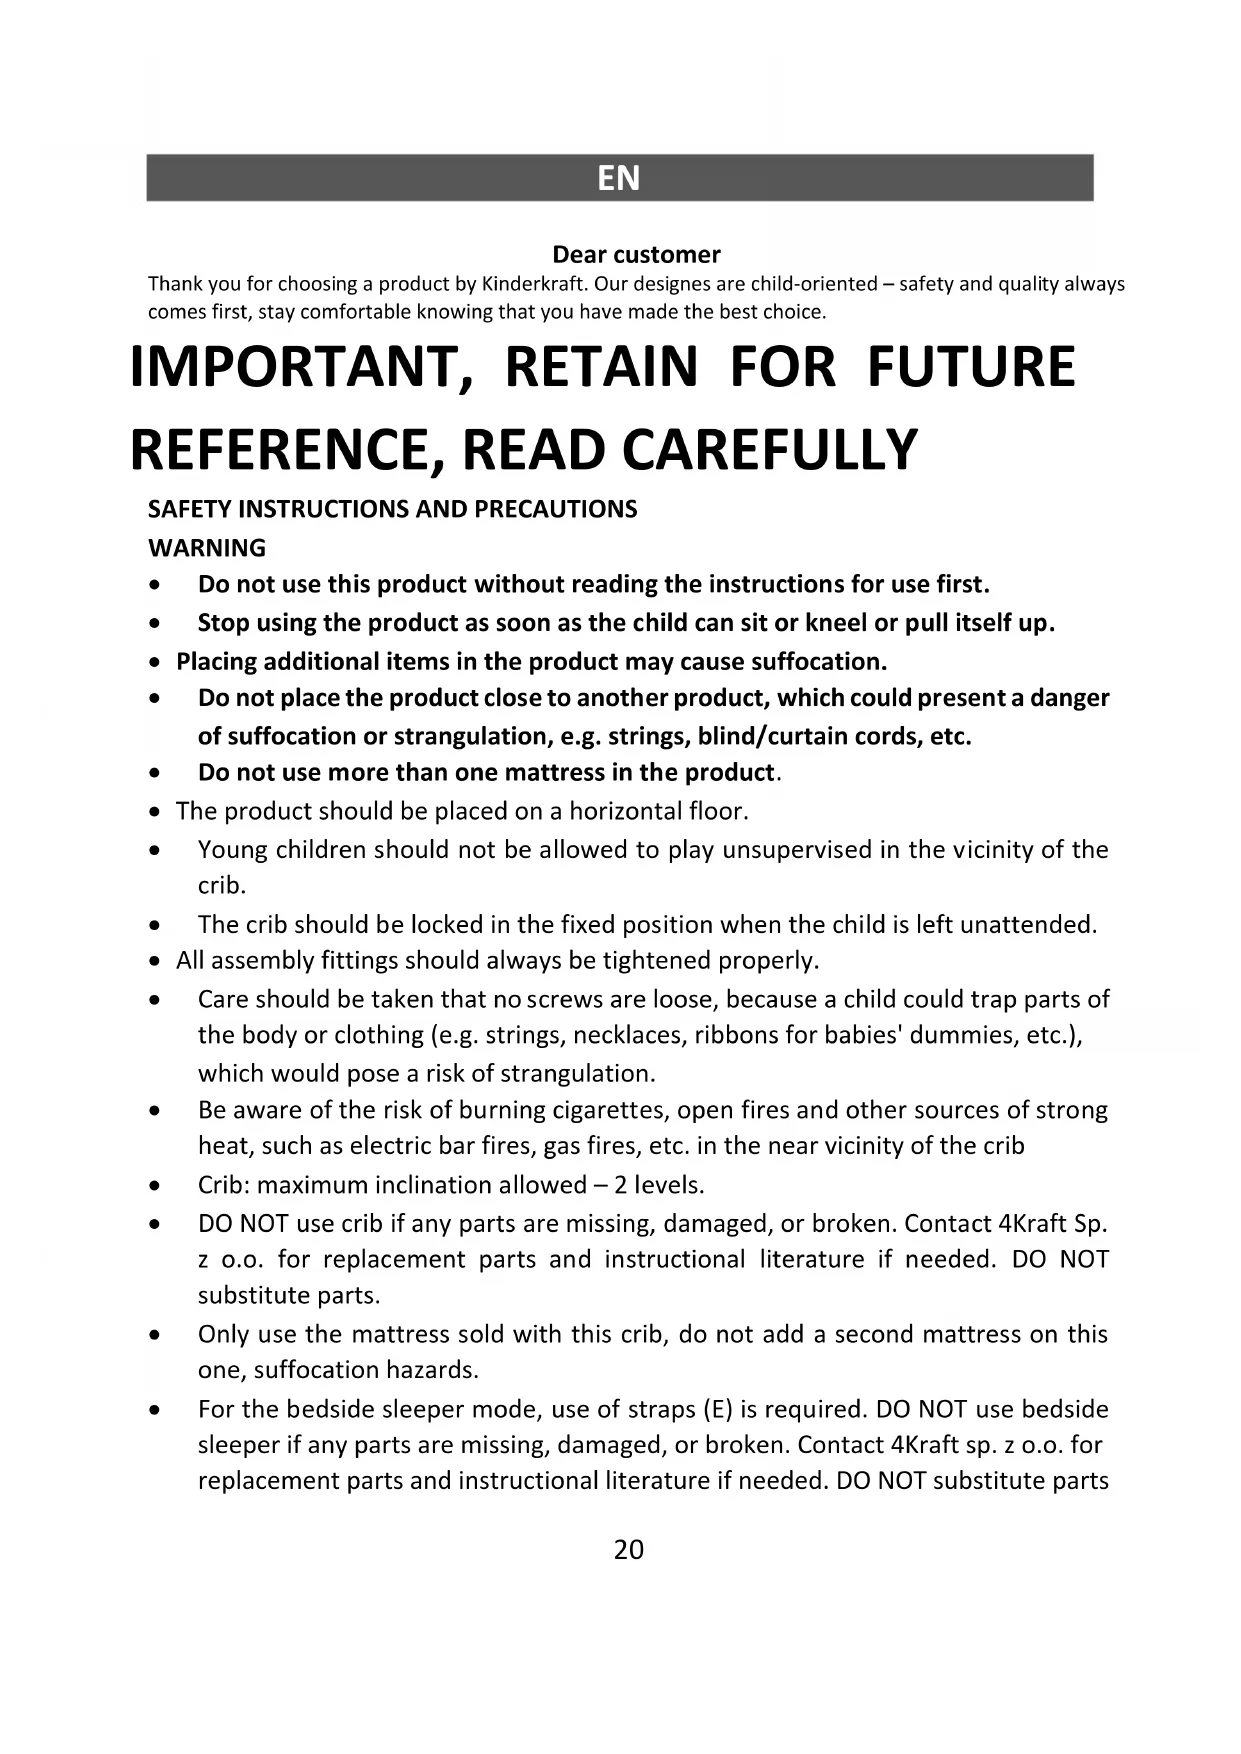
Line drawing of a mechanical device with two circular components and connecting rods (no text or symbols)A
natural_image
Simple line drawing of a rectangular container with two side handles (no text or symbols)B
natural_image
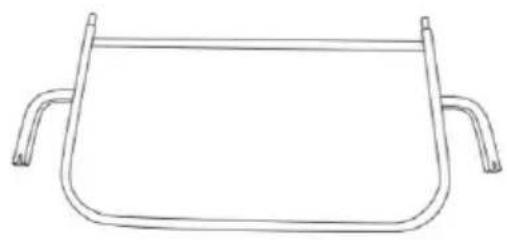
Simple line drawing of a horizontal bar with rounded ends and a central slot (no text or symbols)C
natural_image
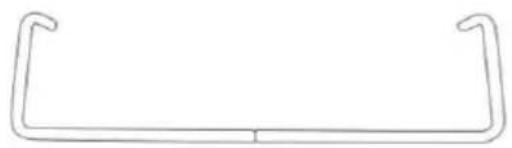
Simple hand-drawn rounded rectangle outline (no text or symbols)D
natural_image
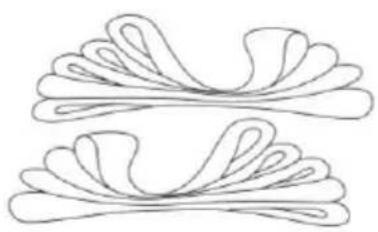
Abstract line drawing of two symmetrical, wavy, ribbon-like shapes with no text or symbolsE
natural_image
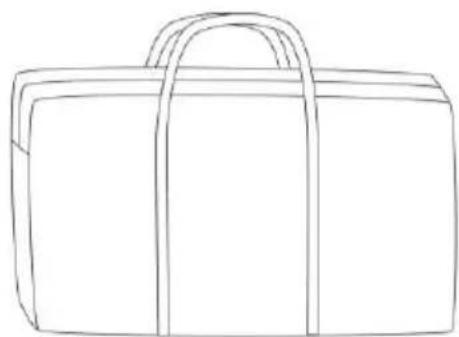
Line drawing of a closed rectangular object with a handle (no text or symbols)F
text_image
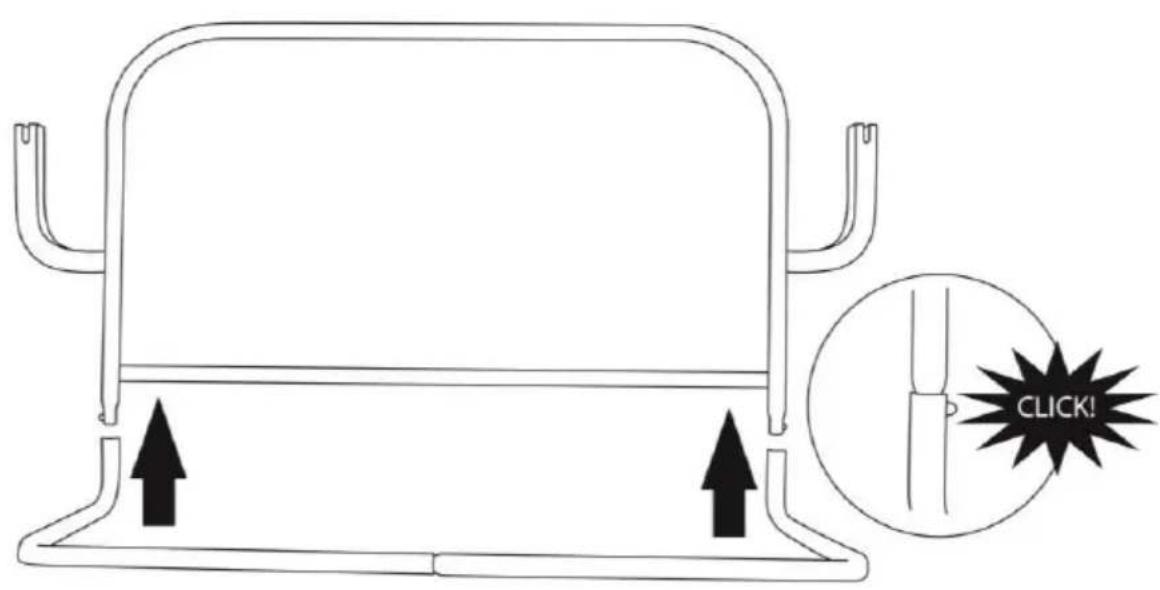
CLICK!1
text_image
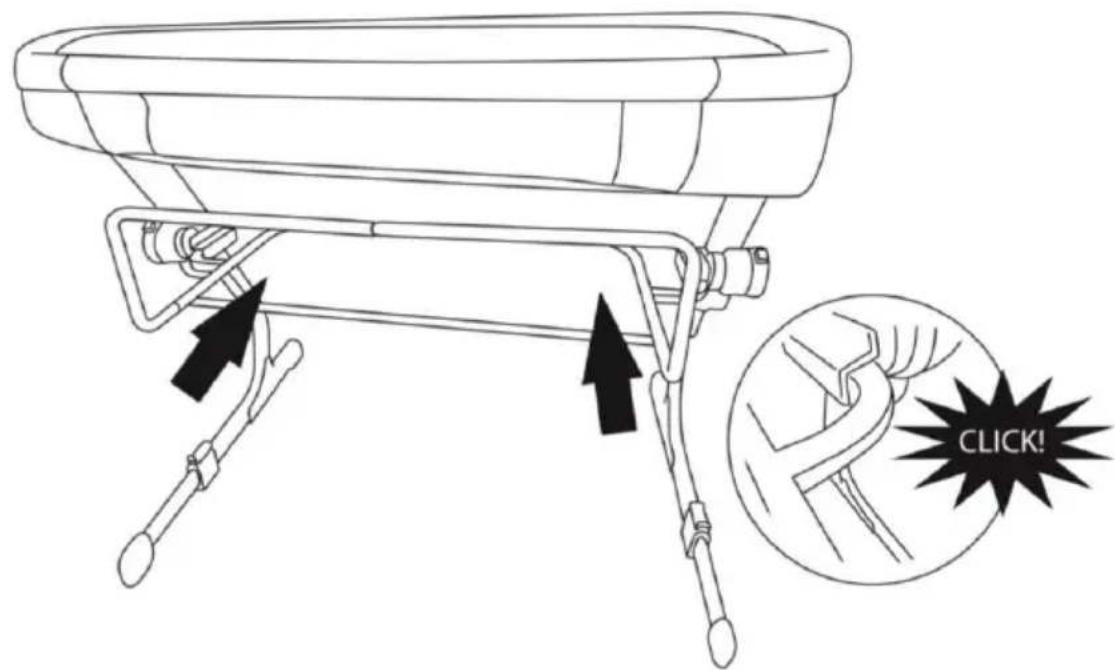
CLICK!2
4
natural_image
Line drawing of a mechanical component with arrows indicating direction (no text or symbols)5
natural_image
Line drawing of a baby bathtub with four legs (no text or symbols)6
7
natural_image
Line drawing of two hands holding a small object with arrows indicating movement or force (no text or symbols)8
9b
natural_image
Line drawing of a simple armchair with four legs (no text or symbols)9c
natural_image
Line drawing of two hands holding a small object, no text or symbols present10
natural_image
Mechanical diagram showing a lever mechanism with two directional arrows indicating motion (no text or symbols)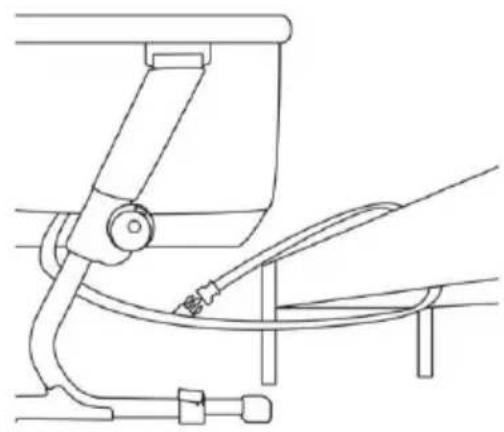
natural_image
Technical line drawing of a mechanical assembly with hoses and connectors (no text or symbols)11
text_image
Diagram illustrating finger movement with labeled points A and B, showing directional arrows indicating movement direction.12
text_image
OK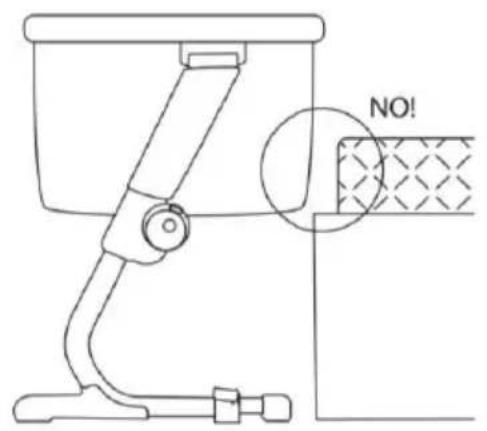
text_image
NO!13
text_image
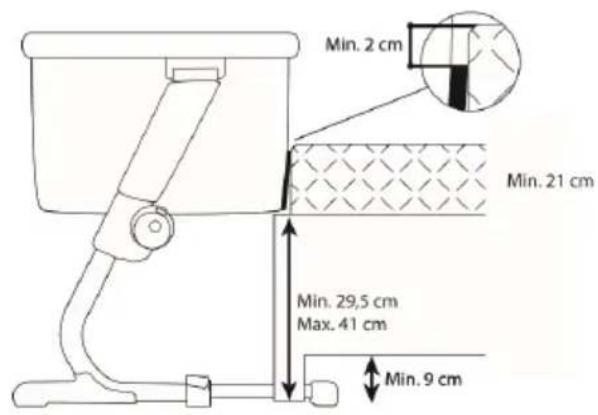
Min. 2 cm Min. 21 cm Min. 29,5 cm Max. 41 cm Min. 9 cm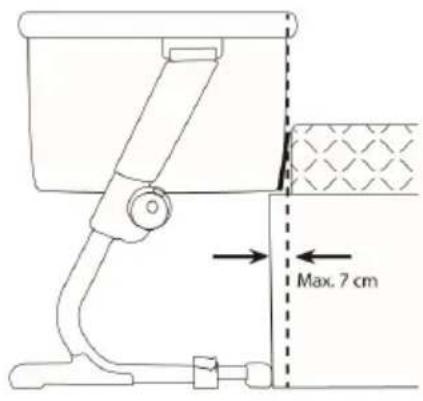
text_image
Max. 7 cm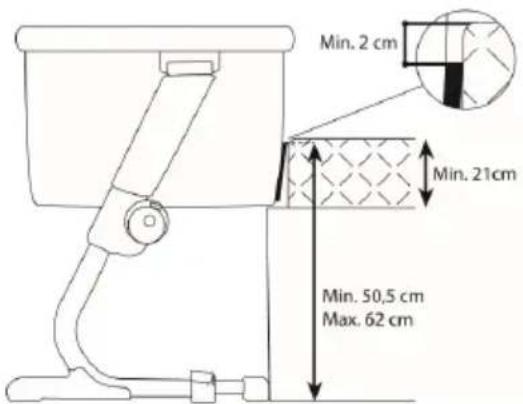
text_image
Min. 2 cm Min. 21cm Min. 50,5 cm Max. 62 cm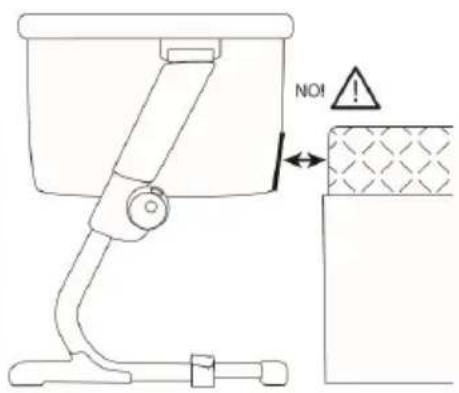
text_image
NO!14
text_image
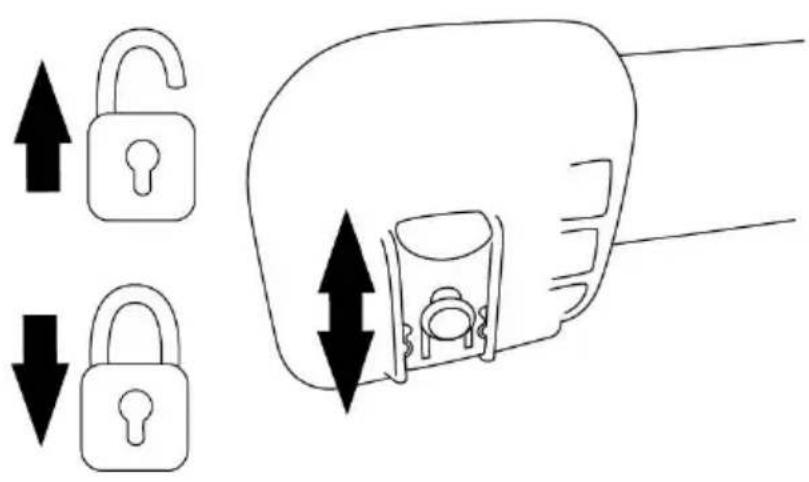
Diagram showing lock and plug mechanism with bidirectional arrows indicating movement or force15
Vážený zákazníku
Thank you for choosing a product by Kinderkraft. Our designs are child-oriented – safety and quality always comes first, stay comfortable knowing that you have made the best choice.
IMPORTANT, RETAIN FOR FUTURE REFERENCE, READ CAREFULLY
SAFETY INSTRUCTIONS AND PRECAUTIONS
WARNING
- Do not use this product without reading the instructions for use first.
- Stop using the product as soon as the child can sit or kneel or pull itself up.
- Placing additional items in the product may cause suffocation.
- Do not place the product close to another product, which could present a danger of suffocation or strangulation, e.g. strings, blind/curtain cords, etc.
- Do not use more than one mattress in the product.
- The product should be placed on a horizontal floor.
- Young children should not be allowed to play unsupervised in the vicinity of the crib.
- The crib should be locked in the fixed position when the child is left unattended.
- All assembly fittings should always be tightened properly.
- Care should be taken that no screws are loose, because a child could trap parts of the body or clothing (e.g. strings, necklaces, ribbons for babies' dummies, etc.), which would pose a risk of strangulation.
- Be aware of the risk of burning cigarettes, open fires and other sources of strong heat, such as electric bar fires, gas fires, etc. in the near vicinity of the crib
• Crib: maximum inclination allowed – 2 levels.
- DO NOT use crib if any parts are missing, damaged, or broken. Contact 4Kraft Sp. z o.o. for replacement parts and instructional literature if needed. DO NOT substitute parts.
- Only use the mattress sold with this crib, do not add a second mattress on this one, suffocation hazards.
- For the bedside sleeper mode, use of straps (E) is required. DO NOT use bedside sleeper if any parts are missing, damaged, or broken. Contact 4Kraft sp. z o.o. for replacement parts and instructional literature if needed. DO NOT substitute parts
- Height from the floor of the adult's bed for which the bedside sleeper is suitable can be found on picture 14.
- Information on the types of adult bed for which the bedside sleeper is suitable can be found on picture 14.
- User shall not use other attachment system.
- Bedside sleepers shall never be used in an inclined position
- To prevent a suffocation hazard from entrapment, the bedside sleeper shall be properly secured to the adult bed using the attachment system.
- There shall never be a gap between the lower side of the bedside sleeper and the mattress of the adult bed.
- Check the tightness of the attachment system before each use by pulling the bedside sleeper in a direction away from adult bed.
- If there is any gap between the bedside sleeper and the adult bed, DO NOT use product.
- Gaps should not be filled with pillows, blankets or other items.
- DANGER! – Always completely raise the drop side when not attached to the adult's bed
- To avoid hazards from the child's neck being caught on the top rail on the side that is next to the adult bed, the top rail must not be higher than the adult bed mattress.
- To avoid the risk of your child being strangled the attachment system to the adult's bed shall always be kept away from and out of the crib.
1. List of baby cot components - page 3
| A | Main frame | B | Middle support of the cot's bottom |
| C | Side support of the cot's bottom | D | Mattress with removable cover |
| E | Fastening straps | F | Carrying Bag |
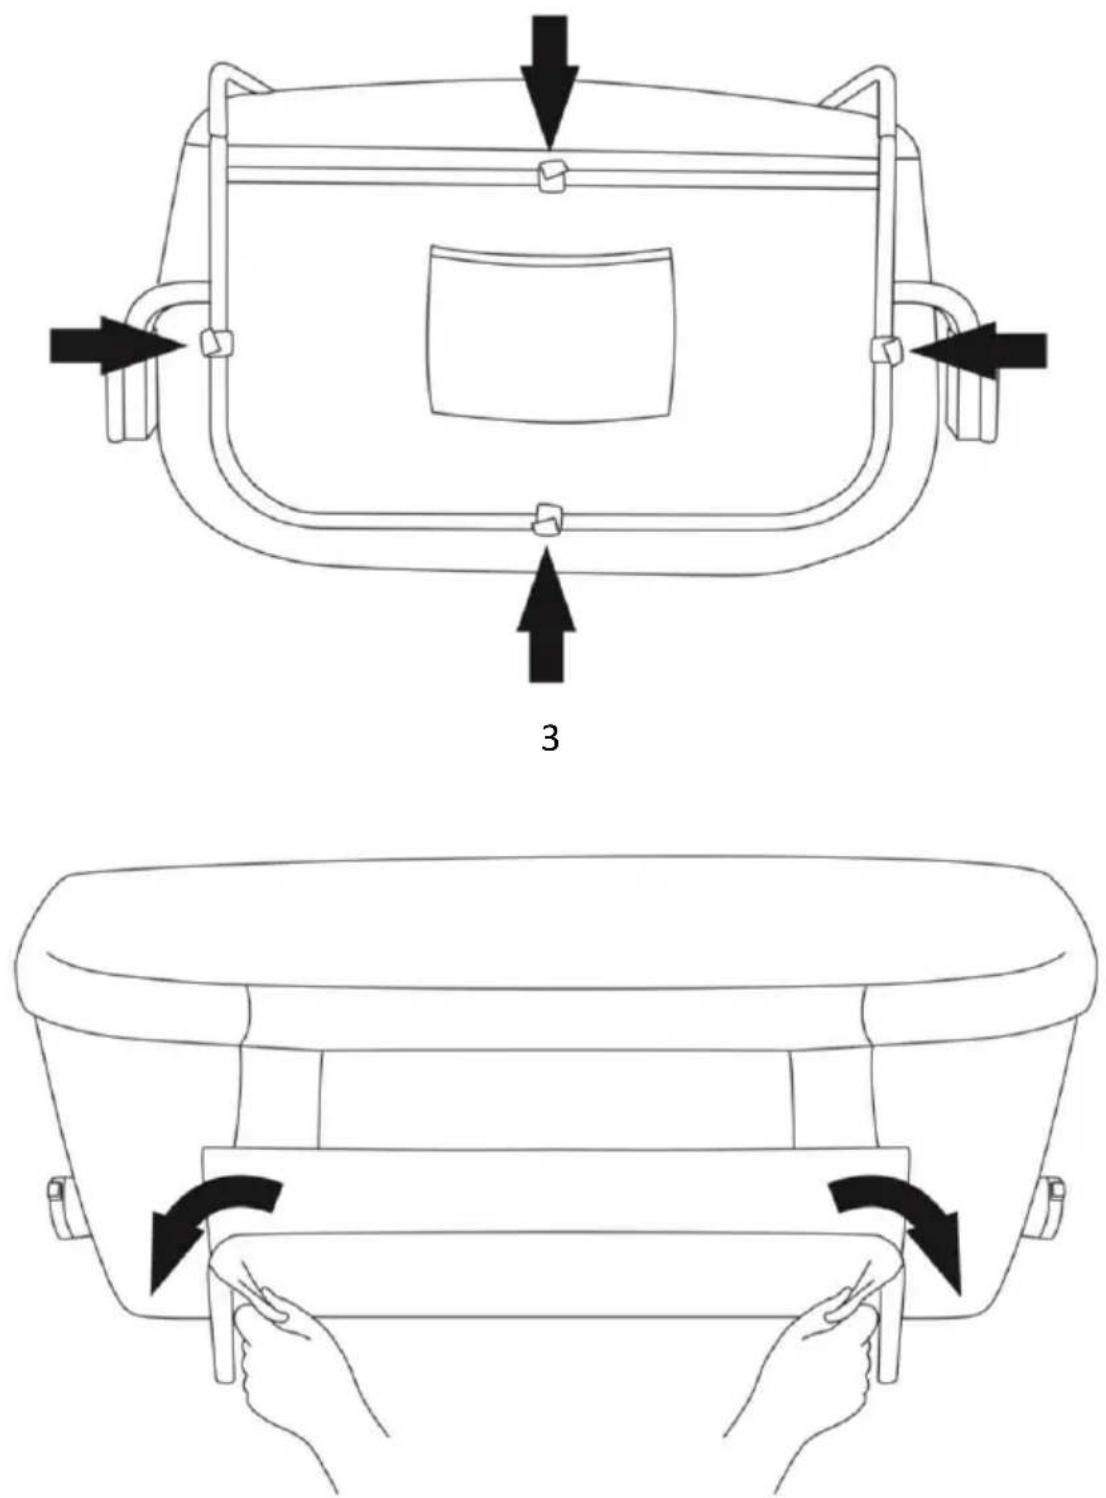
2. Mounting of the cot:
Attach the middle support (B) to the side support (C). Make sure that the metal latches are properly secured: you should hear a "click" sound (fig. 1). Connect the obtained construction to the main frame (A) by sliding it in on both sides until it locks in place with another characteristic "click" (fig. 2). Attach Velcro straps around the supports on the underside and on the sides of the cot (fig. 3). Insert the mattress into the interior of the cot, taking care to ensure that it is in the correct position. Cover the side support (C) with the cover provided (fig. 4). Attach the loose end of the cover to the bottom of the cot with Velcro straps. (fig. 5). The cot is ready to use (fig. 6).
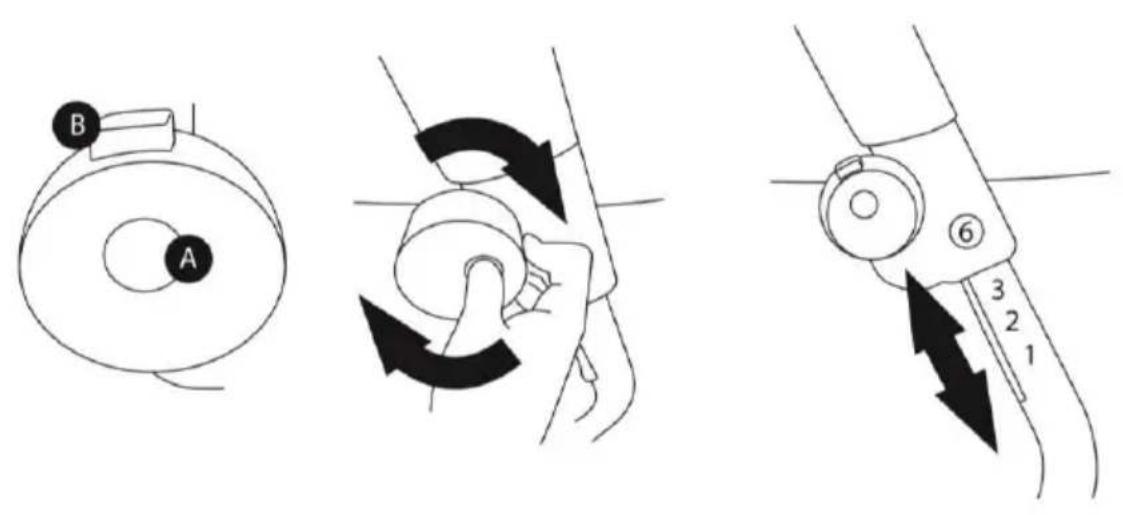
3. Height adjustment:
The cot is adjustable to 6 different heights. To adjust the height of the cot, press buttons A and B at the same time and turn the knob (fig. 7).
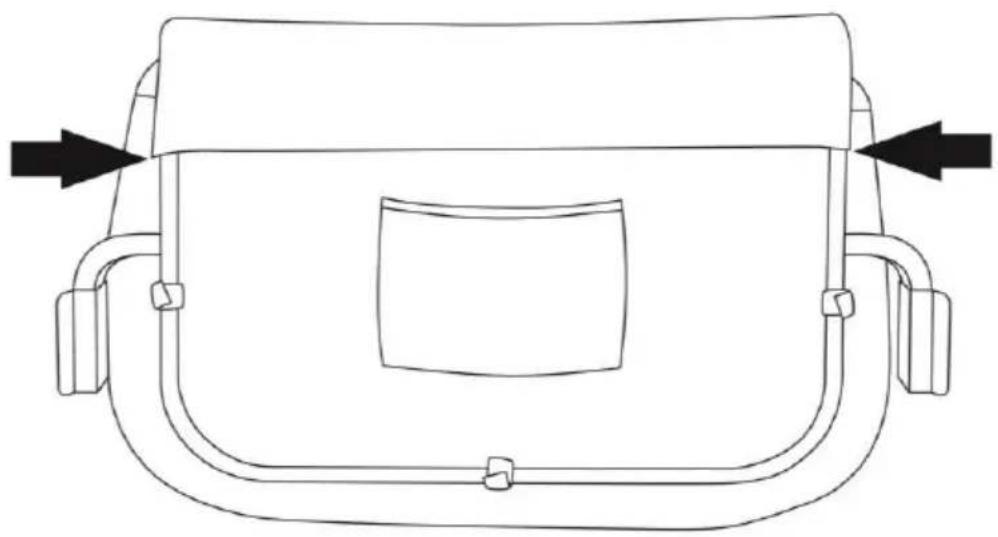
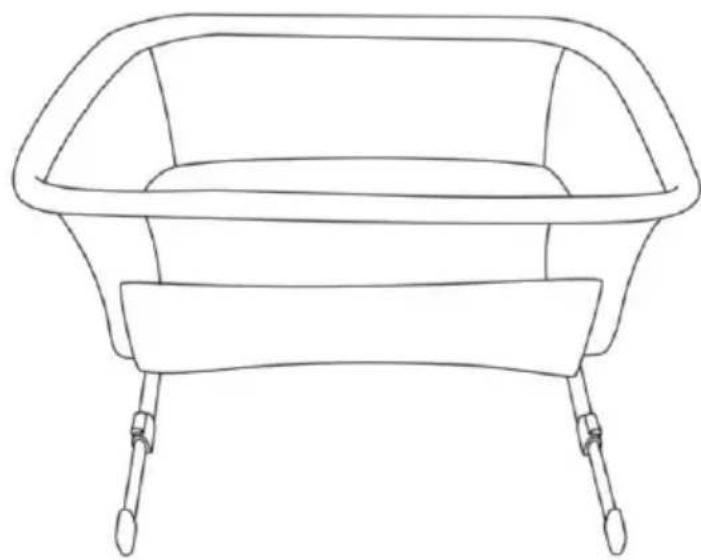
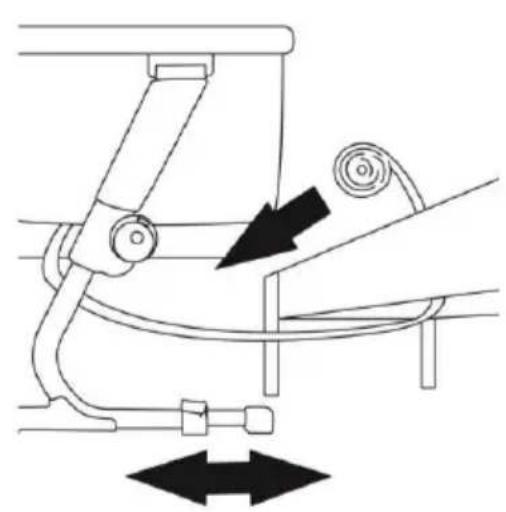
4. Bedside cot:
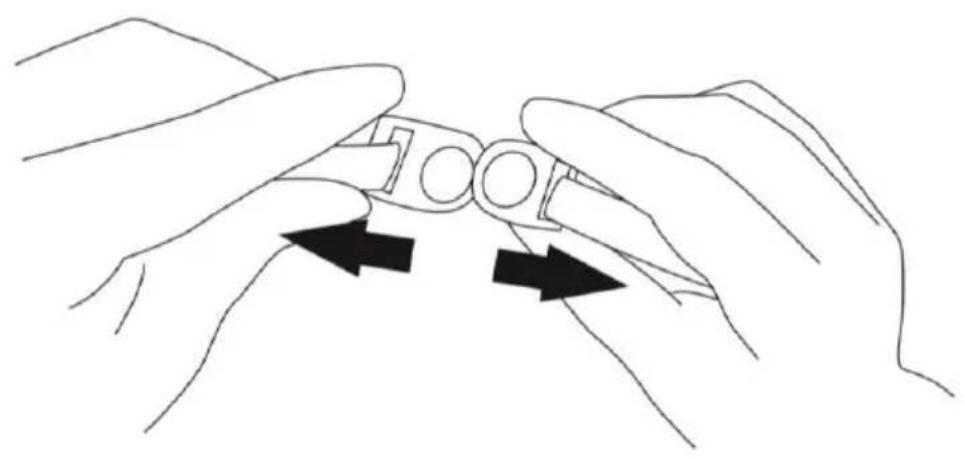
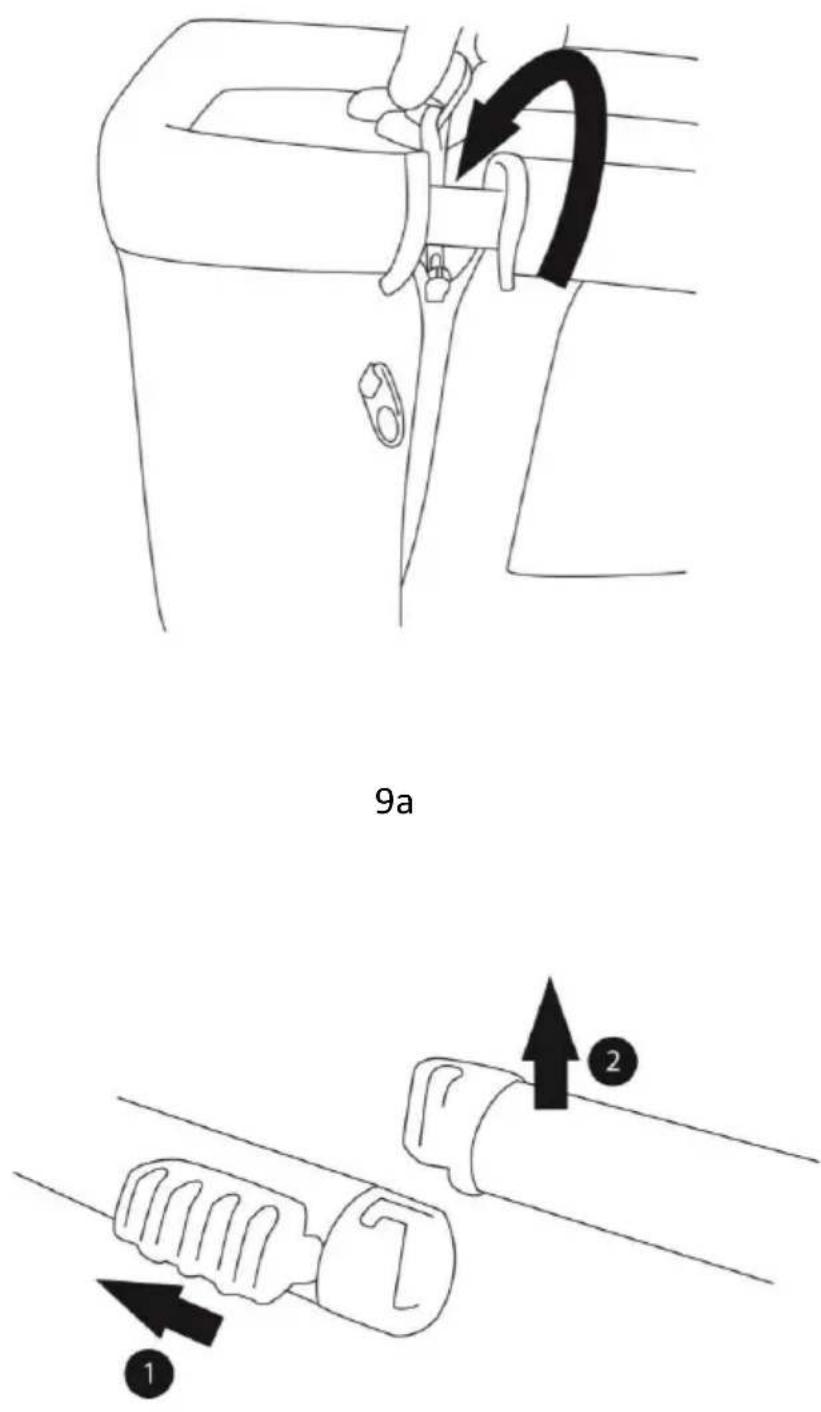
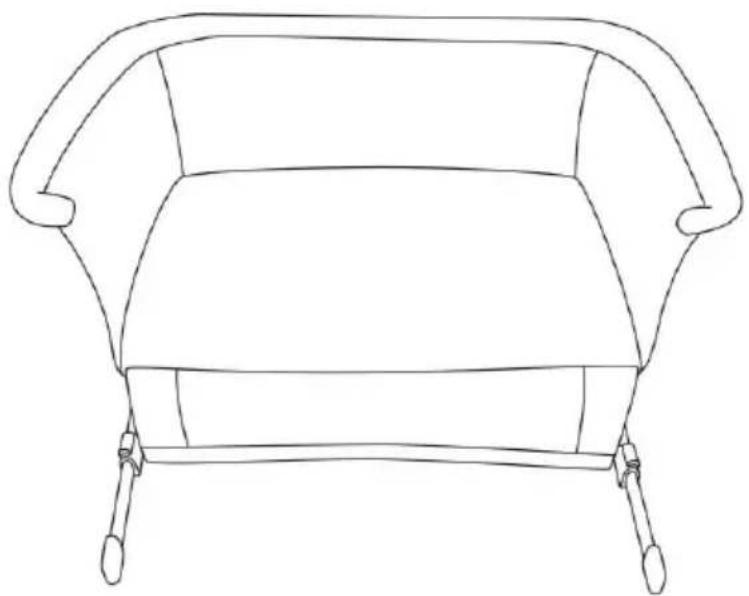
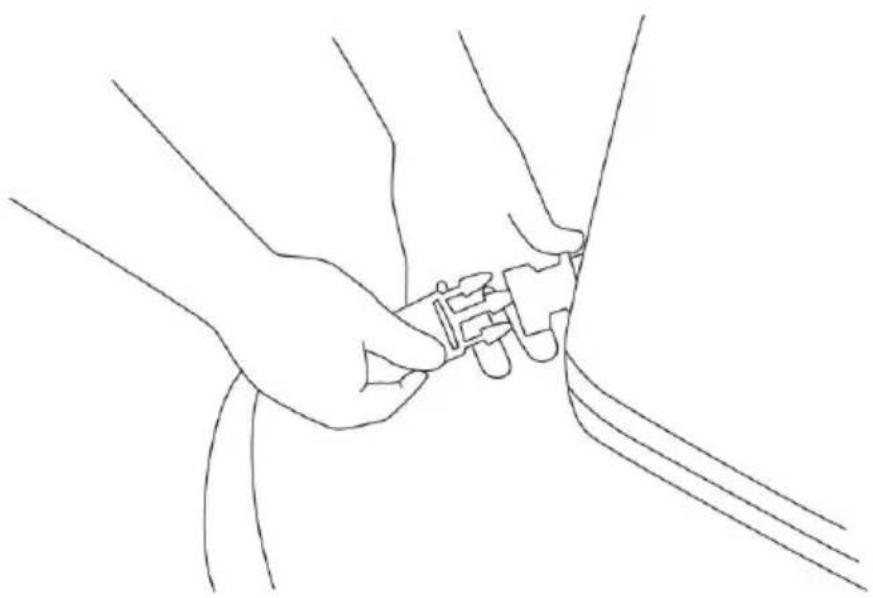
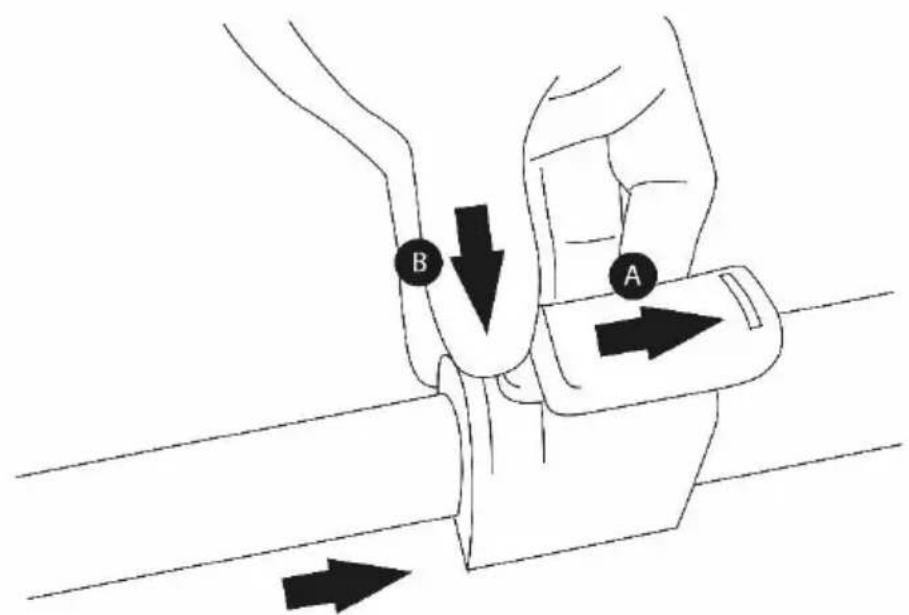
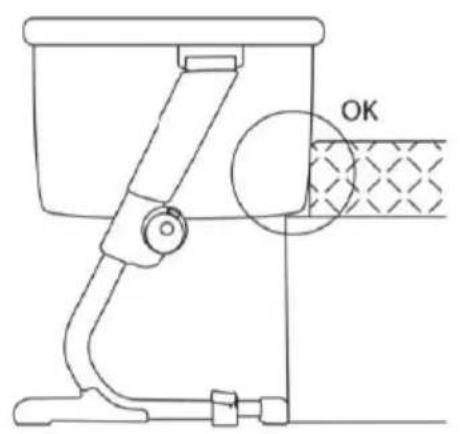
To attach the cot to the parent's bed, unfasten the safety locks (fig. 8). Unlock the zips on both sides (fig. 9a). Slide the lever and pull out the tube of the side panel (fig. 9b). Repeat the same action on the other side. Remove the side panel of the cot (fig. 9c) and pull the tube out of it. Adjust the height of the cot to the parents' bed (see fig. 14). Attach the fastening straps to the cot (fig. 10). Make sure that the hooks of the fastening straps are positioned so that they are not covered. If necessary, put the fastening straps through the holes in the Velcro straps. Interleave the straps through the whole bed or only through the side rail (fig. 11) and adjust the straps so that the cot is fixed firmly to the parents' bed (fig. 13). Roll the loose parts of the straps under the cot. To move the cot as close as possible from the base of the parent's bed move button A sideways (fig. 12) and at the same time press button B. Move the legs to the desired distance. ATTENTION! Make sure that the straps are properly adjusted and the cot is adjacent to the mattress of the parents' bed (fig. 13).
5. Locking the wheels:
The cot has 2 wheels that allow to move the cot and to connect it with the parents' bed. To lock the wheels, press the locking button down. To unlock, move the button upwards (fig. 15).
6. Maintenance and cleaning
Frame - clean with a soft, clean and dry cloth.
 | Wash at max. 30°C, gentle process. |  | Do not wash. Clean the product gently with a damp cloth and a mild detergent. |
 | Do not bleach |  | Do not iron |
 | Do not dry in a tumble dryer |  | Do not dry clean |
Do not fold or store the product when it is wet and never store it in wet conditions, as it can lead to mould growth.
7. Warranty
A. All Kinderkraft products are covered by a 24-month warranty. The warranty period begins on the date of releasing the product to the Buyer.
B. The warranty is valid for products sold in the following countries: France, Spain, Germany, Poland, United Kingdom, Italy.
C. In countries not listed above warranty terms and conditions are determined by the Seller.
D. It is possible to extend the warranty period to 120 months (10 years). Full text of the terms and conditions and warranty extension registration form are available at WWW.KINDERKRAFT.COM
E. The warranty is valid only in the country where the purchase was made.
F. Complaints should be submitted by completing the form available at WWW.RMA.KINDERKRAFT.COM
G. The warranty shall not cover:
a. claims arising from product specifications, as long as they comply with those specified by the manufacturer in the instruction manual or other documents of a legislative nature;
b. product damage caused by improper maintenance or use of inadequate chemicals;
c. colour change (discolouration) when the product has been exposed to direct sunlight against the instructions provided in the instruction manual;
d. tear, wear, crack of fabric/plastic that is the fault of the Customer;
e. reduction in the quality of the product and consumables due to normal wear and tear;
f. products which have not been used according to specifications;
H. The warranty period for accessories attached to the device is 6 months from the date of sale, with the exception of mechanical damage.
- With regard to Products such as furniture, the Customer is obliged to deliver the Product only at the express request of the Warrantor. In such a case, the Product should be packed in a way that allows for safe transport, i.e., if possible, in the original packaging, or, if there is no original packaging, in substitute, cubic packaging, which protects the Product against damage in transport. The Guarantor reserves the right not to collect the Product if it is packed in an incorrect way, until the indicated irregularities are removed.
J. The warranty claim for Products such as furniture is considered on the basis of the complaint form available at www.rma.kinderkraft.com and the attached photos. In case the piece of furniture is shipped by the Customer on its own, i.e. before the previous instruction from the Guarantor, referred to in point I above, the Guarantor is not obliged to refund the costs incurred in this way and take any actions resulting from the Guarantee.
K. These guarantee terms and conditions are complementary to the Customer's rights in relation to 4KRAFT sp. z o.o. The warranty shall not exclude, limit or suspend the rights of the Customer arising from the provisions on the warranty for defects in the goods sold.
L. Full text of Warranty Terms and Conditions is available at WWW.KINDERKRAFT.COM.
All rights to the present document belong entirely to 4Kraft Sp. z o.o. Any unauthorized use of them against their purpose, including in particular: using, copying, reproducing, making available - in whole or in part, without the consent of 4Kraft Sp. z o.o. may result in legal consequences.
ES
¡Estimado Cliente!
EN In the interests of our Clients - we are at your disposal! If you have a problem with the product you received, contact us in the most convenient way for you!