LEODY - Baby bed Kindercraft - Free user manual and instructions
Find the device manual for free LEODY Kindercraft in PDF.
User questions about LEODY Kindercraft
0 question about this device. Answer the ones you know or ask your own.
Ask a new question about this device
Download the instructions for your Baby bed in PDF format for free! Find your manual LEODY - Kindercraft and take your electronic device back in hand. On this page are published all the documents necessary for the use of your device. LEODY by Kindercraft.
USER MANUAL LEODY Kindercraft
natural_image
Line drawing of a baby crib with wheels and a curved backrest (no text or symbols)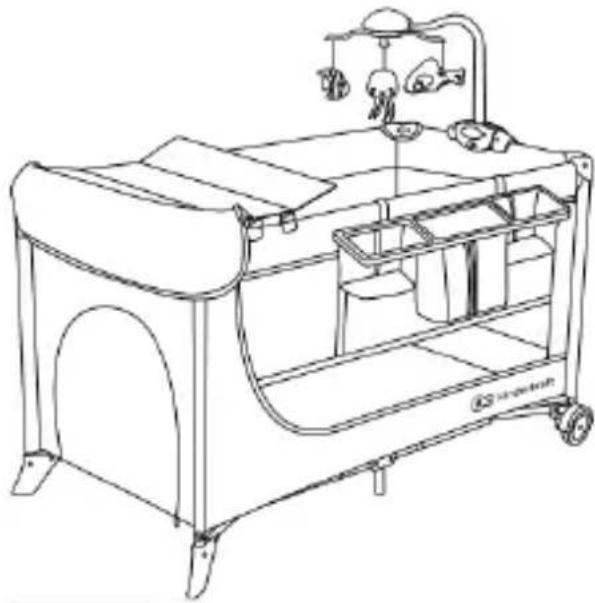
natural_image
Line drawing of a baby crib with seats and overhead fixtures (no text or symbols)
kinderskraft.com

kinderkraftofficial

kindenlkaft

kindendraftofficial
(AR) دليل الاستخدام (CS) Návod k obsluze (DE) Bedienungsanleitung (EN) User manual (ES) Manual de uso (FR) Guide d'utilisation (HU) Használati útmutató (IT) Istruzioni per utente (NL) Gebruiksaanwijzing (PL) Instrukcja obsługi (PT) Manual de instruções (RO) Manual de utilizare (RU) Руководство по эксплуатации (SK) Návod na použitie (SV) Bruksanvisning
(AR) (CS) Cestování cot (DE) Reisebett (EN) Travel cot (ES) Cuna de viaje (FR) Lit de voyage (HU) Utazoagy (IT) Lettino da viaggio (NL) Reiswieg (PL) Łóżeczko turystyczne (PT) berço de viagem (RO) Pat de călătorie (RU) Кроватка для путешествий (SK) Cestovná postel' (SV) Resesäng
All rights to this data are entirely reserved to 4Kraft Sp. z o.o. Any unauthorized use or misuse, including usufruct, copying, duplication and sharing, wholly or partially, without consent of 4Kraft Sp. z o.o. may result in legal consequences.
AR....10
CS 15
DE 21
EN....28
ES....34
FR 40
HU 47
IT 53
NL 59
PL....66
PT 72
RO....78
RU....85
SK 91
SV 97
natural_image
Close-up of a hand using a tool to adjust or install a small component on a wooden surface, with arrows indicating movement (no text or symbols visible)G
natural_image
Medical procedure image showing a surgical tool interacting with a patient's arm (no visible text or labels)H
natural_image
Close-up of a wooden door with two arrows pointing to a hole and a curved surface (no text or symbols visible)|
natural_image
Close-up of a hand placing a small box into a container with an arrow indicating rotation (no text or symbols visible)J
natural_image
Close-up of a fabric or leather piece with a black arrow pointing to a detail (no visible text or symbols)K
natural_image
Close-up of a hand pressing down on fabric with a curved arrow indicating direction (no text or symbols)L
natural_image
Interior view of a bed with visible bedding and wall-mounted frame (no text or symbols)M
natural_image
Close-up of a hand pressing down on fabric with a black arrow pointing to a seam (no text or symbols visible)N
natural_image
Black-and-white photo of a doorway with curtains and hanging clips (no text or symbols visible)0
natural_image
Close-up of a hand adjusting a small object on a wooden surface, with arrows indicating motion (no text or symbols visible)P
natural_image
Close-up of a textured fabric or material surface with two black arrows pointing to specific features (no text or symbols visible)R
natural_image
Close-up of a white plastic clip attached to a textured fabric or material (no visible text or symbols)s
natural_image
Close-up of a fabric or leather jacket with two black arrows pointing to a small piece, no visible text or symbols.T
natural_image
Close-up of fabric detail with a circular arrow indicating rotation, no visible text or symbolsU
natural_image
Close-up of a small sink with a handle and a curved handle, showing a downward arrow indicating a force or point (no text or symbols present)W
natural_image
Close-up of a plastic recycling bin with two arrows pointing to the top panel (no text or symbols visible)X
natural_image
Close-up of a curved metallic object with an arrow pointing to it, possibly part of a device or tool (no visible text or symbols)Y
natural_image
Close-up of a curved, smooth object with a curved arrow indicating rotation or movement (no text or symbols)Z
natural_image
Close-up of a hand holding a cylindrical device with a curved arrow indicating motion or direction (no text or symbols visible)AA
natural_image
Close-up of hands performing a medical procedure on a bulb, with an arrow indicating the point of motion (no text or symbols present)AB
natural_image
Two black-and-white illustrations of a female reproductive system, one with a hand pulling a baby and the other holding a bag (no text or symbols)AC
natural_image
Illustration of a child playing with toys under a lamp, featuring a cat and fish (no text or symbols)AD
text_image
Körkska KinderkraftAE
natural_image
Close-up of hands adjusting a wooden beam with directional arrows indicating movement (no text or symbols)AF

natural_image
Close-up of a wooden bed frame with visible bedding and structural ribs (no text or symbols)AG
natural_image
Stacked shipping containers with a folded paper bag on top (no visible text or symbols)AH
natural_image
Black and white photo of a baby crib with mesh backrest and small accessories (no text or symbols visible)AI
natural_image
Close-up of hands installing or adjusting a dark panel with arrows indicating direction (no text or symbols visible)AJ
natural_image
Close-up of a curved mechanical component with a hand holding a looped part, showing motion direction (no text or symbols)AK
text_image
Diagram illustrating human behavior with stick figures and directional arrows, possibly indicating movement or interaction.natural_image
Simple line drawing of a sun above a musical note and a circle with motion arrows (no text or symbols)natural_image
Symbol of a trash bin crossed with two crossed lines, no text or numbers presentnatural_image
Illustration showing human and child walking poses with a diagonal pole, no text or symbols presentnatural_image
Simple line drawing of a sun, musical note, and music symbol (no text or labels)natural_image
Simple line drawing of a trash bin with crossed lines indicating no waste or discharge (no text or symbols)natural_image
Illustration showing human and child walking poses with a diagonal pole, no text or symbols presentLaufgitter- WARNUNG:
natural_image
Simple line drawing of a sun, musical note, and music symbol (no text or labels)natural_image
Simple line drawing of a trash bin with crossed lines indicating no waste or plastic (no text or symbols)Thank you for choosing a product by Kinderkraft. Our designs are child-oriented – safety and quality always comes first, stay comfortable knowing that you have made the best choice.
IMPORTANT, RETAIN FOR FUTURE REFERENCE: READ CAREFULLY
SAFETY INSTRUCTIONS AND PRECAUTIONS IMPORTANT! KEEP FOR FUTURE REFERENCE WARNING
- Be aware of the risk of open fire and other sources of strong heat, such as electric bar fires, gas fires, etc. in the near vicinity of the cot;
- Do not use the cot if any part is broken, torn or missing and use only spare parts approved by the manufacturer;
- Do not leave anything in the cot or place the cot close to another product, which could provide a foothold or present a danger of suffocation or strangulation, e.g. strings, blind/curtain cords;
-
Do not use more than one mattress in the cot.
-
Travel cot is ready for use, only when the locking mechanisms are engaged. Check carefully that they are fully engaged before using the folding travel cot.
- The lowest position of the base is the safest. When the child starts sit alone, is advised to use only this base level.
- If you leave the child in the cot unattended, always check, if the side entrance is fastened with a zip.
- Thickness of the mattress shall be such that the internal height (measured from the top of mattress to the upper edge of the cot frame) was at least 500 mm in the lowest position of the travel cot base and at least 200 mm in the highest position of the travel cot base.
• Maximum thickness of the mattress: 8 cm. - Mattress should have size 120 x 60 cm. Length and width shall be that there shall be no gap more than 30 mm between the mattress and the sides and ends.
- All assembly elements and fittings should be tightened properly and checked regularly and retightened as necessary.
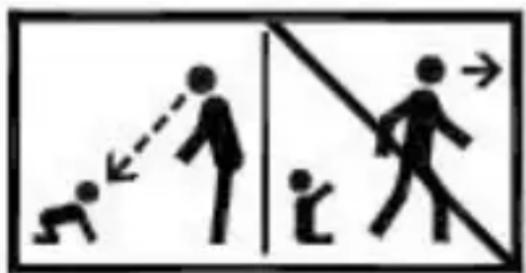
• To prevent injury from falls, if the child is able to climb out of the cot, the cot shall no longer be used for that child.
CHANGING PAD – WARNING:
Changing pad is available only in travel cot with accessories
- WARNING: Do not leave the child unattended
• Wheels shall be locked before the changing pad is in use
text_image
Diagram illustrating human walking and child movement with directional arrows, including a baby figure and adult figure.- The changing pad is intended for use for children up to an age of 12 months and up to a maximum weight of 11 kg.
- Any additional or replacement parts shall only be obtained from the manufacturer or distributor.
• Never leave changing unit in place when child is in the playpen.
PLAYPEN – WARNING:
- Do not place the playpen close to an open fire or other heat source.
- Do not use the playpen without the base.
- Ensure that the playpen is fully erected and all the locking mechanisms engaged before placing your child in this playpen.
• Maximum age of child for which the playpen is intended – 36 months.
- The base should always be used in the lowest position as soon as the child is old enough to sit, kneel or to pull itself up.
- Accessories which are not approved by the manufacturer shall not be used.
- Do not leave anything in the playpen or place the playpen close to another product, which could provide a foothold or present a danger of suffocation or strangulation, e.g. strings, blind/curtain cords.
- All assembly fittings should always be tightened properly.
- Do not use the playpen if any part is broken, torn or missing and use only spare parts approved by the manufacturer.
- When using the playpen function, do not use the bar with toys and a mattress.
- If you leave the child in the playpen unattended, always check, if the side entrance is fastened with a zip.
TOY BAR - Safe use of the batteries:
Toy bar is available only in travel cot with accessories.
Non-rechargeable batteries are not to be recharged. Different types of batteries or new and used batteries are not to be mixed. Check polarity when inserting batteries.
Remove empty batteries from the product. Do not short-circuit power poles. The batteries can be charged only under adult supervision. Rechargeable batteries are to be removed from the toy before being charged.
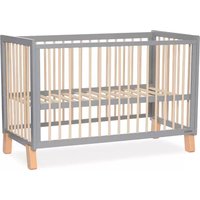
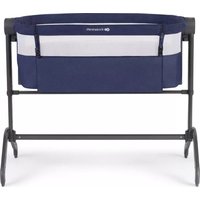
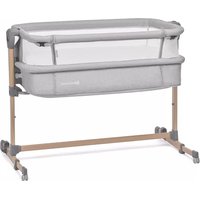
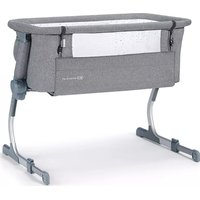
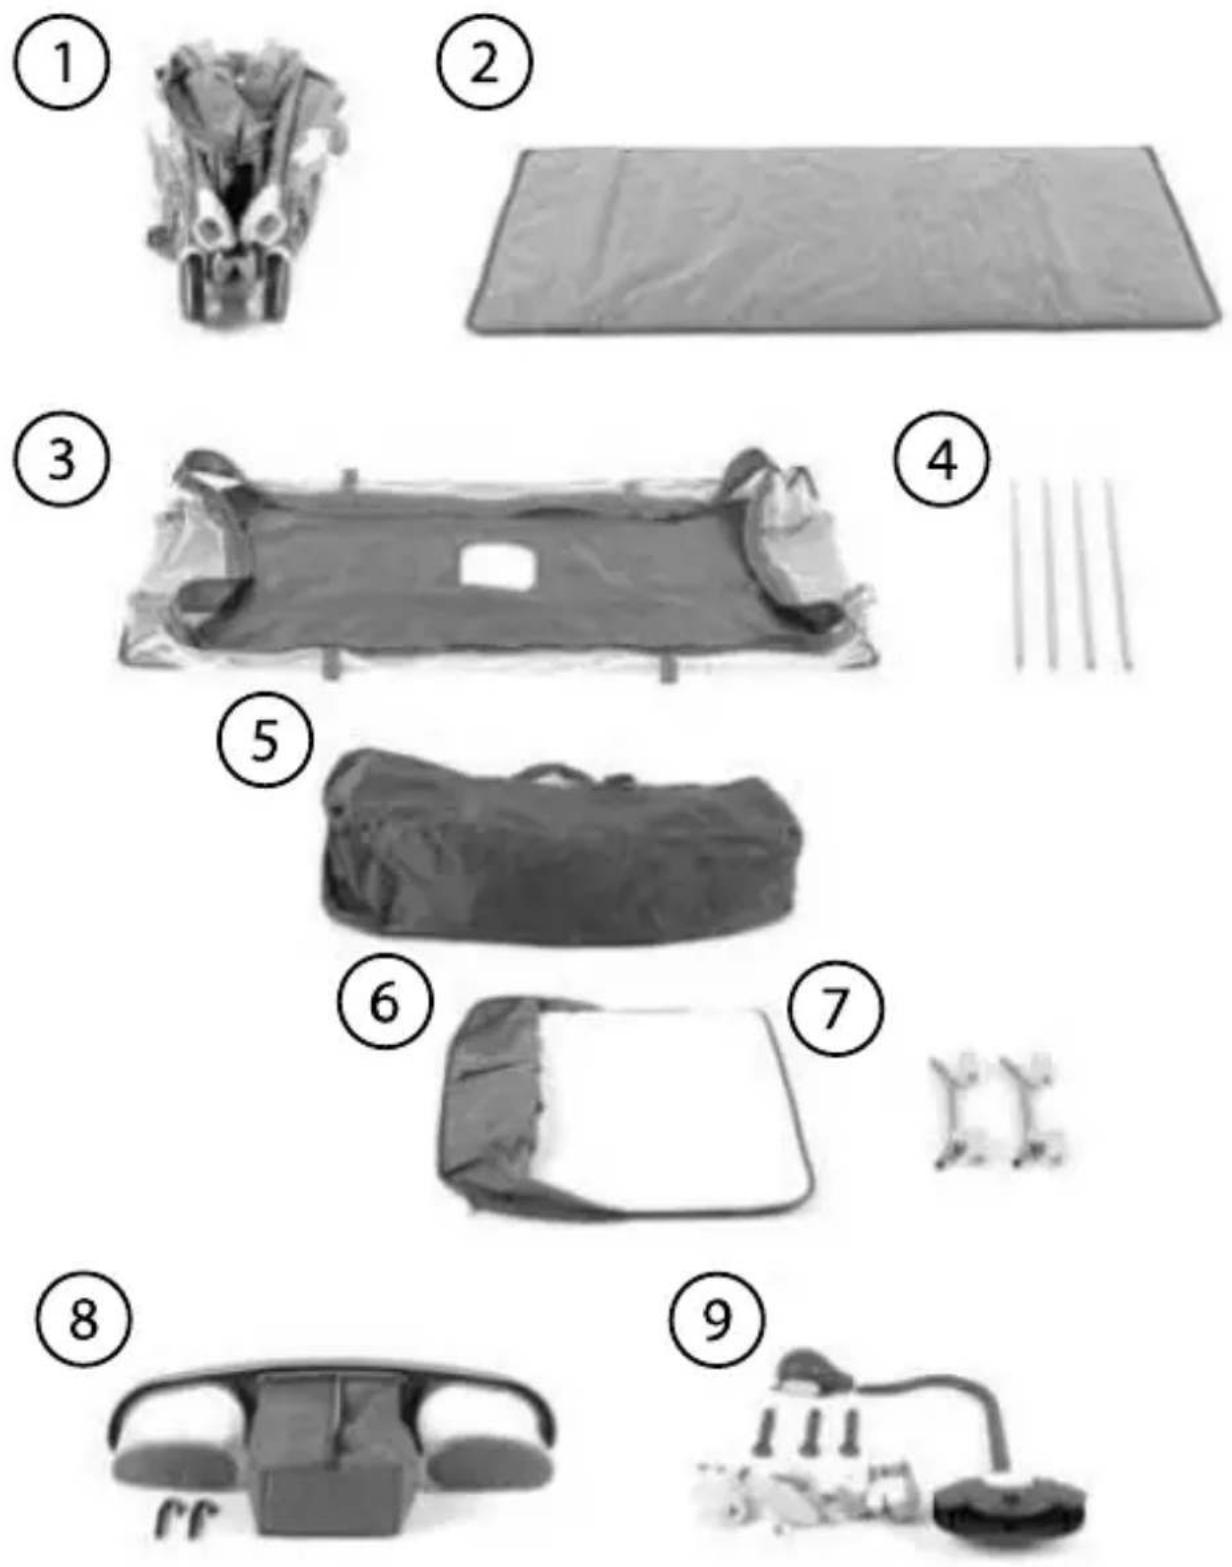
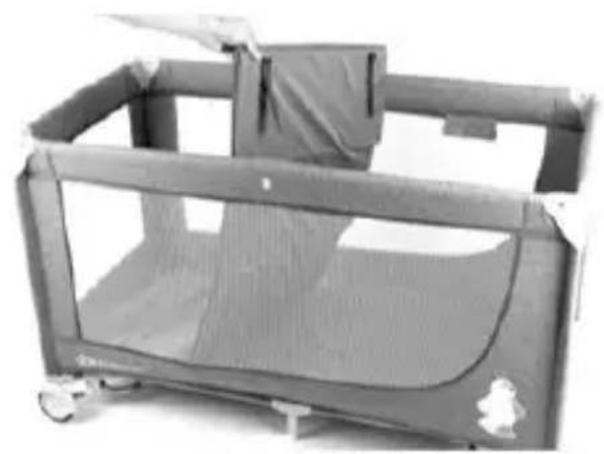
List of baby cot elements:
- Frame
- Folding base
- Suspended floor
- Suspended floor brackets x4
- Bag
- Changing top*
- Skids to secure the changing table x2*
- Panel with baskets and fastening hooks (x2)*
- Toy bar with 3 plush mascots*
*Items available only in the model with accessories.
1. Assembly of the bed:
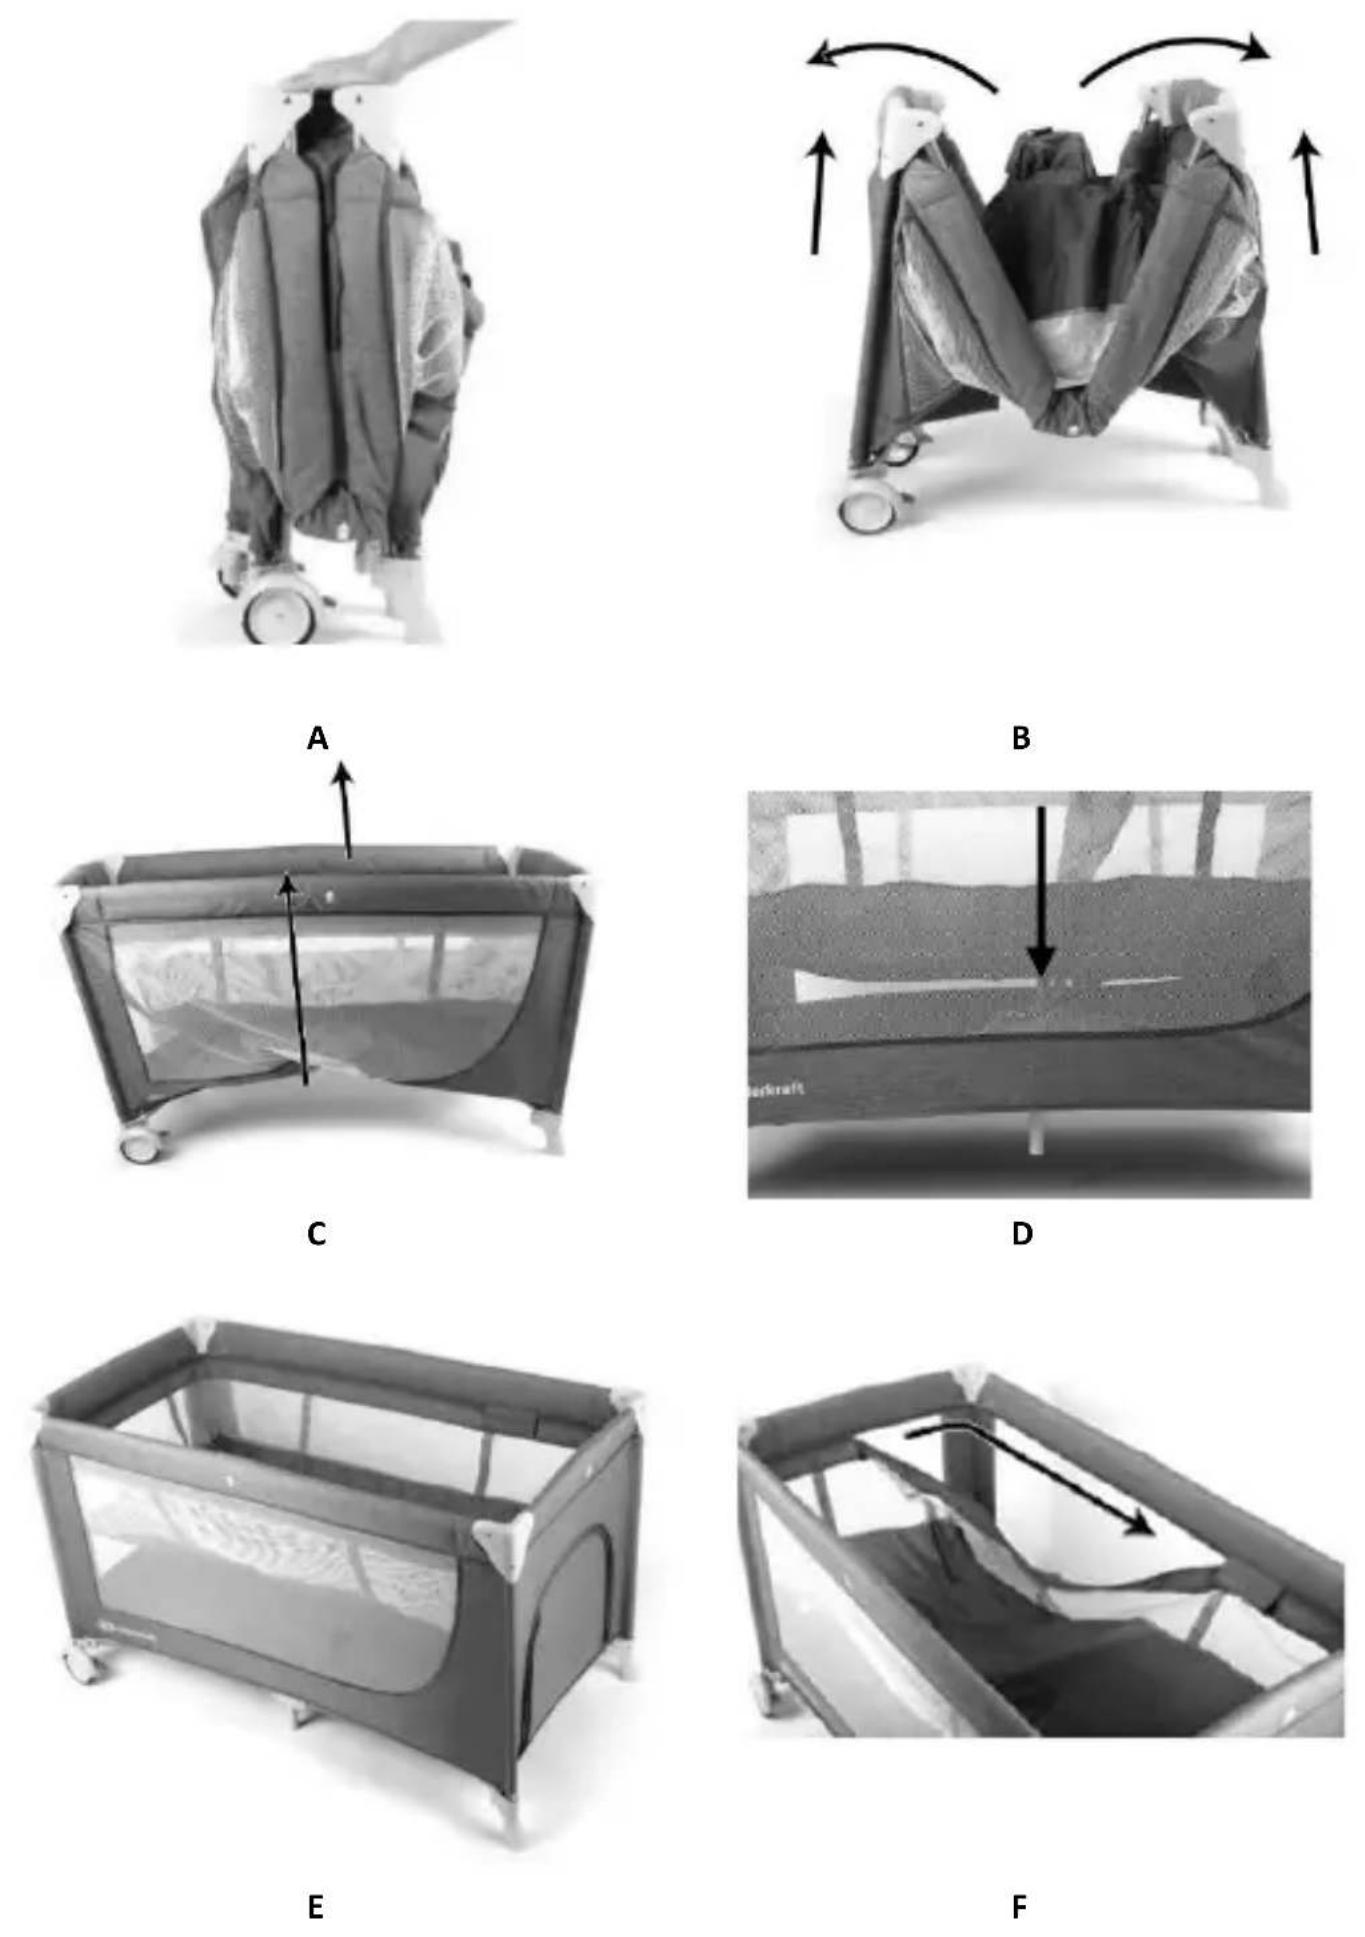
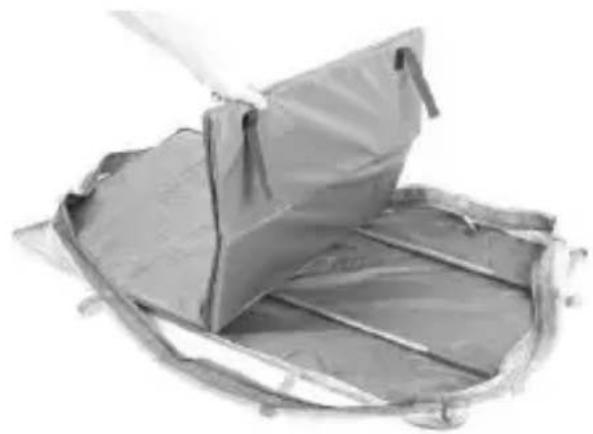
Unzip the bag and take the bed out of the bag. Separate velcro fasteners on the folding surface (2). Take out the bed and other elements of the set. In order to unfold the frame (1), place it appropriately - wheels down (Figure A), move the corners apart in order to grasp middle elements of sides, and then pull shorter sides up (sharply) to lock them (Figure B). Grasp middle elements of longer sides and pull them (firmly) until they lock (Figure C). Then press down on the center part of the bed's bottom – facing it down (Figure D). The frame will fully unload and the bed will be locked (Figure E).
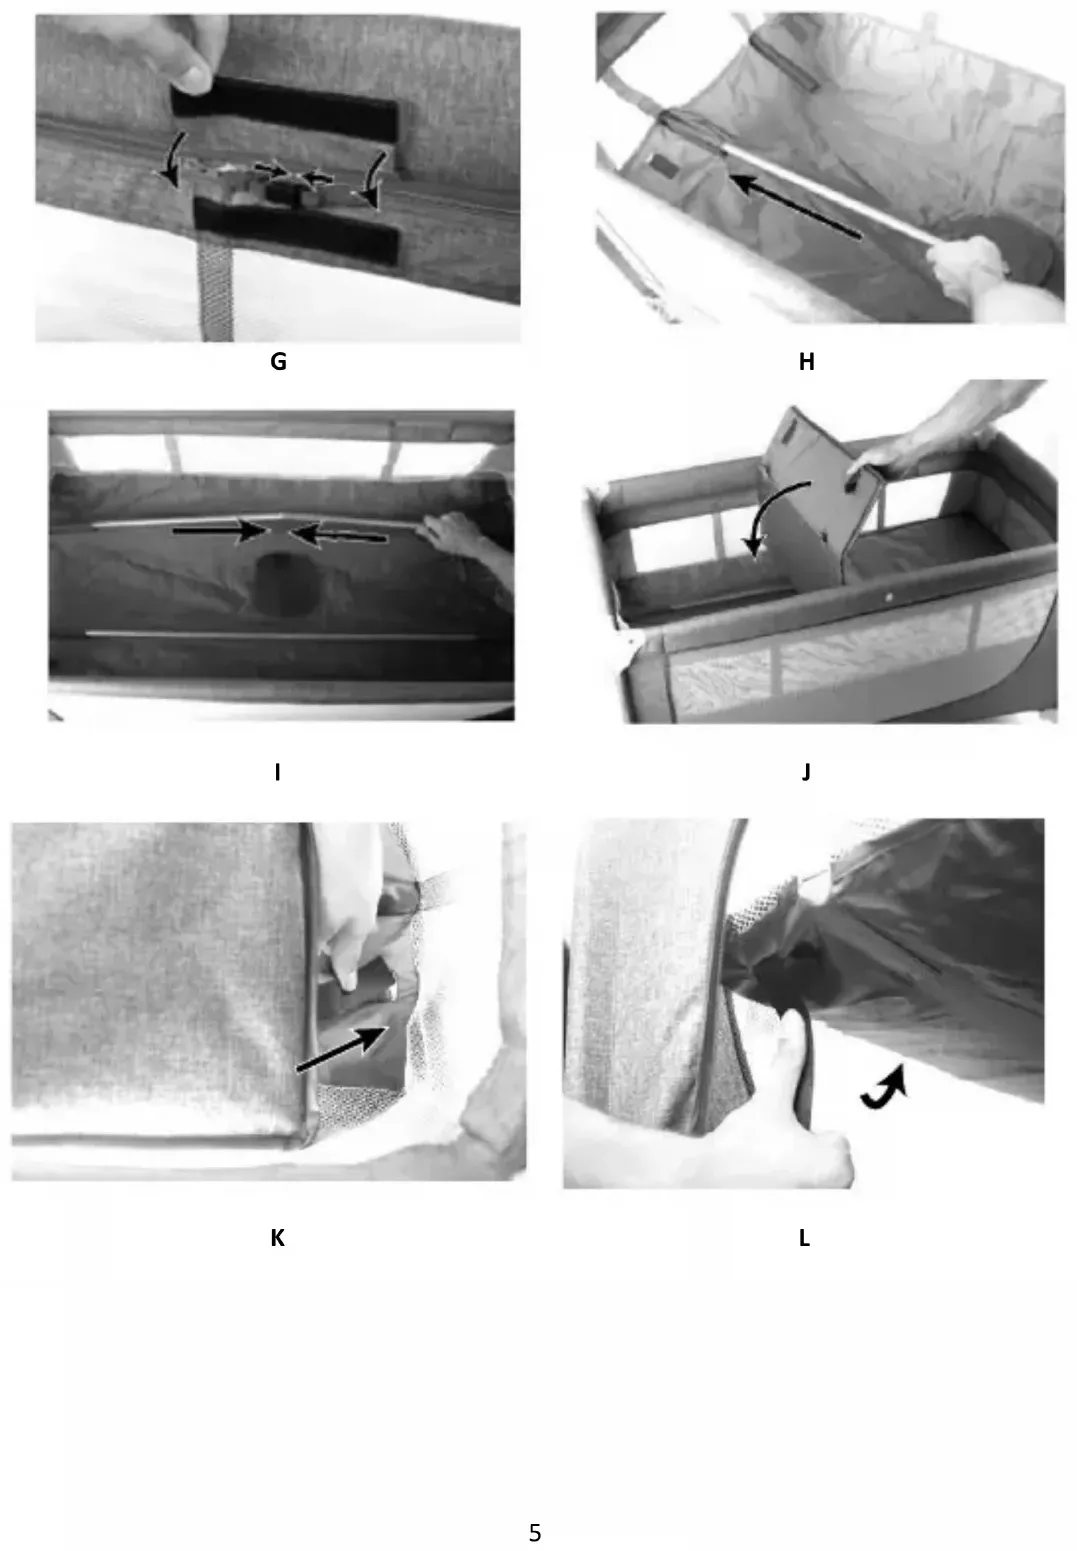
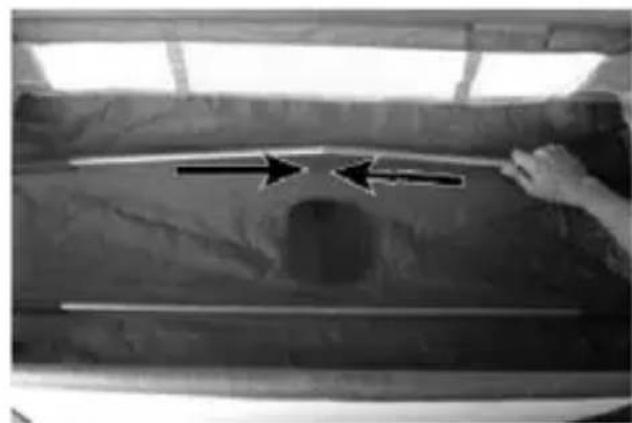
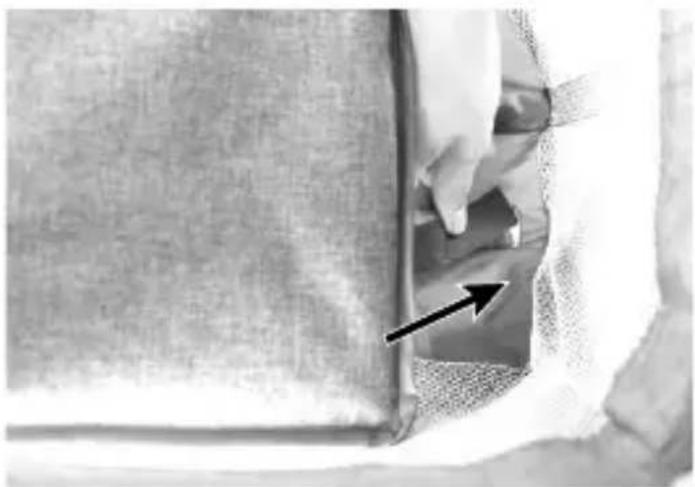
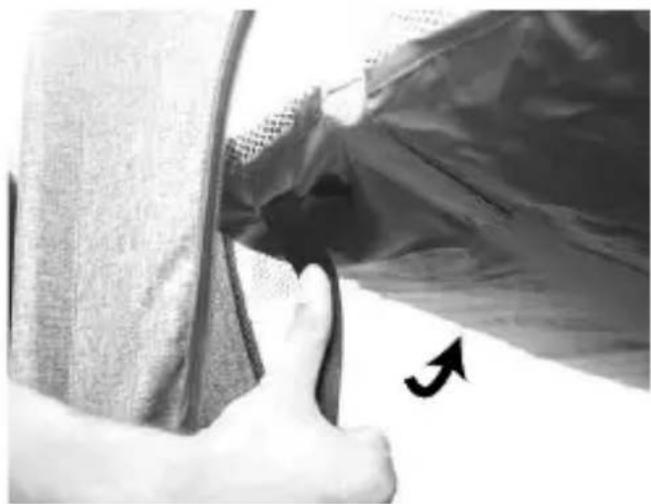
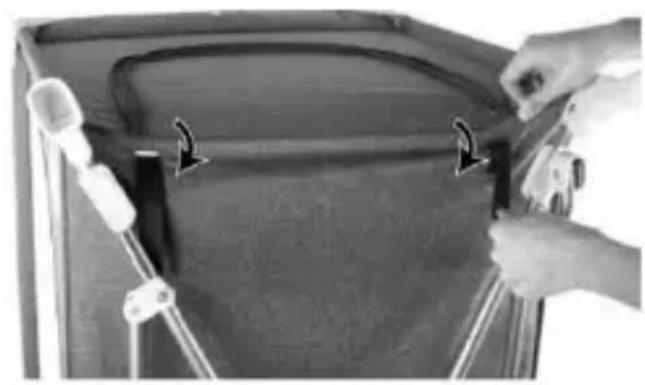
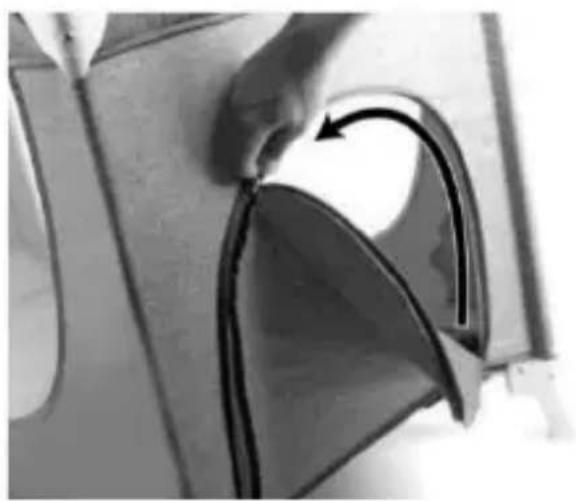
NOTE: Make sure that all four center elements of the bed's sides are locked! The side locking mechanisms will not work when the bottom part of the bed will be laid flat. Therefore, when locking the sides, the central part of the bottom must be raised. When the suspended floor (3) is not installed, install it with the zip fastener (Figure F) and secure with the clamp (Figure G). Place support tubes (4) into holes in the suspended floor (Figures H and I), and then place the base (2) inside the bed (Figure J). NOTE: For safety purposes, attach straps under the base – starting from the opening of the entrance (open the entrance in order to fasten the straps
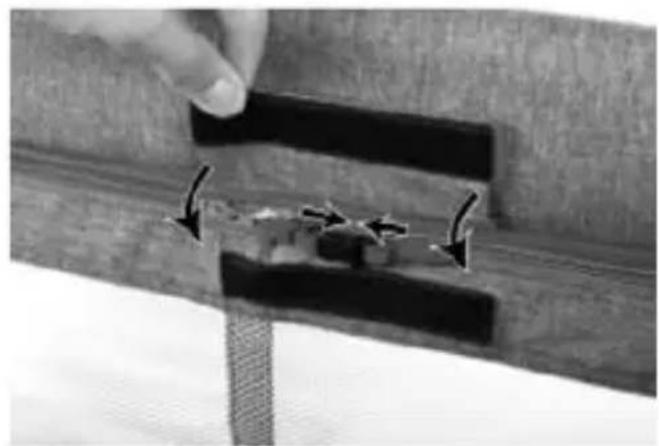
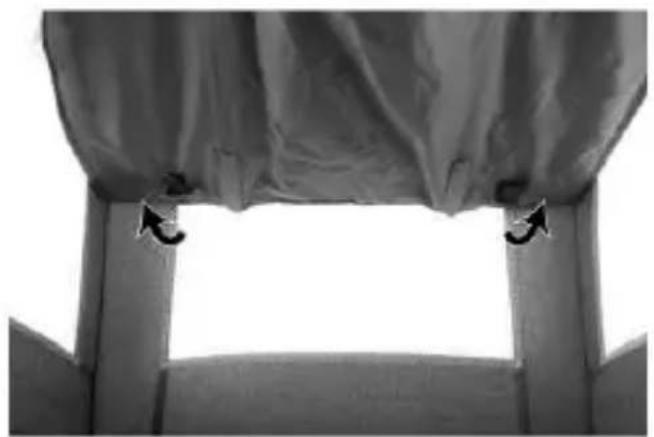
under the floor (Figures K and L)) and ending on the opposite side. To facilitate the installation of the opposite side, it is recommended to partially unclip the zipper around the suspended floor (Figure M), and then insert the straps into holes and attach to velcro straps under the floor (Figures N and O). Fasten the zipper around the floor and lock it by clipping it into the buckle (Figure P).
2. Installation of accessories\*:
Changing table
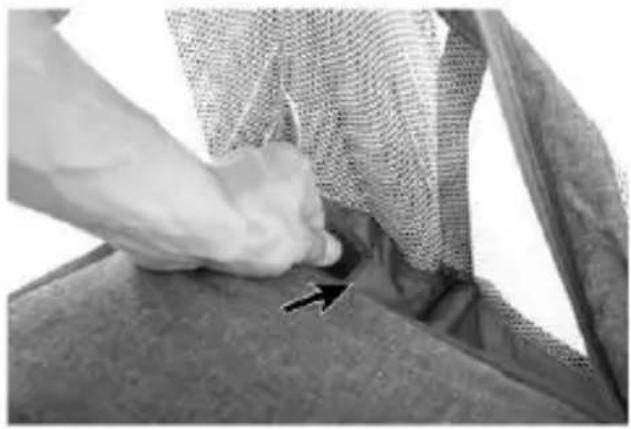
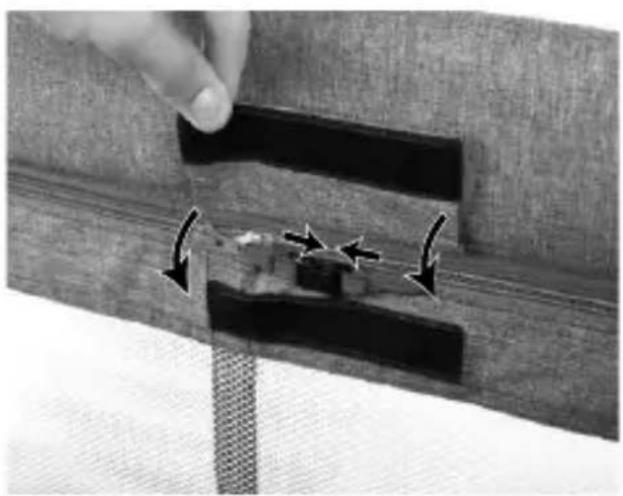
Place mounting skids (7) into the changing table's frame (6) until the locking button inserts the frame (Figures R and S). NOTE: To facilitate the installation of the skids, unfasten corners on the changing table's velcro tabs, and after mounting the frame, close all clips. Place the changing table by pressing it (firmly) to the bed's frame until it slides completely to sides (Figure T). Plastic buckles located on the cover with pockets should be placed over the bed's frame (Figure U).
Panel with baskets and hooks for fixing
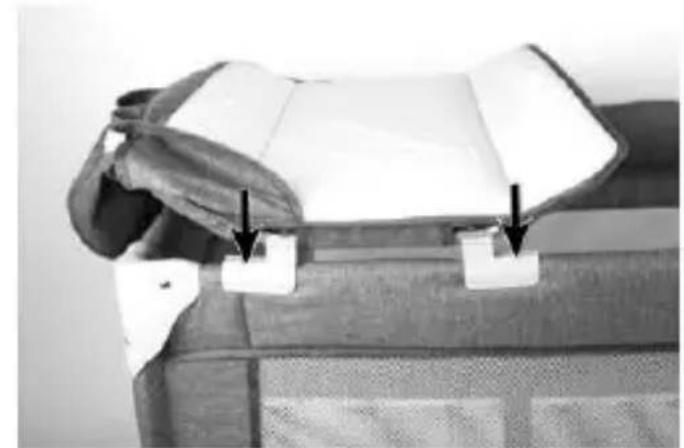
Insert hooks into the panel's holes (8), and then hook them onto the bed's frame (Figures W and X).
Bed handle bar
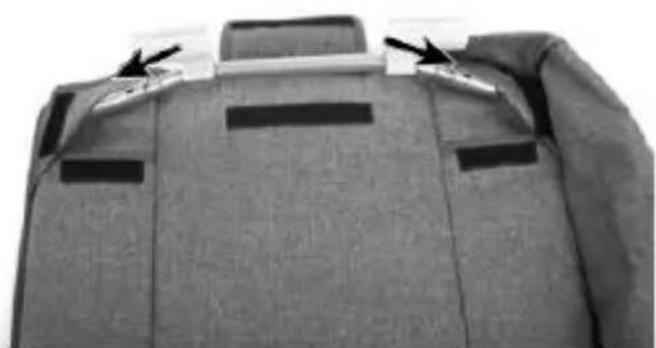
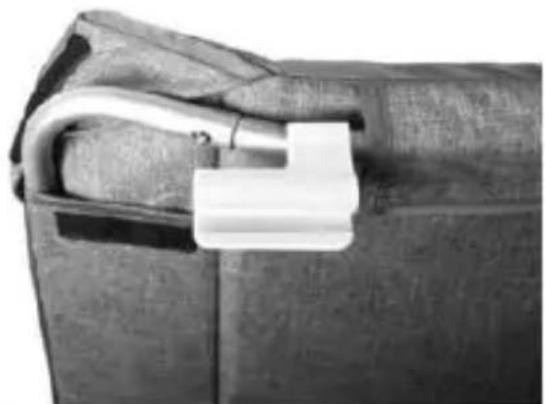
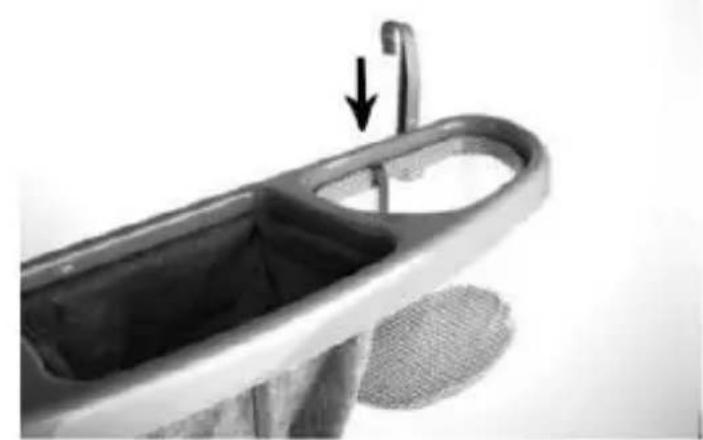
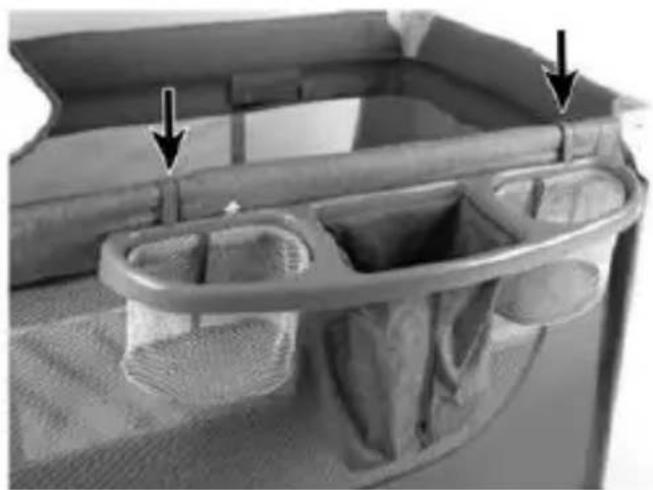
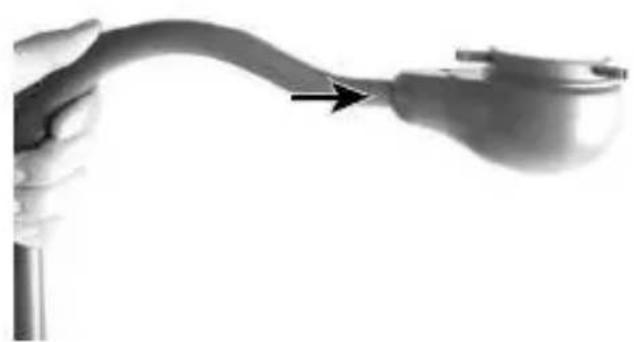
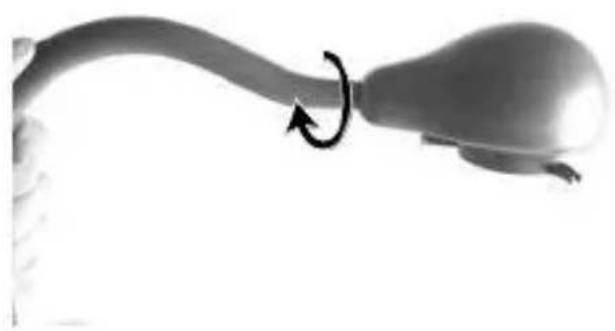
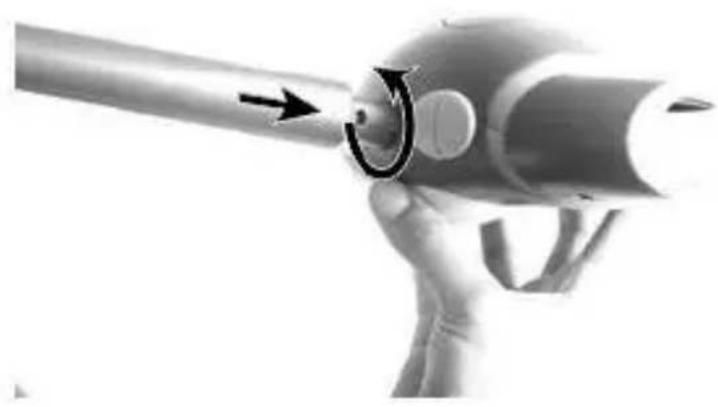
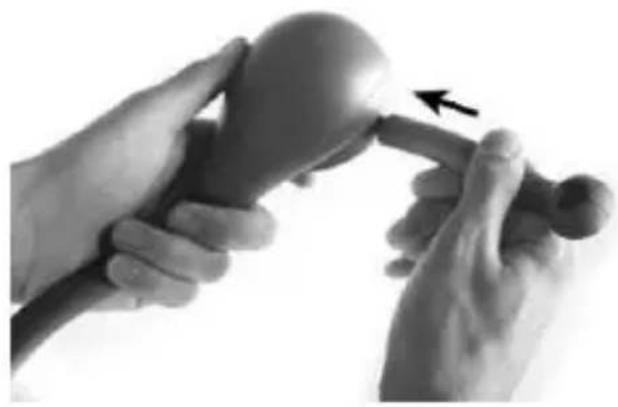
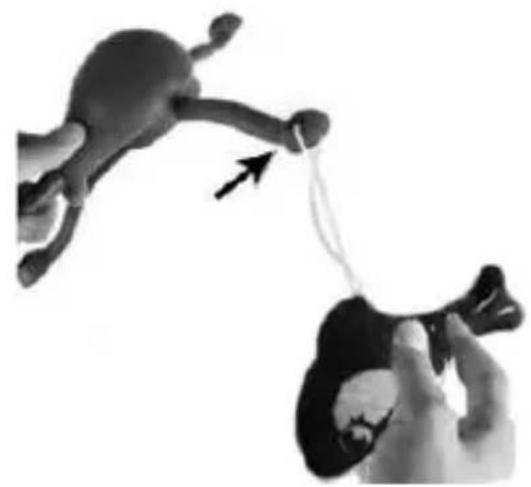
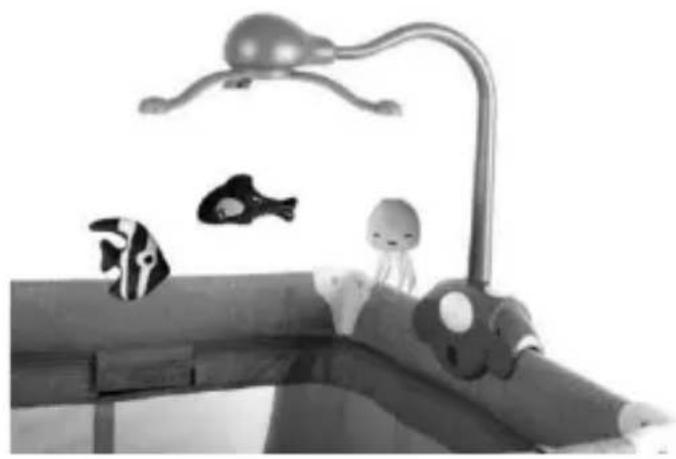
Place the handle bar (9) in the swivel head in the direction of the arrow. Then turn it 180° counterclockwise (Figures Y and Z). Then attach it to the base of the bar by positioning it in the direction of the arrow and turning counterclockwise (Figure AA). Install mascot holders and then hang toys on them (Figures AB and AC). Place the bar on one of four sides on the frame mounting mechanism (Figure AD). NOTE: To avoid dropping the bar on your child, make sure that the handle bar with toys is properly mounted and stable on the frame!
3. Baby cot functions\*:
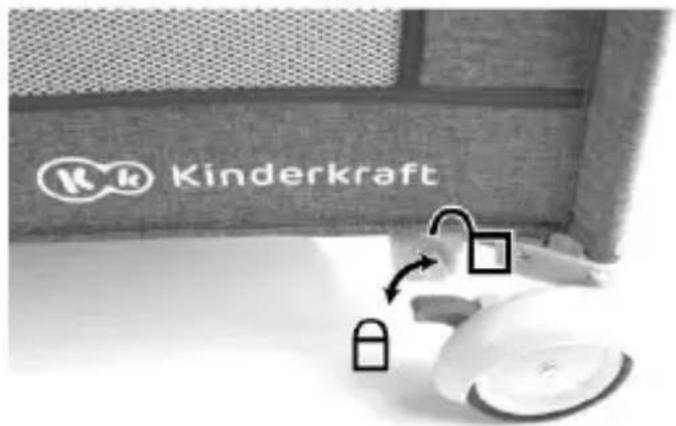
Wheel lock: The baby cot has a wheel lock. To lock the wheels press the brake lever. To unlock lift the brake lever (FIG. AE).
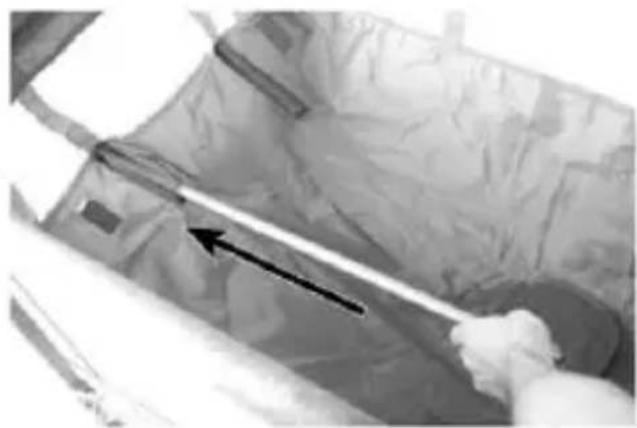
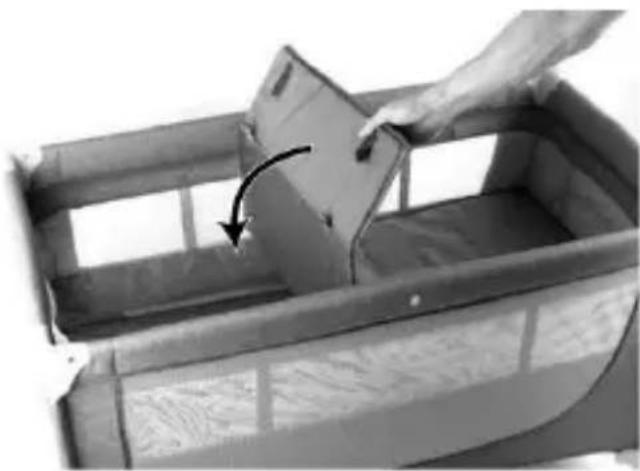
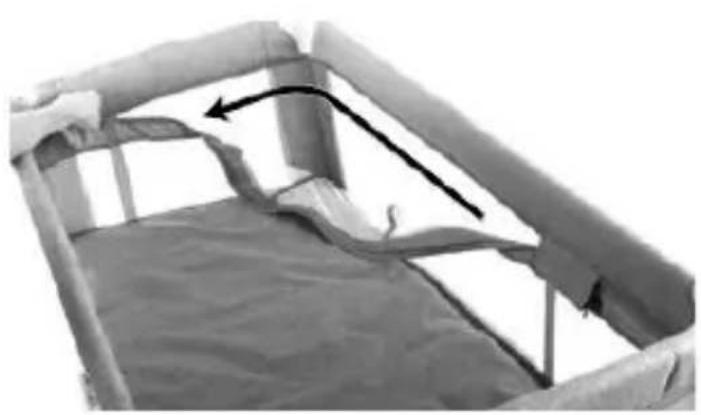
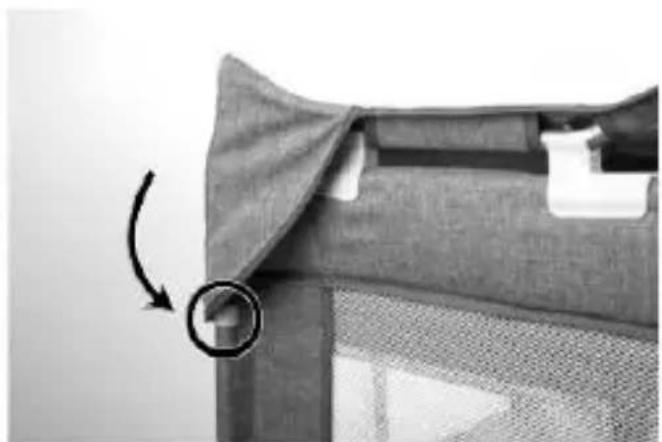
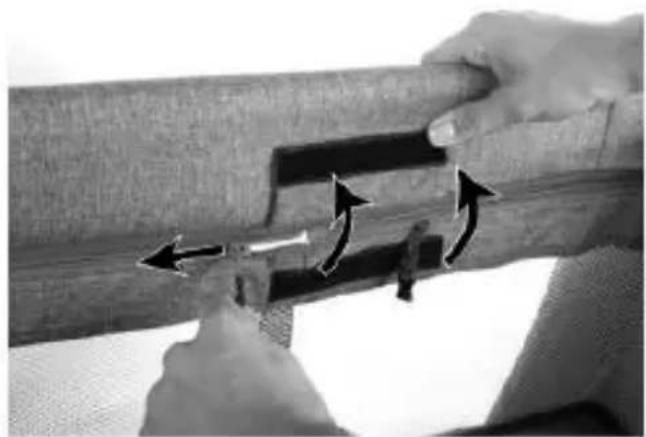
Base adjustment: The baby cot has base height adjustment. To lower the base unclip the zip fastener buckle and open the zip fastener inside the baby cot along with the base placed inside the baby cot (FIG. AF and AG). In the next step detach the straps from the floor and place the folding base in the baby cot (FIG. AH and AI). NOTE: To ensure security, attach the straps located under the base (FIG. AJ). When the base is at the lowest level, you can use the side entrance (FIG. AK).
4. Toy bar function\*:
The toy bar is powered by battery: 3 pcs. X AA (LR6) 1.5 V (not included).
Battery installation/replacement: To install or replace batteries, using a screwdriver, unscrew the cover of the battery compartment. Replace the batteries paying attention to the polarity and close the compartment using the cover.
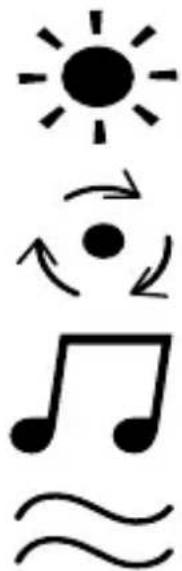
The toy bar has several buttons with the following functions:
natural_image
Simple line drawing of a sun, moon, and musical notes with motion arrows (no text or symbols)Lightswitch. The first click will turn the light on, the second click will reduce the intensity of the light. Another click of the button will turn the light off.
The button starts the carousel. Click the button again to turn the carousel off.
Pressing the button will start a series of soothing melodies, with three levels of volume. When the fourth button is pressed, the melody is turned off.
The button activates the vibration function with three levels of intensity.
After pressing the button the fourth time, the function is turned off.
Maintenance and cleaning
Travel cot and folding pad fabric - wipe clean with a mild soap and water. Never clean with abrasive, ammonia based, bleach based or spirit type cleaners. The travel cot must be dried thoroughly before use or storage.
Changing pad * - wipe clean with a mild soap and water. Never clean with abrasive, ammonia based, bleach based or spirit type cleaners. Allow to air dry.
Toy bar * - wipe clean with a damp cloth and mild soap. Don't immerse in water.
Toys * - hand wash at max 40°C, do not bleach, do not dry in a tumble dryer, do not iron, do not dry clean
Frame – clean the metal frame with a soft, clean and damp cloth using mild soa
PRODUCT DISPOSAL
natural_image
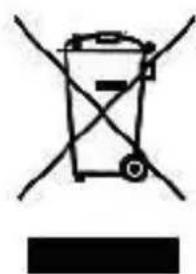
Simple line drawing of a trash bin with crossed lines indicating no waste or discharge (no text or symbols)The symbol of crossed-out rubbish bin placed on the equipment, packaging or the attached documents indicates that the product must not be disposed of together with other waste.
The user shall provide worn equipment to a designated collection point for proper processing. Information on the available system of collecting electrical equipment waste may be found at the customer service of a store and at the municipal office of the city / municipality.
Each household uses electrical and electronic equipment, and thus it is a potential source of waste dangerous for humans and the environment, as this kind of equipment includes hazardous substances, mixtures and components. On the other hand, worn-out equipment is a valuable material that may be a source of recyclable materials such as copper, tin, glass, iron and other.
Appropriate disposal of your old appliance will help to prevent negative consequences for the environment and human health!
¡Estimado Cliente!
text_image
Diagram illustrating human walking and child movement with directional arrows and a baby figure pointing to the adult.natural_image
Simple line drawing of a sun, moon, musical note, and waveform symbols (no text or labels)natural_image
Simple line drawing of a trash bin with crossed lines indicating no waste or discharge (no text or symbols)natural_image
Illustration showing human and child walking poses with a stick figure pulling a rope (no text or symbols)natural_image
Simple line drawing of a sun, moon, and musical note symbols (no text or labels)natural_image
Symbol of a trash bin with crossed x-marks and a blank rectangular base (no text or numbers)text_image
Diagram illustrating human walking and child movement with directional arrows and a baby figure pointing to a person.natural_image
Simple line drawing of a sun, musical note, and music symbol (no text or labels)natural_image
Symbol of a trash bin crossed with no text or labels, accompanied by a black rectangular block below (no readable text or symbols)natural_image
Illustration showing human and child walking poses with a diagonal pole, no text or symbols presentnatural_image
Simple line drawing of a sun, musical note, and music symbol (no text or labels)natural_image
Simple line drawing of a trash bin with crossed lines indicating no waste or plastic, and a solid black rectangle below (no text or symbols)natural_image
Illustration showing human and child walking poses with a diagonal pole, no text or symbols presentnatural_image
Simple line drawing of a trash bin with crossed lines indicating no waste or discharge (no text or symbols)text_image
Diagram illustrating human walking and child movement with directional arrows, including a baby figure and adult figure.natural_image
Simple line icons representing sun, moon, musical note, and water symbols (no text or labels)natural_image
Simple line drawing of a trash bin with crossed lines indicating no waste or discharge (no text or symbols)natural_image
Illustration showing human figures with different poses and directional arrows, no text or symbols presentnatural_image
Simple line drawing of a trash bin with crossed lines indicating no waste or plastic, and a solid black rectangle below (no text or symbols)text_image
Diagram illustrating human walking and child movement with directional arrows, likely depicting a physical or educational concept.natural_image
Simple line icons representing sun, moon, musical note, and music symbol (no text or labels)natural_image
Simple line drawing of a trash bin with crossed lines indicating no waste or discharge (no text or symbols)natural_image
Illustration showing human and child walking poses with a diagonal pole, no text or symbols presentnatural_image
Simple line drawing of a trash bin with crossed lines and a horizontal bar below (no text or symbols)natural_image
Illustration showing human and child walking poses with a stick figure, no text or symbols presentOhrádka – VAROVANIE
natural_image
Simple line drawing of a sun above a musical note and a circle with arrows, no text or symbols present.natural_image
Simple line drawing of a trash bin with crossed lines indicating no waste or discharge (no text or symbols)text_image
Diagram illustrating human and child walking behaviors with directional arrows and a baby figure, likely for safety or social intervention.Lekhage - WARNING:
natural_image
Simple line drawing of a sun, musical note, and music symbol (no text or labels)natural_image
Simple line drawing of a trash bin with crossed lines and a horizontal bar below (no text or symbols)(EN) In the interests of our Clients - we are at your disposal! If you have a problem with the product you received, contact us in the most convenient way for you!