RIDE 55 - Scooter URBAN GLIDE - Free user manual and instructions
Find the device manual for free RIDE 55 URBAN GLIDE in PDF.

User questions about RIDE 55 URBAN GLIDE
0 question about this device. Answer the ones you know or ask your own.
Ask a new question about this device
Download the instructions for your Scooter in PDF format for free! Find your manual RIDE 55 - URBAN GLIDE and take your electronic device back in hand. On this page are published all the documents necessary for the use of your device. RIDE 55 by URBAN GLIDE.
USER MANUAL RIDE 55 URBAN GLIDE
SECURITY AND PRECAUTIONS 2
Equipment for protection 2
Driver advice and parental supervision 2
Procedures and driving conditions 2
Using charger 3
BEFORE YOUR START 4
ASSEMBLY 4
USING THE SCOOTER 5
HARDWARE MAINTENANCE 6
Brake 6
Frame, fork, and handlebars 6
Tires 6
Personal protection equipment 6
Battery 6
REPAIR AND SERVICES 7
TROUBLESHOOTING 9
EXPLOSIVE VIEW 10
SECURITY AND PRECAUTIONS
CAUTION: Driving an electric scooter may be dangerous, so be careful when using it. Misuse of the product does not affect the manufacturer, please pay attention to the tips and safety that you will find in this manual. This product can cause loss of control, a fall or a dangerous situation. If any of these things happen, you risk losing your life, please use the safety equipment and be careful around you. You drive at your risk used your common sense.
This manual contains many warnings and tips for using your scooter, please read them carefully and pay attention to them. If a serious accident is caused to occur, it is not the responsibility of the company.
• Equipements for protection
Always wear the following safety equipment:
- Helmet approved and certified according to your location
- Knee pads and elbow patches
- Long-sleeved T-shirt and long pants
- Gloves
- Shoes with rubber soles, never drive barefoot or sandal. Check to make the laces made, and keep them as far as possible from the wheels and the internal system.
- Driver advice and parental supervision
The driver should not exceed 50kg, the size and weight do not fully certify that the driver will have full control of the vehicle. This manual contains valuable information, warnings and advice, and it is your responsibility to ensure that all users are aware of the risks. The recommended minimum age for scooter use is 6 years old. It is your responsibility to put a younger child, taking into account their skills, maturity and ability to follow the rules. Do not touch the engine or the brakes during or immediately after using the vehicle, these parts may be extremely hot. Keep the product away from children, and ensure that the person using the vehicle has read the instructions in this manual.
• Procedures and driving conditions
Please check local laws and rules before using the scooter. Always look around when driving, and pay attention to all possible hazards. Always respect the rights and properties of everyone. Do not engage the throttle without being on the scooter and safe. Please do not try to figure or cascade with the electric scooter. This product is not designed to make jumps, skids etc.
SECURITY AND PRECAUTIONS
To avoid any risk of accident, parental supervision is necessary. Never drive near vehicles, stairs, hills, swimming pools or other streams. Hold the handlebars with both hands. Never ride more than one person on the product. Keep your fingers and all other parts of your body away from the chain, engine or brakes. Never drive with a smartphone by hand or with an mp3 player. Never hang anything on the scooter to pull it. Never put the product in contact with water, electrical components can be damaged and create a dangerous situation. Roll only on flat, solid surfaces. Avoid surfaces with gravel, holes and ice can lead to loss of control and accidents.
Do not drive at night or in areas where visibility is reduced. Do not drive indoors where carpets and carpets can interfere.
Before each use, check that each piece is in its place and is in good condition.
People who have medical follow-up or treatment such as: cardiac people, pregnant women, people not responsible, people with a problem in the back or neck should not use the product.
Maximum speed of the scooter: 10 km / h
Before each use, check the following:
- The brakes are in good working order.
- All components are in good condition and in their place.
- The parts that showed anomalies during the last use have been repaired or changed according to the manufacturer's conditions.
- Using the charger
The charger must be in perfect condition with each use, check the wires, the condition of the tips etc. if the product does not charge, it may be that the charger is defective, you will need to change it.
Use only the supplied charger. The charger is not a toy and should be used by an adult. Never connect the charger near flammable products or liquids. Always unplug the charger from both sides when not charging.
USE THE CHARGER
- Check the charger regularly for any possible damage to cord, plug, cover, or other parts. If any is found, do not use the charger until it has been repaired or replaced.
- Only use a charger supplied or recommended by our company
- The charger is not a toy and must only be used by an adult.
- Never charge when flammable materials or liquids are nearby
- Disconnect the power cord and unplug from the scooter when charging is completed
- Charge the scooter only for the time period that is recommended. Do not overcharge it
- Always disconnect the charger before wiping or cleaning the scooter
FAILURE TO HEED TO THE WARNINGS LISTED ABOVE INCREASES RISK OF POTENTIAL SERIOUS INJURY. USE THE APPROPRIATE CAUTION WHEN RIDING AND ALWAYS WEAR PROTECTIVE GEAR WHEN RIDING.
BEFORE YOUR START
Upon unpacking, please check the contents against the packing list.
WARNING: Before assembling the scooter, please make sure power switch is turned 'OFF'.
ESTIMATED TIME FOR ASSEMBLY
Assembly can typically be completed in 25 minutes, not including the time of charging for the first time. Time of charging is 7 hours for the first time.
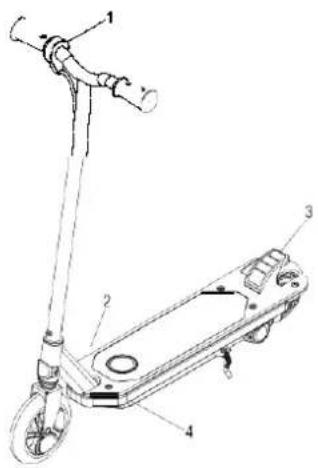
- Throttle knob
- Power switch
- Brake pedal
- Charging socket
Required Tools
 |  | |
| 1pc 12—14mm open spanner (Not provided along with scooter) | 2pcs 4mm hex keys (Provided along with the scooter) | 1 pc screw driver (Not provided along with the scooter) |
| 1pc 13—15mm open spanner (Not provided along with scooter) | 1pc 4mm socket hexagon spanner (Not provided along with the scooter | |
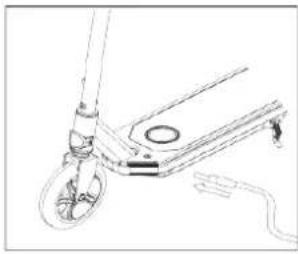
ASSEMBLY
Assembling the steering handle
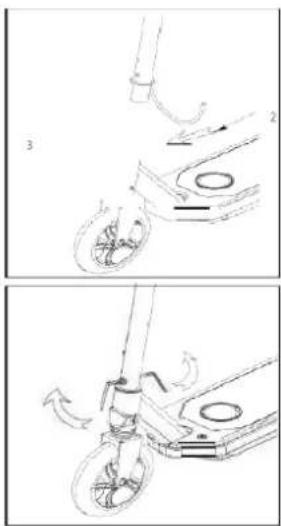
According to the figure 1, align the steering T-bar and push it onto the fork tube. Ensure all four hales are aligned with each other. (The throttle knob on the handle shall be on the right hand side when installed.)
insert a hexagon round flat head nut and bolt into the lock hole, as indicated in the drawing, and tighten them using two 4mm hex keys
WARNING: The scooter must always be switched off while being charged.
Time of charging for the first time: 7 hours.
- Time of any subsequent charging: about 4 hours.
- To keep the scooter in good performance, you need to charge it at least once a month when it is not regularly used.
natural_image
Line drawing of a scooter's wheel and seat assembly (no text or symbols)Check that the power switch is in the "OFF" position before plugging in your charger. Plug the charger cord into the charging socket, which is on the right side of the battery box
natural_image
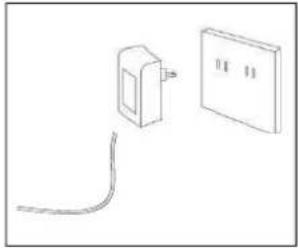
Simple line drawing of a wall socket connected to a cable, with no text or symbols present.Plug the charger into the mains outlet and turn on. The charger indicator will come on. A red color indicates that the battery is being charged, and a green color indicates that the battery is fully charged.
USING THE SCOOTER
natural_image
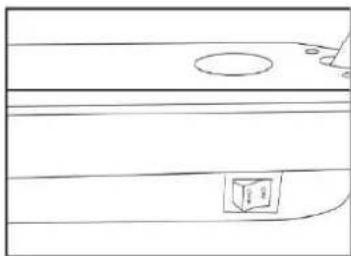
Simple line drawing of a boat hull with a circular marker and a small cube on the side (no text or symbols)Ensure the power switch is on the 'ON' position. The switch is located on the right side of the deck.
Put one foot onto the deck and place both hands onto the handlebar
natural_image
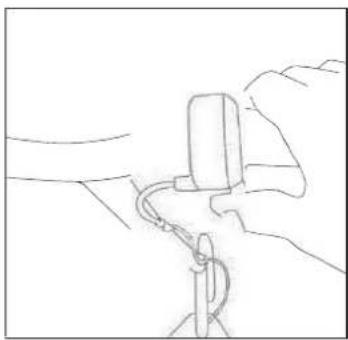
Line drawing of a hand holding a small object with a looped cable (no text or symbols)To accelerate, press the throttle knob next to the right handlebar grip. The further you push, the faster the scooter will go.
Make sure that both feet are on the scooter deck while riding. To turn, rotate the handlebars left or right to go the desired direction. To slow down, release the throttle knob and push down on the rear brake with your foot.
natural_image
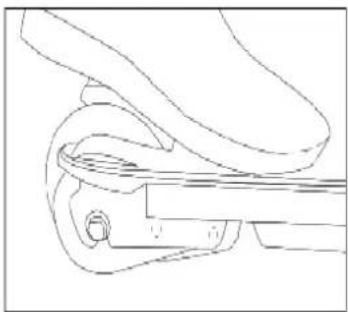
Line drawing of a mechanical component with no visible text or symbolsOnce you have finished using your scooter, please turn the power switch to the 'OFF' position.
Using as a kick scooter
Using your other foot, kick yourself along by pushing your feet along the ground. To turn, rotate the handlebars left or right to go the desired direction. To slow down, gently push down on the rear brake. To stop, push the rear brake all the way.
HARDWARE MAINTENANCE
BATTERY
Make sure the power switch is in the "OFF" position when the scooter is not in use. Never store the scooter in a frigid or icy place! Low temperature may degrade or damage the battery permanently
ALWAYS CHECK:
PERSONAL PROTECTION EQUIPMENT
Always wear proper protection equipment, such as:
A safety helmet of reliable quality. (Wearing a safety helmet may be mandatory according to the local law or regulation).
- Elbow pads and kneepads;
- Long-sleeve shirt and long pants;
- Gloves;
- Sports shoes.
Make sure that shoelaces are tied and are kept out of the way of the wheel and the driving system.
BRAKE
Check the brake for proper function.
When you apply the brake pedal, the rear wheel shall stop rotating;
When the brake is applied, the power shall be off and the motor shall stop working
Make sure the wheels are able to rotate freely, and do not rub against the brake pedal when not applied.
Never ride the scooter if its brake malfunctions.
THROTTLE KNOB
If the power switch in the "ON" position, rotate the throttle knob and the motor will start to drive the scooter forward. Make sure you are in an open and safe place before rotating the knob. Balance your body and hold the steering handle with both hands while riding.
TIRES
Check the tires far excessive wear/aging and replace them when necessary.
FRAME, FORK, AND STEERING HANOLE
Always carefully inspect your scooter before every ride. Check far cracks, wearing, or loosening; and make repairs or replace parts where necessary.
REPAIR AND SERVICES
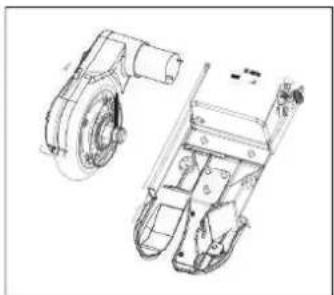
REPLACEMENT OF THE REAR WHEEL
Tools needed: 1 pc screw driver, 1 pc 12--14mm open spanner, and 1 pc 13--15mm open spanner.
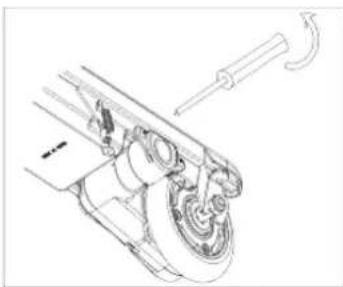
natural_image
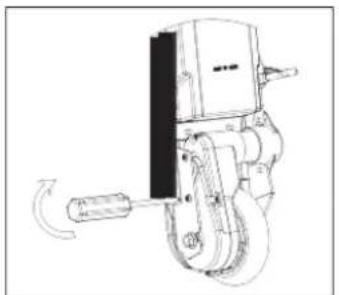
Technical line drawing of a mechanical assembly with no visible text or symbolsLoosen the locking screws on the motor cover using a Philips screwdriver and take off the cover.
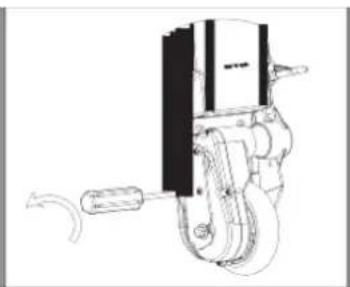
natural_image
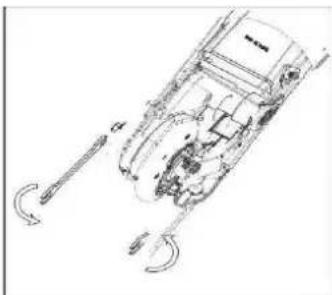
Technical line drawing of a mechanical device with no visible text or symbolsLoosen the fixing screws using Philips screwdriver
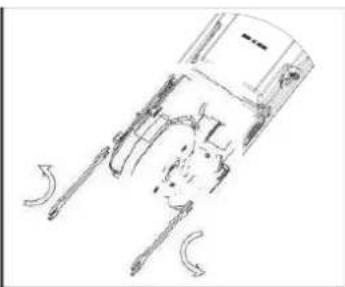
natural_image
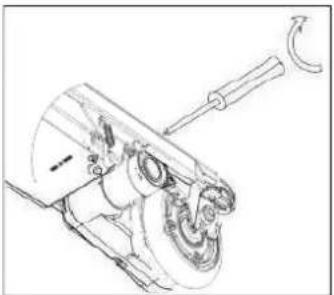
Technical line drawing of a mechanical component with multiple curved and straight parts (no text or symbols)Remove the rear wheel axle nut using a 13mm and a 14mm solid spanner.
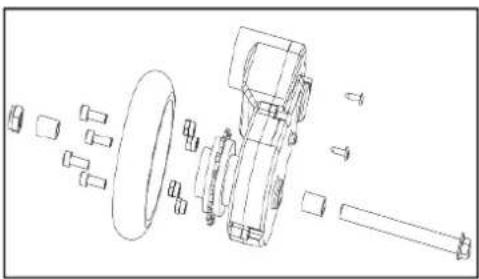
natural_image
Exploded view diagram of a mechanical assembly showing components like gears, shafts, and housing (no text or labels)Take note of the location of the parts on the rear wheel and make sure all these parts are in their correct position when re-mounted.
REPLACING THE REAR WHEEL
natural_image
Technical line drawing of two mechanical components with no visible text or symbolsMount the replacement rear wheel assembly onto the frame by inserting the assembly into the rear wheel axle housing by reversing the operation described in step 2 above.
natural_image
Technical line drawing of a mechanical device with a rotating shaft and housing (no text or symbols)Make sure the rear wheel axle has slid home in the rear wheel axle housing on the frame. Then tighten the motor fixing screws using a Philips screwdriver.
natural_image
Technical line drawing of a car interior with visible structural components and directional arrows (no text or labels)Tighten the rear wheel axle nut with a 13mm and a 14mm spanner and then check that the wheel is able to rotate freely
natural_image
Technical line drawing of a mechanical assembly with no visible text or symbolsMount the motor cover using a screwdriver. Do not overs-tighten the screws or the motor cover might be damaged.
REPLACING THE FRONT WHEEL
natural_image
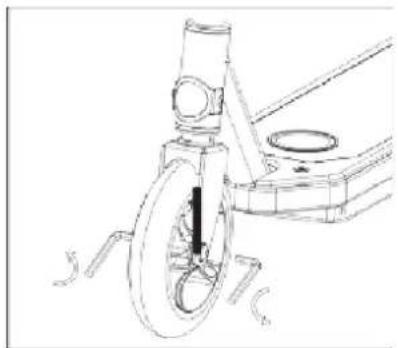
Technical line drawing of a mechanical device with wheels and components (no text or symbols)Remove the front wheel axle by twisting counterclockwise 2pcs 5mm hex keys.
natural_image
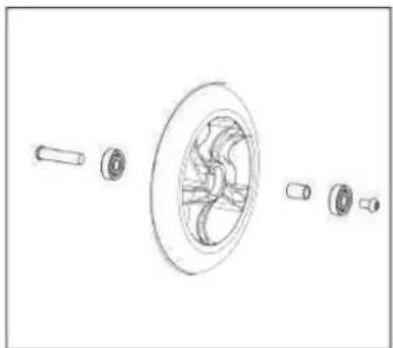
Technical line drawing of a wheel assembly with multiple components (no text or labels)Take note of the location of the parts on the front wheel and make sure all these parts are in their correct position when re-mounted. (The front wheel is removed in a similar way to the way the rear wheel is removed.)
natural_image
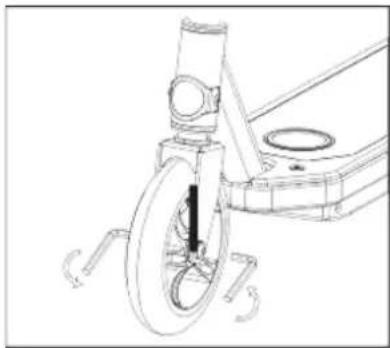
Technical line drawing of a mechanical device with wheels and components (no text or symbols)Tighten the front wheel axle by twisting clockwise 2pcs 5mm hex keys.
REPAIR AND SERVICES
Do not store the battery in an environment above 25^ C or below 0^ C.
This scooter contains sealed lead-acid batteries, which shall be recycled in accordance with your local laws and regulations. Please read and understand the following instructions on disposal of the batteries.
Disposal: This product contains sealed lead-acid batteries, which must be disposed of in an environmentally sound manner. Do not dispose of a lead-acid battery in tire. The battery may explode or leak. Do not dispose of a lead-acid battery in your regular household trash. The incineration, land filling or mixing of sealed lead-acid batteries with household trash is prohibited by law in most areas. Return exhausted batteries to a local, approved lead-acid battery recycler or a local seller of automotive batteries.
Charger: The charger supplied with the scooter should be regularly examined far damage to the cord, plug, enclosure and other parts, and in the events of such damage the scooter must not be charged until the charger has been repaired or replaced.
Wheels: Wear and tear is unavoidable in the wheels and the driving system in the course of operation. This is not a product fault. The user shall check regularly the wheels and the driving system for wearing and make adjustment or replacement when necessary.
WARNING: If a battery leak occurs, avoid contact with the leaking acid and place the damaged battery in a plastic bag. Refer to the disposal instructions above. If acid comes into contact with skin or eyes, wash with cool water for at least 15 minutes and contact a doctor.
TROUBLESHOOTING
| Problem | Possible Cause | Solution |
| The scooter won't start. | Power Switch is in OFF position.Battery is not charged.Wires or connectors areloase or unplugged. | Switch the Power Switch to ON.Charge the battery fully. Charge the batte7c for 7 hours for the very first time and 4 hours for subsequent chargingDismantle the scooter and check the power connection and controller connection for any loosening. Reconnect them when necessary. |
| Scooter run time is short. | Battery requires charging.The battery will not accept full charge. | Fully charge the battery. Charge the battery 7 hours for the very first time and 4 hours for a subsequent charging.See that the charger plug is connected to a 230V power supply.Make sure the wall outlet switch is on. Battery may need to be replaced. Even with proper care, rechargeable batteries do not las!forever. The average rechargeable battery liteis 1 to 2 yearsdependingonscooterconditions and use. |
| The scooter runs very slowly. | The scooter is overloaded.The riding surface is not suitable.Brakes are not adjusted correctly. | Make sure the scooter is not overloaded. This product designed to sustain a maximum of 50kg. An excessive overload triggers off automatic protection and makes the scooter refuse to start. Do not ride uphill or use the scooter to tow any cargo. Do not overload the scooter, which may cause the battery and the electronics to ag prematurely and damage the power system.On ride on solid, even, clean, and dry surfaces such as sidewalks and flat ground.Refer to the instruction manual on adjusting brakes. |
EXPLOSIVE VIEW
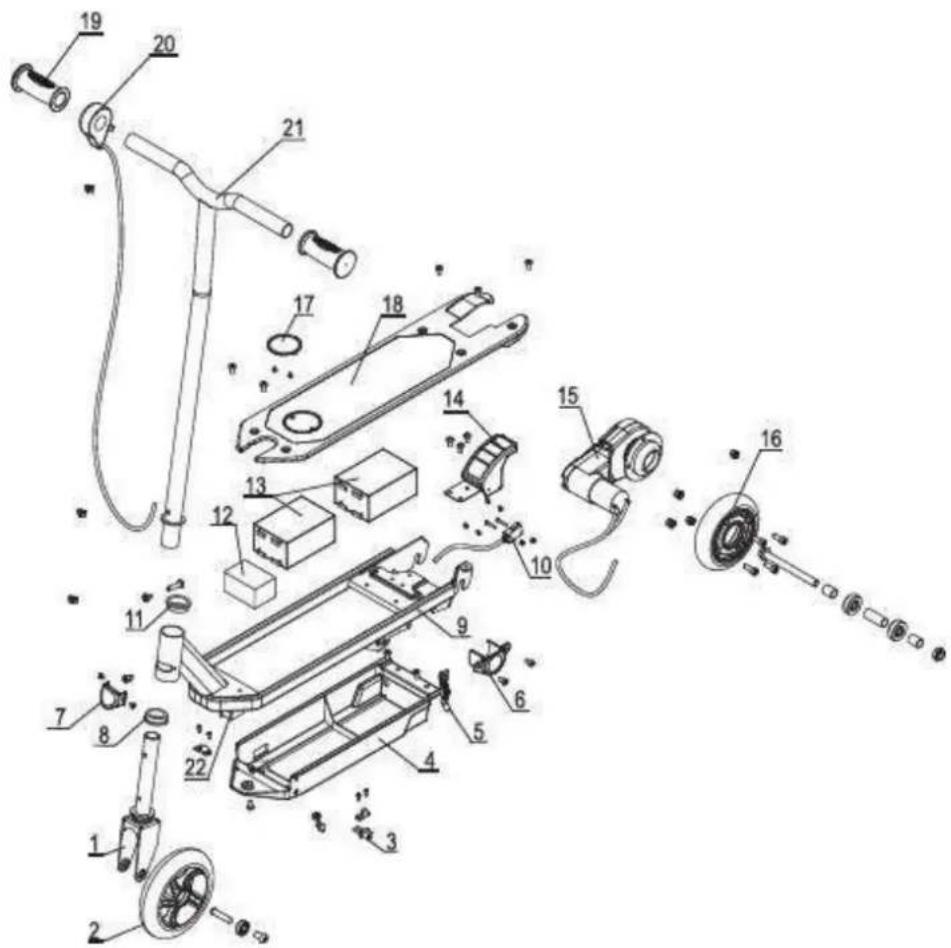
| Part | Part Designation | Part | Part Designation |
| 1 | Front Fork | 12 | Controller |
| 2 | FrontWheel | 13 | Battery |
| 3 | Charging Socket | 14 | Brake Pedal Cover |
| 4 | Battery Box | 15 | Motor Assembly |
| 5 | Kickstand | 16 | RearWheel |
| 6 | Motor Cover | 17 | LOGO Cover |
| 7 | Decorative Cover | 18 | Foot Board |
| 8 | Lower Nylon Ring | 19 | Hand Grip |
| 9 | Frame | 20 | Throttle knob |
| 10 | Brake Power Switch | 21 | Handle Bar |
| 11 | Upper Nylon Ring | 22 | ON/OFF Switch |
We undersigned PACT GROUP hereby declare that the product.
Model: URBANRIDE 55
Type: Scooter
Function: Electric scooter
Product description: Electric scooter for child.
Meets all standards and technical directives below: DIRECTIVES
| 2006/66/EC | 2013/56/EU | 2011/65/EU |
TESTS STANDARD
| EN 55014-1:2006+A1:2009+A2:2011 | EN 61000-3-2:2014 | EN 61000-3-3:2013 |
| EN 55014-2:1997+A1:2001+A2:2008 | EN55014+A2 2011 | EN 14619:2015 |
| ASTM F2641-2008 (R2015) | EN 50563:2011+A1:2013+278/2009/EC |
All radio emission tests were carried out by the laboratories mentioned below:
Intertek Testing Services Shenzhen Ltd. Guangzhou Branch Block E, No 7-2 Guang Dong Software Science Park, Caipin Road, Guangzhou Science City, GETDD Guangzhou, China
Burea Veritas Consumer Products Services, Inc. BVCPS (Shanghai) No. 368 Guangzhou Road, Zhuanqiao Town, Minhang, Shanghai 201108, China
Contact details of the manufacturer or agent:
PACT Group
33 rue du ballon
93160 Noisy le Grand – France
Contact details of the person authorized to edit the technical document:
Michael Barreira
33 rue du ballon
93160 Noisy le Grand - France
This declaration shall be issued under the responsibility of the manufacturer and, where appropriate, of his representative 03/12/2018.
Representative of the company:
PACT GROUP
URBANRIDE 55
MANUEL D'UTILISATION
VEUILLEZ LIRE ATTENTIVEMENT LE MANUEL D'UTILISATION ET LE LIVRE DE GARANTIE AVANT DE L'UTILISER
TABLE DES MATIÈRES
natural_image
Line drawing of a scooter handle and seat assembly (no text or symbols)natural_image
Simple line drawing of a wall-mounted electrical outlet connected to a cable (no text or symbols)natural_image
Simple line drawing of a laptop with a circular lens and a small box on the screen (no text or symbols)natural_image
Line drawing of a hand holding a small object with a chain, no text or symbols presentnatural_image
Line drawing of a mechanical assembly with no visible text or symbolsCADRE, FOURCHE ET GUIDON
natural_image
Technical line drawing of a mechanical assembly with no visible text or symbolsnatural_image
Technical line drawing of a mechanical device with no visible text or symbolsnatural_image
Technical line drawing of a mechanical component with multiple curved and straight parts (no text or symbols)natural_image
Exploded view diagram of a mechanical assembly (no text or labels)natural_image
Technical line drawing of a mechanical assembly with two views (top and side), no visible text or symbolsnatural_image
Technical line drawing of a mechanical device with a spring and lever (no text or symbols)natural_image
Technical line drawing of a vehicle's internal components and suspension system (no text or labels)natural_image
Illustration of a person using a tool to interact with another person (no text or symbols present)natural_image
Technical line drawing of a mechanical device with wheels and a handle (no text or symbols)natural_image
Technical line drawing of a wheel assembly with multiple components (no text or labels)natural_image
Technical line drawing of a bicycle wheel assembly (no text or symbols)Intertek Testing Services Shenzhen Ltd. Guangzhou Branch Burea Veritas Consumer Products Services, Inc.
Block E, No 7-2 Guang Dong Software Science Park, Caipin Road, Guangzhou Science City, GETDD Guangzhou, China BVCPS (Shanghai) No. 368 Guangzhou Road, Zhuanqiao Town, Minhang, Shanghai 201108, China
COORDONNEES DU FABRICANT OU MANDATAIRE :
PACT Group
33 rue du ballon
93160 Noisy le Grand – France
COORDONNEES DE LA PERSONNE AUTORISE A EDITER LE DOCUMENT TECHNIQUE :
Michael Barreira
33 rue du ballon
93160 Noisy le Grand - France
ARMADO
natural_image
Line drawing of a scooter handle assembly with no text or symbolsnatural_image
Simple line drawing of a wall-mounted electrical outlet connected to a cable (no text or symbols)natural_image
Simple line drawing of a boat hull with a circular marker and a small cube on the side (no text or symbols)natural_image
Line drawing of a hand holding a small object with a coiled cable, no text or symbols presentnatural_image
Simple line drawing of a mechanical component or tool (no text or symbols)natural_image
Technical line drawing of a mechanical assembly with no visible text or symbolsnatural_image
Technical line drawing of a mechanical device with no visible text or symbolsnatural_image
Technical line drawing of a mechanical component with multiple curved and straight features (no text or symbols)natural_image
Exploded view diagram of a mechanical assembly (no text or labels)natural_image
Technical line drawing of a mechanical assembly with two views (top and side), no visible text or symbolsnatural_image
Technical line drawing of a mechanical device with no visible text or symbolsnatural_image
Technical line drawing of a mechanical assembly with no visible text or symbolsnatural_image
Technical line drawing of a mechanical assembly with no visible text or symbolsnatural_image
Technical line drawing of a bicycle with wheels and a handle (no text or symbols)natural_image
Technical line drawing of a mechanical component with multiple parts and a central wheel (no text or symbols)natural_image
Technical line drawing of a bicycle wheel assembly (no text or symbols)Intertek Testing Services Shenzhen Ltd. Guangz Burea Veritas Consumer Products Services, Inc.
Block E, No 7-2 Guang Dong Software Science Par
Guangzhou Science City, GETDD Guangzhou, Chin
BVCPS (Shanghai) No. 368 Guangzhou Road, Zhuanqiao
Town, Minhang, Shanghai 201108, China
natural_image
Line drawing of a scooter's wheel and attached seat (no text or symbols)natural_image
Simple line drawing of a wall socket connected to a cable, with no text or symbols present.natural_image
Line drawing of a hand holding a car seatbelt with a small rectangular object inserted (no text or symbols)natural_image
Line drawing of a mechanical component with no visible text or symbolsnatural_image
Technical line drawing of a mechanical assembly with gears and a lever (no text or symbols)natural_image
Technical line drawing of a mechanical device with no visible text or symbolsnatural_image
Technical line drawing of a mechanical component with multiple curved elements and internal features (no text or symbols)natural_image
Exploded view diagram of a mechanical assembly showing components like gears, shafts, and housing (no text or labels)natural_image
Technical line drawing of a mechanical assembly with two views (top and side), no visible text or symbolsnatural_image
Technical line drawing of a mechanical device with a rotating shaft and housing (no text or symbols)natural_image
Technical line drawing of a mechanical assembly with no visible text or symbolsfest.

natural_image
Technical line drawing of a mechanical assembly with no visible text or symbolsnatural_image
Technical line drawing of a bicycle's wheel assembly (no text or symbols)natural_image
Exploded view diagram of a mechanical component showing exploded view with no text or symbolsnatural_image
Technical line drawing of a mechanical device with wheels and mounting feet (no text or symbols)Intertek Testing Services Shenzhen Ltd. Guangzhou Branch Block E, No 7-2 Guang Dong Software Science Park, Caipin Road, Guangzhou Science City, GETDD Guangzhou, China
Burea Veritas Consumer Products Services, Inc. BVCPS (Shanghai) No. 368 Guangzhou Road, Zhuanqiao Town, Minhang, Shanghai 201108, China
natural_image
Line drawing of a scooter's wheel and seat assembly (no text or symbols)natural_image
Simple line drawing of a wall socket connected to a cable (no text or symbols)natural_image
Simple line drawing of a boat hull with a circular marker and a small cube (no text or symbols)natural_image
Line drawing of a hand holding a small object with a looped cable (no text or symbols)natural_image
Line drawing of a mechanical component with no visible text or symbolsnatural_image
Technical line drawing of a mechanical assembly with no visible text or symbolsnatural_image
Technical line drawing of a mechanical device with no visible text or symbolsnatural_image
Technical line drawing of a mechanical component with multiple curved slots and internal features (no text or symbols)natural_image
Exploded view diagram of a mechanical assembly showing components like gears and shafts (no text or labels)natural_image
Technical line drawing of a mechanical assembly with two views (top and side), no visible text or symbolsnatural_image
Technical line drawing of a mechanical device with a rotating shaft and housing (no text or symbols)natural_image
Technical line drawing of a vehicle's internal components and suspension system (no text or symbols)natural_image
Technical line drawing of a mechanical assembly with no visible text or symbolsnatural_image
Technical line drawing of a mechanical component with no visible text or symbolsnatural_image
Technical line drawing of a mechanical assembly with multiple components (no text or symbols)natural_image
Technical line drawing of a mechanical device with wheels and a central hub (no text or symbols)Intertek Testing Services Shenzhen Ltd. Guangzhou Branch
Block E, No 7-2 Guang Dong Software Science Park, Caipin Road, Guangzhou Science City, GETDD Guangzhou, China
Burea Veritas Consumer Products Services, Inc.
BVCPS (Shanghai) No. 368 Guangzhou Road, Zhuanqiao Town, Minhang, Shanghai 201108, China
PROBLEEMOPLOSSING 64
ONDERDELEN OVERZICHT 65
natural_image
Technical line drawing of a mechanical assembly with labeled parts (no readable text or symbols)natural_image
Line drawing of a scooter with wheels and motion arrows indicating rotation (no text or symbols)natural_image
Line drawing of a scooter handle and seat assembly (no text or symbols)natural_image
Simple line drawing of a wall socket connected to a cable, with no text or symbols present.natural_image
Simple line drawing of a boat hull with a circular marker and a small cube on the side (no text or symbols)natural_image
Line drawing of a hand holding a car seatbelt with a loop handle (no text or symbols)natural_image
Technical line drawing of a mechanical component with no visible text or symbolsnatural_image
Technical line drawing of a mechanical assembly with no visible text or symbolsnatural_image
Technical line drawing of a mechanical device with no visible text or symbolsnatural_image
Technical line drawing of a mechanical component with multiple curved slots and internal features (no text or symbols)natural_image
Exploded view diagram of a mechanical assembly showing components like gears, shafts, and housing (no text or labels)natural_image
Technical line drawing of two mechanical components with no visible text or symbolsnatural_image
Technical line drawing of a mechanical device with rotating shaft and housing (no text or symbols)natural_image
Technical line drawing of a vehicle chassis with internal components and directional arrows indicating movement (no text or symbols)natural_image
Technical line drawing of a mechanical assembly with gears and a handle (no text or symbols)natural_image
Technical line drawing of a bicycle's wheel assembly (no text or symbols)natural_image
Technical line drawing of a mechanical assembly with multiple components (no text or symbols)natural_image
Technical line drawing of a bicycle wheel assembly (no text or symbols)Intertek Testing Services Shenzhen Ltd. Guangzhou Branch
Block E, No 7-2 Guang Dong Software Science Park, Caipin Road, Guangzhou Science City, GETDD Guangzhou, China
Burea Veritas Consumer Products Services, Inc.
BVCPS (Shanghai) No. 368 Guangzhou Road, Zhuanqiao Town, Minhang, Shanghai 201108, China
natural_image
Line drawing of a scooter handle and seat assembly (no text or symbols)natural_image
Simple line drawing of a wall-mounted electrical outlet connected to a cable (no text or symbols)natural_image
Simple line drawing of a boat hull with a small cube and circular hole, no text or symbols presentnatural_image
Line drawing of a hand securing a car tire with a key inserted (no text or symbols)natural_image
Simple line drawing of a boat hull with no text or symbolsnatural_image
Technical line drawing of a mechanical assembly with no visible text or symbolsnatural_image
Technical line drawing of a mechanical device with no visible text or symbolsnatural_image
Technical line drawing of a mechanical component with internal parts and curved features (no text or symbols)natural_image
Exploded view diagram of a mechanical assembly (no text or labels)natural_image
Technical line drawing of a mechanical assembly with two views (top and side), no visible text or symbolsnatural_image
Technical line drawing of a mechanical device with a spring and lever (no text or symbols)natural_image
Technical line drawing of a vehicle's internal components and suspension system (no text or symbols)natural_image
Technical line drawing of a mechanical assembly with gears and a tool (no text or symbols)natural_image
Technical line drawing of a bicycle wheel assembly (no text or symbols)natural_image
Technical line drawing of a mechanical component with multiple parts (no text or symbols)natural_image
Technical line drawing of a mechanical device with wheels and components (no text or symbols)Intertek Testing Services Shenzhen Ltd. Guangzhou Branch
Block E, No 7-2 Guang Dong Software Science Park, Caipin Road, Guangzhou Science City, GETDD Guangzhou, China
Burea Veritas Consumer Products Services, Inc.
BVCPS (Shanghai) No. 368 Guangzhou Road, Zhuanqiao Town, Minhang, Shanghai 201108, China
COORDONADAS DO FABRICANTE OU MANDATARIO:
PACT Group
33 rue du ballon
93160 Noisy le Grand – France