
Circle i-Size - Car seat Foppapedretti - Free user manual and instructions
Find the device manual for free Circle i-Size Foppapedretti in PDF.
| Product type | Child car seat, i-Size approved (R129/03) |
| Brand | Foppapedretti |
| Model | Circle i-Size |
| Child height | 40 to 150 cm (from birth to approx. 12 years) |
| Orientation | Rearward facing (40-105 cm), Forward facing (76-150 cm) |
| Installation methods | ISOFIX + Top Tether (40-105 cm); ISOFIX + 3-point belt or belt alone (100-150 cm) |
| Restraint system | Height-adjustable 5-point harness (up to 105 cm); vehicle's 3-point seat belt (100-150 cm) |
| Rotation | 360° with lock in rearward and forward positions, and a lateral position for installation |
| Recline adjustment | Multiple positions, maximum recline in rearward facing mode |
| Headrest | Height adjustable, integrated belt guide |
| Newborn insert | Included, to be used up to 75 cm |
| Correct installation indicators | Green indicators on ISOFIX connectors and Top Tether tensioner |
| Audible alarm | For unattached Top Tether, duration 3 min, powered by CR1620 3V lithium battery |
| Seat weight | Approximately 12 kg |
| Dimensions (approx.) | 70 x 45 x 55 cm (H x W x D) |
| Materials | Plastic frame, fabric cover |
| Care | Removable and washable cover (follow label), dry cleaning recommended |
| Included accessories | ISOFIX guides, newborn insert, KID PAD for 3-point belt |
| Safety | Do not use on front seat with active airbag; deactivate passenger airbag if car seat is rearward facing |
| Warranty | 12 months (manufacturer's conventional warranty) |
| Spare parts | CR1620 battery (button cell), replacement cover recommended by manufacturer |
Frequently Asked Questions - Circle i-Size Foppapedretti
User questions about Circle i-Size Foppapedretti
0 question about this device. Answer the ones you know or ask your own.
Ask a new question about this device
Download the instructions for your Car seat in PDF format for free! Find your manual Circle i-Size - Foppapedretti and take your electronic device back in hand. On this page are published all the documents necessary for the use of your device. Circle i-Size by Foppapedretti.
USER MANUAL Circle i-Size Foppapedretti
CAR SEAT - Assembly instructions
FR
1.Warnings PAG 37
2. Restrictions and requirements regarding the use of the productand vehicle seat PAG 41
- Components
4.1 How to use the buckle
4.2 How to adjust the harness
4.3 Headrest adjustment
4.4 Adjusting the recline
4.5 How to rotate the seat
4.6 How to install the ISOFIX system
4.6.2 Removing the ISOFIX system
4.7 Adjusting and using the Top Tether belt
4.8 Removing and installing the harness
4.9 Using the newborn reducer
5.1 Placing the car seat in the rear-facing position
(Children between 40 and 105~cm in height, ISOFIX + Top Tether + harness) PAG 48
5.2 Installation in the forward-facing position
(Children between 76 and 105~cm in height, isofix + Ttop Tether + harness) PAG 49
5.3 Removing the car seat from the vehicle PAG 50
5.4 Installation in the forward-facing position (children between 100
And 150 cm in height, 3-point seat belt or ISOFIX + 3-point seat belt) PAG 50
-
KID-PAD installation PAG 52
-
Maintenance and cleaning
-
Safety of the electrical parts (buckle "Top Tether" with alarm): PAG 54
Correct disposal of this product (waste electrical & electronic equipment) PAG 54
Changing the batteries PAG 55
Batteries PAG 55
Formal guarantee PAG 56
WARNING
1. ATTENTION:
- Before use, it is recommended that you carefully read the instructions, which you will need to follow strictly in order to have the highest levels of product safety.
- Store these instructions carefully for future reference. These instructions can be stored in the special compartment on the car seat during the period of use.
- Failure to follow the car seat installation instructions carefully could pose a risk to your baby.
- Do not use a car seat on the front seat where active airbags are fitted, as this can be dangerous. This risk does not apply to the side airbags.
- WARNING! Deactivate the passenger airbag when the child is in the front seat in the rear facing direction.
-
This car seat is approved according to the ECE R129/03 regulation for the transport of children between 40~cm and 150~cm in height, and can be installed:
-
In the rear-facing position (children between 40 and 105cm in height), with the ISOFIX anchoring system + Top Tether.
- In the forward-facing position (children between 76 and 105cm in height), with the ISOFIX anchoring system + Top Tether.
-
In the forward-facing position (children between 100 and 150~cm in height), with the ISOFIX anchoring system + the vehicle 3-point seat belt or with the vehicle 3-point seat belt only.
-
IMPORTANT: Do not use forward facing before the child's age exceeds 15 months. The car seat can be installed facing forward once the child is at least 76~cm tall.
- NOTICE: This is an i-Size Enhanced Child Restraint System. It is approved according to UN Regulation No. 129, for use in, i-Size compatible vehicle seating positions as indicated by vehicle manufacturers in the vehicle users' manual. If in doubt, consult either the Enhanced Child Restraint System manufacturer or the retailer.
- NOTICE: This is a i-Size booster seat Enhanced Child Restraint System. It is approved according to UN Regulation No. 129. for use primarily in "i-Size seating positions" as indicated by vehicle manufacturers in the vehicle user's manual. If in doubt, consult either the Enhanced Child Restraint System manufacturer or the retailer.
- WARNING: NEVER leave your child unattended - your child's safety is your responsibility.
- WARNING: Adult assembly required.
- WARNING: The child car seat must be fitted in accordance with the manufacturer's instructions. Incorrect installation could be dangerous.
- WARNING: Always ensure that new or occasional users [e.g. grandparents] have read the instructions or been taught the correct installation by someone who has
WARNING
read and understood the instructions.
- WARNING: Always keep this instruction manual with the child car seat, or in the vehicle in which you are carrying the child car seat. Some models of child car seat have a pocket to store the instructions.
- WARNING: If in doubt regarding the installation and correct use of the car seat, contact the manufacturer of the child restraint device.
BEFORE STARTING
- WARNING: Do not fit the child car seat in a rearward facing position
- WARNING: Before installing the child car seat ensure that the passenger seat you are using is locked in the upright position.
- WARNING: Do not use the child car seat in the home - it has only been designed to be used in the car.
- WARNING: Do not leave loose/unsecured objects on the back seat of your car or the parcel shelf. They may be dangerous to your child if you are forced to brake suddenly.
WHEN USING THE CHILD CAR SEAT
- WARNING: WARNING: Make sure that the child car seat is placed somewhere so that rigid items and plastic parts do not become trapped in doors or movable seat units when the seat is in everyday use.
- WARNING: Always use the vehicle's door child safety lock system, if one is available, to make it impossible for the child to open the car doors from inside.
- WARNING: Allow the child a break during long car journeys and make sure they don't get out of the car seat unaided and without supervision.
- WARNING: NEVER leave your child unattended - your child's safety is your responsibility.
- WARNING: Ensure that the child car seat is secured to the car seat at all times even when not in use.
- WARNING: The child car seat must be fitted securely to the passenger seat. Ensure that it is not loose or wobbly after you have fitted it.
- WARNING: The child seat shall not be used without the cover.
- WARNING: The seat cover should not be replaced with any other than the one recommended by the manufacturer, because the cover constitutes an integral part of the restraint performance.
- WARNING: Allow the child a break during long car journeys and make sure they don't get out of the car seat unaided and without supervision.
WARNING
- WARNING: In the event of an emergency it is important to be able to release the child quickly (as defined by British Standards). This means that seat buckle cannot be fully tamper proof and you should actively discourage your child from playing with or using the buckle.
- You should actively discourage your child from playing with or using the buckle.
SEAT BELT
- WARNING: NEVER use any load bearing contact points other than those described in these instructions.
- WARNING: Ensure that the lap section of the seatbelt or harness is worn low down, so that pelvis is firmly engaged. The harness must be tight enough, the space between the pectoral belt and the child's chest must not be more than two fingers thick. The abdominal belt of the harness should be in the lowest possible position to adequately restrain the child's pelvis.
- WARNING: Make sure that ALL the passengers in your vehicle have their seatbelts fastened, as unrestrained people can be very dangerous to the child in an accident..
- WARNING: NEVER use a seatbelt routing scheme that differs from these instructions.
- WARNING: The lap and diagonal seatbelt must be used at all times when your child is in the child car seat.
SUNLIGHT/HOT DAYS
- WARNING: Do not leave your child in the child car seat while parked in direct sunlight or on a hot day.
- WARNING: Do not subject the child car seat to prolonged direct sunlight as this may be dangerous for your child (the metal and plastic fittings could become hot) and may cause the fabric to fade. You can reduce this problem by covering the child car seat with a sheet when not in use.
SECOND HAND OR DAMAGED CHILD CAR SEATS AND SEATBELTS
- WARNING: Never buy a second hand child car seat. It may have unseen damage.
- WARNING: The manufacturer only guarantees this product when the original owner uses it.
- WARNING: You MUST replace the child car seat and your vehicles seatbelts if they become badly worn or amaged.
- WARNING: You MUST replace the child car seat if it is involved in an accident it may have unseen damage and may not protect your child as well as it should. At the
WARNING
very least send the child car seat to your retailer for inspection, together with the accident report.
- The FOPPAPEDRETTI company declines all responsibility for improper use of the product and for any use that does not comply with these instructions.
IMPORTANT WARNING
from 40 to 105~cm (i-Size universal ISOFIX)
- This is an i-Size Enhanced Child Restraint System. It is approved according to UN Regulation No. 129, for use in, i-Size compatible vehicle seating positions as indicated by vehicle manufacturers in the vehicle users' manual. "Circle i-Size" can be used in all i-Size seating positions and in any ISOFIX seating positions. If in doubt, consult either the Enhanced Child Restraint System manufacturer or the retailer.
- From 40~cm to 105~cm it must be installed on seats equipped with the Isofix System and Top Tether.
From 100cm to 150cm (i-Size booster seat).
- This is a i-Size booster seat Enhanced Child Restraint System. It is approved according to UN Regulation No. 129, for use primarily in "i-Size seating positions" as indicated by vehicle manufacturers in the vehicle user's manual. "Circle i-Size" can be use in all i-Size seating positions and, it can be used also in any UNIVERSAL seating position provided that it does not conflict with the interior of the car. If in doubt, consult either the Enhanced Child Restraint System manufacturer or the retailer.
WARNING! DO NOT use the Top Tether from 100 to 150 cm. - If the vehicle is not fitted with Isofix anchorage, the "Circle i-Size" can be installed (in the 100-150 cm configuration) front-facing with a 3-point adult safety belt, approved according to UN/ECE Regulation No. 16 or equivalent.
- WARNING! When using the 3-point adult safety belt, make sure that the lap portion is positioned correctly on the pelvic area.
2. RESTRICTIONS AND REQUIREMENTS REGARDING THE USE OF THE PRODUCTAND VEHICLE SEAT
WARNING! Follow the restrictions at all times:
- This child car seat can be installed so that it faces opposite of the car driving direction. The car seat can be installed in the rear facing position when the height of the child is between 40~cm and 105~cm . The car seat can be installed
- facing forward once the child is at least 76 cm tall.
- IMPORTANT! Do not use forward facing before the child's age exceeds 15 months.
- WARNING! Deactivate the passenger airbag when the child is in the front seat in the rear facing direction.
- The car seat can be used on all i-Size approved vehicle seats (check the vehicle's instruction manual) and on seats of vehicles included in the "Vehicle compatibility list" given with the car seat.
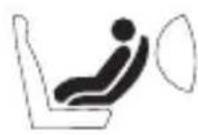
- The vehicle seat must be forward facing. Never use this car seat on vehicle seats facing the sides or opposite to the direction of the driver's seat.
| CAR SEAT | GROUP ORIENTATION INSTALLATION METHODS | TYPE | ||
| Circle i-Size 40 - 105 cm | Rear-facing | ISOFIX + Top Tether | i-Size | |
| Circle i-Size 76 - 105 cm | Forward-facing | ISOFIX + Top Tether | i-Size | |
| Circle i-Size 100 - 150 cm | Forward-facing | ISOFIX + 3-point Seat Belt | i-Size booster seat | |
| Forward-facingCircle i-Size-point seatbelt | i-Size booster seat | |||

The car seat can be fitted only if the vehicles considered as suitable are equipped with 3-point seat belts approved pursuant to Regulation UN/ECE n.16 or other equivalent standards
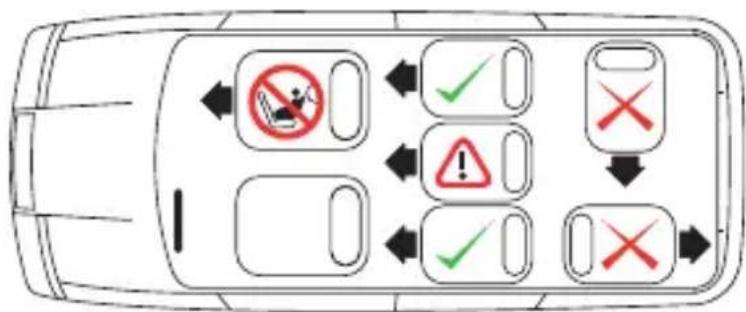
The car seat can be installed as shown in the figure:


| ·Forward-facing | YES |
| ·Rear-facing | YES |
| ·With a 2-point seat belt The use of two-point seat belts significantly increases the risk of injury to the child in the event of an accident. | NO |
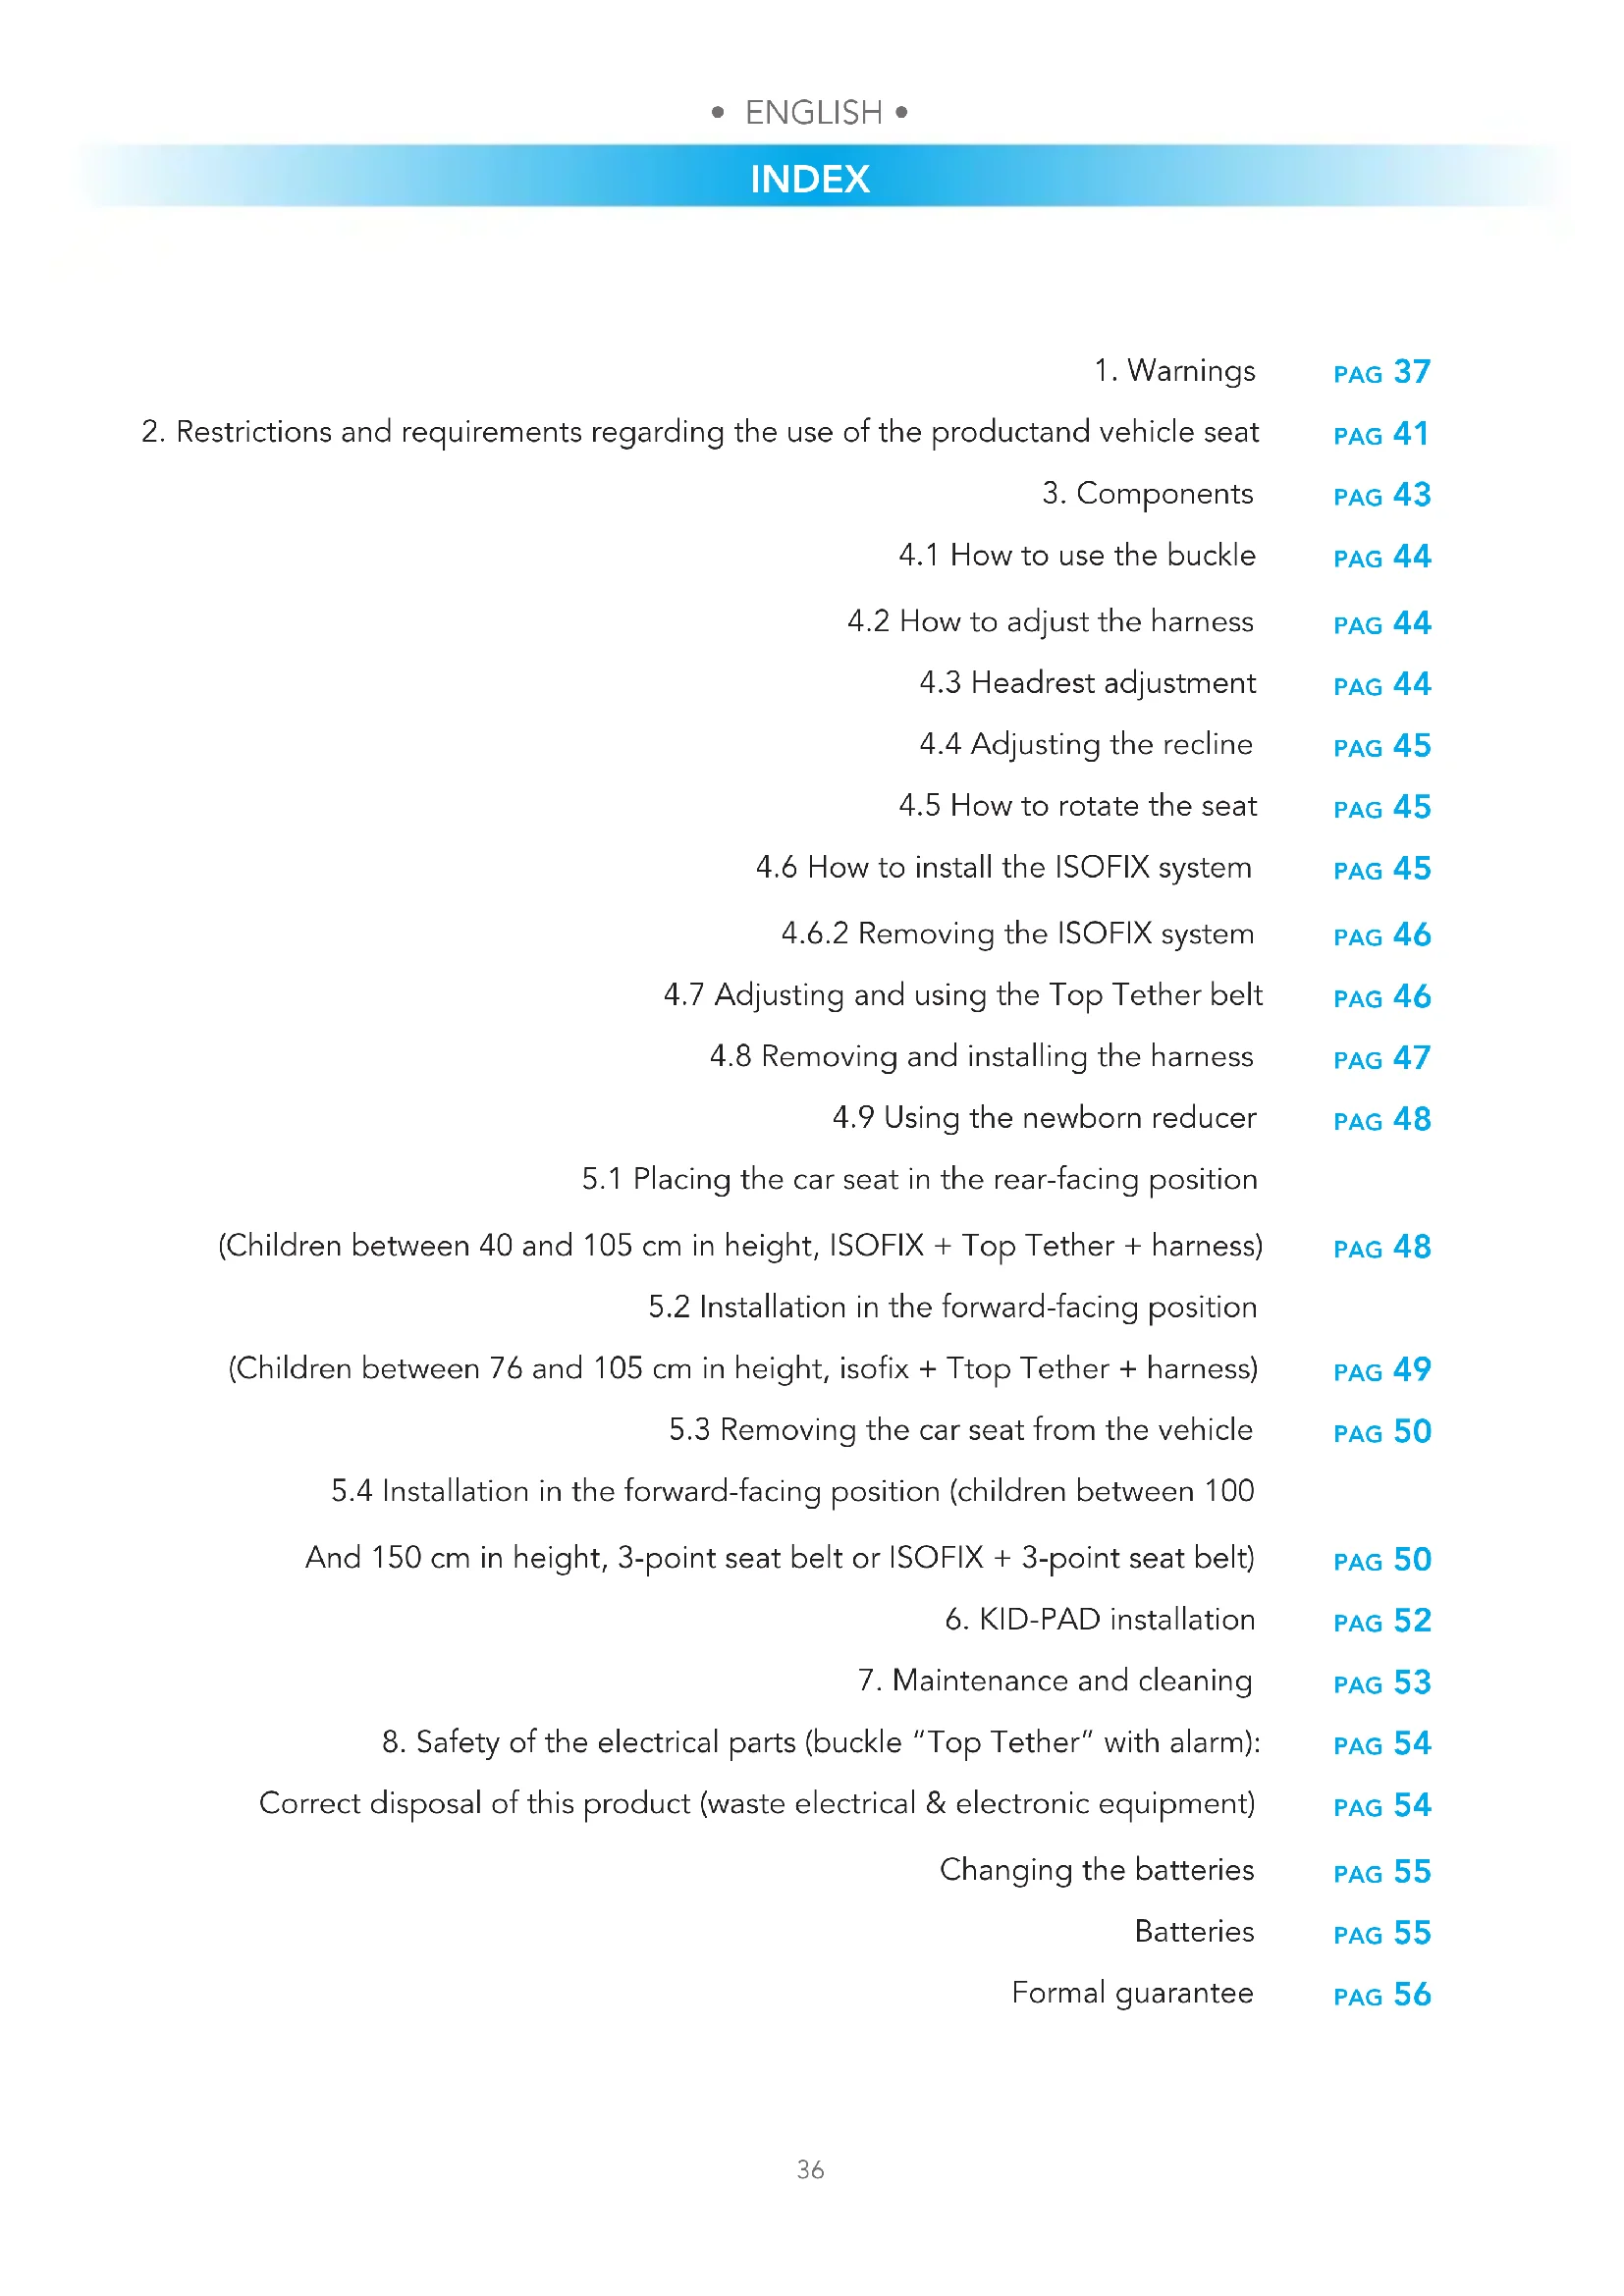
| ·With a 3-point seat belt The seat belt must be approved according to the ECE R16 regulation or other equivalent standards | YES |
| ·With the ISOFIX and Top Tether | YES |
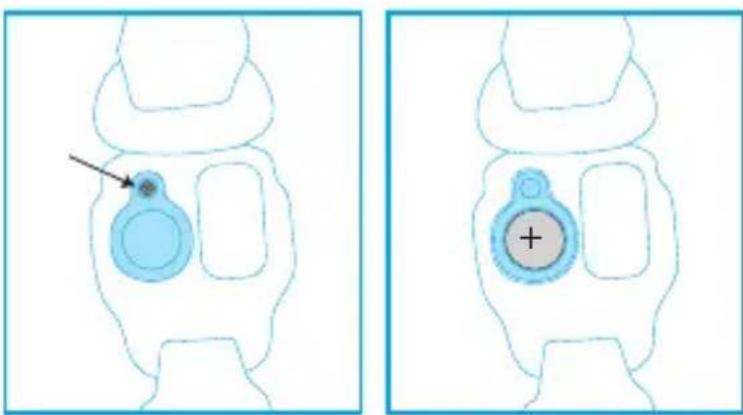
| ·On the front passenger seat DO NOT USE ON PASSENGER SEATS EQUIPPED WITH ACTIVE FRONT AIRBAGS! The car seat can be attached to the front passenger seat using the ISOFIX systems, or alternatively without these, by following the same warnings as for these systems (slide the passenger seat backwards and consult the instructions in the vehicle user manual). | YES 2 |
| ·On the two rear side passenger seat | YES |
| ·On the rear centre passenger seat The car seat can be used on the central rear passenger seat if it is equipped with a three-point seat belt. | YES 1 |
(You must comply with local regulations in force in your country of residence).
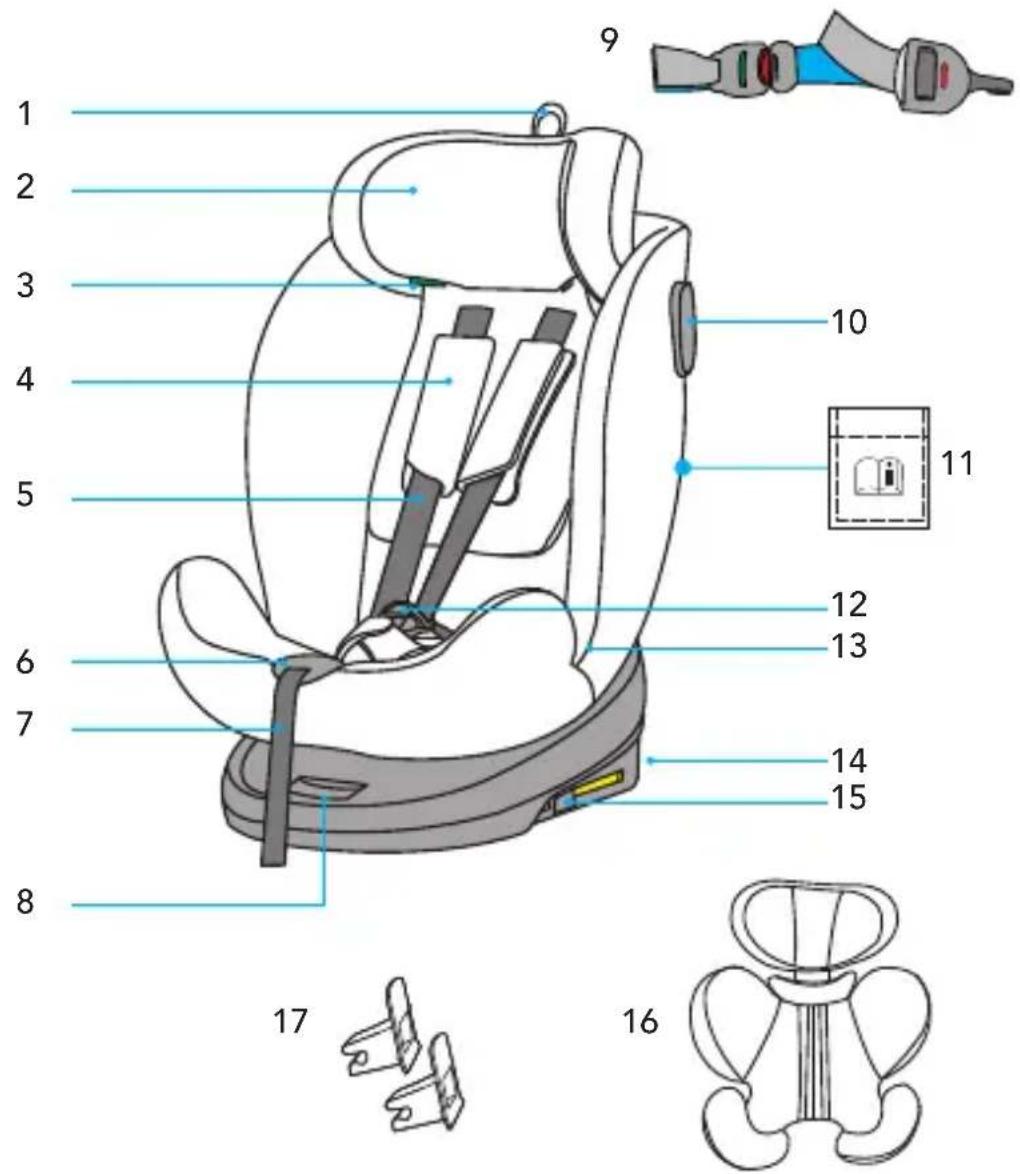
3. COMPONENTS

- Headrest height adjustment lever
- Headrest
- Diagonal belt guide
- Chest belt protection
- 5-point seat belt
- Shoulder strap adjustment button
- Shoulder strap adjustment belt
- Seat rotation lever
- Top Tether
-
Top Tether belt guide (rear-facing car seat)
-
Instruction compartment
- Buckle
- Lap belt guide
14.ISOFIX connectors
15.ISOFIX release button - Reducer
17.ISOFIX insert guider
INSTALLATION IN THE VEHICLE
4. BEFORE INSTALLATION
4.1 How to use the buckle
To release the buckle: Press the red button to remove the tabs from the central buckle (fig. 1).
To attach the buckle: Hold together the central buckle tabs (fig. 2) and insert them in the special slot inside the harness buckle (fig. 3). A "click" will indicate that it has attached correctly (fig. 4).
NOTE: to attach the buckle, it is necessary to insert both tabs.
4.2 HOW TO ADJUST THE HARNES
To tighten the harness: Pull the adjustment strap so that the harness is tight and close to the child's body (fig. 5).
NOTE: Check that there is a onefinger space (1 cm) between the straps and the upper part of the shoulders. Make sure that the child is comfortable and protected.
To loosen the harness: Press the adjustment button and at the same time grip the straps (chest belts) at the bottom, under the pads of the chest protectors, and pull them forwards to loosen them (fig.6).
IMPORTANT: Do not pull on the shoulder pads.
4.3 HEADREST ADJUSTMENT
IMPORTANT! Correct adjustment of the headrest ensures maximum protection for your child when they are inside the car seat.
When using the 5-point harness, the headrest must be adjusted so that the straps are at the same height as the child's shoulders (fig. 7).
WARNING! to a lower height than the child's shoulders, nor to the level of the child's ears or above. When using the 3-point vehicle seat belt, the headrest must be adjusted so that there is a two-finger space between the headrest and the child's shoulders. Make sure that the diagonal belt, when passing through the "diagonal belt guide loop" on the side of the headrest, is positioned at the shoulders and not at the child's neck (fig. 8).
To raise the headrest: pull the headrest adjustment strap upwards (fig. 9).
NOTES: Loosen the shoulder straps before adjusting the headrest (for more details see point 4.2).
To lower the headrest: pull the headrest adjustment strap upwards and press the headrest downwards (fig. 9).
CLE
4.4 ADJUSTING THE RECLINE
Press the adjustment handle located under the front of the car seat and, holding it down, pull or push the seat forwards or backwards. Release the handle when the seat is in the desired position and make sure that it is locked correctly; you will hear a "click" when the seat has attached (fig. 10).
WARNING! The seat can be reclined in the most horizontal position only when the car seat is installed in the rear-facing position.
4.5 HOW TO ROTATE THE SEAT
In the rear-facing position (fig.11) - Used in the rear-facing position, for children from 40 to 105cm in height (from birth to about 4 years ≤ 18kg ).
In the forward-facing position (fig.12) - Used in the forward-facing position, for children from 76 to 150~cm in height (from about 15 months to 12 years).
In the sideways position (fig13) - Allows you to place and remove the child from the car seat very easily. This position is prohibited while driving
Press the rotation button and turn the seat of the car seat in the desired direction (fig. 14 e fig. 15).
Once the desired position is reached, the seat will lock in place, a "click" will indicate that it has locked (fig. 16).
IMPORTANT: Before starting the engine make sure that the seat is locked in the forward-facing or rear-facing position.
WARNING! Using the car seat in the rear-facing position is mandatory for a child up to 15 months of age and 76~cm in height. The rear-facing position remains the safest, even after exceeding this limit, and it is therefore advisable to use the car seat facing backwards for as long as possible.
4.6 HOW TO INSTALL THE ISOFIX SYSTEM
If your car does not have standard ISOFIX connector guides, insert those supplied with the car seat with the recess facing upwards in the two ISOFIX anchoring points in the car (fig. 17a).
SUGGESTION: The ISOFIX anchoring points are located between the seat and the backrest of the passenger seat (fig. 17b).
INSTALLATION IN THE VEHICLE
4.6.1 INSTALLING THE ISOFIX SYSTEM
Press the ISOFIX buttons located on both sides of the seat and extend the ISOFIX connectors as much as possible (fig. 18 e 19).
Insert the two ISOFIX connectors in the appropriate guides: a "click" will indicate that they have been inserted and that the ISOFIX connectors are attached on both sides (fig. 20).
WARNING! The ISOFIX connectors are properly anchored when the respective buttons are green (fig. 21)
Push the car seat against the backrest of the passenger seat by applying even pressure on both sides. Shake the car seat to make sure it is firmly attached and check again that the ISOFIX safety buttons are green (fig. 22).
4.6.2 REMOVING THE ISOFIX SYSTEM
Push the car seat against the backrest of the passenger seat (fig. 23).
At the same time press the ISOFIX release buttons and retract the ISOFIX connectors (fig. 24).
4.7 ADJUSTING AND USING THE TOP TETHER BELT
Grasp the Top Tether belt and, if necessary, lengthen the strap by pressing the appropriate locking button, extending it to the desired length (fig. 25).
Attach the fixing device of the "Top Tether" to the anchoring point indicated in the vehicle user manual (fig. 27). Check that this icon is present inside the passenger compartment:
Tighten the Top Tether belt, pull the loose belt from the free end until it is sufficiently tight. A special indicator on the adjuster will turn green, to indicate that the belt has been tightened correctly (fig. 28).
Check that the Top Tether belt is correctly fastened before starting the vehicle.
FORWARD-FACING (Children between 76 and 105~cm ), ISOFIX + Top Tether
- Fasten the Top Tether belt to the headrest of the vehicle passenger seat with the Velcro strap, as shown in the figure 29a, 29b, 29c.
- Hook the tab into the buckle of the Top Tether belt (fig. 30a, fig.30b). A click will indicate successful hooking. Grasp the Top Tether belt and, if necessary, lengthen the strap by pressing the appropriate locking button, extending it to the desired length (fig. 25). Attach the upper fixing device of the "Top Tether" to the anchoring point indicated in the vehicle user manual (fig. 26, 27).
- Tighten the Top Tether belt, pull the loose belt from the free end until it is sufficiently tight. A special indicator on the adjuster will turn green, to indicate that the belt has
INSTALLATION IN THE VEHICLE
been tightened correctly Check that the Top Tether belt is correctly fastened before starting the vehicle.
- Press the red button on the Top Tether belt buckle to release the Top Tether belt and be able to rotate the seat towards the vehicle door, a continuous "beep" will indicate that the Top Tether buckle is not engaged (fig 31a, fig.31b).
The "beep" alarm sounds for 3 minutes. - After placing your child in the car seat or taking them out, rotate the seat into the rear-facing position (installation for children 40 to 105cm tall) or the forward-facing position (installation for children 76 to 105cm tall) and attach the Top Tether buckle, the audible alarm will go off.
- The Top Tether belt is guaranteed to work even without the use of the battery, but it is recommended to insert the battery to allow the sound check to make sure that the car seat has been installed correctly.
CAUTION: when installing the car seat with children between 40 and 105~cm or between 76 and 105~cm , check that the Top Tether belt is correctly fastened before starting the vehicle.
4.8 REMOVING AND INSTALLING THE HARNESS
Completely loosen the shoulder straps, see paragraph "4.2 How to adjust the harness". Pull the handle on the headrest and, keeping it pulled, raise or lower the headrest, adjusting it according to the child's height (fig. 9).
Press the red button on the central buckle to release the shoulder straps (fig. 1). Unhook the press studs on the sides of the backrest fabric, place the shoulder straps on the back of the fabric. Place the buckle tips on the seat sides, in the lower part.
Position the backrest fabric correctly and attach the press studs. Remove the buckle protection padding and store it in a safe place or place it behind the backrest fabric, with the chest straps. Lift up the seat cover fabric, pulling it out of the harness adjustment device and lift up the inner padding, pulling it out of the harness adjustment device, pulling carefully and gently.
Unthread the buckle inwards from the slots in the fabric and padding, open up the container compartment door and put the buckle back inside. Close the compartment.
Reposition the internal padding correctly on the seat. Reposition the seat lining correctly, fitting the fabric around the harness adjustment device. Reposition the lining correctly along the outer edge of the car seat (fig.35/ fig.41).
INSTALLATION IN THE VEHICLE
4.9 USING THE NEWBORN REDUCER
The seat reducer is designed for use with newborns, to ensure greater comfort and stability and provide a more reclined position, preventing their head from falling forwards.
The complete reducer must be used until the child reaches 75 cm (fig. 42a).
5.1 PLACING THE CAR SEAT IN THE REAR-FACING POSITION
(Children between 40 and 105~cm in height, ISOFIX + Top Tether + harness)
WARNING! The child car seat must be installed in the rear facing position until the child is older than 15 months. The rear-facing position remains the safest, even after exceeding this limit, and it is therefore advisable to use the car seat facing backwards for as long as possible.

DO NOT install the car seat on the passenger seat with an active airbag: this
can cause SERIOUS, OR EVEN FATAL, INJURY.
Make sure the seat is fully reclined before rotating to rear facing position.
- Rotate the car seat until it is in the rear-facing position, then tilt the seat into the most horizontal position. Place the car seat so that it is in the rear-facing position.
Use the reducer until the child reaches 75 cm.
Attach the ISOFIX connectors (cfr. par. 4.6) (fig. 46).
Check that the ISOFIX attachment indicators are green on both sides.
Push the car seat against the passengerseat, making sure that both ISOFIX connectors are extended in the same position. Shake the car seat to be sure it is correctly fixed in place and check again that the ISOFIX safety buttons are green.
Grasp the Top Tether belt and, if necessary, lengthen the strap by pressing the appropriate locking button, extending it to the desired length (cfr. par. 4.7).
Insert the Top Tether strap into one of the guide slots "A" at the shoulders (fig. 47).
Attach the Top Tether to the appropriate anchoring point on the vehicle indicated by the symbol:
Tighten the Top Tether belt until the indicator turns green. The Top Tether belt must pass over the backrest of the vehicle passenger seat, it must never pass over the headrest. If necessary, lift up or remove the headrest from the passenger seat.
NOTE: before use, check that the ISOFIX connectors are correctly attached on both sides, when pulling the car seat, they must not detach.
CAUTION: Before every journey, make sure that the rotating part of child seat is fully engaged by trying to turn the seat around in both directions.
CLE
Place the child into the car seat. Adjust the headrest to the appropriate height, position the harness correctly and attach the buckle, finally tighten the harness (fig. 48).
For the safety of the child, check before every journey that:
- Both ISOFIX connectors are hooked into the appropriate anchoring points, and both indicators are green;
- The car seat is firmly installed on the car;
- The Top Tether belt is correctly tightened and adheres perfectly to the backrest of the passenger seat, the indicator turns green when it is correctly tightened.
- The harness of the car seat adheres to the body of the child without squeezing them, between the straps and the upper part of the shoulders there must be a one-finger space (1 cm);
- The straps are positioned at the right height and are not twisted;
- The chest protectors are at the same height as the child's shoulders;
- The tips of the central buckle are attached correctly.
5.2 INSTALLATION IN THE FORWARD-FACING POSITION
(Children between 76 and 105~cm in height, ISOFIX + Top Tether + harness)
WARNING! Using the car seat in the rear-facing position is mandatory for a child up to 15 months of age and 76~cm in height. The rear-facing position remains the safest, even after exceeding this limit, and it is therefore advisable to use the car seat facing backwards for as long as possible.
Rotate the seat into the forward-facing position. Place the seat so that it is in the forward-facing position (fig. 49 e 50). Make sure that it is locked.
Attach the ISOFIX connectors (fig. 51) (cfr. par. 4.6).
Check that the ISOFIX attachment indicators are green on both sides.
Push the car seat against the passengerseat, making sure that both ISOFIX connectors are extended in the same position. Shake the car seat to be sure it is correctly fixed in place and check again that the ISOFIX safety buttons are green.
Grasp the Top Tether belt and, if necessary, lengthen the strap by pressing the appropriate locking button, extending it to the desired length (fig. 52).
Attach the Top Tether to the appropriate anchoring point on the vehicle indicated by the symbol (fig. 53):
Tighten the Top Tether belt until the indicator turns green. The Top Tether belt must pass over the backrest of the vehicle passenger seat, it must never pass over the headrest. If necessary, lift up or remove the headrest from the passenger seat (fig. 54).
INSTALLATION IN THE VEHICLE
NOTE: before use, check that the ISOFIX connectors are correctly attached on both sides, when pulling the car seat, they must not detach.
CAUTION: Before every journey, make sure that the rotating part of child seat is fully engaged by trying to turn the seat around in both directions.
Place the child into the car seat. Adjust the headrest correctly, position the harness correctly and attach the buckle, finally tighten the harness (fig. 55).
5.3 REMOVING THE CAR SEAT FROM THE VEHICLE
Loosen the Top Tether belt to reduce the fixing tension (fig. 54). Unhook the belt anchoring carabiner. At the same time press the ISOFIX release buttons and retract the ISOFIX connectors (fig. 56). Remove the car seat from the vehicle.
5.4 INSTALLATION IN THE FORWARD-FACING POSITION (Children between 100 and 150~cm in height, 3-point seat belt or ISOFIX + 3-point seat belt)
It is recommended that you use the 5-point harness for as long as possible. When the growing child reaches a height of 100cm , the car seat must be transformed for use with children between 100 and 150cm in height. In this configuration, it is necessary to remove the 5-point seat belt (harness) supplied with the car seat.
Remove the harness.
Ruotare la seduta nella direzione di marcia. Rotate the seat into the forward-facing position. Place the seat so that it is in the forward-facing position (fig. 57 e 58).
Make sure that it is locked.
If the car seat is not equipped with the ISOFIX anchoring system, you can use only the 3-point seat belt for the installation.
Mode A - INSTALLING WITH 3-POINT SEAT BELT TOGETHER WITH ISOFIX CONNECTORS
Attach the ISOFIX connectors (cfr. par. 4.6.1).
The indicator on both brackets will turn green, confirming that they have attached (fig.59).
Ensure that both brackets are correctly fastened. Shake the car seat to be sure it is correctly fixed in place. Push the car seat against the passenger seat, making sure that both ISOFIX connectors are extended in the same position. There must not be any space between the backrest of the passenger seat and the car seat.
Place the child into the car seat. Adjust the headrest to the appropriate height.
Pull the vehicle's seat belt and, running it across in front of the child, attach the buckle of the vehicle 's seat belt, inserting the tip into the buckle (fig. 60). A "click" will indicate
CLE
that it is attached correctly.
WARNING! The vehicle's seat belt buckle must not be placed in the lower guide of the lap belt passage.
Insert the diagonal belt and the lap belt into the lower loop from the side near the fastening buckle of the vehicle's seat belt (fig. 61).
Thread the lap belt on the opposite side of the car seat into the lap belt loop (fig. 62).
WARNING! The lap belt must run as low as possible over your baby's pelvis.
Insert the diagonal belt into the belt guide loop, making sure it is not twisted (fig. 63).
Mode B - INSTALLING WITH 3-POINT SEAT BELT
Press the ISOFIX release buttons and retract the ISOFIX connectors (fig.64).
Place the car seat on the car's seat. Push the car seat against the backrest of the passenger seat. There must not be any space between the backrest of the passenger seat and the car seat (fig. 65).
Place the child into the car seat. Adjust the headrest to the appropriate height. Pull the vehicle's seat belt and, running it across in front of the child, attach the buckle of the vehicle's seat belt, inserting the tip into the buckle (fig. 66). A "click" will indicate that it is attached correctly.
WARNING! The vehicle's seat belt buckle must not be placed in the lower guide of the lap belt passage.
Insert the diagonal belt and the lap belt into the lower loop from the side near the fastening buckle of the vehicle's seat belt (fig. 67).
Thread the lap belt on the opposite side of the car seat into the lap belt loop (fig. 68).
WARNING! The lap belt must run as low as possible over your baby's pelvis.
Insert the diagonal belt into the belt guide loop, making sure it is not twisted (fig. 69).
For the safety of the child, check before every journey that:
- Both ISOFIX connectors are hooked into the appropriate anchoring points, and both indicators are green;
- The car seat is firmly installed on the car;
- The lap belt is inserted into the respective "lap belt guide" loops placed on the two sides of the car seat;
- The diagonal belt, on the buckle side of the vehicle's seat belt, is correctly inserted into the lap belt guide loop;
- The diagonal belt is inserted into the upper diagonal belt guide loop of the headrest from the belt retractor side;
- The buckle is properly fastened and the belt is not twisted.
INSTALLATION IN THE VEHICLE
6. KID-PAD INSTALLATION
The KID-PAD is a device that must ALWAYS be installed on the diagonal vehicle seat belt to ensure proper protection in the event of an impact.
Position the diagonal belt under the two Velcro straps of the KID-PAD (fig. 70), close the KID-PAD on itself (fig. 71) making sure that the shaped part is positioned between the chin and the chest of the child (fig. 72).
WARNING! The KID-PAD must ALWAYS be used.
7. MAINTENANCE AND CLEANING
The lining can be removed and washed. Follow the instructions shown on the washing label of the lining.
How to remove the lining: remove the harness first and then the lining (fig. 73, 75).
Follow the lining removal steps in reverse order to reposition it.
WARNING! DO NOT use the car seat without the fabric lining properly.
WARNING! Never use the car seat if the 5-point harness if it is not fitted and attached to the car seat for to use with children between 40 and 105~cm ;
IMPORTANT: Make sure that the harness belts are not twisted.
BATTERIES
8. SAFETY OF THE ELECTRICAL PARTS (buckle "Top Tether" with alarm):
WARNING
- WARNING: Batteries must only be replaced and fitted by an adult.
- WARNING: Batteries may leak acid or explode if thrown into a fire.
- WARNING: Always dispose of leaking batteries immediately: They can cause burns or their types of injuries.
- WARNING: Non-rechargeable batteries are not to be recharged; they might explode.
- WARNING: Do not leave the product out in the rain; water infiltrations will damage the electronic circuit.
- WARNING: Only use batteries which are equivalent to those recommended.
- WARNING: Batteries are to be inserted with the correct polarity.
- WARNING: Exhausted batteries are to be removed from the musical console.
- WARNING: Do not short-circuit the battery terminals.
- WARNING: Remove the batteries if you won't use the product for long time.
- WARNING: Only use batteries of the same type or equivalent to the type recommended for the correct function of this product, (LITHIUM - CR1620 - 3V).
- WARNING: The use of rechargeable batteries is not recommended as the product may not work properly.
WARNING: Rechargeable batteries must only be recharged under adult supervision. - WARNING: Rechargeable batteries must be removed from the product during recharging.
- WARNING: Remove the batteries from the product before disposing of the product.
WARNING: Always keep batteries and tools out of the reach of children.
CORRECT DISPOSAL OF THIS PRODUCT (Waste Electrical & Electronic Equipment) (Applicable in the European Union and other European countries with separate collection systems)
This marking shown on the product or its literature, indicates that it should not be disposed with other household wastes at the end of its working life.
To prevent possible harm to the environment or human health from uncontrolled waste disposal, please separate this from other types of wastes and recycle it responsibly to promote the sustainable reuse of material resources.
Household users should contact either the retailer where they purchased this product, or their local government office, for details of where and how they can take this item for environmentally safe recycling.
This product should not be mixed with other commercial wastes for disposal. If the waste material should be disposed of illegally, fines may be applied, as provided for by the Decree Law in force.

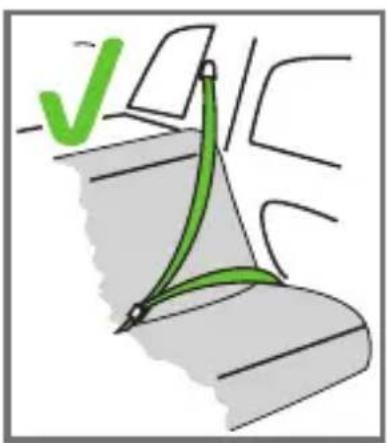
CHANGING THE BATTERIES:
To change the batteries, unscrew the lid with a star screwdriver, remove the spent batteries and place the new batteries correctly, ensuring the correct polarity, then replace the lid and screw down.
RECOMMENDED BATTERIES:
- 1 battery model LITHIUM - CR1620 - 3V.
- The use of rechargeable batteries is not recommended for this product.
PRECAUTIONS WITH THE BATTERIES:
- Always insert the batteries with the correct polarity.
- The batteries can easily be swallowed by children and cause dangerous consequences.
- If you think that your child swallowed a battery, contact urgently a doctor.
- Do not short-circuit the power clamps.
- Do not throw batteries in the garbage, but bring them to collection points.
The contents of this document as stated below will come into effect as from 01.01.2005 and replace, on every account and in full, any previous message referring to the guarantee provided by Foppa Pedretti S.p.A.
FORMAL GUARANTEE
Foppa Pedretti S.p.A. the head office of which is located at n. 11 Via Volta, Grumello del Monte (Italy), guarantees directly to the Consumer that this brand new product is free of faults with regard to the materials, design and manufacture and that it complies with the characteristics as declared by the manufacturer. This formal guarantee is valid in all Member Countries of the European Union and it neither excludes nor limits the Consumer's rights in accordance with mandatory measures provided for by the law with regard to the Retailer of the Product.
To take advantage of this formal guarantee, the Consumer must return the faulty product to the Retailer, presenting to the same the proof of purchase of the Product which must clearly show the Retailer's address, the date of purchase of the Product with the Retailer's stamp and signature and an indication of the Product itself or, alternatively, the receipt which must not have been altered and which must clearly show the same information as that referred to above.
The formal guarantee is valid for twelve (12) months from the date of purchase of the Product. During this period, Foppa Pedretti S.p.A. will repair or replace the faulty product, at its own discretion. The formal guarantee is granted to the end buyer of the Product (Consumer) and it neither excludes nor limits the mandatory rights of the Consumer as provided for by the law and/or the rights that the Consumer may have with regard to the Dealer/Retailer of the Product.
EXCLUSIONS TO THE FORMAL GUARANTEE.
The formal guarantee is excluded in the case of damage caused to the Product for the following reasons: if the product is used in a way that does not comply with the information contained in the use and assembly instruction sheet, if the product is knocked or dropped, if the Product is exposed to humidity or extreme heat or environmental conditions, or to sudden changes in the same, corrosion, oxidization, unauthorized alterations or repairs to the Product, repairs using unauthorised spare parts, improper use, improper maintenance or failure to carry out the same, improper maintenance compared to the information given on the use and assembly instruction sheet, incorrect assembly, accidents, damage caused by food or drink, damage caused by chemical products, cases of force majeure.
In any case, Foppa Pedretti S.p.A. declines all responsibility for damage caused to persons or to property, other than the Product, when such damage is caused by a failure to comply with the instructions/advice/warnings cont a ined in the manua I or, alternatively, in the use and assembly instruction sheet provided with each Product for the owner/user. (Purely as an example, in the case of a cot : "Check your baby constantly. Make sure that the sheets and blankets do not cover the baby's head...").
Furthermore, Foppa Pedretti S.p.A. declines all responsibility for damage to persons and to property when the breakage of its products is due to a deterioration in the components of the Product that are subject to wear. All the components of the Product made of plastic are considered to be components subject to wear.
TABLE DES MATIÈRES
For the safety of the child, check before every journey that:
- Both ISOFIX connectors are hooked into the appropriate anchoring points, and both indicators are green;
- The car seat is firmly installed on the car;
- The lap belt is inserted into the respective "lap belt guide" loops placed on the two sides of the car seat;
- The diagonal belt, on the buckle side of the vehicle's seat belt, is correctly inserted into the lap belt guide loop;
- The diagonal belt is inserted into the upper diagonal belt guide loop of the headrest from the belt retractor side;
- The buckle is properly fastened and the belt is not twisted.
6. INSTALLATION DU KID-PAD
EXCLUSIONS DE LA GARANTIE CONVENTIONNELLE.
Whenever 40cm has a diameter of 105cm (i-Size ISOFIX Universal)
Whenever 100cm has to be 150 cm (i-Size booster seat)
Dos 100 cm ate os 150 cm (i-Size booster seat)
7. MANUTENÇÂO E LIMPEZA
- KomnoHeHTbl CTP. 159
4.1 KaK noJIb3OBAtBcA npJxKoI CTP. 160
4.2 KaK OtperyI npoBaTb ydepKnBaIoUpeMeHb CTP. 160
4.3 PerylnpobKa noIroJIOBHNka CTP, 160
4.4 PerylinpoBka NaKloHa CTP. 161
4.5 KaK pa3BepHyTb cnIeHbe CTP. 161
4.6.2 ChTne cncTeMbI ISOFIX CTP. 162
4.7 PerylnpobKa n HcnoJb3ObaHne peMH Top Tether CTP. 162
4.8 ChTne uYcTaHOBka yIdepKINBaHOUxpeMHei CTP. 163
4.9 IcnoIb3ObaHne BklaDbIa dIy caMbIX MaJeHbKnx CTP. 164
5.1OpneHTaun npOTnB XoJa DvNKeHna ABToMo6nla IJra Tei
(ДeТи рocTom ot 40do 105cm,ISOFIX+Top Tether+удержИваюше peMHn) CTP.164
5.2 YctaHOBKa nO xOy dBnKHeNnaBTOMo6nla
(Дети рocTom OT 76 до 105 cm, ISOFIX + Top Tether + удерхиваошпе peMHN) CTP. 166
5.3 ChTne aBtOKpeCna c aBtOMo6nla
5.4 YctaHOBka no xOdy dBnJKeHHaBtOMo6nla (TeTn poCTom ot 100 do 150 cm) CTP. 167
-
YctaHOBka npncnoc6JeHnK IKD PAD
-
YcTaHOBKa 06NBKN/CHrTne 06NBKN
-
Be30NaChOCTb 3JaEaKTPnuecknx KOMNoHEHToB (npraKka top tether c cnHaJIIn3aInei)
Ppabnla ytnin3aunn n3deJnna (eKtpueckne n eKtpoHHbI oTxDbl) CTP. 171
3aMeHa 6aTapeek
Batapeek
TapaHTnHbIe 06a3aTeJIbCTBa CTP. 173
PPEyIPEKDEHNA
1. BHIMAHNE!!:
- Перед Tem, Кк пистугь К ИСПОЛБЗОВАнЮ, peKOMeHДуЕТСВНИМаTeьноЗнAKOMITbCS C ИНСТPyКциЕ NO ЭКСПУаТaцИN, KOTOPYIO HeO6xOДIMо CTpOrO CO6JIOnaTbДЯ МAKCIMaJIbHOJ 6e3ОпаСHTС ИЗДeЛЯ.
- Правильhoe крелене системы ISOFIX и onopнй HOЖКИ IMeET nepBOcTepeHHOe 3нauене Дя 6e3oNaChOCTn pe6eHka.
- BepejHo xpaHnTe IHCTpyKcHIO, YTO6bI NMeTb BO3MOxHocTb O6paaTbcra K Hei B 6yduem. B npouecce kcnlnyataun daHHyU INCTpyKcHIO cJeDyET XpaHnTb B CneuaJbHOM OTceke abTokpcsla.
-
HecoblodeHne 3THX INCTpyKcIM MOKeT HeRaTINBHO OTPa3NTbCRA Ha 6e3ONaCHOCTN IIN CTaTB npuHHo cepbe3HbIX TpaBM nIIc CmepTN pe6eHka.
BHIMAHHE! OTKIIOHTe NOdykU 6e3OpanacHOCTn naccaxnpa, KOrda pe6EHK haoNTcHa nepeiHem cndeHbe IINQOM pOTNB XODa DBNXKeHnaBTOMO6nla.
-Данhoe abTokpecno npoшно omoloraunB COOTBeTCTBnC perlaMeHToM ECE R129/03дпяпербоЗкдeTeи рocTom OT 40 cmdo 150 cmи может устанваься: -
Празовхда двжени (дети ростом от 40 до 105 с), с креленем ISOFIX + Top Tether.
- Поху движени (дети рocTom ot 76 до 105 cm), с кpenлени ISOFIX + Top Tether.
-
Похудьнжени (дети рocом OT 100do 150cm),с креленem ISOFIX +штать 3-TOueHHbI peMeHb IIn60 TOLbKO StTaTHbI 3-TOueHHbI peMeHb.
-
AXHO: He yctaHaBnBaIte aBtOKpeCNo NO XOy DnHexHnJa IJeTeB Bo3paCTOM MlaIWe 15 MecaeB. DaHHoe aBtOKpeCNo MoKet 6bItb YcTaHOBLeHo IIncOm No XOy DnHexHnA bTOMo6nla IJpe6EhKa pocTOM HaunHnAOT 76 cm.
BHIMAHNE: "i-Size" - зто поедовая система уdeckжьа-юших устpoистдля поевозкдTeн.Она одобретаВ coOTBETCTBиC PerlaMeHTOM N° 129,Для ИспользOBAHNY B aBTOMO6nIax C cn-дeнЯМИ, COBMecTmMbIMN C cHCTeMOJ «i-Size», Кak yka3aHO npOn3BOdITeJIem aBTOMO6nIaBpyKOBoIDCTBe nolb3OBaTeJIa. EcIn comHeBaTeEcB, npOKOHcYJIbTnPyITeEc b C npOn3BOdI-TeJIeM cHCTeM 6e3ONaCHocTn Для DeTeJ ИлnpoDAvZOM.
BHIMAHNE : "i-Size" - зто пешиовая система уdeckивагих усторьдля пеши bo3kn dete. Oha odobpeha B COOTBETCTBn C PerlaMeHTOM N° 129, Дли ИспользOBaHn B aBTOMO6nIax C cndeHbAmN, COBmecTnMbIMn C cnteMoY "i-Size", Кк уka3aHo npOn3BOdnteJem aBTOMO6nIaBpykoBoDCTBe nolb3OBaTeJЯ. EcIn comHeBaTeCb, npOKOHcylbTnpyuTecb C npOn3BOdnteJem cniCTeM 6e30nacHOCTn Дя DeTeJ ИлnpoDaBtOM. - ПЕДУПЕЖДЕНЕ: НИКОДА He octabлай Te MaMbIsha 6e3 npncmOTpa - Bbl HeceTe OTBETCTBeHHOCTb 3a 6e3OnaChOCTb Baшero pe6eHka.
PPEyIPEKDEHNA
IPED HauJIOM IcIOJIb3OBAHnI
BHIMAHHE: He yctaHaBnBaTb aBtOKpeCNo Ha aBTOMo6nIbHbIe cnJeHb, KOtOpbl e NOBepHyTbI B CTOPOHy 3aDHei YacTHn aBTOMo6nJIu N B 6OKOBm HAnpaBLeHN.
- ПЕДУПЕЖДEHNE: Пе徴 установков abtokpeсla yбдntecb в TOM, чTO спнka naccaknpckoro сдения заблokирова на Вervтikальом поожени.
- ПЕДУПЕЖДЕНЕ: 3anpeuaetcЯ nCnoJb3ObaTb aBtOKpeCNo B domaunx yCIOBnX B kaueCTBe cTuJa. OHO npedHa3NayeHo dIЯ nCnoJb3ObaHnR aBtOMo6nJIe.
BHIMAHNE: PpOBepbTe, YTO 6aJx nn Dpyrne ppeMeTbI, KOtOpBle TeOpEtNueckn MOry T haHeCTn ydApbl nn NOBpeKdEHHra CndAeMy B aBToKpeCLe npn abapnn, HaNekHO 3aKpePJIeHbl.
ПИИСПОЛьЗOBAHIN ABTOKPECLA
- ПЕДУПЕЖДEHWE: TБердье зелемпьи пл actMaccobbieЧаCTN DeTCKORO ydepxnBaHooero yctpoiCTBa DoJxHbI 6bITb paCNoLOXeHbI n YcTaHOBJIeHbI TaKIM o6pa3OM, YTO6bl npHOpMaJIbHOM IcNoJb3OBaHm ABTomO6nla OHN He 3aCTpeBaJI NOD IIOdBnKhbIM CnIeHbeM nII B npoeme DBepciI.
- ПЕДУПЕЖДEHNE: Испльзуйтм МханзM 6локировк OТкрьИвня Девер的新Tomоюнл н3нутуг, eclin EmeeТСВ Налчи. 3TO п徳OTВразNT OTКрьITNe Dевер peбенkom.
- ПЕДУПЕЖДЕНЕ: Делаite He6oJIbIWe OCTaHOBKn BO BpeMЯ ДИHHOJ NOe3dKN, YTO6bl pe6eHOK MOr paccla6nTbcrN IOdbIwAtb CBexKIM BO3dYXOM.
- ПЕДУПЕЖДЕНЕ: He octabлайтpe6eHka B DeTcKOM ydeprKnBaIOUeM yCTpoiCTBe 6e3 npncMOtpa.
- I P E D U N P E X K D E H N E: Pa3Me u e H H O e Ha a B T O M O 6 n l b H O M c n d e H b e a B T O K p e c n o 6 b a t e h o
PPEyIPEKDEHNA
Должно 6ыт bзakpenлено пи помоши системы ISOFIX n onopною HOЖК, дж ecn OHO B daHHbIM MOMENT He IncnoJb3yETc. B npOTINBHom cIyuae abTOKpeCIO MOKet HaHeCTN TpaBMbl NaCCaJHKpAMпрpe3KOM TOPMOKeHIn.
- ПРЕДУПЕЖДЕНЕ: Росле монтаякубпесь в ТOM, УTO abTOKpeсно Наджно 3aФИКсИровано и He КачаETСЯ. EcIn aBToMObиьный рeMeHb 6e3OpaCHocTN ocla6, ВернITE erO B пөжHee NOLOXKeHne И BHOБь UCTaHOBITe abTOKpeсно.
- ПЕДУПЕЖДЕНЕ: He польбоватбая уdeckиваюшустpoйстов дд ребенka 6e3чека.
- ПЕДУПЕЖДEHNE: He 3aMeHЯTeЧEXOJI, peKOMeHDoBaHHbIиЗROTOBNTeJIeM, ДугIMЧExЛOM, OCKOLbKY 3TO MOJKeT NOBInrTa Hа пapВиьнocтб ФункцИнрOBaHHa YdePKNBaIOUSeRo yCTpoiCTBa.
- BAXHO: OctaHOBKn BO BpeMЯ ДлинHо NOe3dkn LyuWe DeJaTb Upee3 peryIapHbIe npOMexKytKN, pRn 3TOM npoBepaTe Bcerda npaBnIbHoCTb yCTaHOBKn KpeCna, a TaKKe, YTO peMHn 6e3OpacHocTn He ocla6JIeHbl.
- ПЕДУПЕЖДЕНЕ: B слуаe abapин Heo6xOДИМо 6bICTpo paCCTeHyTb npJKKy- 3aMOKи ocB06OДИТь pe6Eнka. ПОТOMY пяжka-3aMOKdoJxHa JERKO OTKpbIbTaBcR, He 3aKpbIbAitTe ee HnueM. He no3BOJЯTe pe6Eнky irpaTb c npJKKoN-3aMKoM.
- I P E D Y N P E X K D E H N E: He pa3Me uaTe nOd aB T O K p e c l oM, M e x d y H m i a B T O M O 6 n h b h i m cn d e h b e M, H N k A K X T E K C T N b H b i x n3d e L n (H a n p i m e p, n oI o T e H c e n I I I n o D y u k a), T a K Ka K 3TO M O K J E T N O B I N A T b Ha 6e30nacHoe f y H K C U O H N P O B a H n e n3d e L n.
- ПЕДУПЕЖДEHNE:ВЗИМ gee Врмя roda He ycaЖиBaIte pe6eHka B aBtOKpeCLO,ОдeТOrO B cLshkom obbEMHyO OdEkJy. CInskom obbEMHaЯ OdEJda MoKet cTaTb npuHoi HnnpaBnIbHO perYIpOBKn 6peTeJe CTpaxOBOUhIx pemHe ABTOKpeCla. B clyuae abapn,pe6eHok MOKeT He npaBnIbHO ydePxNBaTbcra 6peTeJIaMn.
- ПЕДУПЕЖДЕНЕ: Металлически и пл actиковые DeТалп StaHOBЯТСя roрачимп по BOЗдевICTBнEM ВICOKОI TempepaTpybl. ПOTOMу peKOMeHdyeTcR HaKpbiBaTb abTOKpeCNo npn napkoBke aBTOMO6nla Na coJIHnce.
- ПЕДУПЕЖДЕНЕ: Barajи друге ТяжелыпpeДметы, осobенho ecnkoшne,doJxHb 6bIb NaJExHNo 3akpenJIeHb B caIoHe aBtOMo6nla. B clyuae abapinn He3akpenJIeHHbIпpeДметы мOrYT haHeCTn TpaBMbl pe6Ehky.
- ПЕДУПЕЖДЕНЕ: He octabлай Te He3aKpeHnHbI e npeMeTbI Ha noJIke 6araJHKnka: в сLOYае abapи OHI MOrTy HaNecTI TЯKeJIbI TpaBMbl NaccaKnpaM.
- ПЕДУПЕЖДЕНЕ: ПеpeД Началовиябintecь в ТО, чTO BCE 6лOKИРУОПЕ устpoйства павильно застгHTы.
- I P E D U N P E X K D E H N E: 3a n p e u a e t c r n o l b 30 B a T b c r 3a n q a c t r m n n i n k o m p l e k t y o u s m n, He n o c t a b l a r e M b i M n n i n He o d o b p e H h b i M n p o n 3 B O d n t e J e m, n o c k o l b k y 3T O M o x e t O t p u z a T e l b h o c k a 3 a T b c r h a 6 e 30 n a c h o c t n n 3 d e j n y.
PPEyIPEXKeHnA
B clyuae abapnn ABTOKpeCNo MOKeT ytpaNTb 6e3OpaCHOCTb BCJeCDTBne NOJyueHHbIX NOBpeXdHn, daKe ecn OHn He cpa3y CTAHyT OYeBNHbIMN.
3aIpeuaetcBCKpbIBaTb aBTOKpeCNo, NocKOJIbKy 3TO MOKeT OTpuCaTeJbHO NOBJIraTb Ha o6uYIO 6e3OpacHOCt b N3dEJIy.
-Чтоби ИЗбека ТОВпсдени OБИВК, He peKOMeHДуETС YДАЛТь ЛOrOTиNbI/эТИКЕТК. ПользУнTeСь abTOKpeCLOm ДАже BO ВрмЯ KOPOTКИX NOE3ДOK, NOCKOLbKY 6OЛБшЯ чAstь abAPи npONCXODIT ИМEHNO B 3Тnx Clyuayx.
- Перд пиобпетенем убенись вTom, чTo abTOKpeCNo COBmecnMo C Baшим abTomO6nJIem.
Bo Bpem JaIbHnx Noe3doK peKOMeHdyetc DeJaTb OCTaHOBKn, YTO6bl pe6bI pe6bIK MOr HEMHoro OTDOxHyTb.
- PódaBaIte IInHbI npIMep n 683aTeIbHo nOJIb3yITecb peMHem 6e30nacHOCTn.
- Ośbarychnte pebeHKy, uTO OH HN B KOem cIyae He dOJIKeH nIgpaTb c npJxKoJ yIepKINBaHOxpeMHei.
PEMEHb B3ONACHOCTN
AByokpecno MoXHO yCTaHOBnTb, KaK NOKa3aHO Ha pncyHke:


| •Ор在线咨询 по:xovodvdbIxHENIA | ДА |
| •П ropИВ xOda DBIxHEnIA: | ДА |
| •C 2-x ToчeyныIMпemняIMьe30napChOCTN ИсpoЛьзOBaHnue ДБухToчeyнbIX рeMHeNь6e30napChOCTN ЗачИтIELNo yBéJIuHbAeT pIck TpaBMIpOBaHnY pe6eHkaВСлуаe abapn. | NET |
| •C 3-x ToчeyныIMпeMHЯIMьe30napChOCTN ЕмEHь 6e30napChOCTNdoJXeHь 6bITb Odo6peHВ СоOTBeTCTBnC PerIamEhTom ECE R16 nIIpyrIMN ЗКВИВaJIeHTHbIMN STaHdApTAmN. | ДА |
| •C системо ISOFIX n Top Tether | ДА |
| •Ha nepeДнEM пassжирсOM сideHbe ЗАРЕШАЕТСУСТАНABЛВATь ABTOKPECLOHA ПASSCAЖИРСКOE сiDEHBE C AKTINВИРОBAHHO НадVBHОДОПUSKOI BE30napChOCTN! СiDEHBe NepeДнERO пassжира можeT coYeTaTbCS nII He coYeTaTbCS C сiSteMamIM ISOFIX c Temn Jxe празуп inexpдениМ, OTHOCЯшимСКЭТIM сiСТeMam (CДВИьTe сiDEHBe Ha3aI N O3HakOMbTeCs C ИнСТPyKUZIMN B rykoBoDcTBe NO 3KcPnLyaTauciN ABTOMObIЯ). | DA2 |
| •Ha 3aIdHem 6okOBom сiideHbe | ДА |
| •Ha 3aIdHem zuHtpaJIbHOM сiideHbe ДeТСКоE кесло можно ИсpoЛьЗОВаьТ ha zuHTPaJIbHOM ЗaIdHem сiideHbe, ecII N OHO OCHaUSeHOr TpexToUeHbIMN рeMHЯIMь 6e30napChOCTN. | DA1 |
(Ctporo co6IoudaaTe Tpe6oBaHna 3akOHoTaTeJbCTBa, DeiCTbYIOUeRo B BaWei CTpaHe).
- Pbyar perylnpoBkn BbICOTbl NOIROJOBHnka
2.ПоДг罗OBнИK - CKB03Haj HaprabJIOUa JarpyDHorOpemHj
- HaklaKaДЯ HarpydHoro peMHra
- 5-TouehblpeMeHb6e3onacHOCTn
- KhoPka ceHTpaJIbHOro MExaHn3MapeRyIInpOBKn JAmOK
- PemeHb perylnipOBKN JIAmOK
-
Pbyar noBopoTa cnIeHbJy
-
Top Tether
- HanpaBlaioa naonChoro Top Tether (abTOKpeCNO npOTNB XoDa DnHexHna)
- OTeK dIa nHcTpkyu
- PRAKKKA
- CKB03Ha HnPaBlaIOUaI NOrCHOrOpemH
- CoeHHnTeHn ISOFIX
- KhoNka oTcTeRnBaHnI ISOFIX
- BklaDbIa
- HaprablaIOUne ISOFIX
YCTAHOBKA B ABTOMO6NAE
4. ПЕДУCTAHOBKOI
4.1 KaK noJIb3ObaTbc8 npraJkoJ
Pemeh Top Tether doJxhen npoxoHTb haCnHKOABTOMO6nIbHOrO cndeHbry HN B KOEM clyuae He had nOroLOBHKOM. Pprn Heo6xoDMOCTN prnIOHMITE nn DEmOHTPyTe NOroLOBHK C cnDeHbry.
Iy630nacnoctn pe6eHka nepe KaKdo noe3dko npOn3BOOHTe cJeDyUOuNE npOBepKn:
- O6a coeHHTeIg ISOFIXdoJHKbI 6bITb npICTeHyTbIK CneuaJIbHbIM TocKaM KpePHeHn, a o6a HdkaTopa doJHKbI 6bITb 3eJeHO rBeTa;
- ABTOKpeCNo DoJxHo 6bItb npOuHO yCTaHOBLeHO B caIHOte aBTOMo6nla;
- PemeHb Top Tether doJxeh 6bITb npaBnIbHO HaTayT nidealbHO npnIeRaT b K cnnHke aBTOMo6nIbHorO cndeHja, a HndNKaTOP npaBnIbHO HaTajxehna DOJxeh 6bITb 3eJeHbIM;
- YdepxnBaIOuIne peMHn aBToKpeCna DOJXHbI npIneratb K TeNy pe6eHka, He npnxmra ero:
-Мекдуламкamи верхней частью п leч должно octaba tcя pa cctояпсь в 1 палeц (1 cm); - JIaMKN DOJXHbI paCnOlaTaBcRa Ha npaBnIbHOB BbICOTe n He DOJXHbI nepeKpyuBaTbCra;
3aunTHbI HarpyHnKIOJXHbI paCNoJaTbcHa BbICote nJeu pe6eHka;
HaKoHeuHnKn npJxKn dOLXHbI 6bITb npaBnIbHO 3acteHyTbI.
YCTAHOBKA B ABTOMOBNAE
5..2 YCTAHOBKA IO XOODY DBIXEHNIA ABTOMOБИЯ
TAPAHINHbIE O8a3ATEbCTBA
HnKeyka3aHHbIe nOJoxeHnB BCTynaOT B DeIcTBHe c 01.01.2005 r. nNoJIHOCTbIO 3aMeHnT IIO6yIO dpyrYIO HΦOpMaunIO, UTO KacaETcraPaNTHN, PpeIoCTaBnaEmoKOMpaHneFoppa Pedretti S.p.A., ABJRAcb.
TAPAHTHbIE O6r3ATEbCTBA
KOMnHn Foppa Pedretti S.p.A. OfHuHaJIbHo 3apeHcTpnpoBaHHo no aIpecy: Grumello del Monte (Italia) Via Volta 11, KOTopar rapaHTnpyET HenocpeDCTBeHHO NOpTeJIIO, UTO DaHHoe H3dJIne, TOJbKO YTO BbIpyeHHoe C fApNIKN, He HmEeT DeΦeKTOB Hn MaTePnaJIOB, HN PPOeKTHpOBaHHa, HN PON3BOdCTBeHHbIX, H COOTBETCTByET 3aABJIeHHbIM XapaKTePNCtIKaM.
Hactoia rapaHTna DeiCTBnteNbHa BO BCex CtpaHax- YIeHax E3C n He NCKIOuaet n He orpaHnUbaet npaba POnb3ObaTeJRA, B COOTBeTCTBnC 3aKOHoDaTeJBCTBOM, perlaMeHTnpuyuM B3aHMOOTHOWeHHa C PpOn3BODHTeMe H3DeJIa. YTo6bl BOCNoB3OBAtbcra DaHHoR rapaHTnei, Notpe6nteIb DOJXeH nprHeCTn DeΦeKTHOe H3DeJIe IpoAbuy, ppeOCTaNB DOKyMeHT, ydoCTOBepaIooN O npno6peTeHHn H3DeJIa, c neaTbIO n IOnnCbIO Ipoabua n yka3aHHeM Ha3BaHHa H3DeJIa HJI, KaK aJIbTePHaTHBa, fncKaJIbHbIK KaccOBbI YeK, 6e3 KaKnx-JIn60 H3MeHEN, n3 KOtOPOr O YETKO BnHa BcYka3AHNa Do 3TOr O HΦOpMaunr. rapaHTna IMeET cPOK DeIcTBn DAbeHaDcaTb (12) MeCAueB C daTbI npno6peTeHHa H3DeJIa.
B TeuHne BbIeUka3aHHoro cPoka KOMnHa Foppa Pedretti S.p.A. 6o3yETcO OTPMOHTnpOBaTb NIn 3aMeHtB, Ha CBOB Bb6Op, DeEeKTHoe H3dJIne. TapaHTn npDeocTabJrTeC KoHeuHomy PokynateLIO H3dJIy (NoIb30BaTeLIO) n He NckIIOuaet n He orpaHnUHbAeT npab DaHHoro NoIb30BaTeJI, npEdyCMOTpeHbIX DeiCTByIOUm 3aKOHOaTeJIbCTBOM n/INn npBaAMn POnb30BaTeJI, Ha npdeJbABJeHne CBOx npab B aDPEC DnIepa/IpOdaBua H3dJIy.
HE NOKPbIBAOTCRA PAAHTHEI.
TapaHTne He nOKpbIbAEcra yUeep6, CByaHHbIC HCNoJIb3OBaHHe M 3dEJIa, BO3HKnuNIO CLeDyUOIM PrnHAm: HEnpaBHLbHOc HcNoJIb3OBaHHe, He COOTBeTCTByUoUee yKa3aHnM, COdePkaUmCRA BO BklaDbIiue C INHCTpyKUHMIO MOHTaKy I KcPlyatauN, UdApbl N NaDeHnR 3dEJIa, H3dEJIne NOBepraLocb BO3dEINCTBNUBlaXHoCTn IIN 3KCTpeMaJbHbIM TEMpePaTyam N He6JaIopnIaTHbIM YcLOBnAM OKpykaUoSe C PocToHHo CMeHO N 3TNX YcLOBNI, KoppO3N N OKsClenHIO, a TaKxe HecaHKUHOHPoBAHOMy PemOHTu IIN MoDInΦnKaUIN, H3dEJIe HcNoJIb3OBaIocb He No Ha3HaueHIO IIN HnPaBnJIbHO, 6e3 cO6JIouDEHnY kA3aHnB INHCTpyKUHX PO MOHTaKy I EKcPlyatauN, PnI NIOxOM YXOJe IIN OTCytCTBnT TakOBOrO, PEmOHTe C HcNoJIb3OBaHHe M HeOpnIHNaHBix 3aNacteN, PO npuHHe HnpabNlBHO c6OpKn, ABapN, BO3dEINCTBnI NII N HAINTKOB, XMHueCKNX BeueCTB, a TaKxe BCJeIDCTBne Ype3BbIuaHbIX 06CTOaTeJIbCTB.
B liobom clyuae, kompaHnna Foppa Pedretti S.p.A. He Hecet HnkakOJ OTBeTCTBHeHocTH 3a yuepe6, npuHHeHHbIJIIOdAMNII INpeDMeTaM, OTINHbIM OT N3deHnA, no npuHne Heco6IIODeHnYkazAHn / npedncaHn / npedynpeXdEHN, coepkauxxC8 B daHOM pyKOBODCTBE Hn, KaK aIbTePHaTHBa, B "HhctpyKcHn NO MOHTaXy N 3KcNlyaTaUH", COnpoBQdaIOSei Kaxdoe N3deHne H npedHa3NaueHHOE dJa BlaedeLbua/ NOlb30BaTeJ. (HaNPmep, YnCTO B KaYeCTBe npimepa, B clyuae DeTcKO JKPOBatKN: "HnkOrDa He OCTabIaIte 6e3 npncmOTpa pe6eHka. KOHTpOJIpyIte, YTO6bl rOLOBa pe6eHka He OKa3aJIacb POKpbITOn IpoCTbIHEO Hn ODEJLOM...").
KoMaHnFoppa Pedretti S.p.A., Kpome npOyeo, He HecET HnKaKOJ OTBeTCTBENHOCTu 3a yUep6, PnPHHEnHbI JIOdAm NIn MMyueCTBy, eCIn NOlOMKa eE npOdyKcN CBr3aHa c pa3pySeHEm KOMNoHETOB N3eJINa, NOBepraembIX HopMaIbHOMy N3Hocy. KomNoHcTAMn, NOBepraIoUIMNCa HOpMaIbHOMy N3HOCy, CHTaOTcB BCE nlaCTMaCCOBbie KOMNoHcTbI N3DeJINa.
Importatoda:
RU CnncOK ABTOTPAHcNOPTbIX CPeIcTB
ISO/R2 - SO/F2X
ISO/B2


Cars approved for the Circle i-Size car seat, provided the car is equipped with the ISOFIX system.
-
Circle i-Size is a universal child restraint device. It is approved under the R129 regulation for use in all vehicle positions marked with the i-Size logo. The Circle i-Size car seat is also suitable for attachment in the seating positions of the cars listed below, provided that the approved ISOFIX points are present and available. The seating positions in other cars may also be suitable to accommodate this child restraint device, however we have not yet tested these cars in conjunction with the Circle i-Size. If in doubt, consult either the enhanced child restraint system manufacturer or the retailer.
-
The ISOFIX anchoring points on the passenger seat (position 2) are normally available as an option, therefore, this may or may not be the case for this position, depending on the model. Installation on the rear passenger seat of the car may limit the space for the passenger in the front seat.
Always check the compatibility of the "Circle i-Size" car seat with your carto verify that the available space is adequate. - Please note that this list undergoes ongoing revision procedures, with changes and additions of vehicles accordingly.
The up to date list can be consulted on our web site: www. foppapedretti.it
Warning: Do NOT use on a passenger seat fitted with an activated front airbag.
INFORMATION
Please consult with the vehicle manufacturer regarding access to ISOFIX points.
WARNING: before purchasing, consult the vehicle Use and Maintenance Guide to ensure the ISOFIX anchor is present, as this could be an optional.

- WARNING
- ATTENTION:
- BEFORE STARTING
- WHEN USING THE CHILD CAR SEAT
- SEAT BELT
- SUNLIGHT/HOT DAYS
- SECOND HAND OR DAMAGED CHILD CAR SEATS AND SEATBELTS
- IMPORTANT WARNING
- from 40 to 105~cm (i-Size universal ISOFIX)
- From 100cm to 150cm (i-Size booster seat).
- RESTRICTIONS AND REQUIREMENTS REGARDING THE USE OF THE PRODUCTAND VEHICLE SEAT
- WARNING! Follow the restrictions at all times:
- COMPONENTS
- INSTALLATION IN THE VEHICLE
- BEFORE INSTALLATION
- How to use the buckle
- HOW TO ADJUST THE HARNES
- HEADREST ADJUSTMENT
- CLE
- ADJUSTING THE RECLINE
- HOW TO ROTATE THE SEAT
- HOW TO INSTALL THE ISOFIX SYSTEM
- INSTALLING THE ISOFIX SYSTEM
- REMOVING THE ISOFIX SYSTEM
- ADJUSTING AND USING THE TOP TETHER BELT
- FORWARD-FACING (Children between 76 and 105~cm ), ISOFIX + Top Tether
- REMOVING AND INSTALLING THE HARNESS
- USING THE NEWBORN REDUCER
- PLACING THE CAR SEAT IN THE REAR-FACING POSITION
- For the safety of the child, check before every journey that:
- INSTALLATION IN THE FORWARD-FACING POSITION
- REMOVING THE CAR SEAT FROM THE VEHICLE
- INSTALLATION IN THE FORWARD-FACING POSITION (Children between 100 and 150~cm in height, 3-point seat belt or ISOFIX + 3-point seat belt)
- Mode A - INSTALLING WITH 3-POINT SEAT BELT TOGETHER WITH ISOFIX CONNECTORS
- Mode B - INSTALLING WITH 3-POINT SEAT BELT
- KID-PAD INSTALLATION
- MAINTENANCE AND CLEANING
- BATTERIES
- SAFETY OF THE ELECTRICAL PARTS (buckle "Top Tether" with alarm):
- CORRECT DISPOSAL OF THIS PRODUCT (Waste Electrical & Electronic Equipment) (Applicable in the European Union and other European countries with separate collection systems)
- CHANGING THE BATTERIES:
- RECOMMENDED BATTERIES:
- PRECAUTIONS WITH THE BATTERIES:
- FORMAL GUARANTEE
- EXCLUSIONS TO THE FORMAL GUARANTEE.
- TABLE DES MATIÈRES
- INSTALLATION DU KID-PAD
- EXCLUSIONS DE LA GARANTIE CONVENTIONNELLE.
- Whenever 40cm has a diameter of 105cm (i-Size ISOFIX Universal)
- Whenever 100cm has to be 150 cm (i-Size booster seat)
- Dos 100 cm ate os 150 cm (i-Size booster seat)
- MANUTENÇÂO E LIMPEZA
- PPEyIPEKDEHNA
- BHIMAHNE!!:
- IPED HauJIOM IcIOJIb3OBAHnI
- ПИИСПОЛьЗOBAHIN ABTOKPECLA
- PPEyIPEXKeHnA
- PEMEHb B3ONACHOCTN
- YCTAHOBKA B ABTOMO6NAE
- ПЕДУCTAHOBKOI
- KaK noJIb3ObaTbc8 npraJkoJ
- YCTAHOBKA B ABTOMOBNAE
- 5..2 YCTAHOBKA IO XOODY DBIXEHNIA ABTOMOБИЯ
- TAPAHINHbIE O8a3ATEbCTBA
- TAPAHTHbIE O6r3ATEbCTBA
- HE NOKPbIBAOTCRA PAAHTHEI.
- INFORMATION
Brand : Foppapedretti
Model : Circle i-Size
Category : Car seat