E1 Prima - Coffee machine Victoria Arduino - Free user manual and instructions
Find the device manual for free E1 Prima Victoria Arduino in PDF.
User questions about E1 Prima Victoria Arduino
0 question about this device. Answer the ones you know or ask your own.
Ask a new question about this device
Download the instructions for your Coffee machine in PDF format for free! Find your manual E1 Prima - Victoria Arduino and take your electronic device back in hand. On this page are published all the documents necessary for the use of your device. E1 Prima by Victoria Arduino.
USER MANUAL E1 Prima Victoria Arduino
text_image
Victoria ArduinoINSPIRED BY YOUR PASSION.
natural_image
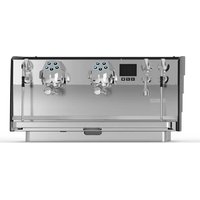
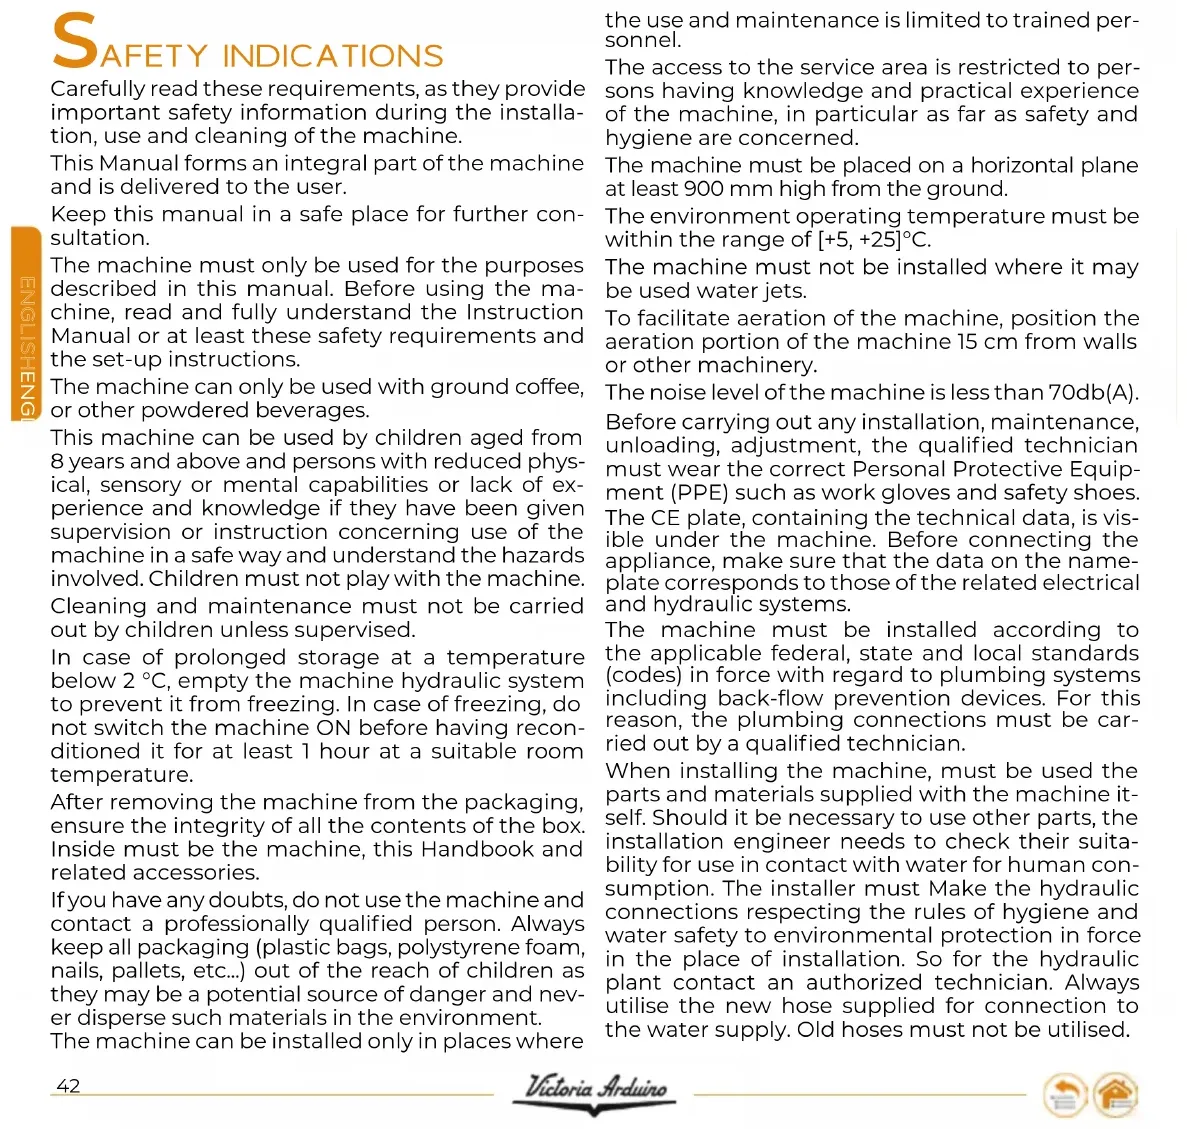
Exterior view of a modern espresso machine with dual switches and a central digital camera (no visible text or symbols)EJ PRIMA PRO
INSTRUCTIONS MANUAL (Translation of the Original Instructions)
MANUEL D'INSTRUCTIONS (Traduction des Instructions Originales)
natural_image
Blue circular icon with a white vertical line and horizontal bars, resembling a stylized lamp or circuit symbol (no text or numbers present)natural_image
Recycling symbol with four arrows forming a triangle (no text or labels)natural_image
Symbol of a trash bin with crossed lines and a blank rectangular base (no text or numbers)text_image
Victor AdviceACCENSIONE MACCHINA 14
ACCENSIONE DISPLAY 18
SCHERMATA INIZIALE 19
POWER OFF 20
EROGAZIONE ESPRESSO STANDARD 20
EROGAZIONE ESPRESSO VIS 20
EROGAZIONE PUREBREW 21
MENU RICETTE 21
Ricetta Espresso Standard 21
Ricetta Espresso VIS 21
Ricetta PureBrew 22
Ricetta EasyCream - Latte (optional) 23
natural_image
Illustration of a hand using a sewing machine to press or install a product, with no visible text or symbols.text_image
Diagram of a water treatment or gas purification system with labeled components and directional arrows indicating flow.text_image
Safety warning symbol showing a plug with a fuse and an electrical socket, with an orange upward arrow indicating improvement or progress.text_image
60" 10" 10" x 3text_image
Victoria Arduino INSPIRED BY YOUR PASSION. 2"text_image
E1PRIMA [PRO] 1"text_image
Diagram showing a device with labeled components and orange arrows indicating flow or movement, possibly illustrating a process or system.natural_image
Illustration of a robotic arm performing a manual pump operation on a platform, with two labeled cross-sections (x1 and x2) showing no text or symbols.text_image
Diagram showing a robotic arm with labeled components and orange arrows indicating flow or movement, possibly for industrial or mechanical control.natural_image
Line drawing of a coffee maker pouring liquid into a cup on a tray (no text or symbols)text_image
Diagram showing a device with a red 'X' symbol and warning sign, indicating a hazard or failure.text_image
Diagram showing a hand cleaning a machine with labeled buttons and a timer, likely for cleaning or repair.text_image
Diagram showing a hand using a water filtration machine with labeled components and directional arrows indicating flow or movement.text_image
Diagram showing a warning sign and a hand holding a red X symbol, with warning symbols and electrical components above.natural_image
Illustration of a hand using a tool to clean or wash a cylindrical object on a tray (no text or symbols visible)text_image
Diagram of a coffee maker with labeled parts and control buttons, showing front panel, side view, and interior layout.natural_image
Line drawing of a robotic arm operating a staircase with a mesh platform (no text or symbols)text_image
Diagram showing a plug connected to an electrical outlet with warning symbol and orange directional arrows indicating current flow or discharge.text_image
Victoria Arduino INSPIRED BY YOUR PASSIONAL 2"natural_image
Circular black button with a white power symbol icon at center (no text or numbers)text_image
35 93.4 °C Off Degassing Espressotext_image
4 93.4 °C Off Degassing Espressogauge
| Metric | Value | | ------------ | ----- | | 88.0 °C | 35 | | Medium | | | Degassing | | | Pure Brew | |text_image
Abilita ON Set Purge (s) 2text_image
X SALVA Gruppo ON Vapore OFFnatural_image
Circular black button with a white power symbol icon at center (no text or numbers)text_image
Espresso 0 PureBrew 0text_image
X SALVA Connessioni ONtext_image
SALVA 0.952text_image
X SALVA Power ONtext_image
Espresso 0 PureBrew 0text_image
Digital nuova password 1234text_image
X > Vapore ON >flowchart
graph TD
    A["1: Finishing funnel"] --> B["2: Drop drop"]
    B --> C["3: Water drop"]
    C --> D["4: Cover with +"]
    D --> E["5: Tap with 30% water"]
    E --> F["6: Finishing funnel"]
A fine giornata:
natural_image
Illustration of a pipette dispensing liquid into a test chamber with an orange arrow indicating flow, accompanied by scientific symbols (no text or labels)natural_image
Illustration of a hand cleaning a kitchen sink with a cloth (no text or symbols)natural_image
Illustration of a hand holding a pen, with tools and a washing machine in the background (no text or symbols)Carefully read these requirements, as they provide important safety information during the installation, use and cleaning of the machine.
This Manual forms an integral part of the machine and is delivered to the user.
Keep this manual in a safe place for further consultation.
The machine must only be used for the purposes described in this manual. Before using the machine, read and fully understand the Instruction Manual or at least these safety requirements and the set-up instructions.
The machine can only be used with ground coffee, or other powdered beverages.
This machine can be used by children aged from 8 years and above and persons with reduced physical, sensory or mental capabilities or lack of experience and knowledge if they have been given supervision or instruction concerning use of the machine in a safe way and understand the hazards involved. Children must not play with the machine. Cleaning and maintenance must not be carried out by children unless supervised.
In case of prolonged storage at a temperature below 2 °C, empty the machine hydraulic system to prevent it from freezing. In case of freezing, do not switch the machine ON before having reconditioned it for at least 1 hour at a suitable room temperature.
After removing the machine from the packaging, ensure the integrity of all the contents of the box. Inside must be the machine, this Handbook and related accessories.
If you have any doubts, do not use the machine and contact a professionally qualified person. Always keep all packaging (plastic bags, polystyrene foam, nails, pallets, etc...) out of the reach of children as they may be a potential source of danger and never disperse such materials in the environment.
The machine can be installed only in places where the use and maintenance is limited to trained personnel.
The access to the service area is restricted to persons having knowledge and practical experience of the machine, in particular as far as safety and hygiene are concerned.
The machine must be placed on a horizontal plane at least 900 mm high from the ground.
The environment operating temperature must be within the range of [+5, +25]^ .
The machine must not be installed where it may be used water jets.
To facilitate aeration of the machine, position the aeration portion of the machine 15 cm from walls or other machinery.
The noise level of the machine is less than 70db(A).
Before carrying out any installation, maintenance, unloading, adjustment, the qualified technician must wear the correct Personal Protective Equipment (PPE) such as work gloves and safety shoes. The CE plate, containing the technical data, is visible under the machine. Before connecting the appliance, make sure that the data on the nameplate corresponds to those of the related electrical and hydraulic systems.
The machine must be installed according to the applicable federal, state and local standards (codes) in force with regard to plumbing systems including back-flow prevention devices. For this reason, the plumbing connections must be carried out by a qualified technician.
When installing the machine, must be used the parts and materials supplied with the machine itself. Should it be necessary to use other parts, the installation engineer needs to check their suitability for use in contact with water for human consumption. The installer must Make the hydraulic connections respecting the rules of hygiene and water safety to environmental protection in force in the place of installation. So for the hydraulic plant contact an authorized technician. Always utilise the new hose supplied for connection to the water supply. Old hoses must not be utilised.
The device needs to be supplied with water that is suitable for human consumption and compliant with the regulations in force in the place of installation. The installation engineer needs confirmation from the owner/manager of the system that the water complies with the requirements and standards stated above.
The pressure of the water supply must be at least 0.2 MPa (2 bar) and the maximum pressure, for the correct operation of the machine, must not exceed 0.65 MPa (6.5 bar).
Only for Denmark, Norway, Sweden and Finland, in case the machine is connected to mains water supply, the minimum pressure must be 0,2 Mpa (2 Bar) and the maximum pressure can't exceed 1,0 Mpa (10 Bar). In case the mains water supply's pressure exceeds 1,0 Mpa (10 Bar), it's necessary, for the proper operation of the machine, to install a pressure reducer upstream the water connection of the machine.

natural_image
Blue circular icon with a white line and ground symbol (no text or numbers)For electrical safety, this machine requires a ground system. Contact a technically certified electrician who must check that the line electrical capacity is adequate for the maximum capacity indicated on the machine label.
The warranty expires if the characteristics of the power supply do not correspond to the CE name-plate data.
On installation, the qualified electrician must fit a circuit breaker switch as foreseen by the safety norms in force that has a contact open distance that permits the complete disconnection under conditions of overload category III, which must be installed in the power supply system in accordance with the wiring regulations.
For the Australian and New Zealand markets, the disconnector must be installed in accordance with AS/NZS 3000.
The qualified electrician must also check that the section of the installation's cables is large enough for the absorbed power of the appliance.
Never use adapters, multiple jacks or extension cords. When such items prove absolutely necessary, call in a qualified electrician.
In case of installation in kitchens, connect the equipotential conductor to the terminal on the machine indicated by the symbol ♦.
It is advisable to install a mains earth leakage circuit breaker with a rated differential current not exceeding 30mA.
To avoid risks of electric shock, the use of the machine involves compliance with some basic rules, in particular:
- Never touch the machine with wet hands or feet;
- Never use the machine with bare feet;
- Never use in bathrooms or showers;
- Never pull on the power supply cord to unplug the machine from electrical supply;
- Never leave the machine exposed to atmospheric agents (rain, direct sunlight, etc...);
- Do not allow the machine to be used by children as specified above, or by unauthorised staff who have not read and understood the information in this Manual.
To prevent dangerous overheating, it is advisable to fully extend the power supply cord. Never block the intake and/or heat dissipation grills.
The user must never replace the machine's power supply cord. If this cord is damaged, turn OFF the machine and have it replaced by a professionally qualified technician.
Should it be necessary to replace the power cord, this operation must only be performed by an authorized service centre or by the manufacturer.
For cleaning and maintenance operations follow the instructions given in this manual carefully.
Once started the washing machine, do not interrupt it; the detergent residue may remain inside the dispensing group.
In case of breakdown or poor function, turn OFF the machine. It is strictly forbidden to intervene. Contact only professionally qualified personnel. Only the manufacturer or an authorized service center can make repairs and only using original spare parts.
Non compliance with the above can compromise machine safety.
Before performing any sort of maintenance, the authorized technician must turn OFF the machine and disconnect the power cable.
In case of fire, if possible, disconnect power to the machine by turning OFF the main switch. Its absolutely avoid to extinguish the fire with water when the machine is electrically powered.
When the machine is not used for a long period, close the water inlet tap.
EXEMPTION FROM LIABILITY
The Simonelli Group Manufacturer cannot be held responsible for damages, injuries and/or hazardous situations generated, such as for example:
- Failure to comply with the safety, installation, use, cleaning and maintenance requirements of this Manual.
- Any damage caused by improper, incorrect and unreasonable use of the machine.
- Machine left on without the presence and supervision of a qualified operator.
- The lack of grounding of the electrical system by the buyer.
- Repairs carried out independently without the authorisation of the Manufacturer, or without the appropriate skills.
- Dismantle the parts of the machine, especially remove or tamper with the safety devices provided by the Manufacturer during the design phase.
The Manufacturer also reserves the right to amend the Booklet without the obligation to update previous editions, except in exceptional cases, so images may differ slightly from reality.
INTENDED USE
The correct use of the machine must comply with what is stated in this Manual:
- Machine designed and built respecting what is expressed in the declaration of conformity.
- The machine can only be used with ground coffee or soluble beverages for the delivery of filter coffee, tea or infusions.
- The machine has an electronic cup warmer for pre-heating the cups. Any other use is regarded as improper and therefore dangerous.
FORESEEABLE IMPROPER USE
This paragraph lists only a few reasonably foreseeable misuse situations.
- Use by non-professional or incorrectly trained operators.
- Introduction of liquids other than softened drinking water with a maximum hardness of 5/6 French degrees (50/60 ppm).
- Touch the dispensing machine with your hands before it has cooled down.
- Introduce things or materials other than ground coffee or soluble beverages into the filter holder.
- Place containers with liquids on the cup warmer.
- Heating drinks or other non-food substances.
- Obstructing the vents with cloths or other items.
- Use the machine if wet or with wet hands or feet.
RESIDUAL RISKS

Despite the fact that the manufacturer has provided for mechanical and electrical safety systems, there is still a danger when using the machine of being burned by touching the dispensing unit, steam wand, hot water wand and/or cup warmer.
Steam can cause burns if directed towards parts of the body.
Immediately after use and after switching OFF, hot areas of the machine still remain.
DISPOSAL

natural_image
Recycling symbol with four arrows forming a triangle (no text or labels)Should you decide to stop using this type of machine, we suggest you render it inoperable by unplugging it and cutting the power supply cord.
Do not disperse the machine in the environment: for disposal, contact an authorized center or contact the manufacturer for pertinent indications.
natural_image
Symbol of a trash bin crossed with two crossed lines and a solid black rectangle below (no text or labels)Under the senses of the Directives 2015/863/EU concerning the reduction of the use of dangerous substances in electric and electronic equipment, as well as the disposal of wastes
The symbol of the crossed large rubbish container that is present on the machine points out that the product at the end of its life cycle must be collected separately from the other wastes.
The user for this reason will have to give the equipment that got to its life cycle to the suitable separate waste collection centres of electronic and electro-technical wastes, or to give it back to the seller or dealer when buying a new equipment of equivalent type, in terms of one to one.
The suitable separate waste collection for the following sending of the disused equipment to recycling, the dealing or handling and compatible environment disposal contributes to avoid possible negative effects on the environment and on the people's health and helps the recycling of the materials the machine is composed of.
The user's illegal disposal of the product implies the application of administrative fines as stated in Law Decree n.22/1997" (article 50 and followings of the Law Decree n.22/1997).
TRANSPORT
text_image
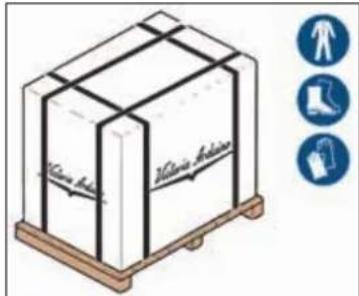
Victoria Australia Victoria AustraliaThe machine is transported on pallets containing several machines inside cartons strapped to the pallet.
Before performing any transport or movement operations, the operator must wear gloves, safety shoes and overalls with elasticized cuffs.
MOVEMENTS
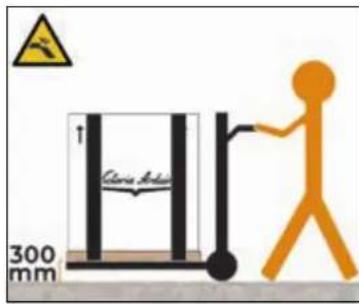
text_image
Clance Adju 300 mmSlowly lift the pallet about 30 cm from the ground and reach the loading area.
After checking that there are no obstacles, things or people, proceed with the loading.
Once you arrive at your destination, always with a suitable lifting device (e.g. forklift), after making sure that there are no things or people in the unloading area, take the pallet to the ground and
move it about 30 cm from the ground, until to the storage area.
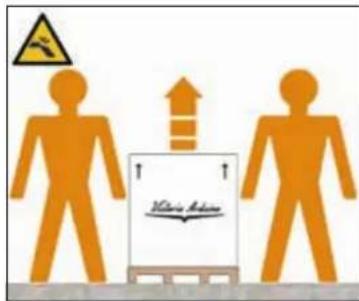
text_image
ElectricianThe machine must be moved by 2 or more operators.
Failure to respect current safety regulations and standards on lifting and handling materials absolves the Manufacturer from all liability for possible damage to person or things.
STORED
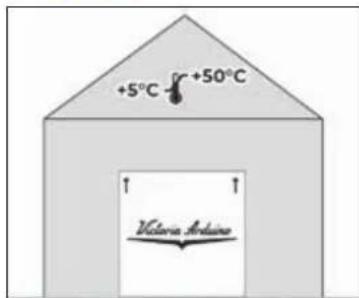
text_image
+5°C +50°C Victoria ArabinaThe package containing the machine must be stored away from atmospheric agents.
Before performing the following operations, make certain that the load is in stable and will not fall when the straps are cut.
Wearing gloves and safety shoes, the operator must cut the straps and store the product. During this operation, see the product technical features for the weight
of the machine being stored and proceed as necessary.
CONTENTS CHECK
Upon receipt of the box, check that the packaging is intact and visually undamaged.
Inside the packaging must be the instruction manual and the relative kit.
In case of damage or faults, contact your local dealer.
For any communication, always communicate the serial number.
The communication must be carried out within 8 days from the receipt of the machine.
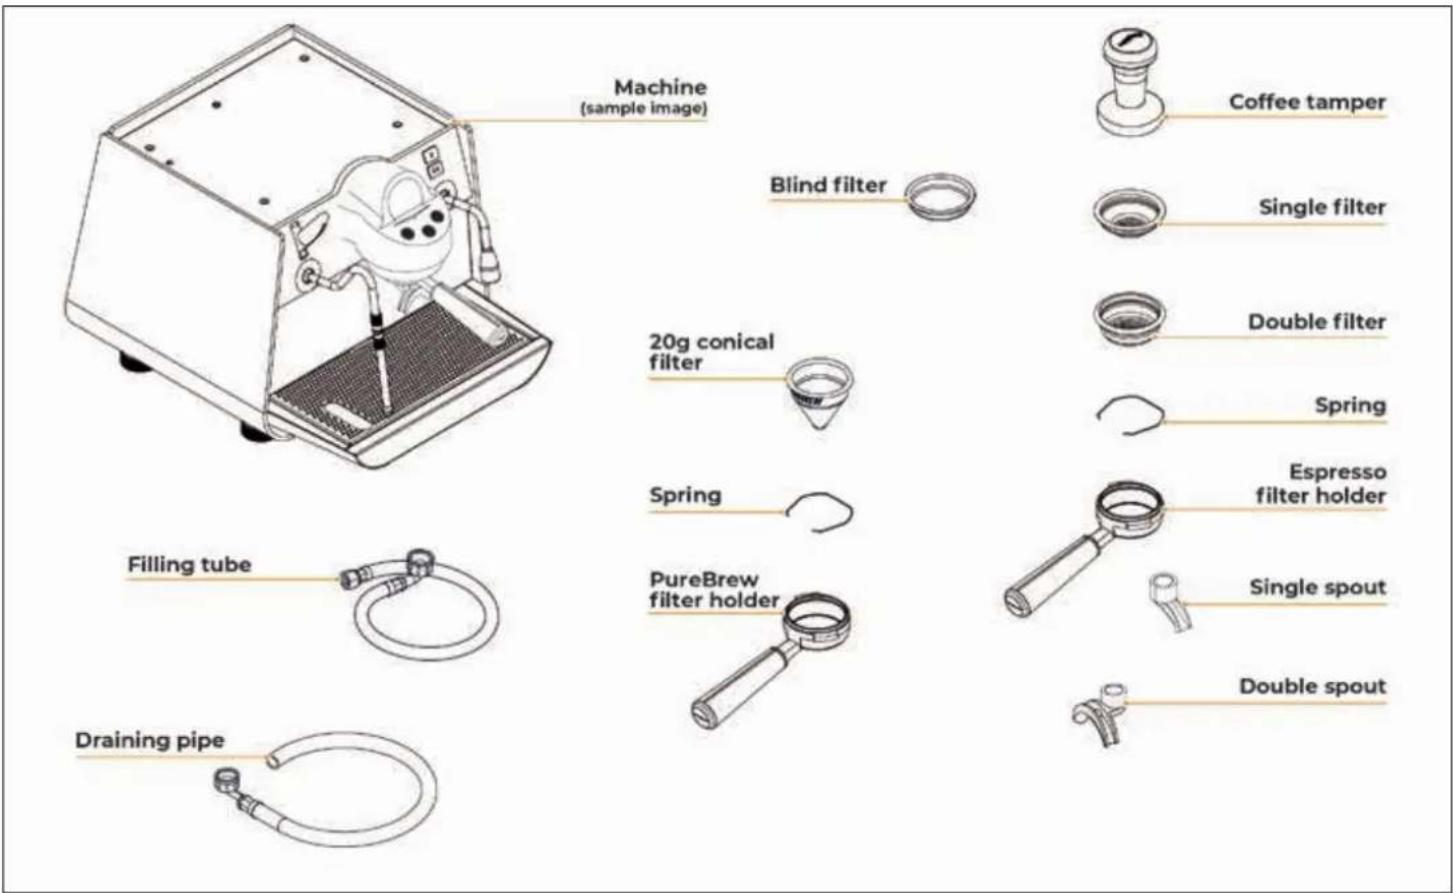
text_image
Machine (sample image) Blind filter 20g conical filter Spring Filling tube Draining pipe Coffee tamper Single filter Double filter Spring Espresso filter holder PureBrew filter holder Single spout Double spoutINDEX
SAFETY INDICATIONS 42
EXEMPTION FROM LIABILITY 44
INTENDED USE 44
FORESEEABLE IMPROPER USE 44
RESIDUAL RISKS 44
DISPOSAL 45
TRANSPORT 45
MOVEMENTS 45
STORED 45
CONTENTS CHECK 46
MOBILE APP
"VICTORIA ARDUINO E1 PRIMA" 48
TECHNICAL DATA 49
MACHINE DESCRIPTION 50
DESCRIPTION OF DISPENSING GROUPS 51
INSTALLATION 51
PREPARATION BY THE PURCHASER 51 POSITIONING 51
WATER CONNECTION 52 ELECTRICAL CONNECTION 52
PRELIMINARY OPERATIONS 52
ESPRESSO ACCESSORIES PREPARING 52 PUREBREW ACCESSORIES PREPARING 52
USE 53
MACHINE SWITCH ON 53
ESPRESSO COFFEE DISPENSING 54
PUREBREW COFFEE DISPENSING 54
STEAM DISPENSING 55
HOT WATER DISPENSING 56
EASYCREAM STEAM WAND (OPTIONAL) 56
SWITCH OFF THE MACHINE 57
PROGRAMMING 57
SWITCHING ON THE DISPLAY 57
HOME PAGE 58
POWER OFF 59
STANDARD ESPRESSO DISPENSING 59
VIS ESPRESSO DISPENSING 59
RECIPES MENU 60
Standard Espresso recipe 60
VIS Espresso recipe 60
PUREBREW DISPENSING 60
PureBrew recipe 61
EasyCream recipe - Milk (optional) 62
Hot Water recipe 62
ALARMS MENU 62
MAIN MENU 63
Cleaning 63
Temperature 64
Energy Savings 64
Counters 66
General Settings 66
TECHNICAL SETTINGS 67
Update 68
Connections 68
Calibration 68
Power Management 70
Diagnostics 70
Reset Counters 71
Alarms History 71
Maintenance 71
Keys and Display 72
Password management 72
Reset Settings 73
Configuration 74
ORDINARY CLEANING 74
FILTER AND FILTER HOLDER CLEANING 75
BODY MACHINE CLEANING 75
GROUP SHOWER CLEANING 75
CLEANING THE DISPENSING GROUP 76
MAINTENANCE 77
ELECTRICAL DIAGRAM 78
HYDRAULIC DIAGRAM 79
BOILER DIAGRAM 80

Victoria Arduino
MOBILE APP
"VICTORIA ARDUINO EI PRIMA"


text_image
EL PRIMA Victoria ArduinoManage your E1 Prima coffee machine and elevate your coffee experience. Victoria Arduino E1 Prima renewed app has been updated to include all the models available: E1 Prima, E1 Prima EXP, and E1 Prima PRO.
This version of the app allows you to manage the settings of your coffee machine. Other than setting temperature, weekly programming, extraction time, doses, and pre-wetting function, the app lets you
control the performance of the machine. The renewed version app gives you the possibility to save and share recipes from the Cloud.
Through the app, you can create and share recipes with Espresso or PureBrew and create recipes of coffee or tea-based cocktails and mocktails.
The brand-new section VA World contains the latest news and events about Victoria Arduino, together with useful video tutorials and community recipes.
My VA is your personal profile where you can save your favourite content from the community and upload your recipes and pictures.
Turn ON Bluetooth to connect the app to the coffee machine.

text_image
E1PRIMA PRO ✓ CONNECTED ACTIVE RECIPE Set Espresso PureBrew TEMPERATURE 88 °C TIME 120 SEC PUMP 0 BAR STEAM 2.2 BAR View active recipe My Machine My VA VA World SettingECHNICAL DATA
Model E1 PRIMA
Version Pro
Groups number 1
Voltage (V) 220 - 240 / 110 - 120
Frequency (Hz) 50 - 60
Total power (W) 3100
Steam boiler capacity (l) 1,8
Coffee boiler capacity (I) 0,6
Net weight (kg / lb) 36 / 79,4
Cross weight (kg / lb) 51,5 / 113,5
× 411 / 16,18
¥ 379 / 14,92
Z 510 / 20,08
A 95/3,74
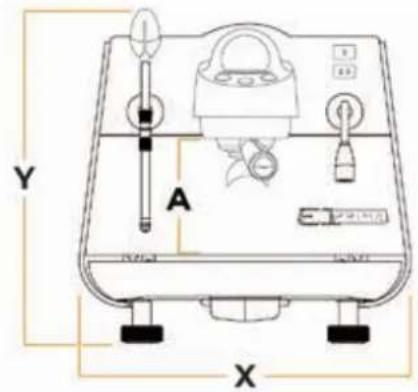
text_image
Y A X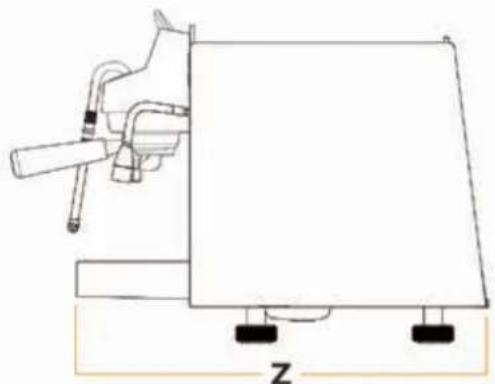
natural_image
Simple line drawing of a mechanical device with a lever and base, labeled 'Z' at the bottom (no text or symbols on the diagram itself)Dimensions (mm / inch)
MACHINE DESCRIPTION
text_image
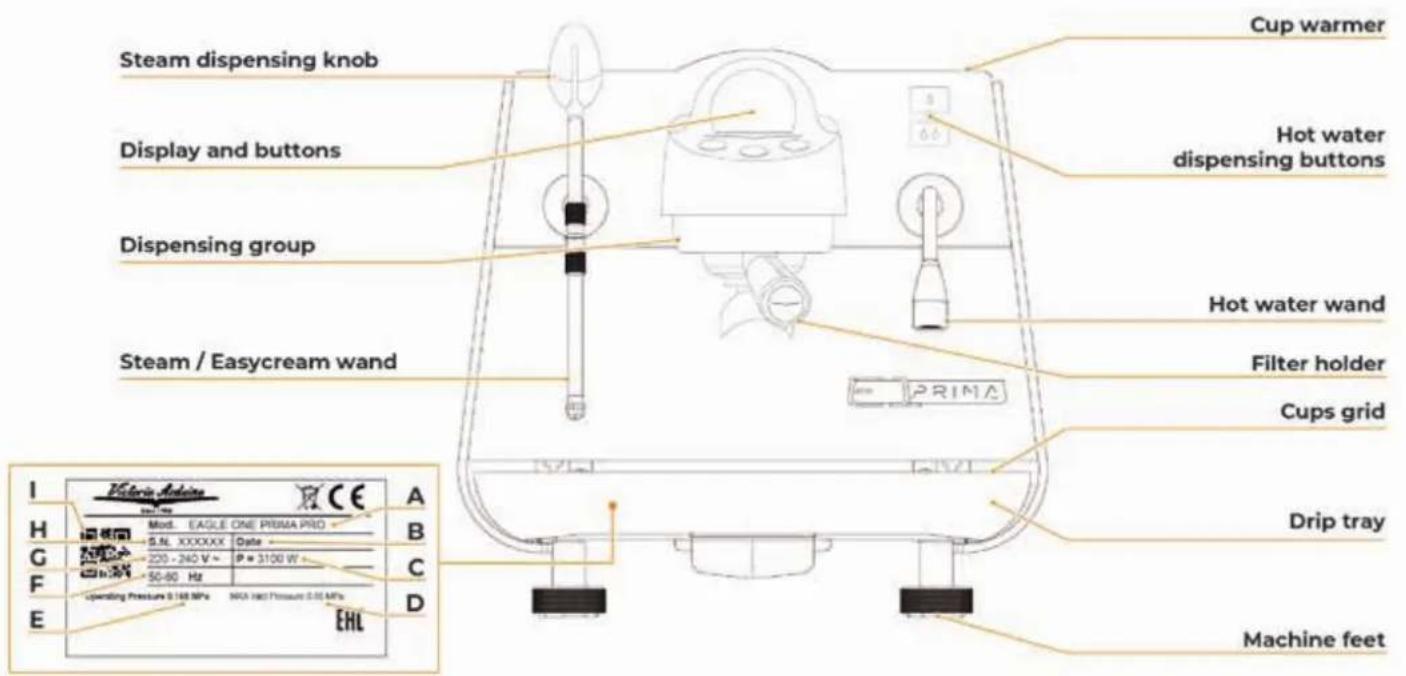
Cup warmer Steam dispensing knob Hot water dispensing buttons Display and buttons Hot water wand Dispensing group Filter holder Steam / Easycream wand Cups grid Drip tray Machine feet Operating Pressure 0.140 MPa NDA HACI Pressure 0.05 MPa EHL I Victoria Adkins Mod. EAGLE ONE PRIMA PRO A B C D E F G H I Mod. EAGLE ONE PRIMA PRO G.NL XXXXXX Date 220 - 240 V ~ P = 3100 W -50-80 Hz Operating Pressure 0.140 MPa NDA HACI Pressure 0.05 MPaA Model and version
B Production date
C Power
D Water main maximum pressure
E Water main operating pressure
F Frequency
G Power supply
H Serial number
QR Code
The E1 PRIMA PRO is a state-of-the-art professional single-unit machine and guarantees performance, control, extraction flexibility, lightness and compactness.
The T3 Genius technology gives the absolute control over brewing temperatures, for meticulous precision with exceptional performance and efficiency.
The revolutionary PUREBREW extraction method, exploiting the pulsating frequencies of water pressure, allows you to release the purest and most refined flavour of ground coffee or powdered drink. Combined with the new patented 20 g conical filter, it allows you to dispense beverages at the push of a button.
DESCRIPTION OF DISPENSING GROUPS
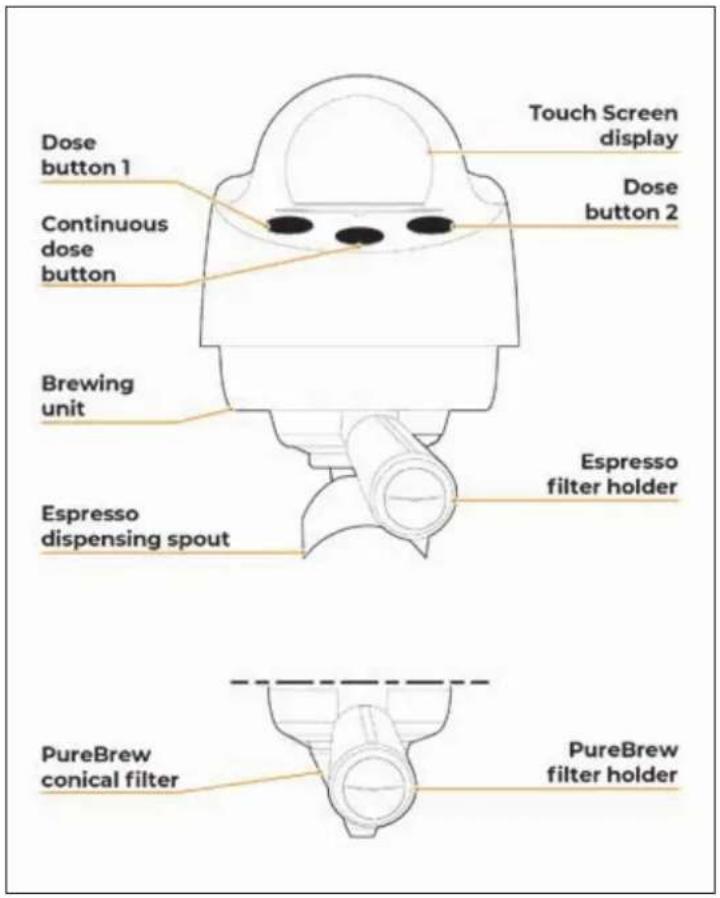
text_image
Dose button 1 Continuous dose button Brewing unit Espresso dispensing spout Touch Screen display Dose button 2 Espresso filter holder PureBrew conical filter PureBrew filter holderINSTALLATION
PREPARATION BY THE PURCHASER
Preparation of the installation site
The purchaser must prepare the surface on which the machine will stand suitable to support the machine weight.
Electrical requirements

The mains power installation must comply with the safely regulations and standards in force in the country of installation and must include an efficient earth system. An omnipolar cut-off device must be installed on the power line upstream of the machine.

The power wires must be sized according to the maximum current required by the machine to ensure a total voltage loss under full load of less than 2%.
Plumbing requirements
Prepare a suitable drain and a mains that supply water a maximum hardness of 5/6 French Degrees (50/60 ppm).
POSITIONING
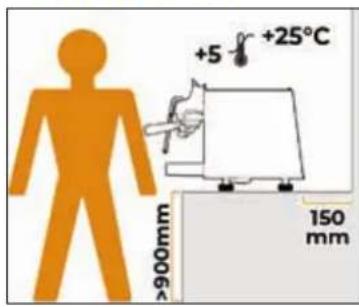
text_image
+5 °C +25°C 150 mm 900mmBefore installing the machine, make sure the area where it will be installed is compatible for the size and weight of the machine.
Position the machine on a horizontal plane at least 900 mm high from the ground.
Keep at least 150 mm around the machine for proper ventilation.
text_image
Diagram illustrating a sewing machine operation with labeled parts and a hand holding a bag, showing mechanical components and a sewing machine.To adjust the height and levelling of the machine, rotate the feet:
Clockwise to decrease the height of the machine.
Anti-clockwise to increase the height of the machine.
WATER CONNECTION
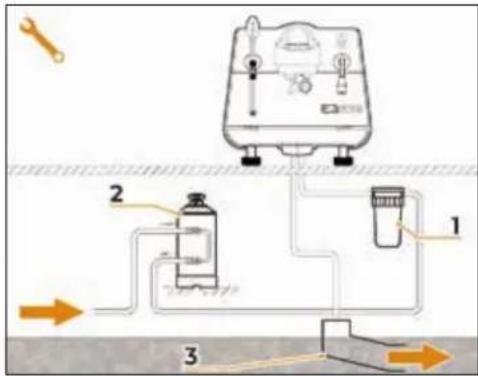
text_image
Diagram of a water treatment or filtration system with labeled components and directional arrows indicating flow paths.1 Mesh filter.
2 Softener.
3 Drain ∅ 50 mm.

Avoid throttling in the connecting tubes. Assess that the drain pipe is able to eliminate waste. It is forbidden to use connecting pipes already used in the past. Filter maintenance is the responsibility of the purchaser.
Failing to maintain water into the correct levels will void the warranty.

If present, an anti-flooding system must be installed upstream of the softener in accordance with IEC EN 61770.
WATER SPECIFICATIONS
• Total hardness: 50-60 ppm (parts per million).
- Pressure 2-5 bar (cold water).
• Minimum flow: 200 l/hr.
- Filtration: less than 1.0 micron.
- Alkalinity: between 10 and 150 ppm.
• Total dissolved salt (TDS): 50 - 250 ppm.
- Chlorine: < 0.50 mg/l.
pH: 6.0 - 8.0.
ELECTRICAL CONNECTION
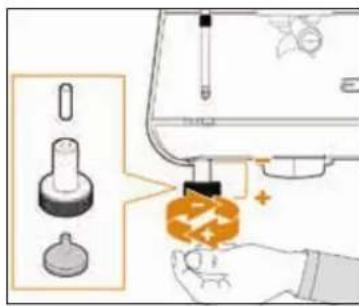
natural_image
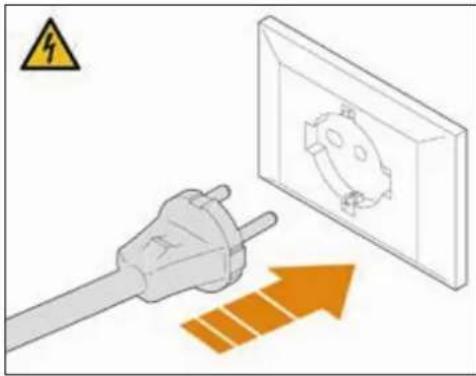
Illustration of a plug connected to an electrical outlet with an orange upward arrow indicating power flow (no text or symbols)Prior to connecting the machine to the electrical mains, assess that the voltage shown on the machine's data plate corresponds with that of the mains.
Insert the plug into the electrical socket.
ELECTRICAL SPECIFICATIONS
220 - 240 V - mono-phase.
PRELIMINARY OPERATIONS
text_image
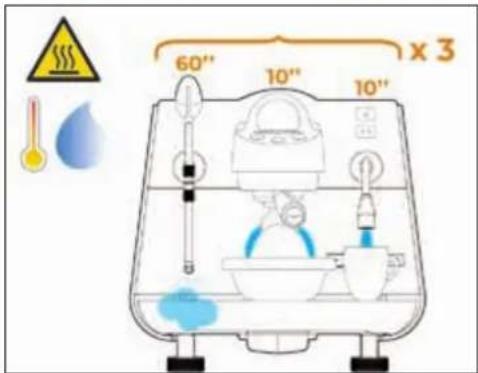
60" 10" 10" x 3At the end of the installation, the machine is powered up and brought to the "ready to operate" condition. After that:
- Dispense water from group for at least 10 seconds.
- Dispense water from the hot water wand for at least 10 seconds.
- Open the steam wands for 1 minute.
Repeat the whole operation at least 3 times. At the end of installation, it is good practice to draw up a report of the operations.
ESPRESSO ACCESSORIES
PREPARING
text_image
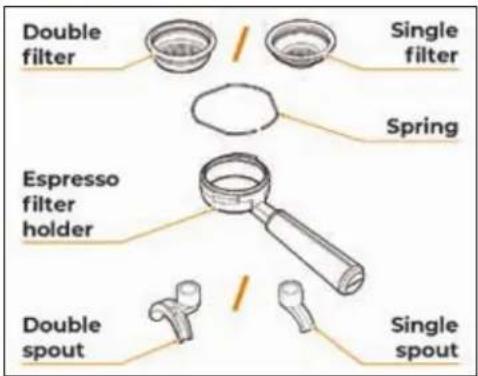
Double filter Single filter Spring Espresso filter holder Double spout Single spoutInsert the ring inside the filter holder, in the space provided.
Insert one of the two filters available.
Screw one of the two nozzles onto the filter holder based on the filter chosen.
PUREBREW ACCESSORIES
PREPARING

text_image
PureBrew conical filter A PureBrew filter holderInsert the ring inside the filter holder, in the space provided.
Insert the PUREBREW conical filter into the filter holder, orienting the seal A in the opposite direction to the handle.
USE

Before starting to use the appliance, the operator must be sure to have read and understood the safety prescriptions contained in this Manual.
MACHINE SWITCH ON
text_image
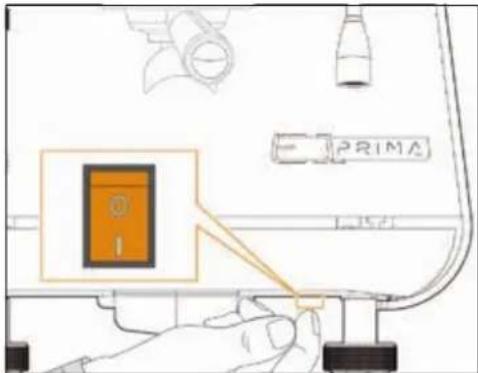
PRIMAAll E1 PRIMA PRO models have the power button at the bottom on the right-hand side. The button has two states:
- 0 = machine OFF.
- I = machine ON.
After performing the operations described in the previous chapters, to switch the machine ON, press the power button to the 'I' position

When switching ON for the first time or after a reset, the qualified technician must initially set some general parameters following a guided procedure:
• Display language.
- Date and time.
- Unit of measurement.
After the initial settings, the machine starts loading the boilers.

text_image
Victoria Arduino INSPIRED BY YOUR PASSION.The display will show the welcome page with the Victoria Arduino logo for 2 seconds.
text_image
E1 PRIMA PRO 1"After that, it will show the E1 PRIMA PRO logo for 1 second.

text_image
HELLO! 2"The user can set a welcome message as desired. Alternatively, the machine will display this screen for 2 seconds.

text_image
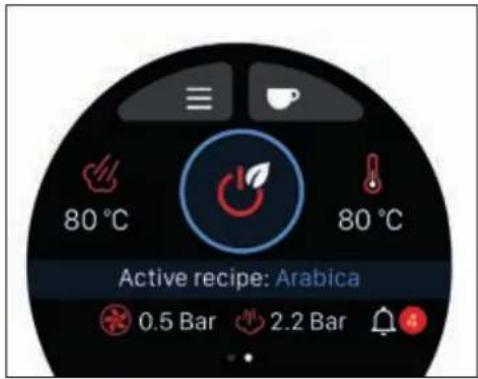
ESPRESSO 80 °C 80 °C Active recipe: Arabica 0.5 Bar 2.2 Bar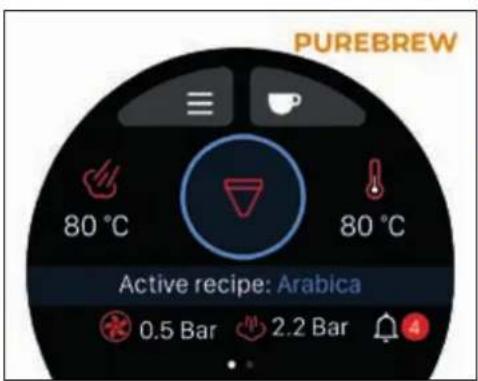
text_image
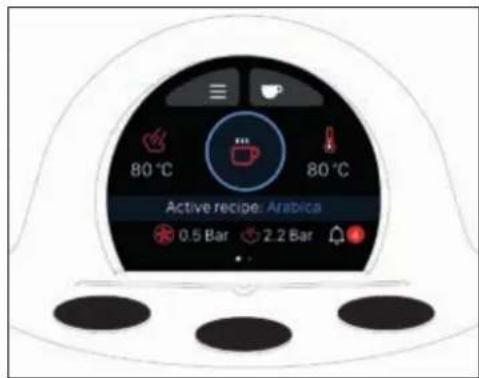
PUREBREW 80 °C 80 °C Active recipe: Arabica 0.5 Bar 2.2 BarSubsequently, the Home Page will be visible in Espresso or PureBrew brewing mode depending on the settings.
ESPRESSO COFFEE DISPENSING
Do not use the PureBrew conical filter in Espresso mode because excessive pressure may damage it.

text_image
ESPRESSO 80 °C 80 °C Active recipe: Arabica 0.5 Bar 2.2 BarIf the machine is in PureBrew brewing mode, select Espresso mode by pressing the centre icon for 3 seconds.
text_image
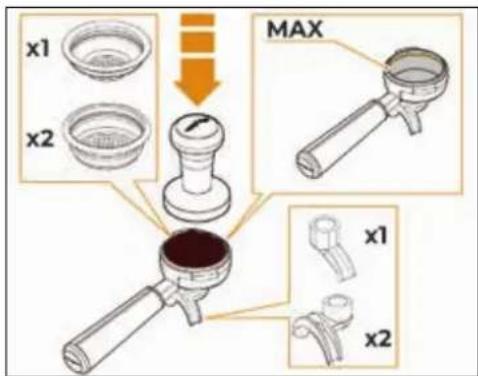
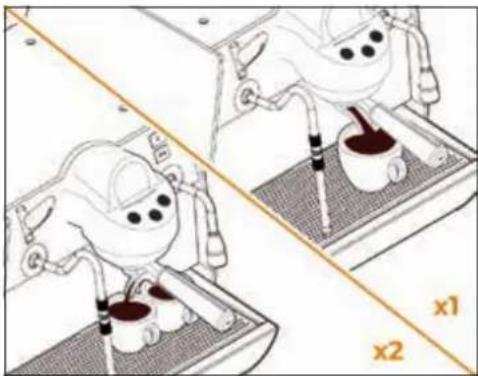
x1 x2 MAX x1 x2Choose the desired filter holder with single or double spout.
Fill with ground coffee up to the maximum level indicated by the line inside the filter.
Press the coffee in the filter uniformly using the appropriate tamper.
Clean the edge of the filter of coffee residues.
Before insert the filter holder, the group must be purged for at least 2 seconds to refresh the water present in the circuit, turning ON and OFF the supply.
text_image
Diagram showing a mechanical device with labeled parts 1, 2, and 3, likely illustrating a machining or assembly process.Insert the filter holder in the dispensing group and turn it to fix it, as indicated by the arrows.
natural_image
Illustration of a robotic arm performing a manual press or stamping operation on a platform, with no visible text or symbols.Place the cup/s under the spout/s and press the desired dispensing button.
The machine will perform a pre-brewing phase according to the settings of the chosen recipe. When the set quantity is reached, the dispensing ends automatically.
At the end of each coffee dispensing leave the filter holder inserted in the group so that it will keep warm for a successful delivery.
It will also prevent the head gasket inside the group head premature drying out.
PUREBREW COFFEE DISPENSING
Do not use the PureBrew conical filter in Espresso mode because excessive pressure may damage it.
text_image
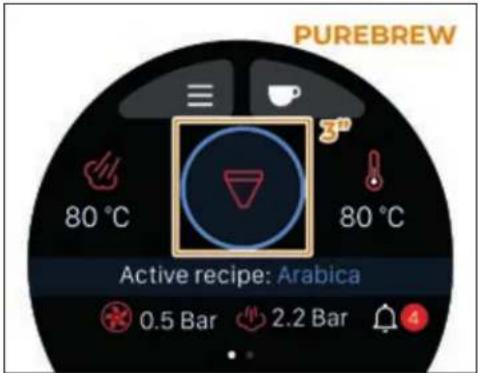
PUREBREW 80 °C 80 °C Active recipe: Arabica 0.5 Bar 2.2 BarIf the machine is in Espresso brewing mode, select PureBrew mode by pressing the centre icon for 3 seconds.
text_image
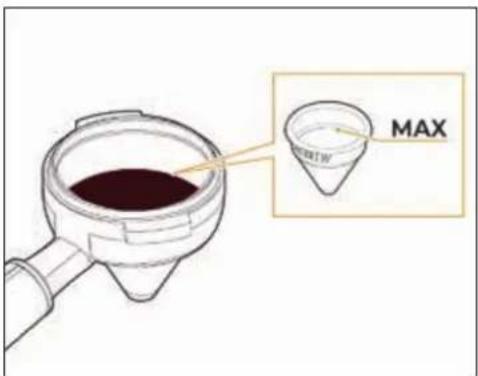
MAXInsert the PUREBREW conical filter into the filter holder.
To dispense filter coffee, fill with ground coffee that has a particle size of at least 500μm, without exceeding the maximum level.
Clean the edge of the filter from coffee residues.
text_image
Diagram showing a device with labeled components and orange arrows indicating flow or movement, possibly illustrating a process or system.Insert the filter holder in the dispensing machine and turn it to fix it, as indicated by the arrows.
STEAM DISPENSING
text_image
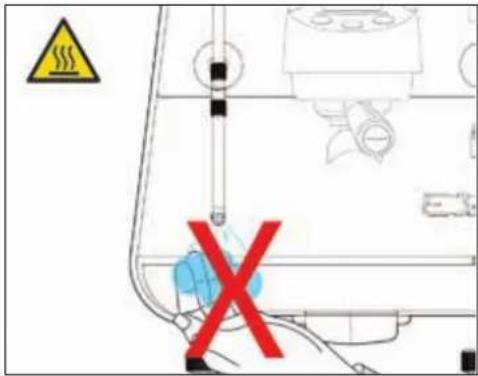
Diagram showing a warning sign with a red X mark and a warning symbol, likely indicating a hazard or absence of a device.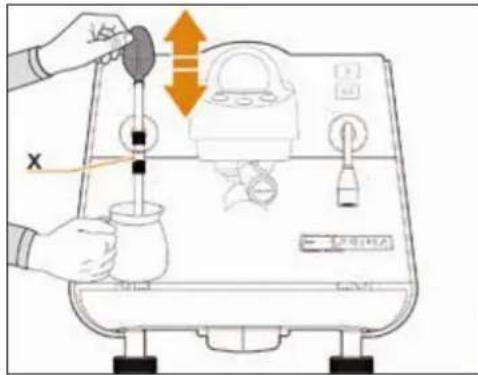
text_image
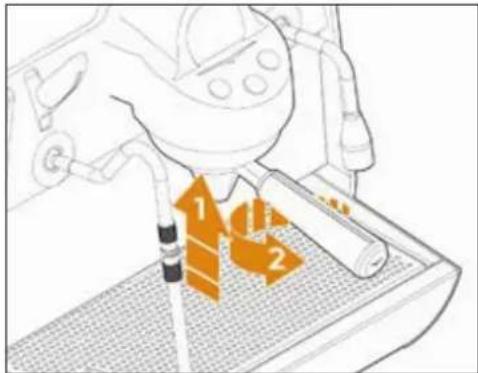
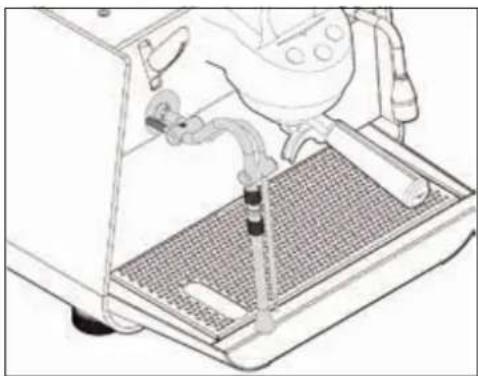
Diagram illustrating a water filtration or gas injection process with labeled components and directional arrowsTo use the steam:
- Make certain that the spout of the nozzle is within the grill.
- Raise or lower the knob.
- When steam comes out, move the nozzle using the rubber protection X.
natural_image
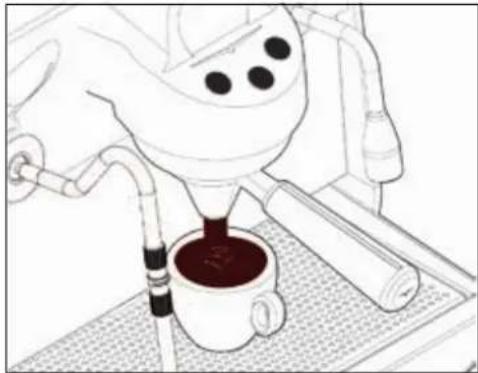
Line drawing of a coffee maker pouring liquid into a cup on a tray (no text or symbols)Place the cup under the PUREBREW conical filter and press the dispensing button.
When the set quantity is reached, the dispensing ends automatically.
Beverage extraction should flow out within the first 10-15 seconds, i.e. during the blooming phase. Otherwise, stop dispensing and grind the coffee with a coarser grind size.
The doses can be programmed or the machine functions can be set via the display.
At the end of each coffee dispensing leave the filter holder inserted in the machine so that it will keep warm for a successful delivery.
It will also prevent the head gasket inside the group head premature drying out.
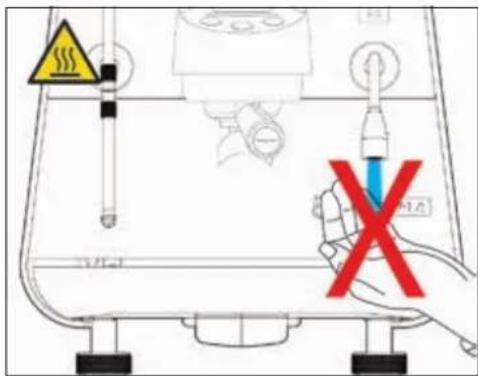
Do not remove the conical filter from the filter holder by pressing it on a work surface, as this may damage it.

While using the steam wand, you must pay attention to not place your hands beneath it or touch just after it has been used.
Before use the steam wand, cleaning out of the condensation for at least 2 seconds.
text_image
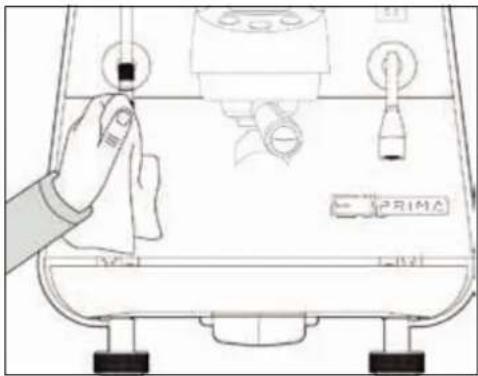
Diagram of a coffee machine with labeled buttons and a hand cleaning the interior panelBefore and after use, clean the steam wand with a cloth moistened with warm water.
The steam wand is articulated to guarantee their easy use.

text_image
B A C DThe steam knob has 4 positions:
A REST: knob in central position and no steam output.
B CLEAN: knob pushed back manually, with active delivery for the time the lever is held.
C MEDIUM POWER: knob pulled forward by half its stroke, with active delivery at low pressure.
D MAXIMUM POWER: knob pulled forward to the end of its stroke where it remains locked, with active delivery at high pressure.
HOT WATER DISPENSING
text_image
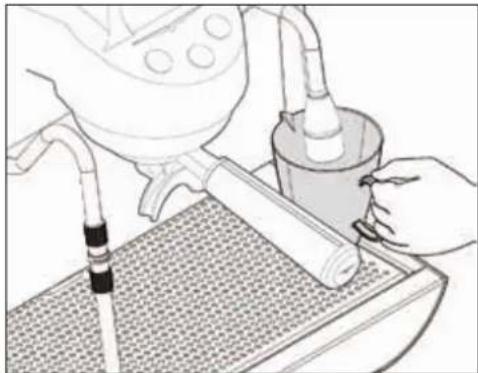
Diagram showing a test tube with warning symbols and a hand holding a test tube, indicating no chemical reaction or testing.While using the hot water nozzle, pay careful attention not to place your hands beneath it or touch it just after it has been used.
The use of the hot water wand must always be preceded by the purge of the hydraulic circuit for at least 2 seconds.
natural_image
Illustration of a hand using a tool to clean or wash a cylindrical object on a textured surface (no text or symbols visible)Place a suitable container under the hot water nozzle.
text_image
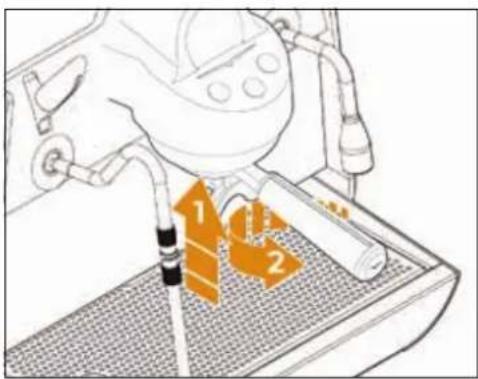
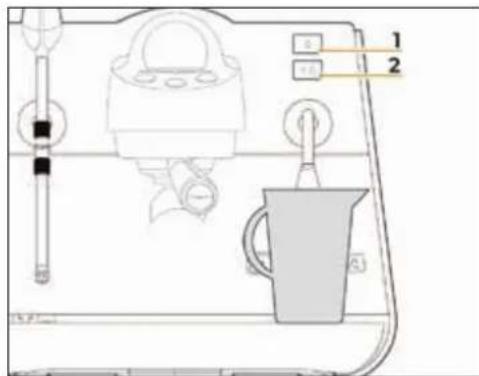
Diagram of a coffee maker with labeled parts and control buttons, showing front panel and side viewTo dispense hot water from the wand, press one of the two dose buttons:
1 Hot water dispensing dose 1.
2 Hot water dispensing dose 2.
Wait for the end of dispensing or press the hot water button again to stop dispensing manually.
Hot water can be delivered at the same time as coffee.
EASYCREAM STEAM WAND
(OPTIONAL)
natural_image
Line drawing of a robotic arm operating a machine with a mesh platform (no text or symbols)As an option, the machine can be fitted with the EasyCream steam wand instead of the standard steam wand.
The automatic steam nozzle can be used to deliver steam to foam milk or heat other liquids.
The temperature and air quantity are programmable and controlled by a temperature probe.
Place a suitable container with milk or another beverage inside it beneath the automatic steam nozzle.
As for the standard steam wand, to use the EasyCream wand:
1 Make certain that the spout of the nozzle is within the grill.
2 Raise or lower the knob.
3 Steam will flow from the wand until the liquid reaches the set temperature.
The knob for the EasyCream steam wand has 4 positions as for the standard steam wand:
A REST: knob in central position and no steam output.
B CLEAN: knob pushed back manually, with active delivery for the time the lever is held.
C MEDIUM POWER: knob pulled forward by half its stroke, with active delivery at low pressure.
D MAXIMUM POWER: knob pulled forward to the end of its stroke where it remains locked, with active delivery at high pressure.
SWITCH OFF THE MACHINE

text_image
O E PRIMATo switch OFF the machine, press the power switch at the bottom on the right-hand side to the "0" position.
The display and dispensing buttons switch OFF.
text_image
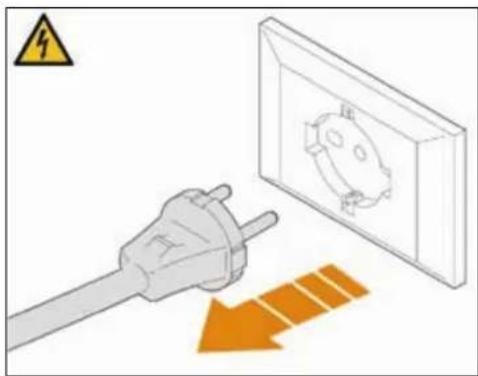
Safety warning illustration showing a plug connected to an electrical socket with an orange arrow indicating dislocation or damage.For long pauses and for the safety of people, it is good practice to also disconnect the plug from the mains.
PROGRAMMING
text_image
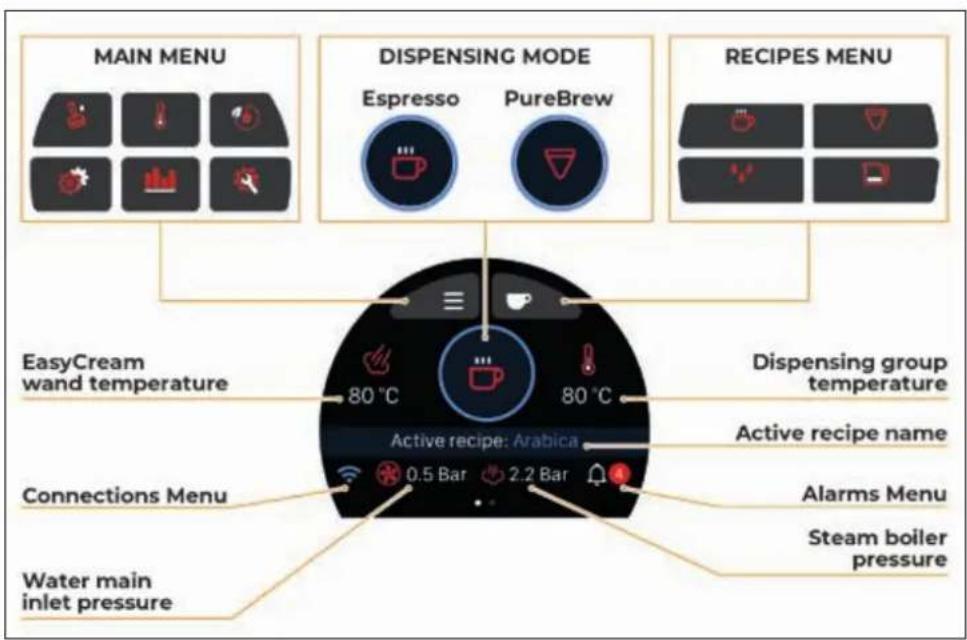
MAIN MENU DISPENSING MODE ESpresso PureBrew RECIPES MENU EasyCream wand temperature 80 °C 80 °C Active recipe: Arabica Dispersing group temperature Active recipe name Connections Menu 0.5 Bar 2.2 Bar Alarms Menu Water main inlet pressure Steam boiler pressureSWITCHING ON
THE DISPLAY

text_image
Victoria Arduino INSPIRED BY YOUR PASSION.When switched ON, the display will show the welcome page with the Victoria Arduino logo for 2 seconds.
text_image
E1 PRIMA PRO 1"Then it will show the E1 PRIMA PRO logo for 1 second.

text_image
HELLO! 2"The user can set their preferred welcome message. Alternatively, the machine will show this screen for 2 seconds.
When starting the machine for the first time or after a reset, it is necessary to set:
Language.
- Date and time.
- Units of measurement.
For more information on these settings, see the paragraph on General Settings.
The Home Screen will then be visible in Espresso or PureBrew dispensing mode depending on the settings.
HOME PAGE

text_image
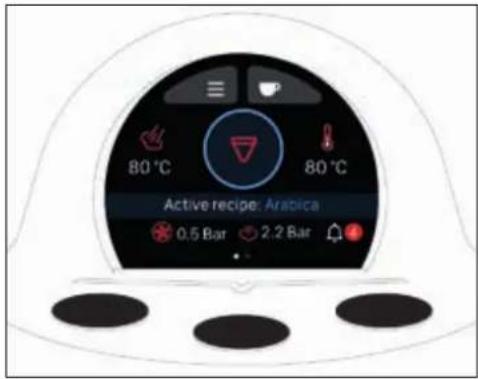
ESPRESSO EasyCream wand temperature 80 °C 80 °C Water main inlet pressure Active recipe: Arabica 0.5 Bar 2.2 Bar Dispensing group temperature Steam boiler pressure PUREBREW EasyCream wand temperature 80 °C 80 °C Water main inlet pressure Active recipe: Arabica 0.5 Bar 2.2 Bar Dispensing group temperature Steam boiler pressureDepending on the settings, the Home Page can be in Espresso or PureBrew dispensing mode. At first start-up, the default mode is Espresso.
To change the dispensing mode, press the or button for 3 seconds.
The flashing button indicates that the mode has been changed.
The Home Page also allows access to:
Main Menu.
Recipes Menu.
Alarms Menu (if any).
Connections Menu (if enabled).
POWER OFF

text_image
80 °C 80 °C Active recipe: Arabica 0.5 Bar 2.2 BarFrom the Home Page, swipe left on the display to access the button.
Press and hold the button for 5 seconds to turn the machine to Power OFF.

natural_image
Circular black button with a white power symbol icon at center (no text or numbers)In Power OFF mode, the machine is only powered electrically, but the steam boiler is brought to 0 bar.
To exit the Power OFF mode and restore normal operation of the machine, press and hold the button for a few seconds.
STANDARD ESPRESSO
DISPENSING
text_image
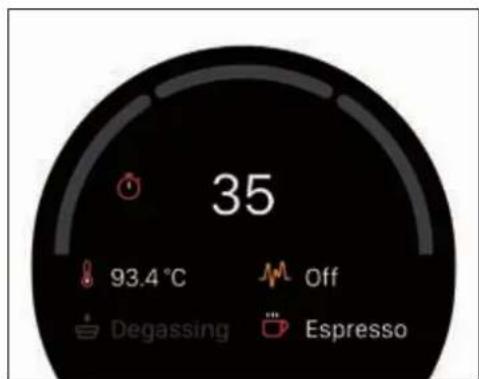
80 °C 80 °C Active recipe: Arabica 0.5 Bar 2.2 BarFrom the Home Page, in Espresso mode, press a dispensing button.
text_image
35 93.4 °C Off Degassing EspressoThe dispensing screen displays:
- Dispensing time.
- Group temperature.
• Pre-infusion (if activated). - PB-Tech (if activated).
- Espresso mode.
At the end of dispensing, the display returns to the Home Page.
VIS ESPRESSO
DISPENSING

text_image
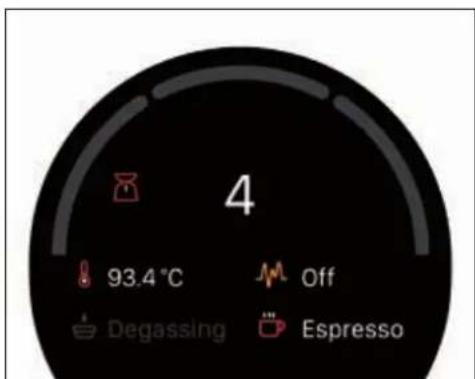
80 °C 80 °C Active recipe: Arabica 0.5 Bar 2.2 BarFrom the Home Page, in Espresso mode with VIS option enabled, press a dispensing button.
text_image
4 93.4 °C Off Degassing EspressoThe dispensing screen displays:
• Estimated dispensing weight (VIS).
- Group temperature.
• Pre-infusion (if activated).
PB-Tech (if activated).
- Espresso mode.
At the end of dispensing, the display returns to the Home Page.
PUREBREW DISPENSING
text_image
80 °C 80 °C Active recipe: Arabica 0.5 Bar 2.2 BarFrom the Home Page, in PureBrew mode, press a dispensing button.

gauge
| Metric | Value | | ------------ | ----- | | 35 | 35 | | 88.0 °C | 88.0 | | Medium | Medium | | Degassing | Degassing | | Pure Brew | Pure Brew |The dispensing screen displays:
- Dispensing flow.
- Dispensing time.
- Group temperature.
• Pre-infusion (not available).
- Extraction profile.
• PureBrew mode.
At the end of dispensing, the display returns to the Home Page.
RECIPES MENU
text_image
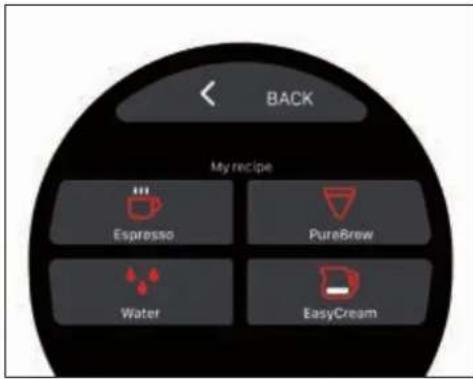
BACK My recipe Espresso PureBrew Water EasyCreamFrom the Home Page, press to access the Recipes menu:

Espresso recipes.

PureBrew recipes (if enabled).

Hot Water recipes.

EasyCream recipes - Milk (if enabled).
Press < to return to the Home Page.
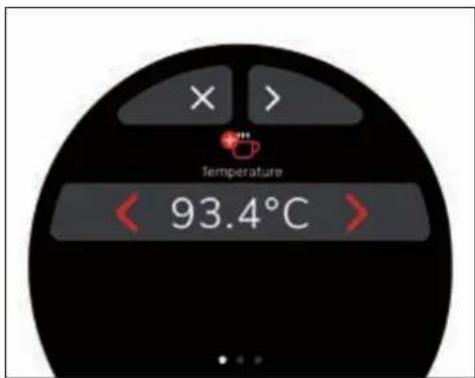
Standard Espresso recipe

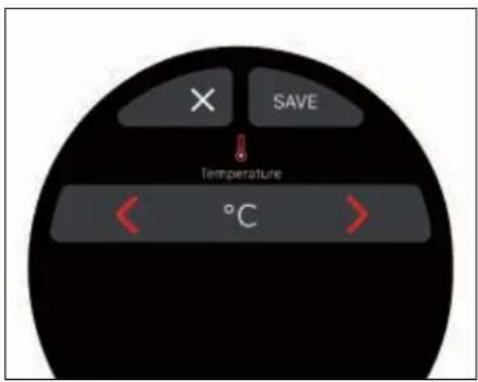
text_image
Temperature < 93.4°C >From the Recipes menu, press to access the Espresso recipe settings.
Press ✗ to return to the Recipes menu.
You can scroll through the screens with the < > buttons and change the parameters with < >.
When finished, on the last screen, press SAVE to save the settings and return to the Recipes menu.
If a dose is set above 500 ml, it will be recognised by the machine as a Continuous Dose.
The doses can also be set by manual sampling.
Standard Espresso recipe parameters
| Parameters Min. Max. Default Step | ||||
| Temperature | 70,0°C | 105,0°C | 93,4°C | 0,1°C |
| Dose 15 ml 500 ml 20 ml | 1 ml | |||
| Dose 2 | 5 ml | 500 ml | 120 ml | 1 ml |
| Degassing | OFF | ON | OFF | ON/OFF |
| Degassing Duration ON | 1 s | 10 s | 1 s | 0,5 s |
| Degassing Duration OFF | 1 s | 10 s | 2 s | 0,5 s |
| PB-Tech | OFF | ON | OFF | ON/OFF |
VIS Espresso recipe
text_image
Temperature 93.4°CIf the VIS function is enabled, from the Recipes menu, press to access the Espresso VIS recipe settings.
With this mode, the machine estimates the weight of the drink in the cup.
Press ✗ to return to the Recipes menu.
You can scroll through the screens with the

buttons.
The doses dispensed can also be set by manual sampling.
For both doses, it will be necessary to align the weight in the cup with that of an external scale.

text_image
Dose 1 (g) < 20 > Dose 2 (g) < 40 >Deliver a single or double dose, or set the dose on the display with
Weigh the weight of the coffee cup on an external scale.

text_image
BACK Dose 1 (g) 20 VIS (g) 20.3Press on the set value to access the VIS calibration.
Enter the value read on the scale in the VIS (g) field and press < to return to the settings.
When finished, on the last screen, press to save the settings and return to the
Recipes menu.
VIS Espresso recipe parameters
| Parameters | Min. Max. | Default Step | ||
| Temperature | 40,0°C | 105,0°C | 93,4°C | 0,1°C |
| Dose 15 g 500 g | 20 g 1 g | |||
| VIS Dose 10 g 100 g | 20 g | 0,1 g | ||
| Dose 2 | 5 g 500 g | 40 g 1 g | ||
| VIS Dose 2 | 0 g 100 g | 40 g | 0,1 g | |
| Degassing | OFF | ON | OFF | ON/OFF |
| Degassing Duration ON | 1 s | 10 s | 1 s | 0,5 s |
| Degassing Duration OFF | 1 s | 10 s 2 s | 0,5 s | |
| PB-Tech | OFF | ON | OFF | ON/OFF |
PureBrew recipe
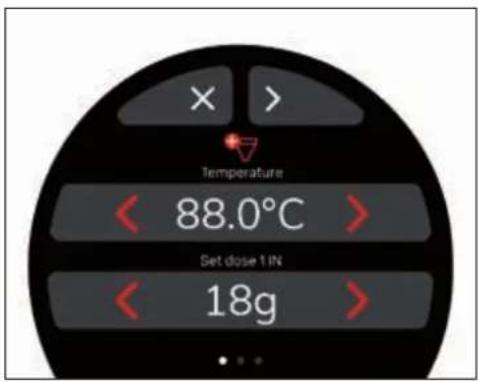
text_image
Temperature < 88.0°C > Set dose 1 IN < 18g >From the Recipes menu, press to access the PureBrew recipe settings.
Press ✗ to return to the Recipes menu.
You can scroll through the screens with the < > buttons and change the parameters with < >.
When finished, on the last screen, press SAVE to save the settings and return to the Recipes menu.
PureBrew recipe parameters
| Parameters | Min. | Max. | Default | Step |
| Temperature | 70,0°C | 98,0°C | 88,0°C | 0,1°C |
| Set Dose 1 IN | 2 g | 50 g | 18 g | 0,5 g |
| Set Dose 2 IN | 2 g | 50 g | 18 g | 0,5 g |
| Dose 1 | 0 ml | 500 ml | 125 ml | 1 ml |
| Dose 2 | 0 ml | 500 ml | 125 ml | 1 ml |
| Profile | - | - Medium | LightMediumStrongCustom | |
PureBrew custom recipe parameters
| Parameters | Min. | Max. | Default | Step |
| Blooming phase volume | 50 ml | 250 ml | 40 ml | 1 ml |
| Ton blooming | 0,5 s | 10 s | 0,5 s | 0,5 s |
| Toff blooming | 0,5 s | 10 s | 1,0 s | 0,5 s |
| Pause | 0 s | 60 s | 15 s | 1 s |
| Volume % Pure 1 phase | 0 % | 100 % | 50 % | 1 % |
| Ton Dose 1 | 0,5 s | 10 s | 1,0 s | 0,5 s |
| Toff Dose 1 | 0,5 s | 10 s | 1,0 s | 0,5 s |
| Pause Pure 1 Pure 2 | 0 s | 60 s | 15 s | 1 s |
| Volume % Pure 2 phase | 0 % | 100 % | 50 % | 1 % |
| Ton Dose 2 | 0,5 s | 10 s | 1,0 s | 0,5 s |
| Toff Dose 2 | 0,5 s | 10 s | 1,0 s | 0,5 s |
EasyCream recipe - Milk (optional)
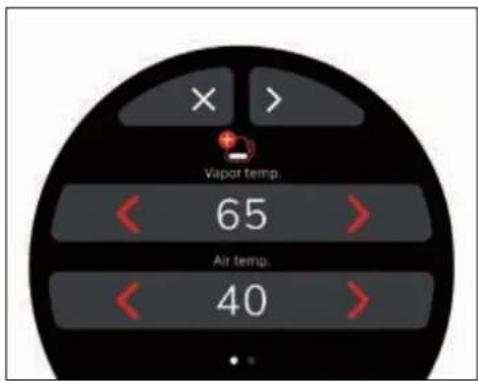
text_image
Vapor temp. 65 Air temp. 40From the Recipes menu, press to access the EasyCream (Milk) recipe settings.
This menu is only available if the EasyCream option is activated.
Press ✗ to return to the Recipes menu. You can scroll through the screens with the
< > buttons and change the parameters with < >.
When finished, on the last screen, press SAVE to save the settings and return to the Recipes menu.
EasyCream recipe parameters
| Parameters | Min. | Max. | Default Step | |
| Steam temperature | 20°C | 85°C | 65°C 1°C | |
| Air temperature | 10°C | 60°C | 40°C 1°C | |
| Air valve 0% | 100% | 100% | 5% |
Hot Water recipe
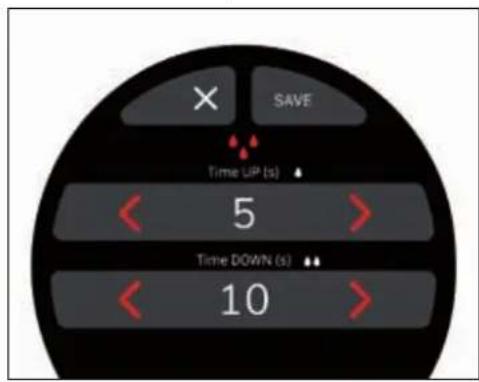
text_image
× SAVE Time UP (s) 5 Time DOWN (s) 10From the Recipes menu, press to access the Hot Water recipe settings.
Press ✗ to return to the Recipes menu. You can scroll through the screens with the
< > buttons and change the parameters with < >.
When finished, on the last screen, press SAVE to save the settings and return to the Recipes menu.
Hot Water recipe parameters
| Parameters | Min. | Max. | Default Step | |
| Time UP | 0 s | 60 s | 5 s | 1 s |
| Time DOWN | 0 s | 60 s | 10 s | 1 s |
ALARMS MENU
text_image
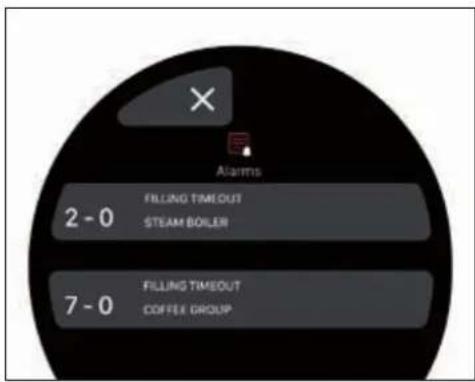
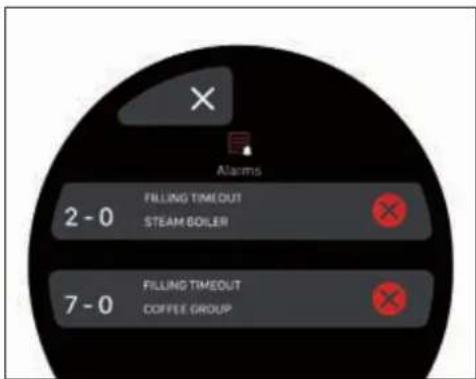
× Alarms 2 - 0 FILLING TIMEOUT STEAM BOILER 7 - 0 FILLING TIMEOUT COFFEE GROUPIn the Home Page, the Alarms Menu icon is only visible if there is an error. In this case, press to access the Alarms Menu.
The number visible in the icon identifies the error present.
Access to the alarms list is possible even if no alarm is actually active.
It is not possible to reset alarms from this menu.
Press ✗ to return to the Home Page.
Alarms list
- Alarms history list full.
- Alarm history
- Perform the washing operations.
Coffee unit. - EasyCream.
Overpressure.
• Service boiler. - Coffee boiler
- External boards communication error.
- Connections module.
- Mains pressure below threshold.
- Mains pressure.
- Maintenance report.
- Maintenance by cycles or date.
- System monitoring error.
- Low battery or LSE error.
• Alarm/counter history loading error. - Error loading recipe parameters.
- Filling timeout.
- Heating timeout.
• Probe in short circuit.
• Probe in open circuit.
MAIN MENU
text_image
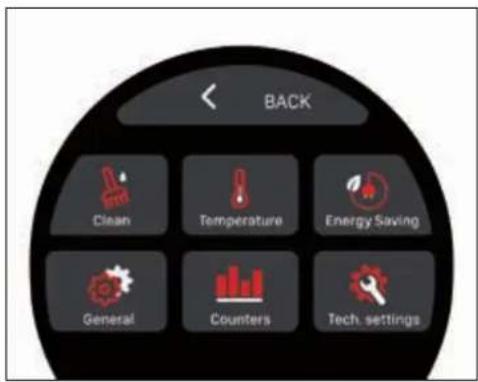
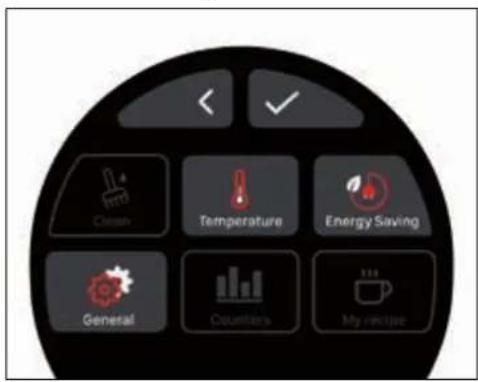
BACK Clean Temperature Energy Saving General Counters Tech. settingsFrom the Home Page, press to access the Main Menu.

Cleaning.

Temperature.

Energy Saving.

General Settings.

Counters.

Technical Settings.
A password is required to access the Technical Settings.
Press < to return to the Home Page.
Cleaning
text_image
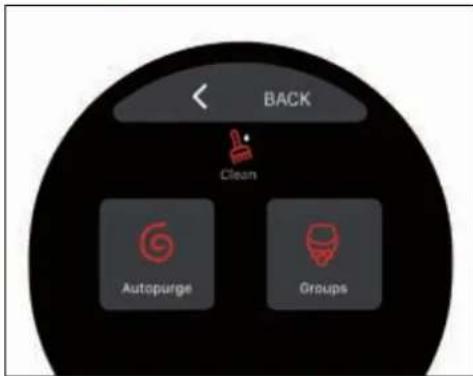
BACK Clean Autopurge GroupsFrom the Main Menu, press to access the Cleaning menu:

Autopurge.

Group Cleaning.
Press

to return to the Main Menu.
Autopurge
text_image
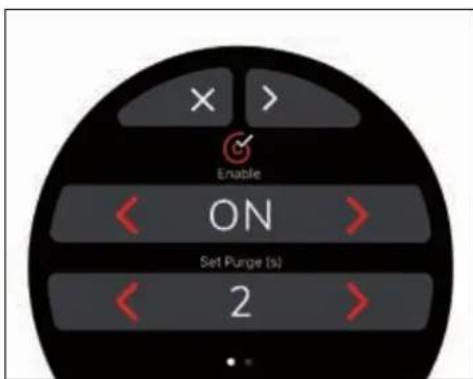
Enable ON Set Purge (s) 2From the Cleaning menu, press to access the Autopurge function settings.
The parameters are only visible if enabled (ON).
You can scroll through the screens with the < > buttons and change the parameters
with

When finished, on the last screen, press SAVE to save the settings and return to the Cleaning menu.
Press ✗ to return to the Cleaning menu.
Autopurge parameters
| Parameters | Min. | Max. | Default Step | |
| Enable OFF ON | ON | ON/OFF | ||
| Set Purge 0 s | 10 s | 2 s 1 s | ||
| Set Delay 0 s | 10 s | 1 s 1 s |
Group Cleaning
text_image
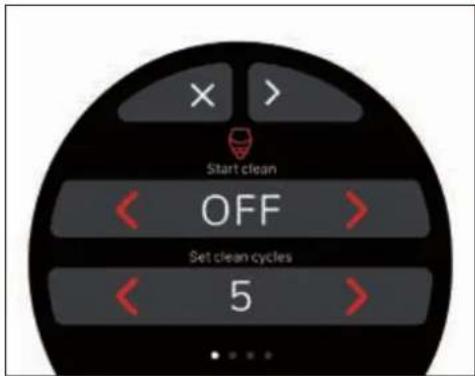
Start clean OFF Set clean cycles 5From the Cleaning menu, press to access the Group Cleaning settings.
You can scroll through the screens with the < > buttons and change the parameters with < >.
When finished, on the last screen, press SAVE to save the settings and return to the Cleaning menu.
Press ✗ to return to the Cleaning menu.
If the washing alarm is enabled and appears on the display, the unit washing must be started. For more information, see the ORDINARY CLEANING chapter.
Group Cleaning parameters
| Parameters | Min. | Max. | Default Step | |
| Start clean OFF ON OFF ON/OFF | ||||
| Set clean cycles | 0 10 | 2 1 | ||
| Set reflushing cycles | 0 10 | 2 1 | ||
| Clean time 0 s | 59 s | 10 s | 1 s | |
| Alarm enable OFF ON OFF ON/OFF | ||||
| Alarm hour 00 | 23 | 8 | 1 h | |
| Alarm minutes | 00 | 60 | 00 | 1 min |
Temperature
text_image
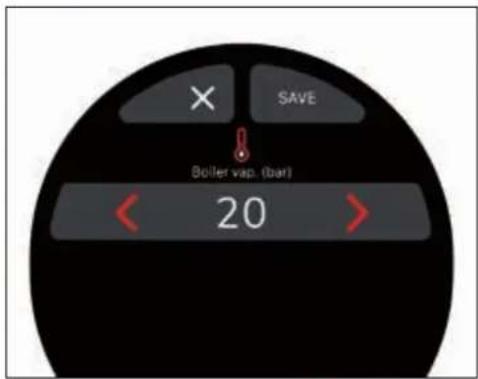
SAVE Boller vap. (bar) 20From the Main Menu, press to access the steam boiler Temperature management.
Press ✗ to return to the Main Menu.
Set the boiler temperature between 0.5 bar and 2.5 bar with <> then press SAVE to save the setting and return to the Main Menu.
Energy Savings

text_image
BACK Energy saving Boiler manager Standby Weekly Prog.From the Main Menu, press to access the Energy Saving menu:
Boiler manager.
Standby.
Weekly programming.
Press < to return to the Main Menu.
Boiler manager

text_image
X SAVE Group ON Steam OFFFrom the Energy Saving menu, press to access the Boiler Manager.
Press ✗ to return to the Energy Saving menu.
You can optimise the power consumption of the machine according to your needs, by enabling (ON) or disabling (OFF) the coffee dispensing unit and/or the steam nozzle.
To change the settings, use the < > buttons, then press SAVE to save the settings and return to the Energy Saving menu.
If the unit and/or the nozzle are disabled (OFF), it will not be possible to dispense coffee or steam.
Standby
text_image
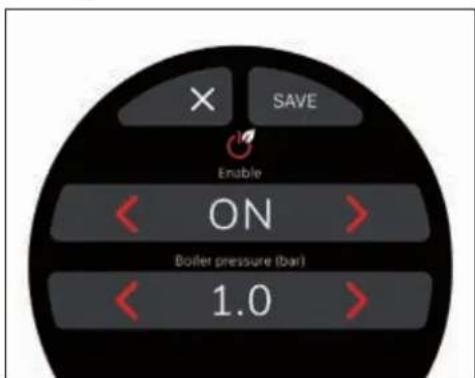
SAVE Enable ON Boiler pressure (bar) 1.0From the Energy Saving menu, press 📋 to set the Standby function.
Press ✗ to return to the Energy Saving menu.
This function allows you to enter or exit into an active standby state after a set time of inactivity, which allows you to choose whether to switch the machine OFF completely or keep it at a set (below the operating pressure).
To change the settings, use the <7> buttons, then press SAVE to save the settings and return to the Energy Saving menu.
If the Standby function is enabled, swipe left from the Home Page on the display to access the Standby screen.
text_image
80 °C 80 °C Active recipe: Arabica 0.5 Bar 2.2 BarPress the icon for 3 seconds to turn the machine to Standby.
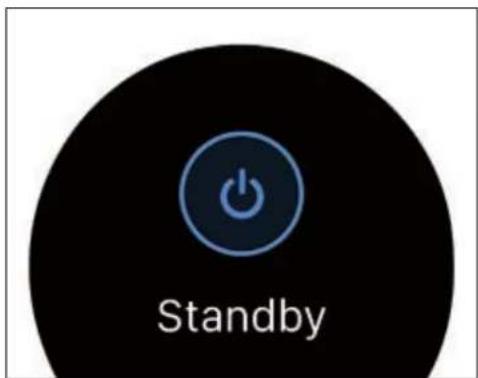
text_image
StandbyIn Standby, the machine is switched ON, but the pressure of the steam boiler is reduced to save energy.
To exit the Standby mode, press one of the three dispensing buttons, or press to switch to Power OFF mode.
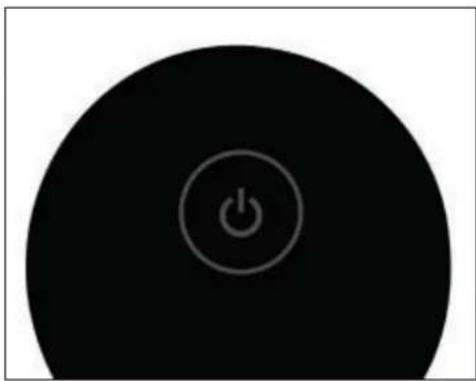
natural_image
Circular black button with a white power symbol icon at center (no text or numbers)For more information on the Power OFF mode, see the relevant paragraph.
Standby parameters
| Parameters | Min. | Max. | Default Step | |
| Enable OFF ON | OFF ON/OFF | |||
| Boiler pressure | 0 bar | 1,8 bar | 1,2 bar | 0,6 bar |
Weekly programming
text_image
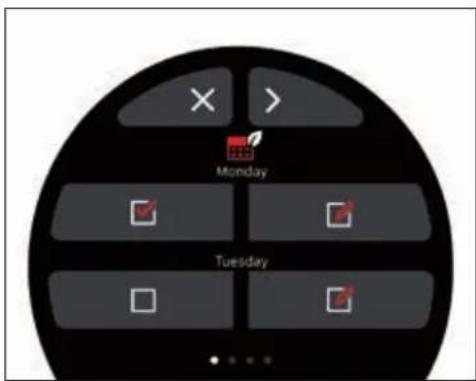
Monday TuesdayFrom the Energy Saving menu, press to access the Weekly Programming.
This page allows you to specify the days of rest and the days on which the machine is programmed to switch ON and OFFa automatically.
Press ✗ to return to the Energy Saving menu.
You can scroll through the day screens with the < > buttons.
The selected days are highlighted by the icon.
Press ☐ to access the settings for the selected days.
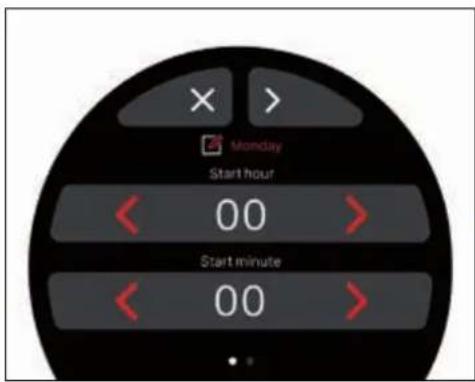
text_image
Monday Start hour 00 Start minute 00Set for the selected day:
- Start hour.
- Start minute.
- Stop hour.
- Stop minute.
Press ✗ to return to the day selection screen.
You can scroll through the screens with the < > buttons and change the parameters with < >.
When finished, on the last screen, press SAVE to save the settings and return to the day selection screen.
Counters
text_image
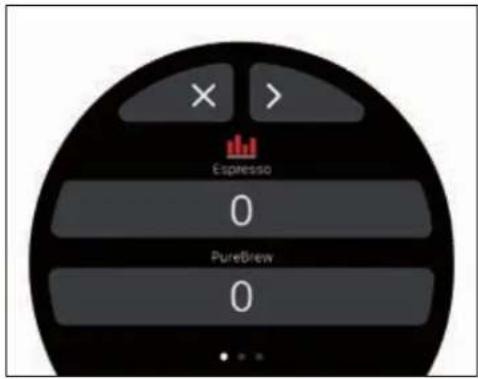
Espresso 0 PureBrew 0From the Main Menu, press to access the Counters.
On the first screen, the counters for Espresso and PureBrew beverages are displayed.
Press ✗ to return to the Main Menu.
Press > to move to the next screen.
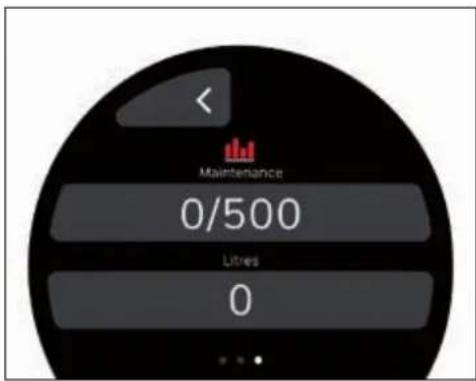
text_image
Maintenance 0/500 Litres 0The third and final screen displays the counters:
Maintenance: indicates the number of cycles left before maintenance. When the set threshold is reached, the alarm appears on the display.
- Litres: indicates the amount of litres of water dispensed by the machine.
Press < to return to the previous screen.
Language

text_image
SAVE Language English
From the General Settings menu, press to set the display Language:
• Italian.
- English.
- French.
- German.
- Spanish.
• Russian.
- Chinese.
text_image
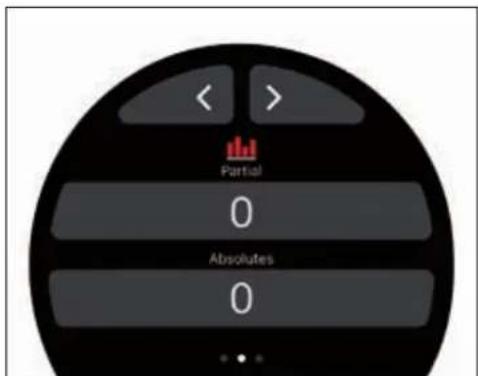
< > Partial 0 Absolutes 0The second screen displays the partial and absolute counters.
You can scroll through the screens with the
< > buttons.
General Settings

text_image
BACK General Language Time and data UnitFrom the Main Menu, press to access the General Settings menu:
Language.
Date and Time.
Unit of measurement.
Press < to return to the Main Menu.
Set the language with the < > buttons.
Press ✗ to return to the General Settings.
When finished, press SAVE to save the settings and return to the General Settings menu.
Date and Time
text_image
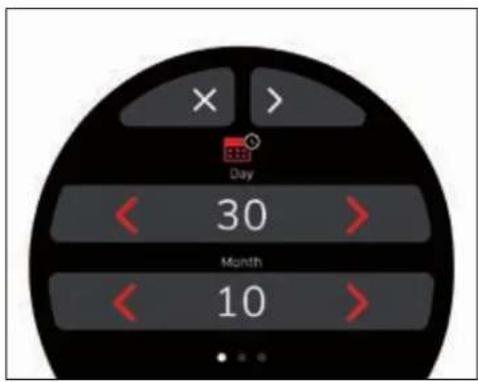
Day 30 Month 10From the General Settings menu, press to set the display Date and Time.
Day.
• Month.
- Year.
· Time.
• Minute.
Press ✗ to return to the General Settings.
You can scroll through the screens with the

buttons and change the parameters
with

When finished, on the last screen, press

to save the settings and return to the
General Settings menu.
Unit of measurement
text_image
× SAVE ↓ Temperature °CFrom the General Settings menu, press to set the temperature Unit of Measurement between °C and °F.
Press < to return to the General Settings.
Set the unit of measurement to

When finished, press SAVE to save the settings and return to the General Settings menu.
TECHNICAL SETTINGS
From the Main Menu, press to access the Technical Settings menu.
This menu allows sensitive parameters to be set which, in the event of setting errors, could cause the machine to malfunction.
Access to the Technical Settings is only possible after entering the 4-digit password.
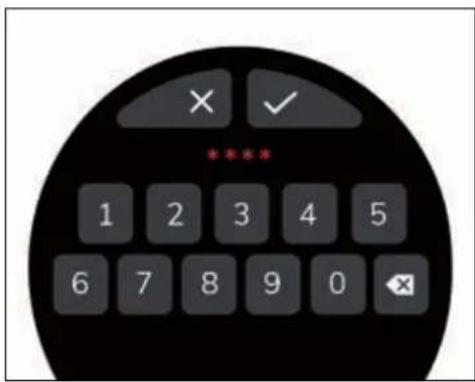
text_image
× ✓ **** 1 2 3 4 5 6 7 8 9 0 ✕Press to return to the Main Menu.
After entering the password, press √ to confirm.
text_image
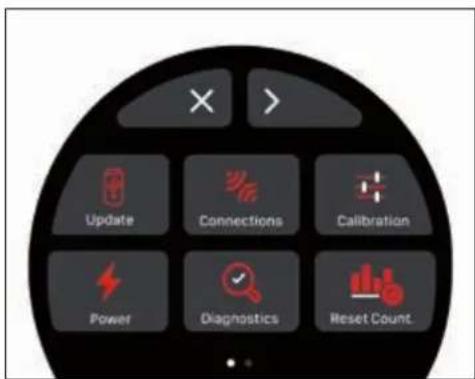
Update Connections Calibration Power Diagnostics Reset Count.From the first screen of the Technical Settings menu, you can access:

Update.

Connections.

Calibration.

Power Management.

Diagnostics.

Counter Reset.
Press ✗ to return to the Main Menu. Press > to move to the next screen.
text_image
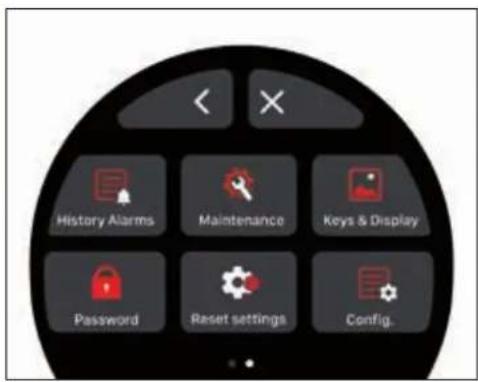
History Alarms Maintenance Keys & Display Password Reset settings Config.From the second screen, you can access:

Alarm History.

Maintenance.

Buttons and display.

Password.

Data Reset.

Configuration.
Press ✗ to return to the Main Menu. Press ✕ to return to the previous screen.
Update
text_image
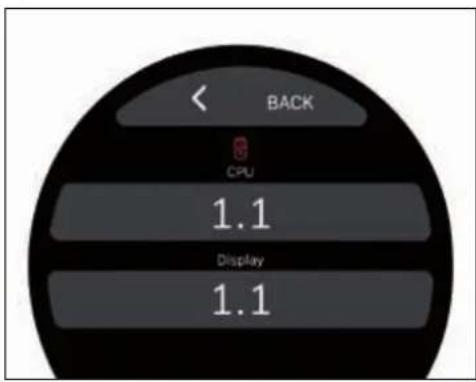
BACK CPU 1.1 Display 1.1From the Technical Settings menu, press to display the Firmware versions: - CPU. - Display.
Press < to return to the Technical Settings menu.
Connections
text_image
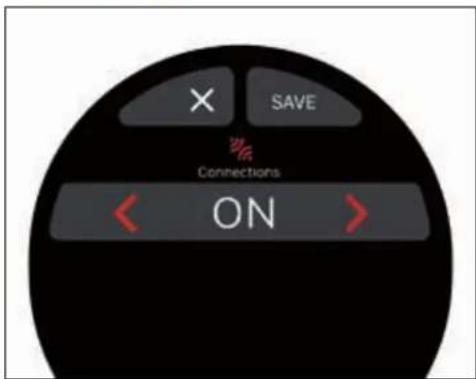
X SAVE Connections ONFrom the Technical Settings menu, press to enable (ON) or disable (OFF) the Connections, using the < > buttons. Press ✗ to return to the Technical Settings menu.
When finished, press SAVE to save the settings and return to the Technical Settings menu.
If the connection is enabled, the 📄 icon is displayed on the Home Page.
Calibration
text_image
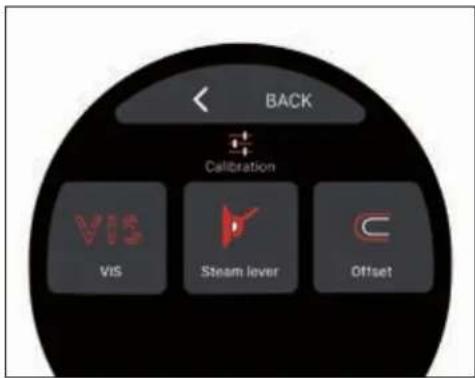
BACK Calibration VIS VIS Steam lever OffsetFrom the Technical Settings menu, press to access the Calibration menu:

VIS.

Steam lever.

Offset.
Press < to return to the Technical Settings menu.
VIS calibration
text_image
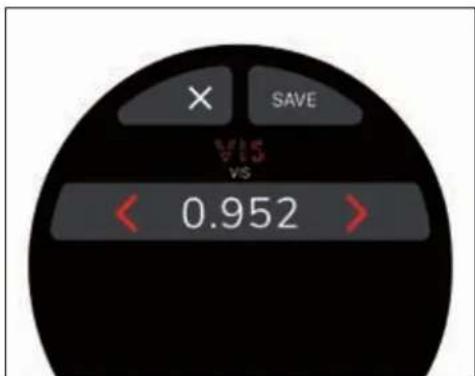
× SAVE VIS VS < 0.952 >From the Calibration menu, press to access the VIS calibration.
The values in this menu only need to be
changed when replacing the machine's dosing model.
Press ✗ to return to the Calibration menu.
Set the parameters with the < > buttons and press SAVE to save the settings and return to the Calibration menu.
VIS Calibration Parameters
| Parameters | Min. | Max. | Default Step | |
| VIS 0.0 | 1.0 | 0.952 | 0.001 |
Steam lever calibration
text_image
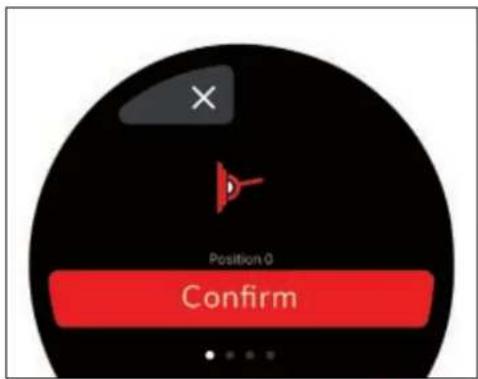
Position 0 ConfirmFrom the Calibration menu, press to access the Steam Lever calibration.
Press ✗ to return to the Calibration menu.
In this menu, the steam lever positions can be physically calibrated:
Rest.
- Cleaning.
• Medium Power.
• Maximum Power.
Once the Calibration procedure has begun, it cannot be interrupted.
Then the display shows the √ icon that confirms the operation and prepares for the calibration of the next position.
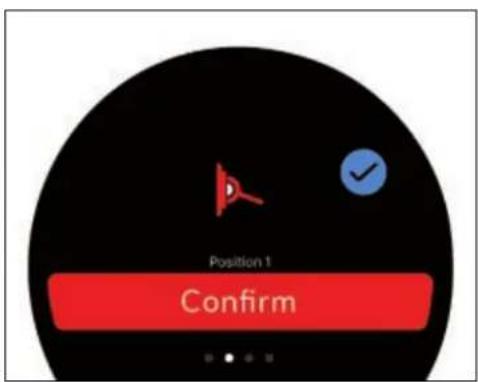
text_image
Position 1 ConfirmPhysically place the steam lever in the Medium Power position and press Confirm.
Then another √ icon appears on the display that confirms the operation and prepares for the calibration of the next position.
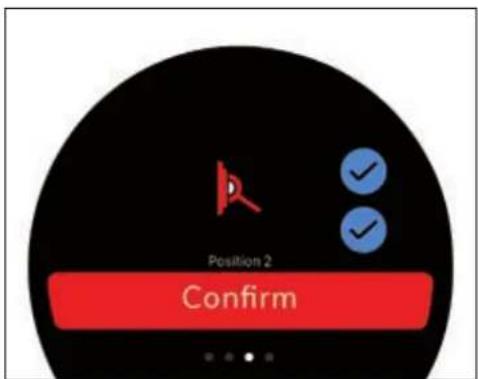
text_image
Position 2 ConfirmPhysically place the steam lever in the Maximum Power position and press Confirm.
Then another icon appears on the display that confirms the operation and prepares for the calibration of the last position.
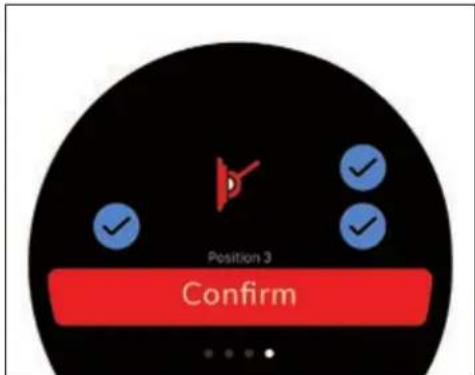
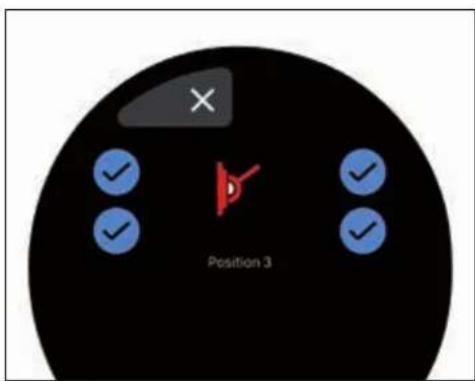
text_image
Position 3 ConfirmPhysically place the steam lever in the Cleaning position and press Confirm.
At the end of the calibration, the display displays 4 icons and the button that allows you to return to the Calibration menu.
text_image
Position 3Physically place the steam lever in the Rest position and press Confirm to carry out the calibration.

Victoria Arduino
Offset calibration
text_image
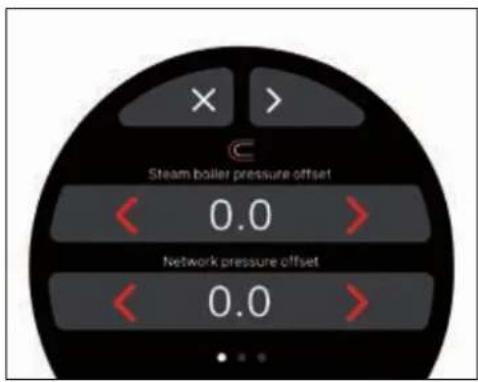
Steam boiler pressure offset 0.0 Network pressure offset 0.0
to ac-
From the Calibration menu, press to access the Offset menu.
Offset indicates the difference from a measured value to a reference value.
Temperature probes may be slightly different from an external thermometer.
Press ✗ to return to the Calibration menu. You can scroll through the screens with the

buttons and change the parameters


When finished, on the last screen, press SAVE to save the settings and return to the
Calibration menu.
Offset Parameters
| Parameters | Min. Max. Default Step | |||
| Steam boiler pressure offset | -1,0 bar | +1,0 bar | 1,0 bar 0,1 | bar |
| Network pressure offset | -3,0 bar | +3,0 bar | 0,0 bar 0,1 | bar |
| GR probe offset | -10°C | +10°C 0,0°C | 0,1°C | |
| Coffee boiler probe offset | -10°C | +10°C 0,0°C | 0,1°C | |
| EasyCream probe offset | -10°C | +10°C 0,0°C | 0,1°C | |
| Steam offset | -10°C | +10°C | 0,0°C | 0,1°C |
Power Management
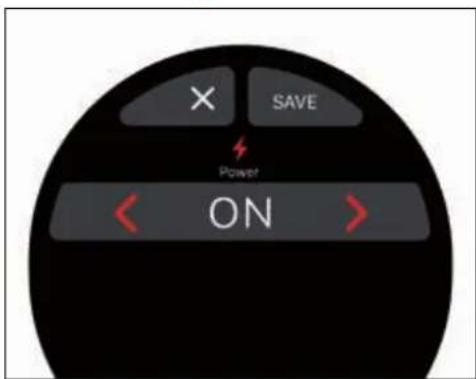
text_image
X SAVE Power ONFrom the Technical Settings menu, press to access the Power Management function, which allows you to limit the power consumption of the machine.
Enable (ON) or disable (OFF) the consumption management using the 🎨 buttons, or press ✗ to return to the Technical Settings menu.
Diagnostics
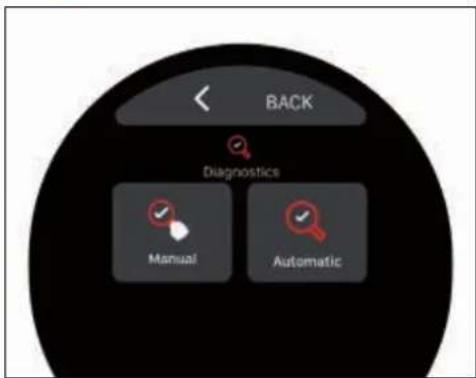
text_image
BACK Diagnostics Manual AutomaticFrom the Technical Settings menu, press to access the Diagnostics menu, which allows you to verify the correct operation of the individual machine components:

Manual diagnostics.

Automatic diagnostics.
Manual Diagnostics

text_image
Manual Pump Group boiler heatingFrom the Diagnostics menu, press to access the Manual Diagnostics.
Press ✗ to return to the Diagnostics menu. You can scroll through the component screens with the buttons at the top <>, while to start the test, press > next to the component name:
Pump.
- Group boiler heating.
- Group heating.
- Group dispensing.
• Service boiler heating.
- Filling the service boiler.
- Steam dispensing.
Hot water.
- Boiler cleaning.
The Boiler Cleaning function allows you to empty the steam boiler.
Components may vary depending on the machine's options.
During the tests, the icon is displayed and at the end, the result can be:

Test passed correctly.

Test not passed.
Automatic Diagnostics
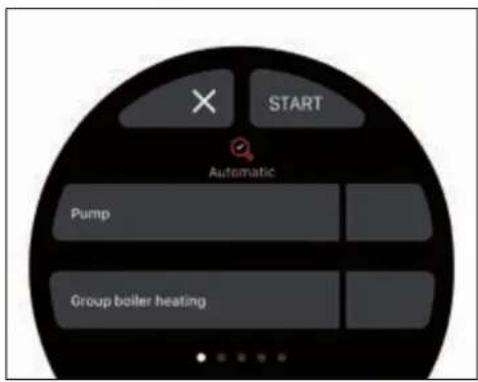
text_image
START Automatic Pump Group boiler heatingYou can scroll through the counters with the
< > buttons and reset them with
- Expresso drinks counter.
• PureBrew beverage counter. - Hot water meter.
- Partial counter.
- Maintenance counter
- Litres dispensed counter.
It is not possible to reset the absolute counter.
Maintenance
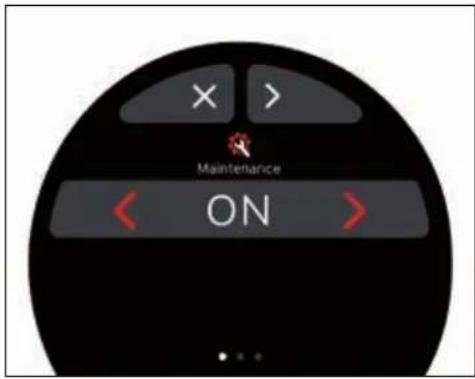
text_image
X > Maintenance ONFrom the Diagnostics menu, press to access the Automatic Diagnostics.
Press ✗ to return to the Diagnostics menu. This function allows automatic testing of components in the same order as for Manual Diagnostics.
Boiler Cleaning is not available in this mode.
Press START to start the test.
Alarms History
text_image
Alarms 2 - 0 FILLING TIMEOUT STEAM GOILER 7 - 0 FILLING TIMEOUT COFFEE GROUPFrom the Technical Settings menu, press to access the Maintenance menu.

The maintenance alarm can be enabled by setting a maximum number of dispensing cycles, so that when this number is reached, the alarm is activated on the display.
In addition to the number of cycles, a date can be programmed for the maintenance alarm to be activated.
Reset Counters
text_image
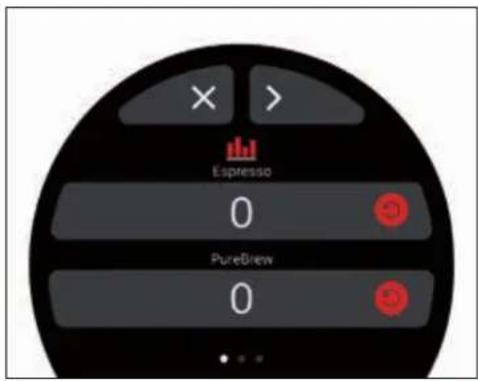
Espresso 0 PureBrew 0From the Technical Settings menu, press to access the Alarms History.
Press ✗ to return to the Technical Settings menu.
Press ✗ to delete an error line.
Press ✗ to return to the Technical Settings menu.
You can scroll through the settings screens with the <> buttons and change the parameters with <>:
- Enable or disable the alarm (ON/OFF).
- Dispensing cycle counter (5000/100000).
Day.
• Month. - Year.
The options are only available if the maintenance alarm is activated (ON). Otherwise, the following pages will not be available.
From the Technical Settings menu, press to access the Reset Counters.
Press ✗ to return to the Technical Settings menu.

Victoria Arduino
Keys and Display
text_image
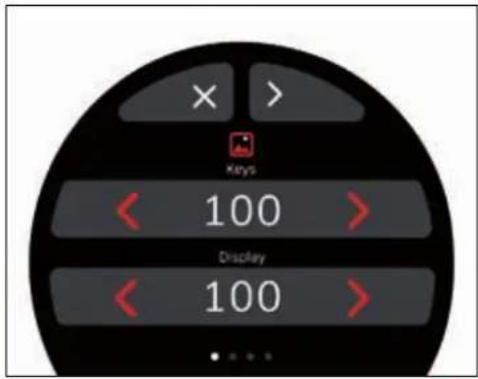
× > Keys 100 > Display 100 >From the Technical Settings menu, press to access the Keys and Display menu.
Press ✗ to return to the Technical Settings menu.
You can scroll through the settings screens with the <> buttons and change the parameters with <>
Password management
text_image
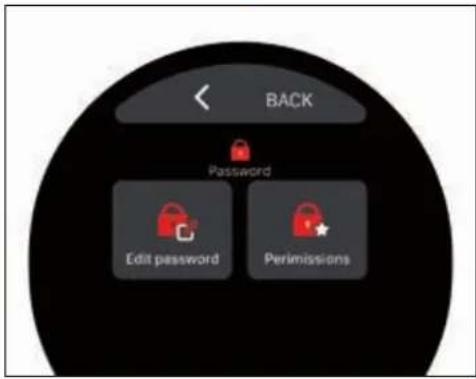
BACK Password Edit password PermissionsFrom the Technical Settings menu, press to access the Password Management menu:
Edit password. Permissions Management.
Press < to return to the Technical Settings menu.
Enter the Current Password and the New Password in the appropriate entry fields.
To enter the password, press on the input fields. The numeric keypad will appear on the display.

text_image
Enter the new password 1234Type the 4-digit password and press to
Keys and Display parameters
| Parameters | Min. Max. Default Step | |||
| Display brightness | 0 % 100 % 70 % 1 % | |||
| Keys brightness | 0 % 100 % 70 % 1 % | |||
| Leds OFF ON OFF ON/OFF | ||||
| Led power 0 % | 100 % 70 % 1 % | |||
| Persistence info | 0 s | 60 s 10 s | 1 s | |
| Name | Alphanumeric keyboard | |||
| VIS* | - | - | Weight + Time | Weight, Time, Weight + Time |
* Only available if the VIS option is activated.
Edit Password

text_image
SAVE Current password * * * * New passwordFrom the Password Management menu, press to edit the Password to access the Technical Settings.
Press ✗ to return to the Password Management menu.
Press < to return to the Edit Password screen.
At the end of the procedure, press SAVE to confirm the change of the password.
A confirmation message on the display will communicate the actual change.

text_image
Password changed successfullyPermissions Management
text_image
Clean Temperature Energy Saving General Counters My recipeFrom the Password Management menu, press to access Permissions management.
Press < to return to the Password Management menu.
This screen allows you to choose which functions the user can access.
The deactivated icons (not coloured) will only be accessible by entering the password.
When finished, press √ to confirm the settings and return to the Password Management menu.
Reset Settings
text_image
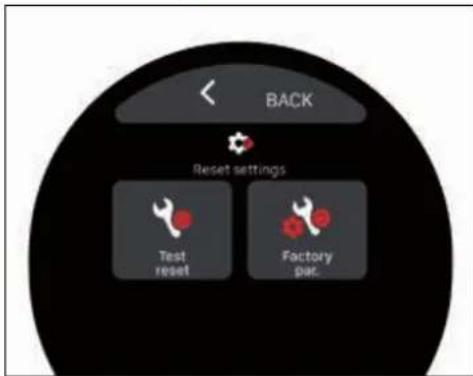
BACK Reset settings Test reset Factory set.From the Technical Settings menu, press to access the Reset Settings menu:
Test Reset. Factory Parameters Reset.
Press < to return to the Technical Settings menu.
Test Reset
text_image
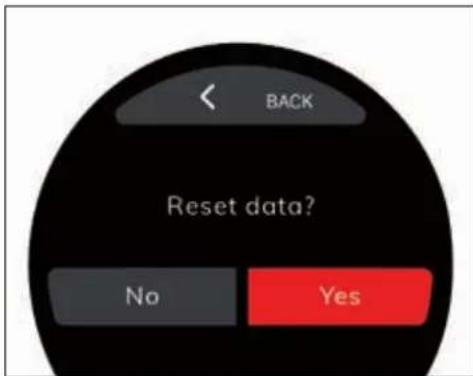
BACK Reset data? No YesFrom the Reset Settings menu, press to proceed with the Test Reset.
Press < to return to the Reset Settings menu.
If this is confirmed, the display will show a message advising you to empty the boiler and the hydraulic circuit.
The next time the machine is restarted, it will be necessary to complete the first start-up procedure again, and the machine will fill the boilers automatically.
Factory Parameters Reset
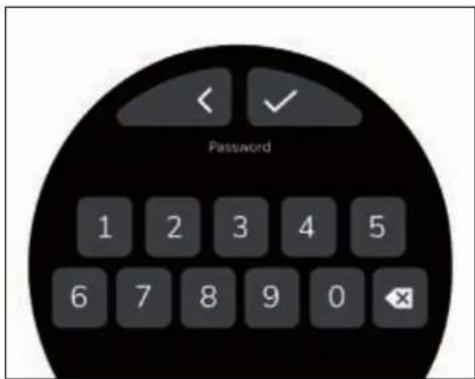
To access this function, the password is required.
text_image
Password 1 2 3 4 5 6 7 8 9 0 ✕From the Reset Settings menu, press to proceed with the Factory Parameters Reset.
Press < to return to the Reset Settings menu.
Type the 4-digit password and press √ to proceed.

text_image
BACK Reset data? No YesIn the event of confirmation, the machine proceeds with the total reset.
Press < to return to the Reset Settings-menu.
Configuration

text_image
X > Steam ONFrom the Technical Settings menu, press to access the machine Configuration.
Press ✗ to return to the Technical Settings menu.
You can scroll through the settings screens with the <> buttons and change the parameters with <>
Configuration Parameters
| Parameters Min. Max. Default Step | ||||
| Steam OFF ON / | EasyCream | ON | ON/OFF/EasyCream | |
| PureBrew OFF | ON | ON ON / OFF | ||
| Coffee boiler self-level OFF | ON | OFF ON / OFF | ||
| Pump self-level active OFF | ON | OFF ON / OFF | ||
| Steam boiler self-level OFF | ON | OFF ON / OFF | ||
| Water with active pump | OFF | ON | OFF ON / OFF | |
| Water pressure alarm set (bar) | 0,0 bar | 3,0 bar | 0,0 bar | 0,1 bar |
| VIS | OFF | ON | OFF ON / OFF | |
* Allows you to set a pressure threshold above which an error message will be displayed.

RDINARY CLEANING
| Item to be cleaned | After use | Daily Weekly | |
| Filter and filter holder | √ | √ | |
| Body machine | √ | ||
| Cup holder grid | √ | ||
| Water collection tray | √ | ||
| Dispensing group diffuser | √ | ||
| Dispensing group gasket | √ | ||
| Dispensing group | √ |


Excluding the cleaning of the dispensing group, any cleaning must be carried out with zero energy status (plug disconnected from the mains) and with the hot parts at environment temperature.
Avoid to clean the machine using water jets or standing it in water.
Do not use solvents, chlorine-based products or abrasives.
FILTER AND FILTER HOLDER CLEANING
After use, always empty the conical filter from the coffee used inside it.
flowchart
graph TD
    A["1: Finishing funnel, dropping funnel"] --> B["2: Drop drop, 3: Add water"]
    B --> C["3: Water tank with + and - labels"]
    C --> D["4: Add water into container with + and - label"]
    D --> E["5: Drain with water tap"]
    E --> F["6: Finishing funnel, dropping funnel"]
    F --> G["6: Drop drop, 7: Add water"]
    G --> H["7: Water tank with + and - labels"]
    H --> I["8: Add water into container with + and - labels"]
    I --> J["9: Water tank with + and - labels"]
    J --> K["10: Add water into container with + and - labels"]
    K --> L["11: Add water into container with + and - labels"]
    L --> M["12: Add water into container with + and - labels"]
    M --> N["13: Add water into container with + and - labels"]
    N --> O["14: Add water into container with + and - labels"]
    O --> P["15: Add water into container with + and - labels"]
    P --> Q["16: Add water into container with + and - labels"]
    Q --> R["17: Add water into container with + and - labels"]
    R --> S["18: Add water into container with + and - labels"]
    S --> T["19: Add water into container with + and - labels"]
    T --> U["20: Add water into container with + and - labels"]
    U --> V["21: Add water into container with + and - labels"]
    V --> W["22: Add water into container with + and - labels"]
    W --> X["23: Add water into container with + and - labels"]
    X --> Y["24: Add water into container with + and - labels"]
    Y --> Z["25: Add water into container with + and - labels"]
    Z --> AA["26: Add water into container with + and - labels"]
    AA --> AB["27: Add water into container with + and - labels"]
    AB --> AC["28: Add water into container with + and - labels"]
    AC --> AD["29: Add water into container with + and - labels"]
    AD --> AE["30' water tank"]
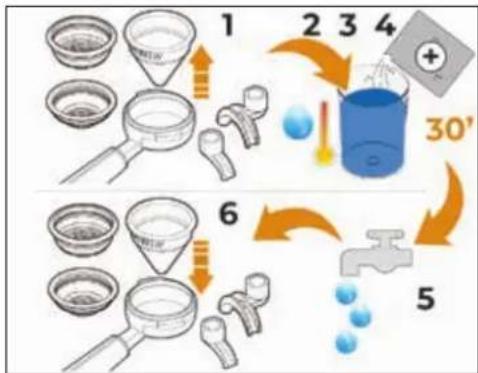
At the end of the day:
1 Remove the filters from their filter holders.

To remove the PureBrew conical filter, lever the cone from the top of the filter holder.

Do not remove the conical filter from the filter holder by pressing it on a work surface, as this may damage it.
2 Insert the manufacturer's recommended dose of the specific detergent powder in a container with hot water.
3 Immerse the filters and filter holder (take care not to also immerse the handle) in the container.
4 Wait 30 minutes.
5 Rinse thoroughly with running water; if necessary, clean the filters with a brush.
6 Insert the filters back into their filter holders.
The conical filter should be regularly cleaned in a dishwasher to avoid clogging.
BODY MACHINE CLEANING
Work area cleaning
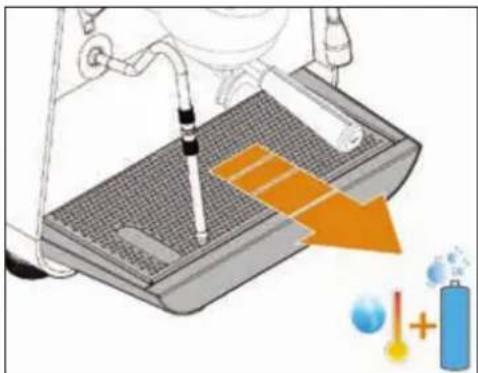
natural_image
Illustration of a pipette dispensing liquid into a test tube with an orange arrow indicating flow, accompanied by scientific symbols (no text or labels)1 Remove the worktop, lifting it up from the front and sliding it out.
2 Remove the water collection dish underneath.
3 Clean everything with hot water and cleansers.
External body and display cleaning
natural_image
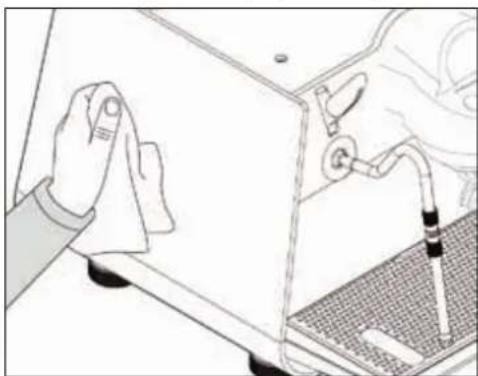
Illustration of a hand cleaning a kitchen appliance with a tool, showing no text or symbols.To clean the external bodies and the display, switch OFF the machine and use a soft cloth moistened with warm water.
Clean the screen with the machine switched OFF and avoid leaving the display wet or damp.
Never not use solvents, chlorine-based products and / or abrasives.
GROUP SHOWER CLEANING

natural_image
Illustration of a hand holding a pen, with tools and a device on a surface (no text or symbols)1 Unscrew the screw placed in the centre of the diffuser and shower. Automatically the screw, diffuser and shower fall out.
flowchart
graph TD
    A["Beaker with filter"] --> B["30° Condensation"]
    B --> C["Water bath"]
    C --> D["Water displacement"]
    D --> E["Water displacement + 1 mmol/L"]
    E --> F["Water displacement + 2 mmol/L"]
    F --> G["Water displacement + 3 mmol/L"]
    G --> H["Water displacement + 4 mmol/L"]
    H --> I["Water displacement + 5 mmol/L"]
    I --> J["Water displacement + 6 mmol/L"]
    J --> K["Water displacement + 7 mmol/L"]
    K --> L["Water displacement + 8 mmol/L"]
    L --> M["Water displacement + 9 mmol/L"]
    M --> N["Water displacement + 10 mmol/L"]
    N --> O["Water displacement + 11 mmol/L"]
    O --> P["Water displacement + 12 mmol/L"]
    P --> Q["Water displacement + 13 mmol/L"]
    Q --> R["Water displacement + 14 mmol/L"]
    R --> S["Water displacement + 15 mmol/L"]
    S --> T["Water displacement + 16 mmol/L"]
    T --> U["Water displacement + 17 mmol/L"]
    U --> V["Water displacement + 18 mmol/L"]
    V --> W["Water displacement + 19 mmol/L"]
    W --> X["Water displacement + 20 mmol/L"]
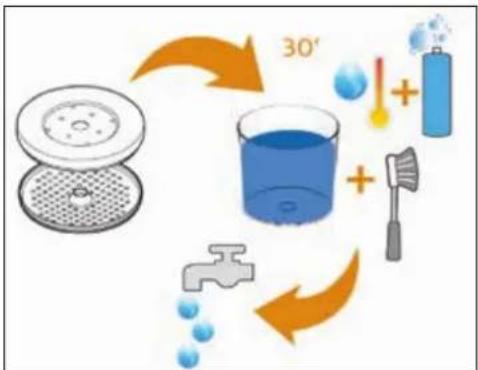
2 Place everything in a container with hot water and specific detergent for about 30 minutes.
3 Brush the shower and the diffuser.
4 Rinse everything thoroughly with running water.
5 Restore everything on the machine by proceeding in the opposite direction to resume normal operation.
CLEANING THE DISPENSING GROUP
Wash at least once a day.
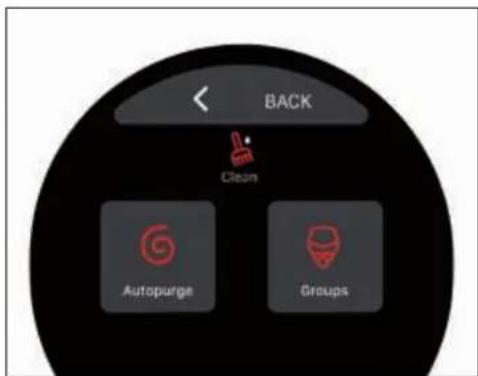
To wash the dispensing unit, from the display, access the Cleaning menu.
text_image
BACK Clean Autopurge Groups
From the Cleaning menu, press to access the washing cycle of the dispensing unit.
text_image
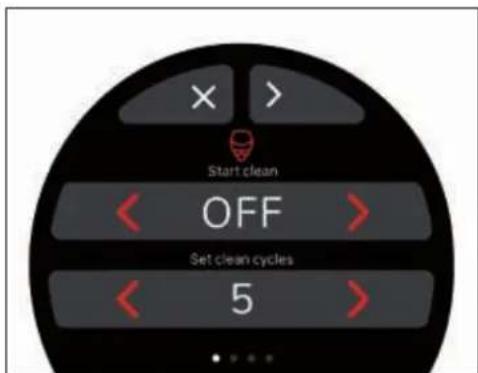
Start clean OFF Set clean cycles 5Set the washing cycle parameters and then set the Start Clean option to ON.

text_image
Wait cleaningTo start the washing cycle, press the continuous dispensing key.
To exit the washing cycle, press

When the automatic washing cycle is started, it cannot be stopped before its end.
If the machine is stopped before the cycle has finished, when it is switched back on, it restarts the rinsing cycle automatically.
The washing cycle follows the set parameters and consists of the washing and rinsing phases.

text_image
60 Cleaning groupThe countdown for the washing phase is visible on the display.
At the end of the washing phase, the machine prepares for the rinsing phase.

text_image
Wait flushingPress the continuous dispensing key to proceed with the rinsing phase.
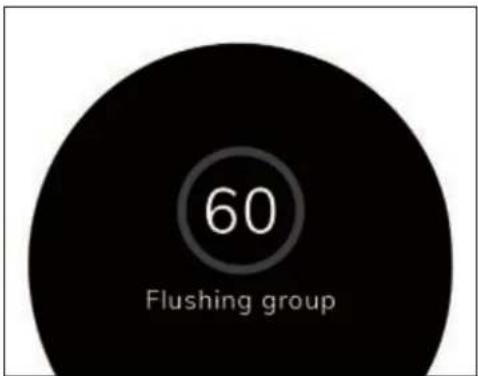
text_image
60 Flushing groupThe countdown for the rinsing phase is visible on the display.
At the end of the rinsing phase, it is possible to return to the normal operation of the machine.
MAINTENANCE
In the event of maintenance, switch OFF the machine using the switch and unplug the power cord.
During maintenance / repairs, the parts used must be able to guarantee compliance with the safety and hygiene requirements envisaged for the machine. Original replacement parts can offer this guarantee.
After the repair or replacement of any components of parts that come into contact with food or water, it is necessary to carry out the washing procedure as described in this manual or according to the manufacturer's instructions.
If the machine has been in use recently, wait for it to cool down before carrying out any kind of work on it.
Maintenance includes annual replacement of the group shower and gasket.
To carry out this operation, contact a qualified technician.
Failure to comply with these conditions will automatically invalidate the warranty.
For any additional work on the machine, please contact the dealer where you purchased the product.
If the machine must be shipped:
• Empty the water tank.
- Switch OFF the machine.
- Use the original packaging.
- Give your contact details or put them inside the box.
ELECTRICAL DIAGRAM
CB Coffee boiler
DOS Volumetric counter
DSP Touch-screen display
EVLV Level solenoid valve
EVGR Group solenoid valve
EVHW Hot water solenoid valve
EVPJ Jet pulse solenoid valve
EVS A Steam solenoid valve
EVS B Steam solenoid valve
EVWS Water stop solenoid valve
F Fuse
FC Frequency converter
FHS Filter-holder sensor
GR Dispensing group
HWK Hot water buttons
LP Level probe
LST LED strip
M Compressor
MB Electronic control panel
MS Main switch
PM Pump motor
PR Pressure switch
PS Safety pressure switch
R Relay
RCB Coffee boiler resistance
RGR Dispensing group resistance
RSB Steam boiler heating element
RTD EasyCream resistive sensor
SB Steam boiler
SL Steam lever
SSR Static safety relay
TF Temperature probe
TP Temperature probe
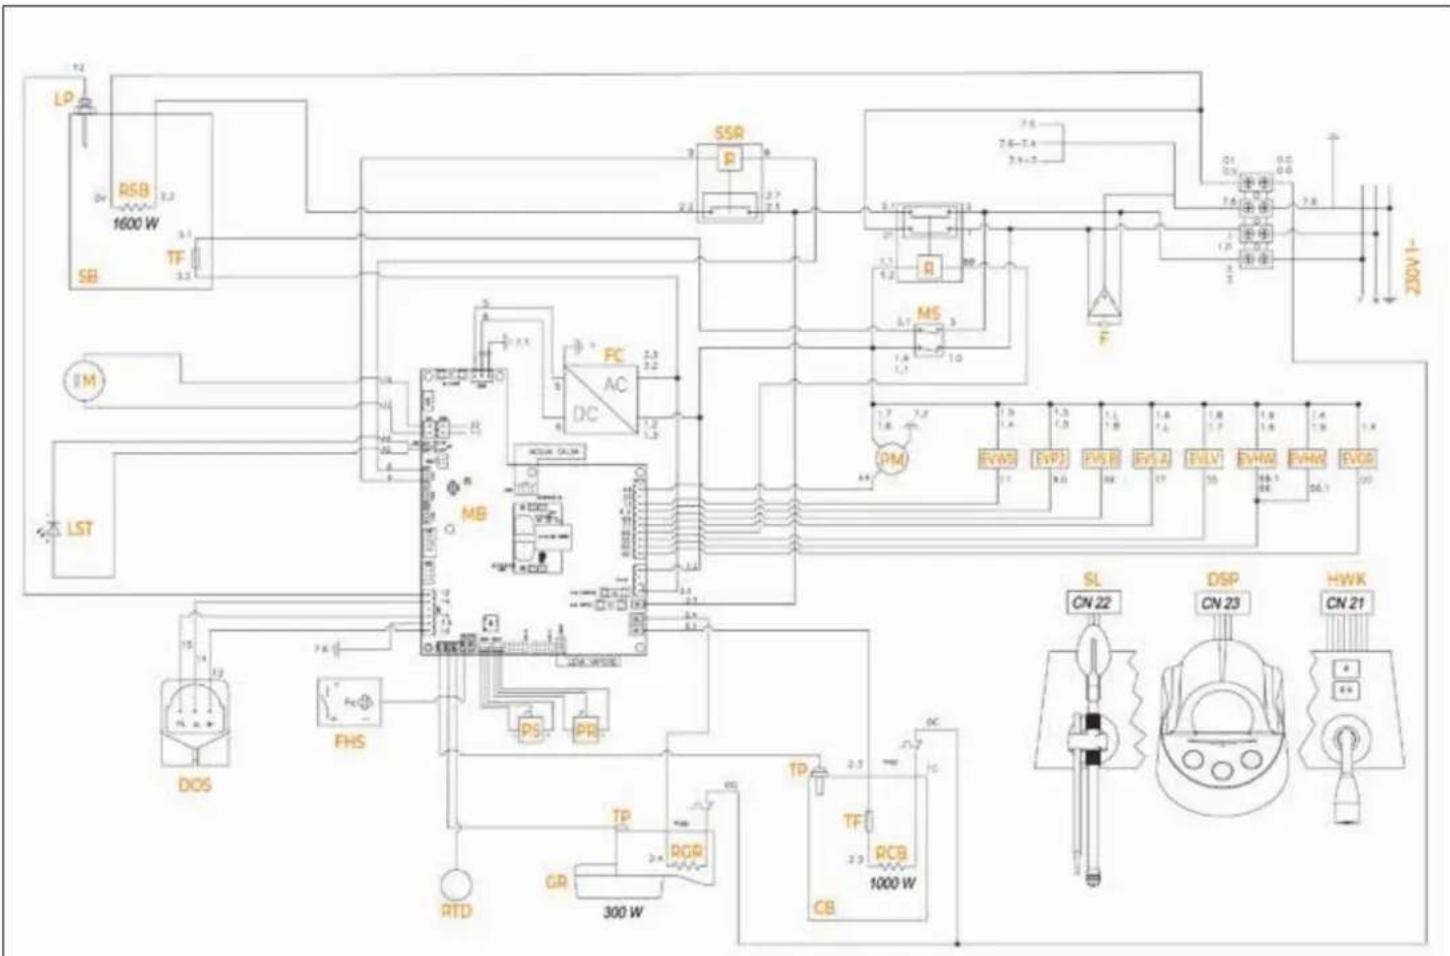
text_image
LP R5B 1600 W SB TF 3.1 3.2 3.3 3.4 3.5 3.6 3.7 3.8 3.9 4.0 4.1 4.2 4.3 4.4 4.5 4.6 4.7 4.8 4.9 5.0 5.1 5.2 5.3 5.4 5.5 5.6 5.7 5.8 5.9 6.0 6.1 6.2 6.3 6.4 6.5 6.6 6.7 6.8 6.9 7.0 7.1 7.2 7.3 7.4 7.5 7.6-7.7 7.7-7.8 7.8-7.9 8.0-8.1 8.1-8.2 8.2-8.3 8.3-8.4 8.4-8.5 8.5-8.6 8.6-8.7 8.7-8.8 8.8-8.9 8.9-9.0 9.0-9.1 9.1-9.2 9.2-9.3 9.3-9.4 9.4-9.5 9.5-9.6 9.6-9.7 9.7-9.8 9.8-9.9 9.9-1000 W TP RTD FHS MB DC FC AC MS PMI EVMSI EVPJ EVS B EVS A EVLV EVMH EVRH EVOB SL CN 22 DSP CN 23 HWK CN 21
YDRAULIC DIAGRAM
1 Water supply
2 Check valve
3 Water stop solenoid valve
4 Pump
5 Volumetric counter
6 Calibrated orifice
7 Flow control solenoid valve
8 Coffee boiler
9 Dispensing solenoid valve
10 To the filter holder
11 Discharge
12 Safety valve (16.5 bar)
13 Level solenoid valve
14 Steam boiler
15 Anti-vacuum valve
16 Safety valve (3 bar)
17 Steam solenoid valve
18 Hot water solenoid valve with tap
19 To the steam nozzle
20 To the hot water nozzle
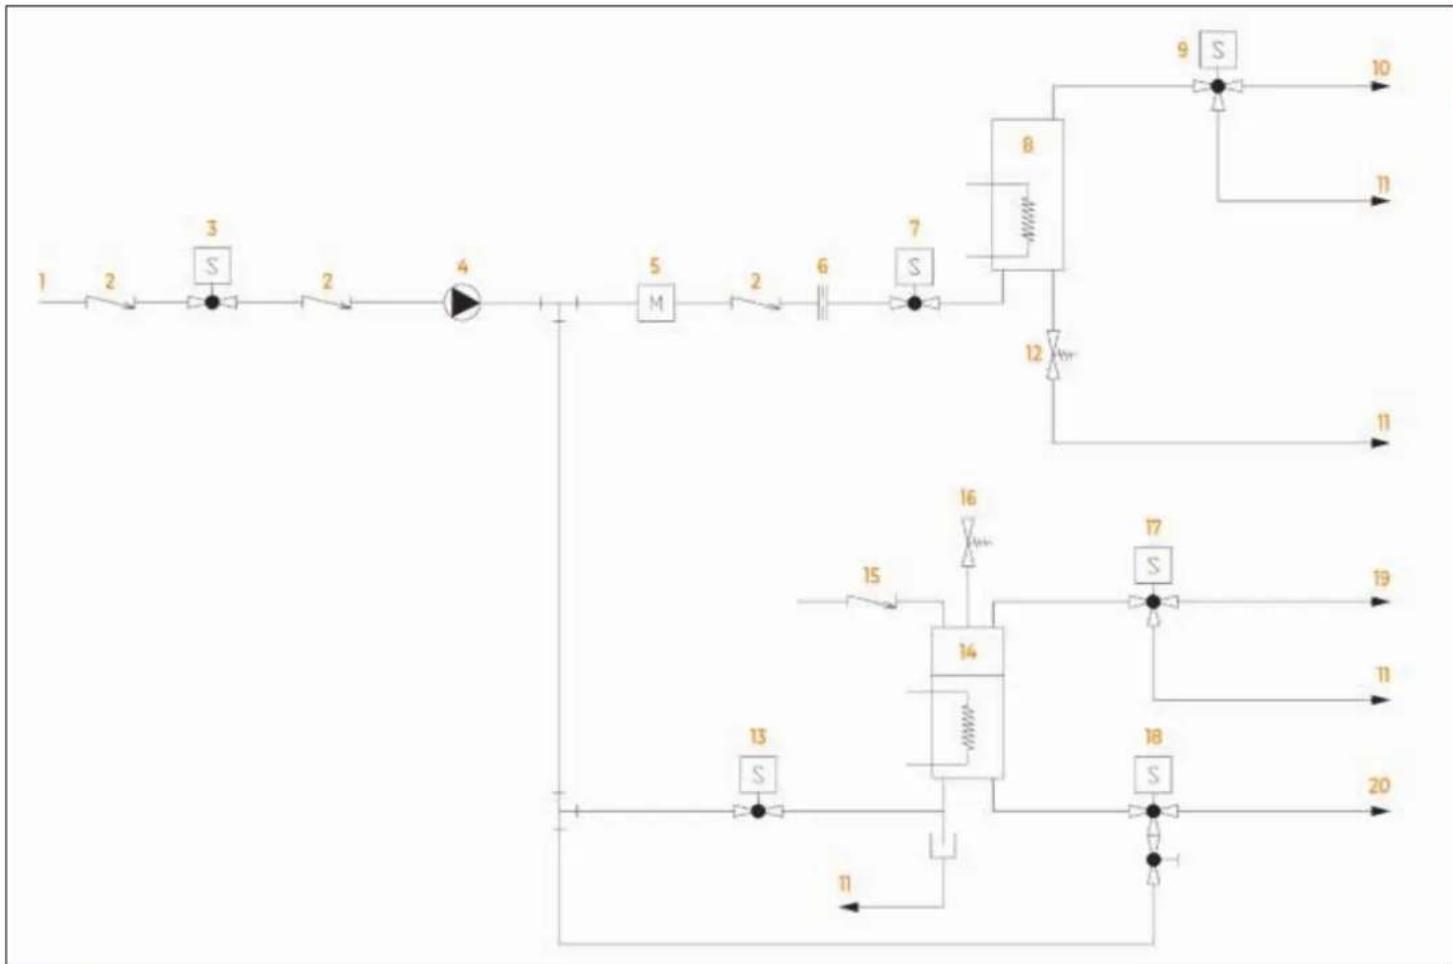
flowchart
graph TD
    A["1"] --> B["2"]
    B --> C["3"]
    C --> D["2"]
    D --> E["4"]
    E --> F["5"]
    F --> G["M"]
    G --> H["2"]
    H --> I["6"]
    I --> J["7"]
    J --> K["8"]
    K --> L["9"]
    L --> M["10"]
    K --> N["11"]
    K --> O["12"]
    O --> P["11"]
    Q["13"] --> R["S"]
    R --> S["14"]
    S --> T["15"]
    T --> U["16"]
    U --> V["17"]
    V --> W["S"]
    W --> X["18"]
    X --> Y["19"]
    X --> Z["20"]
    style A fill:#f9f,stroke:#333
    style Q fill:#f9f,stroke:#333
    style R fill:#ccf,stroke:#333
    style S fill:#ccf,stroke:#333
    style T fill:#ccf,stroke:#333
    style U fill:#ccf,stroke:#333
    style V fill:#ccf,stroke:#333
    style W fill:#ccf,stroke:#333
    style X fill:#ccf,stroke:#333
    style Y fill:#ccf,stroke:#333
    style Z fill:#ccf,stroke:#333
BOILER DIAGRAM
1 Boiler body
2 Upper flange
3 M3x8 stud bolt
4 Connection 1/4"
5 M6x25 stud bolt
6 Lower flange
7 M6x20 stud bolt
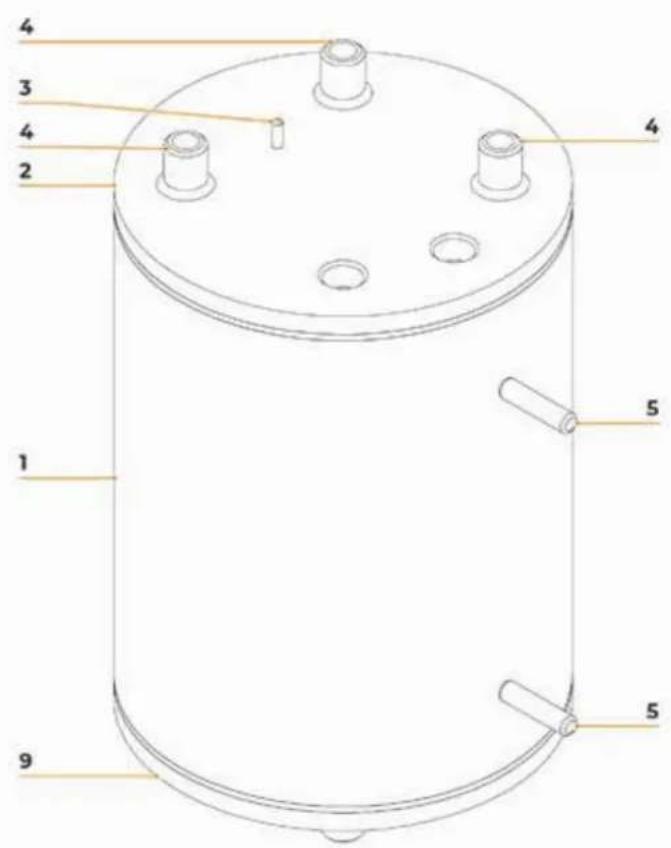
text_image
4 3 4 2 4 1 5 5 5 9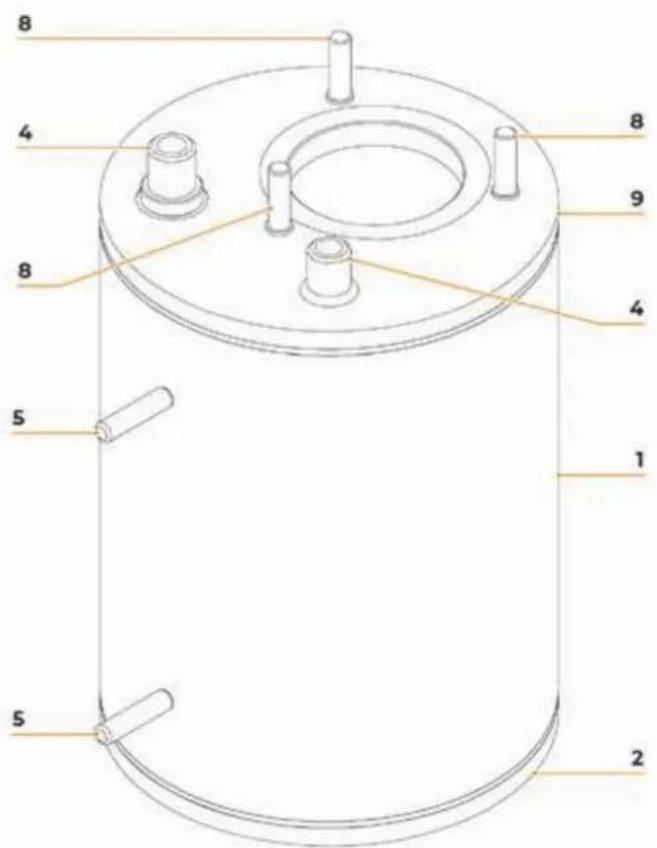
text_image
8 4 8 9 4 5 1 5 2PRESCRIPIONS DE SÉCURITÉ
natural_image
Blue circular icon with a white vertical line and horizontal lines above a base, resembling a stylized lamp or circuit symbol (no text or numbers present)natural_image
Recycling symbol with four arrows forming a triangle (no text or labels)natural_image
Symbol of a trash bin crossed with a diagonal line and a horizontal bar below (no text or labels)text_image
Micro Actionnatural_image
Simple line drawing of a mechanical device with a lever and base, labeled 'Z' at the bottom (no text or symbols on the diagram itself)DESCRIPTION DE LA MACHINE
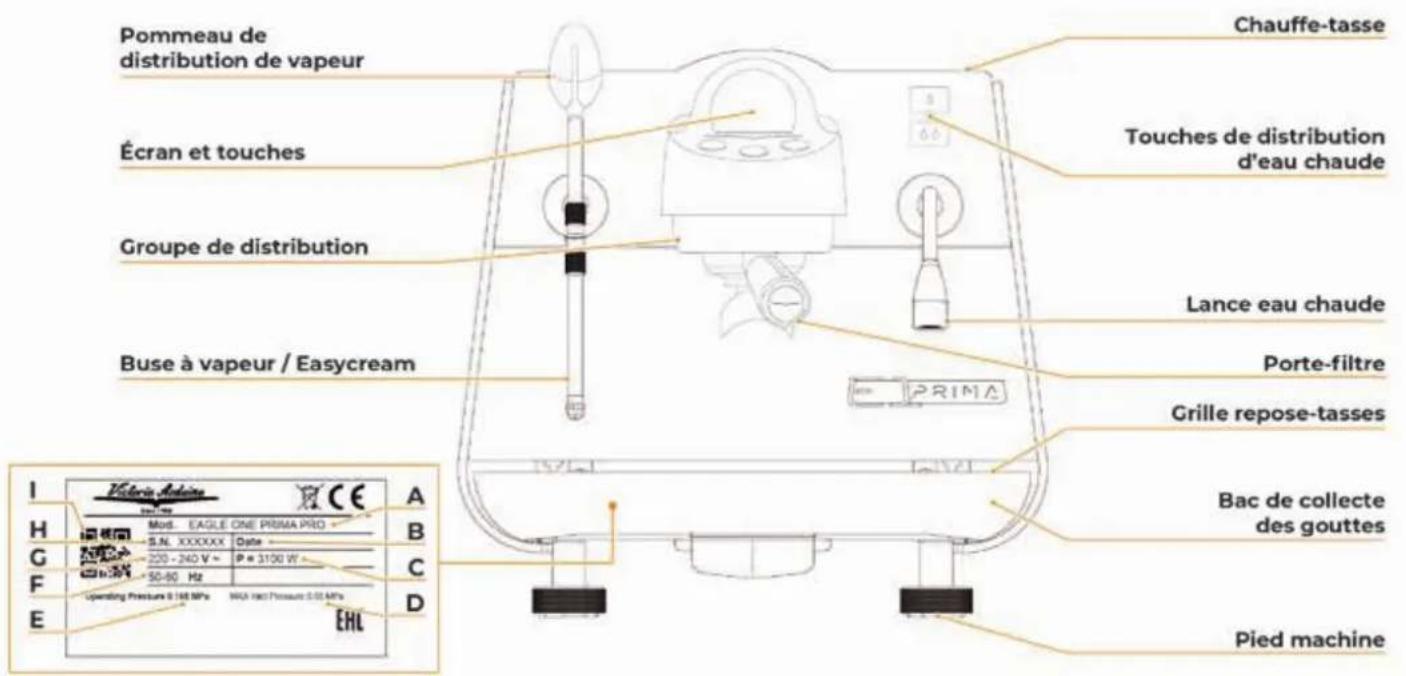
text_image
+5 °C +25°C ≥900mm 150 mmtext_image
Diagram illustrating a sewing machine operation with labeled parts and a hand holding a bag, showing mechanical components and a sewing machine's base.text_image
Diagram of a water treatment or gas flow system with labeled components and directional arrows indicating flow paths.natural_image
Illustration of a plug connected to an electrical outlet with an orange upward arrow indicating power flow (no text or symbols)text_image
60" 10" 10" × 3text_image
Victoria Arduino INSPIRED BY YOUR PASSION. 2"text_image
Diagram showing a mechanical device with labeled components and orange highlighted areas, likely illustrating a process or assembly.natural_image
Illustration of a robotic arm operating on a platform with two labeled cross-sections (x1 and x2), no text or symbols present.text_image
Diagram showing a mechanical device with labeled components and orange arrows indicating flow or movement paths.text_image
Diagram showing a warning sign with a red X mark and a warning symbol, likely indicating a hazard or absence of an injury.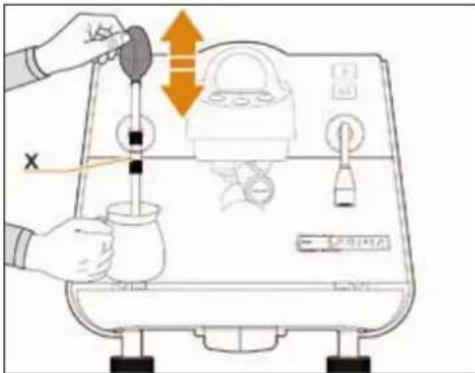
text_image
Diagram showing a hand using a water tap to measure a product, with Chinese text labels and directional arrows indicating flow or movement.natural_image
Line drawing of a coffee maker pouring liquid into a cup on a tray (no text or symbols)text_image
Diagram showing a hand cleaning a kitchen appliance with labeled buttons and a QR code on the door.text_image
Diagram showing a test tube with warning symbols and a hand holding a test tube, indicating a chemical or lab setup.natural_image
Illustration of a hand pouring liquid into a container using a tool, with no visible text or symbols.text_image
Diagram of a coffee maker with labeled parts and control buttons, showing mechanical components and a pitcher.natural_image
Line drawing of a robotic arm operating on a staircase (no text or symbols)text_image
Diagram showing a plug connected to an electrical outlet with warning symbol and orange directional arrows indicating current flow or discharge.natural_image
Circular black button with a white power symbol icon at center (no text or numbers)text_image
35 93.4 °C Off Degassing Espressotext_image
4 93.4 °C Off Degassing Espressogauge
| Metric | Value | | ------------ | ----- | | Current | 35 | | 88.0 °C | 35 | | Medium | 35 | | Degassing | 35 | | Pure Brew | 35 |text_image
× > temperature < 93.4°C >text_image
× > Activer ON Set Purge (s) 2 >text_image
SAUVE. Active ON Pression Chaudière (bar) 1.0natural_image
Circular black button with a white power symbol icon at center (no text or numbers)text_image
Espresso 0 PureBrew 0text_image
RETOUR CPU 1.1 Display 1.1text_image
× SAUVE. VIS VS < 0.952 >text_image
Position 0 Confirmertext_image
Position 1 Confirmertext_image
Position 2 Confirmertext_image
Position 3 Confirmertext_image
Position 3Calibration Offset
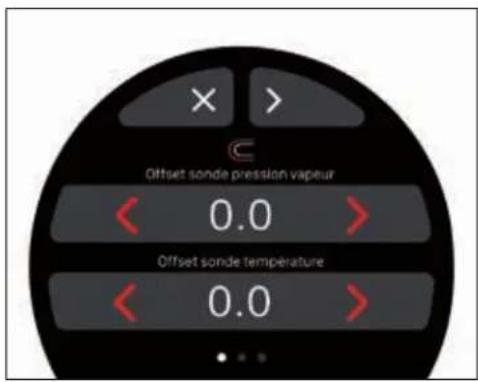
text_image
Offset sonde pression vapeur 0.0 Offset sonde température 0.0text_image
X SAUVE. Power ONDiagnostique manuel
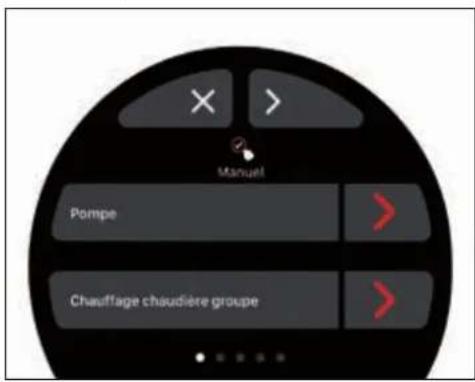
text_image
Espresso 0 PureBrew 0text_image
× > Maintenance ONflowchart
graph TD
    A["1: Finishing funnel"] --> B["2: Color change"]
    B --> C["3: Water displacement"]
    C --> D["4: Color change + water displacement"]
    D --> E["5: Drop in water"]
    E --> F["6: Collection with funnel"]
natural_image
Illustration of a pipette dispensing liquid into a test chamber with an orange arrow indicating flow (no text or symbols)natural_image
Illustration of a hand cleaning a kitchen appliance with a tool (no text or symbols visible)natural_image
Illustration of a hand holding a tool near a washing machine (no text or symbols)natural_image
Blue circular icon with a white vertical line and horizontal bars, resembling a stylized lamp or circuit symbol (no text or numbers present)natural_image
Recycling symbol with four arrows forming a triangle (no text or labels)text_image
Diagram showing a crossed-out trash bin with no text or symbols, indicating no waste or disposal.text_image
Victor's Box Victor's Boxtext_image
Electriciannatural_image
Simple line drawing of a mechanical device with a lever and base, labeled 'Z' at the bottom (no text or symbols on the diagram itself)Größen (mm / inch)
text_image
+5 °C +25°C ≥900mm 150 mmtext_image
Diagram illustrating a sewing machine operation with labeled parts and a hand holding a golden object.text_image
Diagram of a water treatment or filtration system with labeled components and directional arrows indicating flow paths.natural_image
Illustration of a plug connected to an electrical outlet with an orange upward arrow indicating power flow (no text or symbols)text_image
60" 10" 10" x 3text_image
Victoria Arduino INSPIRED BY YOUR PASSION. 2"text_image
Diagram showing a device with labeled components and orange arrows indicating flow or movement, possibly illustrating a process or system.natural_image
Illustration of a robotic arm performing a manual valve operation on a tray, with two labeled cross-sections (x1 and x2) showing no text or symbols.text_image
Diagram showing a mechanical device with labeled components and orange arrows indicating flow or movement, possibly illustrating a process or assembly.natural_image
Line drawing of a coffee maker pouring liquid into a cup on a tray (no text or symbols)text_image
Diagram showing a warning sign with a red 'X' symbol and a warning triangle with a yellow 'S' symbol, likely indicating a hazard or caution.text_image
Diagram showing a hand cleaning a kitchen appliance with labeled buttons and a control paneltext_image
Diagram illustrating a hand pouring liquid into a machine with control panel and directional arrows indicating flow or movement.text_image
Diagram showing a test tube with warning symbols and a hand holding a test tube, indicating a chemical reaction or safety hazard.natural_image
Illustration of a hand using a tool to clean or wash a cylindrical object on a textured surface (no text or symbols visible)text_image
Diagram of a coffee maker with labeled parts and control buttons, showing front panel, side view, and interior layout.natural_image
Line drawing of a robotic arm operating on a staircase (no text or symbols)text_image
Diagram showing a plug connected to an electrical outlet with warning symbol and orange directional arrow indicating current flow or discharge.text_image
Victoria Arduino INSPIRED BY YOUR PASSION. 2"natural_image
Circular black button with a white power symbol icon at center (no text or numbers)text_image
35 93.4 °C Off Degassing Espressotext_image
4 93.4 °C Off Degassing Espressotext_image
35 88.0 °C Medium Degassing Pure Brewnatural_image
Circular black button with a white power symbol icon at center (no text or numbers)text_image
Espresso 0 PureBrew 0text_image
Position 3Offset-Kalibrierung
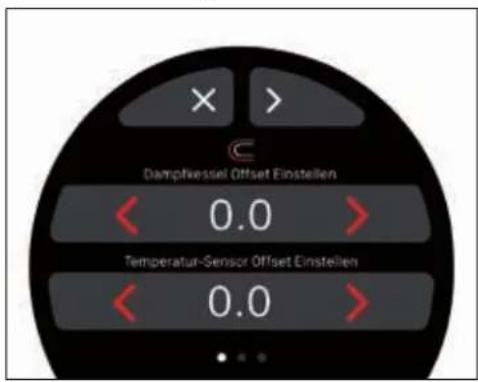
text_image
Dampfkeessel Offset Einstellen 0.0 Temperatur-Sensor Offset Einstellen 0.0text_image
Espresso 0 PureBrew 0text_image
X > Dampf ONflowchart
graph TD
    A["1: Finishing funnel"] --> B["2: Drop drop"]
    B --> C["3: Water displacement"]
    C --> D["4: Add (+) to blue cylinder"]
    D --> E["5: Discharge to faucet"]
    E --> F["6: Finishing funnel"]
    F --> G["7: Drop drop"]
    G --> H["8: Water displacement"]
    H --> I["9: Discharge to faucet"]
Am Ende des Tages:
natural_image
Illustration of a pipette dispensing liquid into a test tube with an orange arrow indicating flow, accompanied by droplets and a blue battery (no text or symbols)natural_image
Illustration of a hand cleaning a laptop with a cloth, showing the screen and keyboard (no text or symbols present)natural_image
Illustration of a hand holding a tool near a wall-mounted device with control buttons (no text or symbols)natural_image
Blue circular icon with a white vertical line and horizontal lines, resembling a stylized lamp or circuit symbol (no text or numbers present)natural_image
Recycling symbol with four arrows forming a triangle (no text or labels)natural_image
Symbol of a trash bin crossed with two crossed lines and a solid black rectangle below (no text or labels)text_image
Electrician ↑ ↑natural_image
Simple line drawing of a mechanical device with a lever and base, labeled 'Z' at the bottom (no text or symbols on the diagram itself)natural_image
Illustration of a hand using a sewing machine to press down a golden coin (no text or symbols visible)text_image
Diagram of a water treatment or gas flow system with labeled components and directional arrows indicating flow paths.natural_image
Illustration of a plug connected to an electrical outlet with an orange upward arrow indicating power flow (no text or symbols)text_image
60" 10" x 3 10"text_image
Victoria Arduino INSPIRED BY YOUR PASSION. 2"text_image
Diagram showing a mechanical device with labeled parts 1, 2, and 3, likely illustrating a machining or assembly process.natural_image
Illustration of a robotic arm performing a manual tool on a platform, with two labeled cross-sections (x1 and x2) showing no text or symbols.text_image
Diagram showing a robotic arm with labeled components and orange arrows indicating flow or movement, possibly illustrating a robotic operation or system.natural_image
Line drawing of a coffee maker pouring liquid into a cup on a tray (no text or symbols)text_image
Diagram showing a warning sign with a red X mark and a warning symbol, likely indicating a hazard or absence of a device.text_image
Diagram showing a hand cleaning a kitchen appliance with Korean text labels and control buttonstext_image
Diagram showing a hand using a micrometer to measure a product, with Chinese text labels and directional arrows indicating process flow.text_image
Diagram showing a device with warning symbols and a red X mark indicating cancellation or failure, including warning labels and electrical components.natural_image
Illustration of a hand using a tool to clean or wash a cylindrical object on a perforated tray (no text or symbols visible)text_image
Diagram of a coffee maker with labeled parts and control buttons, showing front panel and side view.natural_image
Line drawing of a robotic arm operating a machine with a mesh platform (no text or symbols)text_image
Safety warning illustration showing a plug with a fuse and an electrical socket inside a wall, with an orange arrow indicating disassembly or repair.natural_image
Circular black button with a white power symbol icon at center (no text or numbers)text_image
35 93.4 °C Off Degassing Espressotext_image
4 93.4 °C Off Degassing Espressotext_image
35 88.0 °C Medium Degassing Pure Brewnatural_image
Circular black button with a white power symbol icon at center (no text or numbers)text_image
Espresso 0 PureBrew 0text_image
Espresso 0 PureBrew 0text_image
X > Vapor ONflowchart
graph TD
    A["1: Roundup funnel with dropping funnel"] --> B["2: Drop funnel"]
    B --> C["3: Water drop with blue liquid"]
    C --> D["4: Cover with + and down arrow"]
    D --> E["5: Down arrow to tap"]
    E --> F["6: Roundup funnel with drop funnel"]
    F --> G["6: Drop funnel"]
    G --> H["7: Down arrow to tap"]
Al final del día:
natural_image
Illustration of a pipette dispensing liquid into a test tube with an orange arrow indicating flow, accompanied by scientific symbols (no text or labels)natural_image
Illustration of a hand cleaning a laptop with a cloth (no text or symbols visible)natural_image
Illustration of a hand holding a screwdriver next to a washing machine (no text or symbols)MS Interruptor principal
PM Motor de bomba
PR Presostato
EC DECLARATION OF CONFORMITY - PRESSURE EQUIPMENT
DÉCLARATION DE CONFORMITÉ CE - MACHINE SOUS PRESSION
EU-KONFORMITATSERKLARUNG - UNTER DRUCK BETRIEBENES GERAT
Simonelli Group declares under its own responsibility that the espresso coffee machine identified as below complies with the directives specified below and meets the essential requirements indicated in attachment A Conformity evaluation: category 1, form A The following harmonized standards have been applied following the provisions of the directives specified below.
ATTENTION: This declaration is to be kept with the equipment at all times and must always go together with the equipment. Any use of the equipment than for the purposes for which it was designed is prohibited. The integrity and efficiency of the equipment of the safety devices are the responsibility of the user. The declaration is null and void if the machine is modified without the express authorization of the Manufacturer or if improperly installed and used in such a way that does not comply with indications in the user's manual and the instructions.
text_image
Victoria ArduinoINSPIRED BY YOUR PASSION.
Simonelli Group
Via E. Betti, 1
62020 Belforte del Chienti (MC) Italy
+39 0733 9501
info@victoriaarduino.com
victoriaarduino.com