Theresia - Coffee machine Victoria Arduino - Free user manual and instructions
Find the device manual for free Theresia Victoria Arduino in PDF.
| Product type | Professional espresso machine |
| Brand | Victoria Arduino |
| Model | Theresia |
| Number of groups | 1 |
| Body material | Supermirror stainless steel |
| Supply voltage | 208-240 V, 50-60 Hz |
| Power consumption | 3000 W |
| Dimensions (W × H × D) | 430 × 585 × 460 mm |
| Net weight | 32 kg |
| Gross weight | 37 kg |
| Steam boiler capacity | 1.1 L (thermal sealed stainless steel) |
| Coffee boiler capacity | 0.7 L (thermal sealed stainless steel) |
| Hydraulic system | Volumetric pump, electronic self-leveling, safety valve, pressure adjustment (9 bars recommended) |
| Extraction system | High Efficiency Extraction System (HEES) |
| Electronic functions | Graphic display, dose programming, temperatures (coffee, steam, group), counters, automatic washing, on/off programming, energy saving |
| Safety | Omnipolar circuit breaker, mandatory grounding, overheat protection |
| Steam wand | 1 stainless steel wand with cool touch coating |
| Hot water economizer | Adjustable for optimized output temperature |
| Automatic cleaning | Washing cycle with blind filter and powder detergent |
| Water softener | Recommended to prevent limescale; manual resin regeneration |
| Recommended water pressure | 2.3 bars (max 4 bars) |
| Water supply | Tank or direct connection |
Frequently Asked Questions - Theresia Victoria Arduino
User questions about Theresia Victoria Arduino
0 question about this device. Answer the ones you know or ask your own.
Ask a new question about this device
Download the instructions for your Coffee machine in PDF format for free! Find your manual Theresia - Victoria Arduino and take your electronic device back in hand. On this page are published all the documents necessary for the use of your device. Theresia by Victoria Arduino.
USER MANUAL Theresia Victoria Arduino
Congratulations, you have chosen an unique in its kind machine.
Read carefully what is advised in the instruction manual for "setting-up" of your THERESIA.
You will see how easy it is to make delicious coffee and creamy cappuccinos.
With the passing of time, you will also realise how little maintenance is needed.
Victoria Arduino
Applied regulations: Collections M,S, VSR editions '78 and '95 and available in the registered office.
Drawing No. (See the end of the Instruction Booklet)
ATTENlON: This declaration is to be kept with the equipment at all times and must always go together with the equipment. Any use of the equipment than for the purposes for which it was designed is prohibited. The integrity and efficiency of the equipment of the safety devices are the responsibility of the user. The declaration is null and void if the machine is modified without the express authorization of the manufacturer or if improperly installed and used in such a way that does not comply with indications in the user's manual and the instructions.
2.DESCrizIONEMACCHINATHERESIA.12
2.1 DESCrizIONE PANNELLO DI COMANDO 13
2.2 LISTA ACCESSORI
6.1 ACCENSIONE DELLA MACCHINA
1.1 SAFETY REGULATIONS
2.DESCRIPTION 44
2.1 CONTROL PANEL DESCRIPTION 45
2.2 ACCESSORIES LIST
3. TRANSPORT AND HANDLING 47
3.1 APPLIANCE IDENTIFICATION
4. INSTALLATION AND PRELIMINARY OPERATIONS 47
5. SETTING OF THE SKILLED TECHNICIAN 49
5.1 FIRST START UP PROCEDURE 49
5.2 PUMP ADJUSTMENT
5.3 HOT WATER ECONOMISER ADJUSTMENT 50
6. USE 51
6.1 TURNING THE MACHINE ON 51
6.2 FIRST INSTALLATION PROCEDURE AND MANUAL WATER FILLING IN THE TANK 51
7.PROGRAMMING 54
7.1 KEY 5
7.2. PROGRAMMING 55
7.2.1 LANGUAGE 55
7.2.2 CLEANING CYCLE 56
7.2.3 DOSES 56
7.2.4 COUNTERS 58
7.2.5 SETTINGS 58
8.MACHINE FUNCTION MESSAGES THERESIA 65
9. CLEANING AND MAINTENANCE 66
9.1 SWITCHING OFF THE MACHINE 66
9.2 CLEANING THE OUTSIDE OF THE MACHINE 66
9.3 CLEANING THE STAINLESS STEEL COFFEE-HOLDERS 66
9.4 CLEANING THE UNIT WITH THE AID OF THE BLIND FILTER 66
9.5 CLEANING FILTERS AND FILTER-HOLDERS 67
- MAINTENANCE 67
10.1 REGENERATION OF THE SOFTENER RESINS 67
ELECTRIC SYSTEM 102
BOILER DIAGRAM 103
BOILER DIAGRAM 104

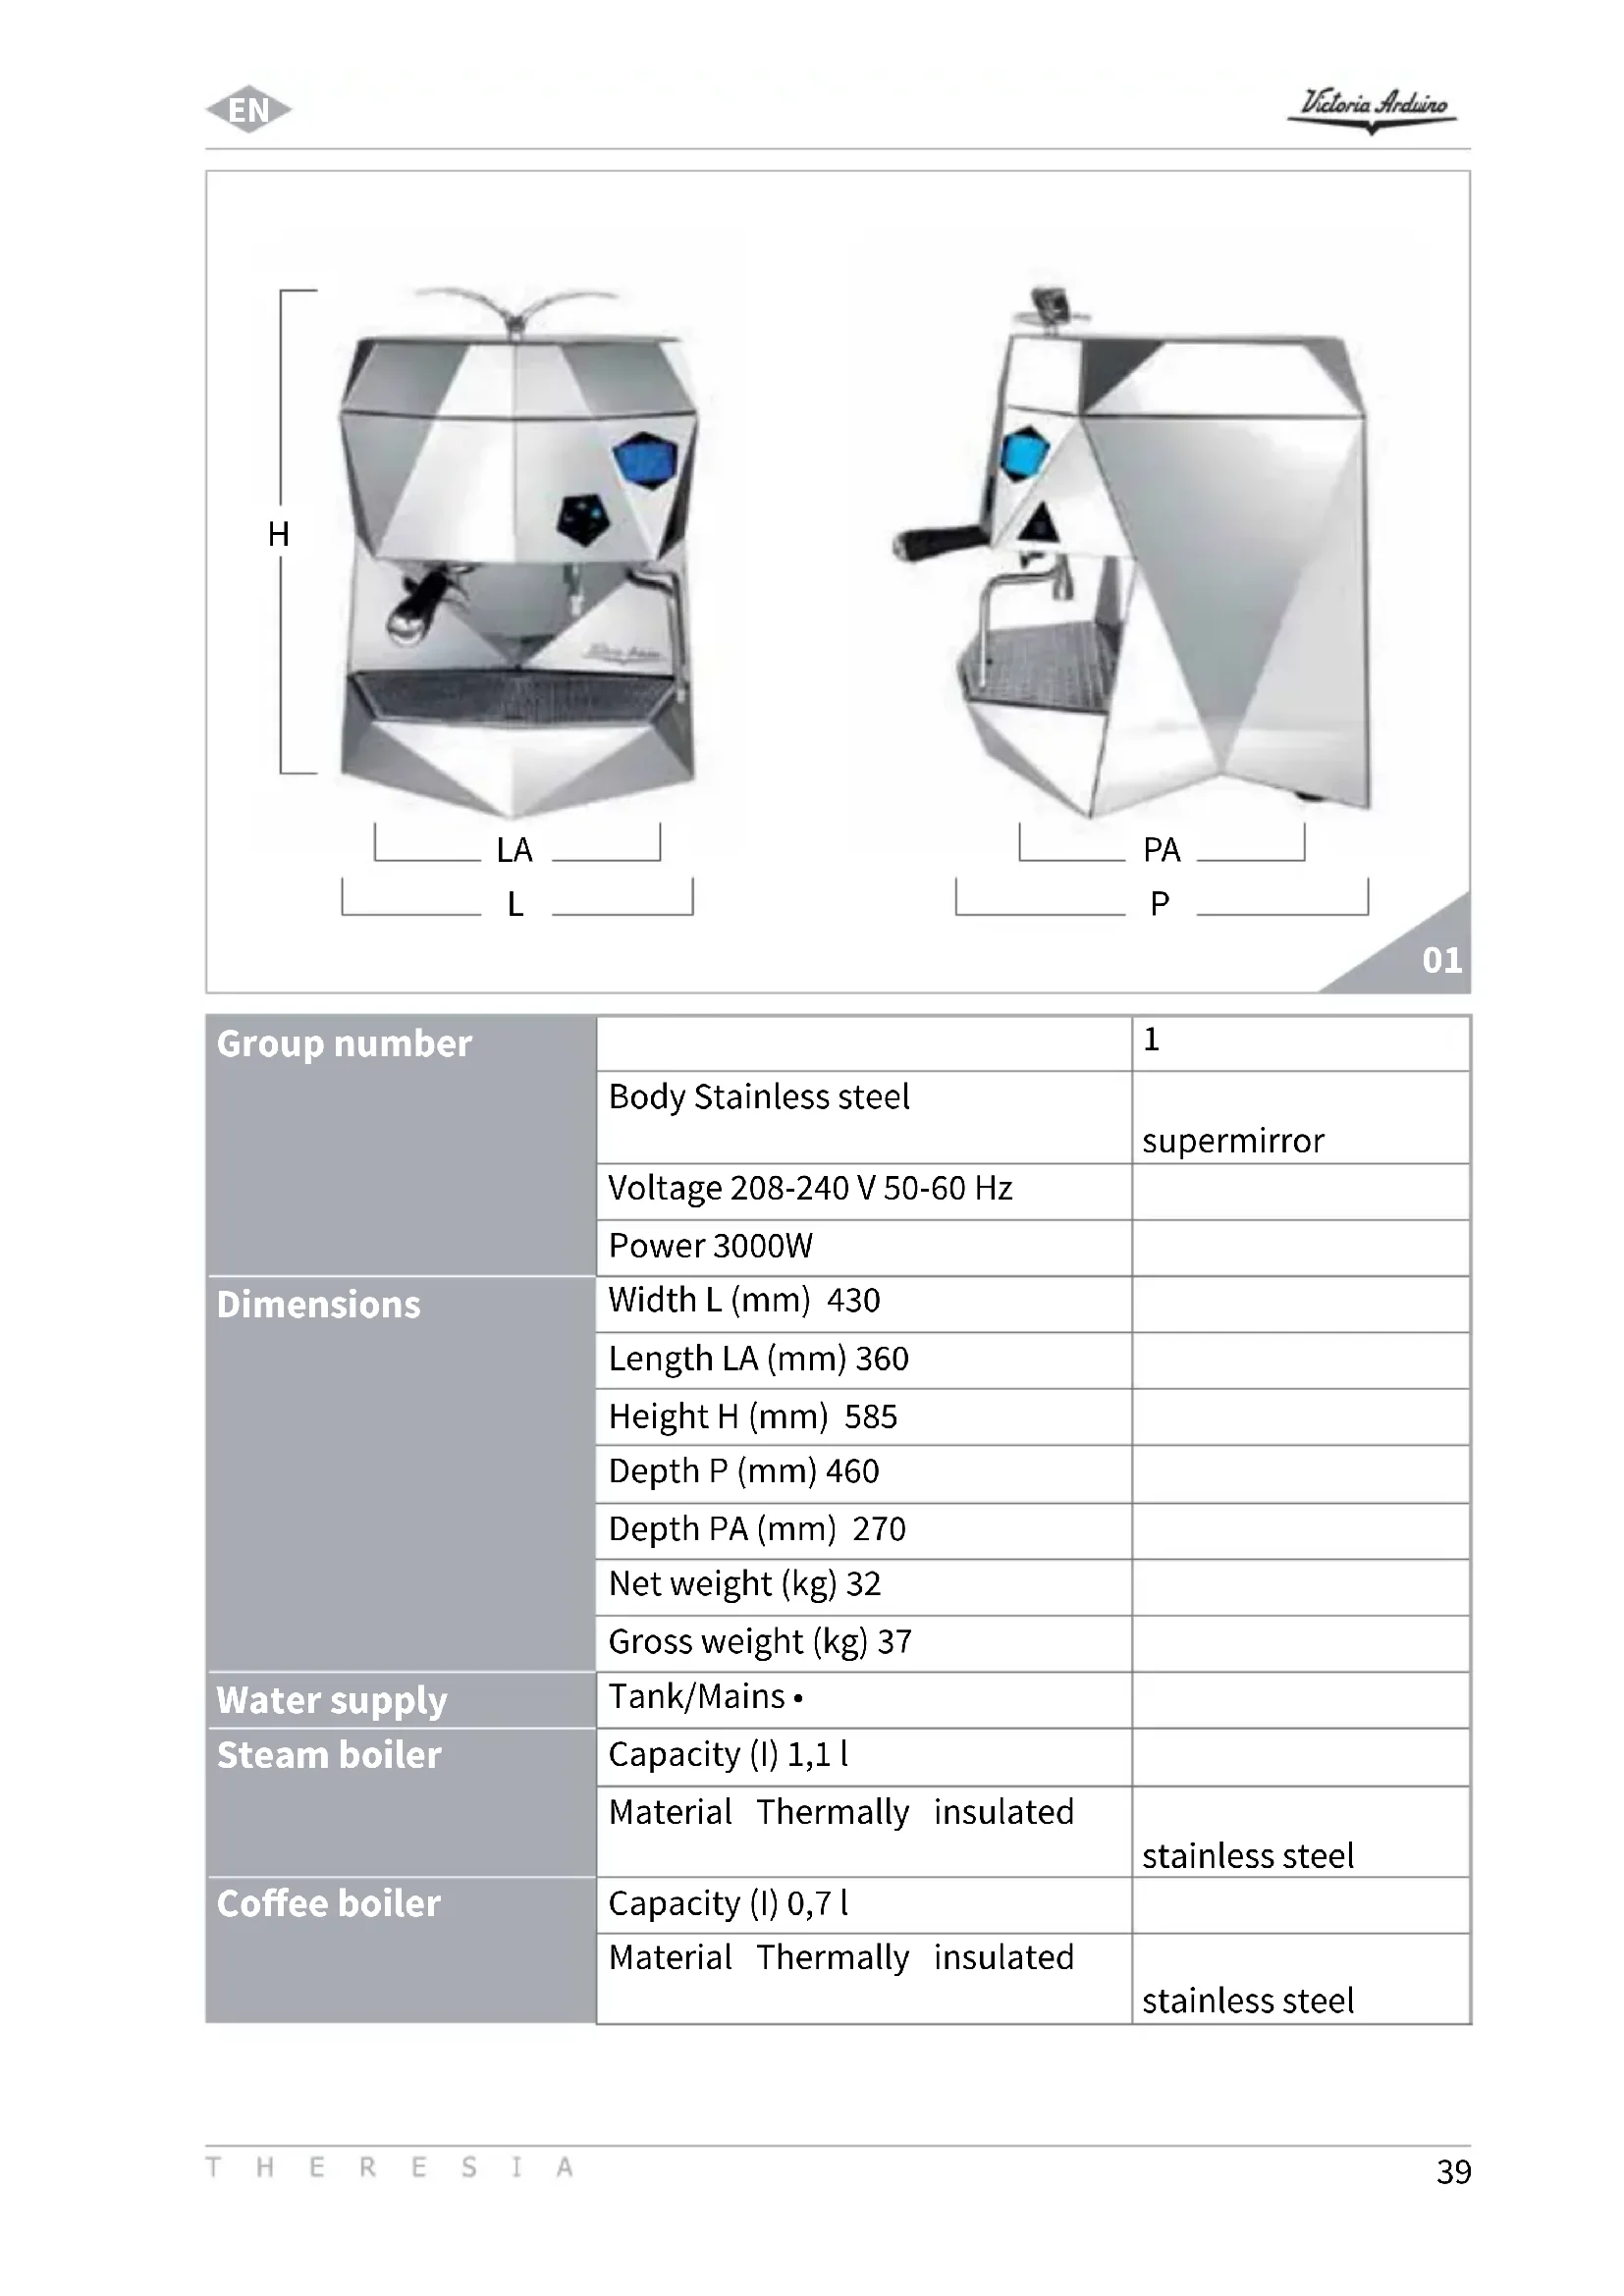
01
| Group number | 1 | |
| Body Stainless steel | supermirror | |
| Voltage 208-240 V 50-60 Hz | ||
| Power 3000W | ||
| Dimensions | Width L (mm) 430 | |
| Length LA (mm) 360 | ||
| Height H (mm) 585 | ||
| Depth P (mm) 460 | ||
| Depth PA (mm) 270 | ||
| Net weight (kg) 32 | ||
| Gross weight (kg) 37 | ||
| Water supply | Tank/Mains • | |
| Steam boiler | Capacity (l) 1,1 l | |
| Material Thermally insulated | stainless steel | |
| Coffee boiler | Capacity (l) 0,7 l | |
| Material Thermally insulated | stainless steel | |
| Hydraulics | Safety valve · | |
| Electronic water level · | ||
| Volumetric pump · | ||
| Pump pressure adjustment · | ||
| Volumetric dosage · | ||
| Group | Group temperature adjustment · | |
| High Efficiency Extraction System · | ||
| Filter-holder of leather + Teflon · | ||
| Easy clean spout · | ||
| Steam | Stainless steel steam wand · | |
| Cool touch wand · | ||
| Wand No. 1 | ||
| Hot Water | Hot Water economizer · | |
| Hot Water dosage · | ||
| Electronics | Graphic Display · | |
| On/Off · | ||
| Partial/total counter · | ||
| Automatic cleaning program · | ||
| Maintenance programming · | ||
| Pouring time · | ||
| Steam boiler temperature · | ||
| Coffee water temperature · | ||
| Group temperature · | ||
| Steam temperature programming | · | |
| Coffee water temperature programming | · | |
| Group temperature programming | · | |
| Water softener replacement programming | · |
1. GENERAL REMARKS ON THE CONSIGNMENT
1.1 SAFETY REGULATIONS
- The present manual is an integral and essential part of the product and will have to be handed over to the user. Read carefully the written warnings in the present manual as they give important suggestions concerning the safety of installation and setup, use and maintenance. Keep this manual in a safe place for further information.
- All illustrations contained in this manual are meant for information purposes only. Your appliance may differ in some parts compared to the one shown on the picture. Victoria Arduino reserves the right to make changes to production and to the manual without any obligation to update previous production and manuals accordingly.

POLLUTION DANGER
-
After removing the packaging, verify appliance integrity. If in doubt, do not use the machine and contact the professionally qualified personnel. The elements of the packaging must be kept out of children's reach as they can be potential sources of danger and they mustn't be disposed of in the environment.
-
Before connecting the machine make sure that the data of the plate correspond to those of the electrical distribution network. The installation has to be carried out in compliance with the regulations of the Country where the machine is set-up, according to the instructions by the manufacturer and qualified personnel. The manufacturer can't be considered responsible for possible
damage caused by failure in earthing the plant. For the electrical safety of this machine it is obligatory to arrange the earthing plant, contact an electrician with proper and certified technical suitability, to check the electrical capacity of the plant is adequate to the maximum power of the machine, stated on the plate. In particular the electrician will have to make sure that the section of the plants' cables is suitable to the power absorbed by the machine. Do not use adapters, multiple socket and extensions. If their use is necessary, it is compulsory to call a licensed electrician.
- For appliances at 220-230 V, the highest impedance from the power mains mustn't exceed 0,37 ohm.
- When installing the device, it is necessary to use the parts and materials supplied with the device itself. Should it be necessary to use other parts, the installation engineer needs to check their suitability for the use in contact with water for human consumption.
- This machine must be installed according to the applicable federal, state, and local standards (codes) in force with regard to plumbing systems. For this reason, the plumbing connections must be carried out by a qualified technician.
- The device is to be supplied with water suitable for human consumption and compliant with the regulations in force in the place of installation. The installation engineer requires the confirmation from the owner/ manager of the system that the water complies with the requirements and standards stated above.
- This machine will have to be used
only for the purpose described in this manual. The manufacturer can't be considered responsible for possible damage caused by improper, wrong, or unreasonable uses.

WARNING
-
Before using the machine read carefully the instruction manual or, at least, the safety and setting instructions.
-
This appliance is not suitable for use by children or persons with reduced physical, sensory or mental capabilities, or by persons with a lack of experience or knowledge, unless supervised or given instructions.
-
The maximum and minimum storage temperatures must fall within a range of [-5, +50]^ .
-
The operating temperature must be within the range of [+5, +35]^ .
-
At the end of installation, the device is switched on and taken to rated operating conditions, leaving it in a state in which it is "ready for operation".
The device is then switched off and the whole hydraulic circuit is bled of the first lot of water in order to remove any initial impurities.
The device is then refilled and taken to rated operating conditions.
After reaching the "ready for operation" condition, the following dispensing operations are carried out:
100% of the coffee circuit through the coffee dispenser (in case of several dispensers, this is divided equally);
100% of the hot water circuit through the water dispenser (in case of several dispensers, this is divided equally);
^ opening of each steam outlet for 1 minute.
-
At the end of installation, it is good practice to draw up a report of the operations.
-
The use of any electrical device must comply with fundamental regulations. In particular:
do not touch the machine with wet hands or feet;
do not use the machine barefoot;
do not use extensions in places used as bath or shower;
- do not pull the supply cable to disconnect the machine from the power mains;
do not leave the machine exposed to atmospheric agents (rain, sun, etc.);
do not allow the machine to be used by children or by non-authorised personnel that haven't read and understood this manual.
During installation, equip the power mains with a disconnector switch to cut off each phase.
-
Before carrying out any maintenance operation, the authorized technician has to unplug the socket after having switched off the machine.
-
For cleaning, bring the machine to state "O", that is to say "machine switched off and socket unplugged" and follow only instructions in the present manual.
-
In case of breakdown or wrong functioning of the machine, switch it off. Any intervention is strictly forbidden. Contact exclusively professionally authorized personnel. The possible repair of the products will have to be made by the manufacturer only or by an authorized service using exclusively original spare parts. Noncompliance with the above stated can compromise the safety of the machine.
-
When setting it up, the licensed electrician will have to check an omnipolar switch is provided by the actual safety regulations with opening distance from the contacts which is the same or higher than 3mm .
- To avoid dangerous overheating, do not uncoil the supply cable to its full length.
- Do not obstruct the ventilation and/or energy-dissipating grids, especially in the cup warmer.
- The power cable is not to be replaced by the user. In case of damage, switch the machine off and contact exclusively professionally qualified personnel for replacement.
- In the event this kind of machine is used no longer, it is recommended to make it inoperative by unplugging the socket, and then to cut the supply cable.

POLLUTION DANGER
- Do not dispose of the machine in the environment: for waste disposal, contact a specialized authorized center or contact the manufacturer that will give you information about this.
- To support the aeration of the machine, place it with a distance of 15 cm from the walls or from other machines.

BURN HAZARD
- Handle the vapor spear with care when using it, do not put hands under it and avoid to touch it immediately after use.
- Before carrying out any operation of installation, maintenance, download, or setting, the qualified operator must wear working gloves and safety shoes.
-
The maximum noise disturbance level is lower than 70db.
-
In case the hydraulic system pipe is replaced, never use it again.

WARNING
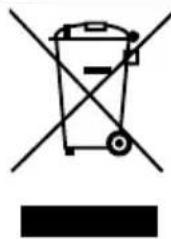
INFORMATION TO USERS
Pursuant to Art. 13 of the Legislative Decree dated 25th July 2005, No. 151 "Implementation of the 2002/95/EC, 2002/96/EC, and 2003/108/
EC on the restriction of the use of certain hazardous substances in Electrical and Electronic Equipment as well as on waste disposal".
The symbol of the crossed large rubbish container that is present on the machine points out that the product at the end of its life cycle must be collected separately from the other wastes. The user for this reason will have to give the equipment that got to its life cycle to the suitable separate waste collection centers of electronic and electrotechnical wastes, or to give it back to the seller or dealer when buying a new equipment of equivalent type, in terms of one to one. The suitable separate waste collection for the following sending of the disused equipment to
recycling, the dealing or handling and compatible environment disposal contributes to avoid possible negative effects on the environment and on the people's health and helps the recycling of the materials the machine is composed of. The user's illegal disposal of the product implies the application of administrative fines as stated in Law Decree n.22/1997" (article 50 and followings of the Law Decree n.22/1997).
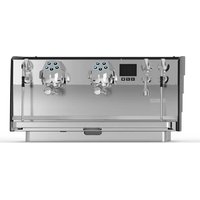
2. DESCRIPTIONTHERESIA
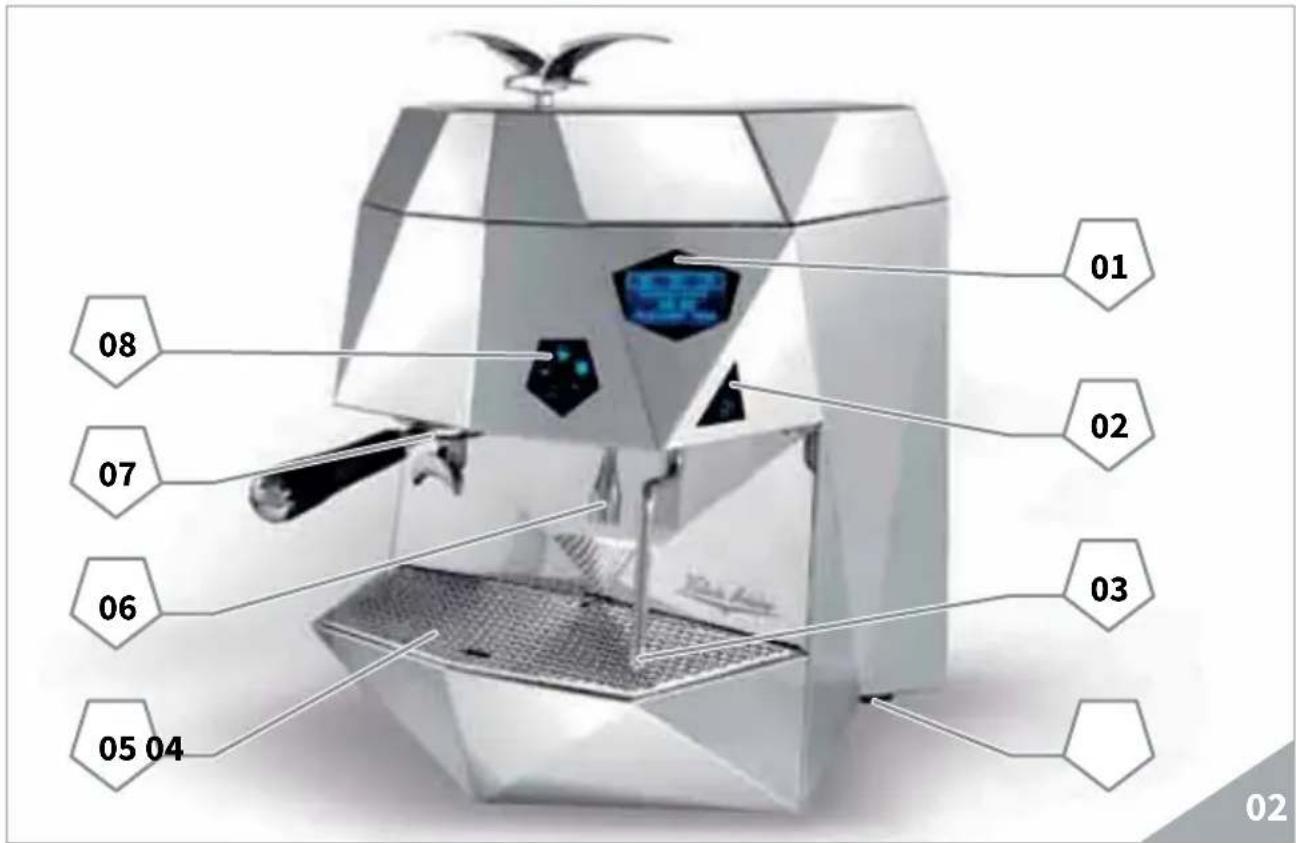
KEY
01 LCD Display
02 Steam control button
03 Manual Steam Nozzle
04 Main switch
05 Cup rack
06 Hot Water Nozzle
07 Filter-holder
08 Touch Screen control panel
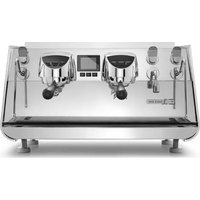
2.1 CONTROL PANEL DESCRIPTION
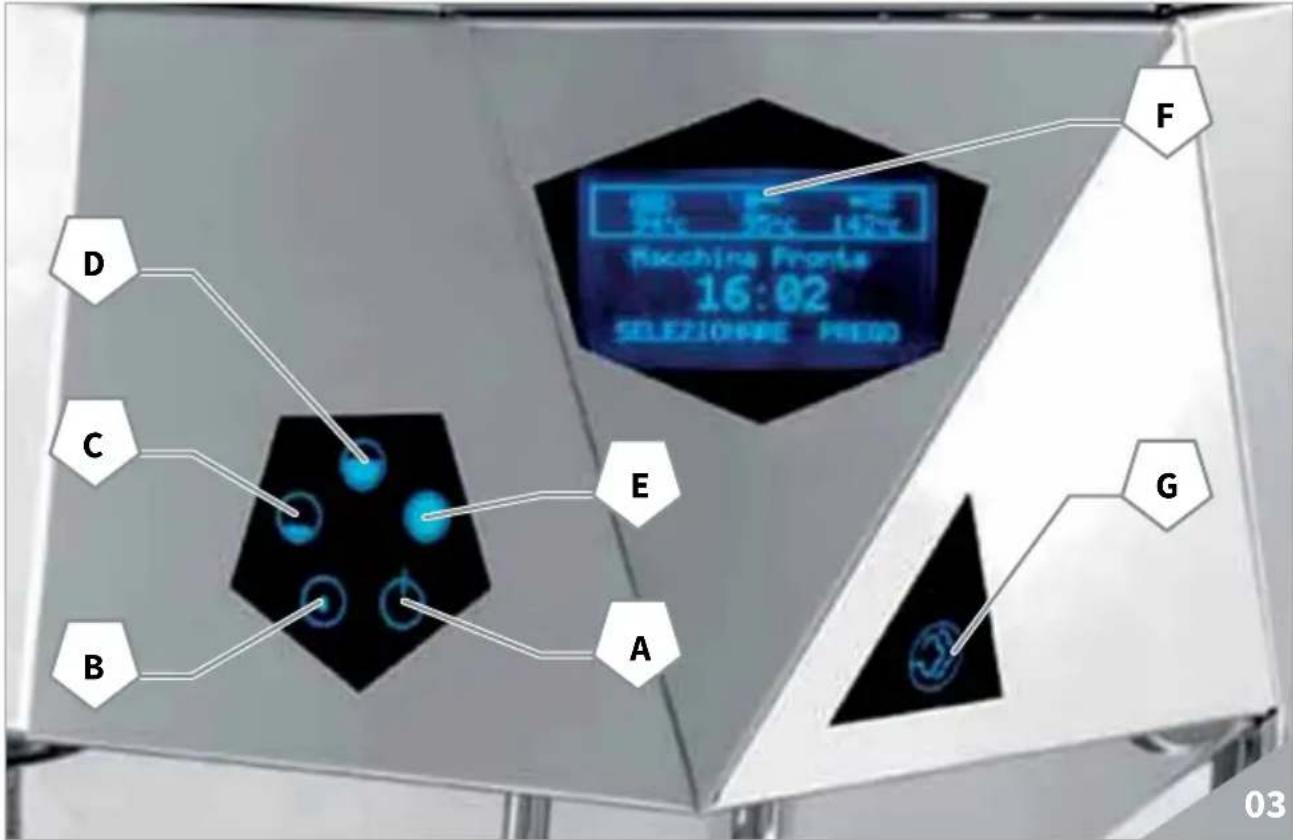
KEY
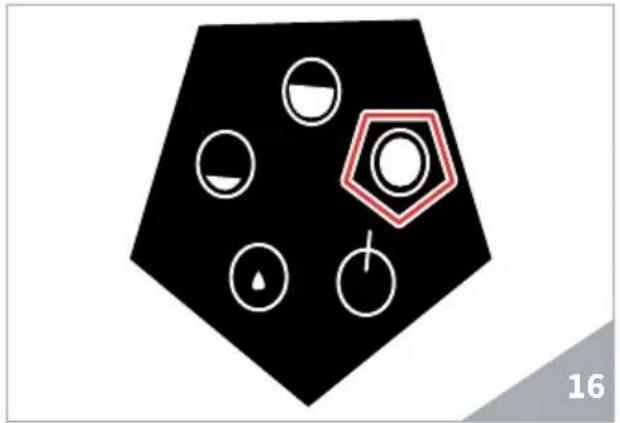
A ON/OFF button
B Hot Water button
C Single coffee delivery button
D Double coffee delivery button
E ENTER button
F LCD Display
G Steam button
2.2 ACCESSORIES LIST
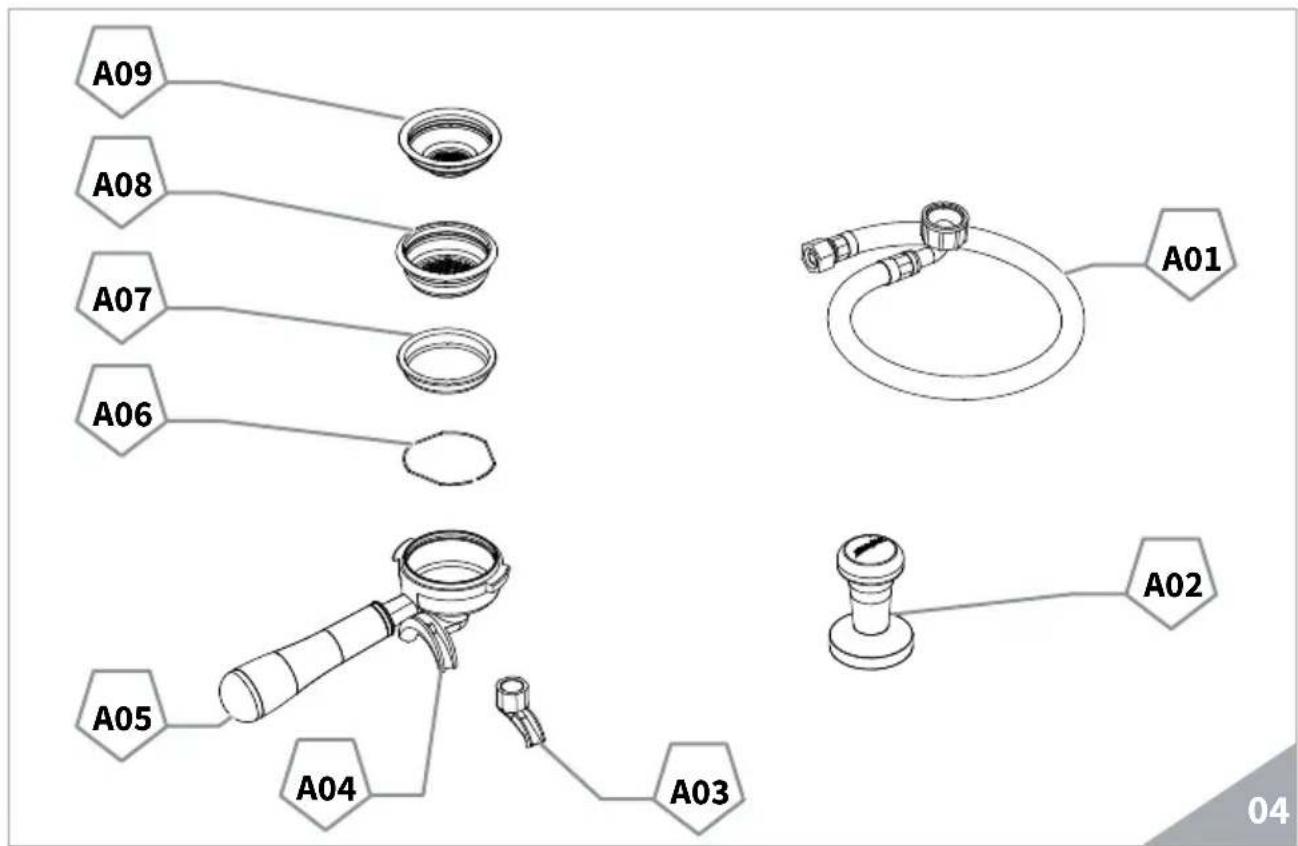
KEY
A01 Discharge pipe 3/8"
A02 Coffee presser
A03 Single delivery spout
A04 Double delivery spout
A05 Filter-holder
A06 Spring
A07 Blind filter
A08 Double filter
A09 Single filter
3. TRANSPORT AND HANDLING
3.1 APPLIANCE IDENTIFICATION
When contacting the manufacturer, Victoria Arduino for any reason, always quote the machine serial number. The machine is transported on pallets containing several machines inside boxes secured to the pallet by straps. Before performing any transport or handling operation, the operator must wear safety gloves and footwear, as well as overalls with plastics. Pallets must be transported using an adequate lifting mechanism (fork-lift truck type).

COLLISION OR CRUSHING HAZARD
During the entire handling operation, the operator must make sure no one or nothing is inside the operating area. Slowly lift the pallet to about 30~cm from the ground and move to the loading area. After making sure there are no obstacles, persons or things, proceed with loading. Once at destination, always using an adequate lifting mechanism (e.g. fork-lift), after making sure there is no one or nothing within the unloading area, lower the pallet to about 30~cm from the ground and transport it to the storage area.

COLLISION OR CRUSHING HAZARD
Before performing the following operation, make sure the load is in place and is not likely to fall when the straps are cut. The operator, wearing safety gloves and footwear, must now cut the straps and store the product. To perform this operation, check the technical characteristics of the product to determine the weight of the machine to be stored and take consequent precautions.

POLLUTION DANGER
Once the machine has been freed of the pallet or container, do not discard these in the environment - pollution hazard.
4. INSTALLATION AND PRELIMINARY OPERATIONS
After unpacking, assess that the machine and its accessories unit are complete, then proceed as follows:
- Place the machine on a flat surface;
- Level the machine through the adjustable feet;
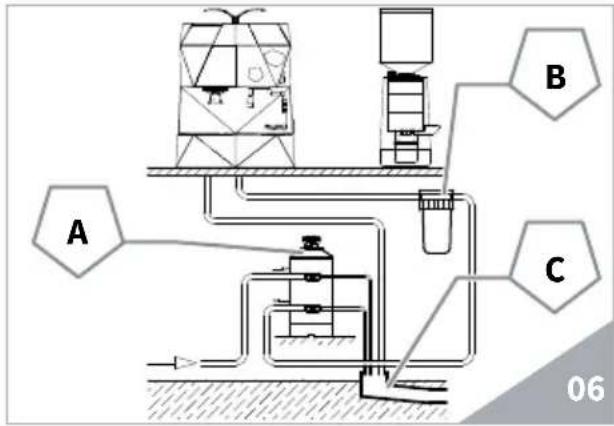
In the preliminary stage, it is advisable to install a softener (A) on the external part of the hydraulic system, and then a mesh filter (B).
In this way impurities like sand, particles of calcium, rust etc. will not damage the delicate graphite surfaces and durability will be guaranteed.
Following these operations, connect the hydraulic systems (see Fig. 06).

WARNING
Recommended water mains pressure is [2.3] bar.

WARNING
Avoid throttling in the connecting tubes. Check the drain pipe (3) eliminates waste.

NOTE
At the beginning of the daily activity and in case of breaks longer than 8 hours, it is necessary to change 100% of water in the circuits by means of the proper dispensers.

NOTE
In case of continuous services, carry out the above changes on a weekly basis.
KEY
A. Water softener
B. Mesh filter
C. Drainage system 050mm

NOTE
For a correct functioning of the machine the water works pressure must not exceed 4 bars. Otherwise install a pressure reducer upstream of the softener; the internal diameter of water entrance tube must not be less than 6mm (3/8) .

SHORT CIRCUIT HAZARD
The machine must always be protected by an automatic unipolar switch of suitable power with contact openings of equal distance or more than 3mm . Victoria Arduino cannot be held liable for any damage to people or things due to non observance of the safety prescriptions. Prior to connecting the machine to the electrical mains, assess that the voltage shown on the machine's data plate corresponds with that of the mains.
5. SETTING OF THE SKILLED TECHNICIAN
5.1 FIRST START UP PROCEDURE
All models
equipped with a level gauge to keep the water level inside the boiler constant.
When using the machine for the first time or by emptying the boiler for maintenance, make sure there is water in the circuit to prevent the electrical resistor from damaging and activating the electronic protection.
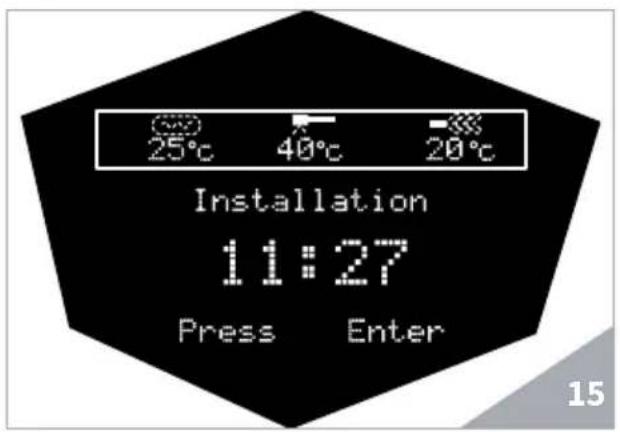
When starting the machine for the first time, it shows "installation, press enter".
- By pressing ENTER, the pump starts automatic filling of boilers.
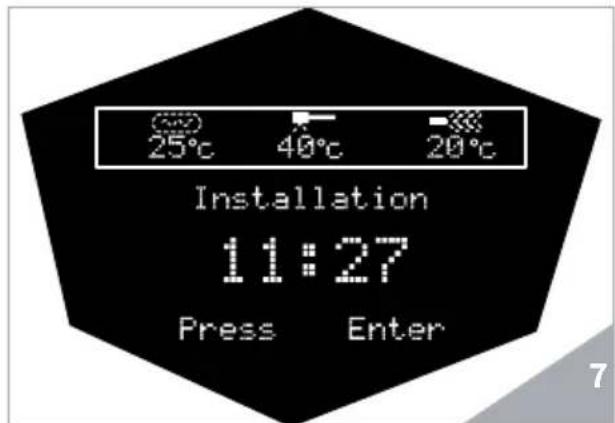
- When water comes out from dispensing group, press ENTER again to stop the filling phase of the hydraulic system;
WARNING
Do not switch the machine off during the above procedure to avoid stopping it. In case of accidental power cut, it is enough to switch the machine off, and back on again to restart the installation procedure and properly complete the filling.
5.2 PUMP ADJUSTMENT NOTE
This operation can be carried out while the machine is turned on.
To adjust the service pressure of the boiler, proceed as follows:
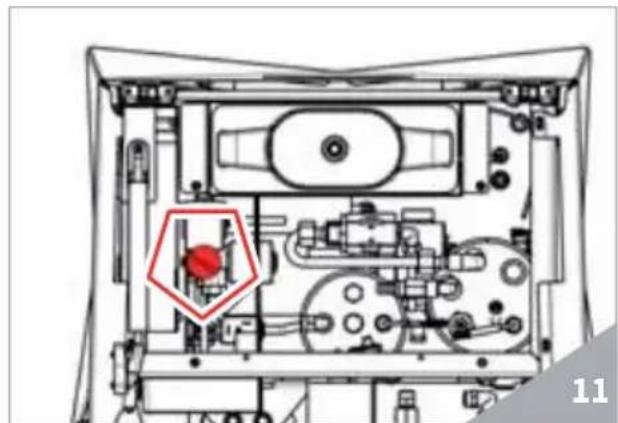
- Remove the grid and the drip tray;
- Turn the pump adjusting screw A clockwise to INCREASE and counter clock wise to DECREASE the pressure (recommended value 9 bar).
The default pressure set by Victoria Arduino is 9 bar. For any modification, contact a technician. - At the end of adjustments, position the sheet metal protection in the corresponding housing and fix it with the two side screws; place the drip tray and the operating table grid in place.
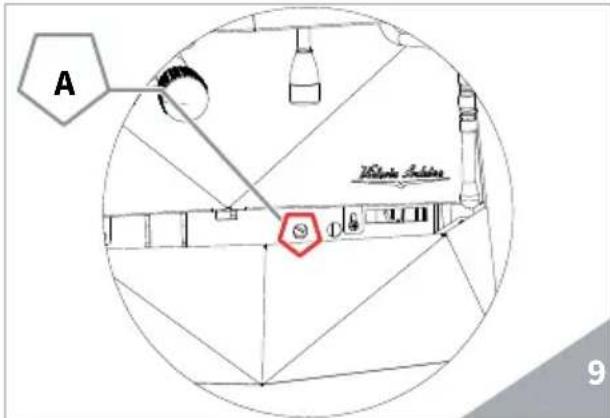
5.3 HOT WATER ECONOMISER ADJUSTMENT

NOTE
This operation can be carried out while the machine is turned on, too.
All models THERESIA are equipped with a hot water mixer tap which adjusts the water temperature and optimises the system's performance.
To adjust the hot water economizer, turn the registration knob.
The hot water economizer is situated inside the machine.
To access the economizer, proceed as follows:
Disassemble the cup warmer plate by unscrewing the two screws as shown in the following illustration.
- Turn the adjustment knob ANTI-CLOCKWISE / CLOCKWISE to INCREASE / REDUCE the hot water temperature;
At the end of the procedure, screw the protective panel back on.
6. USE
Before starting any operation, the operator must be sure to have read and understood the safety prescriptions contained in this booklet.
The model THERESIA is equipped with an User's visualization key and a Technician key. The User's visualization key allows to access the normal operating functions and to visualize the programming menus (Chapter 7).
The Technician's key allows to access all particular functions and to modify the parameters.
6.1 TURNING THE MACHINE ON
- Switch off the disconnector and set the main switch A to I.
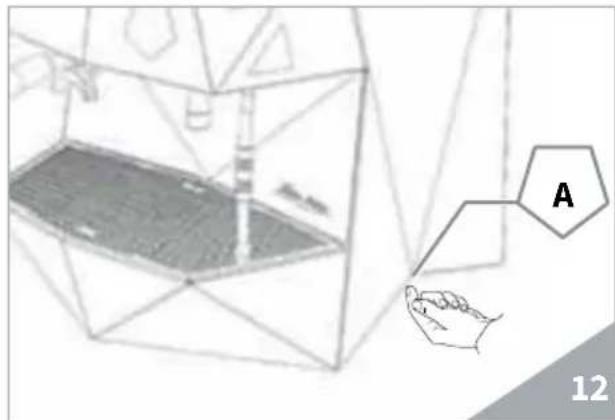
The information about the software and the machine status are shown on the display.
NOTE
The machine is not operative as the main switch only supplies the electronic card.
WARNING
In case of electronic card maintenance, turn the machine off by means of the external main switch or unplug it.
6.2 FIRST INSTALLATION PROCEDURE AND MANUAL WATER FILLING IN THE TANK
When commissioning the machine for the first time or after carrying maintenance switch ON the machine using the main switch positioned lower down and on the right and proceed as follows:
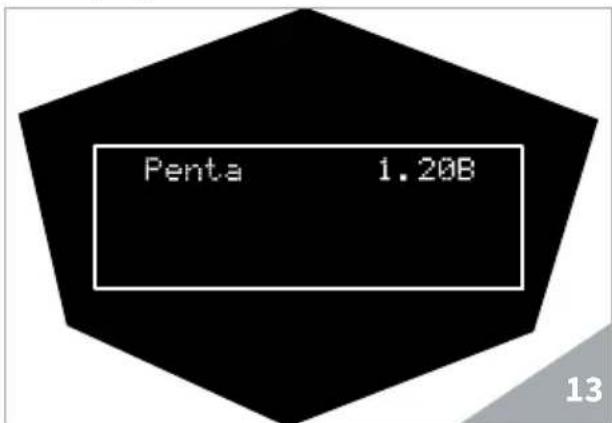
- When starting the machine, the display shows the software release:
- When starting the machine for the first time, the display shows as follows:
- Press the ON/OFF button to start the machines. The display shows as follows:
- Press the ENTER key to start the water filling cycle in the boiler:
The display shows as follows:
-
Press the ENTER key again to stop the first-filling procedure when water comes out from the dispensing unit. When water comes out from the unit, it means that the boiler was properly filled.
-
Wait until boiler filling with water is complete; the display shows as follows:
WARNING
This cycle cannot and must not be interrupted.
If this cycle is interrupted due to an electricity failure or accidental switching off of the machine using the main switch, when the machine is restarted, the installation cycle continues.
In case it is necessary to fill the boiler manually after extraordinary maintenance or other reasons, the installation procedure can be restarted:
-
Turn the machine off by means of the main switch.
-
Switch the machine on and, when it is on, keep the Steam key pressed for at least 5 seconds; the installation message is then shown.
-
Press ENTER to confirm and press again when water starts coming out from the dispensing unit.
MANUAL SWITCHING ON/OFF
Automatic On / Off (NOT PROGRAMMED)
SWITCHING ON
Press the ON/OFF key for some seconds, the display goes on indicating the EPROM release for about 1 second.
The control unit will perform an autodiagnostic of all functions and any selection key goes on.
Once the diagnosis is complete, the display will read as follows:
Once having reached the temperature, the display shows as follows:

NOTE
At the end of the diagnostic, all selection keys are activated.
WARNING
In case the auto diagnosis indicates error or malfunction, call an assistance centre; the operator MUST NOT intervene.
NOTE
The machine is equipped with a sequential heating system to limit the absorbed electronic power. The steam boiler heating depends on the coffee boiler heating.
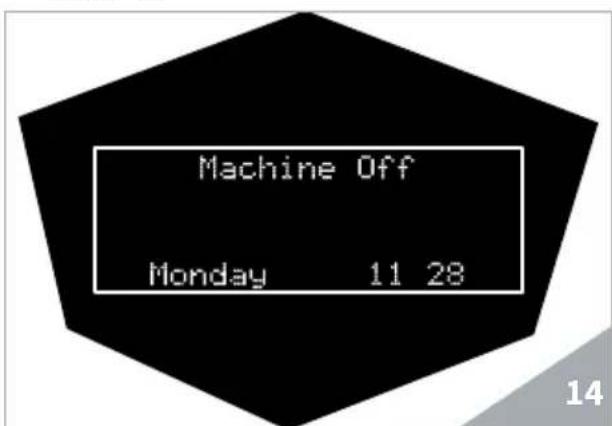
SWITCHING OFF
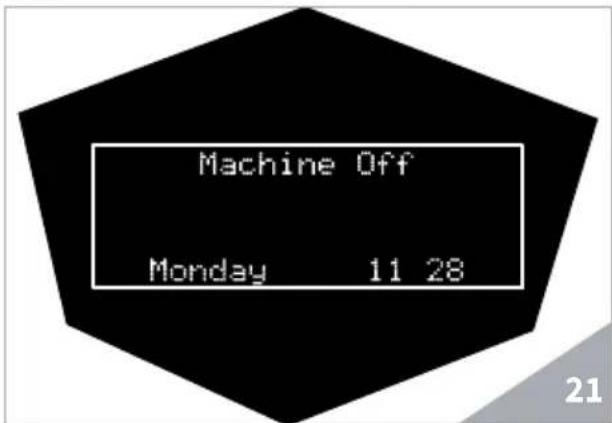
Press the ON/OFF key for some seconds; the machine turns off and the display shows:
Automatic On/Off(PROGRAMMED)
The machine SWITCHES ON at the first programmed switch-on time (see chapter "PROGRAMMING" at the paragraph "PROGRAMMING ON-OFF").
The control unit performs an auto-diagnostic of all functions and any selection key goes on.
At the end of the diagnostic, the display shows as follows:
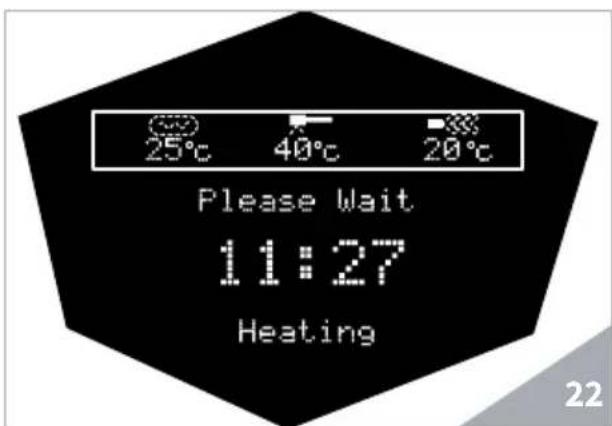
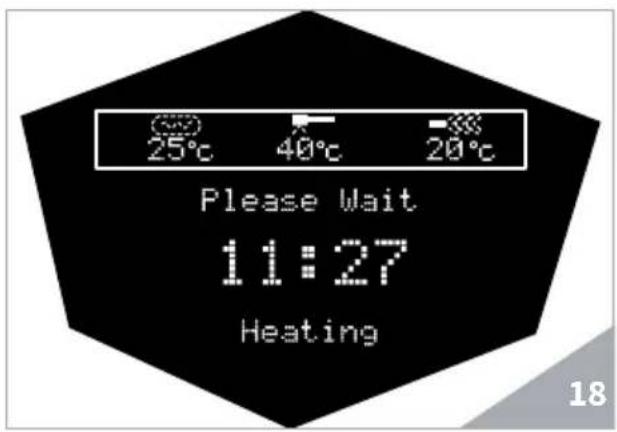
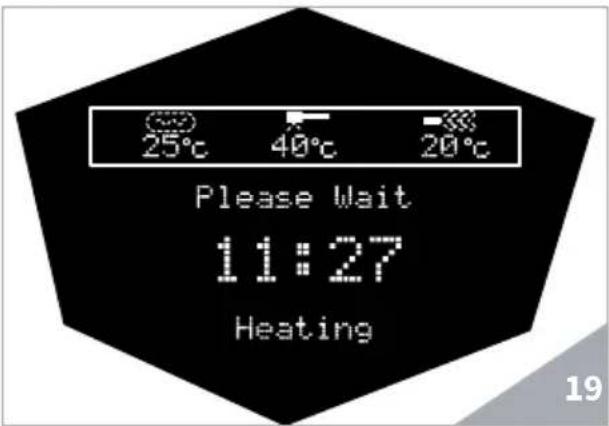
Once the temperature set is reached, the writing "Heating" disappears and is replaced by:
The machine SWITCHES OFF at the first stopping time set (see chapter on "PROGRAMMING" and paragraph on "PROGRAMMING ON-OFF").

NOTE
The machine can be switched on or off manually as indicated in the previous paragraph.
7. PROGRAMMING
7.1 KEY
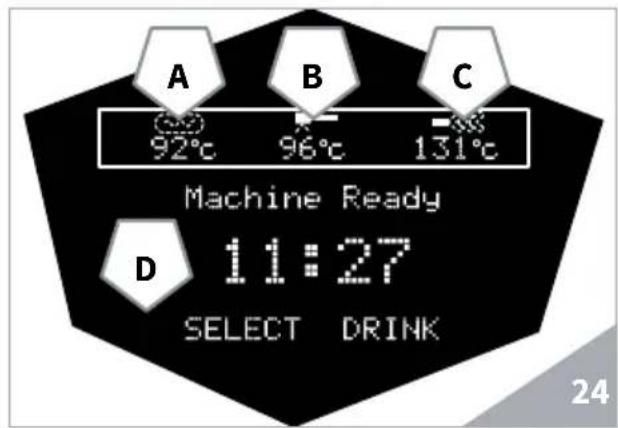
No. Description
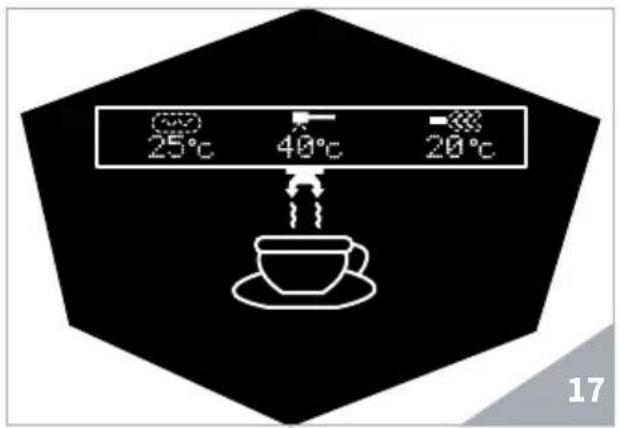
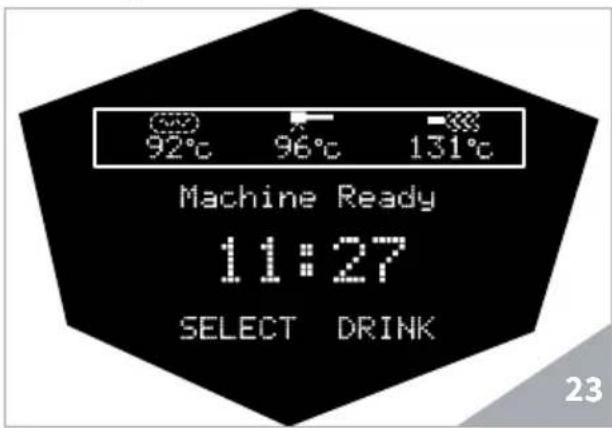
| A | 92°C | Boiler temperature indicator |
| B | 96°C | Group temperature indicator |
| C | 131°C | Steam boiler temperature indicator |
| D | Machine Ready 11:27 SELECT DRINK | Hour indicator area and machine messages |
7.2.PROGRAMMING
Switch the machine on as described in the chapter "Use"-paragraph "Switching on/off of the machine".
The display shows the "Home Page".
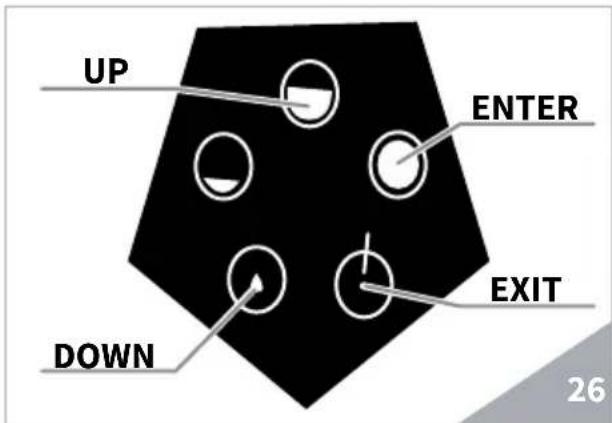
The selection and the scrolling down inside the menu pages is carried out with the following buttons:
ENTER

Press to access the sub-menus and to confirm the values set.
UP/DOWN CURSOR


Press to scroll up or down the menu and to increase or reduce the values.
EXIT

Press to exit from sub-menus.
SETTABLE MACHINE FUNCTIONS
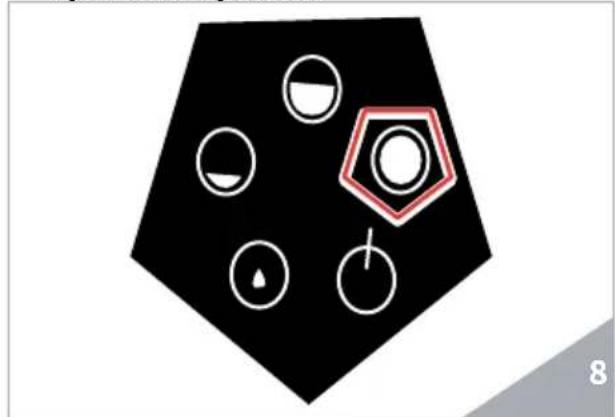
The machine is equipped with a menu accessible for the user and a menu with access reserved to the technician/installer. The available functions for the user menu are as follows:
LANGUAGE
- CLEANING CYCLE
DOSES
COUNTERS
- SETTINGS
- EXIT
To enter the menu, press the CURSOR DOWN for 5 seconds until the first available programming function appears.
7.2.1 LANGUAGE
It is the first voice of the programming menu; press ENTER to access.
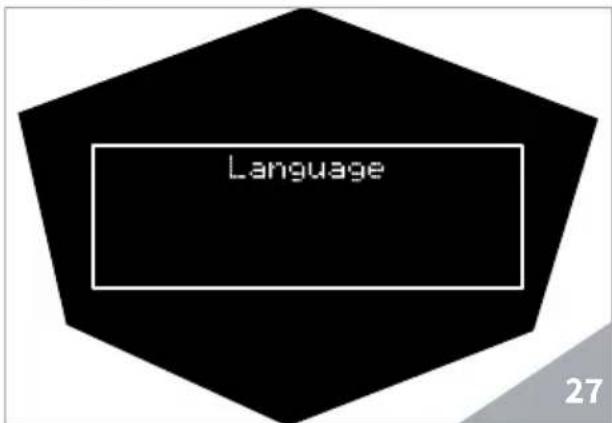
The submenu for language selection of the whole interface is shown.

Move with the CURSOR within in the screen and press the ENTER key to confirm the language selection.
7.2.2 CLEANING CYCLE
Using the CURSOR keys, select "CLEANING CYCLE" and press ENTER to restart the cleaning cycle of the group after having inserted the blind filter.
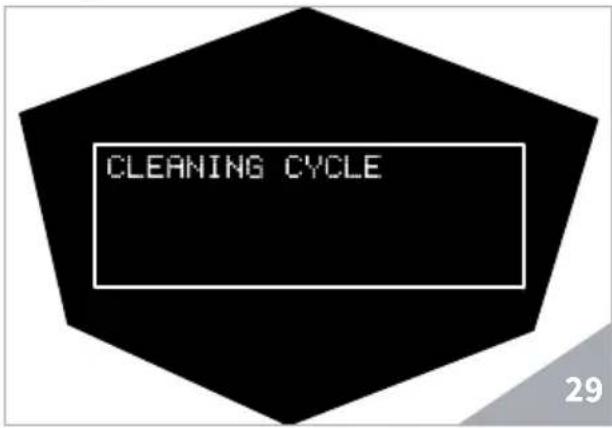

NOTE
For further information, refer to the related chapter "CLEANING AND MAINTENANCE".
7.2.3 DOSES
Using the CURSOR, select "DOSES" and press ENTER to access.

Using the CURSOR keys, select the required options (the relevant key is highlighted in purple on the control panel).
Hereunder the correspondence between the buttons and the display.
| Display Button | ||
| KEY PROGR:01 | ▲ | Single coffee |
| KEY PROGR.:02 | ▲ | Double coffee |
| KEY PROGR:03 | ▲ | Continuous |
| Tea | ▲ | Hot Water |
| Steam | ▲ | Steam |
Select the key to be set using the ENTER key.
The available functions to be assigned to keys 01, 02 and 03 are as follows:
- Single coffee
Double coffee
Continuous
Using the CURSOR o sys, select the function to be assigned and confirm by means of the ENTER key.
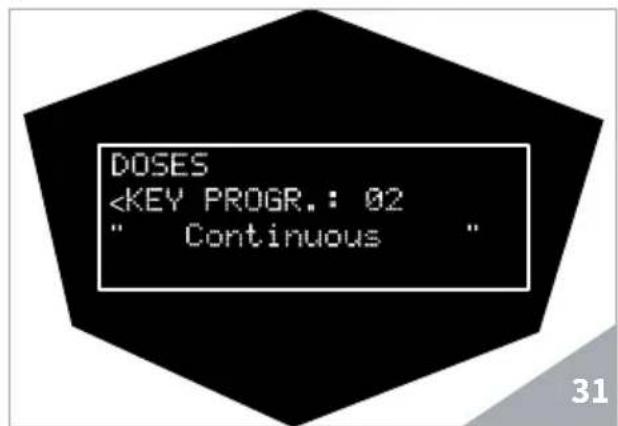
Once having selected the function of a key, it is possible to set the beverage amount and the pre-brewing time by pressing the ENTER key again.
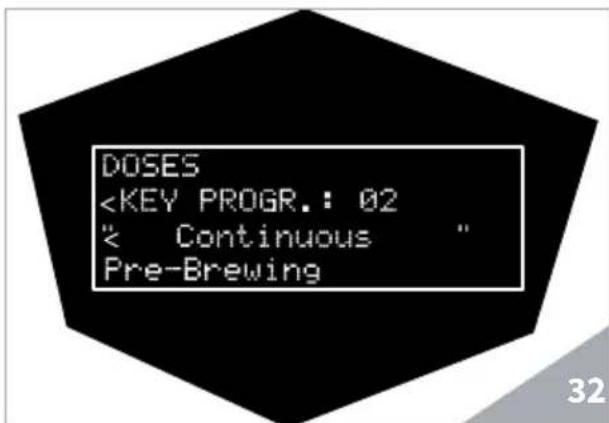
As regards to "Single coffee", "Double coffee" and "Continuous", the variables that can be set are:
- CAPACITY ml: it sets the water amount to be dispensed in ml;
PRE-BREWING: it sets the pre-brewing time in seconds. When 0 is set, the function is disabled.
By means of the CURSOR keys, it is possible to set the required values.
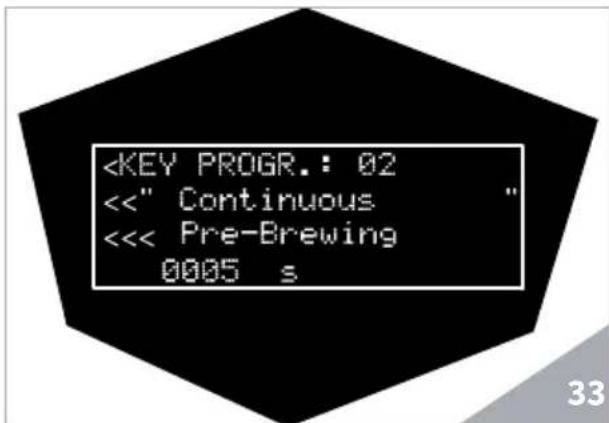
Press the ENTER key to confirm.

NOTE
The amount set in ml is indicative of water inserted in the machine hydraulic circuit and it doesn't refer to product quantity in the cup, which is a variable depending on the kind of coffee and grinding.
HOT WATER
Through the Hot water key, it is possible to set the dispensing duration expressed in seconds.
Increase or reduce the time through the CURSOR keys.
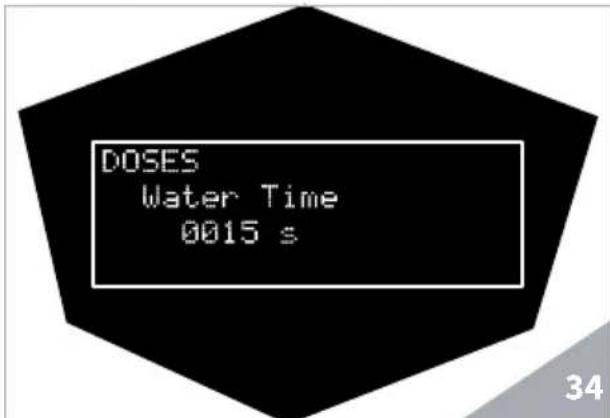
Press the ENTER key to confirm.
STEAM
Through the Steam key, it is possible to set the dispensing duration expressed in seconds.
Increase or reduce the time through the CURSOR keys.
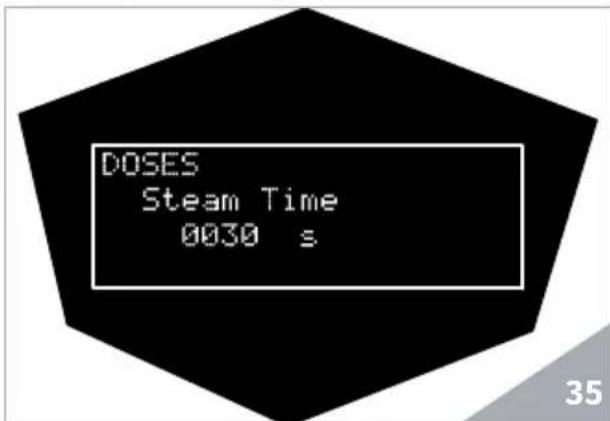
Press the ENTER key to confirm.
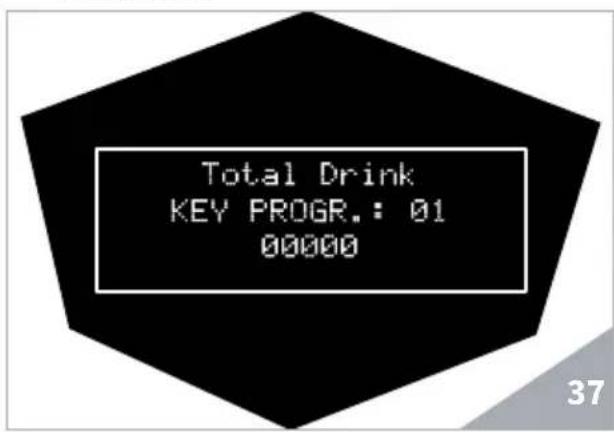
7.2.4 COUNTERS
Using the CURSOR, select "COUNTERS" and press ENTER to access.
The display shows the machine counts.
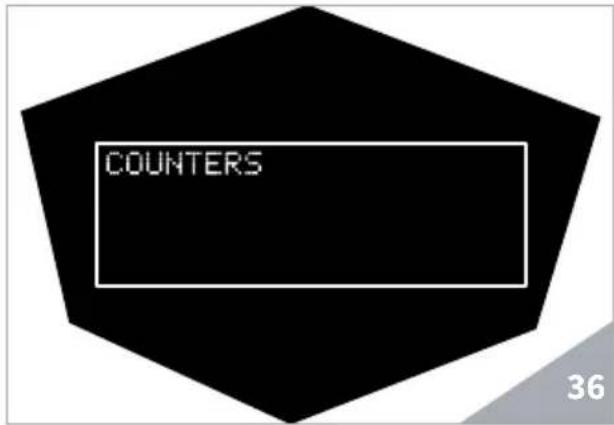
Through the CURSOR keys, select the required value among the following ones:
- KEY PROGR.:01
KEYPROGR:02 - KEY PROGR:03
Tea
Steam - Cleaning
Total litres
7.2.5 SETTINGS
Using the CURSOR, select " SETTINGS" and press ENTER to access.
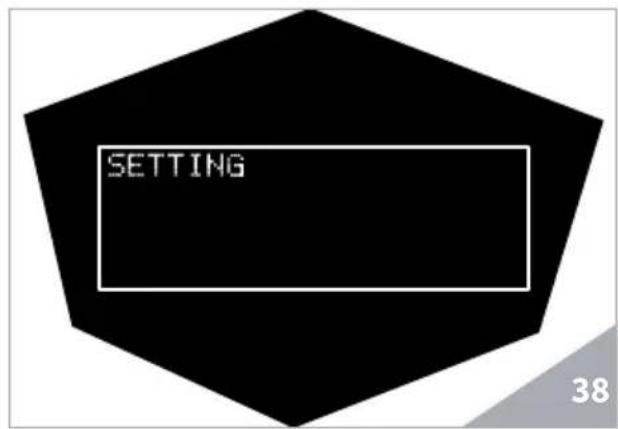
Using the CURSOR keys, select the various settings and press ENTER to access the sub-menus:
- Coffee temperature
- Steam temperature
Group temperature
Clean warning - On/Off programming
Energy saving
Day/Hour
Water filter - Temperature measurement unit
Chrono
Display contrast
Standard settings
COFFEE TEMPERATURE
Through the CURSOR keys, select the "Coffee temperature" submenu.

Press the ENTER key to access coffee temperature setting. Increase or reduce the value through the CURSOR keys.
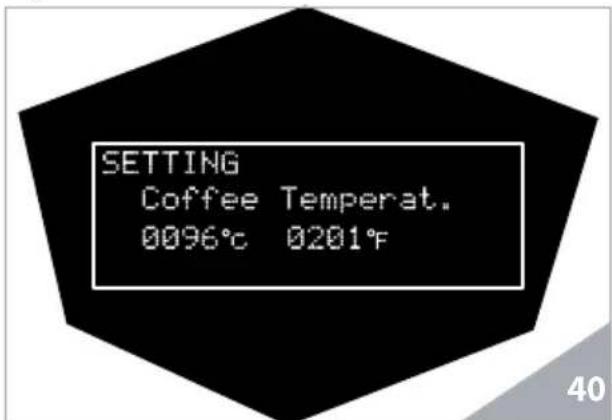
Press the ENTER key to confirm.
STEAM TEMPERATURE
Through the CURSOR keys, select the "Steam temperature" submenu.

Press the ENTER key to access steam temperature setting. Increase or reduce the value through the CURSOR keys.
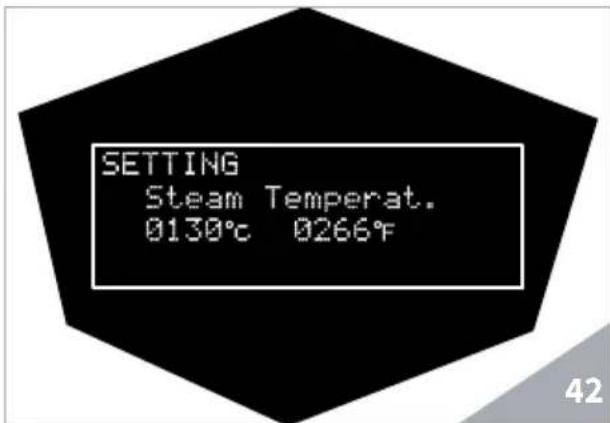
Press the ENTER key to confirm.
GROUP TEMPERATURE
Through the CURSOR keys, select the "Group temperature" submenu.

Press the ENTER key to access dispensing group temperature setting. Increase or reduce the value through the CURSOR keys.
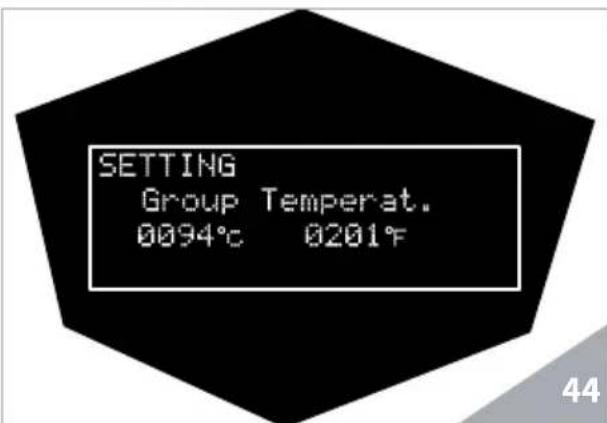
Press the ENTER key to confirm.
CLEAN WARNING
Through the CURSOR keys, select the "Clean warning" submenu.

Press the ENTER key to access group clean warning parameter setting. Increase or reduce the value through the CURSOR keys.
By setting these values, the machine signals when reaching the cycle set number or the operating hours, in order to carry out cleaning when set.
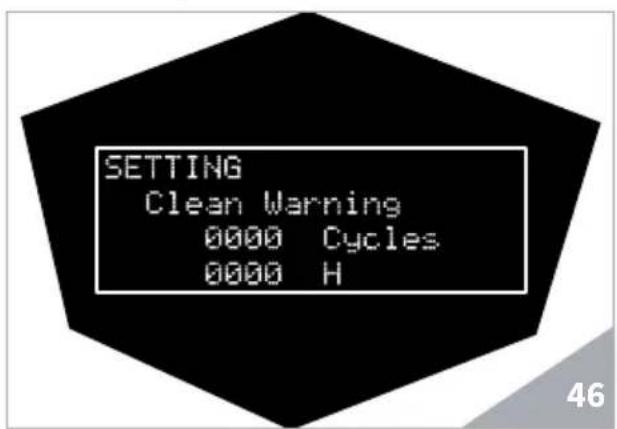
Press the ENTER key to confirm.
WARNING
By setting to 0 the "Cycle number" and "Operating hours", THE ALARM IS NOT SHOWN.
Press the EXIT key to exit the menu.
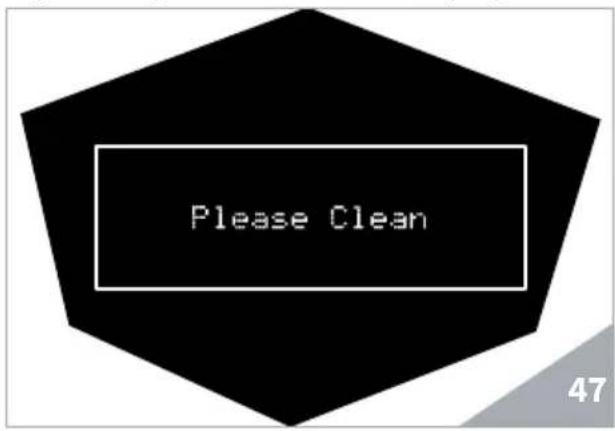
When reaching the "Cycle number" or
"Operating hours" set, the display shows:
ON/OFF PROGRAMMING
It is possible to set the machine switching on/off hour for every day of the week. Through the CURSOR keys, select the "Program. ON-OFF" submenu.
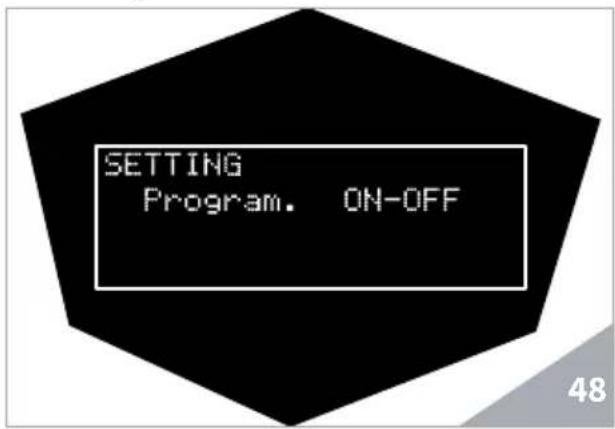
Press the ENTER key to access the machine automatic switching on/off settings. Set day, hour and/or weekly rest day through the CURSOR keys and press the ENTER key to confirm.
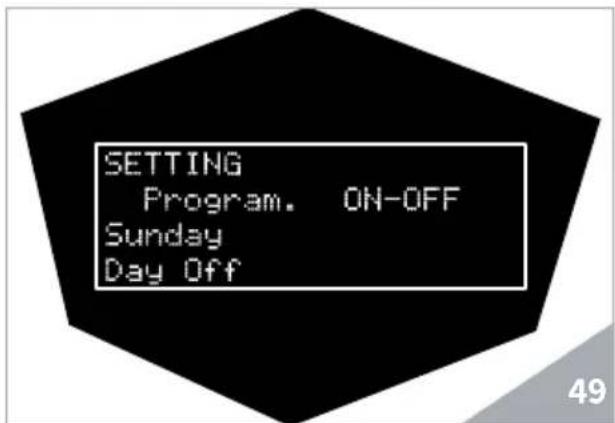
The default setting is OFF (switching on and off are manual).
ENERGY SAVING
Through the CURSOR keys, select the "Energy saving" submenu.

Press the ENTER key to access the interval time settings, after which the machine automatically activates the energy saving, by reducing the heating temperature. Set the values by means of the CURSOR keys.
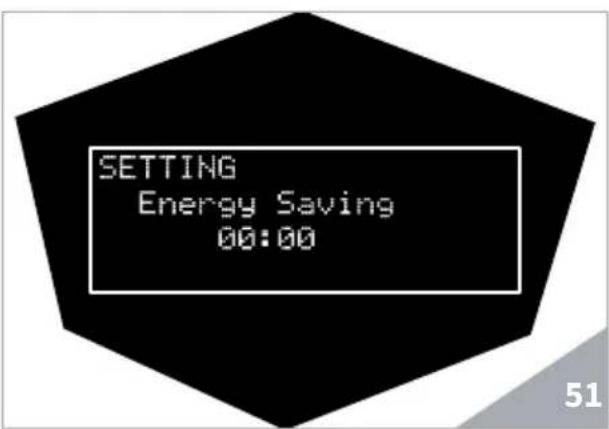
Press the ENTER key to confirm.
DAY/HOUR
Through the CURSOR keys, select the "Day/Hour" submenu.

Press the ENTER key to access the machine settings of the day of the week and the time. Adjust minutes, hours and day through the CURSOR keys.
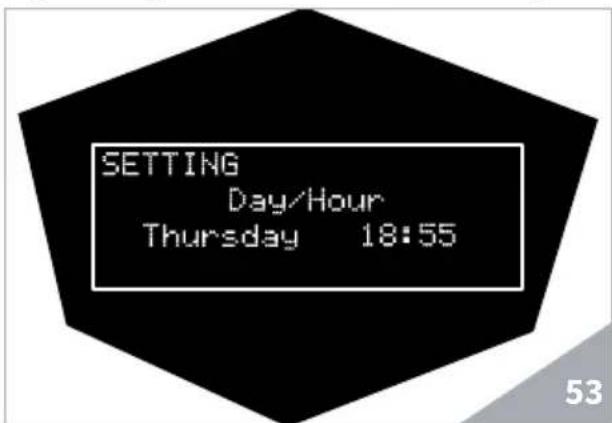
Press the ENTER key to confirm.
WATER FILTER
Through the CURSOR keys, select the "Water filter" submenu.
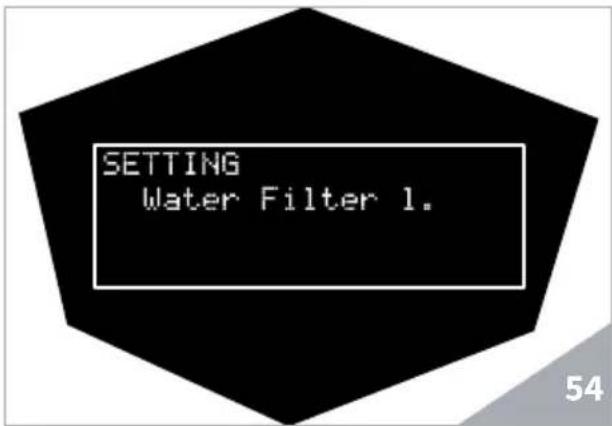
Press the ENTER key to access to dispensed water liters before the water filter replacement alarm activates.
Increase or reduce the value through the CURSOR keys.

Press the ENTER key to confirm.

WARNING
The water filter is NOT included in the accessories supplied by Victoria Arduino.
The technician will be in the position to suggest you the filter which meets your requirements.
MEASUREMENT UNIT
Through the CURSOR keys, select the "T. measurement unit" submenu.

Press the ENTER key to access the temperature measurement unit settings (Celsius degrees or Fahrenheit degrees). Set the degree scale using the CURSOR keys.
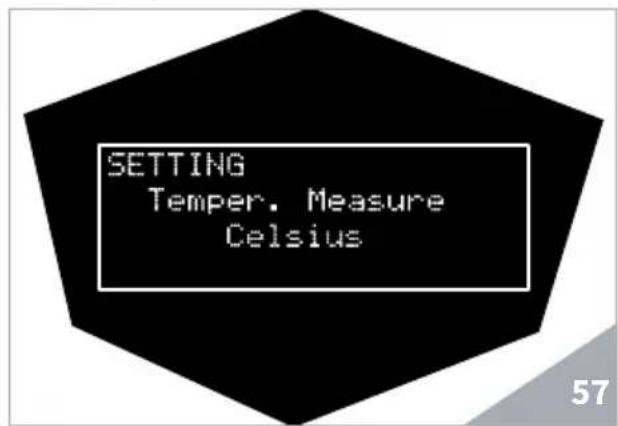
Press the ENTER key to confirm.
CHRONO
Through the CURSOR keys, select the "Chrono" submenu.

Press the ENTER key to access the dispensing time visualization in seconds, during the normal operating cycle. Enable or disable this setting through the CURSOR keys.

Press the ENTER key to confirm. NOTE
The default value for this setting is NO (OFF).
DISPLAY CONTRAST
Through the CURSOR keys, select the "Display contrast" submenu.
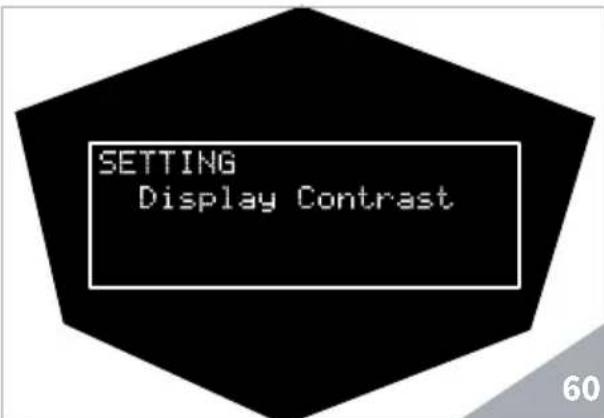
Press the ENTER key to access display contrast setting. The value, which may vary from 10 to 54, has a default setting of 40.
Adjust the display contrast through the CURSOR keys.
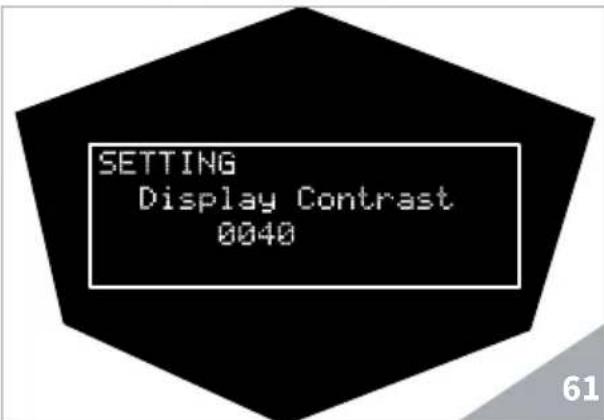
Press the ENTER key to confirm.
STANDARD SETTINGS
Through the CURSOR keys, select the "STANDARD" submenu.
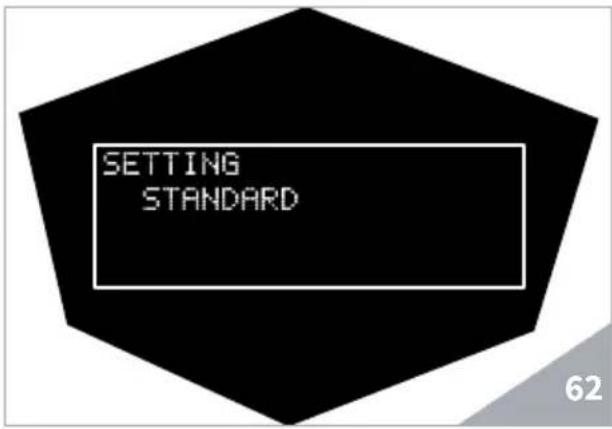
Press the ENTER key to reset the settings from the factory concerning doses, boiler temperature and group temperature.
The setting reset is confirmed through a message of correct application of the control.
EXIT
Through the CURSOR keys, select the "EXIT" submenu.

Press the EXIT key to exit the "SET-TING" menu.
8. MACHINE FUNCTION MESSAGES THERESIA
| DISPLAY AND KEY INDICATIONS | CAUSE EFFECT SOLUTION REMARKS | |||
| ERROR DIAGNOSIS | At the time of the diagnosis, the system presents faults within the control unit EPROM. | The heating element and all other functions are blocked. | ||
| DELIVERY ERROR | On reaching delivery time limit (120 seconds) the doser doesn't send out its set commands. | The display indicator and the 'continuous' key belonging to the relative unit blink. | Press the ON/OFF key or one of the CURSOR key | |
| DOSER ERROR | If the doser doesn't send out its set commands within the first three seconds from delivery. | If the delivery isn't manually stopped, the maximum time limit (120 sec) is blocked. | Press the ON/OFF key or one of the CURSOR key | |
| LEVEL ERROR | In case water level is not restored after 90 seconds of machine functioning. | The display indicator blinks. The pump is de-activated. The heating element and all other functions will be disabled. | Turn the machine off and then turn it on again. All its functions are re-activated. | |
| PRESSURE ERROR | When the machine's temperature is higher than 130°C. | The display indicator flashes and the resistor is de-activated. | The system is re-established as soon as the temperature goes below 130°C. | The boiler is provided with a manual refitting safety thermostat; if the resistor is not restored, contact a qualified technician. |
| OVERCURRENT ERR. | Incorrect power absorption caused by a malfunction in one of the machine loads. | The display indicator flashes. The pump is de-activated. The heating element and all other functions are disabled. | Switch off the machine and contact a skilled technician. | |
9. CLEANING AND MAINTENANCE
9.1 SWITCHING OFF MACHINE
TH
9.3 CLEANING THE STAINLESS STEEL COFFEE-HOLDERS
The stainless steel coffee holder is situated underneath the dispensing unit.
To switch the machine off, press the main switch and set the machine to the "O" position.
9.2 CLEANING THE OUTSIDE OF THE MACHINE
The machine must be set to "O" power (switch off and disconnector open) before any cleaning operations.

WARNING
Do not use solvents, chlorine-based products or abrasives.

WARNING
It is not possible to clean the machine using water jets or immersing it in water.
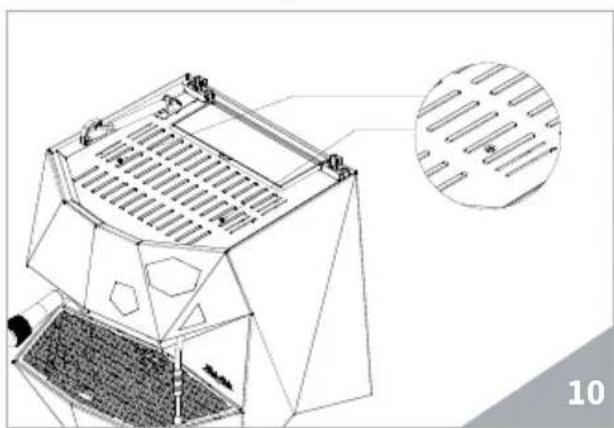
Cleaning the work area: remove the worktop grid, lifting it up from the front and sliding it out. Remove the water collection dish underneath and clean with hot water and cleansers.
Cleaning the bottom: To clean all the chromium-plated areas, use a soft, damp cloth.

NOTE
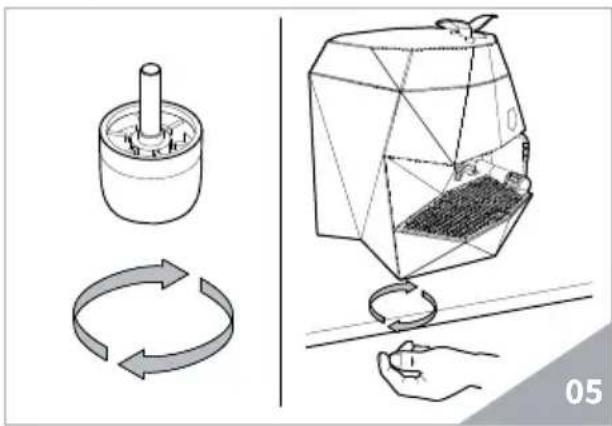
To clean proceed as follows:
- Turn the screw placed in the centre of the coffee-holder.
- Slide the coffee-holder out and check that its holes are not obstructed.
- If obstructed, clean as described (Paragraph "CLEANING FILTERS AND FILTER-HOLDERS").
It is recommended to clean the coffee-holder once a week.
9.4 CLEANING THE UNIT WITH THE AID OF THE BLIND FILTER
The machine is pre-set for cleaning the delivery unit with a specific washing powder.
The machine will initiate washing cycle which consists in the circulation of hot water followed by regular breaks.
We recommend carrying out a washing cycle at least once a day with special cleansers.

RISK OF INTOXICATION
Once the filter-holder has been removed, repeat delivery operations a few times to eliminate any cleanser residues.
To carry out the washing procedure, proceed as follows:
- Substitute the filter with the delivery unit blind filter.
- Fill it with two spoonfuls of special cleanser powder and insert it into the unit filter-holder.
-
Press the Hot water and Steam keys at the same time, and then press ENTER to restart the cleaning.
-
The machine carries out a series of dispensing for group cleaning. After the series of dispensing, the machine restart rinsing. Empty and reposition the blind filter, and then press the ENTER key to restart rinsing.
-
Remove the filter-holder, repeat delivery operations a few times to eliminate any cleanser residues.
9.5 CLEANING FILTERS AND FILTER-HOLDERS
Place two spoonfuls of special cleanser in half a litre of hot water and immerse filter and filter-holder (without its handle) in it leaving them to soak for at least half an hour. Then rinse abundantly with running water.
10. MAINTENANCE
NOTE
During the maintenance / repairing, the components used must ensure the hygiene and safety requirements necessary for the device. The original spare parts provide this warranty.
NOTE
After a repair or a replacement of the components that concern parts in contact with water and food, it is required a cleaning procedure indicated at the point 1.4 or following the procedures indicated by the manufacturer.
10.1 REGENERATION OF THE SOFTENER RESINS
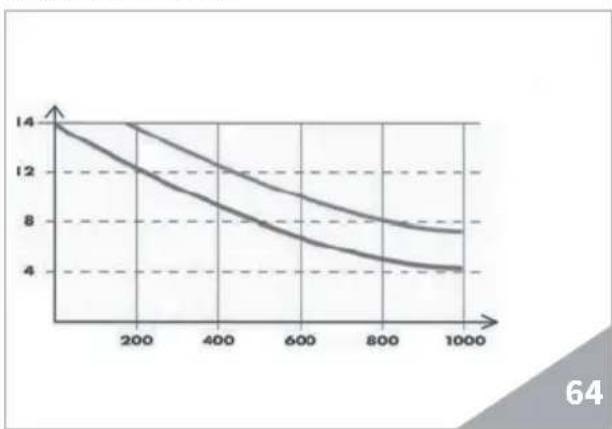
If water from the water supply system is used, in order to avoid limestone deposits forming inside the boiler and the heat exchanger, it is necessary the softener is always in perfect operating conditions. The ion resin regeneration must be checked on a regular basis.
The regeneration times are to be fixed according to the daily quantity of dispensed coffee and the hardness of water used.
Indicatively, they can be found on the diagram below.
The regeneration procedures are indicated below:
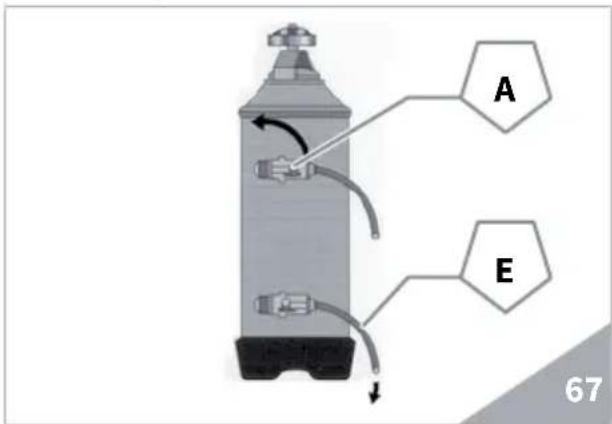
- Switch the machine off and put a container with a capacity of at least 5 litres underneath the hose C.
Rotate the levers A and B from left to right; remove the cap by unscrewing the dial D and introduce 1 Kg of coarse cooking salt.
3) Bring the lever B back to the left.
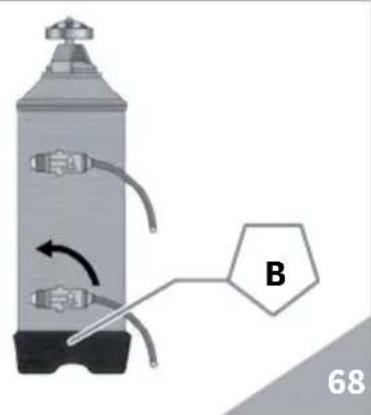
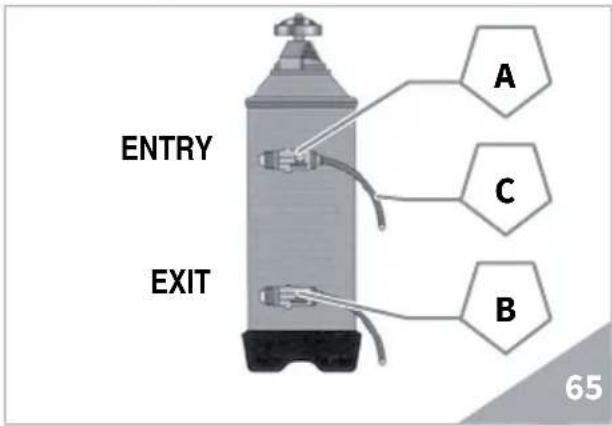
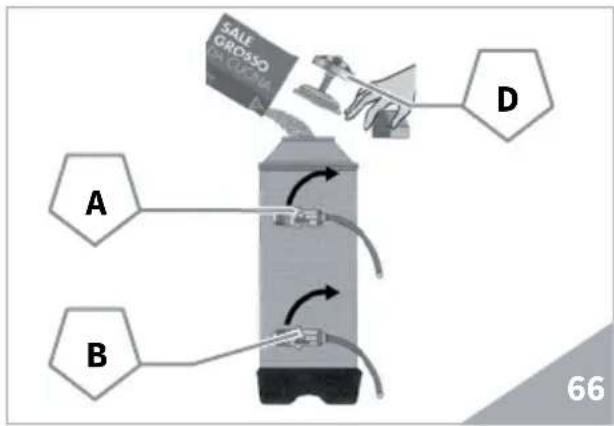
- Reposition the cap and the lever A to the left, by letting the salty water discharge from the hose E until it is fresh again (approximately 1/2 hour).
SOMMAIRE
1. NOTES GENÉRALES A LA LIVRAISON 73
1.1 PRESCRIPTIONS DE SECURITE 73
2.DESCRIPTION DE LA MACHINE...76
2.1 DESCRIPTION PANNEAU DE COMMANDE 77
2.2 LISTE ACCESSOIRES 78
3. TRANSPORT ET MANUTENTION 79
3.1 IDENTIFICATION DE LA MACHINE 79
4. INSTALLATION ET OPÉRATIONS PRELIMINAIRES 79
5. RÉGLAGES DU TECHNICIEN QUALIFIE 81
5.1 PROCEDURE DE PREMIÈRE MISE EN MARCHE 81
5.2 RÉGLAGE POMPE 81
5.3 RÉGLAGE ÉCONOMISEUR EAU CHAUBE 82
6. UTILISATION 83
6.1 MISE EN MARCHE DE LA MACHINE 83
6.2 PROCEDURE DE PREMIÈRE INSTALLATION ET CHARGEMENT MANUEL DE L'EAU DANS LA CHAUDIÈRE ....83
7.PROGRAMMATION 86
7.1 LEGENDE 86
7.2 PROGRAMMATION 87
7.2.1 LAngue 87
7.2.2 CYCLE DE LAVAGE 88
7.2.3 DOSES 88
7.2.4 COMPTEURS 90
7.2.5 SETTING 90
8. MESSAGES FONCTIONS MACHINE HERESIA 97
9. NETTOYAGE ET ENTRETIEN 98
9.1 ARRÉT 98
9.2 NETTOYAGE DE LA CARROSSERIE 98
9.3 NETTOYAGE DES DOUCHES INOX 98
9.4 NETTOYAGE DU GROUPE AVEC L'AIDE DU FILTRBORGNE ....98
9.5 NETTOYAGE DES FILTRES ET DES PORTE-FILTRES 99
- ENTRETIEN 99
A01 Tube chargin 3/8"
A02 Presseur café
A03 Bec distribution simple
A04Bec distribution double
A05 Porte-filtre
A06 Ressort
A07 Filtre borgne
A08 Filtre double
A09 Filtre simple