Atom 65 - Grinder Victoria Arduino - Free user manual and instructions
Find the device manual for free Atom 65 Victoria Arduino in PDF.
| Product Type | Professional coffee grinder |
| Brand | Victoria Arduino |
| Model | Atom 65 |
| Usage | Professional (specialized personnel) |
| Burr Type | Flat burrs |
| Grind Adjustment | Continuous, from fine (espresso) to coarse (filter) |
| Programmable Doses | Single, double, manual (continuous mode) |
| Display | LCD with dose counters (single and double) |
| Power Supply | 230V ~ 50/60 Hz (confirm on rating plate) |
| Motor Protection | Built-in thermal protection |
| Portafilter Holder | Height-adjustable fork, compatible with portafilters from 2.5 to 5 cm |
| Dispensing | Automatic with start button, manual stop possible |
| Locking | Lockable functions via T1 and T5 buttons |
| Counters | Partial resettable, total non-resettable |
| Cleaning | Weekly cleaning of the hopper, daily cleaning of the nozzle |
| Maintenance | Replace burrs every 350 kg of coffee |
| Safety | Automatic stop in case of blockage, mandatory grounding |
| Spare Parts | Use only original spare parts |
| Operating Temperature | -5°C to +30°C |
Frequently Asked Questions - Atom 65 Victoria Arduino
User questions about Atom 65 Victoria Arduino
0 question about this device. Answer the ones you know or ask your own.
Ask a new question about this device
Download the instructions for your Grinder in PDF format for free! Find your manual Atom 65 - Victoria Arduino and take your electronic device back in hand. On this page are published all the documents necessary for the use of your device. Atom 65 by Victoria Arduino.
USER MANUAL Atom 65 Victoria Arduino
MANUEL D'INSTRUCTIONS
MANUEL D'INSTRUCTIONS
MANUEL D'INSTRUCTIONS
MANUEL D'INSTRUCTIONS
MANUEL D'INSTRUCTIONS
MANUEL D'INSTRUCTIONS
MANUEL D'INSTRUCTIONS
GEBRAUCHSANSUINGEN
MANUEL D'INSTRUCTIONS
MANUEL D'INSTRUCTIONS
MANUEL D'INSTRUCTIONS
PRECAUTIONS AND SAFETY FEATURES
GENERAL INFORMATION
TECHNICAL DATA
APPLIANCE DESCRIPTION
IMPORTANT INFORMATION
LOCKING THE CONTAINER
INSTRUCTIONS FOR USE
APPLIANCE PROGRAMMING
CLEANING AND MAINTENANCE
TROUBLESHOOTING
PRECAUTIONS AND SAFETY FEATURES
Machine design has taken into account all reasonable user safety precautions; nevertheless, particular conditions of installation and/or handling may create unforeseen situations beyond the installer's control which will require case-by-case evaluation of residual risks.
We recommend keeping the following in mind:
Always handle the machine with care to avoid the danger of its falling.
- The packing materials (carton, cellophane, staples, polystyrene, etc.) can cut, wound or create hazards if used improperly or handled carelessly. Store such materials out of reach of children and irresponsible persons.
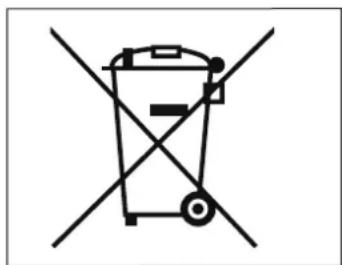
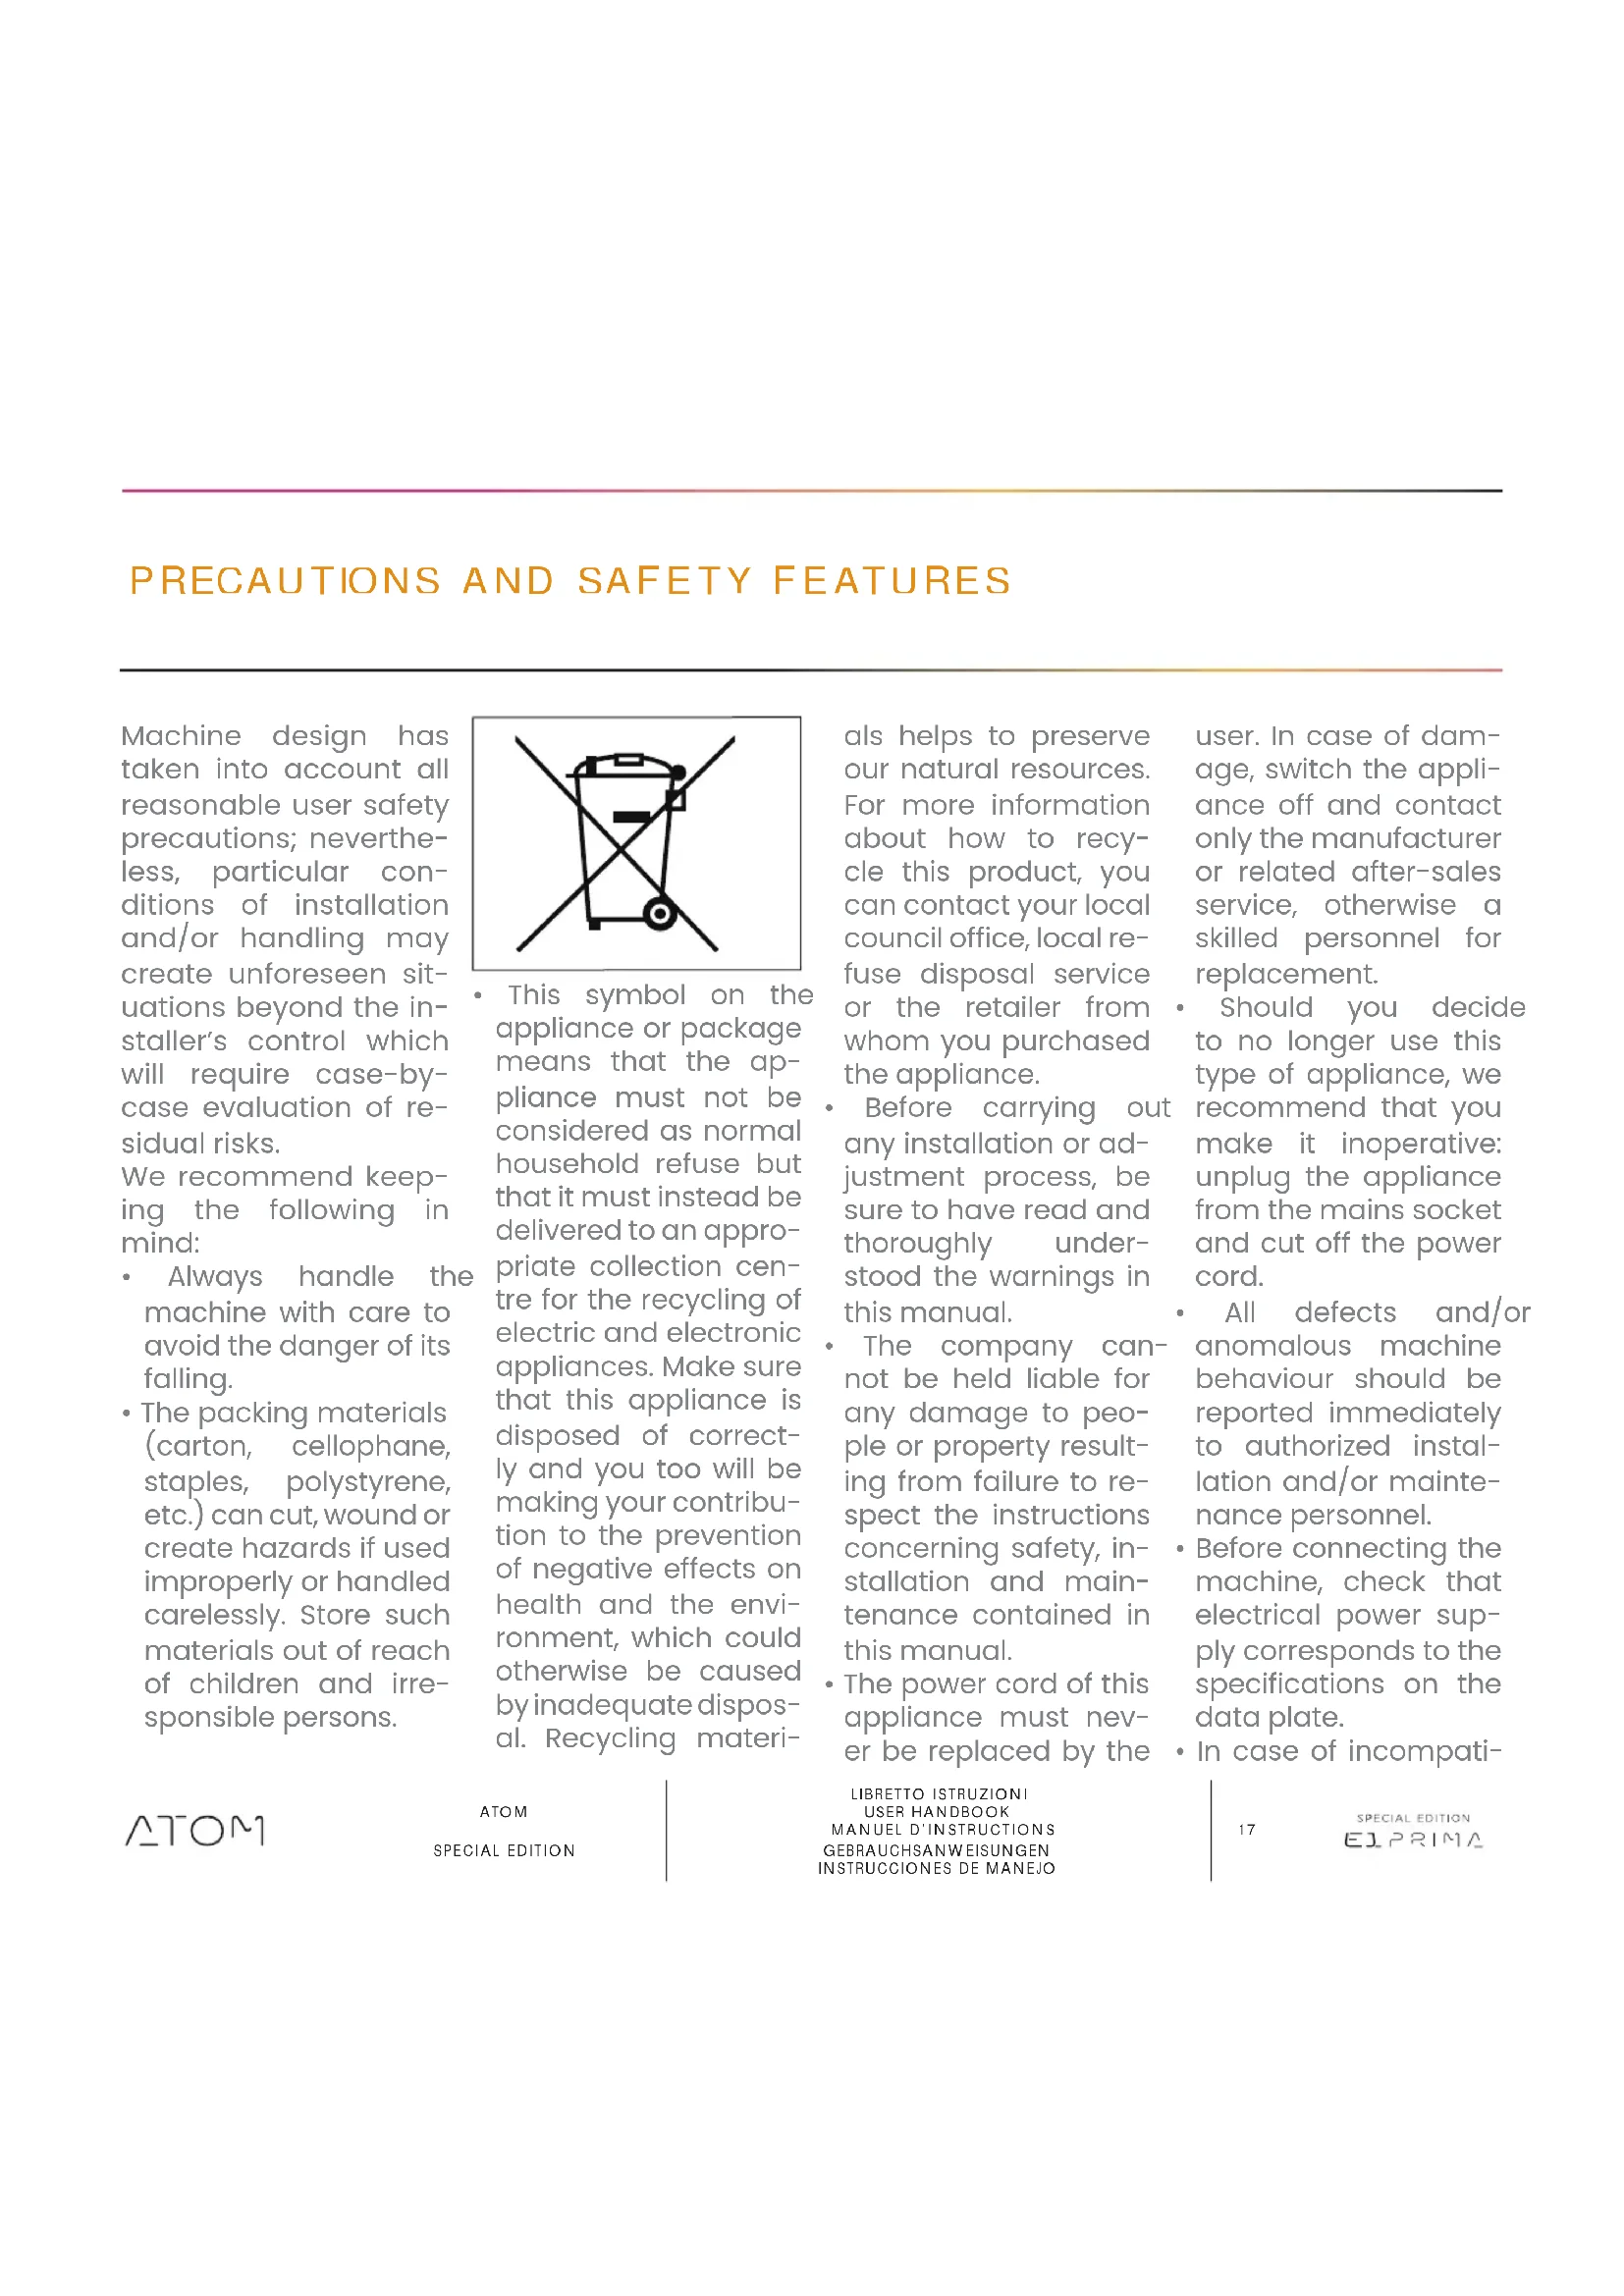
This symbol on the appliance or package means that the appliance must not be considered as normal household refuse but that it must instead be delivered to an appropriate collection centre for the recycling of electric and electronic appliances. Make sure that this appliance is disposed of correctly and you too will be making your contribution to the prevention of negative effects on health and the environment, which could otherwise be caused by inadequate disposal. Recycling materi
als helps to preserve our natural resources. For more information about how to recycle this product, you can contact your local council office, local refuse disposal service or the retailer from whom you purchased the appliance.
Before carrying out any installation or adjustment process, be sure to have read and thoroughly understood the warnings in this manual.
The company cannot be held liable for any damage to people or property resulting from failure to respect the instructions concerning safety, installation and maintenance contained in this manual.
The power cord of this appliance must never be replaced by the
user. In case of damage, switch the appliance off and contact only the manufacturer or related after-sales service, otherwise a skilled personnel for replacement.
- Should you decide to no longer use this type of appliance, we recommend that you make it inoperative: unplug the appliance from the mains socket and cut off the power cord.
- All defects and/or anomalous machine behaviour should be reported immediately to authorized installation and/or maintenance personnel.
- Before connecting the machine, check that electrical power supply corresponds to the specifications on the data plate.
In case of incompati
ATOM
ATOM
SPECIAL EDITION
LIBRETTO ISTRUZIONI
USERHANDBOOK
MANUEL D'INSTRUCTIONS
bility between the plug and the socket, have the plug replaced with a suitable type by the manufacturer, his after-sales service, or by skilled personnel, who should also check that the section of the plug wires is suitable for the power absorbed by the appliance.
- Avoid use of multiple-plug adapters and extension cords.
The ground wire must be connected; the electrical system must meet the standards set by local safety laws and regulations. - The machine must be installed only by authorized, qualified personnel.
- Check that the machine components have suffered no damage during shipping; in the case defects or anomalies are found, interrupt installation and request replacement.
APPLICATIONS AND USE
- This grinder dispenser has been devised for professional use by trained personnel.
- The grinder/dispen-ser must be used only for the application for which it was designed; that is, grinding roasted coffee beans. Any other use must be considered improper and therefore dangerous.
The manufacturer shall not be held responsible for damages deriving from improper, erroneous or unreasonable use of the machine. - The appliance must not be used by children or people with reduced, physical, sensorial or mental abilities. It must also never be used by people without the necessary skills and experience unless under supervision or during training. Do not allow children to play with this equipment at any
time.
The machine is not designed for use in extreme environmental conditions and in any case at temperatures outside the -5^ to +30^ range.
The user must respect the general safety regulations in force in the country in which the machine is installed as well as the rules of common sense, and shall be responsible for ensuring that periodic machine maintenance is correctly performed.
- The persons installing and using the machine and performing machine maintenance shall inform the manufacturer of any defects or damages due to wear that might jeopardize the original safety features of the machine.
- The installer shall be responsible for checking that the machine is installed in tolerable environmental conditions such as to not to create health or safety
hazards for those using the machine.
- Any responsibility deriving from components manufactured and installed on the machine shall be assumed by the respective manufacturers; responsibility attributable to the persons authorized to use the machine shall be assumed by the customer.
The device can be used 24 hours a 24 with intermittent service as listed on the nameplate values Ton and Toff. The machine components are designed and built to ensure at least 1000 hours' operation.
Good cleaning and maintenance also contribute to determining long machine life.
ATOM
ATOM
SPECIAL EDITION
LIBRETTO ISTRUZIONI
USERHANDBOOK
MANUEL D'INSTRUCTIONS
BASIC SAFETY PRECAUTIONS
- Never touch the machine with damp or wet hands.
- Never use the machine when barefoot.
- Never attempt to unplug the machine by pulling the power cord or the machine itself.
- Do not expose the machine to atmospheric agents (sun rain, etc.).
- Never allow the machine to be used by children or by irresponsible persons.
Always use the appliance on a flat, steady surface that is able to support its weight.
Always unplug th machine from the power supply before performing any cleaning or maintenance operations. - Do not use water jets or detergents for cleaning the appliance.
In the case of machine breakdown or malfunction switch the machine off and do not tamper with it.
For repairs contact
only an authorized service center and request use of original spare parts.
Non-observance of the above precautions may make the machine unsafe for future use.
- Do not leave the machine switched on when not in use. Unplug the machine when not in use.
- Do not obstruct the ventilation and/or heat dissipation openings and/or slits nor introduce water or any other liquids into same.
Should the wire be damaged, have it immediately repaired by the manufacturer, his authorized after-sales service, or skilled personnel.
- Never insert spoons, forks or other utensils into the coffee bean container to make withdrawals or interventions.
Always switch off the appliance before removing blockages
container.
- Never place the appliance in water or other liquids.
- Should a foreign body stop the motor, switch the machine off immediately and contact an authorized service center.

Those machines bearing the "EL MOTOR WITH THERMAL PROTECTION" indication are equipped with device protects the motor from overheating. When this is engaged, do not attempt to operate the machine; isolate the machine from the power supply and eliminate the cause of the trouble before re-starting.
SYMBOLS

A

B

C


D
E
A General hazard
B Electrical shock hazard
C Burns hazard
D Hazard of damage.
Operation reserved for the qualified technician, in compliance with current standards
01
GENERAL INFORMATION
MANUFACTURER: CONTI VALERIO S.r.l. - Via Luigi Longo, 39/41 - Sesto Fiorentino, Firenze - Italy
COFFEE GRINDER MODEL: ATOM 65
02
ATOM
SPECIAL EDITION
| DESCRIPTION | MODEL | |
| ATOM 65 | ||
| VOLTAGE | V | 220-240 220 110 |
| FREQUENCY | Hz | 50 220 60 |
| POWER CONSUMPTION | W | 350 |
| CURRENT | A | 3,9 |
| MOTOR POWER | W | 245 245 245 |
| REVOLUTIONS PER MINUTE* | RPM | 1290 1650 |
| HOPPER CAPACITY | g | 510 |
| PRODUCTIVITY | g/s | Espresso coffee: 2,5 - 3,5 Filter coffee: 4,0 - 5,0 |
| ACTIVATION TIMES | s | ON OFF 60 900 |
| WEIGHT WHEN EMPTY | kg | 9,5 |
| DIMENSIONS | ||
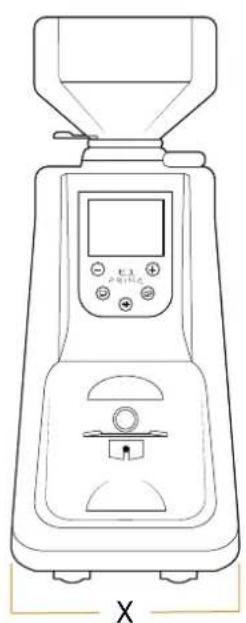
| X | mm | 181 |
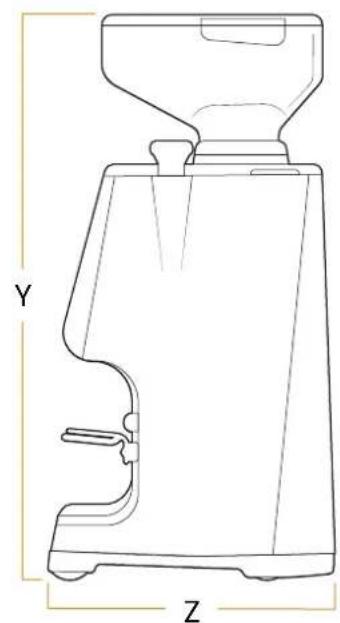
| Y | mm | 440 |
| Z | mm | With filter holder: 264 With basket: 227 |
- The value given is for the actual revolutions of the burrs.
LIBRETTO ISTRUZIONI
USERHANDBOOK
MANUEL D'INSTRUCTIONS
APPLIANCE DESCRIPTION
ATOM
ATOM
SPECIAL EDITION
LIBRETTO ISTRUZIONI
USERHANDBOOK
MANUEL D'INSTRUCTIONS
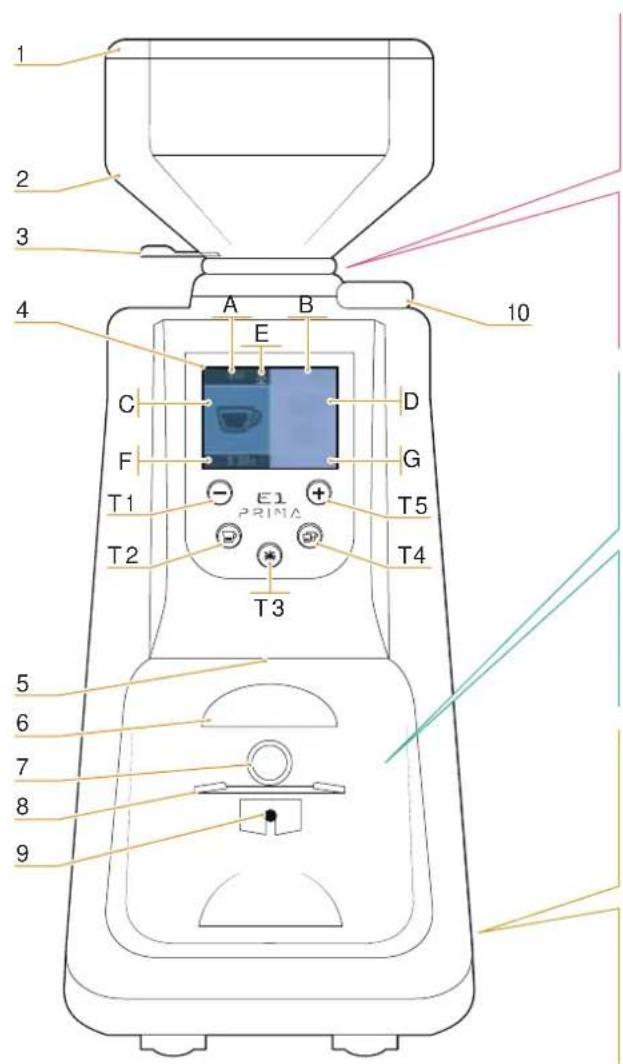
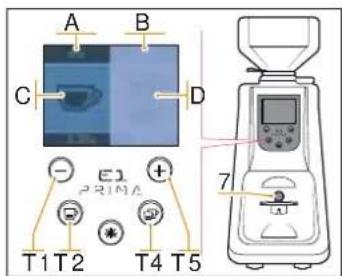
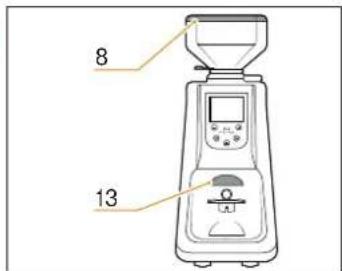
1 Container cover
2 Coffee bean container
3 Coffee bean container for opening/closing tab
4 LCD Display
5 LED lighting holder
6 Dispensing spout
7 Grinding start key
8 Filter holder fork
9 Fork adjustment screw
10 Grinding adjusting knob
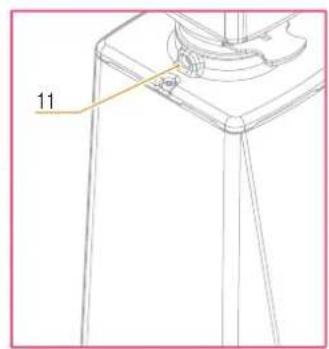
11 Container locking screw
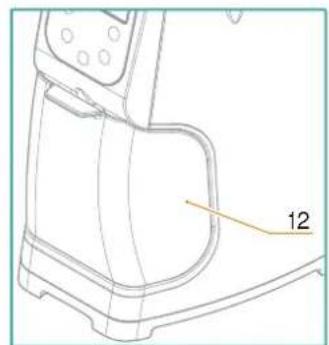
12 Filter coffee tray
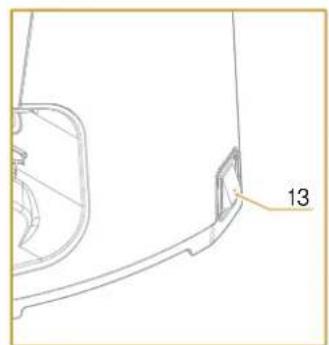
13 Power Switch with LED
T1 Decreasing key
T2 Single dose key
T3 Manual Mode key
T4 Double dose key
T5 Increasing key
A Dispensing visualization of 1 coffee dose
B Dispensing visualization of 2 coffee dose
C Counter of dispensed 1 coffee dose
D Counter of dispensed 2 coffee doses
E Padlock (locked programming)
F Dispensing time of preset 1 coffee dose
G Dispensing time of preset 2 coffee dose
21
SPECIAL EDITION
E1231NA
04
IMPORTANT INFORMATION
This manual is designed for use by the user of the machine and/or by those performing maintenance on the machine and must be considered an integral part of the machine itself.
This manual provides in- mation concerning correct use and appropriate maintenance of the machine, as well as useful indications for ensuring user safety.
This manual must be served for the entire working life of the machine and must be transferred, together with the machine, to future users or owners.
The information contained in this manual must not be construed as substituting the safety prescriptions and the technical data regarding installation and operation carried on the machine itself and on the packing materials.
This manual reflects the current state of machine technology and shall not be considered obsolete solely because updated at a later date on the basis of ac
quired experience.
The manufacturer reserves the right to make modifications to this manual with no obligation to update previous versions except in exceptional cases.
Improper use of the machine or use in manners other than those described in this manual shall invalidate the guarantee conditions and shall release the manufacturer from all responsibility, the machine must be used only by adult, responsible persons.
This manual must be preserved with care: the manufacturer declines all responsibility for damages to persons or things or to the machine itself deriving from improper use or use in manners other than those described herein or in the case the maintenance and safety precautions described herein are not respected.
4.1
PRESERVATION OF THE MANUAL
This manual must be available to the machine user and/or the persons performing maintenance on the machine, who must be provided with full information regarding correct machine use and residual risks.
This manual must be p served in a clean, dry place away from sources of heat. This manual must be use in a manner such as not to damage any part of its contents.
Do not remove, tear out or re-write any part of this manual for any reason. In case of loss of this manual or for further information, please contact your area retailer or the manufacturer.
05
LOCKING THE CONTAINER
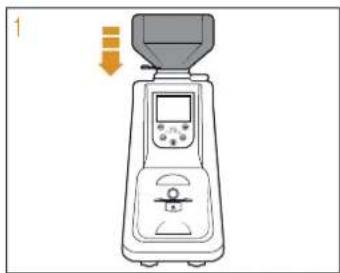
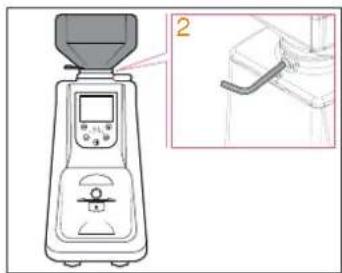
Before operating the appliance, it is necessary to fit the coffee bean container (2).
2 Tighten the lock screw (11).
1 Insert the container (2) into its seat, positioning it so that the hole lines up with the screw (11) on the back part of the appliance.
ATOM
ATOM
SPECIAL EDITION
LIBRETTO ISTRUZIONI
USERHANDBOOK
MANUEL D'INSTRUCTIONS
This appliance can make very precise doses as it refers to grinding time.
It is furthermore necessary to set up the appliance before operating, by determining first of all the coffee blend type (more roasted or less) and the degree of grinding. Grinding time is then set for each dose key by weighting the grinding product.
After having plugged the appliance in, pull the tab (3) at the bottom of the coffee bean container (2) to close it.
6.2
FUNCTIONING WITH FILTER HOLDER
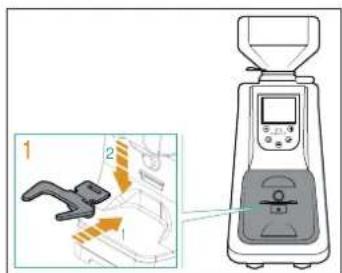
1 Insert the fork (8) into the slot and fasten it in its holder.
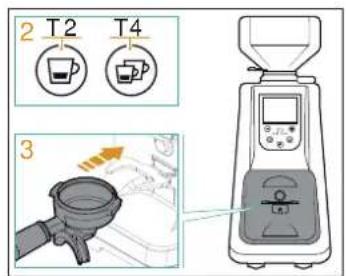
2 Preselect the single or double dose using the buttons (T2) or (T4).
3 Insert the filter holder on the fork (8) to press the (7) button to start dispensing from the nozzle (6). Dispensing stops once the preset time has elapsed.
ATOM
ATOM
SPECIAL EDITION
LIBRETTO ISTRUZIONI
USERHANDBOOK
MANUEL D'INSTRUCTIONS
FUNCTIONING WITH TANK
6.4
GRINDING SETTING
6.5
FILTER HOLDER FORK HEIGHT ADJUSTMENT
1 Insert the tank (12) below the dispensing spout (6).
2 Press the button (T3) to pass at the "Manual Mode" mode and press it again to start dispensing. The dispensing always end by pressing the button (T3).
As an alternative, keep the key (7) pressed to grind. Release the key (7) to stop dispensing.
Set grinding by means of the adjusting knob (10), by rotating it clockwise to make powder finer (Espresso coffee) or anticlockwise to increase the size of its grain (Filter coffee) as shown on the knob. Setting is stepless; it is to be gradual performed, by grinding some coffee every two notches maximum.

If the knob is turned by than 3 notches with the engine stopped, the machine can get stuck and/or damaged.
After adjusting the grind with the knob (10), deliver 2-3 doses to make effective the new grinding.
- By using a Allen key, loosen the fastening screw of the filter holder fork (9). It is recommended not to unscrew the screw completely.
- Raise or lower the fork in order to adjust it according to filter holder dimensions.
Once having reached the correct position, tighten the fork fastening screw.
The appliance is equipped with a filter holder retaining device.

The fork (8) is designed to support all types of filter holder (from 2.5 to 5 cm).
The ATOM allows to remove the fork so that, according to the type of filter holder, the fork height (8) can be modified by inserting it onto its support on the opposite side.
ATOM
ATOM
SPECIAL EDITION
LIBRETTO ISTRUZIONI
USERHANDBOOK
MANUEL D'INSTRUCTIONS
APPLIANCE PROGRAMMING
7.1
APPLIANCE SWITCH-ON
When switching the appliance on for the first time, it is configured in the mode set by the factory and anyway, in the following uses, it will maintain the last mode previous to off.
When switching the appliance on, this screen is shown for some seconds.
Then the display shows the working screen.
7.2
DOSE DISPENSING AND SETTING (DISPLAY)
- Select a dose by pressing (T2), which will light up. Press the grinding start key (7) to dispense coffee and activate the timer up to zero; the cup (C) on the display fills during dispensing.
Once dispensing is completed, the time returns to set value for a new grinding.
The single dose counter (A) is increased of 1. - Select the two doses by pressing (T4), which will light up. Press the grinding start key (7) to dispense coffee and activate the timer up to zero; the cup (D) on the display fills dur
ing dispensing.
Once dispensing is completed, the time returns to set value for a new grinding.
The double dose counter (B) is increased of 1.
- By pressing the increasing key (T5) and decreasing one (T1) the dispensing time of the properly selected dose is increased or decreased.
#
The automatic dispensing can be stopped before the grinding time has elapsed. During dispensing, press the grinding start key (7) with the filter holder to stop dispensing:
Press the new grinding start key (7) again to restart dispensing for the remaining time;
Press the key of the selected dos e (fashing) to stop dis - pensing. The grinding time returns to the value set.
ATOM
ATOM
SPECIAL EDITION
LIBRETTO ISTRUZIONI
USERHANDBOOK
MANUEL D'INSTRUCTIONS
"MANUAL MODE" DISPENSING MODE ACTIVATION
By pressing the keys (T3) the continuous mode is activated.
To start dispensing:
- Press the key (T3) to start dispensing and press it again to stop dispensing.

With the tank (12) inserted, the (7) button is not pressed. Delivering through (T3) button.
- Insert the filter holder until press the button (7); remove the filter holder to release the button (7) to stop dispensing.
By pressing the buttons (T2) or (T4) the appliance returns to the relative dispensing mode.
7.4
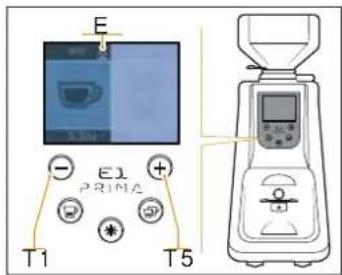
FUNCTION BLOCK
By pressing both and (T5) the time dispensing setting in locked.
On the display appear the icon (E).
Press again both keys (T1) and (T5) to unlock the appliance functions.
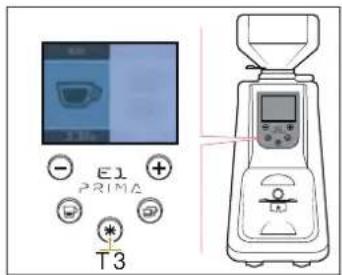
7.5
PARTIAL DOSE COUNTER ZEROING
keys (T1)
From the dispensing programmed doses screen, long press the (T3) button to reset partial counters of doses delivered.
The total counter is not reset.
To display the total count, enter the screen of concealed contents.
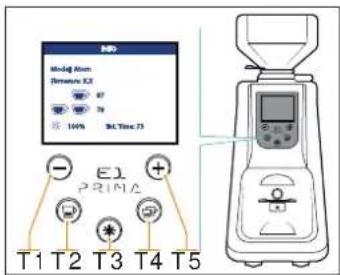
7.6
APPLIANCE SWITCH ON WITH CONCEALED CONTENTS
Press the key (T3) and switch on the appliance, to access the following screen:
- Appliance model
Firmware version.
1 and 2 dose total counter cannot be reset).
Counter total of continuous grind time. - Display brightness, adjustable with the keys (T1) and (T5).
Press the key (T2) or (T4) to return to the dispensing dose screen.
08
CLEANING AND MAINTENANCE

Unplug the appliance before performing any cleaning and maintenance operation.

Do not pull the power cable or the appliance itself to disconnect the plug from the power supply socket.
8.1
CLEANING
Cleanliness is a basic aspect for the proper functioning of the coffee grinder with a dosing unit.
A neglected coffee grinder with dosing unit may have a negative impact on coffee dispensing as well as on the accuracy of dose and grinding.
Before cleaning, make sure the appliance is unplugged. At least once a week, clean the coffee bean container (2), removing the oily coat left by coffee beans by means of a clean cloth.
It is furthermore necessary to often clean (several times a day) the dispensing spout (6) through a brush and a vacuum cleaner.
In case such operations are not carried out, the aromatic oily part contained in coffee may turn rancid with negative consequences on coffee, furthermore the lack of cleanliness may jeopardize regularity of the dose itself.
Clean the base by means of a damp cloth.

Maintenance is to be performed only by skilled personnel authorized by the manufacturer.

Do not carry out improvised or precarious repairing and do not use non-original spare parts.
8.2
MAINTENANCE

In order to ensure a proper functioning of the appliance, check and eventually replace the blades every 350 Kg of ground coffee for flat blades.
ATOM
ATOM
SPECIAL EDITION
LIBRETTO ISTRUZIONI
USERHANDBOOK
MANUEL D'INSTRUCTIONS
Contact skilled personnel.
ATOM
ATOM
SPECIAL EDITION
LIBRETTO ISTRUZIONI
USERHANDBOOK
MANUEL D'INSTRUCTIONS
MANUEL D'INSTRUCTIONS
MANUEL D'INSTRUCTIONS
MANUEL D'INSTRUCTIONS
MANUEL D'INSTRUCTIONS
MANUEL D'INSTRUCTIONS
MANUEL D'INSTRUCTIONS
MANUEL D'INSTRUCTIONS
MANUEL D'INSTRUCTIONS
MANUEL D'INSTRUCTIONS
MANUEL D'INSTRUCTIONS
MANUEL D'INSTRUCTIONS
MANUEL D'INSTRUCTIONS
MANUEL D'INSTRUCTIONS
MANUEL D'INSTRUCTIONS
MANUEL D'INSTRUCTIONS
MANUEL D'INSTRUCTIONS
MANUEL D'INSTRUCTIONS
MANUEL D'INSTRUCTIONS
MANUEL D'INSTRUCTIONS
MANUEL D'INSTRUCTIONS
MANUEL D'INSTRUCTIONS
MANUEL D'INSTRUCTIONS
MANUEL D'INSTRUCTIONS
MANUEL D'INSTRUCTIONS

A
B
m = 311

D
E
MANUEL D'INSTRUCTIONS
GEBRAUCHSANSUINGEN
MANUEL D'INSTRUCTIONS
MANUEL D'INSTRUCTIONS
MANUEL D'INSTRUCTIONS
MANUEL D'INSTRUCTIONS
MANUEL D'INSTRUCTIONS
MANUEL D'INSTRUCTIONS
MANUEL D'INSTRUCTIONS
MANUEL D'INSTRUCTIONS
MANUEL D'INSTRUCTIONS
following the provisions of the regulation:
UNI EN 12100/1-2; UNI EN ISO 13857; CEI EN 55014-1/2; CEI EN 61000-3-2/3; CEI EN 60335-1; CEI EN 60335-2-64; CEI EN 62233; EN 60704-1:1994;
The Legal Representative: Filippo Conti
Simonelli Group | Via E. Betti, I | 62020 Belforte del Chienti (MC) | Italy T +39 0733 9501 | F +39 0733 950242 | info@victoriaarduino.com
www.victoriaarduino.com/eagleoneprima