Mythos MyOne - Grinder Victoria Arduino - Free user manual and instructions
Find the device manual for free Mythos MyOne Victoria Arduino in PDF.
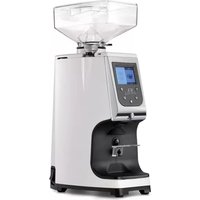
| Product type | Professional coffee grinder-doser |
| Brand | Victoria Arduino |
| Model | Mythos MyOne |
| Dimensions (H x W x D) | 479 mm x 195 mm x 395 mm |
| Net weight | 23.7 kg |
| Power supply | 220-240 V, 50/60 Hz |
| Power consumption | 600 W |
| Hopper capacity | 1.5 kg |
| Grinding speed | 2.5 to 3 g/s |
| Burr type | 75 mm flat burrs (timed version) |
| Grind adjustment | Continuous adjustment wheel (no stop) with 0.4 mm displacement per turn |
| Programmable doses | 3 timed doses A, B, C (0-30 s) + continuous mode |
| Barista mode | Allows real-time dose modification |
| Display | Touchscreen with adjustable backlight |
| Temperature control | Heater in grinding chamber, adjustable from 30 to 60 °C in 5 °C steps |
| Cooling fans | Adjustable delay from 0 to 180 s |
| Buzzer | Can be enabled/disabled |
| Dose counters | Partial A, B, C, continuous, total, absolute (reset with password) |
| Safety | Motor thermal protection relay, filter holder lock, stop if malfunction |
| Maintenance and cleaning | Weekly cleaning of body, hopper and grinding chamber; chamber interval 2 to 5 days |
| Spare parts and repairability | Replaceable burrs (50000 cycles or 1000 kg), switch, probe, etc.; use of original parts recommended |
| General information | Manufacturer: Simonelli Group, Italy. Professional use in restaurants, bakeries, etc. |
Frequently Asked Questions - Mythos MyOne Victoria Arduino
User questions about Mythos MyOne Victoria Arduino
0 question about this device. Answer the ones you know or ask your own.
Ask a new question about this device
Download the instructions for your Grinder in PDF format for free! Find your manual Mythos MyOne - Victoria Arduino and take your electronic device back in hand. On this page are published all the documents necessary for the use of your device. Mythos MyOne by Victoria Arduino.
USER MANUAL Mythos MyOne Victoria Arduino
natural_image
Exterior view of a MyONE coffee machine with open lid and control buttons (no visible text or symbols on main body)Mythos
MYONE
EN USER HANDBOOK (Translation of the Original Instructions)
FR MANUEL D'INSTRUCTIONS (Traduction des Instructions Originales)
natural_image
Symbol of a trash bin crossed out by two crossed lines, with no text or labels present.EN PRECAUTIONS AND SAFETY FEATURES
Coffee grinder design has taken into account all reasonable user safety precautions; nevertheless, particular conditions of installation and/or handling may create unforeseen situations beyond the installer's control which will require case-by-case evaluation of residual risks. We recommend keeping the following in mind. If the manufacturer restricts the use of the coffee grinder, except as described, this will be clearly indicated in this instruction manual.
• Always handle the coffee grinder with care to avoid the danger of its falling.
- The packing materials (carton, cellophane, staples, polystyrene, etc..) can cut, wound or create hazards if used improperly or handled carelessly. Store such materials out of reach of children and irresponsible persons.
- This symbol on the coffee grinder or package means that the coffee grinder must not be considered as normal household refuse but that it must instead be delivered to an appropriate collection centre for the recycling of electric and electronic coffee grinders. Make sure that this coffee grinder is disposed of correctly and you too will be

natural_image
Symbol of a trash bin crossed with a diagonal line, no text or labels presentmaking your contribution to the prevention of negative effects on health and the environment, which could otherwise be caused by inadequate disposal. Recycling materials helps to preserve our natural resources. For more information about how to recycle this prod-
uct, you can contact your local council office, local refuse disposal service or the retailer from whom you purchased the coffee grinder.
- Before carrying out any installation or adjustment process, be sure to have read and thoroughly understood the warnings in this manual.
- The company cannot be held liable for any damage to people or property resulting from failure to respect the instructions concerning safety, installation and maintenance contained in this manual.
- The power cord of this coffee grinder must never be replaced by the user. In the event of damage, switch off the coffee grinder and only contact professionally qualified technicians for its replacement.
- Should you decide to no longer use this type of coffee grinder, we recommend that you make it inoperative: unplug the coffee grinder from the mains socket and cut off the power cord.
- All defects and/or anomalous coffee grinder behaviour should be reported immediately to authorized installation and/or maintenance personnel.
- Before connecting the coffee grinder, check that electrical power supply corresponds to the specifications on the data plate.
- Should the coffee grinder plug not be compatible with your socket, have the plug replaced with a suitable type by a qualified technician, who should also check that the section of the wires supplying the power outlet is suitable for the coffee grinder power requirements.
- Avoid use of multiple-plug adapters and extension cords.
- The ground wire must be connected; the electrical system must meet the standards set by local safety laws and regulations.
- The coffee grinder must be installed only by authorized, qualified personnel.
- Check that the coffee grinder components have suffered no damage during shipping; in the case defects or anomalies are found, interrupt installation and request replacement.
- Never obstruct the fan grids.
- Never insert objects into the fan grids.

ATTENTION
Do not touch the heating element or the upper grinder holder during coffee grinder functioning, as they might reach high temperatures.
APPLICATIONS AND USE
- The coffee grinder is designed for commercial and professional use, by specialised personnel, in places such as restaurant kitchens, can-
teens, hospitals or commercial enterprises such as bakeries, butchers, etc., but not for continuous mass production of food.

ATTENTION
In case of installation in kitchens, connect the equipotential conductor to the terminal on the coffee grinder indicated by the symbol ↓.
- The coffee grinder must be used only for the application for which it was designed; that is, grinding roasted coffee beans. Any other use must be considered improper and therefore dangerous.
- The manufacturer shall not be held responsible for damages deriving from improper, erroneous or unreasonable use of the coffee grinder.
- The coffee grinder is not designed for use in extreme environmental conditions and in any case at temperatures outside the 5°C to 30°C range.
- The user must respect the general safety regulations in force in the country in which the coffee grinder is installed as well as the rules of common sense, and shall be responsible for ensuring that periodic coffee grinder maintenance is correctly performed.
- The persons installing and using the coffee grinder and performing coffee grinder maintenance shall inform the manufacturer of any defects or damages due to wear that might jeopardize the original safety features of the coffee grinder.
- The installer shall be responsible for checking that the coffee grinder is installed in tolerable environmental conditions such as to not to create health or safety hazards for those using the coffee grinder.
- The responsibility of the personnel authorised to operate the coffee grinder lies exclusively with the customer. The manufacturer cannot be considered responsible for improper use of the coffee grinder.
- The coffee grinder can be used daily with intermittent operation, with a maximum work period of 30 seconds followed by a minimum rest period of 180 seconds.
- The coffee grinder's components have been designed and manufactured for a service life of at least 1000 hours. This lifetime is conditioned by proper cleaning and maintenance.
BASIC SAFETY PRECAUTIONS
- Never touch the coffee grinder with damp or wet hands.
- Never use the coffee grinder when barefoot.
- Never attempt to unplug the coffee grinder by pulling the power cord or the coffee grinder itself.
- Do not expose the coffee grinder to atmospheric agents (sun rain, etc..).
- Never allow the coffee grinder to be used by children or by irresponsible persons.
• Always use the coffee grinder on a flat, steady surface that is able to support its weight.
• Always unplug the coffee grinder from the power supply before performing any cleaning or maintenance operations.
• The coffee grinder must not be cleaned with water jets or steam.
- In the case of coffee grinder breakdown or malfunction switch the coffee grinder off and do not tamper with it.
- For repairs contact only an authorized service center and request use of original spare parts.
- Non-observance of the above precautions may make the coffee grinder unsafe for future use.
- Do not leave the coffee grinder switched on when not in use. Unplug the coffee grinder when not in use.
- Do not obstruct the ventilation and/or heat dissipation openings and/or slits nor introduce water or any other liquids into same.
- If the power cable is damaged, have it replaced by an authorised dealer as soon as possible in order to avoid hazards.
- Never insert spoons, forks or other utensils into the pouring lip 6, or into the coffee grain container 2 for any reason whatsoever while the coffee grinder is operating.
• Always switch off the coffee grinder before removing blockages from the pouring lip.
- Never place the coffee grinder in water or other liquids.
- Should a foreign body stop the motor, switch the coffee grinder off immediately and contact an authorized service center.
- While coffee grinder is operating, the upper grinder holder may reach high temperatures; do not touch such part during functioning for any reason.

ATTENTION
If the thermal breaker to protect the motor is triggered, do not attempt any other manoeuvre. Unplug the coffee grinder from the power mains and make sure that any problems have been solved before switching the coffee grinder on again.
IMPORTANT INFORMATION
This manual is designed for use by the user of the coffee grinder and/or by those performing maintenance on the coffee grinder and must be considered an integral part of the coffee grinder itself.
This manual provides information concerning correct use and appropriate maintenance of the coffee grinder, as well as useful indications for ensuring user safety.
This manual must be preserved for the entire working life of the coffee grinder and must be transferred, together with the coffee grinder, to future users or owners. The information contained in this manual must not be construed as substituting the safety prescriptions and the technical data regarding installation and operation carried on the coffee grinder itself and on the packing materials.
This manual reflects the current state of coffee grinder technology and shall not be considered obsolete solely because updated at a later date on the basis of acquired experience. The images shown in this manual are for information only.
The manufacturer reserves the right to make modifications to this manual with no obligation to update previous versions except in exceptional cases.
Improper use of the coffee grinder or use in manners other than those described in this manual shall invalidate the guarantee conditions and shall release the manufacturer from all responsibility, the coffee grinder must be used only by adult, responsible persons.
This manual must be preserved with care: the manufacturer declines all responsibility for damages to persons or things or to the coffee grinder itself deriving from improper use or use in manners other than those described herein or in the case the maintenance and safety precautions described herein are not respected.
PRESERVATION OF THE MANUAL
This manual must at all times be available to the coffee grinder user and/or the persons performing maintenance on the coffee grinder, who must be provided with full information regarding correct coffee grinder use and residual risks.
This manual must be preserved in a clean, dry place away from sources of heat. This manual must be used in a manner such as not to damage any part of its contents.
Do not remove, tear out or re-write any part of this manual for any reason.
In case of loss of this manual or for further information, please contact your area retailer or the manufacturer.
natural_image
Symbol of a trash bin crossed out by a diagonal line, with no text or labels present.In order to identify the coffee grinder, read the code immediately after "SERIAL NUMBER" (serial number) on the label applied on this manual or on the coffee grinder itself and select the corresponding voltage.
* only for 75 mm burrs
FR
text_image
Technical diagram of a device with numbered components and labeled parts in ChineseIT
The ON/OFF switch 7 has two positions:
Switch ON
0 Switch OFF
text_image
Diagram showing a device with labeled parts and directional arrows, including a switch and control panel.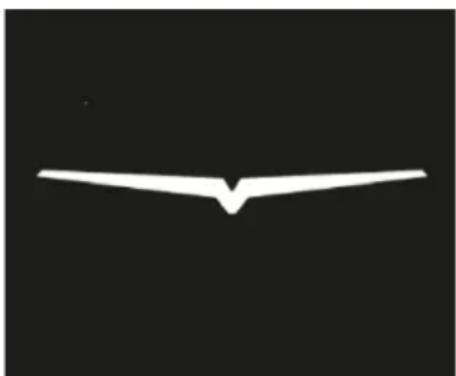
natural_image
Simple white V-shaped line on black background, no text or symbols present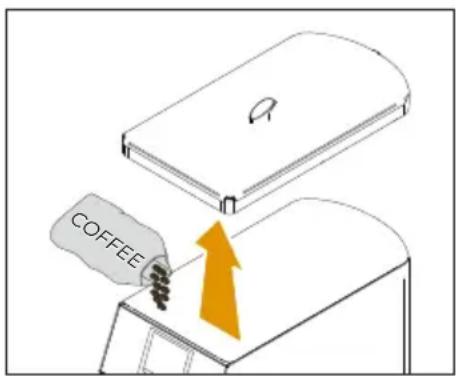
text_image
COFFEEIT
4.1 PREMESSA E ACCENSIONE
4.1 INTRODUCTION AND SWITCH ON
This coffee grinder delivers coffee doses in timed mode.
Place the grinder on a horizontal surface that is perfectly stable and as vibration-free as possible.
Set up the coffee grinder before operating:
1 Plug the coffee grinder to the electrical main.
2 Bring the switch 7 in the switch ON position "I".
When switched ON for the first time, the coffee grinder will be set to the mode set by the factory.
In the following uses, it will maintain the last mode previous to switch OFF.
When switched ON, the display shows the Victoria Arduino logo for about 3 seconds.
4.2 PREPARATION TO USE
1 Open the cover 1 and fill it with coffee beans.
2 Pull the tab inside the container to allow the passage of coffee.
FR
4.1
natural_image
Technical line drawing of a mechanical component with pulley and screw (no text or symbols)IT
4.3 GRINDING SETTING
Use the knob 4, turning it clockwise for finer grinding or anti-clockwise for a coarser grinding.
ATTENTION
Grinding setting must be performed gradually, grinding a little coffee each time that the knob is turned by two digits (notches). The coffee grinder may seize up if the knob is moved by one turn while the motor is switched off.
The setting has no stop points and each turn of the knob corresponds to a movement of 0.4 mm of the burrs.
The coffee grinders equipped with resettable knob can be set to zero at a preset grinding point by holding the top part of the knob in position and using the ring nut on the base.
4.4 REGOLAZIONE ALTEZZA FORCELLA PORTAFILTRO
If the size of the filter holder should be larger than the set one, the fork can be adjusted.
Using a crosshead screwdriver, loosen the fastening screw of the filter holder fork 5.
It is recommended not to un-screw the screw completely.
natural_image
Technical line drawing of a mechanical device with no visible text or symbolsFR
4.3 RÉGLAGE MOUTURE
natural_image
Diagram of a hand operating a mechanical device with directional arrows indicating motion (no text or symbols present)IT
Raise or lower the fork in order to adjust it according to filter holder dimensions.
Once having reached the correct position, make sure that is properly levelled and tighten the fork fastening screw 5.
natural_image
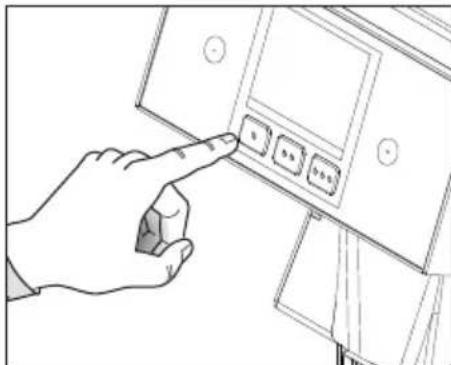
Hand pointing at a control panel with four buttons (no text or symbols visible)4.5
EROGAZIONE DOSI
4.5
DOSE
DISPENSING
A

B
C
Pressing a dose button A, B or C selects the dose to be ground and the display shows the set grinding time.
The dose button C, when set to 0 seconds brewing time, activates continuous grinding, which means that coffee is grounded continuously for as long as the filter holder remains inserted.
natural_image
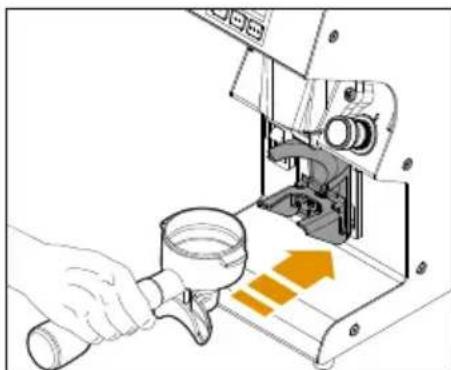
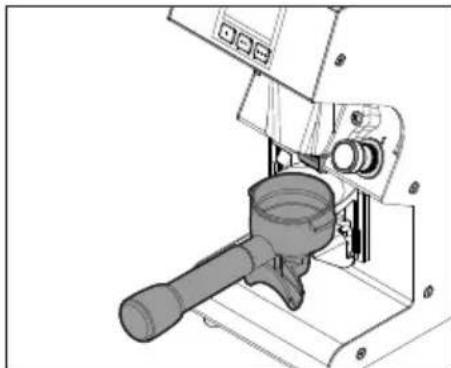
Illustration of a hand using a magnifying glass to press or inspect a machine component with orange arrows indicating motion (no text or symbols present)To start grinding coffee, place the filter cup on the fork 5 and push it forward under the spout 6.
The coffee grinder is equipped with filter holder retaining device.
This device is suitable for Standard Victoria Arduino filter holders, but it can be adjusted according to the available filter holder.
natural_image
Technical line drawing of a mechanical device with a lever and base mount (no text or symbols)
ATTENZIONE
To avoid clogging the spout 6, keep the filter cup placed on the fork 5 and do not bring it close to the spout 6 during grinding.
FR
For timed doses, the display starts counting down when grinding begins.
When grinding is complete, the display shows the initial dose time again.
If the dose partialisation is not active and the filter holder is removed before the time expires, grinding will still continue until the time ends.
Instead if it is active, the grinding stops and the display shows the remaining time.
To resume grinding for the remaining time, simply reinsert the filter holder.
Instead, for the continuous dose, incremental counting from 0 of the grinding time begins on the display.
When finished, the display shows the duration of the last grind.
The next time the filter holder is inserted, the count restarts from 0.
4.5.1
BARISTA MODE
If barista mode is active, for timed doses it is possible to change the grinding duration in real time by pressing the increase and decrease buttons.
Real-time changes become effective and permanent in the dose settings.
FR
text_image
Diagram illustrating a microscope setup with labeled components and directional arrows indicating process flowTo switch OFF the coffee grinder, press the switch 7 in the switch OFF position "0".
The display, the buttons and the lights will switch OFF.
For long pauses and for the safety of people, it is good practice to also disconnect the plug from the mains.
FR
4.6 ARRÊT DE LE MOULIN-DOSEUR
To interact with the display use the buttons:
A Back
B/
C Confirm
D Decrease / Scroll
E Increase / Scroll
FR
The screens described in this manual are indicative only.
To access the Main Menu, press and hold the A and C dose keys for 5 seconds.
With the D and E keys, you can scroll through the sub-menus:
1 Doses settings
2 Counters
3 Settings
4 Language
5 Informations
To exit the Main Menu and re-turn to the Home Page (Main) press A.
After 120 seconds of inactivity, without pressing any key, the display automatically returns to the Home Page.
natural_image
Simple white icon of a mug on black background (no text or symbols)5.2

text_image
1.20IT
5.1
SCHERMATA PRINCIPALE
The home page displays the grinding time of the A-B-C selected dose.
The default time shown on the display corresponds to the dose set for button A.
5.2
DOSES
SETTINGS
Once you enter the Main Menu, the first option is the Doses Setting Menu.
Press C to access the dose timing setting.
Scroll through the options with D and E to select the desired dose A-B-C.
To exit the Dose Setting Menu and return to the Main Menu, press A.
Press A again to return to the Home Page.
After 120 seconds of inactivity, without pressing any key, the display automatically returns to the Home Page.
FR
5.1
ÉCRAN
PRINCIPALE
Press C to enter the DOSE A setting sub-menu. The dispensing seconds appear on the display and the D and E buttons can be used to set the dispensing time for dose A, in 0.1 second steps, up to a maximum of 30 s.
The default setting is 2.8 s.
During the setting, the seconds on the display flash. Press C to confirm and return to the previous menu.
5.2.2
DOSE B SETTING
Press C to enter the DOSE B setting sub-menu. The dispensing seconds appear on the display and the D and E buttons can be used to set the dispensing time for dose B, in 0.1 second steps, up to a maximum of 30 s.
The default setting is 2.8 s.
During the setting, the seconds on the display flash. Press C to confirm and return to the previous menu.
5.2.3
DOSE C SETTING
Press C to enter the DOSE C setting sub-menu.
The dispensing seconds appear on the display and the D and E buttons can be used to set the dispensing time for dose C, in 0.1 second steps, up to a maximum of 30 s.
The default setting is 6 s.
If set to 0 s, the C button corresponds to continuous dispensing. During the setting, the seconds on the display flash.
Press C to confirm and return to the previous menu.
FR
5.2.1
RÉGLAGE DOSE A
To exit the sub-menus and return to the Dose Setting Menu, press A.
After 120 seconds of inactivity, without pressing any key, the display automatically returns to the Home Page.
5.3
COUNTERS
Once you enter the Main Menu, scroll through the options with D and E to the Counters Menu and press C to access.
Displays counters of ground coffee doses:
- Partial dose counter A;
- Partial dose counter B;
- Partial dose counter C;
• Continuous dose counter;
• Total dose counter;
• Absolute dose counter.
To exit the Counters Menu and return to the Main Menu, press A.
Press A again to return to the home page.
After 120 seconds of inactivity, without pressing any key, the display automatically returns to the Home Page.
5.3.1
PARTIAL COUNTERS
The partial dose counters A, B and C show the deliveries made for each dose.
To reset the partial counters, select the desired counter screen and press the dose key C for 3 seconds.
FR
5.2.4
QUITTER LES SOUS-MENUS RÉGLAGE DOSES
CONTINUOUS DOSE COUNTER
Displays the doses delivered with the continuous key.
5.3.3
TOTAL DOSES COUNTER
Displays the total amount of doses A-B-C dispensed.
To reset the total dose counter, press the C key for 3 seconds.
The password will be required to allow resetting.
5.3.4
ABSOLUTE COUNTER
Displays the sum of dispensed and continuous doses.
To reset the total dose counter, press the C key for 3 seconds.
The password will be required to allow resetting.
5.3.5
COUNTERS
SUB-MENU EXIT
To exit the sub-menus and return to the Counters Menu, press A.
After 120 seconds of inactivity, without pressing any key, the display automatically returns to the Home Page.
FR
5.3.2
COMPTEUR DOSES CONTINUES
natural_image
Black rectangular background with a white gear icon in the center (no text or symbols)
text_image
5.4 PASSWORD * * * * *IT
5.4
IMPOSTAZIONI
Once you enter the Main Menu, scroll through the options with D and E to the Settings Menu and press C to access.
Access to the following settings is protected by password (A-B-C keys combination; default = BBBB).
Use the D and E buttons to select the sub-menu and press C to access:
- Doses partialiser;
- Maintenance;
- Doses modalities;
- Barista mode;
- Keys and display;
- Burrs Temp.;
- Temp. sens. offset;
- Fans;
- Buzzer;
- Password;
- Units of measure.
To exit the Settings Menu and return to the Main Menu, press A. Press A again to return to the Home Page.
After 120 seconds of inactivity, without pressing any key, the display automatically returns to the Home Page.
FR
5.4
RÉGLAGES
The first function of the Settings Menu is the Dose Partialiser.
Press C to access and, with the D and E keys, enable or disable the Dose Partialiser.
1 Grinding can be interrupted by removing the filter holder and resumed for the remaining time by reinserting it, or after removing the filter holder, press any key to reset the time on the display.
2 Dispensing ends when the time on the display ends.
If the delivery is unsuccessful, i.e. the time count does not correspond to that of the selected dose, an error icon will appear on the display.
5.4.2
MAINTENANCE
From the Settings Menu, scroll through the options with D and E to the Maintenance function. Press C to access and, with the D and E keys, enable or disable the necessary maintenance signal.
1 Set the maximum number of dispensations. When this number is reached, the indicator light (spanner) will light up on the display to signal maintenance of the grinders.
2 Function disabled: no message on the display.
FR
5.4.1
PARTITEUR DE DOSES
Starting from the OFF condition, by means of individual presses of button E, the number of dispensations is increased to 10000 and is subsequently increased by 5000 for each individual press, up to a maximum of 100000. Starting instead from the maximum figure of 100000 dispensations, with each single press of the D key, the number decreases by 5000 up to a minimum of 10000. At this point, a further pressing of the D key disables the (OFF) function.
5.4.3
DOSES MODALITIES
From the Settings Menu, scroll through the options with D and E to the Dose Mode function. Press C to access and, with the D and E keys, enable or disable the dose setting and dispensing mode.
1 Default mode: doses A and B are timed while button C commands continuous dispensing only.
2 Doses A, B and C are timed and continuous dispensing requires holding down button C.
5.4.4
BARISTA MODE
From the Settings Menu, scroll through the options with D and E to the Dose Mode function. Press C to access and, with the D and E keys, enable or disable the dose setting and dispensing mode.
1 The dose can be modified in real time from the main page using the D and E keys and the changes also become effective and permanent in the settings.
2 The dose can only be modified within the settings.
FR
From the Settings Menu, scroll through the options with D and E to the Keys and Display function.
Press C to access and, with the D and E keys, set the brightness of the keys and the display from 10% to 100%.
5.4.6
BURRS TEMP.
From the Settings Menu, scroll through the options with D and E to the Burrs Temp. function.
Press C to access and, with the D and E keys, adjust the temperature of the grinding chamber in steps of 5^ C from 30^ C to 60^ C.
5.4.7
TEMP. SENS. OFFSET.
From the Settings Menu, scroll through the options with D and E to the Temp. Sens. Offset function.
Press C to access and, with the D and E keys, adjust the sensor offset from -20^ to +20^ .
FR
5.4.5
TOUCHES ET ÉCRAN
From the Settings Menu, scroll through the options with D and E to the Fan function. Press C to access and, with the D and E keys, adjust the activation time of the cooling fans in steps of 1 second from 0 to 180 seconds total.
Fans are activated after each delivery until the set time is reached.
5.4.9
BUZZER
From the Settings Menu, scroll through the options with D and E to the Buzzer function.
Press C to access and, with the D and E keys, enable or disable the audible warning device.
1 Each time you press the keys, a sound signal will be emitted.
2 No sound will be emitted with each key press.
5.4.10
PASSWORD
From the Settings Menu, scroll through the options with D and E to the Password function. Press C to access the password setting to access the Settings Menu.
The password must have 5 digits by combining keys A, B and/or C.
To reset the password, press the B key 5 times.
FR
5.4.8
VENTILATEURS
From the Settings Menu, scroll through the options with D and E to the Unit of Measure function. Press C to access and, with the D and E keys, select the temperature measure unit:
1 °C: Celsius degree
2 °F: Fahrenheit degree
5.4.12
SETTINGS
SUB-MENU EXIT
To exit the sub-menus and return to the Settings Menu, press A.
After 120 seconds of inactivity, without pressing any key, the display automatically returns to the Home Page.
5.5
LANGUAGE
Once you enter the Main Menu, scroll through the options with D and E to the Language Menu and press C to access. Use the D and E keys to select the display language:
• Italian;
- English;
- French;
• German;
- Spanish.
After selection, press C to confirm.
To exit the Language Menu and return to the Main Menu, press A. Press A again to return to the Home Page. After 120 seconds of inactivity, without pressing any key, the display automatically returns to the Home Page.
FR
5.4.11
UNITÉ DE MESURE
text_image
5.6 V 2.15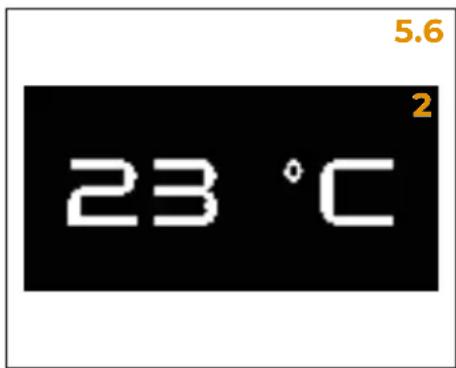
text_image
5.6 23 °CIT
5.6
INFORMAZIONI
Once you enter the Main Menu, scroll through the options with D and E to the Information Menu and press C to access.
With the D and E keys, you can scroll through the information to be displayed:
1 Firmware version installed;
2 Burrs temperature.
To exit the Information Menu and return to the Main Menu, press A.
Press A again to return to the Home Page.
After 120 seconds of inactivity, without pressing any key, the display automatically returns to the Home Page.
FR
5.6 INFORMATIONS
Unplug the coffee grinder before performing any cleaning and maintenance operation.
Do not pull the power cable or the coffee grinder itself to disconnect the plug.
natural_image
3D diagram of a mechanical component with an arrow indicating motion, no text or symbols present6.1
PULIZIA
Before removing the container 2 always remember to close the tab, otherwise it will not come away.
natural_image
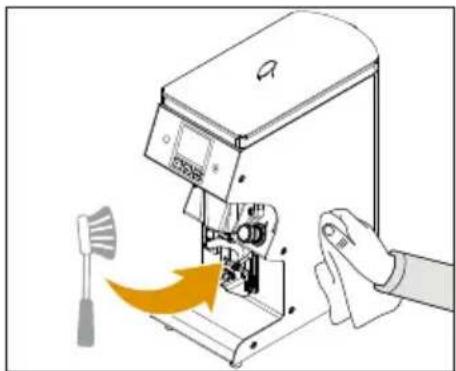
Illustration of a hand operating a 3D printer with a brush, showing mechanical components and an orange arrow indicating motion (no text or symbols present)6.1.1
PULIZIA CORPO MACININO
Switch off the grinder using switch 7 ("0" position) and disconnect the plug from the mains.
Use a brush for cleaning of:
• Dispensing spout 6
- Filter holder fork 5
• Fork adjustment screws
Clean the casing with a damp cloth at least once a week.
Use perfectly clean and hygienic cloths or brushes. Do not use abrasive products that can damage surfaces.
FR

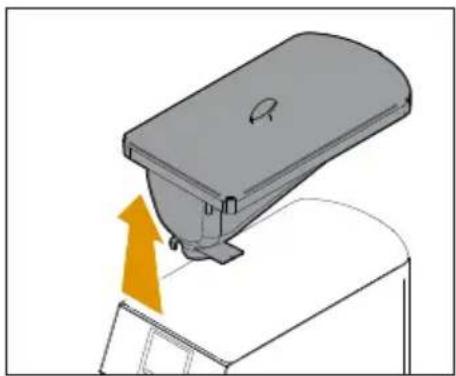
ATTENTION
At least once a week it is necessary to remove the coffee bean container 2, which simply rests on the coffee grinder body. This is to remove the oily layer left by the coffee beans using a clean cloth. If this operation is not performed, there is a risk that the grease will become rancid, with negative effects on the flavour of next cups of coffee.
text_image
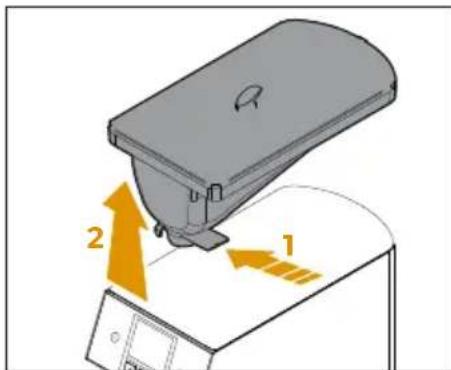
Diagram showing a device with labeled parts and directional arrows indicating motion or movement, including components 1 and 2.To clean the container:
1 Close the container by pulling the inner locking tab and grind the remaining coffee beans in the grinding chamber until it is empty.
2 Push the container upwards to remove it.
natural_image
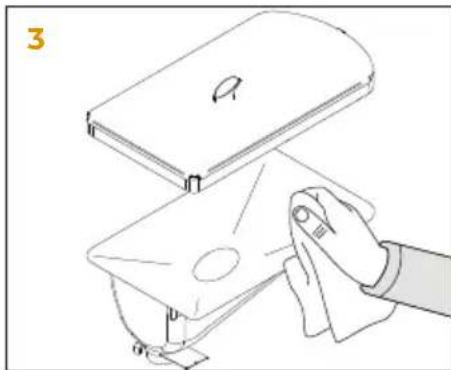
Illustration of a hand holding a closed book and a folded envelope (no text or symbols)3 Transfer coffee beans temporarily to another container and clean the inside and outside of the container with a damp cloth and then dry thoroughly;
text_image
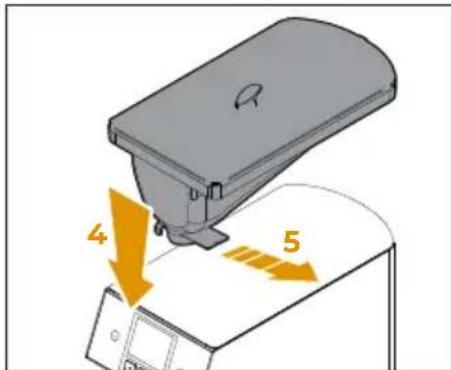
4 54 Replace the container into its original position and insert the coffee into the container again;
5 Open the container by pushing the locking tab.
FR
6.1.2
NETTOYAGE DU RÉCIPIENT CAFÉ EN GRAINS
GRINDING CHAMBER CLEANING
Clean the grinding chamber every 2-5 days.
text_image
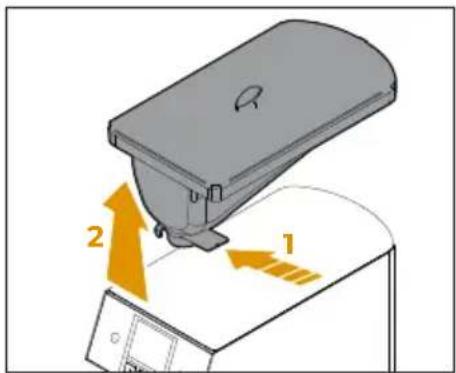
Diagram showing a device with labeled parts and directional arrows indicating motion or movement, including '1' and '2'.It is forbidden to open the grinding chamber.
1 Close the container by pulling the inner locking tab and grind the remaining coffee beans in the grinding chamber until it is empty.
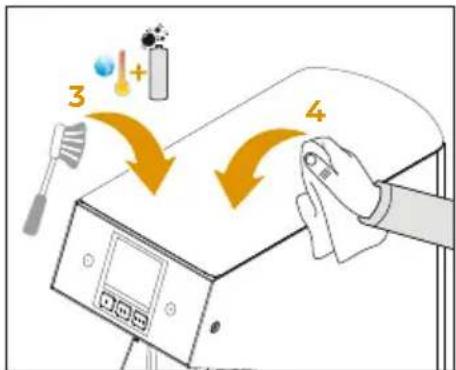
text_image
3 + 42 Push the container upwards to remove it.
3 Using the supplied brush soaked in a solution of water and detergent, clean the grinding chamber.
4 When finished, clean the chamber with an absorbent cloth.
natural_image
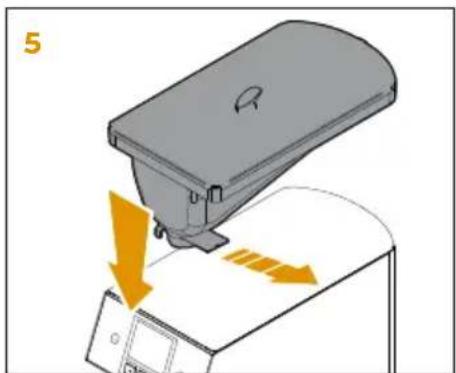
Diagram of a device with an open lid and orange arrows indicating motion or force, no text or symbols present.5 Reinsert the container and open it by pulling the inner tab.
It is recommended to use a specific detergent in tablet form, according to the dosage and procedure prescribed by the manufacturer. Use only detergent specifically for cleaning grinders for professional use.
FR
6.1.3
NETTOYAGE DE LA
CHAMBRE DE MOUTURE
Unplug the coffee grinder from power supply before carrying out any cleaning and maintenance intervention and leave the hot parts to cool down.

ATTENZIONE
Maintenance operations must be carried out by specialized personnel authorized by the manufacturer.

ATTENZIONE
Do not carry out unprofessional or dangerous repairs, do not use non-original spare parts.
For good operation, it is necessary a periodic maintenance performed by the qualified technician.
FR
6.2
ENTRETIEN

ATTENTION
RICERCA GUASTI TROUBLESHOOTING RECHERCHES PANNES
IT
Contact skilled personnel.
FR
1 Power supply
2 Earth rod
3 Main switch
4 Interlock switch
5 Power unit
6 Chamber temperature probe
7 Display unit
8 Left led
9 Right led
10Grinding start button
11 Chamber heating element
12Grinding motor
13 Upper cooling fan
14Lower cooling fan
FR
LÉGENDE
text_image
Electrical schematic diagram with labeled components and connections, including motors, switches, and voltage ratingsEC DECLARATION OF CONFORMITY


text_image
Victoria ArduinoINSPIRED BY YOUR PASSION.
SIMONELLI GROUP
Via E. Betti, 1 - 62020 Belforte del Chienti (MC) – ITALY
Declare under our responsibility that the product:
MACINADOSATORE PER CAFFÈ
MODELLO: MY ONE
COFFEE GRINDER
MODEL: MY ONE
VERSIONE: 110/220 V - 50/60 Hz
VERSION: 110/220 V - 50/60 Hz
SERIE: AA
SERIES: AA
MATRICOLA DAL: 0001-23
to which this declaration relates, following the provisions of the directives:
2006/42/EC - 2014/35/EU - 2014/30/EU - 2011/65/EU - 2012/19/EU
EC 1935/2004 - EC 2023/2006 - D.M. 21/03/1973
10/2011/EEC - 85/572/EEC - 82/711/EEC
Data: Gennaio 2023
Date: January 2023
text_image
Victoria ArduinoINSPIRED BY YOUR PASSION.