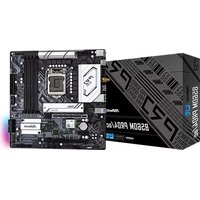
USER MANUAL B560M Pro4/ac ASROCK
Published January 2021
Copyright©2021 ASRock INC. All rights reserved.
Copyright Notice:
No part of this documentation may be reproduced, transcribed, transmitted, or translated in any language, in any form or by any means, except duplication of documentation by the purchaser for backup purpose, without written consent of ASRock Inc.
Products and corporate names appearing in this documentation may or may not be registered trademarks or copyrights of their respective companies, and are used only for identification or explanation and to the owners' benefit, without intent to infringe.
Disclaimer:
Specifications and information contained in this documentation are furnished for informational use only and subject to change without notice, and should not be constructed as a commitment by ASRock. ASRock assumes no responsibility for any errors or omissions that may appear in this documentation.
With respect to the contents of this documentation, ASRock does not provide warranty of any kind, either expressed or implied, including but not limited to the implied warranties or conditions of merchantability or fitness for a particular purpose.
In no event shall ASRock, its directors, officers, employees, or agents be liable for any indirect, special, incidental, or consequential damages (including damages for loss of profits, loss of business, loss of data, interruption of business and the like), even if ASRock has been advised of the possibility of such damages arising from any defect or error in the documentation or product.

This device complies with Part 15 of the FCC Rules. Operation is subject to the following two conditions:
(1) this device may not cause harmful interference, and (2) this device must accept any interference received, including interference that may cause undesired operation.
CALIFORNIA, USA ONLY
The Lithium battery adopted on this motherboard contains Perchlorate, a toxic substance controlled in Perchlorate Best Management Practices (BMP) regulations passed by the California Legislature. When you discard the Lithium battery in California, USA, please follow the related regulations in advance.
"Perchlorate Material-special handling may apply, see www.dtsc.ca.gov/hazardouswaste/perchlorate"
ASRock Website: http://www.asrock.com

AUSTRALIA ONLY
Our goods come with guarantees that cannot be excluded under the Australian Consumer Law. You are entitled to a replacement or refund for a major failure and compensation for any other reasonably foreseeable loss or damage caused by our goods. You are also entitled to have the goods repaired or replaced if the goods fail to be of acceptable quality and the failure does not amount to a major failure. If you require assistance please call ASRock Tel: +886-2-28965588 ext.123 (Standard International call charges apply)
The terms HDMI® and HDMI High-Definition Multimedia Interface, and the HDMI logo are trademarks or registered trademarks of HDMI Licensing LLC in the United States and other countries.

HIGH-DEFINITION MULTIMEDIA INTERFACE
INTEL END USER SOFTWARE LICENSE AGREEMENT IMPORTANT - READ BEFORE COPYING, INSTALLING OR USING.
LICENSE. Licensee has a license under Intel's copyrights to reproduce Intel's Software only in its unmodified and binary form, (with the accompanying documentation, the "Software") for Licensee's personal use only, and not commercial use, in connection with Intel-based products for which the Software has been provided, subject to the following conditions:
(a) Licensee may not disclose, distribute or transfer any part of the Software, and You agree to prevent unauthorized copying of the Software. (b) Licensee may not reverse engineer, decompile, or disassemble the Software. (c) Licensee may not sublicense the Software. (d) The Software may contain the software and other intellectual property of third party suppliers, some of which may be identified in, and licensed in accordance with, an enclosed license.txt file or other text or file. (e) Intel has no obligation to provide any support, technical assistance or updates for the Software.
OWNERSHIP OF SOFTWARE AND COPYRIGHTS. Title to all copies of the Software remains with Intel or its licensors or suppliers. The Software is copyrighted and protected by the laws of the United States and other countries, and international treaty provisions. Licensee may not remove any copyright notices from the Software. Except as otherwise expressly provided above, Intel grants no express or implied right under Intel patents, copyrights, trademarks, or other intellectual property rights. Transfer of the license terminates Licensee's right to use the Software.
DISCLAIMER OF WARRANTY. The Software is provided “AS IS” without warranty of any kind, EITHER EXPRESS OR IMPLIED, INCLUDING WITHOUT LIMITATION, WARRANTIES OF MERCHANTABILITY OR FITNESS FOR ANY PARTICULAR PURPOSE.
LIMITATION OF LIABILITY. NEITHER INTEL NOR ITS LICENSORS OR SUPPLIERS WILL BE LIABLE FOR ANY LOSS OF PROFITS, LOSS OF USE, INTERRUPTION OF BUSINESS, OR INDIRECT, SPECIAL, INCIDENTAL, OR CONSEQUENTIAL DAMAGES
OF ANY KIND WHETHER UNDER THIS AGREEMENT OR OTHERWISE, EVEN IF INTEL HAS BEEN ADVISED OF THE POSSIBILITY OF SUCH DAMAGES.
LICENSE TO USE COMMENTS AND SUGGESTIONS. This Agreement does NOT obligate Licensee to provide Intel with comments or suggestions regarding the Software. However, if Licensee provides Intel with comments or suggestions for the modification, correction, improvement or enhancement of (a) the Software or (b) Intel products or processes that work with the Software, Licensee grants to Intel a non-exclusive, worldwide, perpetual, irrevocable, transferable, royalty-free license, with the right to sublicense, under Licensee's intellectual property rights, to incorporate or otherwise utilize those comments and suggestions.
TERMINATION OF THIS LICENSE. Intel or the sublicensor may terminate this license at any time if Licensee is in breach of any of its terms or conditions. Upon termination, Licensee will immediately destroy or return to Intel all copies of the Software.
THIRD PARTY BENEFICIARY. Intel is an intended beneficiary of the End User License Agreement and has the right to enforce all of its terms.
U.S. GOVERNMENT RESTRICTED RIGHTS. The Software is a commercial item (as defined in 48 C.F.R. 2.101) consisting of commercial computer software and commercial computer software documentation (as those terms are used in 48 C.F.R. 12.212), consistent with 48 C.F.R. 12.212 and 48 C.F.R 227.7202-1 through 227.7202-4. You will not provide the Software to the U.S. Government. Contractor or Manufacturer is Intel Corporation, 2200 Mission College Blvd., Santa Clara, CA 95054.
EXPORT LAWS. Licensee agrees that neither Licensee nor Licensee's subsidiaries will export/re-export the Software, directly or indirectly, to any country for which the U.S. Department of Commerce or any other agency or department of the U.S. Government or the foreign government from where it is shipping requires an export license, or other governmental approval, without first obtaining any such required license or approval. In the event the Software is exported from the U.S.A. or re-exported from a foreign destination by Licensee, Licensee will ensure that the distribution and export/re-export or import of the Software complies with all laws, regulations, orders, or other restrictions of the U.S. Export Administration Regulations and the appropriate foreign government.
APPLICABLE LAWS. This Agreement and any dispute arising out of or relating to it will be governed by the laws of the U.S.A. and Delaware, without regard to conflict of laws principles. The Parties to this Agreement exclude the application of the United Nations Convention on Contracts for the International Sale of Goods (1980). The state and federal courts sitting in Delaware, U.S.A. will have exclusive jurisdiction over any dispute arising out of or relating to this Agreement. The Parties consent to personal jurisdiction and venue in those courts. A Party that obtains a judgment against the other Party in the courts identified in this section may enforce that judgment in any court that has jurisdiction over the Parties.
Licensee's specific rights may vary from country to country.
CE Warning
This device complies with directive 2014/53/EU issued by the Commission of the European Community.
This equipment complies with EU radiation exposure limits set forth for an uncontrolled environment.
This equipment should be installed and operated with minimum distance 20cm between the radiator & your body.
Operations in the 5.15-5.35GHz band are restricted to indoor usage only.
| AT | BE | BG | CH | CY | CZ | DE |
| DK | EE | EL | ES | FI | FR | HR |
| HU | IE | IS | IT | LI | LT | LU |
| LV | MT | NL | NO | PL | PT | RO |
| SE | SI | SK | TR | UK | | |

Radio transmit power per transceiver type
Function Frequency Maximum Output Power (EIRP)
| 2400-2483.5 MHz 18.5 + / -1.5 dbm |
| 5150-5250 MHz 21.5 + / -1.5 dbm |
| WiFi | 5250-5350 MHz | 18.5 + / -1.5 dbm (no TPC) |
| 21.5 + / -1.5 dbm (TPC) |
| 5470-5725 MHz | 25.5 + / -1.5 dbm (no TPC) |
| 28.5 + / -1.5 dbm (TPC) |
Bluetooth 2400-2483.5 MHz 8.5 +/- 1.5 dBm
Motherboard Layout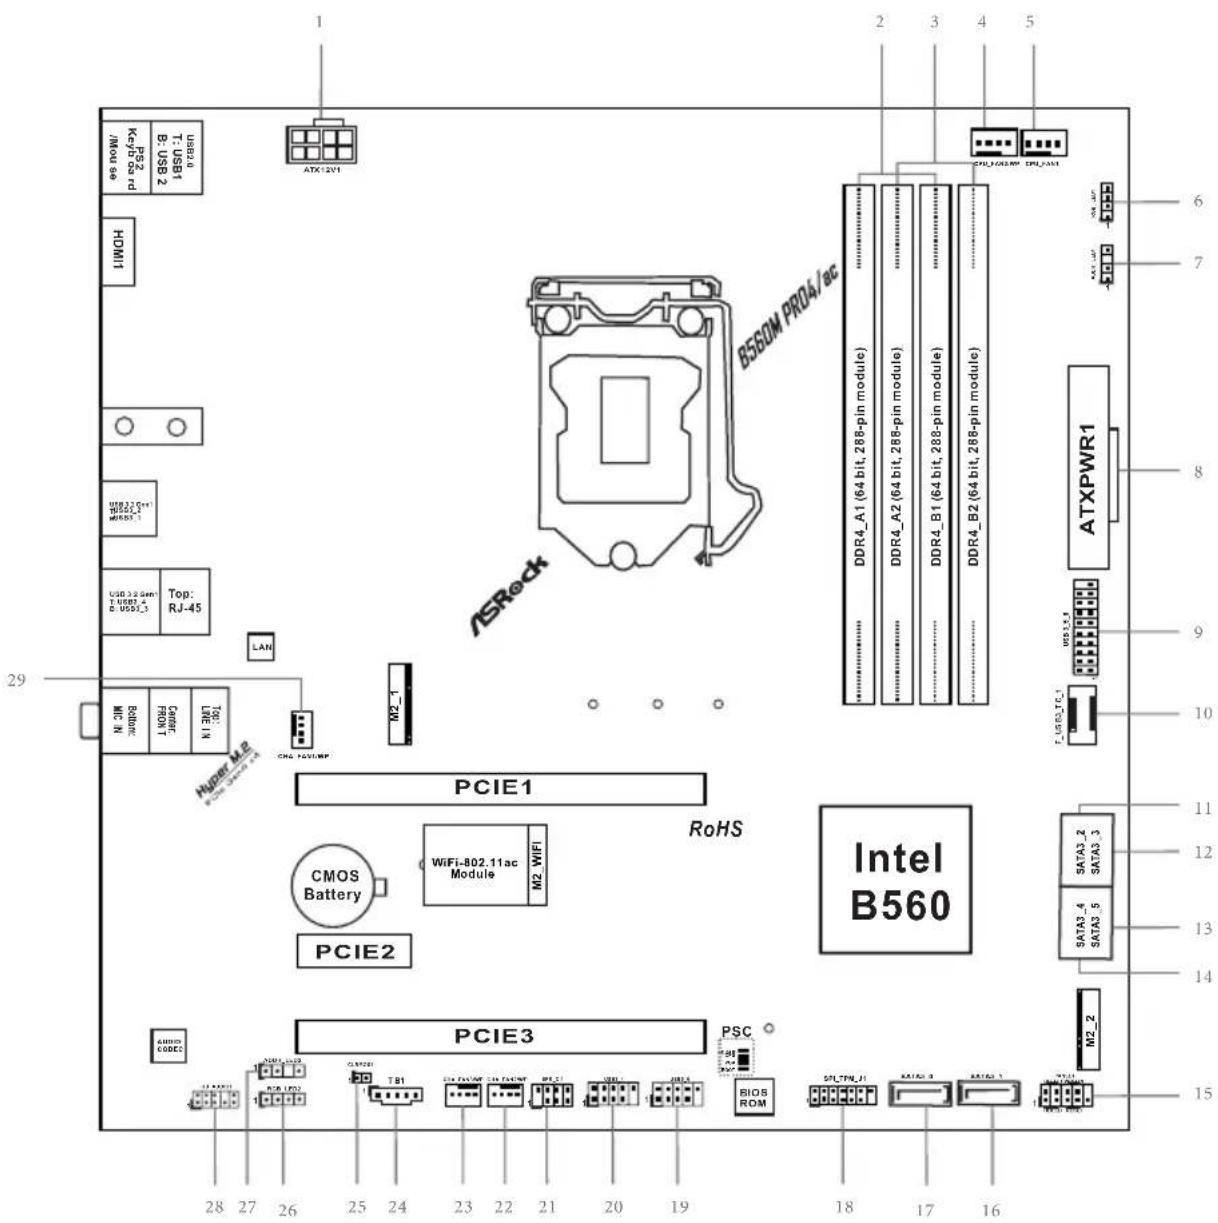
No. Description
1 ATX 12V Power Connector (ATX12V1) 2 2 x 288-pin DDR4 DIMM Slots (DDR4_A1, DDR4_B1) 3 2 x 288-pin DDR4 DIMM Slots (DDR4_A2, DDR4_B2) 4 CPU/Water Pump Fan Connector (CPU_FAN2/WP) 5 CPU Fan Connector (CPU_FAN1) 6 RGB LED Header (RGB_LED1) 7 Addressable LED Header (ADDR_LED1) 8 ATX Power Connector (ATXPWR1) 9 USB 3.2 Gen1 Header (USB3_5_6) 10 Front Panel Type C USB 3.2 Gen1 Header (F_USB3_TC_1) 11 SATA3 Connector (SATA3_2)(Upper) 12 SATA3 Connector (SATA3_3)(Lower) 13 SATA3 Connector (SATA3_5)(Lower) 14 SATA3 Connector (SATA3_4)(Upper) 15 System Panel Header (PANEL1) 16 SATA3 Connector (SATA3_1) 17 SATA3 Connector (SATA3_0) 18 SPI TPM Header (SPI_TPM_J1) 19 USB 2.0 Header (USB5_6) 20 USB 2.0 Header (USB3_4) 21 Chassis Intrusion and Speaker Header (SPK_CI1) 22 Chassis/Water Pump Fan Connector (CHA_FAN2/WP) 23 Chassis/Water Pump Fan Connector (CHA_FAN3/WP) 24 Thunderbolt AIC Connector (TB1) 25 Clear CMOS Jumper (CLRMOS1) 26 RGB LED Header (RGB_LED2) 27 Addressable LED Header (ADDR_LED2) 28 Front Panel Audio Header (HD_AUDIO1) 29 Chassis/Water Pump Fan Connector (CHA_FAN1/WP)
I/O Panel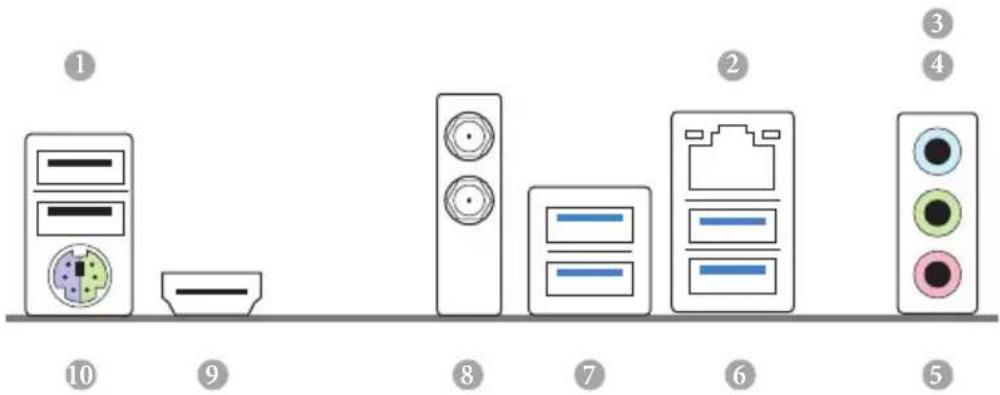
No. Description No. Description
1 USB 2.0 Ports (USB12) 6 USB 3.2 Gen1 Ports (USB3_3_4) 2 LAN RJ-45 Port* 7 USB 3.2 Gen1 Ports (USB3_1_2) 3 Line In (Light Blue)** 8 Antenna Ports 4 Front Speaker (Lime)** 9 HDMI Port 5 Microphone (Pink)** 10 PS/2 Mouse/Keyboard Port
* There are two LEDs on the LAN port. Please refer to the table below for the LAN port LED indications.
ACT/LINK LED
LAN Port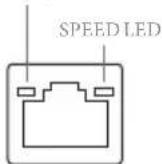
Activity / Link LED Speed LED Status Description Status Description
| Off | No Link | Off | 10Mbps connection |
| Blinking | Data Activity | Orange | 100Mbps connection |
| On | Link | Green | 1Gbps connection |
**Function of the Audio Ports in 7.1-channel Configuration:
| Port | Function |
| Light Blue (Rear panel) | Rear Speaker Out |
| Lime (Rear panel) | Front Speaker Out |
| Pink (Rear panel) | Central /Subwoofer Speaker Out |
| Lime (Front panel) | Side Speaker Out |
1.5 WiFi-802.11ac Module and ASRock WiFi 2.4/5GHz Antennas
WiFi-802.11ac + BT Module
This motherboard comes with an exclusive WiFi 802.11 a/b/g/n/ac + BT v5.1 module that offers support for WiFi 802.11 a/b/g/n/ac connectivity standards and Bluetooth v5.1. WiFi + BT module is an easy-to-use wireless local area network (WLAN) adapter to support WiFi + BT. Bluetooth v5.1 standard features Smart Ready technology that adds a whole new class of functionality into the mobile devices. BT 5.1 also includes Low Energy Technology and ensures extraordinary low power consumption for PCs. * The transmission speed may vary according to the environment.
WiFi Antennas Installation Guide
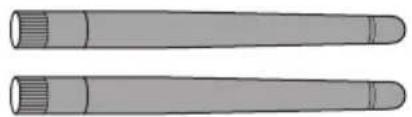
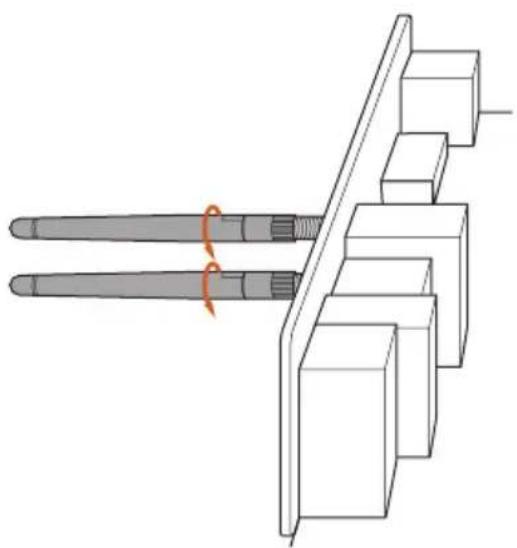
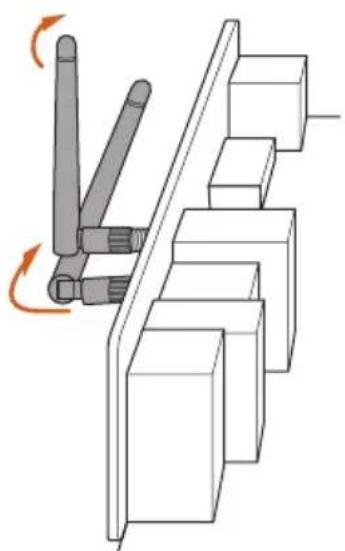
Step 1
Prepare the WiFi 2.4/5 GHz Antennas that come with the package.
Step 2
Connect the two WiFi 2.4/5 GHz Antennas to the antenna connectors. Turn the antenna clockwise until it is securely connected.
Step 3
Set the WiFi 2.4/5 GHz Antenna as shown in the illustration.
*You may need to adjust the direction of the antenna for a stronger signal.
Chapter 1 Introduction
Thank you for purchasing ASRock B560M Pro4/ac motherboard, a reliable motherboard produced under ASRock's consistently stringent quality control. It delivers excellent performance with robust design conforming to ASRock's commitment to quality and endurance.

Because the motherboard specifications and the BIOS software might be updated, the content of this documentation will be subject to change without notice. In case any modifications of this documentation occur, the updated version will be available on ASRock's website without further notice. If you require technical support related to this motherboard, please visit our website for specific information about the model you are using. You may find the latest VGA cards and CPU support list on ASRock's website as well. ASRock website http://www.asrock.com.
1.1 Package Contents
• ASRock B560M Pro4/ac Motherboard (Micro ATX Form Factor) • ASRock B560M Pro4/ac Quick Installation Guide • ASRock B560M Pro4/ac Support CD • 2 x Serial ATA (SATA) Data Cables (Optional) • 2 x ASRock WiFi 2.4/5 GHz Antennas (Optional) • 2 x Screws for M.2 Sockets (Optional) • 1 x Standoff for M.2 Socket (Optional) • 1 x I/O Panel Shield
1.2 Specifications
• Micro ATX Form Factor • Solid Capacitor design
CPU
- Supports 10th Gen Intel* CoreTM Processors and 11th Gen Intel* CoreTM Processors (LGA1200)
- Digi Power design • 8 Power Phase design • Supports Intel® Turbo Boost Max 3.0 Technology
Chipset
- Intel® B560
Memory
• Dual Channel DDR4 Memory Technology
• 4 x DDR4 DIMM Slots
- 11th Gen Intel® Core™ Processors support DDR4 non-ECC, un-buffered memory up to 4800+(OC)*
- 10th Gen Intel® Core™ Processors support DDR4 non-ECC, un-buffered memory up to 4600+(OC)*
* 11th Gen Intel® Core™ (i9/i7/i5) support DDR4 up to 2933; Core™ (i3), Pentium® and Celeron® support DDR4 up to 2666.
* 10th Gen Intel® Core™ (i9/i7) support DDR4 up to 2933; Core™ (i5/i3), Pentium® and Celeron® support DDR4 up to 2666.
* Please refer to Memory Support List on ASRock's website for more information. (http://www.asrock.com/)
• Supports ECC UDIMM memory modules (operate in non-ECC mode)
• Max. capacity of system memory: 128GB
• Supports Intel® Extreme Memory Profile (XMP) 2.0
Expansion
11th Gen Intel® Core™ Processors
Slot
- 2 x PCI Express x16 Slots (PCIE1/PCIE3: single at Gen4x16 (PCIE1); dual at Gen4x16 (PCIE1) / Gen3x4 (PCIE3))
10th Gen Intel® Core™ Processors
- 2 x PCI Express x16 Slots (PCIE1/PCIE3: single at Gen3x16 (PCIE1); dual at Gen3x16 (PCIE1) / Gen3x4 (PCIE3))
* Supports NVMe SSD as boot disks
• 1 x PCI Express 3.0 x1 Slot
• Supports AMD Quad CrossFireX™ and CrossFireX™
- 1 x M.2 Socket (Key E), supports type 2230 WiFi/BT module and Intel® CNVi (Integrated WiFi/BT)
Graphics
- Intel® UHD Graphics Built-in Visuals and the VGA outputs can be supported only with processors which are GPU integrated.
- 11th Gen Intel® Core™ Processors support Intel® Xe Graphics Architecture (Gen 12). 10th Gen Intel® Core™ Processors support Gen 9 Graphics
- Graphics, Media & Compute: Microsoft DirectX 12, OpenGL 4.5, Intel® Built In Visuals, Intel® Quick Sync Video, Hybrid / Switchable Graphics, OpenCL 2.1
- Display & Content Security: Rec. 2020 (Wide Color Gamut), Microsoft PlayReady 3.0, UHD/HDR Blu-ray Disc
- Supports HDMI 2.0 with max. resolution up to 4K x 2K (4096x2160) @ 60Hz
- Supports Auto Lip Sync, Deep Color (12bpc), xvYCC and HBR (High Bit Rate Audio) with HDMI 2.0 Port (Compliant HDMI monitor is required) • Supports HDCP 2.3 with HDMI 2.0 Port
- Supports 4K Ultra HD (UHD) playback with HDMI 2.0 Port * 11th Gen Intel® CoreTM Processors support HDMI 2.0. 10th Gen Intel® CoreTM Processors support HDMI 1.4.
Audio
• 7.1 CH HD Audio (Realtek ALC897 Audio Codec) • Supports Surge Protection - Nahimic Audio
LAN
• Gigabit LAN 10/100/1000 Mb/s • Giga PHY Intel® I219V • Supports Wake-On-LAN • Supports Lightning/ESD Protection • Supports Energy Efficient Ethernet 802.3az • Supports PXE
Wireless
- Intel® 802.11ac WiFi Module • Supports IEEE 802.11a/b/g/n/ac • Supports Dual-Band (2.4/5 GHz) • Supports high speed wireless connections up to 433Mbps • Supports Bluetooth 5.1 + High speed class II
Rear Panel
I/O
- 2 x Antenna Ports • 1 x PS/2 Mouse/Keyboard Port
- 1 x HDMI Port • 4 x USB 3.2 Gen1 Ports (Supports ESD Protection) • 2 x USB 2.0 Ports (Supports ESD Protection)
- 1 x RJ-45 LAN Port with LED (ACT/LINK LED and SPEED LED) • HD Audio Jacks: Line in / Front Speaker / Microphone
Storage
- 6 x SATA3 6.0 Gb/s Connectors, support Intel Rapid Storage Technology 18, NCQ, AHCI and Hot Plug* * If M2_2 is occupied by a SATA-type M.2 device, SATA3_1 will be disabled.
- 1 x Hyper M.2 Socket (M2_1), supports M Key type 2242/2260/2280 M.2 PCI Express module up to Gen4x4 (64 Gb/s) (Only supported with 11th Gen Intel® Core™ Processors) **
- 1 x Ultra M.2 Socket (M2_2), supports M Key type 2280 M.2 SATA3 6.0 Gb/s module and M.2 PCI Express module up to Gen3 x4 (32 Gb/s) ** ** Supports NVMe SSD as boot disks ** Supports ASRock U.2 Kit
Connector
• 1 x SPI TPM Header • 1 x Chassis Intrusion and Speaker Header • 2 x RGB LED Headers * Support in total up to 12V/3A, 36W LED Strip • 2 x Addressable LED Headers * Support in total up to 5V/3A, 15W LED Strip • 1 x CPU Fan Connector (4-pin) * The CPU Fan Connector supports the CPU fan of maximum 1A (12W) fan power. - 1 x CPU/Water Pump Fan Connector (4-pin) (Smart Fan Speed Control) * The CPU/Water Pump Fan supports the water cooler fan of maximum 2A (24W) fan power.
- 3 x Chassis/Water Pump Fan Connectors (4-pin) (Smart Fan Speed Control)
* The Chassis/Water Pump Fan supports the water cooler fan of maximum 2A (24W) fan power.
* CPU_FAN2/WP, CHA_FAN1/WP, CHA_FAN2/WP and CHA_FAN3/WP can auto detect if 3-pin or 4-pin fan is in use.
• 1 x 24 pin ATX Power Connector - 1 x 8 pin 12V Power Connector (Hi-Density Power Connector) • 1 x Front Panel Audio Connector - 1 x Thunderbolt AIC Connector (5-pin) (Supports ASRock Thunderbolt 4 AIC Card) - 2 x USB 2.0 Headers (Support 4 USB 2.0 ports) (Supports ESD Protection) - 1 x USB 3.2 Gen1 Header (Supports 2 USB 3.2 Gen1 ports) (Supports ESD Protection) - 1 x Front Panel Type C USB 3.2 Gen1 Header (Supports ESD Protection)
BIOS
Feature
• AMI UEFI Legal BIOS with multilingual GUI support • ACPI 6.0 Compliant wake up events - SMBIOS 2.7 Support - CPU Core/Cache, GT, DRAM, VPPM, VCCIN AUX, VCCSA, VCCIO Multi-adjustment
Hardware
Monitor
• Fan Tachometer: CPU, CPU/Water Pump, Chassis/Water Pump Fans
• Quiet Fan (Auto adjust chassis fan speed by CPU temperature): CPU, CPU/Water Pump, Chassis/Water Pump Fans
• Fan Multi-Speed Control: CPU, CPU/Water Pump, Chassis/Water Pump Fans
• CASE OPEN detection
• Voltage monitoring: +12V, +5V, +3.3V, CPU Vcore, DRAM, VPPM, VCCIN AUX, VCCSA, VCCIO, CPU PLL Voltage
- Microsoft® Windows® 10 64-bit
Certifications
- FCC, CE
• ErP/EuP Ready (ErP/EuP ready power supply is required)
* For detailed product information, please visit our website: http://www.asrock.com

Please realize that there is a certain risk involved with overclocking, including adjusting the setting in the BIOS, applying Untied Overclocking Technology, or using third-party overclocking tools. Overclocking may affect your system's stability, or even cause damage to the components and devices of your system. It should be done at your own risk and expense. We are not responsible for possible damage caused by overclocking.
Chapter 2 Installation
This is a Micro ATX form factor motherboard. Before you install the motherboard, study the configuration of your chassis to ensure that the motherboard fits into it.
Pre-installation Precautions
Take note of the following precautions before you install motherboard components or change any motherboard settings.
- Make sure to unplug the power cord before installing or removing the motherboard components. Failure to do so may cause physical injuries and damages to motherboard components.
- In order to avoid damage from static electricity to the motherboard's components, NEVER place your motherboard directly on a carpet. Also remember to use a grounded wrist strap or touch a safety grounded object before you handle the components.
- Hold components by the edges and do not touch the ICs.
- Whenever you uninstall any components, place them on a grounded anti-static pad or in the bag that comes with the components.
- When placing screws to secure the motherboard to the chassis, please do not over-tighten the screws! Doing so may damage the motherboard.
2.1 Installing the CPU

- Before you insert the 1200-Pin CPU into the socket, please check if the PnP cap is on the socket, if the CPU surface is unclean, or if there are any bent pins in the socket. Do not force to insert the CPU into the socket if above situation is found. Otherwise, the CPU will be seriously damaged.
- Unplug all power cables before installing the CPU.
1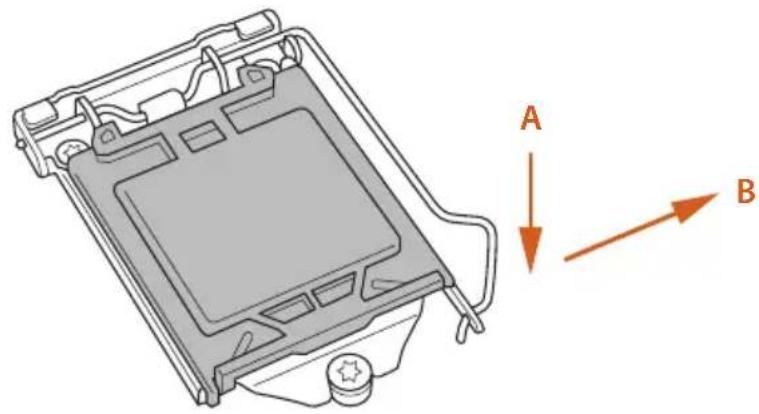
2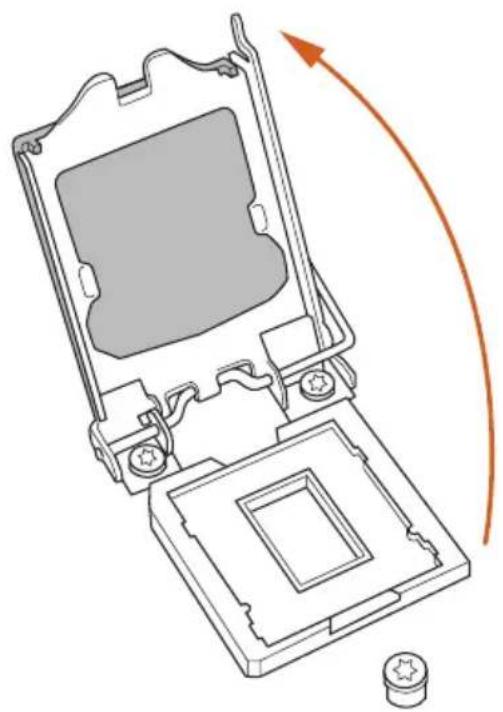
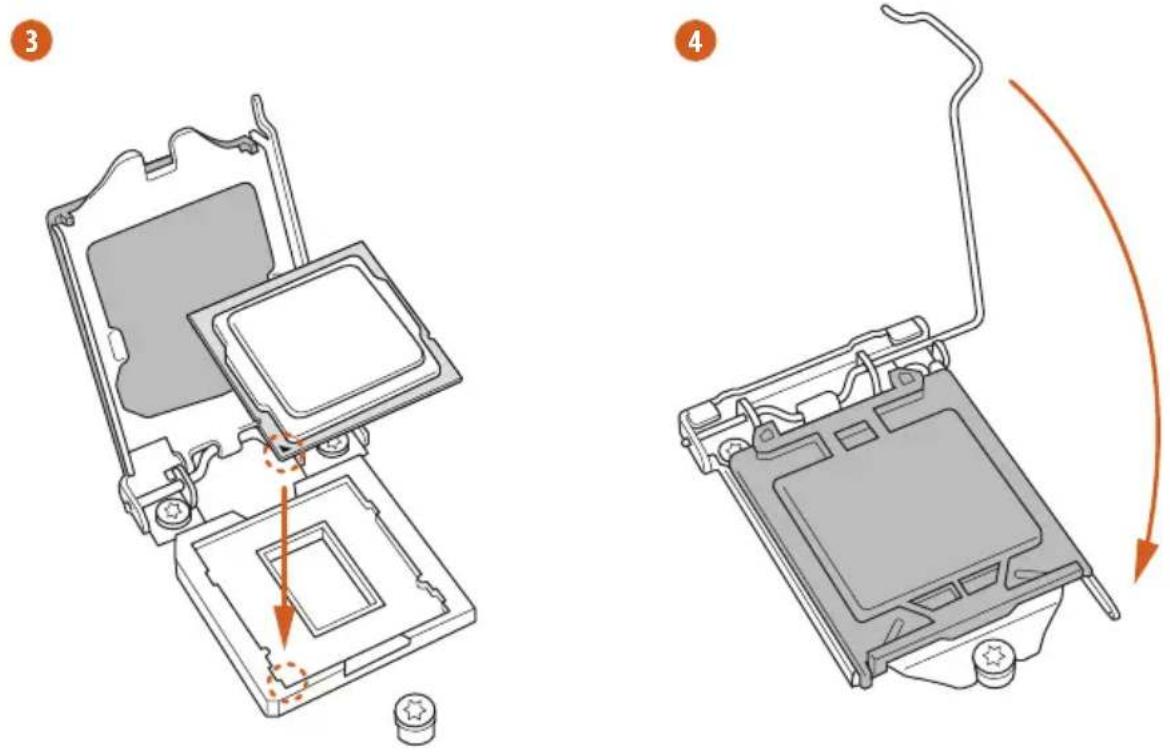
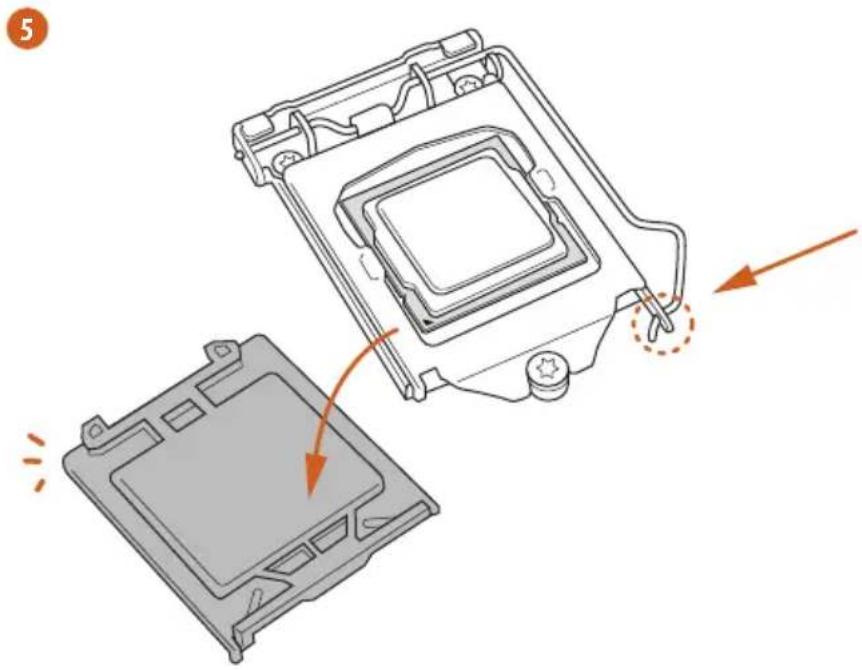

Please save and replace the cover if the processor is removed. The cover must be placed if you wish to return the motherboard for after service.
2.2 Installing the CPU Fan and Heatsink
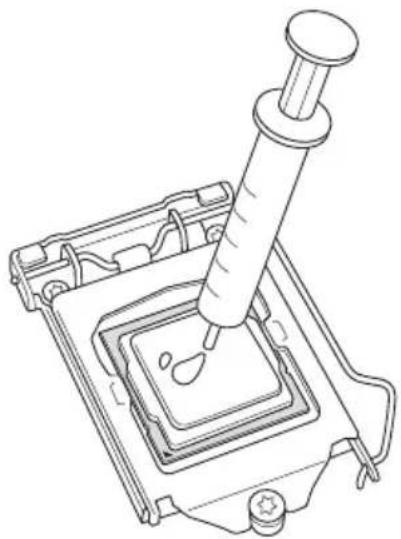
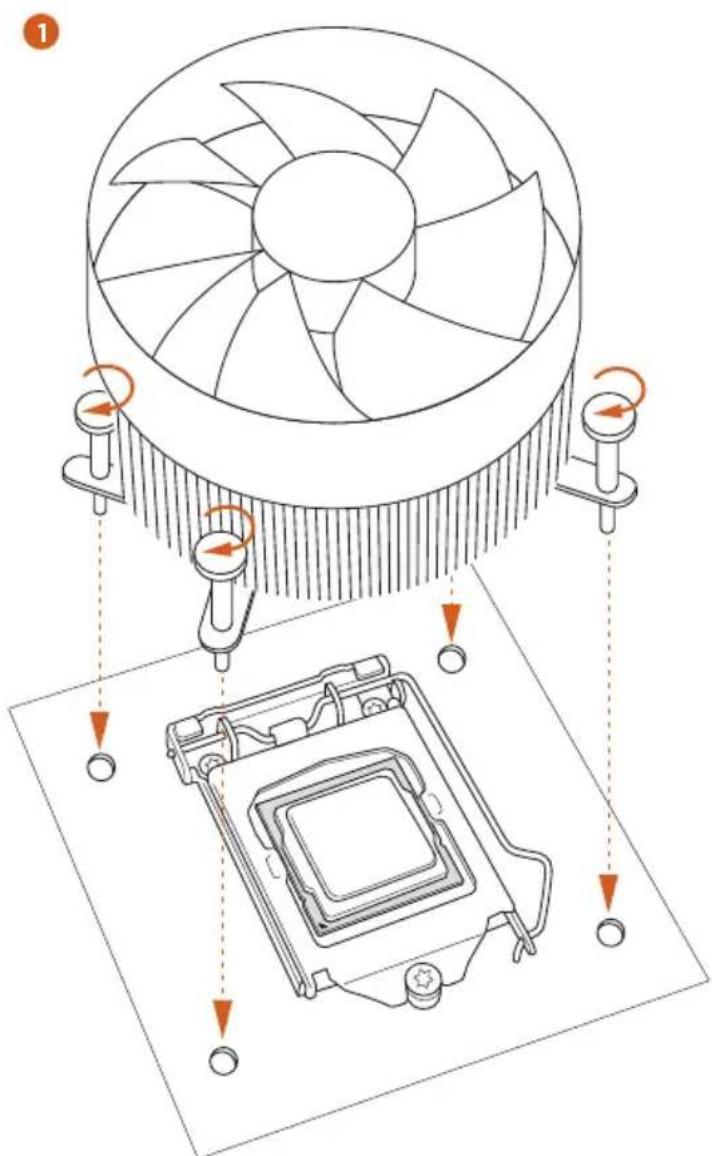
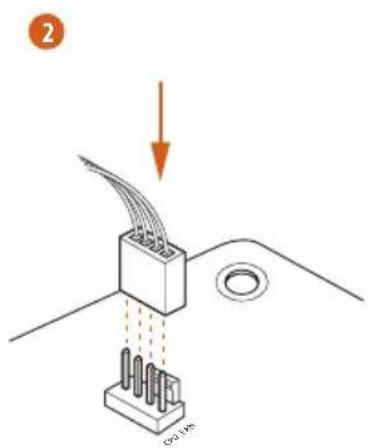
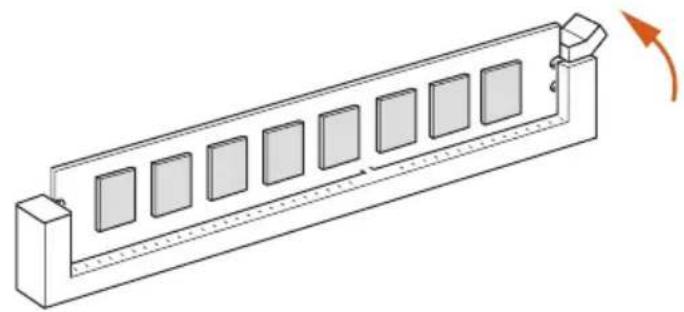
2.3 Installing Memory Modules (DIMM)
This motherboard provides four 288-pin DDR4 (Double Data Rate 4) DIMM slots, and supports Dual Channel Memory Technology.

- For dual channel configuration, you always need to install identical (the same brand, speed, size and chip-type) DDR4 DIMM pairs.
- It is unable to activate Dual Channel Memory Technology with only one or three memory module installed.
- It is not allowed to install a DDR, DDR2 or DDR3 memory module into a DDR4 slot; otherwise, this motherboard and DIMM may be damaged.
Dual Channel Memory Configuration
Priority DDR4_A1 DDR4_A2 DDR4_B1 DDR4_B2
| 1 Populated Populated | | | |
| 2 Populated Populated Populated Populated | | | |

The DIMM only fits in one correct orientation. It will cause permanent damage to the motherboard and the DIMM if you force the DIMM into the slot at incorrect orientation.
1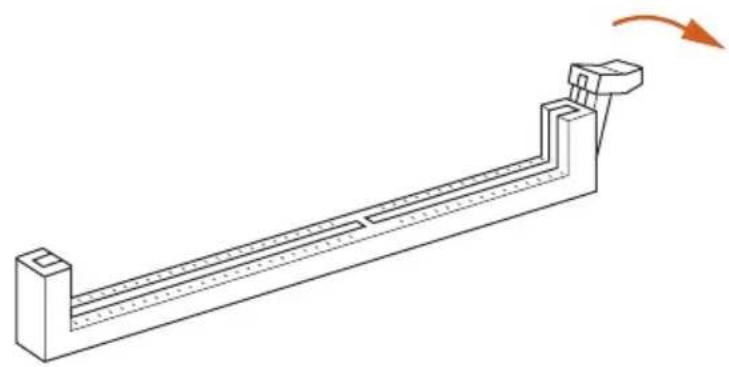
2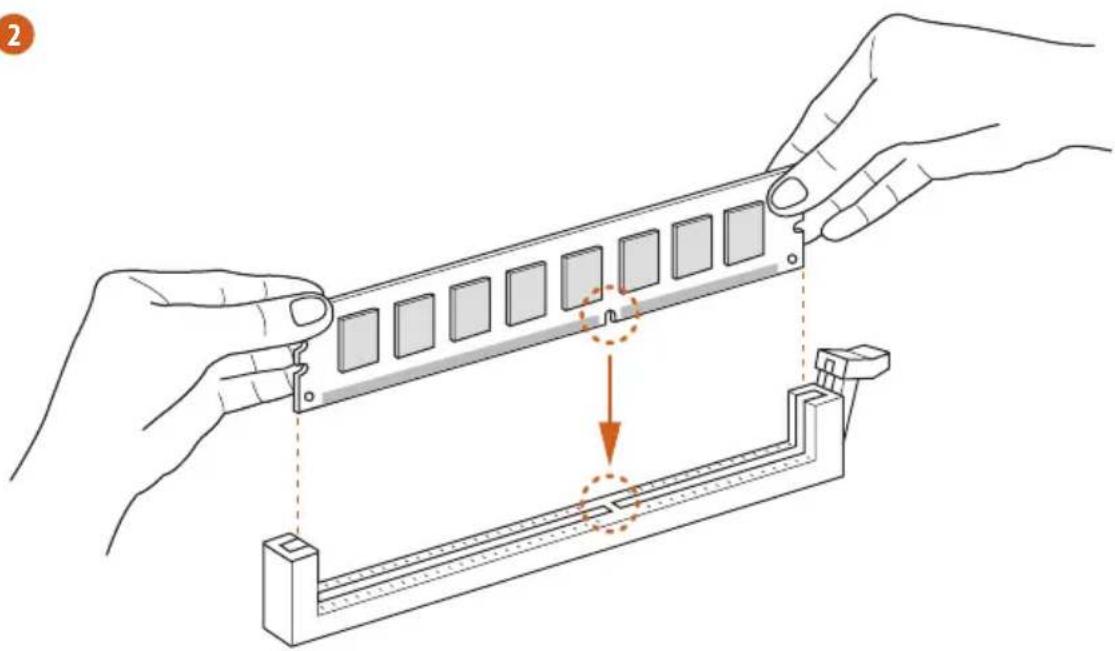
3
2.4 Expansion Slots (PCI Express Slots)
There are 3 PCI Express slots on the motherboard.

Before installing an expansion card, please make sure that the power supply is switched off or the power cord is unplugged. Please read the documentation of the expansion card and make necessary hardware settings for the card before you start the installation.
PCIe slots:
11th Gen Intel® Core™ Processors:
PCIE1 (PCIe 4.0 x16 slot) is used for PCI Express x16 lane width graphics cards.
PCIE2 (PCIe 3.0 x1 slot) is used for PCI Express x1 lane width cards.
PCIE3 (PCIe 3.0 x16 slot) is used for PCI Express x4 lane width graphics cards.
PCIe slots:
10th Gen Intel® Core™ Processors:
PCIE1 (PCIe 3.0 x16 slot) is used for PCI Express x16 lane width graphics cards.
PCIE2 (PCIe 3.0 x1 slot) is used for PCI Express x1 lane width cards.
PCIE3 (PCIe 3.0 x16 slot) is used for PCI Express x4 lane width graphics cards.
PCIe Slot Configurations
11th Gen Intel® Core™ Processors:
PCIE1 PCIE3
Single Graphics Card Gen4x16 N/A
Two Graphics Cards in
CrossFireX™ Mode
Gen4x16 Gen3x4
10th Gen Intel® Core™ Processors:
PCIE1 PCIE3
Single Graphics Card Gen3x16 N/A
Two Graphics Cards in
CrossFireX™ Mode
Gen3x16 Gen3x4

For a better thermal environment, please connect a chassis fan to the motherboard's chassis fan connector (CHA_FAN1/WP, CHA_FAN2/WP or CHA_FAN3/WP) when using multiple graphics cards.
2.5 Jumpers Setup
The illustration shows how jumpers are setup. When the jumper cap is placed on the pins, the jumper is “Short”. If no jumper cap is placed on the pins, the jumper is “Open”.
Short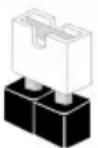
Open
Clear CMOS Jumper (CLRMOS1)
(see p.1, No. 25)
2-pin Jumper
CLRMOS1 allows you to clear the data in CMOS. To clear and reset the system parameters to default setup, please turn off the computer and unplug the power cord from the power supply. After waiting for 15 seconds, use a jumper cap to short the pins on CLRMOS1 for 5 seconds. However, please do not clear the CMOS right after you update the BIOS. If you need to clear the CMOS when you just finish updating the BIOS, you must boot up the system first, and then shut it down before you do the clear-CMOS action. Please be noted that the password, date, time, and user default profile will be cleared only if the CMOS battery is removed. Please remember to remove the jumper cap after clearing the CMOS.

If you clear the CMOS, the case open may be detected. Please adjust the BIOS option "Clear Status" to clear the record of previous chassis intrusion status.
2.6 Onboard Headers and Connectors

Onboard headers and connectors are NOT jumpers. Do NOT place jumper caps over these headers and connectors. Placing jumper caps over the headers and connectors will cause permanent damage to the motherboard.
System Panel Header
(9-pin PANEL1)
(see p.1, No. 15)
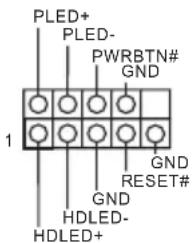
Connect the power switch, reset switch and system status indicator on the chassis to this header according to the pin assignments below. Note the positive and negative pins before connecting the cables.

PWRBTN (Power Switch):
Connect to the power switch on the chassis front panel. You may configure the way to turn off your system using the power switch.
RESET (Reset Switch):
Connect to the reset switch on the chassis front panel. Press the reset switch to restart the computer if the computer freezes and fails to perform a normal restart.
PLED (System Power LED):
Connect to the power status indicator on the chassis front panel. The LED is on when the system is operating. The LED keeps blinking when the system is in S1/S3 sleep state. The LED is off when the system is in S4 sleep state or powered off (S5).
HDLED (Hard Drive Activity LED):
Connect to the hard drive activity LED on the chassis front panel. The LED is on when the hard drive is reading or writing data.
The front panel design may differ by chassis. A front panel module mainly consists of power switch, reset switch, power LED, hard drive activity LED, speaker, and so on. When connecting your chassis front panel module to this header, make sure the wire assignments and the pin assignments are matched correctly.
Chassis Intrusion and
Speaker Header
(7-pin SPK_CI1)
(see p.1, No. 21)
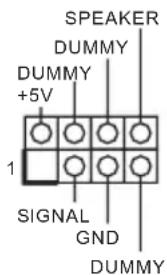
Please connect the chassis intrusion and the chassis speaker to this header.
Serial ATA3 Connectors
Vertical:
(SATA3_0:
see p.1, No. 17)
(SATA3_1:
see p.1, No. 16)
Right Angle:
(SATA3_2:
see p.1, No. 11)(Upper)
(SATA3_3:
see p.1, No. 12)(Lower)
(SATA3_4:
see p.1, No. 14)(Upper)
(SATA3_5:
see p.1, No. 13)(Lower)
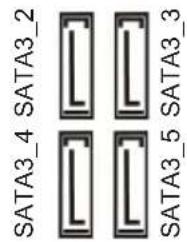
SATA3_0 SATA3_1

These six SATA3
connectors support SATA data cables for internal storage devices with up to 6.0 Gb/s data transfer rate.
*If M2_2 is occupied by a SATA-type M.2 device, SATA3_1 will be disabled.
USB 2.0 Headers
(9-pin USB3_4)
(see p.1, No. 20)
(9-pin USB5_6)
(see p.1, No. 19)
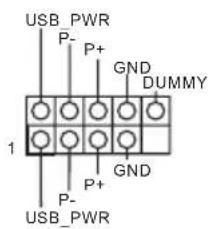
There are two USB
2.0 headers on this motherboard. Each USB 2.0 header can support two ports.
USB 3.2 Gen1 Header
(19-pin USB3_5_6)
(see p.1, No. 9)
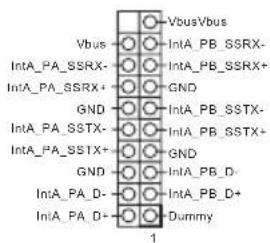
There is one USB 3.2
Gen1 header on this motherboard. This USB
3.2 Gen1 header can support two ports.
Front Panel Type C USB
3.2 Gen1 Header
(20-pin F_USB3_TC_1)
(see p.1, No. 10)
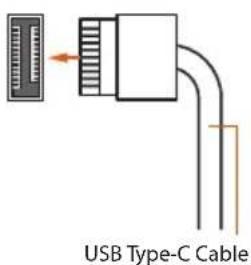
There is one Front
Panel Type C USB 3.2
Gen1 Header on this motherboard. This header is used for connecting a USB 3.2 Gen1 module for additional USB 3.2 Gen1 ports.
Front Panel Audio Header
(9-pin HD_AUDIO1)
(see p.1, No. 28)
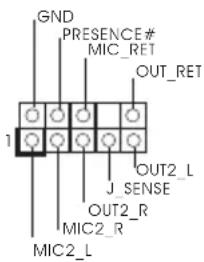
This header is for
connecting audio devices
to the front audio panel.

- High Definition Audio supports Jack Sensing, but the panel wire on the chassis must support HDA to function correctly. Please follow the instructions in our manual and chassis manual to install your system.
- If you use an AC'97 audio panel, please install it to the front panel audio header by the steps below:
A. Connect Mic_IN (MIC) to MIC2_L. B. Connect Audio_R (RIN) to OUT2_R and Audio_L (LIN) to OUT2_L. C. Connect Ground (GND) to Ground (GND). D. MIC_RET and OUT_RET are for the HD audio panel only. You don't need to connect them for the AC'97 audio panel. E. To activate the front mic, go to the "FrontMic" Tab in the Realtek Control panel and adjust "Recording Volume".
Chassis/Water Pump Fan
Connectors
(4-pin CHA_FAN1/WP)
(see p.1, No. 29)
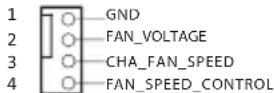
This motherboard provides three 4-Pin water cooling chassis fan connectors. If you plan to connect a 3-Pin chassis water cooler fan, please connect it to Pin 1-3.
(4-pin CHA_FAN2/WP)
(see p.1, No. 22)
(4-pin CHA_FAN3/WP)
(see p.1, No. 23)
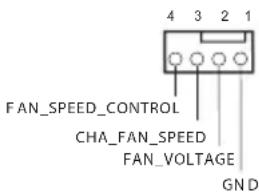
CPU Fan Connector
(4-pin CPU_FAN1)
(see p.1, No. 5)
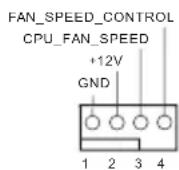
This motherboard provides a 4-Pin CPU fan (Quiet Fan) connector.
(Quiet Fan) connector.
If you plan to connect a 3-Pin CPU fan, please connect it to Pin 1-3.
CPU/Water Pump Fan Connector (4-pin CPU_FAN2/WP) (see p.1, No. 4)
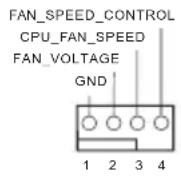
This motherboard provides a 4-Pin water cooling CPU fan connector. If you plan to connect a 3-Pin CPU water cooler fan, please connect it to Pin 1-3.
ATX Power Connector (24-pin ATXPWR1) (see p.1, No. 8)
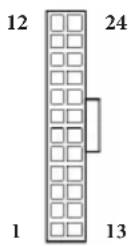
This motherboard provides a 24-pin ATX power connector. To use a 20-pin ATX power supply, please plug it along Pin 1 and Pin 13.
ATX 12V Power Connector (8-pin ATX12V1) (see p.1, No. 1)
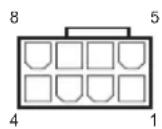
This motherboard provides a 8-pin ATX 12V power connector. To use a 4-pin ATX power supply, please plug it along Pin 1 and Pin 5.
*Warning: Please make sure that the power cable connected is for the CPU and not the graphics card. Do not plug the PCIe power cable to this connector.
SPI TPM Header (13-pin SPI_TPM_J1) (see p.1, No. 18)
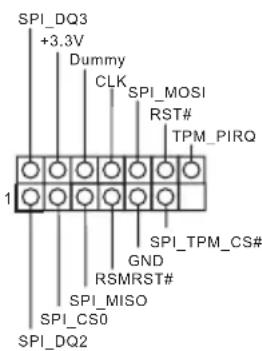
This connector supports SPI Trusted Platform Module (TPM) system, which can securely store keys, digital certificates, passwords, and data. A TPM system also helps enhance network security, protects digital identities, and ensures platform integrity.
Thunderbolt AIC Connector (5-pin TB1) (see p.1, No. 24)

Please connect a Thunderbolt™ add-in card (AIC) to this connector via the GPIO cable. *Please install the Thunderbolt™ AIC card to PCIE3 (default slot).
RGB LED Headers (4-pin RGB_LED1) (see p.1, No. 6)
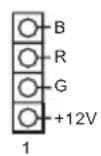
(4-pin RGB_LED2) (see p.1, No. 26)
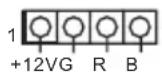
These two RGB LED headers are used to connect RGB LED extension cables which allow users to choose from various LED lighting effects.
Caution: Never install the RGB LED cable in the wrong orientation; otherwise, the cable may be damaged.
*Please refer to page 33 for further instructions on this header.
Addressable LED Headers
(3-pin ADDR_LED1)
(see p.1, No. 7)
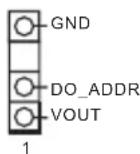
(3-pin ADDR_LED2)
(see p.1, No. 27)
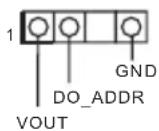
These two headers are used to connect Addressable LED extension cables which allow users to choose from various LED lighting effects.
Caution: Never install the Addressable LED cable in the wrong orientation; otherwise, the cable may be damaged.
*Please refer to page 34 for further instructions on this header.
Post Status Checker
(see p.1)
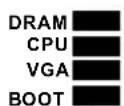
Post Status Checker (PSC) diagnoses the computer when users power on the machine. It emits a red light to indicate whether the CPU, memory, VGA or storage is dysfunctional. The lights go off if the four mentioned above are functioning normally.
2.7 M.2_SSD (NGFF) Module Installation Guide (M2_1)
The M.2, also known as the Next Generation Form Factor (NGFF), is a small size and versatile card edge connector that aims to replace mPCIe and mSATA. The Hyper M.2 Socket (M2_1) supports M Key type 2242/2260/2280 M.2 PCI Express module up to Gen4x4 (64 Gb/s) (Only supported with 11th Gen Intel® Core™ Processors).
Installing the M.2_SSD (NGFF) Module
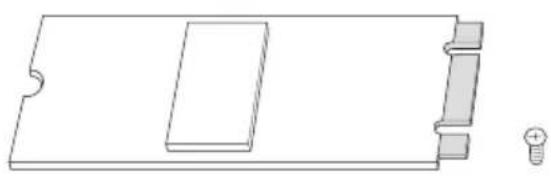
Step 1
Prepare a M.2_SSD (NGFF) module and the screw.

Step 2
Before installing a M.2 (NGFF) SSD module, please loosen the screws to remove the M.2 heatsink.
*Please remove the protective films on the bottom side of the M.2 heatsink before you install a M.2 SSD module.
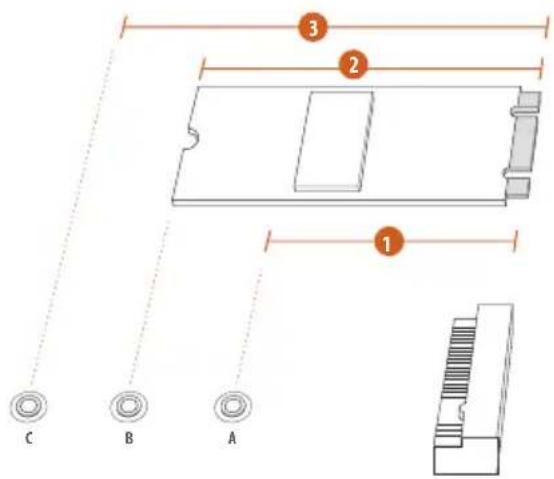
Step 3
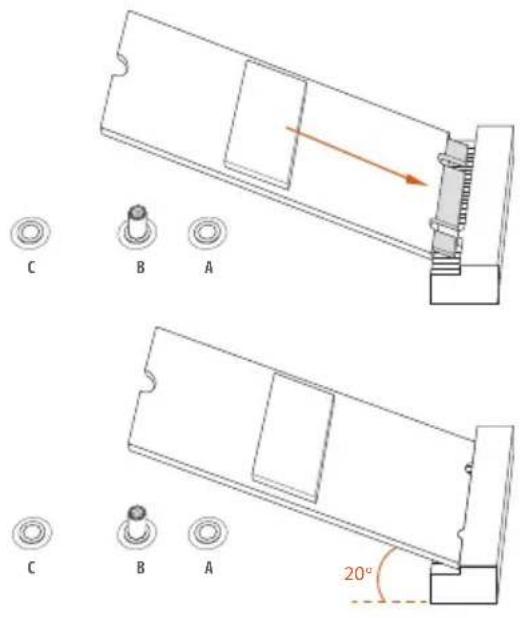
Depending on the PCB type and length of your M.2_SSD (NGFF) module, find the corresponding nut location to be used.
No.123
Nut Location A B C
PCB Length 4.2cm 6cm 8cm
Module Type
Type2242
Type2260
Type 2280
Step 4
Prepare the M.2 standoff that comes with the package. Then hand tighten the standoff into the desired nut location on the motherboard. Align and gently insert the M.2 (NGFF) SSD module into the M.2 slot. Please be aware that the M.2 (NGFF) SSD module only fits in one orientation.
Step 5
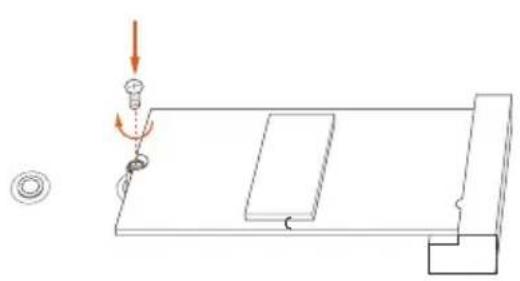
Tighten the screw that come with the package with a screwdriver to secure the module into place.
Step 6
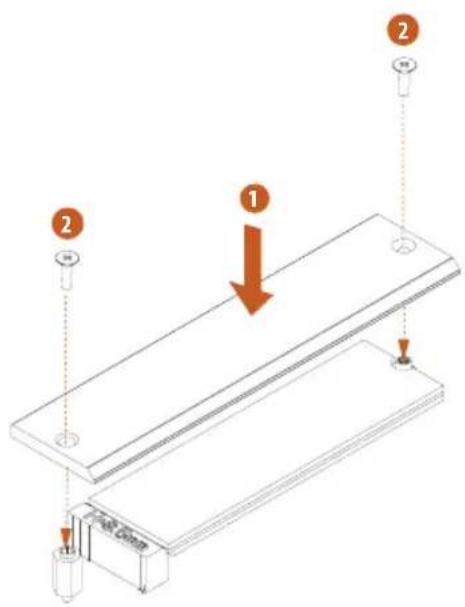
Tighten the screw with a screwdriver to secure the module and M.2 heatsink into place. Please do not overtighten the screw as this might damage the module and M.2 heatsink.
M.2 SSD (NGFF) Module Support List (M2_1)
| Vendor Interface P/N |
| ADATA PCIe3 x4 ASX7000NP-128GT-C |
| ADATA PCIe3 x4 ASX8000NP-256GM-C |
| ADATA PCIe3 x4 ASX7000NP-256GT-C |
| ADATA PCIe3 x4 ASX8000NP-512GM-C |
| ADATA PCIe3 x4 ASX7000NP-512GT-C |
| Apacer PCIe3 x4 AP240GZ280 |
| Corsair PCIe3 x4 CSSD-F240GBMP500 |
| Intel PCIe3 x4 SSDPEKKF256G7 |
| Intel PCIe3 x4 SSDPEKKF512G7 |
| Kingston PCIe3 x4 SKC1000/480G |
| Kingston PCIe2 x4 SH2280S3/480G |
| OCZ PCIe3 x4 RVD400 -M2280-512G (NVME) |
| PATR IOT PCIe3 x4 PH240GPM280SSDR NVME |
| Plextor PCIe3 x4 PX-128M8PeG |
| Plextor PCIe3 x4 PX-1TM8PeG |
| Plextor PCIe3 x4 PX-256M8PeG |
| Plextor PCIe3 x4 PX-512M8PeG |
| Plextor PCIe | PX-G256M6e |
| Plextor PCIe | PX-G512M6e |
| Samsung | PCIe3 x4 | SM961 MZVPW128HEGM (NVM) |
| Samsung | PCIe3 x4 | PM961 MZVLW128HEGR (NVME) |
| Samsung | PCIe3 x4 | 960 EVO (MZ-V6E250) (NVME) |
| Samsung | PCIe3 x4 | 960 EVO (MZ-V6E250BW) (NVME) |
| Samsung | PCIe3 x4 SM951 (NVME) |
| Samsung | PCIe3 x4 | SM951 (MZHPV256HDGL) |
| Samsung | PCIe3 x4 | SM951 (MZHPV512HDGL) |
| Samsung | PCIe3 x4 SM951 (NVME) |
| Samsung | PCIe x4 | XP941-512G (MZHPU512HCGL) |
| SanDisk | PCIe | SD6PP4M-128G |
| SanDisk | PCIe | SD6PP4M-256G |
| TEAM | PCIe3 x4 TM8FP2240G0C101 |
| TEAM | PCIe3 x4 TM8FP2480GC110 |
| WD | PCIe3 x4 | WDS256G1X0C-00ENX0 (NVME) |
| WD | PCIe3 x4 | WDS512G1X0C-00ENX0 (NVME) |
For the latest updates of M.2 SSD (NGFF) module support list, please visit our website for details: http://www.asrock.com
2.8 M.2 SSD (NGFF) Module Installation Guide (M2_2)
The M.2, also known as the Next Generation Form Factor (NGFF), is a small size and versatile card edge connector that aims to replace mPCIe and mSATA. The Ultra M.2 Socket (M2_2) supports M Key type 2280 M.2 SATA3 6.0 Gb/s module and M.2 PCI Express module up to Gen3 x4 (32 Gb/s).
* If M2_2 is occupied by a SATA-type M.2 device, SATA3_1 will be disabled.
Installing the M.2 SSD (NGFF) Module
Step 1
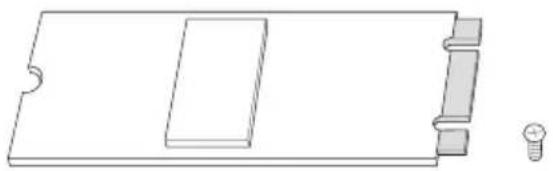
Prepare a M.2 SSD (NGFF) module and the screw.
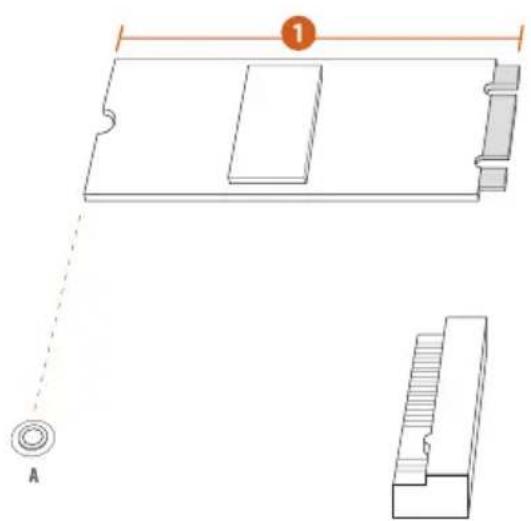
Step 2
Depending on the PCB type and length of your M.2 SSD (NGFF) module, find the corresponding nut location to be used.
No.1
Nut Location A
PCB Length 8cm
Module Type Type2280
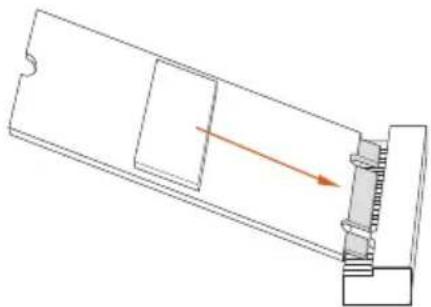
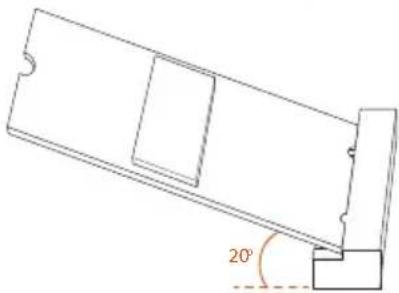
Step 3
Align and gently insert the M.2
(NGFF) SSD module into the M.2
slot. Please be aware that the M.2
(NGFF) SSD module only fits in one orientation.
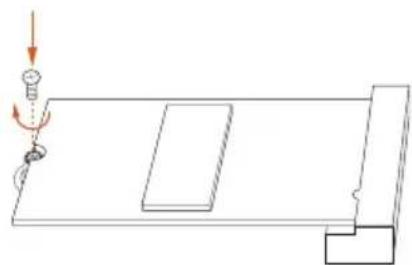
Step 4
Tighten the screw with a screwdriver to secure the module into place.
Please do not overtighten the screw as this might damage the module.
M.2_SSD (NGFF) Module Support List (M2_2)
| Vendor Interface P/N |
| ADATA PCIe3 x4 ASX7000NP-128GT-C |
| ADATA PCIe3 x4 ASX8000NP-256GM-C |
| ADATA PCIe3 x4 ASX7000NP-256GT-C |
| ADATA PCIe3 x4 ASX8000NP-512GM-C |
| ADATA PCIe3 x4 ASX7000NP-512GT-C |
| Apacer PCIe3 x4 AP240GZ280 |
| Corsair PCIe3 x4 CSSD-F240GBMP500 |
| Intel PCIe3 x4 SSDPEKKF256G7 |
| Intel PCIe3 x4 SSDPEKKF512G7 |
| Kingston PCIe3 x4 SKC1000/480G |
| Kingston PCIe2 x4 SH2280S3/480G |
| OCZ PCIe3 x4 RVD400 -M2280-512G (NVME) |
| PATR IOT PCIe3 x4 PH240GPM280SSDR NVME |
| Plextor PCIe3 x4 PX-128M8PeG |
| Plextor PCIe3 x4 PX-1TM8PeG |
| Plextor PCIe3 x4 PX-256M8PeG |
| Plextor PCIe3 x4 PX-512M8PeG |
| Plextor PCIe PX-G256M6e |
| Plextor PCIe PX-G512M6e |
| Samsung | PCIe3 x4 | SM961 MZVPW128HEGM (NVM) |
| Samsung | PCIe3 x4 | PM961 MZVLW128HEGR (NVME) |
| Samsung | PCIe3 x4 | 960 EVO (MZ-V6E250) (NVME) |
| Samsung | PCIe3 x4 | 960 EVO (MZ-V6E250BW) (NVME) |
| Samsung | PCIe3 x4 SM951 (NVME) |
| Samsung | PCIe3 x4 | SM951 (MZHPV256HDGL) |
| Samsung | PCIe3 x4 | SM951 (MZHPV512HDGL) |
| Samsung | PCIe3 x4 SM951 (NVME) |
| Samsung | PCIe x4 | XP941-512G (MZHPU512HCGL) |
| SanDisk | PCIe SD6PP4M-128G |
| SanDisk | PCIe SD6PP4M-256G |
| TEAM | PCIe3 x4 TM8FP2240G0C101 |
| TEAM | PCIe3 x4 TM8FP2480GC110 |
| WD | PCIe3 x4 | WDS256G1X0C-00ENX0 (NVME) |
| WD | PCIe3 x4 | WDS512G1X0C-00ENX0 (NVME) |
For the latest updates of M.2_SSD (NGFF) module support list, please visit our website for details: http://www.asrock.com
2.9 ASRock Polychrome SYNC
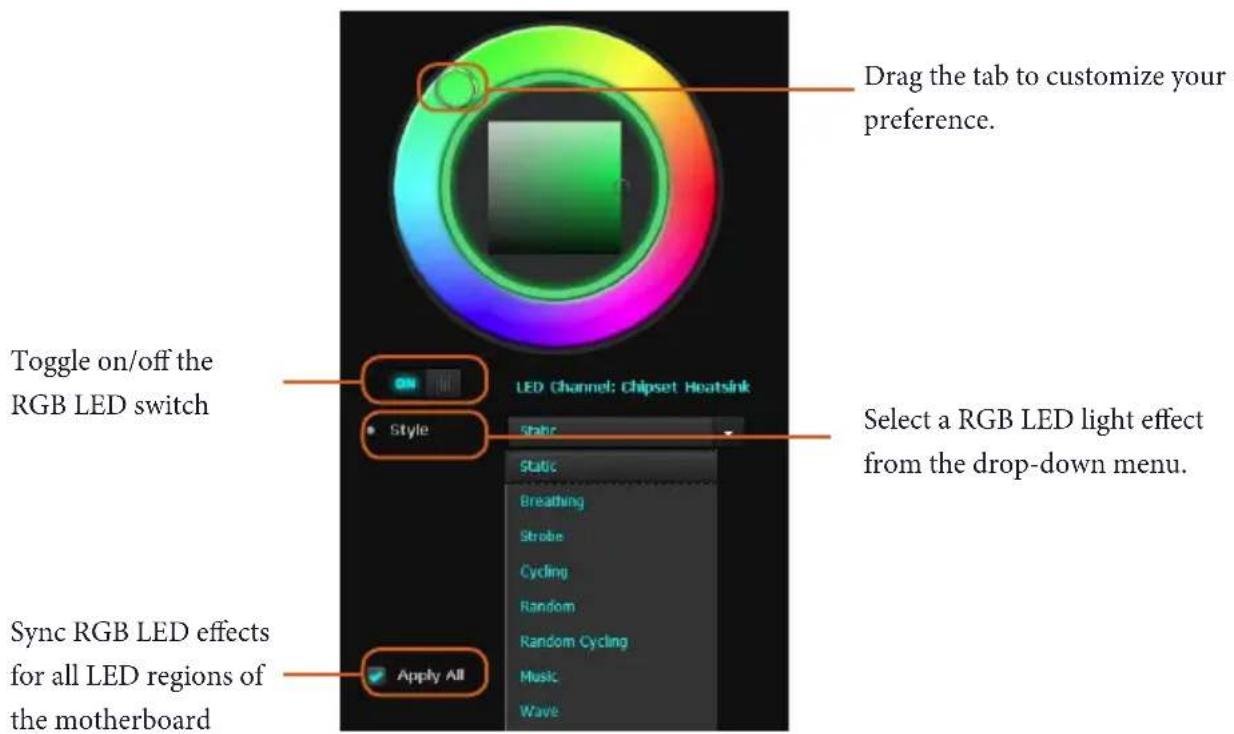
ASRock Polychrome SYNC is a lighting control utility specifically designed for unique individuals with sophisticated tastes to build their own stylish colorful lighting system. Simply by connecting the LED strip, you can customize various lighting schemes and patterns, including Static, Breathing, Strobe, Cycling, Music, Wave and more.
Connecting the LED Strip
Connect your RGB LED strips to the RGB LED Headers (RGB_LED1 / RGB_LED2) on the motherboard.
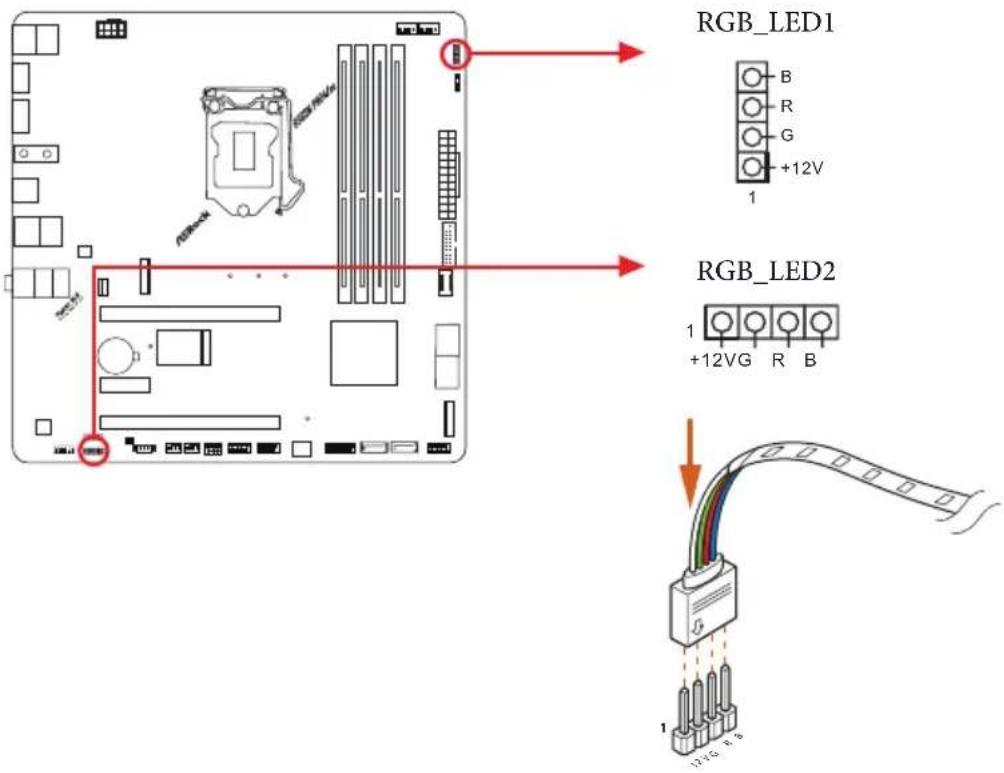

- Never install the RGB LED cable in the wrong orientation; otherwise, the cable may be damaged.
- Before installing or removing your RGB LED cable, please power off your system and unplug the power cord from the power supply. Failure to do so may cause damages to motherboard components.

- Please note that the RGB LED strips do not come with the package.
- The RGB LED header supports standard 5050 RGB LED strip (12V/G/R/B), with a maximum power rating of 3A (12V) and length within 2 meters.
Connecting the Addressable RGB LED Strip
Connect your Addressable RGB LED strips to the Addressable LED Headers (ADDR_LED1 / ADDR_LED2) on the motherboard.
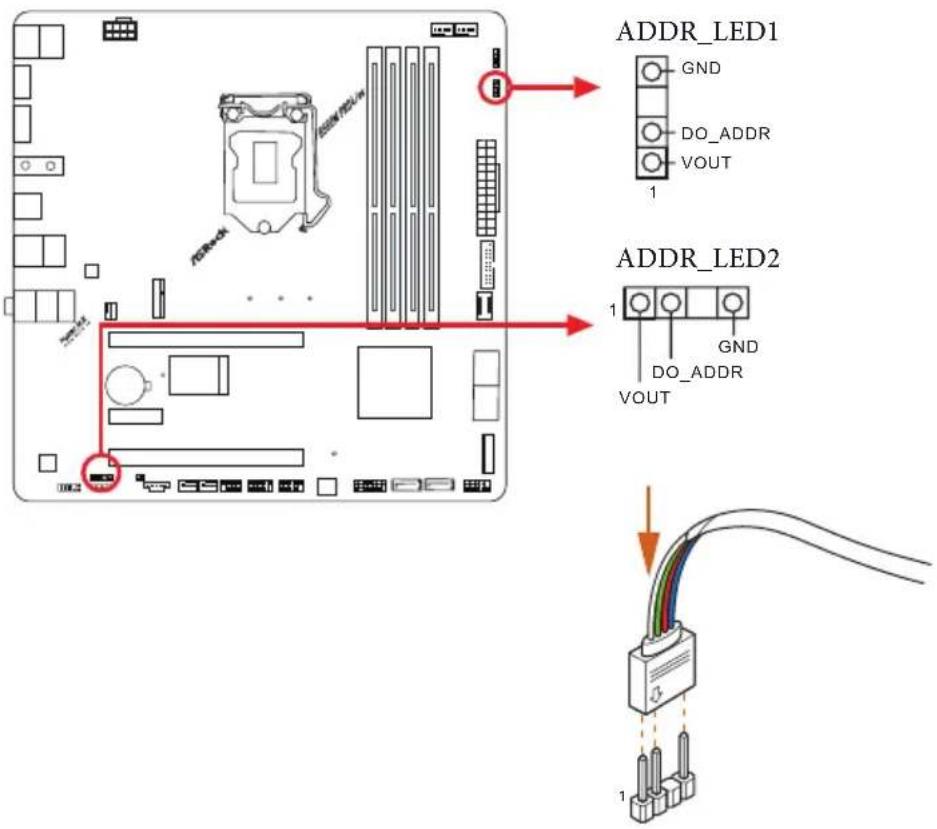

- Never install the RGB LED cable in the wrong orientation; otherwise, the cable may be damaged.
- Before installing or removing your RGB LED cable, please power off your system and unplug the power cord from the power supply. Failure to do so may cause damages to motherboard components.

- Please note that the RGB LED strips do not come with the package.
- The RGB LED header supports WS2812B addressable RGB LED strip (5V/Data/GND), with a maximum power rating of 3A (5V) and length within 2 meters.
ASRock Polychrome SYNC Utility
Now you can adjust the RGB LED color through the ASRock Polychrome SYNC Utility. Download this utility from the ASRock Live Update & APP Shop and start coloring your PC style your way!
1 Introduction
(4-pin, CHA_FAN1/WP)
(4-pin, CHA_FAN2/WP)
(4-pin, CHA_FAN3/WP)
- 6 SATA3 6.0 Gb/s connectors, supporting Intel Rapid Storage Technology 18, NCQ, AHCI and Hot Plug*
Clear CMOS Jumper (CLRMOS1)
(see p.1, No. 25)

2-pin jumper
USB Type-C Cable
If you need to contact ASRock or want to know more about ASRock, you're welcome to visit ASRock's website at http://www.asrock.com; or you may contact your dealer for further information. For technical questions, please submit a support request form at https://event.asrock.com/tsd.asp
ASRock Incorporation
2F., No.37, Sec. 2, Jhongyang S. Rd., Beitou District,
Taipei City 112, Taiwan (R.O.C.)
ASRock EUROPE B.V.
Bijsterhuizen 11-11
6546 AR Nijmegen
The Netherlands
Phone: +31-24-345-44-33
Fax: +31-24-345-44-38
ASRock America, Inc.
13848 Magnolia Ave, Chino, CA91710
U.S.A.
Phone: +1-909-590-8308
Fax: +1-909-590-1026
Per FCC Part 2 Section 2.1077(a)

Responsible Party Name: ASRock Incorporation
Address: 13848 Magnolia Ave, Chino, CA91710
Phone/Fax No: +1-909-590-8308/+1-909-590-1026
hereby declares that the product
Product Name : Motherboard
Model Number : B560M Pro4/ac
Conforms to the following specifications:
☒ FCC Part 15, Subpart B, Unintentional Radiators
This device complies with part 15 of the FCC Rules. Operation is subject to the following two conditions: (1) This device may not cause harmful interference, and (2) this device must accept any interference received, including interference that may cause undesired operation.
Representative Person's Name: James
Signature:
Date: May 12, 2017
ASRock®
For the following equipment:
Motherboard
(Product Name)
B560M Pro4/ac/ ASRock
(Model Designation / Trade Name)
ASRock Incorporation
(Manufacturer Name)
2F., No.37, Sec. 2, Jhongyang S. Rd., Beitou District, Taipei City 112, Taiwan (R.O.C.)
(Manufacturer Address)
☒ EMC — Directive 2014/30/EU (from April 20th, 2016)
□ EN 55022:2010/AC:2011 Class B
EN 55024:2010/A1:2015
EN 55032:2012+AC:2013 Class B
EN 61000-3-3:2013
EN 61000-3-2:2014
RED-Directive 2014/53/EU
□ EN 300 328 V2.1.1 EN 301 489-17 V3.1.1
×
□ EN 301 893 V2.1.1
□ EN 301 489-3 V2.1.1
□ EN 300 220 V3.1.1
□ LVD — Directive 2014/35/EU (from April 20th, 2016)
□ EN 60950-1:2011+A2:2013
□ EN 60950-1:2006/A12:2011
☒ RoHS — Directive 2011/65/EU
CE marking

(EU conformity marking)
ASRock EUROPE B.V.
(Company Name)
Bijsterhuizen 1111 6546 AR Nijmegen The Netherlands
(Company Address)
Person responsible for making this declaration:
(Name, Surname)
A.V.P
(Position / Title)
January 22, 2021
(Date)
P/N: 15G062264000AK V1.0