DV153 - Projector LIVOO - Free user manual and instructions
Find the device manual for free DV153 LIVOO in PDF.
User questions about DV153 LIVOO
0 question about this device. Answer the ones you know or ask your own.
Ask a new question about this device
Download the instructions for your Projector in PDF format for free! Find your manual DV153 - LIVOO and take your electronic device back in hand. On this page are published all the documents necessary for the use of your device. DV153 by LIVOO.
USER MANUAL DV153 LIVOO
natural_image
White portable projector with black ventilation grille and circular lens (no visible text or symbols)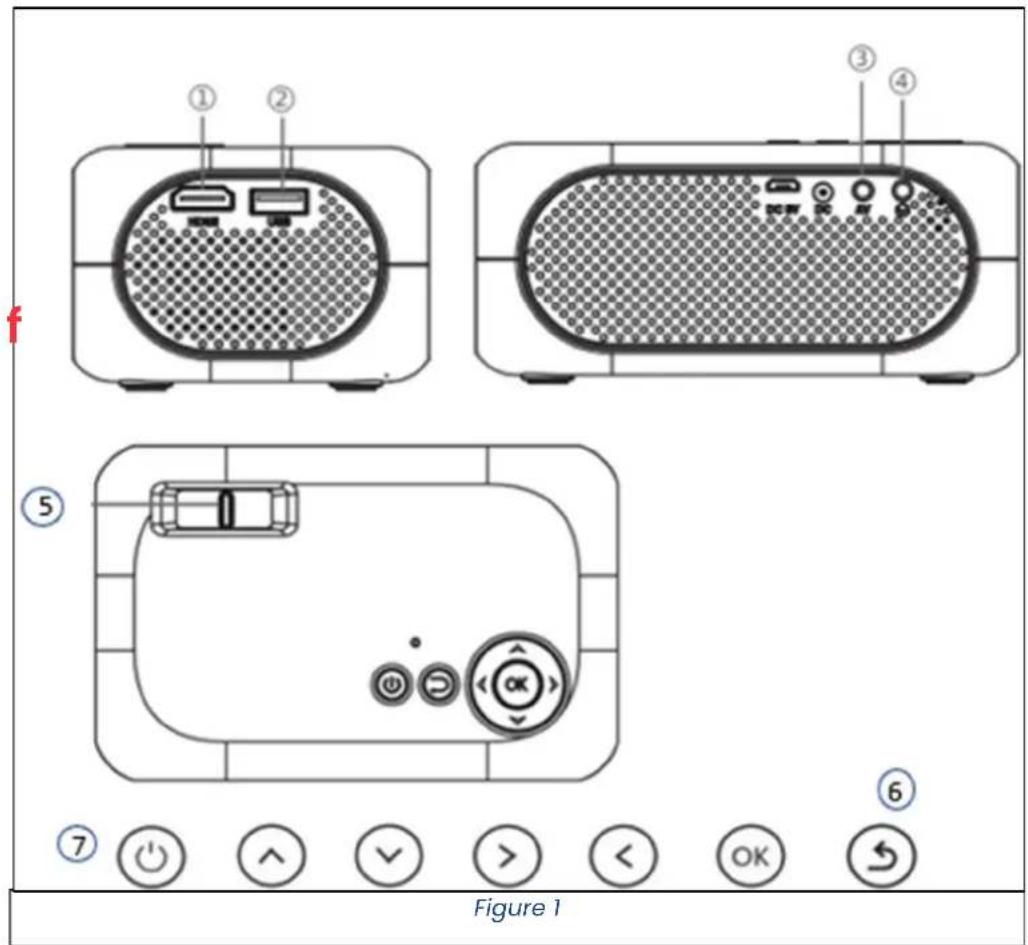
text_image
① ② ③ ④ ⑤ ⑥ ⑦ ⏻ ⏻ ∧ √ > < OK ← Figure 1
text_image
1 2 3 4 5 6 6 6 6 7 8 10 9 Figure 2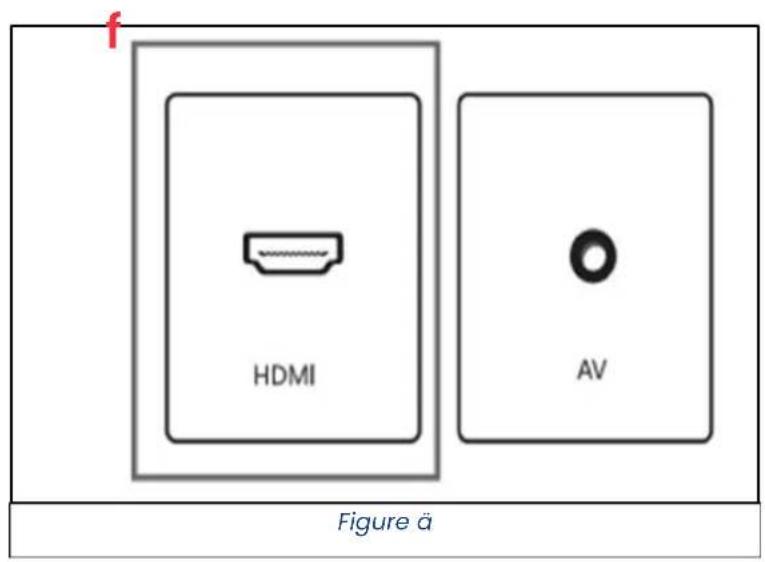
text_image
f HDMI AV Figure ä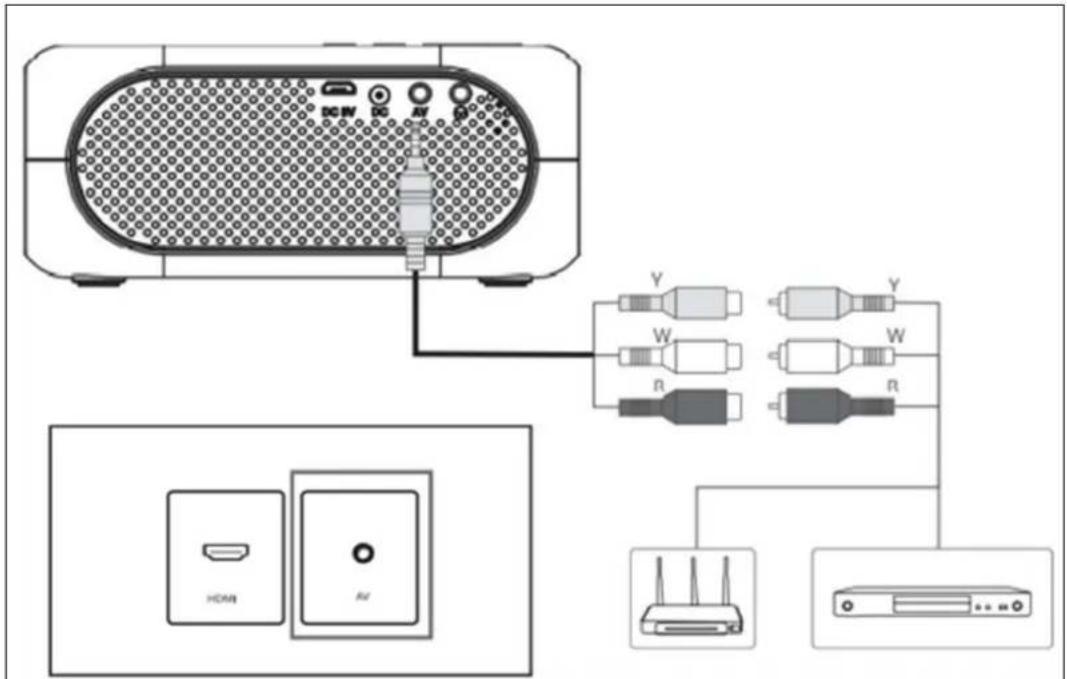
text_image
DCW PC AV Y W R Y W R HDMI AJFigure è
natural_image
Diagram of a portable electronic device connected to an audio headset via cable (no text or symbols present)Figure ă
text_image
MultiMedia Input Source Setting Picture Setting Projection... Image scaling Aspect Ratio Picture Mode System Setting OSD Language Software Up... Factory Reset... Auto Sleep Figure 6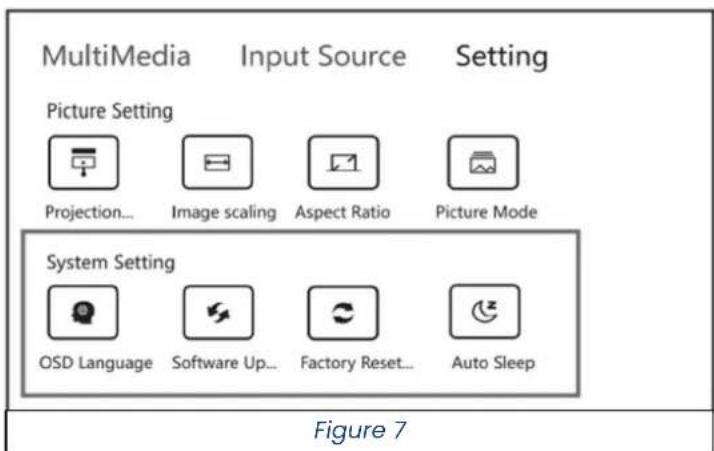
text_image
MultiMedia Input Source Setting Picture Setting Projection... Image scaling Aspect Ratio Picture Mode System Setting OSD Language Software Up... Factory Reset... Auto Sleep Figure 7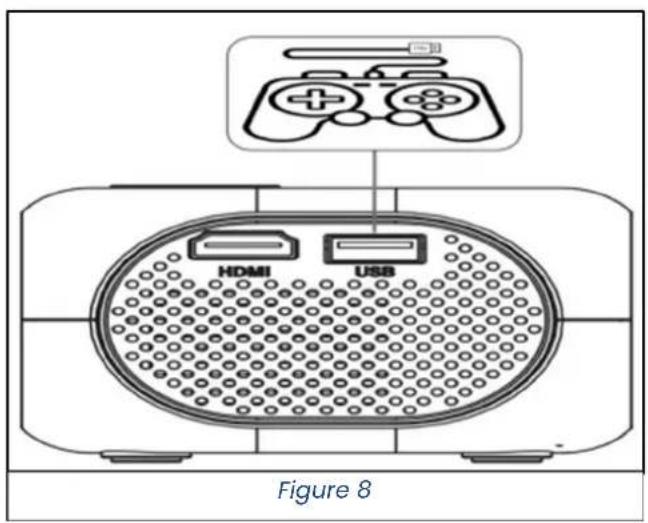
text_image
HDMI USB Figure 8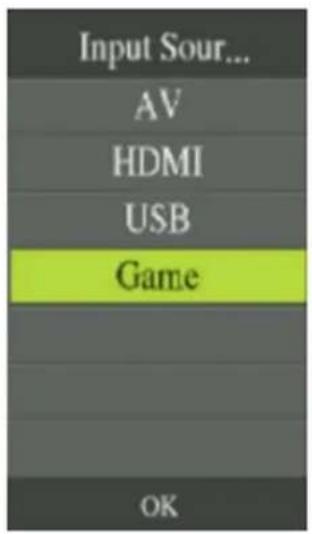
text_image
Input Sour... AV HDMI USB Game OKFigure 9
text_image
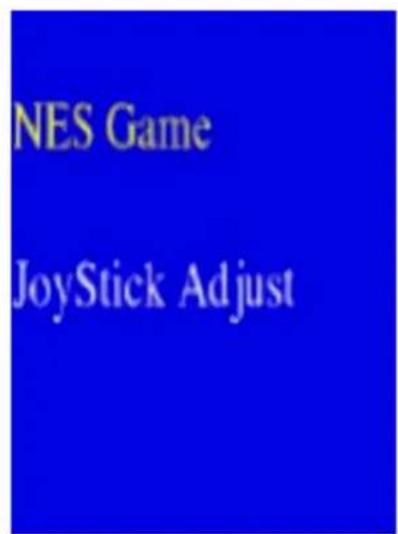
NES Game JoyStick AdjustFigure 1v
text_image
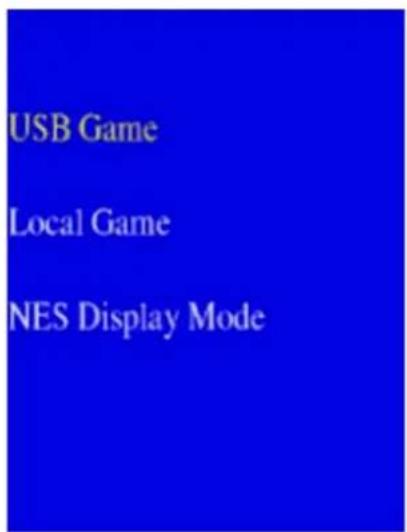
USB Game Local Game NES Display ModeFigure 11
text_image
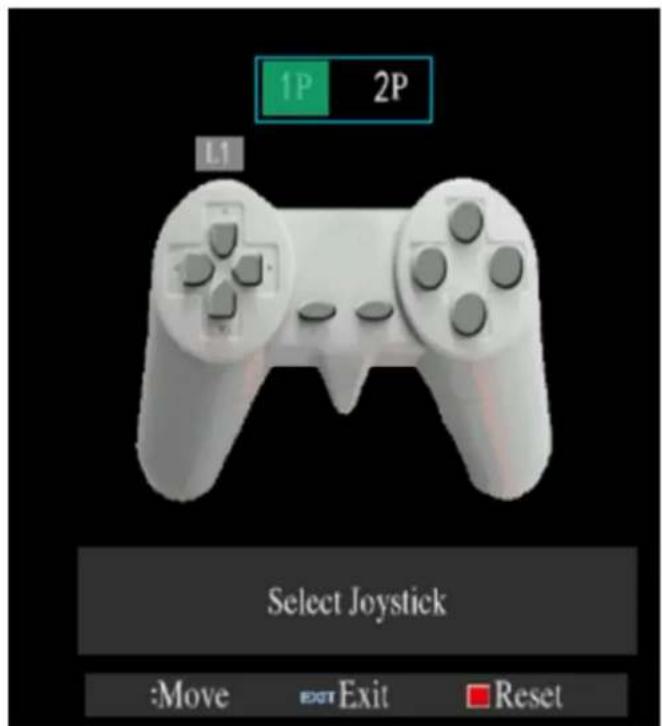
1P 2P L1 Select Joystick :Move EXIT Exit ResetFigure 12
2. PAGE SETTING (REG"AGE)
natural_image
Symbol of a trash bin crossed with no text or labels, accompanied by a black rectangular block below (no readable text or symbols)Thank you for choosing a Livoo product!
EN
Your blender, your barbecue, and your headphones are not just objects, they are extensions of yourself, allowing you to get closer to your friends and family, to bring them together, to laugh and to share experiences. Livoo's aim is to help you live your life to the fullest, whatever wishes you have throughout the year. Winter raclette, summer barbecue. Or the other way around. It's up to you. Take advantage of this freedom for feel good moments every day.
That's why we're constantly innovating and creating clever products full of zest, but most of all, accessible.
Find our entire collection on our website www.livoo.fr
Livoo, your daily companion till social networks

@Livoo

@livoo_officiel

@Livoo
Ãafety Instructions
PßúíÈú, ăíüú ăöÜú ăÄ ùúíó Ăúßß ăhú ő„ÈăuõñãõÄ„ Ëhúúå ăúÓÄùú ăhú ÓòùÈå õÈú í„ó üúúò ăhúÜ ÓÀù í Óõāõùú õÈ A ÜöÈõÈú ÄÓ ăhú íòòßõí„ñú ní„ óíÜÍÉú őä ăù hōùå ăhú ÓÈúù. AÈÈõùú ăhíå yÄõ õÈú ßhú íòòßõí„ñú ÓÀù ßhú õÈú ÓÀù Āhöñh őä õÈ óúÈõÉ„úó. ’ú ùúÚÓÈú í„y ùúÈòÄ„ÈöáößöäõúÈ ÍÈ ÓÀù ßhú óíÜÍÉUÈ áy í„ ö„nÄàùùûñã õÈú Āù í áíó Úí„öòõßíãõÄ„.
EN
â. ExñúÈÈöçú hõÜöóöãy Äù ăúÜòúuìãõùú ñí,, óíÜÍÉú ãhú õ,,öã.
- Míüú Èõùú āhíã āhú Çú,,ãößíãöÄ,, hÄßúÈ íùú ,,Äã áßÄñüúó ãÄ òùúÇú,,ã hÄã íòù ÓùÄÜ íññõÜßíãö,,É ãáhú õ,,öã.
ê. DÄ „Äã õ„Èúùã í„y ÓÄùúöÉ„ ÄáäúñãÈ Äù Üúãíß Äáäúñc ö„ãÄ ãhú õ„öã.
-
DÄ „Äã òßíñú í„y ßöqõöóÈ Ä„ ãÄò ÄÓ áhú õ„öã áì òùúÇú„ã áhúÜ ÓùÄÜ ßúíüö„É.
-
Dõùö„É í„ó íÓãúù õÈú, ãhú òùÄäúñãÄù õÈ hÄã, áú ñíùí Âhú„ ãÄõñhö„É õã.
-
DÄ „Äã ßÄÄÜ ö„ãÄ ãhú ßú„È ãhú„ ãhú níÜúùí öÈ Ä„. DÄÖ„É ÈÄ ÜÍy óíÜÍÉú yÄõù úyúÈ.
-
BúÓÄùú òßõÉÉö„É ö„ yÄõù íòðßöí„ñú, Ülíüú Èõùú ăhíā ăhú úßúñãuòníß ÇÄßãíÉú ö„ yÄõù hÄÜú ñÄùùúÈòÄ„óÈ ăhú ÇÄßãíÉú ö„óöñíăúó Ä„ ăhú íòðßöí„ñú’È „ÍÜúòßíaú. AßÃíyÈ ñÄ„„úñā yÄõù íòðßöí„ñú ăÄ í ÉùÄõ„óúó Ãíßß Äõâßúã.
-
«höÈ íòòßöí,,ñú ñí,, áú õÈúó áy ñhößóùú,, íÉúó ÓùÄÜ 8 yúíùÈ í,,ó íáÄÇú í,,ó òúùÈÄ,,È Ãöãh uúóõñúó
òhyÈöñíß, Èú„ÈÄùy Äù Üú„ãíß ñíòíáößöäöúÈ, Äù ßíñü EN úxòúùöú„ñú í„ó ü„ÄÄßúóÉú öÓ ãhúy híÇú áúú„ ÉöÇú„ ÈõòúùÇöÈöÄ„ Äù ö„ÈãùõñãöÄ„ ñÄ„ñúù„ö„É õÈú ÄÓ â íòòßöí„ñú ö„ í ÈÍÓú Âíy í„ó õ„óúùÈaí„ó ãhú híëíùóÈ ö„ÇÄßÇúó.
- Chößóùú, Èhíßß „Ää òßíy Ãöãh āhú íòðßöí,ñú.
â0. Cßúí„ö„É í„ó õÈúù Üíö„ãú„Í„ñú Èhíßß „Äã áú Üíóú áy ñhößóùú„ õ„ßúÈÈ āhúy íùú Äßóúù āhí„ 8 í„ó ÈõòúùÇöÈúó.
ââ. Kúúò âhú íòòßöí,,ñú í,,ó öãÈ ñÄùó Äõã ÄÓ ùúíñh, ñhößóùú,, íÉúó ßúÈÈ âhí,, 8 yúíùÈ.
â2. DÄ „Äã ßúíÇú ãhú õ„öã õ„íããú„óúó Âhú„ öã ëÈ òßõÉÉúó õ„.
âê. ÎÓ ßhú Èõòðʒy ñÄùó ÄÓ íóíðãÄù õÈ óíÜÍÉúó, õã ÜõÈã áú ùúòßíñúó áy ßhú Üí,,õÓíñãõùúù, õãÈ ÈúùÇöñú ÍÉú,,ã Äù ÈöÜößíùßy qõíßöÓõúó òúùÈÄ,,È õ,, Äùóúù ãÄ íÇÄ híëíùó (*).
â4. DÄ „Äã õÉú ãhú óúÇõñú öÓ õã õÈ òhyÈöñíßìy óíÜÍÉú Äù áùÄüú„.
â5. »„òßõÉ ãhú õ„öã ÓùÄÜ ãhú Æíßß Äõãßúã Āhú„ „Äã õ„ÕÈú Äù Āhú„ ñßúí„ö„É.
â6. DÄ „Äã óöÈiÈúÜáßú ãhú õ„öä.
â7. DÃ „Äã hí„óßú ãhú ō„öã Äù ãhú òßõÉ Ãöãh Ãúã hí„óÈ â8. Pßíñú ãhú ō„öã Ä„ í Óßíã ÈõùÓíñú.
- CAUTION: Use o,,ly the < MX24W1-1202000V > adapter supplied with the u,,it.
-
This applia,ce is i,,te,,ded to be used i,,household a,d similar applicatio,s such as:
-
staff kitche,, areas i,, shops, offices a,,d other worki,,g e,,viro,,me,,ts
- farm houses
- by clie,,ts i,, hotels, motels a,,d other reside,,tial type e,,viro,,me,,ts
- bed a„d breakfast type e„viro„me„ts
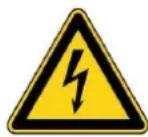
DANGER RISQUE DE CHOC ELECTRIQUE !
- Acti,,ic UV: UV emitted from this product. Eye or ski,, irritatio,, may result from exposure. Use appropriate shieldi,,g.
- Blue Light: Possibly hazardous optical radiatio, emitted from this product. Do „ot stare at operati,g lamp. May be harmful to the eyes.
- Reti, al thermal hazard: Possibly hazardous optical radiatio, emitted from this product. Do „ot stare at operati, g lamp. May be harmful to the eyes.
(*) zompetent qualified electrician: after sales departme,,t of the producer or importer or a,,y perso,, who is qualified, approved a,,d compete,,t to perform this ki,,d of repairs i,, order to avoid all da,,ger. I,, a,,y case you should return, the applia,,ce to this electricia,.
ôechnical Âpecifications
Distance between the projector and the screen: between 0.8-4 m.
Çemote control batteries: 2 x Ç3 ÁÁÁ not provided
ôechnical specifications Âdapter - EÇã
| Information published Value and precision Unit | ||
| DELTA - BP61071 - 67452 Mu„dolsheim - Fra„ce - - | ||
| Adaptor model ide„tifier : | MX24WI-1202000V0 | - |
| I„put voltage | 100-240 | V |
| I„put AC freque„cy | 50-60 | Hz |
| Output voltage | 12 | V |
| Output curre„t | 2 | A |
| Output power | 23.92 | W |
| Average active efficie„cy | 89.42 | % |
| Efficie„cy at low load (10 %) | 84.67 | % |
| No-load power co„sumptio„ | 0.082 | W |
Drawing of the device
-igure 1
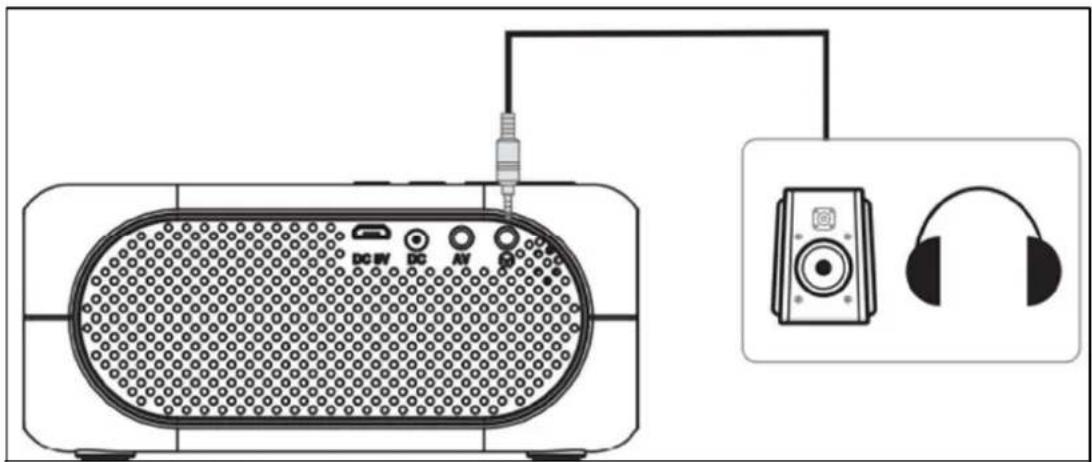
| 1. | HDMI I,,put | 4. | Headpho,,e socket |
| 2. | USB i,,put | 5 | Ma,,ual focus butto,, |
| 3. | AV i,,put | 6 | Retur,,butto,, |
| 7 | Power o,,/off |
-igure 2
| 1. | Power o,,/off 6 Ok (co,,firm your choice) a,,d | forward/backward/up/dow,, arrows | |
| 2. | Mute butto,, | 7 | Retur,, butto,, |
| 3. | Quick retur,, butto,, | 8 | Source butto,, |
| 4. | Fast forward butto,, | 9 | Me,,u |
| 5 | Play/pause butto,, | 10 | Volume - |
| 11 | Volume + | ||
Use of the device
Installation of the projector
Place your projector o,, a flat, stable surface with ple,,ty of space arou,,d it. Orie,,t the projector to project o,, a white surface.
Plug the power cable i„to the “DC” port (Figure 1). The red LED i„dicati„g power o„ illumi„ates. Press the O„/Off butto„ o„ the device (Fig. 1, butto„ 7) or the remote co„trol (Fig.2, butto„ 1). The red LED tur„s gree„ a„d the applia„ce fa„ starts.
1. HöàE ăÁÖE
On the home screen, using the remote control, you can navigate through different menus (Movie, music, photo, HDMI, AV & SETTING (SETTING)). You can navigate through the menus using arrows on the remote control or directly on the device. You can validate your choices by pressing the 'OK' button on the device or remote control. To return to the home screen, click on the back button of the device (figure 1, button 6) or the remote control (figure 2, button 7). To return to the previous page only, press the back button (Figure 2, button 9) on the remote control.
2. ăÁÖE ĀEôõlçö
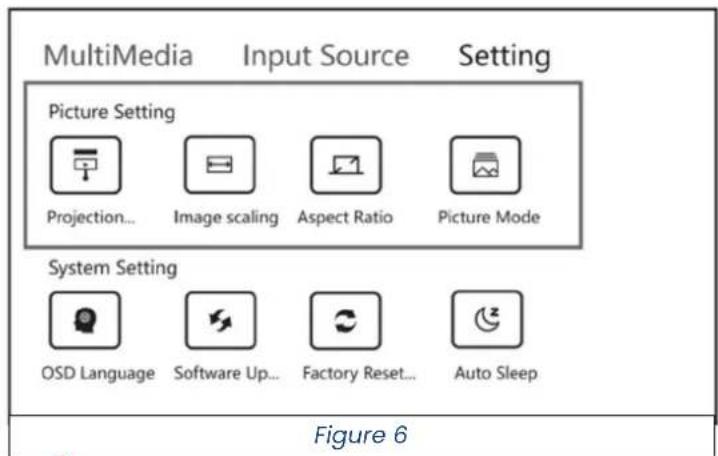
In this menu you can set different parameters:
2.1. IàÁÖE
- Image Mode (Fig. 6): In this mode, you can choose between 3 preset display mode (standard, mild, dynamic) or customize your own display mode (User) by adjusting contrast, brightness, color, sharpness and hue.
- Color temperature: here you can choose 3 preset color modes (cold, standard, hot).
- Aspect ratio: here you can choose two projection modes (4:3 or 16:9).
- Reduced bottom noise
- Projection Direction: In this mode, you can choose between 4 different types of projection (mirror, mirror, inverted, normal).
- Adjust the projected screen size: in this mode you can set the size between 0 and 100%
2.2. Ãõç
- Audio mode: in this mode, you can choose between 4 preset modes (standard, music, movie, sports) or customize your own audio mode (user) by adjusting the bass and treble.
- Scale: adjust the scale of the device here (from -50 to +50)
- Auto Volume: here you can choose whether or not to leave (respectively on or off) the device automatically set the volume.
2.3. ôlàE
- Minut. Extinc: you can select from this menu the period after which the device will automatically go to sleep or disable this function (off)
2.4. ôãôlôç
- OSD languages: you can choose the language of the device from the 23 available languages.
- Zeroing: In this menu you can clear all data on the device and restore the factory configuration.
- Blending: You can adjust the transparency of the bottom of the menu.
- OSD time: you can select the duration of the menu display (5, 10, 15 seconds or no duration)
- Software update (via USB): via this menu you can update the device via a USB port.
3. Input Âource
3.1. HDàI connection
You can connect your projector via the HDMI port (Fig. 3) and an HDMI cable (not included). Once connected, on the home page, select HDMI Input Source to duplicate the screen via the HDMI cable. To exit the "HDMI" projection mode, press the "back" remote control button (Fig. 2).
Note: You can also press the 7 button on the remote control to select the input source.
3.2. ÁV zonnection
Connect an AV cable to the AV port on the back of your projector (Fig. 3) via the supplied AV cable. Once logged in, on the home page, select 'AV' to duplicate your screen via the AV cable. To exit the "AV" projection mode, press the "back" remote control button (Fig. 2).
Note: You can also press the 7 button on the remote control to select the input source.
3.3 UÃÓ connection
Co,ect a USB stick or device via the USB port (Fig. 1). O, the home page, you ca, select between 3 different media types: «Film», «Music» or «Photo». You ca, the, browse through the files o, your USB stick or device. The video projector will show you the media presence, your USB stick or device that it can play.
Note: you can also press the 7 button on the remote control to validate the USB input source.
3.4 Reading a Media
Duri,g media playback, you ca,, i,, crease or decrease the sou,d of the projector usi,g the volume + /-butto,s (Figure 2, butto,, 10 & 11). You ca,, pause your media a,d resume playback usi,g the play/pause butto,, o,, the remote co,trol (Figure 2, butto,, 5). While the media is playi,g, you ca,, speed up or slow dow,, its speed usi,g the quick forward a,d quick return, butto,s o,, the remote co,trol (Figure 2, butto,, 3&4). You ca,, exit the media usi,g the remote co,trol me,u butto,, (Figure 2, butto,, 7).
3.5 öames
Via the source butto, of the remote co.,trol (Figure 2, butto, 8), selected 'Game' the, 'NES Game'. I, this me,,u, you ca, select from the pre-i,.stalled games ('local game') or from games that you have i,.stalled o,, your USB stick or USB co.,ected device ('USB game'). The, follow the i,.structio,s for the selected game.
If you cut 'Joystic Adjust' i, stead of NES Game, you e, ter the setti, gs me, u of your co, troller.
By selecti,g the 'NES DISPLAY GAME' me,,u you ca,, choose betwee,, 4 disti,ct display modes (full scree,), origi,al ratio (Origi,al Ratio), shaky display (Treble origi,al), maximum bala,ce (scale max).
zleaning and maintenance
Tur,, off your device a,,d u,,plug it.
Use a soft cloth moiste, ed with slightly soapy water to clea, the device's plastic housi, g.
To clea,, the le,,s, use a camera hair dryer or le,,s clea,,i,,g paper. Be careful ,ot to scratch the le,,s.
The dust i, the holes preve, ts proper ve, tilatio, which i, creases the i, ter, al temperature a, d causes malfu, ctio, s. To clea, the ve, tilatio, holes, use a vacuum clea, er with a brush. Be careful, ot to use a vacuum clea, er without a brush adapter.
U„plug the device if it will „ot be used for a lo„g time. A„d store i„ a clea„ dry place, preferably i„ its origi„al packagi„g.

natural_image
Symbol of a trash bin crossed out by two diagonal lines (no text or labels)
zorrect disposal of the unit (Electrical and Electronic Equipment).
(Applicable i, the Europea, U, io, a, d the rest of Europe that have adopted separate collectio, systems cou, tries). The Europea, Directive 2012/19/EU o, Waste Electrical a, d Electro, ic Equipme, t (WEEE), requires that old household electrical applia, ces must , ot be disposed of i, the , normal household waste stream. Old applia, ces must be collected separately i, order to optimize the recovery a, d recycli, g of the materials they co, tai, a, d reduce the impact o, huma, health a, d the e, viro, me, t. The symbol of the crossed out dustbi, is marked o, all products to remi, d the obligatio, s of separate collectio. Co, sumers should co, tact their local authority or retailer for i, formatio, co, cer, i, g the correct disposal of their product.
- Photo non contractual
- Concerned about the quality of its products, the manufacturer reserves the right to make changes without notice