DV152 - Projector LIVOO - Free user manual and instructions
Find the device manual for free DV152 LIVOO in PDF.
| Product Type | Portable Android 9.0 projector |
| Dimensions | 16.5 x 17 x 15.5 cm |
| Weight | 1.4 kg |
| Power Supply | 110-240 V AC via power adapter (output 12V, 2A) |
| RAM | 1 GB |
| Internal Storage | 8 GB |
| Operating System | Android 9.0 |
| Wi-Fi Connectivity | Dual band 2.4 GHz and 5 GHz |
| Bluetooth Connectivity | Version 4.0, profiles A2DP/AVRCP, range 5 m |
| Ports | HDMI, USB, AV, SD card, audio output |
| Speakers | 2 x 5 W built-in |
| Projection Distance | 1.5 m to 5 m |
| Keystone Correction | Automatic and manual |
| Features | Screen sharing AirScreen/Miracast, Bluetooth speaker mode |
| Remote Control | Included with mouse simulator |
| Maintenance | Soft cloth, lens cleaning with special paper, vacuum for ventilation |
| Safety | Do not look into the lens, keep 30 cm clearance around, flat surface |
| Protection Class | Class II |
| Battery | Not built-in |
| Pre-installed Apps | Netflix, YouTube, Disney+, Spotify, Facebook, etc. |
| Software Update | OTA or via USB key/SD card |
Frequently Asked Questions - DV152 LIVOO
User questions about DV152 LIVOO
0 question about this device. Answer the ones you know or ask your own.
Ask a new question about this device
Download the instructions for your Projector in PDF format for free! Find your manual DV152 - LIVOO and take your electronic device back in hand. On this page are published all the documents necessary for the use of your device. DV152 by LIVOO.
USER MANUAL DV152 LIVOO
natural_image
White portable projector with a circular lens and perforated grille, no visible text or symbols
text_image
1 2 3 4 5 6 7 8 9 10 11Figure 1
natural_image
Two types of electrical probes with coiled and straight wires, labeled as Figure 2 (no text or symbols on the devices themselves)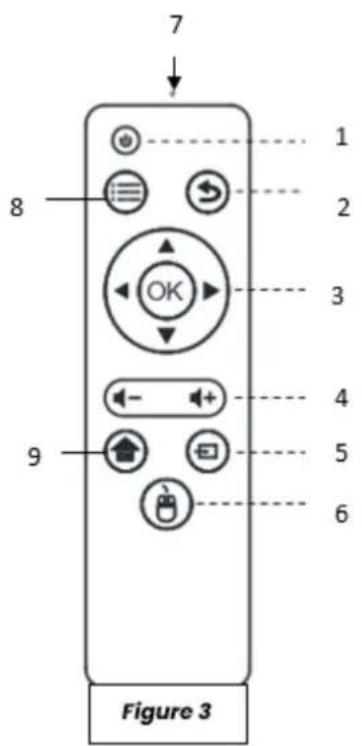
text_image
7 8 1 2 3 4 5 6 9 Figure 3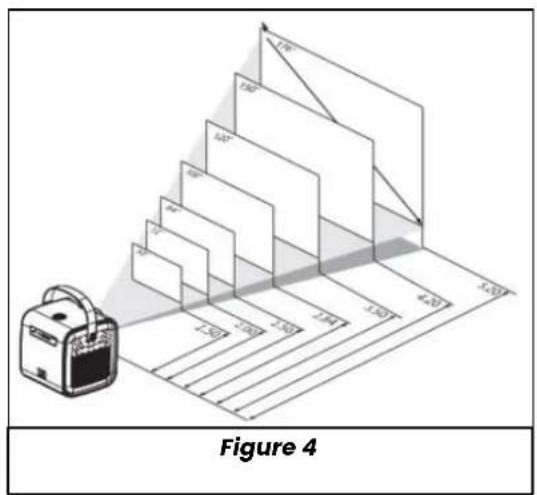
text_image
Figure 4
text_image
30 cm 30 cm 30 cm Figure 5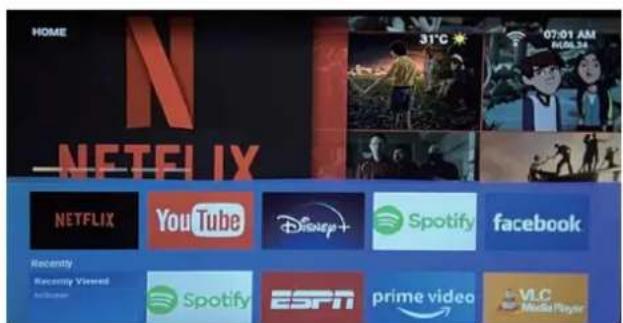
text_image
HOME NETFLIX 31°C 07:01 AM HOM 28 NETFLIX YouTube Disney+ Spotify facebook Recently Recently Viewed and you know Spotify ESPN prime video VLC Media PlayerFigure 6
text_image
SEARCH HOME APPS VIDEO MUSIC SETTING °C 12:57 AM Wed 06:22 1 -- 3 ABC 5 4 DEF CHI 8 6 JKL NIND 7 8 PCR STU 9 6 VWX YZ 香 CDFigure 7
text_image
SETTING Network & Internet Wi-Fi Available networks top-tech Check password identity agent ESP4064671 HUAIWEI-5200 LECO600 LELEK MID-WIFI5 MIDVPN2.4G Redmi123Figure 8
text_image
SETTING Network Projector Input Source Media Center BT Bluetooth Boot Source Language System Remotes & Access... Search BluetoothFigure 9
text_image
My apps APP Store App Store KODI Miracast LocalMtl YouTube Settings Browser ArtScreenFigure 10
text_image
My apps APP Store KODI Miacast Android Gett LocalMai AS App Store KoB AirScreen YouTube Settings BrowserFigure 11
text_image
My apps APP Store KODI Miracast Logitech AS App Store Xool Android Card Returners YouTube Settings BrowserFigure 12
text_image
SETTING 02:09 PM Wed: 12:31 Network Projector Input Source Media Corner Software Update Bluetooth Boot Course Language Options Memory CleanFigure 13
text_image
ZoomSettings Auto Trapezoid Flip < Forward Positive > Trapezoid Four > Zoom Settings > Trapezoid Settings >Figure 14
natural_image
Symbol of a trash bin with no text or labels, including a crossed-out box and a solid rectangle below (no readable text or symbols)Thank you for choosing a Livoo product!
EN
Your blender, your barbecue, and your headphones are not just objects, they are extensions of yourself, allowing you to get closer to your friends and family, to bring them together, to laugh and to share experiences. Livoo's aim is to help you live your life to the fullest, whatever wishes you have throughout the year. Winter raclette, summer barbecue. Or the other way around. It's up to you. Take advantage of this freedom for feel good moments every day.
That's why we're constantly innovating and creating clever products full of zest, but most of all, accessible.
Find our entire collection on our website www.livoo.en.
Livoo, your daily companion till social networks

@Livoo

@livoo_officiel

@Livoo
Safety Instructions
Please, take time to read well the instruction sheet before the first use and keep them for a future use.
A misuse of the appliance can damage it or hurt the user. Assure that you use the appliance for the use for which it is designed. We refuse any responsibilities as for the damages by an incorrect use or a bad manipulation.
EN
- Excessive humidity or temperature can damage the unit.
- Make sure that the ventilation holes are not blocked to prevent hot air from accumulating in the unit.
- Do not insert any foreign objects or metal objects into the unit.
- Do not place any liquids on top of the unit to prevent them from leaking.
-
During and after use, the projector is hot, be careful when touching it.
-
Do not look into the lens when the camera is on. Doing so may damage your eyes.
- Before plugging in your appliance, make sure that the electrical voltage in your home corresponds to the voltage indicated on the appliance's nameplate. Always connect your appliance to a grounded wall outlet.
- This appliance can be used by children aged from 8 years and above and persons with reduced physical, sensory or mental capabilities, or lack of experience and knowledge if they have been given supervision or instruction concerning use of the appliance in a safe way and understand the hazards involved.
- Children shall not play with the appliance.
- Cleaning and user maintenance shall not be made by children unless they are older than 8 and supervised.
- Keep the appliance and its cord out of reach of children aged less than 8 years.
- Do not leave the unit unattended when it is plugged in.
- If the supply cord is damaged, it must be replaced by the manufacturer, its service agent or
similarly qualified persons in order to avoid a hazard (*).
- Do not use the device if it is physically damaged or broken.
- Unplug the unit from the wall outlet when not in use or when cleaning.
- Do not disassemble the unit.
- Do not handle the unit or the plug with wet hands.
- Place the unit on a flat surface.
- The device and its charging cable must be easily accessible at all times.
- Use only the power cable supplied with the unit.
-
This appliance is intended to be used in household and similar applications such as:
-
staff kitchen areas in shops, offices and other working environments
- farm houses
- by clients in hotels, motels and other residential type environments
-
bed and breakfast type environments
-
DANGER RISK OF ELECTRIC SHOCK! To avoid any electric shock, do not open the casing of your video projector.
23. To maintain the performance of your device, maintain a free space of 30cm all around the projector. (Fig.5)
(*) Competent qualified electrician: after sales department of the producer or importer or any person who is qualified, approved and competent to perform this kind of repairs in order to avoid all danger. In any case you should return the appliance to this electrician.
Technical Specifications
Input: 110-240 \~, 50-60Hz, 56W
Memory RAM:1 Go - Memory ROM:8 Go
Distance between the projector and the screen: between 1.50m and 5m

Classe II

| BLUETOOTH | |
| Bluetooth Version | V4.0 |
| Bluetooth Profil | A2DP/AVRCP |
| Frequency band / output power | 2400MHz-2483.5MHz/68dBm |
| Bluetooth distance | 5 m |
| WIFI | |
| Wifi version | 2.4G +5G Dual wifi |
| AUDIO | |
| Rated output power | 2*5W |
| Frequency response | 20-20KHz |
| Signal to noise ratio | 75dB |
| SPEAKER | |
| Impedence | 4 Ohm±15% |
| Speaker | Built-in 2 Speaker |
| Sensibility | 95±3dB |
| GENERAL INFORMATIONS | |
| Input | 12V, 2A |
| Built in battery | / |
| Size | 16,5 x 17 x 15,5cm |
| Weight | 1.4KG |
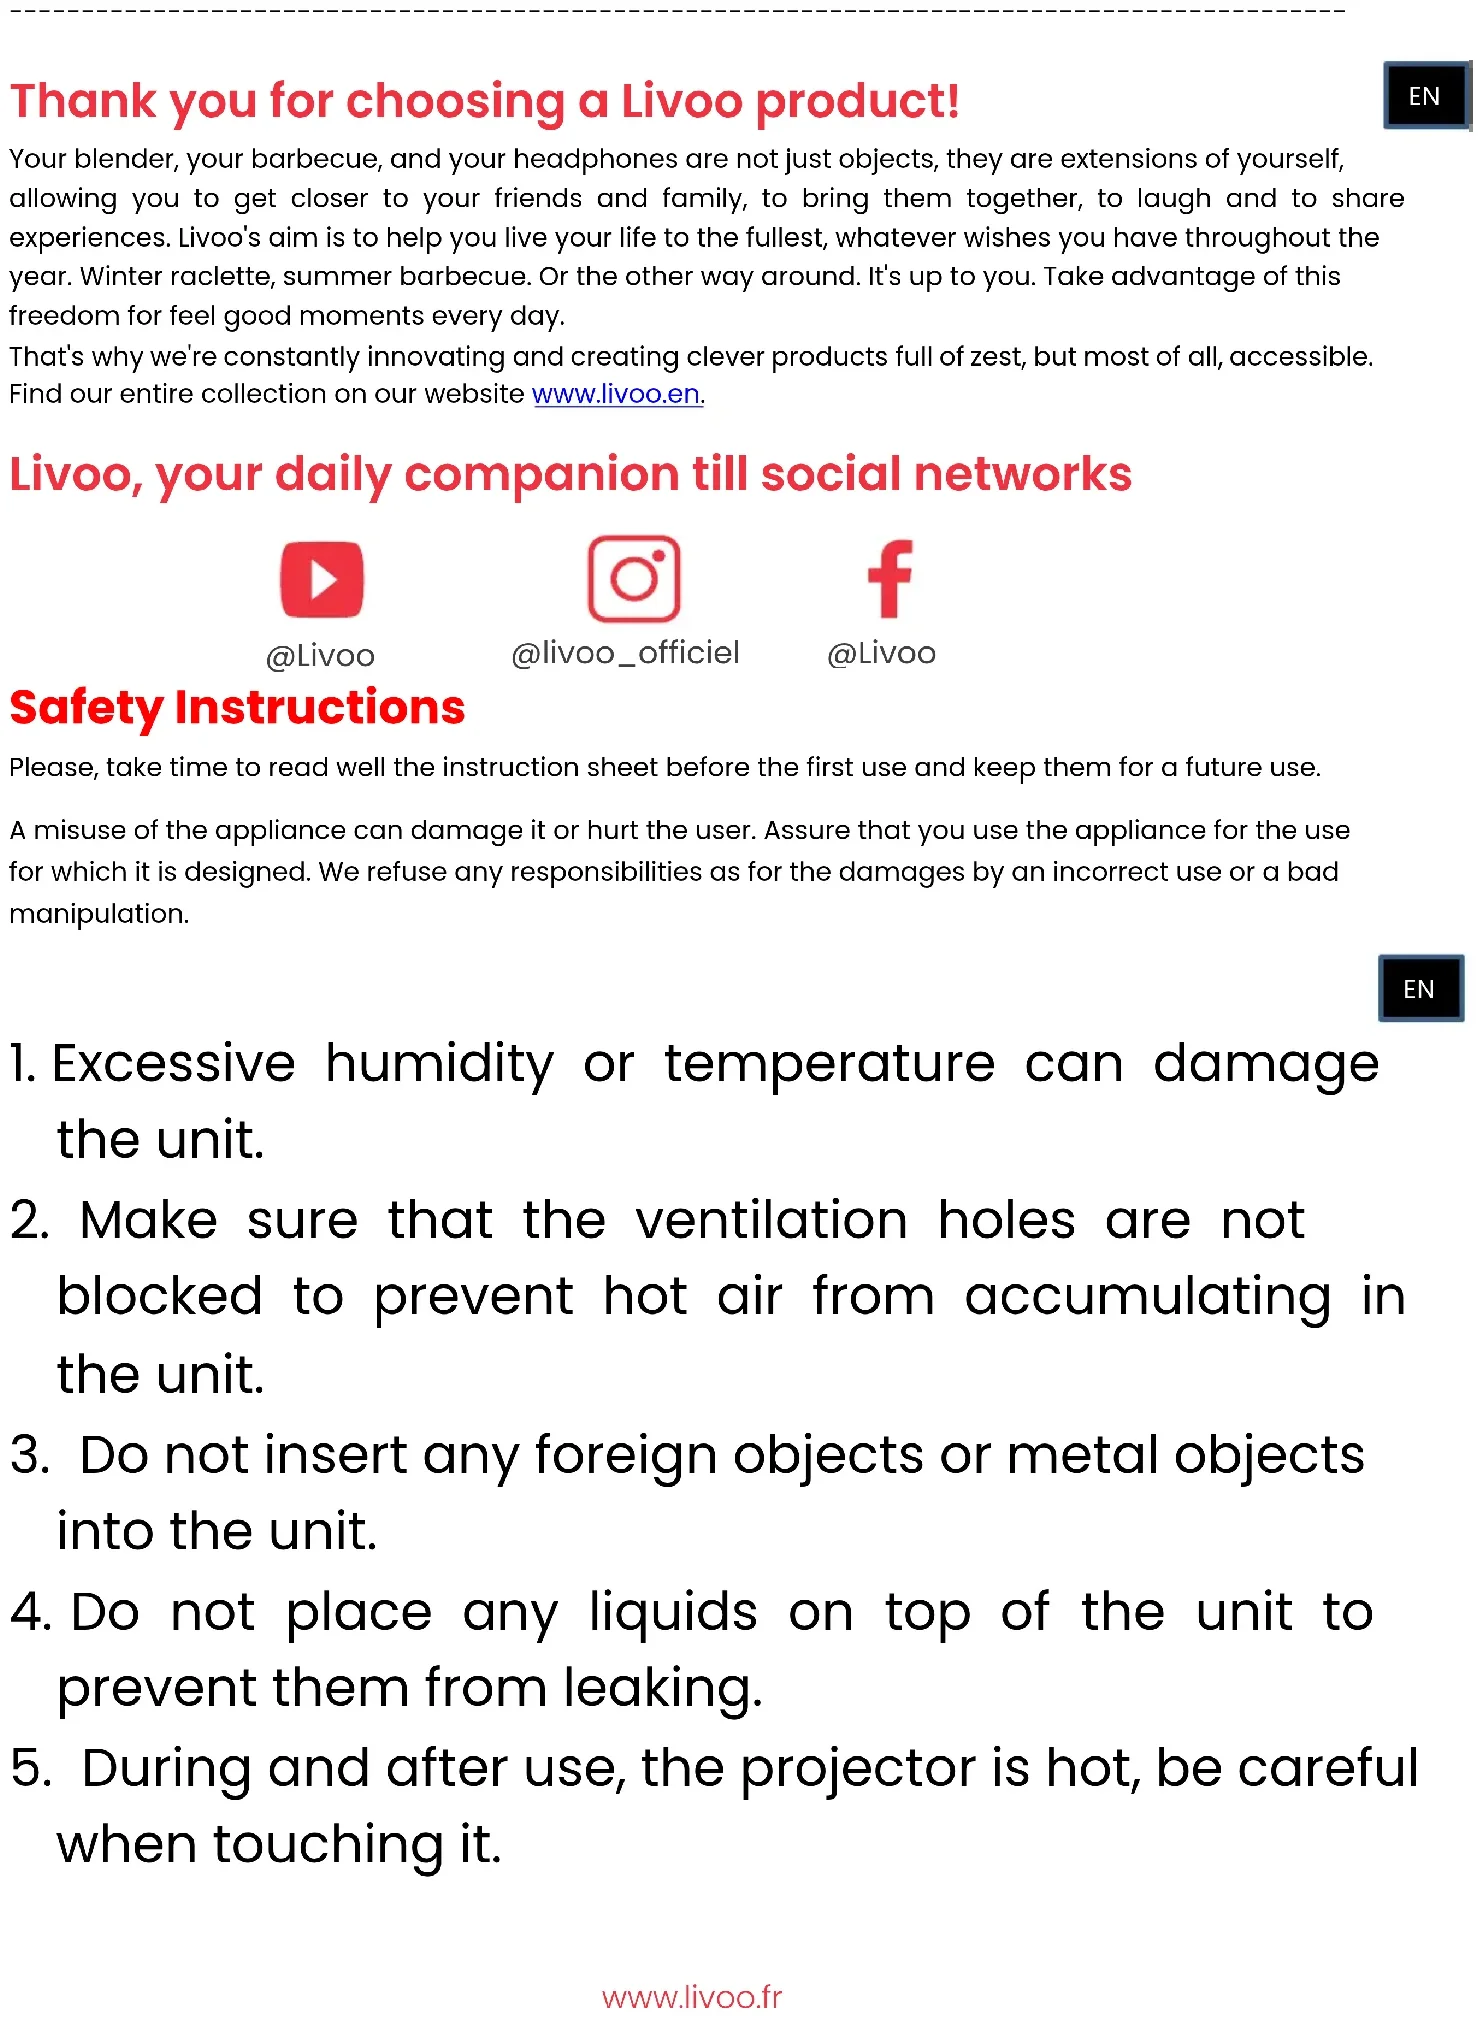
Drawing of the device
Figure 1
| 1. | Focus for adjusting the image quality | 6. | Audio output |
| 2. | Sensor for the remote control | 7. | AV input |
| 3. | Power On/off | 8. | HDMI input |
| 4. | Power port | 9. | USB input |
| 5. | Infrared sensor | 10. | SD carte input |
| 11. | Lens | ||
Figure 3
| 1. | Power on/off | 5. | Source |
| 2. | Return button | 6. | Mouse |
| 3. | Ok (confirm your choice) and forward/backward/up/down arrows | 7. | Infrared transmitter |
| 4. | Volume + ou - | 8. | Menu |
| 9. | Home page | ||
Use of the device
Installation of the projector
Place your projector on a flat, stable surface with plenty of space around it (Fig. 5). Orient the projector to project on a white surface.
Plug in the power cable and press the power button on the projector (Fig. 1) or on the remote control (Fig. 3).
The home screen will be projected automatically (Fig. 6). Adjust the sharpness of the image using the dial above the lens (Fig. 1).
Note: If the unit is too close to the screen, you will not be able to obtain a sharp image. In this case, move the unit back from the screen.
1. Home page
On the home screen, using the remote control, you can navigate through
- pre-installed applications (Facebook, Netflix, YouTube, Disney+, Spotify ...),
- the applications you have installed on the device,
- the trends proposed by the device
- the different pages existing in the device (Search, Home, Applications, Video, Music, Settings, weather conditions).
To launch an application or go to a selected page, with the arrow on the remote control and press the "OK" button.
From the home screen, go to the device's "SETTINGS" page by navigating the menus located in the upper left corner of the screen.
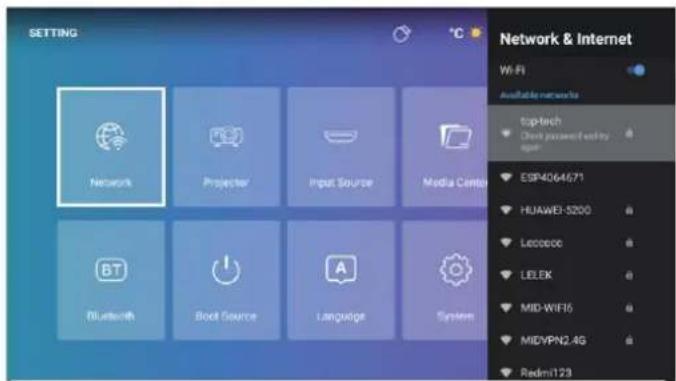
Wi-Fi connection
In the "SETTINGS" page, select "Network" (Fig. 8).
You will see on the right of the screen the list of available Wi-Fi networks. Select in the list the Wi-Fi network you want to connect to.
Note: if your network does not appear, check that your internet box is activated. If your box is activated but no network is visible, check that the "Wi-Fi" option is activated at the top of the column that appears on the right of the screen.
If your Wi-Fi network is password protected, you will need to enter the password to connect.
When you are connected to the network of your choice, the mention "connected" appears under the name of the network.
Input source
1. HDMI Connection
Connect your projector to another device using an HDMI cable. The HDMI port is located on the back of your projector (Fig. 1).
In the "SETTINGS" page, select "Input Source" (Fig. 8). A column appears on the left of the screen where you can choose "HDMI". When you confirm, you will project via the HDMI cable.
Note: you can also make the selection column appear from any projected page by using the button NO. 5 on the remote control (Fig. 3)
To exit the "HDMI" projection mode, press the "Home Page" button on the remote control (Fig. 3).
2. AV connection
Connect an AV cable to the AV port on the back of your projector (Fig. 1).
In the « SETTING page », select « input source » (Fig. 8). A column appears on the left of the screen in which you could choose "AV". By confirming, you validate the projection source.
Note: you can also make the selection column appear from any projected page by using the button NO. 5 on the remote control (Fig. 3)
3. MEDIA connection
Plug in USB key, external hard drive or other device can be connected via USB port, which is located on the back of your projector (Fig. 1).
In the « SETTING » page, select "input source" (Fig. 8). A column appears on the left of the screen in which you could choose "Media" files. By confirming, you validate the projection source.
Note: you can also make the selection column appear from any projected page by using the button NO. 5 on the remote control (Fig. 3)
Software update
For an optimal function of your device, it is necessary that the software used is regularly to be updated, in this menu, you can activate or deactivate the three options below:
- Automatically detect new software versions that are available.
- Automatically remind you to update the system, if necessary, when you turn on the device.
- Automatically update the system to download a new software version.
These options can only work if the device is connected to a Wi-Fi network (please refer to the chapter WFI connection).
For a good function of your device, we advise you to activate these 3 options.
In this menu, you can also perform a local system update: this action allows you to update the system of the device using a mobile storage system (USB key, SD card) connected to the device on which a software update have been previously loaded.
Besides, you could find out the model of your device and the version of the system used by your device.
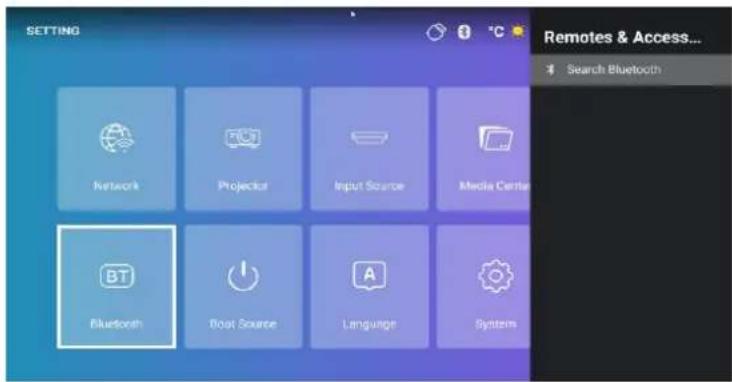
Bluetooth Connection (Fig. 9) – Use the projector as a Bluetooth speaker
In the" SETTINGS" page, select "Bluetooth", a black column appears on the right of the screen.
On the device that you wish to connect to the video projector, activate your Bluetooth.
On the projector, confirm search Bluetooth, a list of devices proposed by the projector will appear, select and confirm the one you want to pair.
One the device you want to connect to the projector, a new device appears in the list of available devices. Confirm on your device and on the projector the paring of the 2 devices.
When the 2 devices are connected, the projector will indicate it by a sound signal.
For a better sound quality of your projector, you could connect a speaker or a sound bar via Bluetooth function. You can also connect your phone to the projector, use it as a speaker.
Note: via le Bluetooth, you will not be able to project the content of your phone.
Boot source (Fig. 9)
Set the default boot source to AV or HDMI.
Language setting (Fig. 9)
In the « SETTING » page, select "Language", a column appears on the right of screen where you could select the language of your choice.
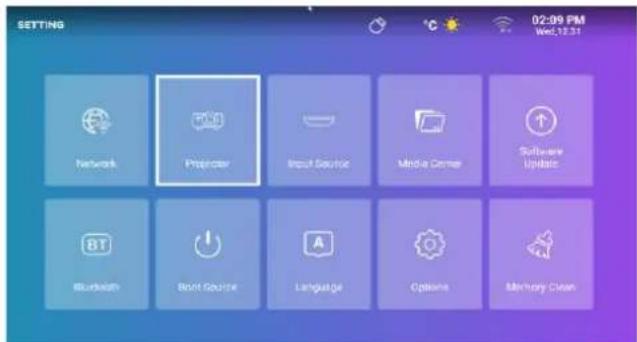
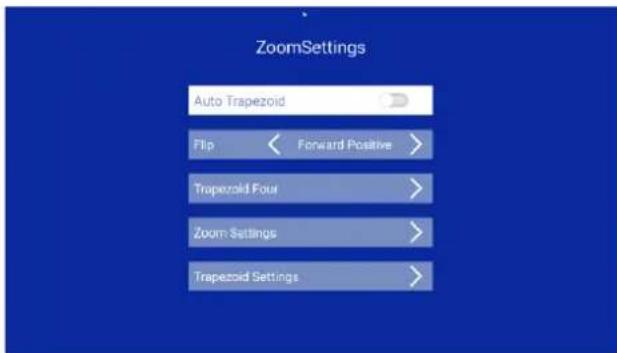
Projector (Fig. 13)
To perform keystone correction, go to Home > Settings > Projector, you can choose automatic or manual keystone correction (Fig.14).
System setting (Fig. 9)
In the « SETTING » page, select « System ». A column appears on the right of the screen from which you could selection 3 options:
- Network and internet: via this menu you could also connect to Wi-Fi (see chapter Wi-Fi Connection)
-
Device preference: in this menu, you will find the different programs:
-
About: it allows you to know the name of this device, the network status and the difference software versions.
- System update: please refer to software update chapter
- date &time: this allows you to set the time zone and the format (12H/24H)
- Applications: here you will find the different applications installed in this device, this program allows you to open, force the shutdown, uninstall, consult used storage space, delete data, empty the cache or delete the default values of each application.
• Languages: see the language setting chapter.
• Keyboard: here you can find information about the virtual keyboard of the projector. - Power: With this program you can set the device to automatically switch to standby mode between 10 and 120 minutes as you wish.
- Storage: here you can see the internal storage space.
• Display: see the projector chapter - Reset: this program allows you to reset the device to its factory default state.
- Remote and accessories: Via this menu, you could connect devices by Bluetooth (see chapter Bluetooth connection).
Memory clean (Fig. 9)
In the « SETTINGS » page, select « Memory clean ». a new page appears on which you could see the use of the internal memory of the device of the device and the applications open in the background.
3 actions are possible on this screen:
- Free memory: when you activate this feature, the device performs a cleaning of its internal memory. This does not delete the files you have stored on the device. This feature only removes temporary files that allow the device to run faster.
- Enable or disable the alert option when there's less than 10% of the memory left.
- Stop applications running in the background: go to the application in question and press the "OK" button on the remote control.
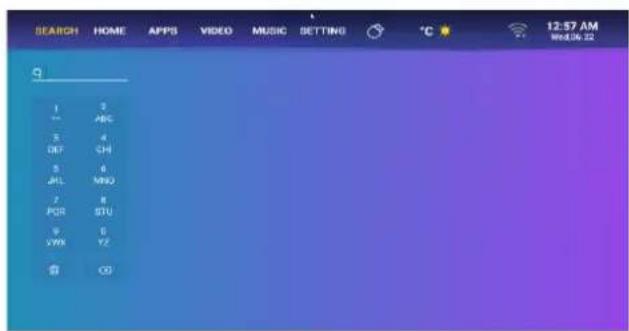
3. PAGE « SEARCH »
Via home page, go to the "SEARCH" page of the unit by navigating the menus in the upper left corner of the screen with arrows on the remote. Once in the menu, you could start a search by selecting characters with the arrows on the remote. The results will be both videos and applications that match your search.
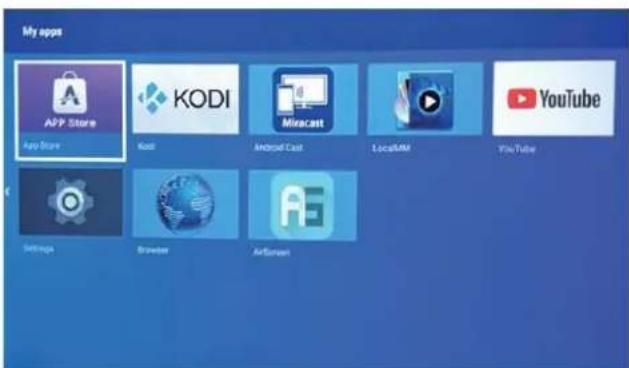
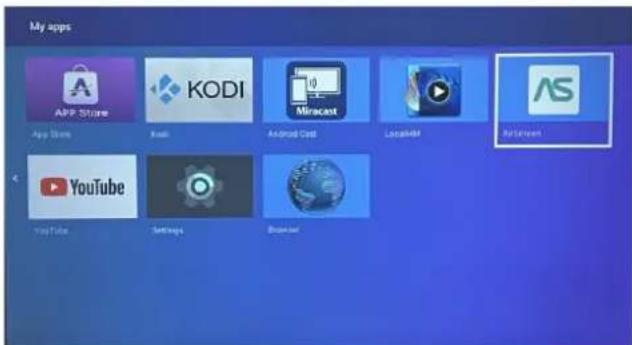
4. PAGE « APPS »
From home page, go to the "APPS" page of the device by navigating the menus located in the upper left corner of the screen using the arrows on the remote control.
In this menu, you'll be able to view all the applications installed on your device in the "My app" section.
You could also be able to navigate through different tabs that will propose you applications according to the pre-selected themes (Video, Sports, Music, Lifestyle, NEWS, Education, Games, Tool).
By selecting an application, you could install this application on the device. Each application has its own interface, so let the application guide you through the installation process.
5. PAGE « VIDEO »
From home page, go to the "VIDEO" page of the device by navigating the menu located in the upper left corner of the screen using the arrows on the remote control.
In this menu, you'll be able to navigate through different themes and discover selected videos for each theme.
The videos you select will be accessible via the applications installed on your device.
6. PAGE « MUSIC »
From home page, go the "MUSIC" page of the device by navigating through the menus in the upper left corner of the screen using the up arrow on the remote.
In this menu, you'll be able to navigate through different themes and discover selected music for each theme.
The music you select will be accessible via the applications installed on your device.
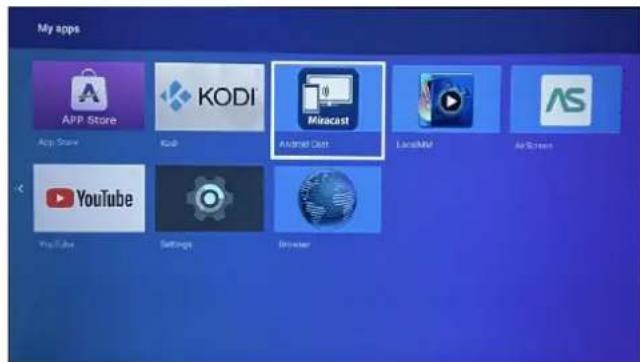
7. Project your cell phone content via Wi-Fi
In the « APPS » menu of the projector, launch the AirScreen or Miracast application, these applications are pre-installed on your device.
On the device you want to project on the projector, launch the screen sharing application preinstalled in your device software (SmartView, Cast...)
When you launch the application on your device, follow the instructions that appear.
Note: to work, both devices must be connected to the same Wi-Fi network.
Note: Different devices (smartphones or others) have different names and opening methods for the wireless display function. Please refer to the manual of the Android device you are using.
8. Connecting a gamepad
To get the most out of the gaming applications you might install on this projector, you can connect a game controller via the USB port. Some game applications will allow you to set up your controller.
Others will not be compatible with a controller or will not allow you to set it up. This depends on the application and not the device.
9. Simulate the mouse
Button 6 on the remote control (Fig. 3) allows you to make a pointer appear on the screen. To activate this function, press and hold the button on the remote control for a few seconds until you see the words "Simulate Mouse" appear on the screen. Release the button. A pointer appears on the screen that you can move using the arrows on the remote.
To stop this function, press button 6 on the remote control again for a few seconds (Fig. 3).
Cleaning and maintenance
Turn off your device and unplug it.
Use a soft, dry cloth with a mild detergent to clean the plastic housing of the device.
To clean the lens, use a camera hair dryer or lens cleaning paper. Be careful not to scratch the lens.
Dust in the vents prevents proper ventilation, which increases the internal temperature and causes malfunction. To clean the ventilation holes, use a vacuum cleaner with a brush. Do not use a vacuum cleaner without a brush adapter.
Unplug the unit if it will not be used for a long period of time.
UE DECLARATION OF CONFORMITY
Nous,
DELTA - BP61071
67452 Mundolsheim – France
Declare under our own responsibility that the article:
- Description: Portable video projector Android® 9.0
- Référence : DV152
to which this declaration applies, is in conformity with the applicable EU harmonization legislation:
| DIRECTIVES | NORMES or SPECIFICATIONS |
| (EMC) 2014/30/EU( RED) 2014/53/EU | ETSI EN 301 489-1 V2.2.3(2019-11)ETSI EN 301 489-3 V2.1.1 (2019-03)ETSI EN 300 328 V2.2.0 (2017-11)EN 62479 :2010 |
| (ROHS) 2011/65/EU | The object of the declaration described above is in conformity with Directive 2011/65/EU of the European Parliament and of the Council of 8 June 2011 on the restriction of the use of certain hazardous substances in electrical and electronic equipment.EU 2011/65/EU et EU 2015/863 |
| (LVD) 2014/35/EC | EN IEC 62368-1 2020 + AII 2020 |
| (ERP) 2009/125/EC | No 1275/2008 & (EU) No 801/2013 |
Mundolsheim le 15/06/2023
David Bousquet, CEO
Signature :
text_image
DELTA sas 1 rue FOCH BP 61071 67452 MUNDOLSHEM GEDEX FRANCE SHEET: 324 302 186 0038 APE: 516 J TEL: 33 390-22 51 92 FAX: 33 3 90 20 39 29 e-mail: vella@delta-import.com
natural_image
Symbol of a trash bin crossed with two crossed arms, no text or labels presentCorrect disposal of the unit (Electrical and Electronic Equipment).
(Applicable in the European Union and the rest of Europe that have adopted separate collection systems countries). The European Directive 2012/19/EU on Waste Electrical and Electronic Equipment (WEEE), requires that old household electrical appliances must not be disposed of in the normal household waste stream. Old appliances must be collected separately in order to optimize the recovery and recycling of the materials they contain and reduce the impact on human health and the environment. The symbol of the crossed out dustbin is marked on all products to remind the obligations of separate collection. Consumers should contact their local authority or retailer for information concerning the correct disposal of their product.