
POWX1410 - Saw PowerPlus - Free user manual and instructions
Find the device manual for free POWX1410 PowerPlus in PDF.
| Product Type | Mini circular saw for metals |
| Brand | PowerPlus |
| Model | POWX1410 |
| Rated voltage | 220-240 V |
| Rated frequency | 50 Hz |
| Rated power | 600 W |
| No-load speed | 3500 min⁻¹ |
| Blade diameter | 120 mm |
| Max cutting depth | 41.5 mm |
| Compatible materials | Iron, copper, aluminum, non-ferrous metals, sheets |
| Protection class | II (double insulation) |
| Included accessories | 24T blade, hex key, parallel guide |
| Safety - Protective cover | Removable mobile protective cover |
| Safety - Arbor lock | Spindle lock button |
| Safety - Double insulation | No grounding necessary |
| Maintenance | Regular cleaning of vents, blade, and dust housing |
| Warranty | 36 months |
| Certification | CE |
| Weight | Approximately 2.5 kg (estimate) |
Frequently Asked Questions - POWX1410 PowerPlus
User questions about POWX1410 PowerPlus
0 question about this device. Answer the ones you know or ask your own.
Ask a new question about this device
Download the instructions for your Saw in PDF format for free! Find your manual POWX1410 - PowerPlus and take your electronic device back in hand. On this page are published all the documents necessary for the use of your device. POWX1410 by PowerPlus.
USER MANUAL POWX1410 PowerPlus
natural_image
Yellow and black power knife with a clear blade and metal base, shown against a plain background (no text or symbols visible)POWX1410
NL NEDERLANDS VERTAALDE VERSIE VAN DE ORIGINELE HANDLEIDING
FR FRANÇAIS TRADUCTION DU MODE D'EMPLOI D'ORIGINE
EN ENGLISH ORIGINAL INSTRUCTION MANUAL
DE DEUTSCH ÜBERSETZUNG DER ORIGINAL-GEBRAUCHSANWEISUNG
ES ESPAÑOL TRADUCCIÓN DEL MANUAL DE INSTRUCCIONES ORIGINAL
IT ITALIANO TRADUZIONE DEL MANUALE DI ISTRUZIONI ORIGINALE
PT PORTUGUÊS TRADUÇÃO DO MANUAL DE INSTRUÇÕES ORIGINAL
NO NORSK OVERSETTELSE AV ORIGINAL BRUKERVEILEDNING
DA DANSK OVERSÄTTELSE AF DEN ORIGINALE BRUGSVEJLEDNING
SV SVENSKA ÖVERSÄTTNING AV DEN URSPRUNGLIGA BRUKSANVISNINGEN
FI SUOMI ALKUPERÄISEN OHJEKIRJAN KÄÄNNÖS
EL Ελληνικά Μετάφραση του πρωτότυπου εγχειριδίου οδηγιών
HR HRVATSKI PRIJEVOD ORIGINALNOG PRIRUČNIKA S UPUTAMA ZA RAD
SR SRPSKI PREVOD ORIGINALNOG UPUTSTVA ZA UPOTREBU
CS ČESKY PŘEKLAD ORIGINÁLNÍHO NÁVODU K POUŽITÍ
SK SLOVENČINA PREKLAD NÁVODU NA POUŽÍVANIE Z ORIGINÁLU
RO ROMÂNĂ TRADUCEREA MANUALULUI DE INSTRUCTIUNI ORIGINALE
HU MAGYAR AZ EREDETI KEZELÉSI UTASÍTÁS FORDÍTÁSA
RU РУССКИЙ ОРИГИНАЛЬНАЯ ИНСТРУКЦИЯ ПО ЭКСПЛУАТАЦИИ
BG БЪЛГАРСКИ ПРЕВОД НА ОРИГИНАЛНОТО РЬКОВОДСТВО

FIG. A & B
POWERPLUS®
HIGH QUALITY TOOLS
POWX1410

natural_image
Mechanical device with labeled component '15' and blue arrow indicator (no readable text or symbols beyond label)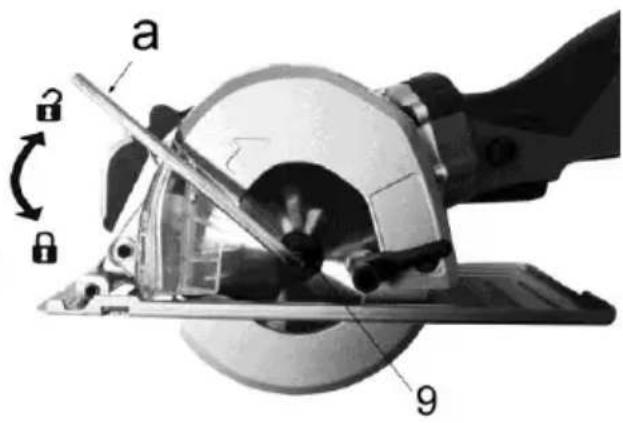
Fig. 1 Fig. 2

Fig. 3

natural_image
Close-up of a power cutter tool with a close-up inset showing the blade and gear assembly (no text or symbols visible)Fig. 4

natural_image
Close-up of a cut-out power tool with blue directional arrows indicating motion (no text or symbols visible)Fig. 5
POWERPLUS®
HIGH QUALITY TOOLS
POWX1410
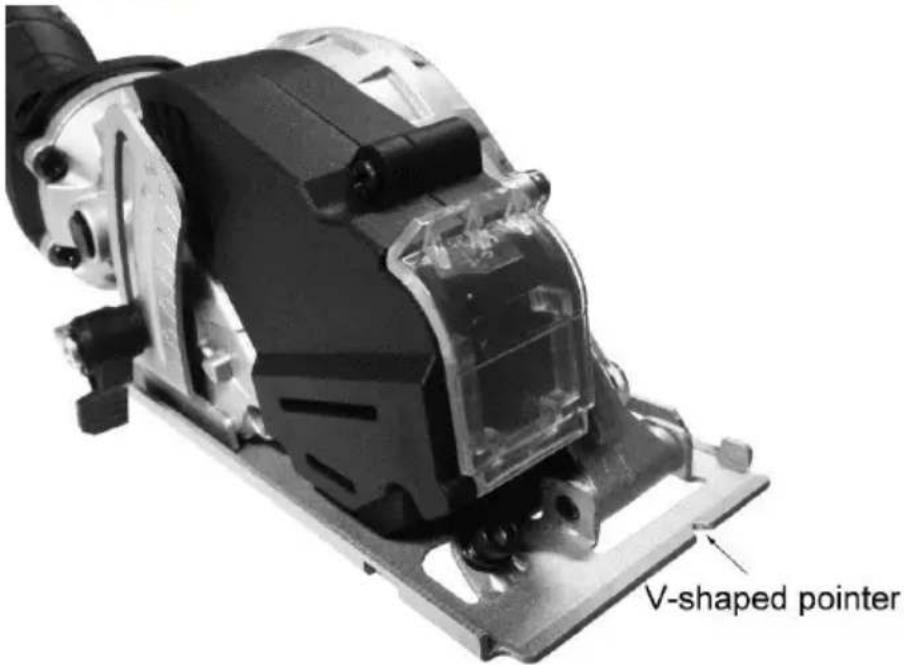
Fig. 6

Fig. 7
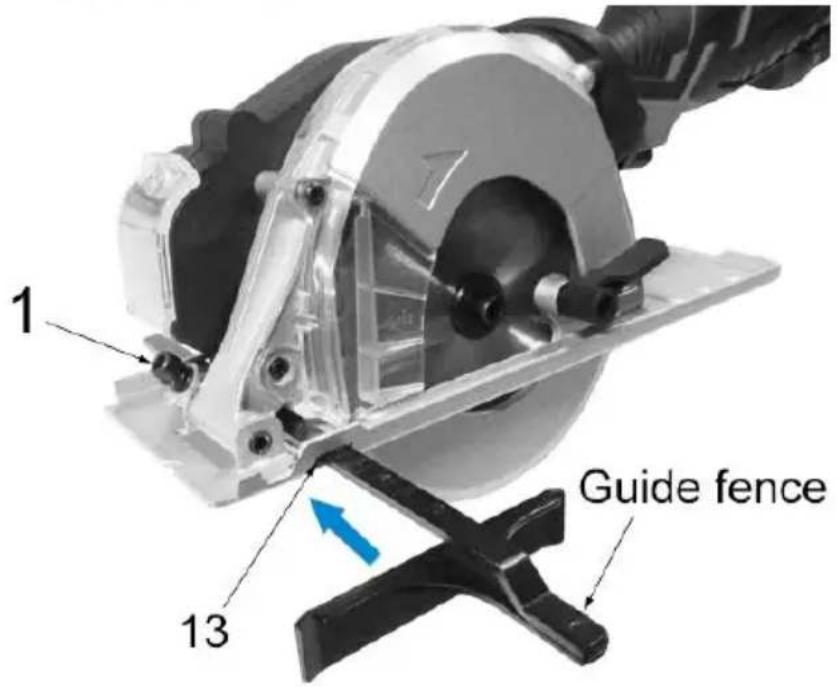
Fig. 8
1 GEBRUIKSDOELEINDEN 2
2 OVERZICHT VAN DE ONDERDELEN (FIG. A&B) 2
3 INHOUD VAN DE VERPAKKING 2
4 TOELICHTING VAN DE SYMBOLEN 3
5 ALGEMENE VEILIGHEIDSVOORSCHRIFTEN 3
5.1 Werkplaats 3
5.2 Elektrische veiligheid 3
1 APPLICATION....2
2 OVERVIEW COMPONENTS: (FIG. A & B) 2
3 PACKAGE CONTENT LIST....2
4 SYMBOLS....3
5 GENERAL POWER TOOL SAFETY WARNINGS .... 3
5.1 Work area ....3
5.2 Electrical safety....3
5.3 Personal safety 4
5.4 Power tool use and care....4
5.5 Service....4
6 ADDITIONAL SAFETY INSTRUCTIONS ....4
7 CAUSES AND PREVENTION OF KICKBACK 5
8 ASSEMBLY 6
8.1 Changing the blade (Fig. 1, 2, 3)....6
8.2 Dust extraction (Fig. 4)....6
9 OPERATION....7
9.1 Switching on and off (Fig. 5)....7
9.2 Line following (Fig. 6)....7
9.3 Depth Adjustment (Fig.7)....7
9.4 Setting the guide fence (Fig. 8)....7
9.5 General cut....7
10 CLEANING AND MAINTENANCE....8
11 TECHNICAL DATA....8
12 NOISE....8
13 WARRANTY....9
14 ENVIRONMENT 9
15 DECLARATION OF CONFORMITY .... 10
MINI METAL SAW 600W
POWX1410
1 APPLICATION
This machine is primarily intended for the sawing, longitudinally and transversely, of iron, copper, aluminum, nonferrous metals and metal sheet
Please note that the blade pre-installed in the saw as supplied is intended for use with metal only. Any other use or modification to the device shall be considered as improper use and could give rise to considerable dangers. Not suitable for commercial use.

WARNING! Read this manual and general safety instructions carefully before using the appliance, for your own safety. Your power tool should only be passed on together with these instructions.
2 OVERVIEW COMPONENTS: (FIG. A & B)
-
Lock screw for Edge guide
-
Movable protective cover
-
Cutting depth scale
-
Soft grip
-
Unlock button
-
Switch
-
Lever for removable protective cover
-
Blade clamping screw
-
Saw blade
-
Storage for hex key
-
Spindle lock button
-
Cover for dust collection box
-
Dust collection box
-
Base plate
-
Lock lever for cutting depts
-
Guide fence slot
3 PACKAGE CONTENT LIST
■ Remove all packing materials.
- Remove remaining packaging and transit supports (if existing).
- Check the completeness of the packing content.
- Check the appliance, the power cord, the power plug and all accessories for transportation damages.
- Keep the packaging materials as far as possible till the end of the warranty period.
Dispose it into your local waste disposal system afterwards.

WARNING Packing materials are no toys! Children must not play with plastic bags! Danger of suffocation!
HSS saw blade 24T
Guide fence
Hex key

When parts are missing or damaged, please contact your dealer.
4 SYMBOLS
In this manual and/or on the machine the following symbols are used:
 | Denotes risk of personal injury or damage to the tool. |  | Class II - The machine is double insulated; Earthing wire is therefore not necessary. |
 | Read the manual carefully before use. |  | Always wear safety goggles. |
 | In accordance with essential requirements of the European directive(s). |  | Wear gloves |
5 GENERAL POWER TOOL SAFETY WARNINGS
Read all safety warnings and all instructions. Failure to follow all warnings and instructions may result in electric shock, fire and/or serious injury. Save all warnings and instructions for future reference. The term "power tool" in the warnings refers to your mains operated (corded) power tool or battery operated (cordless) power tool.
5.1 Work area
- Keep work area clean and well lit. Cluttered and dark areas invite accidents.
- Do not operate power tools in explosive atmospheres, such as in the presence of flammable liquids, gases or dust. Power tools create sparks which may ignite the dust or fumes.
- Keep children and bystanders away while operating a power tool. Distractions can cause you to lose control.
5.2 Electrical safety

Always check that the power supply corresponds to the voltage on the rating plate.
- Power tool plugs must match the outlet. Never modify the plug in any way. Do not use any adapter plugs with earthed (grounded) power tools. Unmodified plugs and matching outlets will reduce risk of electric shock.
- Avoid body contact with earthed or grounded surfaces such as pipes, radiators, ranges and refrigerators. There is an increased risk of electric shock if your body is earthed or grounded.
- Do not expose power tools to rain or wet conditions. Water entering a power tool will increase the risk of electric shock.
- Do not abuse the cord. Never use the cord for carrying, pulling or unplugging the power tool. Keep cord away from heat, oil, sharp edges or moving parts. Damaged or entangled cords increase the risk of electric shock.
- When operating a power tool outdoors, use an extension cord suitable for outdoor use. Use of a cord suitable for outdoor use reduces the risk of electric shock.
- If operating a power tool in a damp location is unavoidable, use a residual current device (RCD) protected supply. Use of an RCD reduces the risk of electric shock.
5.3 Personal safety
- Stay alert, watch what you are doing and use common sense when operating a power tool. Do not use a power tool while you are tired or under the influence of drugs, alcohol or medication. A moment of inattention while operating power tools may result in serious personal injury.
- Use safety equipment. Always wear eye protection. Safety equipment such as dust mask, non-skid safety shoes, hard hat, or hearing protection used whenever conditions require will reduce personal injuries.
- Avoid accidental starting. Ensure the switch is in the off position before plugging in. Carrying power tools with your finger on the switch or plugging in power tools that have the switch on invites accidents.
- Remove any adjusting key or wrench before turning the power tool on. A wrench or a key left attached to a rotating part of the power tool may result in personal injury.
- Do not overreach. Keep proper footing and balance at all times. This enables better control of the power tool in unexpected situations.
- Dress properly. Do not wear loose clothing or jewellery. Keep your hair, clothing and gloves away from moving parts. Loose clothes, jewellery or long hair can be caught in moving parts.
- If devices are provided for the connection of dust extraction and collection facilities, ensure these are connected and properly used. Use of these devices can reduce dust related hazards.
5.4 Power tool use and care
- Do not force the power tool. Use the correct power tool for your application. The correct power tool will do the job better and safer at the rate for which it was designed.
- Do not use the power tool if the switch does not turn it on and off. Any power tool that cannot be controlled with the switch is dangerous and must be repaired.
- Disconnect the plug from the power source before making any adjustments, changing accessories, or storing power tools. Such preventive safety measures reduce the risk of starting the power tool accidentally.
- Store idle power tools out of the reach of children and do not allow persons unfamiliar with the power tool or these instructions to operate the power tool. Power tools are dangerous in the hands of untrained users.
- Maintain power tools. Check for misalignment or sticking of moving parts, breakage of parts and any other condition that may affect the power tool's operation. If damaged, have the power tool repaired before use. Many accidents are caused by poorly maintained power tools.
- Keep cutting tools sharp and clean. Properly maintained cutting tools with sharp cutting edges are less likely to stick and are easier to control.
- Use the power tool, accessories and tool bits etc., in accordance with these instructions and in the manner intended for the particular type of power tool, taking into account the working conditions and the work to be performed. Use of the power tool for operations different from intended could lead to a hazardous situation.
5.5 Service
- Have your power tool serviced by a qualified repair person using only identical replacement parts. This will ensure that the safety of the power tool is maintained.
6 ADDITIONAL SAFETY INSTRUCTIONS
- Keep hands away from cutting area and the blade.
- Do not reach underneath the work piece.
-
Adjust the cutting depth to the thickness of work piece.
■ Never hold piece being cut in your hands or across your leg. -
Hold power tool by insulated gripping surfaces when performing an operation where the cutting tool may contact hidden wiring or its own cord.
- When ripping always use a rip fence or straight edge guide.
■ Always use blades with correct size and shape (diamond versus round) of arbour holes. - Never use damaged or incorrect blade washers or bolt.
7 CAUSES AND PREVENTION OF KICKBACK
- A kickback is the sudden reaction as a result of a stuck, jammed or misaligned saw blade which leads to an uncontrolled saw to be lifted and moved from the workpiece out in the direction of the operator.
- A kickback can occur when the saw blade gets stuck or jammed in the saw gap. The saw blade is blocked and the motor force repels the circular saw in the direction of the operator.
- A kickback can occur when the saw blade becomes twisted or misaligned in the saw groove. As a result, the teeth of the back edge of the saw blade can get stuck in the surface of the workpiece, whereby the saw blade is moved out of the saw gap and the saw jumps back in the direction of the operator.
- A kickback is the result of incorrect or faulty use of the saw. It can be prevented by appropriate precautions as described below.
- Hold the saw firmly and bring your arm into a position in which you can resist the kickback forces. Always hold the saw blades on the sides, never bring the blade in line with your body. In a kickback, the saw can jump backwards, but the operator can control the kickback forces if appropriate measures were taken.
- If the saw blade jams or sawing is interrupted for any reason, release the ON / OFF switch and calmly hold the saw in the material until the saw blade stands completely still. Never attempt to remove the saw from the workpiece or pull it backwards as long as the saw blade is moving or a kickback might occur. Find the cause of the saw blade jam and eliminate them through appropriate measures.
- When you want to restart a saw that is stuck in a workpiece, center the saw blade in the saw gap and check that the saw teeth are not stuck in the workpiece. If the saw blade jams, it can move out from the workpiece or a kickback can happen if the saw is restarted.
- Prop up large panels in order to minimise the risk of a kickback by a jammed saw blade. Large panels tend to sag under their own weight. Panels must be supported on both sides, both in the vicinity of the saw gap as well as on the edge.
- Do not use dull or damaged saw blades. Saw blades with blunt or misaligned teeth cause increased friction, jamming of the saw blade and kickback by an excessively narrow saw gap.
- Tighten the cutting depth position prior to cutting. If the settings change while cutting, the saw blade can jam and a kickback can occur.
- Be especially careful if you perform a "circular cut" in a hidden area, such as an existing wall. The protruding saw blade can get blocked in hidden objects while cutting and cause a kickback.
- Do not place the saw on the workbench or the floor unless the saw blade is at a standstill. An unprotected, running saw blade moves the saw against the cutting direction and cuts whatever is in its way. Thus note the delay time of the saw.
- For this reason, the saw is not suitable for use in reverse position as fixed equipment.
- Do not operate the saw if it is not working properly or has been damaged. In case of technical problems, do not attempt to repair it on your own. Contact the service or have the saw repaired by a professional.
8 ASSEMBLY
Check for damage to the tool, parts and accessories which may have occurred during transportation. Take some time to read this manual carefully and understand all the content prior to assembly and operation.
CAUTION! Always ensure that the tool is switched off and unplugged from the mains supply before assembly.
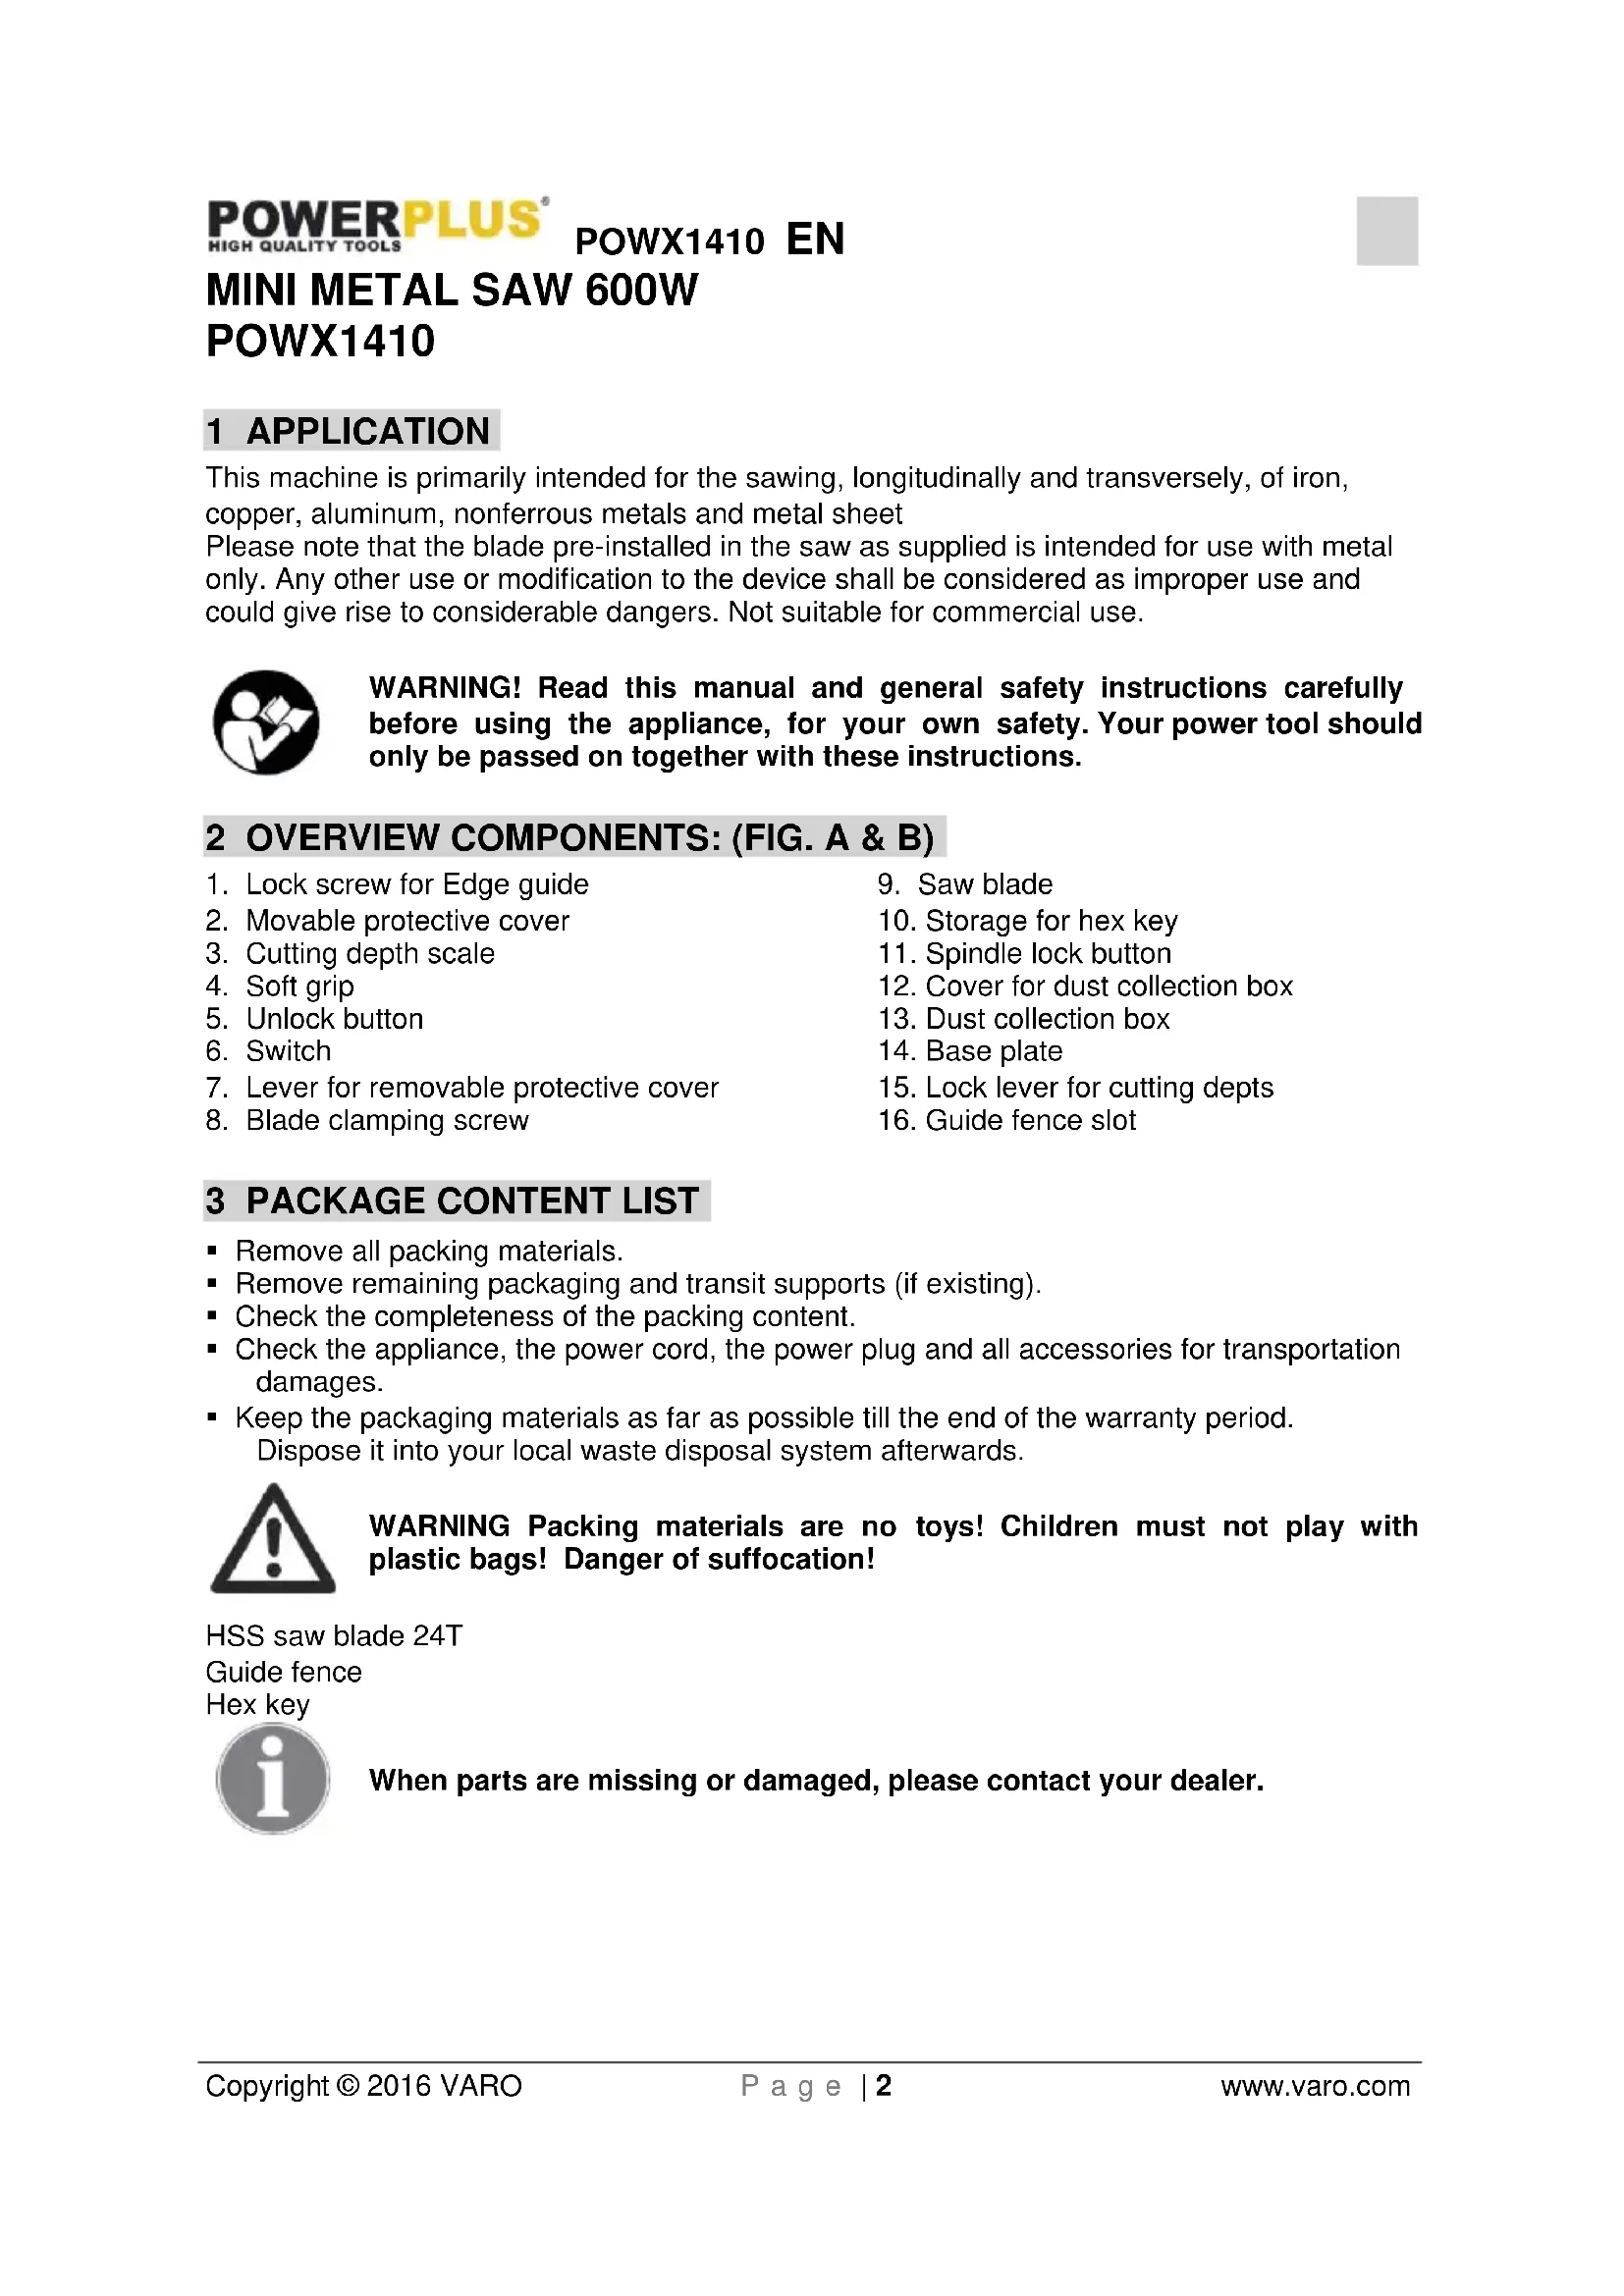
8.1 Changing the blade (Fig. 1, 2, 3)

Incorrect positioning of the blade can permanently damage the tool.
- Ensure the tool is unplugged from the mains supply.
- Set the cutting depth to the maximum.
- Press and hold the spindle lock button (11) on, release the clamping screw with plain washer (9) by using the inner hexagon wrench (turn clockwise to open). Remove the clamping screw with plain washer and outer
■ Lift up removable protective cover (2) by the lever (7).
■ Remove the saw blade. - The installation of a sawblade is done in the reverse order.
- Press the spindle lock button (11) (until it engages) and tighten the clamping screw (9) firmly.

The arrow on the saw blade must agree with the arrow showing the direction of rotation (running direction shown on the device).
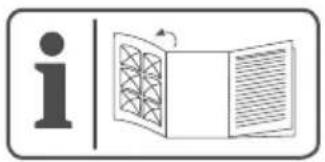
8.2 Dust extraction (Fig. 4)
- The metal saw has a dust collection box (13) which collects the chippings from cutting the work piece when working.
- If the dust collection box is full, open the cover (12) of dust collection box, empty dust, scrap iron, etc. in the body, finally clean the dust collection box.
9 OPERATION
9.1 Switching on and off (Fig. 5)

Note: Before engaging the on/off switch, check the saw blade to see if it is fitted properly and runs smoothly, and the blade clamp screw is well tightened.
- Connect the plug to the power supply.
- To start the tool, depress the unlock button(5) and press the switch trigger(6).
■ Release the trigger(6) to turn the tool off.
9.2 Line following (Fig. 6)
A V-shaped pointer locate at the front of the base plate (14) which allow a line to be followed when cutting.
9.3 Depth Adjustment (Fig.7)
- Loosen the cutting depth setting clamp (15) by lifting the lock lever.
- Set the required cutting depth on the scale (3)
■ Re-clamp the lock lever (15)
9.4 Setting the guide fence (Fig. 8)
Release the lock screw for guide fence (1) on the base plate (14) and set the guide fence in the guide fence slot (16). Set a desired width and retighten the lock screw for the guide fence (1).
9.5 General cut
- Check the specifications to ensure the suitability of the material to be cut.
- Fit the correct blade ensuring it is sharp and not damaged.
- Set the depth of cut.
- Place the material to be cut onto a flat surface such as a workbench or table. Use a piece of scrap material underneath if: You do not wish to damage the work surface.
- Plug into mains supply.
- Grasp the tool firmly and rest its metal base plate onto the surface to be cut. Ensure that the rear half of the base plate overhangs the work surface. Do not plunge the blade into the material.
- NOTE: Never draw the tool backwards.
- Very little force should be used to feed the tool along the cut. Excess force will cause operator fatigue and excessive wear to the blade and tool. Excess force is also likely to cause the temperature cut-out to trip, resulting in delays.
- Once the cut has been finished, lift the tool from the work surface before switching off. If a lot of dust has been created, keep switched on for a few seconds extra to allow the dust to clear from within the tool.
- Ensure that the base plate is always held flat on the material being cut. This is particularly important at the start or finish of a cut or if thin strips are being cut where the base plate is not fully supported.
10 CLEANING AND MAINTENANCE

WARNING! Preventive maintenance performed by unauthorized personnel may result in misplacing of internal wires and components which could cause serious hazard.
Always be sure that the tool is switched off and unplugged before performing any inspection, maintenance or cleaning.
- Keep the ventilation slots of the machine free from dust and dirt to prevent overheating of the engine. Regularly clean them with compressed dry air. Do not attempt to clean by inserting pointed objects through openings.
- Regularly clean the machine housing with a soft cloth, preferably after each use. If the dirt does not come off, use a soft cloth moistened with soapy water.

Never use solvents such as carbon tetrachloride, chlorinated cleaning solvents, ammonia and household detergents that contain ammonia, etc. These solvents may damage the plastic parts.
- Regularly clean the saw blade and the gaps between the guard and blade with a brush or with compressed dry air, and preferably after each use.
- When the supply cord is damaged have it replace by a qualified technician.
11 TECHNICAL DATA
| Rated voltage | 220-240 V |
| Rated frequency | 50 Hz |
| Rated power | 600 W |
| Rotation speed | 3500 min ^-1 |
| Blade size | ∅ 120 mm |
| Max. cutting depth | 41,5 mm |
12 NOISE
Noise emission values measured according to relevant standard. (K=3)
| Acoustic pressure level LpA | 94 dB(A) |
| Acoustic power level LwA | 105 dB(A) |

ATTENTION! Wear hearing protection when sound pressure is over 85 dB(A).
aw (Vibration):
4,8 m/s²
K = 1.5 ~m / s^2
13 WARRANTY
- This product is warranted as provided by law for a 36-month period effective from the date of purchase by the first user.
- This warranty covers all material or production flaws excluding : batteries, chargers, defective parts subject to normal wear & tear such as bearings, brushes, cables, and plugs, or accessories such as drills, drill bits, saw blades, etc. ; damage or defects resulting from maltreatment, accidents or alterations; nor the cost of transportation.
- Damage and/or defects resulting from inappropriate use also do not fall under the warranty provisions.
- We also disclaim all liability for any bodily injury resulting from inappropriate use of the tool.
- Repairs may only be carried out by an authorised customer service centre for Powerplus tools.
- You can always obtain more information at the number 00 32 3 292 92 90.
- Any transportation costs shall always be borne by the customer, unless agreed otherwise in writing.
- At the same time, no claim can be made on the warranty if the damage of the device is the result of negligent maintenance or overload.
- Definitely excluded from the warranty is damage resulting from fluid permeation, excessive dust penetration, intentional damage (on purpose or by gross carelessness), inappropriate usage (use for purposes for which the device is not suitable), incompetent usage (e.g. not following the instructions given in the manual), inexpert assembly, lightning strike, erroneous net voltage. This list is not exhaustive.
- Acceptance of claims under warranty can never lead to the prolongation of the warranty period nor commencement of a new warranty period in case of a device replacement.
■ Devices or parts which are replaced under the warranty therefore remain the property of Varo NV
- We reserve the right to reject a claim whenever the purchase cannot be verified or when it is clear that the product has not been properly maintained. (Clean ventilation slots, carbon brushes serviced regularly, etc.).
- Your purchase receipt must be kept as proof of date of purchase.
- Your appliance must be returned undismantled to your dealer in an acceptably clean state, (in its original blow-moulded case if applicable to the unit), accompanied by proof of purchase.
14 ENVIRONMENT

Should your appliance need replacement after extended use, do not discard it with the household rubbish but dispose of it in an environmentally safe way. Waste produced by electrical machine items should not be handled like normal household rubbish. Please recycle where recycle facilities exist. Check with your Local Authority or retailer for recycling advice.
VARO N.V. - Joseph Van Instraat 9 - BE2500 Lier - BELGIUM, declares that,
Product: Mini Metal Saw 600W
Trade mark: POWERplus
Model: POWX1410
is in conformity with the essential requirements and other relevant provisions of the applicable European Directives, based on the application of European harmonized standards. Any unauthorized modification of the apparatus voids this declaration.
European Directives (including, if applicable, their amendments up to the date of signature):
2011/65/EU
2006/42/EC
2014/30/EU
European harmonized standards (including, if applicable, their amendments up to the date of signature):
EN60745-1 : 2009
EN60745-2-5:2010
EN55014-1:2006
EN55014-2:1997
EN61000-3-2:2014
EN61000-3-3:2013
Keeper of the Technical Documentation : Philippe Vankerkhove, VARO – Vic. Van Rompuy N.V.
The undersigned acts on behalf of the company CEO,

Philippe Vankerkhove
Regulatory Affairs – Compliance Manager
28/04/2016
MINI METALLL-TRENNMASCHINE 600 W POWX1410
1 EINSATZBEREICH
Regulatory Affairs – Compliance Manager
28/04/2016
MINI METALLSAG 600 W POWX1410
1 BRUKSOMRÅDE
Denne maskinen er primært beregnet på langsgående og tverrgående saging av jern, kobber, aluminium, ikke-jernholdige metaller og platemetall.
MINI-METALLSÅG 600 W POWX1410
1 ANVÄNDNINGSOMRÅDE
3 FÖRPACKNINGSINNEHÅLL
MINI PILA ZA METAL 600 W POWX1410
1 PRIMJENA
Stroj je prvenstveno namijenjen piljenju, uzdužnom i poprečnom, željezo, bakar, aluminij, obojeni metali i metalni lim.
Primijetite da je nož koji je postavljen u isporučenu pilu namijenjen za upotrebu samo za metal. Bilo koji drugi način uporabe ili preinaka uređaja smatrat će se nepravilnom uporabom i može predstavljati značajnu opasnost. Nije namijenjeno za komercijalnu uporabu.

UPOZORENJE! Prije uporabe alata, a radi vaše vlastite sigurnosti pažljivo pročitajte ovaj priručnik i opće upute o sigurnosti. Ove upute čine sastavni dio opreme električnog alata, pa i u slučaju prodaje drugom vlasniku.
2 OPIS (SL. A&B)
1 Vijak za blokadu rubne vodilice
2 Pomični zaštitni poklopac
3 Mjerilo dubine rezanja
4 Meki rukohvat
5 Gumb za deblokadu
6 Sklopka
7 Ručica za uklonjivi zaštitni poklopac
8 Vijak za stezanje lista pile
9 List pile
10 Pretinac za šesterokutni ključ
11 Gumb za blokadu vretena
12 Poklopac kutije za prikupljanje
prašine
13 Kutija za prikupljanje prašine
14 Osnovna ploča
15 Ručica za blokadu graničnika dubine
16 Utor granične vodilice
3 POPIS SADRŽAJA PAKETA
MINIPILA NA KOV 600 W POWX1410
1 OBLAST POUŽITÍ
MINI PÍLA NA KOV 600 W POWX1410
1 POUŽÍVANIE
natural_image
Yellow and black power tool with saw blade and cutting board (no text or symbols visible)varo
WWW.VARO.COM
DESIGNED AND MARKETED BY VARO
©copyright by varo
VARO - VIC. VAN ROMPUY nv
JOSEPH VAN INSTRAAT 9 - 2500 LIER - BELGIUM
OFFICES:


- MINI METAL SAW 600W
- POWX1410
- APPLICATION
- OVERVIEW COMPONENTS: (FIG. A & B)
- PACKAGE CONTENT LIST
- SYMBOLS
- GENERAL POWER TOOL SAFETY WARNINGS
- Work area
- Electrical safety
- Personal safety
- Power tool use and care
- Service
- ADDITIONAL SAFETY INSTRUCTIONS
- CAUSES AND PREVENTION OF KICKBACK
- ASSEMBLY
- Changing the blade (Fig. 1, 2, 3)
- Dust extraction (Fig. 4)
- OPERATION
- Switching on and off (Fig. 5)
- Line following (Fig. 6)
- Depth Adjustment (Fig.7)
- Setting the guide fence (Fig. 8)
- General cut
- CLEANING AND MAINTENANCE
- WARRANTY
- ENVIRONMENT
- MINI METALLL-TRENNMASCHINE 600 W POWX1410
- EINSATZBEREICH
- MINI METALLSAG 600 W POWX1410
- BRUKSOMRÅDE
- MINI-METALLSÅG 600 W POWX1410
- ANVÄNDNINGSOMRÅDE
- FÖRPACKNINGSINNEHÅLL
- MINI PILA ZA METAL 600 W POWX1410
- PRIMJENA
- OPIS (SL. A&B)
- POPIS SADRŽAJA PAKETA
- MINIPILA NA KOV 600 W POWX1410
- OBLAST POUŽITÍ
- MINI PÍLA NA KOV 600 W POWX1410
- POUŽÍVANIE
Brand : PowerPlus
Model : POWX1410
Category : Saw