Cuneo - Radio Audizio - Free user manual and instructions
Find the device manual for free Cuneo Audizio in PDF.

| Product Type | Internet Radio DAB+/FM |
| Brand | Audizio |
| Model | Cuneo |
| Dimensions | 300 x 120 x 140 mm |
| Weight | 2.2 kg |
| Power Supply | 100-240 VAC 50/60 Hz via 9V power adapter |
| Output Power | 50 Watts |
| Playback Modes | Bluetooth Streaming, DAB+, FM, Internet Radio |
| Display | 2.8-inch Color Screen |
| Network Connectivity | Wi-Fi b/g/n, UPnP/DLNA |
| Connectivity | 3.5mm headphone jack, Aux In, Line Out, telescopic antenna |
| Remote Control | Yes, with batteries (not included) |
| Preset Memory | Up to 250 Internet stations, 99 FM, 99 DAB |
| Alarms | Dual alarms, nap alarm, snooze function |
| Additional Features | Spotify Connect, control via AirMusic Control app, weather service |
| Care and Cleaning | Use a dry cloth, do not use chemical products |
| Safety | Do not open the casing, avoid moisture, unplug during thunderstorms |
| Repairability | Repair by authorized technician, use original parts |
| General Information | CE certification, indoor use, operating temperature 5°C to 35°C |
Frequently Asked Questions - Cuneo Audizio
User questions about Cuneo Audizio
0 question about this device. Answer the ones you know or ask your own.
Ask a new question about this device
Download the instructions for your Radio in PDF format for free! Find your manual Cuneo - Audizio and take your electronic device back in hand. On this page are published all the documents necessary for the use of your device. Cuneo by Audizio.
USER MANUAL Cuneo Audizio
natural_image
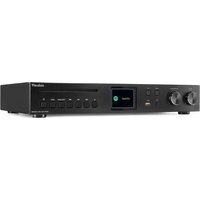
White audio device with two speakers and a Spotify Connect logo on the front panel (no visible text beyond branding)INSTRUCTION MANUAL
GEBRUIKSAANWIJZING
BEDIENUNGSANLEITUNG
MANUEL D'INSTRUCTIONS
V1.2
ENGLISH ....5
UNPACKING INSTRUCTION....6
CONTROLS 6
REMOTE CONTROL....6
BEFORE YOU START 7
GETTING STARTED....7
CONNECTING TO YOUR WIFI NETWORK....7
INTERNET RADIO 8
SPOTIFY 9
BT 9
MEDIACENTER....9
FM MODE....10
DAB MODE 10
INFORMATION CENTER 11
AUX IN....12
DLNA 12
CONFIGURATION....12
TROUBLE SHOOTING 15
NEDERLANDS....16
UITPAKKEN 17
BEDIENING 17
AFSTANDSBEDIENING 17
VOORDAT JE BEGINT 18
AAN DE SLAG....18
VERBINDING MET UW WIFI-NETWERK 18
INTERNET RADIO 19
SPOTIFY 20
BT 20
MEDIACENTER 21
FM MODE....21
DAB MODE 22
INFORMATIECENTRUM....23
AUX IN....23
DLNA 23
CONFIGURATIE....23
PROBLEEMOPLOSSING 26
DEUTSCH....27
AUSPACKEN 28
BEDIENUNG 28
FERNBEDIENUNG....28
BEVOR SIE BEGINNEN....29
ERSTE STARTUNGEN 29
CENTRE INFORMATIONS....57
AUX IN....57
DLNA 57
CONFIGURATION....57
PROBLEMES 60
TECHNICAL SPECIFICATION / TECHNISCHE SPECIFICATIE / TECHNISCHE DATEN / SPECIFICACIONES TÉCNICAS / SPÉCIFICATIONS TECHNIQUES....62
ENGLISH
Congratulations to the purchase of this Audizio product. Please read this manual thoroughly prior to using the unit in order to benefit fully from all features.
Read the manual prior to using the unit. Follow the instructions in order not to invalidate the warranty. Take all precautions to avoid fire and/or electrical shock. Repairs must only be carried out by a qualified technician in order to avoid electrical shock. Keep the manual for future reference.
- Prior to using the unit, please ask advice from a specialist. When the unit is switched on for the first time, some smell may occur. This is normal and will disappear after a while.
- The unit contains voltage carrying parts. Therefore do NOT open the housing.
- Do not place metal objects or pour liquids into the unit This may cause electrical shock and malfunction.
- Do not place the unit near heat sources such as radiators, etc. Do not place the unit on a vibrating surface. Do not cover the ventilation holes.
- The unit is not suitable for continuous use.
- Be careful with the mains lead and do not damage it. A faulty or damaged mains lead can cause electrical shock and malfunction.
- When unplugging the unit from a mains outlet, always pull the plug, never the lead.
- Do not plug or unplug the unit with wet hands.
- If the plug and/or the mains lead are damaged, they need to be replaced by a qualified technician.
- If the unit is damaged to such an extent that internal parts are visible, do NOT plug the unit into a mains outlet and DO NOT switch the unit on. Contact your dealer. Do NOT connect the unit to a rheostat or dimmer.
- To avoid fire and shock hazard, do not expose the unit to rain and moisture.
- All repairs should be carried out by a qualified technician only.
- Connect the unit to an earthed mains outlet (220-240Vac/50Hz) protected by a 10-16A fuse.
- During a thunderstorm or if the unit will not be used for a longer period of time, unplug it from the mains. The rule is: Unplug it from the mains when not in use.
- If the unit has not been used for a longer period of time, condensation may occur. Let the unit reach room temperature before you switch it on. Never use the unit in humid rooms or outdoors.
-
To prevent accidents in companies, you must follow the applicable guide lines and follow the instructions.
-
Do not repeatedly switch the fixture on and off. This shortens the life time.
- Keep the unit out of the reach of children. Do not leave the unit unattended.
- Do not use cleaning sprays to clean switches. The residues of these sprays cause deposits of dust and grease. In case of malfunction, always seek advice from a specialist.
- Do not force the controls.
- This unit is with speaker inside which can cause magnetic field. Keep this unit at least 60cm away from computer or TV.
- If this product have a built-in lead-acid rechargeable battery. Please recharge the battery every 3 months if you are not going to use the product for a long period of time. Otherwise the battery may be permanently damaged.
- If the battery is damaged please replace with same specifications battery. And dispose the damaged battery environment friendly.
- If the unit has fallen, always have it checked by a qualified technician before you switch the unit on again.
- Do not use chemicals to clean the unit. They damage the varnish. Only clean the unit with a dry cloth.
- Keep away from electronic equipment that may cause interference.
- Only use original spares for repairs, otherwise serious damage and/or dangerous radiation may occur.
- Switch the unit off prior to unplugging it from the mains and/or other equipment. Unplug all leads and cables prior to moving the unit.
- Make sure that the mains lead cannot be damaged when people walk on it. Check the mains lead before every use for damages and faults!
- The mains voltage is 220-240Vac/50Hz. Check if power outlet match. If you travel, make sure that the mains voltage of the country is suitable for this unit.
- Keep the original packing material so that you can transport the unit in safe conditions.

This mark attracts the attention of the user to high voltages that are present inside the housing and that are of sufficient magnitude to cause a shock hazard.

This mark attracts the attention of the user to important instructions that are contained in the manual and that he should read and adhere to.
The unit has been certified CE. It is prohibited to make any changes to the unit. They would invalidate the CE certificate and their guarantee!
NOTE: To make sure that the unit will function normally, it must be used in rooms with a temperature between 5^ C/41°F and 35^ C/95°F.

Electric products must not be put into household waste. Please bring them to a recycling centre. Ask your local authorities or your dealer about the way to proceed. The specifications are typical. The actual values can slightly change from one unit to the other. Specifications can be changed without prior notice.
Do not attempt to make any repairs yourself. This would invalid your warranty. Do not make any changes to the unit. This would also invalid your warranty. The warranty is not applicable in case of accidents or damages caused by inappropriate use or disrespect of the warnings contained in this manual. Audizio cannot be held responsible for personal injuries caused by a disrespect of the safety recommendations and warnings. This is also applicable to all damages in whatever form.
UNPACKING INSTRUCTION
CAUTION! Immediately upon receiving the product, carefully unpack the carton, check the contents to ensure that all parts are present, and have been received in good condition. Notify the shipper immediately and retain packing material for inspection if any parts appear damage from shipping or the package itself shows signs of mishandling. Save the package and all packing materials. In the event that the product must be returned to the factory, it is important that the product be returned in the original factory box and packing.
If the device has been exposed to drastic temperature fluctuation (e.g. after transportation), do not switch it on immediately. The arising condensation water might damage your device. Leave the device switched off until it has reached room temperature.
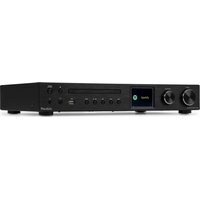
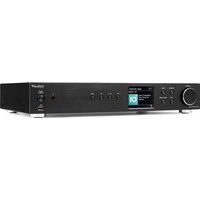
CONTROLS
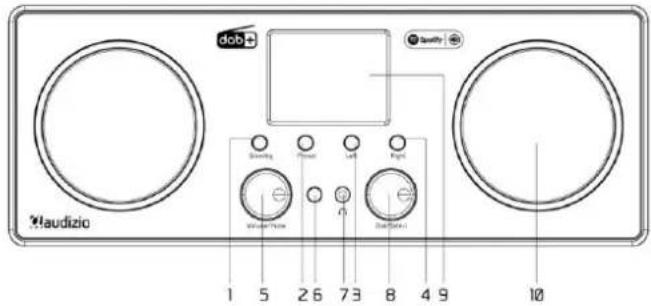
text_image
dodo laudizio 1 5 26 73 8 4 9 10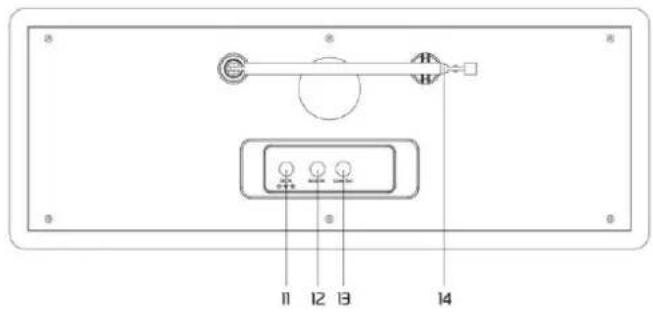
text_image
11 12 13 14- Standby button
- Preset Long press to enter the "Add to favourite" list. Press it briefly to recall the preset list.
- Left Left cursor/Press to return to previous menu.
- Right Right cursor/View radio info
- Volume/Home Rotate to adjust the volume level/Press the knob to return Home (main menu).
- Infrared remote sensor
- 3.5 mm earphone jack
- Dial/Select Rotate to browse the menu/Press to confirm a selection or stop the playback.
- 2.8" color display
- Speaker
- DC IN Socket
- Aux-In Jack
- Line out Jack
- Telescopic antenna
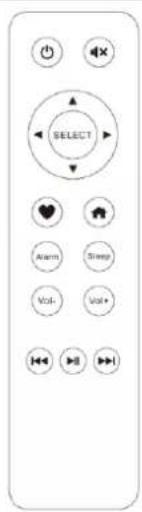
REMOTE CONTROL
Standby button
Mute
▲ : Cursor up
▼ : Cursor down
◀ : Cursor left / back to previous menu
▶ : Cursor right
SELECT: confirm button
❤️ : Favorite button, press to recall the favorite stations, hold to enter the "Add to favourite" list
: Main menu
Alarm: Alarm button, press to set the alarm
Sleep: Sleep Timer, press to set the sleep time
Vol+: Volume up
Vol-: Volume down
◀: Previous radio channel on the list
▶: Play/pause
→: Next radio channel on the list
◀: Previous radio channel on the list
▶: Play/pause
▶: Next radio channel on the list
text_image
SELECT Warm Sleep Vol VolBEFORE YOU START
Please ensure the following is ready:
- You have a broadband internet connection.
- A wireless broadband router is connected to the internet successfully. The radio supports Wireless B, G and N connection (Wireless N router can also be used with the setting on B or G).
- You know the Wired Equivalent Privacy (WEP) or Wi-Fi Protected Access (WPA) data encryption code/password. You need to key in the correct code when the radio is connected to the wireless router for network connection. If you do not know the code/password, please contact the person/technician who set up the router/network for you.
• The radio can work via Wireless network connection (Wi-Fi connection)
GETTING STARTED
Connect the mains adaptor to the radio unit, one end to the DC IN on the radio and the other end to the mains wall outlet.
Caution: Use only the mains adaptor supplied with the radio. Connecting a power supply with a different rating will cause permanent damage to the radio and may be hazardous.
The display on the front of the radio will light up and show:

text_image
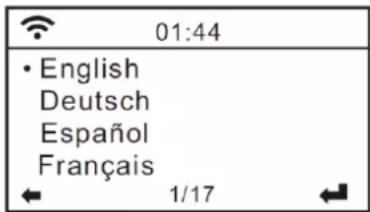
WelcomeThen you can select your prefer language on the radio.
text_image
01:44 • English Deutsch Español Français ← 1/17 ←It will ask you if you want to Enable the
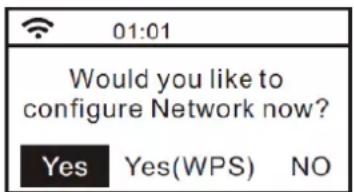
CONNECTING TO YOUR WIFI NETWORK
The screen below will appear. You can choose
text_image
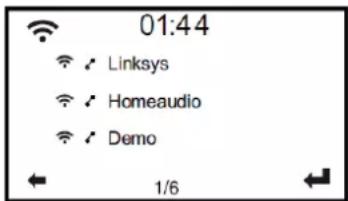
01:01 Would you like to configure Network now? Yes Yes(WPS) NOIt will then start scanning the network. After the search is done, it will display a list of the available router.
text_image
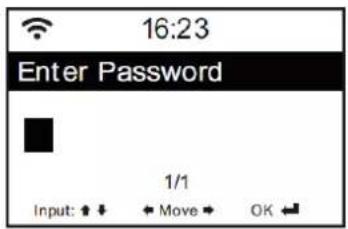
01:44 Linksys Homeaudio Demo 1/6Choose your router from the list, enter the WEP(Wired Equivalent Privacy) or WPA(Wi-Fi Protected Access) code. If your network is not enabled with security code, the unit will connect to the router automatically.
text_image
16:23 Enter Password 1/1 Input: ↑ ↓ ← Move → OK ←Note: The encryption code would have been set up by the person who set up and configured your network.
Please follow the steps below to enter the encryption code of your router using the buttons on the radio:
- Rotate the
knob to browse the character - Press the
button to skip to the next entry - After you finish with the entries, press the
knob to confirm. Do NOT press the right button again.
To use the remote control entering the password: Press <▲> or <▼> button to select the characters. Press the <▶> button for the next entry, press <◀> button to delete the character or to amend it. When the last character is entered, press the
Do NOT press the <▶> button.
The radio will start connecting to the network. After the router is connected successfully, it will display the main menu as follow:
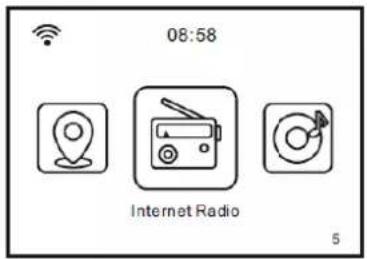
text_image
08:58 Internet Radio 5You can now start enjoying the internet radio.
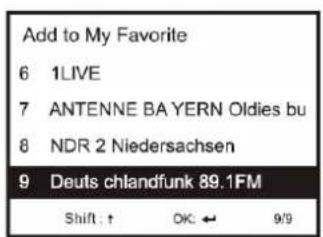
INTERNET RADIO
Choose
My Favorite
This is to show the list of your Favorite stations which have been assigned to the presets.
To preset a station:
While you are playing the favorite station, long pressing the
Press [Dial/Select] knob to confirm
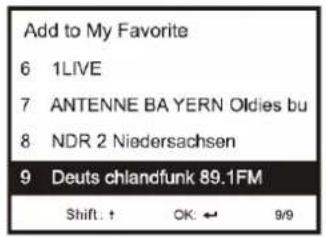
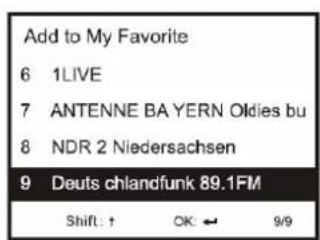
text_image
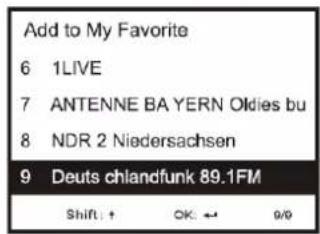
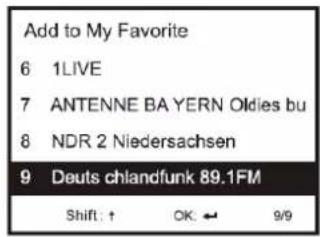
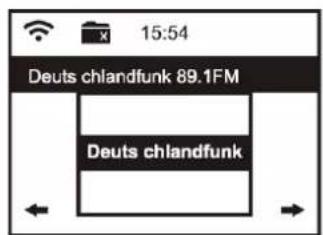
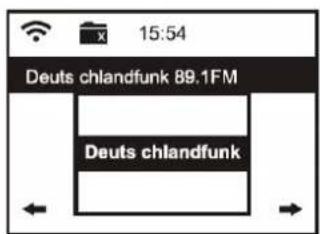
Add to My Favorite 6 1LIVE 7 ANTENNE BA YERN Oldies bu 8 NDR 2 Niedersachsen 9 Deuts chlandfunk 89.1FM Shift: + OK: ← 9/9The symbol x means the station has already been added to the favourite list
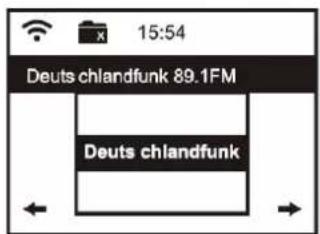
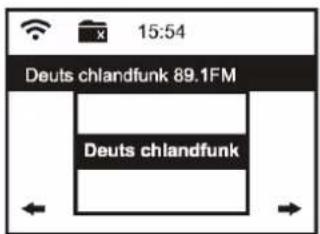
text_image
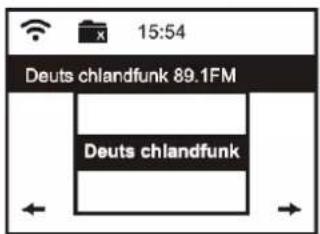
15:54 Deuts chlandfunk 89.1FM Deuts chlandfunkThe presets will be stored in ascending order. You can store up to 250 presets.
Note: Preset 1 to 5 are reserved for your own choice of the dedicated radio channels. Scroll to choose the desired number to save your favourite channel. To save more channels after the first five presets are occupied, press and hold the preset button and it will assign to preset no. 6 onwards.
You can edit your favorite list anytime. Go to Internet radio> My Favourite or press the
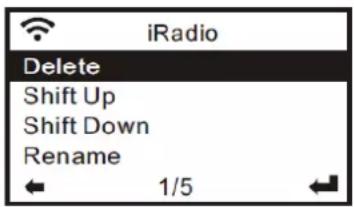
text_image
iRadio Delete Shift Up Shift Down Rename ← 1/5 ←Delete – To delete the selected station
Shift up- To shift the selected station by one level up on the ranking
Shift down – To shift the selected station by one level down on the ranking
Rename – To rename the selected station
Play – press and play the selected station
Choose the radio station that you want to make with the above changes.
Then press the
To recall a preset station:
Press the
Radio Station / Music
Select this option, then you can select your desired radio station by Category, Genre or Location., etc.
Local Radio
If you want to access quickly the radio station located in your area via internet, select this function and it will display the list of the stations available.
History
The radio will memorize the last listened 10 stations.
Service
Search Stations
You can find your desire radio station by entering the name of the radio.
Add New Radio Station
If you cannot find your desire station from the Radio station list and you have the URL address, you can input the link here and add to your favorite list.
Note: The URL has to be an audio streaming URL in order to play on the radio.
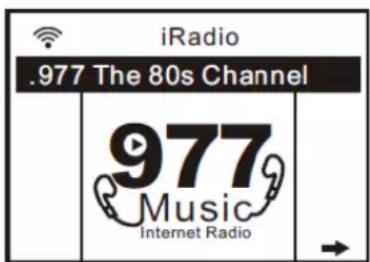
When the radio station is playing, the display will show a color image transmitted from the radio station.
text_image
.977 The 80s Channel 977 Music Internet RadioSPOTIFY
A better way to listen at home. Listen on the Bari using the Spotify app as a remote. Enjoy the music together. Use your phone, tablet or computer as a remote control for Spotify. Go to spotify.com/connect to learn how.

Spotify®
BT
The radio receives and plays music streamed by other BT-device. Choose BT from the main menu or use the
- Turn on BT on the BT device and look up the device named "Audizio Bari" from the list. Select it to start pairing.
- If the connection is successful, it will show "Connected" on your BT-device list.
- You can start playing music from your BT-device now.
MEDIACENTER
UPnP (Universal Plug and Play)
The device supports UPnP and is DLNA-compatible. This provides the opportunity to stream music from your other network devices. However, this requires you to have a compatible device in your network that can function as a server. This can be e.g., a network hard drive or a conventional PC with e.g., Windows 8 via which access to the shared folder or media sharing is permitted. The folders can then be browsed and played on the Tuner.
Remark: Please make sure your computer laptop is on the same Wi-Fi network as the Radio before you start using this function.
Music streaming
- Once the UPnP/DLNA compatible server is configure to share media files with your radio, you can start music streaming.
- On the main menu, select [Media Centre] and choose [UPnP].
- It may take a few seconds for the radio to complete the scan for available UPnP servers. If no UPnP servers are found, it will show [Empty List].
- After a successful scan is done, select your UPnP server.
- The radio will show the media categories available from the UPnP server, e.g. 'Music', 'Playlists' etc.
- Choose the media files that you wish to play. You can set the mode of playback under Configuration>Playback setup.
My Playlist
You can make your own playlist from the UPnP music files. Choose and highlight the song you want to add to playlist, press and hold the [Dial/Select] knob, unit the sign appears. The song will be added to My playlist.
Clear My Playlist
Remove all songs in My playlist to allow a new playlist to be prepared.
Note: If you have DLNA compatible servers available, follow the steps described above to browse the audio files from DLNA compatible device on the radio to play.
FM MODE
You can listen to the ordinary FM radios without internet connection. Extend the telescopic antenna or in other direction / length of the antenna may be required to optimize the reception level.
Choose the FM from the main menu or use the <button on the remote to find to FM mode.
To auto scan the next available FM station, press and hold the
Auto preset scan
There is an option to auto preset the FM station. Press the
Service Following
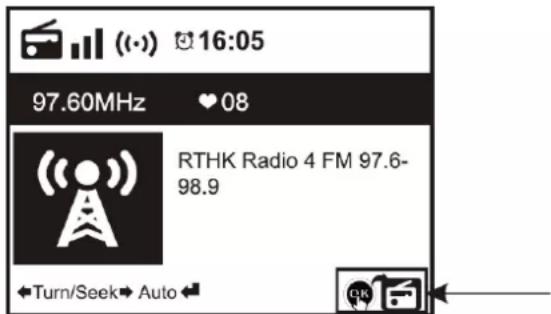
This is a feature to help finding the same channel over internet provided that the radio station has an internet stream available and it is suitable to play on the radio. Listening over internet radio allows free of noises which usually caused by interference or weak reception over FM.
After the scan is done on FM, choose a channel to play. If the same channel is available on Internet, there will be an icon appeared as follow:
text_image
(·) 16:05 97.60MHz ♥08 RTHK Radio 4 FM 97.6- 98.9 ←Turn/Seek→Auto ←Press and hold the
It can store up to 99 presets.
DAB MODE
You can listen to ordinary DAB channels without internet connection. Extend the telescopic antenna or in other direction / length of the antenna may be required to optimize the reception level. Choose the DAB from the main menu or use the <â> button on the remote to find to DAB.
If this is the first time you use the DAB mode, it will scan the DAB radio station automatically. It will display the DAB station list when the scan is done.
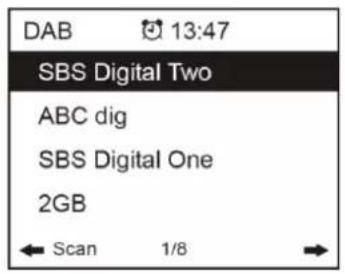
text_image
DAB 13:47 SBS Digital Two ABC dig SBS Digital One 2GB ← Scan 1/8 →Choose the station you want to listen, and press the
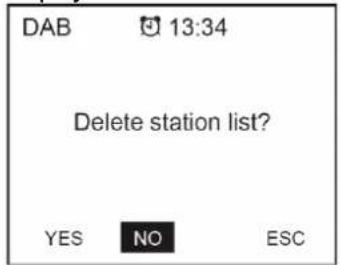
text_image
DAB 13:34 Delete station list? YES NO ESCChoose
Choose
Choose
To stop playing the station, press the
Service Following
This is a feature to help finding the same channel over internet provided that the radio station has an internet stream available and it is suitable to play on the radio. Listening over internet radio allows free of noises which usually caused by interference or weak reception over DAB.
After the scan is done on DAB, choose a channel to play. If the same channel is available on Internet, there will be an icon appeared as follow:
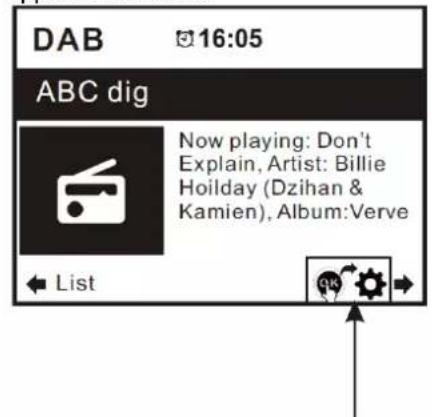
text_image
DAB 16:05 ABC dig Now playing: Don't Explain, Artist: Billie Holiday (Dzihan & Kamien), Album: Verve ListPress and hold the
It can store up to 99 presets.
INFORMATION CENTER
Weather
The radio provides weather information and can display in Standby mode. To enable this feature, follow the steps below: Go to main menu, choose Information Center> Weather Information, choose the region you want it to display the weather information. After region is selected, press the
The date/time and weather info will appear alternatively every 10 seconds. In standby with the analogue clock display, press the
Remark: The weather is just for reference only. It may have deviation to the actual weather.
System Information
You can view the information of the radio such as the Version of the software / Wlan Mac / IP address..etc.
AUX IN
You can enjoy the music from other audio devices by connecting the audio cable to the AUX IN connector at the rear of the unit, such as mobile phone, MP3 player, etc.
DLNA
The Internet radio can play music stream from DLNA compatible device, provided that the Internet radio and other DLNA devices are under the same Wi-Fi network.
The radio will be discovered as "AirMusic" when you try to search it on other devices. If you want to change other name from AirMusic, go to Configuration and DLNA setup to make the change.
CONFIGURATION
Time Display
You can choose the time display at Analog or Digital.
Network
Wireless Network Configuration
Press the
Wireless Network (WPS PB)
The WPS allows to connect the radio with your router by pressing one key on the radio and a WPS key on your router for wifi connection, provided that your router has the WPS function.
Manual Configuration
You can set the DHCP on or off, and enter the SSID name, or delete the connected SSID.
Check network when power on
This is set to enable or disable
Date & Time
The time is set automatically to your local area.
You can choose to manual set the time if you want.
Time Format setting
Time format setting: 12hours / 24hours
Date Format setting
Date format: YYYY/MM/DD, DD/MM/YYYY and MM/DD/YYYY
If manual setup is selected, you will see an added item Daylight Saving Time (DST) setting appeared on the list.
Alarm
Dual alarm clock
There are 2 alarm clocks available and settings as follow:
Scheduling alarm: You can schedule the alarm repeated for every day, particular day in the week or just once.
Alarm sound : Wake to Radio (must be the preset station), Wake to Melody and Wake to Beeping sound.
Alarm Volume : Select this option to adjust your desire volume level.
NAP Alarm
If you would like to take a nap or need an alarm to due in short time, you can use this function. You can select the time from 5 minutes up to 120 minutes. No Snooze function available for the NAP alarm.
Remark: The NAP Alarm will only release beeping sound.
Snooze
When the Alarm sounds, press any key except
Remark: In case there is network issue renders the wake to radio networking, it will auto release beeping sound after 1 minute.
Language
There are 17 Languages available, such as English, German, French, Norwegian, Italiano, Svenska, Dansk and others.
Dimmer
You can adjust the backlight of the LCD with below settings:
Power Saving
You can set the backlight to dim down when there is no operation for a certain time of period.
Turn on
You can adjust the backlight level for the operation mode, i.e. when you are operating the radio or checking on the menu.
Display
You can choose the display in colour or monochrome style.
Power Management
This function is to allow the radio to go to Standby if there is no internet signal received in order to save power. The default setting is 30 minutes. When the radio does not receive any internet signal, the radio will go into Standby after 30 minutes. Other time frame for 5 minutes and 15 minutes are available. You can choose to turn it off too.
Sleep Timer
You can set the timer to put the radio in standby after certain time elapsed, from 15 minutes to 180 minutes with the step of every 15 minute. You also can do the setting with the
Weather
You can set to display the weather information in standby mode by choosing different regions and the temperature unit. To turn off the weather display, please navigate to Configuration > Weather > Show on Standby > select OFF Local Radio Setup. The radio will detect your local area stations automatically and simply press the
If you would like to change the Local area stations to other countries, you can choose "Manual setup" to make the change.
Playback Setup
This is to set the preference of UPnP playback. You can set the playback as Off, Repeat one, Repeat all, Shuffle.
Device
DLNA Setup
The radio can play music from DLNA compatible devices which connected to the same wifi network as the radio. The radio will be discovered by the DLNA devices with the name as "AirMusic". This is the name by default. You can change other name here as you desire.
Remark: The DLNA feature is compatible and works with corresponding 3rd party Apps on Android platform. Apple devices are not supported.
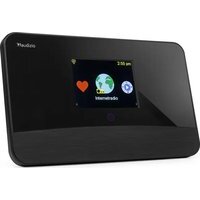
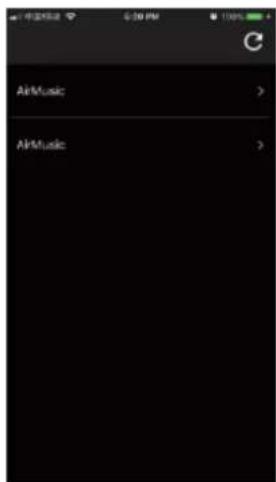
Remote App - AirMusic Control
Using your smart phone / tablet to control the radio by installing the App "AirMusic Control". It is available on Android Play store and iOS App Store. It's free of charge.
Both the radio and the device with the remote app installed must be on the same wifi network to work. Search the App with the name "AirMusic Control".
You can also locate it by scanning the QR code below:
Android:
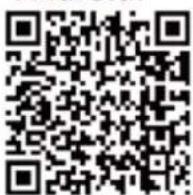
iOS:

text_image
AirMusic AirMusic
text_image
Local Radio Internet Radio Media Center AUX Bluetooth 1 2 3 4 5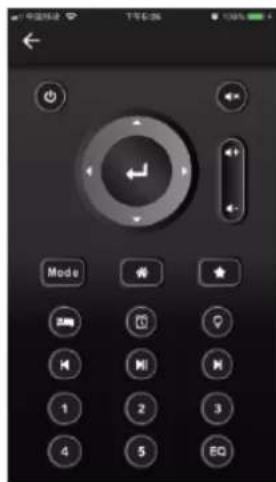
text_image
Mobile phone control panel interface with mode, navigation buttons, and playback controlsEqualizer
Select your prefer equalizer to suit your listening preference.
Resume When Power On
The radio will resume playing the last listened station when you power it on next time if ON is selected in this option. The ON is set by default.
Software update
Upgrade information will pop up on the display when there is update version available.
Note: This option is for manufacturer's use only.
Reset to default
You can do this factory reset to empty all of the settings and it comes back to default settings.
Note: Please note all the Station presets, Settings and configuration will be lost after you have carried out the "Reset to default".
- If you have trouble connecting the radio to your wireless network, these steps may help to resolve the problem:
- Confirm that a Wi-Fi or Ethernet Wired connected PC can access the internet (i.e. can browse the web) using the same network.
- Check that a DHCP server is available, or that you have configured a static IP address on the radio.
- Check that you firewall is not blocking any outgoing ports.
- Some access points may be set so that only equipment with registered MAC addresses can connect to them. This is one possible cause of the Internet Radio being unable to connect to the Wi-Fi network, and the Internet Radio display will show Bad ESSID or key. To overcome this problem you will need to add the Internet Radio's MAC address to the list of allowed equipment in your access point. The Internet Radio's MAC address can be found using the menu Information Center > System Information > Wireless Info > MAC address.
You will need to refer to the guide for you Access Point in order to enter the Internet Radio as an allowed piece of equipment.
- If you have an encrypted network, check that you have entered the correct key or passphrase into the radio. Remember that text-format keys are case sensitive.
- If your wireless network name (ESSID) is 'Hidden'(a setting on the wireless access point), then you can either turn on the name, or you can manually enter the name into the internet radio and media player, Select
- If your radio can connect to the network successfully, but is unable to play particular stations, it may be due to one of the following reasons:
-The station is not broadcasting at this time of the day (remember it may be located in a different time zone).
-The station has too many people trying to attach to the radio station server and the server capacity is not large enough.
-The station has reached the maximum allowed number of simultaneous listeners.
-The station is not broadcasting anymore.
-The link on the radio is out of date. This is updated automatically every day, so the next time you turn on the link will be recognised.
-The internet connection between the server (often located in a different country) and yours is slow. Some internet service providers may fail to stream in certain geographical areas. Try using a PC to play back the stream via the broadcaster's web site. If you can play back the station with a PC, please report to the customer service where you bought this radio. If you have a laptop, try connecting it if your Internet Radio cannot find the station.
- When you scan for PCs under UPnP function, none can be found, or the PC you are looking for does not appear in the list:
-You have not connected to the wireless Access point. On the internet radio, select 'Configuration', 'Network', 'Wireless network connection' and then select your Wireless network. (You may need to enter a security key to access the network wirelessly).
-You have a firewall set on your PC which is stopping you accessing shared files.
-If you have a third party firewall (Like Norton, or Zone Alarm) that will have its own control panel and you will need to consult the manual for your firewall.
-If your PC is connected to a managed network, with a server sometimes the PC being searched for needs to be set to Home group. See the instructions under Media Center.
- You can see the PC you want to play music from, but cannot find any folders on the PC:
-You have a firewall running which is preventing the internet radio from seeing the shared folder. As a quick check, you can disable firewalls like Norton to see if this overcomes the problem, if this resolves the issue then you can either leave the firewall off, or allow file sharing through the fire wall.
Note: If you firewall is required to provide security for your system, it should not be left off.
- If the Internet Radio keeps re-buffering radio station:
-The Internet Radio is streaming the data from the radio station via your broadband connection, if there is a high error rate on your broadband connection, or the connection is intermittent, then it will cause the Internet Radio to pause until the connection is re-established and it has received enough data to start playing again.
-If your Internet Radio keeps stopping, please check the DSL modem to ensure that the Broadband line is not suffering a high error rate or disconnections. If you are experiencing these problems, you will need to contact your broadband supplier.
- What is Buffering?
When playing a stream, the Internet Radio/Media player, downloads a small amount of the stream before it starts playing. This is used to fill in any gaps in the stream that may occur if the internet or the wireless network is busy. If a stream gets blocked or experiences Internet congestion while transferring it may stop/interfere with the quality of play. If this happens, check your internet connection speed- it must be faster than the speed of the stream
text_image
01:01 Would you like to configure Network now? Yes Yes(WPS) NOtext_image
16:23 Enter Password 1/1 Input: ↑ ↓ ← Move → OK ←Press [Dial/Select] knob to confirm
text_image
Add to My Favorite 6 1LIVE 7 ANTENNE BA YERN Oldies bu 8 NDR 2 Niedersachsen 9 Deuts chlandfunk 89.1FM Shift: + OK: ← 9/9The symbol x means the station has already been added to the favourite list
text_image
15:54 Deuts chlandfunk 89.1FM Deuts chlandfunktext_image
iRadio Delete Shift Up Shift Down Rename ← 1/5 ←text_image
.977 The 80s Channel 977 Music Internet RadioSPOTIFY
UPnP (Universal Plug and Play)
text_image
(·) 16:05 97.60MHz ♥08 RTHK Radio 4 FM 97.6- 98.9 ◄Turn/Seek►Auto◄text_image
DAB 13:34 Delete station list? YES NO ESCThe time is set automatically to your local area.
You can choose to manual set the time if you want.
Time Format setting
Time format setting: 12hours / 24hours
Date Format setting
Date format: YYYY/MM/DD, DD/MM/YYYY and MM/DD/YYYY
If manual setup is selected, you will see an added item Daylight Saving Time (DST) setting appeared on the list.
Datum & Tijd
text_image
Local Radio Internet Radio Media Center AUX Bluetooth 1 2 3 4 5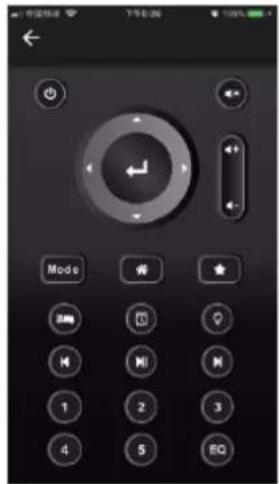
text_image
Mobile phone control panel with mode, clock, and numeric keypadEqualizer
text_image
01:01 Would you like to configure Network now? Yes Yes(WPS) NOtext_image
16:23 Enter Password 1/1 Input: ↑ ↓ ← Move → OK ←Choose
Press [Dial/Select] knob to confirm
text_image
Add to My Favorite 6 1LIVE 7 ANTENNE BA YERN Oldies bu 8 NDR 2 Niedersachsen 9 Deuts chlandfunk 89.1FM Shift: + OK: ← 9/9The symbol 📄 x means the station has already been added to the favourite list
text_image
15:54 Deuts chlandfunk 89.1FM Deuts chlandfunktext_image
iRadio Delete Shift Up Shift Down Rename ← 1/5 ←text_image
.977 The 80s Channel 977 Music Internet RadioSPOTIFY
UPnP (Universal Plug and Play)
text_image
DAB 13:34 Delete station list? YES NO ESCtext_image
Local Radio Internet Radio Media Center AUX Bluetooth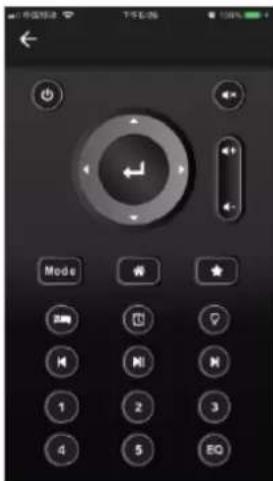
text_image
Mobile phone control panel interface with mode, reset, and function buttonsEqualizer
text_image
01:01 Would you like to configure Network now? Yes Yes(WPS) NOtext_image
16:23 Enter Password 1/1 Input: ↑ ↓ ← Move → OK ←Press [Dial/Select] knob to confirm
text_image
Add to My Favorite 6 1LIVE 7 ANTENNE BA YERN Oldies bu 8 NDR 2 Niedersachsen 9 Deuts chlandfunk 89.1FM Shift: ↑ OK: ← 9/9The symbol x means the station has already been added to the favourite list
text_image
15:54 Deuts chlandfunk 89.1FM Deuts chlandfunktext_image
iRadio Delete Shift Up Shift Down Rename ← 1/5 ←Delete – Para eliminar la emisora seleccionada.
text_image
.977 The 80s Channel 977 Music Internet RadioSPOTIFY
UPnP (Universal Plug and Play)
text_image
DAB 13:34 Delete station list? YES NO ESCWireless Network (WPS PB)
text_image
Local Radio Internet Radio Media Center AUX Bluetooth 1 2 3 4 5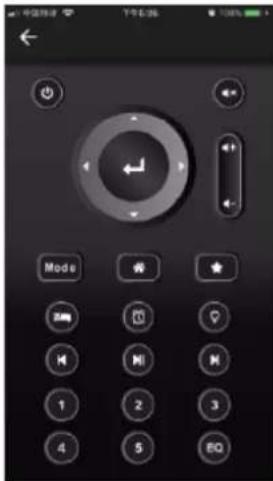
text_image
Mode OK Cancel Help Share Help Share Help Share Help Share Help Share Help Share Help Share Help Share Help Share Help Share Help Share Help Share Help Share Help Share Help Share Help Share Help Share Help Share Help Share Help Share Help Share Help Share Help Share Help Share Help Share Help Help ShareEcualizador
❤️: Favorite button, press to recall the favorite stations, hold to enter the "Add to favourite" list
Menu principal
text_image
01:01 Would you like to configure Network now? Yes Yes(WPS) NOtext_image
16:23 Enter Password 1/1 Input: ↑ ↓ ← Move → OK ←Press [Dial/Select] knob to confirm
text_image
Add to My Favorite 6 1LIVE 7 ANTENNE BA YERN Oldies bu 8 NDR 2 Niedersachsen 9 Deuts chlandfunk 89.1FM Shift: ↑ OK: ← 9/9The symbol x means the station has already been added to the favourite list
text_image
15:54 Deuts chlandfunk 89.1FM Deuts chlandfunktext_image
iRadio Delete Shift Up Shift Down Rename ← 1/5 ←text_image
.977 The 80s Channel 977 Music Internet RadioSPOTIFY
UPnP (Universal Plug and Play)
text_image
DAB 13:34 Delete station list? YES NO ESCtext_image
Local Radio Internet Radio Media Center AUX Bluetooth 1 2 3 4 5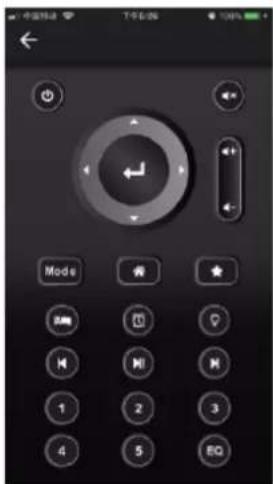
text_image
Mobile phone control panel with mode, reset, and navigation buttonsThe specifications are typical. The actual values can slightly change from one unit to the other. Specifications can be changed without prior notice.
The products referred to in this manual conform to the European Community Directives to which they are subject:
European Union
Tronios B.V.,
7602KR Almelo, The Netherlands
2014/35/EU
2014/30/EU
2011/65/EC
2014/53/EU

United Kingdom
Tronios Ltd.,
130 Harley Street,
London W1G 7JU, United Kingdom
S.I. 2016:1101
S.I. 2016:1091
S.I. 2012:3032
S.I. 2017:1206

The Spotify Software is subject to third party licenses found here: https://www.spotify.com/connect/third-party-licenses

Spotify®
Specifications and design are subject to change without prior notice.
www.tronios.com
Copyright © 2022 by Tronios The Netherlands