
BG-EV 1231 - Electric mower EINHELL - Free user manual and instructions
Find the device manual for free BG-EV 1231 EINHELL in PDF.
| Product Type | Electric scarifier (lawn aerator) |
| Brand | Einhell |
| Model | BG-EV 1231 |
| Power Supply | 230 V ~ 50 Hz, 1200 W |
| Working Width | 31 cm |
| Number of Blades | 8 double blades |
| Depth Adjustment | -3 / 3 / 7 / 9 mm (4 positions) |
| Weight | 8.4 kg |
| Sound Pressure Level (LpA) | 85.2 dB(A) |
| Measured Sound Power Level (LWA) | 94.02 dB(A) |
| Guaranteed Sound Power Level (LWA) | 99 dB(A) |
| Handle Vibration | 2.71 m/s² (K=1.5 m/s²) |
| Protection Class | II (double insulation) |
| Protection Type | IPX4 (protected against water splashes) |
| Max Extension Cable Length | 50 m (section 3x1.5 mm², type H05RN-F) |
| Usage | Domestic and hobby gardens (max. annual use 10 hours) |
| Safety | Two-position switch, automatic stop when releasing the lever, thermal motor protection |
| Maintenance | Clean after each use, check cables, replace worn blades, check fasteners |
| Spare Parts | Replacement blade roller ref. 34.055.80 |
Frequently Asked Questions - BG-EV 1231 EINHELL
User questions about BG-EV 1231 EINHELL
0 question about this device. Answer the ones you know or ask your own.
Ask a new question about this device
Download the instructions for your Electric mower in PDF format for free! Find your manual BG-EV 1231 - EINHELL and take your electronic device back in hand. On this page are published all the documents necessary for the use of your device. BG-EV 1231 by EINHELL.
USER MANUAL BG-EV 1231 EINHELL
Pattfield® ERGO TOOLS
D
natural_image
Exterior view of a lawn mower with adjustable handle and wheels (no text or symbols visible)PE-EV 1231
-2-

natural_image
Close-up of a mechanical component with labeled part '11' (no other text or symbols visible)
natural_image
Close-up of a black U-shaped metal hook with a looped end, isolated on white background (no text or symbols)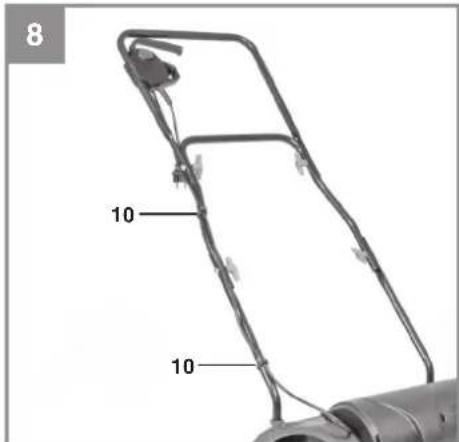
natural_image
Close-up of a hand pressing a tire with two circular arrows indicating clockwise motion (no text or symbols)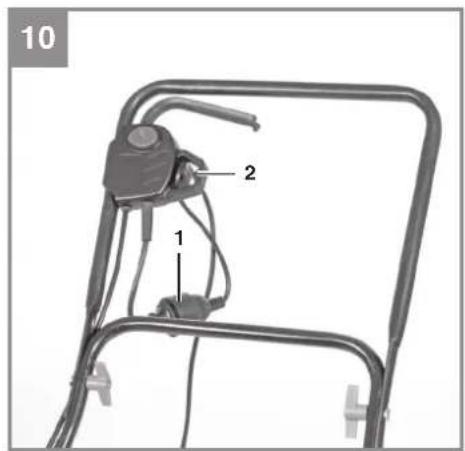

D
Gefahr!
Directive CEM 2014/30/UE (EMV)
When using the equipment, a few safety precautions must be observed to avoid injuries and damage. Please read the complete operating instructions and safety regulations with due care. Keep this manual in a safe place, so that the information is available at all times. If you give the equipment to any other person, hand over these operating instructions and safety regulations as well. We cannot accept any liability for damage or accidents which arise due to a failure to follow these instructions and the safety instructions.
1. Safety regulations
This equipment is not to be used by people (including children) with disabilities, whether physical, sensory or cognitive, or by people without prior experience/adequate knowledge of the equipment, without supervision by qualified safety personnel, or instructions on how to use it. Children should be supervised, to ensure that they do not play with the equipment
Replacing the power cable If the power cable for this equipment is damaged, it must be replaced by the manufacturer or its after-sales service or similarly trained personnel to avoid danger.
CAUTION: To prevent a risk arising from the unintentional resetting of the thermal cut out, never connect the equipment to an external switching device such as a timer switch or to an electric circuit which is regularly switched on and off.
Safety instructions
1.1 General Safety Instructions for this electrical equipment
- This equipment is not to be used by people (including children) with disabilities, whether physical, sensory or cognitive, or by people without prior experience/adequate knowledge of the equipment, without supervision by qualified safety personnel, or instructions on how to use it.
• Children should be supervised, to ensure that they do not play with the equipment
1.2 Safety instructions for electric scarifi ers
- Both before and after every time the equipment is used, check for damage and wear to the mains connection and extension cable. The equipment must not be used if cables are damaged.
- If the electricity supply should get damaged during use of the equipment, the plug must immediately be removed from the socket. The mains connection and extension cable must not be touched until the plug is removed from the socket.
- Before each use, check the equipment for possible damage. The equipment should not be used if it is damaged, and must not be used up until it has been attended to by a specialist/our customer service personnel.
- If the equipment vibrates excessively, switch it off immediately and remove the plug from the socket. Tilt the equipment to examine the scarifier rotor for possible causes of imbalance and remove these as necessary.
- Always wear gloves when working with this equipment, to avoid cuts. Should this not be the cause, consult one of our service personnel for repairs.
- When starting, both hands must be on the handle, the equipment must be on the ground, and must not be overturned.
- Safety components must be checked for damage before each use, and if any damage is present, must be replaced by our customer service personnel.
GB
Warning
Danger! The Lawn Scarifi er (Lawn ventilator) must not be used if any connections are damaged or worn out.
Danger! Do not connect a damaged cable to the power supply and do not touch the cable before it is disconnected from the power supply. A damaged cable may result in contact with active parts.
Danger! Do not touch the teeth before the equipment is disconnected from the power supply and the teeth have reached a complete standstill.
Danger! Keep the extension cables away from the teeth. The teeth could damage the cables and lead to contact with active parts
Danger! Always interrupt maintenance work (by removing the plug from the socket):
• when the equipment is left unattended,
• before a trapped tool is freed from the machine.
- when the equipment is checked, cleaned, or having maintenance work done
• fter a foreign body has been hit,
• or if the equipment vibrates abnormally.
It is advisable only to connect the equipment to an electricity supply which is protected by a residual-current operated protective device (RCD) with a release current of max. 30 mA.
Preparations
a) Never allow children or other persons who are not familiar with the operating instructions to use the equipment. Contact your local governmental agency for information regarding minimum age requirements for the user;
b) Never use the machine while other people, particularly children or animals, are nearby;
c) Always keep in mind that the operator or user of the equipment is responsible for accidents or risks involving other persons or their property;
d) Wear hearing and eye protection while operating the machine;
e) Always wear sturdy, non-slip footwear and long trousers when using the equipment. Never use the equipment barefoot or in sandals;
f) Check the ground on which the equipment will be used and remove stones, sticks, wire, bones and other foreign bodies that could be caught up and violently flung out;
g) Before use, always visually examine the tools and bolts for signs of wear or damage. To prevent any imbalance, replace worn out or damaged tools and bolts as a set only;
h) If you operate equipment with an ejector at the rear and exposed rear rollers without a debris device, you must wear full eye protection at all times.
Handling
a) Only use the equipment in broad daylight or in well-lit conditions;
b) If possible, the equipment should not be used on damp grass, but if this cannot be avoided, take special care to ensure that you do not slip;
c) Always maintain good footing on slopes;
d) Only operate the equipment at a walking pace;
e) Always guide the equipment across slopes, never straight up or down;
f) Be particularly careful when you change direction on a slope;
g) Do not work on overly steep slopes;
h) Be particularly careful when you turn the equipment around or pull it toward yourself;
i) Stop the tools if the equipment has to be tipped to one side for transport purposes. Stop the tools if you cross any surfaces other than grass and whilst transporting the equipment from and to the area on which you wish to use it;
j) Never use the equipment with damaged or missing safety devices, e.g. without defl ector plates and/or the grass collecting device;
k) Do not adjust or overclock the engine speed settings;
I) Uncouple all tools and drive units before you start the engine;
m) Use the ON/OFF switch with caution, according to the manufacturer's advice. Make sure that your feet are far enough away from the tool(s).
n) Do not tilt the equipment when you start the engine, unless the equipment must be raised off of the ground a little, in order to start it. In this case, tilt it as little as absolutely necessary and only raise the side opposite to that of the user;
o) Do not start the motor if you are positioned in front of the chute;
GB
p) Never move your hands or feet toward or under any rotating parts. Keep clear of the chute opening at all times;
q) Never lift or carry the equipment with the engine running.
Maintenance and storage
a) Make sure that all nuts, bolts and screws are tightened securely to ensure that the equipment is in safe working condition;
b) Allow the motor to cool before you put the equipment in an enclosed area;
c) to avoid risk of fire, keep the ventilation openings free of grass, straw, moss, leaves and similar materials,
d) Make regular checks on the grass collecting device for wear or damaged parts;
e) Check the equipment at regular intervals and replace worn or damaged parts for your own safety.
Description of the warning logos (see Fig. 12) A = Important!
Read the directions for use before operating the tool.
B = Keep other persons (and animals) away from the danger zone.
C = Caution, sharp teeth. The teeth continue to rotate after the equipment is switched off. Pull the plug out of the socket outlet before carrying out any maintenance or if the cable becomes damaged.
D = Wear hearing and eye protection.
E = Keep the power cable away from the roller.
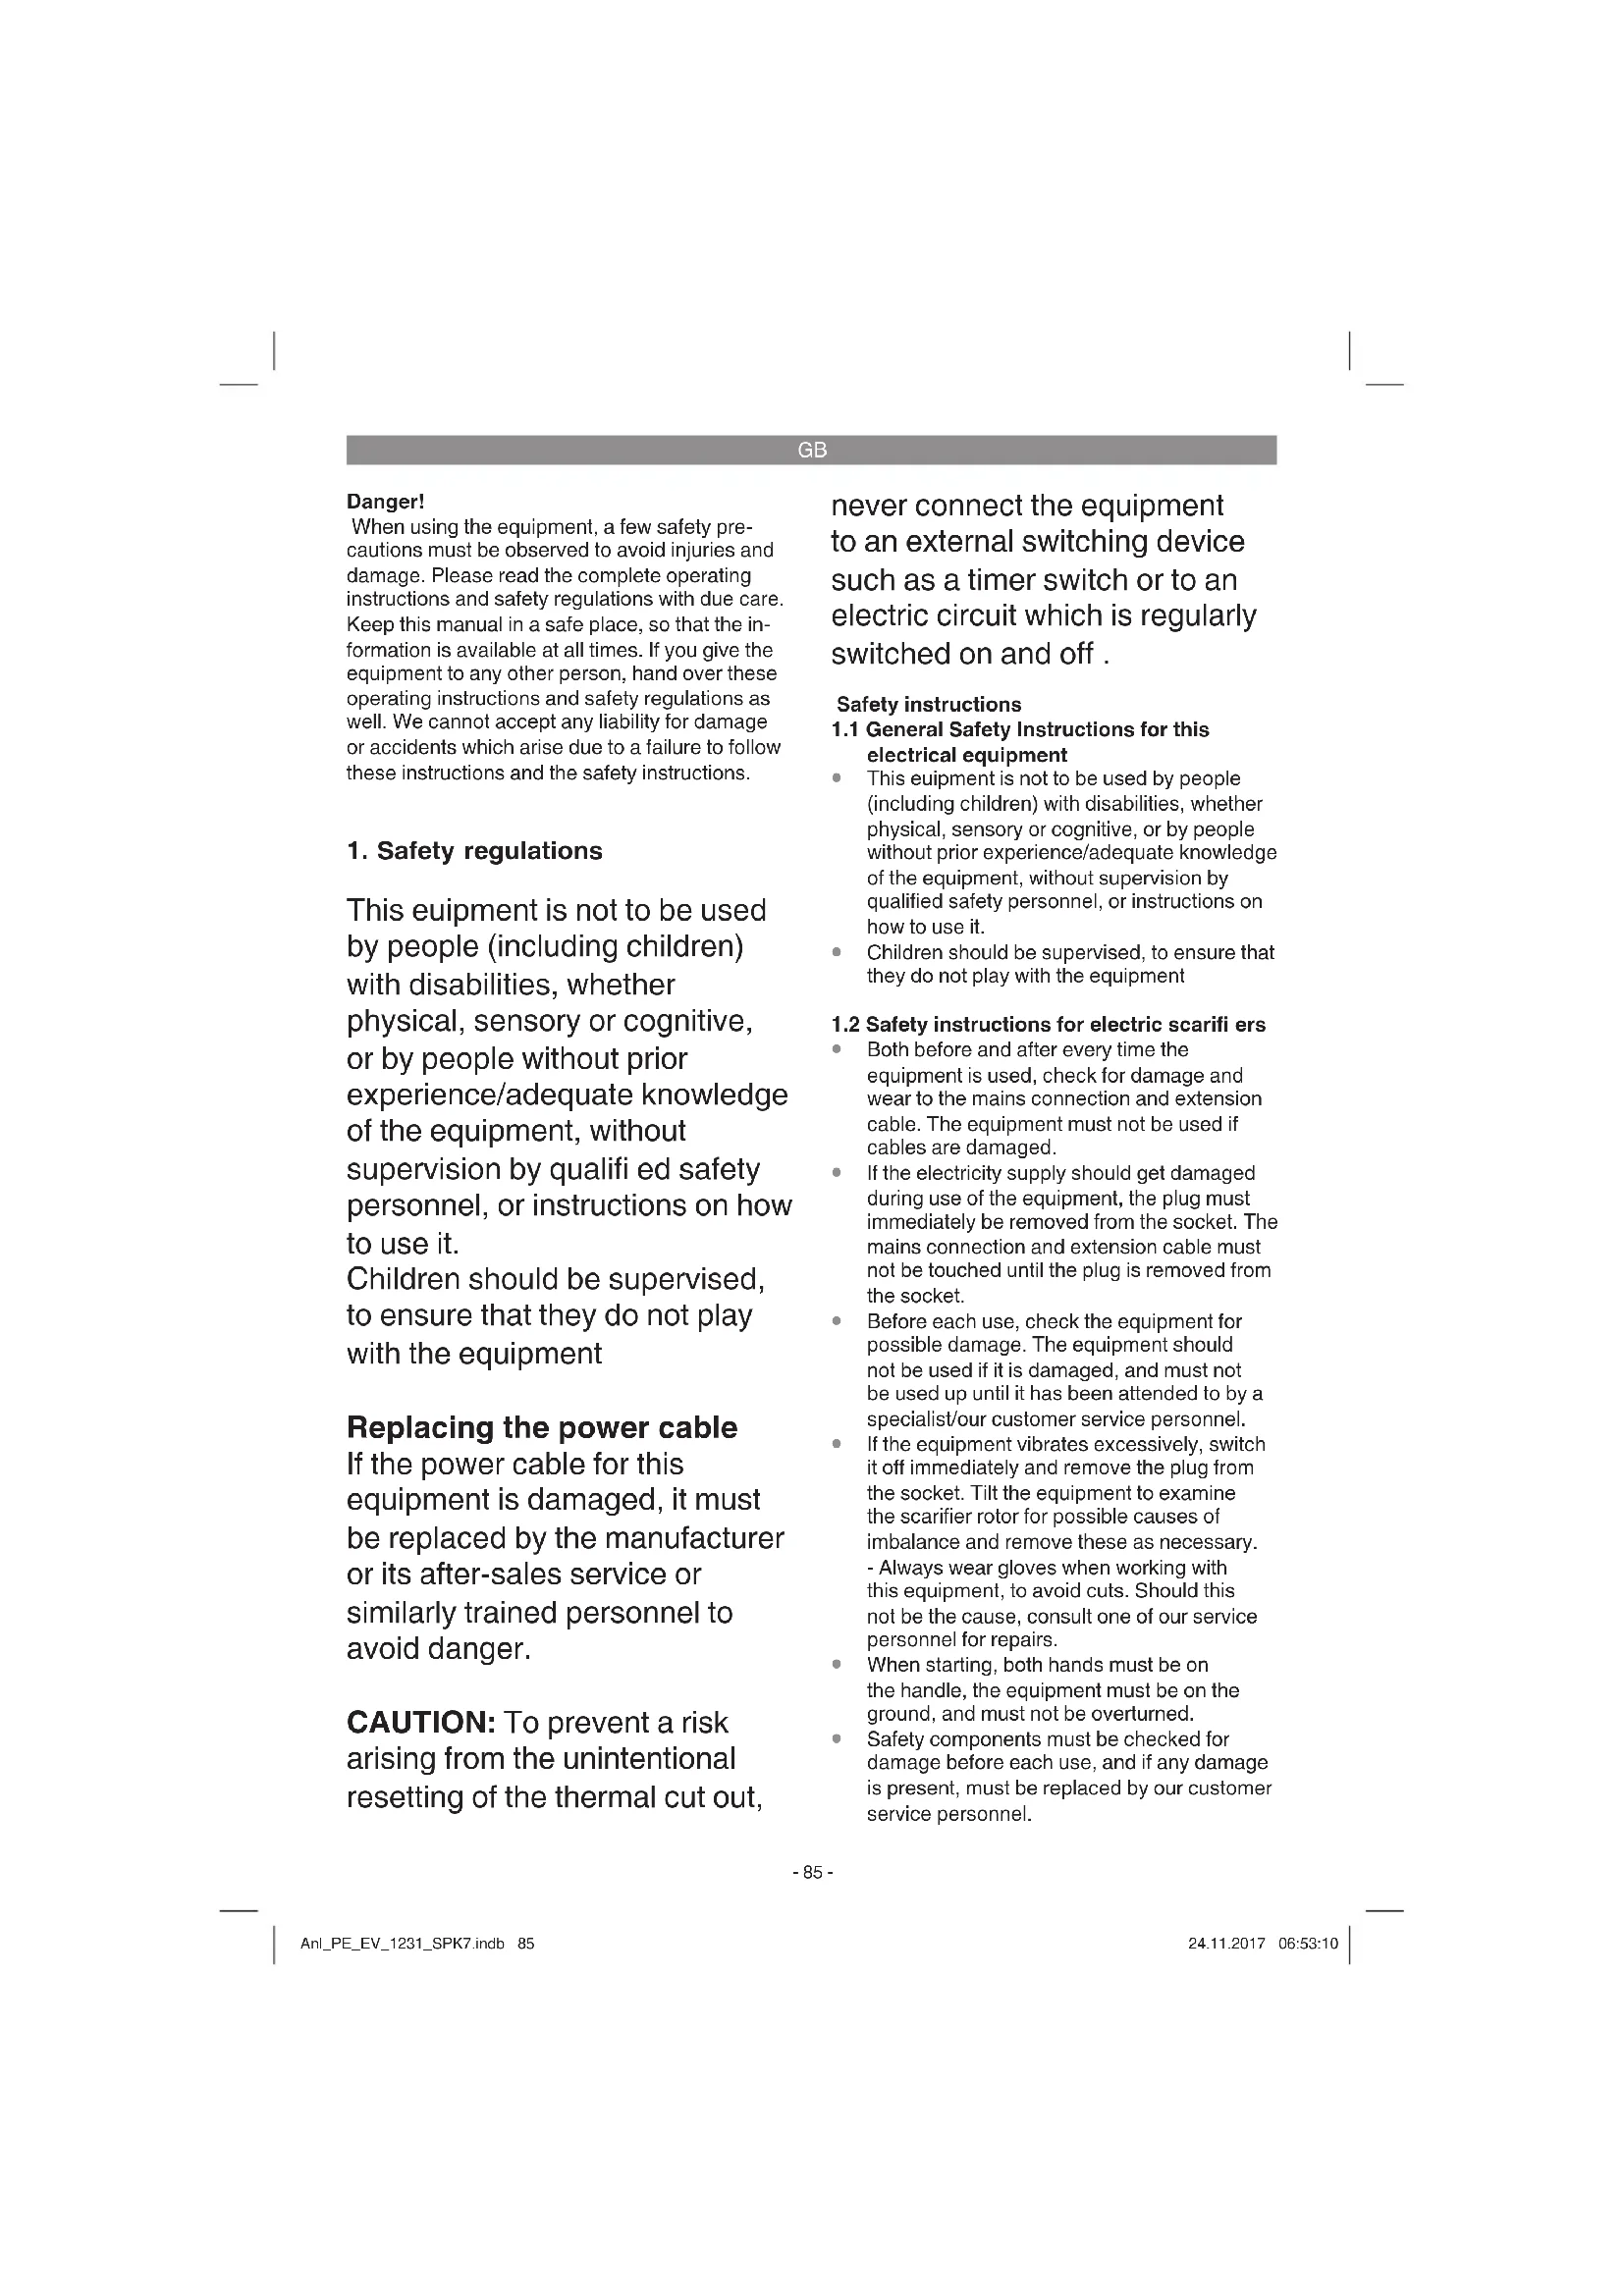
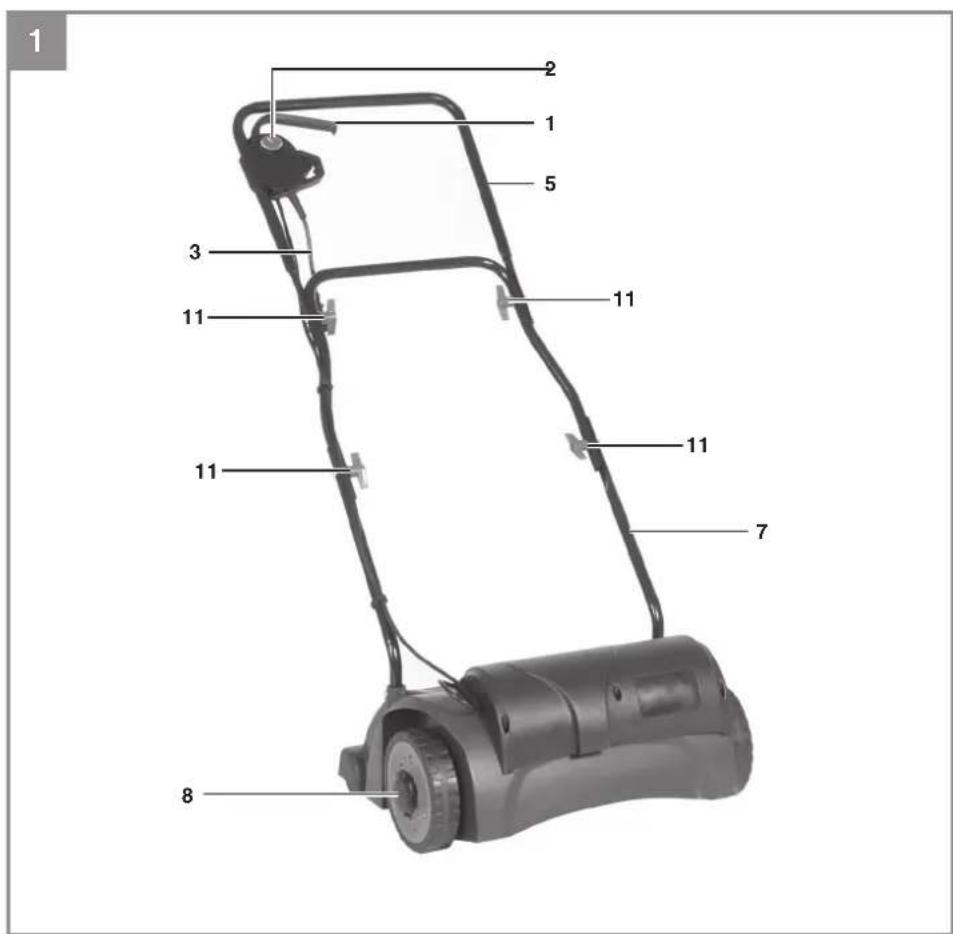
2. Layout and items supplied
2.1 Layout (Fig. 1/2)
1.ON/OFFswitch
2. Safety lock-off
3. Power cable
4. Cable grip
5. Top push bar
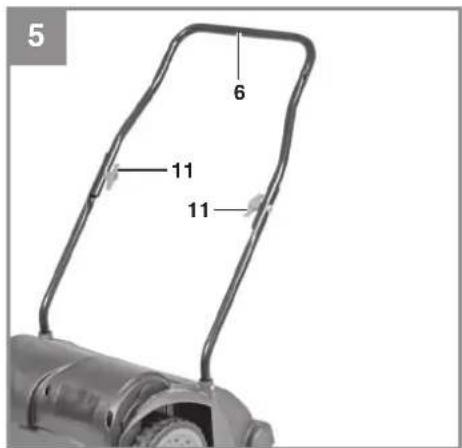
6. Lower push bar
7. Push bar bracket
8. Scarifying depth
9. Ejector fl ap
10. Cable clips
11. Fastening screws for push bar
12. Retaining screws for push bar
2.2 Items supplied
Please check that the article is complete as specified in the scope of delivery. If parts are missing, please contact our service center or the sales outlet where you made your purchase at the latest within 5 working days after purchasing the product and upon presentation of a valid bill of purchase. Also, refer to the warranty table in the service information at the end of the operating instructions.
- Open the packaging and take out the equipment with care.
- Remove the packaging material and any packaging and/or transportation braces (if available).
- Check to see if all items are supplied.
- Inspect the equipment and accessories for transport damage.
- If possible, please keep the packaging until the end of the guarantee period.
Danger!
The equipment and packaging material are not toys. Do not let children play with plastic bags, foils or small parts. There is a danger of swallowing or suffocating!
• Original operating instructions
3. Proper use
The equipment is intended for private use i.e. for use in home and gardening environments.
Scarifi ers for private use are machines whose annual operating time generally does not exceed 10 hours, during which the machine is primarily used to maintain small-scale, residential lawns and home/hobby gardens. Public facilities, sporting halls, and agricultural/forestry applications are excluded.
The operating instructions as supplied by the manufacturer must be kept and referred to in order to ensure that the equipment is properly used and maintained. The instructions contain valuable information on operating, maintenance and servicing conditions.
Warning! Due to the high risk of bodily injury to the user, the equipment may not be used to grind up branch or hedge clippings. Moreover, the equipment may not be used as a power cultivator to level out high areas such as mole hills.
GB
For safety reasons, the scarifi er may not be used as a drive unit for other equipment or toolkits of any kind, unless specifi cally advised to do so by the manufacturer.
The equipment is to be used only for its prescribed purpose. Any other use is deemed to be a case of misuse. The user / operator and not the manufacturer will be liable for any damage or injuries of any kind caused as a result of this.
Please note that our equipment has not been designed for use in commercial, trade or industrial applications. Our warranty will be voided if the machine is used in commercial, trade or industrial businesses or for equivalent purposes.
4. Technical data
Mains voltage: 230 V\~50Hz
Power input: 1200 W
Working width: 31 cm
Number of blades: 8 double blades
Scarifying depth: -3 / 3 / 7 / 9 mm
L_pA sound pressure level: 85.2 dB(A)
L_WA Measured sound power level: ..... 94.02 dB(A)
L_WA Guaranteed sound power level: ...... 99 dB(A)
Vibration at the handlebars: 2.71 m/s ^4
K uncertainty: 1.5 m/s ^2
Protection class: ...... II / ☐
Protection type: IPX4
Weight: 8.4 kg
Danger!
Sound and vibration
Sound and vibration values were measured in accordance with EN 60335.
Keep the noise emissions and vibrations to a minimum.
- Only use appliances which are in perfect working order.
• Service and clean the appliance regularly.
• Adapt your working style to suit the appliance.
• Do not overload the appliance. - Have the appliance serviced whenever necessary.
- Switch the appliance off when it is not in use.
- Wear protective gloves.
Caution!
Residual risks
Even if you use this electric power tool in accordance with instructions, certain residual risks cannot be rules out. The following hazards may arise in connection with the equipment's construction and layout:
- Damage to hearing if no suitable ear protection is used.
- Health damage caused by hand-arm vibrations if the equipment is used over a prolonged period or is not properly guided and maintained.
5. Before starting the equipment
Before you connect the equipment to the mains supply make sure that the data on the rating plate are identical to the mains data.
Warning!
Always pull the power plug before making adjustments to the equipment.
The scarifi er is delivered unassembled. The complete push bar must be assembled and mounted before using the scarifi er. Follow the operating instructions step-by-step and use the pictures provided as a visual guide to easily assemble the equipment.
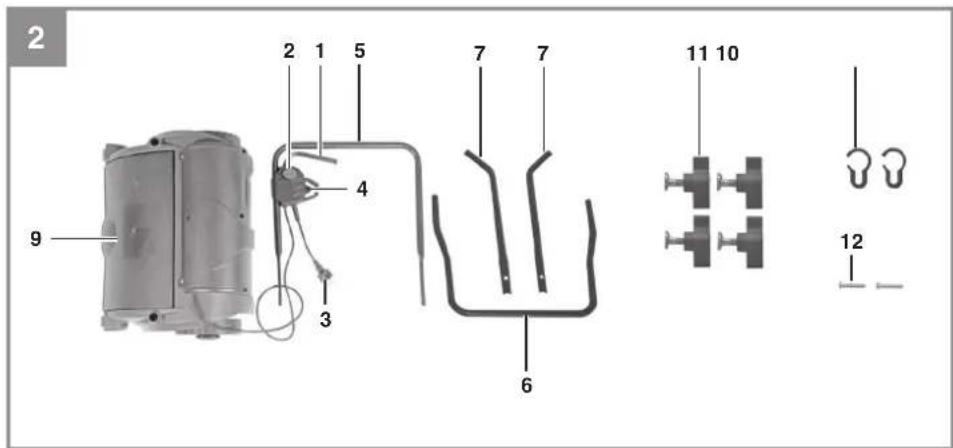
Fitting the push bar brackets (see Figs. 3-4)
Insert the push bar brackets (Fig. 3/Item 7) into the provided openings (Fig. 3). Then fasten the brackets with the retaining screws (Fig. 4/Item 12).
Fitting the lower push bar (see Fig. 5)
- Slide the lower push bar (Fig. 5/Item 6) over the push bar brackets.
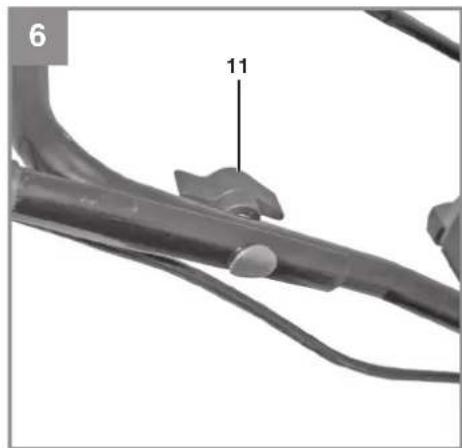
- Screw the tubes together, using the screws supplied (Fig. 6/Item 11).
Fitting the upper push bar (see Figs. 6-8)
- Position the upper push bar (Fig. 1/Item 5) such that its holes line up with the holes of the lower bar.
- Screw the tubes together, using the screws supplied (Fig. 2/Item 11).
- Using the cable clips supplied (Fig. 7), attach the power cable to the tubes of the push bars so that it is possible to open and shut the ejector flap (Fig. 8/Item 10).
GB
Please ensure that the ejector flap can be opened and closed easily!
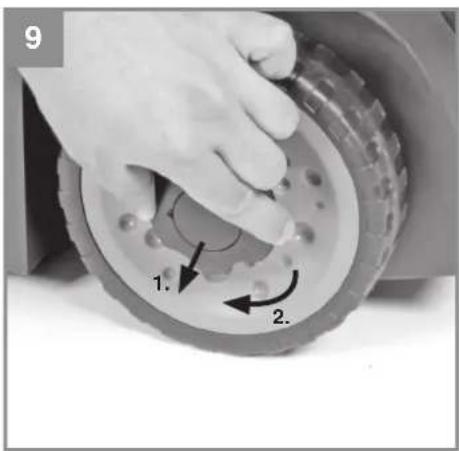
Adjusting the scarifi er depth (see Fig. 9)
The scarifi er depth is adjusted at both front wheels via the adjustment mechanism. For this, pull out the adjusting screw and turn the wheel to the left or right into one of the available positions (0/I/II/III).
The scarifi er depth must always be identically set on both sides!
0 = drive/transport position
I = scarifi er depth 3 mm
II = scarifi er depth 7 mm
III = scarifi er depth 9 mm
Electrical connection
The equipment can be connected to any normal socket with 230V AC. It is only acceptable to connect it to a shockproof socket with a 16A circuit breaker. Furthermore, a residual-current-operated protective device with max. 30 mA should be connected upstream.
Power cable
Please only use power cables that are not damaged. The total length of the power cable should not exceed 50 meters; going beyond this distance will reduce the power output of the electric motor.
The power cable must have a cross-section of 3 x 1.5 mm ^2 . The insulating sheath of scarifier power cables is frequently damaged.
Some of the causes for this are:
• Cracking from running over the cable
- Pinching when the power cable is dragging under doors and pulled through windows
• Cracking due to old age of the insulation
- Kinking by improperly fastening or guiding the power cable
The power cables must, at the very minimum, be of type HO5RN-F and 3-stranded. The cable type must be printed somewhere on the power cable. Only purchase power cables that are marked as such! Plugs and socket couplers for the power cables must be made from rubber and be splashproof. There is a limit to how long power cables can be. Longer power cables require larger conductor cross-sections. Power cables and connecting lines must be regularly checked for damage. Ensure that the lines are de-energized before checking them. Completely unwind the power cable. Also check power cable entry points, plugs and socket couplers for kinks.
6. Operation
Connect the machine's power supply cable to the plug (Fig. 10/Item 1) and secure the power cable with the stress-relief clip (Fig 10/Item 2).
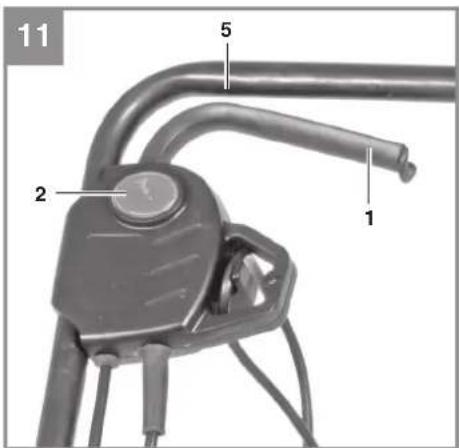
To prevent accidental start-up of the equipment, the push-bar (Fig. 11 / Item 5) is equipped with a safety lock-off (Fig. 11 / Item 2) which must be pressed before the lever switch (Fig. 11 / Item 1) can be pressed. If the lever switch is released, the equipment switches off.
Repeat this process several times so that you are sure that the machine functions properly. Before you perform any repair or maintenance work on the machine, ensure that the cutting unit is not rotating and that the power supply is disconnected.
Important! Never open the ejector flap when the motor is running. A rotating cutting unit can cause injuries.
Always fasten the ejector flap carefully. The flap fl ips back to the "Closed" position by the tension springs!
Always ensure that a safe distance (provided by the long handles) is maintained between the user and the housing. Be especially careful when scarifying and changing direction on slopes and inclines. Maintain a solid footing and wear sturdy, non-slip footwear and long trousers. Always scarify along the incline (not up and down).
For safety reasons, the scarifi er may not be used to scarify inclines whose gradient exceeds 15 degrees.
Use special caution when backing up and pulling the scarifier (tripping hazard)!
GB
Tips for proper working
It is recommended that you overlap scarifying paths a little.
Try to scarify in straight lines for a nice, clean look. Insodoing, the aeration swaths should always overlap each other by a few centimeters in order to avoid bare strips.
How frequently you should scarify your lawn is determined primarily by the speed at which the grass grows and the hardness of the soil.
Keep the underside of the equipment clean and remove soil and grass build-up. Deposits make it more difficult to start the aerator and decrease the quality of the scarifying.
Always scarify along inclines (not up and down). Switch off the motor before doing any checks on the roller.
Danger!
The roller rotates for a few seconds after the motor is switched off. Never attempt to stop the roller. In the event that the rotating roller strikes an object, immediately switch off the equipment and wait for the roller to come to a complete stop. Then inspect the condition of the roller. Replace any parts that are damaged (see section 8.4). Lay the power cable on the ground in loops in front of the power outlet. Scarify away from the power outlet and cable, making sure that the power cable always trails in the already scarified grass so that the equipment does not travel over the cable.
7. Replacing the power cable
Danger!
If the power cable for this equipment is damaged, it must be replaced by the manufacturer or its after-sales service or similarly trained personnel to avoid danger.
8. Cleaning, maintenance and ordering of spare parts
Danger!
Always pull out the mains power plug before starting any cleaning work.
8.1 Cleaning
- Keep all safety devices, air vents and the motor housing free of dirt and dust as far as possible. Wipe the equipment with a clean cloth or blow it with compressed air at low pressure.
• We recommend that you clean the device immediately each time you have finished using it. - Clean the equipment regularly with a moist cloth and some soft soap. Do not use cleaning agents or solvents; these could attack the plastic parts of the equipment. Ensure that no water can seep into the device. The ingress of water into an electric tool increases the risk of an electric shock.
8.2 Carbon brushes
In case of excessive sparking, have the carbon brushes checked only by a qualified electrician.
Danger! The carbon brushes should not be replaced by anyone but a qualified electrician.
8.3 Maintenance
- A worn out or damaged cutting unit should be replaced by an authorised expert (see adress on the warranty certificate).
- Take care that all fastening elements (screws, nuts, etc.) are firmly tightened, so that you can work safely with the scarifier.
• Store the scarifier in a dry place. - For longer life, all screw-fastened parts, such as wheels and axles should be cleaned and subsequently oiled.
- Regular servicing of the scarifier not only secures longer endurance and performance, but also contributes to an accurate and simple scarification of your lawn.
- At the end of the season, carry out a general check of the scarifier, and remove all residue collected. Before the start of every season, it is absolutely necessary to check the state of the scarifier. Contact our Customer Service (see address on the warranty certificate) if repair work is necessary.
GB
8.4 Replacing the spike drum
For safety reasons, we recommend having the spike drum replaced by an authorized professional (see address on warranty certifi cate).
Wear work gloves!
Only replace the unit with a genuine Einhell spike drum, as this will ensure top performance and safety under all conditions.
8.5 Ordering replacement parts:
Please quote the following data when ordering replacement parts:
• Type of machine
• Article number of the machine
• Identification number of the machine
- Replacement part number of the part required Current prices and information are available on request at your Hornbach store.
Replacement cutting unit Art. No.: 34.055.80
GB
9. Troubleshooting guide
| Fault Possible causes Rectifi cation | ||
| Motor does not start | a) No electricity in plugb) Cable defectivec) Switch, switch/plug block defectived) Connections to motor or capacitor disconnectede) Housing clogged | a) Check line and fuseb) Checkc) Have machine checked by a customer service centerd) Have machine checked by a customer service centere) If necessary adjust working depth.Clean housing so that the roller can run freely |
| Engineperformance drops | a) Soil is too firmb) Housing cloggedc) Roller badly worn | a) Changeworkingdepthb) Clean housingc) Replace roller |
| Imprecisescarifying result | a) rollerwornb) Wrong working depth | a) Replace rollerb) Correct working depth |
| Motorisrunning, roller is not rotating | a) Toothed belt is torn | a) By customer service workshop |
Important notice! To protect the motor itis equipped with a thermal overload switch which cuts out when overloaded and starts again automatically after a short cooling-down period.
GB
10. EC Declaration of Conformity
Declaration of Conformity

declare, that the product described in Technical Data :

Electric scarifier PE-EV 1231
Manufactured for:
Hornbach Baumarkt AG
Hornbachstraße 11
76879 Bornheim / Germany
is in conformity with the following directives:
Machinery Directive 2006/42/EC
Outdoor Noise Directive 2000/14/EG
EMC Directive 2014/30/EG
RoHS Directive 2011/65/EG
and in accordance to the following applicable harmonized standards:
EN 60335-1:2012+A11
EN 50636-2-92:2014
EN 62233:2008
EN 55014-1/A2:2011
EN 55014-2/A2:2008
EN 61000-3-2:2014
EN 61000-3-3:2013
The conformity with the Noise Emission of Outdoor Equipment Directive is verified by the adherence to the following emissions values:
Measured sound power level: 94,02 dB (A)
Guaranteed sound power level: 99 dB (A)
ppa

Andreas Back
Head of Quality Management &
Person authorised to compile the technical file
The crossed-out wheeled bin logo requires the separate collection of waste electric and electronic equipment (WEEE). Such equipment may contain dangerous and hazardous substances. These tools must be returned to a designated collection point for the recycling of WEEE and must not be disposed as unsorted municipal waste. By doing so, you will help to conserve resources and protect the environment. Contact your local authorities for more information.
Children must not play with plastic bags and packaging material, due to possible injury or danger of suffocation. Store such material safely or dispose of environmentally friendly.
Subject to technical changes
Pattfield®
ERGO TOOLS

Pattfield®
ERGO TOOLS
Pattfield®
ERGO TOOLS

Pattfield® ERGO TOOLS
Manufactured for HORNBACH-Baumarkt AG
Hornbachstraße 11, 76879 Bornheim / Germany
ED201711


- Pattfield® ERGO TOOLS
- D
- Gefahr!
- Safety regulations
- Safety instructions
- General Safety Instructions for this electrical equipment
- Safety instructions for electric scarifi ers
- GB
- Warning
- Preparations
- Handling
- Maintenance and storage
- Description of the warning logos (see Fig. 12) A = Important!
- Layout and items supplied
- Layout (Fig. 1/2)
- Items supplied
- Danger!
- Proper use
- Technical data
- Sound and vibration
- Keep the noise emissions and vibrations to a minimum.
- Caution!
- Residual risks
- Before starting the equipment
- Warning!
- Fitting the push bar brackets (see Figs. 3-4)
- Fitting the lower push bar (see Fig. 5)
- Fitting the upper push bar (see Figs. 6-8)
- Adjusting the scarifi er depth (see Fig. 9)
- Electrical connection
- Power cable
- Operation
- Tips for proper working
- Replacing the power cable
- Cleaning, maintenance and ordering of spare parts
- Cleaning
- Carbon brushes
- Maintenance
- Replacing the spike drum
- Ordering replacement parts:
- Troubleshooting guide
- EC Declaration of Conformity
- Declaration of Conformity
- Pattfield®
- ERGO TOOLS
Brand : EINHELL
Model : BG-EV 1231
Category : Electric mower