
POWXG1045 - Saw PowerPlus - Free user manual and instructions
Find the device manual for free POWXG1045 PowerPlus in PDF.
| Product type | Cordless pruning saw |
| Brand | PowerPlus |
| Model | POWXG1045 |
| Power supply | 12 V lithium-ion battery |
| Blade length | 100 mm |
| Guide bar cutting length | 90 mm |
| Chain pitch | 7.6 mm (0.30") |
| Chain gauge | 1.1 mm (0.043") |
| Drive sprocket | 7 teeth |
| Sound pressure level (LpA) | 78 dB(A) |
| Sound power level (LwA) | 86 dB(A) |
| Vibration level (aw) | 2.6 m/s² |
| Warranty | 36 months |
| Batteries included | 2 batteries |
| Charger included | Yes, with mains adapter |
| Cutting material | Wood only |
| Intended use | Pruning, cleaning for homeowners |
| Kickback protection | Yes, safety instructions included |
| Lubrication | Manual before use |
| Charging temperature | 4 °C to 40 °C |
| Battery storage temperature | 5 °C to 20 °C |
| Battery capacity indicator | 3 LEDs (full, 60%, low) |
| Spare parts available | Chain, guide bar, batteries |
Frequently Asked Questions - POWXG1045 PowerPlus
User questions about POWXG1045 PowerPlus
0 question about this device. Answer the ones you know or ask your own.
Ask a new question about this device
Download the instructions for your Saw in PDF format for free! Find your manual POWXG1045 - PowerPlus and take your electronic device back in hand. On this page are published all the documents necessary for the use of your device. POWXG1045 by PowerPlus.
USER MANUAL POWXG1045 PowerPlus
natural_image
Yellow POWERPLUS power chain tool with black handle and chain teeth (no text or symbols visible on the device itself)
| NL | NEDERLANDS | VERTAALDE VERSIE VAN DE ORIGINELE HANDLEIDING |
| FR | FRANÇAIS | TRADUCTION DU MODE D'EMPLOI D'ORIGINE |
| EN | ENGLISH | ORIGINAL INSTRUCTION MANUAL |
| DE | DEUTSCH | ÜBERSETZUNG DER ORIGINALBETRIEBSANLEITUNG |
| ES | ESPAÑOL | TRADUCCIÓN DEL MANUAL DE INSTRUCCIONES ORIGINAL |
| IT | ITALIANO | TRADUZIONE DEL MANUALE DI ISTRUZIONI ORIGINALE |
| PT | PORTUGUÊS | TRADUÇÃO DO MANUAL DE INSTRUÇÕES ORIGINAL |
| NO | NORSK | OVERSETTELSE AV ORIGINAL BRUKERVEILEDNING |
| DA | DANSK | OVERSÆTTELSE AF DEN ORIGINALE BRUGSVEJLEDNING |
| CS | ČESKY | PŘEKLAD ORIGINÁLNÍHO NÁVODU K POUŽITÍ |
| RO | ROMÂNÃ | TRADUCEREA MANUALULUI DE INSTRUCTIUNI ORIGINALE |
| BG | БЪЛГАРСКИ | ПРЕВОД НА ОРИГИНАЛНОТО РЬКОВОДСТВО |


FIG. B

A = negative pole
FIG. C

FIG. D

natural_image
Close-up of a gloved hand using a tool to cut a black chain track with a yellow line labeled 'a' (no text or symbols on the diagram itself)FIG. D
2 BESCHRIJVING (FIG. A)
Product: Snoeizaag 100 mm
Handelsmerk: PowerPlus
Model: POWXG1045
01/12/2021, Lier - Belgium
18 DÉCLARATION DE CONFORMITÉ


VARO – Vic. Van Rompuy N.V. - Joseph Van Instraat 9 - BE2500 Lier - BELGIQUE, déclare solennellement que :
Appareil : SCIE D'ÉLAGAGE – FONCTIONNANT SUR BATTERIE
Marque : PowerPlus
Modèle : POWXG1045
01/12/2021, Lier - Belgium
1 INTENDED USE .... 3
2 DESCRIPTION (FIG A) 3
3 PACKAGE CONTENT LIST....3
4 SYMBOLS 4
5 GENERAL POWER TOOL SAFETY WARNINGS....4
5.1 Work area....4
5.2 Personal safety 4
5.3 Power tool use and care....5
5.4 Service....5
6 SAFETY....5
7 ADDITIONAL SAFETY INSTRUCTIONS FOR BATTERIES AND CHARGERS 6
7.1 Batteries....6
7.2 Chargers....7
8 CHARGING AND INSERTION OR REMOVAL OF BATTERY .....7
8.1 Charger indications (Fig. B)....7
8.2 Charging the battery (Fig. B & C)....7
8.3 Removal / insertion of battery (Fig. A & C)....7
8.4 Battery capacity indicator (Fig. A) 8
9 KICKBACK SAFETY PRECAUTIONS 8
10 ASSEMBLY 8
10.1 To assemble the chain and bar (Fig. A & D)....9
10.2 Lubricating oil for the saw chain (Fig. D)....9
11 OPERATION....9
11.1 Before using a new chain saw....9
12 STARTING AND STOPPING THE CHAIN SAW (FIG. A)......10
12.1 Starting the chain saw.... 10
12.2 Stopping the chain saw....10
13 CLEANING AND MAINTENANCE 10
13.1 Guide bar maintenance....10
13.2 Chain sharpening .... 10
13.3 Chain maintenance....11
14 TECHNICAL DATA....12
15 NOISE....12
16 WARRANTY....13
17 ENVIRONMENT 13
18 DECLARATION OF CONFORMITY 14
MINI CHAINSAW 12V 100MM POWXG1045
1 INTENDED USE
These models are intended for infrequent use by homeowners, cottagers, and campers, and for such general applications as clearing, pruning, etc. They are not intended for prolonged use. If the intended use involves prolonged periods of operation, this may cause circulatory problems in the user's hands due to vibration. Not suitable for professional use.

WARNING! Read this manual and general safety instructions carefully before using the appliance, for your own safety. Your power tool should only be passed on together with these instructions.
2 DESCRIPTION (FIG A)
- Saw chain
- Guide bar
- Sprocket cover
- Sprocket cover knob
- Trigger switch
- Lock-off button
- Hand guard
- Chain guard
- Battery pack
- Charger
- Power adapter
- Charger indicator LED's
- Release latch
- Battery capacity indicator
- Direction of chain rotation
- Sprocket
- Chain tensioning wheel

NOTE: Study your saw and be familiar with its parts.

WARNING! Beware of kickback. For your own safety, please read and follow the safety precautions in this manual before attempting to operate your chain saw. Improper use can cause serious injury.
3 PACKAGE CONTENT LIST
■ Remove all packing materials
■ Remove remaining packaging and transit supports (if existing)
- Check the completeness of the packing content
- Check the appliance, the power cord, the power plug and all accessories for transportation damages.
- Keep the packaging materials as far as possible till the end of the warranty period. Dispose it into your local waste disposal system afterwards.

WARNING Packing materials are no toys! Children must not play with plastic bags! Danger of suffocation!
1 x chainsaw
1 x power adapter
2 x batteries
1 x charger
1 x chain
1 x bar
1 x bar sheath
1 x manual
1 x empty oil bottle

When parts are missing or damaged, please contact your dealer.
4 SYMBOLS
In this manual and/or on the machine the following symbols are used:
 | Wearing of protection against noise advised |  | Wearing eye protection is advised |
 | Always wear gloves |  | Wear a mask In dusty conditions |
 | Denotes risk of personal injury or damage to the tool. |  | In accordance with essential applicable safety standards of European directives |
 | Read manual before usage |  | Wearing of protective shoes advised |
 | Do not expose charger and battery pack to water |  | Do not incinerate battery pack or charger |
 | Ambient temperature 40°C max. (only for battery) |  | Use battery and charger only in closed rooms |
5 GENERAL POWER TOOL SAFETY WARNINGS

Read all safety warnings and all instructions. Failure to follow all warnings and instructions may result in electric shock, fire and/or serious injury. Save all warnings and instructions for future reference. The term "power tool" in the warnings refers to your mains operated (corded) power tool or battery operated (cordless) power tool.
5.1 Work area
- Keep work area clean and well lit. Cluttered and dark areas invite accidents.
- Do not operate power tools in explosive atmospheres, such as in the presence of flammable liquids, gases or dust. Power tools create sparks which may ignite the dust or fumes.
- Keep children and bystanders away while operating a power tool. Distractions can cause you to lose control.
5.2 Personal safety
- Stay alert, watch what you are doing and use common sense when operating a power tool. Do not use a power tool while you are tired or under the influence of drugs, alcohol or medication. A moment of inattention while operating power tools may result in serious personal injury.
- Use safety equipment. Always wear eye protection. Safety equipment such as dust mask, non-skid safety shoes, hard hat, or hearing protection used whenever conditions require will reduce personal injuries.
POWXG1045 EN
- Avoid accidental starting. Ensure the switch is in the off position before plugging in.
Carrying power tools with your finger on the switch or plugging in power tools that have the switch on invites accidents.
- Remove any adjusting key or wrench before turning the power tool on. A wrench or a key left attached to a rotating part of the power tool may result in personal injury.
- Do not overreach. Keep proper footing and balance at all times. This enables better control of the power tool in unexpected situations.
- Dress properly. Do not wear loose clothing or jewelry. Keep your hair, clothing and gloves away from moving parts. Loose clothes, jewelry or long hair can be caught in moving parts.
- If devices are provided for the connection of dust extraction and collection facilities, ensure these are connected and properly used. Use of these devices can reduce dust related hazards.
5.3 Power tool use and care
- Do not force the power tool. Use the correct power tool for your application. The correct power tool will do the job better and safer at the rate for which it was designed.
- Do not use the power tool if the switch does not turn it on and off. Any power tool that cannot be controlled with the switch is dangerous and must be repaired.
- Disconnect the plug from the power source before making any adjustments, changing accessories, or storing power tools. Such preventive safety measures reduce the risk of starting the power tool accidentally.
- Store idle power tools out of the reach of children and do not allow persons unfamiliar with the power tool or these instructions to operate the power tool. Power tools are dangerous in the hands of untrained users.
- Maintain power tools. Check for misalignment or sticking of moving parts, breakage of parts and any other condition that may affect the power tool's operation. If damaged, have the power tool repaired before use. Many accidents are caused by poorly maintained power tools.
- Keep cutting tools sharp and clean. Properly maintained cutting tools with sharp cutting edges are less likely to stick and are easier to control.
- Use the power tool, accessories and tool bits etc., in accordance with these instructions and in the manner intended for the particular type of power tool, taking into account the working conditions and the work to be performed. Use of the power tool for operations different from intended could lead to a hazardous situation.
5.4 Service
- Have your power tool serviced by a qualified person using only identical replacement parts. This will ensure that the safety of the power tool is maintained.
6 SAFETY
- DO NOT operate a chain saw when you are fatigued, under the influence of drugs, alcohol or medication.
- Use safety footwear, snug-fitting clothing, protective gloves, and eye, hearing and head protection devices.
- DO NOT allow other persons to be near when starting or cutting with the chain saw. Keep bystanders and animals out of the work area.
- DO NOT start cutting until you have a clear work area, secure footing, and a planned retreat path from the falling tree.
- Keep all parts of your body away from the saw chain when the engine is running.
■ Before you start the engine, make sure that the saw chain is not contacting anything.
- DO NOT operate a chain saw that is damaged, improperly adjusted, or not completely and securely assembled. Be sure that the saw chain stops moving when the trigger switch is released.
POWXG1045 EN
- Use extreme caution when cutting small size brush and saplings because slender material may catch the saw chain and be whipped toward you or pull you off balance.
- When cutting a limb that is under tension, be alert for spring back so that you will not be struck when the tension in the wood fibers is released
- Keep the handles dry, clean, and free of oil.
- Operate the chain saw only in well-ventilated areas.
■ DO NOT operate a chain saw in a tree unless you have been specifically trained to do so.
- All chain saw service, other than the items listed in the user manual safety and maintenance instructions should be performed by competent chain saw service personnel.
- When transporting your chain saw, use the appropriate guide bar scabbard.
- DO NOT operate your chain saw near or around flammable liquids or gases whether in or out of doors. An explosion and/or fire may result.
- USE THE RIGHT TOOL: Cut wood only. Do not use the chain saw for purposes for which it was not intended. For example, do not use the chain saw for cutting plastic, masonry, or non-building materials.
- The first time user should have practical instruction in the use of chainsaw and the protective equipment from an experienced operator.
- Be aware of harmful dust, mist (such as saw dust or oil mist from chain lubrication) and protect your self properly.
- Wear gloves and keep your hand warm. Prolonged use of chainsaws exposing the operator to vibrations may produce white finger disease. In order to reduce the risk of white finger disease, please wear gloves and keep your hand warm. If any of the white finger symptoms appear, seek medical advice immediately.
- Only chain and guide bar can be replaced by the user himself. Always make sure you replace with correct material as stated in the specifications of the manual.
7 ADDITIONAL SAFETY INSTRUCTIONS FOR BATTERIES AND CHARGERS

Use only batteries and chargers applicable for this machine.
7.1 Batteries
■ Never attempt to open for any reason.
- Do not store in locations where the temperature may exceed 40 °C.
- Charge only at ambient temperatures between 4 °C and 40 °C.
- Store your batteries in a cool dry place (5 °C-20 °C). Never store batteries in discharged state.
It is better for Li-ion batteries to discharge and reload them regularly (at least 4 times a year). The ideal charge for long-term storage of your Li-ion battery is 40% of capacity.
- When disposing of batteries, follow the instructions given in the section "Protecting the environment".
- Do not cause short circuits. If connection is made between the positive (+) and negative (-) terminal directly or via accidental contact with metallic objects, the battery is short circuited and an intense current will flow causing heat generation which may lead to casing rupture or fire.
- Do not heat. If batteries are heated to above 100 °C, sealing and insulating separators and other polymer components may be damaged resulting in electrolyte leakage and/or internal short circuiting leading to heat generation causing rupture or file. Moreover do not dispose of the batteries in fire, explosion and/or intense burning may result.
■ Under extreme conditions, battery leakage may occur. When you notice liquid on the battery, proceed as follows:
- Carefully wipe the liquid off using a cloth. Avoid skin contact.
- In case of skin or eye contact, follow the instructions below:
POWXG1045 EN
√ Immediately rinse with water. Neutralize with a mild acid such as lemon juice or vinegar.
√ In case of eye contact, rinse abundantly with clean water for at least 10 minutes. Consult a physician.

Fire hazard! Avoid short-circuiting the contacts of a detached battery. Do not incinerate the battery.
7.2 Chargers
- Never attempt to charge non-rechargeable batteries.
- Have defective cords replaced immediately.
- Do not expose to water.
- Do not open the charger.
- Do not probe the charger.
- The charger is intended for indoor use only.
8 CHARGING AND INSERTION OR REMOVAL OF BATTERY
8.1 Charger indications (Fig. B)
Charger indicator LED's (11):
- Solid red: charging
- Solid green: charged
Note: if the battery does not fit properly, disconnect it and confirm that the battery pack is the correct model for this charger as shown on the specification chart. Do not charge any other battery pack or any battery pack that does not securely fit the charger.
■ Frequently monitor the charger and battery pack while connected
- Unplug the charger and disconnect it from the battery pack when finished.
- Allow the battery pack to cool completely before using it.
- Store the charger and battery pack indoors, out of reach of children.

NOTE: If battery is hot after continuous use in the tool, allow it to cool down to room temperature before charging. This will extend the life of your batteries.

WARNING: Before making any adjustments ensure the tool is switched off or remove the battery pack.
8.2 Charging the battery (Fig. B & C)
- Connect the power adapter (11) to a power outlet socket.
- Put the charger (10) on a flat surface and connect it to the power adapter.
- When inserting the battery pack (9) in the charger you have to make sure the negative pole (A), corresponds to the negative pole (A) of the charger (10). The battery pack will not fit in the charger if this is not correct.
- Push the battery pack in to the charger, the red LED (12) will light up.
- The green LED (12) will light up when the battery pack is fully charged.
- The battery can simply be pulled out of the charger.
8.3 Removal / insertion of battery (Fig. A & C)
- Hold the tool with one hand and the battery pack (9) with the other.
POWXG1045 EN
- Push in the battery pack, it will not fit the tool if the position is wrong.
- To remove: Press the battery release latches (13) and pull the battery pack out at the same time.
8.4 Battery capacity indicator (Fig. A)
There are battery capacity indicators (14) just below the trigger switch (5), you can check the capacity status of the battery by pressing the trigger switch (5). Before using the machine, please press the trigger switch to check if the battery is full enough for proper working.
Those 3 LEDs (14) show the status of the capacity level of the battery:
■ 3 LED's are lit: Battery fully charged
■ 2 LED's are lit: Battery 60% charged
■ 1 LED is lit: Battery almost discharged
9 KICKBACK SAFETY PRECAUTIONS
KICKBACK may occur when the NOSE or TIP of the guide bar touches an object, or when wood closes in and pinches the saw chain in the cut.
Tip contact in some cases may cause a lightning-fast reverse reaction, kicking the guide bar up and back toward the operator.
PINCHING the saw chain along the BOTTOM of the guide bar may PULL the saw forward away from the operator.
PINCHING the saw chain along the TOP of the guide bar may PUSH the guide bar rapidly back toward the operator.
Any of these reactions may cause you to lose control of the saw, which could result in serious personal injury.
- With a basic understanding of kickback, you can reduce or eliminate the element of surprise. Sudden surprise contributes to accidents.
- Keep a good firm grip on the saw, when the motor is running. Use a firm grip with thumbs and fingers encircling the chain saw handle. A firm grip will help you reduce kickback and maintain control of the saw. Don't let go.
- Make sure that the area in which you are cutting is free from obstructions. Do not let the nose of the guide bar contact a log, branch, or any other obstruction which could be hit while you are operating the saw.
- Cut at high engine speeds. Do not overreach or cut above shoulder height.
- Follow manufacturer's sharpening and maintenance instructions for the saw chain.
- Only use replacement bars and chains specified by the manufacturer or the equivalent.

NOTE: Low-kickback saw chain is a chain that has met the kickback performance.

WARNING: Kickback can lead to dangerous loss of control of the chain saw and result in serious or fatal injury to the saw operator or to anyone standing close by. Always be alert. Rotational kickback and pinch-kickback are major chain saw operational dangers and the leading cause of most accidents.
10 ASSEMBLY

Always wear gloves when handling the bar and chain; these components are sharp and may contain burrs.
POWXG1045 EN
Never touch or adjust the chain while the motor is running. The saw chain is very sharp; always wear protective gloves when performing maintenance to the chain to avoid possible serious lacerations.
10.1 To assemble the chain and bar (Fig. A & D)
- Remove the battery from the chain saw.
- Rotate the sprocket cover knob (4) anti clockwise and remove the knob and the cover (3)
- Lay out the new saw chain in a loop and straighten any kinks. The cutters should face in the direction of chain rotation (15) which is marked above the sprocket (16). If they face backwards, turn the loop over.
- Place the chain drive links into the bar groove as shown.
- Position the chain so there is a loop at the back of the bar.
- Hold the chain in position on the bar and place the loop around the sprocket (16).
- Fit the bar flush against the mounting surface so that the bar studs are in the long slot of the bar.

NOTE: When placing the bar on the bar studs, ensure that the adjusting pin is in the chain tension pin hole.
- Replace the sprocket cover (3).
- Replace the sprocket cover knob (4). Turn the knob clockwise to tighten the sprocket cover. The bar should still be free to move for tension adjustment.
- Remove all slack from the chain by turning the chain tensioning wheel (17) down until the chain seats snugly against the bar with the drive links in the bar groove.
■ Lift the tip of the guide bar up to check for sag. - Release the tip of the guide bar turn the chain tensioning wheel (17) 1/2 turn down. Repeat this process until sag does not exist.
- Hold the tip of the guide bar up and tighten the sprocket cover knob. The chain is correctly tensioned when there is no sag on the underside of the guide bar, the chain is snug, but it can be turned by hand without binding.

NOTE: If the chain is too tight, it will not rotate. Loosen the sprocket cover lock knob slightly, turn the chain tensioning wheel 1/4 turn up. Lift the tip of the guide bar up and retighten the chain cover lock knob. Ensure that the chain will rotate without binding.
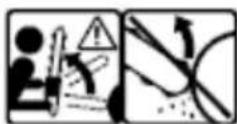
10.2 Lubricating oil for the saw chain (Fig. D)
Before starting up your new chain saw, the chain has to be lubricated manually. (Available in our product range: POWOIL003 - 1L & POWOIL006 - 5L)
- It allows operating the chain saw at ambient temperatures down to as low as -15°C.
- Never use waste oil for lubricating the saw chain.
- Switch off the saw and remove the battery.
- Place the saw on a level surface.
- Clean the guide bar and chain with a soft brush and solvent.
- Apply oil in area (a) between the guide bar an chain.(FIG. D)
- Refit the battery and run the saw until the oil is evenly distributed over the chain.
11 OPERATION
11.1 Before using a new chain saw
- Please read this manual carefully.
POWXG1045 EN
- Fully charge the battery before using it the first time. See instructions under the heading "Charging the battery".
- Check that the cutting equipment is correctly fitted and adjusted. See instructions under the heading "Assembly".
- Do not use the chain saw until sufficient chain oil has reached the chain. See instructions under the heading "Lubricating" cutting equipment.
- Long-term exposure to noise can result in permanent hearing impairment. So always use approved hearing protection.
12 STARTING AND STOPPING THE CHAIN SAW (FIG. A)

WARNING Keep body to the left of the chain line. Never straddle the saw or chain, or lean over past the chain line.
12.1 Starting the chain saw
- Make sure chain tension is at desired setting. Refer to Adjusting the Chain Tension in the Maintenance of this manual.
■ Make sure the sprocket cover lock bolt (4) is tight to the chain cover. - Make sure no objects or obstructions are in immediate vicinity which could come in contact with the bar and chain. Fit the battery pack (9) into the chain saw.
- Depress the lock-off button (6) and pull the trigger switch (5).
- Press and hold the trigger switch (5), release the lock-off button (6) and continue to squeeze the trigger switch for continued operation.
12.2 Stopping the chain saw

NOTE: It is normal for the chain to coast to a stop once the trigger switch is released.
■ Release the trigger switch (5) to stop the chain saw.
- Upon release of the trigger switch (5), the lock-off button (6) will be automatically reset to the lock position.
13 CLEANING AND MAINTENANCE
13.1 Guide bar maintenance
Most guide bar problems can be prevented merely by keeping the chain saw well maintained. Insufficient guide bar lubrication and operating the saw with chain that is too tight will contribute to rapid bar wear. To help minimize bar wear, the following guide bar maintenance procedures are recommended:
■ Thoroughly clean the guide bar and the guide groove with a brush and solvent.
- Replace the guide bar if the guide groove is damaged or worn and the saw chain has too much lateral space.
- Tighten all accessible screws, if necessary.

Warning: always wear protective gloves during maintenance operations. Do not carry out maintenance when the engine is hot.
13.2 Chain sharpening
For the inexperienced chain saw user, we recommend that the saw chain be professionally sharpened by the nearest professional service center. If you feel comfortable sharpening your own saw chain, special tools are available from the professional service center.
Chain sharpening requires special tools to ensure that cutters are sharpened at the correct angle and depth.

Warning: when having a wrong sharpened chain, there may occur a higher danger of kickback.
- To sharpen the saw chain, use the suitable sharpening tools:
- round chain file
- file leading
– chain measuring caliber.
- These tools can be bought in any specialized stores.
- To gain well shaped sawdust particles, use sharp chain. If there appears wooden powder, you must sharpen the saw chain.
Warning: all cutting teeth must be similarly long. Different length of the teeth can cause rough run of the chain or its rupture, as well.
- Minimum length of the teeth must be 4mm. If they are shorter, remove the saw chain.
- Angles, which the teeth are under, must be followed.
- To sharpen the chain basically, make 2 to 3 pulls of the file from the inside out.

Warning: after 3 to 4 of your sharpening of the cutting teeth, have the saw chain sharpened in any authorized service. They will sharpen the depth limiter as well, which provides the distance.
Chain sharpening
The pitch of the chain depends on the model.
| POWXG1045 | |
| Pitch | 7,6mm (0,30") |
| Gauge | 1,1mm (0,043") |
- Sharpen the chain using protective gloves and a round file of 5 / 32'' (4mm).
■ After sharpening, the cutting links must all have the same width and length.

Warning: a sharp chain produces well-defined chips. When your chain starts to produce sawdust, it is time to sharpen.
- After every 3-4 times the cutters have been sharpened you need to check the height of the depth gauges and, if necessary, lower them using the flat file and template supplied optional, then round off the front corner.

WARNING: Proper adjustment of the depth gauge is as important as proper sharpening of the chain.

Warning: never mount a new chain on a worn sprocket or self-aligning ring.
13.3 Chain maintenance
Chain tension (also see paragraph 10.1)

A slack chain may jump off the bar and cause serious or even fatal injury.
Always remove the battery before any assembly, maintenance and/or checking is done on the machine.
- The more you use a chain the longer it becomes. It is therefore important to adjust the chain regularly to take up the slack.
- Check the chain tension every time you lubricate the chain. NOTE! A new chain has a running-in period during which you should check the tension more frequently. Tension the chain as tightly as possible, but not so tight that you cannot pull it round freely by hand.
- Release the sprocket cover lock knob until it snaps open.
- Turn the knob anti clockwise to loosen the drive sprocket cover.
- Remove all slack from the chain by turning the chain tensioning wheel down until the chain seats snugly against the bar with the drive links in the bar groove.
- Turn the wheel up for less tension on the chain as needed.
- Tighten the sprocket cover by turning the knob clockwise.

Warning: never have more than 3 links removed from a loop of chain. This could cause damage to the sprocket.
Chain lubrication (also see paragraph 10.2)
- Adequate lubrication of the bar and chain during cutting operations is essential to minimize friction with the guide bar.
- Never starve the bar and chain of lubricating oil. Running the saw dry or with too little oil will decrease cutting efficiency, shorten saw chain life, cause rapid dulling of chain, and lead to excessive wear of bar from overheating. Too little oil is evidenced by smoke or bar discoloration.
14 TECHNICAL DATA
| Model: | POWXG1045 |
| Voltage | 12 V |
| Blade length | 100mm |
| Bar cutting length | 90mm |
| Chain pitch | 7,6mm (0,30") |
| Chain gauge | 1,1mm (0,043") |
| Drive sprocket | 7 teeth |
15 NOISE
Noise values measured according to relevant standard. (K=3)
Acoustic pressure level LpA 78 dB(A)
Acoustic power level LwA 86 dB(A)

ATTENTION! Wear hearing protection when sound pressure is over 85 dB(A)
aw (Vibration)
2,6 m/s²
K = m/s^2
16 WARRANTY
- This product is warranted for a 36-month period effective from the date of purchase by the first user.
- This warranty covers all material or production flaws excluding : batteries, chargers, defective parts subject to normal wear & tear such as bearings, brushes, cables, and plugs, or accessories such as drills, drill bits, saw blades, etc. ; damage or defects resulting from maltreatment, accidents or alterations; nor the cost of transportation.
- Damage and/or defects resulting from inappropriate use also do not fall under the warranty provisions.
■ We also disclaim all liability for any bodily injury resulting from inappropriate use of the tool.
- Repairs may only be carried out by an authorised customer service centre for Powerplus tools.
- You can always obtain more information at the number 00 32 3 292 92 90.
- Any transportation costs shall always be borne by the customer, unless agreed otherwise in writing.
- At the same time, no claim can be made on the warranty if the damage of the device is the result of negligent maintenance or overload.
- Definitely excluded from the warranty is damage resulting from fluid permeation, excessive dust penetration, intentional damage (on purpose or by gross carelessness), inappropriate usage (use for purposes for which the device is not suitable), incompetent usage (e.g. not following the instructions given in the manual), inexpert assembly, lightning strike, erroneous net voltage. This list is not exhaustive.
- Acceptance of claims under warranty can never lead to the prolongation of the warranty period nor commencement of a new warranty period in case of a device replacement.
■ Devices or parts which are replaced under the warranty therefore remain the property of Varo NV.
- We reserve the right to reject a claim whenever the purchase cannot be verified or when it is clear that the product has not been properly maintained. (Clean ventilation slots, carbon brushes serviced regularly, etc.).
- Your purchase receipt must be kept as proof of date of purchase.
- Your appliance must be returned undismanteled to your dealer in an acceptably clean state, (in its original blow-moulded case if applicable to the unit), accompanied by proof of purchase.
- Your tool must be charged at least 1x per month to ensure optimal operation of this tool.
17 ENVIRONMENT

Should your appliance need replacement after extended use, do not dispose of it with the household refuse, but in an environmentally safe way.
Waste produced by electrical machine items should not be handled like normal household rubbish. Please recycle where recycle facilities exist. Check with your Local Authority or retailer for recycling advice.
18 DECLARATION OF CONFORMITY


VARO – Vic. Van Rompuy n.v., Joseph Van Instraat 9 – 2500 Lier – Belgium, solely declares that,
product PRUNER – BATTERY OPERATED
trade mark PowerPlus
model POWXG1045
is in conformity with the essential requirements and other relevant provisions of the applicable European Directives / Regulations, based on the application of European Harmonized Standards.
Any unauthorized modification of the apparatus voids this declaration.
European Directives / Regulations (including, if applicable, their amendments up to the date of signature);
2011/65/EU
2006/42/EC
2014/30/EU
2000/14/EC Annex V LwA
Measured 86dB(A)
Guaranteed 90dB(A)
European Harmonized Standards (including, if applicable, their amendments up to the date of signature);
EN62841-1:2015
EN55014-1:2017
EN55014-2:2015
Keeper of the Technical Documentation : Philippe Vankerkhove, VARO Vic. Van Rompuy n.v.
The undersigned acts on behalf of the company CEO,
Mentens Ludo
Ludo Mertens
Certification Manager
01/12/2021, Lier - Belgium
01/12/2021, Lier - Belgium
01/12/2021, Lier - Belgium
1 TILTENKT BRUK 3
2 BESKRIVELSE (FIG. A) 3
3 PAKKENS INNHOLD....3
4 SYMBOLER....4
5 GENERELLE SIKKERHETSFORSKRIFTER....4
5.1 Arbeidsplassen....4
5.2 Personsikkerhet....4
5.3 Bruk og vedlikehold av elektroverktøy....5
5.4 Service....5
6 SIKKERHET 5
7 EKSTRA SIKKERHETSREGLER FOR BATTERIER OG LADERE 6
12 START OG STOP AF SAVEN (FIG. A)

01/12/2021, Lier - Belgium
01/12/2021, Lier - Belgium
01/12/2021, Lier - Belgium

natural_image
Yellow and black power plant tool with visible blade and handle (no text or symbols)varo
WWW.VARO.COM
DESIGNED AND MARKETED BY VARO
©copyright by varo
VARO - VIC. VAN ROMPUY nv
JOSEPH VAN INSTRAAT 9 - 2500 LIER - BELGIUM
OFFICES:


- BESCHRIJVING (FIG. A)
- DÉCLARATION DE CONFORMITÉ
- ADDITIONAL SAFETY INSTRUCTIONS FOR BATTERIES AND CHARGERS 6
- MINI CHAINSAW 12V 100MM POWXG1045
- INTENDED USE
- DESCRIPTION (FIG A)
- PACKAGE CONTENT LIST
- SYMBOLS
- GENERAL POWER TOOL SAFETY WARNINGS
- Work area
- Personal safety
- POWXG1045 EN
- Power tool use and care
- Service
- SAFETY
- ADDITIONAL SAFETY INSTRUCTIONS FOR BATTERIES AND CHARGERS
- Use only batteries and chargers applicable for this machine.
- Batteries
- Chargers
- CHARGING AND INSERTION OR REMOVAL OF BATTERY
- Charger indications (Fig. B)
- Charging the battery (Fig. B & C)
- Removal / insertion of battery (Fig. A & C)
- Battery capacity indicator (Fig. A)
- KICKBACK SAFETY PRECAUTIONS
- ASSEMBLY
- To assemble the chain and bar (Fig. A & D)
- Lubricating oil for the saw chain (Fig. D)
- OPERATION
- Before using a new chain saw
- STARTING AND STOPPING THE CHAIN SAW (FIG. A)
- Starting the chain saw
- Stopping the chain saw
- CLEANING AND MAINTENANCE
- Guide bar maintenance
- Chain sharpening
- Chain maintenance
- NOISE
- WARRANTY
- ENVIRONMENT
- DECLARATION OF CONFORMITY
- START OG STOP AF SAVEN (FIG. A)
Brand : PowerPlus
Model : POWXG1045
Category : Saw