
POWX00408 - Screwdriver PowerPlus - Free user manual and instructions
Find the device manual for free POWX00408 PowerPlus in PDF.
| Brand | PowerPlus |
| Model | POWX00408 |
| Product type | Cordless screwdriver 3.6 V |
| Rated voltage | 3.6 V |
| No-load speed | 200 rpm |
| Battery capacity | 1500 mAh (built-in Li-ion) |
| Charging time | 3 to 5 hours |
| Power supply | Built-in lithium-ion battery, charging via USB-C port |
| Sound pressure (LpA) | 56 dB(A) |
| Sound power (LwA) | 67 dB(A) |
| Vibration (aw) | 0.9 m/s² (K=1.5 m/s²) |
| Screwable materials | Wood and plastic |
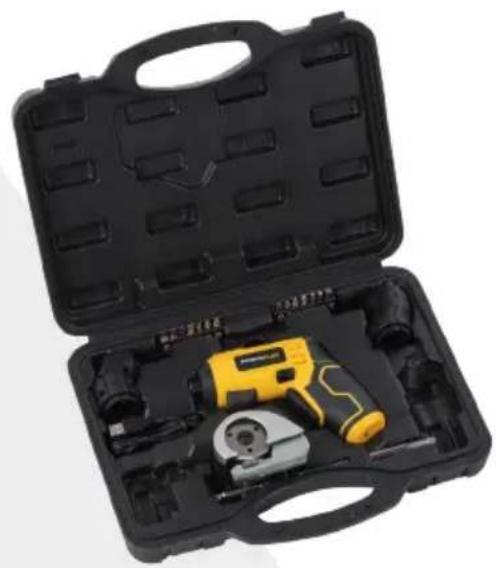
| Included accessories | 2 bits 50 mm, 14 screwdriver bits, eccentric attachment, angled attachment, cutting attachment, magnetic bit holder, USB-C cable |
| Main functions | Screwing/unscrewing, cutting of soft materials (max 6 mm), LED work light, reversible rotation |
| Safety | Wearing safety glasses and gloves required, read the manual |
| Maintenance and cleaning | Clean with a soft damp cloth (soapy water), avoid solvents, keep ventilation slots clean |
| Warranty | 36 months (excluding batteries, chargers, wear parts) |
| Weight | Approximately 0.3 kg (estimate) |
Frequently Asked Questions - POWX00408 PowerPlus
User questions about POWX00408 PowerPlus
0 question about this device. Answer the ones you know or ask your own.
Ask a new question about this device
Download the instructions for your Screwdriver in PDF format for free! Find your manual POWX00408 - PowerPlus and take your electronic device back in hand. On this page are published all the documents necessary for the use of your device. POWX00408 by PowerPlus.
USER MANUAL POWX00408 PowerPlus
2 BESCHRIJVING (FIG. A)
11/03/2022, Lier - Belgium
1 INTENDED USE 3
2 DESCRIPTION (FIG. A) 3
3 PACKAGE CONTENT LIST 3
4 SYMBOLS 4
5 GENERAL POWER TOOL SAFETY WARNINGS 4
5.1 Working area 4
5.2 Electrical safety 4
5.3 Personal safety 5
5.4 Power tool use and care 5
5.5 Service 5
6 MACHINE-SPECIFIC SAFETY WARNINGS 5
7 OPERATION 6
7.1 Charging procedure (Fig.B) 6
7.2 Inserting and extracting bits (Fig. C) 7
7.3 Trigger switch (Fig. A) 7
7.4 Working spot light (Fig. A) 7
7.5 Direction of rotation 7
7.5.1 Clockwise rotation: 7
7.5.2 Anticlockwise rotation: 7
7.6 Screw insertion 7
7.7 Screw removal 8
7.8 Changing the attachments (Fig. A & D 8
7.8.1 Fitting the attachments (b) 8
7.8.2 Removing the attachments. (c) 8
7.9 Using the cutting attachment (Fig. A & E) 8
8 CLEANING AND MAINTENANCE 8
8.1 Cleaning 8
8.2 Maintenance 9
9 TECHNICAL DETAILS 9
10 NOISE 9
POWERPLUS HIGH QUALITY TOOLS
POWX00408 EN
11 WARRANTY 9
12 ENVIRONMENT 10
13 DECLARATION OF CONFORMITY 10
SCREW DRIVER 3.6 V POWX00408
1 INTENDED USE
The power tool is intended for driving through wood and plastics.
The tool also includes a cutting attachment, this should only be used to cut soft flat and thin materials like carpet, leather, fabric, plastic sheets and cardboard.
Not suitable for professional use.

WARNING! Read this manual and general safety instructions carefully before using the appliance, for your own safety. Your power tool should only be passed on together with these instructions.
2 DESCRIPTION (FIG. A)
- Bit holder
- Dust cap
- Direction of rotation selector
- Trigger switch
- LED light
- Eccentric attachment
-
Angled attachment
-
Cutting attachment
- USB C port
- USB charging cable
- Charging LED light
- Magnetic bit holder
- Attachment removal tab
3 PACKAGE CONTENT LIST
- Remove all packaging materials.
- Remove remaining packing and package inserts (if included).
- Check that the package contents are complete.
- Check the appliance, the power cord, the power plug and all accessories for transportation damage.
- Keep the packing materials as far as possible till the end of the warranty period. Dispose it into your local waste disposal system afterwards.

WARNING: Packaging materials are not toys! Children must not play with plastic bags! Danger of suffocation
1x cordless screwdriver
1x USB charging cable
1x cutting attachment
1x magnetic bit holder
2x 50mm bit
1x eccentric attachment
1x angled attachment
14x screw bit
1x manual

If any parts are missing or damaged, please contact your dealer.
4 SYMBOLS
- In this manual and/or on the machine the following symbols are used:
| ! | Denotes risk of personal injury or damage to the tool. | CE | In accordance with essential requirements of the European directive(s). |
| Mandatory use of eye protection. | Wear gloves. | ||
| Read manual before use. | Electrical products must not be disposed with the domestic waste. | ||
| i | Important information. |
5 GENERAL POWER TOOL SAFETY WARNINGS
- Read all safety warnings and instructions. Failure to heed warnings and follow instructions may result in electric shock, fire and/or serious injury.
- Keep safety warnings and instructions for future reference. The term "power tool" in the safety warnings refers to your mains- operated (corded) power tool or battery- operated (cordless) power tool.
5.1 Working area
- Keep working area clean and well lit. Untidy and dark areas can lead to accidents.
- Do not operate power tools in potentially explosive surroundings, for example, in the presence of inflammable liquids, gases or dust. Power tools create sparks which may ignite the dust or fumes.
- Keep children and bystanders at a distance when operating a power tool. Distractions can cause you to lose control of it.
5.2 Electrical safety
- Always check that the power supply corresponds to the voltage on the rating plate.
- Power tool plugs must match the outlet. Never modify the plug in any way. Do not use adapter plugs with earthed power tools. Unmodified plugs and matching outlets will reduce the risk of an electric shock.
- Avoid body contact with earthed surfaces such as pipes, radiators, kitchen ranges and refrigerators. There is an increased risk of an electric shock if your body is earthed.
- Do not expose power tools to rain or wet conditions. If water gets inside a power tool, it will increase the risk of an electric shock.
- Do not damage the cord. Never use the cord for carrying, pulling or unplugging the power tool. Keep the cord away from heat, oil, sharp edges or moving parts. Damaged or entangled cords increase the risk of an electric shock.
- When operating a power tool outdoors, use an extension cable suitable for outdoor use. Using a cord suitable for outdoor use reduces the risk of an electric shock.
- If operating a power tool in a damp location is unavoidable, use a power supply protected by a residual current device (RCD). Using an RCD reduces the risk of an electric shock.
5.3 Personal safety
- Stay alert, watch what you are doing and use common sense when operating a power tool. Do not use a power tool when you are tired or under the influence of drugs, alcohol or medication. A moment of inattention when operating a power tool may result in serious personal injury.
- Use safety equipment. Always wear eye protection. Using safety equipment such as a dust mask, non-skid safety shoes, a hard hat, or hearing protection whenever it is needed will reduce the risk of personal injury.
- Avoid accidental starts. Ensure the switch is in the off position before inserting the plug. Carrying power tools with your finger on the switch or plugging in power tools when the switch is in the on position makes accidents more likely.
- Remove any adjusting keys or spanners before turning on the power tool. A spanner or key left attached to a rotating part of the power tool may result in personal injury.
- Do not reach out too far. Keep your feet firmly on the ground at all times. This will enable you retain control over the power tool in unexpected situations.
- Dress properly. Do not wear loose clothing or jewellery. Keep your hair, clothing and gloves away from the power tool. Loose clothes, jewellery or long hair can become entangled in the moving parts.
If there are devices for connecting dust extraction and collection facilities, please ensure that they are attached and used correctly. Using such devices can reduce dust-related hazards.
5.4 Power tool use and care
- Do not expect the power tool to do more than it can. Use the correct power tool for what you want to do. A power tool will achieve better results and be safer if used in the context for which it was designed.
- Do not use the power tool if the switch cannot turn it on and off. A power tool with a broken switch is dangerous and must be repaired.
- Disconnect the plug from the power source before making adjustments, changing accessories, or storing power tools. Such preventive safety measures reduce the risk of starting the power tool accidentally.
- Store power tools, when not in use, out of the reach of children and do not allow people who are not familiar with the power tool or these instructions to operate it. Power tools are potentially dangerous in the hands of untrained users.
- Maintain power tools. Check for misalignment or jammed moving parts, breakages or any other feature that might affect the operation of the power tool. If it is damaged, the power tool must be repaired. Many accidents are caused by using poorly maintained power tools.
- Keep cutting tools sharp and clean. Properly maintained cutting tools with sharp cutting edges are less likely to jam and are easier to control.
- Use the power tool, accessories and cutting tools, etc., in accordance with these instructions and in the manner intended for the particular type of power tool, taking into account the working conditions and the work which needs to be done. Using a power tool in ways for which it was not intended can lead to potentially hazardous situations.
5.5 Service
Your power tool should be serviced by a qualified specialist using only standard spare parts. This will ensure that it meets the required safety standards.
6 MACHINE-SPECIFIC SAFETY WARNINGS
-
Hold power tool by insulated gripping surfaces, when performing an operation where the fastener may contact hidden wiring. Fasteners contacting a "live" wire may make exposed metal parts of the power tool "live" and could give the operator an electric shock.
-
Protect the battery charger from rain and moisture. The penetration of water in a battery charger increases the risk of electric shock.
POWX00408 EN
- Recharge only with the charger specified by the manufacturer. A charger that is suitable for one type of battery, it may create a risk of fire when used with another battery.
- Do not charge other batteries. The battery charger is suitable only for charging our lithium ion batteries within the listed voltage range. Otherwise there is danger of fire and explosion.
- Keep the battery charger clean. Contamination may cause the danger of electric shock.
- Check the battery charger, cable and plug each time before using. Do not use the battery charger when defects are detected. Do not open the battery charger yourself and have it repaired only by qualified personnel using original spare parts. Damaged battery chargers, cables and plugs increase the risk of electric shock.
- Do not operate the battery charger on easily inflammable surfaces (e. g. paper, textiles, etc.) or in combustible environments. There is danger of fire due to the heating of the battery charger during charging.
- Under abusive conditions, liquid may be ejected from the battery; avoid contact. If contact accidentally occurs, flush with water. If liquid contacts eyes, additionally seek medical help. Liquid ejected from the battery may cause irritation or burns.
- Do not open the battery yourself. There is danger of a short circuit.
- Protect the battery against heat, e.g., including against continuous sun irradiation and fire. There is a danger of explosion.
- Do not short-circuit the battery. There is a danger of explosion.
- In case of damage and improper use of the battery, vapours may be emitted. In case of complaints, provide for fresh air and consult a physician. The vapours can irritate the respiratory system.
7 OPERATION
7.1 Charging procedure (Fig.B)
The Li-ion battery is protected against deep discharging. When the battery is empty, the machine is switched off by means of a protective circuit: The bit holder no longer moves.

The screwdriver has a built in battery, do not try to remove the battery.

NOTE: Not every USB A port on laptops, PC's etc. is a power source, some are only for data transfer. Devices can not be charged via data transfer only USB A ports. It does not mean that your device is defective. Simply look for another USB A port to charge your device.

NOTE: When connecting to a built in USB A port in another source device (e.g. laptop, PC, etc.) make sure this device is switched on and connected to a mains socket. Charging will only start when these requirements are met. Power banks are however an exception and are an autonomous power source.
- The screwdriver can only be charged via a powered USB A port, for example in a power bank, laptop, PC, or a USB charger (not included) from your smartphone.
Plug the USB C connector of the charging cable (10) in to the USB C port (9) at the bottom of the screwdriver handle and the USB A connector to the powered USB A port. - In case of a power bank, charging starts as soon as the USB A cable plug is inserted in the USB A port.
-
In case of using a USB charger (e.g. smartphone charger), make sure it is plugged in to a mains socket.
-
The charging process starts as soon as the USB A charging cable plug is inserted in the USB A port.
The charging LED light (11), lights up red to during the charging procedure. The battery is fully charged when the red indicator turns green.

During the charging procedure, the handle of the machine warms up. This is normal.
When the charging is finished, disconnect the battery charger from the socket.
Do not use the machine during the charging procedure.
7.2 Inserting and extracting bits (Fig. C)

Important! Always lock the trigger switch before you change the screw bit to avoid unintentional starting of the machine (see paragraph 7.3). When the machine is completely stopped, insert or extract the screw bit.

Only use tool bits which can be securely fastened in the chuck and for which the bits has been designed.
Before using the machine check whether the screw-bit is inserted correctly. Avoid over-tightening screws, otherwise the screw head may be damaged or stripping of the threads may occur.
7.3 Trigger switch (Fig. A)
Use the trigger switch (4) to start the machine and keep holding it for continuous operation.
- To switch the machine off, release the trigger switch (4)
- To lock the trigger switch (4), set the direction of rotation selector (3) at the centre position.
7.4 Working spot light (Fig. A)
- Pushing the operating button will turn on the working spot light.
- Leaving the operating button will switch off the working spot light.
7.5 Direction of rotation
Direction of rotation is controlled by the direction of rotation selector ( ) located above the trigger switch.
7.5.1 Clockwise rotation:
To select clockwise rotation, release the trigger switch and push the direction of rotation selector (3) to the left side of the tool.
7.5.2 Anticlockwise rotation:
To select anticlockwise rotation, release the trigger switch and push the selector (3) lever to the right side of the tool.
7.6 Screw insertion
Set the direction of rotation (3) of the screwdriver to the clockwise direction. Insert the screwbit into the slot in the head of the screw. Hold the screw bit perpendicular to the head of the screw, otherwise the screw or the screw head may be damaged. Press the screw bit against the screw with a constant pressure while driving in the screw.

When the screw is completely screwed in, hold the machine firmly and release the On/Off trigger, otherwise the screw or the screw head may be damaged. If the On/Off trigger is not released immediately a high torque could also damage the screw-bit or the screwdriver.
7.7 Screw removal
Set the direction of rotation of the screwdriver (3) to the anticlockwise direction. Insert the screw-bit into the slot in the head of the screw. Hold the screw-bit perpendicular to the head of the screw, otherwise the screw or the screw head may be damaged. Press the screw bit against the screw with a constant pressure while removing the screw.
7.8 Changing the attachments (Fig. A & D)
The screwdriver comes with 3 attachments :
- 2 screw driving attachments (6 & 7)
1 cutting attachment (8)
Before fitting attachments, the rubber cap (2) needs to be removed (a) from the driver head.
7.8.1 Fitting the attachments (b)
The 2 screw driver attachments can be fitted in all 4 directions (up, down, left and right).
The cutting attachment (8) should only be fitted with the knife pointing down.
- The opening and the arrows of the attachment should point towards the driver head.
- Push the attachment on to the screwdriver until it clicks in to place.
7.8.2 Removing the attachments. (c)
- Notice there are two removal tabs (13) on the sides of all the attachments, these are marked with stripes and an arrow.
- Push down firmly on both removal tabs and pull out the attachment.
7.9 Using the cutting attachment (Fig. A & E)
The cutting attachment (8) can be used for cutting flat and soft materials (see chapter 1).
The maximum thickness of material is 6mm
- The direction of rotation can be set to either direction.(see paragraph 7.5)
- Start the cutter attachment by pressing the trigger switch.
- Gently slide the cutter opening over the edge of the material and continue cutting as needed.

Cutting hard materials (for example wood, metal, stone etc.) or materials thicker than 6mm may result in damage to the device or personal injury.
8 CLEANING AND MAINTENANCE
8.1 Cleaning
- Keep the ventilation slots of the machine clean to prevent overheating of the engine.
- Regularly clean the machine housing with a soft cloth, preferably after each use.
- Keep the ventilation slots free from dust and dirt.
- If the dirt does not come off use a soft cloth moistened with soapy water.
- Never use solvents such as petrol, alcohol, ammonia water, etc. These solvents may damage the plastic parts.
-
Damaged cutting blades have to be repaired or exchanged by a qualified service man before working with the machine
-
After each cutting operation, clean the cutting blade with a soft brush and cloth.
8.2 Maintenance
- Attention! Always switch off the screwdriver and lock the switch in the OFF position before carrying out any work on the machine.
9 TECHNICAL DETAILS
| Model no. | POWX00408 |
| Rated voltage | 3,6 V |
| No-load speed | 200 rpm |
| Battery capacity | 1500 mAh |
| Charging time | 3 – 5 hours |
| Torque | 5,5 Nm |
10 NOISE
- Noise emission values measured according to relevant standard. (K = 3)
Acoustic pressure level LpA 56 dB(A)
Acoustic power level LwA 67 dB(A)

ATTENTION! Wear hearing protection when sound pressure is over 85 dB(A).
aw (Vibration)
0,9 m/s²
K=1,5m/s²
11 WARRANTY
This product is warranted for a 36-month period effective from the date of purchase by the first user.
- This warranty covers all material or production flaws excluding : batteries, chargers, defective parts subject to normal wear & tear such as bearings, brushes, cables, and plugs, or accessories such as drills, drill bits, saw blades, etc. ; damage or defects resulting from maltreatment, accidents or alterations; nor the cost of transportation
- Damage and/or defects resulting from inappropriate use also do not fall under the warranty provisions.
We also disclaim all liability for any bodily injury resulting from inappropriate use of the tool.
- Repairs may only be carried out by an authorized customer service centre for Powerplus tools.
- You can always obtain more information at the number 00 32 3 292 92 90.
- Any transportation costs shall always be borne by the customer, unless agreed otherwise in writing.
- At the same time, no claim can be made on the warranty if the damage of the device is the result of negligent maintenance or overload.
- Definitely excluded from the warranty is damage resulting from fluid permeation, excessive dust penetration, intentional damage (on purpose or by gross carelessness), inappropriate usage (use for purposes for which the device is not suitable), incompetent usage (e.g. not following the instructions given in the manual), inexpert assembly, lightning strike, erroneous net voltage. This list is not exhaustive.
- Acceptance of claims under warranty can never lead to the prolongation of the warranty period nor commencement of a new warranty period in case of a device replacement.
Devices or parts which are replaced under the warranty therefore remain the property of Varo NV.
- We reserve the right to reject a claim whenever the purchase cannot be verified or when it is clear that the product has not been properly maintained. (Clean ventilation slots, carbon brushes serviced regularly, etc.).
- Your purchase receipt must be kept as proof of date of purchase.
- Your appliance must be returned undismantled to your dealer in an acceptably clean state, (in its original blow-molded case if applicable to the unit), accompanied by proof of purchase.
12 ENVIRONMENT

Should your appliance need replacement after extended use, do not dispose of it with the household refuse, but in an environmentally safe way.
Waste produced by electrical machine items should not be handled like normal household rubbish. Please recycle where recycle facilities exist. Check with your Local Authority or retailer for recycling advice.
13 DECLARATION OF CONFORMITY

varo
VARO N.V. - Joseph Van Instraat 9 - BE2500 Lier - BELGIUM, declares that,
product : Screw Driver 3.6V
trade mark : POWERplus
model:POWX00408
is in conformity with the essential requirements and other relevant provisions of the applicable European Directives, based on the application of European harmonized standards. Any unauthorized modification of the apparatus voids this declaration.
European Directives (including, if applicable, their amendments up to the date of signature);
2011/65/EU
2014/30/EU
2006/42/EC
European harmonized standards (including, if applicable, their amendments up to the date of signature);
EN62841-1:2015
EN62841-2-2:2014
ENIEC55014-1:2021
EN IEC 55014-2:2021
Keeper of the Technical Documentation : Philippe Vankerkhove, VARO - Vic. Van Rompuy N.V.
The undersigned acts on behalf of the company CEO,
Philippe Vankerkhove, MSc. EE
Regulatory Affairs - Compliance Manager
11/03/2022, Lier - Belgium
Regulatory Affairs - Compliance Manager
11/03/2022, Lier - Belgium
8 RENGJØRING OG VEDLIKEHOLD
8.1 Rengjoring
11/03/2022, Lier - Belgium
1 TILSIGTETBRUG 3
2 BESKRIVELSE (FIG.A) 3
3 MEDFØLGENDE INDHOLD 3
4 SYMBOLER 4
11/03/2022, Lier - Belgium
11/03/2022, Lier - Belgium
1 IPOBAEIONENH XPHSH 3
2 IEPIIGPAH (EIK.A) 3
3 ΛΙΣΤΑ ΠΕΡΙΧΟΜΕΝΟύN ΣΥΣΚΕYΑΣΙΑΣ 3
4 SYMBOA 4
5 TENIKE ΠΝΟΕΙΟΙΗΣΕΙΣ ΑΣΦΑΛΕΙΑΣ ΓΙΑ TA HΑEKΤΡΙΚA ΕΡΑΛΕΙΑ
5.1 Xwpoc epyaiaac 4
5.2 HkpiKn aovalia 4
5.3 Atoikn aovapaa 5
5.4 Xpnoi kai qovriδa twv nλekpiikwv εpyalεiwv... 5
5.5 6
6 IPOEIOHOIHEIAAFAEIAEIEAIKEEIA TO MHXANHMA
7 AEITOYPIIA 6
7.1 i i i (E .B) 6
7.2 Eioaywyn kai eaywyn purwv (Eik.C) 7
7.3 i k o a v (E i .A) 8
7.4 p y i (E i k, A) 8
7.5 Kaeuovan npoiopns 8
7.5.1 8
7.5.2 ApioTepeoTpoqn TepiOToqn: 8
7.6 Biδωμα βiδας 8
7.7 AvaripEon Bidiac 8
7.8 Alambda 5gptnmuTsw (Eik.A & D). 8
7.8.1 TooEtnon twv eapntmuatw (b) 8
7.8.2 Aqipoeon Twv Eapntmuatwv (c). 9
7.9 Xpno n rou eapnmuos konns (Eik. A & E) 9
8 KAOAPIEMOIGKAI SYNTHPHSH 9
8.1 Kaopipouos
8.2 9
9 TEXNIKA ΣTOIXEIA 9
10 ①OOPYBOE 10
11 ERTYHSEH 10
12 IEPIBAMON 11
13 HAAQEH SYMMOPQEQH
KATΣABIΔI 3,6 V POWX00408
1 PPOBÄENOMENH XPHΣH
o epyaieio Tepiauapei enionc eva eaptnka konnc, to onio a npetie va xnpoiotoeitai
movo ia nV KOINn paakw, eTTeDWv kai aeTTWv uikwv otTWC xal, depua, upaoua,
PAAOTIKA qUAA KAAYAPTOVI.
Akataaannyia TAYEAATIKXPnON.

IPOEIAOIOIH! Ia Tn Dikn Oac aopalaia, diaaote TPOoEKtka auto To EYxepidio kai Tc Yevikecs odnyiec aopalaiaac Tpiv Xpnoioutoinoe To umxavna. Av dwoete to nlektpiko epyaleio oe allo xpnoTn, 0a TTpeTl va dwoete ma zi kai autc tis odnyies.
2 ΠΕΡΑΦH (EIK. A)
- YtnoOxn n μntns
- KaTaki OKovns
- Eπλογεας φορας περιστροφής
- DiakóTTns oKaovδaλns
5.Φωτεινή ενδειξη - EKKeVTpo EApTnua
-
Γωνιακό εξάρτημα
-
Eşaptnμα kottns
- Θúpα USB C
- Kaλωδio φόptiαns USB
- Φωτενή ενδεξη φόρτιας
- MayvnTikn utOdoxn mUTns
11/03/2022, Lier - Belgium
1 NAMJENA 3
2 OPIS (SL. A) 3
3 POPIS SADRZAJA PAKETA 3
4 SIMBOLI 4
5 OPÇA UPOZORENJA O SIGURNOSTI RUKOVANJA
ELEKTRICNIM ALATIMA 4
5.1 Radno mesto 4
5.2 Elektricna sigurnost 4
5.3 Osobna sigurnost.. 5
5.4 Uporaba i odrzavanje elektricnog alata 5
5.5 Servis. 5
11/03/2022, Lier - Belgium
1 NAMEJENA UPOTREBA 3
2 OPIS (SL. A) 3
3 SPISAK SADRZAJA PAKOVANJA 3
4 SIMBOLI 4
5 OPŠTA BEZBEDNOSNA UPUTSTVA ZA ELEKTRICNE ALATE 4
5.1 Radna oblast 4
5.2 Elektricna bezbednost 4
5.3 Lična bezbednost 5
5.4 Korišćenje i odžavanje elektricnog alata 5
5.5 Servisiranje 5
6 SIGURNOSNA UPUTSTVA SPECIFICNA ZA APARATE...
7 RAD 6
7.1 Postupak punjenja (Sl. B) 6
7.2 Umetanje i vadenje bit-nastavaka (Sl. C) 7
7.3 Okidni prekidač (SI. A) 7
7.4 Radno svetlo (SI. A) 7
7.5 Smer obrtanja 7
7.5.1 Obrtanje u smeru kazaljke na satu: 7
7.5.2 Obrtanje u smeru suprotnom od kazaljke na satu: 7
7.6 Umetanje vrijka 8
7.7 Uklanjanje vija 8
7.8 Zamena nastavaka (Sl. A i D) 8
7.8.1 Montiranje nastavaka (b) 8
7.8.2 Uklanjanje nastavaka (c) 8
7.9 Upotreba nastavka za sećenje (SI. A i E) 8
8 CIscENJE I ODRZAVANJE 9
8.1 Cijscenje.. 9
8.2 Održavanje 9
9 TEHNICKI PODACI 9
10 BUKA 9
11 GARANCIJA 10
12 ZIVOTNA SREDINA 10
13 IZJAVA O USKLADENOSTI 11
ODVIJAÇ 3,6 VPOWX00408
1 NAMENJENA UPOTREBA
11/03/2022, Lier - Belgium
1 UTILIZARE PREVAZUTA 3
2 DESCRIERE (FIG. A) 3
3 CONTINUTUL PACHETULUI 3
4 SIMBOLURI 4
5 AVERTISMENTE GENERALE DE SIGURANă PRIVIND APARATUL ELECTRIC 4
1 HA3HAUeyE 3
2 OINCAHNE (PNC.A) 3
3 COIDEPJKMOE YNAKOBKN 3
4 YCJIOBHBIE OBO3HAUEHN 4
5 OБшЯ ИНСТРУКЦИ NO TEXHиKE 6E3ОПАСHOCTN ПРИ PABOTE C 3ЛЕКТPOHHTCPUMEHTOM 4
5.1 Pa6ooye mecm0 4
5.2 3neKmpo6e3onachocmb.. 4
5.3 5
5.4 3Kcnpnyamauua u yxod 3a 3JekmpouHcmpymom.. 5
5.5 06cnyxueaHue.. 6
6 OCObIE YKA3AHnI NO TEXHnke B3OpAChOCTn 6
7 3KcPnyATAUa. 7
7.1 Ipoceypa 3apk (Puc.B) 7
7.2 YcmaHO8ka u u3eJeueHue 6um (Puc. C) 8
7.3 Nyckoob bblouameB (Puc.A) 8
7.4 Pa6ouy moeyhbu ucmouhku ceema (Puc.A) 8
7.5 HapraeHue epaueHua 8
7.5.1 BpaueHne no yacobon cTpeIke: 8
7.5.2 BpaueHne npOTnB yacOBoCtpeKN: 8
7.6 BkpyueaHue eunmoe 8
7.7 OmkpyuueaHue eunmoe 8
7.8 3aMeHa HacadoK (Puc. A u D) 9
7.8.1 YcTaHOBka Hacadok (b) 9
7.8.2 ChTne HacdoK (c) 9
7.9 IcnoIb3o8aHue HacaKu dner pe3ku (Puc.A u E) 9
8 CHNCTKA N OBCJNYKINBAHNE 9
8.1 9
8.2 06cnyxuehue.. 10
9 TEXHnueCKNE DAHHbIE 10
10 10
11 10
12 OKPYKAIIOUAR CPEA 11
13 DEKJIAPAUH O COOTBETCTBUN 12
LlUPyNObEPT 3,6 BPOWX00408
1 HA3HAUeyHNE
3NeKtpOnHcTpymeHT npedHa3HaueH dIy 3aBnHnBaHn I ypynoB n BnTob B depeBe n IIaCTMacce.
HCTpymEnT TaKKe BKNIOUaET B Ce6r HacaIky IINpe3KN, KOToPyO CneIyET NcNOJb3OBaTb TOJIbKO IIN pe3KN MRAKNX IIOCKNX IN TOHKNX MaTePnaIOB, TAKNX KAK KOBPOBOE NOKpbITNe, KOKa,TKaHb,IIaCTNKOBbIE JInCTbI IN KapTOH.
He npedha3naueH dny KOMMepueecko nCIOJIb3ObaHn.

3 COIDEPXXHMOE YNAKOBKN
- YdaIInTe BCE ynaKOBOHybIe MaTePnAbI.
- YdaJIte OCTaTKN yNAKOBKN IN peKNaMHBIE JINCTKN-BKJaNbIbIuN (ecnI ecTb).
- Поверп Te NOHOTY KOMNNEKTA NOCTaBKn.
- IpoBepbTe annapat, cnIOBoi Ka6eIb, WTeNCeIb N BCE npHAnJeXHOCTN Ha npEaMeT NOBpeKDeHn Pnp TpaHCnOpTupOBKe.
XpaHnTe ynaKOBOuHbI MaTePnAJIbI NO BO3MOxHOCTN Do nCTeueHnraPaHTnHOro cPOKa. Iocne 3Toro n36aBbTEcB OT HIX, nCNoJb3yR MeCTHyIO CnCTeMy yTnIN3aUIn 6bITOBbIX OTXODOB.

IPEyIeHHe:YnakoOuHbIe MaTePnaJIbI-3To He nrgyUKN! He No3BOJrTe DeTAM HpaTb c PnactIKOBbIMn NaKeTaM! Ectb onaChocTb yduhenia!
1 akkymyIaTOpHbI wypynoBepT
13apnBkabeb USB
1 3KcUeHTpIKOBa HacaKa
1yrrnoBaHaCadaKa
1 hacaKa dny pe3kn
1 MarHHthbI DepeKaTeIb 6nt
26nta 50 MM
146ntdIyUypynOBepTa
1 pykoBOcTBO no 3KcNlyatauui

Ecn n deTann OTCyTCTBYOT nn noBpeKdHbI, 6paTnTeCb K CBOemy dInepy.
4 YCJIOBHBIE OBO3HAUEHNIA
B daHHOM pyKOBOCTBE n/nn Ha cAmO MaunHe NCNoJIb3yOTc CJeDyIOUne CMBOJIbI:
UypynOBePT NMeET BCtpoEHbI aKKymyJrTOp, He nbItaTeCb n3BnpeYb aKKymyJrTOp.

ПРИМЕЧАНЕ: He Кждь pa3bem USB A ha Hoy6ykax, ПК и T. Д. Лягется NGTOUHKO mNTaHnA, HeKOTOpbIe pa3bemblпpeHa3HaueHbI TOlbKO dЯппедач DanHbIX. YcToPocCTBa HeNb3aJapKaTb chepe3 pa3bembldЯпедач DanHbIX, a ToJIbKO uepe3 pa3bembl USB A. 3To He o3Haayet, yTo BaWe ycToPocCTBO HeNCpabHo. ПрocTo NaIte pyroJ pa3bem USB A dЯнЗapYdkn BaWero ycToPocCTBa.

NPPIMEYAHNE: Pn NOKJIIOUeHNN K BCTPOEHOMy pa3bemy USB A pyroro yctpoiCTBa-NCTOHnka (HaNPIMep, Hoyt6yka, PIK n T. d.) y6eINTecb, yTO 3TO yCTPOIcTBo BKIOUeHO N NOKIIIOUeHO K cTeBOB po3eTke. 3apAnk aHauHETcra TOIbKO pnp Co6JIIODeHNN 3TNX Tpe6OBaHn. ODAKO NCKIIOUeHnEM YBnIOTcra IopTaTINHbIe 3apAIDhIE yCTPOIcTBa, KOtOpBle npedCTabJIANTcO6o ABTOHOMHbI INCTOCHNK 3JIeKTPoNTaHnI.
UypnoBepT MoKHO 3apKaTb TOnbKO uepe3 cnIOBOI pa3beM USB A, HApnMep, B nOpTaTHOB 3apHOM yCTPOINCTBe, HoYt6yKe, INK nn 3apHOM yCTPOINCTBE USB (He BXoNT B KOMNKeT) c BaWero CMapTOHa.
- ПдсоeнHTe uTekep USB C 3apdHoro ka6eY (10) K pa3bemy USB C (9) B HnXHeuactn pyKoTkn uypynOBepTa, a uTekep USB A - K cnIObOMy pa3bemy USB A.
B cnuyae nopTaunBHorO 3apdHoro yctpoiCTBa, 3apdKa NaHTcK, KaTolbko WTekep Ka6eJr USB A 6vET BCTaBHeH B pa3bem USB A.
- Pn nCnoJb3ObaHm 3apAHHoro yCTpoiCTBa USB (HaPIMep, 3apAHOe yCTPOIcTBO CMAPTOH) y6eINTecb, YTO OHO NODKIIUyeHO K CeTEBOI PO3ETKe.
- Ipouecc 3aprAnKn HauHcTcR, KaK ToJIbKO WTeKeP 3aprAnHO rKa6eJr USB A 6yJeT BCTaBHeN B pa3BeM USB A.
Bo BpemI npOeDpybI 3apAKn CBeToNDnHbI INHnKaTOp 3apAKn (11) rOpNT KpaCHbIM UBeTom. AkMyJrTop 6yJeT NOHOCtBIO 3apAKeH, KOrDa KpaCHbI ZBeT INHnKaTopa N3MeHITcR Ha 3eNeHbI.

B npoecce 3apdKn pykoTka HnctpyMeHTa HarpeBaetc. 3To YBnEeTcHOpMaJIbHbIM.
IIO OKOHuaHn 3apAKn OTcoeHNHe 3apAHOe yCTpoNCTBO nAkkymyTAToPA O TPO3EKN.
He IOnb3yIteCb IHCTpyMeHToM BO BpEmr Ipouecca 3apAdkn.
7.2 YcmaHo8ka u u3eJeueHue 6um (Puc. C)

BHMaHHe! Bo n36exKaHHe HnpeDHaMepeHHoro BkIooHn IHCtpymeHTa nepeD 3aMeHO Bnta Bcerda 3abNOKpyTe NyCKOBn BBIKIOuATeNB (cm. n. 7.3). BCTaBnIte nn n3BneKaIte 6NT npn noHOn octaHOBe IHcTpymeHTa.

NcnoIb3yIte TOnbKO 6NTbl, KOToPbIe MoXHO HaDeXHO 3aKpeINITb B NaTpoH e N dJa KOTopbIX npeHa3HaueH INCTpyMeHT.
Ipeep nCNoJb3OBAHnem HnctpyMeHTa npOBepbTe, npaBnIbHO JN BCTaBJIeH 6NT. N36eraIte Ype3MepHoro 3aTЯRnBaHnRA BVHTOB, INaYe MoXHO IOBpeDITb TOnOBky BnHTa IIN MOKeT npON3oITn Cpblb pe3b6bl.
7.3 Nyckoob ebiknoyamelb (Puc.A)
- IcnoIb3yIte nyckOBB bIKIOHateJIb (4) dIra 3ayncKa HnCTpyMeHTa n depXnTe erO HaxkATbIM dJIr HnpepbIBHO pa60Tbl.
- ⅡЯ BBIKHNoeHnHNCTpyMeHTa OTNcyTne NyCKOBoB BBIKHOuHaTeJIb (4).
- 3abokpoBaTb nyckoBn BbIKHouaTeNb (4), yctahOBtne nepeKIOuataIb HapabHeHn BpaueHn (3) B cpeHne noLOXeHne.
7.4 Pa6ouu moeyhbi ucmouhuk cema (Puc.A)
-Пинхати pa6oey KhoNk npa6oyn ToeYhbl nCTOuHnK CBeTa BKNIOHTcra.
- PnOtnyckaHn pa6oey KhoNk pa6oyn ToeYhB NCTOCHK CBa T BIKIIOHTcA.
7.5 HanpaBHeHue epauehen
HaPabHeHm BpaueHn moKHO ynpaBnTb C nOMoUbNo nepeKnOuTeJI HaPabHeHn BpaueHn (3), HaxoJaueroCn Hn nyCKOBbIM BblIOuTeJIeM.
7.5.1 BpaeHne no yacOBoi cTpeJIke:
YTo6bI Bbl6paTb BpaueHne no YacOBoN CTpeNKe, OTnycNTe NyCKOBu BblKnIOaTeJb I nepeBeDInTe nepeKNIouaTeNb HnPaBNeHnB BpaueHnra (3) B NeByIO CTOpOHy INHCTpyMeHTa.
7.5.2 BpaeHne npotnb yacobOc cTpeKn:
YTo6bI BbIbpaTb BpaueHne npOTnB YacOBn CTpeKn, OTNcyTnTe NcCKOBn BBIKIOuAteJb n nepeBeDnte nepeKluOaTeJb HAnpabLnEHHra BpaueHn (5) B npabyUcTOPOHy INCTpyMeHTa.
7.6 BkpyuueaHue buHmoe
YcTaHOBtHe HnpaBHeHne BpaUeHnI WypynOBepTa (3) no YacOBoi cTpeJIke. BCTaBbTe 6NT B na3 B rONOBKe BNHTa. DepxNte 6nt nepEnHdIKyJpHNOrOBKe BNHTa, INaYe MoXHO NOBpeDnTB BVHT nII rONOBky BNHTa. Ppn BKpyuHaHHn BNHTa npxKMaIte 6NT K BNHTy C IOCToRHHbIM DaBJIeHNEM.

Korda BnHT BkpyeH NONHOCTbIO, KpenKO ydePKNBa HNCTpyMeHT, OTnyCTNTe NyCKOBoB BBIKNoYaTeNb, INHaYe MOxHObPepdntb BnHT NnI rOJOBky BnHTa. EcnI cpa3y Je He OTnyCTNTb NyCKOBoB BBIKNoYaTeNb, BBICOKN KpyTAnM MOMENT MoXe TaKKe BB13BaTb NOBpeXdEHe 6NTa NnI shypynOBepTa.
7.7 Omkpyuuehaue buHmoe
YcTaHOBnTe nepeKlIOuateIb HanpaBJeHnB BpaueHnra (3) WypynOBepTa Ha BpaueHne npOTNB YacOBn CTpeKN. BCTaBbTe 6NT B n3 B rOJOBKe BNHTa. DepxnTe 6NT
NepneHnKyIpyHO roJIOBKe BnHTa, nHaue MoXHo NOBpeIb BnHT nIIN rOJOBky BnHTa. PpN BbIKpyuBaHHn BnHTa npIXkMaIte 6nT K BnHTy C NOCToRHHbIM DaJIeHNEM.
7.8 3aMeHa HacadoK (Puc.A u D)
UypnoBepT noctabIeTc3 HacaKaMn:
2HacaKnIJIyBkpyuBaHHaBn86n7)
1 hacaKa dJa pe3Kn (8).
IpeqyctaHOBkoH hacaDOK Heo6xOdmo cHrTb pe3HHOBbl KOJIpaQK (2) (a) c roJIOBkn WypynOBepTa.
7.8.1 YcTaHObKa HacaIOK (b)
2 Hacaikn IJIy BkpyuHaHnB BuHTOB MoXHO yCTaHaBnBaTb BO BCEx 4 HappaBHeHnx (BBepx, BHN3, BNeBO n BnpaBO).
Hacaiky dny pe3kn (8) cne dyetycTaHaBnBaTb TOnbKO TaK, YTo6bl HOx 6bl HapabNeB
- Ppoem n CTpeKn HacaKn DoJxHbI 6bITb HappaBneHb I CTOPOHy rOIOBkn UwpynOBepTa.
HaeneHbTe Hacaiky Ha uypynOBepTdo qnkcaun Ha MeCTe.
7.8.2 CHaTne HacaIok (c)
- 06patnte BHIMAHHe Ha To, YTo Ha 6OKOBbIX CTOpOHax BCEX HacaDOK IMeOTcI DBA BbICTyNa dIg CHaTnA (13), OHN NOMEueHbI NOJOCKAMN I CTpeJIKOi.
Kpenko Haxmnte Ha 06a Bbictyna dIra ChrTna N BbITauNTe HacaIky.
7.9 NcnoB3o8aHue hacaKu dna pe3ku (Puc.A u E)
Hacaiky Ipy pe3kn (8) MoXHO nCNOJb3OBaTb Ipy pe3kn IIOCKnx MmRkNx MaTePnaNoB (cm. pa3de1 1).
MaKcImaJIbHa TOnUHHa MaTePnJa IOnXHa 6bl6 MM.
Moket 6bIbYcTaHOHeNo IIO6oe HappaBneHne BpaueHnra (cm. n. 7.5).
OcToPOxHO npeBnraIte HOKeBOI npoem no KpaIO MaTePnAna I npoDoJIkaIte pe3Ky NO Mepe Heo6XODIMOCtN.

Pe3ka TBepdbix MaTepeNaIOB (Ha npImep, DepeBa, MeTaJIa, KaMnI N T. d.) Hnn MaTepeNaIOB ToJIuINHO 6OJIe 6 MM MoXeT pNBeCTN K NOBpeKdEHHO yCtpoiCTBa Hnn TpaBMam.
8 UNCTKA N OBCJIYJKBAHNE
8.1 Yucmka
Copeknte BeHTnIaHIOHHbI OTBepCTnMaunHbI B uNCTOTE JnpeDoTbpaueHnnepepeBa DnraTeJI.
PerynepHO OunuTe KOpnyc MaunHb MrgKo TpRko, XeJaTeNbHO NocJe KaXdoRo UcnoB3OBaHn.
He donyckaIte nonadaHn IbIIN Ipr3N BBeHTnIaOHHbE OTBepCTnJ.
- Ecnn rpr3b He OTXoINr, nCNoJIb3yIte MArKyIO TkaHb, CMOueHHyIO B MbJIbHOJ BOJe.
Hikorda He nCnoJb3yUte TaKne pactBOpNTeN, Ka6beH3nH, cInpT, aMMnaHra Boda n T.I. 3TN pACTBOPNTeN MOVT NOBpeNTb NtactMaccOBble DetaJI.
- Ppepa60ToC MaunHOKBAJINΦnIUPoBaHHbIM CneuaJIACTOM DOJXHbI 6bITb OTPEMOHTIOPOBaHbI JIN 3aMeHeHbI NOBpeXdeHHbI peKyuune HOxN.
- Iocne kaxdoon onepaunpe3kn OUnsaTe pejxun HOK MAnKOJ UeTKOIN TKAHbIO.
8.2 06cnyxueaHue
BHHMaHHe!pepeBbIIOJIHeHEmJIIO6oPa6ObIHa IHCTpyMeHTe BcERda BbIKHOaHTe UypnoBepr 3a6nokpyte BbIKIOuataIb B noIOxehN Off (BbIKJ).
9 TEXHnueCKne DAHHbIE
12 OKPYKAIOUCA CPEDA
Ecn Baaw annapat Tpe6yET 3aMeHbI nocne dInTeNbHoro NcNoJb3ObaHn, He Bbl6paCbBaIte ero BMecTe C DOMaUHM Mycopom, a NcNoJb3yIe 3KOJIoNueckn 6e3onacBh cnoc6 dJa ero yTnInu3aun.
C OTXODAMN 3JIeKTPnuecknx MaunH HeIb3aOBpaAaTbcKaK C O6bIyHBIMN 6bITOBbIMN OTXODAMN. I03a6oTBTeCb 6b yTuIN3aUN TAm, rDe dIy 3TOrO eCTb COOTBETCTByIOUne yCTaHOBKn. IpOKOHcyIbTnpuYInTEcb y MeCThBX OPraHOB Bnactn INy IPODAuCA O BO3MOxHOCHTyTuIN3aUN.
VARO N.V. - Joseph Van Instraat 9 - BE2500 Lier - BELbIy, HactoIzum 3aBnEeT, UTO,
PpOdyKT: UYPYNOBEPT 3,6 B
Mapka: POWERplus
MoeJIb:POWX00408
COOTBETCTByeT 683aTeIbHbIM Tpe6OBaHnM INHbIM COOTBETCTByIOUm NOIOXeHnM DeNCTByIOuIX EbponeiCKnx DnpeKtNB, OCHOBaHHbIX Ha EbponeiCKnx rapMOHN3IpOBAHHbIX CTAndapTax. IIO6oe HecaHKUHOHpOBaHHOE N3MeHeHne yCTpoiCTBa aHHyInpyeT daHHOe 3aABJIeHne.
Ebponeckne dnpekTbbl (BkHoua, ecn npmeHMO, nx nonpaBKn Do DaTbI NODncaHNA):
2011/65/EU
2014/30/EU
2006/42/EC
Ebponeckne rapMOHN3npOBaHHbI cTaHdapTbI (BkJIouyA, ecNI npIMeHMo, INx NoppaBKn Do DaTbI NOINCAHNA):
EN62841-1:2015
EN62841-2-2:2014
EN IEC 55014-1:2021
ENIEC55014-2:2021
Ebponeckne rapMOH3npOBaHHbIe cTaHdapTbI (BkIIOUa, ecn npMeHMo, nx nonpaBKn do DaTbI NOINSCAHN);
HnKeNoDnncabwncIeNCTByeT OIT MeH NcNoHNHeBHO DnpeKTopa KOMnaHIn,
7.3 Ppeeknioyeameneh cnycbK (Ua.A)
- 3nON3BaIte npBkIIOHbATEJIHHcNcYcbK (4), 3a da cTapTpIpaTe MaUNHaTa n npOdbJXkaBaIte Da ro DbpxInTe 3a HenpeKbChata pa6ota.
3a da n3knHHTe MaunHaTa,OCBO6oTe npeBKnHbTaTeHNrCnycbk (4).
3a da 3aknouHTe npeBknOuBaTeHnra cnycbK (4), noctabete celeKTopa Ha nocokata Ha BbpTeHe (3) B cpeHaTATA no3uIy.
7.4 Pa6omHo moKoO ocemJeHue (Ua.A)
HaTnCKaHTo Ha pa6oTHn6bYToH ue BkIOuN pa6oTHOTO TOKOBOCBETJeHHe.
OTNYCKaHTo Ha pa60THN 6yTOH 7e N3KIOUH pa60HTO TOYKOBO OCBETJIeHne.
7.5 Nocoka Ha ebpmeHe
- Nocokata Ha BbptHe ce ynpabJra Ba Ype3 ceneKTopa Ha nocokata Ha BbptHe (5) pa3noJoxeHa cnycbKa Ha npebkIIOuBaTeJIa.
7.5.1 BbptHe no YacOBHnKoBaTa cTpelenka:
3a Na n36epete BbptHe NO yacOBnKOBaTa CtpeIka, OCBO6oTe CnycBka Ha IpeBKnIOyBaTeJI N HATNCHeTe CeJIeKTopa Ha NOCOKaTa Ha BbptHe (6) KbM JIABaTa CTpaHa Ha INHCTpyMeHTa.
7.5.2 BbptHe o6paTHo Ha yacOBHnKOBaTa cTpeJIka;
3a da n36epete Bbptene 06paTHo Ha yacOBHKOBaTa cTpeJIka,OCBO6OJe cNycbKa Ha npBkIHOVAteJIHaTNCHeTe cEnEKTopa (6) KbM JraCHaTa cTpHa Ha IHCTpyMeHTa.
7.6 3aehmeHa ha euhm
HactpoTe nocokata Ha BbPteHe Ha BNHTOBepTa (3) no yacobnKOBaTa cTpeNka. BkapaiTe BNTOBnHaKpaHnK B npope3a B rnaBata Ha BNHTa. DpbXTe BNHTOBnHaKpaHnK nepEnHKyIpyHO KbM rnaBata Ha BNHTa, B npOTuBeH Cnyuayn BNHTbT NnI rnaBata Ha BNHTa MORat Da 6bDaT NOBpeDeHn. HATnCKaTe BNHTOBnHaKpaHnK KbM BNHTa C NOCTOReH HATnCK CbC 3aBNHTBaHETo Ha BNHTa.

Korato BnHTbT 6bDe HAnbIHO 3aBnHTeH, XBaHeTe MaunHaTa 3dpaBO n OTnycheTe cnycbKa 3a BKn./n3Kn., B npOTnbEh CnyaH BnHTbT nN rnaBata Ha BnHTa Morat da 6bDat nobpeHn. Ako cnycbKbT 3a BKn./n3Kn. He 6bDe OTnychat BeDHarA, BnCOKnT BbPtyu MOMeH MoKe Da NobpeHn BnHTOBnHa KApaiHnk Nnn BnHTObepTa.
7.7 OmbuHmeaHe Ha euhm
HactpoTe nocokata Ha BbptHe Ha BNHTOBepTa (3) 6paTHO Ha yacOBnka. BkapaiTe BNHTOBnHaKpaHnK B npope3a B rnaBata Ha BNHTa. DpbXte BNHTOBnHaKpaHnK nepEniKyIpyHO KbM rnaBata Ha BNHTa, B npOTuBeH cnyaBnHTbT IINrnaBata Ha BNHTa MORat Da 6bDat NOBpeDeHH. HatNcKaIe Ta BNHTOBnHaKpaHnK KbM BNHTa C NOCTOJHeH HAITCK CbC OTBNHTBaHETo Ha BNHTa.
7.8 CmHa Ha npucmaeku (Ua.A u D)
BnHTOBePbT Ce DoCTaBc 3 npCTaBkn:
2 npncTabk3a 3aBnHTBaHe Ha BnHTObe (6 n7).
1 pexeeta npncTabka (8).
Ipei nocTabrHe Ha npCTabKn rymeHaTa KanaUka (2) Tp6Ba da 6bde OTCpaHeHa (a) OT 3aBnKbaHata gnaba.
7.8.1 NocTabrHe Ha npucTabkn (b)
2-Te npuctabkn 3a 3aBnHTbaHe Ha BnHTOBe MoT a6bDat NOCTaBEHn BBB BCNUKITE 4 NOCOKN (HaRoPe, HAnOnV, HAnRBO n HAnrCHO).
- Pexeata npctabka (8) Tp6Ba da 6bne nocTabra h cmo C Hoxa coee HAOJY.
OTBOpbI n cTpeNknte Ha npncTabkata Tp6Ba da COaT KbM 3aDbNxBaAata rnaBa.
HaTnCHeTe npCTaBkata Bbpxv BuHTOBepTa,doKaTo upaKHe Ha MRCTO.
7.8.2 Chemahe Ha npictabkn (c)
O6bpHete BHMaHne, Ye IMa IBe INaCTnH 3a ChemaHe (13) Bbpxy cTpaHnte Ha BCuKn npuctabKn, Te ca MapknpaHn C JeHTn n CTpeJIka.
HaHCHHe HADONY CNJHO IN DBeTe PnactInn 3a ChemaHe n 3dbpnaTe npCTaBkata.
7.9 Ynompe6a Ha pexeuama npucmaeKa (Ua.A u E)
Pexeata npictabka (8) moke da 6bde n3noJ3BaHa 3a p3aHe Ha IIOCKn IMekn MaTepnaIIN (BIXTe rIABA 1).
MaKcImaJIHaTa De6JIuHa Ha MaTePnIa e 6 MM.
Iocokata Ha BbptHe MoKe da 6bde HactpoeHa BbB BCra Ka nocoka (BnKTe naparpa7.5).
CTapTnpaTepekeuataPnCTabKaCHaTnCKaHeHaPBeBKnIOUbATEJHnCnYcBk.
BHMMaTeHNO pIb3HeTe OTbopa Ha pe3eua Bbpxy Pb6a Ha MaTePnAHa npOdbJxKeTe dapeXeTe cnopei Heo6xOIMOCCTTA.

Pra3aHTo Ha TBbpDn MaTePnaHn (Ha npImep DbPBeCnHa, MeTaN, KaMbK N dp.) HnMaTePnaHn No-De6eNn OT 6 MM MoKe da DOBeDe Do NOBpeDa Ha yCTpoiCTBOTo Hn Do HapaHBAHe Ha Xopa.
8 NOUHCTBAHE IN IOIDPbJKA
8.1 NoyucmbaHe
BENTINaIOHHnTe OTbOpn Ha ypeDa Tp6Ba Da ca YnCTn, 3a Da ce npeDoTbpaTn PperPraBaHTo Ha DnRaTeJI.
PeIOBHO NOUcTBaIe KOpNyCa Ha MaUNHaTa C MeK napuaI, PO Bb3MOxHOCCT CneI BcRAKa ynotpe6a.
Ha BENTINaIauIOHnTe OTBOpn He Tp6Ba Da Ima npax N MpbCOTnA.
Ako MPbCOTnra He nada, n3noJ3BaIe MEK napua, HAMOKpeH cbc canyHeHa BOda.
He n3no13BaIte pa3TBOpHTeIN, KaTO 6eH3nH, HApTa, CnIPT, pa3TBOP Ha amOHAK N T.H. Te3n pa3TBOpHTeIN MORAT Da IOBpeTITNactMACOBITE YACTN.
IobpeHnTe pexeun ocptneTa Tp6Ba da 6bDat peMOHTnpaHn nn CMeHeHn OT KbaHnHnHaPcEBN3 npeDn da pa6OTte C MaunHaT.
CneBcKa pexeHa onepaun NoucTbaIte pexeoTO ocTpne C MeKa YeTKa N Kbpna.
8.2 Nodopbxxka
BnMaHne! BnHaI n3KIOUbaTe BnHTOBepTa n 6IoKnpaTe npEeKnIOuBaTeJRA B N3KJI. IIOJOKeHne Ipei Da n3BbPwBaTe KaKBATO n da 6NlO pa6Ota no MaunHaT.
9 TEXHnueCKn DAHHN
| М odeл №. | POWX00408 |
| Номинално нальожения | 3,6В |
| Овороти на праzeнхов | 200об./min. |
| Каццтет на батерияta | 1500 mAh |
| Вреme за заразжданe | 3-5чaca |
10 WYM
CTOINOCTN Ha 3ByKOBOTo HaIraHe I3MepeHn B CbOTBeTcTBnE C npNIOXIMnA cTaHApT. (K=3)
HnBO Ha 3ByKOBoTo HnIraHe LpA 56 dB(A)
HnBO Ha 3BykoBaTa MoUHOCT LwA 67 dE(A)

BHIMAHHE! Hocete nHnBnDyajHn npeJna3Hn cpeCTBa 3a cnYxa (aHTnOHN), aKO 3ByKOBOTo HaJraHe npeBnU 85 dE(A).
aw (Bn6paun)
0.9 M/c²
K=1,5M/c²
11 TAPAHUN
To3n npOyKT nMa rapaHcNoHcPok 36 Meceua, KOITOBn3a BCnna OT daTata Ha NOKynka Ha NpBnra Notpe6nten.
Ta3n rapaHnI npKpNB aBcNk n DepeKTn Ha MaTePnAIn I npOn3BOndTBeHn DepeKTn, HO He BKNUChBa: 6aTePnN, 3apAnH yCTPONCTBa, DepeKTn Yactn BCJeDCTBne Ha HopMaJIHO n3HOCBaHe n N3TPNaBaHe KaTo NaRePn, YeTK, Ka6eJIu N cEncEJIu Nn AkceCoApn KaTO CBpeJNa, HAKpaHnIz 3a npObHN HhCTpyMeHTn, pExeJIu DnCKOBe N T.H., NOBpeDN n DepeKTn PpON3TuHaun OT He npabUNHa yNotpe6a, 3JNoJnyKn Nn HAnpaBeHn IpomeH, HHTo TpaHCnpTHHe pa3XoDi
IobpeHn Hnn n defeektn npou3Tuauo ot He npabunho ynoTpe6a He ce oxbauat OTe3n rapaunOHn ycNoBna.
OcBHe TOBa He Hocm HnKaKbA OTROBOPHOCT 3a TeNECHn HapaHBAHn npOn3TuAun OTHnpaBnHaTa yNoTpe6a Ha nHCTpyMeHTa.
PemOHn Morat da 6bDat n3BpWbaHc mo OT ynbHOMoueh noTpe6ntckn cepBn3eH ceHTbp 3a eJNEKTPoHHCTpyMeHTn.
Moxete da noJyute DonbHnTeHa HOpMaun Ha Homep 00 32 292 92 90.
Bcun TpaHcnOpTHn pa3xoDn ige 6bDat noetn OT nOte6nte,OCBeH aKO nncMeHO He e dorobopeHo dpyro.
BcIto BpeMe, He Morat da ce IpeJraBaT IpeTeHcNn no rapaHcNtA, aKO nobpeDaTa Ha ypeJa E BCJIeDCTBHe OT IpeHe6peRbaHe Ha TexHueCKOTo 06CJyKBaHe nII npetOBapBaHe.
- Ot rapaunra KaTeOpuHc Ce n3KnUOyBa NOBpeDa, KOrTO e B pe3yIaT OT npOHKBaHe Ha TeuHOCT, MHOro npax, PpeHaMepeHa NOBpeDa (ymnJneHa NnnpaDi TOTaHb 6e3rpNkne), HeNoXODAIO n3NOJ3BaHe (n3NOJ3BaHe 3a ceJI, 3a KOnTO ypeDbT He e nOxOJa), HEKOMNeTeHTHO n3NOJ3BaHe (HAnp. Hecna3BaHe Ha IHCTpyKUnTe B pBkoBOdCTBOTO), HEKOMNeTeHTeMH MoTAtJ, rpbMOTeBuYeH yAp, HenpaBnHb HAnpexKeHne. To3n cnncbk He e n3UepNaTeJIeH.
- Ппемано Ha rapанцоннnpeteHинKORA He Moxe Da DoBede Do yIbJxabaHe Ha rapaunHHn CpOK, HTO Do 3anOuBaHe Ha HOB rapaHcnoHe CpOK B CnyaHa 3amHa Ha yCTpoNCTBO.
- YcTpoICTBaTa nIN DeTaInIte, KOnTO ca 3aMeHeH CbO6pa3HO rapaHcUNOHnTe ycNoBn, cJeIOBaTeJIHO OCTaBAt Co6CTBeHOCr Ha Varo NV.
Hne cn 3ana3BaMe npaBTo Da OTXBpJIM BcKa npeTeHcIy, B cIyuae ne NOKynkaTa He MoKe da 6bJe npOBepHa IIN, KOrato e aCHO, Ye npOdyKTbT He e NOdIbpxaH npabnHO. (NouchTaHe Ha BEHTnlaucIOHHte OTBOpN, peoBHa NoDpBxKHa Ha KapboHOBtte YETKN,...)
CbxpaHbAaTe paKTypaTa 3a NOKyPkata KaTO DOKa3aTeNCTBO 3a DaTAta, Ha KOrTo e HappabeHa T.
Tp6Ba Da BbPHeTe HeJEMOHTpaHnI HNCTpyMeHT Ha npoDaBaHa B npneMJIInBO YnCTO CbCTOaHHe, BOpuHaHTo My IyTO Kyapue, aKO yCTPOINCTBOTO IMa TAKOBa, PnpdpyKaBaHO OT DOKa3aTeNTBOTO 3a NOKyPkata.
12 OKOJIHA CPEDA
Korato ypeBbT Bn Tpr6Ba da 6bIe 3aMeHcneI npOdbJnxTeJIHa ynoTppe6a, He ro N3XBpbIyIe C DOMAKINCKITe OTnaDbu, a No HauH cbo6pa3eH c Ona3BaHTo Ha OKoJIHaTa CpeJa.
HehynHne eIeKtpnueckn npOyKTn He Tp8Ba Da 6bDaT N3XBpJrHn 3aeHNO C domaknHcNte OTnaDbu. MoJa npoyTe Kbde IMa Bb3MOxHOCTn 3a peuknnpaHe. PONCKaTe OT MeCTHnE Bnactn IJIn OT npOdaBau cBBeTn OTHOCHO peuknnpaHTo.
VARO N.V.-VARO N.V.-Joseph Van Instraat 9-BE2500 Lier-Beltrn deKapnpaT,ye
IpoDyKT: BnHTOBePt 3,6B
Mapka: POWERplus
moJeI:POWX00408
e B CbOTBcTCTBnE C OCHOBHnTe N3NCKBaHHn I DpyrN CbOTBeTHn pa3nope6n Ha npINIOXmHTe Ebponeckn DnpeKtNB, 6a3npaHn Bbpxy npInaraHeTo Ha EbponecknTe xapMOHN3npaHn CTaNapTN. Bcya HeynbHOMoSeHa MoDnΦnKauaHa anapaTa aHynpa Ta3n DeKnapaua.
Ebponeckn DnpeKtNB (BKnIOHTeJIHO TexHNTe npomeH NbM daTaTa Ha noDnncBaHe, aKO ca npNJIOXIMN):
2011/65/EU
2014/30/EU
2006/42/EC
Ebponeckn xapMOH3npaHn CtaHdapTn (BKNIOHTeHNO TexHNTe npomeHn KbM daTaTaHa noDnncBaHe, aKo ca npINOxIMN):
EN62841-1:2015
EN62841-2-2:2014
ENIEC55014-1:2021
EN IEC 55014-2:2021
CbXpaHnTeJHaTexHueckaTaDokymeHTaun:Филп BaHkepKxOB,VARO-Vic.Van Rompuy N.V.
IOnyNoDnucHnT DeiCTBa OT nMeTo Ha N3nbHnTeHnHa dIpeKTop Ha KOMnaHnTa,,
Philippe Vankerkhove, MSc.EE.
PereyanaOnHH Bbnpocn - MeHnJkbp no cbOTBeTCTBnraTa 11/03/2022, Lier - Belgium
Vario
WWW.VARO.COM
DESIGNED AND MARKETED BY VARO
Copyright by varo
VARO - VIC. VAN ROMPUY nv
JOSEPH VAN INSTRAAT 9 - 2500 LIER - BELGIUM
OFFICES:
IBERICA BRICOLAGE S.L. - ESPAN
ASIA PACIFIC HONG KONG Ltd / SHANGHAI PRC
AUSTRALIA Pty Ltd


- BESCHRIJVING (FIG. A)
- POWERPLUS HIGH QUALITY TOOLS
- POWX00408 EN
- SCREW DRIVER 3.6 V POWX00408
- INTENDED USE
- DESCRIPTION (FIG. A)
- PACKAGE CONTENT LIST
- SYMBOLS
- GENERAL POWER TOOL SAFETY WARNINGS
- Working area
- Electrical safety
- Personal safety
- Power tool use and care
- Service
- MACHINE-SPECIFIC SAFETY WARNINGS
- OPERATION
- Charging procedure (Fig.B)
- Inserting and extracting bits (Fig. C)
- Trigger switch (Fig. A)
- Working spot light (Fig. A)
- Direction of rotation
- Clockwise rotation:
- Anticlockwise rotation:
- Screw insertion
- Screw removal
- Changing the attachments (Fig. A & D)
- Fitting the attachments (b)
- Removing the attachments. (c)
- Using the cutting attachment (Fig. A & E)
- CLEANING AND MAINTENANCE
- Cleaning
- Maintenance
- TECHNICAL DETAILS
- NOISE
- ATTENTION! Wear hearing protection when sound pressure is over 85 dB(A).
- WARRANTY
- ENVIRONMENT
- DECLARATION OF CONFORMITY
- RENGJØRING OG VEDLIKEHOLD
- Rengjoring
- KATΣABIΔI 3,6 V POWX00408
- PPOBÄENOMENH XPHΣH
- ΠΕΡΑΦH (EIK. A)
- ODVIJAÇ 3,6 VPOWX00408
- NAMENJENA UPOTREBA
- LlUPyNObEPT 3,6 BPOWX00408
- HA3HAUeyHNE
- COIDEPXXHMOE YNAKOBKN
- YCJIOBHBIE OBO3HAUEHNIA
- YcmaHo8ka u u3eJeueHue 6um (Puc. C)
- Nyckoob ebiknoyamelb (Puc.A)
- Pa6ouu moeyhbi ucmouhuk cema (Puc.A)
- HanpaBHeHue epauehen
- BpaeHne no yacOBoi cTpeJIke:
- BpaeHne npotnb yacobOc cTpeKn:
- BkpyuueaHue buHmoe
- Omkpyuuehaue buHmoe
- 3aMeHa HacadoK (Puc.A u D)
- YcTaHObKa HacaIOK (b)
- CHaTne HacaIok (c)
- NcnoB3o8aHue hacaKu dna pe3ku (Puc.A u E)
- UNCTKA N OBCJIYJKBAHNE
- Yucmka
- 06cnyxueaHue
- OKPYKAIOUCA CPEDA
- Ppeeknioyeameneh cnycbK (Ua.A)
- Pa6omHo moKoO ocemJeHue (Ua.A)
- Nocoka Ha ebpmeHe
- BbptHe no YacOBHnKoBaTa cTpelenka:
- BbptHe o6paTHo Ha yacOBHnKOBaTa cTpeJIka;
- 3aehmeHa ha euhm
- OmbuHmeaHe Ha euhm
- CmHa Ha npucmaeku (Ua.A u D)
- NocTabrHe Ha npucTabkn (b)
- Chemahe Ha npictabkn (c)
- Ynompe6a Ha pexeuama npucmaeKa (Ua.A u E)
- NOUHCTBAHE IN IOIDPbJKA
- NoyucmbaHe
- Nodopbxxka
- TEXHnueCKn DAHHN
- WYM
- TAPAHUN
- OKOJIHA CPEDA
Brand : PowerPlus
Model : POWX00408
Category : Screwdriver