MC40 DAB - Hi-fi system Auna - Free user manual and instructions
Find the device manual for free MC40 DAB Auna in PDF.
User questions about MC40 DAB Auna
0 question about this device. Answer the ones you know or ask your own.
Ask a new question about this device
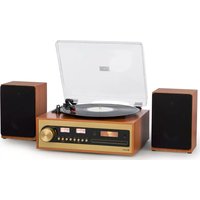
Download the instructions for your Hi-fi system in PDF format for free! Find your manual MC40 DAB - Auna and take your electronic device back in hand. On this page are published all the documents necessary for the use of your device. MC40 DAB by Auna.
USER MANUAL MC40 DAB Auna
Dear Customer, Congratulations on purchasing this equipment. Please read this manual carefully and take care of the following hints to avoid damages. Any failure caused by ignoring the items and cautions men- tioned in the instruction manual are not covered by our warranty and any liability. Scan the QR code to get access to the latest user manual and other information about the product. CONTENTS Technical Data 30 Safety Instructions 30 Product Overview 32 System Connections 37 Basic Operation 38 DAB Operation 38 FM Radio Operation 41 CD/USB Operation 43 BT Audio 45 Listening to a Cassette Tape 46 Settings 48 Disposal Considerations 5030
SAFETY INSTRUCTIONS General instructions
- Lightning - If you are not going to use the unit for a longer period of time or if there is a thunderstorm, pull the plug out of the socket or disconnect the unit from the antenna connection. This will prevent damage to the unit due to lightning and overvoltage.
sockets as this may result in a re or electric shock.
- Foreign objects and liquid ingress - Never push objects of any kind into the unit through openings as they may touch dangerous voltage points or short out parts that could result in a re or electric shock. Never spill liquids of any kind on the unit.
- Repair and maintenance - Do not attempt to service this unit yourself as opening or removing covers may expose you to dangerous voltages or other hazards. Refer all servicing to qualied service personnel..
- Damage requiring service - Unplug the appliance from the mains and refer servicing to qualied service personnel if any of the following occurs: (a) If the power cord or plug is damaged. (b) If liquid has been spilled or objects have fallen on the unit. (c) If the unit has been exposed to rain or water. (d) If the unit has been dropped or damaged. (e) If the performance of the unit is signicantly reduced.
- Spare parts - If spare parts are required, ensure that the specialist company replacing the parts only uses spare parts that are approved by the manufacturer or have the same characteristics as the original part. Unauthorised replacement may result in re, electric shock or other hazards.
- Heat - Do not install near any heat sources such as radiators, heat registers, stoves, or other apparatus (including ampliers).Special notes on operation
- Children from the age of 8, mentally, sensory and physically impaired persons may only use the appliance if they have been familiarised in detail with the functions and safety precautions by a supervisor responsible for them beforehand and understand the risks involved.
- Before use, check that the mains cable is undamaged. If the mains cable or plug are damaged, they must be replaced by the manufacturer, an authorised specialist company or a similarly qualied person. Children should be supervised to ensure that they do not play with the appliance. Make sure that children and babies do not play with plastic bags or other packaging materials.
- Make sure that the mains plug/mains adapter always remains easily accessible so that the appliance can be quickly disconnected from the mains in an emergency.
- When you are no longer using the appliance, switch it o and unplug it from the mains.32
PRODUCT OVERVIEW Front view33
1 DISPLAY Display the unit operation status and information 2 STANDBY Press to turn on the unit. Press again to turn o and go to Standby mode 3 Skip forward /TUNE+ DAB: Press to display the next station information FM: Short press to tune to a dierent frequency Press and hold to scan the next available station CD/USB/BT: Press to search to the next track 4 Skip backward /TUNE- DAB: Press to display the previous station information FM: Short press to tune to a dierent frequency Press and hold to scan the previous available station CD/USB/BT: Press to search to the previous track 5 SOURCE Press this key to choose dierent modes of operation: DAB/FM/CD/
DAB/FM: Press to select the change setting in the menu operation Press and hold to toggle between stereo and force mono when FM station is received 7 MENU/INFO DAB/FM: Press to display station information Press and hold to enter the Menu for setting change
8 HEADPHONE OUT JACK
Connect to the external headphone 9 USB input 10 CD DISC compartment door 11 IR reception window 12 Presets button Store up to 20 digital, 20 FM preset stations 13 – VOLUME + Adjust the main volume 14 STOP Press to stop the CD/USB playback operation
CD/USB/BT: Press to toggle between pause and resume playback operation. FM: Short press to scan the next available FM station. Press and hold to start auto-scanning and store all available FM stations. DAB: Press to start auto-scanning and store all available DAB stations. 16 TAPE DOOR
Use buttons on the unit to play a tape.34
Rear view 18 ANT IN Insert the single wire antenna into this terminal. Ensure that the wire antenna polarity is correctly inserted. The wire should be extended to ensure good reception.
19 LEFT/RIGHT SPEAKER OUTPUT
Left and right speakers should insert into these terminals L and R respectively. Ensure that the wire polarity is correctly inserted.
Connect to supplied mains adapter only.35
Remote Control Operation A CR2025 battery is already installed in the remote control unit. Before using, pull out the battery insulation sheet as shown below. To replace a new battery, please refer to the gure shown below. When inserting a battery, be sure to do so in the proper direction.
- If the remote control conicts with other devices, the operation will be aected.
- Do not simultaneously press buttons on the unit and the remote control.
- Avoid using two remote controls at the same time as it will cause a malfunction.
- Use only CR-2025 size batteries.
- If there is battery leakage, clean the remote control thoroughly before replacing batteries
- Do not short two terminals of the batteries. Dispose old batteries in a suitable place.37
1. Insert the jack of the supplied mains adapter into the socket on the rear
of the radio (A). Plug the mains adapter into the mains supply (B).
2. Connect the DAB/FM aerial wire to the DAB/FM socket and position the
DAB/FM aerial wire in the direction where the strongest signal.38
Antennas Find a location and an orientation that provide good reception, and then set up the antenna.Keep the antenna away from the speaker cords and the DC power cord to avoid picking up noise.Before unplugging the FM/DAB antenna, make sure the system is turned o to preserve your own FM and DAB settings. BASIC OPERATION Insert the jack of the supplied mains adapter into the socket on the rear of the radio and the power plug of the adapter into the wall socket. The display will show “SCANTIME”. The unit is now updating the time from the broadcaster. Wait for a while until it is nished and the real time will be display. Press the STANDBY button to turn on the unit. To turn o, press the STANDBY button again.
DAB/FM/CD/USB/BT/TAPE
Press the SOURCE button to select from dierent sources. Volume Control Turn the VOLUME control or press the VOL-/VOL+ buttons on the remote control to change the volume. Adjusting the Antenna The wire antenna at the rear panel of the unit should be extended and altered to ensure a good DAB/FM reception. DAB OPERATION The rst time the DAB mode is selected, it will automatically scan for available DAB stations. Wait until the scanning has nished. The display will show the scanning progress. After scanning it will tune to the rst station. Stations are listed in numerical then alphabetic order. All stations scanned are stored. The next time the unit is turned on there will be no automatic scanning. Auto Scan
1. Turn on the unit and select DAB mode
2. Press the SCAN button on the front or remote control, to start auto-
scanning for available DAB radio stations.39
1. Turn on the unit and select DAB mode
2. Press MENU button on the remote control to access the menu control.
3. Press the ⏮ or ⏭ button until “MANUAL” is displayed and then press the
Tuning Press the TUNE or TUNE button to display the information of the next station. Then press the ENTER button to tune to this station in few seconds. Storing DAB Presets You can save up to 20 DAB stations.
1. Tune to the station you wish to store.
2. Press and hold the MEMORY button to access the menu control. Flashing
3. Press the TUNE or TUNE button to a preset number that you want
to store. Then press the ENTER button to save. Stored DAB Presets Press the CH- or CH+ button directly tune to the preset channel. Displaying DAB Station Information There are several types of information as listed below. To change the display information, press the INFO button repeatedly.
1. Radio Text scrolling: Comprises music titles or programme details
provided by the broadcaster.
2. Signal Bar: Reception signal level. The more the star mark is displayed,
the stronger the signal is received. To improve the reception adjust the wire antenna position.
3. Program Type (PTY): Type of program provided by the Radio station.
4. Multiplex Name: Displays name of multiplex to which the current station
5. Frequency: Current channel frequency.40
6. Signal Error Rate: It shows the error received. The larger this value the
more errors are received. To improve the reception adjust position of the wire antenna.
7. Audio Bit Rate: This is the current channel audio bit rate.
Other DAB menu operations Press the MENU button on the remote control to access the menu control. Then press the ⏮ or ⏭ button for dierent options as described below. Dynamic Range Control (DRC) DRC can make quieter sounds easier to hear when the unit is used in a noisy environment. The DRC level of a broadcast is set by the radio station and transmitted with the service. Changing the DRC value on your unit enables you to apply a scaling factor to this level. There are three levels of compression:
- DRC high: Maximum compression as sent with the transmitted service
- DRC low: Set to 1/2 that of the sent transmitted service
- DRC o: No compression
1. Press the MENU button on the remote control to access the menu
2. Press the ⏮ or ⏭ button until “DRC” is displayed and then press the
4. Press the MENU button on the remote control to exit the menu control.
- Not all DAB stations are able to use DRC function. If the radio station does not support DRC then the DRC setting in the unit will have no eect.
- After you have adjusted the DRC level the sound may be louder. Prune This function removes inactive stations.
1. Press MENU button on the remote control to access the menu control.
2. Press the ⏮ or ⏭ button until “PRUNE” is displayed and then press the
3. Press the ⏮ or ⏭ button to select “PRUNE Y” and then press the
ENTER button to prune the unit.
4. Press the MENU button on the remote control to exit the menu control.41
1. Turn on the unit in FM mode.
2. Press and hold the SCAN button to start auto-scanning and saving the
available stations (max. 20 storage). Manual Scan
1. Press the TUNE or TUNE button repeatedly to tune to a dierent
automatically search to the next available station. Storing FM Presets You can save up to 20 FM stations.
1. Tune to the station you wish to store.
2. Press and hold the MEMORY button. Flashing “PROG” is displayed.
3. Press the TUNE or TUNE button to a preset number that you want
to store. Then press the ENTER button to save. Recall FM Presets Press the CH- or CH+ button directly tune to the preset channel. Stereo/Force Mono Selection When receiving a stereo broadcast FM station, press the MONO/ST button will switch between stereo audio or force mono audio. Displaying FM Station Information There are several types of information as listed below. To change the display information press the INFO button repeatedly.
Scrolling text which displays information about music title or program details provided by the active radio station.
2. Program Type (PTY)
Type of program provided by the broadcaster.
Current channel frequency.
Stereo or Mono. Other FM menu operation Press the MENU button on the remote control to access the menu control. Then press the ⏮ or ⏭ button for dierent options as described below. Scan Setting
1. Press the MENU button on the remote control to access the menu
2. Press the ⏮ or ⏭ button until “SCAN” is displayed and then press the
3. Press the ⏮ or ⏭ button to toggle between “ALL” or “STRONG”
selections and then press the ENTER button conrm. When “ALL” is selected, all stations will be detected during FM scanning even if the radio station is noisy. When the “STRONG” is selected, only the strong stations are detected. Scanning will ignore those noisy stations.
4. The next time doing a FM scan the unit will search for the stations based
on this conrmed setting. Audio Setting
1. Press the MENU button on the remote control to access the menu
2. Press the ⏮ or ⏭ button until “AUDIO” is displayed and then press the
3. Press the ⏮ or ⏭ button to toggle between “STEREO” or “MONO”
Loading and Playing CD Disc Open the CD door. Install a disc with the CD graphic side facing up. Close the CD door. Press the SOURCE button to CD mode. After reading the total number of tracks will be shown on the display. Press the CD/USB PLAY/ PAUSE button to play. Reading and Playing USB Device Insert a USB device into the USB input jack. Press the SOURCE button to USB mode. After reading the total number of tracks will be shown on the display. Press the CD/USB PLAY/PAUSE button to play. Play/Pause Control To pause playback press the CD/USB PLAY/PAUSE button. Press the button again to resume playback. Stop Control To stop playback press the STOP button. Skip Track During playback press the ⏮ or ⏭ button to search to the previous or next track. Random Play During playback press the RANDOM button to play music in random order. The display will show “RANDOM”. Press the RANDOM button again to resume normal playback. High-Speed Music Search During playback press & hold the ⏮ or ⏭ button to start high-speed searching. When you release the ⏮ or ⏭ button normal speed playback will resume. Repeat Playing During playback press the REPEAT button once the display shows “RPT ONE”. The current track will be played repeatedly. Press the REPEAT button again the display shows “RPT ALL”. All tracks will be played repeatedly. Press the REPEAT button again to resume normal playback. In case of MP3 le folder playback, there is a repeat folder as well and the display will show “RPT FOLD”.44
Programmed playback This unit can be programmed to play a sequence of tracks selected.
1. Insert a disc and in stop mode press the MEMORY button. “P01” is shown
2. Press the ⏮ or ⏭ button to select the desired track.
3. Press the MEMORY button to save the desired track.
4. Repeat steps 2-4 to program up to 20 programmed tracks.
5. Press the CD/USB PLAY/PAUSE button to play according to the
6. To clear the program play, press the STOP button twice or change to
another mode. During program play you can also do the “Repeat One” or “Repeat All” operation. When programmed playback is active, the random play function is not available. Note: when programming MP3 from CD or USB, you need to press the MEMORY button twice before you can start programming. In MP3 programming mode you can select up to 99 tracks. Folder Select (MP3 le only) During MP3 playback press the FOLDER or FOLDER button to change the folder. In stop mode press the FOLDER or FOLDER button to change the folder. Then press the ⏮ or ⏭ button to select your desired track to play. Press the PLAY/PAUSE button to start playback the track. ID3 Tag Display (MP3 le only in which the ID3 Tag information is included) Press the DISPLAY button will toggle the ID3 Tag display on/o. When it is on, the MP3 track’s title, artist and album details will be displayed.45
BT AUDIO Please follow the pairing instructions below to link the unit to your BT device.
1. Press the SOURCE button repeatedly to enter the BT mode. The
display will show “BT”. It will start searching and will display a ashing “PAIRING”.
2. If the unit has never been paired with a BT device before or cannot nd
the last paired device, the display and the BT status indicator will keep on ashing. Turn on the BT function of your device and enable the search until “MC-40 DAB” is found. Select “MC-40 DAB” on the BT device to make connection. Enter the pass code “0000” if required.
3. After successfully paired the unit will display “BT AUDIO”.
4. You can now start playing music from your smartphone wirelessly to the
6. You can press the BT ⏮ or BT ⏭ button to search to the previous or
next song. This product has a BT reception function, you can not transmit any BT sound with it: this means that you can receive wirelessly a BT sound signal from an external source like a smartphone.46
1. Set the SOURCE button to TAPE.
2. Open the cassette compartment by pushing the ⏹ STOP/
3. Load a cassette into the cassette compartment with the side to be
⏏ EJECT button, then press the ⏩ F FW button. To rewind, press the STOP/⏏ EJECT button, then press the ⏪ RWD button. To interrupt playback: Press the PAUSE button during playback. Press the PAUSE button again to resume playback. To stop playback: Press the ⏹ STOP/ ⏏ EJECT button. Precautions:
- Be sure not to press the ▶ PLAY and ⏪ RWD buttons simultaneously, or the tape will become damaged.
- Before changing from one tape operation to another, press the ⏹ STOP/ ⏏ EJECT button.47
- Do not press the PAUSE button whilst the fast forward or rewind operations are in progress. The ⏩ F FW or ⏪ RWD button will not be released when the tape end is reached. Once this occurs, press the ⏹ STOP/⏏ EJECT button. Cassette tape
- For playback, use normal or low-noise tapes for the best sound. (Metal or CrO2 tapes are not recommended.) For recording, use only normal tapes.
- Do not use C-120 tapes or poor-quality tapes, as they may cause malfunctions.
- Before loading a tape into the cassette compartment, tighten the slack with a pen or a pencil.
- Cassettes have removable tabs that prevent accidental recording or erasing. Removing the tab will protect the corresponding side from being erased. Cover the tab holes with adhesive tape to erase or record again Recording on a Cassette Tape Before recording:
- When recording important selections, make a preliminary test to ensure that the desired material is properly recorded.
- AUNA is not liable for damage or loss of your recording arising from malfunction of this unit.
- The ALC (Automatic Record Level Control) circuit automatically controls the level of the input signal used for recording.
- The VOLUME control may be adjusted with no eect on the recorded signal. (Variable Sound Monitor)
- Metal and CrO2 tapes cannot be used for recording.
- Make sure that the overwrite protection tab has not been removed. If the tab has been removed, cover the broken tab using adhesive tape.
1. Press POWER Button to turn on the power of the unit, and then
prepare the source you want to record. a. To record CD-DA tracks or MP3 les on a disc Place a disc in the CD compartment. Make sure not to start playback. See “CD /USB optional.” b. To record a radio program Press FM/DAB/BT repeatedly to select a band and tune to the desired station. See “DAB /FM/BT optional.”
2. Press insert a cassette tape into the cassette tape compartment and
then close the compartment cover
3. Press ⏺ REC to start recording (the play button will depress48
automatically at the same time). a. When recording from a disc : Playback starts automatically and recording of all the tracks/ les on the disc proceeds from the rst track/le. When the tape reaches the end, recording stops automatically. b. When recording a radio program or sound from a connected optional component Recording continues until the tape reaches the end. SETTINGS EQ operation You can enjoy dierent EQ sound eect modes. Press the EQUALIZER button will change to dierent sound eects of FLAT/CLASSIC/ROCK/POP/ JAZZ. X-BASS You can also boost the bass eect of the music. Press the X-BASS button will toggle the X-Bass eect between ON and OFF. Sleep function
1. When the unit is switched on, press the SLEEP button repeatedly to
select a sleep duration from either SLEEP 00 (sleep o), 90, 80, 70, 60, 50, 40, 30, 20 or 10 minutes. The sleep icon will be shown on the display.
2. When the sleep timer is zero, the unit will turn o automatically.
3. To cancel the sleep function, press the STANDBY button to turn o the
unit. Or press the SLEEP button repeatedly to select “SLEEP 00”. Energy saving Due to ErP stage 2 requirement and protect the environment, the unit will turn o to the standby mode automatically once no music has been playing for about 15 minutes, it will automatically switch to standby mode. When it is 10 minutes before entering the standby, the display will ash. You can press PLAY button to disable the auto-o function. To reactivate the unit, press the STANDBY button to turn on the unit. Software version check You can check the unit software version.
1. Turn on the unit in DAB mode or FM mode.
INFO button on the front panel) to access the menu control.
3. Press the ⏮ or ⏭ button until “SYSTEM” is displayed and then press
4. Press the ⏮ or ⏭ button until “SW VER” is displayed and then press
the ENTER button to show the software version number.
5. Press the remote control MENU button to exit the menu control.
Language setup You can set the unit’s language.
1. Turn on the unit in DAB mode or FM mode.
2. Press the remote control MENU button (or press and hold the MENU/
INFO button on the front panel) to access the menu control.
3. Press the ⏮ or ⏭ button until “SYSTEM” is displayed and then press
4. Press the ⏮ or ⏭ button until “LANGUAGE” is displayed and then press
5. Press the ⏮ or ⏭ button to toggle between dierent languages. Select
your desired language and then press the ENTER button to conrm.
6. Press the remote control MENU button to exit the menu control.
Factory reset This function resets the unit to the original factory settings.
1. Turn on the unit in DAB mode or FM mode.
2. Press the remote control MENU button (or press and hold the MENU/
INFO button on the front panel) to access the menu control.
3. Press the ⏮ or ⏭ button until “SYSTEM” is displayed and then press the
4. Press the ⏮ or ⏭ button until “RESET” is displayed and then press the
5. Press the ⏮ or ⏭ button until “RESET Y” is displayed and then press the
DISPOSAL CONSIDERATIONS If there is a legal regulation for the disposal of electrical and electronic devices in your country, this symbol on the product or on the packaging indicates that this product must not be disposed of with household waste. Instead, it must be taken to a collection point for the recycling of electrical and electronic equipment. By disposing of it in accordance with the rules, you are protecting the environment and the health of your fellow human beings from negative consequences. For information about the recycling and disposal of this product, please contact your local authority or your household waste disposal service. This product contains batteries. If there is a legal regulation for the disposal of batteries in your country, the batteries must not be disposed of with household waste. Find out about local regulations for disposing of batteries. By disposing of them in accordance with the rules, you are protecting the environment and the health of your fellow human beings from negative consequences.
DECLARATION OF CONFORMITY
Manufacturer: Chal-Tec GmbH, Wallstrasse 16, 10179 Berlin, Germany. Importer for Great Britain: Berlin Brands Group UK Ltd PO Box 1145 Oxford, OX1 9UW United Kingdom Hereby, Chal-Tec GmbH declares that the radio equipment type MC40 DAB is in compliance with Directive 2014/53/EU. The full text of the EU declaration of conformity is available at the following internet address: use.berlin/10038000 For Great Britain: Hereby, Chal-Tec GmbH declares that the radio equipment type MC40 DAB is in compliance with the relevant statutory requirements. The full text of the declaration of conformity is available at the following internet address: use.berlin/1003800051