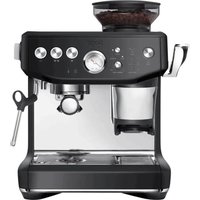
the Barista Express Impress SES876 - Coffee machine SAGE - Free user manual and instructions
Find the device manual for free the Barista Express Impress SES876 SAGE in PDF.
User questions about the Barista Express Impress SES876 SAGE
0 question about this device. Answer the ones you know or ask your own.
Ask a new question about this device
Download the instructions for your Coffee machine in PDF format for free! Find your manual the Barista Express Impress SES876 - SAGE and take your electronic device back in hand. On this page are published all the documents necessary for the use of your device. the Barista Express Impress SES876 by SAGE.
USER MANUAL the Barista Express Impress SES876 SAGE
we are very safety conscious. We design and manufacture consumer products with the safety of you, our valued customer, foremost in mind. In addition, we ask that you exercise a degree of care when using any electrical appliance and adhere to the following precautions. IMPORTANT SAFEGUARDS
- Remove and discard any packaging materials safely before use.
- Ensure the product is properly assembled before rst use and fully unwind the power cord before operating.
- Before using for the rst time, please ensure that your electricity supply is the same as shown on the rating label on the underside of the appliance (220-240 V ~ 50-60 Hz 1560-1850 W). If you have any concerns, please contact your local electricity company.
- The installation of a residual current safety switch is recommended to provide additional safety when using all electrical appliances. Safety switches with a rated operating current not more than 30mA are recommended. Consult an electrician for professional advice.
- Regularly inspect the power cord, plug and actual appliance for any damage. If found to be damaged in any way, immediately cease use of 2 Sage
the appliance, and return the entire appliance to the nearest authorised Sage Service Centre for examination, replacement, or repair.
- Do not let the power cord hang over the edge of a counter or table. Do not let the power cord touch hot surfaces or become knotted.
- Do not touch hot surfaces. Always ensure the appliance has been allowed to cool; if the appliance is to be: – left unattended, cleaned, moved, assembled, or stored, always switch o the espresso machine by pressing the POWER button to OFF. Switch o and unplug from the power outlet.
- Children must not play with the appliance. Do not leave the appliance unattended when in use. Do not move the appliance whilst in operation.
- This appliance can be used by persons with reduced physical, sensory, or mental capabilities or lack of experience and knowledge if they have been given supervision or instruction concerning use of the appliance in a safe way and understands the hazards involved. Cleaning and user maintenance shall not be made by children unless they are older than 8 and supervised. Keep the appliance and its cord out of reach of children aged less than 8 years. To eliminate a choking hazard for young children, discard the protective cover tted to the power plug safely.
- Position the appliance on a stable, heat resistant, level, dry surface away from the counter edge, and do not operate on or near a heat source such as a hot plate, oven, or gas hob.
- Do not operate the appliance in an enclosed space, or inside a cupboard.
- Do not use attachments other than those provided with the appliances. The use of attachments not sold or recommended by Sage
may cause re, electric shock, or injury.
- This appliance is for household use only. Do not use the appliance for anything other than its intended purpose. Do not use in moving vehicles or boats. Do not use outdoors. Misuse may cause injury.
- Servicing should only be performed by an authorised service representative.
- Improper use of the appliance incorrectly operated or unprofessionally repaired. In such a case, any warranty claim is void. No warranty for any damages can be accepted.FOR HOUSEHOLD USE ONLY
SAVE THESE INSTRUCTIONS
- The appliance is not intended to be operated by means of an external timer or separate remote-control system.
- Use caution when operating machine as metal surfaces are liable to get hot during use. Heating element is subject to residual heat after use.
- The steam wand must be positioned over the drip tray and away from persons before turning the steam dial to ON.
- Do not put ngers into the tamping chute when pushing down the tamping lever.
- Do not open the programming port, this is exclusively for authorised service personnel only.
- Do not operate the grinder without the hopper lid in position. Keep ngers, hands, hair, clothing, and utensils away from the hopper during operation.
- Do not ll water tank with hot water.
- Never use the appliance without water in the water tank.
- Wipe the outer surface with a soft, damp cloth and then polish with a soft, dry cloth. Keep the appliance and accessories clean. Follow the cleaning instructions provided. CAUTION To prevent damage to the appliance, do not use alkaline cleaning agents when cleaning, use a soft cloth and a mild detergent. The symbol shown indicates that this appliance should not be disposed of in normal household waste. It should be taken to a local authority waste collection centre designated for this purpose or to a dealer providing this service. For more information, please contact your local council oce. To protect against electric shock, do not immerse the power cord, power plug or appliance in water or any other liquid.EN
FOR HOUSEHOLD USE ONLY
SAVE THESE INSTRUCTIONS
Features THERMOCOIL PRECISION HEATING SYSTEM Integrated stainless steel water coil that accurately controls water temperature. PRECISION CONICAL BURR GRINDER Precision conical burrs maximise ground coee surface area for a full espresso avour. LESS MESS The portalter remains secure in the same position as you grind, dose and tamp, reducing any potential grinds mess on your drip tray and bench top.
PID TEMPERATURE CONTROL
Electronic PID temperature control for increased temperature stability.
DEDICATED HOT WATERSPOUT
For making Long Blacks and pre-heating cups. MANUAL MICRO-FOAM TEXTURING WAND 360° swivel action steam wand that easily adjust to perfect position for milk texturing.
SYSTEM Simplies the steps needed to grind, dose, and tamp to create an impressive puck. Less mess. Less fuss. Intelligent Dosing with Central Grinds Loading Dose is automatically calculated based on last grind, and coee is centre loaded to promote an even dose. Assisted Tamping with a Barista Twist Finish Precise 10kg impression with a professional 7 degree barista twist for a polished puck. Precision Measurement Auto Corrects the Next Dose Gauge indicates when correct level is achieved, and the system automatically remembers the adjustment for the next time.Rating Information
I. Removable Tamp Cover
Tool storage tray – houses accessories when not in use. (see next page)
CEN Rating Information
ACCESSORIES A. 54mm Stainless Steel Portalter B. Stainless steel milk jug C. Water lter holder with lter D. 1 CUP & 2 CUP single wall lter baskets E. 1 CUP & 2 CUP dual wall lter baskets F. Cleaning tablets G. The Razor
I. Cleaning tool for steam wand tip
J. Cleaning disc K. Descaling powder L. Cleaning brush
Machine PreparationRemove and discard all labels and packaging materials attached to your espresso machine.Ensure you have removed all parts and accessories from the box before discarding the packaging.Remove the water tank located at the back of the machine by pulling the water tank handle.Clean parts and accessories (water tank, portalter, lter baskets, jug) using warm water and a gentle dish washing liquid. Rinse well then dry thoroughly. NOTE For machines in colour, drip tray protection guard included. DO NOT DISCARD.
INSTALLING THE WATER FILTER
- Remove the water lter and water lter holder from the plastic bag.• Set the reminder for next month of replacement. It is recommend replacing the lter every 3 months. 90d
- Soak the lter in cold water for 5 minutes.
- Rinse the lter holder with cold water.• Insert the lter into the two parts of the lter holder.• To install the assembled lter holder into the water tank, align the base of the lter holder with the adapter inside the water tank. Push down to lock into place. NOTE Replacing the water lter every three months will reduce the need to descale the machine. Filters can be purchased at sageappliances.comEN
Functions Filling the Water Tank
- Ensure the water lter is securely tted inside the water tank.
- Use the handle at the top of the water tank to assist in lifting the water tank and away from the machine.
- Fill the water tank with cold potable tap water up to the MAX marking indicated on the side of the water tank.
- Replace the water tank back on the machine, pressing down to ensure that it is properly positioned and attached to the machine. NOTE If the water level in the water tank is below the minimum (MIN) marking, the espresso machine will not operate. Attaching the Hopper
- Insert the bean hopper into position on top of the machine.
- Turn the dial to lock the hopper into place.
- Fill the hopper with fresh beans. NOTE The lter light ashes between single and double basket size when the bean hopper is not correctly locked into position. Attaching the Drip Tray
- Place the drip tray grill on top of the drip tray.
- For machine in colour, attach the drip tray protection guard cover on the drip tray.
- Slide the drip tray into the machine.10 GENERAL OPERATION
- Check the water tank is lled with cold tap water up to the maximum mark.
- Plug the power cord into the power outlet.
- Press the POWER button. The POWER button will ash while the machine is heating. (Light will ash for up to 55 seconds while the machine is heating.) When the correct temperature has been reached, the 1 CUP and 2 CUP buttons and the POWER button on the control panel will illuminate. First Use Priming and Flushing the Machine It is recommended to complete a water ushing operation to ensure the machine has been conditioned. When the machine has reached STANDBY mode, run the following steps.
- Place a cup under the group head and press the 2 CUP button to run hot water through the group head.
- Place a cup under the hot water spout. Rotate the dial to “Hot Water” position and run water through the hot water outlet for 10 seconds.
- Position the steam wand over the drip tray. Rotate the dial to “Steam” position and activate steam for 10 seconds.
- Discard the contents of the cup.
- Repeat this cycle 3 times. Discard the contents of the drip tray and rell the water tank up to the max line.
- Insert the portalter into the grinding cradle, press and hold 'Dose' button for 3 seconds. Remove the portalter and discard any grinds. NOTE
- Top up the water daily. The water tank should be lled with fresh, cold tap water before each use.
- DO NOT use highly ltered, demineralized, or distilled water in this machine. This may aect the taste of the coee. FILTER BASKETS This machine includes both single and dual wall, 1 CUP and 2 CUP lter baskets. Use the 1 CUP lter basket when brewing a single cup and the 2 CUP lter baskets when brewing 2 cups or a stronger single cup or mug. Adjust the grind amount and size if switching from a single basket to a double basket, or vice versa. The provided lter baskets are designed for: 1 CUP lter basket = 8-11g 2 CUP lter basket = 16-19g Single Wall Filter Baskets 1 CUP 2 CUP Single Wall lter baskets should be used when grinding fresh whole coee beans. These allows you to experiment with grind and dose to create a more balanced espresso. Dual Wall Filter Baskets 1 CUP 2 CUP Dual Wall lter baskets should be used when using pre-ground coee and older beans that are past the 30-day roast date. These regulate the pressure and helps to optimize the extraction regardless of the grind, dose, or freshness.EN
THE GRIND Setting the Grind Size FINER GRIND SIZE TURN COARSER GRIND SIZE TURN The grind size will aect the rate of water ow through the coee in the lter basket and the avour of the espresso. When setting the grind size, it should be ne but not too ne and powdery. There are 25 settings on the GRIND SIZE dial. To adjust the grind, rotate the dial to the back of the machine to go ner, or rotate the dial towards the front of the machine to go coarser. The smaller the number, the ner the grind size. The larger the number, the coarser the grind size. We recommend you start at the No.16 setting and adjust as required. NOTE
- When making changes to the grind size, the new auto dosing time will be calculated after your next tamp and updated for the dose cycle following that.
- For most bean varieties, the grinder will automatically switch o when the beans get too low to complete a dose. TIP Changing the grind size aects the dose in the portalter. A ner grind size may cause an under dose requiring “A Bit More”. A coarser grind size may cause an over dose. To avoid an over dose, press and hold the ‘Filter’ button for 3 seconds, reducing the grind time by 3 seconds. DOSING
- Ensure the bean hopper is locked on the machine and lled with fresh coee beans.
- Insert the lter basket required, into the portalter.
- Press ‘Dose’ button to start grinding. The light blinks until grind cycle is completed. DOSE NOTE If the Dose button is not illuminated, check that the portalter is inserted securely in the cradle, the bean hopper is locked in position and the tamp lever is in the up-home position.12 TAMPING When the grind cycle is completed, the ‘Tamp’ light indicator blinks.
- Push the lever downwards to the end position until a beep sound plays. This will tamp the coee grinds in the portalter using a consistent amount of tamp force. Pushing the lever slowly and consistently will help to improve the puck appearance. BEEP!
- Release the lever slowly upwards to the home position after tamping. TIP It is recommended to tamp twice to achieve a very polished coee puck. Below is a table of DOSE LEVEL indicator bars: DOSE LEVEL TAMP DOSE LEVEL TAMP DOSE LEVEL TAMP DOSE LEVEL TAMP DOSE LEVEL TAMP Ideal Severe Under Dose Under Dose (under middle bar) Over Dose (above middle bar) Severe Over Dose
- The bar on the machine indicates ideal tamp level and the right amount of coee grind is in the portalter. This is the level that you are aiming for.EN
OVER DOSE? An under or over dose can occur when fresh beans are added to the hopper; when coee beans age; a dierent type of coee bean is used or if a change is made to the grind size. What to do when dose level is below the ideal middle bar?
- When tamp is below the ideal middle bar, the machine is switched to ‘A Bit More’ mode, the ‘Dose’ button light will ash. DOSE
- Press the ‘Dose’ button to add 'A Bit More' grinds to the portalter, then complete a tamp for an updated dose level reading.
- When ideal dose level is reached, the machine will automatically update the auto dose time for the next cycle. What to do when dose level is above the ideal middle bar?
- When tamp is above the ideal middle bar, remove the portalter from the cradle.
- Use the Razor Trimming Tool. (refer to Trimming the Dose section)
- The machine will calculate how much to reduce the auto grind time and apply this for the next cycle.
DEDUCT TIME FROM AUTO DOSE
When an over dose is anticipated to occur before grinding, due to; changing to a coarser grind size, changing beans, or running out of beans on previous grind cycle; press and hold the 'Filter' button for 3 seconds. DOSING MODES Automatic Dosing MANUAL DOSE AUTO MANUAL This is the default dose function of the machine and the mode that will be most commonly used. The amount of coee grinds will automatically dose into the portalter, and the machine will provide guidance on achieving the ideal amount through the Dose Level Gauge. The machine will adjust the ideal dose on the next grind. Under Dose (A Bit More) After tamping the ‘Dose’ button will ash to indicate more grinds is needed into the portalter. Press the ‘Dose’ button to add ‘A Bit More’ coee grinds. Dose Top-up This feature is ideal when the portalter already has coee but needs more. For example, in situations where:
- Removing the portalter during grinding and failing to re-insert within 5 seconds time out.
- Removing the portalter after a full grind cycle without tamping skimming o the top of the coee pile. The machine can top up from that amount already in the portalter basket preventing coee waste, starting a fresh grind cycle, or updating the auto grind time. To initiate the top up, the portalter will need to be inserted into the cradle and tamped. If the tamp level displays an under dose, the dose button will blink indicating a top up. Press the 'Dose' button to start the grind and it will dose the right amount to get the ideal level.14 NOTE
- This feature is only available on 'Auto' mode.
- This feature may require 2 to 3 top up cycles to reach an ideal dose.
- The set auto grind time will not be aected by this feature.
- Machine will not start a top up with an over dose or ideal level. Remove the portalter and trim the excess with the razor. Over Dose (Trimming the Dose) the Razor
precision dose trimming tool allows you to trim the puck to the right level for a consistent extraction. Insert the Razor
into the coee basket until the shoulders of the tool rest on the rim of the lter basket. The blade of the dosing tool should penetrate the surface of the tamped coee. Rotate the Razor
dosing tool back and forth while holding the portalter on an angle over the knock box to trim o excess coee. Manual Dosing
MANUAL DOSEAUTO MANUAL
Press the manual dose button to switch to manual dose mode. The light around the Manual Dose Dial and the Manual light will illuminate when in manual mode. Select the dose amount by turning the dial clockwise for more or counter clockwise for less grind time. Grinder Purge It is recommended to purge the retained grinds left in the burrs or chute prior to making the rst coee of the day. Old grinds may aect the in-cup quality and coee taste. Purging will ensure only fresh coee makes it into your cup. To purge, press and hold the 'Dose' button. The grind will start after 0.5 seconds, and it will stop once the ‘Dose’ button is released. In auto mode, after doing a purge it is required to remove the portalter, discard the grind from the basket and re-insert the portalter into the grinding cradle to return the machine to its standby mode.EN
Purging the Group Head Before placing the portalter into the group head, run a short ow of water through the group head by pressing the 1 CUP button. This will purge any ground coee residue from the group head and stabilize the temperature prior to extraction. Inserting the Portalter Wipe excess coee grinds from the rim of the lter basket to ensure a proper seal is achieved in the group head. Place the portalter underneath the group head so that the handle is aligned with the INSERT position. Insert the portalter into the group head and rotate the handle towards the centre until resistance is felt. Extracting Espresso
- As a guide, the espresso will start to ow after 8-12 seconds (infusion time) and should be the consistency of dripping honey.
- If the espresso starts to ow before 7 seconds you have either under dosed the lter basket and/or the grind is too coarse. This is an UNDER-EXTRACTED shot.
- If the espresso starts to drip but doesn’t ow after 12 seconds, then you have either over dose the lter basket and/or the grind is too ne. This is an OVER-EXTRACTED shot. A great espresso is about achieving the perfect balance between sweetness, acidity, and bitterness. The avour of your coee will depend on many factors, such as the type of coee beans, degree of roast, freshness, coarseness or neness of the grind, and the dose of ground coee. Experiment by adjusting these factors just one at a time to achieve the taste of your preference.16 EXTRACTION GUIDE OPTIMUM 8-11g (1 CUP) 16-19g (2 CUP) 25-30 SEC BALANCED
- Press and hold the 1 CUP or 2 CUP button for the desired pre-infusion time.
- Release the button to start the extraction.• Press the 1 CUP or 2 CUP button again to stop the extraction. NOTE Pressing any button during extraction will stop extraction and the machine will return to standby mode.
PROGRAMMING SHOT VOLUME
- Press and hold both the 1 CUP and 2 CUP buttons for 3 seconds, the buttons will illuminate and ash.
To set the 1 CUP volume:• Press the 1 CUP button to start the extraction.• Press the 1 CUP button again to stop the extraction. The modied volume will be saved.To set the 2 CUP volume, follow the above steps but select the 2 CUP button to start and stop the extraction.
The machine has a dedicated hot water outlet.• Turn the dial on the right, from STANDBY to HOT WATER.• Turn the dial back to STANDBY to stop hot water ow.• Maximum ow out of hot water volume is 240 ml. WARNING Cup temperature is approximately 90°C (194°F). Be careful in handling hot beverages.EN
TEXTURING MILK There are two phases to texturing milk, stretching, and heating. These two operations should blend into one with the goal being silky smooth textured milk at the correct temperature.
- Start with fresh cold milk of choice.
- Fill the milk jug between the min and max level.
- Position the steam tip over the drip tray and turn the dial from STANDBY to STEAM and wait until the steam is owing strongly.
- Turn the steam dial to the STANDBY position to pause the steam, then within 8 seconds, insert steam wand tip into milk jug and turn dial back to STEAM position.
- Insert the steam tip 1-2cm below the surface of the milk close to the right-hand side of the jug at the 3 o’clock position.
- Keep the tip just under the surface of the milk until the milk is spinning clockwise, producing a vortex (whirlpool eect).
- With the milk spinning, slowly lower the jug. This will bring the steam tip to the surface of the milk and start to introduce air into the milk. You may have to gently break the surface of the milk with the tip to get the milk spinning fast enough.
- Keep the tip at or slightly below the surface, continuing to maintain the vortex. Texture the milk until sucient volume is obtained.
- Lower the tip beneath the surface but keep the vortex of milk spinning. The milk is at the correct temperature (60-65°C) when the jug is hot to comfortably touch.
- Move the steam dial to the STANDBY position before taking the tip out of the milk.
- Set the jug to one side, turn dial to STEAM to purge out any residual milk from the steam wand and wipe steam wand with a damp cloth.
- Tap the jug on the bench to collapse any bubbles.
- Swirl the jug to polish and re-integrate the texture.
- Pour milk directly into the espresso.
- The key is to work quickly, before the milk begins to separate.
CAUTION: BURN HAZARD
Pressurized steam can still be released, even after machine has been switched o. Children must always be supervised. Adjusting Water Temperature Dierent beans may require dierent water temperatures to extract their optimum avour. The temperature can be adjusted +/- 2°C in 1°C increments from the default setting:
1. Turn the machine to OFF.
2. Press and hold lter, 1 CUP and 2 CUP then
press and hold the POWER button.
3. The machine will beep once and display the
current temperature.
4. Press one of the below buttons within
- Increase 1°C – 2 CUP
- Decrease 2°C – Dose The machine will beep twice to conrm the change and return to standby mode.
Some types of coee may require a wider grind range to achieve an ideal extraction or brew. A feature of your Barista Express Impress
is the ability to extend this range with an adjustable upper burr. We recommend making only one adjustment at a time.
Hold hopper over container & turn dial to release beans into container
Align hopper into position DOSE
Run grinder until empty
Remove wire handle from both sides of the burr
Align the number with the handle opening
Insert wire handle from both sides of the burr
Push upper burr firmly into position
Align hopper into position
Check your extraction
RESET DEFAULT SETTINGS
Reset Auto Dose Time Resetting the auto dose time is recommended if there is a signicant change to the grind size or there is an accidental double dose into the portalter. The machine must be on STANDBY mode.
- Press and hold ‘Manual Dose’ button and ‘Filter’ button for 3 seconds to reset grind time to factory settings.
- The machine will conrm the reset when the control panel lights for lter, grind mode and dial will ash 3 times with beeping sounds.
- The machine will return to STANDBY mode. Reset Extraction Time The machine must be on STANDBY mode.
- Press and hold the 'Filter' and 1 CUP and 2 CUP buttons for 3 seconds.
- The machine will beep 3 times.
- The machine will then go into ready mode. ALERTS No Hopper Warning The lter lights ash between single and double basket size, the hopper is not attached correctly. Check the hopper and ensure the bean hopper is inserted correctly and locked in place. Low Coee Beans Warning The ‘Dose’ button and the ‘Dose Level’ lights will ash two red LEDS and will sound 3 beeps. Add coee beans to the hopper. Tamp Lever Not at Home Position The machine beeps 3 times and pauses dose cycle. Return the lever to the up or home position and press Dose button to continue.EN
REPLACING THE WATER FILTER
Soak water filter for 5 mins
Rinse water filter Place filter into filter holder
Install filter in water tank
Insert & lock water tank The provided water lter helps reduce the risk of scale build-up in and on many of the inner functioning components. Replacing the water lter every three months will reduce the need to descale the machine. If you live in a hard water area, it is recommended to change the water lter more frequently. WARNING After regular use, hard water can cause mineral build up in and on many of the inner functioning components, reducing the brewing ow, brewing temperature, power of the machine, and taste of the espresso.• Remove the lter from the plastic bag, and soak in a cup of water for 5 minutes.• Rinse the lter under cold running water for 5 seconds.• Insert the lter into the lter holder.• Set the date dial 3 months ahead.• To install, push down the lter to lock into place. NOTE For replacement of water lters contact Sage Service Centre or visit our website at sageappliances.com CLEANING CYCLE NOTE This is a back-ushing cycle and separate from descaling.The CLEAN / DESCALE light will ash when a cleaning cycle is required.1. Insert the 1 CUP lter basket into the portalter, followed by the supplied cleaning disc, followed by one cleaning tablet.2. Lock the portalter into the group head and place a large container beneath the portalter spouts.3. Ensure the water tank is lled with cold water and the drip tray is empty.4. Press the POWER button to switch the machine o.5. Press and hold 1 CUP, 2 CUP and the POWER buttons for 3 seconds.
6. The cleaning cycle will commence and last for approximately 5 minutes. During this time, water will intermittently ush into the portalter to dissolve the cleaning tablet and ush back into the group head. NOTE No water should come through the portalter.7. Remove the portalter and ensure the tablet has completely dissolved. If the tablet has not dissolved; repeat from step 4 of the cleaning cycle until the tablet is dissolved.8. Once the tablet has completely dissolved, remove the cleaning disc, reinsert the portalter and press the 2 CUP button to rinse the brew head. It is recommended to place a container under the portalter spout to avoid water splashing onto the machine. Once complete, make sure to wipe o any splashes with a soft dry cloth.20 DESCALING NOTE
- Ensure that the water lter is removed from the water tank before adding the descaling powder when descaling the machine.
- While the cleaning cycle is important for keeping the brew, head clean from coee oils; the descaling cycle is essential to ensure that the machine is kept clean on the inside and free from mineral build-up.
- Do not use bottled water when descaling. Most bottled water may contain dissolved solids that can leave deposits inside the machine. The CLEAN / DESCALE light will illuminate solid when descaling is required
1. Fully dissolve one sachet of Sage descaling
powder into 1 litre of water then ll the water tank (start the process after fully dissolving the powder).
2. Ensure the machine is OFF; then press
and hold the 2 CUP and POWER buttons simultaneously for 5 seconds to enter the descale mode.
The unit will heat up as part of commencing the descaling action, during the heating process, the POWER and 2 CUP buttons should ash continuously. The machine will indicate it is ready for descaling when the POWER button, 2 CUP button, CLEAN / DESCALE indicator and HOT WATER / STEAM indicator are all illuminated solid. Descaling the coee component
3. Press the 2 CUP button to start the
descaling for the coee component of the machine. Descaling coee component takes approximately 25 seconds. The 2 CUP button should ash continuously and remain constant once the descaling process has nished. To terminate the descaling within 25 seconds, press the 2 CUP button again. Extraction will run for 25 seconds or the user press the 2 CUP button. The unit will conrm coee component descale cycle with a beep and the 2 CUP light turns solid. Descale the steam and hot water components Descaling steam and hot water take approximately 13 seconds and 8 seconds respectively. Descaling can be terminated prematurely by turning the steam dial to STANDBY.
4. Descale Steam component by turning
the steam dial RIGHT towards the STEAM icon.
5. Descale Hot water component by turning
the steam dial to the LEFT towards the HOT WATER icon. Repeat processes to complete descaling After the above processes about half (0.5 litre) of the descale solution should be left in the water tank.
6. Repeat steps 3 to 5 above to complete the
descaling process to empty the solution in the tank. Descaling Solution Rinse
7. After descaling, remove the water tank and
rinse thoroughly then rell with fresh cold water to the maximum capacity (2 litres) and repeat steps 4-6 to further cleanse the machine of any residue of the cleaning solution thoroughly.
8. Press POWER to quit the descaling process.
This will be indicated by the LED lights switching o. NOTE The machine turns o automatically if there is no action for 5 minutes in descaling mode. To resume descaling start from step 2.EN
Regular cleaning helps the burrs achieve consistent grinding results.
Remove top burr Clean top burr with brush
Clean lower burr with brush
Clean the chute with brush
Replace tamp cover ADVANCED CLEANING FOR THE CONICAL BURR GRINDER This step is only required if there is a blockage between the grinding burrs and the grinder outlet.
Use 10mm socket. Rotate clockwise to loosen the nut only TURN COARSERGRIND SIZE
Remove nut,spring & flat washer.Carefully remove lower burr.
Unblock the grinds exit chute using the brush or a pipe cleaner
Removetamp cover Clean the chute with brush Replacetamp cover
Insert lower burr (drive pin & cavity to align).Insert flat washer& spring washer. TIGHTEN NUT
Set GRIND SIZE to 16
Replace hopper Lock hopper WARNING Care should be taken as the grinder burrs are extremely sharp.22
Clean the chute with brush
- Remove the tamp cover.
- Brush clean the tamp face and cradle from any dust or grinds.
- Push down and hold the lever down, using the tamp cleaning brush, dust o grind residues in and around the tamp.
- Slowly release the lever back up making sure the cleaning brush is clear and out of the tamp system area.
CLEANING THE STEAM WAND
- The steam wand should always be cleaned after texturing milk. Wipe the steam wand with a damp cloth. Then with the steam wand tip directed over the drip tray, briey set the STEAM / HOT WATER dial to the STEAM position. This will clear any remaining milk from inside the steam wand.
- If any of the holes in the tip of the steam wand become blocked, ensure the STEAM / HOT WATER dial is in the STANDBY position. Press the POWER button to switch the machine o and allow to cool. Use the pin on the end of the provided cleaning tool to unblock the hole(s).
- If the steam wand remains blocked, remove the tip using the integrated spanner in the cleaning tool and soak in hot water. Use the pin on the end of the provided cleaning tool to unblock the hole(s) before re-attaching to the steam wand.
- The lter baskets and portalter should be rinsed under hot water immediately after use to remove all residual coee oils.
- If any of the holes in the lter basket become blocked, use the pin on the end of the provided cleaning tool to unblock the hole(s).
- If the hole(s) remain blocked, dissolve a cleaning tablet in hot water and soak lter basket and portalter in solution for approx. 20 minutes.
- The group head interior and shower screen should be wiped with a damp cloth to remove any ground coee particles.
- Periodically purge the machine. Place an empty lter basket and portalter into the group head.
- Press and hold the 1 CUP button and run a short ow of water to rinse out any residual coee.
- The drip tray should be removed, emptied, and cleaned at regular intervals, particularly when the drip tray full indicator is visibly oating.
- Remove the grid from the drip tray. Lift the coee grind separator and dispose of any coee grounds. The drip tray full indicator can also be removed from the drip tray by pulling upwards to release the side latches. Wash all parts in warm soapy water with a soft cloth. Rinse and dry thoroughly.
- The storage tray (located behind the drip tray) can be removed and cleaned with a soft, damp cloth. Do not use abrasive cleansers, pads or cloths which can scratch the surface. NOTE All parts should be cleaned by hand using warm water and a gentle dish washing liquid. Do not use abrasive cleansers, pads or cloths which can scratch the surface. Do not clean any of the parts or accessories in the dishwasher.EN
- The outer housing and cup warming tray can be cleaned with a soft, damp cloth. Polish with a soft, dry cloth. Do not use abrasive cleansers, pads or cloths which can scratch the surface.
STORING YOUR MACHINE
- Before storing, press the POWER button to o, turn the steam dial to STANDBY switch O at the power outlet and unplug. Remove unused beans from the hopper, clean the grinder, empty the water tank and the drip tray.
- Ensure the machine is cool, clean, and dry. Insert all accessories into position or into the storage tray. Store upright. Do not place anything on top. WARNING To prevent damage, do not use alkaline cleaning agents when cleaning. Use a soft cloth and a mild detergent. WARNING Do not immerse power cord, power plug or appliance in water or any other liquid. The water tank should never be removed or completely emptied during decalcifying.
Over time, the silicone seal surrounding the shower screen will need to be replaced to ensure optimum brewing performance.
1. Press the POWER button to switch the
machine o and unplug the cord from the power outlet.
2. Carefully remove the water tank and drip tray,
taking particular care if they are full.
3. Using a skewer or similar, clean the centre of
the screw of any residual coee.
4. Insert the shorter end of the Allen Key into the
centre of the screw. Turn counter clockwise to loosen the screw.
5. Once loosened, carefully remove, and retain
the screw and stainless-steel shower screen. Make note of the side of the shower screen that is facing downwards. This will make re-assembly easier. Wash the shower screen in warm soapy water, then dry thoroughly.
6. Remove the silicone seal with your ngers or a
pair of long-nose pliers. Insert the new seal, at side rst, so the ribbed side is facing you.
7. Re-insert the shower screen, then the screw.
With your ngers, turn the screw clockwise for 2-3 revolutions then insert the Allen Key to tighten until the screw is ush with the shower screen.
8. Re-insert the drip tray and water tank.
NOTE Contact Sage Service Centre or visit sageappliances.com for replacement silicone seals or for advice. Clean centre of screw before inserting Allen Key24 Troubleshooting
PROBLEM POSSIBLE CAUSES WHAT TO DO
The machine is on but ceases to operate
- Machine is too hot. Turn machine o. Wait for 30-60 minutes and turn machine back on. If problem persists, call Breville Consumer Support. Water does not ow from the group head
- Machine has not reached operating temperature. Allow time for the machine to reach operating temperature.
- Water tank is empty. Fill water tank.
- Water tank is not fully inserted and locked into position. Push water tank in fully and lock latch closed. No hot water
- Water tank is empty. Fill water tank. Grinder time out
- The coee grind is very ne. Clean out grinder using provided cleaning tool. Refer to ‘Cleaning Conical Burrs’ under Care & Cleaning. Grinding for a very long time
- Chute is blocked. Clean chute using provided cleaning brush. Refer to ‘Cleaning Conical Burrs’ under Care & Cleaning. Will not grind / grind stops
- Out of beans. Add more beans.
- Hopper not locked (dose light ashing back and forth). Lock hopper.
- Portalter not fully inserted in the grinding cradle. Fully insert the portalter and see the DOSE light button illuminates.
- Lever is too low and the tamp blocks the chute. Raise lever fully to home position.
- Coee build-up stopping portalter insertion. Clean grinding cradle with brush. Pressure Gauge is not working
- Incorrect dose or not enough coee in the lter basket. Use dual wall baskets or use a ner grind size setting. If problem persist, call Breville Consumer Support.
- Using coee beans beyond expiry date. Use freshly roasted coee beans with a ‘Roasted On’ date and consume between 5-20 days after that date. Auto time not adjusting
- Machine in ‘Manual’ mode. Press the MANUAL DOSE dial to return to auto mode.
- In ‘Top-up’ mode. Do not remove the portalter until grind has completed and ideal dose is reached.EN
PROBLEM POSSIBLE CAUSES WHAT TO DO
Dose level is not updating
- Machine in ‘Manual’ mode. Press the MANUAL DOSE dial to return to auto mode. Refer to ‘Dosing Modes’ under Functions. Grinder does not grind all beans
- Not enough beans in hopper. Rell hopper or use ‘Manual’ mode. Severe overdose
- Single basket used in double lter mode. Select the correct lter size. Severe underdose
- Double basket used in single lter mode. Select the correct lter size for your next dose, then ‘Reset Auto Dose Time’ under Functions. Underdosed
- Grind adjusted to ner grind. Use ‘A Bit More’ to reach the ideal dose. Coee is not running from the portalter
- The coee grind is too ne. Refer to ‘Setting the Grind Size’ and ‘Extraction Guide’ under Functions.
- Water tank is empty. Fill water tank. Coee runs out too quickly
- The coee grind is too coarse. Refer to ‘Setting the Grind Size’ and ‘Extraction Guide’ under Functions. Coee runs out too slow
- The coee grind is too ne. Refer to ‘Setting the Grind Size’ and ‘Extraction Guide’ under Functions. No crema
- Coee beans are stale. Use freshly roasted coee beans with a ‘Roasted On’ date and consume between 5-20 days after that date. Coee is too cold
- Cups are cold and causing temperature of extraction to reduce. Pre-heat cups.
- Milk not heated enough (if making milk-based drink). When the base of the jug becomes hot to touch this is when the milk is heated at the correct temperature. Refer to ‘Texturing Milk’ under Functions. No steam
- Steam wand is blocked. Use the pin on the end of the provided cleaning tool. If steam wand remains blocked, refer to ‘Cleaning the Steam Wand’ under Care & Cleaning for detailed cleaning process.
- Water tank is empty. Fill water tank. Water coming out of steam wand
- Machine is heating up. Purge steam wand before texturing milk. Refer to ‘Texturing Milk’ under Functions.26
PROBLEM POSSIBLE CAUSES WHAT TO DO
Hot water isn’t continuously owing
- Machine is too hot after steaming. Allow machine to cool down. Lever very hard to tamp
- Severe overdose. Use the Razor trimming tool* to correct current dose. Select the correct lter size.
- Coee build-up in mechanism. Remove shroud (tamp) cover and clean using the cleaning brush provided. Puck surface is not at and smooth
- Coee grinds stuck on tamp face. Remove shroud (tamp) cover and clean using the cleaning brush provided. Puck surface has some loose grounds on top
- Coee grinds caught on tamp. Push the tamp lever again for a very polished coee puck.
- Coee grinds caught on tamp from tamping too quickly. Push the lever down slower. Tamp height is not at desired level
- Machine is on auto mode, that is for ideal height only. Use ‘Manual’ mode for custom control. Tamp light continues to ash and no height reading on gauge after tamping
- Tamping action is not completed. Push the tamp lever down until you hear the beep. When maintenance light indicator ashes
- Cleaning cycle is required. The maintenance light indicator will ash when a cleaning cycle is required. Go to Care & Cleaning section for cleaning and descaling instructions. When maintenance light indicator illuminates solid
- Descale cycle is required. The maintenance light indicator is on solid light when a descale cycle is required. Go to Care & Cleaning section for cleaning and descaling instructions.
- Razor – See accessories list under Components.
2 YEAR LIMITED GUARANTEE
Sage Appliances guarantees this product for domestic use in specied territories for 2 years from the date of purchase against defects caused by faulty workmanship and materials. During this guarantee period Sage Appliances will repair, replace, or refund any defective product (at the sole discretion of Sage Appliances). All legal warranty rights under applicable national legislation will be respected and will not be impaired by our guarantee. For full terms and conditions on the guarantee, as well as instructions on how to make a claim, please visit sageappliances.com Guarantee ENEN
Sage Appliances guarantees this product for domestic use in specied territories for 2 years from the date of purchase against defects caused by faulty workmanship and materials. During this guarantee period Sage Appliances will repair, replace, or refund any defective product (at the sole discretion of Sage Appliances). All legal warranty rights under applicable national legislation will be respected and will not be impaired by our guarantee. For full terms and conditions on the guarantee, as well as instructions on how to make a claim, please visit sageappliances.com Guarantee EN28 Notes ENthe User Guide B###### / S###### DE HANDBUCH SES876 the Barista Express
EasyManual