HG530H 011 - Robot vacuum HOOVER - Free user manual and instructions
Find the device manual for free HG530H 011 HOOVER in PDF.



User questions about HG530H 011 HOOVER
0 question about this device. Answer the ones you know or ask your own.
Ask a new question about this device
Download the instructions for your Robot vacuum in PDF format for free! Find your manual HG530H 011 - HOOVER and take your electronic device back in hand. On this page are published all the documents necessary for the use of your device. HG530H 011 by HOOVER.
USER MANUAL HG530H 011 HOOVER
USER MANUAL (GB)......2
GUIDE D'UTILISATION (FR)......10
MANUALE D'USO (IT)....26
GEBRUIKERSHANDLEIDING (NL) .34
MANUAL DE INSTRUÇÕES (PT) ....42
MANUAL DE USUARIO (ES)......50
BRUGERVEJLEDNING (DK) .....58
BRUKERHÄNDBOK (NO)......66
BRUKSANVISNING (SE)....74
KÄYTTÖOHJE (FI) 82
NAVODILA ZA UPORABO (SI).....122
POUŽÍVATELŠKÁ PRÍRUČKA (SK)...130
KULLANIM KILAVUZU (TR) .....138
FELHASZNÁLÓI KÉZIKÖNYV (HU) ..146
natural_image
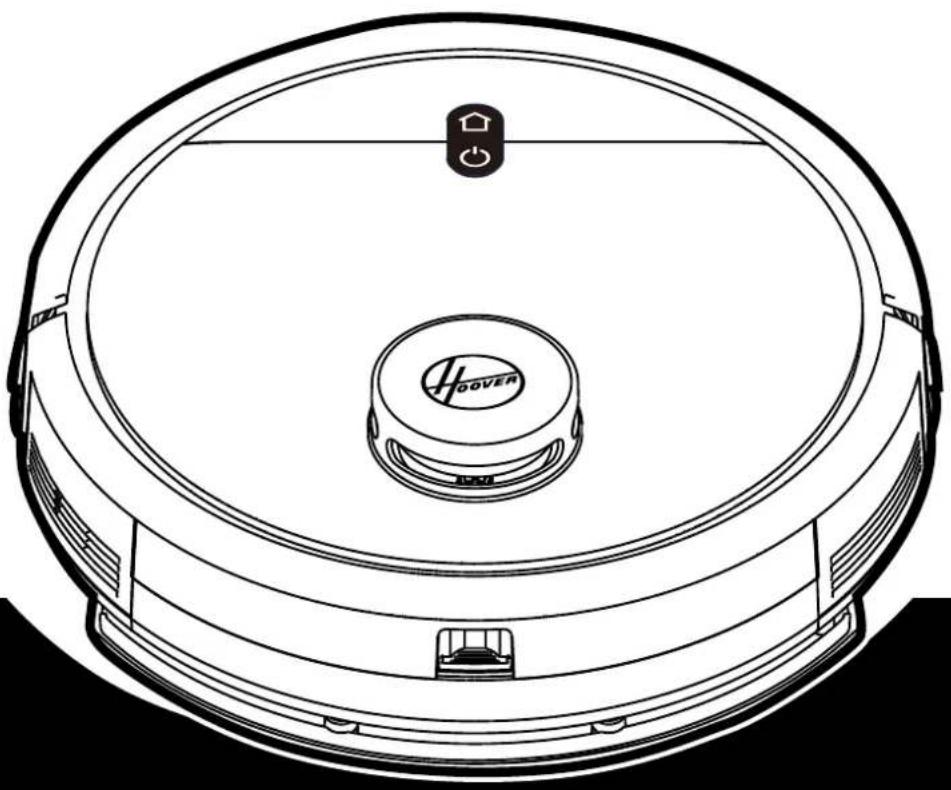
Line drawing of a robotic vacuum cleaner with a central cover and control buttons (no text or symbols)INSTRUCTIONS FOR SAFE USE
This appliance should only be used for domestic cleaning, as described in this user guide. Please ensure that this guide is fully understood before operating the appliance.
Always switch off and remove the charger from the socket before cleaning the appliance or any maintenance task.
This appliance can be used by children aged from 8 years and above and persons with reduced physical, sensory or mental capabilities or lack of experience and knowledge if they have been given supervision or instruction concerning use of the appliance in a safe way and understand the hazards involved. Children shall not play with the appliance. Cleaning and user maintenance shall not be made by children without supervision.
If the power cord is damaged stop using the appliance immediately. To avoid a safety hazard, an authorised Hoover service engineer must replace the power cord.
If the area to be cleaned contains a balcony or stairs, a physical barrier should be used to prevent access to the balcony or stairs and ensure safe operation. Small children and pets must be supervised while the Robot is cleaning.
Always store the appliance indoors. Do not use outdoors or expose the appliance to the elements, humidity or heating sources (oven, fireplace, wet floor).
Do not expose the Robot or accessories to excessive heat / cold (keep between 0-30°C).
Do not drop the Robot or use any accessory if it has been dropped, damaged, left outdoors or dropped in water.
Never unplug or pull the mains power adaptor by the power cord.
Do not use to clean stairs.
Battery Charging
Use only the original charger supplied with the appliance.
Check that your supply voltage is the same as that stated on the charger.
Never charge the batteries in temperatures above 30^ C or below 0^ C.
Plug the charger delivered with this appliance into a suitable socket.
Leaks from battery cells can occur under extreme usage or temperature conditions. If the liquid gets on skin, wash quickly with water. If the liquid gets into the eyes, flush them immediately with clean water for a minimum of 10 minutes. Seek medical attention.
It is normal for the charger to become warm to the touch when charging.
Use only attachments, consumables or spares recommended or supplied by Hoover.
Do not pick up hard or sharp objects, matches, hot ashes, cigarette ends or other similar items.
Do not spray with or pick up flammable liquids, cleaning fluids, aerosols or their vapours.
Do not continue to use your appliance or charger if it appears faulty.
Hoover service: To ensure the continued safe and efficient operation of this appliance we recommend that any servicing or repairs are only carried out by an authorised Hoover service engineer.
Do not use the appliance to clean animals or people.
Do not replace the Robot batteries with non-rechargeable batteries.
If the Robot will not be used for a long time (several weeks), unplug the mains power adaptor.
End of life battery removal
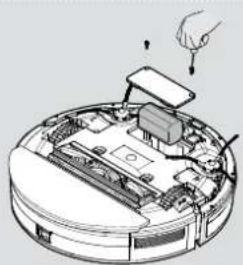
If the appliance is to be disposed of the batteries must first be removed. The appliance must be disconnected from the supply mains when removing the battery. Dispose of the batteries safely. Run the appliance until it stops because the batteries are fully discharged. Used batteries should be taken to a recycling station and not disposed of with household waste. To remove the batteries, please contact the Hoover Customer Centre or proceed according to the following instructions. Unplug the charger and switch off the Robot. Turn the Robot over and place on a level surface. Remove the screws and battery compartment cover. Remove the battery pack. [Fig. 16]
NOTE: Should you experience any difficulty in dismantling the unit or for more detailed information on treatment, recovery and recycling of this appliance, please contact your local city office or your household waste disposal service.
IMPORTANT NOTES BEFORE USE
Please read the following information carefully before using your Robot or its accessories.
Do not disassemble the Robot and do not attempt to repair it yourself. If a fault occurs, please contact the Hoover after Sales Service for professional advice.
Stairs: The Robot uses sensors to avoid falling down steps, stairs or over an edge. In some situations the sensors can become confused.
The Robot cannot detect steps that are less than 8cm in height. Steps less than 8cm may cause the Robot to fall down. If available, set No-go areas or Virtual walls through the app to protect your Robot from falling.
Highly reflective or very dark surfaces used on some steps or stairs, such as glass or polished ceramics may cause the Robot to fall down. If available set No-go areas or Virtual walls through the app or place a carpet on the lower step to protect your Robot from falling.
Using your Robot on mezzanines, landings or raised areas without borders should be avoided. If available set No-go areas or Virtual walls through the app to prevent your Robot entering these areas.
Battery Use: Your Robot is powered by rechargeable, high capacity lithium ion batteries. These rechargeable batteries are guaranteed for a period of 6 months if they are maintained and operated according to this User Manual.
In the event of a significant drop in the Robot's performance, replacement batteries can be obtained from your Hoover retailer.
Only use Hoover approved replacement parts for your Robot. Use of parts that are not approved by Hoover are dangerous and will invalidate your warranty.
Only use the supplied charging station and mains power adaptor to recharge your Robot. Use of the incorrect charging station or mains power adaptor is dangerous and will invalidate your warranty.
| Frequency bands 2412 MHz to 2472 MHz | |
| Maximum RF power transmitted in the frequency band | 802.11 b: +15.95 dBm802.11 g: +14.91 dBm802.11 n20: +13.78 dBm |
The Environment
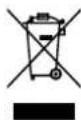
The symbol on this appliance indicates that this appliance may not be treated as household waste. Instead it must be handed over to the applicable collection point for the recycling of electrical and electronic equipment. Disposal must be carried out in accordance with local environmental regulations for waste disposal. For more detailed information about treatment, recovery and recycling of this appliance, please contact your local city office, your household and waste disposal service or the shop where you purchased the appliance.

This appliance complies with the European Directives 2014/53/EU and 2011/65/EU. To receive a copy of the declaration of conformity, please contact the manufacturer through the website: www.candy-group.com
CANDY HOOVER GROUP Srl Via Privata Eden Fumagalli, 20861 Brugherio (MB) Italy
CONTENTS OF THE BOX
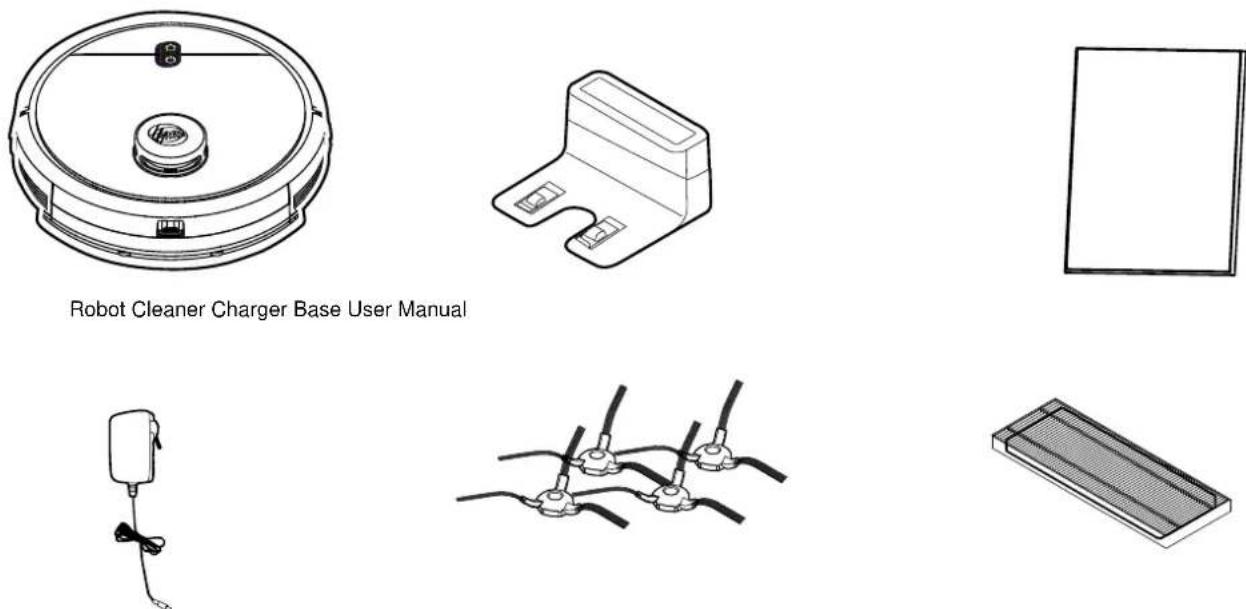
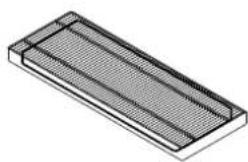
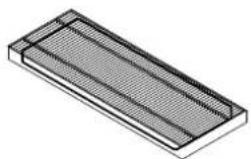
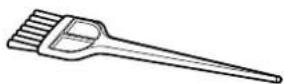
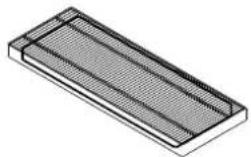
Mains Power Adaptor X4 Edge Cleaning Brush Additional Filter for Robot
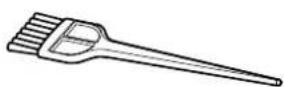
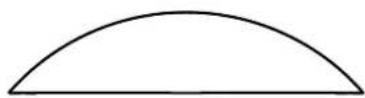
Cleaning Brush X2 Mop Pad
text_image
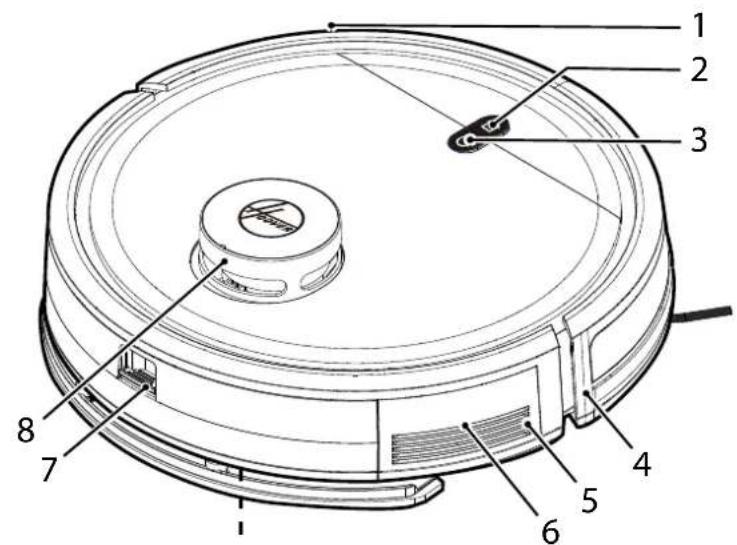
Technical diagram of a circular device with numbered components for identification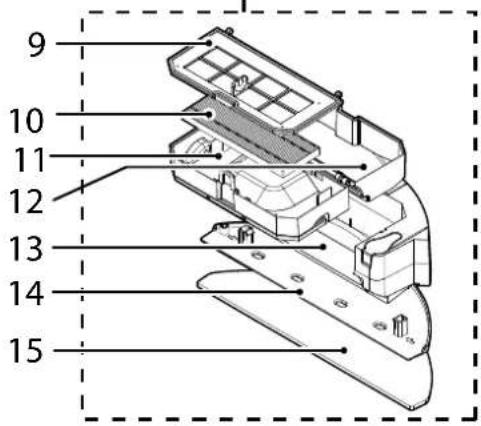
text_image
9 10 11 12 13 14 15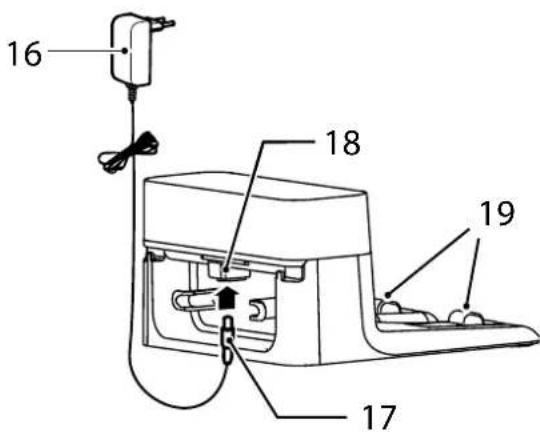
text_image
16 18 19 17| 1 Frontal Bumper |
| 2 HOME (Charger Base) Button |
| 3 ON/OFF Power Button |
| 4 Front Signal Receiver |
| 5 Speaker |
| 6 Reset Button (Red Button) |
| 7 Dust Container Release Button |
| 8 Lidar Tower |
| 9 Filter Mesh |
| 10 EPA filter |
| 11 Top Cover of Dust Container, Handle |
| 12 Bottom Cover of Dust Container |
| 13 Water Tank |
| 14 Mop Pad Holder |
| 15 Mop pad |
text_image
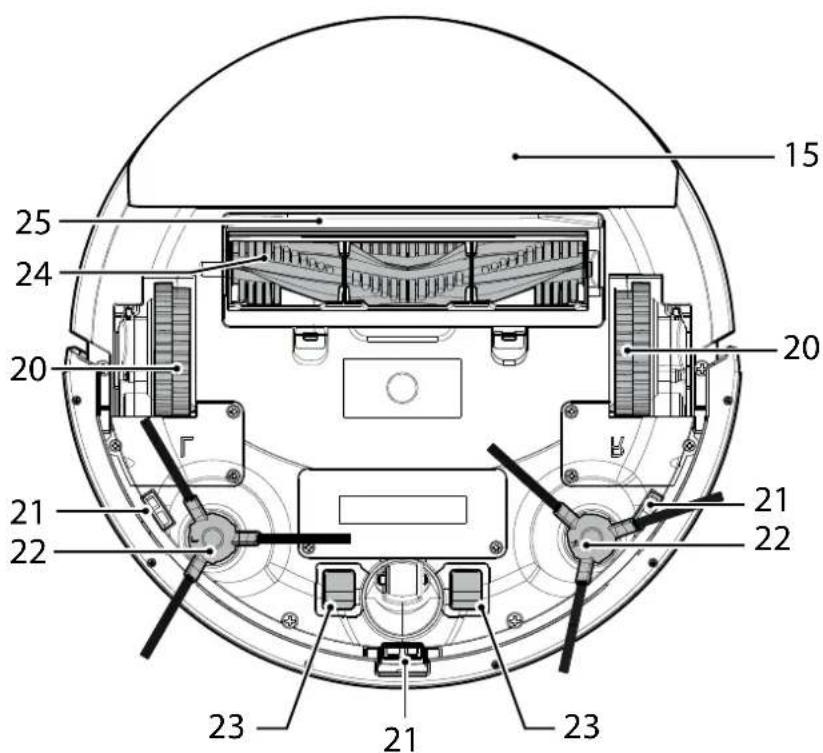
15 25 24 20 20 21 21 22 22 23 21 23| 16 Mains Power Adaptor |
| 17 Power Supply Connector |
| 18 DC Jack, Charger Base |
| 19 Charger Contacts |
| 20 Drive Wheel |
| 21 Anti-Fall Sensor |
| 22 Edge Cleaning Brush |
| 23 Robot Charging Contacts |
| 24 Agitator |
| 25 Agitator Top Cover |
PREPARE YOUR ROBOT CLEANER
PACKAGING
Do not dispose of your Robot packaging. It may be required for the validity of your guarantee in the future.
When unpacking your Robot and its accessories, take care to keep bags away from babies, young children and animals to avoid the risk of suffocation.
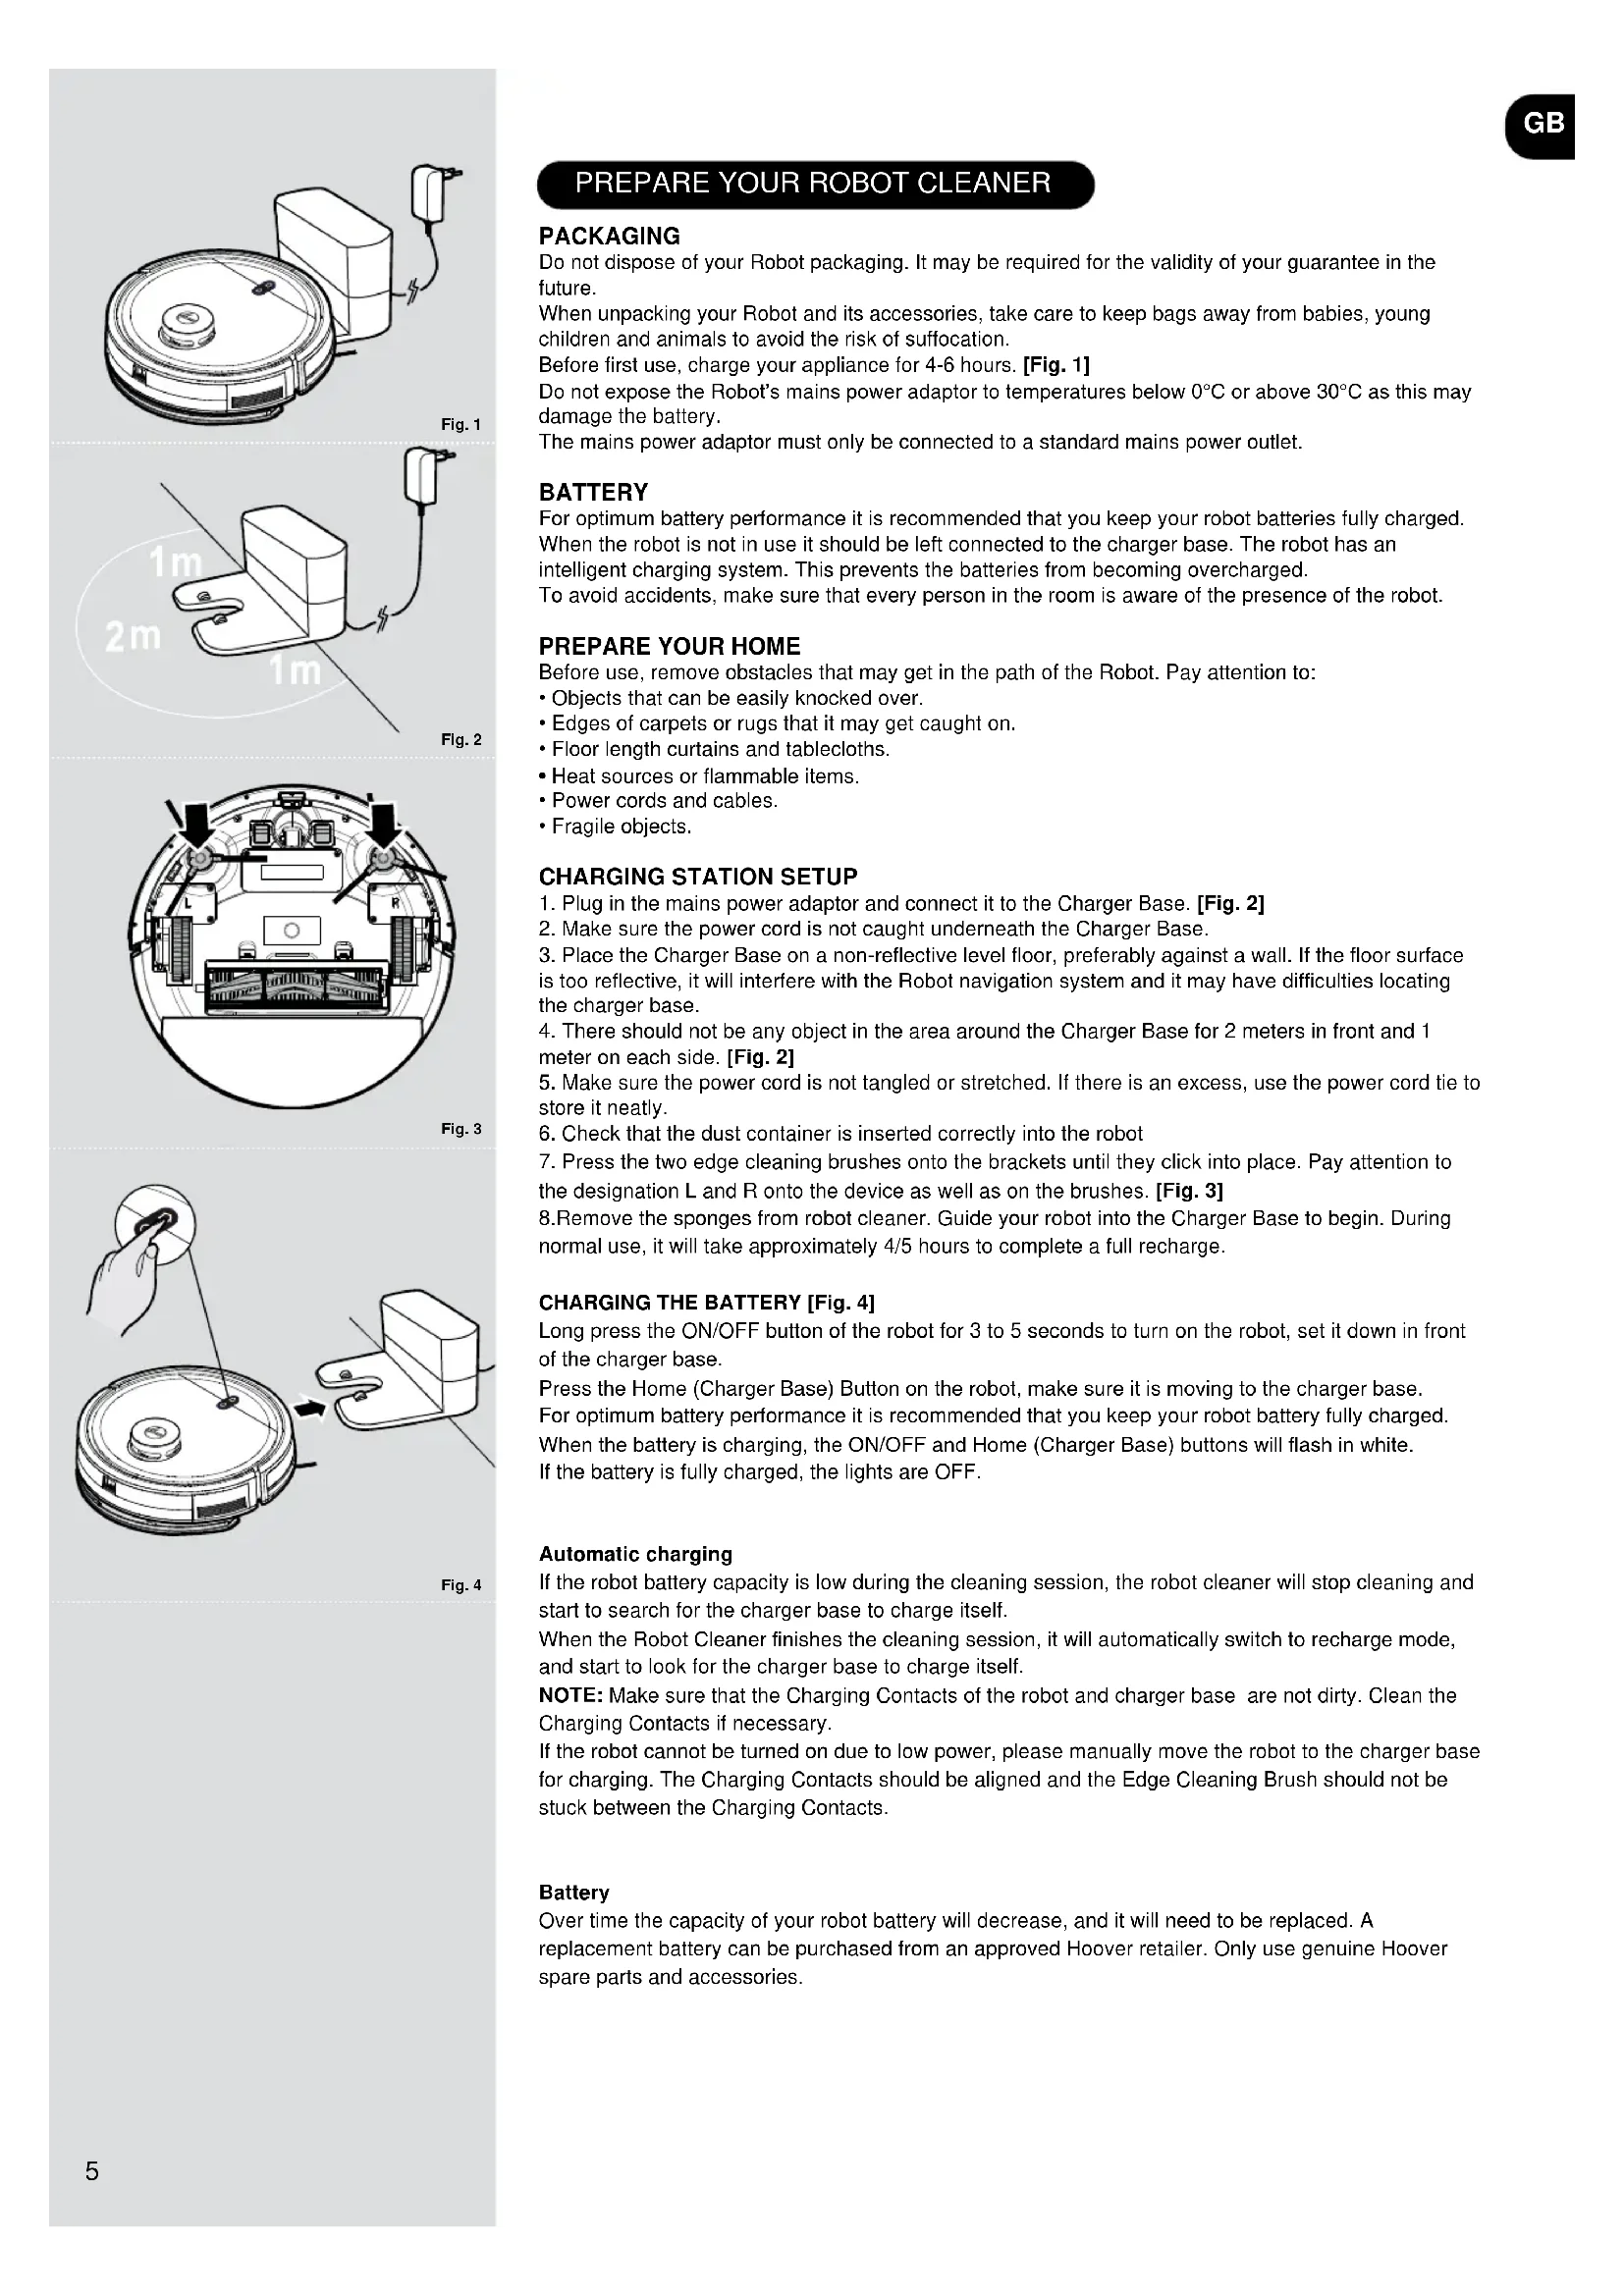
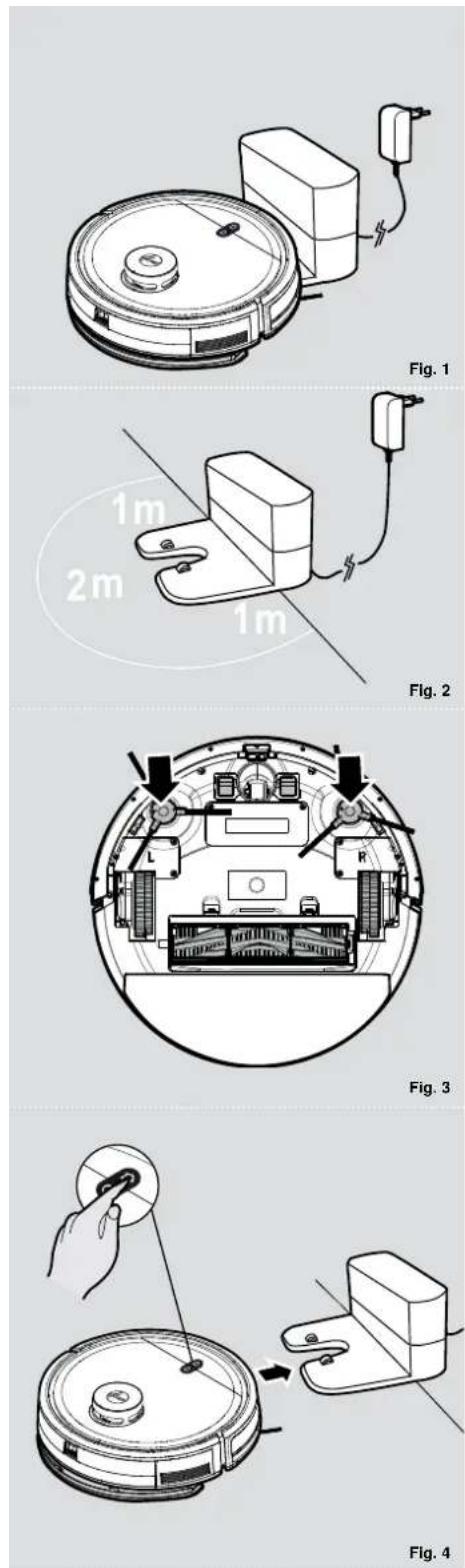
Before first use, charge your appliance for 4-6 hours. [Fig. 1]
Do not expose the Robot's mains power adaptor to temperatures below 0°C or above 30°C as this may damage the battery.
The mains power adaptor must only be connected to a standard mains power outlet.
BATTERY
For optimum battery performance it is recommended that you keep your robot batteries fully charged. When the robot is not in use it should be left connected to the charger base. The robot has an intelligent charging system. This prevents the batteries from becoming overcharged.
To avoid accidents, make sure that every person in the room is aware of the presence of the robot.
PREPARE YOUR HOME
Before use, remove obstacles that may get in the path of the Robot. Pay attention to:
- Objects that can be easily knocked over.
- Edges of carpets or rugs that it may get caught on.
• Floor length curtains and tablecloths. - Heat sources or flammable items.
• Power cords and cables. - Fragile objects.
CHARGING STATION SETUP
- Plug in the mains power adaptor and connect it to the Charger Base. [Fig. 2]
- Make sure the power cord is not caught underneath the Charger Base.
- Place the Charger Base on a non-reflective level floor, preferably against a wall. If the floor surface is too reflective, it will interfere with the Robot navigation system and it may have difficulties locating the charger base.
- There should not be any object in the area around the Charger Base for 2 meters in front and 1 meter on each side. [Fig. 2]
- Make sure the power cord is not tangled or stretched. If there is an excess, use the power cord tie to store it neatly.
- Check that the dust container is inserted correctly into the robot
- Press the two edge cleaning brushes onto the brackets until they click into place. Pay attention to the designation L and R onto the device as well as on the brushes. [Fig. 3]
- Remove the sponges from robot cleaner. Guide your robot into the Charger Base to begin. During normal use, it will take approximately 4/5 hours to complete a full recharge.
CHARGING THE BATTERY [Fig. 4]
Long press the ON/OFF button of the robot for 3 to 5 seconds to turn on the robot, set it down in front of the charger base.
Press the Home (Charger Base) Button on the robot, make sure it is moving to the charger base. For optimum battery performance it is recommended that you keep your robot battery fully charged. When the battery is charging, the ON/OFF and Home (Charger Base) buttons will flash in white. If the battery is fully charged, the lights are OFF.
Automatic charging
If the robot battery capacity is low during the cleaning session, the robot cleaner will stop cleaning and start to search for the charger base to charge itself.
When the Robot Cleaner finishes the cleaning session, it will automatically switch to recharge mode, and start to look for the charger base to charge itself.
NOTE: Make sure that the Charging Contacts of the robot and charger base are not dirty. Clean the Charging Contacts if necessary.
If the robot cannot be turned on due to low power, please manually move the robot to the charger base for charging. The Charging Contacts should be aligned and the Edge Cleaning Brush should not be stuck between the Charging Contacts.
Battery
Over time the capacity of your robot battery will decrease, and it will need to be replaced. A replacement battery can be purchased from an approved Hoover retailer. Only use genuine Hoover spare parts and accessories.
USING YOUR ROBOT CLEANER
• Home (Charger Base) Button
Short press: Recharge
Long press: App Connection
Light Indicator:
White light flashing: charging
White Light Flashing Rapidly: App Connection
• ON/OFF Power Button
Long press: power on (if robot is off)
Long press: power off (if robot is on)
Short press: start/pause (if robot is in sleep mode)
Light Indicator:
Blue light flashing: standby mode
Blue light is always on: working mode
Blue light off: sleep mode
- The operation process of the robot: sleep mode >standby mode >working mode
A. Sleep mode: When the robot is in standby mode, and has not been working for 3 minutes, it will automatically enter the sleep mode. When the robot is in sleep mode, the button light is off, and the robot is still.
B. Standby mode: When the robot is in standby mode, the button light is flashing blue, and the robot is still.
C. Working mode: When the robot is working, the button light is always on with blue, and the robot is in cleaning session.
Mopping Function
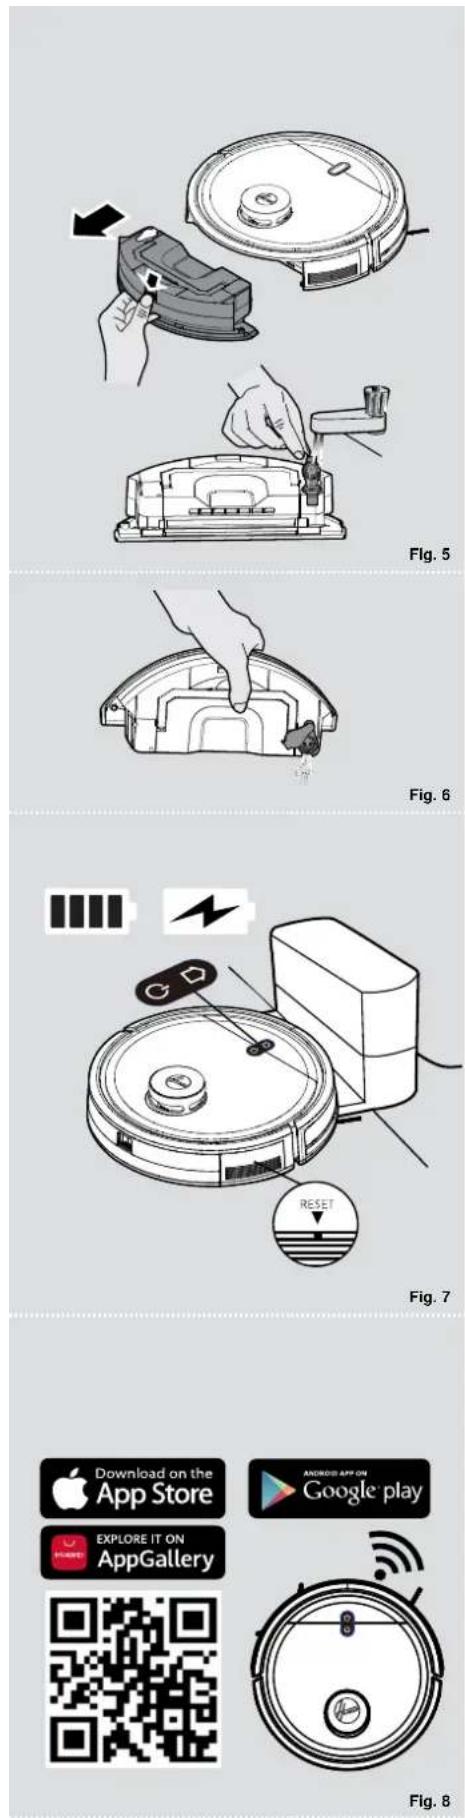
When in cleaning mode with mopping function activated, please make sure water tank is filled with clean water and mop pad and mop pad holder are attached correctly to the water tank. [Fig. 5]
Pull out the water tank and fill it with clean water through the dedicated opening, until the maximum level indicated. Attach mop pad to the holder and then insert them under the water tank. Please make sure they are correctly inserted in the dedicated openings below the water tank. Refit water tank into the robot.
Fill water tank with water only. Other liquids may corrode the water tank.
Use only cold/room temperature water. Hot water may cause damages to water tank.
Please notice that it takes a couple of minutes for the mop pad to be fully wet. If preferred, wet the mop pad removing any excess of water before activating mopping function.
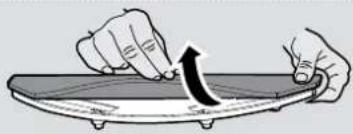
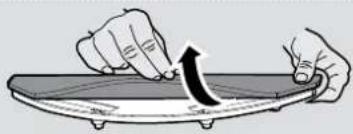
When mopping function is not activated, remove mop pad, mop holder and empty water tank from any residual water. [Fig. 6] Regularly wash the mop pad after each use to maintain cleaning quality.
2. Pause
Pause means that the robot is switched from the working mode to the standby mode. This can be operated by pressing the "on/off" button on the robot, or via the mobile App.
Attention! [Fig. 7]
If the robot is in sleep mode, press the "ON/OFF" button on the robot twice to make it start cleaning.
If the robot is not used for a long time, long press the "ON/OFF" button to shut down the robot. When the robot encounters a crash, please press the Reset button on the horn for
2-3 seconds with a needle less than 2mm to forcibly shut down.
APP DOWNLOAD AND CONNECTION VIA THE WIFI [Fig. 8]
In order to access all the Robot's Functions from anywhere, it is suggested to download the HG5 APP. You will be able to control the Robot in the most efficient way.
- Download the "HG5" APP from your App Store, Google Play or APP Gallery.
- Open the APP, create an account with your email and a password. Confirm login.
- Ensure your mobile device is connected to WiFi.
- Click the "add device" on APP, follow instructions to complete the pairing.
WARNING
The WiFi name cannot exceed 32 characters.
If the connection is failed, follow below steps to check:
- Make sure to have inserted correct WiFi password
• Make sure to set your WiFi network to 2.4GHz - Make sure the Robot is not too far away from the router.
WITH HG5 APP
After having successfully paired your robot you can create the map of your home. This will let you access fully customizable settings and cleaning schedules of your robot.
Click on the Robot icon to access the map page. Remember to remove any obstacle on the floor (cables, socks, shoes) before power on the robot.
Click on POWER ON button to let the robot start mapping your apartment. You'll see the map creating on your home page. Once the robot has scanned your whole apartment you'll see the complete map on your phone. You can give a name to each room, customize it and set up a dedicated cleaning schedule (suction power level, mopping level, frequency of cleaning, etc.).
-Cleaning Time: indicates the duration of the latest cleaning session
-Area Cleaned: indicates the square meters covered by the robot during the latest cleaning session
-Battery: current level of the battery
- POWER ON ( )
Robot starts cleaning following the current cleaning settings.
- BACK TO CHARGE (💡)
The robot will come back to the charger base.
*All the other icons will turn on and be available only after clicking on Power On icon.
• GO TO PLACE (●)
Select a specific place on the map, the robot will go there and start its cleaning session following the current cleaning settings.
- SELECT ROOM (☐)
Select a specific room on the map, the robot will go there and start its cleaning session following the room cleaning settings.
- SELECT AREA (☐)
Select a specific area on the map, the robot will go there and start its cleaning session following the current cleaning settings.
- NO-GO AREAS (☐)
Define a specific area where the robot won't be allowed to go. You can define no-go areas for mopping, for vacuum or both.
- CUSTOMISE (山口)
Customise rooms on the map. It is possible to merge or split different rooms, fully reset the map, rename rooms, set cleaning schedule for each room, set cleaning sequence for rooms.
- SETTINGS (…)
Full settings list of the robot
MAINTAINING YOUR ROBOT CLEANER
EMPTYING THE DUST CONTAINER
Before performing any maintenance task, ensure the robot is switched off.
-
Turn the robot off and remove it from charger base.
-
Use a dry cloth to clean all surfaces. DO NOT allow water into any part of the product whilst cleaning.
After vacuuming, remove the water tank and the dust container.
-
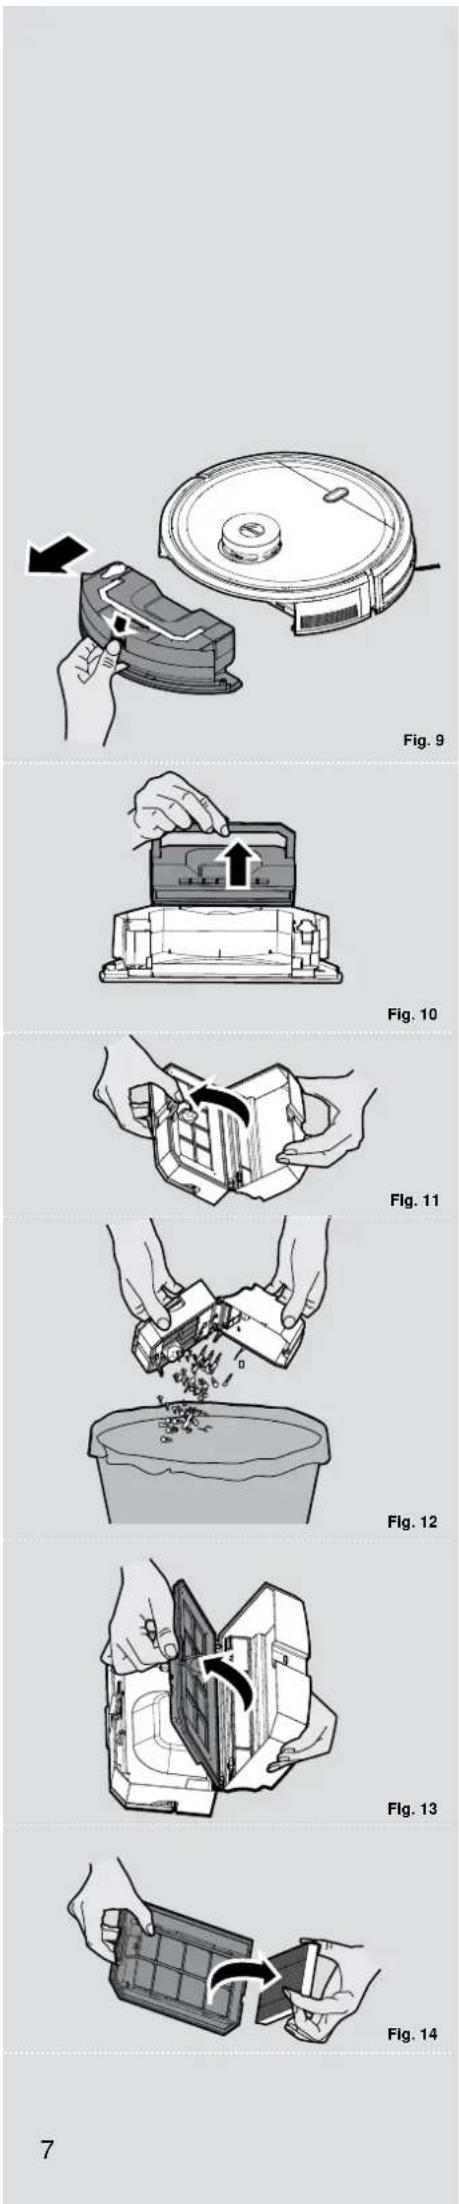
Press the release button and pull it out. [Fig. 9]
-
Lift up the dust container through the handle, [Fig. 10] open the dust container where indicated releasing the clip, [Fig. 11] Empty the dust container over a dust bin. [Fig. 12]
-
Use the cleaning brush when necessary to remove any excess dust from the internal surface of the dust container or filter surface
-
Refit the dust container with water tank into the robot.
CLEANING THE FILTERS
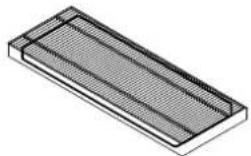
The Robot is fitted with a pre-motor filter. To maintain optimum cleaning performance, regularly clean the filter cover and the pre-motor filter. They should be cleaned after the dust container has been emptied 5 times and should not be washed.
-
After vacuuming, remove the water tank and the dust container. Press the release button and pull it out. [Fig. 9]
-
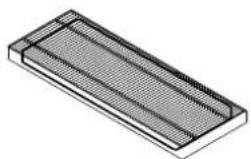
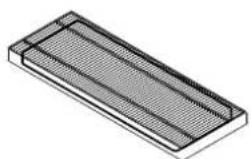
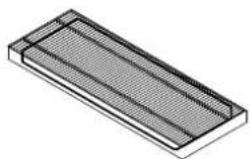
Remove dust container and empty it. [Fig. 10,11,12] Open the dust container, remove EPA filter from filter mesh and clean them separately. The assembly is done in reverse order, make sure the filter is assembled correctly. [Fig. 13,14]
IMPORTANT: Regularly check and maintain the filters following the filter maintenance instructions. This will maintain maximum cleaning performance.
natural_image
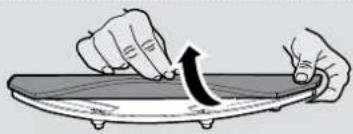
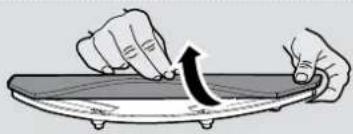
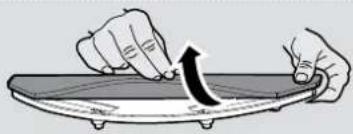
Illustration of a hand pressing down on a mechanical component with an upward arrow (no text or symbols)Fig. 15
natural_image
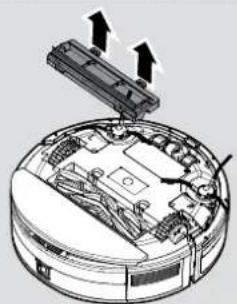
Illustration of hands using a tool to lift a curved surface, showing motion direction (no text or symbols)Fig. 16
natural_image
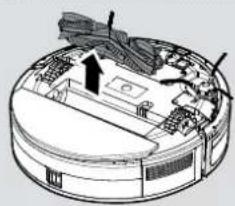
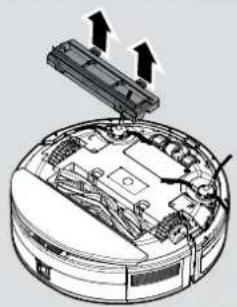
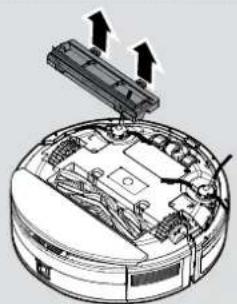
Technical diagram of a robotic vacuum cleaner with exposed internal components and mounting bracket (no text or labels)Fig. 17
natural_image
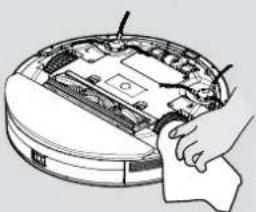
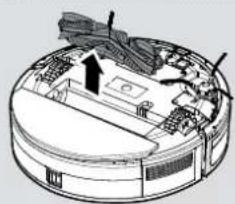
Technical diagram of a circular mechanical or electronic component with internal components and an arrow indicating direction (no text or symbols present)Fig. 18
natural_image
Illustration of a hand inserting a component into a circular device (no text or symbols visible)Fig. 19
natural_image
Technical diagram of a mechanical device showing internal components and a close-up view of a hand interacting with a component (no text or symbols present)Fig. 20
natural_image
Diagram of a robotic vacuum cleaner with internal components and a hand inserting a component (no text or symbols visible)Fig. 21
natural_image
Illustration of hands cleaning a circular object with a knob, no text or symbols presentFig. 22 Fig. 23
If the filter mesh and filter are damaged, they should be removed immediately and replaced in time to avoid damage to the vacuum motor.
CLEANING MOP PAD
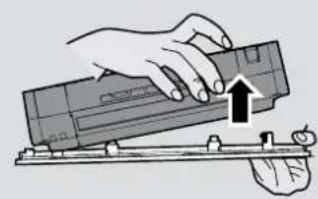
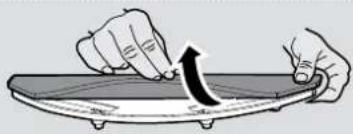
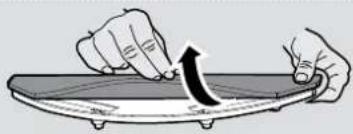
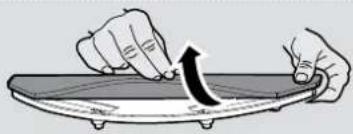
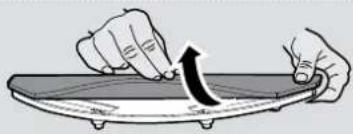
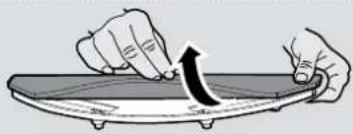
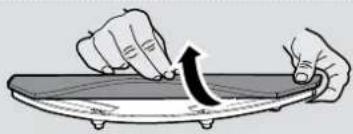
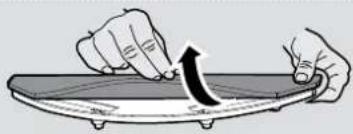
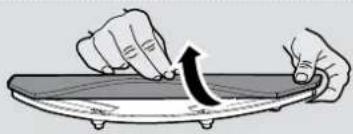
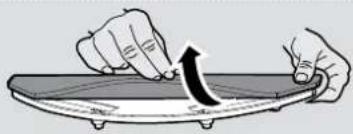
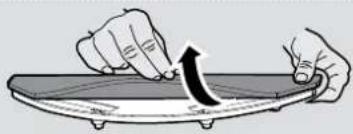
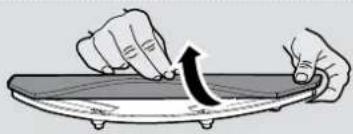
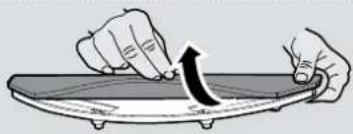
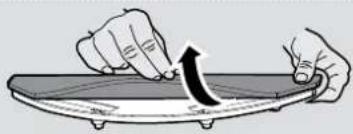
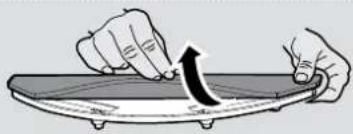
- Remove mop pad holder and mop pad from water tank. [Fig. 15,16]
- Remove mop pad from mop pad holder.
- Wash the mop pad manually or with washing machine.
- Let it dry completely before using it again.
CLEANING THE AGITATOR
Regularly clean the agitator to maintain maximum cleaning performance.
- Turn the Robot OFF and turn it over.
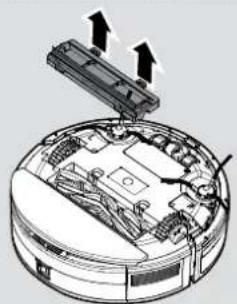
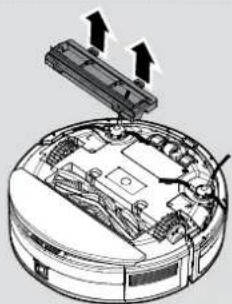
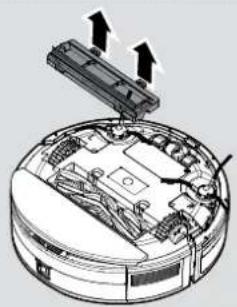
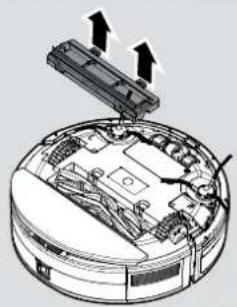
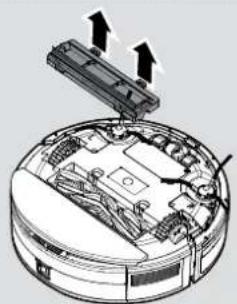
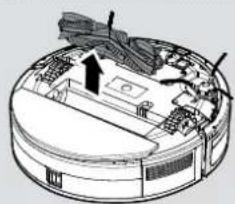
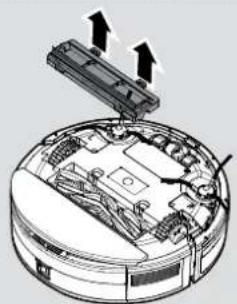
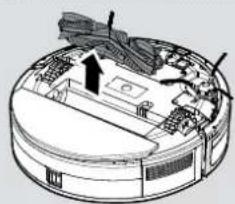
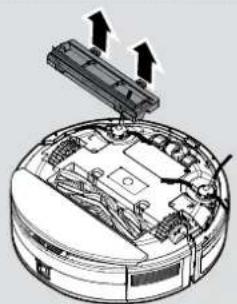
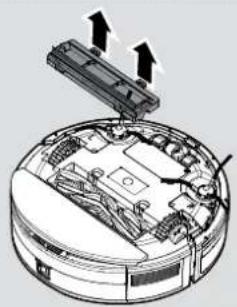
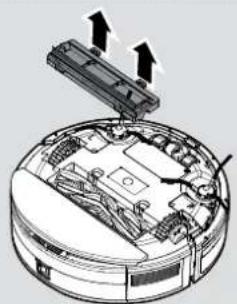
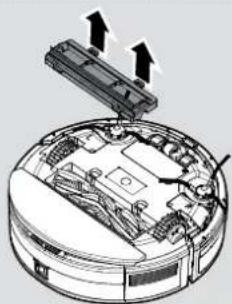
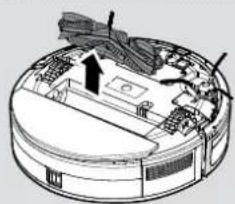
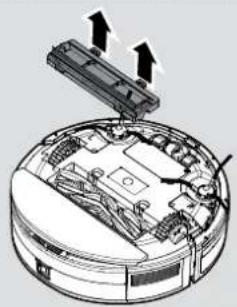
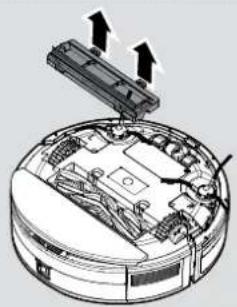
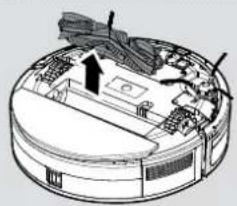
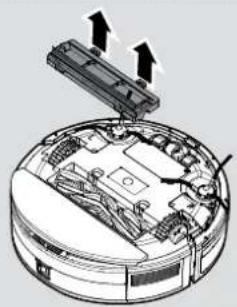
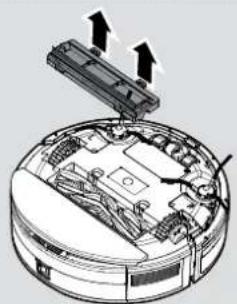
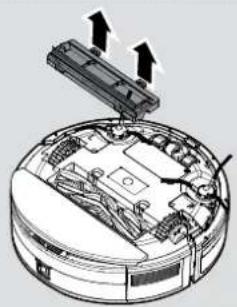
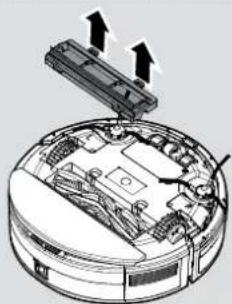
- Press the clips on the sole plate remove the agitator cover. [Fig. 17]
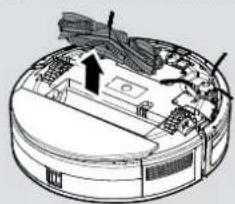
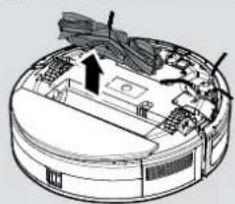
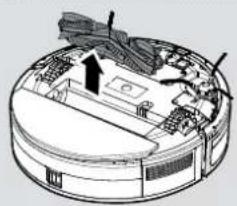
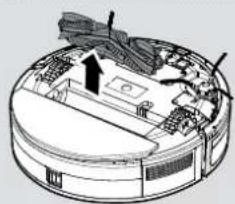
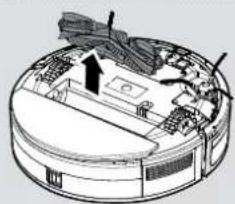
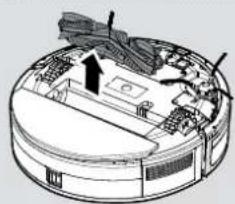
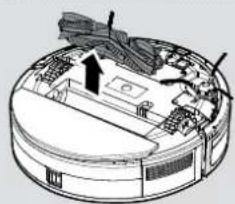
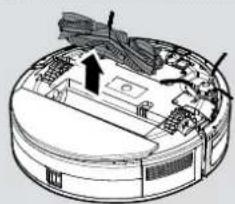
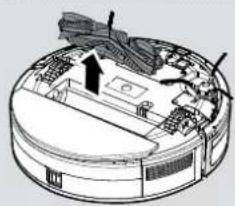
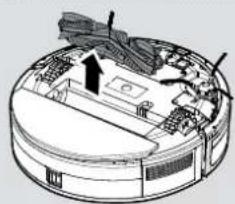
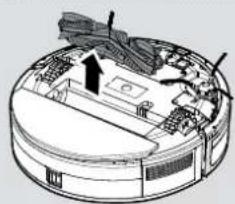
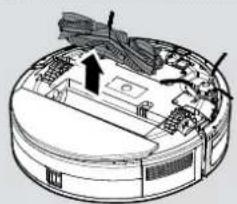
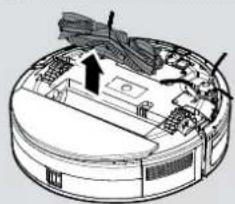
- Lift up the agitator by grasping one end of agitator. [Fig. 18]
- Use the Cleaning Brush to remove any entanglement from the agitator and the dirt on the bristles. Do not lose the rubber sleeve on the ball bearing.
- After cleaning, put the agitator and the agitator cover back into the robot.
Attention: All maintenance tasks should be carried out after taking out the Dust Container, to avoid the dirt in the Dust Container being dumped out accidentally.
CLEANING THE EDGE CLEANING BRUSHES
When the edge brushes become dirty, clean them with clean water and dry it before use; if the edge brush is damaged and cannot work normally, please replace it.
Attention!
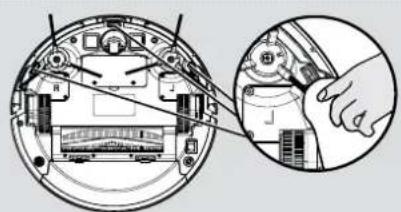
When replacing the edge cleaning brushes, match the "L" and "R" marks on the brush with the "L" and "R" at the bottom of the robot.
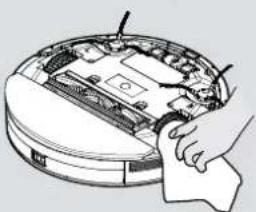
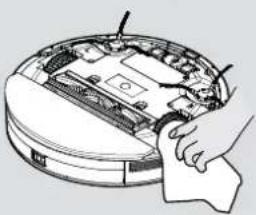
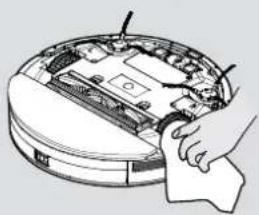
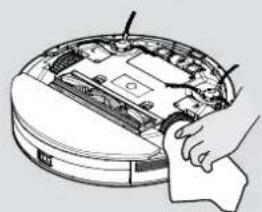
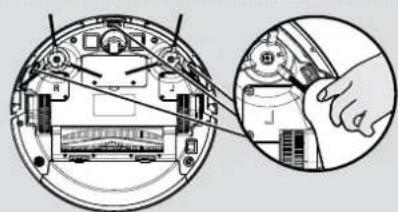
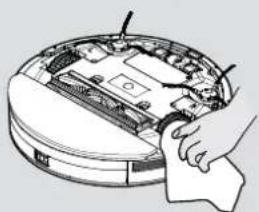
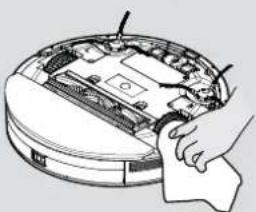
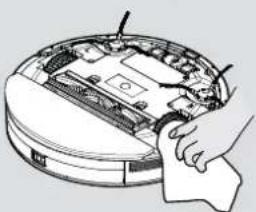
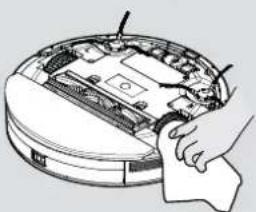
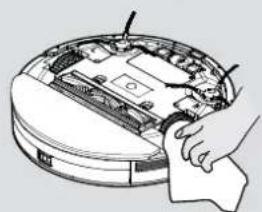
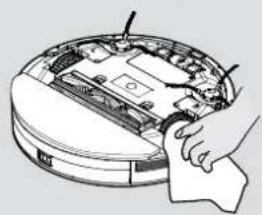
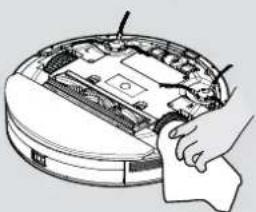
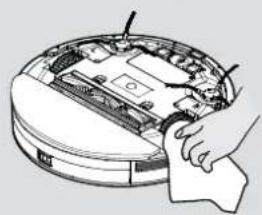
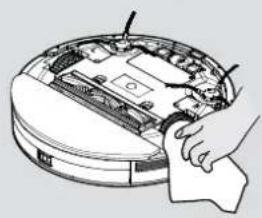
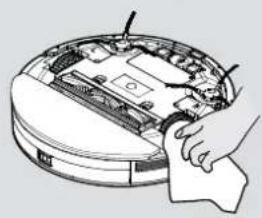
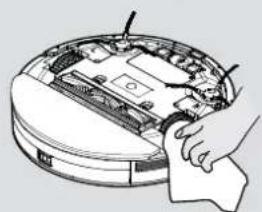
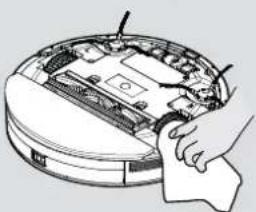
CLEANING THE DRIVE WHEELS [Fig. 19]
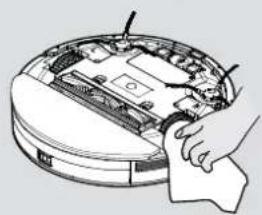
- Switch the Robot off and turn it over.
- Remove any dirt or hair trapped in the wheels.
- Clean the wheels with a dry cloth.
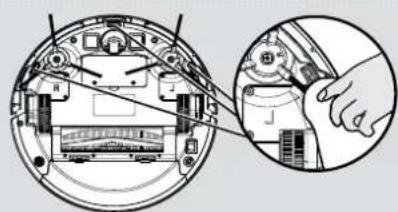
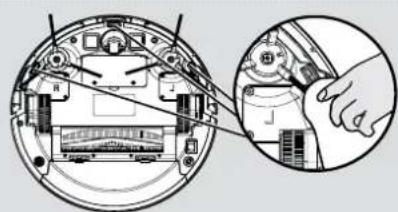
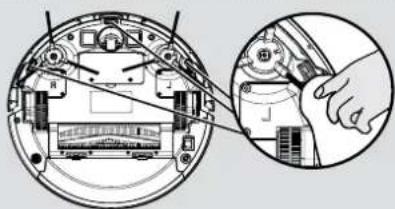
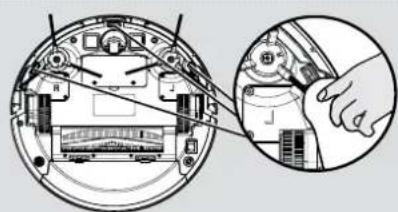
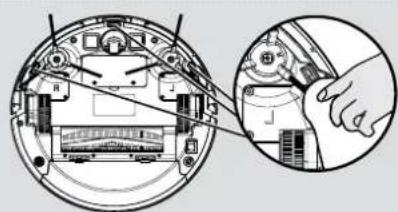
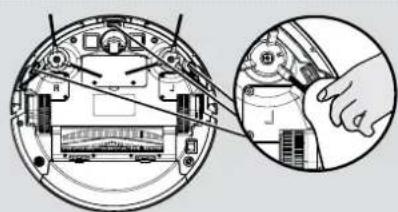
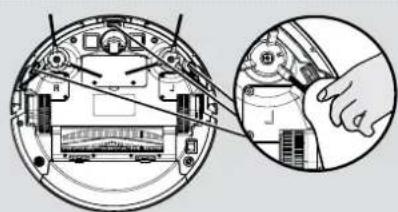
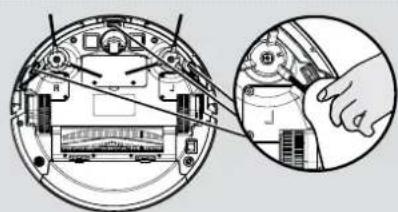
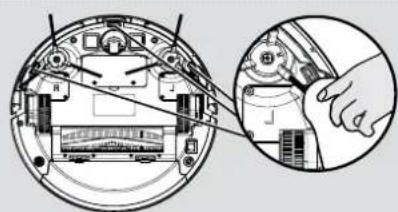
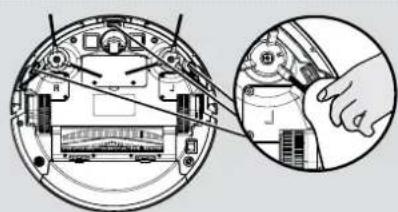
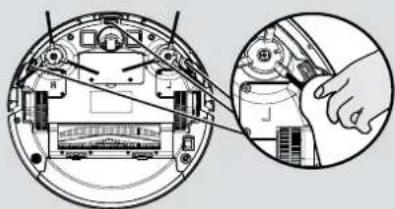
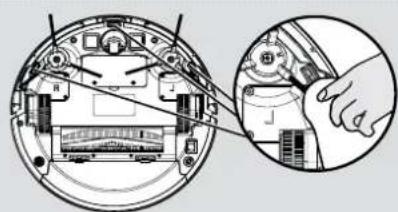
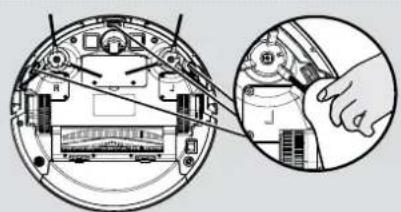
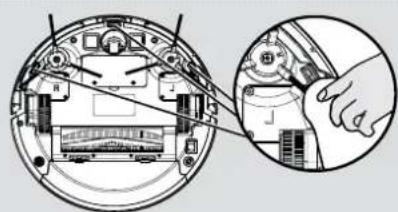
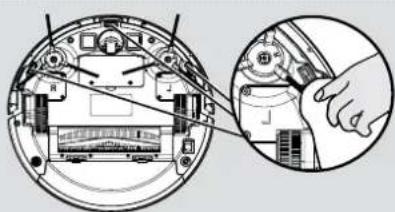
CLEANING THE ANTI-FALL SENSOR LENS [Fig. 20]
To maintain the safe operation of your robot it is important to keep the Anti fall sensors clean. There are 3 sensors located on the bottom side of the robot. Turn the robot upside down and clean them with dry cloth to remove any accumulation of dust, dirt or debris.
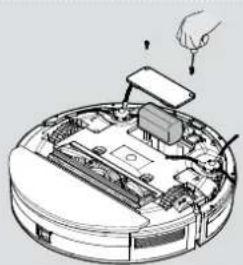
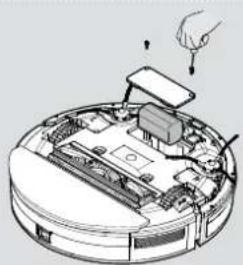
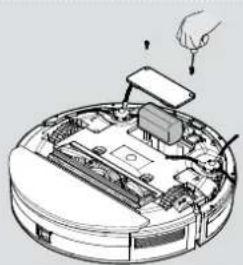
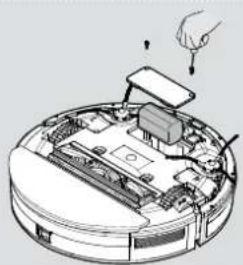
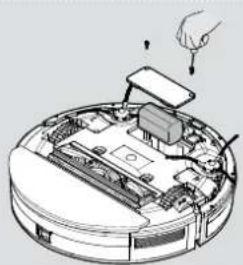
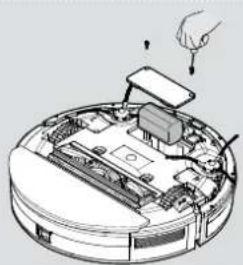
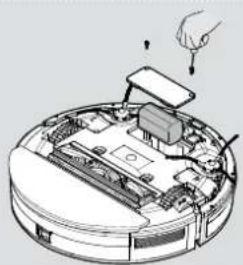
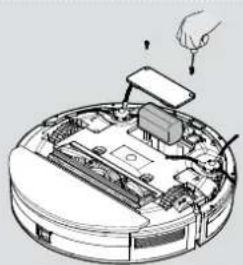
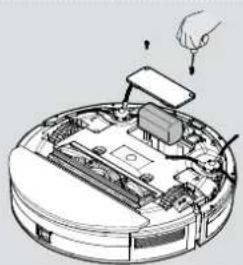
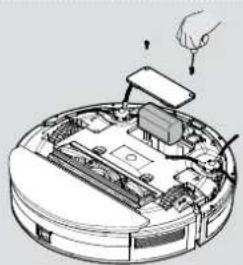
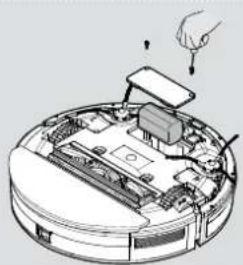
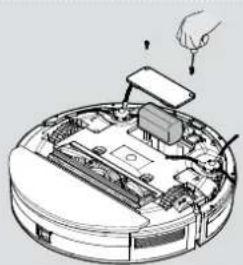
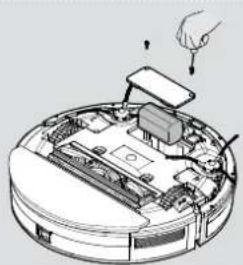
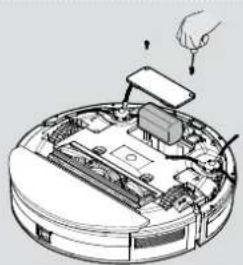
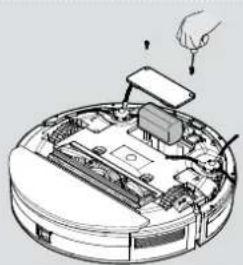
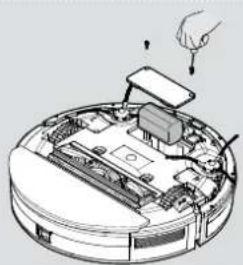
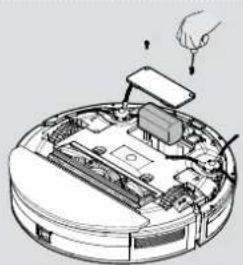
BATTERY REPLACEMENT [Fig. 21]
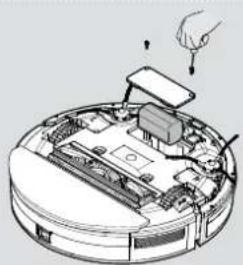
- Use a screwdriver to remove the screws from the battery cover at the bottom of the robot;
- Remove the battery cover.
- Disconnect the connector and remove the battery from the compartment;
- Put the new battery into the compartment and reconnect to the connector. Pay attention to the correct alignment of the connector and the wires. Refit the battery cover and close it with the screws.
- Power on to check whether it is normal.
Attention!
Please recycle the replaced batteries in an environmentally friendly method to avoid pollution.
IMPORTANT NOTICE
Only use approved replacement parts for your robot.
Using parts not validated by Hoover is dangerous and will invalidate your guarantee. If the robot will not be used for several months, please remove the batteries and store in a cool dry location.
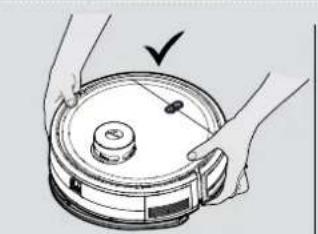
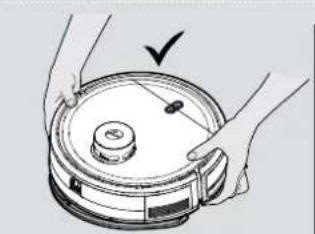
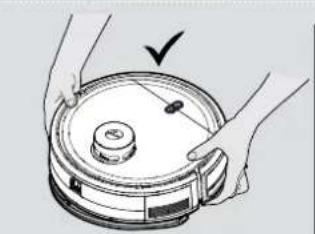
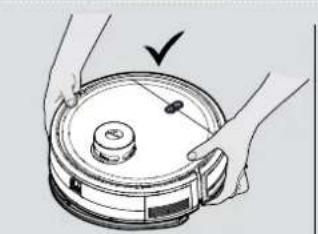
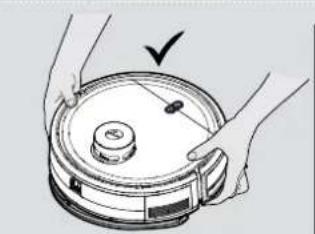
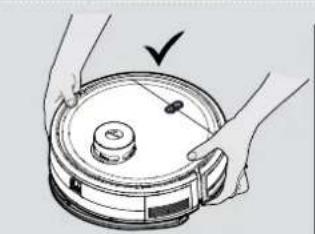
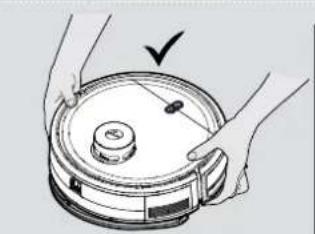
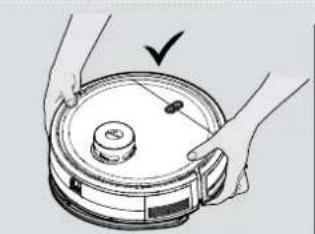
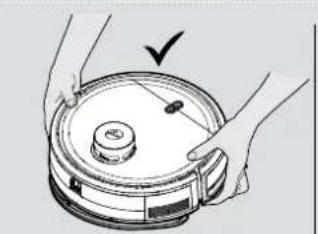
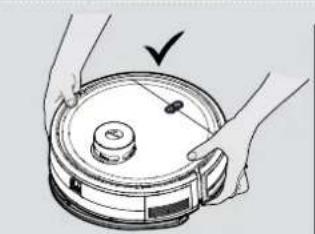
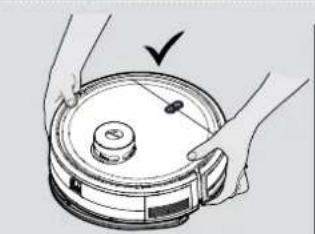
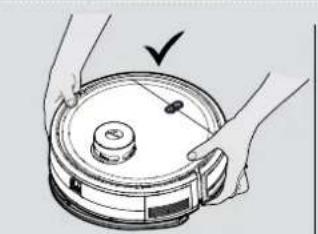
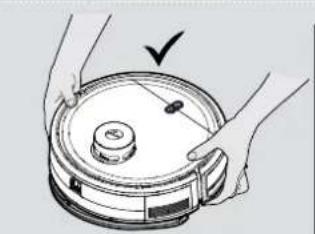
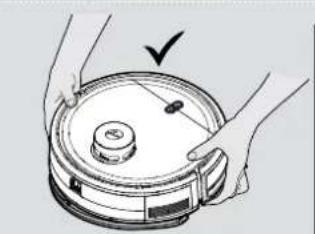
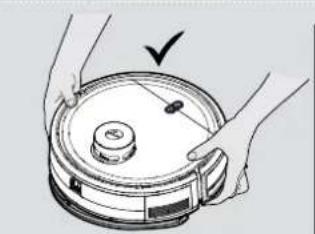
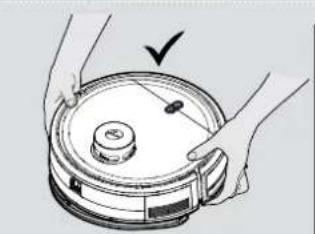
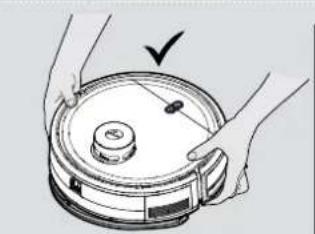
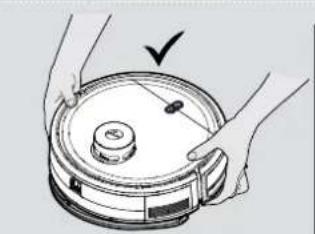
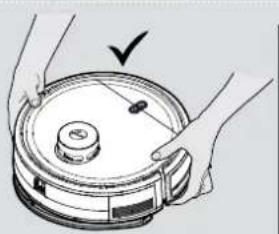
IMPORTANT: Always make sure your device is switched off before maintenance. Always use two hands to lift and carry, and ensure the robot is held level. [Fig. 22]
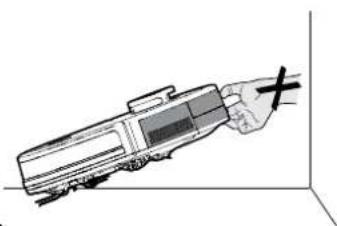
When liting the robot cleaner, ensure you do not grip the water tank to avoid accidental opening. (Fig. 23)
You should avoid using your robot cleaner in direct sunlight or on dark polished surfaces as these conditions will adversely affect the behaviour of your robot.
natural_image
Illustration of a train with a hand holding a cross-shaped object, no text or symbols presentTROUBLESHOOTING
If you have any problem with your robot, follow this simple check list before calling the Hoover Customer Service Centre.
- Robot doesn't work when it is switched on
| Light Indicator of ON/OFF and Home Buttons | Actions |
| White & blue flashing | Check edge cleaning brushes are clean and placed correctly |
| Check agitator is clean and placed correctly | |
| White on Check if the dust container is inserted correctly | |
| White & light blue lights flashing Check | the drive wheels are clean and functioning |
| Blue & light blue lights flashing | Check the anti-fall sensors and frontal bumper are clean and functioning |
| White flashing Check the Lidar tower is functioning | |
- Robot doesn't automatically recharge
Make sure there are no barriers between the robot and the charger base, and no objects in the area around the charger base for 2 meters in front and 1 meter to each side.
- Robot is trapped
Robot will attempt to free itself but in some cases, assist the robot manually.
- Robot is very noisy while cleaning
Clean the dust container and filter, clean and check the agitator and drive wheels.
- Cleaning power is weak.
Clean the dust container and filter, clean and check the agitator and drive wheels.
- Mopping function doesn't work
Check if there is enough clean water in the water tank. Check if mop pad holder and mop pad are inserted correctly on the robot.
IMPORTANT INFORMATION
Hoover Spares and Consumables
Always replace parts with genuine Hoover spares. These are available from your local Hoover dealer or direct from Hoover. When ordering parts always quote your model number.
Quality
Hoover's factories have been independently assessed for quality. Our products are made using a quality system which meets the requirements of ISO 9001.
Your Guarantee
The guarantee conditions for this appliance are as defined by our representative in the country in which it is sold. Details regarding these conditions can be obtained from the dealer from whom the appliance was purchased. The bill of sale or receipt must be produced when making any claim under the terms of this guarantee.
Subject to change without notice.
INSTRUCTIONS DE SÉCURITÉ D'UTILISATION
natural_image
Technical line drawing of a circular mechanical component with a central hub and mounting holes (no text or symbols)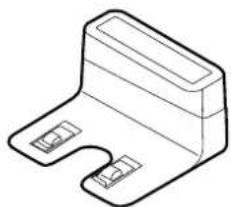
natural_image
Isometric line drawing of a mechanical bracket or bracket (no text or symbols)natural_image
Pure electrical circuit lines without any symbolslatérale (4 pièces)
natural_image
3D rendering of a rectangular metal grate or filter structure with no text or symbolstext_image
Technical diagram of a circular vacuum cleaner with numbered parts labeled 1 through 8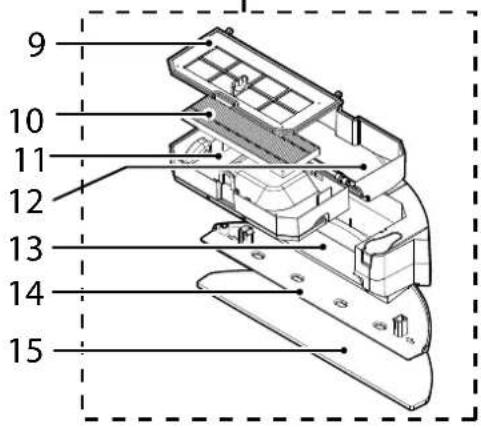
text_image
9 10 11 12 13 14 15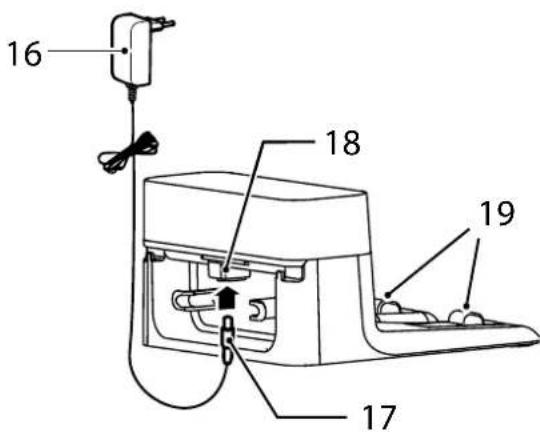
text_image
16 18 19 17natural_image
Illustration of a hand pressing down on a mechanical component with an upward arrow (no text or symbols)Fig. 15
natural_image
Illustration of hands using a tool to lift a curved surface, showing motion direction (no text or symbols)Fig. 16
natural_image
Technical diagram of a robotic device with internal components and mounting brackets (no text or labels)Fig. 17
natural_image
Technical line drawing of a circular device with internal components and a directional arrow (no text or symbols)Fig. 18
natural_image
Illustration of a hand inserting a component into a circular device (no text or symbols visible)Fig. 19
natural_image
Technical diagram of a mechanical device showing internal components and a close-up view of a hand interacting with a component (no text or symbols present)Fig. 20
natural_image
Diagram of a robotic vacuum cleaner with internal components and a hand inserting a component (no text or symbols visible)Fig. 21
natural_image
Illustration of hands holding a circular device with a knob, no text or symbols visibleFig. 22 Fig. 23
SERPILLIÈRE DE NETTOYAGE
natural_image
Illustration of a train with a hand holding a cross-shaped object, no text or symbols presentDÉPANNAGE
natural_image
Technical line drawing of a circular mechanical component with a central hub and mounting holes (no text or symbols)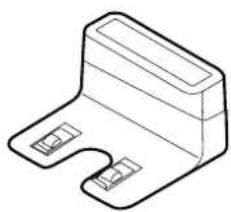
natural_image
Isometric line drawing of a 3D mechanical bracket with two small rectangular cutouts (no text or symbols)
natural_image
Empty rectangular frame with no text, numbers, or symbolsnatural_image
Pure electrical circuit lines without any symbols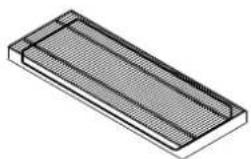
natural_image
3D rendering of a rectangular grid structure with no text or symbolsfür Roboter
text_image
Technical diagram of a circular device with numbered components for identification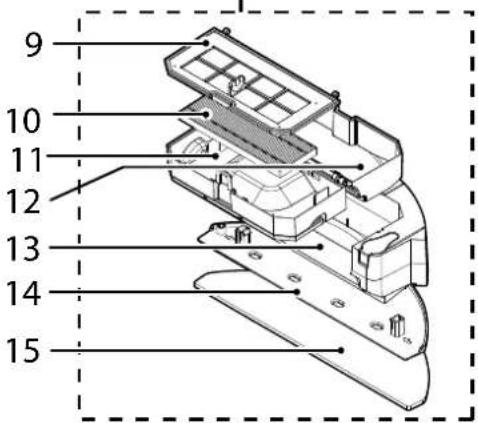
text_image
9 10 11 12 13 14 15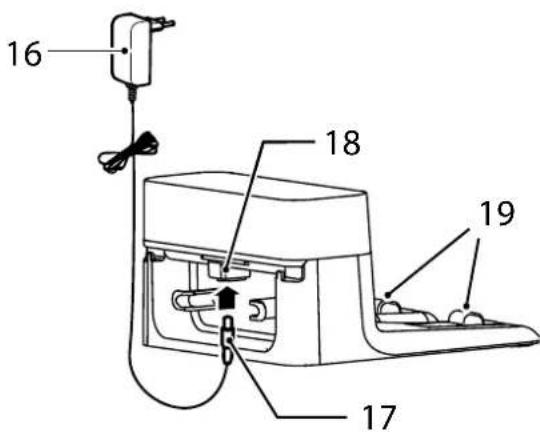
text_image
16 18 19 17natural_image
Illustration of a hand pressing down on a mechanical component with an upward arrow (no text or symbols)Abb. 15
natural_image
Illustration of hands using a tool to lift a curved surface, showing motion direction (no text or symbols)Abb. 16
natural_image
Diagram of a robotic vacuum cleaner with exposed internal components and mounting bracket (no text or labels)Abb. 17
natural_image
Technical diagram of a circular device with internal components and an arrow indicating a specific area (no text or symbols present)Abb. 18
natural_image
Illustration of a hand cleaning a circular device with visible components and wiring (no text or symbols)Abb. 19
natural_image
Technical diagram of a mechanical assembly with a close-up view of a hand operating a component (no text or symbols visible)Abb. 20
natural_image
Diagram of a robotic vacuum cleaner with internal components and a hand inserting a component (no text or symbols visible)Abb. 21
natural_image
Illustration of hands holding a circular device with a lid and handle, no text or symbols presentAbb. 22 Abb. 23
REINIGUNGSTUCH
natural_image
Illustration of a train with a hand holding a cross, no text or symbols presentFEHLERSUCHE
natural_image
Technical line drawing of a circular mechanical component with a central hub and mounting holes (no text or symbols)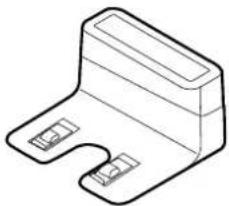
natural_image
Isometric line drawing of a mechanical bracket or bracket (no text or symbols)
natural_image
Blank white square with black border (no text or symbols)natural_image
Pure electrical circuit lines without any symbolstext_image
Technical diagram of a circular vacuum cleaner with numbered parts labeled 1 through 8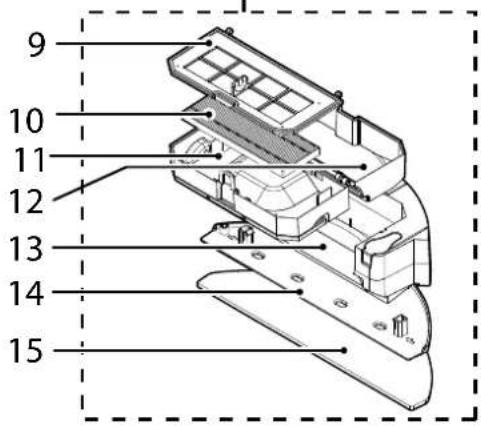
text_image
9 10 11 12 13 14 15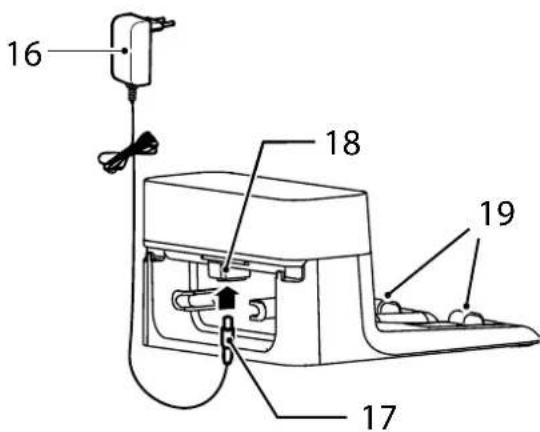
text_image
16 18 19 17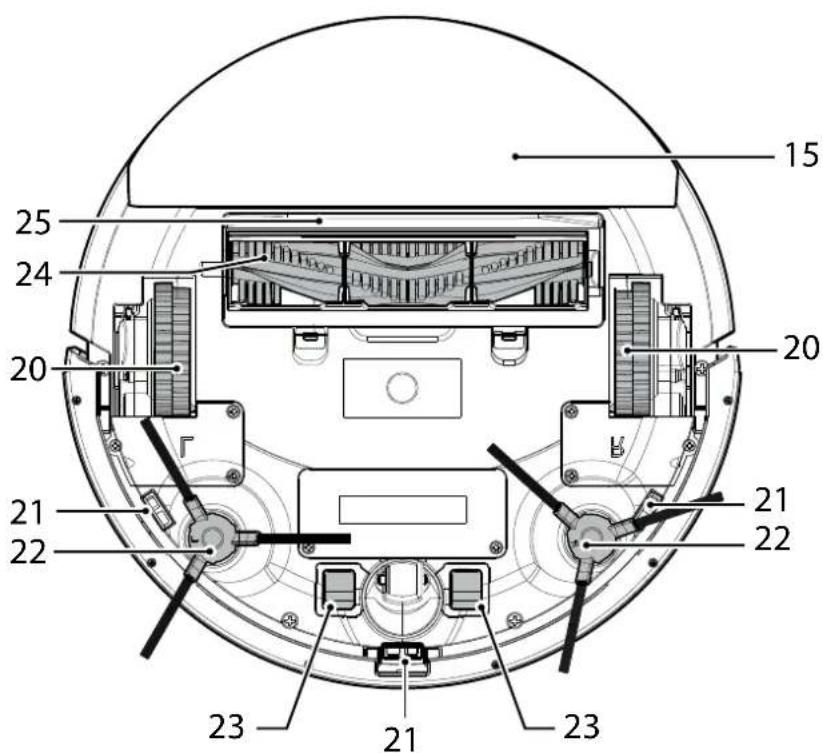
text_image
15 25 24 20 20 21 21 22 22 23 21 23SET UP BASE DI RICARICA
- ACCENSIONE (POWER ON) (▲)
natural_image
Illustration of a hand pressing down on a mechanical component with an upward arrow (no text or symbols)Fig. 15
natural_image
Illustration of hands using a tool to lift a curved surface, showing motion direction (no text or symbols)Fig. 16
natural_image
Diagram of a robotic vacuum cleaner with internal components and airflow arrows (no text or symbols)Fig. 17
natural_image
Technical line drawing of a circular mechanical device with internal components and a directional arrow (no text or symbols)Fig. 18
natural_image
Illustration of a hand cleaning a circular device with a cloth (no text or symbols visible)Fig. 19
natural_image
Technical diagram of a mechanical device showing internal components and a close-up view of a hand interacting with a component (no text or symbols present)Fig. 20
natural_image
Diagram of a robotic vacuum cleaner with internal components and a hand inserting a component (no text or symbols visible)Fig. 21
natural_image
Illustration of hands cleaning a circular object with a knob, no text or symbols presentFig. 22 Fig. 23
PULIZIA DEL PANNO
natural_image
Illustration of a train with a hand holding a cross-shaped object, no text or symbols presenttext_image
Technical diagram of a circular vacuum cleaner with numbered parts labeled 1 through 8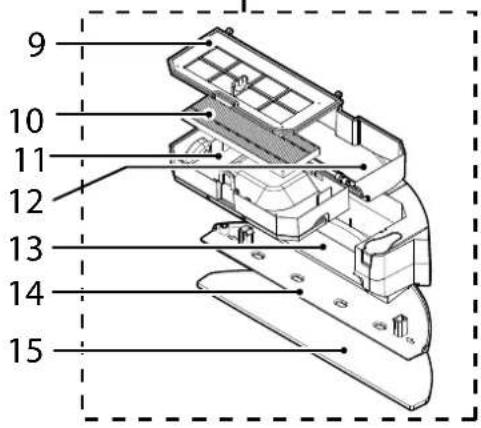
text_image
9 10 11 12 13 14 15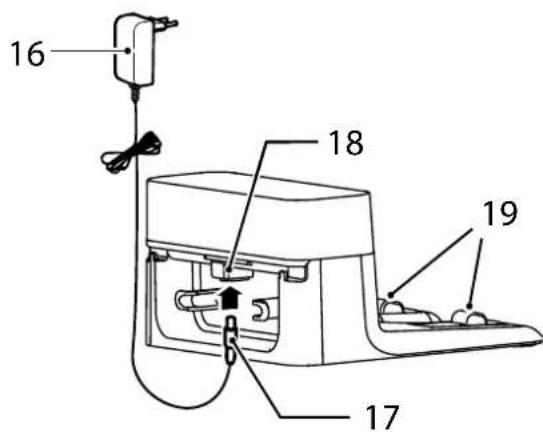
text_image
16 18 19 17natural_image
Illustration of a hand pressing down on a mechanical component with an upward arrow (no text or symbols)Afb. 15
natural_image
Illustration of hands using a tool to lift a curved surface, showing motion direction (no text or symbols)Afb. 16
natural_image
Diagram of a robotic vacuum cleaner with internal components and airflow arrows (no text or symbols)Afb. 17
natural_image
Technical line drawing of a circular device with internal components and a directional arrow (no text or symbols)Afb. 18
natural_image
Illustration of a hand inserting a component into a circular device (no text or symbols visible)Afb. 19
natural_image
Technical diagram of a mechanical device showing internal components and a close-up view of a hand interacting with a component (no text or symbols present)Afb. 20
natural_image
Diagram of a robotic vacuum cleaner with internal components and a hand inserting a component (no text or symbols visible)Afb. 21
natural_image
Illustration of hands holding a circular device with a lid and handle, no text or symbols presentAfb. 22 Afb. 23
SCHOONMAKEN VAN DE DWEILPAD
natural_image
Illustration of a train with a hand holding a cross-shaped object, no text or symbols presentPROBLEEM OPLOSSEN
natural_image
Technical line drawing of a circular mechanical component with a central hub and mounting holes (no text or symbols)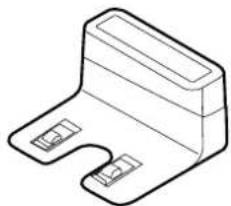
natural_image
Isometric line drawing of a mechanical bracket or bracket (no text or symbols)natural_image
Pure electrical circuit lines without any symbolslimpeza de cantos
natural_image
3D rendering of a rectangular grid structure with no text or symbolstext_image
Technical diagram of a circular vacuum cleaner with numbered parts labeled 1 through 8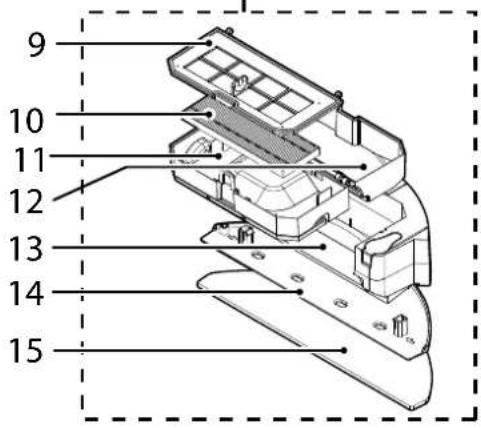
text_image
9 10 11 12 13 14 15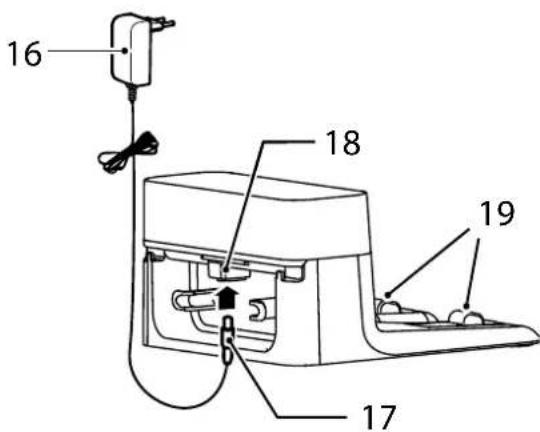
text_image
16 18 19 17natural_image
Illustration of a hand pressing down on a mechanical component with an upward arrow (no text or symbols)Fig. 15
natural_image
Illustration of hands using a tool to lift a curved surface, showing motion direction (no text or symbols)Fig. 16
natural_image
Technical diagram of a robotic device with internal components and mounting brackets (no text or symbols)Fig. 17
natural_image
Technical line drawing of a circular device with internal components and a directional arrow (no text or symbols)Fig. 18

natural_image
Illustration of a hand inserting a component into a circular device (no text or symbols visible)Fig. 19
natural_image
Technical diagram of a mechanical device showing internal components and a close-up view of a hand interacting with a component (no text or symbols visible)Fig. 20
natural_image
Diagram of a robotic vacuum cleaner with internal components and a hand inserting a component (no text or symbols visible)Fig. 21
natural_image
Illustration of hands holding a circular device with a knob, no text or symbols visibleFig. 22 Fig. 23
MOPA DE LIMPEZA
natural_image
Illustration of a train with a hand holding a cross-shaped object, no text or symbols presentnatural_image
Line drawing of a circular mechanical component with a central knob and mounting holes (no text or symbols)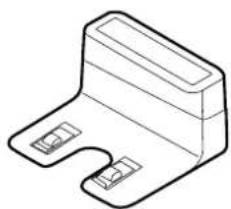
natural_image
Isometric line drawing of a mechanical bracket or bracket (no text or symbols)
natural_image
Blank rectangular frame with no text, numbers, or symbolsnatural_image
Pure electrical circuit lines without any symbolsnatural_image
3D rendering of a rectangular metal grate or filter structure with no text or symbolstext_image
Technical diagram of a circular device with numbered components for identification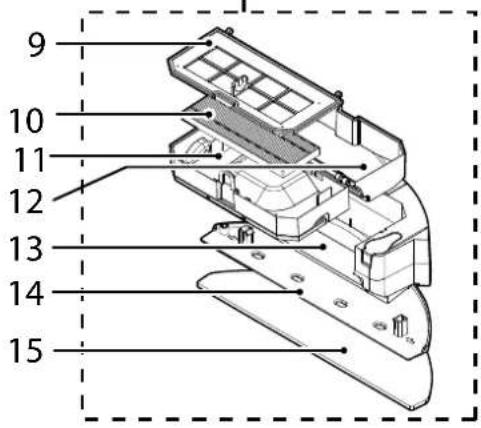
text_image
9 10 11 12 13 14 15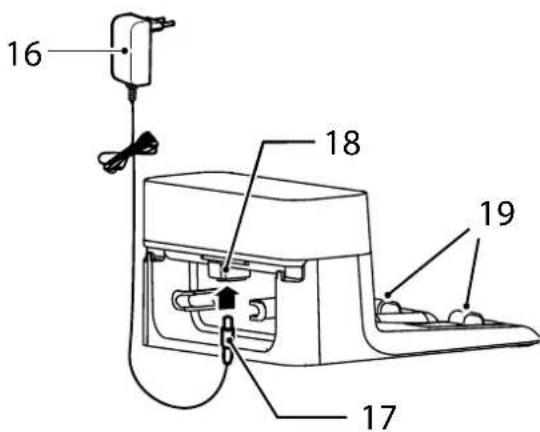
text_image
16 18 19 17natural_image
Illustration of a hand pressing down on a mechanical component with an upward arrow (no text or symbols)Fig. 15
natural_image
Illustration of hands using a tool to lift a curved surface, showing motion direction (no text or symbols)Fig. 16
natural_image
Diagram of a robotic vacuum cleaner with internal components and airflow arrows (no text or symbols)Fig. 17
natural_image
Technical line drawing of a circular device with internal components and a directional arrow (no text or symbols)Fig. 18
natural_image
Illustration of a hand inserting a component into a circular device (no text or symbols visible)Fig. 19
natural_image
Technical diagram of a mechanical device showing internal components and a close-up view of a hand interacting with a component (no text or symbols present)Fig. 20
natural_image
Diagram of a robotic vacuum cleaner with internal components and a hand inserting a component (no text or symbols visible)Fig. 21
natural_image
Illustration of hands holding a circular device with a knob, no text or symbols visibleFig. 22 Fig. 23
LIMPIEZA DE LA MOPA
natural_image
Illustration of a train with a hand holding a cross-shaped object, no text or symbols presentnatural_image
Technical line drawing of a circular mechanical component with a central knob and mounting holes (no text or symbols)
natural_image
Isometric line drawing of a mechanical bracket or bracket (no text or symbols)
natural_image
Blank white rectangle with a thin black border (no text or symbols)natural_image
Pure electrical circuit lines without any symbols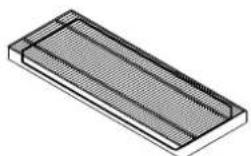
text_image
Technical diagram of a circular vacuum cleaner with numbered parts labeled 1 through 8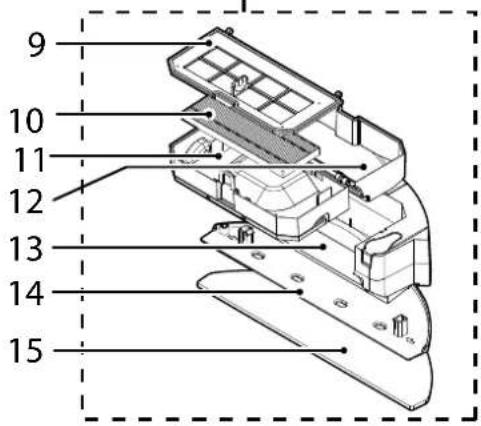
text_image
9 10 11 12 13 14 15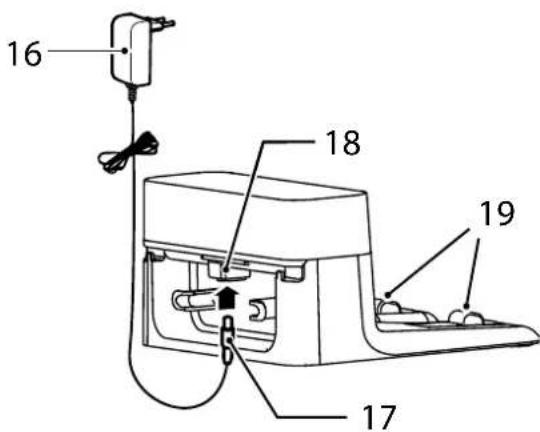
text_image
16 18 19 17natural_image
Illustration of a hand pressing down on a mechanical component with an upward arrow (no text or symbols)Fig. 15
natural_image
Illustration of hands using a tool to lift a curved surface, showing motion direction (no text or symbols)Fig. 16
natural_image
Technical diagram of a robotic device with internal components and mounting brackets (no text or symbols)Fig. 17
natural_image
Technical line drawing of a circular device with internal components and a directional arrow (no text or symbols)Fig. 18
natural_image
Illustration of a hand inserting a component into a circular device (no text or symbols visible)Fig. 19
natural_image
Technical diagram of a mechanical device showing internal components and a close-up view of a hand interacting with a component (no text or symbols present)Fig. 20
natural_image
Diagram of a robotic vacuum cleaner with internal components and a hand inserting a component (no text or symbols visible)Fig. 21
natural_image
Illustration of hands holding a circular device with a knob, no text or symbols visibleFig. 22 Fig. 23
RENG∅RINGSVASKEPUDE
natural_image
Illustration of a train with a hand holding a cross-shaped object, no text or symbols presentFEJLFINDING
text_image
Technical diagram of a circular vacuum cleaner with numbered parts labeled 1 through 8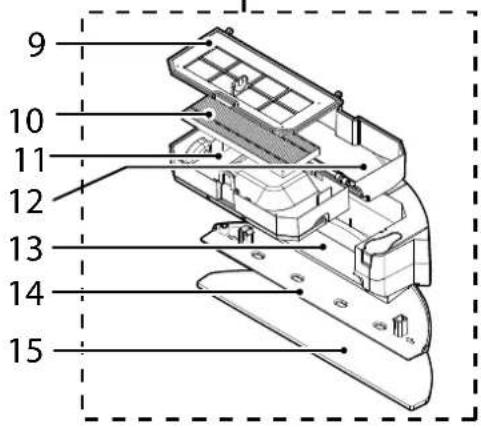
text_image
9 10 11 12 13 14 15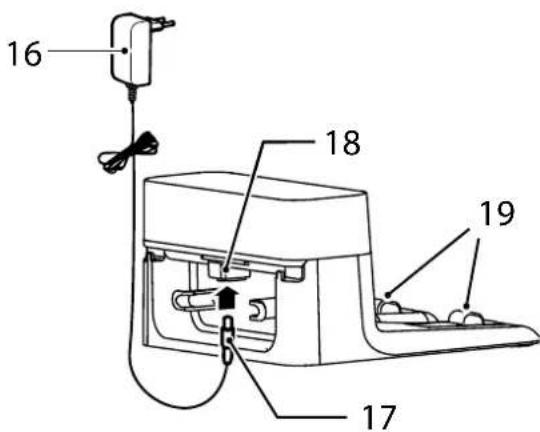
text_image
16 18 19 17KLARGJ∅R HJEMMET DITT
Før bruk må du fjerne hindre som kan være i veien for roboten. Vær oppmerksom på:
T∅MME ST∅VBEHOLDEREN
natural_image
Illustration of a hand pressing down on a mechanical component with an upward arrow (no text or symbols)Fig. 15
natural_image
Illustration of hands using a tool to lift a curved surface with an arrow indicating upward motion (no text or symbols)Fig. 16
natural_image
Technical diagram of a robotic device with internal components and mounting brackets (no text or symbols)Fig. 17
natural_image
Technical diagram of a circular robotic device with internal components and a directional arrow (no text or symbols)Fig. 18
natural_image
Illustration of a hand inserting a component into a circular device (no text or symbols visible)Fig. 19
natural_image
Technical diagram of a mechanical device showing internal components and a close-up view of a hand interacting with a component (no text or symbols visible)Fig. 20
natural_image
Diagram of a robotic vacuum cleaner with internal components and a hand inserting a component (no text or symbols visible)Fig. 21
natural_image
Illustration of hands cleaning a circular device with a knob and handle (no text or symbols)Fig. 22 Fig. 23
RENGJ∅RING AV MOPPEKLUT
natural_image
Illustration of a train with a hand holding a cross-shaped object, no text or symbols presentFEILS∅KING
natural_image
Pure electrical circuit lines without any symbols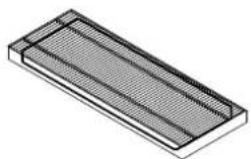
natural_image
Isometric view of a rectangular grid structure with no text or symbolstext_image
Technical diagram of a circular vacuum cleaner with numbered parts labeled 1 through 8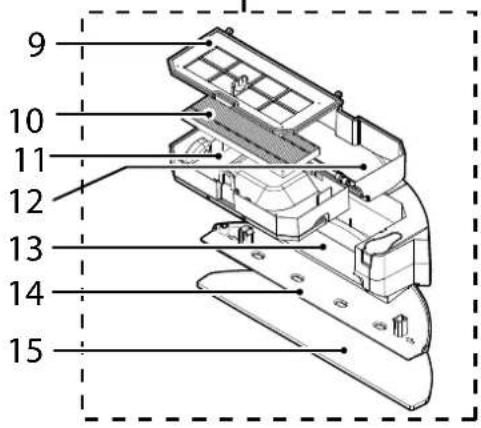
text_image
9 10 11 12 13 14 15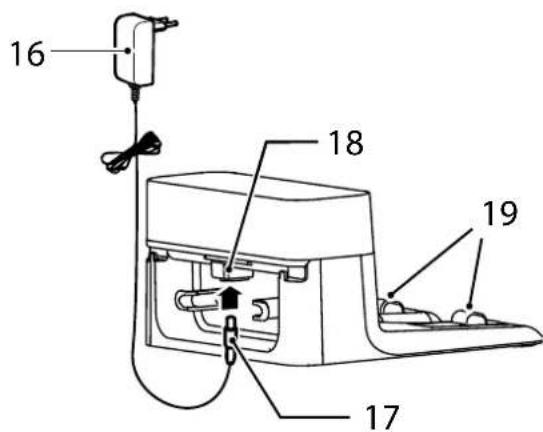
text_image
16 18 19 17natural_image
Illustration of a hand pressing down on a mechanical component with an upward arrow (no text or symbols)Fig. 15
natural_image
Illustration of hands using a tool to lift a curved surface, showing motion direction (no text or symbols)Fig. 16
natural_image
Technical diagram of a robotic device with internal components and mounting brackets (no text or symbols)Fig. 17
natural_image
Technical diagram of a circular robotic device with internal components and a directional arrow (no text or symbols)Fig. 18
natural_image
Illustration of a hand inserting a component into a circular device (no text or symbols visible)Fig. 19
natural_image
Technical diagram of a device interior showing internal components and a close-up view of a hand interacting with a component (no text or symbols visible)Fig. 20
natural_image
Diagram of a robotic vacuum cleaner with internal components and a hand inserting a component (no text or symbols visible)Fig. 21
natural_image
Illustration of hands holding a circular device with a knob, no text or symbols visibleFig. 22 Fig. 23
MOPPDYNA FÖR RENGÖRING
natural_image
Illustration of a train with a hand holding a cross-shaped object, no text or symbols presentFELSÖKNING
text_image
Technical diagram of a circular device with numbered components for identification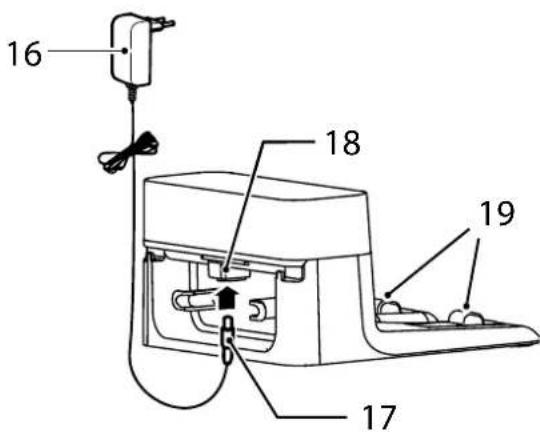
text_image
16 18 19 17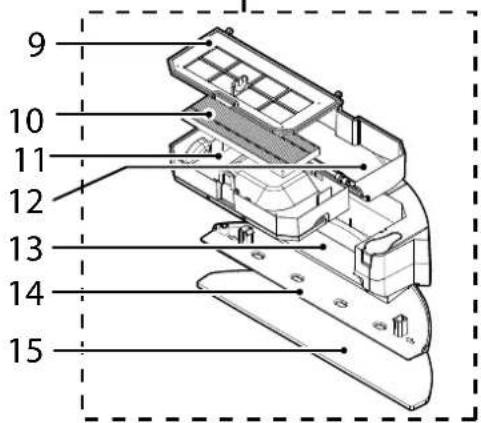
text_image
9 10 11 12 13 14 15PÖLYSÄILIÖN TYHJENNYS
natural_image
Illustration of a hand pressing down on a mechanical component with an upward arrow (no text or symbols)Kuva 15
natural_image
Illustration of hands using a tool to lift a curved surface, showing motion direction (no text or symbols)Kuva 16
natural_image
Diagram of a robotic vacuum cleaner with exposed internal components and mounting bracket (no text or labels)Kuva 17
natural_image
Technical line drawing of a circular device with internal components and a directional arrow (no text or symbols)Kuva 18
natural_image
Illustration of a hand inserting a component into a circular device (no text or symbols visible)Kuva 19
natural_image
Technical diagram of a mechanical device showing internal components and a close-up view of a hand interacting with a component (no text or symbols visible)Kuva 20
natural_image
Diagram of a robotic vacuum cleaner with internal components and a hand inserting a component (no text or symbols visible)Kuva 21
natural_image
Illustration of hands holding a circular device with a knob, no text or symbols visibleKuva 22 Kuva 23
PUHDISTUSMOPPITYYNY
natural_image
Illustration of a train with a hand holding a cross, no text or symbols presentVIANMÄÄRITYS
natural_image
Technical line drawing of a circular mechanical component with a central hub and mounting holes (no text or symbols)natural_image
Isometric line drawing of a mechanical bracket or bracket (no text or symbols)
natural_image
Blank white rectangle with black border (no text or symbols)natural_image
Pure electrical circuit lines without any symbolsάκρων Χ4
natural_image
Isometric view of a rectangular grid structure with no text or symbolstext_image
Technical diagram of a circular vacuum cleaner with numbered parts labeled 1 through 8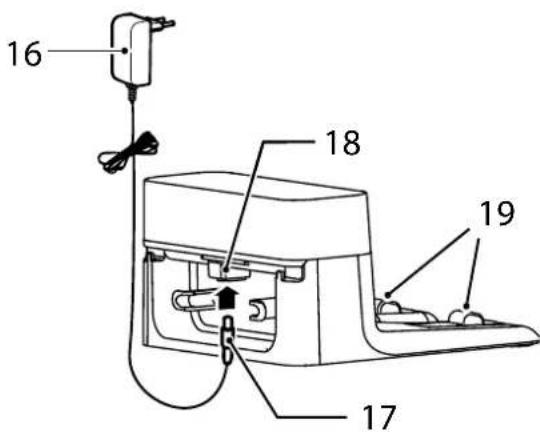
text_image
16 18 19 17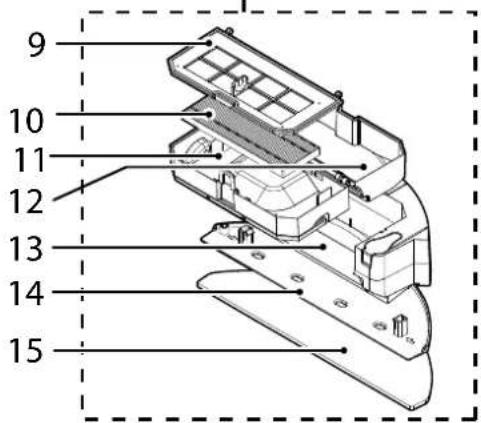
text_image
9 10 11 12 13 14 15natural_image
Illustration of a hand pressing down on a mechanical component with an upward arrow (no text or symbols)Eik. 15
natural_image
Illustration of hands using a tool to lift a curved surface with an arrow (no text or symbols)Eik.16
natural_image
Technical diagram of a robotic device with internal components and mounting brackets (no text or labels)Eik. 17
natural_image
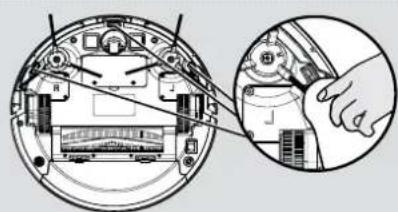
Technical diagram of a circular robotic device with internal components and a directional arrow (no text or symbols)Eik. 18
natural_image
Hand cleaning a circular device with visible components and wiring (no text or symbols)Eik. 19
natural_image
Technical diagram of a mechanical device showing internal components and a close-up view of a hand interacting with a component (no text or symbols visible)Eik. 20
natural_image
Diagram of a robotic vacuum cleaner with internal components and a hand inserting a component (no text or symbols visible)Eik. 21
natural_image
Illustration of hands holding a circular device with a knob, no text or symbols presentEik. 22 Eik. 23
ΚΑΘΑΡΙΣΜΟΣ ΣΦΟΥΓΓΑΡΙΣΤΡΑΣ
natural_image
Illustration of a train with a hand holding a cross-shaped object, no text or symbols presentnatural_image
Technical line drawing of a circular mechanical component with mounting holes and a central hub (no text or symbols)natural_image
Isometric line drawing of a mechanical bracket or bracket (no text or symbols)
natural_image
Blank white rectangle with black border (no text or symbols)пользователя
natural_image
Pure electrical circuit lines without any symbolsочистки краев
text_image
Technical diagram of a circular device with numbered components for identification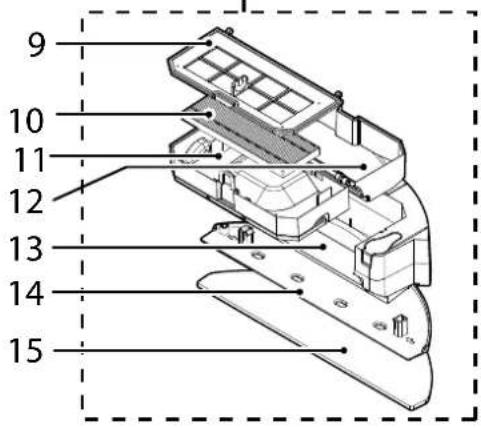
text_image
9 10 11 12 13 14 15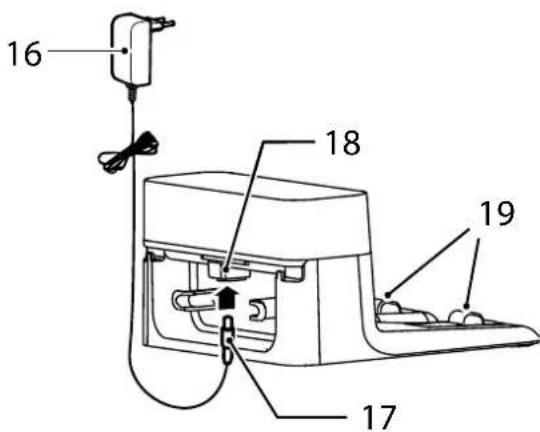
text_image
16 18 19 17natural_image
Illustration of a hand pressing down on a mechanical component with an upward arrow (no text or symbols)Рис. 15
natural_image
Illustration of hands using a tool to lift a curved surface, showing motion direction (no text or symbols)Рис. 16
natural_image
Diagram of a robotic vacuum cleaner with internal components and mounting bracket (no text or labels)Рис. 17
natural_image
Diagram of a circular device with internal components and a directional arrow indicating movement (no text or symbols)Рис. 18
natural_image
Illustration of a hand inserting a component into a circular device (no text or symbols visible)Рис. 19
natural_image
Technical diagram of a mechanical assembly with a close-up view of a hand operating a component (no text or symbols visible)Рис. 20
natural_image
Diagram of a robotic vacuum cleaner with internal components and a hand inserting a component (no text or symbols visible)Рис. 21
natural_image
Illustration of hands holding a circular device with a knob, no text or symbols visibleРис. 22 Рис. 23
natural_image
Illustration of a train with a hand holding a cross-shaped object, no text or symbols presentnatural_image
Technical line drawing of a circular mechanical component with a central knob and mounting holes (no text or symbols)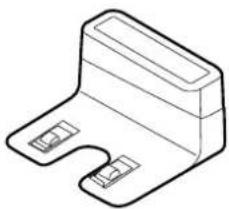
natural_image
Isometric line drawing of a mechanical bracket or bracket (no text or symbols)
natural_image
Empty rectangular frame with no text, numbers, or symbolsnatural_image
Pure electrical circuit lines without any symbolskrawędziowe
natural_image
Isometric view of a rectangular grid structure with uniform mesh pattern (no text or symbols)text_image
Technical diagram of a circular device with numbered components for identification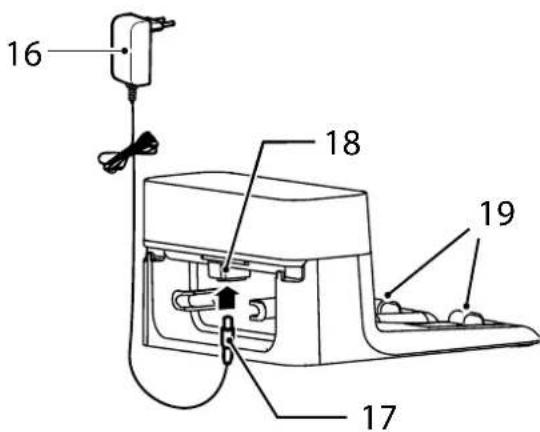
text_image
16 18 19 17
text_image
9 10 11 12 13 14 15natural_image
Illustration of a hand pressing down on a mechanical component with an upward arrow (no text or symbols)Rys. 15
natural_image
Illustration of hands using a tool to lift a curved surface, showing motion direction (no text or symbols)Rys. 16
natural_image
Diagram of a robotic vacuum cleaner with exposed internal components and mounting bracket (no text or labels)Rys. 17
natural_image
Technical line drawing of a circular mechanical or electronic component with internal components and an arrow indicating direction (no text or symbols)Rys. 18
natural_image
Hand cleaning a circular device with visible components and wiring (no text or symbols)Rys. 19
natural_image
Technical diagram of a mechanical device showing internal components and a close-up view of a hand interacting with a component (no text or symbols visible)Rys. 20
natural_image
Diagram of a robotic vacuum cleaner with internal components and a hand inserting a component (no text or symbols visible)Rys. 21
natural_image
Illustration of hands holding a circular object with a knob, no text or symbols presentRys. 22 Rys. 23
CZSZCZENIE ŚCIERECZKI DO MOPOWANIA
natural_image
Illustration of a train with a hand holding a cross, no text or symbols presentROZWIAZYWANIE PROBLEMÓW
natural_image
Technical line drawing of a circular mechanical component with a central hub and mounting holes (no text or symbols)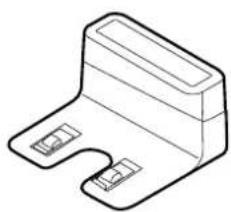
natural_image
Isometric line drawing of a mechanical bracket or bracket (no text or symbols)
natural_image
Blank rectangular frame with no text, numbers, or symbolsnatural_image
Pure electrical circuit lines without any symbolsčištění okrajů
natural_image
Isometric view of a rectangular grid structure with no text or symbolstext_image
Technical diagram of a circular device with numbered components for identification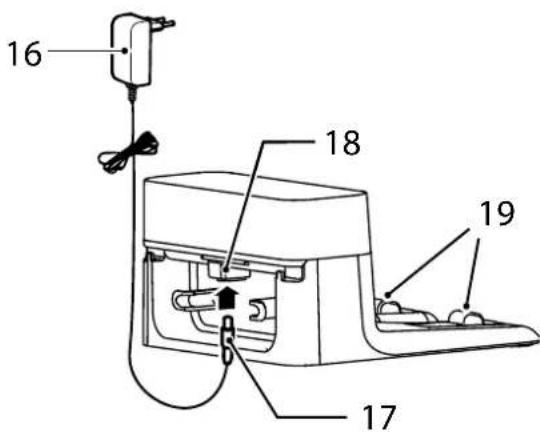
text_image
16 18 19 17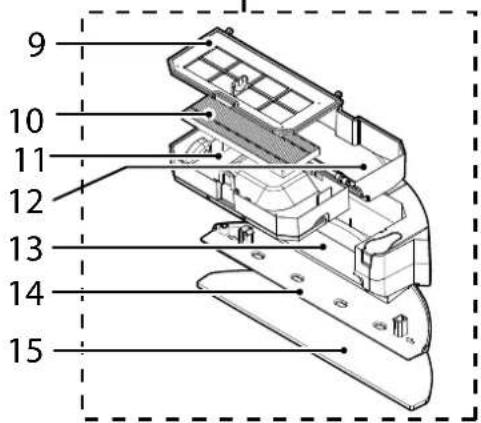
text_image
9 10 11 12 13 14 15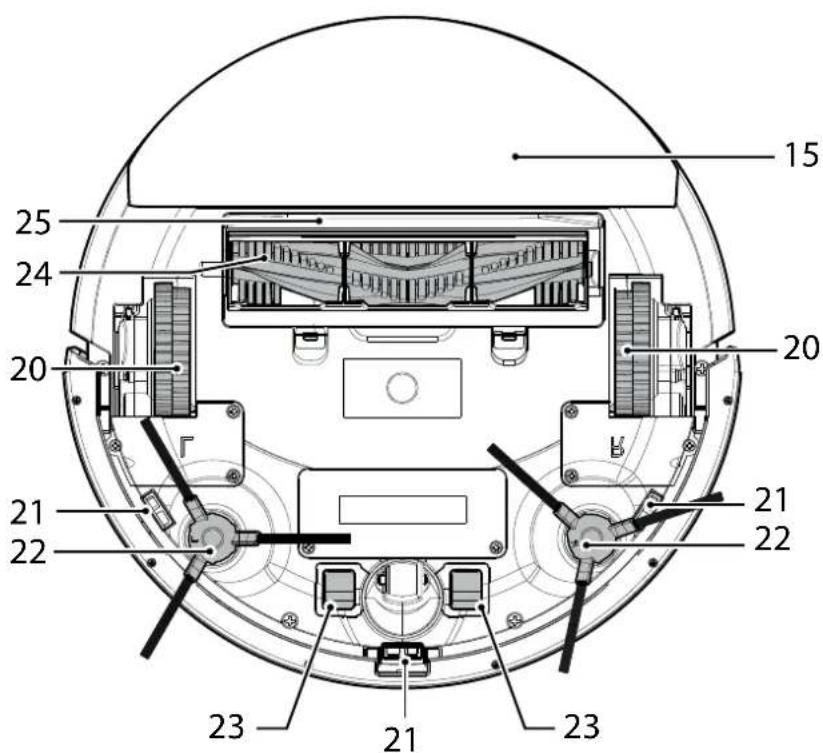
text_image
15 25 24 20 20 21 21 22 22 23 21 23• POWER/ON (ZAPNUTÍ) (
- CUSTOMISE (UPRAVIT) (山口)
natural_image
Illustration of a hand pressing down on a mechanical component with an upward arrow (no text or symbols)Obr. 15
natural_image
Illustration of hands using a tool to lift a curved surface, showing motion direction (no text or symbols)Obr. 16
natural_image
Diagram of a robotic vacuum cleaner with exposed internal components and mounting bracket (no text or labels)Obr. 17
natural_image
Technical line drawing of a circular mechanical device with internal components and a directional arrow (no text or symbols)Obr. 18
natural_image
Hand cleaning a circular device with visible internal components and a tool (no text or symbols)Obr. 19
natural_image
Technical diagram showing a mechanical assembly with a close-up view of a hand operating a component (no text or symbols visible)Obr. 20
natural_image
Diagram of a robotic vacuum cleaner with internal components and a hand inserting a component (no text or symbols visible)Obr. 21
natural_image
Illustration of hands holding a circular device with a knob, no text or symbols visibleObr. 22 Obr. 23
ČIŠTĚNÍ MOPOVACÍ PODLOŽKY
natural_image
Illustration of a train with a hand holding a cross, no text or symbols presentŘEŠENÍ POTÍŽÍ
NAVODILA ZA VARNO UPORABO
natural_image
Line drawing of a circular vacuum cleaner with a central hub and mounting bracket (no text or symbols)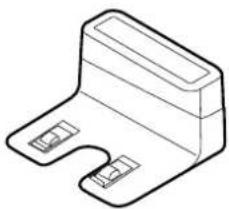
natural_image
Isometric line drawing of a mechanical bracket or bracket (no text or symbols)
natural_image
Blank white square with a thin black border (no text or symbols)natural_image
Pure electrical circuit lines without any symbolsčiščenje robov
natural_image
3D rendering of a rectangular grid structure with no text or symbolsDodatni filter za Robota
text_image
Technical diagram of a circular device with numbered components for identification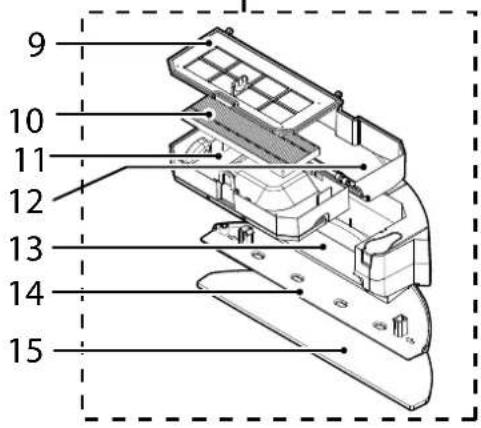
text_image
9 10 11 12 13 14 15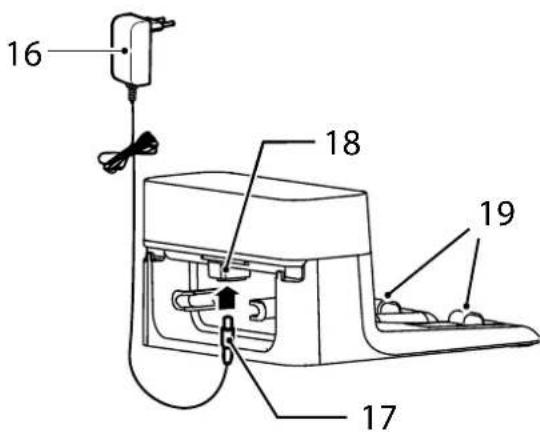
text_image
16 18 19 17natural_image
Illustration of a hand pressing down on a mechanical component with an upward arrow (no text or symbols)Slika 15
natural_image
Illustration of hands using a tool to lift a curved surface, showing motion direction (no text or symbols)Slika 16
natural_image
Diagram of a robotic vacuum cleaner with exposed internal components and mounting bracket (no text or labels)Silka 17
natural_image
Technical diagram of a circular robotic device with internal components and a directional arrow (no text or symbols)Slika 18
natural_image
Hand cleaning a circular device with visible internal components and a tool (no text or symbols)Slika 19
natural_image
Technical diagram of a mechanical device showing internal components and a close-up view of a hand interacting with a component (no text or symbols present)Slika 20
natural_image
Diagram of a robotic vacuum cleaner with internal components and a hand inserting a component (no text or symbols visible)SIIka 21
natural_image
Illustration of hands holding a circular device with a knob, no text or symbols visibleSlika 22 Slika 23
KRPA ZA MOKRO BRISANJE
- Odstranite držalo za krpo za mokro brisanje in krpo za brisanje z rezervoarja za vodo. [Slika 15,16]
- Odstranite krpo za mokro brisanje z držala za krpo za mokro brisanje.
- Krpo za mokro brisanje operite ročno ali v pralnem stroju.
- Pustite, da se popolnoma posuši, preden jo ponovno uporabite.
natural_image
Illustration of a hand holding a train, no text or symbols presentODPRAVLJANJE TEŽAV
natural_image
Technical line drawing of a circular mechanical component with a central hub and mounting holes (no text or symbols)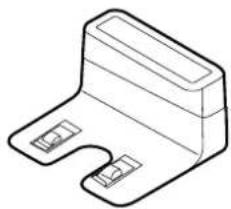
natural_image
Isometric line drawing of a mechanical bracket or bracket (no text or symbols)
natural_image
Empty rectangular frame with no text, numbers, or symbolsnatural_image
Pure electrical circuit lines without any symbolsčistenie okrajov
natural_image
Isometric view of a rectangular grid structure with no text or symbolstext_image
Technical diagram of a circular vacuum cleaner with numbered parts labeled 1 through 8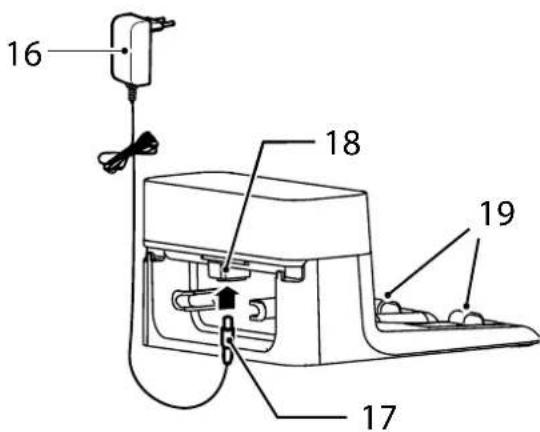
text_image
16 18 19 17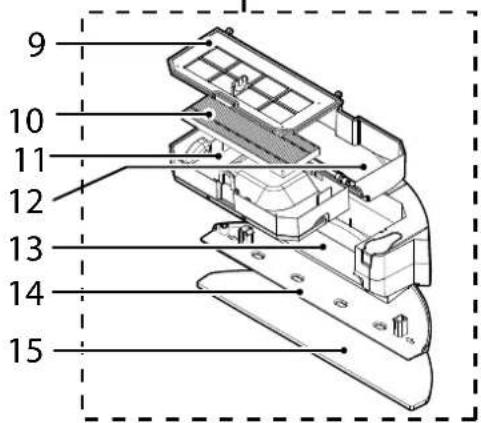
text_image
9 10 11 12 13 14 15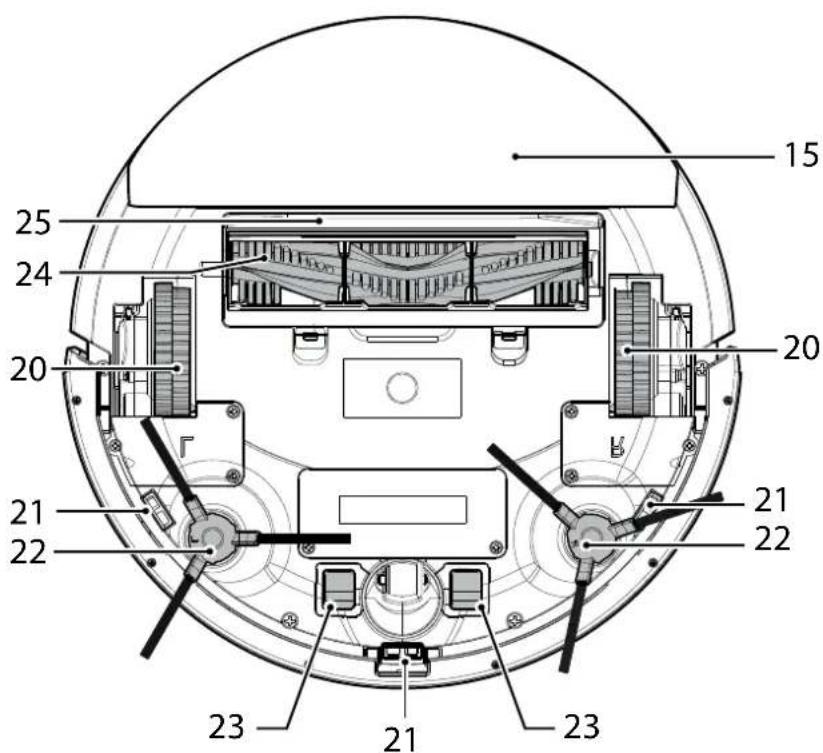
text_image
15 25 24 20 20 21 21 22 22 23 21 23natural_image
Illustration of a hand pressing down on a mechanical component with an upward arrow (no text or symbols)Obr. 15
natural_image
Illustration of hands using a tool to lift a curved surface, showing motion direction (no text or symbols)Obr. 16
natural_image
Technical diagram of a robotic device with internal components and mounting brackets (no text or labels)Obr. 17
natural_image
Technical diagram of a circular robotic device with internal components and a directional arrow (no text or symbols)Obr. 18
natural_image
Illustration of a hand inserting a component into a circular device (no text or symbols visible)Obr. 19

natural_image
Technical diagram of a mechanical device showing internal components and a close-up view of a hand interacting with a component (no text or symbols visible)Obr. 20
natural_image
Diagram of a robotic vacuum cleaner with internal components and a hand inserting a component (no text or symbols visible)Obr. 21
natural_image
Illustration of hands holding a circular device with a knob, no text or symbols visibleObr. 22 Obr. 23
ČISTIACA MOPOVACIA PODLOŽKA
- Vyberte držiak mopovacej podložky a mopovaciu podložku z nádržky na vodu. [Obr. 15,16]
- Vyberte mopovaciu podložku z držiaka mopovacej podložky.
- Mopovaciu podložku umývajte ručne alebo ju operte v práčke.
- Pred d'alším použitím ju nechajte úplne vyschnút'.
ČISTENIE ROTAČNEJ KEFY
natural_image
Illustration of a train with a hand holding a cross, no text or symbols presentRIEŠENIE PROBLÉMOV
text_image
Technical diagram of a circular device with numbered components for identification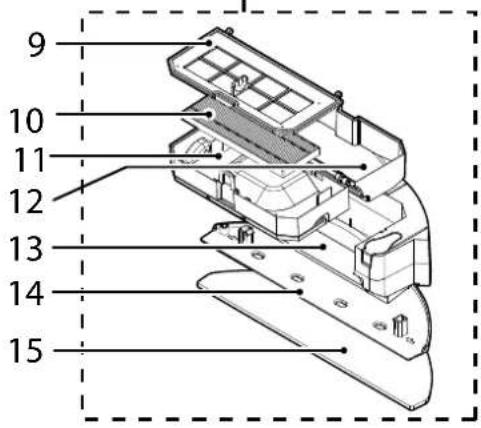
text_image
9 10 11 12 13 14 15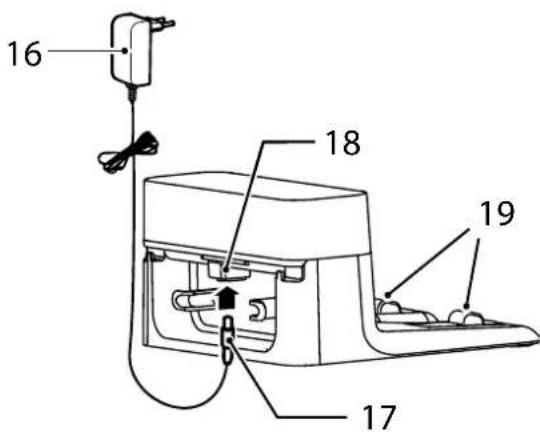
text_image
16 18 19 17natural_image
Illustration of a hand pressing down on a mechanical component with an upward arrow (no text or symbols)Şek. 15
natural_image
Illustration of hands using a tool to lift a curved surface with an arrow indicating upward motion (no text or symbols)Şek. 16
natural_image
Diagram of a robotic vacuum cleaner with exposed internal components and mounting bracket (no text or labels)Şek. 17
natural_image
Diagram of a circular device with internal components and an arrow indicating a specific area (no text or symbols present)Şek. 18
natural_image
Hand cleaning a circular device with visible components and wiring (no text or symbols)Şek. 19
natural_image
Technical diagram of a mechanical device showing internal components and a close-up view of a hand interacting with a component (no text or symbols visible)Şek. 20
natural_image
Diagram of a robotic vacuum cleaner with exposed circuit board and mechanical components (no text or symbols)Şek. 21
natural_image
Illustration of hands holding a circular device with a knob, no text or symbols visibleŞek. 22 Şek. 23
PASPAS BEZİNİN TEMİZLENMESİ
natural_image
Illustration of a train with a hand holding a cross, no text or symbols presentSORUN GİDERME
text_image
Technical diagram of a circular device with numbered components for identification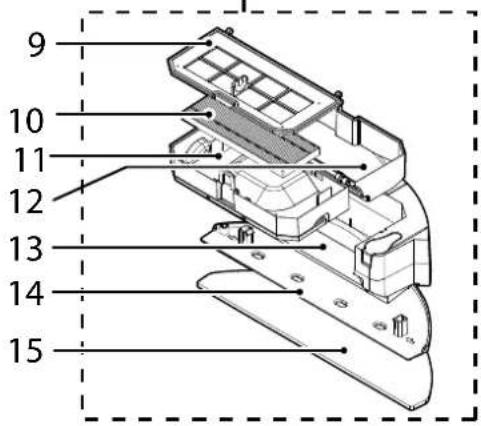
text_image
9 10 11 12 13 14 15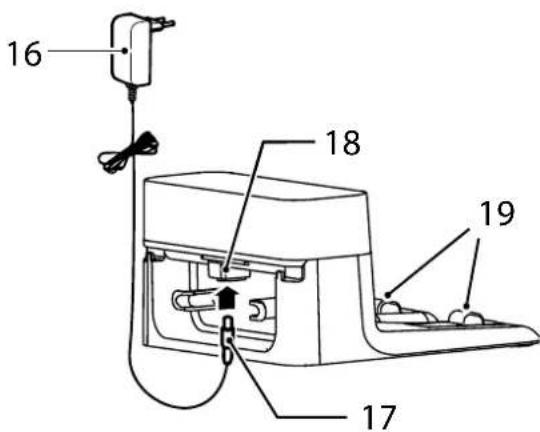
text_image
16 18 19 17natural_image
Illustration of a hand pressing down on a mechanical component with an upward arrow (no text or symbols)15 ábra
natural_image
Illustration of hands using a tool to lift a curved surface, showing motion direction (no text or symbols)16 ábra
natural_image
Diagram of a robotic vacuum cleaner with internal components and mounting bracket (no text or labels)17 ábra
natural_image
Diagram of a circular device with internal components and a directional arrow indicating movement (no text or symbols)18 ábra
natural_image
Illustration of a hand inserting a component into a circular device (no text or symbols visible)19 ábra
natural_image
Technical diagram showing a mechanical assembly with a close-up view of a hand interacting with a component (no text or symbols visible)20 ábra
natural_image
Diagram of a robotic vacuum cleaner with internal components and a hand inserting a component (no text or symbols visible)21 ábra
natural_image
Illustration of hands holding a circular device with a knob, no text or symbols present22 ábra 23 ábra
natural_image
Illustration of a train with a hand holding a cross-shaped object, no text or symbols presentHIBAELHÁRÍTÁS
| Manufacturer Name | Dongguan Sunun Power Co., Ltd. | |
| Manufacturer Address | No.16, Minan Road,Dabandi Industrial Park, Daning Community,Humen Town, Dongguan, China | |
| Model | SA12BH-190060V | |
| Input Voltage | 100-240 V~ | |
| Input AC Frequency | 50/60 Hz | |
| Output Voltage | 19.0 V DC | |
| Output Current | 0.6 A | |
| Output Power | 11.4 W | |
| Average Active Efficiency | 82.7 % | |
| Efficiency at load 10% | 70.0% | |
| No-Load Power Consumption | 0.10 W |