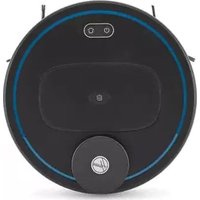
Ranger 5241 - Robot vacuum HOOVER - Free user manual and instructions
Find the device manual for free Ranger 5241 HOOVER in PDF.


| Product Type | Robot Vacuum Cleaner |
| Brand | Hoover |
| Model | Ranger 5241 |
| Dimensions (L x W x H) | 34.5 cm x 34.5 cm x 9.2 cm |
| Weight | 3.2 kg |
| Power Supply | Rechargeable Li-Ion battery, 14.4V, 2600mAh |
| Charging Time | Approximately 4-5 hours |
| Run Time | Up to 90 minutes (standard mode) |
| Dustbin Capacity | 500 ml |
| Suction Power | 2000 Pa |
| Noise Level | ≤ 65 dB |
| Cleaning Modes | Auto, Spot, Edge, Random |
| Sensors | Cliff sensors, anti-collision, dust detection |
| Navigation | Random path with sensor guidance |
| Filter Type | Washable HEPA filter |
| Accessories | Charging dock, power adapter, side brushes, remote control |
| Remote Control | Yes, included |
| Self-Charging | Yes, automatic return to dock |
| Maximum Climbing Height | 1.5 cm |
| Weight | 3.2 kg |
| Warranty | 2 years |
Frequently Asked Questions - Ranger 5241 HOOVER
User questions about Ranger 5241 HOOVER
0 question about this device. Answer the ones you know or ask your own.
Ask a new question about this device
Download the instructions for your Robot vacuum in PDF format for free! Find your manual Ranger 5241 - HOOVER and take your electronic device back in hand. On this page are published all the documents necessary for the use of your device. Ranger 5241 by HOOVER.
USER MANUAL Ranger 5241 HOOVER
Robot Vacuum Cleaner

natural_image
Top-down view of a black circular robotic vacuum cleaner with blue trim and control buttons (no text or symbols on the device itself)Clean Anywhere, Anytime
Smart Autonomous Cleaning
Powerful Cleaning Performance

ranger

5241 Ranger
Congratulations on the purchase of your new HOOVER cleaner. There are many useful features built into your cleaner and we recommend that you carefully read this instruction manual to take the best advantage of these features.
Accessories Included
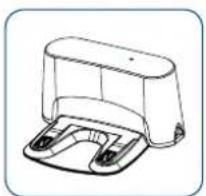
natural_image
Line drawing of a mechanical device with a flat top and base (no text or symbols)Charging Base x1
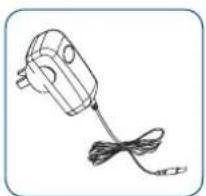
natural_image
Line drawing of a handheld electronic device with wires (no text or symbols)Charging Adaptor x1

natural_image
Simple line drawing of a three-blade fan or propeller (no text or symbols)Spare Side Brushes x2

natural_image
Simple line drawing of two stacked rectangular blocks, no text or symbols presentSpare Filter Set x1

natural_image
Illustration of a screwdriver and a pill bottle (no text or symbols)Screwdriver x1 Screws x2

natural_image
Simple line drawing of a hand holding three blades with a string, enclosed in a rounded square frame (no text or symbols)Cleaning Bush x1
Specifications
- Voltage: 14.4V DC
• Dust Bin Capacity: 450ml
• Weight: 3Kg
• Battery Type: 2500mAh Lithium
- Charge Time: 3.5 hours
• Runtime: Up to 90min (Low), 70min (Medium) & 60min (High)
Please contact Hoover Customer Care 1300 360 845, NZ 0800 387 442 to find your local spare parts provider.
Before You Begin
This cleaner must be operated in accordance with these instructions and used only for domestic household cleaning to remove DRY dirt and dust from household carpets, flooring, walls and fabrics. This cleaner is not fit to be used as an industrial cleaner and will void the manufacturer's warranty if used inappropriately.
Please read these instructions thoroughly
This will ensure you obtain full benefit from your new cleaner. Keep this Instruction Manual in a handy place for future reference.
Important
Always switch off the appliance before cleaning, when not in use, attempting any maintenance task, fitting or removing accessories. The charger must only be connected to an AC power supply at the voltage shown on the rating label. This cleaner should only be charged with the charger provided. This cleaner should only be used for its intended purpose as described in these instructions.
Precautionary measures:

- Do not operate the vacuum cleaner too close to heaters, radiators or other hot surfaces.

- Before inserting the charger adaptor into the wall, make sure your hands are dry.

- Before turning on the vacuum cleaner, safely remove any large objects from the floor or cleaning surface in order to prevent damage to the filter, roller brush, side brushes and cleaning surface.

- When you want to remove the plug from the power socket, do not use the power cable, gently pull the plug from the power socket.

- Do not use this vacuum cleaner to pick-up water or liquids.

Safety Precautions & Warnings
IMPORTANT! Always switch off the appliance before cleaning, when not in use or attempting any maintenance task. The charger must only be connected to an AC power supply at the voltage shown on the rating label. This cleaner should only be used for its intended purpose as described in this instruction manual. Never operate the vacuum cleaner without filters.
Read the manual attentively before using the appliance for the first time.
When using your vacuum cleaner, basic precautions should always be observed, including the following;
- This appliance is not intended for use by persons (including children) with reduced physical, sensory or mental capabilities or lack of experience and knowledge, unless they have been given supervision or instruction concerning use of the appliance by a person responsible for their safety.
- Children should be supervised to ensure that they do not play with the appliance.
- To prevent electrical shock, do not immerse the appliance, battery, or power plug into water or other liquids.
- To prevent electrical shock, do not use the vacuum cleaner outdoors or on wet surfaces.
- Always check the power cord before use, the power cord and the plug should be in a good condition and must not be damaged. If the power supply cord is damaged or defective, it must be replaced by the manufacturer, its service agent or similarly qualified persons in order to avoid a hazard.
- The appliance and charging base are intended for domestic indoors use only.
- Do not unplug by pulling on the power cord. To unplug, grasp the plug, not the power cord.
Use only Australian and New Zealand electrical safety approved extension cords.
- Do not pull or carry the appliance by the power cable, use the power cable as a handle or pull the power cable around sharp edges or corners. Avoid running the appliance over the power cable.
- Do not handle or operate the appliance with wet hands and follow electrical safety precautions at all times.
- Do not operate the vacuum cleaner too close to heaters, radiators and other hot surfaces.
- Do not use the appliance to pick up flammable items or combustible liquids (i.e. gasoline, hot ashes, cigarettes, matches, explosive materials or anything burning) or use in areas where such substances and items may be present.
- Do not use the appliance to pick up toxic materials (i.e. chlorine bleach, ammonia).
- Never operate or use the appliance without the filters in place.
-
Before vacuuming, remove any large or sharp objects from the floor or cleaning surface in order to prevent damage to the filter. cleaning surface and brushes.
-
If the air inlet is blocked, switch off the cleaner straight away. First, clear the blocked object before attempting to start the vacuum cleaner again.
- Before carrying out any maintenance service or cleaning the filters, always switch off the vacuum cleaner.
- Keep openings away from your face and body.
- Do not use the vacuum cleaner if it is damaged or broken. If connection cables are damaged, have them replaced immediately.
- Never clean the vacuum cleaner or any of the electrical parts, especially the electrical connections with water or liquid cleaners.
- Never attempt to make any modifications electrically to the vacuum cleaner and charging base.
- Always store the appliance and charger indoors in a cool and dry place.
- Do not pick up water, for dry household use only
- Use the electric roller brush only for vacuuming dust and dry substances in the home.
- Never run over the power cable with the robot cleaner as this may cause damage to the power cable.
- Never touch the roller brush while the vacuum cleaner is switched on.
- To prevent unnecessary wear on the power head, keep it moving while in operation.
- Damage caused by improper use or by not observing the instructions in this manual will void the warranty.
Battery use and care
- The appliance is only to be used with the charger uniquely provided with the appliance.
-
Only charge the battery inside the product and only use the specifically designated charger to charge the product.
-
When appliance is not in use, keep it away from other metal objects, like paper clips, coins, keys, nails, screws or other small metal objects that can make a connection from one terminal to another. Shorting the appliance terminals together may cause burns or a fire.
- Under abusive conditions, liquid may be ejected from the battery; avoid contact. If contact accidentally occurs, flush with water. If liquid contacts eyes, additionally seek medical help. Liquid ejected from the battery may cause irritation or burns.
- Do not charge or store the appliance outdoors or inside the car. Only charge or store the battery in a dry indoor area where the temperature is more than 5^ C but less than 45^ C. The charger is for indoor used only.
- Never attempt to open the battery for any reason. If the plastic housing of the battery casing breaks or cracks, immediately discontinue use and do not recharge.
- The charger adapter contains electrical connections inside. The charger adapter is not serviceable part.
- Before disposal of your battery, fully discharge your battery by running the product until it stops.
- The cleaner contains a Lithium battery. Do not dispose the appliance with your local garbage. Contact your local council for instructions on how to safely dispose of the battery.
- Do not use the charger to charge a non-chargeable battery.
- Do not touch or insert objects into battery pack terminal.
- Do not attempt to short circuit the battery terminal.

Risk of damage!
- Light, moveable objects can be dragged along by the robot vacuum and cause damage to the object or floor depending on the object characteristics.
- Remove light, moveable objects from the work area.
- Secure cables that hang down or are exposed (e.g. on floor lamps).
Risk of fire!
- Do not use the robot vacuum cleaner too close to heaters, radiators and other hot surface.
- Do not spray with, or pick up flammable liquids, cleaning fluids, aerosols, of their vapours, as this may increase the risk of fire/explosion.
- Do not use the robot vacuum to pick up glowing embers or cigarette butts.
- Never expose the batteries to open flame or an external heat source.
Laser navigation sensor
The navigation sensor contains a class 1 rotating laser.
The following rules of conduct generally apply for lasers:
- Switch off the robot vacuum prior to all changeover tasks.
- Do not aim the laser beam at other persons.
- Do not look at the direct or reflected laser beam.
Modifications (changes) or attempts to repair the device and especially the navigation sensor are prohibited.
Instructions for Use
IMPORTANT! Before commencing cleaning, please tidy up objects on the floor like cables, cleaning cloths, slippers and carpet with fringes to avoid the cleaner being tangled.
Charging Base

natural_image
Line drawing of a robotic vacuum cleaner with attached electrical outlet (no text or symbols)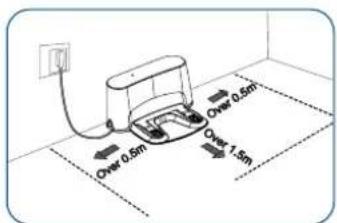
1 Connect the power adaptor to the Charging Base then to the power supply.
2 Place the Charging Base in an open, uncluttered area leaving the following distances around the Charging Base:
- At least 0.5 meters on each side of the Charging Base
- At least 1.5 meter in front of the Charging Base, and at least 1.5 meter away from stairs
- Always keep the Charging Base plugged in and make sure it is in an area with consistent Wi-Fi ^ coverage to allow the robot to receive information via the Hoover Ranger App.
natural_image
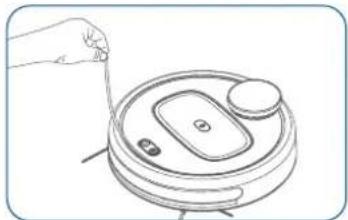
Line drawing of a hand holding a small object next to a circular device with buttons and a handle (no text or symbols)- Please remove the protective strip on the robot before use.
- To access the ON/OFF Switch, remove the dust bin by pressing the Dust Bin Release Button and switch ON the robot by moving the switch to the ON position.

8.

- Place the robot on the Charging Base to begin charging.
NOTE: When the robot completes the cleaning cycle or when battery power is low, the robot will automatically returns to the Charging Base to recharge.

- Download the Hoover Ranger App and connect to Wi-Fi® by following the instructions in the App.


iOS 9.0 or later Android 4.1 or later
NOTE: The robot can only connect to a 2.4Ghz Wi-Fi® Router.
On-board Controls & Status Indicator

natural_image
Line drawing of a vacuum cleaner with control buttons and power connections (no text or symbols)On-Off Button:
- Short press: start or pause cleaning
- Press for 3 seconds for shutdown
Recharge/Area cleaning:
- Short press: return to charging base to recharge
- Press for 3 seconds to activate Area Cleaning. The cleaner will clean a 2m x 2m area based on the current location
Status Indicator:
- Green light: Normal operation/recharging
- Red light: Error/low battery
- Yellow light: WiFi connection issue
NOTE: Press the ⏻ and ⬇ buttons for 3 seconds at the same time to reset the WiFi.

Status Indicator
| No. | Status Display Sound | ||
| 1 | Initialisation after turning on | A flashing green light | Extended beep on start-up |
| 2 | Initialisation finished | A green light | Two beeping sounds |
| 3 | Not connected to WiFi after initialisation | A yellow light | |
| 4 | Connecting to the WiFi | A flashing yellow light | One beeping sound |
| 5 | Connected to the WiFi | A green light on | Two beeping sounds |
| 6 | WiFi connection reset | A yellow light flashing slowly | One beeping sound |
| 7 | Start cleaning | A green/yellow light | Music |
| 8 | Pause cleaning | A green/yellow light | |
| 9 | Resume cleaning | A green/yellow light | Music |
| 10 | Cleaning finished | A green/yellow light | Two beeping sounds |
| 11 | Returning to charging base | A green/yellow light flashing slowly | Music |
| 12 | Recharging in progress | A red light | Two beeping sounds |
| 13 | Receiving a command while charging and with low battery | A red light | One beeping sound |
| 14 | Fully charged | A green/yellow light | |
| 15 | Dustbin removed | A red light flashing quickly | One beeping sound |
| 16 | Dust bin reinserted | A red light flashes quickly / yellow light | One beep |
| 17 | Locating robot | A green/yellow light flashing | Music |
Connecting to WiFi®
- Press the ⏻ button, then press and hold the ⏻ and ⏱ button for more than 3 seconds. The Status Indicator will flash yellow.

Status Indicator
Flashing Yellow: not connected to Wi-Fi®
Green: Wi-Fi ® is connected.
- Follow the prompts in the App to establish connection with the robot.
Operating the Hoover Ranger App
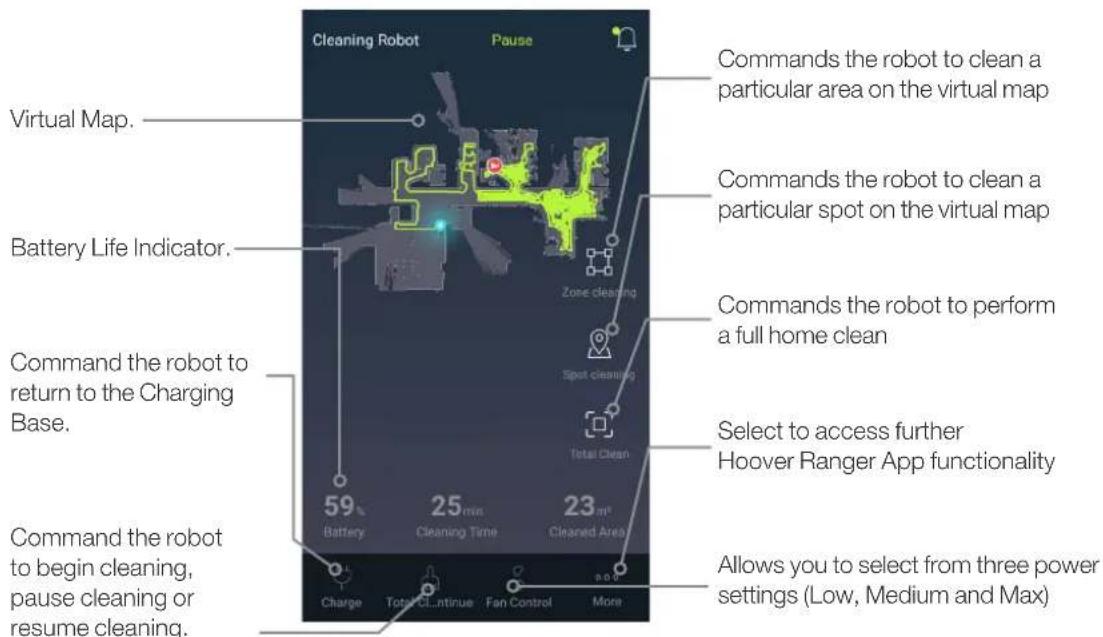

Select 'More' on the App to access additional App functionality. Below are a few key features:
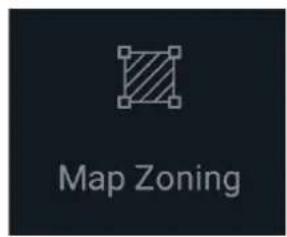
To create a particular cleaning zone in your home, or to command the robot to double clean a particular area or to prohibit the robot from cleaning a particular area.
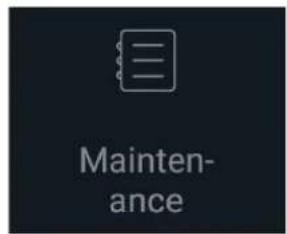
Indicates the remaining life span of the Filter, Side Brushes & the Roller Brush.

Identifies if there is a fault with the robot.

Allows you to manually direct the robot.
Maintenance
IMPORTANT! Ensure that the cleaner is switched off before preforming any maintenance.
Emptying the Dust Bin

natural_image
Line drawing of a hand holding a vacuum cleaner with three circular components (no text or symbols)- Press the Dust Bin Release Button to remove the dust bin.
natural_image
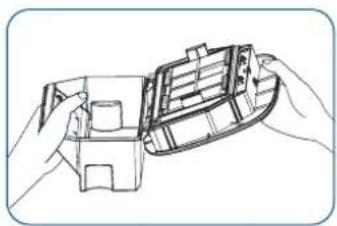
Line drawing of hands holding a small electronic device with a grid-patterned case (no text or symbols)- Open the dust bin lid and empty the contents into a rubbish bin.

natural_image
Line drawing of a hand inserting a small circular component into a vacuum cleaner (no text or symbols)- Close the dust bin lid and reinsert the dust bin back into the cleaner.
Cleaning & Replacing the Filters

natural_image
Line drawing of a hand placing a small object onto a circular device with a control panel (no text or symbols)- Press the Dust Bin release button to remove the dust bin.
natural_image
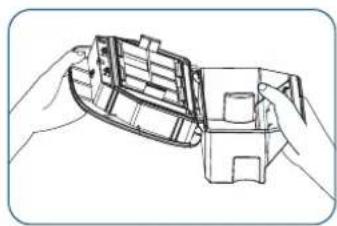
Line drawing of hands assembling a mechanical component (no text or symbols)- Open the dust bin lid and empty the contents into a rubbish bin.

natural_image
Line drawing of a hand placing a small object into a device component (no text or symbols)- The filters are located on the dust bin lid. Remove the filters and clean using the cleaning brush provided. Alternatively, replace the filters if required.
NOTE: it is recommended to replace filters every 6 months.

Cleaning & Replacing the Roller Brush
natural_image
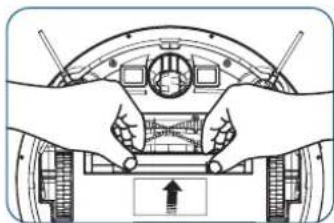
Diagram of hands operating a vehicle head panel with sensors and a directional arrow (no text or symbols)- Push the two locking buttons as shown to remove the brush cover.

natural_image
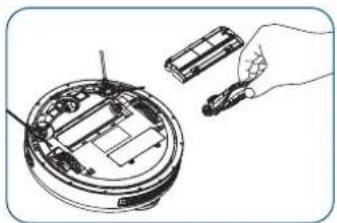
Illustration of a hand operating a mechanical device with gears and a ruler (no text or symbols visible)- Remove the roller brush and clean with the cleaning brush provided. Alternatively, the roller brush can be replaced if required.
natural_image
Illustration of a hand using a tool to adjust or install electronic components on a circular device (no text or symbols visible)NOTE: to reduce the build-up of hair wrap around the roller brush it is recommended to clean the roller brush periodically by removing the roller brush and using the cleaning brush and or scissors to cut away and remove hair wrapped around the roller brush.
Cleaning & Replacing the Side Brushes

natural_image
Technical line drawing of a mechanical device with a screwdriver handle (no text or symbols)- Unscrew the side brushes with the screwdriver provided.

natural_image
Technical line drawing of a three-blade fan or propeller component (no text or symbols)- Clean the side brushes ensuring that any hair wrap is removed.
NOTE: it is recommended to replace filters every 6 months.
Troubleshooting
Problems and solutions
If you come across a problem, please use the checklist of troubleshooting tips before contacting Hoover Customer Care on 1300 360 845, NZ: 0800 387 442..
| Fault Names | Fault Forms | Causes | Solutions |
| Full dust bin | 5 beeping sounds | The dust bin is full | Empty the dust bin |
| Laser Distance Sensor issue | A red light flashes slowly along with 4 beeping sounds | Laser Distance Sensor is covered | Check and ensure the Laser Distance Sensor is not obstructed |
| Cliff sensor issue | A red light flashes slowly along with 2 beeping sounds | The cliff sensors are covered | Check and ensure that the cliff sensors are not obstructed |
| Main wheel issue | A red light is displayed along with a beeping sound | The main wheel is entangled or jammed | Ensure that the main wheel is free from debris |
| Side brush failure | A red light is displayed along with 2 beeping sound | The side brushes are wound or jammed | Ensure that the side brushes are free from debris |
| Main brush issue | A red light is displayed along with 3 beeping sound | The main brush is wound or jammed | Ensure that the main brush is free from debris |
| Robot is stuck | A red light is displayed along with 4 beeping sound | The robot cannot move Relocate the robot | |
| Low battery | A red light is on along with a beeping sound | Low power Charge the robot |

Spare Parts
Please contact Hoover Customer Care: 1300 360 845, NZ: 0800 387 442 to find your local spare parts provider.
| Part Part Number | |
| Roller Brush 31155515 | |
| Side Brushes x2 31155516 | |
| Filter Set 32201689 | |
| Bust Bin 33156148 | |
| Charger Base 33201711 | |
| Charger Adaptor 33201714 |
Notes
Notes

ranger
Robot Vacuum
Conditions of warranty
Your Hoover cleaner, in the case of domestic use, has a one year parts and labour warranty against product defects and failures when the product is used in accordance with the terms and conditions of this warranty statement.
This warranty commences from the original date of purchase and is not transferable; please retain your original proof of purchase for any warranty claims. This warranty is valid only in the country where the cleaner is purchased.
The cleaner must be operated in accordance with these instructions and used only for domestic household cleaning to remove DRY dirt and dust from household carpets, flooring and fabrics. This cleaner is not fit to be used as an industrial cleaner, and is not designed for the collection of vitreous building material including particle board, construction products and similar products such as wood/fibres, cement, fillers, fibre glass etc or excessive or frequent sand. The infrequent pick-up of these materials in these circumstances may be harmful to your cleaner and may void the manufacturer's warranty.
Accessories and consumables including dust bags and filters, unless defective in manufacture, are not subject to this warranty. In order to prolong the life of accessories and consumables, regular care and maintenance is recommended.
When properly used and cared for, your cleaner will render excellent service; refer to the instruction manual for further details, as misuse or failure to follow the instructions makes this warranty void.
In the event of service or advice being needed, please contact Electrical Home-Aids Pty Ltd, Building 3 Brandon Business Park, 530 Springvale Road, Glen Waverley Victoria 3150, or on 1300 360 845, Monday-Friday 9am-5pm EST. The decision to repair or replace the cleaner is at the sole discretion of Electrical Home-Aids Pty Ltd. If Electrical Home-Aids Pty Ltd decide to repair or replace the cleaner, it will do so at its own cost.
Electrical Home-Aids Pty Ltd is unable to accept responsibility under this warranty for any repair work not carried out by an authorised Hoover Service Agent or from the use of non-genuine parts. If any part is no longer available or manufactured, Electrical Home-Aids Pty Ltd will replace it with a genuine functional replacement part. This warranty does not apply to the cost of replacing any parts of the product due to normal wear and tear, alterations, improper installation, physical abuse, misuse or accidental damage. Any transportation costs involved in the repair of defective parts shall be borne by the claimant.
If proof of purchase cannot be provided at the time of a warranty claim or service, any work carried out on the cleaner is chargeable.
The repair of the cleaner under this warranty does not extend the original period of warranty.
The benefits conferred by this warranty are in addition to all other rights and remedies in respect of the product as outlined under the Competition and Consumer Act and other State and Territory laws.
"Our goods come with guarantees that cannot be excluded in the Australian Consumer Law. You are entitled to a replacement or refund for a major failure and for compensation for any other reasonably foreseeable loss or damage. You are also entitled to have the goods repaired or replaced if the goods fail to be of acceptable quality and the failure does not amount to a major failure."

Call Hoover Customer Care
with any product queries
Australia 1300 360 845
New Zealand 0800 387 442
To find out more about our range,
visit: www.hoover.com.au
www.hoover.co.nz
email: customerservice@hoover.com.au
SAVE TIME, REGISTER WARRANTY ONLINE!
www.hoover.com.au and www.hoover.co.nz

- Robot Vacuum Cleaner
- Ranger
- Accessories Included
- Specifications
- Before You Begin
- Please read these instructions thoroughly
- Important
- Precautionary measures:
- Safety Precautions & Warnings
- Battery use and care
- Risk of damage!
- Risk of fire!
- Laser navigation sensor
- Instructions for Use
- Charging Base
- On-board Controls & Status Indicator
- On-Off Button:
- Recharge/Area cleaning:
- Status Indicator:
- Connecting to WiFi®
- Operating the Hoover Ranger App
- Maintenance
- Emptying the Dust Bin
- Cleaning & Replacing the Filters
- Cleaning & Replacing the Roller Brush
- Cleaning & Replacing the Side Brushes
- Troubleshooting
- Problems and solutions
- Spare Parts
- Notes
- ranger
- Robot Vacuum
- Conditions of warranty
Brand : HOOVER
Model : Ranger 5241
Category : Robot vacuum