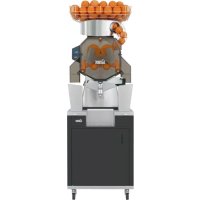
USER MANUAL Versatile Pro Zumex
Essential Pro | Versatile Pro
SIMPLICITY AT WORK MULTI LEVEL PERFORMANCE

natural_image
3D printer with orange robotic arms and orange base, no visible text or symbols on the device itself.
natural_image
Orange 3D-printed Zumiex blender machine with orange juice tray and digital display (no text or symbols on device)
User's Manual

zumex

bar
| Category | Value |
|---|---|
| Category 1 | 100 |
| Category 2 | 100 |
| Category 3 | 100 |
| Category 4 | 100 |
| Category 5 | 100 |
| Category 6 | 100 |
| Category 7 | 100 |
| Category 8 | 100 |
| Category 9 | 100 |
| Category 10 | 100 |
| Category 11 | 100 |
| Category 12 | 100 |
| Category 13 | 100 |
| Category 14 | 100 |
| Category 15 | 100 |
| Category 16 | 100 |
| Category 17 | 100 |
| Category 18 | 100 |
| Category 19 | 100 |
| Category 20 | 100 |
| Category 21 | 100 |
| Category 22 | 100 |
| Category 23 | 100 |
| Category 24 | 100 |
| Category 25 | 100 |
| Category 26 | 100 |
| Category 27 | 100 |
| Category 28 | 100 |
| Category 29 | 100 |
| Category 30 | 100 |
| Category 31 | 100 |
| Category 32 | 100 |
| Category 33 | 100 |
| Category 34 | 100 |
| Category 35 | 100 |
| Category 36 | 100 |
| Category 37 | 100 |
| Category 38 | 100 |
| Category 39 | 100 |
| Category 40 | 100 |
| Category 41 | 100 |
| Category 42 | 100 |
| Category 43 | 100 |
| Category 44 | 100 |
| Category 45 | 100 |
| Category 46 | 100 |
| Category 47 | 100 |
| Category 48 | 100 |
| Category 49 | 100 |
| Category 50 | 100 |
| Category 51 | 100 |
| Category 52 | 100 |
| Category 53 | 100 |
| Category 54 | 100 |
| Category 55 | 100 |
| Category 56 | 100 |
| Category 57 | 100 |
| Category 58 | 100 |
| Category 59 | 100 |
| Category 60 | 100 |
| Category 61 | 100 |
| Category 62 | 100 |
| Category 63 | 100 |
| Category 64 | 100 |
| Category 65 | 100 |
| Category 66 | 100 |
| Category 67 | 100 |
| Category 68 | 100 |
| Category 69 | 100 |
| Category 70 | 100 |
| Category 71 | 100 |
| Category 72 | 100 |
| Category 73 | 100 |
| Category 74 | 100 |
| Category 75 | 100 |
| Category 76 | 100 |
| Category 77 | 100 |
| Category 78 | 100 |
| Category 79 | 100 |
| Category 80 | 100 |
| Category 81 | 100 |
| Category 82 | 100 |
| Category 83 | 100 |
| Category 84 | 100 |
| Category 85 | 100 |
| Category 86 | 100 |
| Category 87 | 100 |
| Category 88 | 100 |
| Category 89 | 100 |
| Category 90 | 100 |
| Category 91 | 100 |
| Category 92 | 100 |
| Category 93 | 100 |
| Category 94 | 100 |
| Category 95 | 100 |
| Category 96 | 100 |
| Category 97 | 100 |
| Category 98 | 100 |
| Category 99 | 100 |
| Total (Total) |
Index
User's manual → 12
Diagrams with Parts: Essential Basic
Diagrams with Parts: Essential Pro
Diagrams with Parts: Versatile Pro

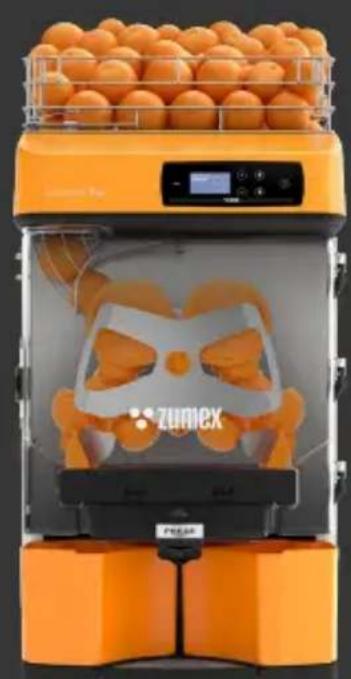
Zumex Essential Basic
natural_image
Technical line drawing of a refrigerator interior showing door, seat, and front panel (no text or labels)
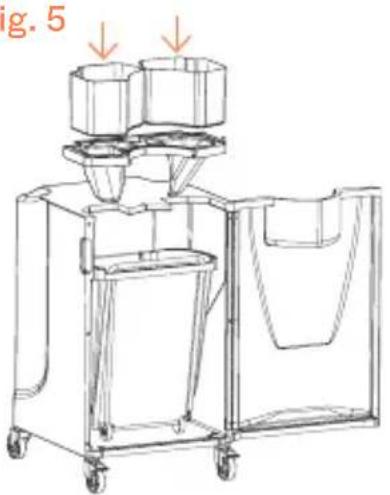
Fig. 5
natural_image
Technical line drawing of a mechanical device with two cylindrical components and a handle, no visible text or symbols
Fig. 6 Fig. 7
natural_image
Mechanical assembly diagram showing gears and a vehicle (no text or symbols)
Fig. 8
natural_image
Technical line drawing of a mechanical component or assembly (no visible text or symbols)
natural_image
Technical line drawing of a mechanical assembly with no visible text or symbols
Fig. 9 Fig. 10
natural_image
Diagram of mechanical components with arrows indicating motion or flow, no visible text or symbols
natural_image
Line drawing of a mechanical device with a handle and internal compartments (no text or symbols)
Fig. 11
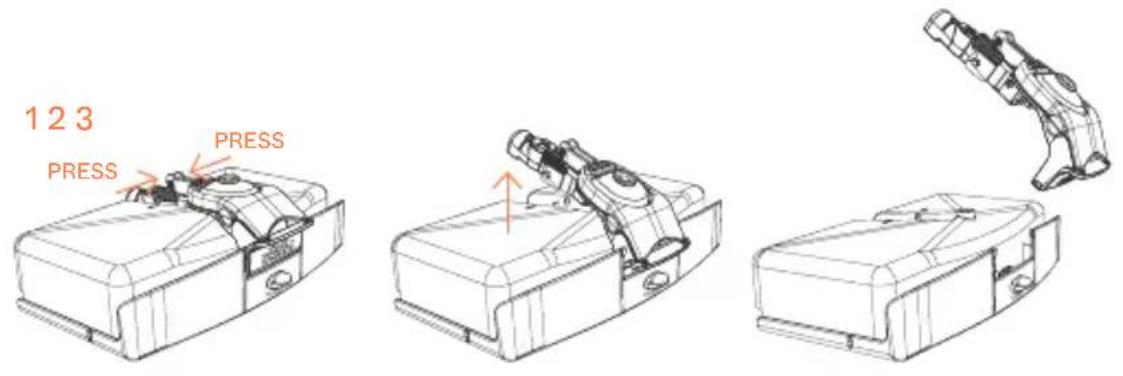
Fig. 12A Fig. 12B Fig. 13
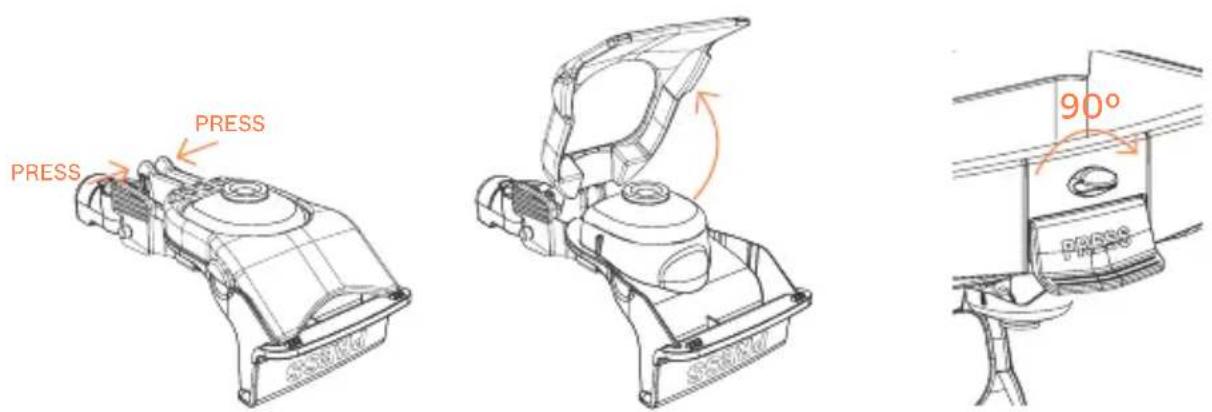
Fig. 14
natural_image
Technical line drawing of a mechanical device with internal components and no visible text or symbols
natural_image
Technical line drawing of a mechanical assembly with no visible text or symbols
natural_image
Technical line drawing of a mechanical or structural assembly with no visible text or symbols
Fig. 15
natural_image
Technical line drawing of a mechanical device with internal components and a separate robotic arm (no text or symbols)
Fig. 16
2
natural_image
Technical line drawing of a mechanical assembly with multiple components and mounting brackets (no text or symbols)
3
natural_image
Technical line drawing of a mechanical assembly with no visible text or symbols
4
natural_image
Technical line drawing of a mechanical clamp or bracket assembly (no text or symbols)
This manual refers to the following models:
Countertop models
Zumex Essential Basic
Zumex Essential Pro
Zumex Versatile Pro
Models with podium Zumex Versatile Pro All-in-One

Extend your warranty to 5 years
By registering your product on our website within the first 3 months

Register your product here
Zumex Essential | Versatile
User's manual
Please read the instructions carefully in order to make the most of your machine.
General index
Figures 3
Important general information 14
Technical features 17
Usage instructions 18
General description 18
Preparation 19
Operation 19
Cleaning 27
1Step Extraction Kit 30
Elevation kit 31
Accessories 33
Fault detection 34
EU declaration of conformity 143
Zumex reserves the right to modify the information contained in this manual without prior notice.
Before you start, we recommend you to take the following precautions into account:
- The specific details about your Zumex juicer (voltage, frequency and other data of interest), can be found on the Identification Label attached to the actual machine.
- Remember that if you have any technical queries, you should get in touch with your Regular Dealer / Official Technical Support Service, always stating the Serial Number on the machine Identification Label.
- Zumex adopts the necessary measures to ensure that the machines placed on the market are selectively collected and managed in an environmentally respectful manner. Please contact your authorised Zumex dealer to correctly dispose of these machines.
- Do not manipulate the machine in such a way that it works without safety elements.
-
This appliance can be used by children over the age of 8 or older, or by people with impaired physical, sensorial or mental capacities or who lack experience or knowledge, if they are supervised or have received adequate training with respect to the safe operation of the appliance and they understand the risks entailed.
-
Children should be supervised to make sure they do not play with the appliance.
- The cleaning and maintenance to be performed by the user must not be carried out by children without supervision.
- Do not spray the appliance with water to clean it.
- Do not use other different fruit to that specified in the manual.
- When you clean, perform maintenance or replace parts, make sure that you have always unplugged the power cable from the socket and it is visible.
- Use the cutting elements with great care, to avoid possible cuts.
- The parts that are in contact with food must be cleaned according to the instructions that you can read in the cleaning chapter.
- If the power cable is damaged, it must be replaced with a cable or special unit to be supplied by the manufacturer or by the after-sales service.
The instructions may be updated. You can consult the updated instructions on our website www.zumex.com, in the section of the selected model.
If you have any suggestions or comments that you believe may improve our machines or service network, please get in touch with Zumex directly at the address below:

ZUMEX GROUP, S.A.
Polígono Ind. Moncada III C/Molí 2. 46113 Moncada. Valencia. Spain.
Tel. +34 961 301 251 · Fax: +34 961 301 255
zumex@zumex.com / www.zumex.com
ZUMEX SERVICE
Tel. +34 960 800 999 · service@zumex.com
Technical Features
| Essential Basic | Essential Pro | Versatile Pro | Podium |
| Oranges per minute: | 22 22 22 | | | |
| Dimensions (cm/inch): | 47 × 50 × 88 cm18.5 × 19.7"x 34.6" | 47 × 50 × 75 cm18.5"x 19.7"x 29.5" | 48 × 55 × 85,5 cm18.9"x 21.7"x 33.7" | 48 × 55 × 166 cm18.9"x 21.7"x 65.3" |
| Net Weight (Kg/lb): | 45 Kg | 99,2 lb 45,75 Kg | 100,8 lb 54 Kg | 119 lb 33 Kg | 72,8 lb |
| Consumption and Voltage: | 380 W for220-240 V 50 Hz220 V 60 Hz320 W for115V 60 Hz | 380 W for220-240 V 50 Hz220 V 60 Hz320 W for115V 60 Hz | 380 W for220-240 V 50 Hz220 V 60 Hz320 W for115V 60 Hz | |
| Protection: | IPX4 IPX4 IPX4 |
| Safety: | Dual magnetic safety sensor.Electronic motor protection. | Dual magnetic safety sensor.Electronic motor protection. | Dual magnetic safety sensor.Electronic motor protection. | |
| Size of fruit: | 65-81 mm(45-67 mm with Kit S) | 65-81 mm(45-67 mm with Kit S) | 65-81 mm(45-67 mm with 1Step Kit S) | |
| Anti-drip system: | NO YES YES |
Usage Instructions
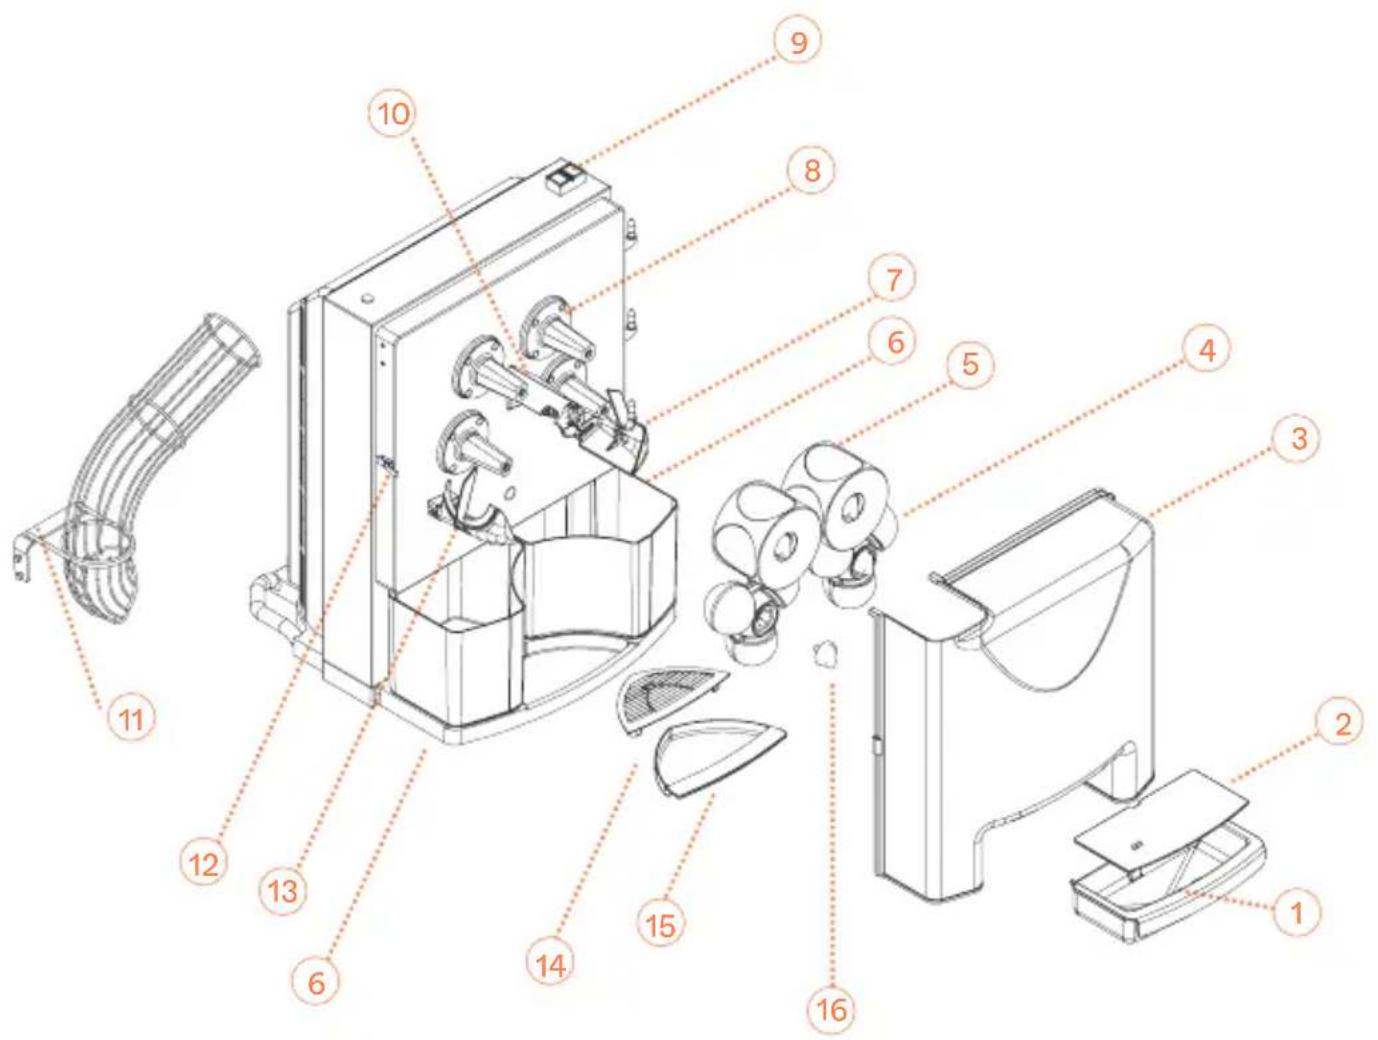
General Description
Zumex Essential ProZumex Essential Basic Zumex Versati
1 Juice container
2 Filter container
3 Zumex cover
4 Lower pressing unit
5 Upper pressing unit
6 Orange peel buckets
7 Right peel ejector
8 Fastener support cap
9 Button rubber protection Blade holder
10 Feeder tube kit
11 Cover catch
12 Left peel ejector
13 Tray filter
14 Drip tray
15 Plastic securing knob
16
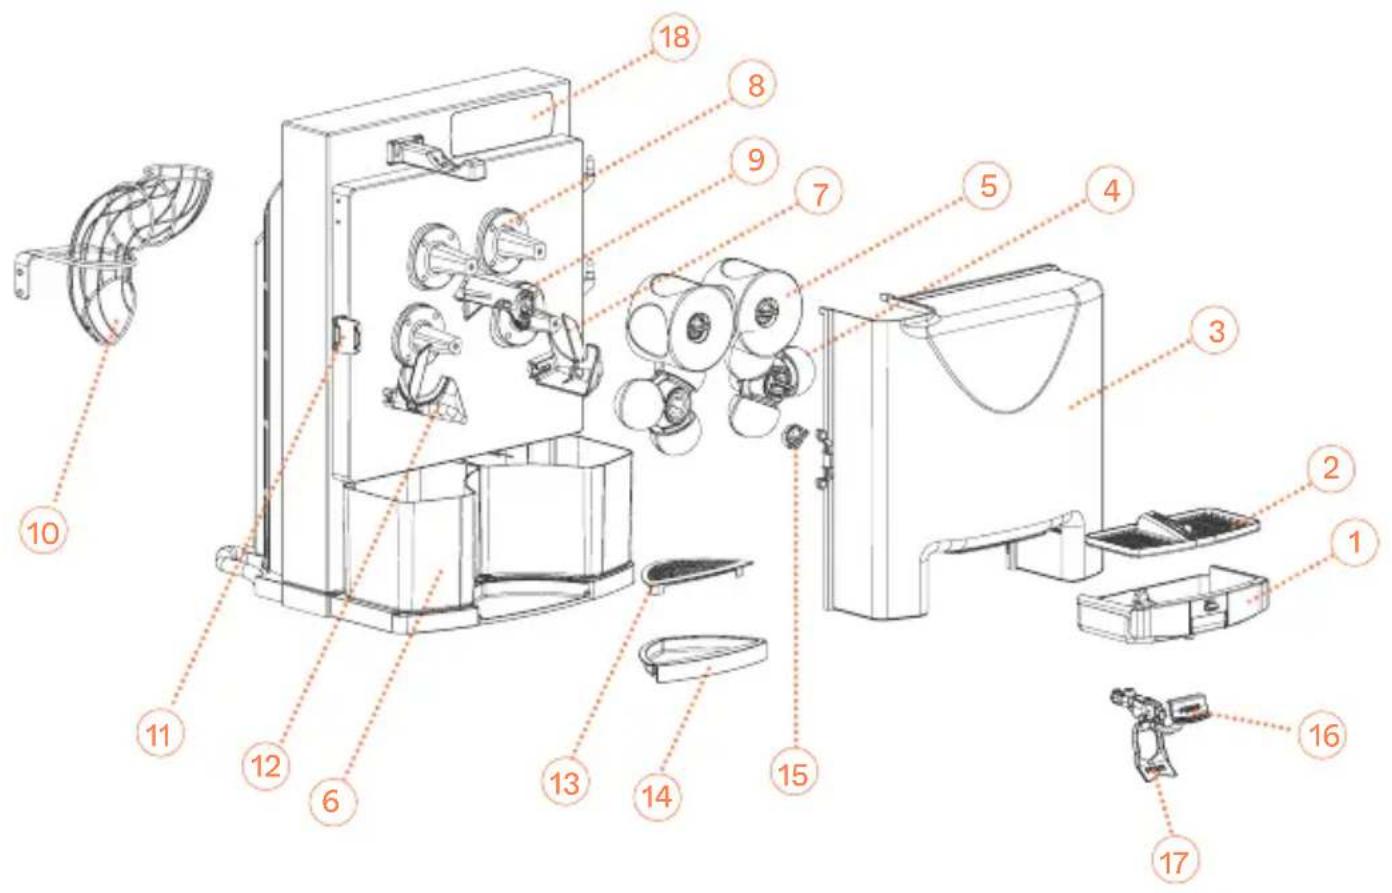
1 Juice container
2 Filter container
3 Zumex cover
4 Lower pressing unit
5 Upper pressing unit
6 Orange, silver or graphite peel bucket
7 Right peel ejector
8 Fastener support cap
9 Blade holder
10 Feeder tube kit
11 Cover catch
12 Left peel ejector
13 Tray filter
14 Drip tray
15 Plastic securing knob
16 Complete faucet kit
17Faucet button
18 Sleeve
1 Juice container
2 Filter container
3 Zumex cover
4 Lower pressing unit
5 Upper pressing unit
6 Orange, silver or graphite peel bucket
7 Right peel ejector
8 Fastener support cap
9 Blade holder
10 Feeder tube kit
11 Cover catch
12 Left peel ejector
13 Tray filter
14 Drip tray
15 Plastic securing knob
16 Complete faucet kit
17 Faucet button
18 Sleeve
19 Plate base
20 Plate kit
21 Front holder
22 Rear holder
Preparation
To start squeezing you must follow the steps below:
1 Unpack your juicer and place it on a surface as horizontal as possible.
2 Ensure that the mains power falls within the margins indicated on the Identification Label of the machine which you will find both on the cover page of this manual as well as on the machine itself.
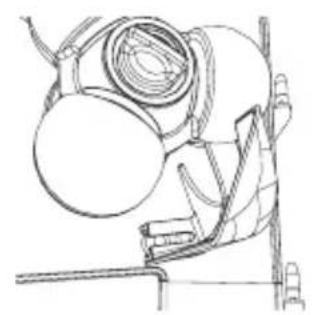
3 Place the peel buckets as indicated in Fig. 1 and 4.
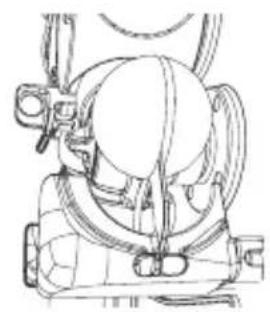
4 Make sure that the juice container and its filter are placed correctly and that the cover is closed and secured by the catch.
ZUMEX ESSENTIAL BASIC. Before starting the unit, place the orange feeding tube in the position shown on Fig. 2. Use the 4 mm Allen key supplied with the machine.
If you have acquired a juicer with a podium, you must place the juicer on the podium, screw it as indicated in the instruction supplied on the podium. Don't forget to secure the front wheels. Then place the hopper and the peel buckets with an open base which you will find inside the stand (Fig. 5).
Operation
Essential Basic
Place a glass / jug under the juice outlet and press the green button (Fig. 3). The machine will start to operate when you press the button. To stop the juicer, press the red button.
Essential Pro y Versatile Pro
Once the previous steps have been followed, connect the connecting plug to a socket base fitted with a standardized ground. And press the sleeve button
to start up the machine. When you turn on the machine for the first time after purchase, a message will appear: "Select language" in order to select the operating language of the machine.
The choice can be made using the arrows ▲▼ and pressing “ON”. Once selected, the machine will be ready for operation in “Self-Service” mode.
As a general rule, to operate within the menu, we can regard the "ON" button as accept and "OFF" as cancel.
Operating Modes with Zumex Essential Pro
Zumex Essential Pro can work in two operating modes:
Autostart: The machine detects the oranges in the feeder tube and starts up as the oranges pass by.
Self-service: The machine starts up by activating the self-service faucet either by pressing the faucet or by activating the switch lever; in order to be able to operate with this switch lever see Fig. 12A and 12B. In this mode you can also work continuously by turning the faucet block 90° (Fig. 13).
Selection of operating mode:
1 Press the MENU key for a few seconds to enter the programming mode.
2 Select the WORKING MODE option by positioning the cursors▲▼ over it and pressing ON to confirm your selection.
3 Select the desired working mode, Autostart or Self-Service using the cursors ▲▼ and press on to confirm your selection. Press OFF several times until you exit MENU.
Operating Modes with Zumex Versatile Pro
Zumex Versatile can operate in two working modes:
Professional: You can programme the no. of oranges to be squeezed in each cycle using the cursors ▲▼, and you can programme up to 20 oranges in each cycle or select the 'c' option to squeeze continuously. The squeezing will start by pressing 'ON' and it will end after ceasing to squeeze the no. of oranges programmed or if you press 'OFF'.
Self-service: The machine starts up by activating the self-service faucet either by pressing the faucet or activating the switch lever. You can also work continuously in this mode by turning the faucet block 90° (Fig. 13).
Selection of the operating mode:
1 Press the MENU key for a few seconds to enter the menu.
2 Select the WORKING MODE option by positioning the cursors▲▼ and pressing ON to confirm your selection.
3 Select the desired working mode, Professional or Self-Service using the cursors ▲▼ and pressing ON to confirm your selection. Press OFF several times until you exit MENU.
Configuration
Your Zumex juicer allows you to adjust the parameters according to your preferences. All adjustments are made at MENU > CONFIGURATION. Press the MENU key for a few seconds to enter the menu and select CONFIGURATION, press ON to confirm your selection.
Lighting: Changes the screen brightness level.
On the CONFIGURATION menu select LIGHTING and press ON to confirm your selection. Adjust the brightness level using the cursors ▲▼ . Once adjusted, confirm by pressing ON. The changes will be memorised.
Language: Changes the juicer menu language.
On the CONFIGURATION menu select LANGUAGE and press ON to confirm your selection. Select the language desired using the cursors ▲▼ . Once selected confirm by pressing ON. The changes will be memorised.
Offset: Depending on the type of fruit to be squeezed, the value can be adjusted for its optimum counting.
Select OFFSET and press the ON key and you will be immediately asked for your PIN. If you don't have one, consult your Technical Service. Then you configure the desired number using the cursors ▲▼ . Once the adjustment has been concluded, press ON to save the changes. This operation must only be carried out under the supervision of an authorised Technical Service.
Note: Remember that if you press OFF, you will cancel any changes made before and you will return to the previous menu.
Technical Service
The Zumex Essential Pro and Versatile Pro juicers provide you with the information you need for correct unit maintenance. They are also fitted with a squeezed orange counter which can be configured in this mode. Press the MENU key for a few seconds to enter the menu and select TECHNICAL SERVICE, press ON to confirm your selection and OFF to return to the previous menu.
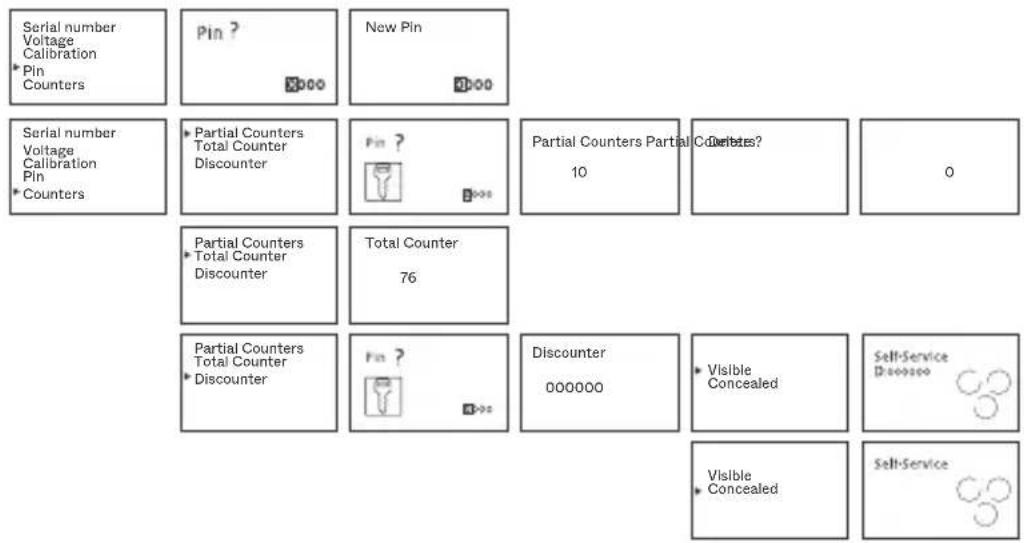
Serial number: This shows you your juicer's serial number which is essential for any TECHNICAL SERVICE consultation.
On the TECHNICAL SERVICE menu select SERIAL NUMBER and press ON to confirm your selection. You can see the serial number on the screen. Return to the previous menu by pressing OFF.
Voltage: This shows you the mains voltage at the time of the consultation, vital for any Technical Assistance Service.
On the TECHNICAL SERVICE menu select VOLTAGE and press ON to confirm your selection. You can view the voltage on the screen. Return to the previous menu, pressing OFF.
Calibration: This shows you the calibration value of your machine which must be adjusted in exceptional cases when the counter is not counting correctly. This information is vital for any Technical Assistance consultation. It also lets you change the values manually. This procedure must only be carried out at the indication and with the aid of an authorised Technical Assistance Service.
Calibration value: On the TECHNICAL SERVICE menu select CALIBRATION > CALIBRATION VALUE and press ON to confirm your selection. You can view the calibration number on the screen. Return to the menu, pressing OFF.
Offset Value: On the TECHNICAL SERVICE menu select CALIBRATION
OFFSET VALUE and press ON to confirm your selection. You can view the offset number on the screen. Return to the menu, pressing ON.
Calibrate: Select CALIBRATE and press ON. Next, set your PIN number and press ON. The machine will ask for confirmation: 'Calibrate?', press 'ON'
to confirm the automatic calibration. The machine will then carry out said calibration and display the adjusted calibration value. Return to the menu, pressing OFF.
This option must only be carried out under the supervision of the Technical Service and when it has been specifically indicated.
Pin: Your juicer has a password so you can access the counters and modify configuration parameters. The standard programmed PIN is 0000 but you can personalise this PIN. On the TECHNICAL SERVICE menu select PIN and press ON to confirm your selection. If this is the first time you have changed your PIN, the standard PIN 0000 will appear and press ON; if you have already programmed a password previously, enter the old password, use the cursors ▲▼ to select each digit, press OFF to move from digit to digit and ON to confirm the password. Upon entering the correct PIN the “New PIN” screen will appear. Programme the new password, select each digit with the cursors ▲, press OFF to move from digit to digit and ON to confirm the new PIN.
If you forget the Pin number programmed, you will be required to reset machine's MENU. In order, to do that, enter CONFIGURATION press▲ button, and while pressed, press ▼ button simultaneously.
Counters: You can control the counter and discounter of your juicer. The counter allows you to establish the no. of oranges squeezed, the discounter function allows you to programme a given no. of oranges and gradually consume oranges from this total.
Partial counter: This shows you the no. of oranges consumed and it can be set to zero. On the TECHNICAL SERVICE menu select COUNTERS > PARTIAL COUNTER and press ON to confirm your selection. Enter your PIN (Remember: Select each digit with the cursor ▲▼, press OFF to move from digit to digit and ON to confirm the password). You can view the number of oranges squeezed on the screen. To set the counter to zero press▼and confirm using ON and on the machine display you will see that the counter has been set to zero. Return to the menu, pressing OFF repeatedly.
Total counter: This shows you all the oranges consumed throughout the life of the juicer, this counter cannot be deleted.
On the TECHNICAL SERVICE menu select COUNTERS > TOTAL COUNTER and press ON to confirm your selection. You can view the number of oranges on the screen. Move up to the upper menu by pressing OFF.
Discounter: This allows you to programme a given no. of oranges and gradually consume oranges from this total. On the TECHNICAL SERVICE menu select COUNTERS > DISCOUNTER and press ON to confirm your selection. Enter your PIN (Remember: Select each digit using the cursors ▲▼, press OFF to move from digit to digit and ON to confirm the password) and you will enter the discounter menu. Programme each digit of the discounter using the cursors ▲▼ and after each digit press OFF to move on to the next one and repeat this action for each digit; on the last digit press ON and the selection will be memorised automatically. Then select whether you want the discounter to be visible or not on the main menu (visible/concealed option). Return to the menu, pressing OFF repeatedly.
Once the discounter is at zero, the juicer will stop until a new sum of oranges is loaded or a change is made to the counter function, entering the “MAIN COUNTER” menu and confirming by pressing ON.
When the visible discounter has been programmed, a 'D' will appear on the normal operating screen in front of the counter digits. If the concealed discounter has been programmed, no figure will be displayed.
Summary of Zumex Essential Pro and Versatile Pro Operating Modes
| Working mode Configuration Technical Service | Self-Service Professional | Self-Service | | | | |
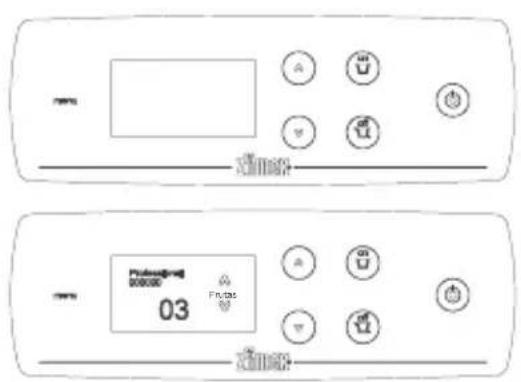
| Self-Service Professional | Professional 03 Fruits | | | | |
| Working mode *Configuration Technical Service | Lighting Language Offset | Lighting | | | | |
| Lighting Language Offset | Language English 1/23 | | | | |
| Lighting Language Offset | Pin ? Offset 0000 | 30 | | | |
| Working mode Configuration *Technical Service | Serial number Voltage Calibration Pin Counters | Serial number 0000 | | | | |
| Serial number Voltage Calibration Pin Counters | Voltage 231 | | | | |
| Serial number Voltage Calibration Pin Counters | Calibration value Offset value Calibration | Calibration value 97 | | | |
| Calibration value Offset value Calibration | Offset value 30 | | | |
| Calibration value Offset value Calibration | Pin ? 0000 | Calibration Calibration? | Calibration Calibration | 85 |
Summary of Zumex Essential Pro and Versatile Pro Operating Modes
Cleaning
Zumex recommends cleaning the machine at least once or twice a day, depending on how much it is used in order to maintain optimal food hygiene conditions.
Zumex recommends using Zumex Citric Active Detergent ^™ , which is specially designed to clean citrus juicers with a high descaling effect for wax and pulp.
For correct cleaning you must follow the steps below:
All models
! WARNING! Turn the machine off at the mains before cleaning process.
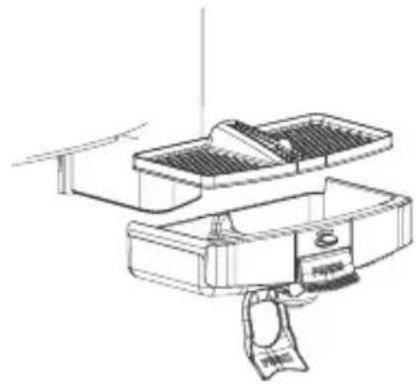
1 Disassemble the container (Fig. 10) by removing it using both hands and pulling it outwards. To assemble it again, hold the container with both hands and position it on the guide rails of the cover and push it until it is fully inserted.
Important: If the container is not correctly assembled, the machine will not be activated. If the juice container contains a filter and juice residue; handle with care to avoid accidentally spilling juice or dropping the filter.
Disassemble the filter by pulling the tab.
2 Empty its contents and place it upside down on a flat surface.
3 Press the plastic pins of the tap and remove the pivots inserted in the container
4 (Fig. 11). Remove the back part first and then remove the front part. To assemble, follow these steps in reverse order: first, insert the front part into the container, then press the pins until the pivots fit into the holes of the container. Lightly pull the faucet to check that it has been correctly inserted.
Remove the front cover by opening the side catch (Fig. 14). Turn the cover 90° to the right until it is outside the feeder. Pull upwards until it is released from the hinges. To assemble it again, hold the cover firmly with both hands and mount it in its fully open position, taking care to insert the three hinges into their holes. Close the cover and lock its position.
Important: Always disassemble the container before removing the cover. Do not remove the cover until it is in its fully open position. Avoid carrying weight on the cover as this could strain the hinges. Ensure that the cover is correctly inserted in its three hinges before closing it.
Essential Basic, Essential Pro
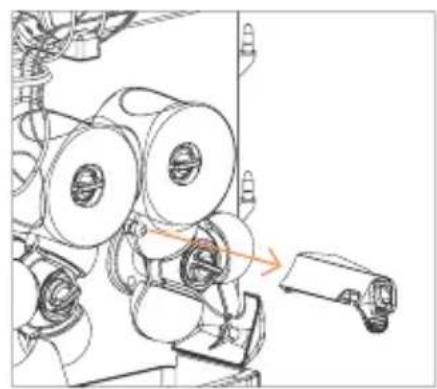
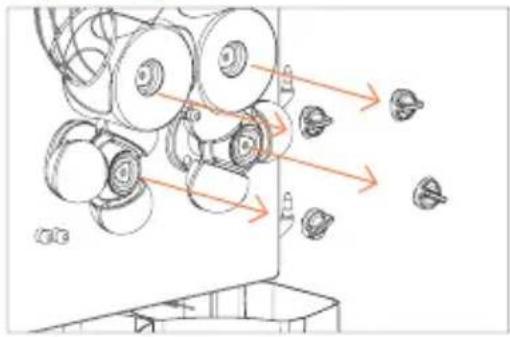
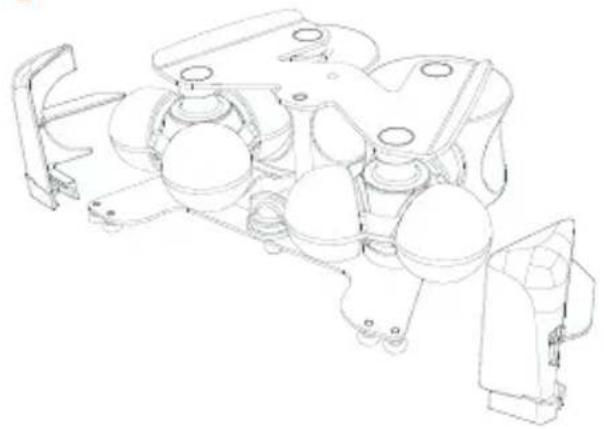
6 Remove the blade holder (Fig. 7) by pulling it towards you using the handle. WARNING! handle this piece very carefully as you could cut yourself.
7 Pull the ejectors out until it is completely free from the machine (Fig. 8). To assemble them again, place the ejectors on the corresponding side and insert them onto the knobs. Push the ejector until the blade is fully inserted into the lower pressing unit and the channel makes contact with the second knob.
Important: Remove the ejectors before removing the pressing units of the juicer. If the ejector is not correctly installed as indicated above, the part may be damaged when the machine is in operation.
8 Remove the pressing units in pairs, after having unscrewed the knobs that hold them in place (Fig. 9).
Versatile Pro
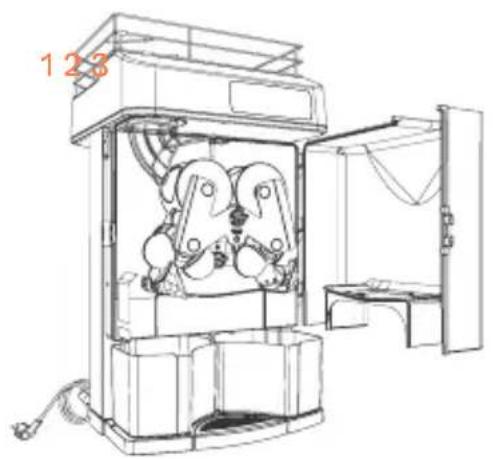
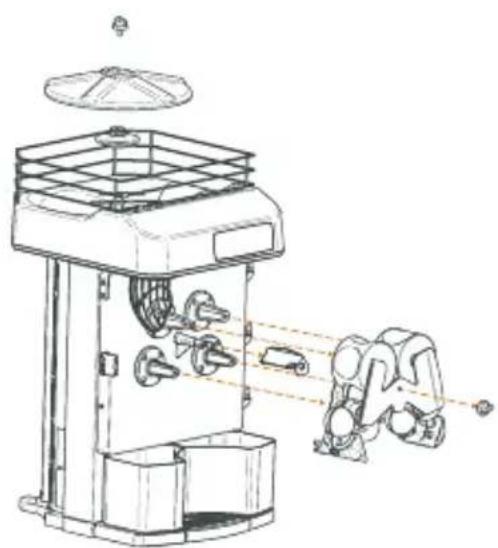
6 Remove the 1Step Kit (Fig. 15-16) from the machine. First, check the assembly and disassembly instructions in the following section 1Step Extraction Kit.
There are two possibilities when cleaning:
- Complete cleaning: once the unit has been removed from the machine, get rid of extra pulp and peel if there is any washing it with water and if necessary a mild soap. The whole unit is also dishwasher safe.
- Deep cleaning: all of the components can be removed and can be cleaned individually. Zumex recommend this type of deep cleaning at least once a week depending on how much usage the machine gets.
Remove the Blade holder (9) and clean it carefully taking care not to hurt yourself.
- The plastic parts of the squeezing system are suitable for cleaning in a dishwasher.
- We do not recommend cleaning the cover and the juice container using the dishwasher. Follow this recommendation to increase their durability. To clean both parts, use a soft cloth soaked in water and Citric Active or food-grade soap. Under no circumstances should you use abrasive or anti-lime products.
- The juice tap and tray must be separated for their correct cleaning, preventing dirt from accumulating between both. The tap may be cleaned in the dishwasher.
- When cleaning the squeezing and cover area you should use a soft cloth dipped in water and washing-up liquid. Then rinse thoroughly in clean water so no soap remains.
- Once the cleaning process has finished, you must assemble all the elements in reverse order to their disassembly. Make sure that all the parts have been correctly assembled and secured.
- Remember that each peel ejector (Fig. 8) only fits on one side and so they are not interchangeable. When you place them make sure that you insert the peel ejector paddle right down to the end of the lower pressing unit.
- In order to avoid the accumulation of wax it is important to clean the fruit feeder frequently of Zumex Versatile Pro models.
- On models with a base stand clean the hopper and the inside of the stand, making sure to eliminate any peel or pulp remains.
This device allows for easy insertion and removal of the pressing units and peel ejectors in just one step (Fig. 15).
Before installation remember to insert the Blade holder (9).
To install, line up the pressing units with the shafts and adjust their position while sliding them in. Use the central knob to attach the device to the machine.
Note: To remove simply reverse the process.
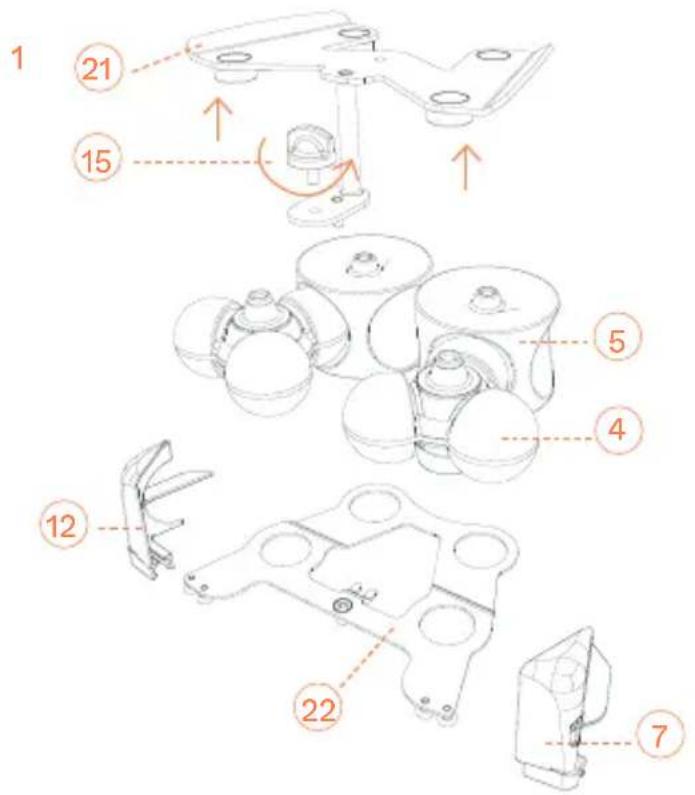
Assembly of the 1Step Kit (Fig. 16)
a) Place the rear holder (22) on a surface. The metal ejector holders should be face down.
b) Match up the lower and upper pressing units (4 and 5). Line up the circular bases of the pressing units with the holes on the holder. Note that the faces of the pressing units are different.
Ensure to mount them as shown in the figure.
d) Line up the protruding cones of the pressing units with the four circular bushes on the front holder (21).
e) Join both holders with the plastic securing knob (15).
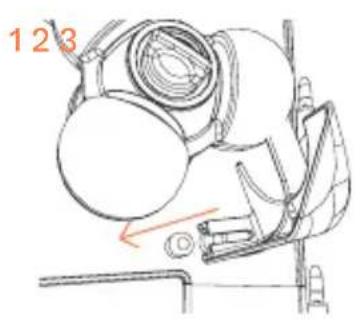
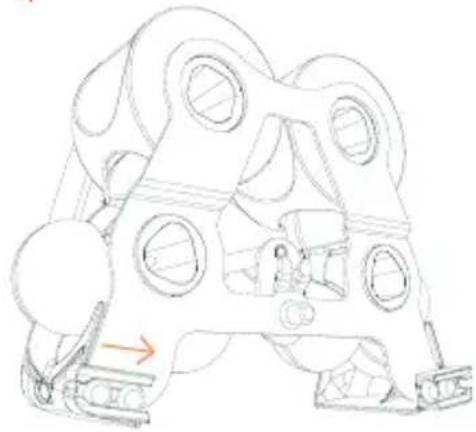
c) Turn the 1step kit 180° and line up the ejectors (7 and 12) with the ejector holders, inserting the extractor blade into the seal of the lower pressing unit.
Ensure that both holders are inside the ejector channel as shown in image 4.
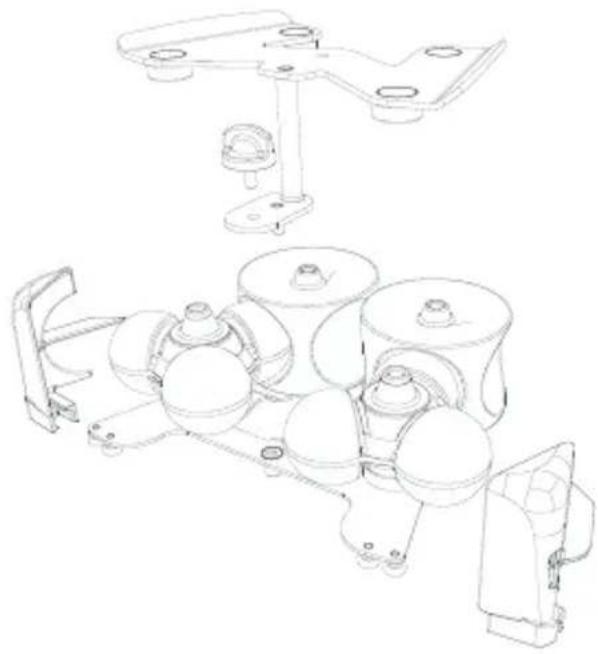
Disassembly of the 1Step Kit (Fig. 16)
c) From the position shown in image 4, pull the ejectors (7 and 12) sideways to remove them from the metal holders.
a) Turn the kit 180° and unscrew the plastic securing knob (15), which is located behind the pressing units and holds both metal holders (21 and 22).
b) Carefully pull the front holder (21).
c) Separate the lower pressing unit (4) and the upper pressing unit (5).
Note: To clean the unit, refer to the Cleaning section.
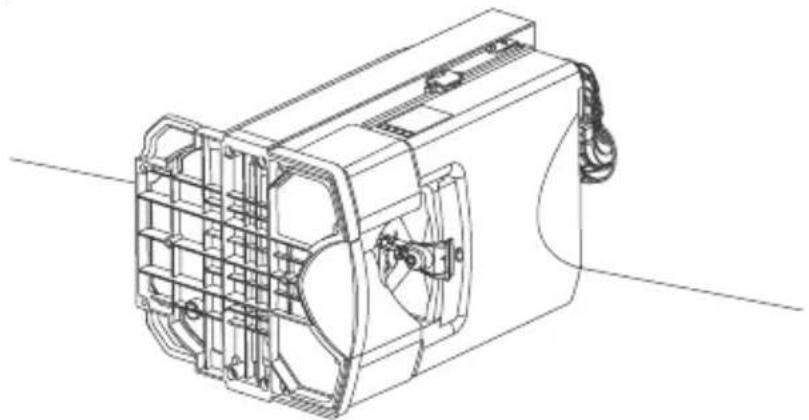
Elevation Kit
This Zumex machine has an Elevation Kit to make it easier to clean the surface where it is located. Elevation Kit ref. 05230* is not included in this model, it is available in the machine accessory catalogue.
This Kit must be mounted according to the following instructions:
Components
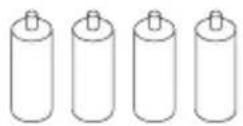
| Legs 4 | |
| Adhesive felt disc 4 | |
| Screw-in stud 4 | |
Installation
The machine comes prepared for this Kit to be simply and quickly installed.
1 Place machine in assembly position.
Carefully place the machine on one of its sides, previously protecting this area to prevent damage to the machine. This operation must be carried out between two people, so that the base of the machine is in view, facilitating the work process.
natural_image
Technical line drawing of a mechanical fan assembly (no text or symbols)
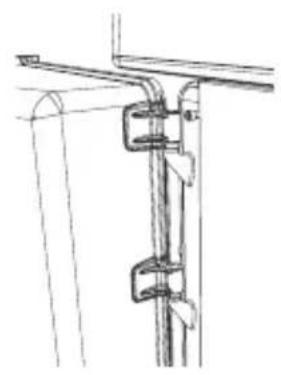
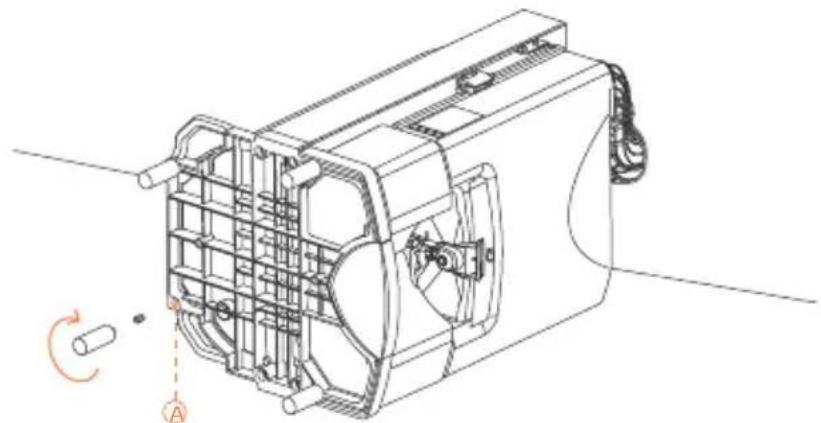
2 Fit the Elevation Kit legs.
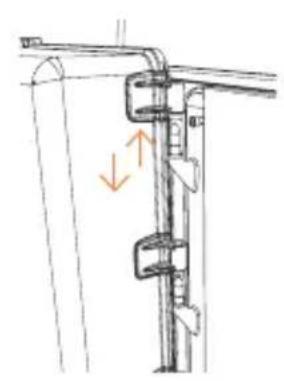
There are four holes on the base of the machine, where the legs go. The legs are supplied with some screw-in studs that are already fitted into the ends of the legs. We must fully insert them into the holes (A) on the base and then screw the legs in as far as they will go. Once this operation has been carried out with all four legs, these can be mounted and removed when required without the screw-in studs coming out of their housing.
natural_image
Technical line drawing of a mechanical device with internal components and a rotation arrow indicator (no text or symbols)
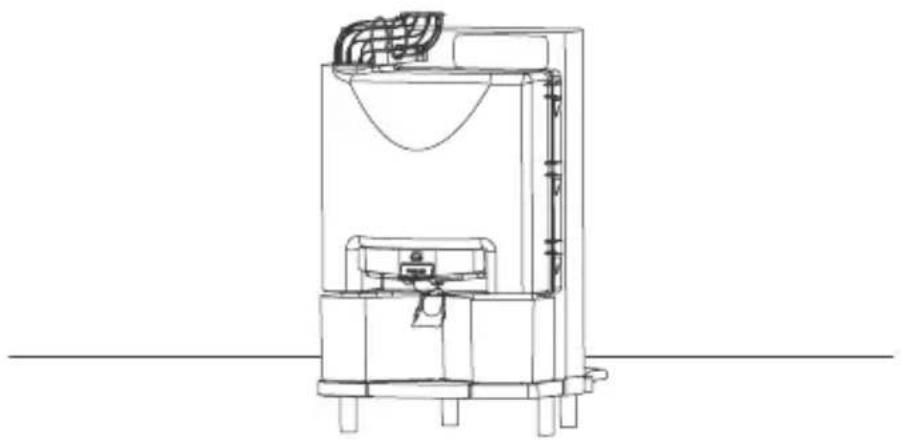
3 Put the machine back into its working position.
Carefully stand the machine back up again leaving it in its working position.
natural_image
Technical line drawing of a mechanical device with no visible text or symbols
Accessories
There is a wide range of accessories available for you to make the most of your machine:
With this accessory you will be able to dismantle the machine in just 10 seconds and clean it under the tap or in the dishwasher.
* Including juice extraction system.
To juice fruit that has a diameter of 45 mm to 67 mm.
Countertop Kit
Integrates waste management keeping things practical and clean.
Elevation kit
This Zumex machine has an Elevation Kit to make it easier to clean the surface where it is located.
Bottle set
For self-service restaurants - bottles, glasses or jugs of juice can be distributed easily. Includes three trays (4 heights). It is integral to the podium and the whole set can be transported with ease.
Zumex Pack
Fresh drinks can be packaged for commercialization, especially freshly squeezed orange juice. There are 6 formats (1.5 l, 1 l, 75 cl, 50 cl, 33cl and 25 cl) and custom-made stickers.
Check www.zumex.com for more information on accessories for your machine.
Detecting Faults
Fault Possible cause Correction
| The machine doesn't work Machine not plugged in. Plug it in. |
| No power is reaching the plug. Check the socket. |
| Cover not fitted properly. Make sure it has been fit properly. |
| Juice container not fitted properly. Make sure it has been fit properly. |
| Blocked pressing units. Turn off the machine at the mains and unblock the pressing units. |
| Safety sensors malfunctioning. Contact your technical service. |
| Faulty ON/OFF button. Contact your technical service. |
| Faulty circuit. Contact your technical service. |
| The machine blocks frequently during juicing | Insufficient voltage. Check that the voltage matches that indicated in the manual. |
| Faulty circuit. Contact your technical service. |
| The pressing units are not synchronized | Fault in an axle. Contact your technical service. |
| Peel ejector breaks Peel ejector incorrectly fitted. Place it in its correct position inserting it totally until observing it has madecontact (Fig. 8) |
| You can hear the motor running but the pressing units are not turning | Internal fault. Contact your technical service. |
Fault Possible cause Correction
| The faucet gets blocked The juice has seeds or too much pulp. | Disassemble and clean the faucet according Fig. 11A. |
| The machine stops every now and again | Insufficient ventilation. Check that the appliance's ventilation grilles are not blocked. |
| Overload. Contact your technical service. |
| Screen does not display information | Alteration to mains systems. Turn off the machine and turn it back on again. |
| The machine is in self-service mode and won't stop operating | Faucet not fitted or fitted incorrectly. | Fit the faucet in the manner indicated in Fig. 11A |
| Faucet well fitted: possible internal fault. | Contact your technical service. |
| Faucet block activated. Put the block in horizontal position by pressing the faucet downwards. |
WARNING: Any action to unblock the machine must be carried out by disconnecting it from the mains. If, after making the checks stated here, the machine does not work, call the technical service.
Screen Messages
| Display Message Cause Correction |
| Excess current The maximum electrical consumption level has been exceeded for at least one second. | Turn off at mains and turn back on again. |
| No oranges The motor remains on for two minutes detecting any squeezing. | Put oranges back in feeder again without and press ON. |
| Memory initiated A memory error has been detected. | Contact your technical service. |
| Calibration An incorrect calibration value has been detected. | Calibrate. |
| Out of service The counter has reached zero. Modify the discounter value as indicated in page 21 or move on to counter function entering PARTIAL COUNTER and pressing ON. |
| Eeprom Error detected in EEPROM memory. | Contact your technical service. |
| Out of range The input power voltage is less than 80V or greater than 260V. | Contact your technical service. |
| Keyboard error (error 1) No communication with the keyboard (Internal fault). | Contact your technical service. |
| Juice tray picture flashing Check the juice tray and front cover are placed correctly. | Place the tray and cover in its correct position as Fig. 4. If the picture does not disappear, contact your technical service. |
*The message: "Keyboard error" may not appear on the display as there is no communication between the CPU and the keyboard panel
zumex.com
Essential Basic, Essential Pro
natural_image
Technical line drawing of a mechanical device with internal components and a rotation indicator (no text or symbols)
natural_image
Technical line drawing of a mechanical device with no visible text or symbols
Accesorios
Kit D'Extraction 1Step 82
Essential Basic, Essential Pro
natural_image
Technical line drawing of a mechanical device with internal components and mounting brackets (no text or symbols)
natural_image
Technical line drawing of a mechanical device with internal components and a rotation indicator (no text or symbols)
natural_image
Technical line drawing of a mechanical device with no visible text or symbols
Accessoires
Essential Basic, Essential Pro
natural_image
Technical line drawing of a mechanical device housing with internal components and mounting brackets (no text or symbols)
natural_image
Technical line drawing of a mechanical device with internal components and a rotation indicator (no text or symbols)
natural_image
Technical line drawing of a mechanical device with no visible text or symbols
Zubehör
Essential Basic, Essential Pro
natural_image
Technical line drawing of a mechanical fan or enclosure component (no text or symbols)
natural_image
Technical line drawing of a mechanical device with no visible text or symbols
Accessori
EU Declaration of Conformity
ZUMEX GROUP S.A., whose registered offices are situated at Polígono Industrial de Moncada III, C/ Molí, 2 – 46113 - Moncada, Valencia (Spain) does hereby declare, under its sole responsibility, that the Essential Basic, Essential Pro, Versatile Pro and Versatile Pro Podium juicer machines are in compliance with the provisions of the European Directives detailed below:
2006/42/EU Security on machinery
2014/35/EU Electrical equipment designed for use within certain voltage limits
2014/30/EU Electromagnetic compatibility (EMC)
REG.(EC) N° 1935/2004 Materials and articles intended to come into contact with food
REG.(EC) N° 10/2011 Plastic materials and articles intended to come into contact with food
REG.(EC) N° 2023/2006 Good manufacturing practice for materials and articles intended to come into contact with food
2011/65/EU Restriction of the use of certain hazardous substances in electrical and electronic equipment ROHS)
2012/19/EU Waste electrical and electronic equipment (WEEE)
To ensure such conformity, the above-mentioned model complies with the following harmonized standards and/or regulations:
IEC 60335-1 2010 Safety of household electrical appliances and similar.
Part 1: General requirements
| IEC 60335-2-14 | 2006 | Household and similar electrical appliances. Safety. |
| + A1 | 2008 | Part 2-14: Particular requirements for kitchen machines |
| + A2 | 2012 |
EN 62233 2008 Measurement methods for electromagnetic fields of household appliances and similar apparatus with regard to human exposure
EN 55014-1 2006 Electromagnetic compatibility. Requirements for household appliances, electric tools and similar apparatus. Part 1: Emission
| EN 55014-2 | 1977 | Electromagnetic compatibility. Requirements for household appliances, electric tools and similar apparatus. Part 2: Immunity. Product family standard |
| + A1 | 2001 |
EN 61000-3-2 2006 Electromagnetic compatibility (EMC). Part 3-2: Limits. Limits for harmonic current emissions (equipment input current <= 16 A per phase)
| EN 61000-3-3 | 1995 | Electromagnetic compatibility (EMC). Part 3-3: Limits. |
| + A1 | 2001 | Limitation of voltage changes, voltage |
| + A2 | 2005 | fluctuations and flicker in public low-voltage supply systems, for equipment with rated current <= 16 A per phase and not subject to conditional connection |
NSF/ANSI 8 2012 National Sanitation Foundation. Commercial powered food preparation equipment
NSF/ANSI 51 2014 National Sanitation Foundation. Food equipment materials
Moncada, February 06th, 2019
CE

natural_image
Abstract line drawing with intertwined curves and a straight line (no text or symbols)
Francisco Serrano
Operations Manager
WARRANTY
SCOPE OF THE WARRANTY: The unit has a two-year warranty against defects and construction problems that could harm the correct operation, provided that the inner parts or mechanisms have not been manipulated. The following are excluded from the warranty.
EXCLUSIONS: Labor, trips, transport, parts that have become deteriorated due to natural wear as a consequence of use, as well as any damage resulting from the incorrect usage or installation of the unit and faults caused as a result of force majeure.
Any incorrect handling of the ID Label will make the Warranty void. Likewise, the warranty will also be void if other persons handle the unit, since only the Official Technical Support Service is qualified and authorized to do so.
Always provide the SERIAL Nr. on the ID Label when contacting the Technical Support Service.
zumex
www.zumex.com