RSP1582 - Hi-fi system ROTEL - Free user manual and instructions
Find the device manual for free RSP1582 ROTEL in PDF.
| Product type | Audio/video surround processor |
| Brand | Rotel |
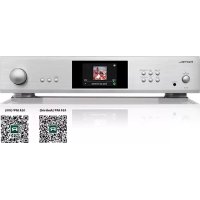
| Model | RSP-1582 |
| Power supply | 120V/60Hz (USA) or 230V/50Hz (EU), selectable |
| Power consumption | Approximately 50 W (standby < 0.5 W) |
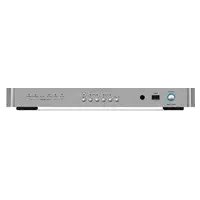
| HDMI inputs | 7 inputs (including 1 front) + 2 outputs (1 with ARC) |
| Supported video resolution | Up to 4K (3840x2160) and 3D |
| Decoded audio formats | Dolby Digital, Dolby TrueHD, Dolby Digital Plus, DTS, DTS-HD Master Audio, DTS Neo:6, Dolby Pro Logic IIx/IIz |
| Number of channels | 7.1 (RCA and XLR preamp outputs) |
| Analog inputs | 7 RCA pairs (including Phono, CD, Tuner, AUX 1-4) + 1 balanced XLR pair + 7.1 Multi-in |
| Digital inputs | 3 coaxial + 3 optical + 1 PC-USB (24-bit/192 kHz) + 1 USB iPod/iPhone |
| Bluetooth | Yes, with aptX codec |
| 12V trigger outputs | 3 assignable trigger outputs |
| Network connectivity | Ethernet RJ-45 for firmware update and home automation control |
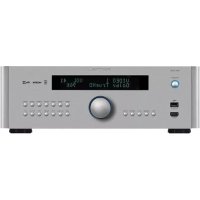
| Remote control | RR-CX100 with backlight |
| Display | Front panel LCD + OSD on HDMI output |
| Total harmonic distortion | < 0.005% |
| Signal-to-noise ratio | 112 dB (IHFA weighted) |
| Maintenance and cleaning | Use a dry cloth or vacuum cleaner for ventilation grilles |
| Safety | Do not expose to moisture, unplug before cleaning, no user-serviceable parts |
| Spare parts and repairability | Contact a Rotel authorized technician; firmware updates via USB or network |
Frequently Asked Questions - RSP1582 ROTEL
User questions about RSP1582 ROTEL
0 question about this device. Answer the ones you know or ask your own.
Ask a new question about this device
Download the instructions for your Hi-fi system in PDF format for free! Find your manual RSP1582 - ROTEL and take your electronic device back in hand. On this page are published all the documents necessary for the use of your device. RSP1582 by ROTEL.
USER MANUAL RSP1582 ROTEL
Surround Sound Processor
Surround sound-processor
Processore Surround
Surroundprocessor
Ipoceccop okpykaioe 3Byka
Owner's Manual
Important Safety Instructions 4
Figure 1: Control and Connections 5
Figure 2: Remote Control 6
Figure 3: Amplifier And Subwoofer 7
Figure 4: Amplifiers and Subwoofer Balanced Connections 8
Figure 5: Digital Audio and PC-USB Connections 9
Figure 6: Blu-Ray and Video Player Connections 9
Figure 7: Front USB Connections 10
Figure 8: CD Player Connections 10
Figure 9: Tuner Connections 11
Figure 10: Front HDMI Connections 11
Figure 11: Rear HDMI Connections 12
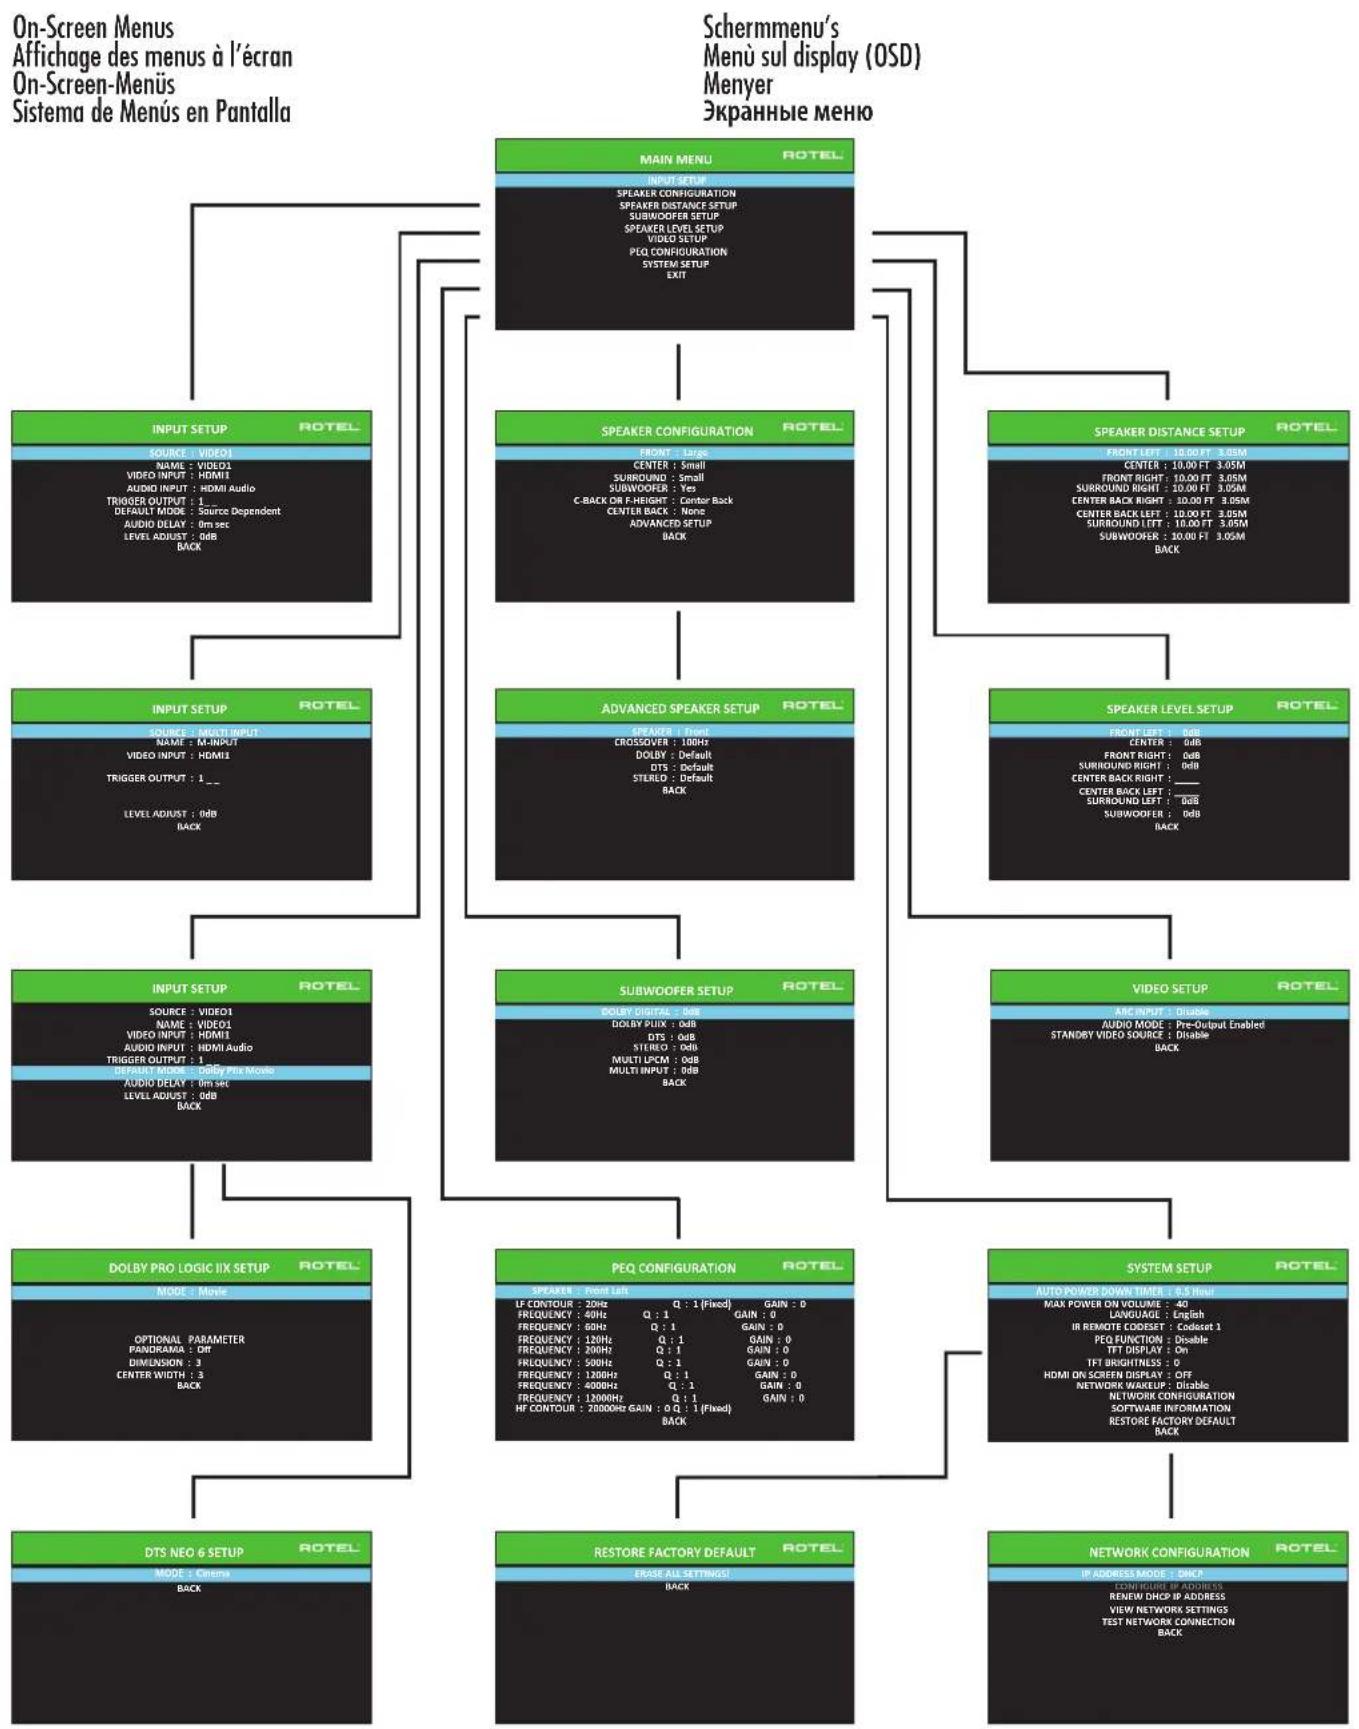
On-Screen Menus 13
About Rotel 14
Getting Started 14
Video Features 14
Audio Features 14
Surround Features 14
Other Features 14
Unpacking 15
Placement 15
Overview of Connections 15
HDMI Inputs and Outputs 15
Rear HDMI IN 1-7 Video Inputs 15
FrontHDMI IN 15
HDMI Monitor Outputs 15
Audio Inputs and Outputs 16
PHONO Input 16
TUNER Input 16
CD Input 16
ANALOG 1-4 Audio Inputs 16
BALANCED Input 16
MULTI Input 16
PREAMP Output 16
BALANCED OUTPUT 16
DIGITAL Inputs 16
PC-USB Input 16
Front USB Input 17
Other Connections 17
VOLTAGE Selector 17
AC Input 17
Master Power Switch 17
12V TRIGGER Output 17
REM IN Jack 17
IR OUT Jacks 17
RS232 Connector 17
NETWORK Connector 17
Making Connections 17
Connecting an Amplifier 17
Connecting a Subwoofer 18
Connecting a DVD, Blu-ray, Cable, Satellite, Game Console and HDTV Tuner 18
Connecting a Blu-ray or DVD Player 18
Connecting a Monitor 18
Connecting a CD Player or XLR Source 18
Connecting a Tuner 19
Connecting an iPod/iPhone 19
Operating the RSP-1582 19
Front Panel Overview 19
Front Panel Display 19
IR Remote Sensor 19
Remote Control Overview 19
Overview of Buttons and Controls 19
STANDBY and Power ON/OFF Buttons 20
VOLUME Knob and VOLUME UP/DOWN Buttons 4 20
DISPLAY (DISP) Button 20
MENUSTUPButton 20
Navigation and ENTER Buttons 20
MUTE Button 20
INPUT Buttons 20
SUR+ Buttons 20
Playback Control buttons ① 20
DIM Button ① 20
SUB, CTR, REAR Buttons 20
MEM Button 20
LIGHT Button 20
ASSISTIVE LIGHT 20
Automatic Surround Modes. 20
Manually Selecting Surround Modes 21
Dolby Digital/TrueHD discs 21
Dolby Digital Surround EX discs 21
Dolby Digital 2.0 discs 21
DTS/DTS-HD 5.1 discs 21
DTS 96/24 discs 21
DTS-ES 6.1 discs 21
Digital Stereo discs 21
Analog Stereo 22
Basic Operation 22
Selecting Inputs 22
USB/iPod Operation 22
iPod/iPhone Connection 22
Playback Control Buttons ① 22
Bluetooth. 22
Bluetooth Connection 22
Rear PC-USB 22
Rear PC-USB Connection 22
Setup 23
Menu Basics. 23
Navigation Buttons 23
Main Menu 23
Configuring Inputs 23
Input Setup 23
Multi Input Setup 24
Dolby Pro Logic IIx 24
DTS Neo:6 25
Configuring Speakers and Audio 25
Speaker Configuration 26
Advanced Speaker Setup 26
Subwoofer Setup 27
Speaker Level Setup 28
Speaker and Delay/Distance Setup 28
Miscellaneous Settings 29
System Setup 29
Video Setup 29
PEQ Configuration 30
Troubleshooting 30
Specifications. 32

CAUTION
RISK OF ELECTRIC SHOCK DO NOT OPEN

WARNING: SHOCK HAZARD-DO NOT OPEN
AVIS: RISOUE DE CHOC ÉLECTRIQUE-NE PAS OUVRIR
This symbol is to alert the user to the presence of uninsulated dangerous voltages inside the product's enclosure that may constitute a risk of electric shock.

This symbol is to alert the user to important operating and maintenance (service) instructions in this manual and literature accompanying the product.
This symbol means that this unit is double insulated. An earth connection is not required.
APPLICABLE FOR USA, CANADA OR WHERE APPROVED FOR THE USAGE
CAUTION: TO PREVENT ELECTRIC SHOCK, MATCH WIDE BLADE OF PLUG TO WIDE SLOT. INSERT FULLY.
ATTENTION: POUR EVITER LES CHOCSE ELECTRIQUES, INTRODUIRE LA LAME LA PLUS LARGE DE LA FICHE DANS LA BORNE CORRESPONDANTE DE LA PRESE ET POUSSER JUSQU AU FOND.


Rotel products are designed to comply with international directives on the Restriction of Hazardous Substances (RoHS) in electrical and electronic equipment and the disposal of Waste Electrical and Electronic Equipment (WEEE). The crossed wheelie bin symbol indicates compliance and that the products must be appropriately recycled or processed in accordance with these directives.
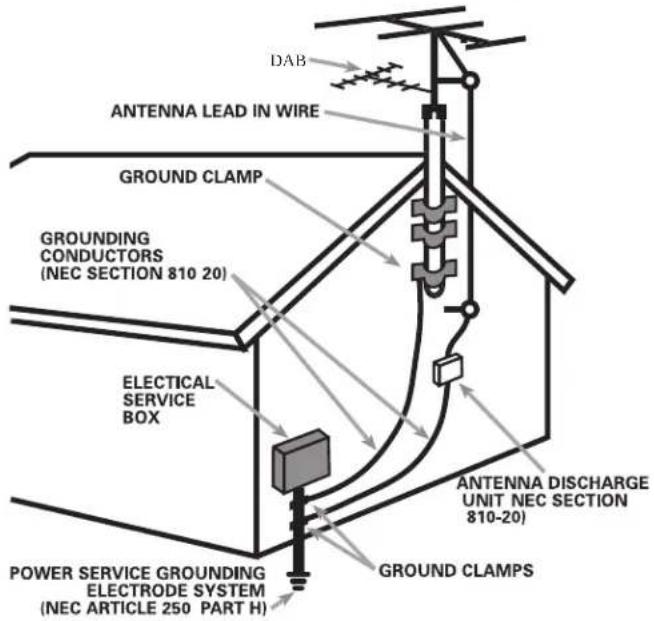
ANTENNA GROUNDING ACCORDING TO NATIONAL ELECTRICAL CODE INSTRUCTIONS SECTION 810: "RADIO AND TELEVISION EQUIPMENT"
The RS232 connection should be handled by authorized persons only.
FCC Information
This equipment has been tested and found to comply with the limits for a Class B digital device, pursuant to Part 15 of the FCC Rules. These limits are designed to provide reasonable protection against harmful interference in a residential installation. This equipment generates, uses and can radiate radio frequency energy and, if not installed and used in accordance with the instruction, may cause harmful interference to radio communications.
However, there is no guarantee that interference will not occur in a particular installation. If this equipment does cause harmful interference to radio or television reception, which can be determined by turning the equipment off and on, the user is encouraged to try to correct the interference by one or more of the following measures:
Reorient or relocate the receiving antenna.(TV, radio, etc.).
- Increase the separation between the equipment and receiver.
- Connect the equipment to an outlet on circuit different from that to which the receiver is connected.
- Consult the dealer or an experienced radio/TV technician for additional help.
Caution
This device complies with part 15 of the FCC Rules. Operation is subject to the following conditions: (1) This device may not cause harmful interference, and (2) this device must accept any interference received, including interference that may cause undesired operation.
NOTE TO CATV SYSTEM INSTALLER: Call the CATV system or antenna installer's attention to Article 820-40 of the NEC. This provides guidelines for proper grounding and, in particular, specifies that the cable ground shall be connected to the grounding system of the building, as close to the point of cable entry as practical. See installation diagram.
NOTE: This equipment has been tested and found to comply with the limits for a Class B digital device, pursuant to Part 15 of the FCC Rules. These limits are designed to provide reasonable protection against interference in a residential installation. This equipment generates and can radiate radio frequency energy and, if not installed and used in accordance with the instructions, may cause interference to radio or TV communications. There is no guarantee that interference will not occur in a particular installation. If this equipment does cause interference to radio or television reception, which can be determined by turning the equipment off and on, try to correct the interference by one or more of the following measures:
Reorient or relocate the receiving antenna.
- Increase the separation between the unit and the television tuner.
- Connect the unit to an AC power outlet on a different electrical circuit.
- Consult your authorized Rotel retailer for assistance.
Important Safety Instructions Notice
WARNING: There are no user serviceable parts inside. Refer all servicing to qualified service personnel.
WARNING: To reduce the risk of fire or electric shock, do not expose the unit to moisture or water. Do not expose the unit to dripping or splashing. Do not place objects filled with liquids, such as vases, on the unit. Do not allow foreign objects to get into the enclosure. If the unit is exposed to moisture, or a foreign object gets into the enclosure, immediately disconnect the power cord from the wall. Take the unit to a qualified service person for inspection and necessary repairs.
Read all the instructions before connecting or operating the component.
Keep this manual so you can refer to these safety instructions.
Heed all warnings and safety information in these instructions and on the product itself. Follow all operating instructions.
Clean the enclosure only with a dry cloth or a vacuum cleaner.
Do not use this unit near water.
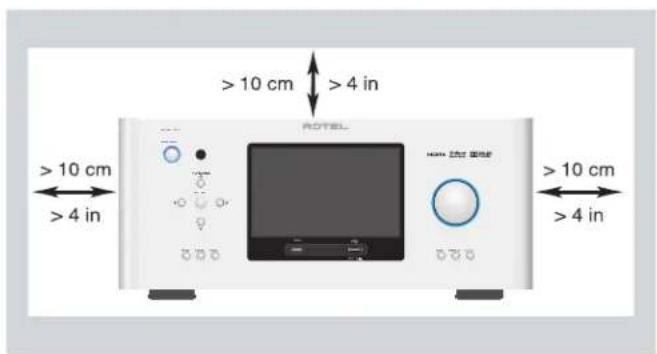
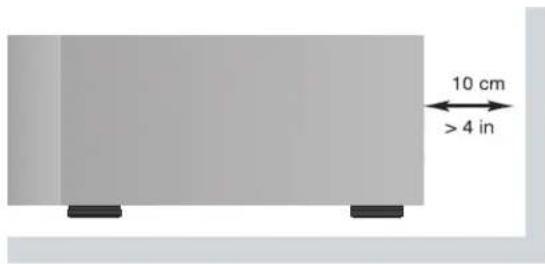
You must allow a minimum 10 cm or 4 inches of unobstructed clearance around the unit.
Do not place the unit on a bed, sofa, rug, or similar surface that could block the ventilation openings. If the unit is placed in a bookcase or cabinet, there must be ventilation of the cabinet to allow proper cooling.
Keep the component away from radiators, heat registers, stoves, or any other appliance that produces heat.
WARNING: The rear panel power cord connector is the mains power disconnect device. The device must be located in an open area that allows access to the cord connector.
The unit must be connected to a power supply only of the type and voltage specified on the rear panel. (USA: 120 V/60Hz, EC: 230V/50Hz)
Connect the component to the power outlet only with the supplied power supply cable or an exact equivalent. Do not modify the supplied cable. A polarized plug has two blades, with one wider than the other. A grounding plug has two blades plus a third grounding prong. These are provided for your safety. Do not defeat grounding and/or polarization safety provisions. If the supplied plug does not fit your outlet, please consult an electrician for replacement of the obsolete outlet. Do not use extension cords.
The main plug of the power cord set is a disconnect device of the apparatus. In order to completely disconnect the apparatus from the supply mains, the main plug of the power cord set should be unplugged from the mains (AC) outlet. The STANDBY LED indicator will not be lit up to show the power cord is unplugged. The disconnect device shall remain readily operable.
Do not route the power cord where it will be crushed, pinched, bent, exposed to heat, or damaged in any way. Pay particular attention to the power cord at the plug and where the cord exits the back of the unit.
The main plug is used as the main disconnect device and should remain ready accessible.
The power cord should be unplugged from the wall outlet during a lightning storm or if the unit is to be left unused for a long period of time.
Use only accessories specified by the manufacturer.
Use only with a cart, stand, rack, bracket or shelf system recommended by Rotel. Use caution when moving the unit in a stand or rack to avoid injury from a tip-over.
Immediately stop using the component and have it inspected and/or serviced by a qualified service agency if:
The power supply cord or plug has been damaged.
- Objects have fallen or liquid has been spilled into the unit.
The unit has been exposed to rain.
- The unit shows signs of improper operation.
The unit has been dropped or damaged in any way.
The batteries in remote control shall not be exposed to excessive heat such as sunshine, fire or the like.
WARNING: The master power switch is located on the rear panel. The unit must allow unobstructed access to the main power switch.
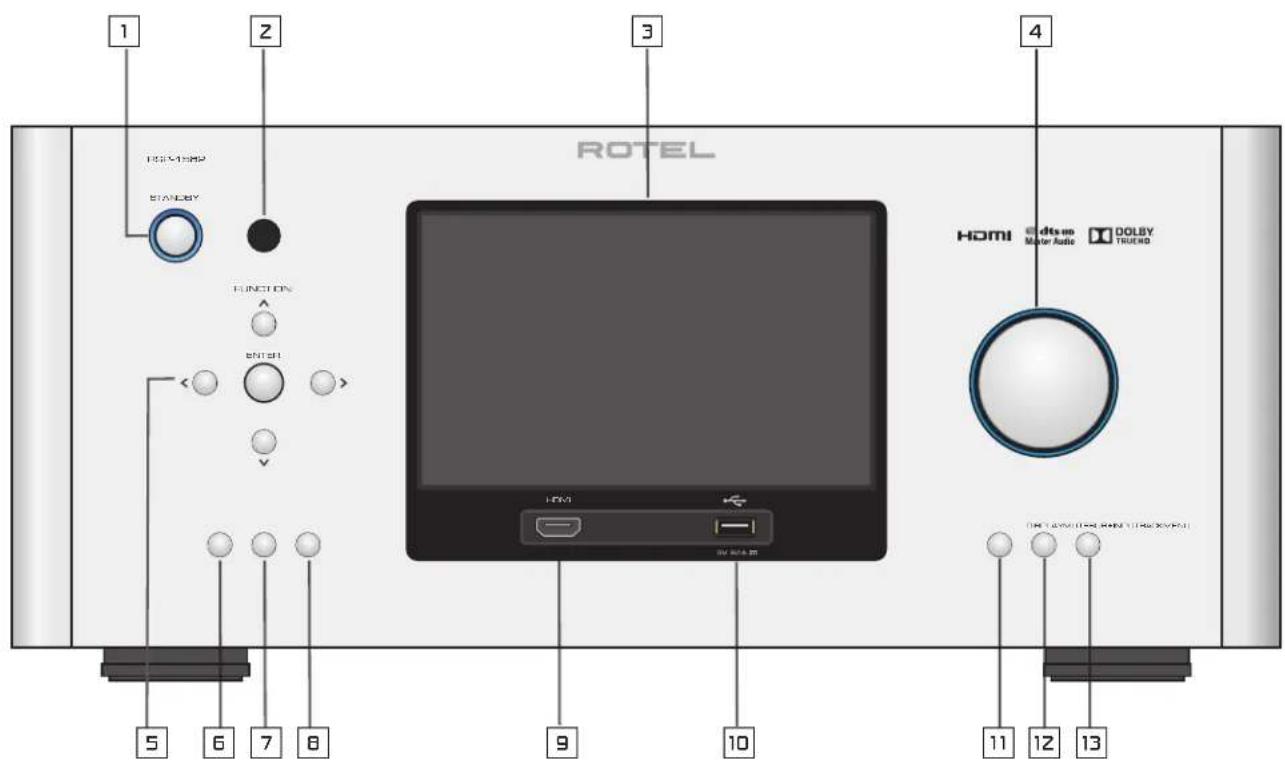
Figure 1: Control and Connections Commandes et Connexions Bedienelemente und Anschlisse Controles y Conexiones
Bedieningselementen en aansluitingen
Controllie connessioni
Kontroller och anslutningar
Oprahby npablenia coeunehnna
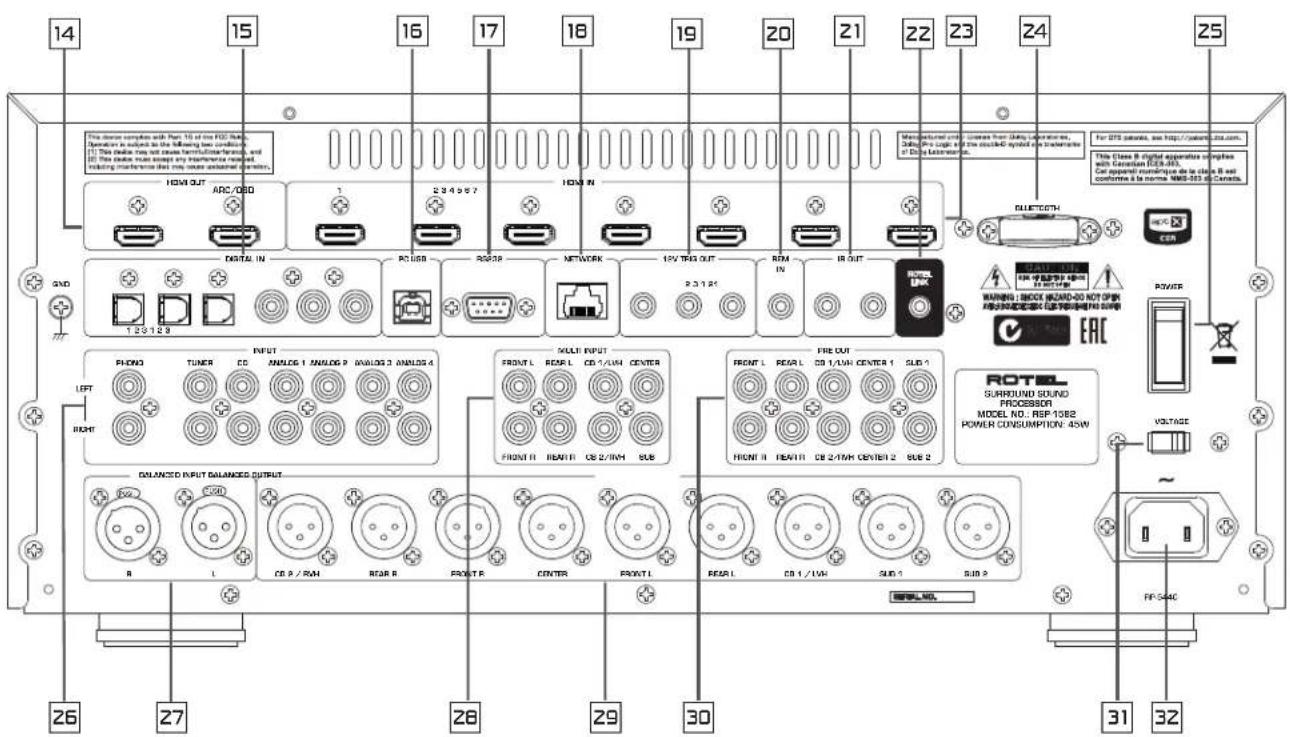
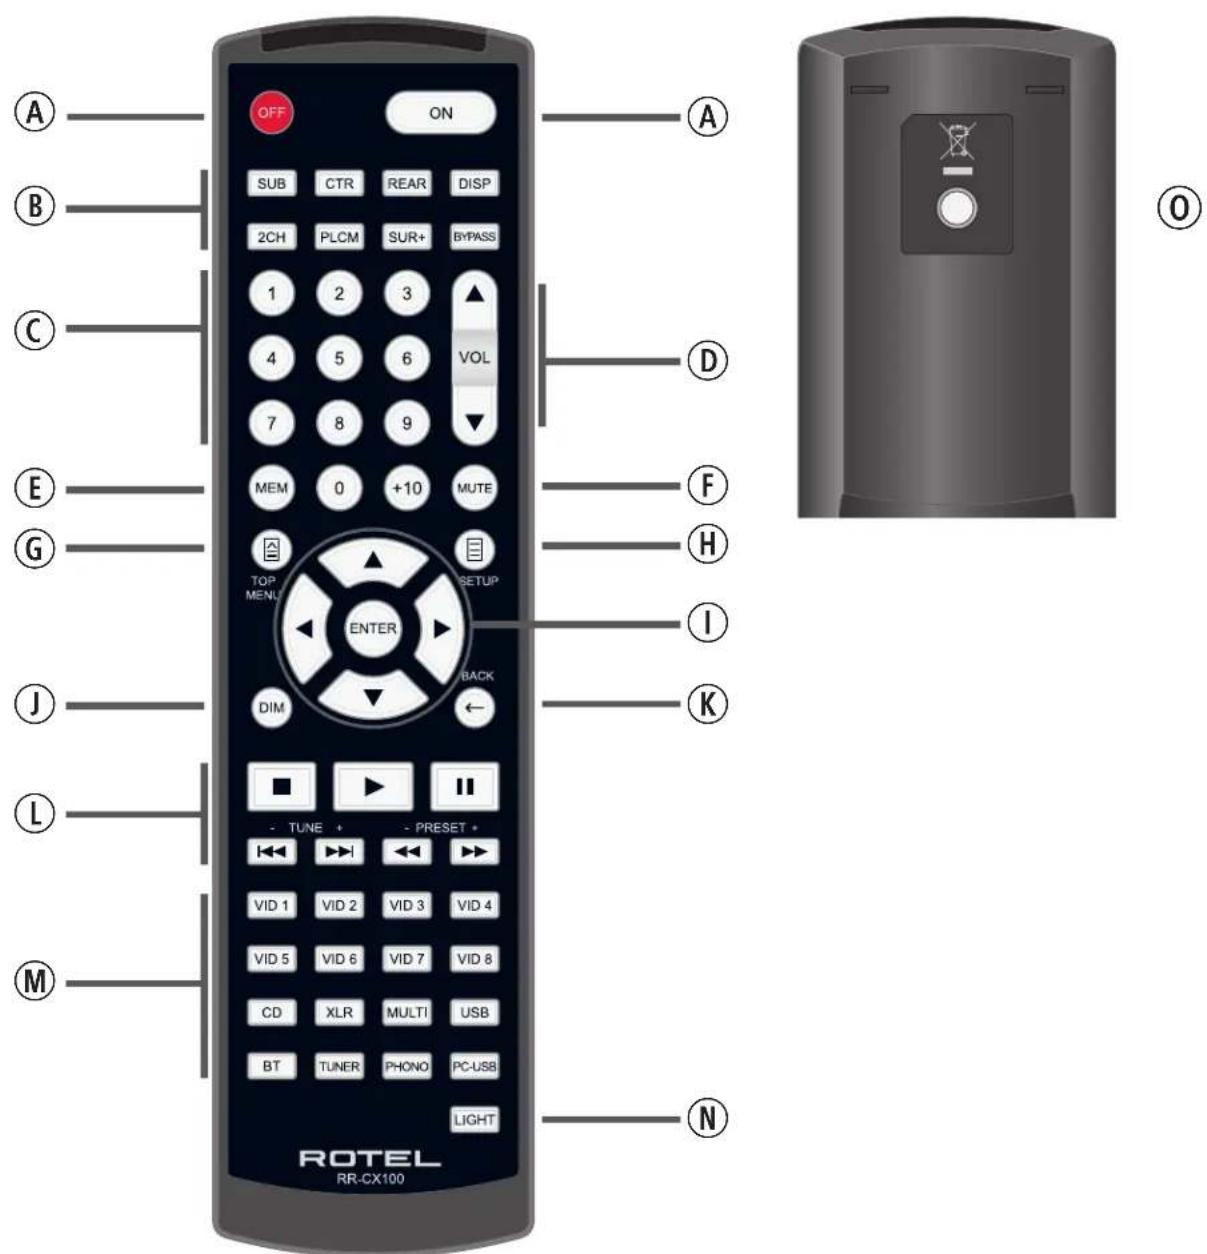
Figure 2: Remote Control Telecommande Fernbedienung Mando a Distancia
Afstandsbediening
Telecomando
Fjarrkontroll
Пульт достацноногу уравлия.

Figure 3: Amplifier And Subwoofer Amplificateurs et caissons de graves Verstärker und Subwoofer Amplificador y Subwoofer
Versterker en subwoofer
Collegamento di amplificatori e subwoofer
Förstarkare och subbas
YcuiuTeB n ca6Bypep
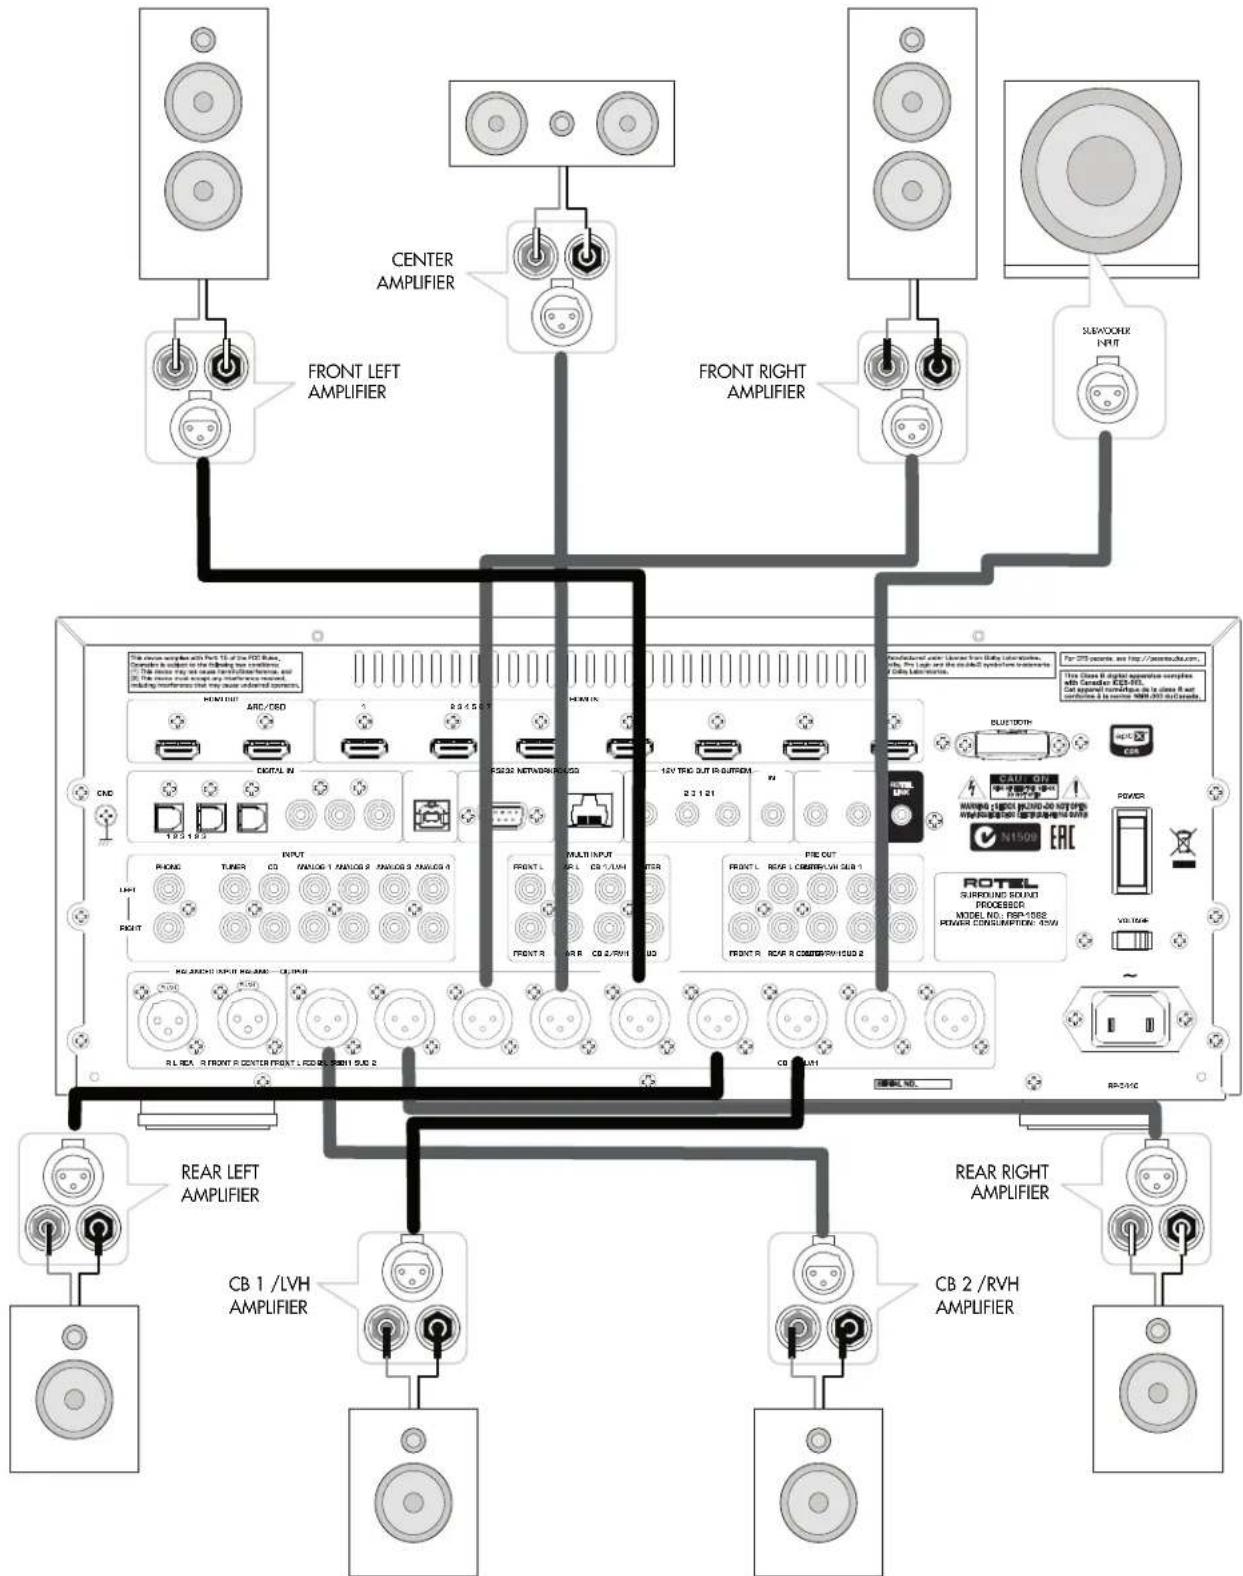
Figure 4: Amplifiers and Subwoofer Balanced Connections Amplificateurs et caissons de graves - connexions symétriques Symmetrische Verbindungen für Veränderkörner und Subwoofer Conexiones Balanceadas para Etapas de Potencia y Subwoofer
Gebalanceerde qansluitingen voor versterkers en subwoofer
Collegamento bilanciato di amplificatori e subwoofer
Forsarkare och subbas, balanserade anslutningar
Balaanchoe noqkuiuene ycnnten n ca6byepa
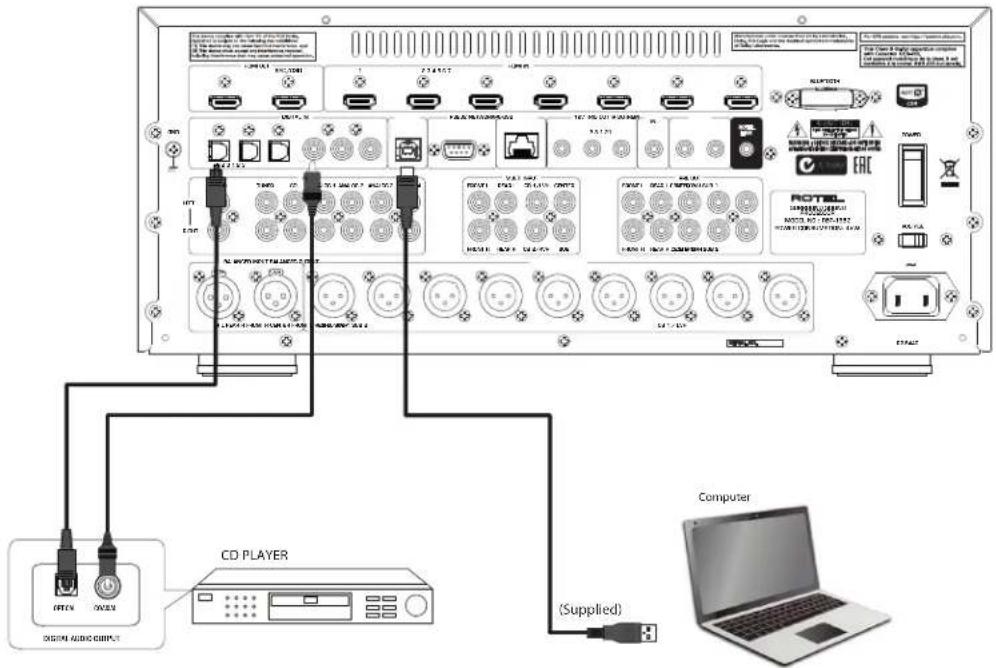
Figure 5: Digital Audio and PC-USB Connections Connexions audio numériques et PC-USB Digitale Audio und PC-USB verbindungen Conexiones Digitales de Audio y PC-USB
Digitale audio-en PC-USB-aansluitingen
Collegamenti audio digitale e PC-USB
Digitala ljd-och PC-USB-anslutningar
Повсейнения чфpoвого aydno n PC-USB
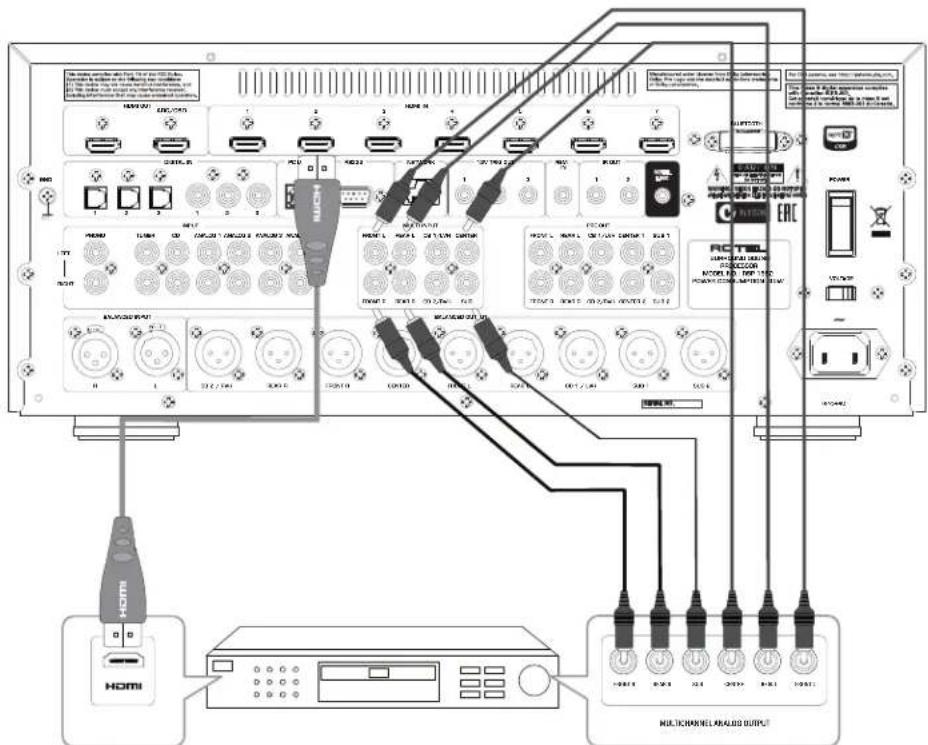
Figure 6: Blu-Ray and Video Player Connections Connexions à un lecteur Blu-Ray ou Video Anschlussdiagramm für Blu-Ray- und Video-Player Conexiones para Reproductor de Video o Blu-Ray
Aansluitingen voor een Blu-Ray of Video-speler
Collegamento di lettori Blu-Ray o Video
Blu-Ray-ller Video-spelare
IoiKnluoyenBlu-RaynnBnDoe npOnrpbBaTeNa
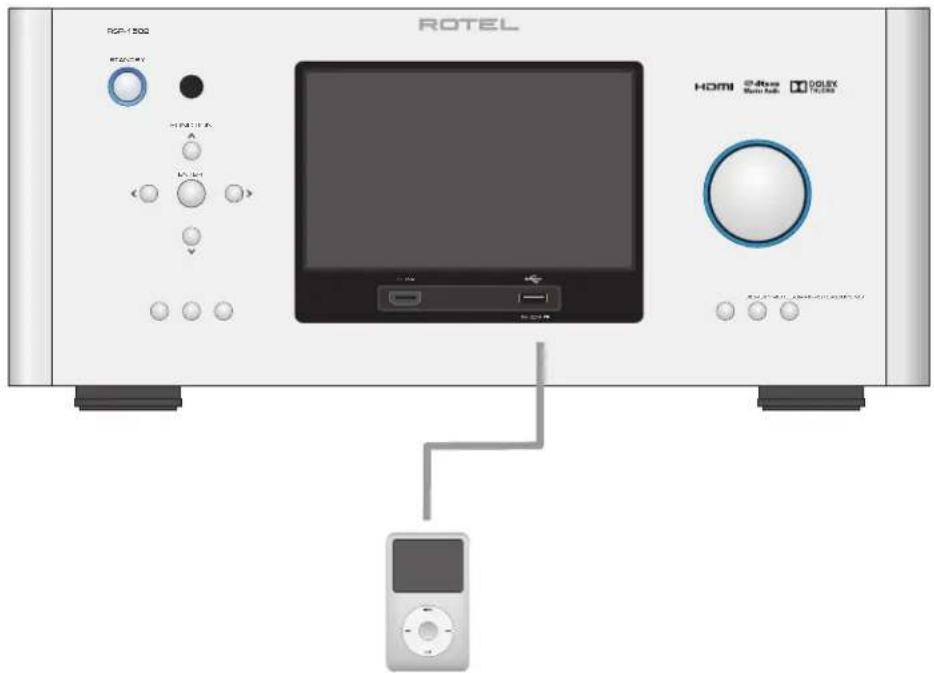
Figure 7: Front USB Connections Connexions USB en face avant Frontseitiger USB-Anschluss Conexiones USB del Panel Frontal
USB-aansluiting op het voorpaneel
Ingresso USB frontale
USB-anslutning pa fronten
Подкlioquee USB-hakonnteneи K Фронтаньнomy nopту
Figure 8: CD Player Connections Connexions à un lecteur de CD Anschlussdiagramm für einen CD-Spieler Conexiones para Reproductor de CD
Cd-speleraaansluitingen
Collegamento di unlettore CD
CD-spelare
IpoKluoyenca CD-nneepa
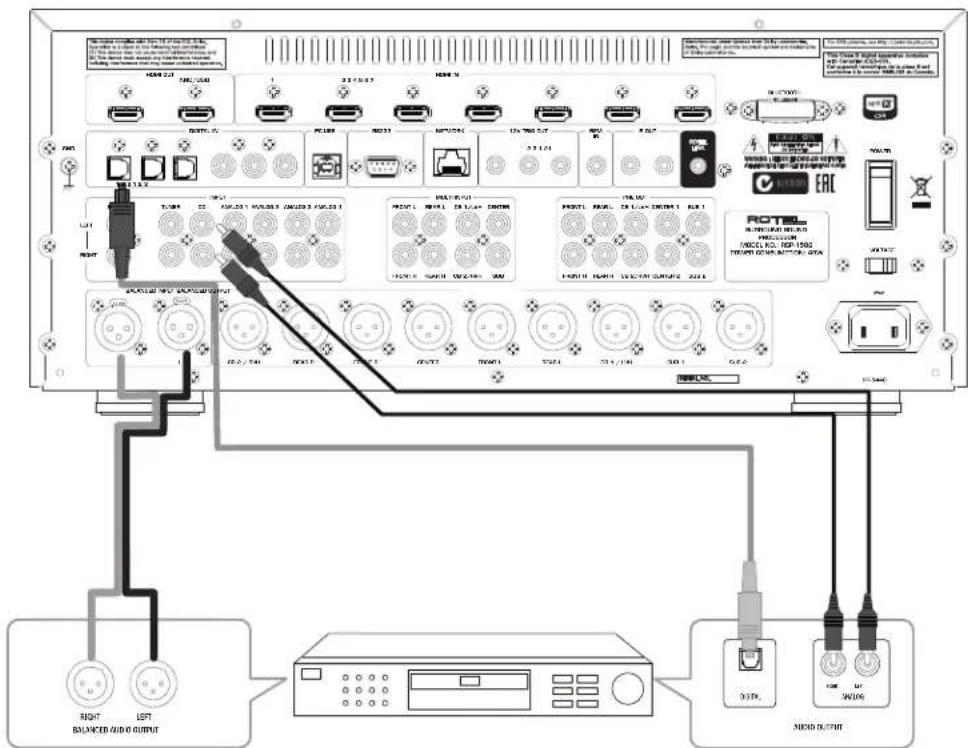
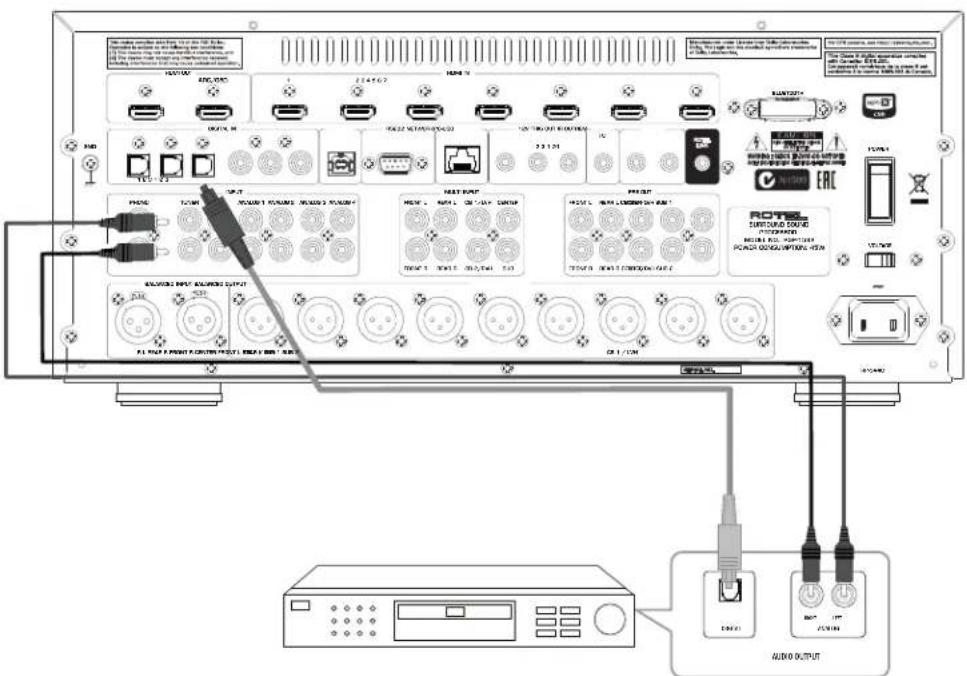
Figure 9: Tuner Connections Connexions a un tuner Anschlussdiagramm fur einen Tune Conexiones para Sintonizador
Aansluitingen voor Tuner
Collegamento di un Sintonizzatore
Tuner Anslutning
Пожкlioочи Тонера
Figure 10: Front HDMI Connections Connexions HDMI avant Vorderseite HDMI-Verbindungen Conexiones HDMI del Panel Frente
HDMI-aansluitingen op de voorijde
Collegamento delle prese HDMI anteriore
HDMI-anslutning pa främre
Ipoeklioue HMI pa3bemy ha nepeenn naheu
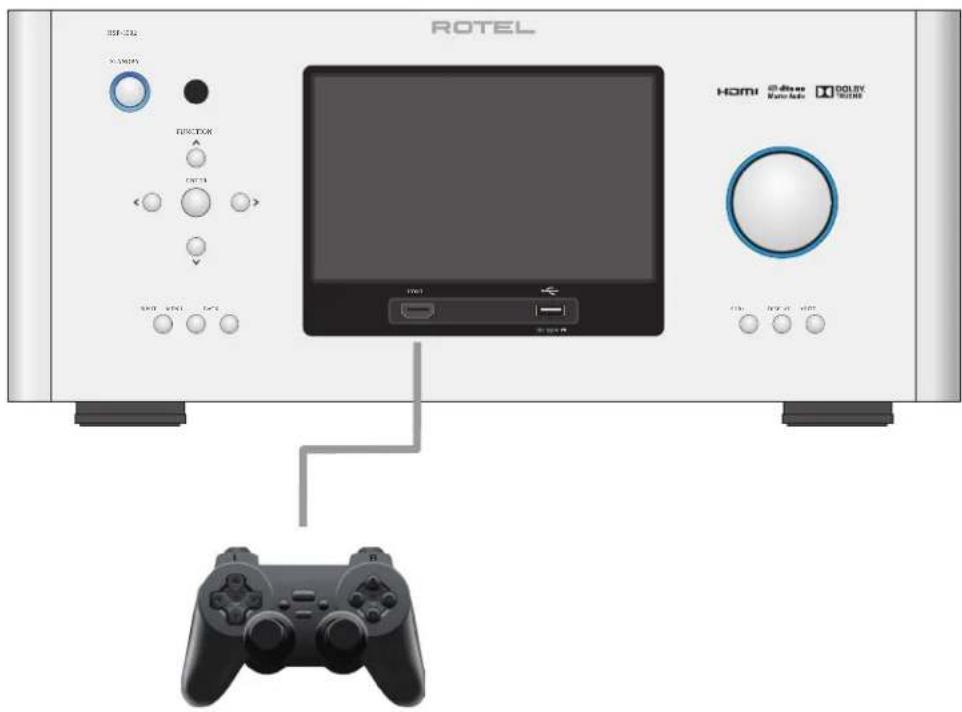
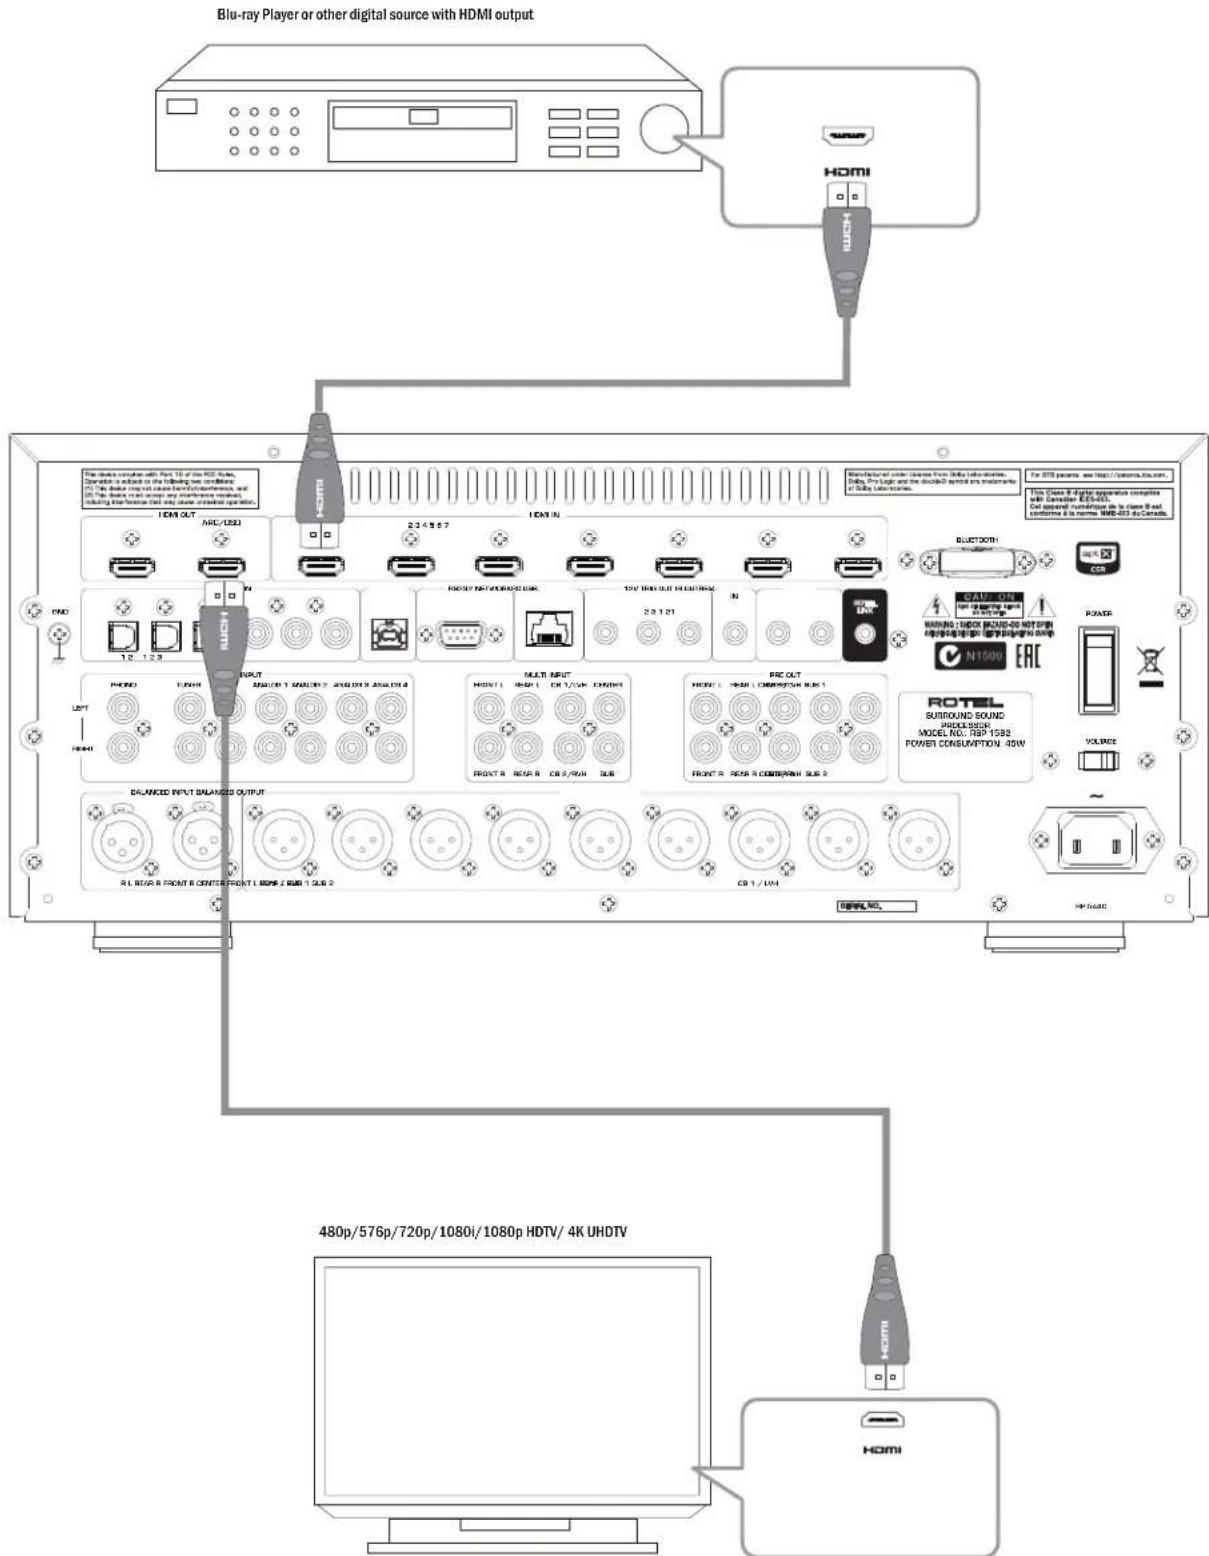
Figure 11: Rear HDMI Connections Connexions HDMI arrières Rückseiteige HDMI-Verbindungen Conexiones HDMI del Panel Posterior
HDMI-aansluitingen op de achterkant
Collegamento delle prese HDMI posteriori
HDMI-anslutning pa baksidan
Повлоченke K HDMI pa3bemy Ha 3aJne naHenn
About Rotel
Our story began over 50 years ago. Over the decades, we have received hundreds of awards for our products and satisfied hundreds of thousands of people who take their entertainment seriously like you!
Rotel was founded by a family whose passionate interest in music led them to manufacture high-fidelity components of uncompromising quality. Through the years, that passion has remained undiminished and the family goal of providing exceptional value for audiophiles and music lovers, regardless of their budget, is shared by all Rotel employees.
Rotel's engineers work as a close team, listening to, and fine tuning, each new product until it reaches their exacting musical standards. They are free to choose components from around the world in order to make that product the best they can. You are likely to find capacitors from the United Kingdom and Germany, semiconductors from Japan or the United States, while toroidal power transformers are manufactured in Rotel's own factory.
We all have concerns about our environment. And, as more and more electronics are produced it is especially important for a manufacturer to do all it can to engineer products that have a minimum impact on the environment.
At Rotel, we are proud to do our part. We have reduced the lead content in our products by using special lead-free ROHS solder and components. Our engineers continually strive to improve power supply efficiency without compromise to quality. When in standby mode Rotel products use minimal power to meet global Standby Power Consumption requirements.
The Rotel factory is also doing their part to help the environment through constant improvements to product assembly methods for a cleaner and greener manufacturing processes.
All of us at Rotel thank you for buying this product. We are sure it will bring you many years of enjoyment.
Manufactured under license from Dolby Laboratories. Dolby, Pro Logic and the double-D symbol are trademarks of Dolby Laboratories. Copyright 1995-2005. All rights reserved.
Manufactured under license under U.S. Patent #s: 5,451,942; 5,956,674; 5,974,380; 5,978,762; 6,226,616; 6,487,535; 7,212,872; 7,333,929; 7,392,195; 7,272,567 & other U.S. and worldwide patents issued & pending. DTS, DTS-HD and the Symbol are registered trademarks, & DTS-HD Master Audio, and the DTS logos are trademarks of DTS, Inc. Product includes software. © DTS, Inc. All Rights Reserved.
This item incorporates copy protection technology that is protected by U.S. patents and other intellectual property rights of Rovi Corporation. Reverse engineering and disassembly are prohibited.
Getting Started
Thank you for purchasing the Rotel RSP-1582 Surround Sound Processor. The unit is a full-featured audio/video control center for analog and digital source components. It features digital processing for a wide range of formats including Dolby Surround, Dolby Digital and DTS source material.
Video Features.
- HDMI switching for digital video signals up to 4K.
- Accepts HDMI video input: 480i, 480p/576p, 720p, 1080i, 1080p, 1080p 24Hz, 4K.
- Outputs HDMI video (480i, 480p/576p, 720p, 1080i, 1080p, 1080p 24Hz, 4K) compatible with common HDMI displays and projectors.
Audio Features
- Rotel's Balanced Design Concept combines advanced circuit board layout, comprehensive parts evaluation, and extensive listening tests for superior sound and reliability.
- Analog bypass mode for pure 2 channel stereo with no digital processing.
- Digital and analog inputs and outputs including Coax, Optical, RCA and Balanced XLR.
- 7.1 Multi-Channel input from compatible source components.
Surround Features
Automatic Dolby Digital decoding for Dolby Digital 2.0, Dolby Digital 5.1, Dolby Digital Surround EX™, Dolby TrueHD and Dolby Digital Plus recordings.
- Dolby® Pro Logic® llx and Dolby® Pro Logic® llz decoding (for 6.1 and 7.1 channel systems) with improved separation and frequency response for Dolby® Surround matrix encoded recordings. Can be optimized for Music or Cinema sources, Pro Logic® or Games.
Automatic decoding for DTS 5.1 channel, DTS-ES Matrix 6.1 channel, DTS-ES Discrete 6.1 channel, DTS 96/24, DTS-ES 96/24 digital, DTS-HD™ Master Audio and DTS-HD™ High Resolution recordings.
- DTS Neo:6 Surround modes for deriving surround channels for 5.1, 6.1 or 7.1 channel systems from 2-channel stereo or matrix surround recordings. Can be optimized for Music or Cinema sources.
- Surround modes for playback of multi channel audio on 2 channel and 3 channel systems.
- Audio Return Channel (ARC) allowing the audio from the TV to be processed by the RSP-1582 via HDMI.
Other Features
- User friendly ON-SCREEN DISPLAY (OSD) menu system with programmable labels for all inputs.
- Multi language support in OSD setup.
-
Upgradable software to accommodate future updates through the rear Internet connection or front USB port.
-
Assignable 12V trigger outputs for remote turn-on of power amplifier(s) and other components.
Unpacking
Remove the unit carefully from its packaging. Find the remote control and other accessories. Save the box as it will protect the product if you move or need to return it for maintenance.
Placement
Place the unit on a solid, level surface away from sunlight, heat, moisture, or vibration. Make sure that the shelf can support the weight of the unit.
Place the unit close to the other components in your system and, if possible, on its own shelf or with the optionally included rack ears. This will make initial connection, and subsequent system changes easier.
The unit can generate heat during normal operation. Do not block ventilation openings. Allow a minimum of 10cm or 4 inches of unobstructed space around the unit. If installed in a cabinet, make sure that there is adequate ventilation.
Do not stack other components or objects on top of the unit. Do not let any liquid fall into the cabinet.
Overview of Connections
Each of the source components in the system are connected to the unit's inputs with a pair of standard RCA cables or balanced XLR cables for analog audio, an HDMI video connection and an optional digital audio cable (coax or optical).
NOTE: Surround formats like Dolby Digital and DTS are digital formats and the unit can only decode them when a digital input signal is available. For this reason, you should always connect your Blu-ray or DVD player's digital outputs to the unit, using either the HDMI, optical or coax inputs.
The outputs of the RSP-1582 processor are sent to power amplifier(s) with balanced XLR connectors or standard RCA cables from the audio outputs. The video signal from the RSP-1582 is sent to the monitor using the HDMI connections.
In addition, the processor has MULTI INPUT connections for use with a source component that does its own surround decoding, remote IR receiver inputs, 12V trigger outputs and Rotel Link.
NOTE: Do NOT plug any system component into an AC source until all connections have been properly made. The S/PDIF digital audio interface standard specifies a 75 ohm impedance and all good digital cables adhere to this requirement. Do NOT substitute conventional audio interconnect cables for digital signals. Standard audio interconnects will pass these signals, but their limited bandwidth reduce performance.
When using analog audio connections ensure the Left and Right signals are attached to the proper RCA jacks. All RCA-type connections on this product follow these standard color codes:
Left channel audio: white RCA jack
Right channel audio: red RCA jack
NOTE: Each source input must be properly configured using the INPUT SETUP menu of the OSD menu system. We recommend going to this menu after connecting each source to configure it as desired. See Input Setup in the Setup section for more information.
HDMI Inputs and Outputs
These connections are used for connecting video signals to and from the unit. See the Making Connections section for specific instructions for each type of component.
Rear HDMI IN 1-7 Video Inputs 23
HDMI inputs provide various digital video connections for use with components that have HDMI outputs. HDMI connections carry video signals in multiple formats including 3D, 1080p / 24Hz and 4K. The implementation of HDMI supports audio signals, or a separate audio connection from an HDMI component.
Front HDMI IN 9
One HDMI input is located on the front panel for easier access. Use this HDMI connection for portable sources or devices that would not be permanently connected.
HDMI Monitor Outputs [14]
The two HDMI outputs of the RSP-1582 send High Definition video signals to your TV monitor in parallel. The HDMI outputs can send video signals to a high-definition TV 2D (480p/576p, 720p, 1080i, 1080p or 4K) and 3D (up to 1080p/24Hz).
NOTE: There are two HDMI outputs on the rear panel sending out the same video signal. Only one of the two will send the On Screen Menu to your TV.
Of the two HDMI Outputs, only one HDMI output supports ARC (Audio Return Channel) and is labeled "ARC" above the HDMI connector. Please refer to the VIDEO SETUP menu section of this manual for more details.
NOTE: Your TV may have more than one HDMI input. Not all HDMI inputs support ARC. Please use the ARC enabled HDMI input of your TV to use the ARC function on this product. ARC compatible inputs should be labeled with "ARC" next to the HDMI input connector.
Additional information for HDMI video outputs:
- All HDMI attached devices must be HDCP compatible to ensure proper display of the HDMI video signal.
- Audio received over HDMI will be processed by this product and sent out via the RCA or XLR outputs. To pass the audio signal to an attached TV the RSP-1582 must be set to "HDMI Audio Output Only" in the VIDEO SETUP menu in the OSD.
- When using both HDMI outputs simultaneously, both HDMI outputs will be set to the same resolution. This resolution will be the lower resolution of any attached monitor.
Audio Inputs and Outputs
This Rotel processor provides both analog and digital audio connections.
PHONO Input 26
A Left/Right pair of RCA analog audio inputs for connecting a phono player. If the turntable has a "ground" wire, connect it to the screw terminal labeled "GND" to the left of the Digital inputs.
TUNER Input 26
A Left/Right pair of RCA analog audio inputs for connecting a tuner.
CD Input Z6
A Left/Right pair of RCA analog audio inputs for connecting a CD player.
ANALOG 1-4 Audio Inputs
Four pairs of RCA inputs (ANALOG 1-4) provide connections for Left/Right analog audio signals from four additional source components.
BALANCED Input 27
A Left/Right pair of Balanced XLR audio inputs for connecting a source component with Balanced XLR audio outputs.
MULTI Input 28
A set of RCA inputs accepting up to 7.1 channels of analog signals from a source component capable of decoding multi channel audio. These inputs support FRONT L & R, CENTER, SUB, REAR L & R, and CENTER BACK 1 & 2 or FRONT VERTICAL HEIGHT L & R in a Dolby PLLz setup.
These inputs bypass all digital processing in the processor and are routed directly to the volume control and outputs.
PREAMP Output 30
A group of ten RCA analog audio outputs sends the RSP-1582's line level output signals to external amplifiers and powered subwoofoers. These output levels are variable and adjusted by the RSP-1582's volume control. The ten connectors provide output for: FRONT L & R, CENTER 1 & 2, SURROUND (REAR) L & R, CENTER BACK CB1 & CB2 (or FRONT VERTICAL HEIGHT L & R), and SUBWOOFER 1 & 2.
BALANCED Output 29
A group of nine Balanced XLR analog audio outputs sends the RSP-1582's balanced output signals to external amplifiers and powered subwoofoers. These output levels are variable and adjusted by the RSP-1582's volume control. The nine connectors provide output for: FRONT L & R, CENTER, SURROUND (REAR) L & R, CENTER BACK CB1 & CB2(or FRONT VERTICAL HEIGHT L & R), and SUBWOOFER 1 & 2.
NOTE: Do not connect both the RCA and XLR to the same amplifier at the same time.
NOTE: Depending on your system configuration, you may use some or all of these connections. For example, if you only have one center channel, connect it to the CENTER 1 output. If you only have one center back channel, connect it to the CB1 output.
DIGITAL Inputs 15
The RSP-1582 accepts digital inputs from source components such as CD players, satellite TV tuners, and DVD players. The DSP in the RSP-1582 detects the sampling rate of the incoming signal and automatically adjusts. Sampling rates up to 192kHz are supported.
NOTE: Digital inputs support both 2 Channel Stereo and Multi Channel audio signals. When using the digital input the processor DSP will decode the incoming audio stream including Dolby Digital or DTS.
There are six digital audio inputs on the rear panel, three coaxial and three optical. These digital inputs can be assigned to any of the VIDEO 1 - 8 input sources using the INPUT SETUP menu during the setup process. For example, you can assign the COAXIAL 1 digital input connector to the VIDEO 1 source and the OPTICAL 2 digital input to the VIDEO 3 source. By default, the source of the audio for inputs Video 1 - 8 is set to HDMI Audio.
At the factory the CD audio input is set to CD (analog RCA), but this can be changed to XLR, Coax 1 - 3, or Optical 1 - 3.
PC-USB Input 16
See Figure 5
Connect this input using the supplied USB cable to the USB socket of your computer.
The RSP-1582 supports both USB Audio Class 1.0 and USB Audio Class 2.0 modes. Windows computers do not require installation of a driver for USB Audio Class 1.0 and support playback of audio up to 96kHz sampling rates. The Factory Default setting is USB Audio Class 2.0.
To take advantage of USB Audio Class 2.0 audio playback supporting up to 192kHz sampling rates you will need to install the Windows driver supplied on the CD included with the RSP-1582. You will also need to switch the RSP-1582 to USB Audio Class 2.0 playback mode with the following:
- Press MENU on the front panel to enter MAIN MENU and use Up/Down buttons to select the INPUT SETUP menu then press ENTER.
- Use Left/Right buttons to select "PC-USB" as INPUT SOURCE and select "USB Audio 2.0" as AUDIO INPUT.
- Power cycle the RSP-1582 and reboot your PC after changing the USB Audio mode to ensure both units are properly configured.
Many audio playback applications do not support 192kHz sampling rate. Please confirm your audio player supports 192kHz audio and you have 192kHz audio files to properly playback this sample rate. Also, you may need to configure the audio driver in your PC to output 192kHz or your computer may "down sample" to a lower audio sample rate. For more information please refer to your audio player or operating system information.
NOTE: USB Audio Class 2.0 requires installation of the Windows PC driver on the CD ROM included with the RSP-1582.
NOTE: MAC computers do not require a driver to support USB Audio Class 1.0 or 2.0 audio but also may require selection of Rotel as the audio output device.
NOTE: Upon successful installation of the driver, you may need to select the ROTEL audio driver from the audio/speaker setup of your computer.
Front USB Input 10
See Figure 7
This connection will accept Apple devices such as iPod, iPad and iPhone. While connected, the iPod and iPhone displays remain active allowing search and play functions.
Other Connections
VOLTAGE Selector
The unit is set to the proper voltage for use in the country where the unit was purchased. The end user should not change the voltage setting.
CAUTION: The rear panel includes an AC voltage selection switch. Confirm this switch is set to the proper AC voltage before attaching the power cord.
AC Input 32
Your Rotel processor is configured at the factory for the proper AC line voltage in the country where you purchased it (USA: 120 volts/60Hz AC or CE: 230 volts/50 Hz AC). The AC line configuration is noted on a decal on the back of your unit. Plug the supplied cord into the AC INPUT receptacle on the back of the unit.
Master Power Switch 25
The large rocker switch on the rear panel is a master power switch. When it is in the OFF position, power to the unit is completely off. When it is in the ON position, the front panel STANDBY and remote control ON/OFF buttons can be used to activate the unit or put it into standby mode.
12V TRIGGER Output 19
Many Rotel amplifiers offer the option of turning them on and off using a 12 volt trigger. These three connections provide this 12 volt trigger signal from the processor. When the unit is activated, a 12 volt DC signal is sent from these jacks to the amplifiers to automatically turn them on. When the processor is put in STANDBY mode, the trigger signal is removed and the amplifiers automatically turn off.
To use the automatic trigger turn on feature, connect one of the RSP-1582's 12V TRIG OUT jacks to the 12 volt trigger input of a Rotel amplifier, using only the black 3.5mm trigger cable included with this unit or a Rotel amplifier. Do not use any other cable for trigger connection. The +12V DC signal appears at the "tip" connector.
NOTE: The 12V Trigger outputs are configured to turn on in various combinations only when specific input sources are activated. See the INPUT SETUP menus in the Setup section of this manual for details.
REM IN Jack 20
This 3.5mm mini-jack receives command codes from third-party IR remote receiver. These remote IR inputs can be used when the RSP-1582 front IR receiver cannot be reached by a sending remote control.
Consult your authorized Rotel dealer for more information on the REM IN jack.
NOTE: The IR signals from the REM IN jack can be relayed to other source components using external IR emitters or hard-wired connections from the IR OUT jacks. See the following section for additional information.
IR OUT Jacks 21
The IR OUT 1 & 2 jacks send IR signals received at the REM IN jack to an infrared blaster or emitter placed in front of a source component's IR sensor. In addition, the IR OUT can be hard-wired to other Rotel products with REM IN jack.
These outputs allow IR signals to be "delayed" through the RSP-1582 either directly to the IR receiver on the front panel or via the REM IN jack on the rear panel. This function provides easy control of other source components when their IR inputs are not accessible such as when they are installed in a rack system or in a cabinet.
See your authorized Rotel dealer for more information on IR emitters and repeater systems.
RS232 Connector 17
The RSP-1582 can be controlled via RS232 for integration with automation systems. The RS232 connector accepts a standard straight DB-9 Male-to-Female cable.
NETWORK Connector 18
The Network socket accepts standard RJ-45, CAT-5 cables. Network connection is not required for normal operation of this unit. This connection is for software updates or control from an automation system only.
For additional information on the connections, cabling, software, and operating codes for automation system control or software updates, contact your authorized Rotel dealer.
Making Connections
Connecting an Amplifier
See Figure 3 and Figure 4
The RSP-1582 has preamp RCA outputs and Balanced XLR outputs for connections to power amplifiers to drive up to eight (seven if using XLR) speakers in a 5.1, 6.1, or 7.1 channel surround sound audio system: right/left front channels, 2 center channels (1 center if using XLR), right/ left surround channels, and two center back (or front height) channels. In addition, there are two subwoofer outputs.
To connect amplifiers, connect an audio cable from each output jack to the input of the amplifier channel that will power the corresponding speaker. For example, connect the FRONT L output to the amplifier channel driving the front left speaker. In a full home theater system, you will make up to seven different connections in addition to the subwoofer. These connections for a 5.1 channel system are labeled FRONT L and FRONT R, CENTER, and REAR L and REAR R. There are two CENTER RCA jacks; use either jack for a single center channel, or both if you have two center channels. In six or seven channel systems, make one or two additional connections for Center Back channel(s). These jacks are labeled CB1/LVH and CB2/RVH. Use CB1 for a single center back channel.
In a Dolby PLLz system, you can have Left Vertical Height (LVH) and Right Vertical Height (RVH) speakers instead of CB1 and CB2.
Make sure that you have each output connected to the correct amplifier channel:
- Connect the front left amplifier to the FRONT L jack.
- Connect the front right amplifier to the FRONT R jack.
- Connect the center channel amplifier to the CENTER 1 or CENTER 2 jack.
- Connect the surround left amplifier to the REAR L jack.
- Connect the surround right amplifier to the REAR R jack.
- Connect the center back left/left vertical height amplifier to the CB1/ LVH jack.
- Connect the center back right/right vertical height amplifier to the CB2/RVH jack.
After you have connected the preamp outputs, you need to configure the RSP-1582 for the size and style of speakers in your system and calibrate the relative volume levels of the speakers using the built-in test tones. See the Setup section of this manual.
Connecting a Subwoofer
See Figure 3 and 4
To connect a powered subwoofer, connect a standard RCA audio cable or Balanced XLR jack from either of the two jacks labeled SUB to the input on the subwoofer's power amp. Both SUB outputs provide the same signal. Use either connection for a single subwoofer. Use both connections to connect two subwoofer.
After you have connected the subwoofer, you need to configure the unit to use the subwoofer and calibrate the relative volume level of the subwoofer using the built-in test tones. See the Speaker Level Setup section of this manual.
NOTE: Connect either the RCA or XLR cables. DO NOT connect both to the same amplifier.
Connecting a DVD, Blu-ray, Cable, Satellite, Game Console and HDTV Tuner
See Figure 6 and 10
Source devices including Blu-ray, DVD, satellite, cable, etc. should be attached to the RSP-1582 using HDMI. Connect an HDMI cable from the output of the source to one of the HDMI inputs on the processor.
Digital audio connection: Depending on the setup of your system, you can also use the audio digital connections and assign them to the HDMI video inputs.
Connect the digital output of the source to any of the DIGITAL IN OPTICAL 1-3 or DIGITAL IN COAXIAL 1-3 inputs on the processor. An HDMI cable carries both digital video and digital audio signals; therefore, in most cases no separate digital audio connection needs to be made.
NOTE: Use the INPUT SETUP screen to assign the audio digital input to the HDMI video input source used above.
Connecting a Blu-ray or DVD Player
See Figure 6
In some cases DVD, SACD, and other external multichannel processors are connected to the processor by sending decoded analog audio signals using RCA cables. A DVD player with HDMI outputs can send digital signals directly to the processor for decoding.
Analog Connections: To connect a Blu-ray or DVD player (or any device that decodes multi-channel audio) with analog connections, use audio RCA cables to connect the outputs of the player to the RCA jacks labeled MULTI INPUT on the RSP-1582. Make sure that you observe proper channel consistency, i.e. connect the right front channel to the FRONT R input, etc.
Depending on your system configuration, make six connections (FRONT L & R, SURROUND L & R, CENTER, and SUBWOOFER), seven connections (adding a CENTER BACK connection), or eight connections (adding two CENTER BACK or Vertical Height connections).
The MULTI inputs are analog bypass inputs, passing signals directly to the Volume Control and preamp outputs, bypassing all of the digital processing.
HDMI digital connection: If the player has HDMI outputs, simply connect an HDMI cable from the output of the player to one of the HDMI inputs on the processor. This cable sends the video signal from the player along with a digital audio signal. Using HDMI for audio and video allows the multichannel decoding to be handled by the processor.
Connecting a Monitor
See Figure 10
Connect one of the HDMI outputs of the RSP-1582 to the HDMI input of your TV monitor. The RSP-1582 has two HDMI outputs. Only one HDMI output will display the OSD and is ARC enabled. This output is labeled on the rear panel with ARC/OSD.
Connecting a CD Player or XLR Source
See Figure 8
Digital audio connection: Connect the output of the CD player to any of the Analog CD, XLR, Optical or Coax digital inputs on the processor. Use the INPUT SETUP menu to assign the audio input to the CD (the default is CD).
Analogue audio connections:
Option 1: Connect the left and right analog outputs from the CD player to the AUDIO IN jacks labeled CD (left and right). This option uses the CD player's D/A converter. Depending on the selected DSP mode this connection method may require the analog signal to be converted to a digital signal for processing.
Option 2: If your CD Player (or another source) has XLR output connectors, you can use the XLR inputs on the RSP-1582 for this connection. Connect the left and right XLR outputs from the source to the jacks labeled BALANCED INPUT (left and right). This option uses the CD player's D/A converter. Depending on the selected DSP mode this connection method may require the analog signal to be converted to a digital signal for processing.
Although there are typically no video connections for a CD Player, the RSP-1582 can assign another video input to the CD or XLR input. The Video choices are HDMI 1-8 (Front), Last Video Source, or off. HDMI 1 video input is assigned to CD and XLR as the default setting.
Connecting a Tuner
See Figure 9
Digital audio connection: If using an HD Radio or other digital tuner, connect the digital output of the tuner to any one of the DIGITAL IN OPTICAL 1-3 or DIGITAL IN COAXIAL 1-3 inputs on the RSP-1582.
NOTE: The Tuner source by default does not allow the selection of a digital input. Please use VIDEO 1 - 8, if connecting a Tuner with a digital input.
Analog audio connection: If using an analog tuner, connect the left and right analog outputs from the tuner to the pair of audio input jacks labeled TUNER on the RSP-1582. Make sure that you connect the right channel to the R input jack and the left channel to the L input jack.
Although there are typically no video connections for a Tuner the RSP-1582 can assign another video input to the Tuner input. The Video choices are HDMI 1 - 8 (Front), Last Video Source, or off. HDMI 1 video input is assigned to the Tuner input, as a default setting.
Connecting an iPod/iPhone
See Figure 11
Connect the iPod/iPhone to the front USB socket.
NOTE: The audio inputs CD, PHONO, XLR, MULTI, USB, PC-USB, BLUETOOTH, and TUNER are set to HDMI 1 video input as the factory default. This can be changed to HDMI 1-8, Last Video Source, or off.
Operating the RSP-1582
Considering its large number of features, settings and options, this Rotel RSP-1582 is remarkably easy to operate. The key to operating the unit is its system of On-Screen Displays (OSD) which guide you through various choices.
To guide you through the operation of the unit, this section of the manual starts with explaining the basic layout and functions of the front panel and the remote control. This is followed by explanation of basic operations such as turning the unit on and off, adjusting volume, selecting a source for listening, etc. Following that is a detailed explanation of surround sound modes and how to configure the unit for various types of recordings. All of these are features that may be used in normal operation. The last section of the manual (Configuration) details options that may be selected during initial setup and configuration of the unit, many of which will be set once and then left untouched.
Throughout this manual, numbers in square boxes refer to the main unit illustration at the front of this manual. Letters in circles refer to the remote handset illustration. When both appear, the function is found on both the unit's front panel and on the remote. When only one appears, that function is found either only on the main unit or only on the remote.
Front Panel Overview
The following is a brief overview of the controls and features on the front panel of the unit. Details concerning the use of these controls are provided in subsequent sections of this manual describing various tasks.
Front Panel Display
The Display on the front panel shows the complete OSD menu of the unit. When the OSD is not in use, the display shows source selected and type of audio mode the unit is in receiving or processing.
IR Remote Sensor
This sensor receives IR signals from the remote control. Do not block this sensor.
NOTE: The remainder of the buttons and controls on the front panel are described in the Overview of Buttons and Controls section.
Remote Control Overview
The RSP-1582 is supplied with an easy to use remote control RR-CX100. The RR-CX100 can be configured to use IR codeset 1 or IR codeset 2 in case the unit is conflicting with other Rotel models. Push and hold the TUN button and 1 (or TUN and 2 for codeset 2) at the same time and hold for approximately 5 seconds until the backlights on the remote control blink on then off then release both buttons. This sets the remote control to use codeset 1 (or codeset 2 if TUN and 2 are held). The System menu in the OSD includes a configuration option to set the processor to either codeset 1 or codeset 2. The factory default for the remote and processor is codeset 1.
The RR-CX100 can also control an attached Rotel CD player. The CD player functions include Play, Stop, Pause, Track Forward, Track Back, Fast Forward, Fast Reverse. To activate these functions press the CD button on the remote. If the CD is attached to the XLR source input these functions can be activated by pressing the XLR button. To change the CD player functions to operate after pressing the XLR button press and hold the XLR and 1 button for 5 seconds until the backlight LEDs blink twice times then release. To disable XLR sending the CD control functions press and hold the XLR and 0 button for 5 seconds until the backlight blinks.
The transport buttons will only operate for CD control after the CD or XLR button is pressed on the remote. If a different input is selected from the remote these buttons will no longer send the CD transport IR commands.
Overview of Buttons and Controls
This section provides a basic overview of the buttons and controls on the front panel and the remote control. Detailed instructions on the use of these buttons are provided in the more complete operating instructions in the following sections.
STANDBY and Power ON/OFF Buttons A
The front-panel STANDBY button and the remote control ON/OFF button activate or deactivate the unit. The rear panel master POWER switch must be on the ON position for the remote standby function to operate.
VOLUME Knob and VOLUME UP/DOWN Buttons 4
The VOLUME UP/DOWN buttons on the remote and the large rotary control on the front panel provide the master VOLUME control, adjusting the output level of all channels simultaneously.
DISPLAY (DISP) Button 28
Push this button to display the current volume.
MENU/SETUP Button 7
Navigating and ENTER Buttons ⑤
The MENU/SETUP button displays the OSD setup screen on the front display and HDMI OSD enabled output. Push the MENU/SETUP button again to deactivate this menu. Use the navigation buttons Up/Down/Left/Right and ENTER on the remote control or front panel to access the various menus.
MUTE Button
Push the MUTE button once to turn the sound off. An indication appears in the front panel and on-screen display. Press the button again to restore the previous volume level.
INPUT Buttons
The INPUT button on the front panel can be used to display the input source menu. The input source can be changed by selecting the desired source with the navigation buttons and pressing the ENTER button on the front panel. The remote control input buttons can change the source directly by pressing the desired source input.
SUR+ Buttons 6
The SUR + buttons on the remote control or front panel will display surround mode information of currently selected source. The default DSP mode can be configured in the Setup menu for each source. Press the SUR + button repeatedly to toggle through the available DSP modes.
NOTE: DSP processing options vary depending on the selected source input type. Not all DSP options are available in analog or digital input modes.
Other buttons on the remote can directly access specific DSP modes.
2CH: Changes the audio mode to STEREO, DOWN MIX or BYPASS.
BYPASS: Bypass all DSP processing.
PLCM: Toggles through the Pro Logic DSP options including Movie, Music and Game.
Playback Control buttons ①
These buttons provide basic control functions for iPod/USB AUDIO playback. Supported functions include Play, Stop, Pause, Next Track, Previous Track.
DIMButton ①
Use this button to dim the front panel display.
NOTE: Adjustment made using the ① button is temporary only and not saved after power off.
SUB, CTR, REAR Buttons
These buttons can access the speaker setting and adjust the output level for each speaker in the system. Use the Up and Down arrow buttons on the remote control to change values. This is only a temporary change. To make permanent adjustments, please access the SPEAKER LEVEL SETUP menu from the OSD.
MEM Button
This button does not operate with the RSP-1582 and is used only to control a Rotel tuner product for preset memory control.
LIGHT Button
Pushing this button turns on the back light of the remote control for easy operation in dimly lit rooms.
ASSISTIVE LIGHT ①
Push and hold on the LIGHT Button for 3 seconds to turn on the assistive light. This light can be used to help locate objects in a dimly lit room such as a home theatre surrounding.
Automatic Surround Modes
Decoding of digital sources connected is generally automatic with detection triggered by a "flag" embedded in the digital recording telling the processor what decoding format to use. For example, when a Dolby Digital 5.1 or DTS 5.1 channel surround signal is detected, the processor activates the proper decoding.
The unit will detect DTS-ES Matrix 6.1 or DTS-ES Discrete 6.1 discs and activate DTS-ES Extended Surround decoding. Dolby Digital Surround EX recordings also trigger automatic decoding (although not all Surround EX DVDs have the necessary flag and may require manually activating Surround EX decoding).
The unit will also detect Dolby True HD and DTS-HD Master Audio automatically.
Likewise, a digital input from a standard compact disc, a DTS 96/24 disc, or DTS-ES 96/24 disc, will be auto-detected and properly decoded to 2CH stereo.
Dolby Pro Logic IIx/IIz processing can be configured to be automatically active in all 6.1 or 7.1 channel systems configured with center back speaker(s) and will ensure proper extended surround decoding of all multichannel digital signals, even those that might not otherwise trigger the proper extended surround mode.
In many cases, the processor will also recognize a digital signal with Dolby Surround encoding (such as the default soundtrack on many DVDs) and activate Dolby Pro Logic II decoding. Additionally, you can configure a default surround mode for each input using the INPUT SETUP menu (see the Setup section of this manual).
Combined with the auto-detection of Dolby Digital and DTS, this default surround setting makes operation of the processor's surround modes totally automatic. For example, if you set Dolby Pro Logic II movie mode as the default for all of your video inputs, the processor will automatically decode Dolby Digital and DTS soundtracks when they are played and use Pro Logic II matrix decoding for all other recordings.
For stereo inputs such as CD and Tuner, you could select STEREO mode as the default for 2-channel playback or Dolby Pro Logic II music mode if you prefer to hear music sources in surround sound.
NOTE: A digital signal coming into the processor will be recognized and properly decoded. However, on a Blu-ray with multiple soundtracks, you may need to configure the player for the desired signal and encoding type. For example, you may need to use the player's menu system to select the Dolby Digital True HD or DTS soundtrack rather than the default Dolby Digital 2.0 Dolby Surround soundtrack.
Manually Selecting Surround Modes
The combination of auto-detection of Dolby Digital and DTS recordings and setting default surround modes for each input during the setup of the processor makes operation of surround modes totally automatic. For many users, this automatic surround mode selection will meet all of their listening needs.
For users who prefer a more active role in setting surround modes, buttons on the remote and the front panel provide manual selection of surround modes that are not automatically detected or, in some cases, to override an automatic setting.
Manual settings available from the front panel and/or the remote control should be used when you want to play:
- Standard 2-channel stereo (Left/Right speakers only) with no surround processing.
- Down mixed 2-channel playback of Dolby Digital 5.1 or DTS recordings.
- Dolby 3-channel stereo (Left/Right/center) of 2-channel recordings.
- 5-channel or 7-channel stereo from 2-channel recordings.
- Dolby Pro Logic II cinema or music mode matrix decoding of 2-channel recordings.
- DTS Neo:6 cinema or music mode matrix decoding of 2-channel recordings.
- Dolby Digital Surround EX decoding of Dolby Digital 5.1 channel recordings or Dolby Digital Surround EX discs that do not trigger automatic decoding.
NOTE: DTS, DTS-ES Matrix 6.1, DTS-ES Discrete 6.1, DTS 96/24, DTS-ES 96/24, DTS-HD, Dolby Digital and Dolby TrueHD signals are auto-detected and cannot be overridden. However, you can choose to use Dolby Digital Surround EX decoding for any Dolby Digital 5.1 source material. You can also down mix Dolby Digital 5.1 or DTS 5.1 recordings for 2-channel playback.
- PCM 2-channel (non 96kHz ) digital signals can be overridden to Dolby Pro Logic II, Dolby 3-Stereo, DTS Neo:6, 5CH Stereo, 7CH Stereo, and Stereo.
- Dolby Digital 2-channel Stereo can be overridden to Dolby Pro Logic II, Dolby 3-Stereo, and Stereo.
The following topics describe in detail the manual surround mode options available for each type of recording:
Dolby Digital/TrueHD discs Dolby Digital Surround EX discs
Dolby Digital decoding is auto-detected and cannot be overridden. You may, however, select a 2-channel down mix of 5.1 channel recordings. In a 6.1 or 7.1 channel system, you can also choose Dolby Surround EX, Dolby Pro Logic IIx Music, Dolby Pro Logic IIx Cinema (7.1 channel only).
To change the surround mode press the SUR + button on the remote control or front panel to toggle through the available options. The 2CH button on the remote control will create a down mix of any multichannel signal to 2 channel stereo mode.
NOTE: Not all surround modes are available for all surround source formats. The input source signal will determine the available surround options that can be selected.
Dolby Digital 2.0 discs
Dolby Digital decoding is auto-detected and cannot be overridden. You may, however, select 2-channel playback, 5.1 channel playback with Pro Logic II matrix surround, 6.1/7.1 channel playback with Pro Logic IIx/IIz matrix surround, or Dolby 3-Stereo playback.
To change the surround mode press the SUR + button on the remote control or front panel to toggle through the available surround options. The 2CH button on the remote control will downmix any multichannel signal to 2 channel stereo mode. The PLCM button on the remote control will toggle between Pro Logic IIx Cinema (Movie), Music or Game.
DTS/DTS-HD 5.1 discs DTS 96/24 discs DTS-ES 6.1 discs
DTS decoding is auto-detected and cannot be overridden. You may, however, select a 2-channel down mix of 5.1 channel recordings for 5.1 channel discs.
To change the surround mode press the SUR + button on the remote control or front panel to toggle through the available options. The 2CH button on the remote control will create a down mix of any multichannel signal to 2 channel stereo mode.
NOTE: Not all surround modes are available for all surround source formats. The input source signal will determine the available surround options that can be selected.
Digital Stereo discs
This group of recordings includes any non-Dolby Digital 2-channel signal from the processor's digital inputs. You can play these recordings in 2-CH Stereo, Dolby 3-Stereo, 5-CH Stereo, 7-CH Stereo modes. You can also use Dolby Pro Logic II matrix surround (5.1 ch systems), Dolby Pro Logic IIx Music (6.1/7.1 ch systems), Dolby Pro Logic IIx Cinema (6.1/7.1 ch systems), Dolby Pro Logic IIz (7.1 ch system) or DTS Neo:6 surround modes.
All of the bass management settings (speaker size, subwoofer, and crossover) are in effect with digital stereo inputs.
To change the surround mode press the SUR + button on the remote control or front panel control to toggle through the available surround options. The 2CH button on the remote control will create a down mix of any multichannel
signal to 2 channel stereo mode. The PLCM button on the remote control will toggle between Dolby PLLx Cinema (Movie), Music or Game.
NOTE: Not all surround modes are available for all surround source formats. The input source signal will determine the available surround options that can be selected.
Analog Stereo
This type of recording includes any conventional stereo signals from the processor's analog inputs, including analog audio from CD players, FM tuners, etc.
Analog stereo inputs require a choice about how the signal is routed through the processor. One option is the analog bypass mode. In this mode, the stereo signal is routed directly to the volume control and the outputs. This mode is pure 2-channel stereo, bypassing all of the digital circuitry. None of the bass management features, speaker level settings, EQ settings, or delay settings is active. There is no subwoofer output. A full-range signal is sent directly to the front left and right speakers.
The other option converts the analog inputs to digital signals, passing them through the digital processors in the RSP-1582. This option allows all of the features to be active including bass management settings, crossovers, subwoofer outputs, EQ settings, etc. In this mode, you can select several surround modes including 2-CH Stereo, Dolby 3-Stereo, 5-CH Stereo, 7-CH Stereo modes. You can also use Dolby Pro Logic II or Pro Logic IIx surround or DTS Neo:6 surround modes.
To change the surround mode press the SUR + button on the remote control or front panel control to toggle through the available surround options. The PLCM button on the remote control will toggle between Pro Logic IIx Cinema (Movie), Music or Game.
NOTE: Not all surround modes are available for all surround source formats. The input source signal will determine the available surround options that can be selected.
Basic Operation
This section covers the basic operating controls of the RSP-1582 and the remote control.
Selecting Inputs
You can select any of the source inputs for listening and/or watching:VIDEO 1-8, CD, PHONO, XLR, MULTI INPUT, USB, PC-USB, BLUETOOTH or TUNER.
The source inputs can be customized using the INPUT SETUP menu to assign which HDMI input to use as the video source. Video 1-8 inputs can also be configured to accept any analog and digital audio sources. The default of audio source is set to HDMI Audio.
When you have configured the source input, you can use INPUT buttons to select the desired inputs.
- Press the INPUT buttons on the front panel [6] and use the navigation buttons to switch to the selected source input i.e. CD, Tuner, Video 1 etc. then press ENTER.
- Press the source input button on the remote control to select the desired source:
NOTE: In addition to selecting analog or digital signals, the configuration options also permit custom labeling for all inputs and selection of a default surround mode for each of video inputs.
USB/iPod Operation
iPod/iPhone Connection
- An iPod/iPhone can be connected using the proper USB cable to the USB front socket of the RSP-1582.
- The iPod/iPhone will stream a digital music signal to the unit. Music selection and playback control can be made from the iPod/iPhone.
- The iPod/iPhone screen will remain active while connected to the unit.
Playback Control Buttons ①
Transport controls are available from the remote control during playback including play, stop/pause, next track, previous track.
Bluetooth
Bluetooth Connection
The Bluetooth feature allows you to stream music wireless from your Bluetooth enabled device, i.e. mobile phones. Select the BLUETOOTH (BT) input on the RSP-1582. From your device (mobile phones etc.) activate Bluetooth and allow it to search for other Bluetooth devices. Select "Rotel RSP-1582" and connect to it. Once connected you can start streaming music to the RSP-1582.
NOTE: The RSP-1582 Bluetooth is APTX compatible. This enables you to stream music at lossless CD quality.
NOTE: Some Bluetooth devices may require you to establish connection again with the RSP-1582 if the unit was powered off. If this occurs, please go through the above steps to re-connect.
Rear PC-USB
Rear PC-USB Connection
The rear USB socket labeled PC-USB accepts a type B USB plug. This input accepts PCM audio signals sent from your computer up to 24 bits/192kHz resolution.
NOTE: You may need to install the USB driver located on the CD supplied with the RSP-1582 if your computer does not recognize the RSP-1582 as an audio driver after the cables have been connected.
NOTE: Mac computers do not require a driver.
Setup
The Rotel RSP-1582 features two types of information displays to help operate the system. The first consists of simple status displays that appear on the TV screen whenever primary settings (Volume, Input, etc.) are changed.
A more comprehensive ON-SCREEN DISPLAY (OSD) menu system is available at any time by pressing the SETUP button on the remote or the MENU button on the front panel. These OSD menus guide you through the configuration and setup of the RSP-1582. The settings made in the configuration process are memorized as default settings and need not be made again for normal operation of the unit.
The OSD menus can be configured to display several different languages. The default English version of all main menus are shown at the front of this manual. If your language is available, those menus will be shown in the instructions. If you would like to change from the default English language before proceeding, go to the instructions for the SYSTEM SETUP menu later in this manual. From this menu, you can change the language display.
Menu Basics
Navigation Buttons
The following remote control buttons are used to navigate the OSD menu system:
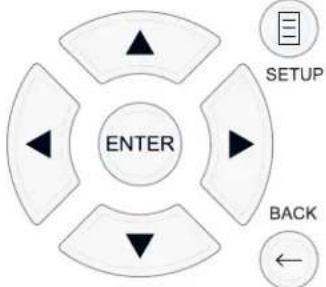
SETUP button: Press to display the MAIN MENU. If a menu is already visible, push this button to close the OSD and return to normal operation.
Up/Down buttons: Press to move up and down in the lists of menu items that appear on the OSD screens.
Left/Right buttons: Press to change the current settings for a selected menu item on OSD screens.
ENTER button: Press ENTER to confirm a setting.
BACK Button: Press BACK to go back to the previous menu.
Main Menu
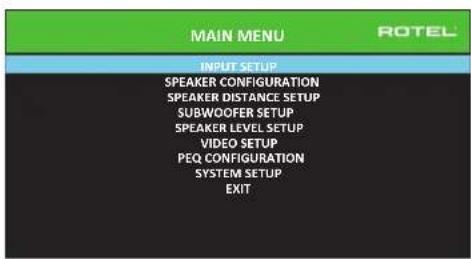
The MAIN MENU provides access to OSD screens for various configuration options. MAIN MENU is reached by pressing the SETUP button on the remote, or the MENU button on the front panel. To go to the desired menu, move the highlight using the Up/Down arrow buttons on the remote control or front panel and press the ENTER button on the remote control or front panel. Press the SETUP/MENU button again or select "EXIT" on the OSD to end setup and return to normal operation.
Configuring Inputs
A key step in setting up the unit, is to configure each source input using the INPUT SETUP screens. Configuring the inputs allows you to set defaults for a number of settings including the type of input connector, the desired surround mode, custom labels that appear in the displays when a source is selected, and many more. The following OSD menus are used to configure the inputs.
Input Setup
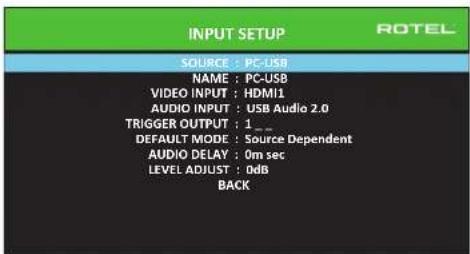
The INPUT SETUP menu configures the source inputs and is accessed from the MAIN menu. The screen provides the following options, selected by placing the highlight on the desired line using the Up/Down arrow buttons:
SOURCE: Changing this input allows you to select a specific input for configuring (CD, TUNER, VIDEO 1-8, USB, PC-USB, XLR, PHONO & MULTI INPUT, BLUETOOTH).
NAME: The name of the source can be customized. For exampleVIDEO1 can be named "TV" for easier reference. The default NAME is the same as the SOURCE. Place the highlight on this option and press ENTER on the remote control or front panel, it will then take you to the SOURCE NAME EDIT sub menu.
- Press the Left/Right arrow buttons on the remote control or front panel to change the first letter, scrolling through the list of available characters.
- Press the ENTER button on the remote control or front panel to confirm that letter and move to the next position.
- Repeat steps 1 and 2 until all eight characters have been completed. The final press of the ENTER button saves the new label. Or select the "←" button on the screen to confirm if you have less than eight characters to enter.
VIDEO INPUT: Selects the video source to be displayed on the TV monitor. Assign the input to a source component you have connected by selecting from HDMI 1-7 and HDMI Front. For audio only sources (such as a CD player), you would typically specify OFF so that no video is displayed. The video source can also be set to "LAST Video Source" so when switching to the specified Video input the previous Video source is not changed. This feature is useful if you want to change only the audio and keep watching whatever was the last displayed video source.
AUDIO INPUT: Assigns a physical input connection for the source displayed in the first line of the menu. Options include Optical 1-3, Coax 1-3, Analog 1-4, HDMI Audio, Tuner, Multi Input, XLR, Phono, CD, Bluetooth, USB or PC-USB.
NOTE: Optical, coaxial, CD and XLR inputs can be assigned to the CD input source or Video 1-8.
NOTE: Audio input is not available to the XLR, PHONO, TUNER, MULTI INPUT, BLUETOOTH or USB input source.
When selecting the input source for "PC-USB", AUDIO INPUT can be changed to "USB Audio 1.0" or "USB Audio 2.0". USB Audio Class 2.0 may require installation of the PC driver. For more information please see PC USB section in this manual.
TRIGGER OUTPUT: The RSP-1582 has three 12V trigger outputs (labeled 1 - 3) that supply a 12V DC signal to turn on other components as needed. This menu item turns on specific 12V trigger outputs whenever the indicated input source is selected. For example, configure the VIDEO 1 input to turn on the 12V trigger for your DVD player. Any combination of trigger outputs can be programmed for each source.
- Place the highlight on the option "TRIGGER OUTPUT" and press the ENTER button on the remote control or front panel.
- Press the Up/Down arrow buttons on the remote control or front panel to change the first position from blank to 1 (activating TRIGGER 1 for that source) and use to the Left/Right arrow buttons move to the next position.
- Repeat until all three positions are set as desired. The final press of the ENTER button confirms the selection.
NOTE: The 12V trigger output 1 is defaulted to be turned on for all input sources. You can turn it off by following the steps as above.
DEFAULT MODE: The DEFAULT MODE setting allows you to set a default surround sound mode for each source input. The default setting will be used unless the source material triggers automatic decoding of a particular type or unless the default setting is temporarily overridden by the front panel or remote surround mode buttons.
Options for the default surround modes are: Dolby PLLx, Dolby 3 Stereo, 5 channel Stereo, 7 channel Stereo, PCM 2 CH, DTS Neo:6, Analog Bypass (for analog input only) and Source Dependant.
NOTE: The following types of digital discs or source material are generally detected automatically and the proper decoding activated with no action or setting required: DTS, DTS-ES Matrix 6.1, DTS-ES Discrete 6.1, Dolby Digital, Dolby Digital Surround EX, Dolby Digital Plus, Dolby TrueHD, DTS-HD Master Audio, DTS-HD High Resolution Audio, Dolby Digital 2-channel, PCM 2-Channel, PCM 96kHz and MP3.
Since Dolby Digital 5.1 and DTS sources are detected and decoded automatically, the default setting typically tells the unit how to process a 2-channel stereo signal. For example, you might have your CD input default to 2-channel stereo, DVD and game console inputs default to Dolby Pro Logic II processing for matrix-encoded Dolby surround material, and TUNER input default to 5 Channel Stereo mode.
In some cases, the default setting can be manually overridden by the SUR + button on the remote control or front panel, or 2CH,PLCM,BYPASS buttons on the remote control. See the Manually Selecting Surround Modes section of this manual for more information on which settings can be overridden.
Two of the default surround mode settings available on this menu offer additional choices. Dolby Pro Logic II decoding offers a choice of Movie, Music or Game settings, etc. DTS Neo:6 decoding also offers a choice of CINEMA or MUSIC settings. When either Dolby Pro Logic II or DTS Neo:6 is selected with this menu item, the current setting choice will also be displayed on the DEFAULT MODE line. To change from MUSIC to other modes enter the sub-menu by pressing ENTER on the remote control or front panel.
AUDIO DELAY: Also known as "lip-sync" delay, this setting delays the audio signal for an input by the specified amount to match the video input. This feature can be useful when the video signal is delayed more than the audio signal as sometimes happens with upconverted digital TV processors.
The range of available settings is from 0 ms to 500 ms, in 10 ms. The setting is individually stored for each input and is the default Audio Delay each time that input is selected.
LEVEL ADJUST: Use this feature to set the volume level lower than the other inputs. This feature is useful for sources that are consistently higher in volume than other sources in the system.
Press the SETUP button on the remote control or MENU button on the front panel to exit the menu and return to normal operation.
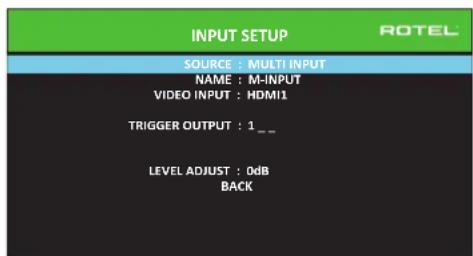
Multi Input Setup
When the MULTI INPUT source is selected on the INPUT SETUP menu, the available options change to reflect the fact that these inputs are direct analog inputs and bypass the unit's digital processing. The AUDIO INPUT, DEFAULT MODE and AUDIO DELAY options are not available since these functions are processed digitally and not available to the MULTI INPUT source.
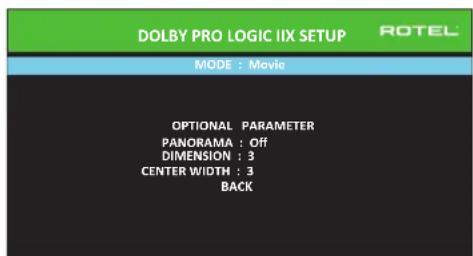
Dolby Pro Logic IIx
When "Dolby PLIIx" is selected as the default surround mode on the INPUT SETUP menu, there are additional settings and parameters to optimize the surround decoding for music or movie soundtracks. Dolby Pro Logic II uses
matrix decoding algorithms to derive a center channel and surround channels from 2-channel source material.
The MODE line of the Dolby Pro Logic IIx sub-menu selects "Movie", "Music", or "Game", modes for matrix decoding. Use the Left/Right arrow buttons to select a mode.
- Select "Movie" to optimize for Dolby Surround encoded movie soundtracks including increased surround separation and full-bandwidth surround channel frequency response.
- Select "Game" to optimize for Dolby Surround encoded video games.
- Select "Music" to optimize for musical recordings.
In addition to MODE, three optional parameters will be available on the OSD screen. Use the Up/Down arrow buttons on the remote control or front panel to select a parameter. Use the Left/Right arrow buttons to change the selected parameter as follows:
- PANorama: The Panorama option extends the front stereo image to include the surround speakers for a dramatic "wraparound" effect. The options are OFF or ON.
DIMENSION: The Dimension option allows you to gradually adjust the soundfield towards the front or towards the rear. There are seven incremental settings from 0 to 6. A setting of 0 shifts the soundfield towards the rear for maximum surround effect. A setting of 6 shifts the soundfield to the front for minimum surround effect. The default setting of 3 provides a "neutral" balance between the two extremes. - CENTER WIDTH: The Center Width option allows you to spread the signal intended for the center speaker to the left and right front speakers, widening the perceived soundfield. There are eight incremental settings from 0 to 7. With the setting of 0, there is no center width spreading and all of the center channel information is sent to the center speaker. The maximum setting of 7 shifts all of the center channel signal to the left and right speakers, essentially muting the center speaker and maximizing the soundfield width. Other settings provide incremental steps between the two extremes. The factory default is set to 3.
When you have completed all the desired adjustments, select "BACK" on the OSD or press the BACK button to return to the INPUT SETUP menu.
DTS Neo:6
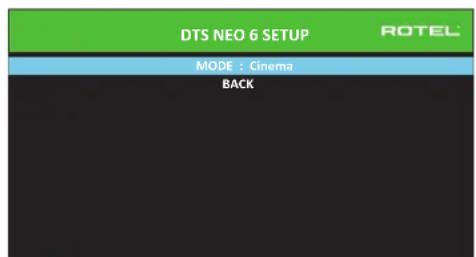
When "DTS Neo:6" is selected as the default surround mode on the INPUT SETUP menu, there are additional option settings and parameters available to optimize the surround decoding for various types of recordings, music or movie soundtracks. DTS Neo:6 uses matrix decoding algorithms to derive a center channel and surround channels from 2-channel source material.
In DTS Neo:6 mode, there will only be one choice available on the submenu: selecting Cinema or Music mode. Use the Left/Right arrow buttons on the remote control or front panel to change the settings.
- Select "Cinema" to optimize the DTS Neo:6 decoding for movie soundtracks.
- Select "Music" to optimize the DTS Neo:6 decoding for musical recordings.
When you have completed the setting, select "BACK" on the OSD or press the BACK button to return to the INPUT SETUP menu.
Configuring Speakers and Audio
This section of the setup process covers items concerning audio reproduction such as the number of speakers, bass management including subwoofer crossovers, establishing equal output levels for all channels, delay settings, and parametric EQ.
Understanding Speaker Configuration
Home theater systems vary in the number of speakers and the bass capabilities of those speakers. This processor offers surround modes tailored to systems with various numbers of speakers and bass management features which send bass information to the speaker(s) best able to handle it - subwoofer and/or large speakers. For optimum performance, you must tell the processor the number of speakers in your system and how bass should be distributed among them.
The following configuration instructions refer to LARGE and SMALL speakers, referring more to their desired bass configuration than their physical size. Specifically, use the LARGE setting for speakers that you want to play deep bass signals. Use the SMALL designation for speakers that would benefit from having their bass sent to more capable speakers. The bass management system redirects bass information away from all SMALL speakers and sends it to the LARGE speakers and/or the SUBWOOFER. It may be useful to think of LARGE as "full-range" and SMALL as "high-pass filtered."
- Five LARGE speakers and subwoofer: This system requires no bass redirection. All five speakers play the normal bass recorded in their respective channels. The subwoofer plays the normal channel bass. Meanwhile the normal bass places higher demands on the capabilities of the other speakers and the amplifiers driving them.
LARGE front, center, surround speakers, no subwoofer: The normal bass from the front, center, and surround channels is played in its respective speakers. -
All SMALL speakers and subwoofer: The normal bass from all channels is redirected to the subwoofer. The subwoofer handles ALL of the bass in the system. This configuration provides several benefits: deep bass is played by the speaker most suited to do so, the main speakers may play louder with less distortion, and the need for amplifier power is reduced. This configuration should be used with bookshelf-size or smaller main speakers. It should also be considered in some cases with floorstanding front speakers. This configuration is advantageous when driving the system with moderate power amplifiers.
-
LARGE front speakers, SMALL center and surround speakers, and a subwoofer: The normal bass from the SMALL center and surround speakers is redirected to the LARGE front speakers and the subwoofer. The LARGE front speakers play their own normal bass plus the redirected bass from the SMALL speakers. The subwoofer plays the redirected bass from all of the other channels. This might be an appropriate configuration with a pair of very capable front speakers driven by a large power amplifier. A potential disadvantage with mixed LARGE and SMALL configurations is that the bass response may not be as consistent from channel to channel as it might be with the all SMALL configuration.
NOTE: As an alternative configuration with a satellite/subwoofer package as the front speakers, follow the speaker manufacturer's instructions, connecting the high-level inputs of the powered subwoofer directly to the front speaker outputs of your amplifier and connecting the satellites to the subwoofer's own crossover. In this arrangement, the speakers would be classified as LARGE and the subwoofer setting would be OFF for all surround modes. No information is lost during playback because the system redirects bass information to the front LARGE speakers. While this configuration ensures proper satellite speaker operation by using the speaker's own crossovers, it has some disadvantages in terms of system calibration and would generally not be the preferred configuration.
Speaker Configuration
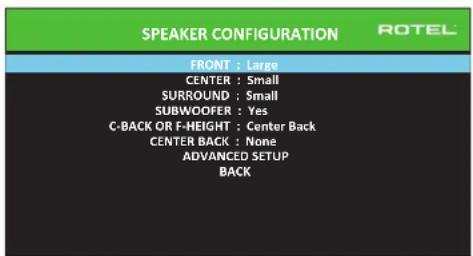
The SPEAKER CONFIGURATION menu is used to configure the RSP-1582 for use with your specific loudspeakers and to determine the bass management configuration as described in the previous overview. The menu is accessed from the MAIN menu.
The following speaker options are available:
FRONT SPEAKERS (Small/Large): Use the "Large" setting to have the front speakers play low bass (full-range). Use the "Small" setting to redirect normal bass away from these speakers to a subwoofer (high-pass filtered).
CENTER SPEAKER(S) (Large/Small/None): Select the "Large" setting (not available with SMALL front speakers) to have the center speaker play low bass (full-range). Select the "Small" setting if your center channel speaker has limited low frequency capability, or if you prefer that the bass be sent to the subwoofer (high-pass). Select the "None" setting if your system does not have a center channel speaker (the surround modes will automatically divide all center channel information equally between the two front speakers, creating a phantom center channel).
SURROUND SPEAKERS (Large/Small/None): Select the "Large" setting (not available with SMALL front speakers) to have the surround speakers play low bass (full-range). If your rear speakers have limited bass capability or if you would prefer that the bass go to a subwoofer, select the "Small" setting (high-pass). If your system has no rear surround speakers, select the "None" setting (surround channels are added to the front speakers so none of the recording is lost).
SUBWOOFER (Yes/Max/No): The "Yes" setting is the standard setting if your system has a subwoofer. If your system does not have a subwoofer, select "No". Select the "Max" setting for maximum bass output with normal bass being duplicated by both the subwoofer and any LARGE speaker in the system.
C-BACK OR F-HEIGHT: The RSP-1582 can connect center back speakers or front height speakers. Use this option to select Center Back speakers or Front Vertical Height speakers in your system.
CENTER BACK (1Large/1Small/2Large/2Small/None): Some systems have one or two additional center back surround speakers. Select the "Large" setting (not available with SMALL front and surround speakers) to have your center back speaker(s) play low bass. Use "1Large" if you have one center back speaker (6.1) or "2Large" (7.1) if you have two center back speakers (7.1). If your center back speakers have limited bass capability or if you would prefer that the bass go to a subwoofer, use the "Small" setting ("1Small" for one speaker, "2Small" for two speakers). If your system has no center back speakers, select the "None" setting. With center back speakers, Dolby Digital EX, DTS-ES, Dolby Pro Logic II, DTS Neo:6 or other decoders will provide center back signals for any surround mode.
FRONT HEIGHT (Large/Small/None): This setting will be available if the unit is set to F-HEIGHT speakers in a Pro Logic IIz setup. Select the "Large" setting (not available with SMALL front and surround speakers) to have your vertical height speakers play low bass. If you would prefer that the bass go to a subwoofer, use the "Small" setting.
ADVANCED: Speaker configuration is generally a global setting for all surround modes and need only be done once. However, for special circumstances, the processor provides the option of setting the speaker configuration independently for each surround mode. Select the ADVANCED SETUP line on the menu and press ENTER to go to the ADVANCED SPEAKER SETUP menu described in the following section.
To change a setting on the SPEAKER CONFIGURATION menu, place the highlight on the desired line using the Up/Down arrow buttons and use the Left/Right arrow buttons to toggle through the available settings. To return to the MAIN menu, select "BACK" on the OSD and press the ENTER button, or press the BACK button. Press the SETUP/MENU button, or select "EXIT" on the OSD to exit setup and return to normal operation.
Advanced Speaker Setup
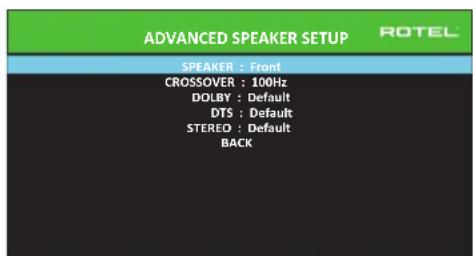
In most cases, the standard speaker configuration described above is a global setting and can be used for all surround modes. However, the processor provides the capability to customize these settings for three different modes: Dolby, DTS, and Stereo. For example, you could set up the Dolby and DTS modes for 5.1 channel sound, while the Stereo mode changes to a 2-speaker setup with or without a subwoofer. In addition, the ADVANCED SPEAKER SETUP allows you to select a customized high-pass crossover frequency for the front, center, surround, surround back speakers, and the subwoofer.
NOTE: In most systems, the default settings on this menu will provide the most predictable results and most users will not need to change any settings. You should fully understand bass management and have a specific reason for needing a custom configuration before changing these settings. Otherwise, skip to the following topic, SUBWOOFER SETUP.
The available settings on the ADVANCED SPEAKER SETUP menu are as follows:
SPEAKER (Front/Center/Surround/Center back/Front Height/Subwoofer): Select the set of speakers to be configured with custom settings.
NOTE: "Front Height" will appear as an option when you select "Front Height" in the C-Back or F-Height setting of SPEAKER SETUP menu and is not available for CROSSOVER, DOLBY, DTS or STEREO setting.
CROSSOVER (40Hz/50Hz/60Hz/70Hz/80Hz/90Hz/100Hz/120Hz/150Hz /200Hz/OFF): This setting for the high-pass and low-pass crossover point is only active for SMALL speakers settings and the subwoofer. When you first access the ADVANCED SPEAKER SETUP menu, the current crossover point will be shown on this line which is set to "100Hz" as the factory default. Change the value of this line only if you want the current speaker to have a different crossover point. This setting ONLY affects redirected bass.
NOTE: The "OFF" setting (available only for the subwoofer) sends a full-range signal to your subwoofer so that you can use its built-in low-pass filter.
NOTE: When a speaker is set to "Large" on the SPEAKER SETUP menu or on this menu, the crossover setting has no effect since, by definition, a LARGE speaker plays full-range with no bass redirection to the subwoofer and no crossover. Likewise, the "OFF" setting for the subwoofer crossover is not available for SMALL speakers, since SMALL means that the speaker will redirect its bass below a given crossover point to the subwoofer. In addition, the CROSSOVER setting is not available for the MULTI INPUT.
DOLBY (Default/Large/Small/None): Sets the current speaker (shown in the first line) to Large, Small, or None, overriding the setting from the SPEAKER SETUP menu. This setting will ONLY take effect with Dolby Digital or Dolby Pro Logic II decoding. If you want to use the speaker size setting set in the SPEAKER SETUP menu, select "Default". The "None" setting is not available for FRONT speakers.
DTS (Default/Large/Small/None): The same options described for Dolby above, except these settings ONLY take effect with DTS and DTS Neo:6 decoding.
STEREO (Default/Large/Small/None): The same options described for Dolby above, except these settings ONLY take effect in STEREO surround mode.
For the subwoofer, the above selections for DOLBY, DTS, and STEREO become "Yes/No/Default". They will be set to "Default" if the front speakers are set to "Default", and they would be set to "Yes" if the front speakers are set to "Small".
NOTE: When the front speakers are set to use the default settings on the ADVANCED SPEAKER SETUP menu, the specific "Large/Small/ None" settings of DOLBY, DTS or STEREO are not available for the other speakers. These speakers will use the default settings.
Subwoofer Setup
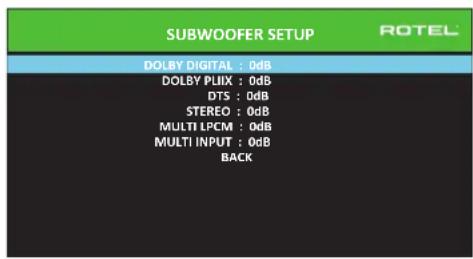
These six lines allow you to override the subwoofer level setting as determined in the Speaker Level Setup menu (see next section) for each specific surround mode.
DOLBY DIGITAL:
DOLBY PLIIx:
DTS:
STEREO:
MULTI LPCM:
MULTI INPUT:
When going to the SUBWOOFER SETUP menu from the MAIN menu, the current surround mode is automatically highlighted. Use the Up/Down arrow buttons to move to the specific surround mode and use the Left/Right arrow buttons to adjust the subwoofer level for the current surround mode. The options are a range of adjustments from -9 dB to +9 dB and MAX (+10 dB). A setting of 0 dB means that the specified surround mode will use the master subwoofer level. Any other setting is an offset to the master setting. For example, an adjustment of -2 dB for a particular surround mode means that the subwoofer level will be 2 dB quieter than the master subwoofer level when that surround mode is selected. Use these subwoofer level settings to adjust the relative bass output of various surround modes. Changing the master subwoofer level will increase or decrease the level for all surround modes.
We recommend starting with the settings for all surround modes at the default 0 dB setting during the speaker level calibration of the system and for a period of familiarization after that. As you listen to a variety of source material over time, you may notice that certain surround modes consistently produce too much or too little bass from the subwoofer. If so, then use these menu settings to customize each surround mode. In general, if the master subwoofer level is set properly (i.e. not too loud), individual settings for each surround mode should not be necessary.
To return to the main menu select "BACK" on the OSD or push the BACK button on the remote control or front panel.
Speaker Level Setup
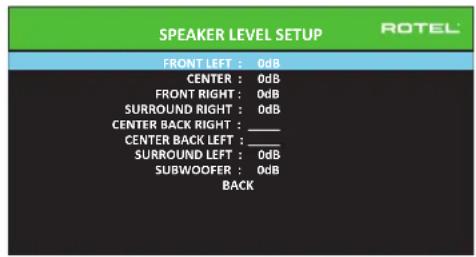
NOTE: If you have configured your system to use two center back speakers, there will be an additional line in the menu, giving you the ability to independently adjust the CENTER BACK LEFT and CENTER BACK RIGHT speakers. If you have selected Front Height speakers in Speaker Configuration, the CENTER BACK speakers option will change to FRONT HEIGHT.
This menu uses filtered pink noise test tones to set equal volume levels for all speakers (FRONT LEFT, CENTER, FRONT RIGHT, SURROUND RIGHT, CENTER BACK/FRONT HEIGHT RIGHT, CENTER BACK/FRONT HEIGHT LEFT, SURROUND LEFT and SUBWOOFER) to ensure proper surround sound reproduction. Setting the output levels using the test procedure provides the most accurate adjustment so that digital surround sound material will be reproduced as it was intended and is a critical step in calibrating the system.
To access this menu and perform the test tone calibration, you can be in any surround mode except BYPASS with any input except MULTI INPUT. Enter the OSD menu system and select SPEAKER LEVEL SETUP from the MAIN MENU to reach this screen.
When you enter the SPEAKER LEVEL SETUP menu, you will hear a test tone coming from the highlighted speaker. Highlight different speakers by moving the cursor to the desired line using the Up/Down arrow buttons. The test tone will shift accordingly to the selected speaker.
Seated in the normal listening location, shift the test tone to the various speakers. Using the one speaker as a reference, listen for any speakers that are noticeably louder or quieter. If so, adjust that speaker's levels up or down (in 0.5 dB increments) using the Left/Right arrow buttons. Continue switching among the speakers and adjusting until all speakers are the same volume.
To return to the MAIN menu, select "BACK" on the OSD or press the BACK button. Press the SETUP/MENU button or select "EXIT" on the OSD to exit setup and return to normal operation.
Calibration with an SPL meter:
Calibrating the system with an SPL (Sound Pressure Level) meter, rather than by ear, provides more precise results and improves the system's performance significantly. Inexpensive SPL meters are widely available and the procedure is quick and easy.
Both Dolby and DTS specify a standard calibration level for all theaters to ensure that soundtracks can be played at the volume level intended by the director of the film. This reference level should result in spoken dialog played at a realistic level for normal speech with the loudest peaks in any single channel at about 105 dB. The RSP-1582's test tones are generated at a precise level (-30 dBfs) relative to the loudest possible digitally recorded sound. At the Dolby or DTS reference level, these test tones should produce a 75 dB reading on an SPL meter.
Set the meter to its 70 dB dial setting with SLOW response and C-weighting, held away from your body at your listening position (mounting the SPL meter on a camera tripod makes this easier). You can point the SPL meter at each speaker as it is being measured; however, positioning the meter in a fixed position pointing at the ceiling is easier and probably produces more consistent results.
Increase the master volume control on the unit until the meter reads 75dB (+5dB on the meter scale) when playing the test tone through one of the front speakers. Then, use the individual channel adjustments on the SPEAKER LEVEL SETUP menu to adjust each of the individual speakers, including the subwoofer, to the same 75dB on the SPL meter.
NOTE: Due to meter weighting curves and room effects, the actual level of the subwoofer may be slightly higher than you measure. To compensate, Dolby suggests setting the subwoofer several dB lower when calibrating with an SPL meter (i.e. set the subwoofer to read 72 dB on the meter instead of 75 dB). Ultimately, the proper subwoofer level must be determined by personal taste and some listeners prefer to set it above 75 dB for film soundtracks. Exaggerated bass effects come at the expense of proper blending with the main speakers and place stress on the subwoofer and its amplifier. If you can localize bass from the subwoofer, the subwoofer level may be too high. Music can be useful for fine-tuning the subwoofer level as excessive bass is readily apparent. The proper setting will generally work well for music and movie soundtracks.
Remember the setting of the master volume control used during this calibration. To play a Dolby Digital or DTS soundtrack at the reference volume level, simply return to that volume setting. Note that most home theater listeners find this setting to be excessively loud. Let your own ears be the judge for deciding how loud to playback movie soundtracks and adjust the master volume control accordingly. Regardless of your listening levels, using an SPL meter to calibrate equal levels for all speakers in the system is recommended.
Speaker and Delay/Distance Setup
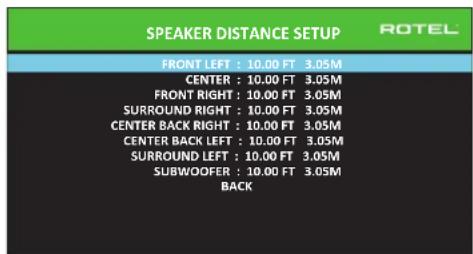
The SPEAKER DISTANCE SETUP menu, which is reached from the MAIN menu, allows you to set the delay for individual speakers. This ensures that the sound from each speaker arrives simultaneously at the listening position, even when the speakers are not all placed at equal distances from the listener. Increase the delay to speakers located closer to the seating area and decrease the delay to speakers located farther from the seating area.
This Rotel processor makes setting the delay time for each speaker very easy. Simply measure the distance (in feet or meters) from your seating position to each speaker in your system. Set the measured distance in the line for each speaker. The menu provides a line for each speaker configured in your system and gives a range of settings up to 33 feet (10.6 meters) in 0.25 foot (0.075m) increments with each increment equivalent to an additional delay of 0.25ms .
To change a setting, place the highlight on the desired line using the Up/Down arrow buttons and use the Left/Right arrow buttons to increase or decrease the delay. To return to the MAIN menu, press the BACK button or select "BACK" on the OSD. Press the SETUP/MENU button or select "EXIT" on the OSD to exit setup and return to normal operation.
Miscellaneous Settings
System Setup
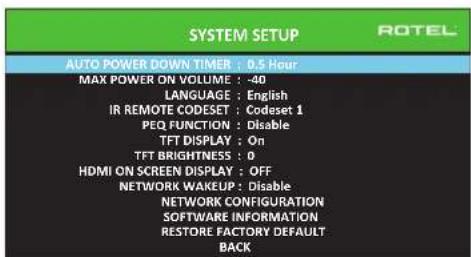
This SYSTEM SETUP menu, reached from the MAIN menu, provides access to several miscellaneous settings as follows:
AUTO POWER DOWN TIMER: Set the amount of time the units stays powered on while idle. The RSP-1582 will automatically go to standby mode if unused for the specified timer period.
MAX POWER ON VOLUME: Specifies a maximum volume level to be used each time the unit powered on, between -70 dB to -20 dB, in 1 dB increments.
LANGUAGE: Selects a language for the On Screen Display.
IR REMOTE CODESET: The RSP-1582 has two IR codesets and can be changed in the event there is a conflict of IR codes with other Rotal products.
NOTE: After changing the IR REMOTE CODESET the remote must also be changed to continue using the remote control. For more information see the REMOTE CONTROL OVERVIEW section of this manual.
PEQ FUNCTION: Turns the PEQ function On or Off.
TFT DISPLAY: This turns the front TFT display On or Off. It can also be set to show temporary volume and all the temporary OSD displays, such as the type of signal detected when the input is switched.
TFT BRIGHTNESS: Sets the brightness of the front TFT display. Settings range from -10 to +10.
HDMI ON SCREEN DISPLAY: Sets the information shown on the main OSD display. Settings are "Off", "Temporary Volume" or "Temporary All".
NETWORK WAKEUP: Enable or Disable power on and power off via the network connection.
NETWORK CONFIGURATION: Sets the network configuration for the unit. In most systems, set the IP ADDRESS MODE to DHCP. This setting will allow your router to assign an IP address to the RSP-1582 automatically. If your network uses fixed IP addresses, set the IP ADDRESS MODE to Static. A fixed or STATIC IP address requires manually entering the IP Address, Subnet Mask, Gateway, and DNS in the IP ADDRESS CONFIGURATION sub menu.
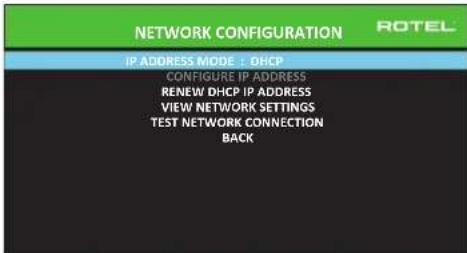
SOFTWARE INFORMATION: Displays the current software installed in the unit. It shows the MAIN, DSP and STANDBY software versions. There is also an option to check for software updates. This feature lets the unit search for software updates on the Internet. The network needs to be properly configured. Alternatively, you can load the software through the front USB socket. For more information on the software update process please contact your authorized Rotel dealer.
RESTORE FACTORY DEFAULT: This option sets the unit back to the original setting as when it left the factory. All user setting will be erased.
NOTE: Use caution when resetting the RSP-1582 to factory defaults as all use configured options will be erased and reset to original factory settings.
Video Setup
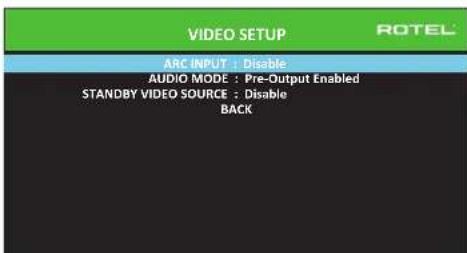
The VIDEO SETUP menu provides configuration of the HDMI output for high-definition video display devices. See the VIDEO INPUTS & OUTPUTS section of this manual.
ARC INPUT: Options are "Disable" or "Enable". You can set the HDMI output to use the ARC HDMI output to your TV. Connect the RSP-1582 HDMI ARC enabled output to your TV's ARC enabled input.
AUDIO MODE: Options are "HDMI Audio Output Only" or "Pre-Output Enabled". In "HDMI Audio Output Only" setting, the HDMI audio input is sent to the TV via the HDMI cable, the audio will be from the TV's speakers. Set to "Pre-Output Enabled" mode to play the HDMI audio input through the RSP-1582.
NOTE: When configured for "HDMI Audio Output Only" no HDMI audio input will be sent from the RSP-1582 RCA or XLR outputs. HDMI inputs sound is only available on the attached TV display.
STANDBY VIDEO SOURCE: Options are "Disable", "HDMI 1-7", "HDMI Front", or "Last". Set this to the source that you would normally use without the audio going through the RSP-1582. In standby mode, the RSP-1582 will pass the HDMI Video and Audio signals to the TV.
Press the BACK button or select "BACK" on the OSD to exit theVIDEO SETUP Menu and return to the main menu.
NOTE: When ARC is enabled, the Rotel unit will play the audio from the TV. The RSP-1582 volume can be controlled by the TV's remote control.
PEQ Configuration
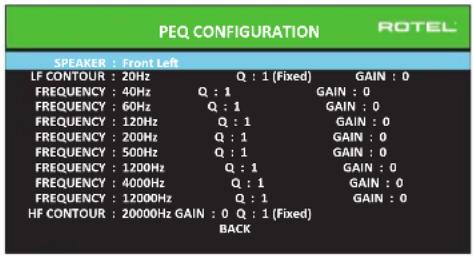
The PEQ CONFIGURATION menu allows you to enter EQ values for 10 bands as shown. PEQ setup requires advanced knowledge and equipment for measuring the frequency response of the room and performance of the speakers. To properly configure the EQ you should be familiar with the tools and equipment needed. Typically these settings are only changed by professional installers to ensure optimal performance of the RSP-1582.
Use the navigations buttons to highlight the frequency: Push the ENTER button on the remote control or front panel to access and make changes. Use the Up/Down arrow buttons to change the value. Use the Left/Right arrow buttons to move to the next section on the line. Press ENTER again to confirm settings and allow navigation to the next PEQ BAND.
FREQUENCY: There are 10 bands available and the frequency can be changed between 10 - 24kHz as below.
BAND 1 LF CONTOUR: 10Hz - 40Hz,1Hz Step Default 20Hz
BAND 2 Freq: 20Hz - 44Hz,1Hz Step Default 40Hz
BAND 3 Freq: 45Hz - 89Hz,1Hz Step Default 60Hz
BAND 4 Freq: 90Hz - 180Hz 10Hz Step Default 120Hz
BAND 5 Freq: 190Hz -350Hz, 10Hz Step Default 200Hz
BAND6Freq:360Hz-690Hz,10HzStep Default500Hz
BAND7Freq:700Hz-1900Hz,100HzStep Default1.2kHz
BAND 8 Freq: 2kHz - 7.78kHz 100Hz Step Default 4kHz
BAND 9 Freq: 8kHz - 20kHz, 100Hz Step Default 12kHz
BAND 10 HF CONTOUR: 8kHz - 24kHz 100Hz Step Default 20kHz
Q: The Q value can be adjusted between 1 to 10.
NOTE: Q for LF CONTOUR and HF CONTOUR are "1" and fixed.
GAIN: The gain can be set between -12 to +2.
To exit this menu press the BACK button or select "BACK" on the OSD then press the SETUP/MENU button to return to normal operations.
NOTE: Q in EQ value relates to the bandwidth of the filter. The higher the value, the narrower the bandwidth.
Troubleshooting
Most difficulties in audio systems are the result of incorrect connections, or improper control settings. If you encounter problems, isolate the problem area, check the control settings, determine the cause of the fault and make the necessary changes. If you are unable to get sound from the unit, refer to the suggestions for the following conditions:
The unit does not turn on
Make sure the power cord is plugged into the rear panel and a AC outlet.
Make sure the rear panel POWER switch is in the ON position.
No sound from any input
Make sure that MUTING is off and VOLUME is turned up.
Make sure that preamp outputs are connected to a power amplifier and that the amplifier is turned on.
Make sure source inputs are connected and configured correctly.
- Check that the setting for AUDIO MODE in the VIDEO SETUP menu is set to "Pre-Out Enable".
No sound from digital sources
- Make sure that digital input connector is assigned to the proper source input and that the source input is configured to use the digital input rather than an analog input.
- Check the configuration of the digital input source player to ensure that the digital output is activated.
No sound from some speakers
- Check all power amp and speaker connections.
- Check Speaker Configuration settings in the Setup menus.
No Video Output
Make sure that the TV monitor is connected properly and check the input assignments.
- Check the source input and TV output resolution are compatible. An HDMI 1080p source can only be sent to a 1080p compliant TV monitor.
HDMI cables must be 5 meters or less in length.
- If watching 3D source, make sure the display is 3D enabled.
Video and Audio do not match.
- Check that the proper video source is selected for each input.
- Check that the group delay (lip-synch) setting is not mis-adjusted.
Clicking or popping sounds when switching inputs
- The unit uses relay switching to preserve maximum sound quality. The mechanical clicking of the relays is normal.
- Switching between HDMI sources may cause delays as HDMI two way communications "handshake" must be established between the source and display. The time required for the handshake varies depending on the attached equipment.
Controls do not operate
- Make sure that fresh batteries are installed in the remote.
- Make sure that the IR sensor on the front panel is not blocked. Aim the remote control at the sensor.
- Make sure the sensor is not receiving strong IR light (sunlight, halogen lighting, etc.).
- Unplug the unit from the AC outlet, wait 30 seconds, and plug it back to reset.
- Confirm the IR Codeset set in the remote control and RSP-1582 are matched to either Codeset 1 or Codeset 2.
Specifications
Audio
Total Harmonic Distortion < 0.005%
Intermodulation Distortion (60 Hz: 7 kHz, 4:1) < 0.005%
Frequency Response
Analog Bypass 10 Hz - 100k Hz, ± 1.5 dB
Digital Input 10 Hz - 20k Hz, ± 0.3 dB
Signal to Noise Ratio (A-weighted)
Analog Bypass 112 dB
Digital Input 112 dB
Input Sensitivity/Impedance
Line Level 250mV / 100k ohms
Balance Level 500 mV/100k ohms
Phono Level 3.2 mV/47k ohms
Preamp Output Level
Line Level 1.0 V
Balance Level 2.0 V
Channel Separation (at 10k Hz) >75 dB
Digital Audio LPCM [up to 192kHz, 24-bit]
Dolby
Digital, Dolby Digital EX
© TrueHD,
© Digital Plus,
"Made for iPod," and "Made for iPhone," means that an electronic accessory has been designed to connect specifically to iPod or iPhone, respectively, and has been certified by the developer to meet Apple performance standards. Apple is not responsible for the operation of this device or its compliance with safety and regulatory standards. Please note that the use of this accessory with iPod, or iPhone may affect wireless performance.
iPhone, iPod, iPod classic, iPod nano, and iPod touch are trademarks of Apple Inc., registered in the U.S. and other countries.
Made for

iPod

iPhone
Video
Input Resolutions
480i/576i, 480p/576p, 720p,
1080i, 1080p, 1080p 24Hz
3D, 4K, UHD
Output Resolution 480i/576i, 480p/576p, 720p
1080i, 1080p, 1080p 24Hz
3D, 4K, UHD
Color Space Support
sRGB,YCbCr4:2:2,YCbCr4:4:4
Deep Color Support
24-bit, 30-bit, 36-bit
HDMI Inputs/Outputs
Version 1.4, support up to 4K
resolution pass-through and
Audio Return Channel.
General
Power Consumption
45 watts
0.5 watt (standby)
120 volts, 60Hz (USA version)
Power Requirements (AC)
230 volts, 50Hz (EC version)
BTU 137 BTU/h
Dimension (W× H× D)
17x7
431× 188× 416.8mm
2/5 x 16 2/s in
Front Panel Height
4U/177mm/7in
Weight 12 kg / 26.46 lbs
When sizing openings in custom cabinets, measure the unit to be installed and/or allow at least 1 mm clearance on all sides for unit to unit tolerances. All specifications are accurate at the time of printing. Rotel reserves the right to make improvements without notice.
Rotel and the Rotel Hifi logo are registered trademarks of The Rotel Co., Ltd. Tokyo, Japan.
Sommaire
This Class B digital apparatus complies with Canadian ICES-003.
CharACTERISTQUES Audio
DTS Digital SurroundTM
DTS Digital Surround 96/24TM
DTS Digital Surround ESTM
DTS Digital Surround ES 96/24TM
DTS-HD High Resolution AudioTM
DTS-HD Master AudioTM.
Vidéo
480i/576i,480p/576p,720p,
1080i, 1080p, 1080p 24Hz
3D,4K,UHD
480i/576i,480p/576p,720p,
1080i, 1080p, 1080p 24Hz
3D,4K,UHD
Compatibility Color Space
sRGB,YCbCr4:2:2,YCbCr4:4:4
Compatibility Deep Color
24-bit, 30-bit, 36-bit
Entres/sorties HDM Version 1.4, support up to 4K
resolution pass-through and
Audio Return Channel.
Generolites
Consummationelectrice
45 watts
veille Standby 0,5 watt
120 volts, 60 Hz (version U.S.)
230 volts, 50 Hz (version CE)
BTU 137 BTU/h
431× 188× 416.8m
17x7 2/5x162/5in
Hauteur face avant
4U/177 mm/7 in
Poids [net]
12 kg/26.46 lbs
This Class B digital apparatus complies with Canadian ICES-003.
Linker Audiokanal = weiBe Cinch-Buchse
Rechter Audiokanal = rote Cinch-Buchse
Audioeingge ANALOG 1-4 [26]
Digital Audio LPCM [up to 192kHz, 24-bit]
Dolby
Dolby
Dolby
DTS Digital SurroundTM
DTS Digital Surround 96 / 24^TM
DTS Digital Surround ES^TM
DTS Digital Surround ES 96/24TM
DTS-HD High Resolution AudioTM.
DTS Digital SurroundTM
DTS-HD Master Audio
^22 Digital, Dolby ^23 Digital EX
Digital Plus,
TrueHD.
Video
Eingangsauflösungen
480i/576i, 480p/576p, 720p,
1080i, 1080p, 1080p 24Hz, 3D, 4K UHD
480i/576i, 480p/576p, 720p,
Ausgangsauflösungen
1080i, 1080p, 1080p 24Hz, 3D, 4K UHD
sRGB,YCbCr 4:2:2,YCbCr 4:4:4
Farbraum
24-bit, 30-bit, 36-bit
Deep Color
This Class B digital apparatus complies with Canadian ICES-003.
Ajustes Varios (Miscellaneous)
ResoluciOn de Salida 480i/576i,480p/576p,720p, 1080i,1080p,1080p 24Hz, 3D,4K UHD
Compatibilidad Espacio de Color sRGB, YCbCr 4:2:2, YCbCr 4:4:4
Compatibilidad Deep Colour 24-bit, 30-bit, 36-bit
Surroundfunctions 109
This Class B digital apparatus complies with Canadian ICES-003.
DTS Digital SurroundTM,
DTS Digital Surround 96/24TM,
DTS Digital Surround ESTM,
DTS Digital Surround ES 96/24TM
DTS-HD High Resolution AudioTM. DTS-HD Master Audio
Video
Resolutions ingangen 1080i, 1080p, 1080p 24Hz, 3D, 4K UHD
480i/576i, 480p/576p, 720p,
480i/576i, 480p/576p, 720p
This Class B digital apparatus complies with Canadian ICES-003.
A这对于 the Internet, this is a great opportunity for researchers to use the Internet to search for information on a variety of topics. For example, the Internet can be used to search for news and information about politics, medicine, and health.
Altri collegamenti
Tasti SUB, CTR, REAR
DTS Digital SurroundTM
DTS Digital Surround 96/24TM
DTS Digital Surround ES™
DTS Digital Surround ES 96/24TM
DTS-HD High Resolution AudioTM.
DTS-HD Master Audio
Digital, Dolby Digital EX
TrueHD,
Digital Plus,
TM
Video
480i/576i, 480p/576p, 720p,
1080i, 1080p, 1080p 24Hz
3D,4K
480i/576i, 480p/576p, 720p,
sRGB,YCbCr4:2:2,YCbCr4:4:4
24-bit, 30-bit, 36-bit
This Class B digital apparatus complies with Canadian ICES-003.
BYPASS: Kopplar ur all DSP-processing.
DTS Digital SurroundTM
DTS Digital Surround 96/24TM
DTS Digital Surround ES^TM
DTS Digital Surround ES 96/24TM
DTS-HD High Resolution AudioTM.
DTS-HD Master Audio TM.
480i/576i,480p/576p,720p,
1080i, 1080p, 1080p 24Hz
3D,4K,UHD
480i/576i, 480p/576p, 720p,
1080i, 1080p, 1080p 24Hz
3D, 4K, UHD
sRGB,YCbCr4:2:2,YCbCr4:4:4
24-bit, 30-bit, 36-bit
IpoHTaTe Bce HnHCTpyKnn nepeed noCoeAneHHeMe m 3Knlyyataaue KOMNOHEHa.
CoxpaHnte 3TO pykoBQCTBO, Yo6bI bbl MOHN o6paTbCA K3TNM HnCTpyKuHM nO 6e30NaCHOCTN.
06paaiTe BHMAMHe HBCnpDyPpeKdHnHmOpMaIoo 6e3oNaCHOCTB3HXHactaJIeHHnx Ha cAmOM H3dJIIN. CneYrTe BcEM HNCTpykUIM No kJpytaun.
OuHauTe KOpIyC ToIbKo npn NmOOn cyXo TpRKn nnBnBnEcoom.
He nnonb3yIte daHHoe ycTpoINCTBO 6bnm BObl.
BbdoJXbI oecneuHTb MHmHym 10cm Cbo6oHoro npocTpaHCTBa BOKpy yctpoHCTBA.
He ctabte yctpoctbno hKpobatb, DnBah, KOBepnn anahorWHy noBepxHObTb, KOtopa moKet nepekpbItb BEHTNIAUONHHble OTBepCTNa. Ecn yctpoctbO pa3MeueHO B KHNKHOM Nn CTehHom ukafo, TaDOnKHa 6b1b BeHTNIAUIN DnDOJKNHO OXnJaedHn.
IepKTe KOMHOENT BOTdANeHNNOT6aTapei, KaIOPMΦePOB, neey Hn HIO6oIpyoI annapatpybI, KOtOpa IpoN3BODNT TENO.
IPEIOCTEPEKHEH: CetBcPa3bEmHa3aHeNnaneHnpeHn3aHaeHn46bIcTPOoOTcoeHNHeH yctpoiCTBaO t3JIeKTPueckoCtH. YcTPOIcTBO DOnJXHO o6ecneuHBaTB cBo6OaNbIOCTyn K 3aHeNn aHeN, yTO6bI cETBO Ka6en MoKHO b6IbO b6IcTPO BbIDepHyTB.
CetbeoHa npaxKeHHe, KKTOpOmynoCoeHHaTcannapat, DNOKHOooTBCTBOBaTb Tpe6OBAHm, yka3aHHbMa 3aDne HaneHn annapata. (CUSA: 120 B, 60 Tg, EC 230 B, 50 Tg)
No.0eHNHnTe KOMHOENTK NHTAOKU po3EKe TOnbKO npN NMOUN CTeBOrO WHypa H3 KOMNekTA NOCTABKN, INR ERO TOHORO 3KBNAeHTA. He NepeENbBAte NoctabneMbl Unyp. NOnpH3OBAHbI WTEKEP IMeET Dba HOJEBBX KOHTAKa, OINH H3 KOTOPBX UInpe DpyrTO. 3aEMNIOUI WTEKEP IMeET Dba HOJEBBX KOHTAKa H TpeTNI 3aEMNIOUI WtBpb. OHN o6ecTeuBAOT BAsy63oNaCHOCTb. He OTKa3bIABaTEc bOT Mep 63oNaCHCTn, PpeOCTABNEIMN 3aEMNIOHM NINNPOH3OBAHbIM WTEKEPOM. EcNI NOCTABNeMbl WTEKEP He NOnxOJNT K Bawei PO3EKe, 6oPaTIeBC K 3NeKTPkUy dIra ZAMEnbY cTapeBWe Po3ETKn. He NcONb3yTe YdNHInhTeNB pTHAHN.
OCHOBHoi tKepe CTeBOro UHypa BnIeTcA OTKNIOUaembIM O TAnnapata IINONHO OTKNIOUeHHN 3NJIENIOT NITAOUeCtN, OCHOBHoi tKepe CTeBOro KABeR NCIeYET OTCOeHNHTb O tCEB0 pO3eTK NEPeMHORo TOKa. CBeTOIOHbH INDkaKATOP KJyUeR oPeKHMa He 6yETr rOpetb, NOk3BaIBa, VTO CteBoi HYP oTKNIOUeHOMy UCTpoCTBy DOnJKeH 6bItb ObceNeueh CBO6DHBIO DCtyn.
He npoknaabaiTe cetBoi uHpy Ta, rne O MoKer 6bIb pa3aBneH, nepeKaT, ckpyen, noDBeRHT B03deCTBnIO TENNA INN NOBpeJekn KaKM-nIO6o CNOcO6OM. 06paauTe ocO6oe BHMaHHe Na cetBoi uHpy B6NI3u TEkepa NTAM, rne O BXoUIT B3aNDIO NaHEb yCTpoHCTBa.
Cetebow Hnyp cneyet OTOcoeHnTb OTcEHNO pO3ETK BO BpEMr rpo3bl nHm yCTPOCTBO OCTabIeH HeCNIOB3yeMbIM dNHTeBHOE BpEMr.
NcnoB3yIeToIbko npHnAdneKHeOHTu, yKa3aHHbIe npOn3BDoHTeMe.
IcnoB3yTe TOnbKO TeEeKKy, NoCTABKy, CToIky, KpOHTeH HnN NOnKy CHTeMbI, peKOMeHDoBaHHo KOMNaHHe Rotel. ByIte OctoPozHbI npN nepeMeueHn yCTpoHCTBa Ha NODTabke Hn CToIke BO I36ekaHne paHHeN oT OPOKnDbHaHna.
HemeJeHHo IpeKpaTHe MCNOb3OBAHHe KOMnHOHeTa H nepeaIte Ha o6cneObaHHe m/nn 06cnyKbAHMe KBAnmPobAHNo peMOTHNo opraH3auee en:
Cetebo uHyp uHn uTekep 6bl nOBpeKdH.
BHytpbycpoiCtBa yponnnn npdmTeblnnnpoannnnKkoctb.
- YcTpoNCTBOIO6bIBaI NOIdoJXdEm.
YcTpoiCTBO demoHcTpnpyET npn3HaKn HeOpMaIbHo pa6Otbl.
YcTpoIcTBO yPOHnnn nn NOBpeHNn NIO6bIM dpyrrm cnoocobm.
Batape, yctahOBnHbIe B nybl T, Hne DoJIKNbI NOJBepraTbCa BO3dCTBIO N3NIuHero Tenna, TaKOrO KAc COJIHeHbI CBET, OOrbH t.I.
IPEIOCTEPEXEHNE: IaBbIy BbIKNoaTeIb NITAHnHa PaCNONoxHn Ha 3aDHeN aHenn. DOnKeH 6bItb Obecneueh CbO6oDbH bOcTyn K TNaBHOMy BbIKNoaTeIb NITAHn.
O kompann Rotel
NCTOPIN HAWEI KOMNAHNI Hauana 60nee 50 net Haad.3a npoewne DecTnNEITMbl NOLyUHNI COTHN Harpa3a HAI NPOyKTb IN CdeJAM CACTINBBIMCOTNH TBICHIIOJE, KOtOpBIE OTHOCAITcK CBOIM pa3BneHnM BNOJIHE cepbe3HO-TAK KE,KAK B!
Komnain Rote1 6bIa ochoBHa cemEChBOM, yBa CTpactk My3bke npOnda nctpeMJIeHne co3daBaTb hi-fi KOMIOHeHtBi 6eCKOMPomCCHORKaueCTBa.3aMHOrne rOdbI eTa ctpactb HcyTb He Ocna5a, nNo ceN deHb o6uaa celb -BbIyNcKaTb PPOyKTB NCKIOHHTeBHOJ CEHHOCTN DnaydNOoHOB NIO6HTeMeMy3bIK, He3aBNCMO OT INx fHNaHCOBix BO3MOXHOCTe, pa3deneTcB CEMNCOTpyDnKAMn Rotel.
HJKeHepBo Rotel pa6oTaK KaEiHaKaOMHa, npocnyuBnA u TuaTeIbHo DOBDA KAKDbl HOBbl npOyKT Do TaKOrO yPOBnCOBepWeHCTBa, KORa OH 6ydtYOBnTBPoRbT bX CTpOIM My3bikAbHbM CTaHdaptAm. ImpeoCTabHeHa CBO6Da Bb6opa KOMnLeKtyUOxN No BCMeMy Mpy, UTo6bl cDenaTb Annapat KaM OMOH NOUWe. BepoTHO, Bbl CMoxTe HaITN B HauNX annapatax OTbOpBHe KOHNecATOpBn3 BeNKo6pnTAHIN n IepMaHH, NOnynpOboNDnKnN 3rNoHnN n CIIa, ONaKO TopoONaJIbNbHbIe CInOBBe TpaHcFopMaTObpblMb n3rotABmBaem HA co6CTBeHHom 3abOde ROTEL.
BceMb3a60TUMc6OxpaHeOkpykaIOeIcpebl.No Mepe TOro,Kak Bce 60bnbe 3NEKTPoHHbIX yCTpoHCTB BMpe BbyNcKaETCA,anocne OKOHHaHN Cpoka Cnykbblb6paCbBAeTcra,ndn pOn3BOJNTeIaOC6eHHO BaxHo npn KOHCTpynpoBaHNI PpOyKTOB cEaTb BCE BO3MOXHO,HTo6bl OH HAcHIN MNHMalbHbYuep6Zemne HNCTOCHNKAM BObl.
MbB KOMnAHm Rotel, ropIMCBA CBOHM BknaDom B 06uee DeNo. Bo-nerbblx, Mbl cokpatNIu COpejXaHHe CBnUa C BCOe3NeKTPoHnke, 3a cuETNCnoNb3ObaHn npinor, OTBeauOJero Tpe6oBaHnAm ROHS. Hauu INxKeHepbl NOctOHHO CTpeMATc yIyUnTb K.I.D. 6LOKOB NITAHn, 6e3 yUepe6a DnK aueCTBa 3ByaHnA. HaxoRb B pexime OxuaHnA standby, npodKytBI Rote INcNoJIb3yIOT MNImalbHoe KOInueCTBO 3Heprn, 4TO6bl yIOBnE TBOpntB rIo6aJIbHbIM Tpe6oBaHnAm Ha nTope6leHne B pexime OxuaHnA.
Фбрпа Ретел Тадкve BHCNT CBOB BKNaD BУNYUsheHne OxpaHbI OkpykaIOSeCpeDbIpyTEMNOCTOHHOROCOBepHECTBOBaHnI pOn3BOdCTBeHHbIX NpOceCCOB,ДелЯ IX BCE 60lee YNCTbIMN I 3eNEHbIMN.
BceMb,coTpduHnK KOMnAHmROTEL,6naorapnM Bac 3a noknykTOTO mDJI. MbyybepeHb, yTO OHO DoCTaBNT Bam MHORoNET yDOBOJbCTBnA.
Izomobleno no nuenzuu Dolby Laboratories. Dolby, Pro Logic u cumboi doouzo D -mo mopoeble mapku Dolby Laboratories. Copyright 1995-2005. Bce npaba zauuuehbl.
I3zomoehe no nueneu u no namehmam CUSA #s: 5,451,942; 5,956,674; 5,974,380; 5,978,762; 6,226,616; 6,487,535; 7,212,872; 7,333,929; 7,392,195; 7,272,567 u npyzumu amepukahckumu u bcemuphmu namehmamu. DTS, DTSHD u cumbDTS -mo zapeucmpupobahnbie mopzobbe mapku, DTS-HD Master Audio u lozomun DTS -mo mopzobbe mapku DTS, Inc. Ppodykm kknouaem npozpammhoe oecneuehne. DTS, Inc. Bce npaba zauuienb.
B 3omnpoueccope ucnolb3yemc mexhno2a3uumb om konupobua, komopaa zauuueha namehmamu CUA u dpyzmu 3akohamu o 3aume umennnekmyalbhou co6cmbeHocmu npunaDnkaaar Rovi Corporation. O6pamhbu unxunupunu u dusaccemblupoabue 3anpeueno.
Первные shaу
Blaqadapm Bac 3a npno6peTHe npoeccopaokpykaohjoero 3byka Rotel RSP1582. Ipoceccop RSP-1582 -3TOIIOHOyHKUOHaNbHbN AV KOHTpOlbHbN CEHTP ynpablenraaynIO N BIDeO dna aHAnorOBbIX uNΦpObIX KOMNoHETOB -ICTOHKnOB cHnAIOB. OH OcuyectBnEETuΦpOByo 06pa6Otky 6onBwOrO Hcna φOpMaTob, BkIoUaDolby Surround°, Dolby Digital' n DTS'.
Функи Виdeo
KOMmytaHDMIJIaIuΦpObIXBnDEocnHaNoB BnIoTbdo pa3peSeHn4K.
-ПиИнмаertлобь teTmblBndeocnHanob:480i,480p/576p,720p,1080i, 1080p,1080p24Iu4K.
- BbdaetHDMI bIneocnHan c nIObIM pa3peSeHnem (480i, 480p/576p, 720p, 1080i, 1080p, 1080p 24TcN 4K) dna corlaocabnA c HDMI coBMeCTmblmn DncnneMn npoeKTopamn.
Aydno yhknnn
Metod6aHnCupOBaHHoDm3aHaRoTeLcoTetaTcOBepeHCTBOBAAHpy pa3bOkyIpaTbI,ITaTeIbHbNOrOTbOpTeIaeIeNo3ByuAHIOu6BnPHeIe NcIbTaHINIPOCJyUWBHMeDNPipeBOxCdHO3ByaHInHAdExKHOCTN.
- Pexim aHaIorOBO 06XoJa dIy YnCToro 2-KaHaIbHOrO cTepeo 6e3 cnΦpOBoi 06pa6OTKn.
LcnpobBie n anaHOrOBBe aynIO BXOdbI N BbIXOdbI, B TOM cncne Coax, Optical, RCA n Balanced XLR.
- IMeetc7.1-kaHaJIbHbI aHaIIOrObBi BXoD.Inra COBMeCTINMbIX INTOUHNKOB CnIHAnOB.
Функшн Okржkaioцero 3byka
- ABTomatuecheKoe deokupobAHne Dolby Digital dan zanuei Dolby Digital 2.0, Dolby Digital 5.1, Dolby Digital Surround EX, Dolby TrueHD u Dolby Digital Plus.
ДекорPORBAHne DolbyPro LogicIix n DolbyPro LogicIlz (dЯ 6.1- n7.1-KaHaJIbHBxCnCTeM)c ynyuHHeHHIMpa3deJeHHemKaHaIOB n dnaJanaOHOm YacToTdЯ3aIncEe, KoDnPoBaHHbIXNo MaTpUHoi CnCTeMe DolbySurround.MoKTe6bITbONTHm3NPOBaHnMy3bKaJIbHBix Music n KInHO Cinema nctouHKnOB, Pro Logicn nnirp-Games. - АВТOMATЧЕСКOE декоровашиддлллг DT5* 5.1, DTS-ES Matrix 6.1, DTS-ES Discrete 6.1, DTS 96/24, DTS-ES 96/24 digital, DTS-HD™ Master Audio n DTS-HD™ High Resolution.
- PekimbDTS* Neo:6Surround nIaI3BneHnOkpykaUxN KaHAnOB dIra cnCTem c 5.1,6.1 n7.1 kaHaIamu n3 2-KaHaIbHoro cTepeo nn 3aIncen C MaTpnuHbIM KoInpoBaHnEM. MoXe 6bITb ONTmM3npoBaH dIra My3blKaJIbHbIX N KINHO NCTOUYHKOB.
- Pexmmb Okpykaioeero 3Byka nla Bocponn3BeDeHnMHOroKaHaBHoro ayno Ha 2-KaHaJIbHbIX n 3-KaHaJIbHbIX CNTEmax.
KaHAn Bo3BpaTayDnO CunHaoB AuidO Rorurn Channel (ARC) no3BoJIoUoIe 6bpa6aTbBAtB 3ByK C TeJeBn3opa B npoueccope RSP-1582 npu npoknIOeHHNo HDMI.
Дугпeneункции
Друньбая сntema AkpaHbIX MeHIO (OSD) c nporpaMMpyEmbIMNMeHaMn ДЯ BCex BXOJOB.
Bb6op 3b6KOB npn HacTpoKe 3KpaHbIX MeHIO (OSD).
Bo3MOxHocTb 6OBHObHeHnI npOrpAMMHorO oecneYeHnI JyDyux anrpeiIOB uepe3 nHTepHET coeHNHeHnE Ha 3aHHe I naHn I nnuepe3 nopT USB.
Ha3haaembIe 12-BoIbTOBbIe TpIITrepHbIe 3aIyckAIOUne BbIXOJIbI ydaHHeHO BRIOeHry YcINITeNE MoOIOCTN dpyrNX KOMIOHETOB.
PacnaKobka
Octopoxho Bbtaunite yctpoictBO n3 ynakOBKn. Haidnte npbl Ty npyrne npnaHnckno. CoxpaHnte KOp6ky, t.K. OHa 3aunTt UcTpoictBO, eCNI Bbl 6ynde nepebo3ntb nn Bo3Ba4uatab ero IraTexnueckoro 0cbnykbaHna
Pa3meeHne
UctahOBHTyeyCTPOIcTBHO TaTBeDIO,ropn3OHTaIbHoi NOBepxHocTN BdaNOT COJIHeHOro CBeta,TeIIa,BaIaN Bn6paun.
YunbaiBe BC pa3MeBpy yctpoiCTBa. Y6eNTecb, yTO noJIka, uKaΦ nI IN CTOnKa MoKeT bIepJAtb Bec RSP-1582.
BoBpMaHbNo pa6oTb, yCTpoiCTBO bIeJIeTIe TEnIO. He 3akpbBaIte BHTNIAUHHbIX OTBepCTNI. OCTaBbTe MNHMym 10 cm CBO6OdHoro npocTaHCTBA BOKpy yCTpoiCTBa. Pn yCTAHOBKe B IkaFy, y6eINTEcb, tO B HEM cyueCTByet HEo6XoUMma BEHTNIAUria.
He ctabte npyrme kcmnoheTb mnpedMeTb cbepxHa yctpoictBO.He donyckaTe nonadHnJIIOB KNDKoCTN BHTpb yctpoiCTBa.
0630p coeHHeHn
KakdbnN3 KOMNOHETOB -NCTOCHIKOB BAwei CNTeMe NOcDOHNEETCA K BXoam npn NOMOUs CTaHapTHoro aHaONORoBO ayINO Ka6eRA UNI 6aANCHoro XLR, INNKe npn NOMOUs uNΦpOBoro Ka6eHDMI nIN BvJeO c ONUHOHBM UΦpOBbM ayINO Ka6eEM (KOAKCuaNbHbIM INN ONTtueckm).
PIMMEYAHNE: OopmabI OKpykaOuoe 3ya, noo6bIe Dolby Digital u DTS, rAIOmcr zuofoobimu foopamamu, u ycmpoCmBO moKem ux dekodupoBam, molko Kozda noaemc zufoPoou BxodHou cuZhan. Io mou npuune, bAM cedyem BCE2da nocoeDnarmb zufoPoBBe bXoDBI baweo npouzpbIbAmena Blu-ray unu DVD K npouecopy, ucnonb3yra nu6 HDMI, nu6o onmuueckue, nu6o KoakcuanbIbe xoDbI.
BbIXOHBie ayDIO CnHnbl npoueccopa RSP-1582 nepeaOTcHa noNDxOJHne UcINNTeM MoHocTn Pn NOMOUs CTaNapTHbX ayDIO KA6eNei RCA nn 6aANChbX XLR cayNo. BuJeocnHnbl ot npoueccopa RSP-1582 nepeaOTc H MaMOHTOp INTEpEey HDMI.
Kpome 3Toro, npoecccop imeet BxOdbi MULTI INPUT dnia KOMnoHeHa - nCTouHnka, KOtobni obopyoBaH co6CTbeHHbIM dekoepom Okpykaioeero 3Byka, aTaKke BxOdbi dyaIydaIeHHoro IK-daTHnka n12-BonbToBbIe TprrRepHbIe BixOdbi Rotei Link.
PIMMEYAHNE: He nooklouaume hukakou u3 komnohehmocumembI b cemebyo pozemky nepemehzo moka noka He bblonHume BCE coedunenra dojxhbm obaom. Cmahdapm Ha uufpoob ayduo
unmepfeuc S/PDIF mpe6yem umnedanca 75 OM u ece xopoouue uufpoobbe Kaebenu coombemcmbyom 3momy mpe6obahu. HE uonb3yume obuHne MeK6Nochhe ayduo Kaebenu BMECTO uufpoobx Ka6eneu. ObuHne MeK6Nochhe ayduo Kaebenu nponycmaim makue cuHaBn, Ho ux o2paHuenna nonoc nponyckahua yxywhum kauecmeo 3Eyka.
Pnncnoh3oBaHm aHaanorOBbIX coeHNHeH y6eINTeCb, YTO bVIOJ IeBoro n npaBOrO kaHana LEFT n RIGHT coeHNHeH c npabInbHbIMRCA pa3beMaMn. Bce pa3bEmbl TnA RCA y 30rO pOueccoppa MeIOT cTAnapThbIe CBeta:
JIeBbI KaHaN ayDnO Left: 6enbl RCA pa3bEm
IIpaBbI KaHaN ayDnO Right: KpaChbI RCA pa3bEm
IPMMEAHHE:Kaxdbu bOxhoHou cmoHuk doJhen 6bmb npabunbHOCKoHfUypupoban npu nomou MeHIO INPUT SETUP kpaHNO MeHOCucmemb. Mby peKomeHdyem nepexod 3mo MeHIO nocne noDcoedunHeKaXdozo ucmOuhuka, ymo6bckoHfUypupobam e2o noBaueMyKeenaHIO.10pOboHyu unOpmauio cm.e MeHIO INPUTSETUP 8pa3dene «Haempouka»
HDMI BxOdbI N BblOdbI
3Tn coeHHeHn HcNoJIb3yIOCTaI nIPOKIIUeHHe BNDEOCrHAnOB KnpOeCCopy n O Tpoecoppa. Cm. pa3JeN «BbInOnHeHne coeHNHeHn» IINoYueHn KOHKpeTHbIX INHCTpykUnI dN KOMNOHeHTa KaKdOrO TnPa.
3aDneBnDoe BxOdbHDMIN1-7
BxodbHDMIO6ecneuBAOT pa3nUHbIe uOphiPoBBe BnDcEO coEHNHeHnIa INCNOLbOBAHn BMeCTe C KOMNoHEHTAMK, KOtOpBE IMeOT BbxoHbHDMl. CoeINHeHnHDMI nepeAoiT BnDEOCURHaJIb BO BCEx fOpMaTx, BKIOUaY 3D, 1080p/24Hz n 4K. DAnHHaPeaINzauHDMI noIDepkXBaET ayINO cIRHaJIb, nn OTdeNbHoe ayINO coEINHeHne OTKOMNoHrTa HDMl.
ΦoHTaNbHbI BuaeO BxoJ HDMI IN
OdHn n3 BxOoB HDMI pa3MeueH ha nepeHne naHenn dna o6nereHnn noKnIOUeHm. NcnoNb3yTe 3TO pTaBem HDMI nnpTaNHBx INCTOHNKOB nn IaTex yCTPOINCTB, KOToPbI He 6dyT NOCoEINHeHb IOCTOHNHO.
BbIXOdbHDMI Ha TV MOHTop 14
ДаHDMI BndeObixOda nepejaot BndeocnHaBbICOKOr pa3peuHnaBaT TB-MOnHT npapAnenbNo. BxOaBb HDMI moryt pepeaBaT bNdeocnHaBb NaTeNeBn3OpbblcOKoRa pa3peuHnTV 2D (480p/576p,720p,1080i,1080p nn 4K)nn 3D (do 1080p/24Hz).
IPIMUEAHHE: Imeemcra 8ba bixoda HDMHa 3a3neu naheu, Ha komopbte bidaemc oun u mom je cuzhan. Ho monbko oun u3 hux bidaem kpanhoe meho ha nooknouenbu meeubop.
ИЗ dBух HDMI bixoob Tolyko OINH DMI ochaeн Функиь Bo3Bpata ayno cunhana ARC (Audio Return Channel) nIMeet o6o3aueheNe «ARC» na pa3bemom HDMI. Cm. Pa3dien «Hactpoikn BIneo» B MeHIO VIDEO SETUP nnyueyen 60lee noDpo6HnHfOpmaun.
IPIMMEYAHNE: YBauezo TB Moem 6bmb 6oee yem oduHDMI exod. He BCE u3 Hux ochauaomc fynKuee ARC. Ntomomy bibepume mom exod HDMI ha meenuope, komopbu obecneum ARC. Ha hem donxha 6bmb Mapkupoeka «ARC» pdo m pa3bemOM.
ДононтеловифорmaцьnoHDMIВидаьвхадм:
Bce noCoeHHeHbIe no HDMl yctpoiCTBa doJXhbl 6bITb coBMecTmbl c3aunToIOT konipobAHnH HDCP,TO6bl npabuHbHO BbIaBaTb n3o6paKeHH.
-Ayduo cnHaIbI, nonyaemblyepe3HDMIOntnctOuHnka,6dyT 06pa6aTaBbTaBcNpOeCCopOM BbIaBaTbCrype3RCA mXLR bixOdbI. IIN peepaun ayduo ciHaHaHaNoDcoEInHeHHbTV npoeccop RSP- 1582doJKeH6bItyCTAHOBEnBnoLoJeHne"HDMI Audio Output Only" B MeHO VIDEO SETUP kKaPAHHOro MeHO OSD.
-Пи ИСпОЛБЗOBAHИОбONX ВьХОДВ HDMI OДНОВРЕмHo,Ha HIX 6удET yCTaHOBJIeNoOДнАКOBоe pa3peSeHHe.3To 6уdET caMOe Hn3Koe pa3peSeHHe N3 dByx NODKIIQUHbIX MOHITOpbl.
Ayno BXOdbI N BblXOdbI
3To npocccop Rotel oecneuBaet kak aHaIorOBbI, TaK n cHpObIe ayDIO coEINHeHn.
BxobjPhono
Papa (nebbl/npabbl) ananorobbx aydno BXoDB RCA npedna3nuehbl dnil noKlouehn nponrpbateBnHnOBbx nlaactINOK. EcnTOT npoirpbyaTeNB IMeET Klemmy 3a3emHeN, coeHNHTe e CBNTOBOI Klemmoi, MapKnpoBaHHO "GND" cIeBa ot uIΦpObIx BXoDB.
BxOdbI JnTIOhepa-Tuner [zE]
Papa (neBbI/npabB) ananorobbix aynIO BXoOB RCA npedHa3NaeHbI dnnnoKIOUeHNAfAM/FM TIOhepa.
BxOaBcCD 20
Papa (IeBb/npab) ananorobbx aydno BxodoRCA npednaHaenbbx dny noKnouhen CD-nponrpblbaTeia.
AnalorobbIe aynno BxoDbI ANALOG 1-4 [26]
YeIbpe npbl RCA BxOIOB (ANALOG 1-4) o6ecneuBAOT noKIOUeHn IaHaNoRObbix ayDnO CunHAnOB JeBOr/npaBOrO KaHApOB ot YeTbIpe DOnONHHTbHbIX NCTOCHIKOB.
BaIaHcHbIe ayDnO BxoDbI BALANCED
Napa (neBb/npaBb) ananorobbix ayno BxodOB Ha XLR pa3bemax npedHa3haeHHbIX nna noKnIOueHnKOMNOHETOB c 6anaHCbIMn aynO BVxoamn XLR.
BxOaIbI MULTI[2e]
Ha6op BxOIOB RCA, KOTOpbIe npHIMaIOT Do 7.1 KaHAnOB aHAnoRbIX CnHAnOB ot DVD-A nIN SACD npOnrpbIbATEN.CyueCTByIOT BXObln pPoHTaNbHbx IeBoro n npaboro KaHAnOB FRONT L & R, cHtpaIbHorO KaHana Center, CaByfepa SUB, 60Kobix IeBoro n npaboro KaHAnOB REAR L& R, nDbYtbInOBbx CEHTpaIbHix KaHAnOB CENTER BACK 1 & 2 nnn Jx BepxHnx fpoHTaNbHix KaHAnOB FRONT VERTICAL HEIGHT L & R B cnCTeme Dolby PLlZ.
3nBxoDbI 60xOaT BcIO cHPOpOByIO 6bpa6oTKy B npoceCope HnapBaJIHO Tc HENOCpeDCTBHeHHo Ha peYJrTOp rPOMKoCTN N BblXOdbI PpeDbaPntbHorO yCNNTeR.
BbIXOdbI npedBaupntelbHoro ycnHtTeJra
Ipynnna n3 anahlorobbix aydno BbIXoOB Ha RCA nepedaet BbIXoHbIe cnHaIbI IInHeHOrO yPbONn pOuceccopa RSP-1582 hA BHeUHne YcUNITeIN n AKTINBhIE ca6Byepebl. YpOBeHb 3TNx BbIXoOB perynuPyETC npn NOMOUI opraHa ynpaBNeHn rPOMKocTbIO pOceccopa RSP-1582. 3TN DecaTb pa3beMoB
06ecneuBAOT BxOJdIa: pOHTaJIbHbIX JeBOrO n npaBOrO KaHaIOB FRONT L & R, cHTpaJIbHbIX KaHaIOB CENTER 1 & 2, 6OKOBbIX JeBOrO n npaBOrO KaHaIOB SURROUND (REAR) L & R, TblIObBix CEHTpaJIbHbIX KaHaIOB 1 n 2 CENTER BACK CB1 & CB2 (nIIJ KepxHnx JpOHTaJIbHbIX KaHaIOB FRONT VERTICAL HEIGHT L & R) n ca6ByfepoB 1 n 2 SUBWOOFER 1 & 2.
BaJahChhble ayDIO BbIXObl BALANCED
Tpynna n3 DeBtN 6aAanhbix ayDnO BxIOOB HA XLR nepeaet 6aAChnbie BxIOHbIe CnHbIy IInHeHoro yPBOHn HA BHeHNHe ycINNTEnn u AKTNbHbIe ca6Byepebl. YpOBeHb 3TxN BxIOOB perynipyeTc npn NOMoOn opraHa ynpabne Hn rPOMKocbIpoueccopa RSP-1582. 3Tu DeBtPa3beMoob o6ecneuBAOT BxIObI py: pOHTaJIbHbIX neBoro n npABORO KaHANOB FRONT L & R, zENTpaJIbHOrO KaHAna CENTER 1, 60KOBbIX neBoro n npABORO KaHANOB SURROUND (REAR) L & R, TbIIOBbIX ceHTpaJIbHbIX KaHANOB 1 n 2 CENTER BACK CB1 & CB2 (wnJKe bepXHHx fpoHTaJIbHbIX KaHANOB FRONT VERTICAL HEIGHT L & R) n c6Byepeob 1 n 2 SUBWOOFER 1 & 2.
IPIMUEAHHE: He nooknouaume odnoepemehno RCA u XLR pa3bembl K odHomuy momy jye yculumenlo.
PIMMEYAHNE: B 3abucumocmu om konfuzypauuu baweu cucmembu, bmyoeme ucnonb3obamb Hekomopbte unu BCE coedunehur. Hanpumep, ecnu y bac umeemcra ounu uehmpalnbHk KaHAN, nooceouhume e0K bixodyCENTER 1.Ecu y bac monbko ounmblnoouehmpalnbHk KaHAN, nooceouhume e0K bixody CB1.
UuΦpObBie BXoDb1
Ppoeccop nnn pecnBep npHHMaet uHpObIe BxOhbIe cHnhbl ot Taknx nctouHKnOB, kak CD-npOnrPbIbATEJI, cnTHNKOBIE npHmHKN npOnrPbIbATEJ DVD. BcTpoEHhBI B yCTPOIcTBo uHpOBo npocccop DSP pacno3Haet npabunbHbe qactOTb BblOpKN. PndepXnBaOTcaCTOTb Bnnot do 192 Kt.
PIMMEYAHNE: Lqfpobbe bXodb nooepkuaom Ka 2-KaHahBhoe cmepeo, mak u MHOZOKAHNBhe ayduo cuHaBly. Ppu uCnoJb3OeaHuu qfpobzo bxoda npouecop DSP dyem deKoDupobamb bxohn nomok daHHbx, BKnIOyA Dolby Digital unu DTS.
Ha 3aHnei nanei npoecoppa yctahOBnHeb 6 uΦpObIX BxOOB, TPN KOAKCNJIbHbIX IN TPI ONTNUeCKNX. 3TN uΦpObBIE BXOdbMORYb6bITb HA3NaueHb HJIO6bIe NCTOCHNK VIDEO 1-8 pni NMOUIN EKpaHHOrO MeHIO INPUT SETUP BO BpeM IPOcEpybl HAcTPOKn.HanPIMep, Bbl MOKeTe Ha3NaHTb uΦpOBOB BXOHDHpoBa3bem COAXIAL 1 Ha NCTOCHNK VIDEO 1 uΦpOBOB BXOD OPTICAL 2 HA NCTOCHNK VIDEO 3. IIO yMOJIaHnIO, BXoDHBMN NCTOCHNKAMn DnB XoOBVIDEO 1-8 cONHfynrpynpoBaHb NOI HDMI Audio.
Ha 3aBoJe ayuMo BxO CD cKoHfynpyupOBaH KaK CD (aHAnoroby RCA), Ho ero moXHO CMeHHTb Ha Ha XLR, Coax 1-3 mnn Optical 1-3.
BxoJ PC-USB
CM.puc.5
CoeHNHe 3OT BxOJ c NOMOuBIO npNarAeMOro USB Ka6eIc nOpTOM USB Ha BaWEM KOMNbIoTepe.
RSP-1582 noDpeKnBaet kAK USB Audio Class 1.0, TAK n USB Audio Class 2.0 pexmbl. Kombltoepbl noD Windows He Tpe6yot yctahOBKn dpaiBepa dny USB Audio Class 1.0 n noDpeKnBAOT Bocpon3BedeHne aydno Bnnot do qactotbl 96 KtU. Da6pnHna YCTAHOBKa NOymuHaHIO - USB Audio Class 2.0.
Дя耗TOуTO6bBOCNoIb3OBAtbcnpMvyIeCTBAMNUSB Audio Class 2.0 cnoIepKko1o192KU,BAMnOTpe6yeTcyaTahOBNTdpaIbep noD Windows,KOTOpBnaHaxOuITcHaCDnICKe,pPnIraaEMOMKRSP-1582.HyKHo TaKke CMeHHTbpeKIMBOcPOn3BeDeHneRSP-1582HaUSB Audio Class 2.0 cnEduoumMobpAOM
XOTaObIuHO He cyueCTByET BIneO coeHHeHH dI pyonrPbIbAteJI KOMnAKTdNcKOB, RSP-1582 MoKet H3NaHTb DpyroB BIneObxoHa CD mXLR BxO. BApMaHTb Ira Bb6opa: HDM1 1-8 (Front), Last Video Source (nocneHnn BIneO nCTouHnK) mIIN off). BIneO BxOHa HDM1 Ha3NaueH Ha CD n XLR bKaueCTBe HAcTPOKn No yMOnUaHnIO.
Pyka VOLUME u Khonka VOLUME UP/DOWN
KhoNKn VOLUME UP/DOWN Ha nyIbTe Dn u 6oJIbwa pyka peryIaTopa HnpeJeHn naneHn o6ceNeuBAOT OCHOBHe ynpaBHeHne rPOMKocTbIO, peryInpura BbxOHDHO npOBeHb BCex KaHaIOB ONDOBpeMeHNO.
Khonka DISPLAY (DISP) 2
HaximaiTe Ha 3Ty KhoNkY, YTo6bI OTo6paXeHnE TeKyuJero o6bema.
Khoinka MENU/SETUP
KhoNk Habraaun N Bb6opa Enter ①
Haxmnte Ha KhoNky MENU/SETUP nla BbIbOda 3KpaHoro MeHIO OSD n HDMI BbIXOda,Ha KOtOpBbY BbIOuNTcR OSD. nra OTKIOUeHn MeHO haxmnte KhoNky MENU/SETUP eue pa3. NcnoJIb3yIte KhoNkn Habirauu UP/DOWN/LEFT/RIGHT n ENTER nla DocTyBa p3aunHbe MeHO.
Khoika MUTE 13
HaxmTe KhONky MUTE Ha nepeHne nahennnnynte Ny oyn pa3, yTo6bI OTKIOUHTb 3Byk. Ha ekpaH e H aicnnee nepeHne nahen noaBNTc HINikauu. HaxmTe KhoNky eue pa3, YTo6bI BocCTaHOBt npedbyuune ypOBH rPOMKOCTN.
KhoNkINPUT
KhoNkINPUT Ha nepeHne NaHeM MoKHO NcNoIb3ObaT Dnla BbIOda Ha
DncPme MeHIO BbIbopa NCTOCHNKOB. 3aTe BMxOHD NCTOCHNK MOKHO MEHrTB,
BbIbpaeraero C nOMoBIO KHOJOK HABIRaCm IN NOITBePjKeHn KHOJIKO
ENTER Ha nepeHne NaHei. KHOKN BxOoB HA PyIbTe NcNoIb3yOTc TaKke
dI npAmoro BbIbopa BXoHBix NCTOCHNKOB.
Khonka SUR+ 116
KhONKnSUR+ha nyIbTe nII nepeDneH naHEnnncnOByTcIraBbIOHa HaDCnPeHnHOFpaMauoOpexkMaXOKpyKaIoUeO3ByKaTEkyuXbBb6paHHbIX NCTOuyNkoB.PekmnoymoJMOHO MzAaBbMeHIO HAcTpoE KSetup Ia KaJdoRIO BxOaNbX INCTOuyNko.BakMaiTe KOnKy SUR+HeckoJIbKO pa3,4To6blpe6bupTaBceOctynbIeDSPpeKmbI.
IPIMUEAHHE: bapuaHmbi DSP o6pa6omku Mozym MeHmbc8 3abucumocmu om muna b6bpanho2o umoHuka. He ece DSP onuu docmynhbl e pekmax ananooobix unu ufofobx exodoe.
Dpyrme KhoIKNHa npIbTe MOryT npRMO Bbl3BaTbOppeIeHhble DSP pexMbl.
2CH: meHnEe peKIM ayDIO ha STEREO,DOWN MIX uIN BYPASS.
BYPASS:pexm06xodaBcexDSPo6pa6toK.
PLCM: nepekkiouaet pekmbl DSP Pro Logic, Bkioua Movie, Music n Game.
KhONKn ynpaBneHn BocpnOn3BeDeHnEM
3TNKHOncnOeocneueHbIoT OCHOBHbIe OepaunNo ynpabHeHIO BOCpOn3Be-DeHem iPod/USB AUDIO.BuCnE noDnepxNBAeMbIX fynKu:Play,Stop, Pause, Next Track, Previous Track.
KHONKA DIM ①
IcnoB3yTe 3Ty KhoNky Dny npnryuweHna Rkoctn DaCnne Ha nepeDne naHei.
PIMMEYAHNE: Hacmpouku, cdeanhaHbIe c nomoubIO smoKhONku ① monbko bpeMeHHbIe U He coxpaHJOMc npu BIKIOueHu numaHur.
KhoNkSUB,CTR,REAR
3TN KHNKn N03BONJIO T3aTn B HAcTpOKn KOHOK n OtperyNUPoBaTb BixOHDNo ypoBeH dIg KaKdo AC B CnCTeMe. NcOnb3yTe KNKn Up n Down Ha Nylte IIN 3MeHeHHN 3HaueHIn. Ho 3TO 6yDyT TOBko BpeMeHHbe I3MeHHHeHH. YTO6bI cEnaTb NOCTOHHBe N3MeHHHn, 3aDnTe B MeHIO SPEAKER LEVEL SETUP n3 kpaHHoro MeHIO OSD.
Khonka MEM
3a KhoNka He pa6oTaet c RSP-1582 nncnoB3yeTcra TOnbko dna TIOhepoB Rotel, 4To6bl 3anOMHnHaT npceTbl.
Khonka LIGHT
Pn Haxatm 3ToI KhoK IN BkIOuAeTc NIOCBETKa NylTa DnO6nerueHn npa60tB 3aTeMHENHom NOMEeHN.
BcnoMOraTeIbHaN noCBeTka - ASSISTIVE LIGHT
Haxmte nyepknte khoNky LIGHT Button N B TeueHne 3 cekyHnBnBKnOueHn BCnOMORAtebHOIOcBETKN. Ee moKHO nCnoJb3oBaTb Ira OCBeeHnE6Ibn3Knx 06bKeTob B 3aTeMHeHHOM NOMEueHn, BpOJe DOnaUHero TeaTpa.
ABTomatueckne pexkmbi Okpykaiooero 3Byka
DekodnpoBAHNE LqfpobbIXNCTOCHIKOB,NOJCOeHNHeHHbIXKUqfpobBM BXOaM, BO6IeM CUYae,ABJREcA BNTOMATNUeCKIM,INPNI NOMOUI O6HApyKeHNA «Phara» BzqfpoB03aIncn,ROBpAJeeroYcTPOIcTB,YkoJIΦOpMaT DeKoDPoBAHNA Tpe6yeTcH.AnpImep,Korda 6hAp4yKe Dolby Digital 5.1 mN DTS 5.1, yCTPOIcTBO AKTNBpyET HaNlEkaee DeKoDPoBAHne.
Ipoceccop o6hapykmbaet TaKke nckn DTS-ES Matrix 6.1 nn DTS-ES Discrete 6.1 nakTbnpyET deoknupobahne DTS-ES Extended Surround. 3annc Dolby Digital SurrouRe EX taKke 3anyckaot ABtomatuecheoe deoknupobahne (xot He BCE nckn DVD SurrouRe EX coepkat fiar n moryt notpe6oBaTBpyHyo akTbaauIO deoknupobAHn SurrouRe EX).
Ipoceccop abTomatnueckn obHapyKnaeT taKke oOpMaTb Dolby True HD n DTS-HD Master Audio.
AHaIOrnHNo, ufoPoBoB BXoHOB CNrHaN OT cTaHapTHORO KOMNaKT. dNcKa DTS 96/24 nnn DTS-ES 96/24 nnn npOnrpbBaTeNA MP3 6ydt ABToMaTHeckMo6hApHyKeHN DoJXHBIMo6pa3OM DeKoDnpoBaH npn2-KaHaNbHOM CtepeoHoHueckom pexnme.
06pa6otka Dolby Pro Logic IIx/Ilz uIN Rotei XS MoKet 6bIb cKOHnpynpoBaHa, qTO6bI ABtOMaTnueckn aKTbNpuObaTcBcBO Bcex 6.1- nIN 7.1-KaHaNbHbIX CInTeMaX, cKOHnpynpoBAHHbIX C CEHTpAlbHbIM NtIOBbIMn rPOMKOrOBopNTeJIIMM, nTO6bI oEocneHt HAdnHexaUee DeKOJnpoBaHme pacuHpeHHoro OkpykaIoIero 3Byka DnI BcEx MHOroKaHaNbHbX ayDnO CNrHaNo, DaXe Tex, KOTOpBe MOrY He 3aNyCkTa IpaBnblbHpaCwIpEHHbI peKIM.
Bo MHorix cnyuax, npouecopp Takke o6hapyknBaet uΦpOBO CNrHan c KOIpOBaHnEM Dolby Surround (Tak KaK OH ABnEe3 3ByKOBoI DOpoxkOIO yMOnuHaHIO Ha MHOrix nckAxDVD) n AKTNBpyET deKoDIPOBaHne Dolby Pro Logic II. Kpome TorO, Bbl MoKeTe cKOHnHynpoBaTb pexm OkpykaioJero 3ByKa IOyMOnuHaHIO dIg KaKDoTo BXoJa pni NOMOUs MeHIO INPUT SETUP (cM. pa3dJI «HaCtpoKa» daHOrO pykoBOdCTBa).
B coetyanm c ABTomauueckm o6hapykeHem Dolby Digital 5.1 n DTS,3a Hacrpojka OKpykaojoero 3Byka no ymoJauHIO deJeAet paOby peKIMOB OKpykaojoero 3Byka noJIOHOCTbIO ABtomauuecko.HanpImep,ecn Bby YCTAHOBNIPEKIM KINHOFIIbMa Dolby Pro Logic II B kaeeCTBe peKIMNA OymouhanIOI INBCEX BAuNX BNIEOXBOD,peCIBEP INN pOnceccop 6ydet ABtomauueckn DEKOIDPOBA Tb 3BykOBle DopoJKN Dolby Digital 5.1 n DTS, KOrDa OHN BOCPON3BOJATCR, INCNONb3OBAb MaTPNUHoe DEKOIDPOBAHHe Pro Logic II dNRA BCEx OCTaNBbIX 3aNNCeI.
Дястебубд.Tuner,ы можerte bby6paTb peKM STEREO B KaueCTBe pexkmaNo ymouanHIO ДЯ 2-KaHaBHorO BocIpOn3BeDeHnN,ИIM My3bKaJIbHbI pexM Dolby Pro Logic II, ecnbl npednoHTae cnyaTb My3bKaJIbHbIe NCTOCHNI B OKpykaIOUeM 3Byke.
PIMMEYAHNE: Ucfoobou cu2Han, nocmnaoouu Ha ycmpoucmeo, 6yoem obnapyken u dekodupoban Hadnlexaum o6pazom. Odnako, Ha duckax DVD c Heckonbkumu 38kyobbim dopokkamu, bbl doJnxbyka3amb npouzpbiamenIO DVD, kakyu u3 Huxnepebadamb ha npoueessop. Hanpumep, bam moxem nompe6oabmbcra bbl6pamb 38kyobyo dopoxky Dolby Digital 5.1 unu DTS 5.1 6mecmo 38kyobu dopoxku Dolby Digital 2.0 Surround, ycmanohennno no ymonuaio.
PuyhoB BbI6op peKIMoB OkpykaIoJero 3ByKa
Coyetahne abTomatueckoro 6hapykeHn 3anncen Dolby Digital n DTS n HactpoKa peKIMOB OKpykaioeero 3Byka no yMOnuaHIO nn KaJdoR BxoJa BO BpemHaCTpoKn npoueccopa, daetapeBoT pyekmOB Okpykaioeero 3Byka nonHocTbIO abTomatueckoi. MnHOrNX NoIb3ObaTeNe, 3OT ABtomatueckn BblOp peKMaOkpykaioeero 3Byka yDobnetBopNT BCE IN NOTpe6HoCTn IpocnyuBaHn.
Дя nonьзовател,在пдочихбонеakntнуpoьвсрк epekmOBokpykaioоero3byka,KNHKnHa npIbTeNHy npeDneH naHennnpocopa obcechnybaIoT pyHoi Bbl6op pexmO okpykaiooero 3byka,koTobHeonpeidenaBtOMaTHueCKn,IN,BEKeKToPbIX clyyax,ДЯ npHdTeBHorO n3MeHeHnaBtOMaTHueCKOHaCTpOkn.
PyHbI He NaCTPOKn,IOCTyNtBHe C nepeDnei NaHEn n/nn nyIbTa Dy, MoryT 6bITb NcNOb3OBAHbI, KOrDa Bbl XOTNE BOCpON3BecTu:
- CtaHapThoe 2-KaHaJIbHoe cTepeo (ToIbKO JIeBbl/npabbl IrpomKorOBOpHTEN) 6e3 06pa6OKn OkpyKaHOUero 3Byka.
CBeHeHbIeB V Da KaHaJa 3aIncu Dolby Digital 5.1 uN DTS.
Dolby trpexkanaNbHoe ctepeo (neBb/npaBb/ueHTp) n3 2-kaHaNbHbIX 3anncen. - 5-nnn7-kaHaNbHbIe cTepeo 3aIncn n3 2-KaHaNbHbIX 3aIncen.
-
OdnHn3 Yetbipex peKIMOB moeJIinpobAHnKoHcepTHOrO 3ana DSP n3 2-KaHaJIbHbIX 3aIInCeN.
-
Матрич形象демпогаиме Dolby Pro Logic II 2-KaHaJIbHbIX 3aIIncei Дя рекIMа My3bika ИИ КИн.
- Матрич形象дени СТС Neo:6 ИЗ 2-kaHаньых заисяй дя рекима музьк сил кИН.
Декорованые Dolby Digital Surround EX дя заимсян Dolby Digital 5.1 по десков Dolby Digital Surround EX, koTopbie He заусанot abTomatпунecкoe Декорованые.
PIMMEYAHNE: LufopoBie cuZanbDTS, DTS-ES Matrix 6.1, DTS-ES Discrete 6.1, DTS 96/24, DTS-ES 96/24, Dolby Digital u Dolby TrueHD oNapuykueaomc aBmamuuecku u He mozym bmbn nepenacmpoehbl BpynuKo. Odnako bbl mojeme bblpambd nucnoIb3obauHure dekodupobahue Dolby Digital Surround EX dna IIO6Ozo Mamepuana ucmouHuka Dolby Digital 5.1. Bbl maKke mojeme cBeemu dna 2-KaHANbHOzO BOcnpu3BedeHure zanucu Dolby Digital 5.1 unu DTS 5.1.
LcHpOBBie 2-KaHaBbHe PCM CnHaBbI (He 96 KfU) MoryT 6bITb pInHyDntbHo nepHaCTpoEhbl BpyHuYHO DaLy Pro Logic II, Dolby 3-Stereo, DTS Neo:6, DSP 1-4, 5CH Stereo, 7CH Stereo n Stereo.
Дыхканьсгпсеге ржм Dolby Digital moKet 6bIb n3MeH BpyHyno Ha Dolby Pro Logic II, Dolby 3-Stereo n Stereo.
Cnedyuie pa3dnebl OINcBbAot B noDpo6HocTnx npaMeTpby puyHoro peKIma OKpykaoIe 3Byka, DoCTynhble IJI KKaJDo TIna 3aNtnc:
Dulby Digital/True HD Dulby Digital Surround EX
Декорованne Dolby Digital Альетс AbToOnpeIeIeMbIM He MoXet 6bTbперehaCTpoENo. Bbl MoXeTe, Ondako, Bb6paTb 2-KaHaJIbHoe CBeIeHne 5.1-KaHaJIbHbIX 3aIInCeB.Cntemax 6.1 n7.1, Bbl TAKHe MoXeTe Bbl6paTb Dolby Surround EX, Dolby Pro Logic IIx Music, Dolby Pro Logic IIx Cinema (Tonko 7.1).
Iy CMeHbI peKIMa HaxMaaTe KONky SUR+Ha nyIbTe DY nnHa nepeHne IaHei nIy nepe6opa BcEx DocTyNbIX BapnAHTOB. KOnka 2CH Ha nyIbTe DY no3BOJare CTBeTn B Da KaHana Ctepeo IIO60 MHOrOKAHaJIbHbN CInHAn.
PIMMEYAHNE: He epe pexkmbi Okpykaioueo 3eyka docymnbI dnerbcex ucmouhkuo. CuZnAn BxOHOzo UcmoHnu Kaepenem, Kacue bapuaHmbI OKpykeHnMo2y mbbb6paHbI.
Dnckn Dolby Digital 2.0
Dolby Digital aBnIaTc aTOoNpeJeHembIM H Me MoKet 6bItb nepeHaCTpoEHO. Bbl, OdaHko, MoKeTe BblpaTb 2-KaHaJIbHOe BocPon3BedeHne, 5.1-KaHaJIbHOe BOCPON3BedeHne BMeCe T MaTPuHbIM 3ByKOBbIM OkpyKeHnEM Pro Logic II, 6.1/7.1-KaHaJIbHOe BOCPON3BedeHne BMeCe T MaTPuHbIM 3ByKOBbIM OKpyKeHnEM Pro Logic Ix/IIz nnnn BocPon3BedeHne Dolby 3-Stereo.
Дя Смени рекима нахима Te KhoIGNky SUR+Ha nyIbte Dу Иин ha nepeDnei naheln Дя nepe6opa Bexc DoCTynbIX BapmaHOB. Khonka 2CH Ha nyIbTe D'no3Bolrae CBeCTN BDA KaHala CTepeo IIO6O MHOroKaHaJIbHbI cRHaJ. Khonka PLCM Ha nyIbTe D' NOB3OJIaRe Tpe6upaTb pekimbl Pro Logic IIx Cinema (Movie), Music nII Game.
ДиСКИ DTS/DTS-HD 5.1
Dnckn DTS 96/24
ДиСКИ DTS-ES 6.1
Декорpoване DTSянгетса ABTOОпeдЯгьМи He можET 6bITb nepeHAcTpoEHO.Бы можete,ODHAKO,Bbl6paTb CbeDEHnE B2 KaHaja dIa 5.1-KaHabhix 3aniceH Na 5.1-KaHabhIx DNCKax.
ДлгсмнblpeхиманжимаTe KhoIGNky SUR+Ha nyltBe Dv nInnHa nepeednei naHennДлгnepe6opa BcEx DoCTynbIX BapnaHTOB.KhONka 2CH Ha nyltBe Dу no3BONReT CBcTn BDA KaHana Ctepeo lo60m MHOrOKaHaJIbHbI CnHAI.
PIMMEYAHNE: He ece pexkmbi Okpykaioeze 38yka docmynbI dner cex ucmouhukob.Cuzhan Bxodno zu cmouhka onpeenem, kakue bapuaHmbi OkpykeHnMoym bimb bibpaHbl.
UΦpObIe CTpeo DnCKn
3a rpynnna 3anncen Bknoyaet IIObIe 2-kaHnbHbe 3aIncn, He OTHOCAIneC K Dolby Digital, npxoxraue n c uippoBix BxOOB npoueccopa. Bbl moKeTe BOCnpoN3BOMDITb 3Tu 3aIncn B 2-KaHaNbHOM Ctepeo, 3-KaHaNbHOM Dolby Stereo, 5-KaHaNbHOM 7-KaHaNbHOM Ctepeo pexmMax. Bbl TaKke moKeTe nCNoB3oBaTb MatpnuHb Dolby Pro Logic II surround (5.1-KaHaNbHbe cnCTembl), Dolby Pro Logic llx Music (6.1/7.1-KaHaNbHbe cnCTembl), Dolby Pro Logic llz (7.1-KaHaNbHbe cnCTembl), nn DTS Neo:6 pekm.
Bce hactpoikn ynpablenia 6acom (pa3Mep rpmKorOBopnten, ca6Byep n Kpoccoep) pa6oTaoT onbKO c uHpObIMn CTpeo BXoamn.
Дя Смени рекима нахима Te KONky SUR+Ha nylbTe Dv nIn Ha nepeDnei naHEnI nI nepe6opa Bcex DocTyNbIX BapmaHTOB Okpyxenna. Khonka PLCM Na npbTe Dv nob3oJnT nepe6upaTb pekimbl Pro Logic Ix Cinema (Movie), Music nnn Game.
IPIMMEYAHNE:HeepekumblOkpykaioueo38yka docmynbI dnebcex ucmouhukob.CuzhanBxodhozo umouhuka onpeidenem,kaque eapuahmbl OkpykeHnMoymb6bmb6bpaHbl.
Ananoloroe ctepeo
3TOTTN 3aNcEe BKNIOUaETIIO6 CTaNAPTHbI CTpeo CnHAn OT aHaNOrOBbIX BXOOB npoecccopa, BKNIOUaA hAnorOBbI 3ByK OT CD npOnrPbIbATEeN, FMTOHEPOB, BNDeoMaRHTNoHOB, KACCtHBx MaHHTofoHOB N T.I.
Ahaorobbtepeo BxodbyTre6yotBb6paTbMappyt CneoobahnCnHana
yepe3 yctpoiCTBO.OHOH n3 HacTPOeK ABnEeTcpezm aHaIorOBoro
0xbxa. B 3om pezime, ctepeocnHn HnpanpabnTcHnOpcnCTBeHHo Ha
perynapToP rpmkOCTN BixOdb.3To- YnCToe 2-KaHnBHe Otepeo,coXoDM
Bce xufoPBbIXxCem.Bce yHKun ynpabHeHn 6acom,HacTPOeYpOBnH
akctnuuecknx CNTem, TembpaUN3aepKKn OTKnIOUeHb.CnHnHa H bVHXode
dnnnoKluOeHn Ca6ByepaOTCYTCTByET.PONHOLOChn CnHnHa Hapmyo
IOCTynaet Ha Dba foPOnTaJIbHbIXrPOMKOrOBOpTeJIa.
DpyroHnactpoiKoIABnIeTcnpoe6pa3OBaHHeaHAnIOBbIXBXOdbixCINHaIOB BzPPOBBe, c npoxoJenHemnx chee3 nippoBbIpeoecccopbIB RSP-1582. 3To N03BOJnAETAKTNBIPoBaTB CeyHKUIn, BKNIOaHnCTPOiKnYnpaBHeHn 6acom, pa3dJInteBbHbIX PhNtPB, BbXODa Ha c6ByepbI, HAcTPOiKn TEm6pa nT.I.BTOM peKIMMe, Bbl MoKeTe Bb6PaTb HeckOJIbKO peKMMOB OkpykaIoero 3Byka, BkIOuaar 2-KaHaJIbHbI CTpeO, Dolby 3-stereo, 5-KaHaJIbHbI CTpeo I 7-KaHaJIbHbI CTpeo. Bbl TaKke MoKeTe NCNOJIb3oBaTb Dolby Pro Logic II nn Pro Logic llx, nn DTS Neo:6.
Дя Смени рекима нахима Te Khoику SUR+Ha nylbte DУ nIn Ha nepejdne hyaHnDЯпесьopa Bexc Doctynbix BapnaHTOB OkpykeHry. Khonka 2CH Na NyIbTe Dny no3BONJIeT CBeCTN BDA KaHana Ctepeo JIO60MHorokHaHnbHy cHnA. Khonka PLCM Ha nyIbTe DY nob3OJeT nepe6npaTb pekimbl Pro Logic IIx Cinema (Movie), Music nIn Game.
PIMMEYAHNE:HeepepKmbiOkpykaioueo38yka docmynbI dna 8ce xcmouhkoB.CusHan BxOHOo UcmoHnka onpedenr, kakue bapuaHmbi OkpykeHnMoymbMbBb6paHbI.
OCHOBHbIE ONEPAUIN
3ToT pa3dien onncbIbae TnpaBHeHne OCHOBHbIMn Opepaunm npoccecopa RSP-1582 nnybTa DY.
Bb60p BxoD0B
Bb MoKeTe Bb6paTb IIO60n 3N IcTOUHKnOB dI npocnyuBaHn r/nn npocmoTa:VIDEO 1-8,CD,PHONO,XLR,MULTIINPUT,USB,PC-USB,BLUETOOTH nTUNER.
Bce BxOaHbIe NCTOCHNk MOrT 6bITb CCKHOHpyPupOBaHbI NoJIb3OBeIem npi nOMOuM MeHIO INPUT SETUP, yTO6bI Ha3HaunTB BxO HDMIB KaueCTBE BnDeo NCTOCHNka. BxObl VIDEO 1-8 MOrT 6bITb TaKke CCKHOHpyPupOBaHbI yTO6bI npINHMaTb IIO6bIe aHaIorOBbI e UcHPOBBie ayDIO NCTOCHNk. POn yMonHaHIO ayDIO NCTOCHNk Ha3HaaeTcH HA HDMl Audio.
Iocne KOHfpynpoBaHH BxOaBbX INCTOCHNKOB MxHO INCnOJb3OBAbK HONIKBxOaOB INPUT dnn Bb6opa Kenaemoro INCTOHNka.
- Haxmte KhoNkY INPUT ha nepeHne nanei 6 nncnoB3yTe KhoNkn Habnraun dna nepeKlnouehn Bac Ha Bb6paHbBxOHOH NCTOHyK, T.e.CD, Tuner, Video 1 nT.D., a 3aTe m Haxmte KhoNky ENTER.
2.HaKMITE KNONky BXODHORO nCTOCHNka Ha nyIbTe M dny Bbl6opa Jxenaemoro nCTOCHNka.
PIMMEYAHNE: Kpome bblbopa ahaiozo8o zuu uufpo8o cuhaioe, onuu konfozupaunno3oieniom makke npuceaubamnb noIb3oamelbckue haumehoaba, amakke pexumblokpykaioe23yka noymouaHIOdna kaxdozo u3 budeo bxodob.
Pa6ota c USB/iPod
Полсeoинене iPod/iPhone 10
- iPod/iPhone Moxkno noCoeHNHb c nOmoIbu noXoJaero USB-Ka6en KaPbemy USB ha nepeHne naHEn RSP-1582.
- iPod/iPhone nocblaet B npoecccop ufofoBMy3bikabhbl cnHAn. B60pom TpeKOB N BOCPON3BeDEHem MOnHO ynpabTb c iPod/iPhone.
3.3kpaiiPod/iPhone octaeTcA kTMBbIM npi npoDcoeHHeHn Knpoccecopy.
KhONKn ynpaBneHn Bocpon3BeHeHnEM
BoBpMaBOcnpOn3BeHnMoXHoCnYbTaynPabNtBnPoecccOp CnOmoBkoMaHd:PLAY,STOP/PAUSE,NXTRACK,PREVIousTRACK.
Bluetooth
Bluetooth coeHneHne
Функцьn Bluethooh no3BONIe Bam nepeDaBaT bnoTOKOBy mo3bky C BaWero BLuethoth yctpoiCTBa, HanpImep c cOTOBOro TeneOHa. Bb6epnte BXoD BLUETOOTH (BT) Ha RSP-1582. Ha BaWem yctpoiCTBe (cOTOBOM TeneOHe n T.n.) aKTHBpyte Bluetooth n daTe emy BO3MOxHocTh hAHTn DpyrIne Bluetooth ycTPOICTBa. Bb6epnte "RoteIRSP-1582" n cOpJrnte erO. PocJe yctaHOBneHnro coeINHeHnBA CBmOKeTe nepeDaBaT bnoTOKOBy mo3bky Ha RSP-1582.
ПРМЕЧАНЕ:Bluetooth ветаь RSP-1582 coBmecmua c APTX.Зmo no380ягам bam nepeabamb nomokobую мьбіку с качсвом CD u 6e3nomepb.
IPIMMEAHHE: Hekomopbte Bluetooth ycmpoucmba mozym nompe6oabmb bHOBB ycmahOBum coeunHeue nocle omknOuenHnpoeccopa RSP-1582 om numaHue. Ecnmo npou3oDEM, npoudme BCE Heo6xodMbue uau, onucanHbE bblwe, dner noBmOpHozo nookluoyenH.
BxoJ PC-USB Ha 3aHnei naHeJI
IopocoeiHeHneKPC-USB
USB pa3bem, MapKnpoBaHHb PC-USB OTHrocntc K TnY B USB nopTOB. OH npHnMaet PCM aydno CnHaJIb, nocbinae b C BaWero KOMNbTepa c pa3peuHHeM Do 246NT/192KtU.
IPIMUEAHHE:Bo3MOxHOBam nompe6yemcyaCmaHOobum USB dpaBep, komopb i 3anucan Ha CD ducke, npuna2aemom K RSP-1582, ecnu baw Komnbomep Hepacno3Haem RSP-1582 KaKycmpoUcm8o nocne coeduHenur Ka6enem.
PIMME4AHHE:MacKoMnboHmepeHHe mpe6yIom ycmahOBkOpdaUbepa.
HACTPOIKA
Rotel RSP-1582 ochaen Dbympa3HOBuHOCCTMn INHOpMaunOHbIX dncnpeeb, NOMORAUxN ynpabnTb cIcTeMo. NepBb coCToNT n3 npocbix OTo6paxhen COCTOHN, KOTOpBie NOABJIOTCHa 3KpaHe TB u/nnn nepeDnei naHei npoueccopa pni IIO6OM 3MeHeHn nepBvHbIX hAcTpoek (rPOMKOCTb, BXoN T.n).
Bonee cnoxha nCCTema 3KpaHnO Ro MeHIO OSD doctynHa B IIO6oe BpeMn no HaxaTnIO KNOpKn SETUP HnIyIte Dnynn KhoNKn MENU 7 Ha nepeHne nAnei. 3TO 3KpaHnOe MeHIO hnpabJrE Bac cepE KOhFpynpoBaHne n HactpoKy npoueccopa RSP-1582.B o6Ie mcluyae, HacTroKN, BbINONHeHbIe B npocce COhFpynpoBaHn, 3AnOMHaIOrcaK HacTroKn No yMOJauHIO, n He Tpe6yIOT NOBtOPHO r3MeHEnr npn HopMaJIbHO pa60Te yCTpoCTBa.
3KpaHbIe MeHIO OSD MOrTy 6bItcKoHfpynpObaHbI IaI OTo6paKeHHa Ha HeckolbKnx pa3nUhBIX Ra6kax. BepCnBce MeHIO c aHrnnickm Ra6bIKOM No yMOnuHaNIO NOKa3Ha B HauAne DaHHoro pykoBoDCTBa. EcnBaa Ra6kIOCTyHe, 3TN MeHIO MOrTy 6bItb NOKa3HaB HnHexCeJeYIOx INHCTpyKUnX. EcnB bIX XOTITE N3MeHNTb Ra6k C aHrnnickOro Ha npRoI nepeI npOeJpyoH NaCTpOoiK, CM. INHCTpyKUnN DJI Ma MeHIO SYSTEM SETUP B KOHe DaHHoro pkyoBOdCTBa.HaxOJaCB bTOM MeHIO, BB MoKeTe N3MeHNTb Ra6bIKOT6paKeHHa.
OchOBhble HactpoiKmEHIO
KhoNk HABRAtuM
IJIpeMeueHnIO CNTeMe 3KpaHHbIX MeHIO NcTIOB3yOTc CneDyUOHe KHOKNIyNbTa DY:
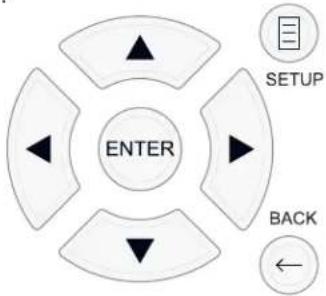
KhONka SETUP: HaxMITE nIa OTO6paXeHnE 3KpaHa MAIN MENU (rnaBHOe MeHIO). Eclm MeHIO yKe OTO6paXaETcA, HaxMITE 3Ty KhoNky dIa BO3BpTa Ka HopMaJIbHOH pa6Ote.
KhoNk UP/DOWN:HaMMte DnepemeueHHBepx N Bn3 Cnckax nyHKTOB MEHIO, KOTOpBE NOBRAKTc Ha EKpaHHbIX MEHIO.
KhONk Left/Right: HaxMnte nIaI3MeHnIe Tckyuei HAcTpOKn dIy Bbl6paHHOrO nyHKTa MeHO.
KhONKa ENTER: HaxMnte ENTER dIy noTbePxdeHnHaCtpoKn.
KhONKa BACK: HaxMnTe BACK dIa Bo3BpaTa B ppeIbIyuee MeHIO.
MAIN MENU -Главhoe MeHIO
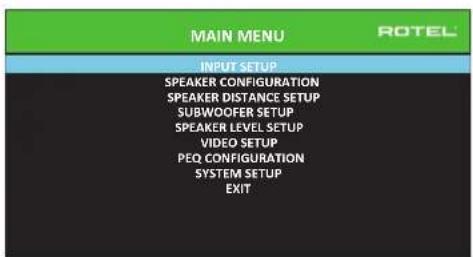
IanaHoe MeHIO MAIN MENU o6ecneuBaet doctynBOSKpaHbI daa paHnHbIX BapnaHTOB KOHOFypaun. Mo MAIN MENU moXHO do6paTbC, Haxab HA KHONKY SETUP H a npbte nI INI MENU 7 Ha nepeHne I naHEn. YTObl nonactb B Jxelaemoe MeHIO, nepemeuaite BbiDeneHne C nomoubIO KHNOK Kypcopa UP/ DOWN N Left/Right Ha npbte, a 3aTe m HAXMITE KHNOK ENTER. HAXMITE KHNOK SETUP/MENU Ha eue pa3 unu Bbi6epute E X I T Ha 3kpaHe, YTObl OTMeHNTb HAcTPOki Ky u Bo3BaPntbCa K HopMaNbHo pa6ote.
KoHpynpoBaHne BXOIOB
KIIIOUeBbIM 3TANOM B HAcTpOKe IPOUeCCopa AIBIeTc KOHOFNpyPpOBAHne KaJdORo BXODHO RTOCTOuHNka npn NOMOOn 3KpaHOB INPUT SETUP. KOHOFNpyPpOBAHme BXODOB N03BOJAEr Bam yCTaHOBt ByMOJuaHnI DnI pRJa HAcTPOEK, BKJIouyA TIN BXODHO rpaBeMa, JEnaEMb peXmOkpyKaioJeero 3Byka,Apblk NOL3OBaTeJI, KOTOpB N08BnEeTc Ha 3KpaHax npn BbIope INTOUHnKa, INMOrne dpyrme. DnI KOHOFNpyPpOBAHnBXODOB NcONb3yIOCTC ncldyIOUHe 3KpaHhble MeHO OSD.
HacpoiKa BxoJa - INPUT SETUP
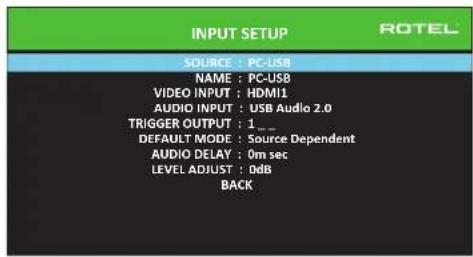
MeHIO INPUT SETUP KOHnHynpyET BXOdbI OT NCTOuyNkOB IN DOCTynHO n3 rnaBHorO MeHIO. 3KpaH o6ecneuBaET cIeNyUoiNe npaMeTpbl, BbIbupaemble nyTEM BbIeHenra XeHaemOn CTpOKPi pni NOMOn K HONok UP/DOWN:
SOURCE:Изменинения BTORA такке поьоглет Bam bbl6paTb onpeidenenhhb BxOД ДЯ КОнФиурпобаня (CD, TUNER, VIDEO 1-8, USB, PC-USB, XLR, PHONO, MULTI INPUT MII BLUETOOTH).
NAME: MoJHo 3aJaTb NOpB3ObaTeNbCKoe HAmMeHOBaHne nCTOuHnKa. HanpImep, BxOVIDeO1 MoJHo Ha3BaTb "TV" dIe O6IeUeHn IOncKa. Imr no yMoJIaHnIO NAME cOBnJaAeT C HAmMeHOBaHnEM nCTOuHnKa SOURCE. Yro6bl Naatb MapKnPoBky, pa3MeCTte BldJeHne Ha 3Toi CTPOKe n HaxMnTe KhoNkY ENTER Ha NyIte Nn Ha nepeHne NaHeIn, N Bt IOnaTe B NoDMHo SOURCE NAME EDIT.
- HaxkmaTe KhoNk Left/Right Ha npIbTe Dy nn Ha nepeDne nanei dna N3MeHnepBoB 6yKbbl, pOkppyuBaB cncOK DocTyHbix 3HaKOB.
- Haxmte KhoNky ENTER Ha npIbTe Dn nn Ha nepeDne naneHnn nna NOITBepKDeHn 3ToN 6yKbbl npeXoNTe Ha cIeNyOuIIONo3nIO.
- NIOBTOPAIte nn.1 n 2, noka BCE BOCemb 3HakOB (BKnoua np6ebl) He 6byT 3anonHebl. ITOROBOE HaxaTne KONKn ENTER COXpaHReT HOBbI apbIK. INIb Bi6epnte Ha kpaHe KHONky BBOD dna noDTBePxDeHIN, ecN Bbl BBeN MeHee 8 3HakOB.
VIDEO INPUT: Bb6npaetNCTOCHNK BnDEOCnHnla, KOTOpB HADo OTO6pa3NTb Ha TB-MOHnTope. Ha3NaHbTe BXoHa NIOCoEINHeHHb KOMNoHEt-NCTOCHNK, KOTOpB Bb Bb6paan n3 HDMI 1-7 n HDMI Front.ДЯayno NCTOCHNKOB (Tnna CD-nNeepa), obuHNO Bb6npaIOT OFF, TAK YTO6bl BnDeo He BbIOBnIOc b Ha dncnneB. BnDeoNCTOCHNKMOJHO TaKke 3aDaTb KaK "LASTVIDEO SOURCE", YTO6bl npi nepeKnIOeHN Ha 3aDaHbB XoD Video npebdyuyn BnDeo NCTOCHNK He CmEHnCn. 3Ta yHKnIy NOE3Ha, KOrda Bb XOTnte CMeHnTb TOnkO aYdno n IpOdoJIKAb CMOTpeTB TOT Ke CaMbI BNDeo NCTOCHNK.
AUDIO INPUT:Ha3Hauaet Φn3NuecKoe BXoHoe CoeINHeHne, KOtOpoe nCNoIb3yETcB KaucCTBe yMOnuHaHN JnA NCTOuHmKa, OTo6paKaemoro B nepBoi CtpKe DaHHoro MeHIO. 3TO MoKet 6bITb OPTICAL 1-3, COAXIAL 1-3, ANALOG1-4,HDMI AUDIO,TUNER,MULTIINPUT,XLR,PHONO,CD,BLUETOOTH, USB nnn PC-USB.
INPME4AHHE:Onmueckku,koakcuanbHbU,CDuXLR8xodmoym6bmb Ha3hauehbl Ha 8xoDhou ucmouHk CD unHa Video 1-8.
IPIMMEYAHNE: Ayuo 8xod He docmyneh dna ucmouhuka 8xodhozo cuzanaXLR, aemomamuecku, miohep, mHOxecmeb exodoe, BLUETOOTH unu USB.
Пи Вьборе BXODногИСТОУнКа КС"PC-USB", AUDIO INPUT MOKHOCMENITb Нa"USB Audio 1.0" ИИN"USB Audio 2.0". USB Audio Class 2.0 можETNotpe6ObaTb уCTановк ПС дайБера.СМ.РаДел«PC USB» B TOM pyKOBOДСТBE.
12-B trnrrpmbbixo TRIGGER: RSP-1582 nmeet Tpr 12-B3anyckaoxnbixbixoda (MapknpobaaHHbx 1-3),KOTOpbe BidaHOT 12-B0nbTOBbIN CnHAnIOCTOHHORToKA dNBA KBIIOUeHNaDpyrNX KOMNOHEHOB pNHeo6XoDMOCNT.3TOnyHKT MEHO BKIIIOAeT ONpeJeENHbIe 12-B3anyCKAOUe NBExoDbBCKAp3,KGDA bblpaetc yka3AHNB INTOOHNK.HanPIMep, cKONPHgPynpyTeBXOD VIDEO1 dNBA KBIIOUe HN 12-B3anyCKAOUe CnHana DnNA BaWero nponrpmbaTeLA DVD.DnNA KaKdoro INTOCHNKA MOKHO 3AnporpamMnPOBaTBIO6oe coueTaHne 3anyCKAOUx BIXoOB.
- BädennTe onuHIO «TRIGGER OUTPUT» Ha 3ToT CTPOKe Hn KaMITE KHOJIky ENTER Ha nyIbTe nnHa nepeDne NaHeN, N Bbl nonaTeB NoDMeHIO
- Haxmmate KhoNkUp/Down Ha npbTe Dy nnHa nepeDne nanei nIa I3MeHnna nepBoNo3nncn OT nyctOoi Do 1 (akTnBnpyouee TRIGGER 1 dJaDaHHoro NcToCHnka) nCnObl3yIte KhoNkn Left/Right dJe npexoKa cnDeyuoe nOnuun.
- NOBTOPAIte, noka Bce Tprn no3nHn He 6yUr 3aDaHbI NO BaWemy JxenaHIO. ItororOBE Haxatne KhoNkN ENTER noTBePkaeT bI6Op.
PIMUEAHHE: 12V bixod mpuzepa 1 Eknioyen no ymonuHIO dne Bcex 6xodhix ucmouHukOB. Bbl moXeme omKnIOuyumb ezo, BbinOHB deUcmbur, KAK onucHO bIwe.
DEFAULT MODE: HactpoKa DEFAULT MODE no3BONJe Bam yctaHOBnTB peKIM OKpykaIooero 3Byka no yMOnuAHHIOI KAKDORO BXODHORO NCTOCHNKA. HactpoKa no yMOnuAHHIOI 6yDet IcNoB3OBAHa, noka KOMaHNbI MaTePnAla NCTOCHNkHe 3aynctTAYtOMaTHueCKOE KeODINPOBaHIne ONpeDEENHORO Tnna INI NOKA HACtpoKa no yMOnuAHHIOI He 6yDet BpemeHNO I3MeHEna CpepeHne naHenn INI KNOHkAMn OKpykaIooero 3Byka npbTa DY.
Hactpoukamn npejkmOB okpykaioe 3bya no ymoanuHO ABIOIOTc: Dolby PIIx, Dolby 3 Stereo, 5 channel Stereo, 7 channel Stereo, PCM 2 CH, DTS Neo:6, Analog Bypass (ToIbko nIa ananorobbxxOoB), n Source Dependent.
PIMMEYAHNE: Cnedyuue munb uqfoobix duckoB uu Mamepuana ucmouhka b o6wem cnyae obnapykuabomc abmamumuecku, u doJxHoe deKoDupOBaHue BkIouaemc camo uu He mpebyem Hacmpouku: DTS, DTS-ES Matrix 6.1, DTS-ES Discrete 6.1, Dolby Digital, Dolby Digital Surround EX, Dolby Digital Plus, Dolby TrueHD, DTS-HD Master Audio, DTSHD High Resolution Audio, Dolby Digital 2-channel, PCM 2-Channel, PCM 96 KTu u MP3.
Послбку nctouнну Dolby Digital 5.1 n DTS obhanykbaotca n ekodnpyotcabTOMATNUeCKn, hactpoika no ymonuahno oobtuho yka3bBaet yctpoiCTBy, kak o6pa6aTBaBt 2-kaHaNbHbI CTpeofoHnueckn cnHan. Hanpnmep, bbl moKTe Ha3HaHTb BAI BxOJ CD no ymonuahnIO Ha 2-kaHaNbHbI CTpeo CnHAN, BXOJI DVD n VCR no ymonuahnIO nIra o6pa60TK Dolby Pro Logic II dIЯ MaTePnAla Dolby Surround c MaTpnuHbIM KoDnpoBaHmE, a BxOJ TUNER no ymonuahnIO npi odHom n3 peKIMOB DSP.
B HeKToOpbIX CnyaX, HAcTpoNk IIO yMOnUaHIno MoKeT 6bITb N3MeHeHa BpyHyIO KhoNkoi SUR+ HaIyIbTe IY nnHa nepeDneHnAeHn, nnKnOHNKaMn PexmOB OkpykaIoJero 3Byka 2CH, PLCM, BYPASS Ha nyIbTe. Noppo6HyIO nHΦopMaIO IO 6 n3MeHЯEMybIX HAcTpoNkax CM. B pa3dJe «BbI6Op pexmOB OKpykaIoJero 3Byka BpyHyIO DaHOrO pyKoBOcTBA.
Ie n3 hacptpoek pexmma Okpykaiooero 38yka no ymoanHIO,doctynhble B 30m MeHIO, npednaraot doonohntelbHbe napaMeTpbl. DeokinpobAHne Dolby Pro Logic II npednaraet b6op hactpoek Movie, Game nnMusic. JeokinpobAHne DTS Neo:6 npednaraet b6op hactpoek CINEMA nnMUSIC. Korda Bmecte c 3TMM nyKtOM MeHIO b6paHa Dolby Pro Logic II nnM DTS Neo:6, taKke 6ydet oTo6paKaTaBcA Tekyuim BB6op B CTopek DEFALMT MODE. Ira cmHeBippekmia c MUSIC Ha dpytne, BoiInTe B NoDmeHIO, Haxab KhoNkY ENTER Ha nyIbTe Nnn Ha nepeDne nnHei.
AUDIO DELAY:ИЗветая такkee к «синхpoиизацу6» Иллзаджka "lip-sync",эт ha nactpoika 3aedepknaBaet aydno cnHnД nlaIIOBO BXOda Ha onpelehenHoe BpemЯДг corlacoBaHn CBnEOBxOdom.ЭтФункua MoKET 6bITb NOJIe3Hoi,korDA BnDEOCurHaN 3aedepkAn 6OBJhe,чem aydno cnHnA,кak INOrda npOnCxODNT c MacuTa6bPyUoUMM TB-npoceccopamm IIN KORda nbITaOTc corlacoBaTb paInobseuHne CBnDeo peNoptaxem co CnpTUBHO rcoBttn.
IuaanaoHdoctynho Hactpoikn coocabnaeTOT MC do 500 MC c warom 10MC. Hactpoika coxpanaetcraTOnbno kaxdoRxoda nBnraetc rpynnoboi 3aepkkoNo ymoJauHIO BCaKni pa3, KOrda Bb6paH 3OT BXoH. Hactpoka MoKeT 6bTB BpeMeHHO N3MeHena C nepeHne NaHEn nnN PybTa DY.
LEVEL ADJUST: IcnoB3yIte 3Ty yHKnIO DnI TORO, YTO6bI 3aIaTb yPOBeHb rPOMKoCTM MeHbSe, HeM Ha dpyrNx BXOaX. 3To NOe3HO nIa NCTOCHNKOB, KOTOpBle NoCTOARHHo rPOMe, HeM dpyrNe B CnCTMe.
YtO6bI BepHyTbCn HOpMaIbHoi pa6oTe, HaxMnte KhoNky SETUP Ha npNbTe Dy nn MENU ha nepeHne naHenn.

Hacrpoika Bxoda Multi
Korda nctouhik MULTI INPUT bbl6paH B MeHIO INPUT SETUP, DocTyNHbIe napaMeTpbln3MeHauOTcA, T06bl OTpa3ntb Tot kaT, 4TO 3TN BXOdbI ABNIOTCn npMbIMn aHaIOrOBbIMn BXoamn N o6xoJr TnΦpOByU O6pa6Otky B npocceope. Onm Audio IINPUT, DEFAULT MODE n AUDIO DELAY He DocTyNHbI, NOckolbykBCE OHN ocuueCTBnIOTc nΦpOBbIM cnocobom.
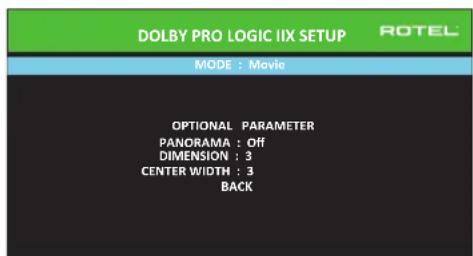
Dolby Pro Logic IIx
Korda《Dolby PL Ilx》Bb6pambKaueCTBe pekmAm Okpykaiooero 3Byka no ymoanHnB MeHIO INPUT SETUP, cyuetbykOT dononHnteHbIhe HacTpoiKn nnapaMeTpbln ONTMn3aunn KeoOpnoBaHnO kpykaiooero 3Byka nla My3bIKn 3BykOBbIX dopoKeK KInHOΦmMbOB. Dolby Pro Logic II nCnOJb3yET
aIITMBi MaTpuHOrO JeKOdIpOBaHaN IIN 3BLeueHn CEHTpaNbHO rKaHaJa I6OKoBbIX KaHaIOB IN2-KaHaJIbHO MaTePnAIA nCTOuHnKa.
IpeBaCTpoka MODE nOdmEno Dolby Pro Logic Ix Bb6napeTpeKmbl Movie, Music,Game dIy MaTpnuHoro DeKoOpOBaHry. Mcnonb3yTe KhoNk Left/ Right Ha npIbTe D'ny TaBb6opa OndHO r HIX.
- Bb6peTe Movie, 706bl ONTMM3NPOBaTB dIa Dolby Surround KoDnpoBaHbIe 3ByKOBbIe DOpOxKKn KINHOoHbMb, BKIOHau yJUySeHbIe pa3dJeHHeNoHONIOChbI dHaNa3OH aCTOT KaHaJa OKpyKaIoUero 3Byka.
- Bb6epTe Game,уTo6bl onTmMn3nupoBaT JdN Dolby Surround KoInpobAH HbIe 3ByKOBbIe DOpOKn dNra BnDcE OrP.
- BbI6epnte Music, yTo6bl ONTINMn3NpOBaTb dny My3bIkaJIbHbIX 3aInciei.
Kpome pexkIM MODE,Ha 3kpAne MeHIO 6dyT DoCTynHb Tpr DOnonHnTeNbHbX npametpa. IcNoIb3yIte KhONKn Up/Down HnyIbTe DY Iy BblOpa npametpa. IcNoIb3yIte KhONKn Left/Right dIy I3MeHeHHa BblOpaHHoro npametpa cnedyioum o6pa30m:
PANORAMA: HactpoiKa Panorama pacunpnet foHHTaIbHy cTepeo KapTnHy dIe BkIIOUeHNI OKpykaHOuNX akcTneCKNX CnCTem dIpaMaTuueckoro 3fFekTA «O6B0JaKbAHNIA. NapaMeTpAmn RaJIOTCA OFF (BblKIIIOUeHa) n ON (BkIIOUeHa).
DIMENSION: HactpoKa DIMENSION (npotJxehHocb) no3B0nIeT Bam nowarOBO HactpanBaT 3ByKOoe NOE NO HapnaBHeHIO O pOHTaBbHix K6OKOBbIMrPOMKOrOBOpNTeHAM.CyueCTBYOT Cemb DnCKpeTHbIX HAcTPOEo T0do6.HactpOka 0CdBraeT 3ByKOoe NOE HA3d, nI MaKcMmaHbHO 3ΦeKtA OKpyKeHn. HactpOka 6 CdBraeT 3ByKOoe NOE BnpeD nI MmHMmaBHo rO 3ΦeKtA OKpyKeHn. HactpOka No yomuaHIO 3 oecneuBaTe [ ~ E ~ H I p a I b H b I ] B 6anaHc MeJdy DByMa 3KCTPemymamN.
CENTERWIDTH: Hactpojka CENTERWIDTH (shpiha zeta) no3b0nlaet Bam pactaHTb ciHraI, npeHa3naeHHbI dIae zentpaIbHoro rpomkoROBOpTeHa, haIeBbI npaBbI pfoTaNbHbe IrpomKOroBOPTeMa, paCUnpRA BOCpInHMAeMOe 3BykoBOe One. CyueCTbyIO T BOCemB DnckpeTbIX HAcTPOeK OT 0 do 7. C hactpojkoN NO yMOnuahNIO 0, cHTp He pactaHTy, IN BCN IHOpMaJUaIz eHTpaIbHOr KOHana nepeaETcH a CEHTpaJIbHBI rPOMKOROBOpTeB. MAKcImaIbHaa HacTPOka 7 cDnRaAe CTnHAI ZEHTpaIbHOrO KAHAl KLeBOMy IN PabOMy rPOMKOROBOpTeMa, CyueCTBeHNO pRITnIyuaa ZEHTpaIbHBI rPOMKOROBOpTeB IN MAKcIMNu3pyu shpiHy aydno nol. DpyrHe HAcTPOkN o6ecneHBAOT nouArOBBe N3MeHenH MeKdy DByMg kctpeymamn. HAcTPOka No yMOnuAHIO - 3.
Korda Bb3aBepuHnBceKeenaemble HactpoKn, BbIeNte ctpoky «BACK» B HxKHeu qactn 3kpaHa n HaxMnte KhoNky ENTER dJa Bo3BpTa B MeHIO hAcTpoKn BxOoB INPUT SETUP.
DTS Neo:6
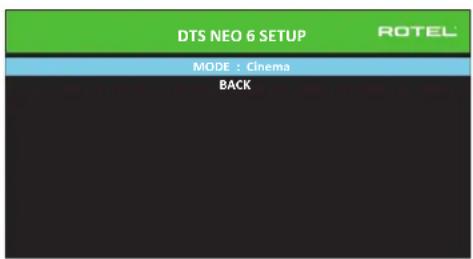
KordaDTS Neo:6Bb6paH B KaueCTBe peXIMa OKpykaIOUeero 3Byka no yMOnuHaHIO B MeHIO INPUT SETUP, cyueCTByIOT dONOpHTeNbHe bHe HAcTpoiKn i npapMeTpbl Iy ONtUMn3auN DEKOINPOBaHnO kpykaIOUeero 3Byka nIpa3NHybIX TUNOB 3aNNceE, My3bIK N 3BykOBbIX DOpOKe KInHOfNlbMOB. DTS Neo:6 NcNoJIb3yET aIroPITMbI MaTPNUHOrO DEKOINPOBaHn DnI N3BLeueHn eHTpaJIbHOrO KaHAnI N 6OKOBbIX KaHAnOB IN2-KaHAnbHorO MATEpNaIaNCTOHNKa.
B pexnme DTS Neo:6, cyueCTbyeT ToIbKO OHa BO3MOKHOCTb, DOCTyINHABIOJDMHeO: Bb6Op peXmOB Cinema nn Music. McnoIb3yTe KhoNkL eft/Right Ha nyIbTe Dny Ira Bb6opa oDHorO nHx.
- Bb6epTe CINEMA nOITUMMaUeKoDnupOBaHr DTS Neo:6 dIa 3BykoBbIX dopOKe KInHOΦmMbMOB.
Bb6epnte MUSIC nOHTUM3aunn deoknpobAHNA DTS Neo:6 dny My3blkAnhX 3anncen.
Korda Bbl 3aBepwnn BCE xenaemble Hactpoyn, BbDnenTe ctpoky BACK B HxKnH qactn kpaHa nn Haxmnte KhoNky BACK Ira Bo3Bpata B MeHIO Hactpoyn BxodOB INPUT SETUP.
KoHfIpypOBAHne akyctnuecknx cnCTem n aydno
3TOTpa3dienPpOeccaHAcTPOKINOnNcBtAEyHKTB,KacAoUeCEBOCpOu3BeDeHn3ByKa,TaKneKaKYNcNOaKyCTUeCKHXCTeM,ynPaBHeNE6aCOM,BKIOUaPa3dENITbHbIeΦNbTpblCaBbYepa,yCTaHOBLeHneOINHaKObBxBVIXoHbIXypOBHeiDnBceKanAIOB,NACTPOKn3aepJekNnapamETpueeckoRo kBAIaNepa.
HnHaHe KOHpyaun akyctnuecknx cnCTem
IOMaWHne KINHOteATpaJIbHbIe CNCTEmbl OTNIuAOTcYNCIOAMKcTNUeCKNX CNTEM N 6acOBbIMn cNOcO6HOCTMn 3TNX aKcTNUeCKNX CNTEM. YcTPOCTBO IpeNlaraet peKIMMb OkpyKaIoUeero 3Byka, npncnoC6JIeHbE K CNTEMAM C pa3NJHbIM mUCNOM aKcTNUeCKNX CNTEM n FyHKUaMn ynpabLeHn6 bACOM, KOtOpBIE nepeDaioT6acOBy uHfOpMaUHO HA rPOMKOrOBOpTeB (akCTNUeCKNE CNTEMbl), HAnlyuWMm oBaPOM CNOC6HbE ee o6pa6aTbIBaTb, -ca6Byepbi n/nn 60bnJWe aKcTNUeCKNE CNTEMbl. DnI NOUYHeNr ONTMaJIbHbIX XapAKTEpNCtIK, BblONJHbIy Kya3aTb POnecCOPy NCNo aKcTNUeCKNX CNTEM B BAWei CNCTEm E N cNOc PaNpeDeLEnHg 6aca MeKdy HmN.
HnkeJeUyIe HNCTpyKuIN NO KOHfynypuOBAHNI OTHOCNTK KrPOMKOrOBOpTEnLM LARGE (60nbun) N SMALL (He60bnun), 4TO 60bne OTHOCNTCA KxJxenaemOn KOhFgpaun 6aca, yem Kx fN3nueckomy pa3mepy. A Imehno, nCnolb3yIte NaCTPOUY LARGE dna Akcytnuecknx CnCTEm, KOtOpbe Bbl XOTNE 3aCTABNTB Bocponl3BOJNTB rny6kne 6acobble curnhalb. IcNoJIb3yIte Ha3NaueHne SMALL dna akcytnuecknx CnCTEm, KOtOpbe 6bl 3Byaun Lyuwe nepeabCBoB 6ac60one cncoc6hIM rPOMKOrOBOpTeHnM.CnCTema npabEnHn Bacom nepehanpabIneT 6acobvIO INHOFpaunIO T akcytnuecknx CnCTEm SMALL I nepedaet ee HA akcytnueckme CnCTEmbLARGE u/nn ca6Byeep. ETo moKet 6bIb NoIe3HO dna noHMmaHNA LARGE KaK "nonHonoIocHb", a SMALL kaK AC dna CpeDHNX N BBcOKNX YACTOT.
Pntb akyctnuecknx cuntem LARGE n ca6byep: 3Ta cnTeMa h Tepe6yeT nepehanpablenen 6aca. Bce nptb akyctnuecknx cuntem Bocnpon3BodT HopmaIbHbI 6ac, 3aIncAHHH B INx COOTBeCTBYIOUX KAHaJAX. Ca6byep BOCnpon3BOoIT HOPmaJIbHbI 6ac KaHaJa. Mexdy Tm, HopmaJIbHbI 6ac npedbAIBnET 6OJIe BeBblcOKne Tpe6OBaHN K CnOco6HOCTM OCTaJIbHbIX akyctnuecknx cuntem IN ycINNTeJeN, KOtOpbe INx Bo36yXdaKOT.
PbakcytuecknxcuCTem LARGE,ca6byepoTcYCTBye.HopMaIbHbi 6acn3phiOHTaNbHbIX,CEHTpaJIbHOrO 6OKOBbIX KaHaIOB BOCpON3BOmNTc erO COOTBeTCTBYOUIMM rPOMKOrOBOpITeJIAMN.
Bce akcyteckne cncTeMbI SMALL n ca6byepe. HopMaIbHbI 6ac co Bex kaHaIOB nepeHApBLeH hca6Byeep.Ca6Byeep onepnpyET BCEM 6acom.3a KOhOpya IImeT pI npmUyecTB: rly6okn 6ac BocnpOn3BOoNTc HAn6Ooe npncOco6HeHbIM K Hemy rpOMKOrOBOpTeMe, OCHOBHe AkyCTnueeckne CNTeMbI MOrTy INpTa TNIwe, C MeHbIMN NCKaKeHnAMN, NTpe6OBaHIM K MoUHOctN yCUNITeJI CHINKeHb. TaKaONOHpyaIgMOrJa 6bIT peAIn3OBAHa C NOLOHbIMN INY UMeHbWeHHbIMN OCHOBHIMN rPOMKOrOBOpTEJIaM.N Y HeKOTbpIX CNYaX, OHa paCCMaTpNBaETc N C HAnOBbIMN rPOMKOrOBOpTEJIaM. 3Ta KOHpyaIgMMeT pENMyueCTBO, KOrDa pa6Otae T CNTeMoY ycINITeJIyMEpeHHoH MOuHOCTN.
- ΦpoHTaNbHbIe akyCTnueckne cnCTembl LARGE, cHTpaNbHbIu 6OKOBbIe SMALL n ca6Byep. HopMaNbHbI b6ac ot cHTpaNbHoro n 6OKOBbIX akyCTnuecknx cnCTem SMALL nepeHaNPaBNe H a foPoHTaNbHbIe akyCTnueckne cnCTembl LARGE n ca6Byep. fPoHTaNbHbIe akyCTnueckne cnCTembl LARGE BOCPON3BOJrNt XcO6TBeHHbI b6ac NIIoc nepeHaNPaBnHbI b6ac ot akyCTnuecknx cnCTem SMALL. Ca6Byep BOCPON3BOJrNt nepeHaNPaBnHbI b6ac OT BCEx OCTaNbHbIX KaHAnOB. 3Ta KOHpRypaun MoKet 6bItb npMeMEmo C npao OyeH CNOC6BHX fPoHTaNbHbIX akyCTnuecknx cnCTem, BeDMbIX 60nbIM YcNJNTeEM MOUHOCTN. IoteHuaNbHbIM HeOCTaKOM CMeaHbIX KOHpRypaun LARGE/ SMALL rABnETcTo, yTO 6acBoBIM dnaNa3OH MoxKet 6bItb He TAK xopoIo corNaCoBaH NOKaHaJIbHo, KAK OH Mor 6bItb CorNaCoBaH B KOHpRypaun co BCEMn rPOMKOROOpTeYAMSmALL.
IPIMEYAHHE: Pacmmpubar anbmepeHamubnyo konfoyupaio c komnlekmom camellumbl/cab6yep e kaucecmee fpohmanlbhix akymcyeckux cuscmem, cdeyume uncmpkyuamnpou3oobumela aycmueckux cuscmem, coedunnoe bxdblicokoo ypobnaakmubnozo cab6yepa henocepdmbeHHc bixohamdu pfohmanbblx akymcyeckux cuscmem npouecoppa, a camellumbl-ko6cbenHompya3denumbHommy funbmpy cab6yepa. B makou konfozupauu, akymcyeckue cuscmembl 6blnblkaccuupuobahk kAK LARGE, u hacpmoukou cab6yepa 6bln6bl OFF (bkiouen) dnerbcex pekumob okpykaonuoe 3byka. Bo vempraocnpou3beHure He mepremca Hukakou unfopmauu, nomomy mto cuscema nepenpanpaernem bacobyu unfopmauho na fpohmanbhe akymcyeckue cuscmembl LARGE. Nocokbky maKaan konfozupaun zapanhmuey madekauyip pa6omy camellumob, ucno3yra cob6mbenhble pa3denumbHne pfunbmpia kcycmueckux cuscmem, oha umeem onpe0dennhie hedocmatku BCMBcne kanubpoukucuscmembu, b obseem cnuyae, he moxem 6bmb pekomedobana kapanodounmumenbna.
KoHpynpobAHne akyctnuecknx cnCTem - Speaker Configuration
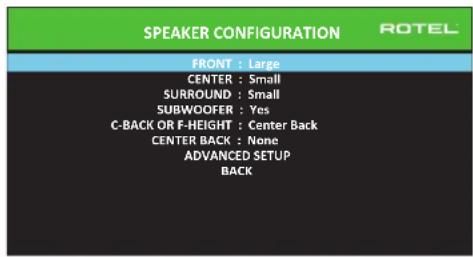
MeHIO SPEAKER CONFIGURATION nCnoIb3yeTc IaI KOHfNpyaun npouecoppa RSP-1582IpaIpmHeHn CbaIIMM KOHNpeTHbIMn rPOMKOrOBOpUTeIAMn IdaonopeJeneHn KOHfNpyaun ynpabJeHn 6acm, KaK OINcaHO B npdeBlyuem o63ope. To MeHIO DoCTyHn u3 rIaNbHorO MeHIO MAIN.
B hem doctynbIcneIyIOuIe NaHcTpoKn akyCTnuCecknx cInTeM:
FRONT SPEAKERS (small/large): Ncnoj3yute NaCTpoKy LARGE, qTo6bl 3aCTaBnTb foPHTaNbHBe AkyCTneCKNe CnCTeMbl BOCpno3BODnTb Hn3Kn 6ac (nonHyIO nonOcy).Ncnoj3yTe NaCTpoKy SMALL, qTo6bl nepeHaNPaBtB HopMaIbHbI 6ac OT aTnx AkyCTneCKNx CnCTeM Ha cABByep (OTfNlTpOBaHb BBICOKMe YaCToTB).
CENTER SPEAKER(S) (large/small/none): IcnoIb3yIte LARGE (He doctynha, ecnn φροNTaJIbHbIe akyCTnueckne cnCTeMbI SMALL), γTO6bI 3aCTaBnITb ζeHTpaJIbHbI rPOMKOROBOPnteB BOCpON3BODInTb HN3KN 6ac (NoIHyO NOIocY). IcnoIb3yIte hAcTPOJky SMALL, ecnn BaI WcEHTpaJIbHbI rPOMKOROBOPnteB NMeET orpAHuENHyyu HN3KOaCToTHyU cNOco6HoCTb, INI ECIN Bbl PpeDOnuTaeTe nepeDaBaTb 6ac Ha cABByΦep (OTΦmNbTpoBaHbI bICOKe qactoTb). Bbl6epNTe NONE, ecnn B BaIeu CnCTeME OTCyTCTByET rPOMKOROBOPnteB ζeHTpaJIbHoro KaHaA (peKIMMb OKpyKaIoero 3Byka 6byT AToMaTnueckn DeIITb BCIO nHΦopMaIIIO ζeHTpaJIbHoro KaHaA NOPoBHy MeJdy DByMRA φροNTaJIbHbIMr POMKOROBOPnteAMn, co3dabAA KaxyUnsca ζeHTpaJIbHbI KaHaI).
SURROUND SPEAKERS (small/large/none): IcnoIb3yIte HaCTpoIky LARGE (He doCTynHa, ecn foPOnTaJIbHbIe akCTUneCKNe CInCTembl SMALL), 4To6bl 3actaBntb 6oKobIbe akyCTUneCKNe CInCTembl BOCpON3BOJNTb HN3KN 6ac (NONHYIO NOnOcy). EcIn BaIIN 6oKOBBe akyCTUneCKNe CInCTembl IMEOT OrpaHEnHHYIO cTocO6HoCTb K BoCpON3BeDeHNIO 6aca, INI ecn BlI ppeIPOuHTaTe NepeDaTb 6ac Ha ca6Byfepe, nCNoIb3yIte HaCTpoIky SMALL (OTfNilbTpOBaHbI bICOKNE HaCTObl). EcIn B BaIeN CInCTeME OTCYCTBYOT 6oKOBBe akyCTUneCKNe CInCTembl, Bbl6epITNE NONE (6oKOBBe KaHaJIbIo6abJIyOTcK FoPoHTaJIbHbIM rPOMKOROBOpTEJAM, TaK TTO HnHuero N3 3aIInc He nponaadaet).
SUBWOOFER (Yes/Max/No):HacptpoKa YES AaJIaTe cTaIaDpTHoH aCtpoKo, ecn BaAa CnCTema Nmee TaCByepc. Ecn BaAa CnCTema He Nmee TaCByepa, Bb6epnte NO. Bb6epnte HAcTPOKy MAX dJa MaKcImaIbHorO 6aca Ha BbIXOde BmecTe ChopMaIbHbIM 6acom, dy6IpyembIM 06OMM Ca6ByepaMn IIOb6bIMN φpoNTaIbHbIMn ΓρOMKOrOBOpUTeLamM LARGE B CnCTeme.
C-BACK/F-HEIGHT:K RSP-1582 MOXHOIIOCoEINHHTb CEHTpaJIbHbIE TbIOBbIE AC BepxHne pOHTaJIbHbIE AC. BbIbpaIte Center Back,ecn y Bac cTb ceHTpaJIbHbIE TbIOBbIE AC,IIu Jke Front Height ecn y bac eCTb BepxHne pOHTaJIbHbIE AC.
CENTERBACK(1large/1small/2large//2small/none):HeKOTOpBie CnCTEmbI IMeHT OIN INIIN DBA DOJONHInTeBbIX LcHTpAlbHbIX TBIObX TpOMKOROBOpTEnIA. NcNoJIb3yIte HAcTPOkiY LARGE (He DoCTyNHa, eCNI φpOHTaNbIbe AkyCTuYeCKne CnCTEmbl SMALL), UTO6bI 3actaBntb Bauin TBIOBBe AkyCTuYeCKne CnCTEmbl BOCIpOnBBOIDNTb Hn3kN bac (nonHy noNocy). NcNoJIb3yIte LARGE1, eCNI y Bac
OINH CEHTpaIbHbI TbIIOBO rPOMKOROBOpTeB (6.1) IINLARGE2 (7.1),ecnny BAC DBA CEHTpaIbHbIX TbIIOBbIX rPOMKOROBOpTeB (7.1).EcnN BaAun TBIOBBle AkyCTMNECKIE CNCTEMBI IMeOT ORPAHNHEHHYIO CNOOCHOCT K BOCIPON3BeDEHIO 6aca, INN ecn N Bbl npednoHTaTe nepeaTb 6ac Ha cABByep, nCnOJIb3yIte HAcTPOIKY SMALL (SMALL IIN OJHOr rPOMKOROBOpTeB, SMALL2 -dIn dByx).EcN B BaAwe cnCTeMe Het TBIOBbIX aKyCTMNECKIX CNCTeM, Bbl6epTE HAcTPOIKY NONE.C CEHTpaIbHbIMI TBIOBbIMI rPOMKOROBOpTeBIMR, Rotel XS eXtended surround,Dolby Digital EX, DTS-ES,Dolby Pro Logic II, DTS Neo:6 IN dpyIne DeKOdepbI oEocneat CnHaJIbI CEHTpaIbHOro TbIIa IINIO60re pexIma OKpykaIoUero 3Byka.
FRONTHEIGHT (large/small/none): Θa NaCTPOJa DaOCTyHa, eCn Bb6paHo F-HEIGHT B KOHmrypaun Pro Logic IIz. Bb6epnte HAcTPOKy "Large" (He DocTyHa, eCn fpoHTaBhIe 60KOBBe akyctuweckne cncTeMb SALL), yTo6b3aCTaBtB BAsn BePxHNe fpoHTaBhIe AC BoCpON3BODInb Hn3kN 6ac. Ecnn Bb npEtnoHTaTe, yTo6b6ac noWeH na C6Byfep, nCnoB3yTe HAcTPOKy "Small".
ADVANCED:B 06uem cnyae, KOHfNpyaunayakctnuecknx nCTEm RAJIeTCA rnoabhno Hacptpokn DnB CexpeKIMOBOKpykaiooero 3Byka NdoJHKha 6bIb BInOJIHeHa OINHpA.ODnako, DnAOCobix O6cTOrTeNbCTB, YcTPOCTBO 06ecneuBaet BO3MOXHOCTb HAcTpoKn KOHfNpyaunm AkyCTNUeCKNX CNTEm He3aBNCMIO nI KAKDORIOPEKIMOB OKpykaiooero 3Byka.Bb6epnte cTPOKY ADVANCED SETUP B MeHIO n HaxMMTE ENTER dI nepeXoJa B MeHIO ADVANCED SPEAKER SETUP, ONncahHoe B CnElyooue pa3dene.
ДлгИЗМЕHENHЯнСТРОДКВМEHNO SPEAKER CONFIGURATION,пелмспгte Bыденине нажелаemуюстрку ппимоши Кногк UP/DOWN nИSCNOLb3ynte Kногк Left/Right dIЯп repeknIOUeHЯdOCTYnHbIX hAcTpoE.ДлгДВOSTBpaSeHЯВ rIaBHOmeMeHIO,Bыдениестрку«BACK»ВнЖнeч acTIN ekpaHa nIln HaJxMNTe Kногк BACKДЯвOSTBpATAK HopmaIbHoP pa6ote.
PacunepHHaHacrpoKa akyctuuecknx cnCTem
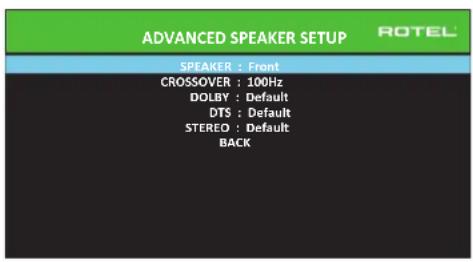
B 60nbunHCTBe Cnyaeb, OnilcaHHa Bblwe CTanapTHA KOHpypaunn ABJETcR IIObIbHO HACTPOKO IN MOKET 6bIT npIMHeHa DnBCEPekIMOB OKpykaUOero 3Byka.ODhako npoceccop o6ecneuBAet BO3MOXHOCTB Nl0b3oBaTeNcKOrO 3MeHEHRA 3TNx HAcTPOE K dTpe Pa3NJuHbIX pekIMOB OKpykaUOero 3Byka.Dolby, DTS stereo.HanpIMep,BblMOnN 6bYctAHOBHTb peKIMB Dolby n DTS dnia 5.1-KaHaJIbHorO 3Byka, B TO BpEMKaK peKIMSTERo 3MeHaeTcH KaONHpyaumIO 2 aKCTNUeCKnx CNTem C c6bByfepmn 6e3 Hero.Kpome TOrO, MeHO ADVANCED SPEAKER SETUP no3BOJnER T Bam BB6paTB Nl0b3oBaTeNbcKoe 3NaueHme YacToBt pa3dena PJIbTpBa BICOKNX AcTOT nIg PpOHTaJIbHbIX, CEHpAlbHoH, 60KOBbIX n TBIOBBIX aKcyTNUeCKNX CNTTEM.
IPIMMEYAHNE: B6oBbUHcMeB cucmem,3aueHn noymoNauHIO 8mOM MeHIO oecneayam Hau6Oe npedeckazMyeMbtepe3ymbamsu, u6oBbUHcMBy noB3OBaMeNe He mpe6yemcUzMeHnMbHukakux HacmpoeK. BbldoJXbNoIHOcmBIO noHMamb ynpablenue bAcom U umemb eckyo npuunHy dna Heo6xodumocmu noB3OBaMeNBckou konfoZupaquuu neped u3MeHeuem 3mux hacmpoeK. B npomubHom cnuyae, nponycume daHnyo cmambu O nepexodume K hacmpouke ca6byepa SUBWOOFER SETUP.
Hnke nepeuynneHb DocTyHbHe NaCTpoKNB MeIO ADVANCED SPEAKER SETUP:
SPEAKER(Front/Center/Surround/Center Back/F-Height/Subwoofer):Bb6epnte Na6op akyctuuecknx cnCTem, KOtOpBy Heo6xOJMo cKoHΦnIpynpoBaTb C nIb3OBaTeNbCKMn HaCTpOJaMn.
ПРМЕЧАМ: "F-Height"nomялемскak onuя,ko2da bblb6upaeme "Front Height"B hacmpoKe C-BACK OR F-HEIGHT B MeHIO SPEAKER SETUP u He docmynha dnycmanobok CROSSOVER,DOLBY,DTS unu STEREO.
CROSSOVER (40Hz/50Hz / 60Hz / 70Hz / 80Hz / 90Hz / 100Hz / 120Hz / 150Hz / 200Hz/ OFF): Θа NaHCTPOIKA BepxHNe HnHKeH NaCTObI Pa3dEJaДлгКрСССБЕРа AKTINBнAЯ TOnbKOДЯ AC TIna SMALL C Ca6ByFepOM. KOrDa Bbl3axOJITe B MeHIO ADVANCED SPEAKER SETUP BnepBbIe, TeKUJIeE 3NaueHnHa cactOtBЯ Pa3dEJa 6yET NOKa3aHO B 3ToI CTPOKe, KOTOPa YCTaHOBnEHa Na «100 Γu» no yMOnuAHnIO.ИЗмEHnIte 3NaueHne B 3ToI CTPOKe, TOnbKO eCInBbl XOTITE, YTObI YeKUaAЯ AC ImeJa IpyrYIO cactOry pa3dEJa.3Ta HAcTPOIKA BnIeT TOJbKO Ha nepeHApabJIeHHbI bac.
IPIMUEAHHE: Hacmpouka OFF (docmynnna monbko dna c6byepa) nepedaem nonHonolochui cu2Han Ha bau ca6byep, ymo6bl bbl mo2nu npumehm bcmpoehhui 8 Hezo H3Koyacmomhui fumbp.
IPIMUEAHHE: Kozda zpomkozobopumelb ycmahOBlen LARGE B MeHO SPEAKER SETUP UuB 3mOM MeHO, Hacmpouka vacmomba pa3delenue He docmynha 88duy mozo, umo, no onpedelehuo, zpomko20obumert Large bocnpou3bodum noHb duana3oh 6e3 nepenhanpaBneHua baca Ha ca6byep u 6e3 pa3denumbehozo funbmpa. Ahano2uHno, Hacmpouka OFF dna pa3denumbehozo funbmpa c6byfepa He docmynha dna akycmuqueckux cucmem SMALL, nockobyk SMALL oHaayaem, umo zpomko20obumelb 6ydem nepenhanpaBnmbc0u bac hXke yka3aHHO dna pa3denumbehozo funbmpa vacmombi Ha c6byfep. Kpome zo, Hacmpouka CROSSOVER He docmynha dna 8xoda MULTI INPUT.
DOLBY(Default/Large/Small/None):YctaHabnBaTeKyuIrpomKorOBOpTeB (nokaaHHb B nepBoB CTpOke) B Large, Smal Nn None, ZameHra BeyUIO hAcTpoKy B MeHO SPEAKER SETUP. 3Ta HacTpoKa 6yEd T BnAeTOJbKO npi DeKoHApOBaHN Dolby Digital nnn Dolby Pro Logic. Ecn Jx Be bXOTnte IcNoB30aBt yCTaHOBKn pa3MePob AC, 3aDaHhBe B MeHO SPEAKER SETUP, BB6epnte "Default". YctaHOBKa "None" HeDocTyHa nA AC FRONT.
DTS (Default/Large/Small/None): AnanorunhBie onncaHbIM nIra Dolby napameptbl, 3a NCKJIueHcHemTORo, UTO 3TN HAcTpoKIN BIIIAOT TOJIbKO npn deKoIupobAHN DTS n DTS Neo:6.
STEREO(Default/Large/Small/None):AHaIaONuHbIe OINcAHHbIM Dn Dolby npapaMeTpbl,3a NcKIIoueHNem TOrO,HTo 3Tu HAcTpoKn BInraIOT TOJIbKO B peXmme OkpykaIoUero 3Byka STERO.
Дясбуфера npи�ьendeны Вьше Habсгpoидэ DOLBY, DTS n STEREO CTahOBЯТС "Yes/No/Default".Сбвуфер nepexoindВ noLoxeHne "Default" ecnФронтайы AC 3аданы кak "Default", n OH 3adaeTcK "Yes" ecnФронтайы AC 3аданы кak "Small".
INPMMEYAHNE: Ko2aΦpoHmAbHbIe akycmuueckue cucmembHaCmpoHbHa ycmahoeku no ymonuHIO B MeHO ADVANCED SPEAKER SETUP, oco6beHacmpouku "Large/Small/None"dN DOLBY, DTS uNt STEREO He docmynHbI dny dpyzux akycmuueckux cucmem. Emu akycmuueckue cucmemb Bydym unonb30abmb hacmpouku no ymonuHIO.
Hactpoika ca6Byepea - Subwoofer Setup
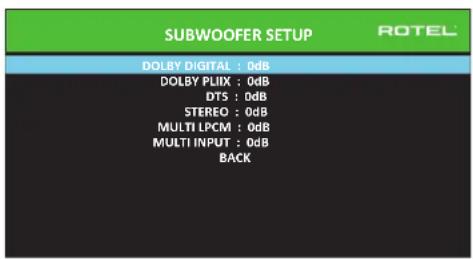
IeTb CToK B MeHIO SUBWOOERSETUP no3B0nIOT npHynteHbHO OTMeHHTb HacTPOKn, 3aDaHHe B MeHIO Speaker Level Setup (cm. cIeDyUoN pa3den) Ia KaKdOrO IV3 KOHKpeTHbIX pexmMoB OkpykaIoJero 3Byka.
DOLBY DIGITAL:
DOLBY PLIIx:
DTS:
STEREO:
MULTI LPCM:
MULTI INPUT:
Korda Bbl nepexouneB MeHIO SUBWOOFER SETUP n3 rnaBHoro MeHIO MAIN, Tekyu nn pexMM OKpykaioeero 3bya abTomatnueckn bbldeJeTcN. McnoIb3yIte KhoNkn Up/Down nI nepeoxoA B KOHKpeTHbI pexMM OKpykaioeero 3bya, a 3aTeM KhoNkn Left/Right nI NOCTpOKn UPOBHa c6Byepa dner Tekyuope pexIMa OKpykaioeero 3bya. HAcTpoKe ocUseCTBnEeTC B dnuana3OHe perynnpobKn OT-9 dl+9 dl N MAX (+10 dl). HAcTpoKa O dl 03hauaet, yTO yKa3aHHb peXIM OKpykaioeero 3bya 6dyET nCNoJIb3OBaTB BeUYsui npOBeHc c6Byepa. IIO6aIpyraH nACTpoKa CDBVaer BeUYsTu HAcTpoKa -2 dl N KOHKPeTHORO pexIMa OKpykaioeero 3bya 03Hauaet, YTO npOBeHb c6Byepa 6dyET Ha 2 dl TNIe, YEM BeUYsui npOBeHc c6Byepa, KOrda BvIbpaH daHHb peXIM OKpykaioeero 3bYa. IcNoJIb3yIte EIN HAcTpoKu npOBeHc c6Byepa dner NOCTpOKn OTHOCTeBHorO BBxOHDoro npOBeHc baca B pa3mNUbIX pexIMax OKpykaioeero 3bYa. INMeHnebeUYsero npOBeHc c6Byepa yBENuHT nIu yMeHbUHT npOBeHd nR Bce pxKIMOB OKpykaioeero 3bYa.
Mbl pekomehnyem haatab c hactpoek dIy Bcepx pexmOB okpykaoioero 3byka npu ypobHe no ymoIaHnIO 0 db b npoucece kann6pOBKn cnCTeMb IncblTaIbIbHM CnHaIOM Hn NapnoD ocBOeHHN oocne 3Toro. Korda Bbl npocnyuINBaTe pa3nnuHbM MaTePnA nCTOHNKOB B TeueHne HeKOtOpORo BpeMeHn, Bbl MoKeTe 3aMeTb, YTO ONpeDeENHbIe pexmBb OKpykaiooero 3byka npon3BODAT CNIKKOM MHO rnn CNIKKOM Mano 6aca ot ca6Byepa. Tolko nocLe 3Toro, NcNoIb3yIte 3Tu HAcPoKNMeHIO dI IN3MeHEnK KaXdOro pexmAb.Bo6Ie CMyae, eCIn BeUYsui npovBeh c6Byepa yctAHOBlen DOnkHbIM o6pa3OM (t.e. He cNIuKOM rPOMKIM), BOTJeNbHbIX HAcToPoiKaX dIy KAKDoR OpeXmAb OKpykaIoUeO 3Byka Het Heo6xOAnMoCTn.
Дя ВОЗВРАСЕНЯ B ГЛавноМЕнJO, ВБДЕЛNTE CTPOK Y BACKB H NЖКЕЧТУЗКРANAOSD ИИN HAZMITE KHOJNY BACK HApyIbTe DY IIN Ha nepeHNeI NaHEnIДя ВОЗВРАСЕНЯ K HopMaJIbHoi pa6Ote.
HactpoIka BbIXoIDhIx ypOBHeAkyCTnueCkNxCnTeM

PIMMEYAHNE: Ecnu bckonfuzypupobau bawy cuminemy dny npumehnue deyx uehmpanbhex mbnoeix akymueckux cuminem, mEHIO noBumc dononHumehna cmpoka, daohua bam 803MOxHocmb He3abucmo ompezynupoabam akcmueckue cuminemb CENTER BACK RIGHT uCENTER BACK LEFT. Ecnu ke bblbpaun b MeHO Speaker setup cepxuefpohmnbhe AC - Vertical Height, onuur Center BACK cmehumra Ha FRONT HEIGHT.
B TOM MeHIO NcNoIb3yeTcNcblTaTeNbHbCnHbA B VnDE OfPhNbTpOBaHHORo PO3OBOrO 7yMa DnI yCTaHOBKn paBbX yPOBHe rPOMKocTn DnI BCex aKyCTuuecknx CNTem (FRONT LEFT, CENTER, FRONT RIGHT, SURROUND RIGHT, CENTER BACK/FRONT HEIGHT RIGHT, CENTER BACK/FRONT HEIGHT LEFT, SURROUND LEFT n SUBWOOFER) dNl o6ecneueHn npaBnHoro BOCpOn3BeDeHnO OkpyKaIoUeero 3Byka. HAcTPOKa BixOaNbX yPOBHe npn NmOsNcblTaTeNbHn PnoeUpybl O6ecneuBaet Han6OJe ToHyo NODcTPOKy CTem, YTObI cNfpPoBo MATEpHaI OkpyKaIoUeero 3Byka 6bl BOCpOn3BeDeH, KaK 6bln 3aDymaHO, INBJIeTcBAxHbIM 3tanOM B KAIb6pOBKe CNTeMbl.
Длд дocунь в�го MeHIO n ocUyecTBJIeHn KaIINbPoBKN nCblTaTeNbHbIM cnHahOM, bbl MoKTe HaxOJNTbcB nLIO6m peXmme OKpyKaHOZero 3Byka, kPOMe BYPASS, n cIIO6bIM BXoDM, kPOMe MULTI INPUT. BoiDIne B ekpaHHOe MeHIO CnCTeMbl n Bbl6epITe SPEAKER LEVEL SETUP B rIaNbHOM MeHIO MAIN MENU, qTO6bI BOITN B�OT ekpaH.
Korda Bby BoiDte B meHIO SPEAKER LEVEL SETUP,Bby yCbIbIeNte NcBtAteBhB cnHnol OT BviIeENHOro rPomKorOBOpTeJI.BvIeJNeTpe Dpyrne aKyctuYeCKne cnCTeMbl, nepemeea JyKpcop Ha JxelaemyO CTpOky npri NmOoi KNHOKONOK UP/ DOWN.NcBtAteBhB cnHnol 6ydet CdbraTcCoOTBeTCTBeHHO BviIeEHHomy rPomKorOBOpTeIIO.
CnBbOBbHOM NIOLOKHeHmI IINPNOcLyuBaHnH, nepeDbRaiTe NcBbTaTbe Hb CnHbHa pa3NHyBle akyCTUeCKne CNTEmb. NcNoB3yOndn rPoMkoBOPn TeB B KaecBe o6pa3oBOrO, npocnyuBaIte OctaNbHbe akyCTUeCKne CNTEmb, KOTOpBE 3aMeTHo rPoMne Hn Tnue. Ecn 30T TaK, NoCDpOte yPoBHN 3nx AkyCTUeCKnx CNTem BBePx NnBn3 (C uarom 1 db), nCnoB3yKnOknk Left/Right. PpOdoJkaIte nepeKlIoueHne akyCTUeCKnx CNTem n NOCDpOky, noka BCE akyCTUeCKne CNTEmb He 6dyT OndNaKOBoI rPoMkoCTn.
Длгь ВОВБРАЕСИЙВТНАВHоМЕнЮ,БыДENITE CTРКУ [BACK]В HИЖКЕЧАТМ ЗкраHA OSД ИИ NAKMITE KONKу BACKHa ПильTe ДУ ИИ NапеДен панени Длгь ВОВБРАЕСИЙНOPмALьHо павOTe.
Kan6pOBKa npn nOmoOnu n3MepeTEna 3BykoBOro daBHeHrA SPL:
KanibpoBka CnCTembl npnnomoo n3Mepnten 3BykoBOrDabNeHn, BMeCTO uei, oecneuBaet6oeeToHbpe3yNbTaTbI uynuHaertnapaMeTpbiCnCTembl. HeOporne n3Mepnten aydno daBnHn unpoko DocTyNb, a npocedypa n3Mepen -6bICTpa HncNoxKnHn.
I KODINPOBAHNE Dolby, n DTS yka3bIAIOT cTaNapThb IyOBeH KaII6pOBKn IaB CEXTeAToPb, YTO6bI rapaHTnPOBaTB BOCPN3BeHHe 3ByKOBbIX dOpOKe Ha IyOBHe TropMKoCTN, 3aDymAHHom peKNCCEpOM KINHOHbMa.3ToT o6pa3OBoH bIyOBeH DoJKeH O6ecneuTH BOCPN3BeHHe dAnorHa H eCTeTBEHOM IyOBHe HopMaJIbHO PeYn BMeCTe C camblm TropKMIM 3ByKaMn B IIO6om EHNHcHOM KaHane npImepHO 105 db. NcbltateNbHbe CnIHanbl Ipouceccopa ReHeppyOTcHa ToCHOM UyOBHe (-30 db.n.) OTHCNTeHbC amOrTo TropMKOrO 3Byka, KOtbpM MoKet 6bIb 3aIncaH uippoBbM cNooc6Om. Ho 6pa3OBOm IyOBHe Dolby nN DST, 3TN nCbltateNbHbe CnIHanbl DOnkHb IpnON3BODITb OTCET B 75 db Ha n3MepeTene 3ByKOBOrO daBJeHn.
UctahOBHTe N3MePHTeB 3ByKOBOrO DaBHeHnHa dMaNa3oH 70 5 np OTKnke SLOW n B3BeuWbAHm C, epKHTe erO daNeKo ot BaWero Tena B BaaWem noLoKeHm DnI npocNuWbAHn (yCTaHOBaNkA N3MePHTeHa WtATNB OT KAMEbp6 o6ntercaet npoccc). Bb MoKeTe HapPaBnTb N3MePHTeB ayDnO DaBHeHn Ha kAnDbI N3MePEmbI rPOMKOrOBOpNTb; OdHako, paCNoJoxHeH e N3MePHTe B fKnCpOBaBHn ToUke npn erO HanpaBHeHn Ha notOnok O6nErTaET N3MepeHn I daEt 6olee HAdExHbIe pe3yNbTaTbI.
YBENHBAIte OCHOBHyIO rpoMkoCTb Ha IPOueCope, NOKa I3MePHTeNB 3ByKOBOrO DaBHeHnI He NOKaKeT 75 d5 (+5 d5 Ha nnana3OHe) BO BpEma BOCpON3BeDHeN HcNbITaTeNbHOrO cunHaHa ODNHM n3 φoPHTaJIbHbIX akCyTnecknx CnCTem. 3aTeM, nCNoIb3yIte OTdJeNbHbIe NOKaHaJIbHbIe perynipOBKn B MeHIO TEST TONE IJnnoCTpOKn KaKDoRn I3 aKyCTnecknx CnCTem, BKNIOUcAcbByFep, K TOMy JKe camOMy yPoBnIO 75 d5 Ha n3MePHTeNE 3ByKOBOrO DaBHeHnI.
IINHHE: H3-3a xapaekmuu B3Bewuabua u3Mepumena U bunHUMKOMHAMbIpeAubHypOBeHa c6ByepeMoXem 6bIMb HEMHOZ bIue npU u3Mepenu. DnA KOMNEHcauu, Dolby peKoMeHdyem HacmpauBamcb6ByepeHaHeckonbKOdeu6enHuKe BO BpEmKaUN6PO8ku C nomoubu u3Mepumena (m.e. c6ByepeDOnxhen nokAsbAm72 db Emeco 75 d5).B KOneHOM umoe, npAbunbHbU yOBoE h c6Byepe DOnxhen 6bIMb onpedelen Baum LNHybIM BKcOm, u HeKoOpmbcnywamenu npednoumaiom ycmaHaeLubamb e0 bIue 75 d5 dna 3Byko6bIX dopOkeK KhoofunbMoB. N3luHne noDcePknhybte 6acObbe 3fkekmbl nocmynam 3acem npAbunbHo2oNoDMeuUBaHur COsOBHbIMU zpOMKo2OBOpumelaMu u cunbHO Hazykaiom ca6Byepeu e0yucumelb. Ecnu bI moKeme NoKanU3OBamb 6ac om c6Byepe, e0 yOpeEHb MoKem 6bIMb cUnkOM bICOKUM. IJ moHKoHacmpouKu yOBoHra c6Byepe Moxem 6bIMb nonE3Hou My3bika, nockoNky U3nuHui 6ac JyRnemca ne2ko pa3NuUmbl. PpaBunhag HacmpouKa 6dEm pa6omamb XopoUO dnn My3bku U 3Byko6bIX dopOke KhoofunbMoB.
3anomnhte hactpoky Beyuero ypOBHr rpmkOCTN, nCnoB3oBAHHyIO BO BpEMr 30tou KAN6pOBKn. TTO6bI BOCnPON3BODHTB 3ByKOBYIO DOPOKKY Dolby ININ DTS Ha o6pa3oOBOM ypOBHe rpmKoCTN, npocTo Bo3BpaNTecb K 3ToT HACTPOKe rpmKoCTN. OTMeTUM, YTO 60JbWHNCTBO CnywateNe i DomaunHX TeaTPOB HAXoDT 3Tu HACTPOKy N3NIuHe rpmKoN. PpeOCTaBte BaWMc Co6CTBeHHbIM Ywam CyuNTb O Tom, KaK rPOMKO BOCnPON3BODHTB 3ByKOBBle dopOKKN KHOHOFNBMO I COOTBEcTBENHO OTPerynpyTe BeDuyn perynTop rpmKoCTN. He3aBNCmIO O TBaWNx ypOBHe npocNuWbAHy, peKOMEHyETcnpImeHeHne N3MepuTeNa AyDNO daBHeHnI dNkAN6pOBKn ODNHaKOBOrO ypOBHd Ncex AkyCTuYeCKNX CnCTEm B CnCTMe.
Hactpoika pacctoHm/3aepKKdo AC -Speaker Distance/Delay Setup
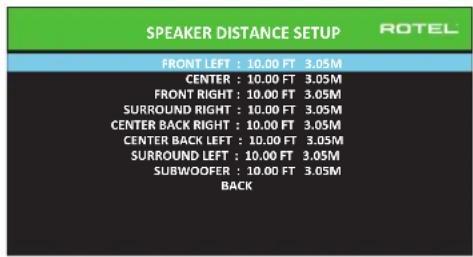
MeHIO SPEAKER DISTANCE SETUP, KOtOpoe DocTyHNO n3 rnaBHO ro MeHIO, PO3BOJnRE BAM yCTaHaBnBaTb 3aepKky dIra OTeJeBbIX akCTNuCeKnX cnCTem.3To rapaHTnpuyET, YTO 3ByK OT KaKdOrO rPOMKorOBopnte IprN6bBaET B NIOJOKeHne dI npocnyuBaHN ONDOBpeMeHNO, DaJke KOrDa He BCE akyCTNuCeKnE CNTeMbl paCNOJIOKeHb Ha OINHaKOBom pacCToHmOT cNyTaTeN. YBeJIuNbAte 3aepKky dIra aKyCTNuCeKnX cnCTem, paCNOJIOKeHbIX 6NnKe K MecTy dIra CNYaTeN, INyMeHbWaiTe 3aepKky dIra akyCTNuCeKnX cnCTem, paCNOJIOKeHbIX daJIbe OT MeTa dIra CNYaTeN.
Ppoeccop Rotel detaeHnactpoKy BpeMeHH 3aepKKn nIg KaKdo rpoMkoBopnten Oeyb IerKo. IpocTo n3mepbTe pacctOAHne (B cytax nII MeTpax)OT BaWero nnonKeHHIO KOaKdo rpoMkoBopnten B BaWe CnCTeme.YcTaHOBtE n3MepeHHoe pacctOAHne B cTPOke DnKaKdo rpoMkoBopnten.MHeIO npedoctabniet CTPOky DN KaKdo rpoMkoBopnten,CKOHfNpypOboHHOR B BaWe CnCTeme,NobceNeuBaET dHaapohn HActpoKn Do 10.6 MePoB (33 cyta)c warom 0,075 M (0.25 cyta), 3KBVBAeHTHbIM DonONHInTehBoH O3aepKke 0.25 Mc.
TtO6bI n3MeHnTB HAcTPOy, BblDenITE XeJaEMyIO CTPOky npi NmooN KhoNOK Up/Down n nCnNoB3yTe KhoNk Left/Right nIyBEnueHn IIN yEmhSeHHaCTPOKn 3aepKKn. IIN B03BpATA B rAabHOe MeHIO, HaxMnte KhoNk BYACK IIIN BblDenITE CTPOky «BACK» B 3KpaHe OSD. IIN Ha nepeHne IaHen nIg Bo3BpATA K HopMaJIbHoJ pa6oTe.HaxMnte KhoNk SETUP/MENU IIN Bbl6epTE «EXIT» B 3KpaHe OSD, TtO6bI BblTN I3 peKIMa HAcTPOky IN BepHyTbcr K HopMaJIbHoJ pa6oTe.
Pa3nHbIe HacTpoKn
Hactpoika cncembl - System Setup
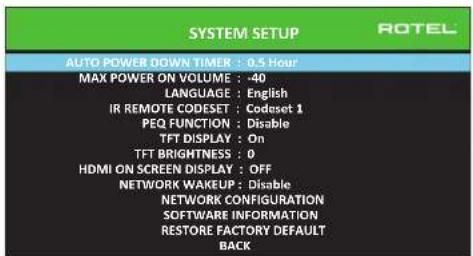
3To MeHIO SYSTEM SETUP,IOCTynHoe n3 rnaBHoro MeHIO,06ecneuBaET DocTyN K HECKOJIbKIM pa3HOO6pa3HbIM HAcTpoiKaM, pINBeDeHHbIM HInke:
AUTO POWER DOWN TIMER: Hacptpoika onpepenenet, uee3 kaooe bpema otknoaetc npocecop nocne ppebibaHnB peKmE xonoctoro xoja.RSP-1582 abTomatueckn nepexoNT B pekm STANDBY,ecn erHe nCnoIb30BaT 3aDaHHoe bpeMa.
MAX POWER ON VOLUME: Yka3bIbae t ypoBHe rPOMKoCTn, KOTOpbI 6yDeT nCnoJIb3OBAH npR BKNIOUeHH INPOueccopa, ot-70 d5 do-20 d5, c wArom B 1 d5.
LANGUAGE: Bb6npaetA3bIK DnA EKpaHbIX MeHO OSD.
Ha6op IK-KoOB - IR REMOTE CODESET: y RSP-1582 dBa ha6opa IR KoOB, KOTOpbIe MoXHO MeHrB B Cnyuae KOHpNkTa C npyUmnp npOyKramn Rotel.
Bo3MOxHbIe HEnCnPaBHOCTN
BolbunHCTBO 3aTpudHeHn B aydno cntEmax ABNIAOTc pe3yIbTaOM Hnnpabunhblx coeDInHeHn, n6o HnpabunblbHMn HactpoKaMn ynpabNeHn. Ecnn Bbl cTOLKNHyncb C np6bnMaMn, n3OJIpyTe o6NaCTb 3aTpudHeHn, npOBepbTe HacptpOnk ynpabNeHn, onpeDenite npuynH cy6oN iCenaiTe HeoXoDMble N3MeHHeH. Ecn Bbl He MoKeTe nOyUnB 3ByK OYCTPOiCTBa, 06paNTecb K COBETAM DnA CneDyoUxns CUYaC:
YCTPOCTBO He BKNIOUaETc
- Y6eHNTecb,уTO ceTeBOI WHyP BCTaBHeN B3aHIO NaHEn b npOceccopa nB paBoTaIOUyIO po3kTy nepemEHoro TOka.
- Y6eDntecb,уTO pepeKIOuATEIb POWER Ha 3aDHe IaHEn HaxoDntcB B noLoXeHN ON.
0TcyTCTByeT 3ByK C IIO6oRo BXOda
- Y6eIntecb,чTo npriIpyseHne MUTING oTKIIOUeHOn rpoMkoCTb VOLUME BkIOUeHa.
- 6eHntecb, TTO BbXOdbI npEBApNTebHoro ycNtTeN noDcoEnHebl KycNtTeIO MOoHOCnIu TO ycNtTeB BKIOueH.
- Y6eIntecb, yTO BxOJIbI NCTOCHNka NOcOeHNHeHb I CKOHfIpypOBAHbI npaBnIbHO.
- Поверьт, Уто натуюйдг АСДО MODE в Экраим мени ВИDEO SETUP АВЛЯТСА"Pre-Out Enable".
OTcyTCTByeT 3Byk OT LcΦpOBbIX INTOUHKNOB
- Y6eDnTecb,уTO uHPOBOB BXoHOB pa3bEm Ha3HaueH ha npaBnBHyI BXoHOB nCTOuHNK uTO BXoHOB nCTOuHNK cKOHnpynpoBaH dJa NCIOJIb3OBAHnC uHPOBBIM,a He aHaJIoROBbIM BXODOM.
-Поверп Te KOnнуграци npOnrрьВateя DVD ДЯrt rapaHTN,чTo aKTHBnPoBaH uΦpOBoI NOTOK n/wnu uΦpOBoI BbXoD.
OTcyTCTByET 3Byk N3 HeKoTopbIX aKyCTnueckNX CNTEm
PpOBepeBtBce coeHHeHnYcunHTeN MoHocTn N aKyCTnuecknx CNTEm.
- Поверпсы Настюк Speaker Configuration B MeHIO HacstpoKn.
OTcyTCTBye TBnEobbIXoH Ha TB-MOnHTOp
- Y6eHITcB,HTO TB-MONHOTIPOIDCOEINHEINDOJKNbIM O6pa3OM,NIPOBepTe H3NaHuEHINBXOJa.
-ПоверьтебовмостьистоникИ идсплгЯ поразшени.Сигнал спостоникHDMIсразшениem 1080p можетбытпесдан.TолькоHa TB-MOHITOp,совмостьmьс 1080p.
Ka6eHnHDMI dOJIKHBi NMeTb DInHy He 6OJIe 5 MeTpOB. - EcnBbIcMOTpIte3D NIOCTOHHK, y6eHNITcB, YTOINCTNIe MOKeT OTO6pa3NTb 3D n3o6paXaeHne.
He coBnaJauT n3o6paKHeHne H3ByK
- PIOBOpBePte, YTO JnKJzDOrO BXoJa Bbl6paH npaBnIbHbI NCTOuHKn BUNEOcNHaHa.
-Поверьт,чToHactpoKa rpynnnoBo 3aepxKHe paccTpoeHa.
Ieunpnnepeknuehenn Bxoob
YcTpoCTBOHCIOB3yETpeKeIIOUeHHeI npI NMOOuIpeI dNcoxpaHEnMaKcIMaJIbHOrO KaueCTBa 3ByaHn. MexaHueckne uenKn peIeABJIPOTC HOPMaJIbHbIMI.
BoBpMaIpeKIOUeHnHDMI NCTOuHKnOB Bo3MOXhbl 3aepxKn UΦpObBIX CnHAnOB, YTObIx INPacNtHaTb NdeKOIpOBA Tb DOnJHbIM 6pa3OM.BpMa3aepxKn 3aBNCIT OT NOkJIoueHHoro O6OpyDobAHm.
He pa6oTaIOT opraHbI ynpaBleHnA
Y6eIntecb, TTOBnynbTe DyycTahOBneHb CBexHe 6aTapei.
- Y6eIntecb, yTO IK-daTnK Ha nepeHne nahEni npoueccopa He 3a6noknpoBaH. HanpaBnIte nyIbT DY ha daTnK.
Y6eHNTecb,yTO DaTmK He npHHMaet CINbHoe NK-n3nyeHne (COnHeHbI CBET, ranoReHHoe OCBeueHne u T.n.).
- OToeHNHte yCTPOCTBO OT CTENHO PO3ETKN nepemEHNO TOKa, noOxDNTE 30 cekyHn BCTaBbTe wTeKep o6paTHo nnepeyctAHOBKn.
- Y6eHITcB,уTO ha6Op IR KOIOB B nyIbTe N B npOceccope RSP-1582 odHn TOT Xe:Codeset 1 nn Codeset 2.
TexHnueckne xapaKTepeNtukn
Aydno
1000000000(THD)<0.005%
HHTepmooyuohnhme wckaxehn(60f47Kf)<0,005%
Huaia30H BOCNPoV3BODMm6xHaCTOT
Ahanorobb oy6xod 10T-100Ku+1.5D
UΦpOBoBxOa10Γu-20KΓu+0.3D
OTHOWHEH CmHan/uym (IHFA-83eeu.)
Ahaorobn o6x0d 112
UΦOBOB BxOJ 112
BxogphayyycrbwnbHOCTb/VmneepaC
JIINHeHbI BxOa 250 MB/100 KOM
BaanacBbBxOg 500MB/100KOM
ΦOHO BXo3.2MB/47KOM
Bbxoohoypobenhpnycannrnn
HHeHHbBbXo1,0B
Baanacnbbl BbIXO2,0B
PasseneHne KaHAnos (Ha 10 KfU) >75
Uphpoboy aymyo LPCM (up to 192kHz, 24-bit)
Dolby Digital, Dolby Digital EX
Dolby® TrueHD,
Dolby Digital Plus,
DTS Digital SurroundTM
DTS Digital Surround 96/24TM
DTS Digital Surround ES^TM
DTS Digital Surround ES 96/24TM
DTS-HD High Resolution AudioTM.
DTS-HD Master AudiodM.
Bnapeo
Bxpyhie paoepenem
480i/576i, 480p/576p, 720p.
1080i, 1080p, 1080p 24Hz,
3D,4K,UHD
480i/576i, 480p/576p, 720p,
1080i, 1080p, 1080p 24Hz
3D, 4K, UHD
sRGB,YCbCr4:2:2,YCbCr4:4:4
Poiepjcka Color Space
IopdeepkKa Deep Color 126nt,246nt,366nt
HMDI BxOdb/BoOdb
Version 1.4, c noДржкон CB03HOrO
nponycka do 4Kx3K n Audio Return
Channel
06mE XapakTepehTKN
Ptope6nemma MoHocctb
45Bt
0.5 Br (standby)
120B,60T(bpcnCA)
2-11-4, Nakane, Meguro-ku,
Tokyo, 152-0031
Japan
Rotel of America
54 Concord Street
North Reading, MA 01864-2699
USA
Phone: +1 978-664-3820
Fax:+1978-664-4109
Rotel Europe
Dale Road
Worthing, West Sussex BN11 2BH
England
Phone: +44 (0)1903 221 710
Fax: +44 (0)1903 221 525
Rotel Deutschland