
RDD1580 - Hi-fi system ROTEL - Free user manual and instructions
Find the device manual for free RDD1580 ROTEL in PDF.

| Product Type | Digital-to-Analog Converter (DAC) for hi-fi system |
| Brand | Rotel |
| Model | RDD1580 |
| Weight | 5.1 kg |
| Power Supply | 120 V / 60 Hz (USA) or 230 V / 50 Hz (Europe) |
| Power Consumption | 25 W (operation); 0.5 W (standby) |
| Frequency Response | 10 Hz - 95 kHz (±3 dB) |
| Signal-to-Noise Ratio (IHF A) | 128 dB |
| Total Harmonic Distortion | 0.004% |
| Digital Inputs | 2 coaxial, 2 optical, PC-USB, front USB |
| Analog Outputs | RCA (2 V / 100 Ω) and XLR balanced (4 V / 200 Ω) |
| Bluetooth Input | Via supplied USB dongle (wireless connection) |
| Supported Audio Formats | PCM up to 24-bit / 192 kHz (coaxial/optical/PC-USB); MP3, WMA, WAV, AAC, Apple Lossless (depending on source) |
| Remote Control | RR-DD91 (infrared) |
| System Connectivity | ROTEL LINK (mini-jack), 12V trigger input, RS232 (Computer I/O) |
| Cleaning | Dry cloth or vacuum cleaner (unplug before) |
| Safety Instructions | Do not expose to moisture; unplug during thunderstorms; do not open the case (no user-serviceable parts) |
| Repairability | Internal fuse replaceable only by an authorized technician |
| Included Accessories | Power cord, USB cable, remote control, Bluetooth dongle, CD-ROM (Windows driver), remote control batteries |
Frequently Asked Questions - RDD1580 ROTEL
User questions about RDD1580 ROTEL
0 question about this device. Answer the ones you know or ask your own.
Ask a new question about this device
Download the instructions for your Hi-fi system in PDF format for free! Find your manual RDD1580 - ROTEL and take your electronic device back in hand. On this page are published all the documents necessary for the use of your device. RDD1580 by ROTEL.
USER MANUAL RDD1580 ROTEL
Important Safety Instructions
Notice
The COMPUTER I/O connection should be handled by authorized persons only.
WARNING: There are no user serviceable parts inside. Refer all servicing to qualified service personnel.
WARNING: To reduce the risk of fire or electric shock, do not expose the unit to moisture or water. Do not expose the unit to dripping or splashing. Do not place objects filled with liquids, such as vases, on the unit. Do not allow foreign objects to get into the enclosure. If the unit is exposed to moisture, or a foreign object gets into the enclosure, immediately disconnect the power cord from the wall. Take the unit to a qualified service person for inspection and necessary repairs.
Read all the instructions before connecting or operating the component.
Keep this manual so you can refer to these safety instructions.
Heed all warnings and safety information in these instructions and on the product itself. Follow all operating instructions.
Clean the enclosure only with a dry doth or a vacuum cleaner.
Do not use this unit near water.
Do not place the unit on a bed, sofa, rug, or similar surface that could block the ventilation openings. If the unit is placed in a bookcase or cabinet, there must be ventilation of the cabinet to allow proper cooling.
Keep the component away from radiators, heat registers, stoves, or any other appliance that produces heat.
WARNING: The rear panel power cord connector is the mains power disconnect device. The device must be located in an open area that allows access to the cord connector.
The unit must be connected to a power supply only of the type and voltage specified on the rear panel. (USA: 120V/60Hz, EC: 230V/50Hz)
Connect the component to the power outlet only with the supplied power supply cable or an exact equivalent. Do not modify the supplied cable. A polarized plug has two blades, with one wider than the other. A grounding plug has two blades plus a third grounding prong. These are provided for your safety. Do not defeat grounding and/or polarization safety provisions. If the supplied plug does not fit your outlet, please consult an electrician for replacement of the obsolete outlet. Do not use extension cords.
The main plug of the power cordset is a disconnect device of the apparatus. In order to completely disconnect the apparatus from the supply mains, the main plug of the power cordset should be unplugged from the mains (AC) outlet. The stand-by LED indicator will not be lit up to show the power cord is unplugged. The disconnect device shall remain readily operable.
Do not route the power cord where it will be crushed, pinched, bent, exposed to heat, or damaged in any way. Pay particular attention to the power cord at the plug and where the cord exits the bok of the unit.
The power cord should be unplugged from the wall outlet during a lightning storm or if the unit is to be left unused for a long period of time. This apparatus shall be connected to a main socket outlet with a protective earth connection.
Use only accessories specified by the manufacturer.
Use only with a cart, stand, rack, bracket or shelf system recommended by Rotel. Use caution when moving the unit in a stand or rack to avoid injury from a tip-over.

Immediately stop using the component and have it inspected and/or serviced by a qualified service agency if:
The power supply cord or plug has been damaged
- Objects have fallen or liquid has been spilled into the unit
The unit has been exposed to rain
The unit shows signs of improper operation
The unit has been dropped or damaged in any way
The batteries in the remote control should not be exposed to excessive temperature such as sunshine, fire or other heat sources.

CAUTION
ISK OF ELECTRIC SHOCK DO NOT OPEN

CAUTION: TO REDUCE THE RISK OF ELECTRIC SHOCK, DO NOT REMOVE COVER. NO USER-SERVICEABLE PARTS INSIDE REFER SERVICING TO QUALIFIED SERVICE PERSONNEL.
APPLICABLE FOR USA, CANADA OR WHERE APPROVED FOR THE USAGE
CAUTION: TO PREVENT ELECTRIC SHOCK, MATCH WIDE BLADE OF PLUG TO WIDE SLOT. INSERT FULY.
ATTENTION:POUR EVITER LES CHOCSELECTRIQUES, INTRODUIRE LA LAME LA PLUS LARGE DE LA FICHE DANS LA BORNE CORRESPONDANTE DE LA PRISSE ET POUSSER,JUSQU AONF.

This symbol is to alert the user to the presence of uninsulated dangerous voltages inside the product's enclosure that may constitute a risk of electric shock

This symbol is to alert the user to important operating and maintenance (service) instructions in this manual and literature accompanying the product.

Rotel products are designed to comply with international directives on the Restriction of Hazardous Substances (RoHS) in electrical and electronic equipment and the disposal of Waste Electrical and Electronic Equipment (WEEE). The crossed wheeile bin symbol indicates compliance and that the products must be appropriately recycled or processed in accordance with these directives.

This symbol means that this unit is double insulated. An earth connection is not required.
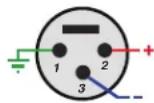
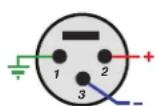
Pin Assignments
Balanced Audio (3 pole XLR):
Pin 1: Ground / Screen
Pin 2: In phase / +ve / Hot
Pin 3:Out of phase /ve/Cold

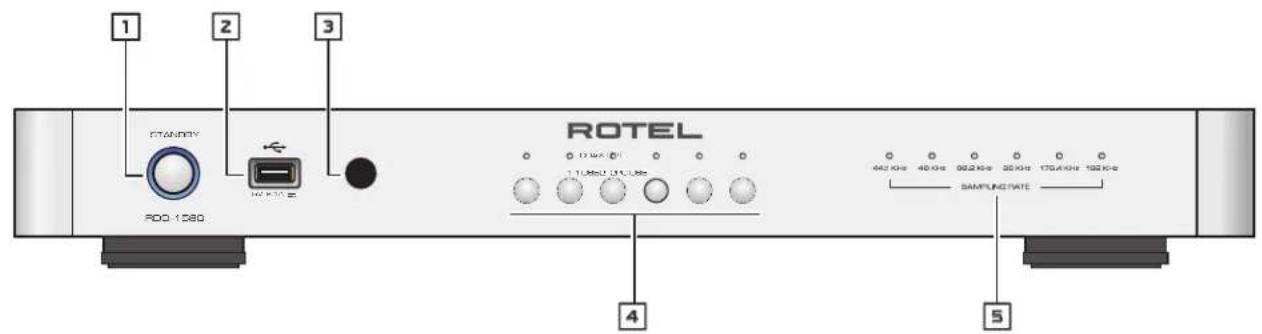
Figure 1: Controls and Connections Commandes et Branchements Bedienelemente und Anschlisse Controles y Conexiones
Bedieningselementen en aansluitingen
Controll e connessioni
Funktioner och ansluitingar
Oprahby npbaBneHn coeHHeHn
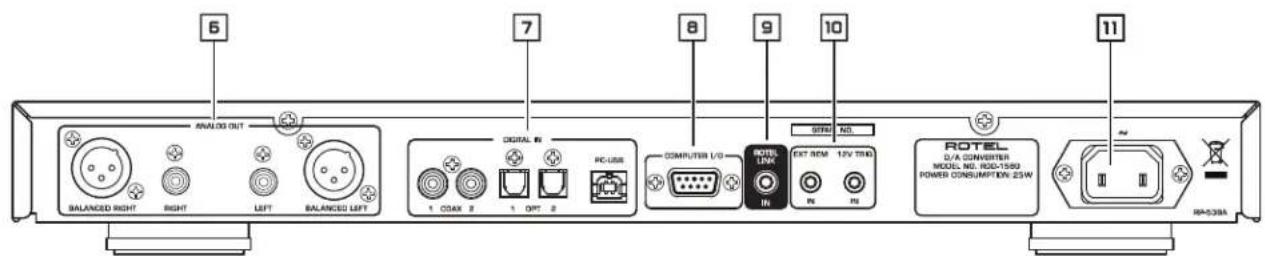
Figure 2: RR-DD91 Remote Control
Telecommande RR-DD91
Fernbedienung RR-DD91
Mando a Distancia RR-DD91
Afstandsbediening RR-DD91
Telecomando RR-DD91
RR-DD91 fjärkrontroll
NynbT dinctaunOHoro
ynpablenra RR-DD91
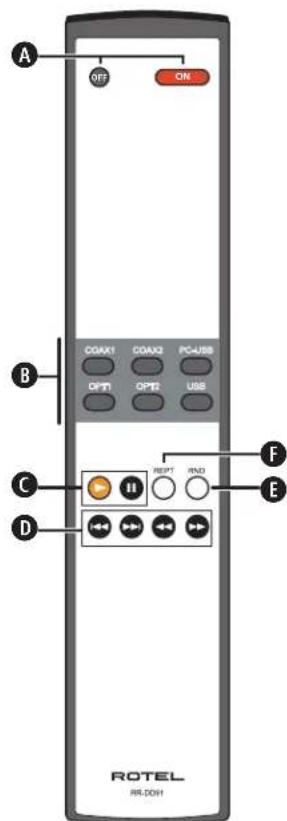
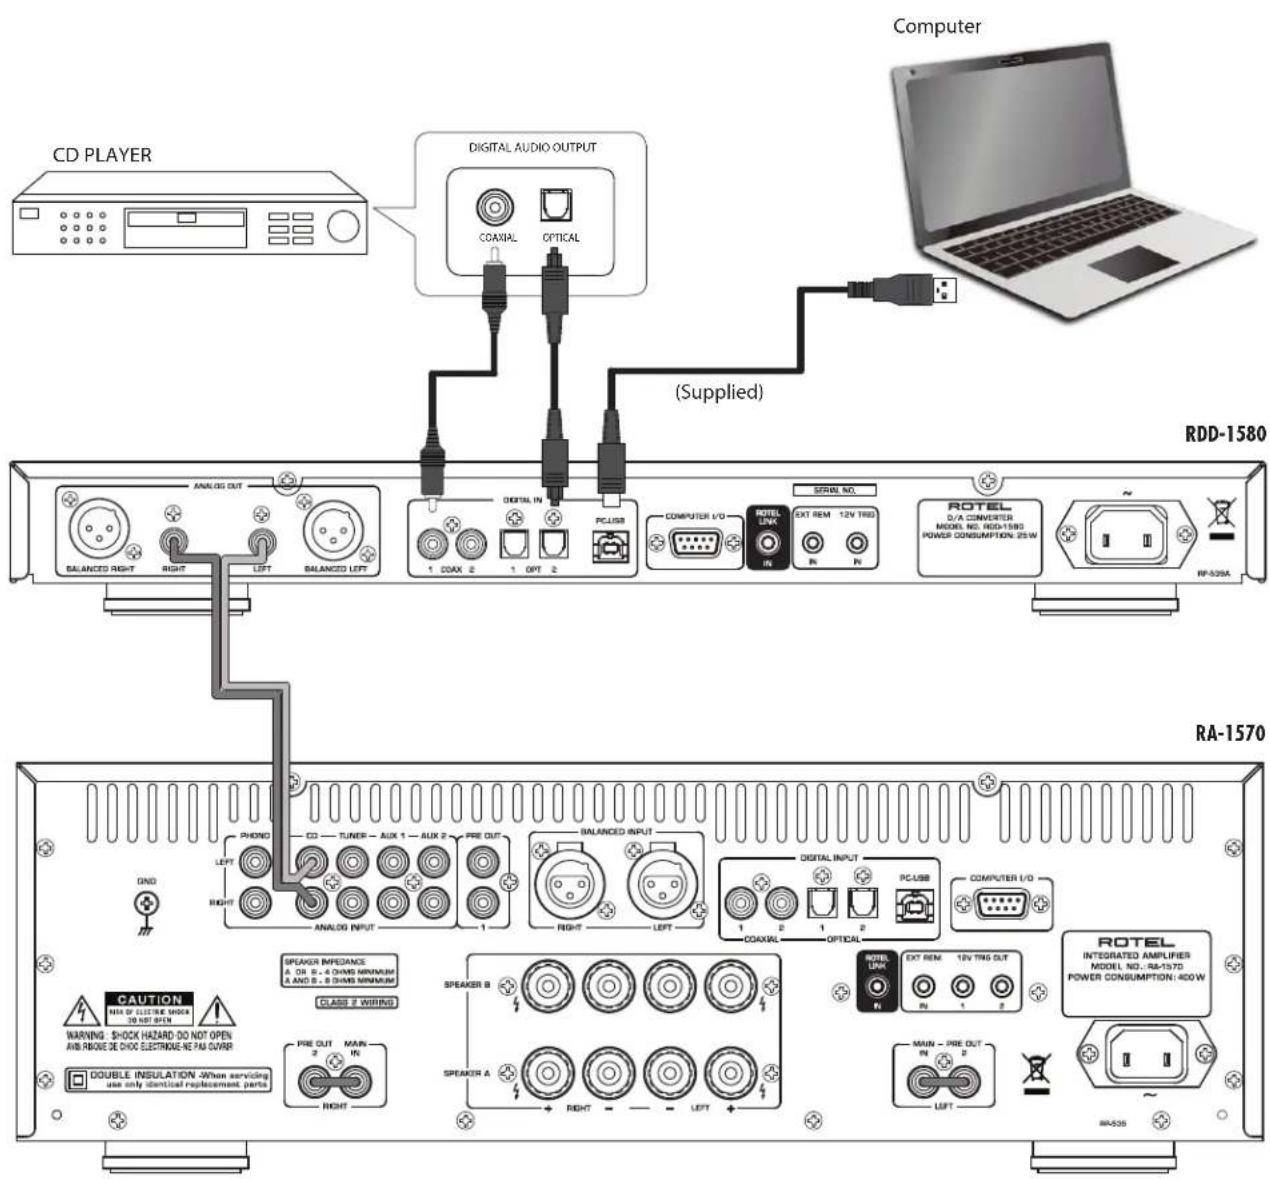
Figure 3: Analog Outputs and Digital Inputs Sorties analogiques et entrees numériques Analoge Ausgange und digitale Eingänge Salidas Analogicas y Entradas Digitales Analoge uitgangen en digitale ingangen Collegamenti ingressi digitali ed uscite analogiche Analoga utgangar och digitala ingangar AnalorobbIe BblOdbI nUHpOBbIe BxoDbI
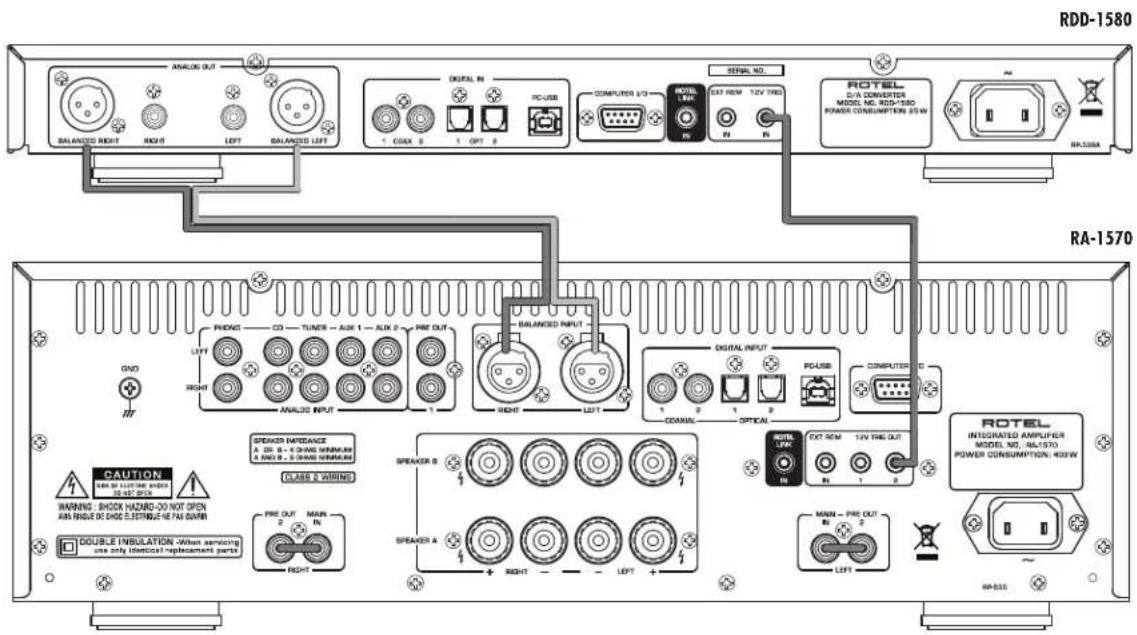
Figure 4: Balanced (XLR) Outputs and 12V Trigger IN Connections Sorties symétriques (XLR) et connexions d'entrée trigger 12V Symmetrische (XLR-)Ausgänge und 12-V-TRIG IN-Anschlüsse Salidas Analogicas Balanceadas (XLR) y Conexiones de Entrada para Senal de Disparo de Gebalanceerde (XLR)-uitgangen en 12V Trigger IN-aansluitingen Uscite anlogiche bilanciate (XLR) e collegamenti segnali Trigger 12VBalanserade utgangar (XLR) och ansluttingar for 12-volts styrsignaler Balaanchble Bbixobbl (XLR) u coeqinenea zanyckaioux Tprirrepnbix BxodB 12 B
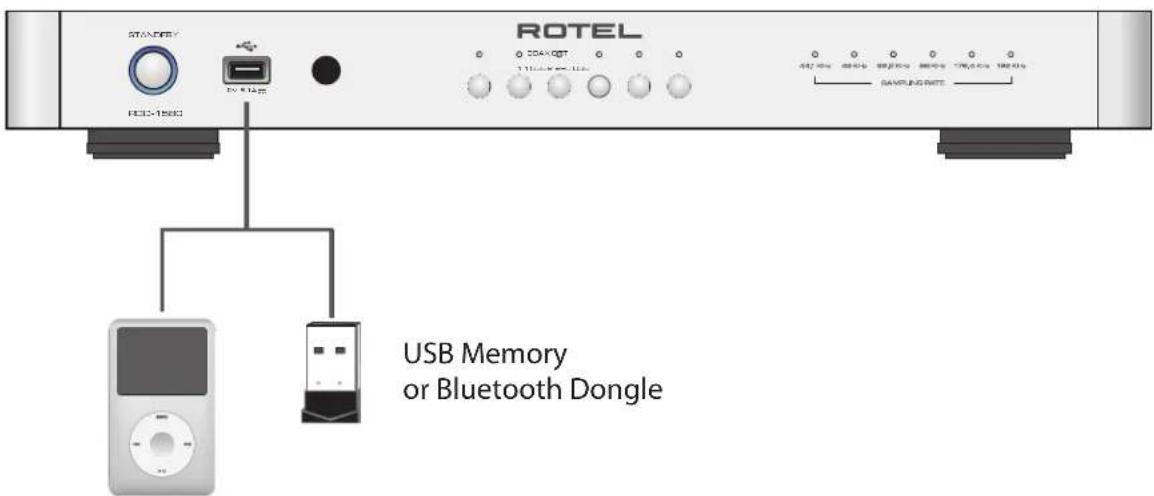
Figure 5: Front USB Input
Entree USB en face avant
Frontseitiger USB-Eingang
Entroda USB Frontal
USB-ingang op het voorpaneel
Ingresso USB frontale
USB-port pa fronten
Bxod USB ha nepeidne napanen
Important Notes
When making connections be sure to:
Turn off all the components in the system before hooking up any components, including loudspeakers.
Turn off all components in the system before changing any of the connections to the system.
Remarques importantes
Important Safety Instructions 2
Figure 1: Controls and Connections 3
Figure 2: RR-DD91 Remote Control 3
Figure 3: Analog Outputs and Digital Inputs 4
Figure 4: Balanced (XLR) Outputs and 12V Trigger IN Connections 5
Figure 5: Front USB Input 5
About Rotel. 7
Getting Started. 7
A Few Precautions 7
Placement 8
Cables 8
The RR-DD91 Remote Control. 8
Remote Control Batteries 8
AC Power and Control 8
AC Power Input 8
Standby Switch and Indicator 1
Remote Sensor 3 8
Front Input Indicators 4
Sampling Frequency Indicators 8
Connections 9
Front USB Input 2 9
Bluetooth Connection 9
Analog Outputs 9
Digital Inputs 7 9
PC-USB Input 7 9
Computer I/O Connector 9
ROTELLINK 9
EXT REM IN Jack 9
12 Volt Trigger Input 10
Audio Controls 10
Source Input 10
Repeat 10
Random 10
Factory Default 10
Troubleshooting 10
Standby Indicator Is Not Illuminated 10
Fuse Replacement 10
NoSound 10
Can not play 24 bit 192kHz source 10
Cannot Connect via Bluetooth 10
Playable Audio Format 11
Specifications. 11
About Rotel
Our story began over 50 years ago. Over the decades, we have received hundreds of awards for our products and satisfied hundreds of thousands of people who take their entertainment seriously - like you!
Rotel was founded by a family whose passionate interest in music led them to manufacture high-fidelity components of uncompromising quality. Through the years, that passion has remained undiminished and the family goal of providing exceptional value for audiophiles and music lovers, regardless of their budget, is shared by all Rotel employees.
Rotel's engineers work as a close team, listening to, and fine tuning, each new product until it reaches their exacting musical standards. They are free to choose components from around the world in order to make that product the best they can. You are likely to find capacitors from the United Kingdom and Germany, semiconductors from Japan or the United States, while toroidal power transformers are manufactured in Rotel's own factory
We all have concerns about our environment. And, as more and more electronics are produced and later discarded, it is especially important for a manufacturer to do all it can to engineer products that have a minimum negative impact on landfill sites and water tables.
At Rotel, we are proud to do our part. We have reduced the lead content in our electronics by using special ROHS solder, while our new Class D (not digital) amplifiers are up to five times more efficient than our legacy designs and still deliver power and performance. These products run cool, give minimum wasted energy, are good for the environment and give better sound too.
Finally, we have printed this brochure on recycled paper stock.
While we understand that these are small first steps, they are still important ones. And we continue to pursue new methods and materials for a cleaner and greener manufacturing process.
All of us at Rotel thank you for buying this product. We are sure it will bring you many years of enjoyment.
Getting Started
Thank you for purchasing the Rotel RDD-1580 Digital to Analog Converter. When used in a high-quality music or home theater system, your Rotel product will provide years of musical enjoyment.
A Few Precautions
WARNING: To avoid potential damage to your system, turn off ALL the components in the system when connecting or disconnecting components. Do not turn the system components back on until you are sure all the connections are correct and secure.
Please read this manual carefully. In addition to installation and operating instructions, it provides valuable information on various RDD-1580 system configurations as well as general information that will help you get optimum performance from your system. Please contact your authorized Rotel dealer for answers to any questions you might have. In addition, all of us at Rotel welcome your questions and comments.
Save the shipping carton and all enclosed packing material for future use. Shipping or moving the RDD-1580 in anything other than the original packing material may result in severe damage that is not covered by the warranty.
If included in the box please fill out and send in the owner's registration card. Also be sure to keep the original sales receipt. It is your best record of the date of purchase, which you will need in the event warranty service is required.
Placement
Like all audio components that handle low-level signals, the RDD-1580 can be affected by its environment. Avoid placing the RDD-1580 on top of other components. Also avoid routing audio signal cables near power cords. This will minimize the chance it will pick up hum or interference.
We recommend installing the unit in furniture designed to house audio components. Such furniture is designed to reduce or suppress vibration which can adversely affect sound quality. Ask your authorized Rotel dealer for advice about component furniture and proper installation of audio components.
The RDD-1580 is supplied with an RR-DD91 remote control and must be placed where the infrared signal from the remote can reach the front panel Remote Sensor.
Cables
Be sure to keep the power cords, digital signal cables and regular audio signal cables in your installation away from each other. This will minimize the chance of the regular audio signal cables picking up noise or interference from the power cords or digital cables. Using only high quality, shielded cables will also help to prevent noise or interference from degrading the sound quality of your system. If you have any questions see your authorized Rotel dealer for advice about the best cable to use with your system.
The RR-DD91 Remote Control
Some functions can be done with either the front panel controls, or the supplied RR-DD91 remote control. When these operations are described, the square call out numbers refer to the main unit, while the encircled letters refer to the remote control.
Remote Control Batteries
Two UM-4/AAA size batteries (supplied) must be installed before the remote control can be used. To install the batteries, remove the cover on the back of the RR-DD91. Install the batteries as shown in the illustration in the battery well. Test the control for proper operation, then replace the cover. When the batteries become weak the remote control won't operate the RDD-1580 consistently. Installing fresh batteries should eliminate the problem.
AC Power and Control
AC Power Input
Your RDD-1580 is configured at the factory for the proper AC voltage in the country where you purchased it, either 120 volts or 230 volts. The AC line configuration is noted on a decal on the back panel.
NOTE: Should you move your unit to another country, it may be possible to reconfigure it for use on a different line voltage. Do not attempt to perform this conversion yourself. Opening the enclosure of the unit exposes you to dangerous voltages. Consult a qualified service person or the Rotel factory service department for information.
NOTE: Some products are intended for sale in more than one country and as such are supplied with more than one AC cord. Please use only the cord appropriate for your country/region.
The RDD-1580 should be plugged directly into a 2-pin polarized wall outlet or into the switched outlet on another component in your audio system. Do not use an extension cord.
Connect the supplied power cord to the Power Connector 10 on the rear of the unit and the AC power outlet. The Standby indicator light is illuminated if the unit is plugged in, it is in Standby mode.
If you are going to be away from home for an extended period of time such as a month-long vacation, it is a sensible precaution to unplug the RDD-1580 (as well as other audio and video components) while you are away.
Standby Switch and Indicator
Press the front panel Standby Switch button, to turn the unit on. One of the input selector indicator light is illuminated when the unit is on. Press the Standby Switch button again, the unit is in Standby mode.
When the Standby indicator is illuminated, the remote control ON and OFF buttons may be used to activate the RDD-1580.
NOTE: Place the self adhesive ring over the light surrounding the Standby switch if the blue light is too bright.
Remote Sensor
This remote sensor window receives IR commands from the remote control. Please do not block this sensor.
Front Input Indicators
The front panel has a set of indicators showing which input is currently selected.
PC-USB : This is the rear USB connection
COAX 1 and 2: Set of Coaxial inputs 1 or 2
OPT 1 and 2: Set of Optical inputs 1 or 2
USB : This is the front USB connection.
Sampling Frequency Indicators
The Sampling Frequency light will illuminate if the music being played matches one of the Sampling Frequency indicators.
NOTE: Not all supported Sampling Frequencies have an indicator. Your music may still play even if it does not have a light associated with the sample rate of your audio.
Connections
NOTE: To prevent loud noises that neither you nor your speakers will appreciate, make sure the system is turned off when you make any signal connections.
Front USB Input
See figure 5
The front USB input can be connected to an iPod, iPhone, USB flash memory or the Bluetooth dongle (supplied) for wireless streaming. With iPod or iPhones, simply plug the device into the front USB and select USB function from the source selector. The iPod and iPhone remain active allowing search and play functions.
Bluetooth Connection
Insert the supplied Bluetooth Dongle into the front USB of the RDD-1580 for wireless streaming via Bluetooth, from your device (i.e. mobile phones). From your mobile device, look for "Rotel Bluetooth" and connect to it. Connection is normally automatic, but if prompted for a password, please press "0000" on your device.
NOTE: Not all Bluetooth dongles will operate with RDD-1580. Please use the one supplied.
Analog Outputs
See figure 3 and figure 4
A pair of standard RCA jacks and XLR balanced connectors supplies an analog output signal from the RDD-1580 to the source inputs of an audio preamplifier, integrated amplifier, or receiver.
NOTE: You should choose only one method of analog connection from the RDD-1580. Do not connect both the RCA and XLR at the same time.
Select high quality audio interconnect cables. Connect the left and right channel outputs of the RDD-1580 to the corresponding inputs on the preamplifier or other component.
Digital Inputs
See figure 3
There are two sets of digital inputs labeled COAX 1 and 2, OPT 1 and 2. Connect the COAXIAL or OPTICAL PCM outputs of your source component into these sockets. The digital signals will be decoded and played by the RDD-1580. The unit is capable of decoding PCM signals up to 24 bit, 192kHz
PC-USB Input
See figure 3
Connect this input using the supplied USB cable to the USB socket of your computer.
The RDD-1580 supports both USB Audio Class 1.0 and USB Audio Class 2.0 modes. Windows computers do not require installation of a driver for USB Audio Class 1.0 and supports playback of audio up to 96kHz sampling rates. The Factory Default setting is USB Audio Class 1.0.
To take advantage of USB Audio Class 2.0 audio playback supporting up to 192kHz sampling rates you will need to install the Windows driver supplied on CD included with the RDD-1580. You will also need to switch the RDD-1580 to USB Audio Class 2.0 playback mode with the following:
- Press and Hold the PC-USB source button on the front panel for 5 seconds. The current USB audio mode is indicated by the blinking Sample Rate LED as:
USB Audio Class 1.0 - Sample Rate 96kHz blinking [Factory Default]
USB Audio Class 2.0 - Sample Rate 192kHz blinking - Press the PC-USB key again to illuminate the 192kHz sample rate light blinks.
- Pressing the PC-USB key will toggle between USB Audio Class 1.0 (96kHz light blinks) and USB Audio Class 2.0 (192kHz light blinks).
- After the desired USB Audio mode is selected wait 3 seconds for the selection period to end and the RDD-1580 will use the selected audio mode.
- Power cycle the RDD-1580 and reboot your PC after changing the USB Audio mode to ensure both units are properly configured.
Many audio playback applications do not support 192kHz sampling rate. Please confirm your audio player supports 192kHz audio and you have 192kHz audio files to properly playback this sample rate. Also, you may need to configure the audio driver in your PC to output 192kHz or your computer may "down sample" to a lower audio sample rate. For more information please refer to your audio player or operating system information.
NOTE: USB Audio Class 2.0 required installation of the Windows PC driver on the CD ROM included with the RDD-1580.
NOTE: MAC computers do not require a driver to support PC-USB 1.0 or 2.0 audio.
NOTE: Upon successful installation of the driver, you may need to select the ROTEL audio driver from the audio/speaker setup of your computer.
Computer I/O Connector
The RDD-1580 can be controlled via RS232 for integration with automation systems. The COMPUTER I/O input accepts a standard straight DB-9 Male-to-Female cable.
For additional information on the connections, software, and operating codes for computer control of the RDD-1580, contact your authorized Rotel dealer.
ROTELINK
This 3.5mm stereo mini-jack (labeled ROTEL LINK IN) can optionally attach to Rotel network enabled products with ROTEL LINK OUT connections. This allows the attached Rotel products to communicate with each other and be controlled via the Rotel Remote App (available for download on the iTunes® store).
EXT REM IN Jack
This 3.5mm mini-jack receives command codes from industry-standard infrared receivers via hard-wired connections. This feature could prove useful when the unit is installed in a cabinet and the front-panel sensor is blocked. Consult your authorized Rotel dealer for information on these external repeaters and the proper wiring of a jack to fit the mini-jack receptacle.
12 Volt Trigger Input
The RDD-1580 can be activated by a 12 volt trigger signal. The trigger input accepts any control signal (AC or DC) ranging from 3 volts to 30 volts.
When a cable is connected to the 12V input and a trigger signal is present, the RDD-1580 is activated. When the trigger signal is turned off, the unit goes into standby mode. The front panel standby indicator remains illuminated, but the unit will not operate.
Audio Controls
Source Input
The Source Input selects the input signal source. From the front panel or remote press the corresponding input key to select the source to listen to.
Repeat
Some audio source devices support the use of the repeat function including Repeat Track, Repeat Album, Repeat Off. Press the Repeat key on the IR remote control to toggle these functions. The USB source LED will blink as follows to indicate the currently activated Repeat function.
Repeat Off: One time blink [Factory Default]
Repeat Album: Two times blink
Repeat Track: Four times blink
Random
Some audio source devices support Random playback of music. Press the Random key on the IR remote control to toggle the Random function. The USB audio source LED will blink as follows to indicate the currently activated function
Random Off: One time blink [Factory Default]
Random On: Two times blink
Factory Default
The RDD-1580 can be reset to restore the factory Default settings. To restore factory defaults press and hold the front USB source input key for 5 seconds until all Source LEDs are blinking. Release the USB source input key and the RDD-1580 will restore factory settings and restart.
Troubleshooting
Most difficulties in audio systems are the result of incorrect connections, or improper control settings. If you encounter problems, isolate the area of the difficulty, check the control settings, determine the cause of the fault and make the necessary changes. If you are unable to get sound from the unit, refer to the suggestions for the following conditions:
Standby Indicator Is Not Illuminated
No main power to the unit. Check AC power connections at the unit and the AC outlet.
Fuse Replacement
If another electrical device works when plugged into the power outlet, but the Standby Indicator of the unit does not light when plugged into the same outlet, it indicates that the internal power fuse may have blown. If you believe this has happened, contact your authorized Rotel dealer to get the fuse replaced.
No Sound
If the unit is getting power, but is producing no sound, check the INPUT INDICATORS on the front panel. Make sure the selected source is connected. Also check to make sure the analog outputs of the unit are properly connected.
Can not play 24 bit 192kHz source
96kHz and 192kHz playbacks are only available through the rear digital inputs. Please also note that many media players are not capable of decoding 24bit 192kHz audio files. Please make sure your player can decode 24bit 192kHz files. Also, confirm the RDD-1580 PC-USB input is configured to USB 2.0 Audio and the Windows audio driver is installed on your computer. (See PC-USB Input in the manual for more details)
NOTE: MAC computers do not need a driver but require software that supports 24bit 192kHz playback but still require the RDD-1580 PC-USB input to be conferred to USB 2.0 Audio.
Cannot Connect via Bluetooth
If you cannot pair your Bluetooth enabled device to the RDD-1580, delete the memory of the previous connection on the RDD-1580 and on your device. On your device this is often listed as "Forget this Device". On the RDD-1580 IR remote PRESS and HOLD the PAUSE button for 5 seconds until the USB indicator flashes rapidly then release the button. Then try to make the connection again.
Playable Audio Format
USB Apple (iPhone, iPod, iPad)
| Format | Notes |
| Apple Lossless | Any supported file loaded to Apple device. Phone may resample depending on stored format. May exclude Apps designed to play formats not originally supported by the sending device. |
| MP3 | |
| AAC | |
| AIFF | |
| WAV |
USB Bluetooth
| Format | Notes |
| Any format supported by the sending device. | May exclude Apps designed to play formats not originally supported by the sending device. |
USB Flash Drive
| Format | Notes |
| MP3 | 48K 16 Bit Maximum |
| WMA | |
| WAV | |
| OGG Vorbis | |
| M4A/AAC |
PC-USB
| Format | Notes |
| Format determined by the Media Player/Server software that you use. | Any supported format by the PC software 44.1K, 48k, 88.2K, 96K, 176.4K, 192K 16 bit, 24 bit |
Coax/Optical
| Format | Notes |
| SPDIF LPCM | 44.1K, 48k, 88.2K, 96K, 176.4K, 192K 16 bit, 24 bit |
Specifications
RDD-1580
Total Harmonic Distortion < 0.004%
Intermodulation Distortion (60Hz:7kHz) < 0.004%
Frequency Response 10Hz-95kHz+/3.0dB (MAX)
Signal to Noise Ratio (IHF "A" weighted) 128 dB
Input Sensitivity/ Impedance 0 dBfs / 75 Ohms
Output Level / Impedance (RCA) 2.0V / 100 Ohms
Output Level / Impedance (XLR) 4.0V / 200 Ohms
Decodable front USB/iPod Digital Signals WAV, MP3, WMA
up to 48kHz 16 bit
Decodable Coaxial/Optical Digital Signals SPDIF LPCM
up to 192kHz 24 bit
Decodable PC-USB Digital Input Signals WAV/PCM Depend on the PC
Player used (up to 192kHz 24 bit)
General
Power Requirements (AC)
U.S.A: 120 Volts, 60 Hz
Europe:
230 Volts, 50 Hz
Power Consumption
25 watts
Standby Power Consumption (normal mode)
0.5 watts
Dimensions
Width × Height × Depth
17x2
431× 55× 316mm
1/8 x 121/2 ins.
Front Panel Height
1U/43.7mm/1 3/4 ins.
Weight (net)
5.1kg/11.24 lbs.
All specifications are accurate at the time of printing.
Rotel reserves the right to make improvements without notice.
Rotel and the Rotel HiFi logo are registered trademarks of The Rotel Co, Ltd., Tokyo, Japan.
"Made for iPod," and "Made for iPhone," means that an electronic accessory has been designed to connect specifically to iPod or iPhone, respectively, and has been certified by the developer to meet Apple performance standards. Apple is not responsible for the operation of this device or its compliance with safety and regulatory standards. Please note that the use of this accessory with iPod, or iPhone may affect wireless performance.
iPhone, iPod, iPod classic, iPod nano, and iPod touch are trademarks of Apple Inc., registered in the U.S. and other countries.
Made for


Voir figure 3 et figure 4
Dimensions(W,H,D) 431×55×316mm
17"×2/8"×12/2"
Computer I/O-connector 35
ROTEL-LINK 35
Computer I/O-connector
Connetlore Computer I/O 41
Rotel Link 41
IngressoEXTREMOTE 41
Connetlore Computer I/O
MnBxHxD)431x55x316mm
Fronthoid
1U/43,7 mm
Wik (netto)
5,1 kg
McnoB3yIteToIbko npHaJneKHOCTN, yKa3aHbIe npOn3BODHTeMe.
McnoB3yIe ToIbKo TeJeKky, NoCTaBky, cTOnKy, KpOnHTeHH MIn NOnKy CnCTeMbI, peKoMeHDoBaHHO KomNaHMeR OTeL. BydTe octopOxKnbl npN nepeMeUeHN npN6opa

HaNoDCTABKe HnH CToKe Bo H36eKaHHe paHEnr OToPOKuDbBaHn.
HemEnHeNo npeKpaTne KcNoB3OBaHne KOMnOHeTa n nepeaTe Ha 06cneDobAHne u/nn 06cnyHMBAHne KBaMnUPOBaHHo peMOHTHO prAHHauee cN:
CeteboWuHypuWuTEKKe6bIINOBpeKdH.
BHytpb np6opapy0HmnppeMeTbI mnpoHmHnKIOCTb.
Pp6Op no6bIaI nOddoxKeM.
- Pn60p demohctnpuyet np3HaKe HHeOpMaBhoH pa60tbl.
- Pnp60 npoHnHn HnnoBpeHn HIO6bIM dpYHM cIoc60m.
BatapeBnybTeHnCTaHIOHOynpAbeHH (N) He doHNbI NOBBepratbcBaO3dEChTBnHO 3NIHHeRTo Tena, TaKOro KaK COJIHeuHbCBET, OTOHbNT.

BHIMAHNE
ANOCHOTBEIPOXAKHEIR 3JEKTPREEKM TOMO

SHIMHAI: DIAI YEN HUAN CHAOYIN TONGXUE XIE KHEETH CCKM TOKIO, HE CHINWATE BEPHOO A JADHOC NAMET BHITAI NET CACTER, DCCTHYUN HOANG CHIKBOAH BOKIOTAKIC, DEBPSE OTSE KONKANSAE KEANKAO CHAWHOW WACTP.
JIU CUA, KAHABNI AYINUTXN CTPAH, TGE YCTPOCNCTBO ODOEPEHO KCMONIL30BA
CAUTION: TO PREVENT ELECTRIC SHOCK, MATCH WIDE BLADES OF PLUG TO WIDE SLOT INSERT FULLY.
ATTENTION:POUR EVITER LES CHOCSE ELECTRIQUES, INTRODUIRE LA LAME LA PLUS LARGE DE LA FICHE DANS LA BORNE CORRESPONDANTE DE LA PRISE ET POUSSER,JUSQU AU FOND.

IIOOpaKHOHMOINMauBpAHOCTOPOHMOE TpeYbIOHKeN KpDyPcEXeBdN NO3oBtAOBAH O HAIHNH BHTYP KOPKP CIOH NDAH
HEHNOHBOHOHATO HOPKREKHJ, BELNIHVA KO TORPORO MOKOT CO3BaBbAOn HOACOCT
POPAHsEY CHUEKOB AENKTPEUCKOM TKOM.

036Baepehme BocnHnIeTeJIbHO 3NBA K a BapHOCTOPONHEIM TReyIOJIHNIke IpeDyINpKaEaTdO NtBOSeTaER O HANHNH C CONOBDOXIAOoenn AnAPAT DOKYMTHAUM BAKHbIXM HcNTpyCkuyu IO NKcIYATAUIN YTeHXWECOOMO BYOCKHNAAIO.

M3dennr Rotel cnpoektnpobahn Inn COOTBETCTNB MEXdyHApOdbm PpeDnCAHNMA H orpaHmne HOnaBbIX BeueCTB (RoHS) B 3NeKTPnueckOM M NcEeKTPoHON MObOpyOBaHN HynTHN3aunH NTOrO O6OpYOBaHN (WEEE). CMBON NepepeKHyTOro Mycophoro 6aka Yka3bIbae H a COOTBETCTNB H A To, TTO BCE N3dennn OdoJbnk HbTbNpepe6oTaHb DooXhMb O6p3oM HnN O6paOtaHb V COOTBETCN H CTMMn PpeDnCAHNMa.

JaHHbI CHMBO03Haayet, YoTo H3deneHne IMeET DBOHYKIO3oJauNIO. 3aemJeHne He tpebyetca.
HaHaayHHe BbIOBoD
BalaHcHbI 3ByK (3-BbIOHOHLR):
BbVbOd1:3emn/3kpan
BbIbO2:Φa3a/+
Bbbo3:PpOmbo4a3a/cmHnA

Copepkanhe
Pcynok1:OpranbIy npabneHn coeHnHn3
Pcynok 2: PnybT dmtctanuohnHOro ynpabEnHa RR-DD913
Pcynok3:AhanoorObbe BbXoBn HuafoBbE BxoBd 4
Pcynok 4:BanachBhe BxOdb (XL) H coeHnHeHm3aYckAouHm TprHrebpHbX BxOoOB 12 B5
Pcynok 5:BxoDSUBHa nepeDne naenm 5
Baxhhe 3ameyua 6
Baxhhe hactablenno no 6e3onachoctn 49
OKompanHH Rotel 50
BxOy/BvIXoIaIIOKIIIOHnIeKOMNbIOTepa 53
ROTELLINK 53
THe3doEXTREMIN 53
3anyckaoui Bxod 12B 53
OprahbI ynpabneHn 3Bykom 53
4 6 53
KhoNka Repeat 53
Khonka Random 53
3aBocnne HcTpoKn no ymoIyHmIo 53
Bo3MOxHbIe HEnCnPaBHOCTN 53
He ropmt Hndukatop xdyuem 53
3aMeHa npedoxpahnte 53
OTcyTCTByeT 3ByK 54
HeBocpOuBODHTcHcTouHHK246nt/192Kt 54
HeB03MOxHNo yCTaHOBnTb BleTooth coeHNHeHne 54
Bocnpn3Bovmmyaydnofoepmat 54
Texmueckx XapaKTepeHcTKn 55
O kompanu Rotel
Haana nctopnna Hauanacb 6oonee 50 net Ha3ad. Ha npotjkehenne DecaTnneTm, MblonuayanncoTHnHarpa3HaanN3dennnyuDobnetBOPnnn CoTHn Tbcry IIOeKOTOpbe cepbe3HO OTHocraTc K CBOIM pa3BleHEnm -KaN Bbl!
KOMnHnR ROTEL 6bIJa OCHOBaHa CeMbey, KOTopA H3-3a CtpAcTHoiIIOBn K My3bIke 3aHJNacb IPOIN3BODCTBOM hi-fi KOMnHOENTOB 6eCKOMnPOMNCCHORKaueCTBa.C rOdAMn 3Ta CtpAcTb He yTHXnA, N cEROnHr CTpeMJeHne CEBn K o6ecNeueHnO ayINOΦnIOB n MenOMaHOB, He3aBnCmO OT INx fHnHaHCOBOro nIoJKeHnA, annapaTyPoB BicOuyawero KaueCTBa, pa3dEJIhot BCE cOTpydHnIK ROTEL.
Dpykna KOMaHa nHKepeBPOpNpOcNyWBAeT NtAteNbHO HAcTaPbAeTKKaJDo HOBoe n3dene, noka OHO He 6yEt COOTBeTCTBOBaTb Nx Tpe6oBaTeIbHbIM My3bKaIbHbMCTAHApTAM. ImPipeOCTaBHeA CBOBoDa BbIbOpaKOMnEKeTyOuixn NO BCEmy MnpY, YTO6bI CEnaTb Annapa KaMoxHoLyUe. BepoTHo, BblCMoxTe HaHTN KOHcHcATOpbI n3 BeNkIObPrtAHnn I EpMaHN, NOnynpoBOHnKn n3 JnoHN n ClUA, Torda kak TopoJaIbHbe CInIOBle TpaHcΦopMaTOpbl, n3rTOBLeHbHa co6CTBeHHom 3aBoDE ROTEL.
Mb BCE 3a60TmCRO HaewoKpyKaioe CpeE. N, nockonbky Bce 60bnwe n 60bnwe 3neKtpOnHKnipOn3BODrN No3DHee Bb6paBbAOT, nI npOn3BODnTeNa OOC6ehHO BaXHo CdeJaTB CeB Bo3MOxHoe, YTO6b pa3pa6OtaTB n3dEnn, KOTOpBIE IMeKOT MHNImalBoHoe HeratNBHO Bo3dJeCTBNE Ha MycOpHBe CBankn I yPOBHNrpyHTOBBX BOJ.
B KOMPANIN RoteI mbI ropdb HbceTn Ha WbKaIa.MbI CHN3NIcOpeJxHae CBNUaBaH aWee 3JIeKTPoHNKe npi NMOOu cneuaJIbHoro npinno, COOTBeCTByIOUero Tpe6oBaHnR MoHS, torda KaK hauu HOBBie ycHNTEN BKnace D (He uNpOBbe) NOHTB paa 60nee 3fFekTNBbl, yem Hauu CTapble pa3pa60TK, n, TEM He Mehee, o6ecneuBAIoT HxkHyIO MOHOCb I KaueCTBO 3Byka. 3TN i3dEInn He HarpeBaIOrC npi pa6ote, paccenBaIOT MmHIMMaJIbHyIO 3HeprnIO, xopoOnn dIra OKpykaIOe CpeBnIKCTaN, Lyuue 3ByuAT.
HakoHeu, Mbl HaneaTn 3Ty 6poHOpy Ha 6ymare, cdaaHHo n3 BTOpuHoro cbpb.
XOTMBIOHIMMaEM,TO3TOHe6oBbIeNepBbIeWAr,HO,TEMHEMeHee,OHN BIAJIOTcBAKHHbIM.NMbIPoDOnJMaE NCKaTBHOBBe MeToBbIMATEpNaIbI Dn860oeYNCTOIgEHO TPOeCCA PPOINBOCDBa.
BceMb BV KOMnAHnRoteI 6naOapum Bac 3a npno6peHne 3toro annapaTa. Mb yBepeHb, yTO OH noapIT Bam dOnrme rOdb HacnaKdHn.
PpncTypaKeknpyatau
Blaqadam Bac 3a npio6pehenie ufoaohanoroboro npeo6pa3oBaTeRaRr Rotel RDD-1580.PnncnoB3OBAHm B BbICOKKaueCTBEHOy My3bikAnbHOu CNTeMe nn Domaunem TeaTpe, Baue n3dne RoteI oecneHT roDb My3bikAnbHoro HacnaJeHn.
HeKoTOpBle MepbI npedocToPoxKHOCTN
IPIPMEYAHNE: ymo6bi u36bexambo 803moxHo2o no6pexdeHuae buaeu cuminb, bblkIOUme BCE kOMnoHeHmbcuminb npu nOcoedunhu unu omcoedunhuaukycmueckux cuminem unu dpyzux CBAaHHbIX KOMNOHEHMoe. He bKIOUaume kOMnoHeHmbcuminb noka Hy6edumecb, ymo Bce coedunheur bInONHeHn npabunbHO uHaDEXHO.
IoxanyiCTa, BHMaTeBHO npouTaNte 3TO pykoBOCTBO. B dononHeHne K HnCTpyKUIMN NO yctAHOBKe uynpabNeHIO, OHO daET BaXHyIO INHOFpaMauNIO O pa3NHybIX KOHNIFypaNix CNTeMbR DDD-1580,a TaKke 6OuyIO INHOFpaMauNIO, KOTOPa NOMOT Bam NOnyUHTb ONTMaJIbHoE KaYeCTBO OT BaWei CNTeMb.I IoxanyiCTa, 6oPaTntecb K BaWemy ABTopIN3OBaHHOMy DInepy Rotel 3a OTBeAMn HAIObIe BO3MOxKnBie BONPocbl.KpOME TOR, BCE cTopydNHKn KOMNaHmRotel npNBcTByIOT BaWIn BONPOCb N KOMMeHTapNI.
CoxpaHnTe TpaHcnpTHyIO KAPTOHHYIO Kopo6ky I BceBnOKeHbIe ynaKOBouHbIe MaTePnAJIb IINNCoNtB3OaHmR B 6dyUeM. IpebcIka NIn nepeBo3Ka RDD-1580 B cem-To dpyrom, KpmeOpirnHaIbHorO ynaKOBuHOrO MaTePnAna, MoKet npmbecrN K cepbe3HOMy NobpeXdEHNIO BaWero np6opa, Kotopoe He nokpbBaETc rapaHTne.
EcInB Kopo6ke ecb perncTpaunOHnHa KapToKc BnaJeIbca,3aONHnTe ee n BblnITE ha. Coxpanite yek o npdaJe. OH YBnEeTcnyuIM NncbMeHHbIM noTBePxeHnEM DaTb npNo6peTHe, KOtOpoe NoHaO6ntcBa Bam B Clyuae, ecn noTp6yeTc rapaHTnHoe 06CnykBaHne.
Pa3MeueHne
IIOO6HO BcEM 3ByKObIM KOMNoHEtAm, KOTope 6Obpa6aTbIBaOT MaJIbe cnHnbl, Ha RDD-1580 MoKeTeBnIbEr oKpyKeHe. N36eAteYctaHaBnBaT npoe6pa3oBaTeNb RDD-1580 Ha pyrIne KOMNoHEtBl. TaKxe N36eAte npoknM MeK6IoOHbIX 3ByKObX KaBeNe B6Jln3n CeTeBbIX WHypOB. 3TO MHNm3nPyET Bo3MOxHooCTb CeTeBOH HABODKn nn NomExn.
Mby pekomehyem yctaHaBnBaTb np60p B me6eBHyO cToiKy, npedHa3HaeeHHyIO IINI DOMaWnIX 3ByKOBbIX KOMnoHEtOB. TakaI cToiKa pa3pa6oTaHa IINI Ocna6BeHn IINI NODaBHeHn Bn6paun, KOTOPa MoXET HerATNBHO BnraTb HA KauCTBO 3ByuHnIA. O6paNTecb K BaWeMy ABTOI3OBAHHom dyInepy Rotel 3a COBeTom o C6OpHn Me6eN INPabUNbHOYCTAHOBKe 3ByKOBbIX KOMnoHEtOB.
Ipeo6pa0BaTeB RDD-1580 noctabnaretc cn ynbTom nctaHOnHHOrO ynpabHeHr RR-DD91 mdoJKeH 6bTb yCTaHOBeH Ta, rne HppaKpaChbI CNrHaONOTyNbTa Dmoket DOCTnRaTb DaTuHkA nCTaHIOHHORO ynpabHeHn Ha nepeDne NaHEn.
Ka6enn
He cB3bIaIe BMeCTe CTeBbIe 5Hpyb, Ka6eN LcHpObix CnHAnOB N O6bUHbIe ayDIO Ka6eIN B BAWei CNCTeMe. 3TO MNHNMIM3Npye TBO3MOXHOCTb HABODKN NOMEx Ha OBuHbIe ayDIO Ka6eIN OT cTeBbIX 5HypOB N cHpOboBx Ka6ene. IcNoJIyTe TOBko BBICOKOKaueCTBeHNbIE, 3KpaHnPOBaHHbIe Ka6eIN, KOTOpBE TaKke NOMoYr PpeoTbPAITb NOMEXN IN DerpaDaUNIO KaueCTBa 3ByaHInra BaWei CNCTeMbI. EcnY B AcEb KaKe-1n60 BOnPoCb, O6paNTecb K BAWeMy ABTopu3OBAHHOMy DInlepy Rotel 3a CoBETOM O HanUYuWnx Ka6eJAX, YTo6bl NCNoJIb3OBAt b IN B BAWei CNCTeMe.
IpeepnnaheNoOshaeHaHa6bopmHnNkKatopoB,OTo6paKaOnxTeKyuBb6paHHb BXoD.
PC-USB: CoeineHneHe USB ha 3aDne HaneHn
COAX 1 n 2:Ha6op KoakcaNbIbIbXbOob 1 n 2
OPT 1 n 2: Na6op onnuecknx BxOob 1 n 2
USB: CoeINHeHne USB ha nepeHne naHnI.
HnKaTopbIyacTObBb6OpKn
AchaTota BbIbOpKn 6yJeT ropeTb,ecN BOCPpOu3BODmMa My3bKa COOTBeTCTByeT ODHOMY IINHnKAtOPOB AChToTb BiBbOpKn.
PIMMEAHHE: He BCE noDopjueaemble yacmombb b6bopku umeom uhdukamop. Bawa my3bika BCE pa8HO 6ydem 8ocnpou3beDeha, daXe ecnu OHa He Umeem uhdukamopa, coombemcmeyioe zoacmome b6bopku bauezo 38ka.
CoednHeHna
PnmuE4AHue: npedompaueHua zpomkux nomex, kOmopbe He ouenm Hu bbl, Hb aauu zpomko2oOpumenu, oB3aemeIbHo BbIKIOUaume cucmemy, Ko2a bebnonHre me IIOb6e cuZhanbHbe coedunehur.
Bxod USB ha nepeDnei naHEnI
Cm.pucyohK5
Φροήτ USB ha nepeθηδη Αhaenη Moxet 6bɪt nbodcoeɪnɛh κ iPod, iPhone, Φιλιω-ικάνу USB ἀπι πρηεmonepaɪdʒy Bluetooth (B KOMΠΕΚΤe noctabκι) ἡν δεςπροBDŋHOrO NotoKOBORO Bocpɒn3BedeHЯ. C iPod nɪn iPphones, npocTo BCTABbTe yctρoɪctBO B nopT USB ha nepeθηδη Αhaenη N bɪbEpɪte ΦɪhкινΟ USB celenkTopoM BXoDob. iPod n iPphone octaɪTCA kʌTNBbIMn, no3BOLJIa BBiONHrTb Φɪhкινι Nɔʊckaɪ N BOCpɒn3BedeHЯ.
CoeHHeHne Bluetooth
BCTaBbTe B p3bEm USB npnlaeraembl aadntep Bluetooth dIe 6ecnpoBHO rno npnema notokoro aytno no Bluetooth, ot BaWero yctpoiCTBa (HapnPmep, MObnHOrO TenefoHO) Ha ycInntel. Ha BaWEM MObnHOM yctpoiCTBe HainDte "Rotel Bluetooth" n noCoedHHTEc b K hemy. ObUHc coeINHeHne npocXoHTABTomAtuueckn, Ho eCIn 6ydet 3anpoWeH napoiB, BBeJITe "0000" Ha BaWEM yctpoiCTBe.
PIMMEYAHHE: He bce npuemepedamuku Bluetooth 6dym pa6omamb c npeo6paobamem RDD-1580. Ioxanyucma, ucnonb3yume makobou u3 komnnekma nocmaeku.
AHaIOrOBeBbIXOaBbl
Cm.pucyHKu 3 u4
Papa cTahapthbixrhe3RCA 6baanchbix pa3bemOB XLRnodaotHaIarobbblbxoHOn cnHnol ot pneo6pa3oBaTei RDD-1580 Ha BxoBly aynOpnpdbapntelhoro ycnnte, nHTerpnpoBaHHoro ycunnte nnpeCBepa.
PIMMEYAHNE: Bam cneoyem bbybpmb oduh eundcmeHHb cnoc6 aHAno2oBzo coeunHeurom npeo6pa3oBaemaRrDD-1580.He nooCoednue u RCA, u XLR odnoBpemehno.
Bb6epnte aydno MeK6bOuHbIe Ka6enB BbcOKoR KauEcTBA. PndcoeHNHTe BixOdbI neBOrO n npaBOrO kaHaJIOB npeo6pa3OBateJe RDD-1580 K COOTBeTCTByUOUM BXoAM Ha npedBaPteNB Hom ycunNTene nn Dpyrom KOMNoHETe.
UHpOBoBbE BxOJIbI
Cm.pucyok3
CyueCTayet HabopunpOboBx BxOIOB, MapKupObaHHbIX COAX 1 n 2, OPT 1 n 2. PndcoeHNHte KoakcnabHbI nn ONTnueckn IKM-BbxObl Ha BaWem KOMNOHEHe - NCTOCHNE K 3Tm rHe3dAm. LnpOpbBie CnHbI b6ydt DeKOdIpOBAHbI N BOCpnON3BeDeHb Ipeo6pa3ObaTeen MDD-1580. Pn6Op cnoc6eH JeKOdIpOBAbT CNHbI NKM pa3raHocTbIO do 24 6nt n acToToB Bb6OpKn do 192 kU.
BxOaPC-USB
Cm.pucyHOK3
IIOcOeHNHTe 3OT BXoD npn nOMOUs NocTabNeHHOro B KOMnJIeKTe Ka6eY USB K rHe3dy USB Baawero KOMnbIoTepa.
Ppeo6pa3oBaTeIb RDD-1580 noDJIepKnBaET peKmbl n USB Audio Class1.0, n USB Audio Class 2.0. KomnbHoteBp, pa6OtaUcne noD OC Windows, He tpe6yot yCTaHOBKn dpaBepa Ira USB Audio Class 1.0 n noDJIepKmBAOT BOCnpoIN3BeHeNHe 3ByKa cAcToTaMn Bb6OpKn Do 96 KfU. 3aBOdCKoHaCTPOIKo no yOMOnuHIO RaBnTcR USB Audio Class 1.0.
YtO6bI BOCnONb3OBaTbC BOCnpOn3BeHEnm 3Byka USB Audio Class 2.0, noDJIepKINBaIOJero YacToTB bbl6OpKn Do 192 KfU, Bam notpe6yetc yCTaHOBnTb DpaBep dJa Windows, NoCTabNHeMbI Ha KOMnAKT-DiNCe BMeCTe C npoe6pa3OBaTeENr RDD-1580.Bam TaKKe NOHaIO6bITc NpeKJIuOHTb peXIM BOCnpOn3BeHEnr RDD-1580 Ha USB Audio Class 2.0 cNeDuOIm mObpa3OM:
1.HaXMMTe uYdePKNBaBte KKnKny NCTOChNka PC-USB ha nepeHne nAheN 5 ceKyHd. TeKyuI pexkM 3Byka USB oTo6paXaetc MIRaHHeM qAcTObtbl Bb6OpKn cJeDyUoIM o6pa3OM:
USB Audio Class 1.0 - BCnbxNBAeT YacToTa Bb6OpKn 96 KfU (3aBocKaHacTroKa no ymOuHaHIO)
USB Audio Class 2.0 - BCnbXnBaETacToTa Bb6Opkn 192 K
2.HaxmTe KhoNkPy PC-USB eue pa3,HTo6bI 3aMrrana qacToTa Bbl6opKn «192K».
3. HaxaTne KhoNkPC-USB nepeKIOUoAeT MekIy peKIMAMM USB Audio Class 1.0 (Mnraet noCDBETKa «96K») n USB Audio Class 2.0 (Mnraet noCDBETKa «192K»).
4.Поссе bblбора кениамо aydno peхима USB nodoxдпe 3 ekундддддддддддддддддддддддддддддддддддддддддддддддддддддддддддддддддддддддддддддддддддддддддддддддддддд徳
3aberseHn, n ppeo6pa3ObaTeIb RDD-1580 6ydtncnoJb3ObaTb Bbl6paHbHbIpexim 3Byka.
5. Nocne cmehblpekma 3byka USB bblnochte n Bknochte cchoBa npoe6pa0bateNBDD-1580nBaawnpcohaBbHbKOMbIOpTe pnaTn, 4TO o6a np6bopaCKOHpyrpnpoabaDolKbHM 6pa3om.
Mhorne npinnojehn DnBocnpn3BedeHn 3Byka He noDpeKnBAOTcactoty Bb6opkn 192 KU. PoxkanyuCTa, npOBepbTe, yTO BAw ayDIO npOnrpBbATEnb PNOdepKnaBET 3Byk 192 KU, uBaCecb AyDIO paMb192 KUd nPaBnBHorO BOCpON3BedeHn C 3ToI qACTOToB Bb6opKn. KpOME TOR, BAM MOKet NOTpe6oBaTcckOHpynpoBaT ayDIO dpAbeP B BaWem nepcoHaJbHom KOMNbIoTepe DnB BbOda 192 KU, NIO Bo BAw KOMNBoTEp MOket BbINONHTb NOHHaQyU nepeNcKpeTn3aUIO Ha 60OE HN3KyU cactO Ty Bb6opKn. 3a NoDpo6HoH INHOpMaueNe, noXaynuCTa, o6paTntEc bNtOpMaun O BaWem 3BykOBom npOnrpbBaTele nn OpeaunHOH cnCTeMe.
PIMMEYAHVE: Pekum USB Audio Class 2.0 mpe6yem ycmaHOBky dpaebepa dny nepcohanbhozo kombbiomepa noD Windows; dpaebep haxoumcHa komnakm-ducke, nocmaenHom bmecm c npeo6pazobamenem RDD-1580.
PIMMEYAHHE: KomnbHomepbI MAC He mpe6yiom ycmHObku dpaBepa dna noodepKku 3Byka PC-USB 1.0 uu 2.0.
PIMMEYAHNE: Nocne ycneuho ycmahOBku dpaubep, bAM, 8O3MOxHO, nompe6yemcBb6pamb «ROTEL audio driver» B HacmpoKe 3Byka/ zopMKo20OpumenBauezoKOMnbomepa.
Bxod/BbIXoD pIe IIOKIIHouEHHa KOMnbTepea
Ппeобразовател RD-1580 можно уравлгь посдтбOM RS-232 днИнтераши B ссtemы abTomatn3aци. BXOD COMPUTER I/O npinHmaet CTanДapThь пямо Ka6eBJ DB-9 Tuna «Вика-Г He3do».
3a donolnHtneBHO HnΦopMaueNe O coeHNHeNax, pa3BOKe, npoPamMHom o6ecneHenn n ynpabnaHounx Kdoax dny npapBneHnRDD-1580 ot Komnbtope aObaaaiTecb K Baawemy ABtopn3OBaHHomy duinepy Rotel.
ROTELINK
CtepeofoHueckoe rHe3do nIa "MHN-IXeK" 3,5 MM (c Mapknupbokn ROTEL LINK IN) moXer 6bITb DOONHHTeBHO NOcOeINHeo K cTei Rotel, o6ecneuBaar coeINHeHn Cn3dEINAMN, OChAeHHbIMn CoeINHeHnAMn ROTEL LINK OUT. 3To no3BOJnTet CoeINHtB N3dEINR RoTe I dCBzI npyrom uynpaBnTB mnn nocpeDCTBOM npUIOKeHnro Rote Remote (doctynho I da 3aRpy3kn B mara3nHeiTunes).
THe3doEXTREMIN
3To 3,5-MM THe3Do "MNHN-DKEK" npnHMaet KObI KOMaHOT CTaHApTbIX npomblneHHbIX NK-ppnemHKnOB uepe3 npoBodhie coeHnHHeN.3Ta fyHKnna MoKET 6bITb NOle3HO, KOrda np6Op yCTaHOBnE B CTOnke, N daTuNK Ha nepeDne Hnene 3abloKnpoBaH. O6paTntecb K BaWemy ABTopu3OBAHHomy DInepy Rotel 3a INHOpmauei no6 Tnx BHeuHx NobTopuTeJx nPpABuNbHOM NoCoedHHeHH uTeKepa, COOTBeCTByUoero po3eTEk «MNHN-DKEK".
3anyckaiouBxO12B
Ipeo6pa3OBaTeB RDD-1580 MoKet 6bItb BKIOueH 12-BOIBTObIM 3aNcKaIOUcM cnHaIOM.3aNyCaIOu BxOJ nPHMaET IIO6o ynpabIAIOu cnHaI (nepemehoro nnocToHHoro ToKa) B dnaIa3OHe ot 3 B do 30 B.
Korda Ka6ebNoCoeHHeBxOdy 12V, n npCyTbByet 3anyckaioun CunHan, npeo6pa0BaTeB RDD-1580 BkIouen. Korda 3anyckaiou n CunHan BblKnIOueH, yctpoCTBO nepexoDnT B kdyuyn pexmM. HndkaTOp Ha nepeHne NaHnn octaetcraopeTb, Ho yctpoNCTBO He 6ydt pa6oTaTb.
OprahbI ynpaBHeHn3ByKoM
BxOДиCTOчнka
KhONKa Source Input Bb6paET NCTOuyHK BXoHORO cuHana. Ha nepeDHe naHei nnnyIte Ny HaxMnTE KhONkY COOTBeTCTByUoero BXoJa, YTo6bl Bb6paTb NCTOuyHK DnI npocnyuBaHna.
Khoika Repeat
HekotopbIe ayuio yctpoiCTBa -NtOCHNI NOdEepKINBAOT NcIONb3OBaHne ΦyHKUIN NOBTOpeHNA, BKIOUaRea Peat Track (NOBTOpntb dopoxk), Repeat Album (NOBTOpntb aIb6om),Repeat Off (NOBTOpeHNE BbIKIOueHO).HaKIMaITe KhONky Repeat HnnyIte DY, YTO6bI nepeKIOUaTb 3TN fYHKUIN No Kpyry. CBeTOnMO INCTOCHNka USB BCnbXHT COOTBETCTBYIOUM o6pa3OM, yKa3bIBaT ETKUyIO AKTUBPBOAHHHIO fYHKUIO NOBTOpeHNA.
Repeat Off: Onda BCnbiuka (3abOcka HactpoiKa no ymonuHIO)
RepeatAlbum:DbBeBcnbikn
Repeat Track: Yetbipe BCbiiuKu
KhoNka Random
HeKoTOpbIe ayDIOyOCTPOniCTBa -NCTOCHNI NOIDepkXnBAOT BOCpON3BedeHne My3bIKB CnyaHOMnopAKe. HaxmaiTe KNONky Random Ha nybTe DY, yTO6bI nepeKnIOATb 3TN fHKuHc. CBeToNDIO NCTOCHNka USB BCnbIXHET COOTBeCTBYIOUcM O6pa30m, yKa3bIBaY TeKyuIyO aKtINBnPOBaHHyO fHKuHIO.
Random Off: Oda BCbIbIa (BbIKIOHc, 3aOBCKaHaCTpoJaNo yMonHaHIO) Random On: DBe Bcblk (BKIIOUeHO)
3aBODKHe HactpoiKNI IO yMOJUahHIO
Ppeo6pa3oBaTeB RDD-1580 MoKet 6bIt nepeyctaHOBnE, YTo6bI BocCTaHOBtB 3aBOcKne HAcTpoKn No yMOuHaHIO. IJra BOcTaHOBNeHn3 aBOcKnX HAcTpoE no yMOUHaHIO, HaxMITE u yepxmbaTe KONKy nCTOuHNka USB B TeueHne 5 cekynd, noka He 3AMrAOT CBeTONDbl Bce x nCTOuHNkOB. OTnycntMe KONky nCTOuHNka USB, npeo6pa3oBaTeB RDD-1580 BocCTaHOBtB Ce 3aBOcKne HAcTpoKn N nepe3aNcyTITCA.
Bo3MOxHbIe HcnpaBHOCTN
BoIbIHNCTBO 3aTpUdHEnH B 3ByKOBbIX CNTeMax ABJIOTcpe3yIbTaTOM He npabunbHbIX CoedHEnH,IN6o He npabunbHbIMN HAcTpoiKaMnYnpaBHeH. Ecnn Bbl cToIKNHyIncB c npO6bnMaMn, IN3OJIpyTe o6NaCTb 3aTpUdHEnH, npOBePbTe HAcTPOIKuYnpaBHeH, ONpEeIe NTpe pnuHNy c6oN iCenaiTe Heo6xOIMble N3MeHEnH. Ecnn Bbl He MoKeTe NOnyUHTb 3ByK OytcpoiCTBO, 6opatntecb K COBETAM DnI CNeDyUOUnx CITyaI:
He roputnHndkaTop KdyuceM
Ha yctpoicTBo He npdaHO cTeBoe HnpanKeHne. IpoBepbTe coeHHeHHIITaHINNE pEmEHORO TOKa yCTPOiCTBa n po3ETy nepeMeHHORO TOka.
3aMeHa npedoxpaHnten
Ecnpn npoknuehen B Ctebyo po3eTky dpyroj 3neKtpnueckyn yctpoCTBO pa60aet, Ho INdkaTOp knyem yctpoCTBOA He ropnt npn npoknuehen B Ty ke camyio po3eTKy, 3O yka3bIbaet, 4TO, BO3MOXHO, crotel BCTPOEHHbI npedoxpahntB nHTAHN. Ecnbl noIaraete, 4TO 3TO OUYINOCb, o6paNTecB KBaWemy aBtOPI3OBAHHomy DInepy Rotel, 4TO6bl nOlyuHTb npedoxpahntBdJRAMeHbI.
OTCYTCTByET 3BYK
Ecn yctpoictbo nonyaetnntahne,HO He Bocpn3B0DNT 3Byk, npOBepbTe HnDnkaTOpby BXoDB HA nepeHne NaHenn. Y6eHITecb,TO Bbl6paHHbI NCTOCHN NOcOeHNHe. TaKKe O6Ba3aTeNbHO npOBepbTe,TO aHaIorOBBe BxOdbYcTPOiCTBOA NOcOeHNHeHb DOJKNHbIM o6pa3OM.
He Bocnpon3B0aNTca NCTOuHnK 246nt/192 KtU
Bocnpn3BeHne cactotamn Bb6opkn 96 KfU 192 KfU Bo3MOKHO TolbKO uepez ufoPobIe BXoDbHa 3aDHeN pAnEi. IoxaanyIcTa, npIMTe BO HIMMaHne, yTO MHOrne MeDa nPonrPbIbATEn He cNoCo6HbI KdeKoOpOBaHNIO 3ByKOBbIX fainob 24 6nt/192 KfU. IoxaanyIcTa, y6eDuTEcb, yTO BaW npOnrPbIbATEnb MoKet dKeOuPiPoBaTb faiNb 24 6nt/192 KfU. Kpome toro, npOBepbTe, yTO BXoD PC-USB npeo6pa3ObATEn RDD-1580 cKoHpyrpObaH dnpeXkima USB 2.0 Audio, n Ha BaW kOMNbIoTepyCTaHOBneH ayDIO dpaiBepdN Windows. (IpoDpo6HcTm. B pykoBOdCTbe dRn BXoDa PC-USB.)
PIMMEYAHHE: Komnbomepb MAC He hyndoomc8 dpaubepe, Ho mpebyom npoqpammhoe obecneuehue, komopoe noodepkuabaem bocnpou3edehue 246um/192Ku, a maakke mpebyom, umo6b xoD PC-USB npeo6pa3obamela RDD-1580 6bn cknphiyupupoaan dny pexuma USB 2.0 Audio.
Hebo3MOxHO yCTaHOBnTB Bluetooth coeHNHeHne
Ecnn BbHe MoKTe yCTaHOBnTb cOnpJKeHne (pair) Baawero Bluetooth coBmectnMOro yCTpoNCTBa C RDD-1580, cotPte n3 NamrTn PpeDyUyece coeHNHeHne Ha RDD-1580 nHa BAWeMycTpoNCTBe. Ha BAWeMycTpoNCTBe qacto 3Ta onepaun HAbsBaetc "Forget this Device". Ha nyIbTe RDD-1580 hXKMnTe uYdEpknTe KKnKpy PAUSE B TceHne 5 cekyn, do tex nop, noka INnKaTop USB 6bCTPO Mrratb. Iocne 3TO rONpOboyte yCTaHOBnTb coeINHeHne eue pa3.
Bocnpoun3BoDnmbi aydno φopMaT
USB Apple (iPhone, iPod, iPad)
OTHOWHHe CnHAn/7yM (A-e3eeu.) 128 n6
BxOHaHyBCTbHTeNbHOCTbMmTeaHc 0 Dn /75 O
BixxohnoypoBeHb/nnneHaC(RCA)2,0B/100OM
BixoHOn yPoBeHb/HmTeJAnc (XLR) 4,0 B / 200 OM
UHpOBoBcMnHbI,ekOJmpyembe WAV,MP3,WMA
foHbHMnopTom USB/Pod (166nt/48Kt)
UHPOBbE CnHnbl,ekOpDpyemble SPDIF LPCM
KOAKC/ORTM. BXOAMn (do 24 6nt/192 KtU)
UHPOBBIEBxOHNbIEcHnHbI, WAV/PCM B3aBNCUMOCHTNOT
Jekpmybce cXoJaPC-USB
npnnpbBATEy,ncnojbyeMTO
nepcohaNbHbIM KOMNbiOTepom
(20 192KU
067
Tpe6oanmKnptanmno (nepeemHbU mok)
CLUA:
120BolbT,60T
Espona:
230BONbT,50Γ
Notpe6nma MoHocTb
25Bt
MoHcTb,Notpe6nemBxDyem pexKme
0.5BT
(HopMaNbBbIpeKum)
Fappanpne paaeppe
UmpnHaX BbICota X rny6nHa
431×55×316MM
BbCota npeDne naHn
1U/43,7 MM
Bec HETTO
5,1K
BceTexnueckme xapakTepeNCTKN BANIOCT TOYHBM HA MOMENT Ny6nkaun. KOMNAH Rote 0ctabnre3a cobon npabn ycoBepuehCTBOBAHN 6e3 ybenomhenn
Rotel n lorotn Rotal Hi-Fi hnnotc 3aperncnpobhmbm toprobbm Mapkamn Rotel Co, Ltd., Tokno, noHHN
"Made foriPod"u"Made foriPhone"03haaet,чto 3eKtpOnHbIpe npHaJNExKHOCTB6bln pa3pa6oTaHbI dnn noDcoEINHeHH CneuaJIbHO K iPD nII iPhone, COOTBeTCTBENHO, u 6bln ceTpNphiUPOBaHbI pa3pa6OToNKOM, UTO6bl yOBOETBOPuTB cTAHDaptAM kauEcTBA Apple. KomnaHnApple He Hecet OTBeTCTBEHNOCt b3 pa6Oty 3TOrO yCTpOCTBa IIN erO coMBMeTUMocTb CO tAHTAPAMI 6eONaCHOCTn peryIaTINBbIMn HopMaMn. IoxkanyIcta, npIMITE BO BHNMAHNe, UTO nCIObn3OBAHNe 3TOI npHaJNEXKHOCTc iPd nII iPhone MOXET NOBNIATb Ha pa6Ory 6ecnpBOADHO CBZn.
iPhone, iPod, iPod classic, iPod nano i iPod touch rabnhotoprobim MapkAm Apple Inc., 3apernctpupobahbIMn B CIIa U npyrrnx ctpaHax.
Made for

iPod

iPhone
ROTEL
The Rotel Co. Ltd.
Tachikawa Bldg. 1F.,
2-11-4, Nakane, Meguro-ku,
Tokyo, 152-0031
Japan
Rotel of America
54 Concord Street
North Reading, MA 01864-2699
USA
Phone: +1 978-664-3820
Fax:+1978-664-4109
Rotel Europe
Dale Road
Worthing, West Sussex BN1 12BH
England
Phone: +44 (0)1903 221 761
Fax:+4401903221525
Rotel Deutschland

- Important Safety Instructions
- Notice
- CAUTION
- APPLICABLE FOR USA, CANADA OR WHERE APPROVED FOR THE USAGE
- Important Notes
- When making connections be sure to:
- Remarques importantes
- About Rotel
- Getting Started
- A Few Precautions
- Placement
- Cables
- The RR-DD91 Remote Control
- Remote Control Batteries
- AC Power and Control
- AC Power Input
- Standby Switch and Indicator
- Remote Sensor
- Front Input Indicators
- Sampling Frequency Indicators
- Connections
- Front USB Input
- Bluetooth Connection
- Analog Outputs
- Digital Inputs
- PC-USB Input
- Computer I/O Connector
- ROTELINK
- EXT REM IN Jack
- Volt Trigger Input
- Audio Controls
- Source Input
- Repeat
- Random
- Factory Default
- Troubleshooting
- Standby Indicator Is Not Illuminated
- Fuse Replacement
- No Sound
- Can not play 24 bit 192kHz source
- Cannot Connect via Bluetooth
- Playable Audio Format
- Specifications
- RDD-1580
- General
- Dimensions
- Computer I/O-connector
- Connetlore Computer I/O
- Fronthoid
- BHIMAHNE
- JIU CUA, KAHABNI AYINUTXN CTPAH, TGE YCTPOCNCTBO ODOEPEHO KCMONIL30BA
- Copepkanhe
- O kompanu Rotel
- PpncTypaKeknpyatau
- HeKoTOpBle MepbI npedocToPoxKHOCTN
- Pa3MeueHne
- Ka6enn
- HnKaTopbIyacTObBb6OpKn
- CoednHeHna
- Bxod USB ha nepeDnei naHEnI
- CoeHHeHne Bluetooth
- AHaIOrOBeBbIXOaBbl
- UHpOBoBbE BxOJIbI
- BxOaPC-USB
- Bxod/BbIXoD pIe IIOKIIHouEHHa KOMnbTepea
- THe3doEXTREMIN
- 3anyckaiouBxO12B
- OprahbI ynpaBHeHn3ByKoM
- BxOДиCTOчнka
- Khoika Repeat
- KhoNka Random
- 3aBODKHe HactpoiKNI IO yMOJUahHIO
- Bo3MOxHbIe HcnpaBHOCTN
- He roputnHndkaTop KdyuceM
- 3aMeHa npedoxpaHnten
- OTCYTCTByET 3BYK
- He Bocnpon3B0aNTca NCTOuHnK 246nt/192 KtU
- Hebo3MOxHO yCTaHOBnTB Bluetooth coeHNHeHne
- Bocnpoun3BoDnmbi aydno φopMaT
- ROTEL
- The Rotel Co. Ltd.
- Rotel of America
- Rotel Europe
- Rotel Deutschland
Brand : ROTEL
Model : RDD1580
Category : Hi-fi system