
WG761E - Lawn mower WORX - Free user manual and instructions
Find the device manual for free WG761E WORX in PDF.
User questions about WG761E WORX
0 question about this device. Answer the ones you know or ask your own.
Ask a new question about this device
Download the instructions for your Lawn mower in PDF format for free! Find your manual WG761E - WORX and take your electronic device back in hand. On this page are published all the documents necessary for the use of your device. WG761E by WORX.
USER MANUAL WG761E WORX
natural_image
Line drawing of a lawn mower with extended blade and bucket (no text or symbols)| Cordless Lawn Mower | EN | P09 |
| Schnu ão ser Rasenmäher | D | P19 |
| Tondeuse à gazon sans fil | F | P31 |
| Tosaerba senza fili | I | P42 |
| Cortacésped a batería | ES | P54 |
| Corta-relva sem fios | PT | P65 |
| Snoerloze graasmaaier | NL | P77 |
| Ledningsfri plæneklipper | DK | P88 |
| Batteridrevet gressklipper | NOR | P99 |
| Sladdlös gräsklippare | SV | P109 |
| Bezprzewodowa kosiarka do trawników | PL | P119 |
| Χλοοκοπτική μηχανή μπαταρίας | GR | P131 |
| Vezetékmentes fúnyíró | HU | P143 |
| Maşină de tuns iarba fără fir | RO | P154 |
| Bezdrátová travní sekačka | CZ | P166 |
| Akumulátorová kosačka na trávu | SK | P177 |
| Brezžična kosilnica | SL | P188 |
| Original Instruction | EN |
| Originalbetriebsanleitung | D |
| Notice originale | F |
| Istruzioni originali | I |
| Manual original | ES |
| Manual original | PT |
| Oorspronkelijke gebruiksaanwijzing | NL |
| Original brugsanvisning | DK |
| Original driftsinstruks | NOR |
| Bruksanvisning i original | SV |
| Instrukcja oryginalna | PL |
| ΜΕΤΑΦΡΑΣΗ ΤΩΝ ΠΡΩΤΟΤΥΠΩΝ ΟΔΗΓΙΩΝ | GR |
| Eredeti használati utasítás | HU |
| Instrucțiuni originale | RO |
| Původní návod k používání | CZ |
| Pôvodný návod na použitie | SK |
| Izvirna navodila | SL |
text_image
Labeled diagram of a lawn mower with numbered parts for identification
natural_image
Coiled electrical plug with terminal connector, no text or symbols visible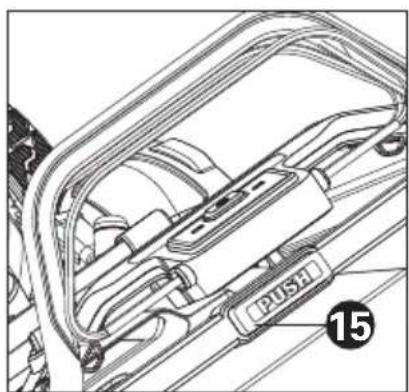
natural_image
Technical line drawing of a mechanical component with labeled parts (no readable text or symbols)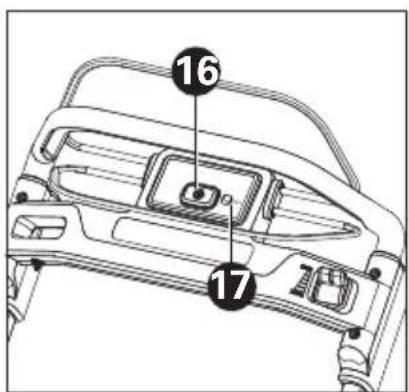
text_image
16 17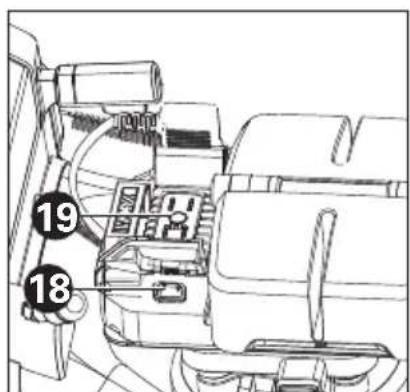
text_image
19 18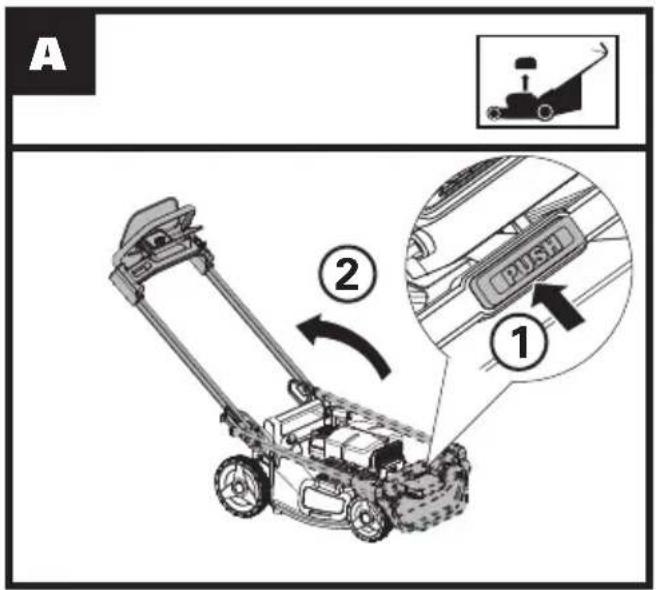
text_image
A ② ①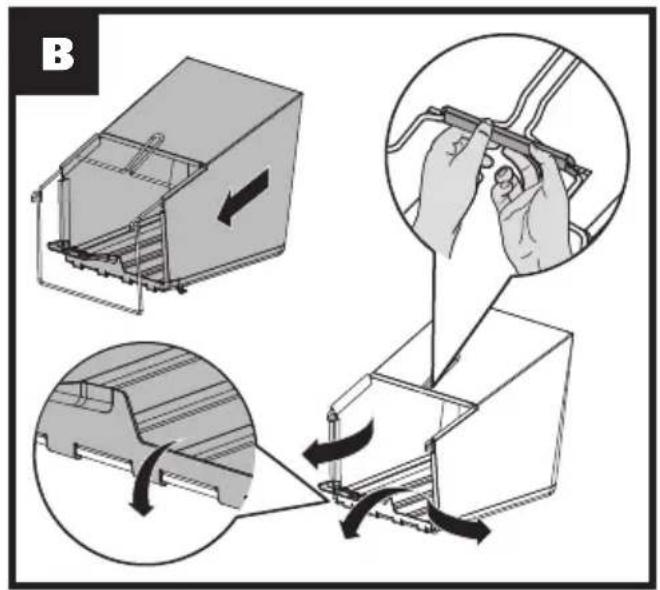
text_image
B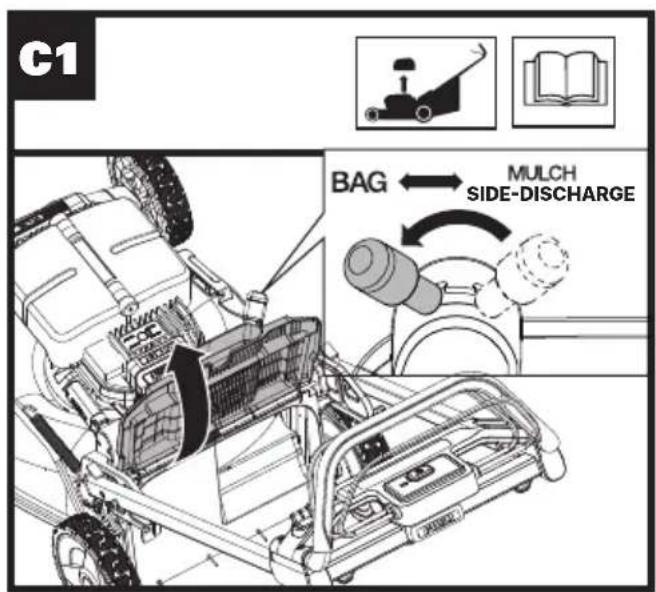
text_image
C1 BAG ← MULCH SIDE-DISCHARGE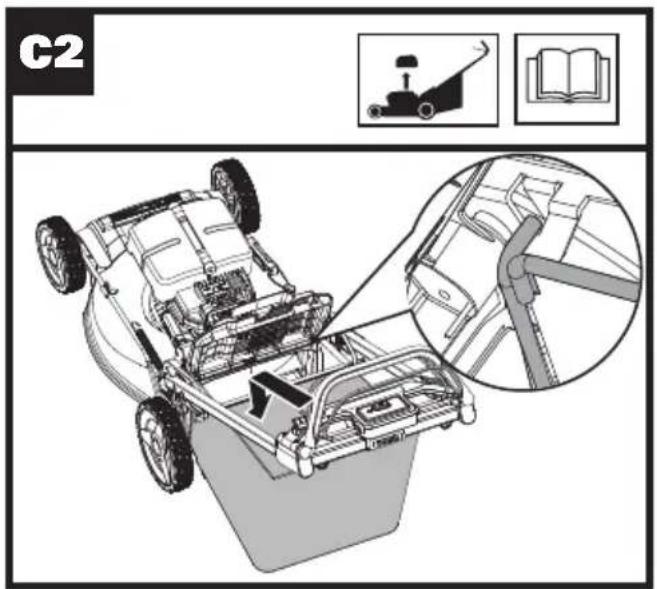
text_image
C2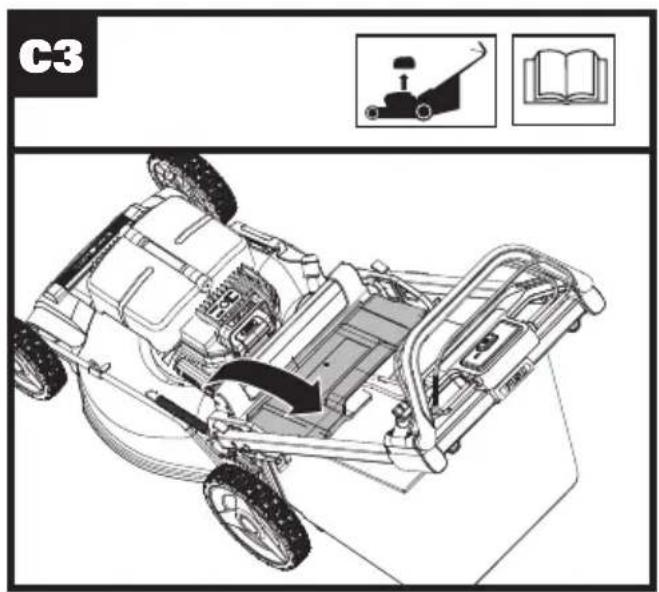
natural_image
Technical line drawing of a vehicle chassis with visible engine, wheels, and structural components (no text or symbols)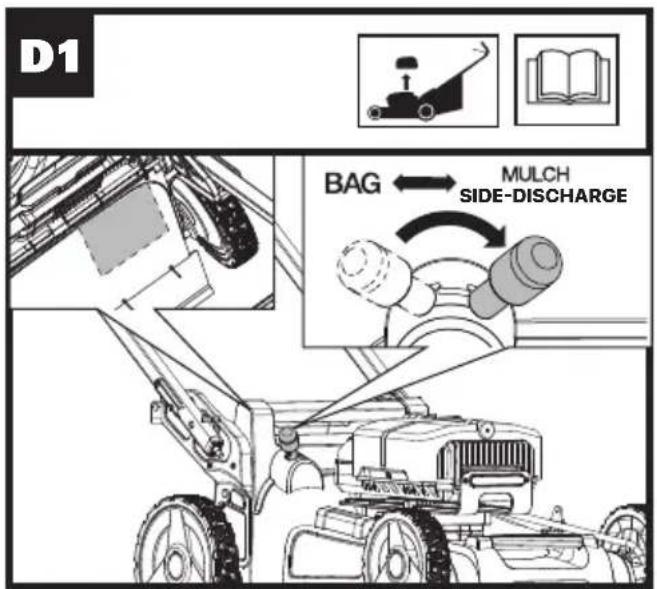
text_image
D1 BAG ← MULCH SIDE-DISCHARGE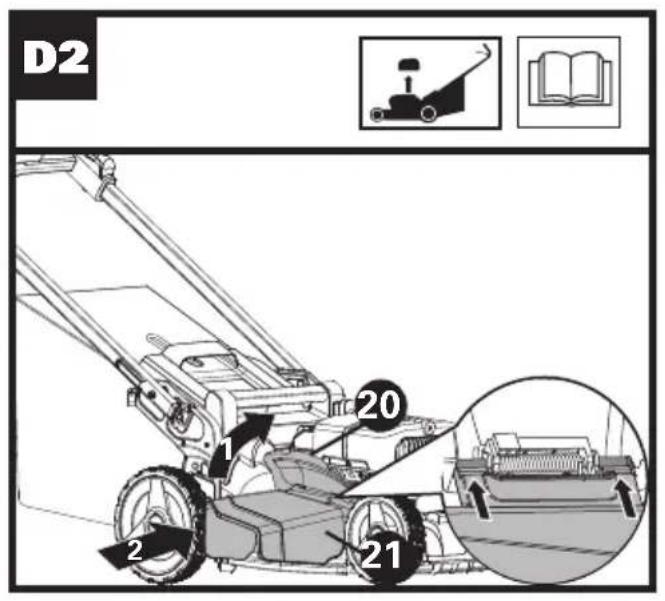
text_image
D2 1 20 21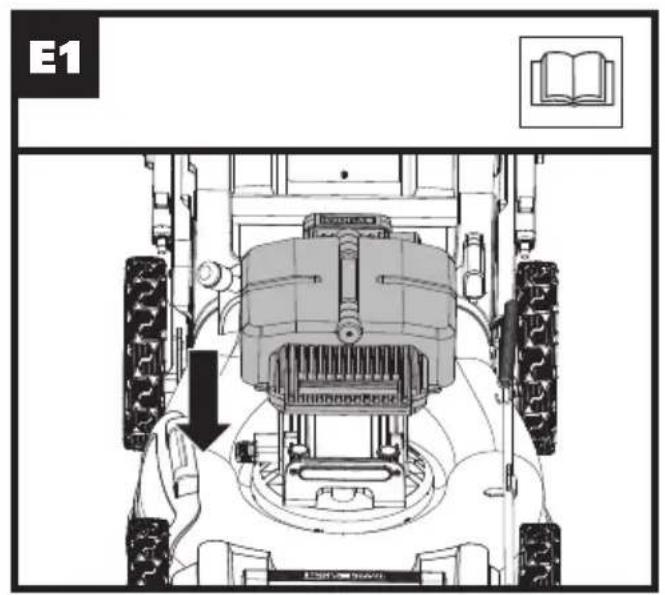
natural_image
Top-down technical diagram of a tractor's wheel assembly with tire tracks and mechanical components, showing no text or symbols.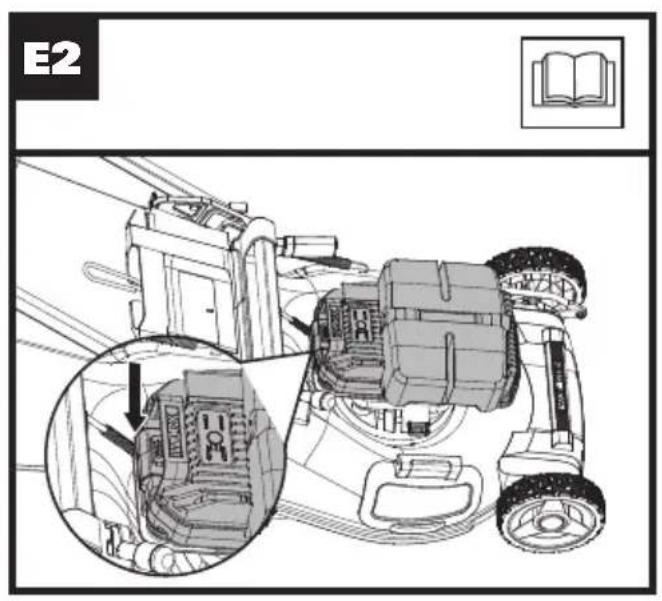
text_image
E2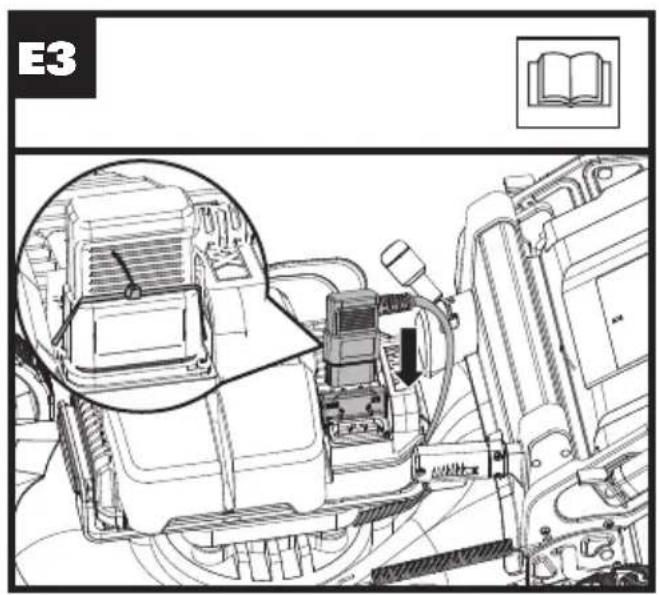
text_image
E3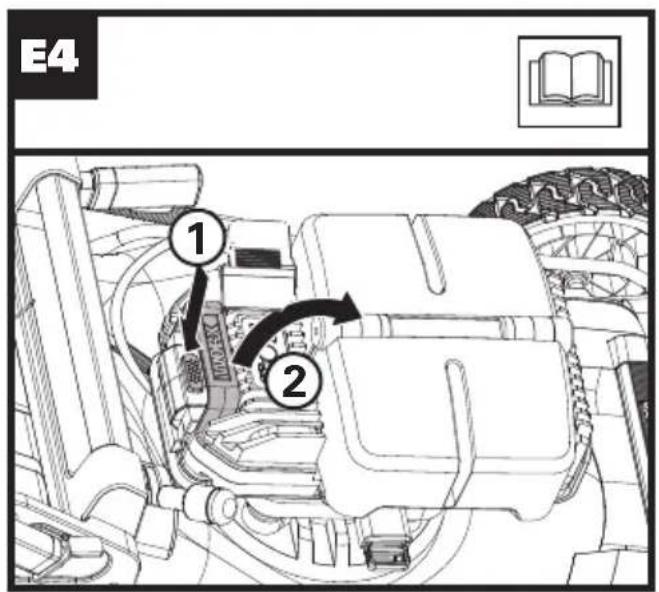
text_image
E4 ① ②
text_image
F1 23 22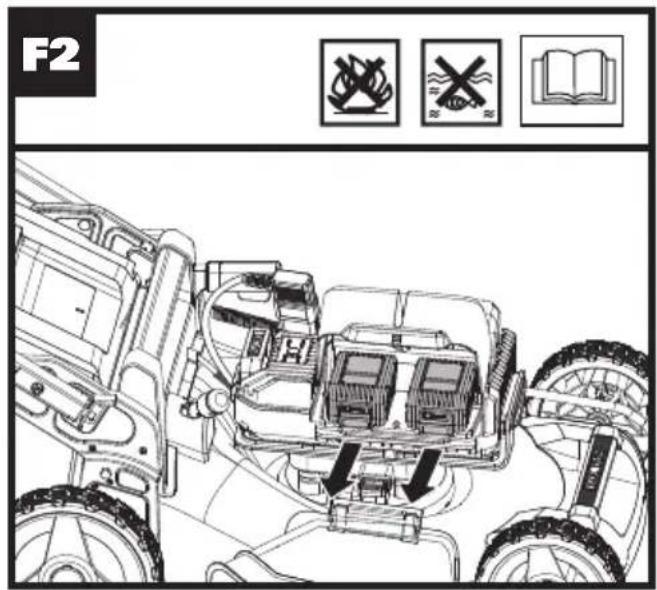
text_image
F2 -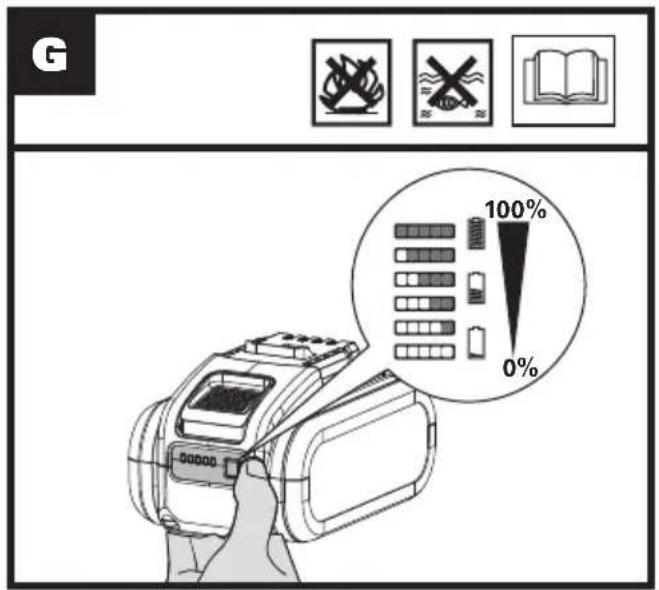
text_image
G 100% 0%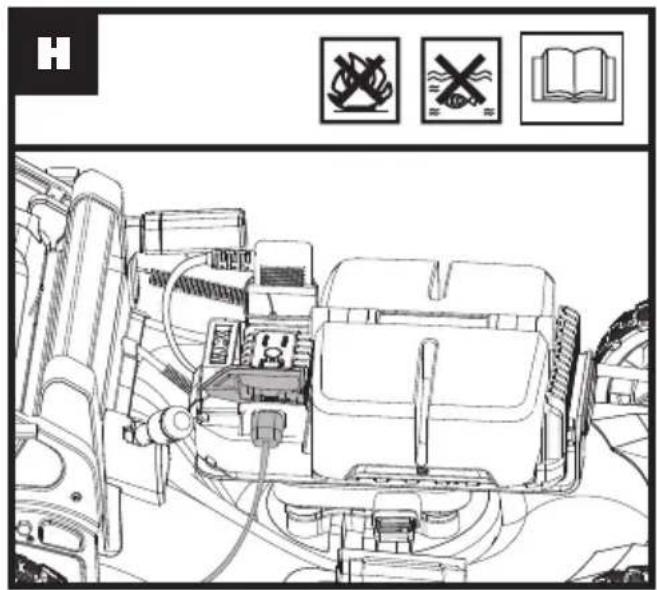
text_image
Diagram of a vehicle's internal components with warning symbols and icons, including no readable text and crossed-out items.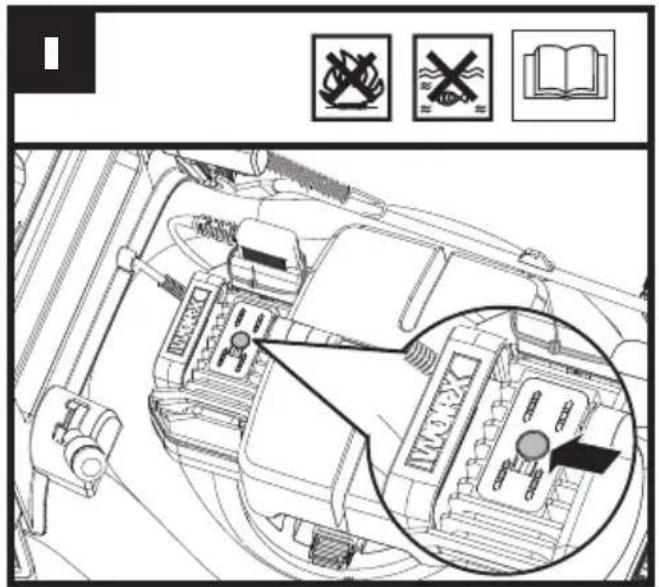
text_image
Diagram of car engine electrical switchgear with warning symbols and labeled parts, including circuit breakers and open book.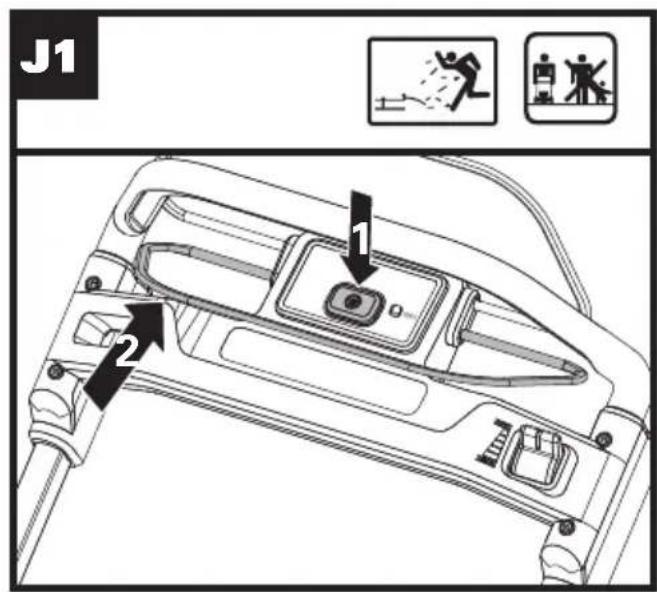
text_image
J1 1 2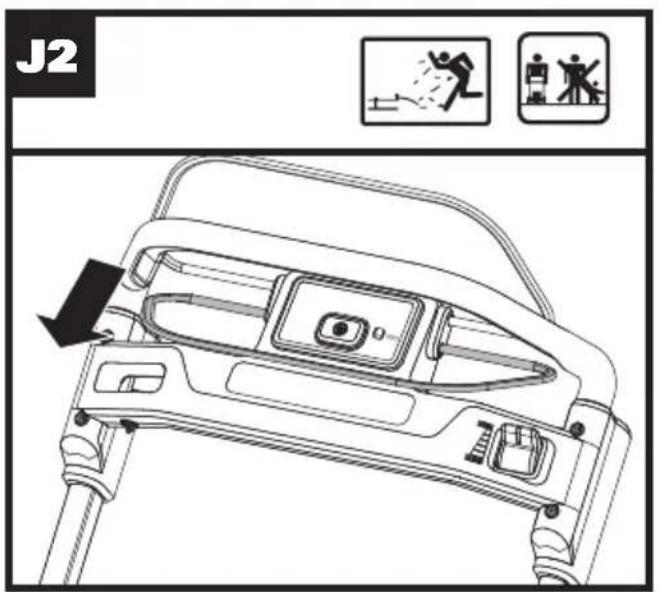
text_image
J2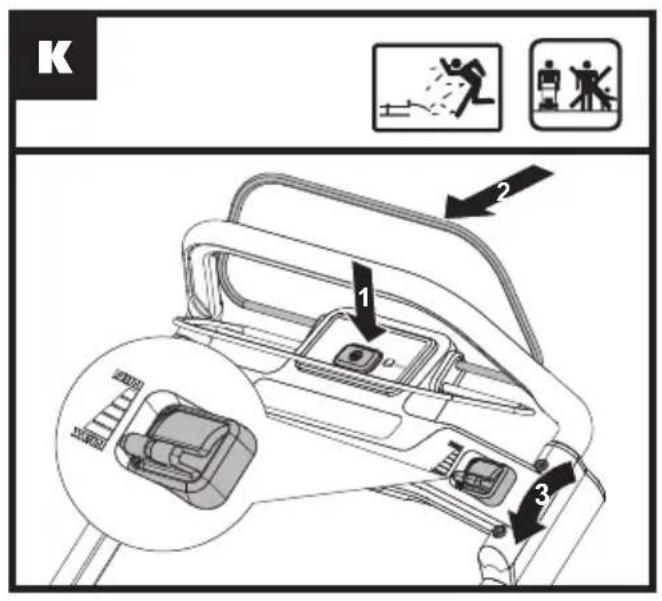
text_image
K 1 2 3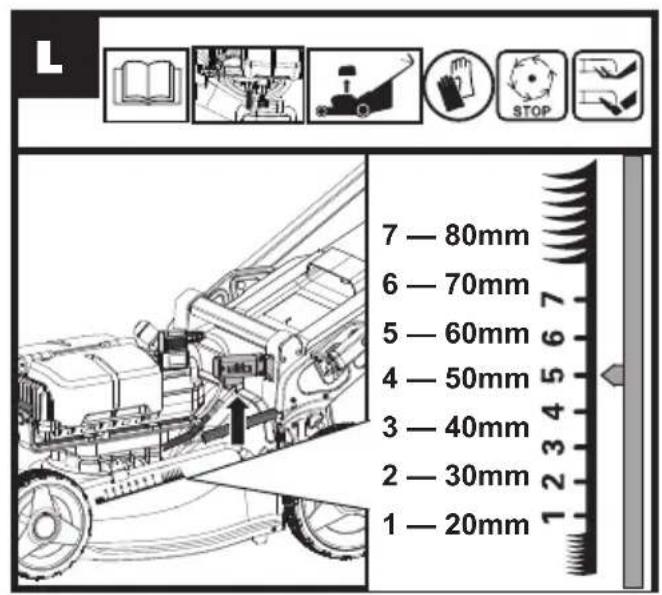
text_image
7 — 80mm 6 — 70mm 5 — 60mm 4 — 50mm 3 — 40mm 2 — 30mm 1 — 20mm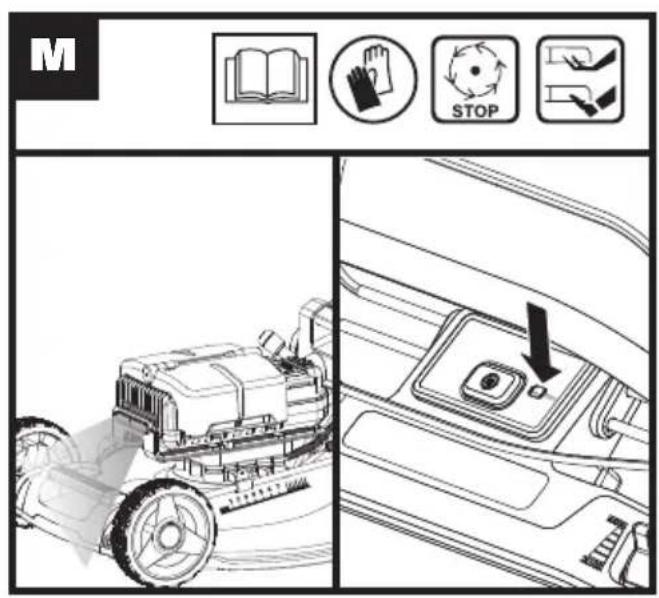
text_image
M STOP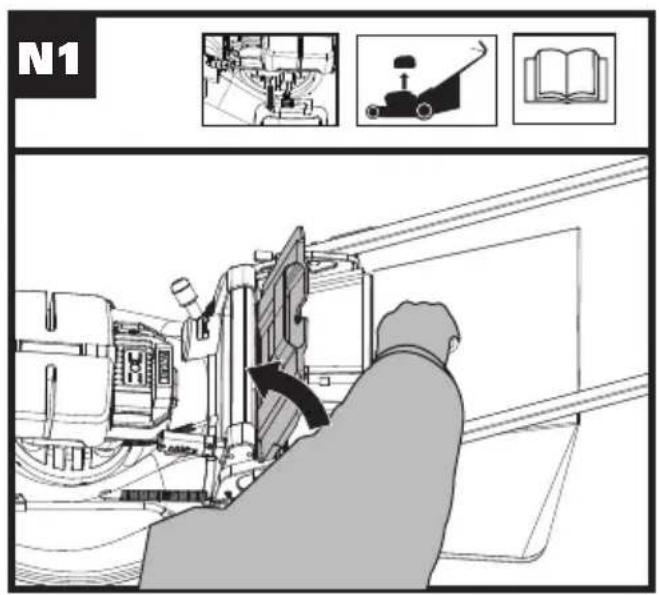
text_image
N1
text_image
N2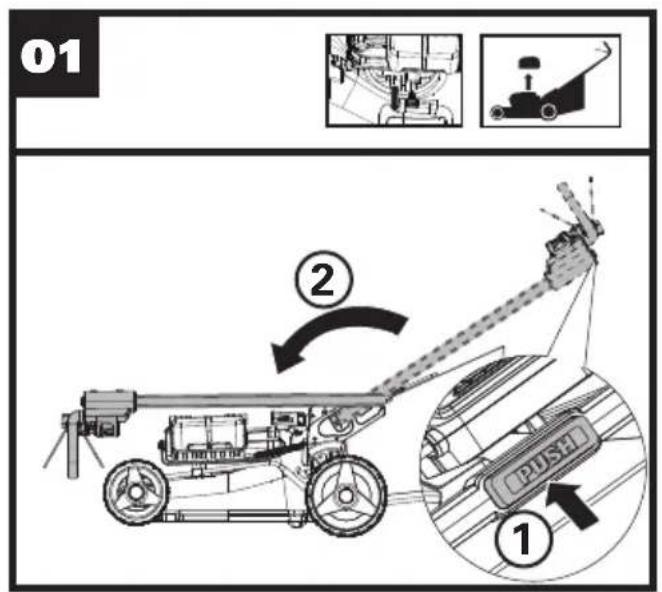
text_image
01 ② ① PUSH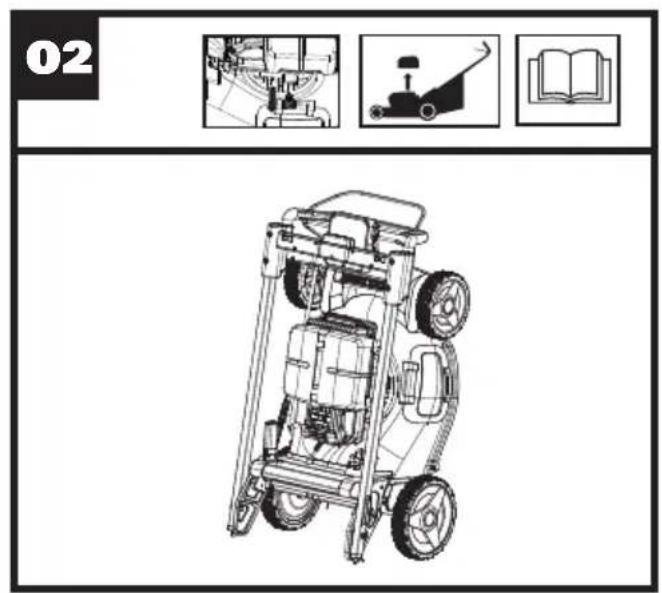
text_image
02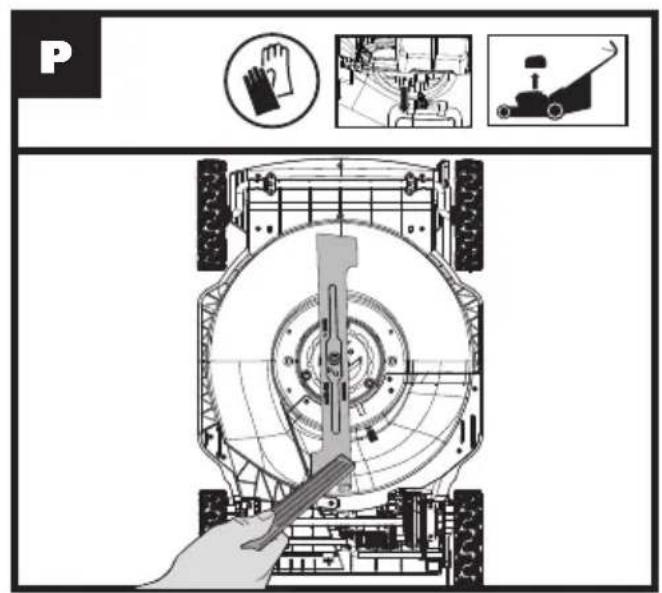
text_image
P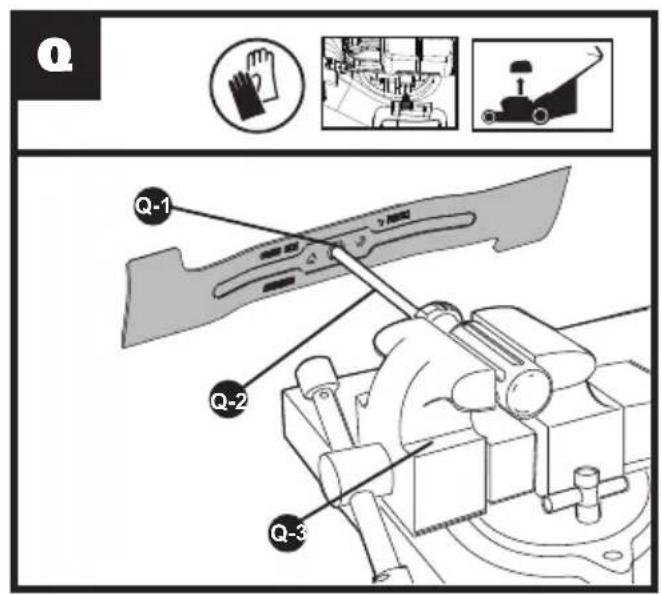
text_image
Q Q-1 Q-2 Q-3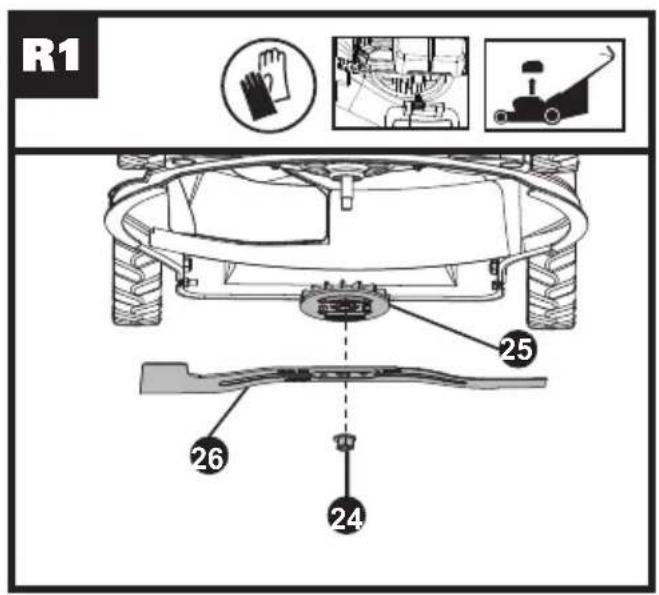
text_image
R1 25 26 24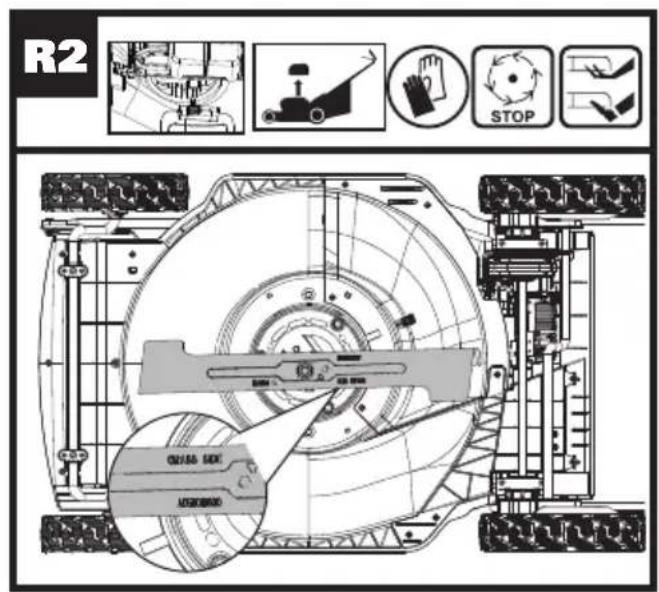
text_image
R2 STOP OUTRASS SIDE MASCULARS
text_image
SPRODUCT SAFETY GENERAL SAFETY WARNINGS

WARNING Read all safety warnings and allstructions. Failure to follow
the warnings and instructions may result in electric shock, fire and/or serious injury.
Carefully read the instructions for the safe operation of the machine. Save all warnings and instructions for future reference.
- This appliance is not intended for use by persons (including children) with reduced physical, sensory or mental capabilities, or lack of experience and knowledge, unless they have been given supervision or instruction concerning use of the appliance by a person responsible for their safety.
- Children should be supervised to ensure that they do not play with the appliance.
- The appliance is only to be used with the power supply unit provided with the appliance.
IMPORTANT READ CAREFULLY BEFORE USE KEEP FOR FUTURE REFERENCE
Safe operation practices Training
a) read the instructions carefully. Be familiar with the controls and the proper use of the equipment;
b) never allow children or people unfamiliar with these instructions to use the lawnmower. Local regulations can restrict the age of the operator;
c) never mow while people, especially children, or pets are nearby;
d) keep in mind that the operator or user is responsible for accidents or hazards occurring to other people or their property.
Preparation
a) While mowing, always wear substantial footwear and long trousers. Do not operate the equipment when barefoot or wearing open sandals;
b) thoroughly inspect the
area where the equipment is to be used and remove all objects which can be thrown by the machine;
c) Before using, always visually inspect to see that the blades, blade bolts and cutter assembly are not worn or damaged. Replace worn or damaged blades and bolts in sets to preserve balance. Replace damaged and unreadable labels.
Operation
a) mow only in daylight or in good artificial light;
b) avoid operating the equipment in wet grass, where feasible;
c) always be sure of your footing on slopes;
d) walk, never run;
e) for wheeled rotary machines, mow across the face of slopes, never up and down; mow across the face of slopes, never up and down.
f) exercise extreme caution when changing direction on slopes;
g) do not mow excessively steep slopes;
h) use extreme caution when reversing or pulling the
lawnmower towards you;
i) stop the blade(s) if the lawnmower has to be tilted for transportation when crossing surfaces other than grass, and when transporting the lawnmower to and from the area to be mowed;
j) never operate the
lawnmower with defective
guards, or without safety
devices, for example
deflectors and/or grass
catchers, in place;
k) switch on the motor carefully according to instructions and with feet well away from the blade(s);
I) do not tilt the lawnmower when switching on the motor, except if the lawnmower has to be tilted for starting. In this case, do not tilt it more than absolutely necessary and lift only the part which is away from the operator;
m) do not put hands or feet near or under rotating parts. Keep clear of the discharge opening at all times;
n) not to touch the blades before the disabling device has been removed and the blades have come to a
complete stop;
o) Do not start the lawnmower when standing in front of the discharge opening.
p) Do not transport the lawnmower while the power source is running.
q) Stop the lawnmower, and remove the disabling device. Make sure that all moving parts have come to a complete stop.
- whenever leaving the machine unattended,
– before clearing a blockage,
– before checking, cleaning or working on the machine,
- after striking a foreign object. Inspect the machine for damage and make repairs before restarting and operating the lawnmower
If the lawnmower starts to vibrate abnormally (check immediately)
- inspect for damage.
- replace or repair any damaged parts.
- check and tighten any loose parts.
Maintenance and storage
a) keep all nuts, bolts and screws tight to be sure the equipment is in safe
working condition;
b) check the grass cacher frequently for wear or deterioration;
c) replace worn or damaged parts for safety. Use only genuine replacement parts and accessories.
d) Be careful during adjusting of the lawnmower to prevent entrapment of the fingers between moving blades and fixed parts of the lawnmower.
e) Always allow the lawwnmower to cool down before storing.
f) When servicing the blades be aware that, even though the power source is switched off, the blades can still be moved.
SAFETY WARNINGS FOR BATTERY PACK
a) Do not dismantle, open or shred cells or battery pack.
b) Do not short-circuit a battery pack. Do not store battery packs haphazardly in a box or drawer where they may short-circuit each other or be short-circuited by
conductive materials.
When battery pack is not in use, keep it away from other metal objects, like paper clips, coins, keys, nails, screws or other small metal objects, that can make a connection from one terminal to another. Shorting the battery terminals together may cause burns or a fire.
c) Do not expose battery pack to heat or fire. Avoid storage in direct sunlight.
d) Do not subject battery pack to mechanical shock.
e) In the event of battery leaking, do not allow the liquid to come into contact with the skin or eyes. If contact has been made, wash the affected area with copious amounts of water and seek medical advice.
f) Keep battery pack clean and dry.
g) Wipe the battery pack terminals with a clean dry cloth if they become dirty.
h) Battery pack needs to be charged before use.
Always refer to this instruction and use the correct charging procedure.
i) Do not maintain battery pack on charge when not in use.
j) After extended periods of storage, it may be necessary to charge and discharge the battery pack several times to obtain maximum performance.
k) Recharge only with the charger specified by WorxNITRO. Do not use any charger other than that specifically provided for use with the equipment.
I) Do not use any battery pack which is not designed for use with the equipment.
m) Keep battery pack out of the reach of children.
n)Retain the original product literature for future reference.
o) Remove the battery from the equipment when not in use.
p) Dispose of properly.
q) Do not mix cells of different manufacture,
capacity, size or type within a device. r) Keep the battery away from microwaves and high pressure.
SYMBOLS
| Read instruction handbook before operation this machine | |
| Keep bystanders away. | |
| Beware of sharp blades. Blades continue to rotate after the motor is switched off- Remove disabling device before maintenance | |
| Batteries may enter water cycle if disposed improperly, which can be hazardous for ecosystem. Do not dispose of waste batteries as unsorted municipal waste. | |
| Do not burn | |
| Li-lon battery This product has been marked with a symbol relating to 'separate collection' for all battery packs and battery pack. It will then be recycled or dismantled in order to reduce the impact on the environment. Battery packs can be hazardous for the environment and for human health since they contain hazardous substances. |
| Waste electrical products should not be disposed of with household waste. Please recycle where facilities exist. Check with your Local Authority or retailer for recycling advice. | |
| Wear protective gloves. | |
| Remove battery from the socket before carrying out any adjustment, servicing or maintenance. | |
| Remove the key | |
| Blade continues to rotate after the machine is switched off. Wait until all machine components have completely stopped before touching them. |
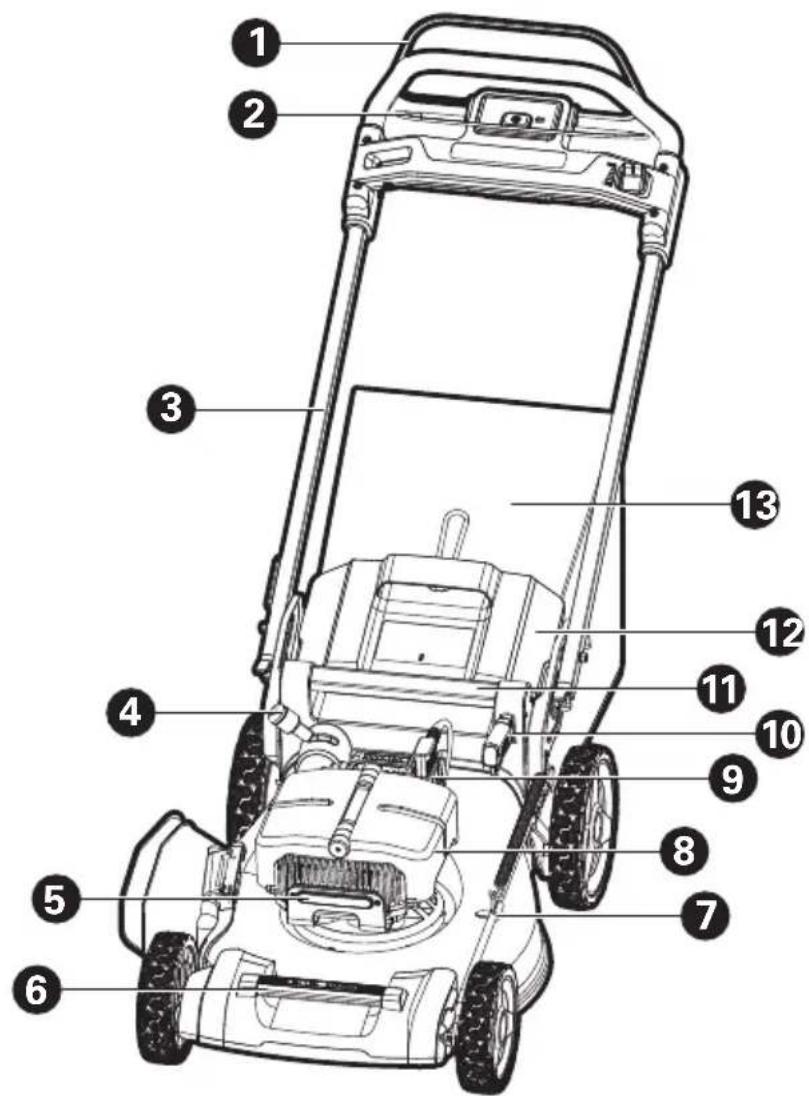
COMPONENT LIST
-
SELF-PROPEL SPEED-CONTROL LEVER
-
OPERATING BAIL HANDLE
-
HANDLE BAR
-
MULCHING-BAG SWITCH LEVER
-
LED HEADLIGHT
-
FRONT CARRY-HANDLE
-
CUTTING HEIGHT ADJUSTMENT POINTER
-
BASECAMP 80V POWER SOURCE & CHARGER
-
BASECAMP PLUG CONNECTION
-
CUTTING-HEIGHT ADJUSTMENT LEVER
-
REAR CARRY-HANDLE
-
SAFETY FLAP
-
GRASS COLLECTION BAG
-
CHARGE CORD
-
QUICK-RELEASE BUTTON
-
SAFETY LOCK-OUT BUTTON
-
SWITCH BUTTON FOR LED HEADLIGHT
18. CHARGE CORD INPUT
19. BATTERY INDICATOR BUTTON
20. SIDE-DISCHARGE COVER (SEE FIG. D2)
21. SIDE DISCHARGE-CHUTE (SEE FIG. D2)
22. BATTERY PACK\* (SEE FIG. F1)
23. SAFETY KEY (SEE FIG. F1)
24. BLADE BOLT (SEE FIG. R1)
25. BLADE (SEE FIG. R1)
26. SPACER (SEE FIG. R1)
*Not all the accessories illustrated or described are included in standard delivery.
TECHNICAL DATA
Type WG761E WG761E.9 (7- designation of machinery, representative of Cordless Lawn Mower)
| WG761E WG761E.9 | ||
| Voltage 80V Max. (4x20V Max.)*** | ||
| No load speed 2800 /min | ||
| Deck width 53 cm | ||
| Cutting width 51 cm | ||
| Front wheel diameter | 200 mm | |
| Rear wheel diameter | 250 mm | |
| Cutting height 20 – 80 mm | ||
| Cutting height positions | 7 | |
| Grass collection capacity | 70 L | |
| Battery capacity | 4.0 Ah (WA3014) / | |
| Battery type | Lithium-Ion | |
| Charger Model | WA3974 | / |
| Charger rating | Input: AC220-240 V~50 HzOutput: 20 V---, 1 A(each battery slot) | / |
| Charging time for a single battery pack (approx.)4.0 Ah 4-5 hrs | / | |
| Machine Weight | 35 kg | 32.4 kg |
** Voltage measured without workload. Initial battery voltage reaches maximum of 80 volts. Nominal voltage is 72 volts.
Each charging port is independent. The charging time for four battery packs of the same capacity is equal to the time for a single battery pack.
ACCESSORIES
| WG761E | WG761E .9 | |
| Battery pack (WA3014) | 4 | / |
| Basecamp (WA3974)(80V Power Source & Charger) | 1 | 1 |
| Grass collection bag | 1 | 1 |
| Side-discharge kit | 1 | 1 |
We recommend that you purchase your accessories from the same store that sold you the tool. Choose the type according to the work you intend to undertake. Refer to the accessory packaging for further details. Store personnel can assist you and offer advice.
NOISE DATA
| A weighted sound pressure | L_pA = 80.9 dB(A) |
| K_pA | 3.0 dB (A) |
| A weighted sound power | L_wA = 94.1 dB(A) |
| K_wA | 2.0 dB (A) |
| Wear ear protection. | |
VIBRATION INFORMATION
| Typical weighted vibration | a_h < 2.5 m/s^2 |
| Uncertainty | K = 1.5 m/s^2 |

WARNING: The vibration emission value during actual use of the power tool can differ from the declared value depending on the ways in which the tool is used dependant on the following examples and other variations on how the tool is used:
How the tool is used and the materials being cut or drilled. The tool being in good condition and well maintained.
Using the correct accessory for the tool and ensuring it is sharp and in good condition.
The tightness of the grip on the handles and if any anti vibration accessories are used.
And the tool is being used as intended by its design and
these instructions.
This tool may cause hand-arm vibration syndrome if its use is not adequately managed.

WARNING: To be accurate, an estimation of exposure level in the actual conditions of use should also take
account of all parts of the operating cycle such as the times when the tool is switched off and when it is running idle but not actually doing the job. This may significantly reduce the exposure level over the total working period.
Helping to minimise your vibration exposure risk.
ALWAYS use sharp chisels, drills and blades.
Maintain this tool in accordance with these instructions and keep well lubricated (where appropriate).
If the tool is to be used regularly then invest in anti vibration accessories.
Plan your work schedule to spread any high vibration tool use across a number of days.
NOTE: Read instruction handbook before operation this machine.
INTENDED USE
This product is intended for domestic lawn mowing.
| ACTION FIGURE | |
| ASSEMBLY | |
| Lifting the handle barNOTE:Press and hold Quick-release button during operation. | See Fig. A |
| Assembling the grass collection bag See Fig. B | |
| Attaching the grass collection bag to the lawn mowerNOTE:Depress the grass collection bag slightly to ensure that it is completely installed.NOTE:Push the mulching-bag switch lever to open the mulching outlet before fitting the grass collection bag. | See Fig.C1-C3 |
| Assembling the side-discharge chuteNOTE:Remember to remove the grass collection bag firstly and then push the mulching-bag switch lever to close the mulching outlet before assembly. | See Fig. D1,D2 |
| Removing /fitting the basecampNOTE:When fitting, gently pull the basecamp to ensure that it is securely installed.NOTE:After fitting, tighten the basecamp power output and the mower with a cable tie to ensure a reliable connection. It is not recommended to remove the cable tie. | See Fig. E1-E4 |
| Fitting/removing the battery packInsert the safety key before installing the battery pack.NOTE:This machine will only run when sp-batteries are installed. It is recommended to use the same Ah batteries and charge the 4 batteries at the same time.When you use 4 batteries with different Ah, the machine will only run to the lower common denominator. | See Fig. F1, F2 |
| Checking the battery charge conditionNOTE:Fig. G only applies for the battery pack with battery indicator light. | See Fig. G |
| Charging the battery packNOTE:The batteries are shipped uncharged. Each battery must be fully charged before the first usage.Always fully charge the 4 batteries at same time. More details can be found in charger's manual.NOTE:Always charge the battery pack with the basecamp on the mower. | See Fig. H |
| Power indicator lightSee details in BATTERY STATUS partPress the battery indicator button, the light will be on to indicate the lower common denominator, after 3s, status of each battery pack will be shown on. | See Fig. I |
| OPERATION | |
| Starting and StoppingNOTE:Place the Mulching-Bag Switch Lever in the bag position after each use. (See Fig. C1) | See Fig. J1, J2 |
| Operating the self-propel system See Fig. K | |
| Adjusting the cutting heightWARNING! Stop, releaseOperating Bail and wait until the motor stops before adjusting height.The blades continue to rotate after the machine is switched off, a rotating blade can cause injury. Do not touch rotating blades. | See Fig. L |
| Opening the LED headlight See Fig. M | |
| Removing/emptying grass collection bagWARNING! Always check the safety flap close the discharge outlet before using. Never lift the safety flap when the lawn mower is being used without fitted grass collection bag. | See Fig. N1, N2 |
| Storage See Fig. 01, | 02 |
BATTERY STATUS (See Fig. I)
| Light ON/ | Flash Status | |
| One Red on Two LED-lights off | — | Defective Battery |
| One Red flash Two LED-lights off | ---- | Battery Temperature ProtectionThe temperature of battery pack is less than 0°C or more than 45°C |
| Three Green on | — | Fully Charged |
| Three Green flash | ---- | Charging |
MULCHING MOWING TIPS
While mulching, your new mower is designed to cut the grass clippings into small pieces and distribute them back into the lawn. Under normal conditions, the mulched grass will biodegrade quickly and deliver nutrients to the lawn. Please review the following recommendations for optimum mulching performance.
1) Avoid mowing when the grass is wet from rain or dew. Wet grass may form clumps which interfere with the mulching action and reduce the runtime. The best time to mow the grass is in the late afternoon when the grass is dry and the newly cut area will not be exposed to direct sunlight.
2) For the best mulching performance, set the cutting height to remove about one third of the grass blade length, ideally no more than 40mm at one time. If the lawn is overgrown, it may be necessary to increase the cutting height to reduce the pushing effort and prevent overloading the motor. For extremely heavy mulching, it is advisable to first cut at a high cut height setting, and then re-cut to the final cut height. Otherwise, make
narrower cuts and mow slowly.
3) For the best performance, keep the mower housing free of built-up grass. From time to time turn off mower and wait for the blades to come to a complete stop. Then Remove the safety key and turn mower on its side. Using an object such as a stick, wipe out any accumulation of grass around the blade area. Be careful of the sharp edges of the blade. Ensure to clean the blade area often when cutting wet or new grass and every time after the machine is used.
4) Certain types of grass or grass conditions may require that an area be mulched a second time to fully disperse the grass throughout the lawn. If cutting a second time, it is advisable to cut perpendicular (across) the first cut pattern. DO NOT CHANGE CUT PATTERN IN ANY WAY THAT WOULD CAUSE MOWING DOWN A HILL.
5) Change your cutting pattern from week to week. This will help prevent matting and graining of the lawn.
6) Do not mow on a slope that has an angle of greater than 15^ .
CUTTING AREA
The cutting area can be affected by several factors, such as cutting height, lawn humidity, grass length and density. Besides, starting and stopping the mower too many times during operation will reduce the cutting area. The table below gives the relationship between cutting conditions and cutting area.
| Cutting Height | Recommend lot size (maximum) |
| Cutting off 8cm to 6cm | With 4*20V / 4.0Ah batteries |
| up to 1000m2 * |
* Use with 4 fully charged battery packs. If batteries of differing amp hours are used together, the product will operate to the lowest common denominator.
TIPS:
1) It is recommended to mow your lawn more frequently, walk at normal pace, and not to start/stop the mower too often during operation.
2) For best performance, please ensure use 4 fully charged battery packs at the same time and always cut off 1/3 or less of the grass height.
3) Walk slowly when cutting long grass, so as to have more effective cutting and properly discharge the clippings.
4) Avoid cutting wet grass, otherwise it will stick to the underside of the deck and the clippings cannot be collected or discharged properly.
5) A higher cutting height shall be applied to new or thick grass and it will extend the battery duration.
STORAGE (SEE FIG. 01, 02)
Stop the mower, and always remove the Safety Key and batteries. Clean the exterior of the machine thoroughly using a soft brush and cloth. Do not use water, solvents or polishes.
Remove all grass and debris, especially from the ventilation slots.
Turn the machine on its side and clean the blade area. If grass cuttings are compacted in the blade area, remove with a wooden or plastic implement.
Store the machine in a dry place. Do not place other objects on top of the machine.
To aid storage, Press and hold Quick-release button, and fold the Handle bar.
MAINTENANCE

WARNING: Stop the mower, remove the safety key and batteries before removing the grass action bag.
NOTE: To ensure long and reliable service, perform the following maintenance procedures regularly. Check for obvious defects such as a loose, dislodged or a damaged blade, loose fittings, and worn or damaged components. Check that the covers and guards are all undamaged and are correctly attached to mower. Carry out any necessary maintenance or repairs before operating mower. If the mower should happen to fail despite regular maintenance, please call our customer helpline for advice.
BLADE SHARPENING
KEEP BLADE SHARP FOR BEST MOWER PERFORMANCE. A DULL BLADE DOES NOT CUT GRASS CLEANLY OR MULCH PROPERLY.
WEAR PROPER EYE PROTECTION WHILE REMOVING, SHARPENING, AND INSTALLING BLADE. ENSURE THAT SAFETY KEY AND BATTERIES ARE REMOVED.
Sharpening the blade twice during a mowing season is usually sufficient under normal circumstances. Sand causes the blade to dull quickly. If your lawn has sandy soil, more frequent sharpening may be required.
REPLACE BENT OR DAMAGED BLADE IMMEDIATELY.
WHEN SHARPENING THE BLADE (See Fig. P)
-
Make sure blade remains balanced.
-
Sharpen blade at the original cutting angle.
-
Sharpen cutting edges on both ends of blade to keep it balanced, removing equal amounts of material from both ends.
NOTE:
-
Be sure the mower is turned off. Remove the key and batteries.
-
Place the mower in stand up storage mode.
BLADE BALANCING (See Fig. Q)
Check balance of blade by placing center hole in blade Q-1 over a screwdriver shank Q-2, clamped horizontally in a vise Q-3. If either end of the blade rotates downward, file that end. Blade is properly balanced when neither end drops.
BLADE MAINTENANCE (See Fig. R1, R2)
Replace your Mower Blade after 50 hours mowing or 2 years, which ever is the sooner-regardless of condition. Follow these procedures to remove and replace the Blade. You will need garden gloves (not provided) and a spanner wrench (not provided) to remove the Blade. Make sure safety key and batteries are not installed. Wedge a block of wood
between the blade and the mower deck to prevent the blade from turning and unscrew the Blade Bolt counter-clockwise using a spanner wrench, and then remove the Blade.
To re-assemble, position the Blade with the cutting edges towards the ground. Then securely tighten the Blade Bolt.
ENVIRONMENTAL PROTECTION

Waste electrical products must not be disposed of with household waste. Please recycle where facilities exist. Check with your local authorities or retailer for cling advice.
TROUBLESHOOTING
| PROBLEM SOLUTION | |
| 1. Mower doesn’t run when Operating Bail is activated. | A. Check to make sure safety key has been installed and is fully seated and that Safety lock-out button is completely pushed.B. Release Operating Bail to turn mower off. Remove safety key and batteries, turn mower over and check that blade is free to turn. If not free, return to an authorized servicer.Blade should turn freely.C. Has battery been fully charged? Plug in charger and wait for green light to come on. |
| 2. Motor stops while mowing. | A. Release Operating Bail to turn mower off. Remove safety key and batteries,turn mower over and check that blade is free to turn. If not free, return to an authorized servicer.Blade should turn freely.B. Raise cutting height of wheels to highest position and start mower.C. Has battery been fully charged? Plug in charger and wait for green light to come on.D. Avoid overloading the mower. Slow down the cutting pace by pushing mower slower or raise the cut height. Or both. |
| 3. Mower runs but cutting performance is unsatisfactory, or does not cut entire lawn. | A. Has battery been fully charged? Plug in charger and wait for green light to come on.”B. Release Operating Bail to turn mower off. Remove safety key and batteries. Turn mower over and check: Blade for sharpness - Keep blade sharp. Deck and discharge chute for clogging.C. Wheel height adjustment may be set too low for grass condition. Raise cutting height. |
| 4. Mower is too hard to push. | A. Raise cutting height to reduce deck drag on grass. Check each wheel for free rotation. |
| 5. Mower is abnormally noisy and vibrates. | A. Release Operating Bail to turn mower off. Remove safety key and batteries. Turn mower on side and check blade to ensure it has not been bent or damaged. If blade is damaged, replace with a replacement blade. If the underside of the deck is damaged, contact service agent.B. If there is no visible damage to the blade and the mower still vibrates: Release Operating Bail to turn mower off, Remove safety key and batteries, and remove blade. Rotate blade 180 degrees and retighten. If mower still vibrates, contact service agent. |
| 6. Vibration sensation and/or swooshing sound coming from underneath deck. | A. Wet grass and/or debris has collected to the inner wall of the deck, creating unbalanced airflow. Remove batteries and remove debris from inner deck wall. |
| 7. Battery charger LED's not on. | A. Check plug connection.B. Replace charger. |
| 8. Battery charger LED does not flip to green. | A. Battery needs to be diagnosed.Take to authorized service center. |
| 9. Mower not picking up clippings with the Grass Collection Bag. | A. Remove mulch plate when bagging.B. Chute clogged. Release Operating Bail to turn mower off. Remove safety key and batteries. Clear chute of grass clippings.C. Too much cut grass. Raise cutting height of wheels to shorten length of the cut.D. Bag full. Empty bag more often. |
| 10. When mulching there are clippings visible. | A. Too much cut grass. Raise cutting height of wheels to shorten length of the cut. Do not cut off more than 1/3 of total length.B. Check blade for sharpness. Always keep blade sharp. |
| 11. Low or diminished run-time after many uses | A. Return to Authorized Service location - may need new battery. |
| 12. The battery charger LED flashes red and the battery can't be charged. | A. The battery overheats after continuous use. Remove battery from the charger and allow it to cool to 42°C or less. |
| 13. If the Mulching-Bag Switch Lever will not move. | A. Remove battery packs.B. Place the mower in the upright storage position.C. Clean grass off of the mulching plate. (See Fig. S) |
DECLARATION OF CONFORMITY
We,
Positec Germany GmbH
Grüner Weg 10, 50825 Cologne, Germany
On behalf of Positec declare that the product
Description Cordless Lawn Mower
Type WG761E WG761E.9 (7- designation of machinery, representative of Cordless Lawn Mower)
Function mowing grass
Complies with the following Directives,
2006/42/EC, 2014/30/EU
2011/65/EU&(EU)2015/863
2000/14/EC amended by 2005/88/EC
2000/14/EC amended by 2005/88/EC
Conformity assessment procedure as per Annex VI.
Measured Sound Power Level 94.1 dB(A)
Declared Guaranteed Sound Power Level 96 dB(A)
The notified body involved
Standards conform to,
EN 60335-1, EN 60335-2-77, EN 62233, EN ISO 3744, EN 55014-1, EN 55014-2
The person authorized to compile the technical file,
Name: Marcel Filz
Address Positec Germany GmbH, Grüner Weg 10, 50825 Cologne, Germany

text_image
A C E2021/03/16
Allen Ding
Deputy Chief Engineer, Testing & Certification
Positec Technology (China) Co., Ltd
18, Dongwang Road, Suzhou Industrial
Park, Jiangsu 215123, P. R. China
18, Dongwang Road, Suzhou Industrial
Park, Jiangsu 215123, P. R. China
SÉCURITÉ DU PRODUIT AVERTISSEMENTS DE SÉCURITÉ GÉNÉRAUX

AVERTISSEMENT
Lire tous les
INFORMATIONS RELATIVES AU BRUIT
INFORMATIONS RELATIVES AUX VIBRATIONS
AVERTISSEMENT: Stop the mower, remove the safety key and batteries before removing the grass collection bag.
18, Dongwang Road, Suzhou Industrial
Park, Jiangsu 215123, P. R. China
18, Dongwang Road, Suzhou Industrial
Park, Jiangsu 215123, P. R. China
SEGURANÇA DO PRODUTO AVISOS GERAIS DE SEGURANÇA

ATENÇÃO!
18, Dongwang Road, Suzhou Industrial
Park, Jiangsu 215123, P. R. China
TIPS VOOR MAAIEN MET GRASBEMESTING
18, Dongwang Road, Suzhou Industrial
Park, Jiangsu 215123, P. R. China
PRODUKTSIKKERHED GENERELLE ADVARSLER
AFVEJNING AF KNIVEN (Se Q)
18, Dongwang Road, Suzhou Industrial
Park, Jiangsu 215123, P. R. China
PRODUKTSIKKERHET GENERELLE SIKKERHETS- ADVARSLER

VEDLIKEHOLD OG LAGRING
UNDER SKARPING AV KNIV (Se figur P)
KNIV-VEDLIKEHOLD (Se figur R1, R2)
18, Dongwang Road, Suzhou Industrial
Park, Jiangsu 215123, P. R. China
SAMSVARSERKLÆRING
Vi,
Positec Germany GmbH
Grüner Weg 10, 50825 Cologne, Germany
På vegne av Positec erklær at produktet
FÖRVARING (SE FIG. 01,02)
18, Dongwang Road, Suzhou Industrial
Park, Jiangsu 215123, P. R. China
BEZPIECZEŃSTWO PRODUKTU OGÓLNE OSTRZEŻENIA DOTYCZĄCE BEZPIECZEŃSTWA

50825 Cologne, Germany

text_image
M ACE
2021/03/16
Allen Ding
18, Dongwang Road, Suzhou Industrial
Park, Jiangsu 215123, P. R. China
18, Dongwang Road, Suzhou Industrial
Park, Jiangsu 215123, P. R. China
BIZTONSÁGOS TERMÉKHASZNÁLAT ÁLTALÁNOS FIGYELMEZTETÉSEK
18, Dongwang Road, Suzhou Industrial
Park, Jiangsu 215123, P. R. China
SECURITATEA PRODUSULUI AVERTISMENTE GENERALE DE SIGURANTĂ
Adresă Positec Germany GmbH, Grüner Weg 10, 50825 Cologne, Germany

text_image
M A
2021/03/16
Allen Ding
Adjunct Inginer şef, Testare si certificare
Positec Technology (China) Co., Ltd
18, Dongwang Road, Suzhou Industrial
Park, Jiangsu 215123, P. R. China
DECLARATIE DE CONFORMITATE
Noi,
Positec Germany GmbH
Grüner Weg 10, 50825 Cologne, Germany
Tlp WG761E WG761E.9 (7 - denumirea
18, Dongwang Road, Suzhou Industrial
Park, Jiangsu 215123, P. R. China
PROHLÁŠENÍ O SHODĚ
My,
Positec Germany GmbH
Grüner Weg 10, 50825 Cologne, Germany
OBSLUHU A USCHOVAJTE HO NA ĐALŠIE POUŽTIE.
18, Dongwang Road, Suzhou Industrial
Park, Jiangsu 215123, P. R. China
VARNOST IZDELKA SPLOŠNA VARNOSTNA NAVODILA

OPOZORILO Preberite vsa varnostna opozorila
18, Dongwang Road, Suzhou Industrial
Park, Jiangsu 215123, P. R. China

natural_image
Completely dark image with no visible content, text, or symbols.WORK NITRO
www.worx.com
Copyright © 2021, Positec. All Rights Reserved. AR01581200