Tool It PBT 550 - Measuring equipment GYS - Free user manual and instructions
Find the device manual for free Tool It PBT 550 GYS in PDF.

| Product type | 12V Battery Tester |
| Brand | GYS |
| Model | Tool It PBT 550 |
| Power supply | Internal battery 3V (CR2032) + power from the tested battery |
| Test voltage | 12 V (START/STOP batteries included) |
| Supported battery standards | CCA, BCI, CA, MCA, DIN, IEC, EN, SAE, GB |
| Maximum CCA current | Up to 2000 A (estimation) |
| Functions | Battery test, start test, alternator test |
| Display | LCD screen |
| Printing | Built-in (thermal printer) |
| Data storage | Yes, review of last data |
| Dimensions (approx.) | 200 x 100 x 50 mm |
| Weight (approx.) | 500 g |
| Maintenance | Clean terminals, replace paper roll, replace internal CR2032 battery |
| Spare parts | Thermal paper roll, CR2032 battery, protective fuse |
| Safety | Reverse polarity protection (fuse), wear goggles, avoid flames and sparks |
| Warranty | 2 years (parts and labor) |
| Compliance | European Directive, EAC, British (UKCA), Moroccan (CMIM) |
| Recycling | Selective collection according to Directive 2012/19/EU |
Frequently Asked Questions - Tool It PBT 550 GYS
User questions about Tool It PBT 550 GYS
0 question about this device. Answer the ones you know or ask your own.
Ask a new question about this device
Download the instructions for your Measuring equipment in PDF format for free! Find your manual Tool It PBT 550 - GYS and take your electronic device back in hand. On this page are published all the documents necessary for the use of your device. Tool It PBT 550 by GYS.
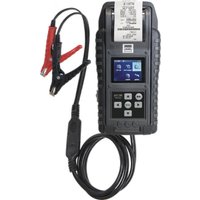
USER MANUAL Tool It PBT 550 GYS
text_image
SWEI INFLATE TEST BLUE RECHARGE TEST RECHARGE SWEI: 80% KOLTAGE: 12.33W SOAH: 85% HEASURED: 585A SELECT INPUT: EN Rated: 580A Internal R: 14.65mA ToolE BATTERY TEST Healthy: 97% $95.00 Intergent: 96% 12.27V Internal R: 14.65mA Rated: 580A GOOD-RECHARGE BATTERY TESTER. MENU OK CE ENCFR 2-5 TESTEUR DE BATTERIE PBT 550
EN 6-9 BATTERY TESTER PBT 550
DE 10-13 BATTERIETESTER PBT 550
ES 14-17 PROBADOR DE BATERÍA PBT 550
RU 18-21 TECTEP БАТАРЕЕК PBT 550
NL 22-25 BATTERIJTESTER PBT 550
IT 26-29
TESTER DELLA BATTERIA PBT 550
INSTRUCTIONS DE SÉCURITÉ

REPLACEMENT DU PAPIER
This manual includes guidelines on the operation of your device and the precautions to follow for your own safety. Ensure it is read carefully before first use and keep it handy for future reference.

Risk of explosion and fire!
A battery being charged can emit explosive gas.
The battery tester should only be connected to batteries with a rated output voltage of 12 V.
CAUTION: Reverse polarity will cause the fuse to blow and could cause permanent damage. Damage due to reverse polarity is not covered by our warranty.
CAUTION: If the car's battery is disconnected, some management systems may be disabled.
Consult your vehicle manual for more information on installation.
Do not use the battery tester if the cord or terminals are damaged.
Do not use the battery tester if it has received a severe shock or has been damaged in any way.
Do not disassemble the device. Incorrect reassembly may result in a risk of electric shock or fire.


Acid projection hazard!
- Wear appropriate safety glasses and clothing.
- If your eyes or skin come into contact with battery acid, rinse the affected part of the body with plenty of water and seek immediate medical assistance.
- Avoid flames and sparks. Do not smoke.
- Protect the electrical contacts of the battery against short-circuiting.
- The device complies with European Directive.
- The certificate of compliance is available on our website.
• EAC conformity mark (Eurasian Economic Commission) - Material conforms to UK requirements. The UK Declaration of Conformity is available on our website (see cover page).
• Device compliant with Moroccan standards. - The C_ (CMIM) declaration of conformity is available on our website.
- This product should be disposed of at an appropriate recycling facility. Do not dispose of in domestic waste.
- Recyclable product that falls within waste sorting recommendations
CONNECTING THE BATTERY TESTER
1- Ensure that the area is well ventilated before performing a test.
2- Tester for 12 V batteries (including START/STOP batteries)
3- Before performing a test on the battery, make sure that the ignition is off, that the accessories are not working. Close all the doors and the boot.
4- Make sure that the battery connections are clean. If necessary, clean them using a wire brush.
⚠️ Any presence of oxidation between the tester terminals and the battery connectors or between the battery connectors and the battery terminals reduces the effectiveness of the tester.
5- Connect the negative (black) terminal to the negative terminal of the battery. Connect the positive plug (red) to the positive terminal of the battery.
SETTING UP THE DEVICE
1- Set the language :
- Press Menu and then «Language».
- Select the language then validate the choice by clicking OK
2- Date / time setting
- Press Menu and then «Adjust time».
- Press the up and down arrows to change the year. Press OK to confirm the change. Proceed in the same way to set the date and time.
BATTERY TEST
- On the Home screen, click OK to display the main menu
- Select «battery test» in the main menu and press OK
- Select the battery type using the arrows and click OK to confirm.
- Select the standard written on the battery then validate (possible standards: CCA, BCI, CA, MCA, DIN, IEC, EN, SAE, GB)
- «Setting Rate»: Enter the start current (indicated on the battery in Amps (A)) using the arrows then OK
- The test starts, the screen displays the result.
• Results display screen
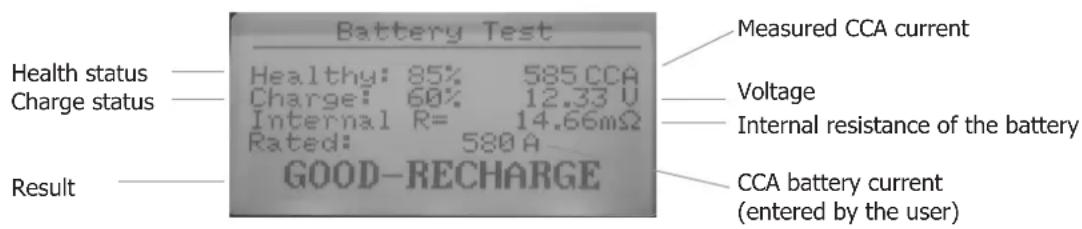
text_image
Battery Test Measured CCA current Health status — Healthy: 85% 585.CCA Charge status — Charge: 60% 12.33 V Internal R= 14.66mΩ Rated: 580 A Result — GOOD-RECHARGE Voltage Internal resistance of the battery CCA battery current (entered by the user)- Battery test result
| Result Analysis | |
| BATTERY OK The battery is operational. | |
| GOOD CONDITION, RECHARGE Battery in good | condition but low state of charge. |
| REPLACE | The battery is nearing the end of its life.A replacement should be considered. |
| CELL NOK, REPLACE A problem at the cell level | is observed (short circuit.....). Replace the battery. |
| CHARGE, NEW TEST | The battery is unstable. It must be recharged and tested again. If the same result appears after charging, the battery is damaged and must be replaced. |
START-UP TEST
- Press «start test» in the main menu
- Start the engine to start the test
- The test starts automatically and displays the starting voltage obtained
• Result of the start test
| Examples Screen display Analysis | ||
| Voltage below 9.6 V | Start testTIME xxxx msVOLTAGE START. LOWx.xx V | The starting voltage is not correct. The battery must be replaced. |
| Voltage above 9.6 V | Start testTIME xxxx msVOLTAGE START. OKx.xx V | The starting voltage is normal. |
TEST OF THE ALTERNATOR CHARGING SYSTEM
- Keep the engine running and press «test load» in the main menu
- After the undulation test, the tester automatically starts the load voltage test
- Follow the instructions of the tester
- The tester indicates the state of the vehicle's charging voltage.
• Result of the alternator charging system test
| Examples Screen display Analysis | ||
| Normal charging voltage | Test loadCharged xx.xxx VDischarged xx.xxx VWave xxm VALTERN. VOLTAGE OK | No problem detected, the alternator is working correctly. |
| Low charging voltage | Test loadCharged xx.xxx VDischarged xx.xxx VWave xxm VALTERN. VOLTAGE LOW | Check the alternator transmission belt in case of slippage. Check if the connection between the alternator and the battery is good. If both belts and the connection are in good condition, consult the manufacturer. |
| High charging voltage | Test loadCharged xx.xxx VDischarged xx.xxx VWave xxm VALTERN. VOLTAGE High | The battery is overcharged, the battery life will be shorter and problems may occur. The alternator must be replaced. The voltage of an alternator must not exceed 14.7 V (+/-0.5V). |
| No voltage output | Test loadCharged xx.xxx VDischarged xx.xxx VWave xxm VNO OUTPUT | Check the alternator connection cable, alternator drive belt and engine. |
| High wave voltage | Test loadCharged xx.xxx VDischarged xx.xxx VWave xxm VHIGH | The diode is damaged. Check and replace the diode |
PRINTING OF TICKETS
- Press «Print data» in the main menu
- The data collected during the test is printed (battery test and/or start test and/or alternator charging system test).
PAPER REPLACEMENT
A. Open the transparent cover.
B. Place a new roll of paper in the compartment.
C. Place a small length of paper from the compartment and press the transparent cover to close.
DATA REVIEW
To read the data from the latest tests without printing a ticket, press «data review» in the main menu of the device. Press OK to scroll through all the tests performed.
MAINTENANCE
| Examples Analysis | |
| Display switched off | "Check that the device is properly connected. The battery voltage is not high enough to perform the test (<6.0 V).Fully recharge the battery and try again." |
| Printing fault | "Paper jam: the paper is not inserted correctly.Out of print paper: Insert paper." |
| Insufficient internal battery Replace the batteries in the tester (3V - CR2032). | |
WARRANTY
The warranty covers faulty workmanship for 2 years from the date of purchase (parts and labour).
The warranty does not cover:
- Transit damage.
- Normal wear of parts (eg. : cables, clamps, etc..).
- Damages due to misuse (power supply error, dropping of equipment, disassembling).
- Environment related failures (pollution, rust, dust).
In case of failure, return the unit to your distributor together with:
- The proof of purchase (receipt etc ...)
- A description of the fault reported
SICHERHEITSHINWEISE