
684786 - Power bank SILVERLINE - Free user manual and instructions
Find the device manual for free 684786 SILVERLINE in PDF.
| Product type | External battery and 12 V jump starter |
| Brand | Silverline |
| Model | 684786 |
| Battery capacity | 6,000 mAh (72 Wh) |
| Output voltage | 12 V (starting), 5 V (USB) |
| Peak current | 400 A |
| Starting current | 150 A (≤ 5 seconds) |
| USB output | 5 V 2.1 A (standard) and quick charge (9 V 2 A) |
| Charge input | 5 V 2.4 A / 9 V 2 A (Micro USB) |
| Charging time | Approximately 2 hours |
| Dimensions (L × W × H) | 151 × 81 × 25 mm |
| Weight | 300 g |
| Operating temperature | -20 °C to 60 °C |
| Battery cycles | > 1000 |
| Compatible engine types | Petrol up to 2.5 L |
| Main functions | 12 V jump start, USB external battery, flashlight (100 lumens) with strobe and SOS modes |
| Safety | Reverse polarity protection, short circuit protection, overheating protection; built-in safety device |
| Included parts | Booster, 3-in-1 USB cable (USB, Micro USB, USB-C, Lightning), crocodile clips, storage case |
| Maintenance | Clean with a dry cloth; charge every 3-4 months if not in use; do not use water or alcohol |
| Warranty | 3 years on the tool, 12 months on the battery (online registration required) |
| Recycling | Do not dispose of with household waste; recycle at approved centres |
Frequently Asked Questions - 684786 SILVERLINE
User questions about 684786 SILVERLINE
0 question about this device. Answer the ones you know or ask your own.
Ask a new question about this device
Download the instructions for your Power bank in PDF format for free! Find your manual 684786 - SILVERLINE and take your electronic device back in hand. On this page are published all the documents necessary for the use of your device. 684786 by SILVERLINE.
USER MANUAL 684786 SILVERLINE
12V Lithium Power Bank & Jump Starter 6000mAh 400A
natural_image
Exterior view of a handheld electronic device with black cables and connectors (no visible text or symbols)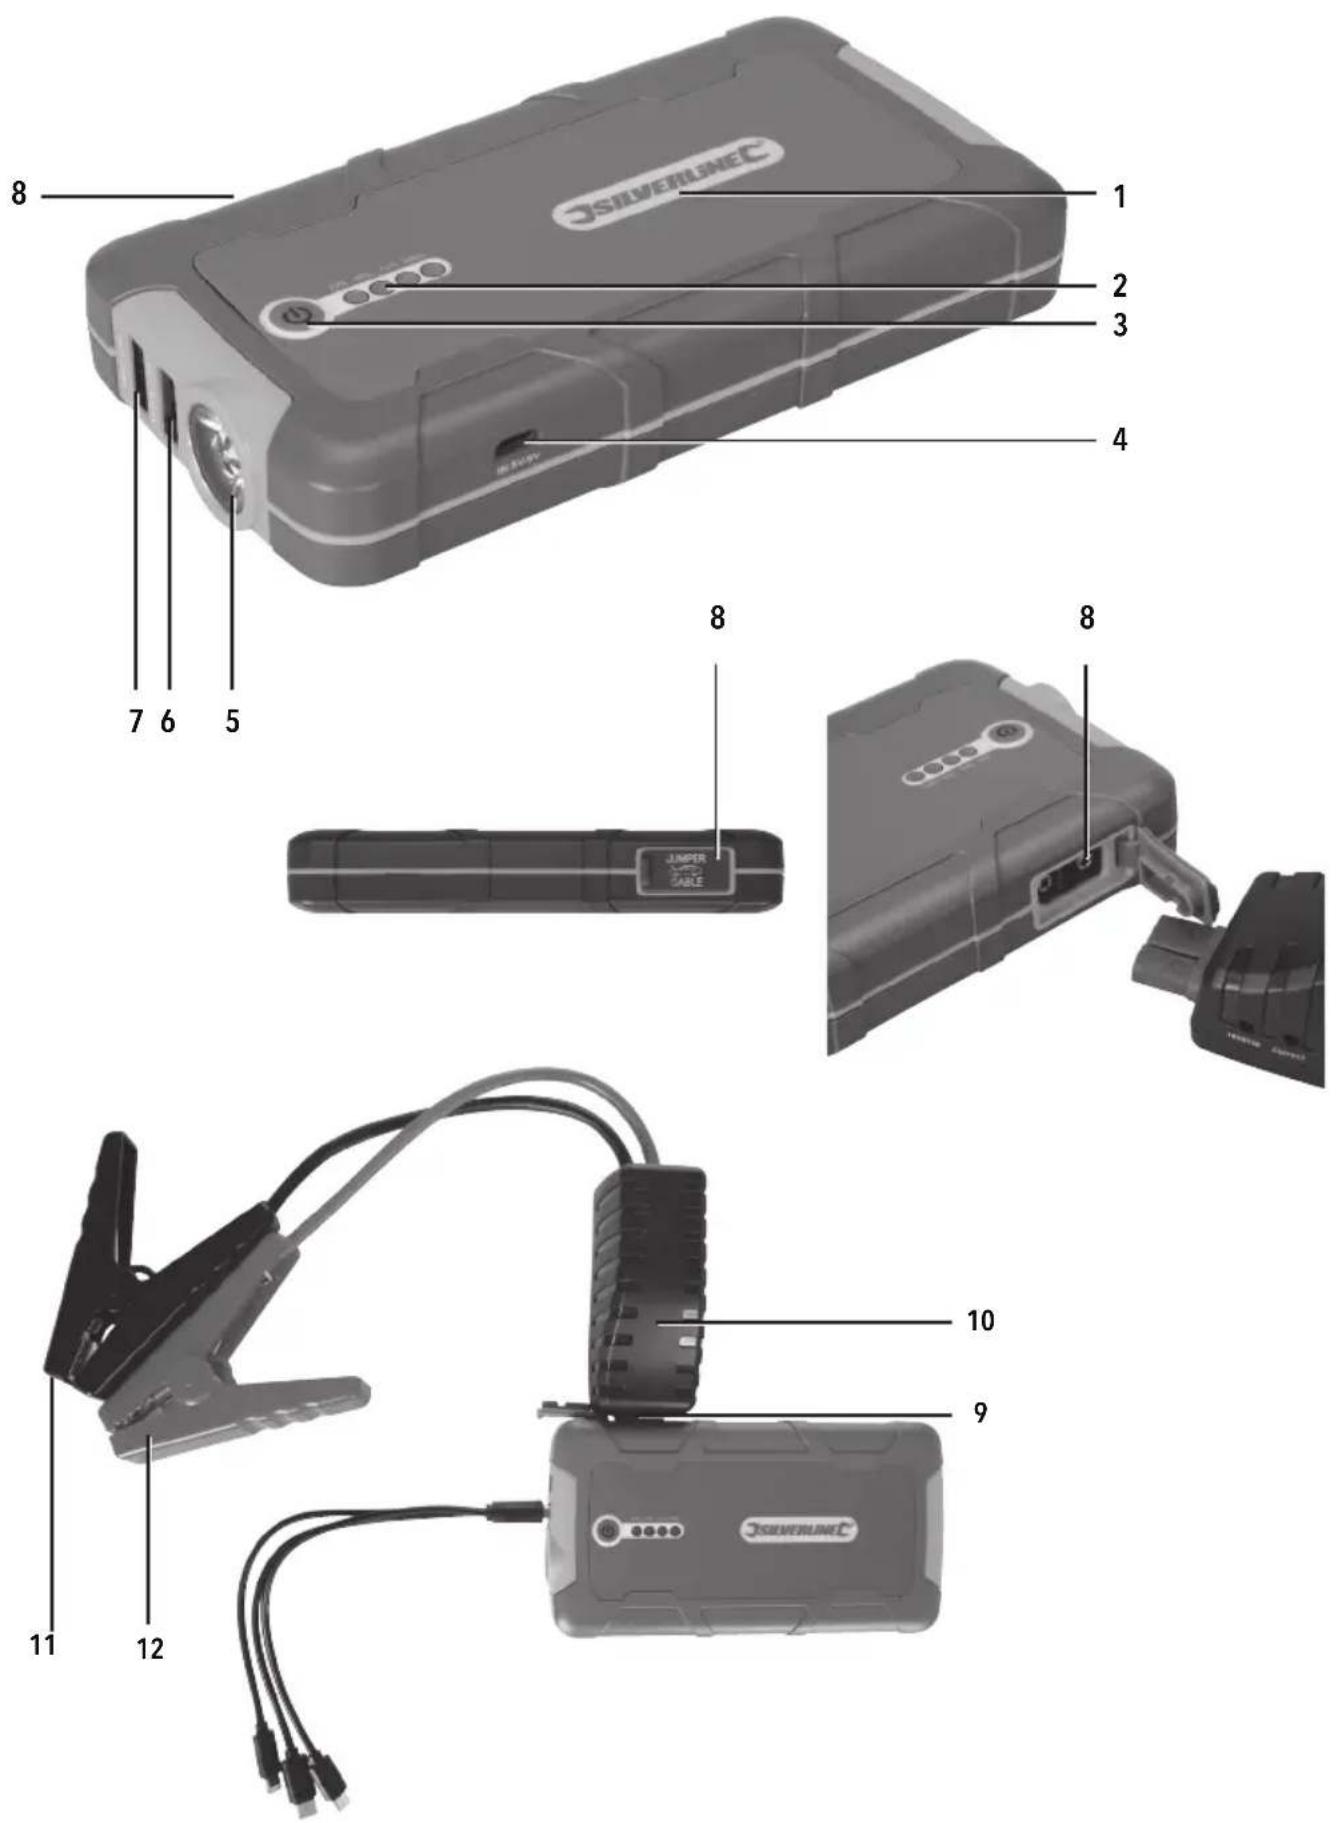
text_image
13 14 159 reverse correct BOOST
text_image
16 17 181920 21Fig. I
natural_image
Technical line drawing showing a mechanical component before and after assembly (no text or symbols)Fig. II
IMPORTANT: White clamps in Fig. II images represent the red positive clamp
White clamp = (red) positive
Black clamp = (black) negative
text_image
Diagram showing a battery connected to a clamp and its circuit breaker, with labeled components and polarity indicators.Solid Green LED
LED verte en permanence
Grünes LED leuchtet
LED verde fijo
text_image
Technical diagram showing a car battery connected to a power plug and a speaker with 2X signal output, including a 2x speed limit indicator.Solid Red LED and Smart Jump Start Protector Unit beeping
text_image
Diagram showing a battery connected to a clamp and its 2x power rating, with labeled terminals and a 2X magnified view.Green LED blinking and Smart Jump Start Unit beeping
text_image
Technical diagram showing a battery connected to a clamp and its electrical socket, with labeled terminals and polarity indicators.No LED or beeping
On product Smart Jump Start Protector Unit quick instructions
CAUTION! Read instructions before use
- Do not press the Boost Button before connecting to the vehicle battery
- Before jump start attempt, ensure the vehicle battery voltage is 12V and the Jump Starter battery charge has 3 or more indicator lights
- Check clamps are connected to correct polarity, red clamp to the battery positive (+) and black clamp to the battery negative (-) terminals
-
Green and Red LED status:
-
Solid Green LED ON, attempt to start engine
- Blinking Green LED and beeping, press Boost Button then attempt to jump start vehicle within 30s
- Solid Red LED ON and beeping, incorrect connection. Check polarity and see manual
- No LED or beeping, check connection and press Boost Button. Follow LED steps (1, 2 or 3) accordingly. If no change, see manual instructions
Jump starting instructions
- Before attempting to start 12V vehicle, please make sure at least 3 LED lights are illuminated when pressing the power button
- Insert the blue connector firmly into the jump start port
- Connect the RED clamp to the battery Positive (+) and BLACK clamp to the battery Negative (-) terminals, ensuring they have a good connection
- Start the vehicle. (if below 32°F / 0°C, please allow a few minutes before starting the vehicle) Once started, remove the battery clamps then disconnect the blue connector
Battery capacity: 6000mAh (72Wh)
Voltage: 12V
USB output: 5V 2.1A
Peak output current: 400A
Thank you for purchasing this Silverline tool. This manual contains information necessary for safe and effective operation of this product. This product has unique features and, even if you are familiar with similar products, it is necessary to read this manual carefully to ensure you fully understand the instructions. Ensure all users of the tool read and fully understand this manual.
Description of Symbols
The rating plate on your tool may show symbols. These represent important information about the product or instructions on its use.

Wear hearing protection. Wear eye protection. Wear breathing protection. Wear head protection.

Wear hand protection.

Wear protective clothing

Wear protective shoes

Risk of explosion!

Read instruction manual

Environmental Protection Waste electrical products and batteries, including Li-Ion batteries, should not be disposed of with household waste. Please recycle where facilities exist. Check with your local authority or retailer for recycling advice.

Risk of fire!

Risk of electrocution!

Hot surfaces - DO NOT touch!

DO NOT use in rain or damp environments!

DO NOT incinerate batteries!

Caution!

Conforms to relevant legislation and safety standards.
Technical Abbreviations Key
| V Volts | |
| ~, a.c. Alternating current | |
| A, mA Ampere, milli-Amp | |
| Ah Amp hours (battery capacity) | |
| Hz Hertz | |
| -, d.c. Direct current | |
| Wh Watt hours |
Specification
| Battery capacity. | 6000mAh / 72Wh |
| Charge time | <2 hours |
| Charger input | 5V_2.4A / 9V_2A |
| Output | 12V, jump start, high current 400A/9V_2A/5V_2.1A |
| USB output | 5V_2.1A |
| Starting current | 150A(< or = 5 seconds) |
| Peak current | 400A |
| Max engine size | 2.5ltr petrol |
| Operating temperature | 20° - 60°C (32° - 104°F) |
| Battery lifetime cycles | >1000 |
| Battery charge time | Approx 2 hours |
| Dimensions (L x W x D) | 151 x 25 x 81mm |
| Weight | 300g |
| LED Power | 100 Lumen |
As part of our ongoing product development, specifications of Silverline products may alter without notice.
General Safety

WARNING: Read all safety warning and all instructions. Failure to follow the warnings, structions may result in electric shock, fire and/or serious injury.
Save all warnings and instructions for future reference.
• Work area safety
- Keep work area clean and well lit. Cluttered or dark areas invite accidents.
Electrical safety
- Mains plugs must match the outlet. Never modify the plug in any way. Do not use any adapter plugs with earthed (grounded) devices. Unmodified plugs and matching outlets will reduce risk of electric shock.
- Avoid body contact with earthed or grounded surfaces, such as pipes, radiators, ranges and refrigerators. There is an increased risk of electric shock if your body is earthed or grounded.
- Do not expose the device to rain or wet conditions. Water entering the device will increase the risk of electric shock.
Personal safety
- Stay alert, watch what you are doing and use common sense when operating this device. Do not use while you are tired or under the influence of drugs, alcohol or medication. A moment of inattention while operating this device may result in serious personal injury.
- Use personal protective equipment. Always wear eye protection. Protective equipment such as dust mask, non-skid safety shoes, hard hat, or hearing protection used for appropriate conditions will reduce personal injuries.

WARNING: This device is not intended for use by persons (including children) with physical or mental capabilities, or lack of experience or knowledge unless they have given supervision or instruction concerning use of the device by a person responsible for their safety. Children must be supervised to ensure that they do not play with the device.
Jump Starter Safety
- Do not allow positive and negative lead clamps to make contact. Live clamps that come into contact with each other could result in the leads melting, and/or create a fire hazard
- Do not attempt to jump start any vehicle whose battery is leaking, cracked, or otherwise damaged
- Do not attempt to jump start a vehicle with a frozen battery. Exercise caution when bringing such a battery into a building as there is a possibility the battery could leak when it returns to normal temperature
- Unless the battery in the vehicle is of the 'maintenance-free' type, always check that the electrolyte level is correct before attempting to jump start the vehicle
- Lead-acid batteries emit explosive, flammable gases, particularly during attempts at starting a vehicle. DO NOT SMOKE and do not expose the jump starter or vehicle's battery to any open flames or high temperature surfaces. The lead acid battery in a vehicle is the primary concern for flammable gas
• Only use in well-ventilated areas
• Always wear protective gloves and goggles when handling lead acid batteries
• Always remove all metal jewellery before handling lead acid batteries
- Be aware that loose clothing and long hair could get caught in moving engine parts. When using this product, tie up hair and secure loose clothing
- Wash thoroughly with soap and water if battery acid contacts skin or clothing. If battery acid contacts eyes, wash thoroughly with clean water and seek medical help
- Only use this jump starter in completely dry conditions
- If the Jump Starter becomes swollen during use or when charging, IMMEDIATELY DISCONNECT Jump Starter from the cables or power supply and discontinue use
- If at any time the Jump Starter begins to swell, smoke, or become hot to the touch, IMMEDIATELY DISCONNECT the Jump Starter and discontinue use
Lithium Polymer & Other Battery Safety

WARNING: Lithium polymer batteries are volatile. If lithium polymer batteries are incorrectly stored or charged they can become a fire, burn and/or explosion hazard.
- Keep the battery out of reach of children
- ONLY charge lithium polymer batteries using the charger provided or designed specifically for your product
- Allow batteries to cool for 15 minutes after charging or heavy use. Failure to follow these instructions may cause overheating or fire
- When not in use, batteries should be stored at room temperature (approximately 20°C)
- Ensure that battery contacts cannot accidentally short in storage. Keep batteries clean; foreign objects or dirt may cause a short. Keep away from other metal objects, for example, paper clips, coins, keys, nails and screws
- Under abusive conditions, liquid may be ejected from the battery. This liquid may cause skin irritation or burns. Avoid contact. If contact accidentally occurs, flush with water. If liquid contacts eyes, seek medical help
- DO NOT open, disassemble, crush, heat above 60°C or incinerate. Do not dispose of in fire or similar
- Never allow a metal tool to concurrently touch both the positive and negative cable/clamp ends or battery terminals
- Be sure to have someone close by you when you are working with electricity and batteries, particularly lead acid batteries
- If the vehicle battery needs to be removed, always remove the negative/black terminal first, followed by the positive/red terminal. Ensure ALL vehicle electrical accessories are switched OFF before removing the battery
- If working with lead acid batteries, ensure there is water, soap, and bicarbonate of soda readily available, just in case there is any skin contact with battery aci
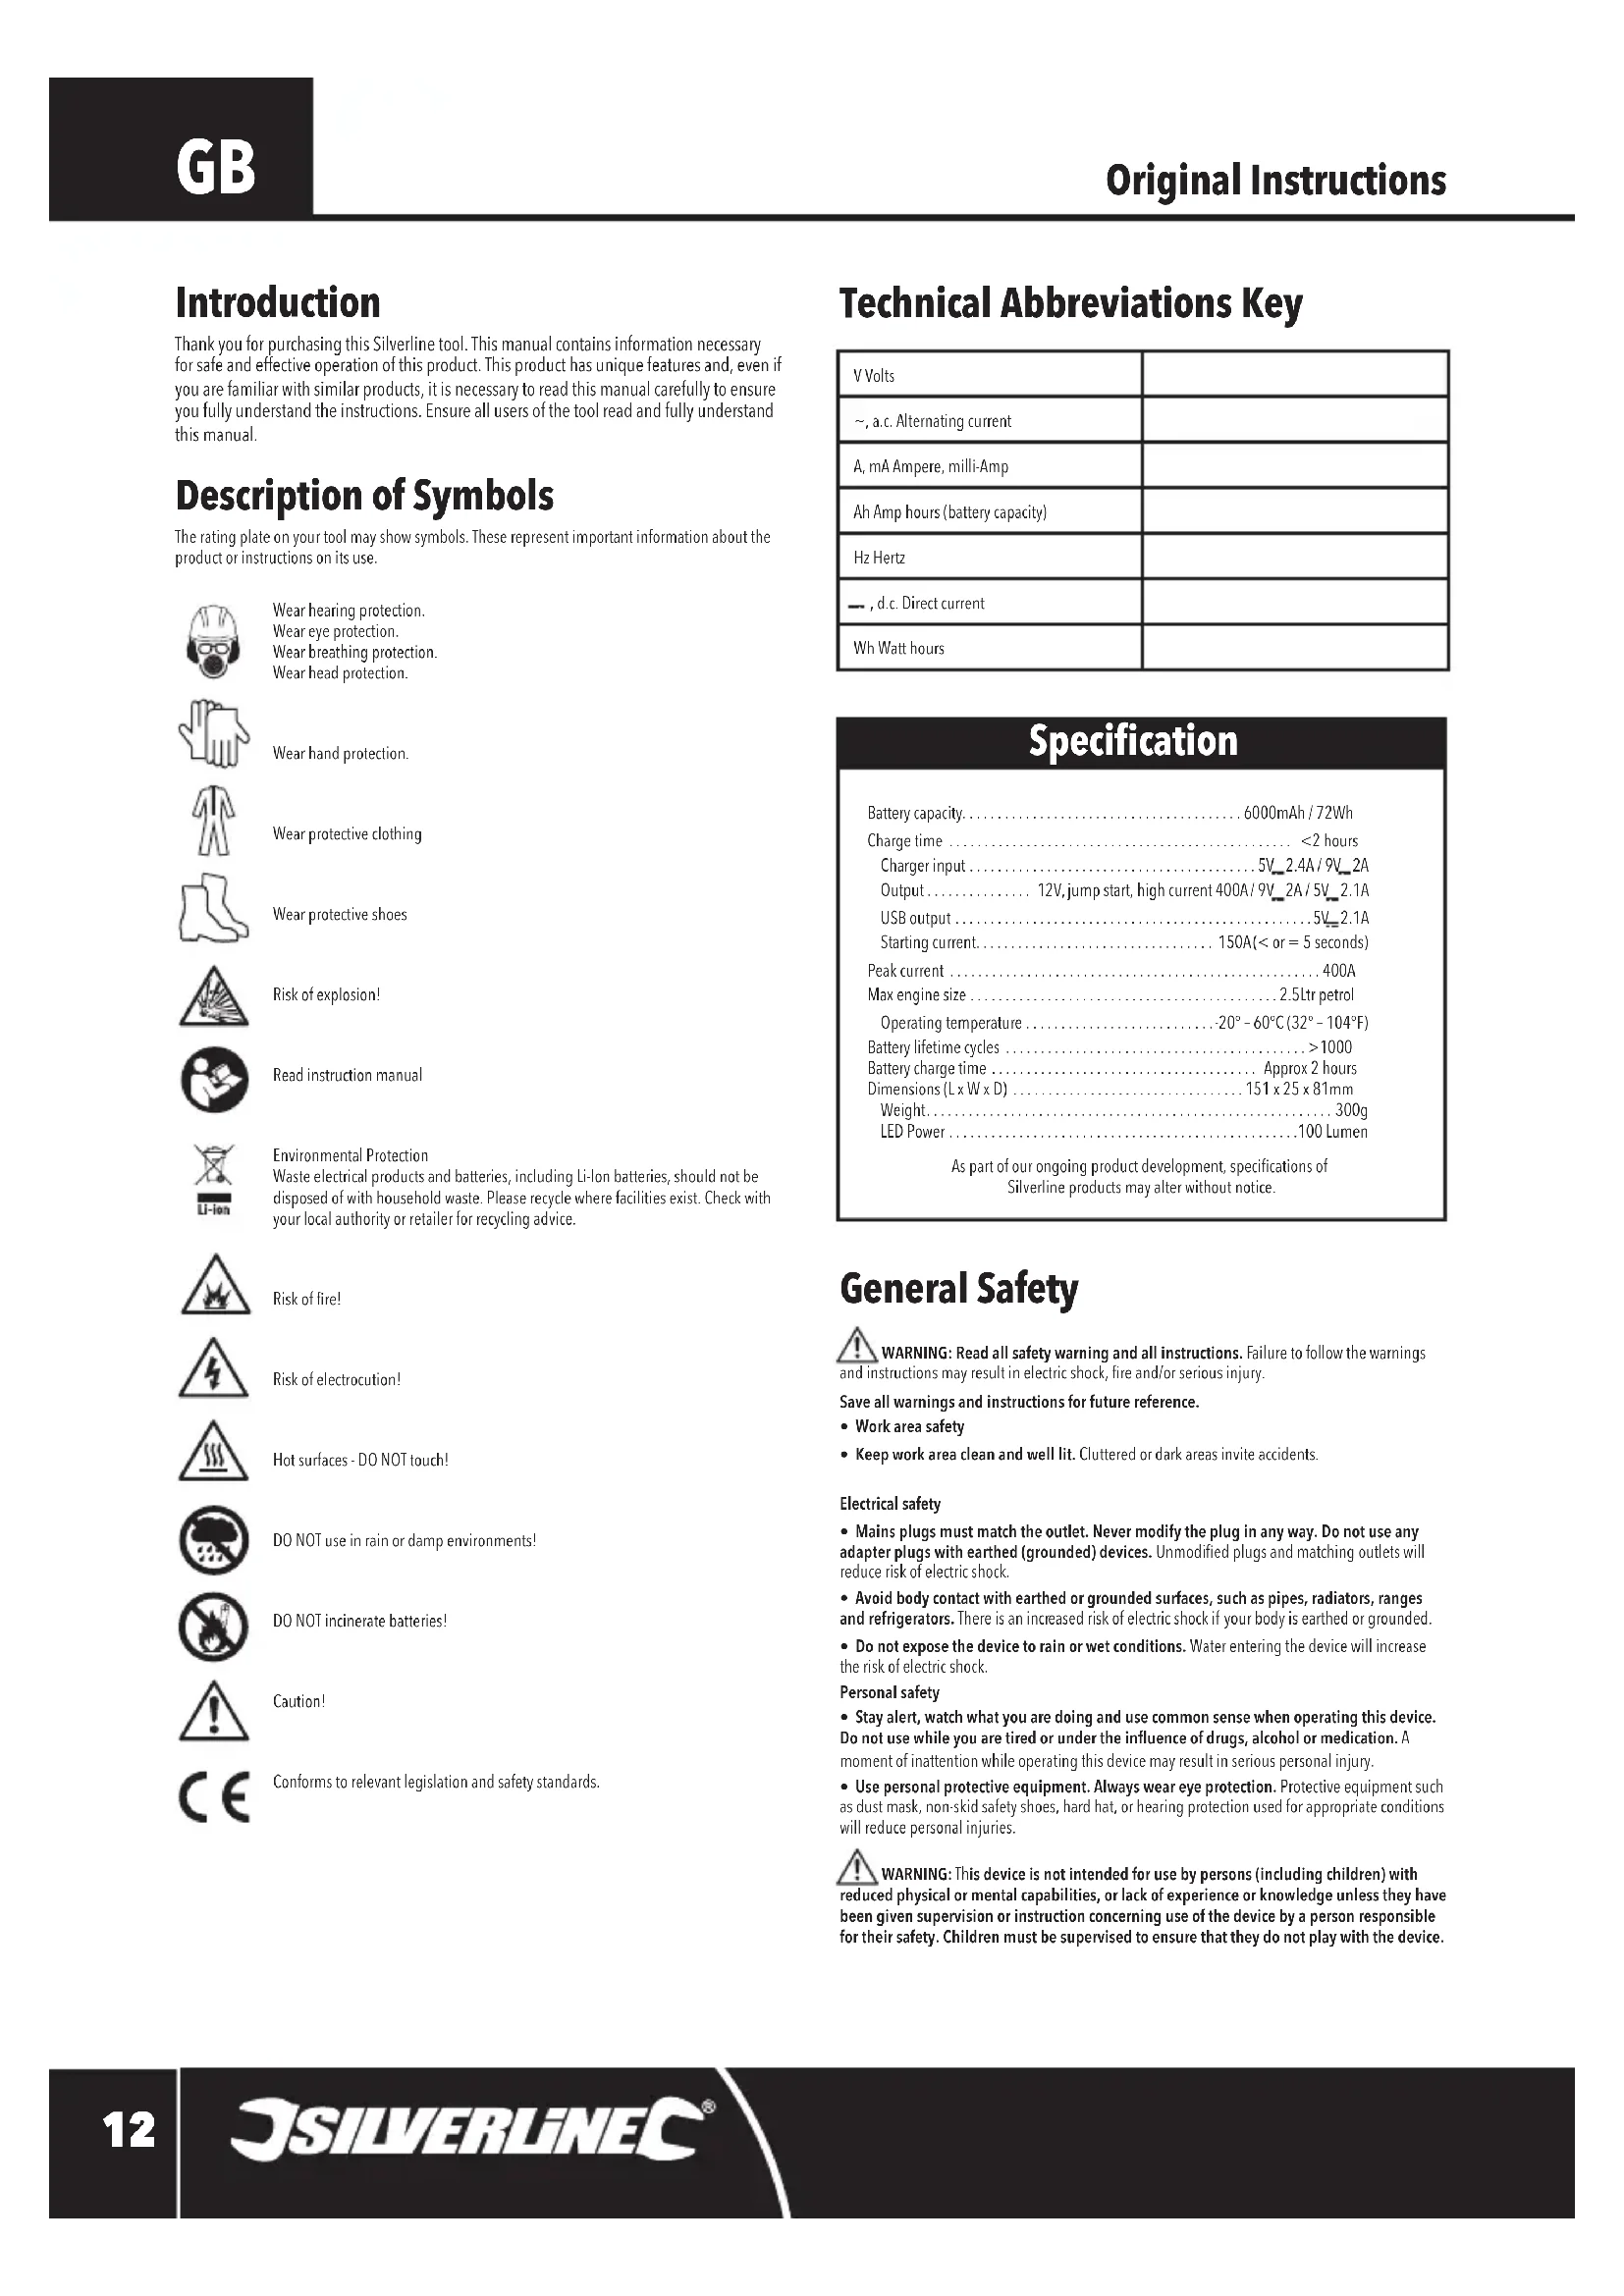
Product Familiarisation
- Lithium Polymer Battery Pack
- LED Power Indicator Lights
- Power Button
- Quick Charge Input Port
- LED Torch
- USB Output 5V 2.1A
- USB Quick Charge Output
- Jump Starter Socket
- High Current Connector Plug
- Smart Jump Start Protector Unit
- Black Negative Clamp
- Red Positive Clamp
- Red LED
- Green LED
- Jump Start Protector Boost Button
- 3-in-1 USB Charging Cable
- JSB
- USB Micro
- USB C
- Lightning Connector
- Storage Case
Intended Use
Power bank used as a portable, high-current DC jump starter. Power bank is also capable of charging or powering other portable devices via the USB Output 5V 2.1A and USB Quick Charge Output ports, and has an LED torch light with flashing, safety modes, including SOS.
Unpacking Your Product
- Carefully unpack and inspect your new product. Familiarise yourself with all its features and functions
- Ensure that all parts of the tool are present and in good condition. If any parts are missing or damaged, have such parts replaced before attempting to use this tool
Before Use
Charging the Jump Starter
IMPORTANT: The Jump Starter should be fully charged before initial use. Always charge the Jump Starter on a hard surface away from combustible materials and do not leave unattended while charging.
- Plug the USB Micro (18) into the Quick Charge Input Port (4) and the USB (17) into any USB output port
- Ensure power supply from a USB output port is ON to charge the Lithium Jump Starter
Note: To check the charge state of the Lithium Jump Starter press the Power Button (3) and the LED Power Indicator Lights (2) will illuminate. The number of illuminated LED lights indicates charge level: 0=0%; 1=25%; 2=50%; 3=75%; 4=100%.
Note: When charging, the LED Power Indicator Lights will flash sequentially. As charging progresses, the lights illuminate solidly without blinking. The more lights that are illuminated solidly, the higher the charge level. The Lithium Jump Starter is fully charged (100%) when all LED Power Indicator Lights are illuminated solidly without blinking.
WARNING: Should the Lithium Jump Starter begin to beep and stop charging during the charging process, IMMEDIATELY DISCONNECT from the power supply and discontinue use. (Refer to troubleshooting.)
Operation
WARNING: If at any time the Jump Starter begins to swell, smoke, or become hot to the touch, IMMEDIATELY DISCONNECT the Jump Starter, if connected, from the power supply or vehicle battery and discontinue use.
Note: When the lithium polymer power bank's power store becomes too low to supply any charge, the device may beep and shut down. The power bank will require recharging. (See 'Charging the Lithium Jump Starter'.)
Charging or powering devices using the USB port
- Plug the required connection, USB Micro (18), USB C (19) or Lightning Connector (20) into the device to be charged and the USB (17) into the required port, USB Output 5V 2.1A (6) or the USB Quick Charge Output (7)
- On the Lithium Jump Starter, press the Power Button (3) to begin charging/sending power to the device
Note: The LED Power Indicator Lights (2) will illuminate during the charging/powering period to indicate the charge level remaining in the Lithium Jump Starter.
• After charging the device, unplug the 3-in-1 USB Charging Cable (16) from the Lithium Jump Starter
- The Lithium Jump Starter will automatically power OFF after approximately 10 seconds when nothing is connected
Using the Torch/Strobe/SOS LEDs
- Press and hold the Power Button (3) for approximately 3 seconds to activate Torch mode
- Short press the Power Button to cycle through the other modes in this order: Torch-Strobe-SOS-OFF
To initiate the Torch mode again, repeat step 1.
Jump starting a 12V vehicle
WARNING: This product is not a vehicle battery charger. Never connect the 3-in-1 USB Charging Cable (16), while connected to a power supply, to the Lithium Jump Starter to supply power to the unit while it is connected to a car battery.
WARNING: Only use in a well-ventilated area.
IMPORTANT: Before attempting a jump start, ensure the Lithium Polymer Battery Pack (1) has at least 75% charge. Check by pressing the Power Button (3) to see how many LED Power Indicator Lights (2) illuminate and ensure at least 3 are lit before attempting to jump start the vehicle. (See 'Charging the Lithium Jump Starter'.)
IMPORTANT: With any vehicle, there are variables that can affect the effective use of the Lithium Jump Starter. Variables include the condition of the battery, vehicle electronics, engine and ignition system. If the Smart Jump Start Protector Unit (10) prevents the power bank from connecting to and/or starting the vehicle, this is not a fault with the device. The function of the Smart Jump Starter Protector Unit is to protect the vehicle and user from damage or harm.
Notes:
- Always refer to the vehicle's handbook before using this product. If the manufacturer specifies a particular sequence for jump starting, follow the manufacturer's advice
- Follow normal starting procedures with regard to pre-charging glow plugs, etc.
- Do not attempt to use this product on anything other than 12V negative earth vehicle electrical systems
- Do not use on vehicles with a 24V battery and electrical system
- The Lithium Jump Starter works in parallel with the fitted battery to provide increased current capacity
- If the cables of the Lithium Jump Starter are not long enough to reach the positive connector on the battery and a suitable negative connection point, the negative cable can be extended using a cable from a standard jump cable set. Do not extend the length of the positive cable from the jump starter
- This Lithium Jump Starter will only be effective when the vehicle's engine and related systems are functioning normally and the vehicle's battery is in a serviceable but partly discharged state
-
Once the Lithium Jump Starter has been used to start a vehicle, it may be necessary to recharge the Lithium Jump Starter before attempting to start another vehicle
-
Ensure your battery and charging system is checked if starting is a regular problem
-
The size of vehicle the Lithium Jump Starter can start varies depending on the existing charge in the vehicle's battery. A very low charge will limit the size of vehicle the Lithium Jump Starter can start. As an approximate guide the product should support petrol engines up to 2500cc
-

natural_image
Line drawing of a cable and connector assembly (no text or symbols)2
natural_image
Diagram of a mechanical clamp or tool with labeled positive and negative terminals (no text or symbols present)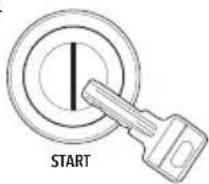

natural_image
Diagram showing a battery with two probes and a positive charge, no text or symbols present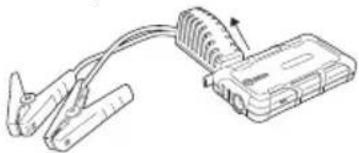
natural_image
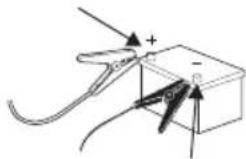
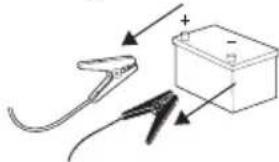
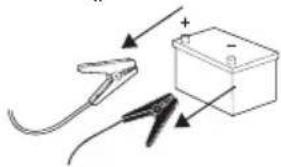
Line drawing of a handheld electronic device with coiled cable and connector (no text or symbols)WARNING: There is a potential hazard of explosion if the clamps are not connected in the correct polarity. The Red Positive Clamp (12) must be connected to the positive (+) battery terminal and the Black Negative Clamp (11) must be connected to the negative (-) battery terminal, and both clamps must have a good connection. Reversing the polarity connection (positive to negative) may cause damage to the vehicle, the Lithium Jump Starter and/or create an explosion /sparking hazard.
- Ensure all vehicle electrical accessory systems (headlights, radio, etc.) are switched off
- Ensure the vehicle is in neutral and the parking brake is applied
- Establish which vehicle battery terminal is positive and negative. The vehicle's own battery will show '+' and '-' alongside the corresponding battery terminal. The cable attached to the positive terminal may be coloured red or could have a red marking to indicate it is positive. If in doubt of the polarity, consult a vehicle technician
-
If the positive battery terminal is corroded or dirty, clean it with a suitable wire brush to ensure good contact with the jump starter clamp is possible
-
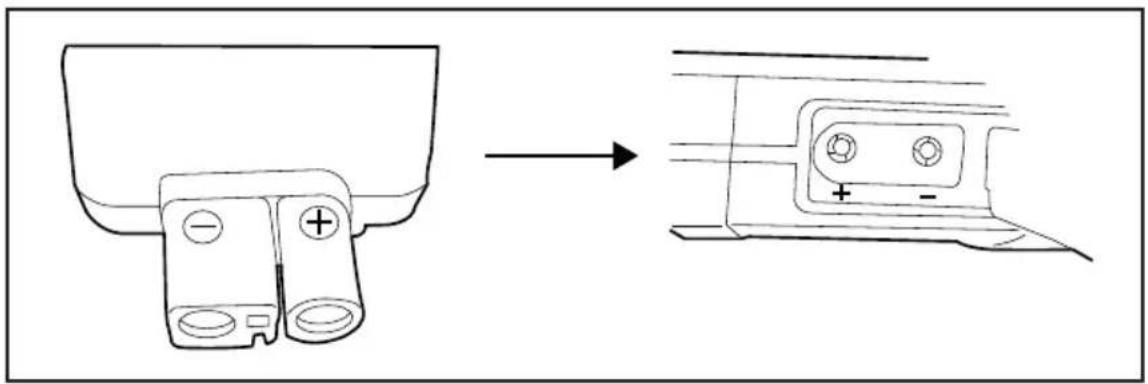
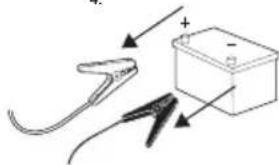
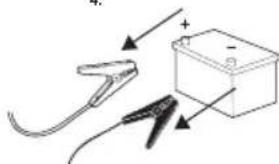
Insert the blue High Current Connector Plug (9) firmly into the Jump Starter Socket (8), ensuring the plug polarity corresponds to the Jump Starter Socket (Fig 1)
- Attach the Red Positive Clamp to the battery's positive terminal, ensuring it is secure with a good connection and cannot short against any other metal part of the vehicle
- Attach the Black Negative Clamp to the battery's negative terminal, ensuring it is secure with a good connection
Note: If the temperature is below 32^ F / 0^ C, allow a few minutes before attempting to start the vehicle.
IMPORTANT: Before cranking the vehicle's ignition, refer to the 'Smart Jump Start Protector Unit' table below to see the battery connection status and whether it is safe to attempt starting the vehicle.
- Turn the vehicle's ignition to start the vehicle but do not crank the ignition for longer than 5 seconds
WARNING: The Lithium Jump Starter is designed for short-term operation only. DO NOT turn the vehicle's ignition key for longer than 5 seconds at a time. Doing so may damage the unit. Allow the Lithium Jump Starter to cool for at least 60 seconds before attempting to start the vehicle again.
Note: The protection cables and clamps are fitted with a Smart Jump Start Protector Unit (10), which has a built-in feature that prevents cranking for more than 5 seconds. The unit will then automatically enter a 60 second rest period, as indicated on the unit by the Green LED (14) blinking green LED. Once the Green LED is solid, the next cranking attempt can commence.
Note: If the Lithium Jump Starter overheats, the Smart Jump Protector Unit's in-built safety protection feature prevents operation.
-
If the vehicle does not start, wait 60 seconds before trying again
-
Once the vehicle has started, unplug the High Current Connector Plug from the Lithium Polymer Battery Pack (1) then disconnect the Black Negative Clamp (-) followed by the Red Positive Clamp (+) from the battery's terminals
IMPORTANT: If the vehicle does not start after 5 consecutive attempts the Smart Jump Start Protector Unit will have to be reset. To do this, press the Jump Start Protector Boost Button (15) before the next attempt. (You will have to wait until after the 60 second rest period before pressing the Boost Button.)
| Smart Jump Start Protector Unit (Fig. II) | ||
| Green and Red LED Status Condition Description Action | ||
| Solid Green LED Cable/clamp polarity correct,the Lithium Jump Starter voltage is above 11V, and vehicle battery is above low limit threshold | Can now attempt to jump start the vehicle | |
| Green LED blinking and Smart Jump Start Protector Unit beeping | Vehicle battery is low Press Jump | Start ProtectorBoost Button. Wait until Green LED is solid then, within 30 seconds, attempt to jump start the vehicle |
| Solid Red LED and Smart Jump Start Protector Unit beeping | Connection is incorrect.Cable/clamps are in reverse polarity, a vehicle battery short has been detected,or incorrect Lithium Jump Starter voltage | Do not attempt to jump start the vehicle. Disconnect High Current Connector Plug and remove clamps from the vehicle's battery terminals.Reconnect clamps to the vehicle's battery in correct polarity (see 'Jump starting a 12V vehicle') then connect the High Current Connector Plug to the Lithium Jump StarterNote: The source of this problem must be found and resolved before any more attempts are made to jump start the vehicle using the Lithium Jump Starter |
| No LEDs or beeping Vehicle's battery may be damaged | Disconnect High Current Connector Plug and remove clamps from the vehicle's battery terminals. Reconnect in correct polarity to the vehicle's battery terminals and Lithium Jump Starter. If there is no solid Green LED, press the Boost Button. | |
WARNING: If the Lithium Jump Starter becomes warm to the touch at any time, disconnect the Lithium Jump Starter from the cables then allow to cool fully before re-attempting the next jump start.
Maintenance
Note: The Lithium Jump Starter comes equipped with an internal rechargeable lithium polymer battery. This battery is not consumer replaceable, and must be disposed of when the battery can no longer hold charge. Correct charging practices will prolong the life of the battery.
- Charge the device fully at least once every 3–4 months if not used regularly to maintain the life of the lithium polymer battery
Cleaning
- Keep your Lithium Jump Starter clean. Always clean dust/particles away
- Use a soft brush or dry cloth to clean the device
- Make sure that the positive and negative lead clamps are kept clean. Dirty electrical contacts will severely impair the performance of this product
- A soft wire brush can be used to clean the clamps
- NEVER use water or alcohol-based cleaners to clean the device
Storage
- Store fully charged. The unit will hold charge for 6 to 12 months, but should always be charged before the next use after being stored for a long period of time
- Store this tool carefully in a secure, cool, dry place (-10°–30°C / 14°–86°F) out of the reach of children
- If storing in a moving vehicle, ensure that the unit, particularly the Lithium Polymer Battery Pack (1), cannot move around freely
Disposal
Always adhere to national regulations when disposing of power tools that are no longer functional and are not viable for repair.
- Do not dispose of power tools or other waste electrical and electronic equipment (WEEE) with household waste
- Contact your local waste disposal authority for information on the correct way to dispose of power tools
Troubleshooting
| Problem Possible cause Solution | ||
| Lithium Jump Starter will not switch OFF when pressing the Power Button (3) | The automatic switch off Leave | the device unplugged from cables and all other devices for approximately 10 seconds, and the unit should switch off automatically |
| The Lithium Jump Starter will not switch ON when pressing the Power Button | The Lithium Polymer Battery Pack (1) has no charge | Charge the unit from a power supply into the Quick Charge Input Port (4). If after charging the device does not switch on, it may have reached the end of the battery life and will need to be disposed of in accordance with local authorities (see 'Disposal') |
| During charging, the Lithium Jump Starter stops charging and begins beeping | There is a problem with the charging procedure; the Lithium Polymer Battery Pack has detected a problem | 1. Press and hold the Power Button for 10-30 seconds to force the continuation of charging and possibly correct the charging issue2. After pressing and holding the Power Button, disconnect the power supply and allow the Lithium Jump Starter to reset3. Reconnect the power supply to the Lithium Jump Starter to see if the unit will charge again normally4. If the unit again discontinues charging and begins beeping, IMMEDIATELY DISCONNECT the power supply and discontinue use. Consult an authorised Silverline technicianNote: After pressing and holding the Power Button during this process, the LED Light (5) will come on, which is normal. After disconnecting the charger, the LED Light may be turned OFF (see 'Using the Torch/ Strobe/SOS LEDs') before reconnecting the charger |
| The Lithium Polymer Battery Pack becomes hot to touch during use/begins to swell | The Lithium Polymer Battery Pack is faulty | IMMEDIATELY DISCONNECT the power supply/cables and discontinue use. Consult an authorised Silverline technician |
Silverline Tools Guarantee
This Silverline product comes with a 3 year guarantee
Register this product at www.silverlinetools.com within 30 days of purchase in order to qualify for the 3 year guarantee. Guarantee period begins according to the date of purchase on your sales receipt.
Registering your purchase
Registration is made at silverlinetools.com by selecting the Guarantee Registration button. You will need to enter:-
- Your personal details
• Details of the product and purchase information
Once this information is entered your guarantee certificate will be created in PDF format for you to print out and keep with your purchase.
Terms & Conditions
Guarantee period becomes effective from the date of retail purchase as detailed on your sales receipt.
PLEASE KEEP YOUR SALES RECEIPT
If this product develops a fault within 30 days of purchase, return it to the stockist where it was purchased, with your receipt, stating details of the fault. You will receive a replacement or refund.
If this product develops a fault after the 30 day period, return it to:
Silverline Tools Service Centre
PO Box 2988
Yeovil
BA21 1WU, UK
The guarantee claim must be submitted during the guarantee period.
You must provide the original sales receipt indicating the purchase date, your name, address and place of purchase before any work can be carried out.
You must provide precise details of the fault requiring correction.
Claims made within the guarantee period will be verified by Silverline Tools to establish if the deficiencies are related to material or manufacturing of the product.
Carriage will not be refunded. Items for return must be in a suitably clean and safe state for repair, and should be packaged carefully to prevent damage or injury during transportation. We may reject unsuitable or unsafe deliveries.
All work will be carried out by Silverline Tools or its authorized repair agents.
The repair or replacement of the product will not extend the period of guarantee
Defects recognised by us as being covered by the guarantee shall be corrected by means of repair of the tool, free of charge (excluding carriage charges) or by replacement with a tool in perfect working order.
Retained tools, or parts, for which a replacement has been issued, will become the property of Silverline Tools.
The repair or replacement of your product under guarantee provides benefits which are additional to and do not affect your statutory rights as a consumer.
What is covered:
The repair of the product, if it can be verified to the satisfaction of Silverline Tools that the deficiencies were due to faulty materials or workmanship within the guarantee period.
If any part is no longer available or out of manufacture, Silverline Tools will replace it with a functional replacement part.
Use of this product in the EU.
What is not covered:
Silverline Tools does not guarantee repairs required as a result of:
Normal wear and tear caused by use in accordance with the operating instructions eg blades, brushes, belts, bulbs, batteries etc.
The replacement of any provided accessories drill bits, blades, sanding sheets, cutting discs and other related items.
Accidental damage, faults caused by negligent use or care, misuse, neglect, careless operation or handling of the product.
Use of the product for anything other than normal domestic purposes.
Change or modification of the product in any way.
Use of parts and accessories which are not genuine Silverline Tools components.
Faulty installation (except installed by Silverline Tools).
Repairs or alterations carried out by parties other than Silverline Tools or its authorized repair agents.
Claims other than the right to correction of faults on the tool named in these guarantee conditions are not covered by the guarantee.
Battery Guarantee
Silverline batteries are guaranteed for 30 days. If a defect occurs on a registered battery during the term of the Battery Guarantee, due to material or manufacturing fault, then Silverline will replace it free of charge. This guarantee does not apply to commercial use nor does it extend to normal wear and tear or damage as a result of accident, abuse or misuse.
Introduction
natural_image
Diagram of a cable and connector assembly with no visible text or symbols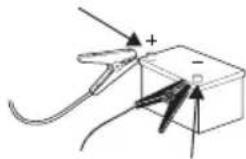
natural_image
Diagram of a mechanical or electrical component with force arrows and polarity indicators (no text or symbols)
natural_image
Diagram showing a tool interacting with a battery and plug, no text or symbols present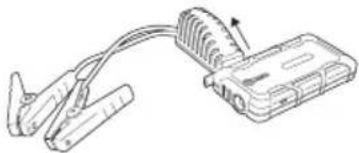
natural_image
Diagram of a clamp device connected to a connector with coiled cable (no text or symbols)
natural_image
Diagram of a clamp tool connecting a cable to a connector (no text or symbols present)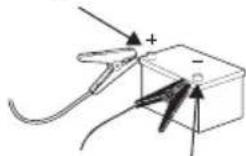

natural_image
Diagram showing a cable and its electrical connector connected to a battery (no text or symbols present)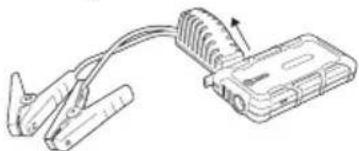
natural_image
Diagram of a clamp tool connecting a cable to a device with a power cord (no text or symbols)Silverline Tools Service Centre
PO Box 2988
Yeovil
The rating plate on your tool may show symbols. These represent important information about the product or instructions on its use.

natural_image
Line drawing of a cable connector with connectors and a connector housing (no text or symbols)Description of Symbols
The rating plate on your tool may show symbols. These represent important information about the product or instructions on its use.

natural_image
Line drawing of a cable connector with connectors and a connector housing (no text or symbols)
natural_image
Diagram of a mechanical or electrical component with force arrows and polarity indicators (no readable text or symbols)
natural_image
Simple line drawing of a clamp tool and a battery box with arrows indicating direction (no text or symbols)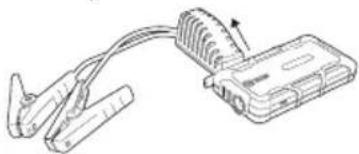
natural_image
Diagram of a cable clamp and connector with a magnified inset showing internal components (no text or symbols)
Silverline Tools Service Centre
PO Box 2988
Yeovil
BA21 1WU, GB
Environmental Protection
Waste electrical products and batteries, including Li-Ion batteries, should not be disposed of with household waste. Please recycle where facilities exist. Check with your local authority or retailer for recycling advice.

Brandgevaar!

Conforms to relevant legislation and safety standards.
Startstroom 150 A (< of = 5 seconden)
Piekstroom 400 A
Max. grootte motor.... 2,5 l benzine
natural_image
Diagram of a cable connector with attached device (no text or symbols)Silverline Tools Service Centre
PO Box 2988
Yeovil
BA21 1WU, GB
natural_image
Diagram of a clamp device connected to a device with coiled cable (no text or symbols)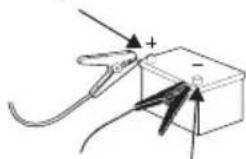
natural_image
Diagram of a mechanical or electrical component with wires and a box, no visible text or symbols
natural_image
Simple line drawing of a clamp tool and battery with polarity indicators (no text or symbols)
natural_image
Line drawing of a clamp device connected to a cable with a spring-loaded connector (no text or symbols)
Silverline Tools Service Centre
PO Box 2988
Yeovil
BA21 1WU, UK
natural_image
Black handheld electronic device with coiled cable and connector, no visible text or symbolsGB 3 Year Guarantee. Register online within 30 days. Terms and Conditions apply.