
POWPG10120 - Lawn mower PowerPlus - Free user manual and instructions
Find the device manual for free POWPG10120 PowerPlus in PDF.

| Product type | Self-propelled lawn mower |
| Brand | PowerPlus |
| Model | POWPG10120 |
| Engine | 4-stroke, Yamaha, 189 cc, 3.2 kW (4.3 HP) |
| Cutting width | 560 mm |
| Cutting height | 25 - 70 mm (7 positions) |
| Grass bag capacity | 70 L |
| Self-propelled | Yes |
| Chassis material | Steel |
| Front wheels | 200 mm (ball bearings) |
| Rear wheels | 250 mm (ball bearings) |
| Fuel tank capacity | 1.2 L |
| Oil tank capacity | 0.6 L |
| Sound pressure level | 84 dB(A) |
| Sound power level | 98 dB(A) |
| Vibrations | 4.1 m/s² |
| Functions | 5-in-1: rear discharge, mulching, side discharge, bagging, edging |
| Max lawn area | 1500 m² |
| Fuel | Unleaded petrol (E10 compatible) |
| Starting | Automatic choke |
| Blade | Sharp |
| Handle | Foldable with soft-grip coating |
| Central height adjustment system | Yes |
| Full bag indicator | Yes |
| Bumper | Yes |
Frequently Asked Questions - POWPG10120 PowerPlus
User questions about POWPG10120 PowerPlus
0 question about this device. Answer the ones you know or ask your own.
Ask a new question about this device
Download the instructions for your Lawn mower in PDF format for free! Find your manual POWPG10120 - PowerPlus and take your electronic device back in hand. On this page are published all the documents necessary for the use of your device. POWPG10120 by PowerPlus.
USER MANUAL POWPG10120 PowerPlus

POWERPLUS
NL NEDERLANDS VERTAALDE VERSIE VAN DE ORIGINELE HANDLEIDING
FR FRANÇAIS TRADUCTION DU MODE D'EMPLOI D'ORIGINE
EN ENGLISH ORIGINAL INSTRUCTION MANUAL
natural_image
Close-up of a hand holding a black plastic clip with a handle, partially cut off or held by a car (no visible text or symbols)Fig. 1B

natural_image
Close-up of a hand adjusting a black cable with a clamp, no visible text or symbolsFig. 1C
natural_image
Close-up of a mechanical component with a circled area highlighting a detail (no visible text or symbols)Fig. 1D

natural_image
Close-up of a mechanical component with a circled area highlighting a detail (no visible text or symbols)Fig.2
natural_image
Mechanical linkage diagram showing angular positions (0°, -20°, 20°) with no visible text or symbolsFig. 3A

natural_image
Close-up of a lawn mower being cleaned with a tool, no visible text or symbolsFig. 3B
natural_image
Close-up of a mechanical component with visible gears and a circular annotation (no text or symbols)Fig.4

natural_image
Close-up of a hand holding a cable with a wire, attached to a metal rod (no text or symbols visible)Fig.5

natural_image
Close-up of a hand operating a manual lawn mower with visible tire and handle (no text or symbols)Fig. 6A

natural_image
Top-down view of a grass lawn mower with visible wheels and handle (no text or symbols)Fig. 6B

natural_image
Top-down view of a person operating a grassy lawn mower (no visible text or symbols)Fig. 7A


natural_image
Top-down view of a lawn mower with visible blades and wheels (no text or symbols)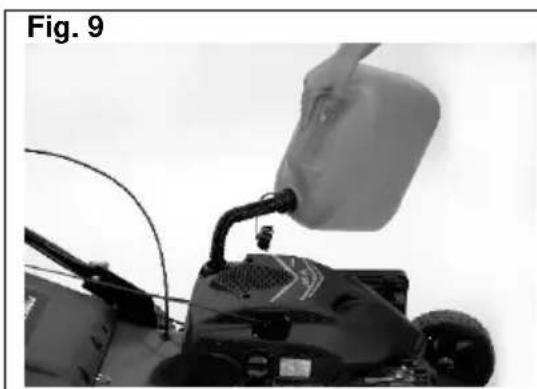
natural_image
Close-up of a grassy tractor with a bucket being poured into it (no visible text or symbols)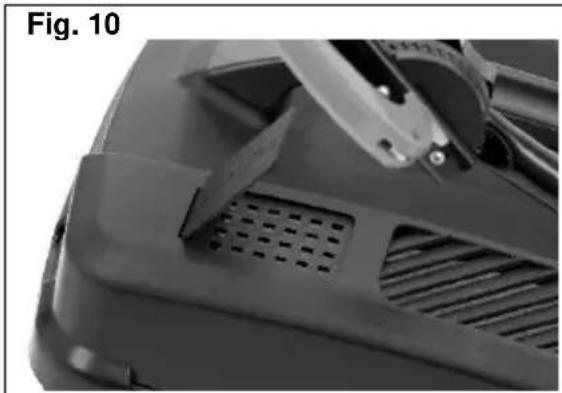
natural_image
Close-up of a mechanical component with a perforated grille and a metallic tool, labeled 'Fig. 10' (no readable text or symbols on the object itself)POWERPLUS POWPG10120 NL
1 GEBRUIKSDOEL....3
2 BESCHRIJVING (FIG. A)....3
3 INHOUD VAN DE VERPAKKING....3
4 TOELICHTING VAN DE SYMBOLEN 4
5 ALGEMENE VEILIGHEIDSVOORSCHRIFTEN....5
6 VEILIGHEIDSWAARSCHUWINGEN 7
7 VEILIGHEIDSWAARSCHUWINGEN VOOR BENZINE .... 7
8 ASSEMBLAGE 8
8.1 Inklapbare handgreep....8
2 BESCHRIJVING (FIG. A)
WAARSCHUWING: Benzine is zeer ontvlambaar.
6 VEILIGHEIDSWAARSCHUWINGEN
12/08/2021, Lier - Belgium
POWERPLUS POWPG10120 FR
1 UTILISATION....3
2 DESCRIPTION (FIG. A)....3
3 LISTE DES PIÈCES CONTENUES DANS L'EMBALLAGE....3
4 PICTOGRAMMES....4
5 CONSIGNES DE SÉCURITÉ GÉNÉRALES .... 5
5.1 Formation....5
5.2 Préparation....5
8.1 Guidon repliable....8
8.1 Guidon repliable
16 DÉCLARATION DE CONFORMITÉ


natural_image
Simple line drawing of a rounded rectangular shape with a small protrusion (no text or symbols)Philippe Vankerkhove
12/08/2021, Lier - Belgium
POWERPLUS POWPG10120 EN
1 APPLICATION .... 3
2 DESCRIPTION (FIG. A)....3
3 PACKAGE CONTENT LIST .... 3
4 SYMBOLS....4
5 GENERAL SAFETY WARNINGS....5
5.1 Training....5
5.2 Preparation....5
5.3 Operation....5
5.4 Maintenance and storage 6
6 SAFETY WARNINGS ....7
7 SAFETY WARNINGS GASOLINE 7
8 ASSEMBLY....7
8.1 Folding handle 7
8.2 Adjustment for an appropriate angle (Fig. 2)....8
8.3 Mounting and dismounting the grass catcher 8
8.4 Starter handle....8
8.5 Height of cut....8
9 5 IN 1....8
9.1 What is mulching? 8
9.2 Different uses....8
9.2.1 Retrofitting for mulching mower....8
9.2.2 Resetting for side-discharge mowing....8
9.2.3 Mowing with the grass catch bag....9
9.2.4 Operating without a grass collecting box 9
9.2.5 Edge cutting (Fig. 8)....9
10 OPERATING INSTRUCTIONS 9
10.1 Before starting 9
10.1.1 Add oil....9
10.1.2 Add gasoline (Fig. 9)....10
10.2 Starting a cold engine....10
10.3 Starting a warmed up engine 10
POWERPLUS POWPG10120 EN
10.4 Stop engine and blade....10
10.5 Self-propelled mower.... 10
10.6 For the best results when mowing....11
10.7 Gras box warning system (Fig. 10)....11
10.8 Height adjustment instructions....11
11 CLEANING AND MAINTENANCE 12
11.1 Oil service....12
11.2 Spark plug 12
11.3 Air cleaner 12
11.4 Engine cleaning....12
11.5 Off season storage....12
12 TECHNICAL DETAILS .... 13
13 NOISE....14
14 WARRANTY....14
15 ENVIRONMENT....14
16 DECLARATION OF CONFORMITY .... 15
POWERPLUS
POWPG10120 EN
SELF-PROPELLED LAWN MOWER 189CC 560MM POWPG10120
1 APPLICATION
The purpose of this lawn mower is to cut grass.

WARNING! Read this manual and general safety instructions carefully before using the appliance, for your own safety. Your power tool should only be passed on together with these instructions.
2 DESCRIPTION (FIG. A)
- Upper handle
- Self-drive control handle
- Lower handle
- Starter handle
- Rope guide
- Locking lever
- Grass catch bag
- Height adjusting lever
- Deck
- Sideward flap
- Spark plug
- Fuel cap
- Oil cap
- Locking knob
- Cable clamp
- Cable clamp
- Brake control handle
- Speed adjusting lever
- Mulching wedge
- Discharge channel
- Front wheel
- Engine
- Back wheel
- Rear cover
- Air filter
- Silencer
- Accelerator (speed) cable
- Self-propelling cable
- Fuel cock
3 PACKAGE CONTENT LIST
■ Remove all packaging materials.
- Remove remaining packing and package inserts (if included).
- Check that the package contents are complete.
- Check the appliance, the power cord, the power plug and all accessories for transportation damage.
- Keep the packing materials as far as possible till the end of the warranty period. Dispose it into your local waste disposal system afterwards.

WARNING: Packaging materials are not toys! Children must not play with plastic bags! Danger of suffocation!
1 x self-propelled lawn mower 189 cc 560 mm
3xCable clips
1 x grass bag
1 x mulching plug
1 x spark plug wrench
1 x discharge channel
1 x manual

If any parts are missing or damaged, please contact your dealer.
4 SYMBOLS
In this manual and/or on the machine the following symbols are used:
 | Denotes risk of personal injury or damage to the tool. |  | In accordance with essential applicable safety standards of European directives. |
 | Read manual before use. |  | Warning! Flying objects. Beware of thrown objects hit by cutting attachment. Keep bystanders away. |
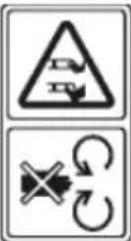 | Danger - rotating blades. Keep hands and feet away from sharp parts. Keep hands away from blades, Don't touch the blades when starting or while operating the unit. |  | Fuel is flammable, keep fire away. Allow engine to cool for at least 2 minutes before refuelling. |
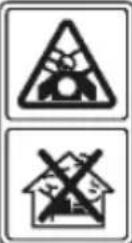 | Toxic fumes! Don't operate inside house. Petrol engines emit carbon monoxide. DO NOT run in enclosed area. |  | Wear hearing protection & eye protection. |
 | When repairing, please take out the spark plug. Then repair according to the operation manual. |  | Caution: Hot engine! Do not touch a hot silencer or cylinder. You may get burned. These parts get extremely hot from operation. When turned off they remain hot for a short time. |
 | Mandatory use of eye protection. |  | Wear noise protection. |
 | Wear gloves. |  | Keep hands and feet away. |

Warning: Keep the safety signs clear and visible on the equipment. Replace the safety signs if they are missing or illegible.
POWERPLUS POWPG10120 EN
5 GENERAL SAFETY WARNINGS
WARNING: When using petrol tools, basic safety precautions, including the following, should always be followed to reduce the risk of serious personal injury and/or damage to the unit. Read all these instruction before operating this product and retain these instructions for future reference.
WARNING: This machine produces an electromagnetic field during operation. This field may under some circumstances interfere with active or passive medical implants. To reduce the risk of serious or fatal injury, we recommend persons with medical implants to consult their physician and the medical implant manufacturer before operating this machine.
5.1 Training
- Read the instructions carefully. Be familiar with the controls and the proper use of the equipment.
- Never allow children or people unfamiliar with these instructions to use the lawn mower. Local regulations can restrict the age of the operator.
- Never mow while people, especially children, or pets are nearby.
- Keep in mind that the operator or user is responsible for accidents or hazards occurring to other people or their property.
- The operators must receive proper training in the use, adjustment and operation of the machine, including prohibited operations.
5.2 Preparation
- While mowing, always wear substantial footwear and long trousers. Do not operate the equipment when barefoot or wearing open sandals.
- Thoroughly inspect the area where the equipment is to be used and remove all objects which can be thrown by the machine.

WARNING: Petrol is highly flammable.
- Store fuel in containers specifically designed for this purpose.
- Refuel outdoors only and do not smoke while refuelling.
- Add fuel before starting the engine. Never remove the cap of the fuel tank or add petrol while the engine is running or when the engine is hot.
- If petrol is spilled, do not attempt to start the engine but move the machine away from the area of spillage and avoid creating any source of ignition until petrol vapours have dissipated.
- Replace all fuel tank and container caps securely.
■ Replace faulty silencers.
■ Before using, always visually inspect to see that the blades, blade bolts and cutter assembly are not worn or damaged. Replace worn or damaged blades and bolts in sets to preserve balance.
5.3 Operation
- Do not operate the engine in a confined space where dangerous carbon monoxide fumes can collect.
- Warning! Do not use the lawnmower when there is a risk for lighting.
- It is recommended to limit the duration of operation, in order to minimize the risks from noise and vibration.
- Be careful when using the lawnmower in slopes and near drop-offs, ditches or embankments.
- Mow only in daylight or in good artificial light.
- Avoid operating the equipment in wet grass, where feasible.
■ Always be sure of your footing on slopes.
■ Walk, never run.
POWERPLUS POWPG10120 EN
- For wheeled rotary machines, mow across the face of slopes, never up and down.
- Exercise extreme caution when changing direction on slopes.
- Do not mow excessively steep slopes.
- Use extreme caution when reversing or pulling the lawn mower towards you.
- Stop the blade(s) if the lawn mower has to be tilted for transportation when crossing surfaces other than grass, and when transporting the lawn mower to and from the area to be mowed.
- Never operate the lawn mower with defective guards, or without safety devices, for example deflectors and/or grass catchers, in place.
- Caution: The lawnmower shall not be operated without either the entire grass catcher or self-closing discharge opening guard in place.
- Do not change the engine governor settings or overspeed the engine.
- Do not alter or tamper with any sealed adjustment for the engine speed control.
- The lawnmower safety systems or features shall not be tampered with or disabled.
- Disengage all blade and drive clutches before starting the engine.
- Start the engine carefully according to instructions and with feet well away from the blade(s).
- Do not tilt the lawn mower when starting the engine.
- Do not start the engine when standing in front of the discharge chute.
- Do not put hands or feet near or under rotating parts. Keep clear of the discharge opening at all times.
- Never pick up or carry a lawn mower while the engine is running.
- Stop the engine and disconnect the spark plug wire, make sure that all moving parts have come to a complete stop and, where a key is fitted remove the key:
– Before clearing blockages or unclogging chute;
- Before checking, cleaning or working on the lawn mower;
- After striking a foreign object. Inspect the lawnmower for damage and make repairs before restarting and operating the lawn mower;
- If lawn mower starts to vibrate abnormally (check immediately).
- Stop the engine and disconnect the spark plug wire, make sure that all moving parts have come to a complete stop and, where a key is fitted remove the key:
- Whenever you leave the lawn mower;
- Before refuelling.
- Reduce the throttle setting during engine shut down and, if the engine is provided with a shut-off valve, turn the fuel of at the conclusion of mowing.
- Go slow when using a trailing seat.
5.4 Maintenance and storage
- Keep all nuts, bolts and screws tight to be sure the equipment is in safe working condition.
- Never store the equipment with petrol in the tank inside a building where fumes can reach an open flame or spark.
- Allow the engine to cool before storing in any enclosure.
- To reduce the fire hazard, keep the engine, silencer, battery compartment and petrol storage area free of grass, leaves, or excessive grease.
- Check the grass catcher frequently for wear or deterioration.
- Replace worn or damaged parts for safety.
- If the fuel tank has to be drained, this should be done outdoors.
- Improper maintenance, use of non-conforming replacement components, or the removal or modification of safety components can damage the lawnmower and injure the operators seriously.
- Only use the recommended blades and spare parts by the manufacturer. The use of non-genuine parts can damage the machine and injure the operators. Keep the lawnmower in good working condition.
POWERPLUS POWPG10120 EN
If the blade stopping device doesn't work, please contact service centre for help.

Warning: Do not touch rotating blade.
Warning: Refuel in a well ventilated area with the engine stopped.
6 SAFETY WARNINGS
- Operate the lawn mower only with the grass box and/or the deflector plate installed.
- Stop the engine before emptying the grass box or adjusting the cutting height.
- Keep your hands and feet away from the area under the lawn mower or under the grass discharge, while the engine is running.
- Before mowing, clear the lawn of any foreign objects which could be thrown up by the lawn mower.
- Keep children, other persons and pets at a safe distance, while operating the lawn mower.
- Never tilt the lawn mower while starting it.
7 SAFETY WARNINGS GASOLINE

WARNING: Use extra care in handling fuels. They are flammable and the vapours are explosive. The following points must be observed.
■ Use only an approved container.
- Never remove the fuel cap or add fuel with the power source running. Allow engine exhaust components to cool before refuelling.
- Do not smoke.
■ Never refuel the machine indoors.
- Never store the machine or fuel containers inside, where is an open flame, such as a water heater.
- If fuel is spilled, do not attempt to start the power source, but move the machine away from the area of spillage before starting.
- Always replace and securely tighten the fuel cap after refuelling.
- If the tank is drained, this should be done outdoors.
8 ASSEMBLY
8.1 Folding handle
- Fix the lower handlebars into the unit body with bolts and locking knobs (Fig. 1A).
- Lift the two locking levers to release the upper handlebars for folding.
- Push the locking lever closed to lock the handlebars in the operating position (Fig. 1B).
- Adjust the tension by turning the lock nut with a suitable spanner.
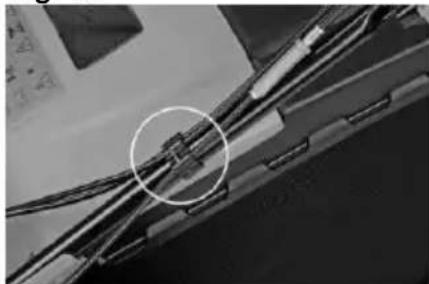
- Attach the cable-clamp to the position shown and then attach the cable (Fig. 1C, Fig. 1D).

Caution: Traction and starter cables must always be positioned on top of the cross bar of the push handle. This provides free movement of the cables on top of the lower section of the push handle, when the handle is folded. Incorrect mounting of these cables could lead to damaging and/or straining them, resulting in a malfunction of the machine. In this case the guaranty is void.
POWERPLUS POWPG10120 EN
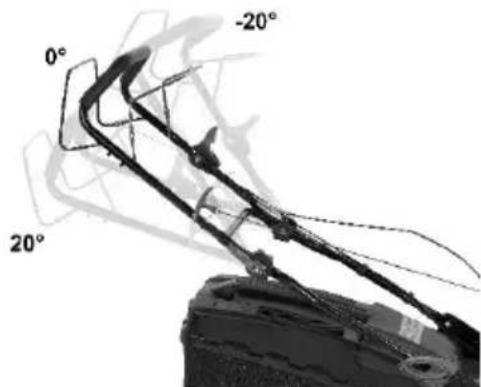
8.2 Adjustment for an appropriate angle (Fig. 2)
- Pull the locking lever opening.
- Rotating the upper handle centred of the angle adjusting gear for adjusted an appropriate angle into the scope -20° to 20° as shown in Fig. 2.
- Push the locking lever closed to connect the lower handle and the upper handle.
8.3 Mounting and dismounting the grass catcher
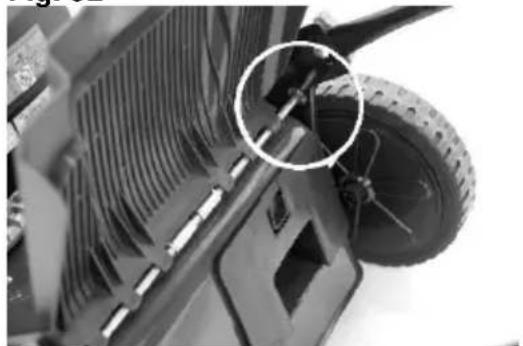
- To fit: Raise the rear cover and hitch the grass catcher on rear of mower (Fig. 3A) (Fig. 3B).
- To remove: grasp and lift rear cover, remove grass catcher.
8.4 Starter handle
Move the starter handle from the engine to the rope guide (Fig. 4A).
8.5 Height of cut
Apply outward pressure to disengage lever from rack. Move lever forward or back to adjust height (Fig. 5 and see clause 10.7).
9 5 IN 1
These lawn mowers can be retrofitted from its normal function, based on the application purpose:
■ From lawn mower with rear discharge to:
Mulching mower or as side-discharge mower.
9.1 What is mulching?
When mulching, the grass is cut in one working step, then finely chopped and returned to the grass strip as natural fertilizer.
Hints for mulch-mowing:
- Regular cut-back by max. 2 cm from 6 cm to 4 cm grass height.
■ Use a sharp cutting knife.
■ Do not mow wet grass. - Set to max. motor speed.
■ Only move at working pace. - Regularly clean mulching wedge, housing inner side and mowing blade.
9.2 Different uses
9.2.1 Retrofitting for mulching mower

WARNING: only with a stopped motor and standstill cutter.
- Raise the rear cover and remove the grass catch bag (Fig. 6A).
- Push the mulching wedge into the deck. Lock the mulching wedge with the button into the opening on the deck (Fig. 6B).
- Lower the rear cover again.
9.2.2 Resetting for side-discharge mowing

WARNING: only with a stopped motor and standstill cutter.
- Lift the rear cover and remove the grass catch bag.
■ Mount the mulching wedge.
■ Lift sidewards flap for side discharge (Fig. 7A).
POWERPLUS POWPG10120 EN
- Attach the side discharge channel in place, in the hooks provided for this purpose..
- Release the flap so it presses the side discharge channel against the deck.
9.2.3 Mowing with the grass catch bag

WARNING: only with a stopped motor and standstill cutter.
For mowing with the grass catch bag, remove the mulching wedge and discharge channel for side discharge and mount the grass catch bag.
Removing the mulching wedge.
- Lift rear cover and remove the mulching wedge.
Removing the discharge guide for side discharge:
■ Lift sideward flap and remove discharge channel.
- The sideward flap automatically closes the discharge opening on the housing by mean of spring force.
- Regularly clean the sideward flap and discharge opening form grass rest and stuck dirt.
Mount the grass catch bag:
■ To fit: raise the rear cover and hitch the grass catch bag on rear of mower.
- To remove: grasp and lift the rear cover, remove the grass catch bag.
9.2.4 Operating without a grass collecting box
You can operate the lawnmower without grass catch bag nor mulching plug. You must nevertheless always ensure that the rear flap / deflector is always folded against the deck.
9.2.5 Edge cutting (Fig. 8)
Lawn mower is designed so that the diameter of the deck lies outside the line of wheels. In this way you can cut the edges very easily.
10 OPERATING INSTRUCTIONS
10.1 Before starting

This lawn mower is shipped WITHOUT OIL OR GASOLINE in the engine.
10.1.1 Add oil
Before each subsequent use the oil level must be check and if necessary topped up with 500ml SAE30 engine oil.

CAUTION: DO NOT overfill engine with oil, or it will smoke heavily from the muffler on start-up.
- Be sure lawnmower is level.
■ Remove oil dipstick from oil fill spout. - Wipe the oil dipstick clean; refit and tighten the oil tank cap and then remove it again. The oil level must be within the marking and should be clear with gold colour.
■ Refill if the oil level is too low. - Check oil level before each use. Add oil if needed. Fill to full line on dipstick.
- Change the oil after every 25 hours of operation or each season. You may need to change the oil more often under dusty, dirty conditions.
IMPORTANT:
10.1.2 Add gasoline (Fig. 9)

WARNING: never fill fuel tank indoors, with engine running or until the engine has been allowed to cool for at least 15 minutes after running.
- Fill fuel tank to base of tank filler neck. Use fresh, clean, regular unleaded gasoline.
- Do not overfill.
- Do not mix oil with gasoline.
- To assure fuel freshness, only purchase fuel in quantities that can be used within 30 days.

CAUTION: Wipe off any spilled oil or fuel. Do not store, spill or use gasoline near an open flame

CAUTION: Alcohol blended fuels (called gasohol or using ethanol or methane can attract moisture which leads to separation and formation of acids during storage. Acidic gas can damage the fuel system of an engine while in storage. To avoid engine problems, the fuel system should be emptied before storage
10.2 Starting a cold engine
- The speed adjusting lever (18), located on the right hand side of the upper handle, is used to regulate the engine speed. Move the lever on «STARTER MAX» position.
- The brake control handle is located in the upper handle of the lawnmower. The handle must be depressed to allow the ignition and held against the lower handle.
- The starter handle is attached to the upper handle on the right hand side. When starting, always stand behind the lawnmower in the operating position. Pull the starter handle until the engine runs.
- Once started, allow 2 / 3 minutes for the engine to warm up before mowing.

The blade starts to rotate after the engine is switched on.
10.3 Starting a warmed up engine
- Depress the brake control handle to allow the ignition and held against the upper handle.
- Pull the recoil starter handle until the engine runs.
10.4 Stop engine and blade
- Release the brake control handle to stop the engine and blade.

WARNING!! The blade continues to rotate after the engine is switched off.

WARNING!!The brake control handle is a safety device. Never attempt to bypass its operations. The blade will be rotating when the engine is running.
10.5 Self-propelled mower
Once engine has been started, push the self-drive control handle up against the upper handle and keep it in this position.
The mower now starts to move.
To stop the mower, release the lever.
POWERPLUS POWPG10120 EN
10.6 For the best results when mowing
Clear lawn of debris. Be sure that the lawn is clear of stones, sticks, wire or other foreign objects which could be accidentally thrown out by the mower in any direction and cause serious personal injury to the operator and others as well as damage to property and surrounding objects. Do not cut wet grass. For effective mowing do not cut wet grass because it tends to stick to the underside of the deck preventing proper mowing of the grass clippings. Cut no more than 1/3 the length of the grass. The recommended cut for mowing is 1/3 the length of the grass. Ground speed will need to be adjusted so the clippings can be dispersed evenly into the lawn. For especially heavy cutting in thick grass it may be necessary to use one of the slowest speeds in order to get a clean well mowed cut. When mowing long grass you may have to cut the lawn in two passes, lowering the blade another 1/3 of the length for the second cut and perhaps cutting in a different pattern than was used the first time. Overlapping the cut a little on each pass will also help to clean up any stray clippings left on the lawn. The mower should always be operated at full throttle to get the best cut and allow it to do the most effective job of mowing. Clean underside of deck. Be certain to clean the underside of the cutting deck after each use to avoid a build-up of grass, which would prevent proper mulching. Mowing leaves. The mowing of leaves can also be beneficial to your lawn. When mowing leaves make sure they are dry and are not laying too thick on the lawn. Do not wait for all the leaves to be off the trees before you mow.

WARNING: if you strike a foreign object, stop the engine. Remove wire from spark plug, thoroughly inspect the mower for any damage and repair the damage before restarting and operating the mower. Extensive vibration of the mower during operation is an indication of damage. The unit should be promptly inspected and repaired.
10.7 Gras box warning system (Fig. 10)
There is a warning piece in the grass catcher which will indicate the grass volume.
- If the flap is open it means that there is still space for grass collection.
- If the flap is closed it means that there is no space for grass collection.
10.8 Height adjustment instructions

CAUTION: Do not at any time make any adjustment to lawnmower without first stopping the engine and disconnecting the spark plug wire.

CAUTION: before changing mowing height, stop mower and disconnect spark plug cable.
Your mower is equipped with a central height adjustment lever offering 7 height positions.
1. Stop mower and disconnect spark plug cable before changing mower cutting height.
2. The central height adjustment lever offers you 7 different height positions.
3. To change the height of cut, squeeze adjuster lever toward the wheel, moving up or down to selected height.
4. All wheels will be in the same height of cut.
POWERPLUS POWPG10120 EN
11 CLEANING AND MAINTENANCE

Stop the engine and disconnect and earth the spark plug before any repairing or maintenance operations.

Use of safety gloves is imperative while performing adjustment or repair of the machine.
Only use original spare parts.

Complicated operations –not listed here below- must be carried out by a specialized technical assistance centre.

Regular and careful maintenance is essential for keeping the safety level and original performance of the machine unchanged in time.

When tipping the lawnmower for access to carryout repairs, empty the fuel tank. Never tip the lawnmower more than 90 degrees in any direction and never leave the mower tipped for any length of time as oilcan drip into the air cleaner of the engine, thus causing a starting problem.
11.1 Oil service
Check the oil level daily before starting the engine and ensure the correct oil level is maintained. Change the engine oil after 8 hours of operation and then every 50 hours or every season depending on usage.
11.2 Spark plug
The spark plug should be changed every 100 hours or every season depending on use. Check the plug before each use and plug gap reset once a season. Refer to the engine manual for the correct plug type and gap specifications.
11.3 Air cleaner
The air cleaner must be changed. Clean every few hours under extremely dry and dusty conditions as poor performance and flooding usually indicate the air cleaner should be cleaned/ changed.
11.4 Engine cleaning
Clean the engine regularly with a dry brush or cloth. Ensure you keep the blower housing area free from debris, grass and dust to allow proper air circulation when is essential for engine performance. Also ensure you remove all grass, dirt and debris from the muffler area.
11.5 Off season storage
It is good practice to prepare your lawnmower for storage when not in use.
- Clean and lubricate the lawnmower thoroughly.
- Refer to the engine manual for correct engine storage instructions.
- Coat the cutting blade with grease to prevent any corrosion when not in use.
- Store the mower in a clean dry area away from corrosive materials like fertilizers.
- When storing your lawnmower or any other type of power equipment in a poorly ventilated or metal storage unit, it is vital that you rust proof the equipment using a light oil silicone, especially cables and all moving parts.
12 TECHNICAL DETAILS
| Cutting width | 560 mm |
| Cylinder capacity | 189 cc |
| Engine power | 3.2 kW |
| Clutch engagement speed | 3.5 km/h |
| Collect box volume | 70 l |
| Engine stroke type | 4-stroke engine |
| Engine brand | Yamaha |
| Cutting height min | 25 mm |
| Cutting height max | 70 mm |
| Number of height positions | 7 |
| Central adjustable height setting | Yes |
| Self-propelled | Yes |
| Material housing | Steel |
| Oil tank capacity | 0.6 l |
| Fuel tank capacity | 1.2 l |
| Collect box material | Plastic – nylon |
| Adjustable handle height | Yes |
| Diameter front wheel | 200 mm |
| Diameter rear wheel | 250 mm |
| Automatic choke | Yes |
| Low fuel consumption | Yes |
| Horse power | 4.3 hp |
| SHARPP blade | Yes |
| Full crank engine | Yes |
| Starter rope length | 220cm |
| Spark plug type | Torch |
| Soft grip | Yes |
| Gear housing material | Aluminium |
| Lawn size up to | 1500 m² |
| Ball bearing wheels | Yes |
| Ready start engine | Yes |
| Full box / bag indicator | Yes |
| Handle type | Foldable |
| E10 fuel proof | Yes |
| Bull bar protection | Yes |
| 5 functions | Side discharge |
| Mulching function | |
| Rear discharge | |
| Edge cutting | |
| Collection |
13 NOISE
Noise emission values measured according to relevant standard. (K=3)
Acoustic pressure level LpA 84 dB(A)
Acoustic power level LwA 98 dB(A)

ATTENTION! Wear hearing protection when sound pressure is over 85 dB(A).
aw (Vibration)
4,1 m/s ^2
K = 1.5 ~m / s^2
14 WARRANTY
- This warranty covers all material or production flaws excluding : batteries, chargers, defective parts subject to normal wear & tear such as bearings, brushes, cables, and plugs, or accessories such as drills, drill bits, saw blades, etc. ; damage or defects resulting from maltreatment, accidents or alterations; nor the cost of transportation.
- Damage and/or defects resulting from inappropriate use also do not fall under the warranty provisions.
■ We also disclaim all liability for any bodily injury resulting from inappropriate use of the tool. - Repairs may only be carried out by an authorised customer service centre for Powerplus tools.
- You can always obtain more information at the number 00 32 3 292 92 90.
- Any transportation costs shall always be borne by the customer, unless agreed otherwise in writing.
- At the same time, no claim can be made on the warranty if the damage of the device is the result of negligent maintenance or overload.
- Definitely excluded from the warranty is damage resulting from fluid permeation, excessive dust penetration, intentional damage (on purpose or by gross carelessness), inappropriate usage (use for purposes for which the device is not suitable), incompetent usage (e.g. not following the instructions given in the manual), inexpert assembly, lightning strike, erroneous net voltage. This list is not exhaustive.
- Acceptance of claims under warranty can never lead to the prolongation of the warranty period nor commencement of a new warranty period in case of a device replacement.
- Devices or parts which are replaced under the warranty therefore remain the property of Varo NV.
- We reserve the right to reject a claim whenever the purchase cannot be verified or when it is clear that the product has not been properly maintained. (Clean ventilation slots, carbon brushes serviced regularly, etc.).
- Your purchase receipt must be kept as proof of date of purchase.
- Your appliance must be returned undismantled to your dealer in an acceptably clean state, (in its original blow-moulded case if applicable to the unit), accompanied by proof of purchase.
15 ENVIRONMENT
Should your appliance need replacement after extended use, do not discard it with the household rubbish but dispose of it in an environmentally safe way.
Please dispose of used motor oil in a manner that is compatible with the environment. We suggest you take it in a sealed container to your local service station for reclamation. Do not throw it in the trash or pour it on the ground.
POWERPLUS POWPG10120 EN
16 DECLARATION OF CONFORMITY


VARO – Vic. Van Rompuy N.V. - Joseph Van Instraat 9 - BE2500 Lier - BELGIUM, declares that.
Product: Self-propelled lawn mower 189 cc 560 mm
Trade mark: POWERplus
Model: POWPG10120
is in conformity with the essential requirements and other relevant provisions of the applicable European Directives, based on the application of European harmonized standards. Any unauthorized modification of the apparatus voids this declaration.
European Directives (including, if applicable, their amendments up to the date of signature):
2006/42/EC
2014/30/EU
2000/14/EC Annex VI LwA
Measured 96dB(A)
Guaranteed 98dB(A)
Testing Authority TÜV Sud - DE
European harmonized standards (including, if applicable, their amendments up to the date of signature):
EN ISO 5395-1 : 2013 - A1
EN ISO 5395-2:2013-A2
EN ISO 14982.:2009
Keeper of the Technical Documentation: Philippe Vankerkhove, VARO – Vic. Van Rompuy N.V.
The undersigned acts on behalf of the company CEO,

natural_image
Simple hand-drawn sketch of a rounded rectangular shape with a small circle on top (no text or symbols)Philippe Vankerkhove
Regulatory Affairs – Compliance Manager
12/08/2021, Lier - Belgium
POWERPLUS POWPG10120 DE
1 EINSATZBEREICH....3
natural_image
Simple hand-drawn sketch of a rounded rectangular shape with a diagonal line (no text or symbols)Philippe Vankerkhove
12/08/2021, Lier - Belgium
POWERPLUS POWPG10120 ES
natural_image
Simple hand-drawn sketch of a rounded rectangular shape with a small arrow on the top right (no text or symbols)Philippe Vankerkhove
12/08/2021, Lier - Belgium
POWERPLUS POWPG10120 IT
natural_image
Simple hand-drawn sketch of a rounded rectangular shape with a curved line extending from its top (no text or symbols)Philippe Vankerkhove
Regulatory Affairs – Compliance Manager
12/08/2021, Lier - Belgium
POWERPLUS POWPG10120 PT
natural_image
Simple hand-drawn sketch of a rounded rectangular shape with a small dot on the side (no text or symbols)Philippe Vankerkhove
12/08/2021, Lier - Belgium
POWERPLUS POWPG10120 NO
natural_image
Simple hand-drawn sketch of a rounded rectangular shape with no text or symbolsPhilippe Vankerkhove
Regulatory Affairs – Compliance Manager (Regulatoriske saker - Samsvarsleder)
12/08/2021, Lier - Belgium
POWERPLUS POWPG10120 DA
1 ANVENDELSESOMRÅDER 3
2 BESKRIVELSE (FIG. A) 3
3 MEDF∅LGENDE INDHOLD 3
4 SYMBOLER 4
5 GENERELLE SIKKERHEDSFORSKRIFTER .... 5
5.1 Træning .... 5
5.2 Klargøring....5
5.3 Betjening 5
natural_image
Simple line drawing of a rounded rectangular shape with a small arrow on top (no text or symbols)Philippe Vankerkhove
Regulatory Affairs (afdelingen for juridiske anliggender) – Compliance Manager 12/08/2021, Lier - Belgium
POWERPLUS POWPG10120 CS
natural_image
Simple hand-drawn sketch of a rounded rectangular shape with a small circular mark on the top (no text or symbols)Philippe Vankerkhove
12/08/2021, Lier - Belgium
POWERPLUS POWPG10120 RO
1 DOMENII DE UTILIZARE ....3
2 DESCRIERE (FIG. A)....3
3 CONTINUTUL PACHETULUI....3
4 SIMBOLURI .... 4
5 REGULI GENERALE DE SIGURANTĂ 5
5.1 Instruire ....5
5.2 Pregătire 5
5.3 Functionarea .... 5
natural_image
Simple line drawing of a rounded rectangular shape with a small circular mark on the top (no text or symbols)Philippe Vankerkhove
Divizia de reglementare – Director de conformitate
12/08/2021, Lier - Belgium
POWERPLUS POWPG10120 BG
natural_image
Simple line drawing of a rounded rectangular shape with a small circular mark on top (no text or symbols)Philippe Vankerkhove
12/08/2021, Lier - Belgium

natural_image
Side view of a power plant lawn mower with visible branding and wheels (no text or symbols on the motor body)varo
WWW.VARO.COM
DESIGNED AND MARKETED BY VARO
©copyright by varo
VARO - VIC. VAN ROMPUY nv
JOSEPH VAN INSTRAAT 9 - 2500 LIER - BELGIUM
OFFICES:


- POWERPLUS
- POWERPLUS POWPG10120 NL
- BESCHRIJVING (FIG. A)
- WAARSCHUWING: Benzine is zeer ontvlambaar.
- VEILIGHEIDSWAARSCHUWINGEN
- POWERPLUS POWPG10120 FR
- Guidon repliable
- DÉCLARATION DE CONFORMITÉ
- POWERPLUS POWPG10120 EN
- POWPG10120 EN
- SELF-PROPELLED LAWN MOWER 189CC 560MM POWPG10120
- APPLICATION
- DESCRIPTION (FIG. A)
- PACKAGE CONTENT LIST
- SYMBOLS
- GENERAL SAFETY WARNINGS
- Training
- Preparation
- WARNING: Petrol is highly flammable.
- Operation
- Maintenance and storage
- SAFETY WARNINGS
- SAFETY WARNINGS GASOLINE
- ASSEMBLY
- Folding handle
- Adjustment for an appropriate angle (Fig. 2)
- Mounting and dismounting the grass catcher
- Starter handle
- Height of cut
- 5 IN 1
- What is mulching?
- Different uses
- WARNING: only with a stopped motor and standstill cutter.
- Mowing with the grass catch bag
- Operating without a grass collecting box
- Edge cutting (Fig. 8)
- OPERATING INSTRUCTIONS
- Before starting
- This lawn mower is shipped WITHOUT OIL OR GASOLINE in the engine.
- Add oil
- CAUTION: DO NOT overfill engine with oil, or it will smoke heavily from the muffler on start-up.
- IMPORTANT:
- Add gasoline (Fig. 9)
- Starting a cold engine
- Starting a warmed up engine
- Stop engine and blade
- Self-propelled mower
- For the best results when mowing
- Gras box warning system (Fig. 10)
- Height adjustment instructions
- CLEANING AND MAINTENANCE
- Oil service
- Spark plug
- Air cleaner
- Engine cleaning
- Off season storage
- NOISE
- ATTENTION! Wear hearing protection when sound pressure is over 85 dB(A).
- WARRANTY
- ENVIRONMENT
- DECLARATION OF CONFORMITY
- POWERPLUS POWPG10120 DE
- POWERPLUS POWPG10120 ES
- POWERPLUS POWPG10120 IT
- POWERPLUS POWPG10120 PT
- POWERPLUS POWPG10120 NO
- POWERPLUS POWPG10120 DA
- POWERPLUS POWPG10120 CS
- POWERPLUS POWPG10120 RO
- POWERPLUS POWPG10120 BG
Brand : PowerPlus
Model : POWPG10120
Category : Lawn mower