KVR 25221 - Vacuum Cleaner Koenic - Free user manual and instructions
Find the device manual for free KVR 25221 Koenic in PDF.
| Product Type | Rechargeable stick vacuum cleaner |
| Brand | Koenic |
| Model | KVR 25221 |
| Rated voltage | 25.2 V |
| Max suction power | 150 W |
| Battery charging time | 5 hours |
| Dust container capacity | 0.3 L |
| Battery type | Integrated, non-removable |
| Charger | Model MC2805B-V, input 100-240 V, output 25 V/29 V, 0.5 A |
| Main nozzle | Floor nozzle with rotating brush |
| Included accessories | Crevice tool, upholstery tool, mop holder accessory with water tank and foot pump, hose, wall mount |
| Simultaneous vacuuming and washing function | Yes (with mop holder accessory) |
| Number of power levels | 2 (high, low) |
| Charge indicator | Flashing LED indicators (charging) / off (charging complete) |
| Filters | Fine filter, filter element, foam outlet filters (washable) |
| Filter maintenance | Regular cleaning by tapping or washing with water (complete drying before reassembly) |
| Rotating brush cleaning | Remove tangled threads and hair with scissors |
| Minimum age of use | 8 years (under supervision) |
| Intended use | Household only, indoor, hard floors and carpets |
| Disposal | Do not dispose of with household waste, recycle at a WEEE collection point |
| Warranty | 1 year (warranty card included) |
Frequently Asked Questions - KVR 25221 Koenic
User questions about KVR 25221 Koenic
0 question about this device. Answer the ones you know or ask your own.
Ask a new question about this device
Download the instructions for your Vacuum Cleaner in PDF format for free! Find your manual KVR 25221 - Koenic and take your electronic device back in hand. On this page are published all the documents necessary for the use of your device. KVR 25221 by Koenic.
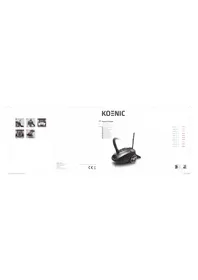
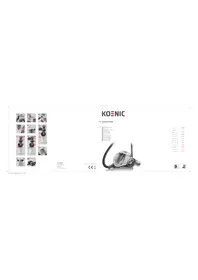
USER MANUAL KVR 25221 Koenic
Cordless Tiny Vacuum Cleaner
natural_image
Black and white photo of a vacuum cleaner (no text or symbols visible)[Unreadable]
End of 10:15
(4) 15
(1) 2014年1月1日
姓名:M.M
- 2017年1月1日
[Unreadable]
3254-33
(四) 企业负责人: 37
(六) 2013年1月4日
(1)
9.xend:72 77
10:46/13.Ⅱ

text_image
Exploded view diagram of a vacuum cleaner with labeled parts and exploded view
text_image
Technical diagram showing mechanical assembly steps with red arrows indicating movement or force directionsSicherheitshinweise
- This product can be used by children aged from 8 years and above and persons with reduced physical, sensory or mental capabilities or lack of experience and knowledge if they have been given instructions concerning the use of the appliance in a safe way and understand the hazards involved or are under supervision.
• Children shall not play with the product. - Cleaning and user maintenance shall not be carried out by children unless they are supervised.
- If the cord of the charger is damaged the charger must be scrapped.
- Only use the provided charger for charging.
-
Follow the instructions in the chapter Cleaning and care.
-
Read this user manual thoroughly before first use and pass it on with the product. Pay attention to the warnings on the product and in this user manual. It contains important information for your safety as well as for the use and maintenance of the equipment.
- Never leave the product unsupervised while it is switched on.
- Do not place any objects on top of the product.
- Never immerse electrical parts of the product in water or any other fluid during cleaning or operation. Never hold the product under running water.
- Do not under any circumstances (e.g. damaged power cord, product has been dropped etc.) attempt to repair the product yourself. For servicing and repairs, please consult an authorised service agent.
- The mains voltage must match the information on the rating label of the product.
- Only unplugging from the power socket can separate the product completely from the mains. Please be sure that the power plug is in operable condition.
- Avoid damages to the charging cable that may be caused by kinks or contact with sharp corners.
- Keep this product including charging cable and power plug away from all heat sources, e.g. ovens, hot plates and other heat-producing products/objects.
- Only unplug from the power socket by the charger itself. Do not pull on the cord.
Safety instructions
- Unplug the product ...
- when the product is not being used,
- in case of malfunctions,
- before attaching / detaching accessories and
- before cleaning the product.
- Use this product in dry indoor areas only and never outdoors.
- This product is not intended for commercial use. It is designed for household use only.
- Do not allow the product to operate unsupervised.
- Make sure that the motor unit and charger incl. power cord do not become wet.
- Use accessories supplied with the device or recommended by the manufacturer only!
- This product is suitable only for private use.
• Always switch the product off before disconnecting it from mains supply. - Let the product cool down sufficiently before storing.
- Do not cover the product while in use. Fire hazard!
- Do not suck up lit cigarettes, hot ashes, matches, etc. Fire hazard!
- Do not suck up inflammable or explosive materials and gases. The product must not be used in rooms that contain explosive gases or liquids.
- Be especially careful when cleaning any kind of stairs.
-
When in use, keep the product away from clothes and body parts (e.g. fingers, hair, face).
-
Do not try to clean people or animals with the product.
- Only use the charging adapter provided to charge the product.
- Never expose the product/rechargeable batteries to excessive heat (e.g. bright sun, fire), and never throw them into fire. The rechargeable batteries could explode.
- Never short-circuit the contacts of the rechargeable battery. Do not throw the rechargeable battery or the product into fire. There is a danger of fire and explosion!
- Never charge the rechargeable battery of the product unattended.
English
Congratulations!
Thank you for your purchase of a KOENIC product. Please read this manual carefully and keep it for future reference.
Intended use
The vacuum cleaner is designed only to vacuum dry dust and dirt. Using it for anything else can damage the device or cause injury. The Imtron GmbH assumes no liability for damage to the product, for property damage or for personal injury due to careless or improper usage of the product, or usage of the product which does not meet the manufacturer's specified purpose.
Before first time use
Remove the product and accessories carefully from the original packaging. It is recommended to keep the original packaging for storage. If you wish to dispose of the original packaging, please observe applicable legal provisions. Should you have any questions regarding proper disposal, contact your local waste management center. Inspect the delivery contents for completeness and damages. Should the delivery contents be incomplete or damaged, contact your sales outlet immediately.
After unpacking, please refer to chapter
Cleaning and care.
Before first time use the built-in batteries must be charged for at least 5 hours, please refer to chapter Charging batteries.
Disposal

Do not dispose of this product as unsorted municipal waste. Return it to a designated collection point for the recycling of WEEE.
By doing so, you will help to conserve resources and protect the environment. Contact your retailer or local authorities for more information.

Please dispose of batteries in an environmentally friendly manner. Do not put batteries into the household waste.
Please use the return and collection systems in your community or contact the dealer where you purchased the product.
Content
1 x Vacuum cleaner with battery
1 x Floor nozzle
1 x Mop attachment
1 x Crevice nozzle
1 x Upholstery nozzle
1 x Tube
1 x Charger
1 x Wall bracket with mounting set
1 x User manual
1 x Warranty card
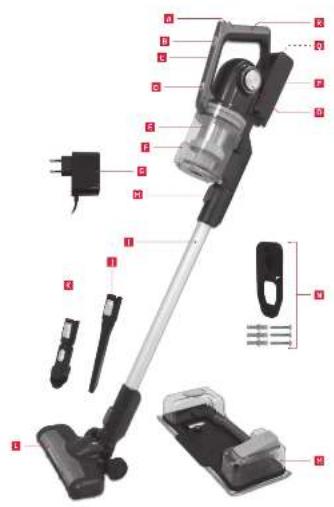
Controls and components
A On / off switch
B Vacuum power level switch
c Vacuum power level indicator and charging control LEDs
D Dust container release button
€ Dust container with dust flap and filter inserts
F Dust container lid release button
G Charger with cable and charging plug
H Suction tube release button
Suction tube
J Crevice nozzle
K Upholstery nozzle
L Floor nozzle with rotating brush
M Mop attachment with water tank and foot pump
N Wall bracket with mounting kit
o Air outlet filter
P Battery
Q Charging socket
R Handle
Assembly
Wall bracket
Fig. 1 If needed, attach the wall bracket to a wall. Please note the distances and dimensions.
Fig. 2 The dimensions of the required dowels and screws (included) can be found in the overview picture. When mounting on the wall, the distance between the holes must be considered. Mark the drill holes beforehand.
Note: Before screwing on the wall bracket, make sure that there is a suitable socket for the charger close by.

Warning!
Make sure there are no power lines or other wires or pipes in the wall where you want to drill holes for the wall bracket. There is danger to life if you drill a live cable!
Fig. 3 The minimum height of the wall bracket must be selected so that the floor nozzle can hang freely downwards.
Charging batteries
Fig. 4 Plug the charger into the socket. Plug the charging plug into the charging socket.
When the charging indicator LEDs are flashing, it indicates that the battery is being charged. The indicator LEDs turn off when the battery is fully charged.
LED indicator
| LED Condition | |
| 1 LED on, flashing | During operation, when battery level is low |
| LEDs on and/or flashing | During charging |
| LEDs off | Charging completed. Fully charged |
Fig. 5 Connect the floor nozzle to the lower end of the suction tube and then connect the tube to the vacuum cleaner.
Mop attachment
Fig. 6 For vacuuming and wet swabbing at the same time, attach the mop attachment to the floor nozzle.
Fig. 7 Before use, fill the tank with water or a suitable floor cleaner. Observe the maximum filling level.
Upholstery nozzle and crevice nozzle
Fig. 8 Both nozzles can either be connected directly to the vacuum cleaner or onto the end of the suction tube. When attaching them, always insert the respective nozzle as far as possible so that it snaps into place.
To vacuum upholstered furniture, mattresses, pillows, curtains, etc., use the upholstery nozzle. The brush can be pushed back whereby a lint brush is available.
To vacuum wrinkles, joints and corners, use the crevice nozzle.
Vacuuming
Using handstick vacuum cleaner
Fig. 9 Press the on/off switch to turn on the product. The light on the floor nozzle turns on and indicates that the rotating brush is turning. Press the vacuum power level switch to set the desired suction power (high, low).
English
Wet swabbing
Fig.10 To wipe with a damp cloth, you have to actuate the foot pump on the water tank from time to time, depending on the surface, by stepping on it with your left foot. Wet the textile cloth before attaching it, for a better cleaning result.

Warning!
When the vacuum cleaner is left standing, it must be switched off, because if the brush is turning while the product is standing, it could cause damage to the floor surface.
After vacuuming, press the on / off switch to turn off the product.
Cleaning and care

Warning!
- When cleaning the product, never use solvents or abrasive materials, hard brushes, metallic or sharp objects. Solvents are harmful to human health and can attack plastic parts, while abrasive cleaning mechanisms and tools may scratch the surface(s).
- Never immerse any electrical parts of the product in water or in other liquids during cleaning. Never place it under running water.
Emptying dust container and cleaning filters
Note: The dust container should be emptied every time after vacuuming.
Fig.11 To empty the dust container, press the dust container lid release button so that the bottom lid of the container opens and the dust falls out. Hold the dust container over a dustbin. If the filter and dust container are relatively clean, close the lid again so that it snaps into place. The vacuum cleaner is ready for use.
Fig. 12 For better cleaning, loosen the dust container and remove it. Remove the complete filter element and the fine filter. Empty the dust from the dust container and tap the filters. The filter element and dust container can also be rinsed with water if completely dried afterwards. When cleaning the elements with water, make sure that they are completely dry before re-assembly. Mount all previously removed components. The assembly is done in reverse order. When assembling make sure that no seal is lost or crushed and that no parts are jamming.
Fig. 13 Regularly clean both outlet filters. Turn off the caps and take out the foam filters. Tap or wash the filters thoroughly. Make sure that all components are absolutely dry before reassembly. The assembly is done in reverse order.
Cleaning floor nozzle
Fig. 14 The floor nozzle should be cleaned at regular intervals. To clean it, release the floor nozzle from the handstick vacuum cleaner. Push the clip to remove the latch. Take out the brush roller from the nozzle. Cut through threads and hairs wounded round the rollers using scissors and remove them.
Note: If the wheels are blocked with threads and hairs, use scissors to carefully remove the blockage.
Fig. 15 Open the cap and empty the water tank of the mop attachment. Take off the mop and wash it off. Pull it into the correct shape and let it dry.
Re-assemble all of the components that have previously been removed. Assembly is carried out in reverse order.
Note:
- Floor nozzles are subject to a certain amount of wear, depending on the type of hard floors you have (e.g. rough, rustic tiles). Therefore, you must check the underside of the floor nozzle at regular intervals.
- Worn undersides of floor nozzles may have sharp edges that can damage sensitive hard floors, such as parquet or linoleum. The Imtron GmbH does not accept any responsibility for damage caused by worn floor nozzles.
Technical data
Re-chargeable vacuum cleaner
Rated voltage :25,2 V
Vacuum power: Max. 150 W
Battery charging time: 5 hrs.
Dust container capacity: 0.3 L
Power adaptor
Manufacturer: Jiangsu Midea Cleaning Appliances Co., Ltd
No.39 Caohu Avenue, Xiangcheng,
Economic Development Zone, Suzhou, Jiangsu, P.R.China.
Business license: 91441900776947111F
Imported by : Imtron GmbH
Wankelstraße 5,85046 Ingolstadt, Germany.
Commercial registration number : HRB 4580
Model : MC2805B-V
Input voltage: 100 - 240 V \~
Input AC frequency: 50-60 Hz
Output voltage : 25.0 V
Output current: 0.5 A
Output power: 12.5 W (25.0 V); 14.5 W (29.0 V)
Average active efficiency : 86.94% (25.0V); 87.19% (29.0V)
Efficiency at low load (10 %) ; 73.68 % (25.0 V); 73.13 % (29.0 V)
No-load power consumption : 0.06 W (25.0 V); 0.06 W (29.0 V)
Troubleshooting
If there are any problems during operation, please refer to the following table. If problems cannot be solved as indicated under Solution, please contact your manufacturer.
| Problem | Possible causes | Solution |
| Product does not work | Interrupted power supplyBattery is empty | Check the power supplyRe-charge battery |
| Product cannot absorb dust or loose suction power | Filters are blocked with dirtDust container fullTube blocked | Clean and wash the filtersEmpty dust containerRemove blockage from tube |
| Rolling brush does not work | Brush is blocked with threads and hairs | Cut and remove the threads and hairs from the brush |
| Floor nozzle difficult to move or get jammed | Wheels are blocked with threads and hair | Remove them carefully by using a flat screwdriver |
Español
Fabricante : Jiangsu Midea Cleaning Appliances Co., Ltd No.39 Caohu Avenue, Xiangcheng, Economic Development Zone, Suzhou, Jiangsu, P.R.China.
Número de registro comercial : 91441900776947111F
Fabricant: Jiangsu Midea Cleaning Appliances Co., Ltd No.39 Caohu Avenue, Xiangcheng, Economic Development Zone, Suzhou, Jiangsu, P.R.China.
No.39 Caohu Avenue, Xiangcheng,
Economic Development Zone, Suzhou, Jiangsu, P.R.China.
Wankelstraße 5,85046 Ingolstadt, Germany.
Produttore : Jiangsu Midea Cleaning Appliances Co., Ltd No.39 Caohu Avenue, Xiangcheng, Economic Development Zone, Suzhou, Jiangsu, P.R.China.
Numero registro imprese : 91441900776947111F
Importato da : Imtron GmbH
Wankelstraße 5,85046 Ingolstadt, Germany.
Numero registro imprese : HRB 4580
Modello : MC2805B-V
Tensione in uscita : 25,0 V
Potenza in uscita : 12,5 W (25,0 V); 14,5 W (29,0 V)
Efficienza attiva media : 86.94 % (25.0 V); 87.19 % (29.0 V)
Efficienza a basso carico (10 %) : 73,68 % (25,0 V); 73,13 % (29,0 V)
Fabrikant: Jiangsu Midea Cleaning Appliances Co., Ltd
No.39 Caohu Avenue, Xiangcheng,
Economic Development Zone, Suzhou, Jiangsu, P.R.China.
Handelsregisternummer:91441900776947111F
Producent: Jiangsu Midea Cleaning Appliances Co., Ltd
No.39 Caohu Avenue, Xiangcheng,
Economic Development Zone, Suzhou, Jiangsu, P.R.China.
Wankelstraße 5,85046 Ingolstadt, Germany.
Carregar as baterias
Fig. 4 Ligue o carregador na tomada. Ligue a ficha de carregamento na tomada de carregamento.
Fabricante : Jiangsu Midea Cleaning Appliances Co., Ltd No.39 Caohu Avenue, Xiangcheng, Economic Development Zone, Suzhou, Jiangsu, P.R.China.
Número de registo commercial : 91441900776947111F
Wankelstraße 5,85046 Ingolstadt, Germany.
Wankelstraße 5,85046 Ingolstadt, Germany.
Kommersiellt registreringsnummer : HRB 4580
Modell : MC2805B-V
No.39 Caohu Avenue, Xiangcheng,
Economic Development Zone, Suzhou, Jiangsu, P.R.China.
Ticaret sicil numarası : 91441900776947111F
Wankelstraße 5,85046 Ingolstadt, Germany.
Ticaret sicil numarası : HRB 4580
Model : MC2805B-V
Giriş gerilimi : 100 - 240 V \~
Çıkış gücü : 12,5 W (25,0 V); 14,5 W (29,0 V)
Ortalama etkin verimlilik : 86.94 % (25.0 V); 87.19 % (29.0 V)