
KWC 23725 - Vacuum Cleaner Koenic - Free user manual and instructions
Find the device manual for free KWC 23725 Koenic in PDF.


| Product Type | Cordless Window Vacuum |
| Brand | Koenic |
| Model | KWC 23725 |
| Dimensions (vacuum) | 28 x 15.1 x 35.7 cm |
| Weight (vacuum) | 870 g |
| Dimensions (spray bottle) | 22 x 7.5 x 24 cm |
| Weight (spray bottle) | 96 g |
| Mains power supply | Adapter 100-240 V~, 50-60 Hz, output 5 V / 1 A |
| Battery | Lithium-ion 3.7 V, 2200 mAh |
| Runtime | Approximately 40 minutes |
| Charging time | ≤ 3.5 hours |
| Dirty water tank capacity | 430 ml (max 200 ml at the mark) |
| Suction nozzles | 28 cm and 17 cm |
| Telescopic pole | Adjustable from 530 to 835 mm |
| Spray bottle | 360 ml with 2 microfiber covers |
| Protection rating | IPX4 |
| Sound level | 68 dB(A) |
| Intended use | Windows, tiles and smooth surfaces |
| Care of covers | Machine washable at 60 °C max |
| Importer | Imtron GmbH, Media-Saturn-Str. 1, 85053 Ingolstadt, Germany |
Frequently Asked Questions - KWC 23725 Koenic
User questions about KWC 23725 Koenic
0 question about this device. Answer the ones you know or ask your own.
Ask a new question about this device
Download the instructions for your Vacuum Cleaner in PDF format for free! Find your manual KWC 23725 - Koenic and take your electronic device back in hand. On this page are published all the documents necessary for the use of your device. KWC 23725 by Koenic.
USER MANUAL KWC 23725 Koenic
Innov. Crick Bela Schum-Smirve 1 ECSB-ingc.stadt Germany mRNA-glycDNA www.mrcv-Bu www.mcrv-2019.com

CE MUKC23725_240801_v10
KOENIC
Get ready for compliments
Window Vacuum Cleaner
<(a)^2/3/1
P: Cibro-Insurvski g. Q: Uzra manual P: F-rumde s-miunie r. P: Mode Sample P: Bresudio-Sale P: P-muic de futa N: I amineus w.ing P: I amitea unolai P: I amir Kianmu
natural_image
Product photo of a cleaning spray cleaner with adjustable lever and clip (no visible text or symbols)Fand-1 1 - 12 Fandh 11 > 21 Sociu 22 31 Funtura 33 41 Hausa 42 50 Ishkans 51 59 Scablanca 60 69 Tokki 70 79 Turkge 80 > 88
Sicherheitshinweise
Anschrift : Room 301, Building 2, No. 55, Hengli Shikeng Road,
Hengli Town, Dongguan City
E-Mail : rnc1@nbppower.com
Netzteil/Ladegerät
Modell : DZ007AHL050100V
Hersteller : Guangdong Keerda Electronics Co., Ltd.
Anschrift : No.2 of Keerda factory, Shilong Intensive Industrial Park, Lunjiao, Shunde, Guangdong, China,
- The Product is intended exclusively for private use and is not designed for professional use.
- Risk of electric shock! Never attempt to repair the product yourself. In the event of faults, only have the product repaired by a qualified expert.
- Warning! Never immerse the electrical components of the product in water or other liquids. Never hold the product under running water.
- This product must not be used by children. Keep the product and the connecting cable out of reach of children.
- This product can be used by persons with reduced physical, sensory or mental capabilities or lack of experience and/or knowledge if they have been given supervision or instruction concerning use of the product in a safe way and understand the hazards involved.
• Children must not play with the product. - Warning! For the purposes of recharging the battery, only use the detachable supply unit DZ007AHL050100V provided with this appliance.
- The polarity of the power supply unit must match that of the product.
- The power supply unit must not be used if the contact pins of the plug section are damaged.
- Before disposing of the product, contact an electrical specialist or your dealer to remove the battery and dispose of it in an environmentally friendly manner.

Safety instructions
- Regularly check the power adapter and the connecting cable for damage. If the connecting cable of this product is damaged, it must be replaced by the manufacturer or its customer service or a similarly qualified person in order to avoid hazards.
- Risk of injury! Be careful during handling, when emptying the water tank and during cleaning.
- This product must always be disconnected from the mains before assembly, disassembly or cleaning if it is not supervised.
- Switch off the product and disconnect it from the power supply before replacing accessories or before approaching parts of the product that move during operation.
- The use of accessories that are not expressly recommended by the manufacturer can cause personal injury and damage. Therefore, only use original accessories.
- Only use the product for its intended purpose and with the recommended accessories and components. Improper or incorrect use is dangerous and can lead to personal injury.
- Clean the product and other accessories after each use.
-
Please refer to chapterCleaning and care.
-
Read these operating instructions thoroughly before using the product for the first time and pass them on together with the product. Observe the warnings on the product and in these operating instructions. It contains important safety instructions as well as operating and maintenance instructions for the product.
-
Never leave the product unattended while it is switched on.
-
Do not place any object on the product.
-
Never immerse electrical parts of the product in water or other liquids during
cleaning or operation. Never hold the product under running water.
-
Do not under any circumstances repair the product yourself (e.g. if the connecting cable is damaged or the product has been dropped, etc.). Have maintenance and repairs only carried out by an authorised customer service centre.
-
The mains voltage must match the specifications on the power adapter's rating plate.
-
Avoid damaging the connecting cable by kinking it or bringing it into contact with
Safety instructions
sharp edges. Do not touch the power adapter or the connecting cable with wet hands.
-
Keep the product, including the connecting cable and power adapter, away from heat sources such as radiators, ovens and other products that generate heat.
-
Disconnect the wall power supply from the socket by grasping the power adapter itself. Do not pull on the connecting cable.
-
Disconnect the wall power supply from the socket,
- when the product is not in use,
- when malfunctions occur,
- before attaching / removing accessories, and
-
before cleaning the product.
-
Only use the product in dry indoor areas, never outdoors.
-
This product is not suitable for commercial use. It is designed for domestic use only.
-
Do not leave the product unattended while it is connected to mains power.
-
Ensure that the motor unit and the connecting cable do not get wet.
-
Do not use any accessories that are not supplied with this product or recommended by the manufacturer!
-
This product is suitable for household use only.
-
Always switch off the product when it is not in use.
-
Allow the product to cool down sufficiently before storing it.
-
Do not cover the product during operation. Fire hazard!
-
Do not vacuum up smoking cigarettes, hot ashes, matches or similar. Fire hazard!
-
Do not vacuum up highly flammable or explosive substances and gases. The product must never be used in rooms with explosive gases or liquids.
-
Keep the product away from clothing and body (fingers, hair, face) during operation.
-
Do not vacuum people or animals.
-
Only charge the product using the charging adapter supplied.
-
Never expose rechargeable batteries to excessive heat (e.g. blazing sun, fire) and never throw them into a fire. Batteries may explode.
-
The battery pack can be removed from the product. Never short-circuit the contacts/ connectors of the battery pack. Do not throw the battery pack or the product into a fire. Risk of explosion and fire! Never charge the product's battery pack unattended.
-
Do not open the product.
-
Do not damage the battery pack under any circumstances. Damage to the battery pack housing can lead to explosion or fire!
-
Charge the battery pack regularly, even if you are not using the product. Due to the battery technology used, you do not need to discharge the battery pack first.
-
Caution! Switch off the product before cleaning and disconnect the power adapter.
-
The product is not suitable for vacuuming large quantities of liquids from horizontal surfaces, e.g. from a drinking glass that has tipped over.
-
Only use this product with accessories and spare parts approved by the supplier. Any other use is considered improper use. The manufacturer is not liable for any resulting damage; the risk is borne solely by the user.
-
The product is not suitable for cleaning the exterior of cars to avoid scratching the paintwork.
-
Children should be supervised so that they do not play with the product.
-
Warning! Do not direct the spray towards eyes.
Congratulations!
Thank you for purchasing a KOENIC product. Please read the operating instructions carefully and keep them for future reference.
Intended use
This battery-operated window vacuum cleaner is designed exclusively for cleaning smooth surfaces such as windows and tiles. A 360ml spray bottle with 2 microfibre covers is included in the scope of delivery. The 28cm an 17cm wide suction nozzles of the window vacuum cleaner extract up to 200 ml of waste water into the tank. It is designed for use in private households and must not be used for commercial purposes.
Imtron GmbH accepts no liability for damage to the product, damage to property or personal injury due to careless, improper or incorrect use of the product or use of the product for purposes other than those specified by the manufacturer.
Before first time use
Carefully remove the product and accessories from the original packaging. It is advisable to keep the original packaging for later storage. If you wish to dispose of the original packaging, do so in accordance with the applicable legal regulations.
Check the contents of the packaging for completeness and damage. If the contents of the packaging are incomplete or damaged, contact your point of sale immediately.
Clean the product after unpacking; see chapter Cleaning and care.
Waste disposal
Do not dispose of this product in unsorted municipal waste, but at a designated collection point for dispose of waste electrical and electronic equipment. This will help to protect resources and the environment. For further information, please contact your dealer or the local authorities.
Scope of delivery
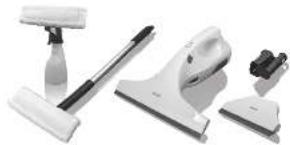
1 x Window vacuum cleaner, consisting of suction head, 2 x suction nozzles (17cm and 28cm) and waste water tank
1 x Spray bottle, consisting of water tank, spray nozzle and 2 x microfibre wiping covers
1 x Telescopic rod with attachment sleeve for the window vacuum cleaner and wiping cover holder
1 x Mains adapter/charger
1 x Instruction manual
1 x Warranty card
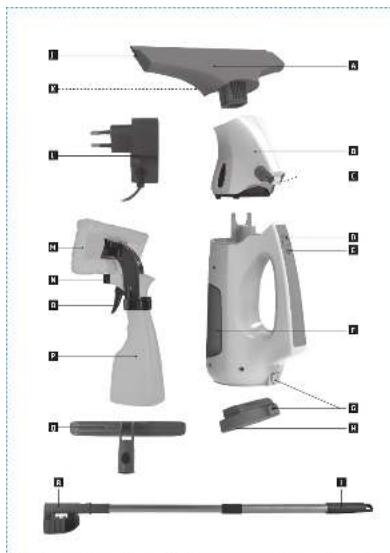
Controls and components Window vacuum cleaner Motor housing
A Suction nozzle
B Suction head
c Suction head release buttons
D LEDs
On/off switch
F Waste water tank
G Charging port
H Battery pack
Telescopic rod
J Release button
K Removable lip
Q Wiping cover holder
R Fastening sleeve for the window vacuum cleaner
Spray bottle
L Power supply unit/charger
M Wiping cover holder with microfibre cover
N Spray nozzle
0 Trigger
P Tank
Operation
Assembling and disassembling the window vacuum cleaner
The window vacuum cleaner must be assembled before use. It consists of three main components. The window vacuum cleaner must be switched off and the connecting cable must be disconnected before assembly or disassembly.
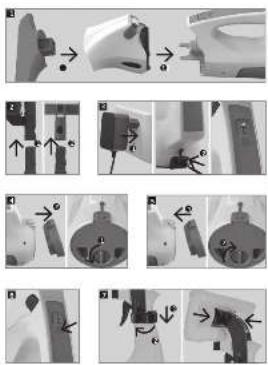
Fig. 1 Insert the suction nozzle into the suction head. The two parts must audibly click into each other.
Insert the suction head with the suction nozzle into the motor housing. These parts must also click audibly into each other.
To disassemble the window vacuum cleaner into its three main components, first remove the suction nozzle. To do this, press the release button at the bottom of the suction nozzle.
To separate the suction head from the motor housing, hold the motor housing firmly with one hand and press the two black release buttons on the suction head with the thumb and index finger of the other hand.
Telescopic extension rod
The window vacuum cleaner is supplied with a telescopic extension rod, which allows you to reach high windows or wall tiles without using a ladder.
Fig. 2 The telescopic rod consists of two parts: the extension rod itself and the attachment sleeve for the window vacuum cleaner. First place the sleeve on the telescopic rod; it can only be inserted in one direction if the release button on the telescopic rod is aligned with the recess in the sleeve.
Open the sleeve using the small slider labelled with two arrow symbols and attach the telescopic rod with sleeve to the handle of the window vacuum cleaner (1).
Close the sleeve and lock it with the small slider.
Adjust the telescopic rod to the desired length between 530 and 835 mm. To do this, release the locking mechanism of the telescopic rod by turning the upper and lower sections anti-clockwise against each other. Adjust the length and lock the telescopic rod
again by turning the upper and lower sections clockwise against each other.
The telescopic rod can also be connected to the supplied wiping cover holder (2). The connection is made as described above for the sleeve of the window vacuum cleaner. Attach the wiping cover to the wiping cover holder.
There is a loop on the back of the wiping cover on the left and right to attach the microfibre cloth to the wiping cover holder. One of the loops has a Velcro fastener and can be opened.
Slide the wiping cover holder under the loop of the wiping cover on one side and close the Velcro fastener on the other side over the wiping cover holder.
Wet the wiping cover with water or glass cleaner to remove stubborn dirt before vacuuming up the liquid with the window vacuum cleaner.
To detach the wiping cover from the telescopic rod, proceed as described above.
Operation
Charging the window vacuum cleaner
The window vacuum cleaner may only be charged when it is switched off. Charge the battery pack of the window vacuum cleaner before using it for the first time. The rechargeable battery pack can be charged either inside the window vacuum cleaner or separately.
Charging the battery pack inside the window vacuum cleaner
Fig. 3 Open the rubber cap, under which the Type-C connector is located, on the motor housing.
Completely unwind the connecting cable and connect the Type-C connector of the connecting cable to the Type-C port (2).
Connect the mains adapter to a suitable socket (1). The three blue LEDs near the
On/Off button flash one after the other to indicate the current capacity of the battery pack. As soon as the battery pack of the window vacuum cleaner is fully charged, all three LEDs light up blue.
During operation, the battery capacity is slowly depleted. If only one of the three blue LEDs on the On/Off button is still flashing, the window vacuum cleaner needs to be recharged.
Charging the battery pack separately
Fig. 4 Unlock the sealed battery pack at the bottom of the window vacuum cleaner. To do so, turn the rotary switch anti-clockwise to the unlocked lock symbol (1). Then place your thumb and index finger in the recesses to the left and right of the rotary switch and remove the battery pack from the window vacuum cleaner (2).
Completely unwind the connecting cable and connect the Type-C connector of the connecting cable to the Type-C port of the battery pack.
Connect the power adapter to a suitable socket. A red LED will now flash on the inside of the battery pack, indicating that the battery pack is being charged. As soon as the battery pack of the window vacuum cleaner is fully charged, the LED lights up red.
Fig. 5 Carefully insert the battery pack back into the bottom of the motor housing (1) and turn the rotary switch clockwise to the locked symbol (2).
Switching on/off
Fig. 6 To switch the window vacuum cleaner on, press the On/Off button! To switch off, press and hold the On/Off button for 3 seconds.
Spray bottle
The window vacuum cleaner is additionally supplied with a spray bottle and two microfibre wiping covers. There is a loop on the back of
the wiping covers on the left and right side to attach the microfibre wiping cover to the wiping cover holder on the spray bottle.
Fig. 7 One of the loops has a Velcro fastener and can be opened.
Slide the wiping cover holder under the loop of the wiping cover on one side and close the Velcro fastener on the other side over the wiping cover holder.
Hold the black wiping cover holder with one hand while unscrewing the tank counter-clockwise with the other hand (1).
Fill the tank with tap water and, if desired, with a small amount of glass cleaner and screw it back under the wiping cover holder. Do not overfill the tank.
The spray nozzle of the spray bottle can be switched. If you look at the side of the spray nozzle, you can see the respective function. SPRAY is for spraying water or glass cleaner, with STREAM a jet is emitted when you press the trigger and in between there is twice OFF, which closes the spray nozzle (2).
Cleaning windows
Fig. 8 First spray the area to be cleaned with the spray bottle or pre-wipe with the telescopic rod and wiping cover.
Wipe over with the wiping cover to loosen stubborn dirt.
Place the spray bottle or telescopic rod to the side and pick up the window vacuum cleaner.
To clean high windows, attach the telescopic rod to the window vacuum cleaner as described above.
Switch on the window vacuum cleaner using the on/off switch.
Fig. 9 Move the suction nozzle slowly and evenly over the area to be cleaned and vacuum up the waste water. It is collected in the waste water tank of the motor housing.
Always hold the window vacuum cleaner upright or at an angle of no more than 45^ . Never hold the window vacuum cleaner horizontally or with the suction nozzle pointing down. In this case, the waste water would flow out from the suction nozzle.
- The capacity of the waste water tank is 430 ml. Please note, however, that the fill level mark – MAX – on the tank must not be exceeded. Do not overfill the tank.
- When the maximum fill level of the waste water tank is reached, switch off the window vacuum cleaner and empty the tank.
Fig. 10 Remove the dirty water tank from the window vacuum cleaner by pressing it together with your thumb and middle finger on the left and right side of the tank. Remove the waste water tank as upright as possible to avoid spilling waste water.
Fig. 11 Remove the sealing cap from the tank and pour out the waste water. Rinse the tank and the protective cap with clear water. Then replace the sealing cap and reinsert the tank in the window vacuum cleaner. First at the top, then at the bottom and press until you hear it click into place.
Fig. 12 Replace the sealing cap and reinsert the tank in the window vacuum cleaner. First at the top, then at the bottom and press until you hear it click into place.
Fig. 13 Always disconnect the window vacuum cleaner from the mains adapter and unplug the mains adapter from the socket after you have recharged the battery for the next use of your window vacuum cleaner. First unplug the mains adapter from the socket and then remove the Type-C plug from the device.
Cleaning and care Motor housing, spray head and spray nozzle
Fig. 14 Disconnect the suction nozzle from the suction head. To do this, first press down the release button (1) and then pull the suction nozzle from the suction head (2).
Fig. 15 Disconnect the suction head from the motor housing. To do this, first press down the release buttons left and right (1) and then pull the suction head from the motor housing (2).
Fig. 16 Disconnect the wiping cover holder from the tank by turning it counterclockwise (1). One of the loops has a Velcro fastener and can be opened.
Remove the wiping cover holder from under the loop and wash separately.
- Cleaning and care by the user must not be carried out by children unless they are 8 years or older and are supervised.
- Only clean the housing with a slightly damp soft cloth. Dry the product carefully after cleaning.
- Do not use aggressive cleaning agents or solvents, hard brushes, metal or sharp objects to avoid damaging the housing.
- Never immerse electrical parts of the product in water or other liquids during cleaning. Never hold the product under running water.
- Ensure that no water (e.g. at the switches) enters the product.
Waste water tank
Rinse out the waste water tank with clean water or a neutral detergent. Allow the tank to dry out completely before reinserting it into the window vacuum cleaner.
Wiping covers (microfibre)
The wiping covers can be washed by hand or in the washing machine or dry-cleaned. Wash the wiping covers at a maximum of 60^ C and do not spin or iron them. Allow the wiping covers to air dry afterwards.
Storage
If possible, store the product in its original packaging in a cool, dry place that is out of reach of children and pets.
The waste water tank of the window vacuum cleaner must be empty, clean and dry.
The spray bottle tank must be empty, clean and dry.
Warning
- Before cleaning, make sure that the product is switched off and the connecting cable is disconnected.
- Make sure that no moisture gets into the product during cleaning.
- Never immerse the motor unit in water or other liquids.
Troubleshooting
| Problem Solution | |
| The window vacuum cleaner does not work. | Charge the battery pack of the window vacuum cleaner. |
| Contact customer service if the battery pack is exhausted. | |
| Streaks form on the surface after the waste water has been vacuumed up. | The lip of the suction nozzle is dirty. Wipe off the lip. |
| Pull the lip of the suction nozzle out sideways to clean it thoroughly. To reinsert it into the suction nozzle, moisten the round side slightly with water or a neutral detergent. | |
| Use less detergent in the solution that you apply to the surface with the spray bottle. | |
| The spray bottle does not work. | Top up with water. |
| Turn the spray nozzle from OFF to SPRAY or STREAM. These markings are located on the side of the spray nozzle. |
Technical data
Power supply/charger
Input voltage : 100 - 240V\~
Input alternating current frequency : 50/60Hz
Input current : 0.2A
Output voltage : 5.0V
Output current : 1.0A
Power output : 5.0W
Power consumption at no load : 0.10W
Average operating efficiency : 73.62%
Eiciency at low load (10 %) : 73.9% (25%)
No-load consumption : 0.05
Connecting cable and plug : 120cm, Type-C connector
Window vacuum cleaner
Battery pack : Lithium-ion battery 3.7V---2200mAh, overcharge protection
Rated voltage : 3.7V ---
Rated current : 1.0A
Power : 12W
Operating time : approx. 40 minutes
Charging time : ≤ 3.5 hours
Ingress protection : IPX4
Connector : Type-C port
Sound pressure level : 68dB(A)
Waste water tank capacity : 430ml, approx. 200ml at - MAX - mark
Suction nozzles : 280mm and 170mm
Dimensions window vacuum cleaner : 28 x 15,1 x 35,7 cm
Weight window vacuum cleaner : 870g
Telescopic rod : Adjustable 530-835mm
Spray bottle
Spray bottle capacity : 360ml
Dimensions spray bottle : 22 x 7.5 x 24cm
Weight spray bottle : 96g
Rechargeable battery
Model : RNE18650
Manufacturer : Dongguan Reanen New Energy Co., Ltd.
Address : Room 301, Building 2, No. 55, Hengli Shikeng Road,
Hengli Town, Dongguan City
Email : rnc1@nbppower.com
Power supply/charger
Model : DZ007AHL050100V
Manufacturer : Guangdong Keerda Electronics Co., Ltd.
Address : No.2 of Keerda factory, Shilong Intensive Industrial Park, Lunjiao, Shunde, Guangdong, China,
Batterie rechargeable
Modèle : RNE18650
Fabricant : Dongguan Reanen New Energy Co., Ltd.
Adresse : Room 301, Building 2, No. 55, Hengli Shikeng Road,
Hengli Town, Dongguan City
E-mail : rnc1@nbppower.com
Adresse : No.2 of Keerda factory, Shilong Intensive Industrial Park, Lunjiao, Shunde, Guangdong, Chine,
: Room 301, Building 2, No. 55, Hengli Shikeng Road,
: rnc1@nbppower.com
:DZ007AHL050100V
: Guangdong Keerda Electronics Co., Ltd.
: No.2 of Keerda factory, Shilong Intensive Industrial Park,
Indirizzo : Room 301, Building 2, No. 55, Hengli Shikeng Road,
Hengli Town, Dongguan City
Email : rnc1@nbppower.com
Indirizzo : No.2 of Keerda factory, Shilong Intensive Industrial Park, Lunjiao, Shunde, Guangdong, China,
Ingress-beveiliging : IPX4
Connector : Type-C-poort
Geluidsdrukniveau : 68dB(A)
Adres : Room 301, Building 2, No. 55, Hengli Shikeng Road,
Hengli Town, Dongguan City
E-mail : rnc1@nbppower.com
Voedingseenheid/oplader
Model : DZ007AHL050100V
Fabrikant : Guangdong Keerda Electronics Co., Ltd.
Adres No.2 of Keerda factory, Shilong Intensive Industrial Park, Lunjiao, Shunde, Guangdong, China,
Adres : Room 301, Building 2, No. 55, Hengli Shikeng Road,
Email : rnc1@nbppower.com
Zasilacz/ładowarka
Model : DZ007AHL050100V
Producent : Guangdong Keerda Electronics Co., Ltd.
Adres : No.2 of Keerda factory, Shilong Intensive Industrial Park,
Lunjiao, Shunde, Guangdong, China, Email : heguirong@keerdapower.com
Adres : Room 301, Building 2, No. 55, Hengli Shikeng Road,
Hengli Town, Dongguan City
Eposta : rnc1@nbppower.com
Adres : No.2 of Keerda factory, Shilong Intensive Industrial Park,
Lunjiao, Shunde, Guangdong, Çin,

- KOENIC
- Sicherheitshinweise
- Netzteil/Ladegerät
- Safety instructions
- Congratulations!
- Intended use
- Before first time use
- Waste disposal
- Scope of delivery
- Controls and components Window vacuum cleaner Motor housing
- Spray bottle
- Operation
- Assembling and disassembling the window vacuum cleaner
- Telescopic extension rod
- Charging the window vacuum cleaner
- Charging the battery pack inside the window vacuum cleaner
- Charging the battery pack separately
- Switching on/off
- Cleaning windows
- Cleaning and care Motor housing, spray head and spray nozzle
- Waste water tank
- Wiping covers (microfibre)
- Storage
- Warning
- Technical data
- Power supply/charger
- Window vacuum cleaner
- Rechargeable battery
- Batterie rechargeable
- Voedingseenheid/oplader
- Zasilacz/ładowarka
Brand : Koenic
Model : KWC 23725
Category : Vacuum Cleaner