KVC 7342 - Vacuum Cleaner Koenic - Free user manual and instructions
Find the device manual for free KVC 7342 Koenic in PDF.


| Brand | Koenic |
| Model | KVC 7342 |
| Vacuum type | Canister vacuum cleaner with dust bag |
| Nominal power | 700 W |
| Supply voltage | 220 - 240 V ~ |
| Frequency | 50-60 Hz |
| Protection class | II |
| Dust bag type | Swirl Y101 (microfibers) |
| Bag fill indicator | Yes, red light |
| Motor filter | Yes, cleanable by tapping |
| Exhaust filter | Yes, cleanable by tapping |
| Included accessories | Floor brush (combined carpet/hard floor), dusting brush, round furniture brush, square furniture brush, parquet brush, crevice nozzle |
| Telescopic tube | Yes, adjustable length |
| Cord storage | Automatic cord rewinder with button |
| Adjustable suction power | Yes, slider on the body and valve on the handle |
| Parking system | Yes, attachment on the back of the vacuum |
| Intended use | Domestic, dry dust vacuuming |
| Warranty | Warranty card included |
Frequently Asked Questions - KVC 7342 Koenic
User questions about KVC 7342 Koenic
0 question about this device. Answer the ones you know or ask your own.
Ask a new question about this device
Download the instructions for your Vacuum Cleaner in PDF format for free! Find your manual KVC 7342 - Koenic and take your electronic device back in hand. On this page are published all the documents necessary for the use of your device. KVC 7342 by Koenic.
USER MANUAL KVC 7342 Koenic
natural_image
Black vacuum cleaner with coiled hose and wheels (no visible text or symbols)| Ferol - 1 | — |
| Ferol - 2 | — |
| Eco - 3 | — |
| Lact - 4 | — |
| Mato - 5 | — |
| Deno - 6 | — |
| Catalan - 8 | — |
| Rexel - 9 | — |
| Vulgad - 10 | — |
| Tuba - 11 | — |
Sicherheitshinweise
- This product can be used by children aged from 8 years and above and persons with reduced physical, sensory or mental capabilities or lack of experience and knowledge if they are supervised or have received instructions concerning use of the appliance in a safe way and understand the hazards involved.
• Children shall not play with the product. - Cleaning and user maintenance shall not be carried out by children unless they are older than 8 and supervised.
- A damaged power cord may only be replaced by the authorised service agent in order to avoid hazards.
-
Follow the instructions in the chapter Cleaning and care.
-
Read this user manual thoroughly before first use and pass it on with the product. Pay attention to the warnings on the product and in this user manual. It contains important information for your safety as well as for the use and maintenance of the equipment.
- Never leave the product unsupervised while it is switched on.
- Do not place any objects on top of the product.
- Never immerse electrical parts of the product in water during cleaning or operation. Never hold the product under running water.
- Do not under any circumstances attempt (e.g. damaged power cord, product has been dropped, etc.) to repair the product yourself. For servicing and repairs, please consult an authorised service agent.
-
The mains voltage must match the information on the rating label of the product.
-
Only unplugging from the power socket can separate the product completely from the mains. Please be sure that the power plug is in operable condition.
- Avoid damages to the power cord that may be caused by kinks or contact with sharp corners.
- Keep this product including power cord and power plug away from all heat sources such as ovens, hot plates and other heat-producing products/objects.
- Only unplug from the power socket by the plug itself. Do not pull on the cord.
- Unplug the product ...
- when the product is not being used,
- in case of malfunctions,
- before attaching / detaching accessories and
- before cleaning the product.
- Use this product in dry indoor areas only and never outdoors.
Safety instructions
- This product is not intended for commercial use. It is designed for household use only.
- Do not allow the product to operate unsupervised.
- Make sure that the motor unit and supply cord do not become wet.
- Use accessories supplied with the device or recommended by the manufacturer only!
- This product is suitable only for private use.
• Always switch the product off before disconnecting it from mains supply. - Let the product cool down sufficiently before storing.
- Do not cover the product while in use. Fire hazard!
- Do not suck up liquids with the product. Do not suck up lit cigarettes, hot ashes, matches, etc. Fire hazard!
- Do not suck up inflammable or explosive materials and gases. The product must not be used in rooms with explosive gases or liquids.
- Be especially careful when cleaning the stairs.
- When in use, keep the product away from clothes and body parts (fingers, hair, face).
- Do not try to clean people or animals with the product.
- Attention! In the event of a malfunction as a result of electrostatic discharge and momentary electrical surges, unplug the appliance and plug it in again.
- Important! Check to ensure that the product is in a serviceable condition before use. The product shall not be used if it shows any signs of damage or it's suspected to be defect.
English
Congratulations!
Thank you for your purchase of KOENIC product. Please read this manual carefully and keep it for future reference.
Intended use
The vacuum cleaner is designed only to vacuum dry dust and dirt. Using it for anything else can damage the device or cause injury. The Imtron GmbH assumes no liability for damage to the product, for property damage or for personal injury due to careless or improper usage of the product, or usage of product which does not meet the manufacturer's specified purpose.
Before first time use
Remove the product and accessories carefully from the original packaging. It is recommended to keep the original packaging for storage. If you wish to dispose of the original packaging, please observe applicable legal provisions. Should you have any questions regarding proper disposal, contact your local waste management center.
Inspect the delivery contents for completeness and damages. Should the delivery contents be incomplete or damaged, contact your sales outlet immediately.
After unpacking, please refer to chapter
Cleaning and care.
Delivery Contents
1 x Vacuum cleaner with dust bag
1 x Floor nozzle
1 x Crevice nozzle
1 x Upholstery nozzle round brush
1 x Upholstery nozzle square brush
1 x Hard floor brush
1 x User manual
1 x Warranty card
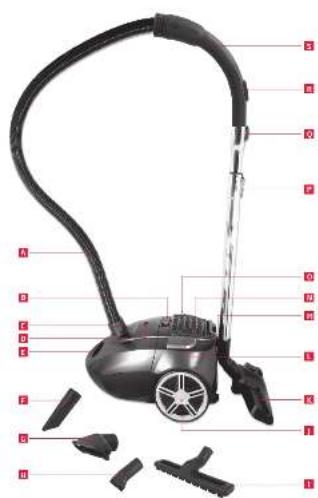
Controls and components
A Suction hose
B Suction power slide control min - max
c Suction tube bracket
D Cover with dust bag fill level indicator
E Carrying handle
F Crevice nozzle
G Upholstery nozzle square
H Upholstery nozzle round
Hard floor brush
J Wheel
K Floor nozzle
On/Off button
M Telescopic tube holder
N Exhaust air filter
0 Cable retraction button
P Telescopic tube with locking mechanism
Q Suction tube handle release button
R Variable suction flap
S Suction tube handle
incl. 1 x micro textile dust bag (not shown)
Assembling the vacuum cleaner
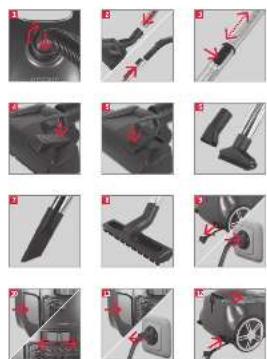
Fig. 1 Insert the suction hose into the hose connection and rotate it to the right (bayonet lock). Make sure, that it has clicked into place.
Fig. 2 Place the floor nozzle on the lower end and the suction tube handle on the upper end of the telescopic tube.
Fig. 3 Adjust the telescopic tube to the desired length, by sliding the locking mechanism up and then pushing the telescopic tube out or pushing it together.
Use of the accessories provided Floor nozzle (Part K)
Fig. 4 To vacuum hard floors, press the toggle switch down.
Fig. 5 To vacuum carpeted areas, press the toggle switch again in order to retract the brushes.
Upholstery nozzle round/square (Part G, H)
Fig. 6 For vacuuming upholstered furniture, mattresses, cushions, curtains, etc.
Crevice nozzle (Part F)
Fig. 7 For vacuuming folds, crevices and corners.
Hard floor brush (Part I)
Fig. 8 For vacuuming hard and wooden floors. Use the hard floor brush to protect the floor from being scratched.
Operation
Fig. 9 Pull out the connection cable to the desired length and insert the power plug into a receptacle.
Fig. 10 Press the On/Off switch to turn the vacuum cleaner on/off. Select the suction power with the suction power slide control min - max.
| Suction power | Suitable for |
| Low Curtains | |
| Medium | Upholstery cushions (sofa, high class carpets, rugs and runners) |
| Normal Normal carpets | |
| Medium strong Long-haired carpets | |
| Strong Hard floors (highest setting) | |
Tip: Depending on your need, you can vary the suction power by adjusting the suction flap on the handle.
Fig. 11 Switch the vacuum cleaner off after use and unplug it when you have finished working.
Fig.12 Wind the power cable around the cable storage device by pressing the automatic cable retraction switch. While you are doing this keep the cable taut, if possible.
English
Parking system for pauses in vacuuming
Fig. 13 You can store the telescopic tube with the floor nozzle on the vacuum cleaner for short pauses in vacuuming. Insert the floor nozzle with the parking attachments into the parking system.
Transport and storage
Fig. 14 To carry your vacuum cleaner grasp it by the handle. To store your vacuum cleaner, the suction tube with the floor nozzle can be mounted on the back of the vacuum cleaner in an upright position.
Cleaning and care

Warning
- When cleaning, never use solvents or abrasive materials, hard brushes, metallic or sharp objects. Solvents are harmful to human health and can attack plastic parts, while abrasive cleaning mechanisms and tools may scratch the surface(s).
- Never immerse any electrical parts of the product in water or in other liquids during cleaning. Never place it under running water.
Changing dust bag
Fig. 15 If the dust bag fill indicator is colored red or if the suction power diminishes, the dust bag must be changed and the filters must be cleaned. Open the lid and put it out. Remove the dust bag by taking it out of the dust bag holder. Insert a new dust bag into the dust bag holder and close the lid.
Cleaning the motor filter
Fig. 16 Remove the motor filter and tap it to remove the dust. Then re-insert it. Reassemble all of the components that have previously been removed. Assembly is carried out in reverse order.

Warning
Never use the vacuum cleaner without a motor filter, as otherwise, the motor will soon get dirty and will be subject to wear. If the motor filter gets dirty, the suction power will diminish.
Cleaning the exhaust air filter (Part N)
Fig.17 Open the flap, take the filter out and tap it to remove the dust. Assembly is carried out in reverse order. Insert the filter in the right direction so that the correct side is facing the motor.
Technical data
Rated Voltage : 220 - 240 V\~
Rated input power : 700 W
Rated frequency : 50-60 Hz
Protection class : II
Dust bag :Swirl® Y101®
• This is a general purpose vacuum cleaner
• The Erp test method is according to (EU) No 666/2013 & EN 60312-1:2017
- Please refer to below website for detail technical information, or contact the manufacturer for technical document:
www.koenic-online.com


- Sicherheitshinweise
- Safety instructions
- English
- Congratulations!
- Intended use
- Before first time use
- Delivery Contents
- Controls and components
- Assembling the vacuum cleaner
- Use of the accessories provided Floor nozzle (Part K)
- Upholstery nozzle round/square (Part G, H)
- Crevice nozzle (Part F)
- Hard floor brush (Part I)
- Operation
- Parking system for pauses in vacuuming
- Transport and storage
- Cleaning and care
- Warning
- Changing dust bag
- Cleaning the motor filter
- Cleaning the exhaust air filter (Part N)
- Technical data
Brand : Koenic
Model : KVC 7342
Category : Vacuum Cleaner