KRVC 14820 WD - Vacuum Cleaner Koenic - Free user manual and instructions
Find the device manual for free KRVC 14820 WD Koenic in PDF.
| Product Type | Robot vacuum cleaner |
| Brand | Koenic |
| Model | KRVC 14820 WD |
| Dimensions (diameter x height) | 320 mm x 85 mm |
| Dustbin capacity | 350 ml |
| Water tank capacity | 400 ml |
| Battery life | 90 to 110 minutes (max. 30 min on 20 m² depending on mode and flooring) |
| Charging time | 4 to 6 hours (first charge: 12 hours) |
| Standard suction power | 800 Pa ±10% |
| Maximum suction power | 1200 Pa ±10% |
| Power supply | Built-in rechargeable battery 14.8 V; AC adapter 100-240 V~, output 19 V / 0.6 A |
| Filters | Pre-filter, fine filter and HEPA filter |
| Cleaning modes | Standard, powerful, corners and edges, surfaces |
| Remote control | Yes, with display and AAA batteries (2 x 1.5 V) |
| Special functions | Timer, automatic return to base, anti-drop sensors, water cleaning |
| Included accessories | Charging station, water tank, 2 washing cloths, cleaning brush, 2 sets of side brushes, 2 batteries, instruction manual |
| IP protection class | IP20 |
| Compatible floor types | Tile, marble, carpet (max. 10 mm thickness) |
| Maintenance and cleaning | Empty dustbin after each use; clean filters and brushes regularly; do not immerse in water |
| Safety | Use only the supplied charger; do not vacuum liquids; keep away from heat sources |
Frequently Asked Questions - KRVC 14820 WD Koenic
User questions about KRVC 14820 WD Koenic
0 question about this device. Answer the ones you know or ask your own.
Ask a new question about this device
Download the instructions for your Vacuum Cleaner in PDF format for free! Find your manual KRVC 14820 WD - Koenic and take your electronic device back in hand. On this page are published all the documents necessary for the use of your device. KRVC 14820 WD by Koenic.
USER MANUAL KRVC 14820 WD Koenic
Robot vacuum cleaner
×3V0.14820W
natural_image
Black robotic vacuum cleaner with visible legs and base (no text or symbols)(2014-11-15)
Eng 5110 27
- 2014年1月
(1)
(1) 12:57
(1) 本说明仅供参考。
The image is too blurry to recognize any text content.
1.2.14.70
dennis@se-19
[5-0]
Pengzhi 112-1
Sensol23
(2) P = 0 .

B.071.47987,2015.6.13(1)
text_image
Exploded view diagram of a robotic vacuum cleaner with labeled parts and control panel
text_image
Technical diagram showing a mechanical assembly process with labeled steps and component illustrationsSicherheitshinweise
Electronics Co., Ltd
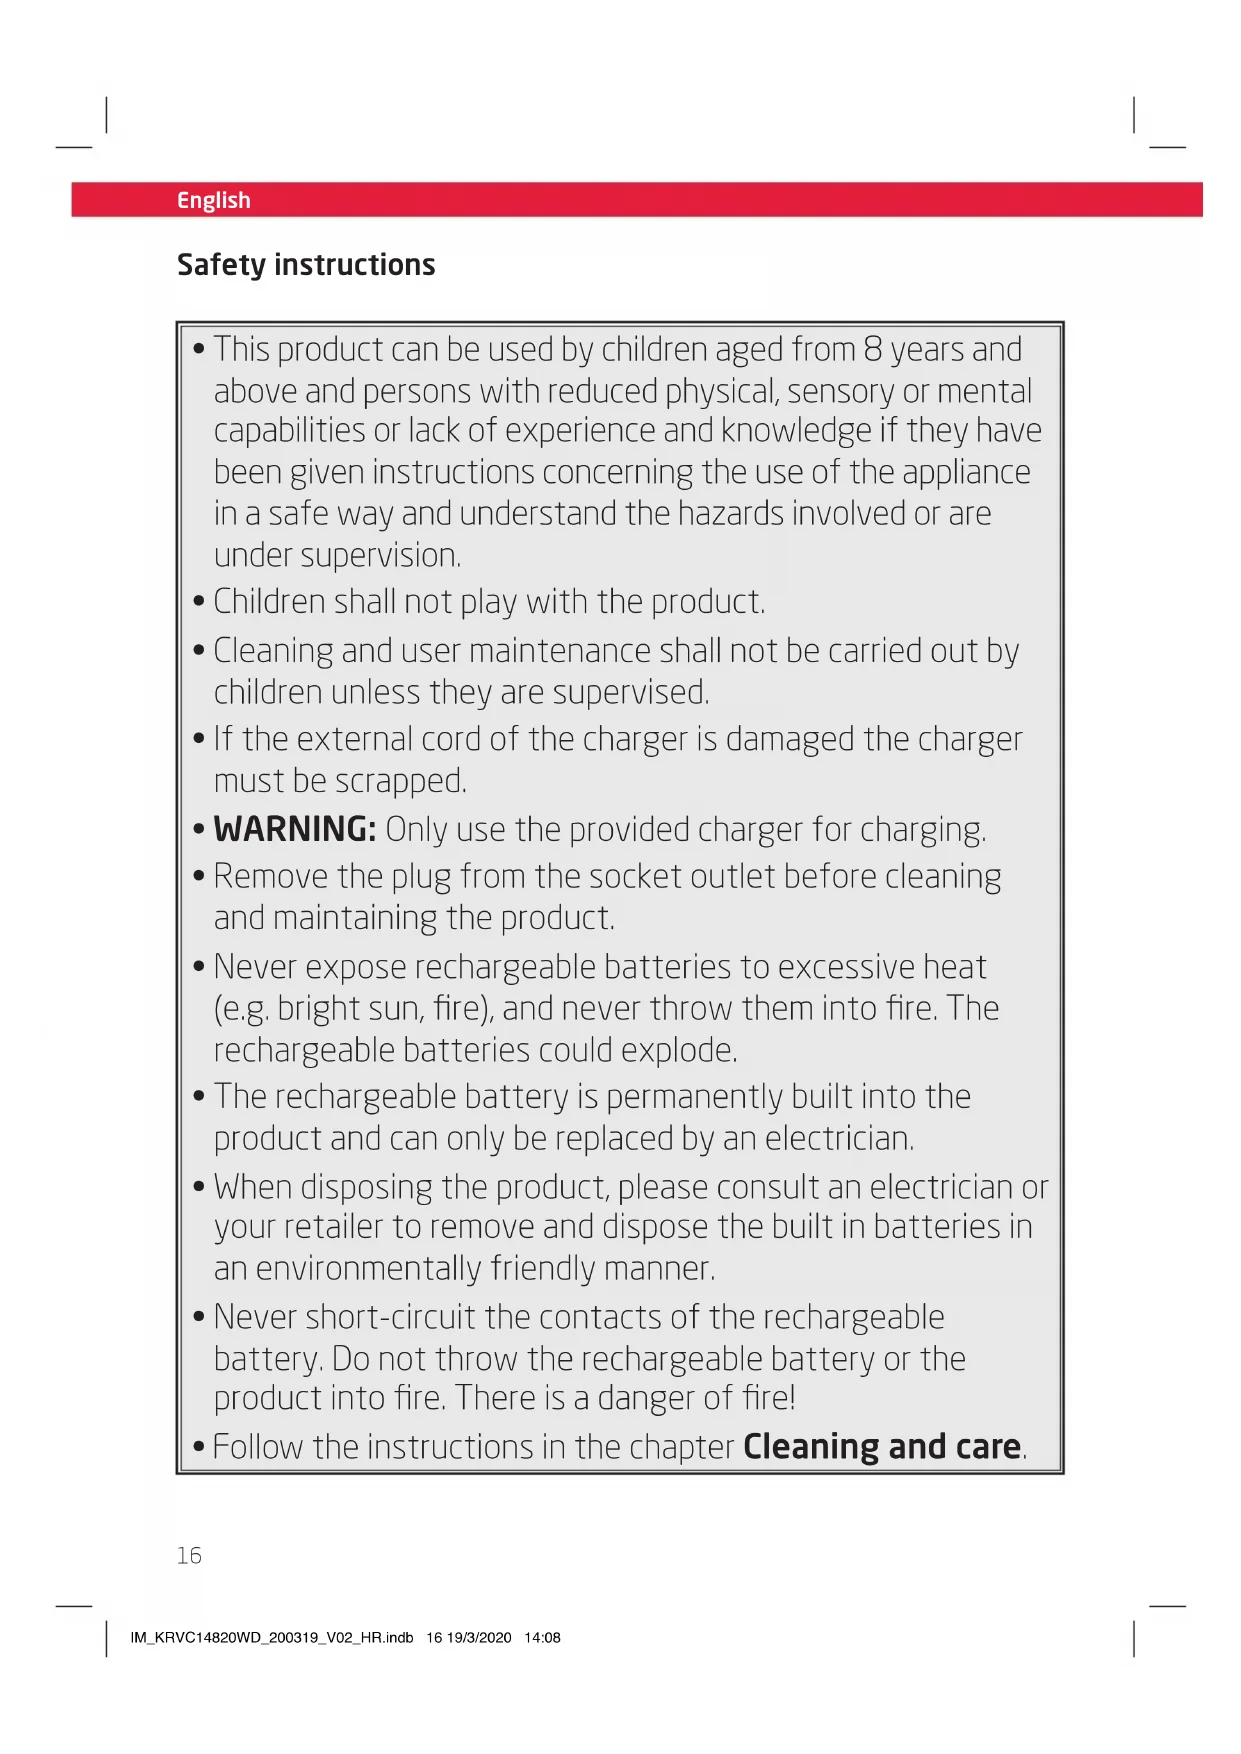
- This product can be used by children aged from 8 years and above and persons with reduced physical, sensory or mental capabilities or lack of experience and knowledge if they have been given instructions concerning the use of the appliance in a safe way and understand the hazards involved or are under supervision.
• Children shall not play with the product. - Cleaning and user maintenance shall not be carried out by children unless they are supervised.
- If the external cord of the charger is damaged the charger must be scrapped.
- WARNING: Only use the provided charger for charging.
- Remove the plug from the socket outlet before cleaning and maintaining the product.
- Never expose rechargeable batteries to excessive heat (e.g. bright sun, fire), and never throw them into fire. The rechargeable batteries could explode.
- The rechargeable battery is permanently built into the product and can only be replaced by an electrician.
- When disposing the product, please consult an electrician or your retailer to remove and dispose the built in batteries in an environmentally friendly manner.
- Never short-circuit the contacts of the rechargeable battery. Do not throw the rechargeable battery or the product into fire. There is a danger of fire!
- Follow the instructions in the chapter Cleaning and care.
Safety instructions

Read this user manual thoroughly before first use and pass it on with the product. Pay attention to the warnings on the product and in this user manual. It contains important information for your safety as well as for the use and maintenance of the equipment.
- Never leave the product unsupervised while it is switched on.
- Do not place any objects on top of the product.
- Never immerse electrical parts of the product in water during cleaning or operation. Never hold the product under running water.
- Do not under any circumstances (e.g. damage to the power cord, product has been dropped etc.) attempt to repair the product yourself. For servicing and repairs, please consult an authorised service agent.
- The mains voltage must match the information on the rating label of the product.
- Only unplugging from the power socket can separate the product completely from the mains. Please be sure that the power plug is in operable condition.
- Avoid damages to the power cord that may be caused by kinks or contact with sharp corners.
- Keep this product including power cord and power plug away from all heat sources, e.g. ovens, hot plates and other heat-producing products/objects.
- Only unplugging from the power socket by the plug itself. Do not pull on the cord.
• Unplug the product ...
- when the product is not being used,
- in case of malfunctions,
- before attaching / detaching accessories and
- before cleaning the product.
- Use this product in dry indoor areas only and never outdoors.
- This product is not intended for commercial use. It is designed for household use only.
- Do not allow the product to operate unsupervised.
• Make sure that the motor unit and supply cord do not become wet.
- Use accessories supplied with the device or recommended by the manufacturer only!
- This product is suitable only for private use.
- Let the product cool down sufficiently before storing.
- Do not cover the product while in use. Fire hazard!
- Do not suck up lit cigarettes, hot ashes, matches, etc. Fire hazard!
- Do not suck up inflammable or explosive materials and gases. The product must not be used in rooms that contain explosive gases or liquids.
- When in use, keep the product away from clothes and body parts (fingers, hair, face).
- Do not try to clean people or animals with the product.
- Only use the charging adapter and charging station provided to charge the product.
English
Safety instructions
- Never expose the product/rechargeable batteries to excessive heat (e.g. bright sun, fire), and never throw them into fire. The rechargeable batteries could explode.
- Never short-circuit the contacts of the rechargeable battery. Do not throw the rechargeable battery or the product into fire. There is a danger of fire and explosion!
- Never charge the rechargeable battery of the product unattended.
- Leaked battery fluids, may not get into contact with eyes or mucous membranes. Rinse affected areas with lots of clear water and contact a doctor.

Important notes for operation
- Do not use the product in surroundings, that are wet or have a high humidity (e.g. bathrooms, outside etc.), or in areas, that pose a risk of the product coming into contact with liquids of any kind.
- Secure power supply cables from electrical items, that are freely laid out or hanging down onto the floor. The vacuum robot could run over and damage them or pull down the electrical item and damage it.
- Do not use the robot in danger zones, e.g. in the proximity of open fires, such as an in-house fire place.
-
Remove light, fragile or easily portable items (e.g. vases, small decorative items etc.) from the working area of the vacuum robot. These items could possibly be dragged along by the product and cause damage to the robot, flooring or the item itself.
-
Keep children and pets away from the product and make sure, that they do not sit or stand on the vacuum robot.
- Never touch the rotating brushes of the vacuum robot.
- Never start the vacuum robot, right next to a possible danger zone (e.g. stairs etc). Also keep a distance of at least 1 m to such areas, to ensure, that the products sensors properly identify them.
- Make sure, that the robot never gets in contact with power supply cables or other items, which are laying or hanging down onto the floor (e.g. parts of curtains).
- Do not use the robot in rooms, in which lighted candles have been placed on the floor.
- Do not use the robot to vacuum cleaning powders of any kind.
- Do not vacuum very fine sands, lime, cement dust etc. as this could damage the filters.
- Carpets that are too thick cannot be cleaned properly by the vacuum robot. Remove these carpets, to ensure that neither the robot, nor the carpets are damaged during the cleaning process. The vacuum robot may only be used with carpet, no thicker than 10 mm.
- The vacuum robot is provided with sensors that prevent it from falling down stairs etc., but note that ultimately, only a physical barrier, erected by the user, can absolutely prevent it from falling down.
- Make sure, that there aren't any light, lose or fragile items in the working area of the vacuum robot.

Important notes for operation
- Do not use the robot in areas, that are smaller than its turning radius, as the robot might get stuck there.
- Floors and objects might be damaged, if the brushes or other components of the robot aren't properly assembled. Always ensure, that all components are properly assembles, to prevent any damages to the floor and other objects.
- The vacuum robot might bump into the legs of chairs, tables etc. while cleaning. Move chairs and other objects out of the vacuums working area in order to prevent this and speed up and enhance the cleaning result.
- Do not pick up the vacuum robot while it is working (e.g. to move it to another room). Always make sure it is turned off before picking it up.
- Do not lay down on the floor, while the robot is working. The rotating brushes might get in contact with your hair, which might cause injuries.
- Remove light or loose objects (e.g. papers, plastic bag etc.) from the working are of the robot. These items could be dragged along be the robot and block its sensors, which might lead to the product bumping into furniture or falling down stairs. This could lead to damage of the product and / or furniture as well as impairment of the cleaning result.
- Observe the dimensions of the robot (see technical data), to prevent it from getting stuck, e.g. beneath cabinets.
- Make sure, that no lighted candles are placed on objects, that could be knocked over by the robot (e.g. light or unstable tables).
- Room with underfloor heating: It is only allowed to use the robot when the temperature of the floor heating room is 16-24 degrees.
English
Congratulations!
Thank you for your purchase of KOENIC product. Please read this manual carefully and keep it for future reference.
Intended use
The robot vacuum cleaner is designed only to vacuum dry dust and can be used in a swap mode. Suitable to use on tile, marble and carpet floors. Using it for anything else can damage the device or cause injury.
The Imtron GmbH assumes no liability for damage to the product, for property damage or for personal injury due to careless or improper usage of the product, or usage of the product which does not meet the manufacturer's specified purpose.
Before first time use
Remove the product and its accessories carefully from the original packaging. It is recommended to keep the original packaging for storage. If you wish to dispose of the original packaging, please observe applicable legal provisions. Should you have any questions regarding proper disposal, contact your local waste management center. Inspect the delivery contents for completeness and damages. Should the delivery contents be incomplete or damaged, contact your sales outlet immediately.
After unpacking, please refer to chapter
Cleaning and care.
Content
1 x Robot vacuum cleaner with dust container
1 x Charging station with charger
1 x Water tank
2 x Mop cover
1 x Cleaning brush
2 x Side brush sets
2 x Batteries (AAA/LR03)
1 x User manual
1 x Warranty card
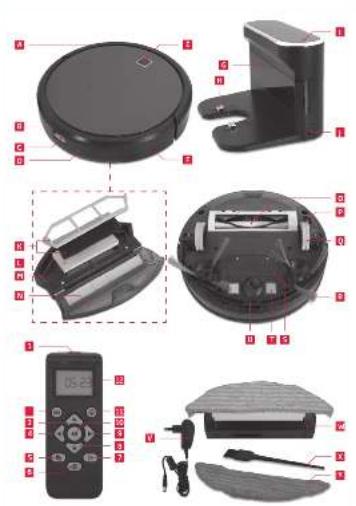
Controls and components
A Shock absorber
B Exhaust holes
c Dust container release
D Dust container
E On/Standby switch with power LED
F DC jack, vacuum robot
G Charging station
H Charging contacts
Charge control LED
J DC jack, charging station
K Dust pre-filter and fine filter
L HEPA filter
M Filter holder
N Filter bottom lid
0 Brush roller
P On/off switch
q Drive wheels
R Rotary brushes
s Battery compartment with lid
T Vacuum cleaner charging contacts
u Depth sensor
v Charger with charging cable and DC plug
W Water tank with mop cover and cap (not shown)
× Cleaning brush
Y Replacement mop cover
Remote control
1 Transmitter diode
2 Vacuuming mode button
3 Button forward
4 Button left
5 Timer button
6 Button charging station
7 Time button
8 Button backward
9 Button right
10 Start / Pause button
11 Mode button
12 Display
Assembly
Charging station
Fig. 1 Insert the DC plug of the charger into the DC socket on the charging station. Connect the power adaptor to the mains.
Fig. 2 Place the charging station against the wall, so that the vacuum robot can return to the charging station independently. Pay attention to the required clearances at the charging station.
Note:
Remove any objects within 1 meter from either side of the station and 2 meters from the front of the station.
Fig. 3 Press the two rotary brushes labelled L and R onto the brackets until they click into place. Pay attention to the designation L and R on the device as well as the brushes..
Remote Control
Fig. 4 Open the battery compartment on the back of the remote control. Insert two AAA / LRO3 batteries into the battery compartment. Observe the correct polarity (+/-) according to the imprint.
Charging the battery
Fig. 5 Switch on the vacuum robot with the on/ off switch on the bottom (I). Set it down in front of the charging station. Press the on/ standby switch on the vacuum robot or the charging base button on the remote control and then immediately the charging station button. Make sure the robotic vacuum cleaner is moving to the charging station. Before first time use the built-in batteries must be charged for at least 12 hours. Subsequent charging processes will take approx. 4-6 hours when the battery is empty.
Alternatively, for charging, the DC plug of the charger can also be connected directly to the DC socket on the vacuum robot.
Note:
- Make sure that the charging contacts of the robot vacuum cleaner and charging base are not dirty. Clean the contacts if necessary.
- It is normal for the charging base and vacuum cleaner to become hot during charging. This is not a cause for concern.
- Remove the water tank before charging the robot vacuum cleaner.
Fig. 6 When the battery is charging, the on/ standby switch LED flashes blue. When the battery is charged, the LED is on permanently.
LED indicator
| LED color Condition | |
| Permanently blue | Battery is fully charged |
| Blue flashing During charging | |
| Indicator light off | Product is switched off |
| Permanently red | Brush roller is blocked and has to be cleaned |
Fig. 7 If the old battery is worn, it can be replaced by a replacement battery (not included in the delivery).
Remove the screws and the battery compartment cover and remove the old battery. Insert the new battery in the correct direction to the connector. Close the battery compartment and tighten the two screws.
Note:
The product must be disconnected from the supply mains when removing the battery.
English
Set time
Fig. 8 To use the timer, the time must be set on the remote control.
Press the time button. The hour indicator flashes. Now set the hours with the aid of the arrow keys ▲▼ Then press the ▶key to set the minutes display. The minute display flashes. Use the arrow keys ▲▼ to set the minutes. Confirm your entry by pressing the time button. The time is now set.
Operation as a vacuum cleaner

Warning!
• To prevent damage, make sure that any loose items, such as curtains, clothing, paper, cables, and extension cords, have been removed from the floor.
- Loose cables can get caught in the vacuum robot during operation and be pulled along by it, which can cause considerable damage and possibly can also cause a fire. Place cables and sockets in such a way that they cannot get in contact with the vacuum robot.
Note:
• Each time a key is pressed, an announcement sounds in English.
- Make sure the dust container is clean and the filters are properly inserted. Please note the chapter Cleaning and care.
Fig. 9 Make sure, that the on/off switch on the under-site of the robot is in the on-position.
Fig. 10 It is possible to start the cleaning process, while the robot is situated on the charging base as well as when it's positioned in the middle of the room. In both cases, use the remote control or the button on the device, to start the cleaning process.
22
Fig. 11 Press the on/ standby button on the device or the start/ pause button on the remote control to start the cleaning process. The LED of the on/ standby button shines permanently.
Press the on/ standby button on the unit or the start/ pause button on the remote control again to pause the cleaning process. Press the on/ standby button on the unit or the start/ pause button on the remote control again if you want to continue cleaning.
However, if you do not press a button within approx. 60 seconds, the vacuum robot will switch to the standby mode. In standby mode, the LED is off. To activate the vacuum robot press the on/ standby button on the device or the start/ pause button on the remote control.
The vacuum robot will automatically return to the charging base, after the cleaning task has been finished or when the battery is almost empty. If the robot is used in a different room, it has to be placed in front of the charging base and the charging base button on the remote control or the button on the device has to be pressed.
Fig. 12 When the battery level is low, the robotic vacuum automatically returns to the charging station. When returning to the charging station, the cleaning process is interrupted.
Clean the suction opening regularly with the appliance switched off (on/off switch in position 0) and empty the dust container and the pre-filter after each use. Please note the chapter Cleaning and care.
Set start time with timer
Fig.13 To start a cleaning process in your absence, set a start time for cleaning.
Note: You must be near the robot vacuum cleaner with the remote control. If the blue LED is off when the timer settings are completed (sleep/ standby mode), the start time settings will not be applied.
Set the on/off switch to position I and press the on/ standby button on the unit or the start/pause button on the remote control. The device is now activated. Press the timer button to set the start time.
The hour indicator flashes. Use the arrow keys
▲▼to set the hours. Then press the arrow key ▶to set the minutes display.
The minute display flashes. Use the arrow keys ▲ to set the minutes.
Confirm your entry by pressing the timer button. An acoustic signal sounds and indicates that the vacuum cleaner has been successfully pre-programmed.
The LED of the control lamp flashes. At the set time, the cleaning process starts.
To deactivate the start time, press the Timer button for approx. 3 seconds. The timer symbol
in the display off the remote control turns off.
Set mode
Fig. 14 After starting a cleaning task, press the mode button on the remote control to set the mode. Follow below table for an explanation.
Operation as swab
Note: To enhance the cleaning result and to achieve an equal distribution of water onto the floor, it is necessary to soak the cleaning cloth under running water and slightly wring it out, before attaching it to the water tank. This enhances equal flow of water from the water tank through the cleaning cloth.
Fig. 15 Remove the dust collector. To do so, press the release button and pull it out.
Fig. 16 Open the rubber cap and fill the water tank as desired, but not above the MAX mark. Close the cap again. Make sure the mop cover is attached correctly.
Attention! Do not use harsh or corrosive cleaners or additives. Note, that the addition of detergents might impair the traction of the product and hence negatively influence the cleaning result. It is recommended to use pure water only for cleaning. Always observe the cleaning recommendations and requirements of the suppliers of the flooring. Consult the supplier in case of doubts or uncertainties.
| Mode Symbols Explanation | ||
| Standard mode | - | • Standard cleaning, areas and edges are cleaned alternating |
| Powerful cleaning |  | • Powerful cleaning, the vacuum cleaner is moving spirally |
| Corners and edges cleaning |  | • The vacuum cleaner is cleaning along edges and around obstacles. |
| Areas |  | • The vacuum cleaner is cleaning areas and moving in parallel lines |
English
Fig.17 Insert the water tank into the vacuum robot.
For operation, follow the instructions in the chapter Operating as a vacuum cleaner. The robot will automatically return to the charging base, after the cleaning process has been finished, or if the battery level is low. Note, that the water tank has to be removed immediately to avoid damages to the flooring.
Note:
- In order to enhance the wet cleaning result, it is advised to vacuum the area prior to the wet cleaning, to remove dust and other small residues.
- Wet the mop for before each use.

Attention
Water will start to drip out of the attachment, as soon as the water tank has been inserted. Start the cleaning process immediately after inserting the water tank, so avoid possible damages to the floor. Due to the same reason, remove the water tank directly after the cleaning process has ended. Always supervise the product during the cleaning, to prevent water damages to the flooring, in case the robot should get stuck. The supplier is not liable for damages, that occur due to the negligence of all given warnings and remarks concerning the usage of the product as well as the cleaning of the flooring.
Fig.18 After swabbing, remove the water tank with the mop cover.
Fig.19 Open the rubber cap and pour remaining water out of the tank.
Fig. 20 Remove the mop cover from the water tank and wash it with a little detergent and rinse it off. Wring the mop cover slightly and let it dry.
Fig. 21 Attach the mop cover in the correct position on the water tank. A replacement mop cover is included.

Recommendations for a better cleaning result
Vacuuming
- Before starting the vacuuming process, remove all objects that stand/ lay on the floor, which could interfere with the process or in which the robot could get tangled up (e.g. toys, carpets with longer cords etc.).
• Make sure that no objects hang down onto the floor, in which the robot could get stuck (e.g. power supply cables, curtains etc.). - If possible, place chairs on the table during the vacuuming process, in order to minimize the number of obstacles on the floor.
- Block areas, in which the robot could get stuck (e.g. closets with lowered boards, tapered areas in between closets etc.).
• Make sure that all brushes can rotate freely and aren't blocked. Clean them if necessary.
• Empty the dust container.
Swabbing
- Observe all recommendations listed above.
- Have the robot vacuum the area before swabbing, in order to reduce the amount of dust on the floor.
- Soak the cleaning cloth under running water and slightly wring it out, before attaching it to the water tank, to enhance the cleaning result and to achieve an equal distribution of water onto the floor.
- If necessary, pause the swabbing process and manually wring out the cleaning cloth, removing bigger particles, before continuing the process.
Cleaning and care

Warning
- When cleaning, never use solvents or abrasive materials, hard brushes, metallic or sharp objects. Solvents are harmful to human health and can attack plastic parts, while abrasive cleaning mechanisms and tools may scratch the surface(s).
- Never immerse any electrical part of the product in water or in other liquids during cleaning. Never place it under running water.
- Before cleaning, always switch off the vacuum robot and disconnect the plug of the charging base from the power supply.
Emptying dust container and cleaning filters and mop cover
Note: The dust container should be emptied every time after vacuuming.
Fig. 22 After vacuuming, remove the dust container. Press the release button and pull it out.
Fig. 23 Hold the dust container over a dust bin, so that the opening with the yellow flap faces upwards. This way, the dust will fall downwards, when opening the container.
Fig. 24 After approx. 3 operating hours, but at the latest when the performance decreases, clean the dust pre-filter, fine filter and HEPA filter. To do this, remove all filter components and clean them separately. The assembly is done in reverse order. Make sure, that the filter insert is correctly assembled. To ensure this, press the shorter side wall into the fitting first, before pushing in the filter on the other sides by pressing down on the edges.
Fig. 25 Close the dust collector again and insert it into the vacuum cleaner. Make sure it is assembled properly.

Warning
Never use the device without a filter
Note:
- The two rotating brushes are subject to a certain amount of wear, depending on the type of hard floors you have (e.g. rough, rustic tiles). Therefore, you must check them at regular intervals to ensure, that they're undamaged.
- Worn rotating brushes may have sharp edges that can damage sensitive hard floors, such as parquet or linoleum. The Imtron GmbH does not accept any responsibility for damage caused by worn brushes
Fig. 26 If the brush roller is blocked by or full with hair, lint or similar residues remove and clean it. Press the buttons on the cap, remove the cap and then remove the brush roller. Remove hair and lint, etc. by hand or with a brush. The assembly takes place in reverse order.
English
Technical data
Robot vacuum cleaner
Rated voltage: 14.8 V
Vacuum power
Standard: : 800 pa ±10%
Powerful: 1200 pa ±10%
IP code: IP20
Battery charging time : 4 - 6 hours
Dust container capacity : 350 ml
Water tank capacity : 400 ml
Dimension (∅ X H) : 320 mm x 85 mm
Operation time: 90 - 110 min (max.
30 minutes at 20 m ^4 , depends on the set mode and type of flooring)
Remote Control
Batteries : 2 x 1,5 V (Type AAA)
Power adaptor
| Manufacturer | : Dongguan Yinli Electronics Co., Ltd |
| Model | : YLJXA-E190060 |
| Input voltage | : 100 - 240 V~ |
| Input AC frequency | : 50/60 Hz |
| Output voltage | : 19.0 V --- |
| Output current | : 0.6 A |
| Output power | : 11.4 W |
| Average active efficiency | : 83.7 % |
| Efficiency at low load (10 %) | : 75.0 % |
| No-load power consumption | : 0.09W |
| Class | : II |
Troubleshooting
If there are any problems during operation, please refer to the following table. If problems cannot be solved as indicated under Solution, please contact your retailer.
Note: Pay attention to the audible remarks by the robot, as these also alert you about possible issues.
| Problem Possible causes Solution | ||
| Product does not work • Interrupted power supply• Battery is empty | • Check the power supply• Re-charge battery | |
| Product cannot absorb dust or loose suction power | • Filters are blocked with dirt• Dust container full, exceed MAX marking | • Clean and wash the filters• Empty dust container |
| Product does not move | • Roller are blocked. | • Remove the blockage |
| Sensor malfunction • Product is placed on a dark place.• Sensor is block by dirt | • Place the product to a lighter place• Clean the sensor | |
| Product does not charge | • Product did not dock properly. | • Place the product again onto the charging station |
| Dry “stripes” remain during wet cleaning.Wet cleaning result is unequal | • Cleaning cloth not thoroughly wetted | • Soak cleaning cloth before wet cleaning |
| Robot looses traction during wet cleaning / wheels are spinning | • A detergent has been added to the water in the tank | • Clean the water tank to wash out the detergent.It is recommended to use pure water only |
26
Troubleshooting, indicated by audible signals of the robot
| Voice signal of the robot Necessary action | |
| The left wheel is hanging in the air Move the robot to a new position and restart the task | |
| Lead brush is twined Remove dirt (e.g. long hairs) from the brush | |
| The right wheel is hanging in the air Move the robot to a new position and restart the task | |
| The left wheel is twined Remove dirt (e.g. long hairs) from the wheel | |
| The right wheel is twined Remove dirt (e.g. long hairs) from the wheel | |
| Because of the uneven ground Move the robot to a new position and restart the task | |
| The side brushes are twined Remove dirt (e.g. long hairs) from the brushes | |
| The speed sensor is abnormal | Turn off the bottom power switch and restart after 5 minutes. If the fault cannot be discharged, contact your retailer |
| The collision sensor is blocked | Check the collision detection board for damages / blockages |
| The dustbin has loosened | Ensure that the dust bin is properly fastened to the robot |
| The ground sensor is blocked | Clean the sensor lens and restart it. If the fault cannot be discharged, contact your retailer |
| Work Current detected abnormal | Check the side brushes, wheels and roller brush. |
Disposal

Do not dispose of this product as unsorted municipal waste. Return it to a designated collection point for the
recycling of WEEE. By doing so, you will help to conserve resources and protect the environment. Contact your retailer or local authorities for more information.

Please dispose of batteries in an environmentally friendly manner. Do not put batteries into the household waste.
Please use the return and collection systems in your community or contact the dealer where you purchased the product.
English
Electronics Co., Ltd
Modelo: YLJXA-E190060
Electronics Co., Ltd
Electronics Co., Ltd
Modello : YLJXA-E190060
Tensione in ingresso : 100 - 240 V\~
Tensione in uscita : 19,0 V=
Electronics Co., Ltd
Model : YLJXA-E190060
Electronics Co., Ltd
Modelo : YLJXA-E190060
Kraftfull 1200 pa ±10%
IP-kod: IP20
Batteriladdningstid : 4 - 6 ore
Dammbehållarens
kapacitet : 350 ml
Vattentankens
kapacitet
Mått (∅ X H) : 320 mm x 85 mm
Driftstid : 90 - 110 minuter
-
Start Charging
-
Cleaning finished
-
Welcome to use Smart Vacuum Robot, glad to serve for you
-
Invalid key-pressing
-
Low battery severely, the robot is going to power off
-
Returning to the beginning position
-
Start Cleaning
-
The cleaning task is paused
-
The Return-to-charge task is stopped.
-
Dingdong
-
Start returning to the charging base to charge
-
The task has been eliminated
-
Start edge sweeping
-
Local Cleaning
-
Key Cleaning
-
As the robot is picked up, the current work has stopped.