KBM100 - Measuring equipment VOLTCRAFT - Free user manual and instructions
Find the device manual for free KBM100 VOLTCRAFT in PDF.

User questions about KBM100 VOLTCRAFT
0 question about this device. Answer the ones you know or ask your own.
Ask a new question about this device
Download the instructions for your Measuring equipment in PDF format for free! Find your manual KBM100 - VOLTCRAFT and take your electronic device back in hand. On this page are published all the documents necessary for the use of your device. KBM100 by VOLTCRAFT.
USER MANUAL KBM100 VOLTCRAFT
text_image
mg/1% μS mS PPt PPM mV pH A B C D E F G MAX CAL MIN HOLD 8.8.8 °C ATC H I J K9. BATTERIEN EINLEGEN, BATTERIEWECHSEL
- Introduction......20
- Explanation of symbols ...... 21
- Scope of delivery....21
- Intende use....22
- Safety information ....23
- Notes on batteries and rechargeable batteries ....24
- Control elements 25
- Displays....26
- Inserting batteries, battery change....26
- Operation....27
a) First commissioning 27
b) Replacing the measuring probe 27
c) Switching on/off....28
d) Change operating mode....28
e) Selecting the Temperature Unit °C or °F 28
f) Perform measurement 29
g) End of operation....30
- Calibration....31
a) Measuring probe for the pH-value....31
b) Measuring probe for conductivity 32
-
Maintenance and cleaning ....34
-
Disposal....34
a) General Information 34
b) Batteries and Rechargeable Batteries 34
- Technical data 35
1. INTRODUCTION
Dear Customer,
Thank you for making the excellent decision to purchase a Voltcraft® product.
Voltcraft® - This name stands for above-average quality products in the areas of measuring, charging and grid technology, characterised by technical competence, extraordinary performance and permanent innovation.
Whether you are an ambitious hobby electronics or a professional user - a product of the Voltcraft®brand family will provide you with the best solution for even the most sophisticated of tasks. Special features: We offer the sophisticated technology and reliable quality of our Voltcraft® products at a near-unbeatable price/performance ratio. We lay the groundwork for long, good and successful cooperation.
Enjoy your new Voltcraft® product!
All company names and product names are trademarks of their respective owners. All rights reserved.
If there are any technical questions, contact:
International: www.conrad.com/contact
United Kingdom: www.conrad-electronic.co.uk/contact
2. EXPLANATION OF SYMBOLS

The exclamation mark in a triangle indicates important notes in these operating instructions that must be observed strictly.

The “arrow” symbol indicates that special advice and notes on operation are provided.
3. SCOPE OF DELIVERY
- Meter
• Electrode for measuring conductivity
• Calibration solution with pH-value 4 (50 ml)
• Calibration solution with pH-value 7 (50 ml) - Calibration solution with pH-value 1413~ S / cm (50 ml)
• Electrode liquid for pH- and ORP-electrode (5 ml) - Hexagon wrench
- 2x spare screws for battery compartment lid
- Carrying loop with clip
- Storage case
- Operating instructions
- Electrode to measure the pH-value (already installed on the meter at delivery)
4. INTENDED USE
The product is used to measure pH-value, ORP (measuring probe not enclosed, can be ordered separately), conductivity, TDS and salinity of powered-down, inflammable and non-corrosive liquids.
The area of use covers the domestic area as well as (fishing) ponds, swimming pools, photolabs, schools, gardeners, etc. The meter is not suitable for use in the industrial area (e.g. Galvano technology).
Automatic temperature compensation (“ATC”) ensures stable measured values even at fluctuating temperatures.
Operation takes place with four batteries type AAA/micro.
The safety notes and all other information in these operating instructions always have to be observed. Keep these operating instructions. Only pass on the device to any third parties together with these operating instructions.
Any other use than that described above is not permitted and will damage the product. Additionally, this is connected to dangers, such as short circuit, fire, etc.
This product complies with the statutory national and European requirements.

The guarantee/warranty will expire if damage is incurred resulting from non-compliance with the operating instructions! We do not assume any liability for consequential damage!
We do not assume any liability for damage to property or personal injury caused by improper use or the failure to observe the safety instructions! In such cases the warranty/guarantee is voided.
- The unauthorized conversion and/or modification of the product is inadmissible for safety and approval reasons (CE). Never disassemble it except for the procedures described in these operating instructions for insertion/replacing the batteries and exchanging the measuring probes.
- The product is not a toy and must be kept out of reach of children.
- The product must not be exposed to extreme temperatures, strong vibration or strong mechanical strain. Protect it from solar radiation, dust and dirt.
- The manufacturer assumes no responsibility for wrong or inaccurate displays or for the effects that may arise from such displays.
- Handle the product with care. It can be damaged by impact, blows or when dropped even from a low height.
If you determine any damage, the product must no longer be operated; take the product to a specialist workshop or dispose of it environmentally compatibly.
• In schools, training centres, hobby and self-help workshops, the use of the product must be supervised by responsible trained personnel.
- In commercial institutions, the accident prevention regulations of the Employer's Liability Insurance Associations for Electrical Systems and Operating Materials are to be observed.
- Do not leave packaging material lying around carelessly. It might become a dangerous toy for children!
- If you are not sure of the correct operation or if there are any questions that are not covered by the operating instructions, do not hesitate to contact our technical support or another specialist.
6. NOTES ON BATTERIES AND RECHARGEABLE BATTERIES
- Keep batteries/rechargeable batteries out of the reach of children.
- Ensure that the polarity is correct when inserting the batteries/rechargeable batteries (observe plus/+ and minus/-).
- Do not leave any batteries/rechargeable batteries lying around openly. There is a risk of batteries being swallowed by children or pets. If swallowed, consult a doctor immediately.
- Leaking or damaged batteries/rechargeable batteries can cause chemical burns to skin. Wear suitable protective gloves when handling them.
- Liquids leaking from batteries/rechargeable batteries are chemically highly aggressive. Objects or surfaces that come into contact with them may take severe damage. Therefore, keep batteries/rechargeable batteries in a suitable location.
- Make sure that batteries/rechargeable batteries are not short-circuited, disassembled or thrown into fire. There is a danger of explosion!
- Never recharge normal (non-rechargeable) batteries. There is a danger of explosion! Only charge rechargeable batteries which are intended for this purpose; use a suitable battery charger.
- If not used for a longer period (e.g. in case of storage), remove the inserted batteries/rechargeable batteries. There is a danger of old batteries/rechargeable batteries leaking, which causes damage to the product, loss of warranty/guarantee!
- Always replace the entire set of batteries/rechargeable batteries, only use batteries/rechargeable batteries of the same type and by the same manufacturer with the same charge status (do not mix charged with partially charged or empty batteries/rechargeable batteries).
- Never mix batteries and rechargeable batteries. Use either batteries or rechargeable batteries.
- For proper disposal of batteries and rechargeable batteries, please read the chapter "Disposal".

It is possible to operate the combination meter with rechargeable batteries. However, the lower voltage (battery = 1.5 V, rechargeable battery = 1.2 V) causes the operating duration and display contrast to reduce strongly.
Therefore we recommend not to use rechargeable batteries for reasons of safety, but to only use high-quality alkaline batteries in the combination meter to ensure long and safe function.
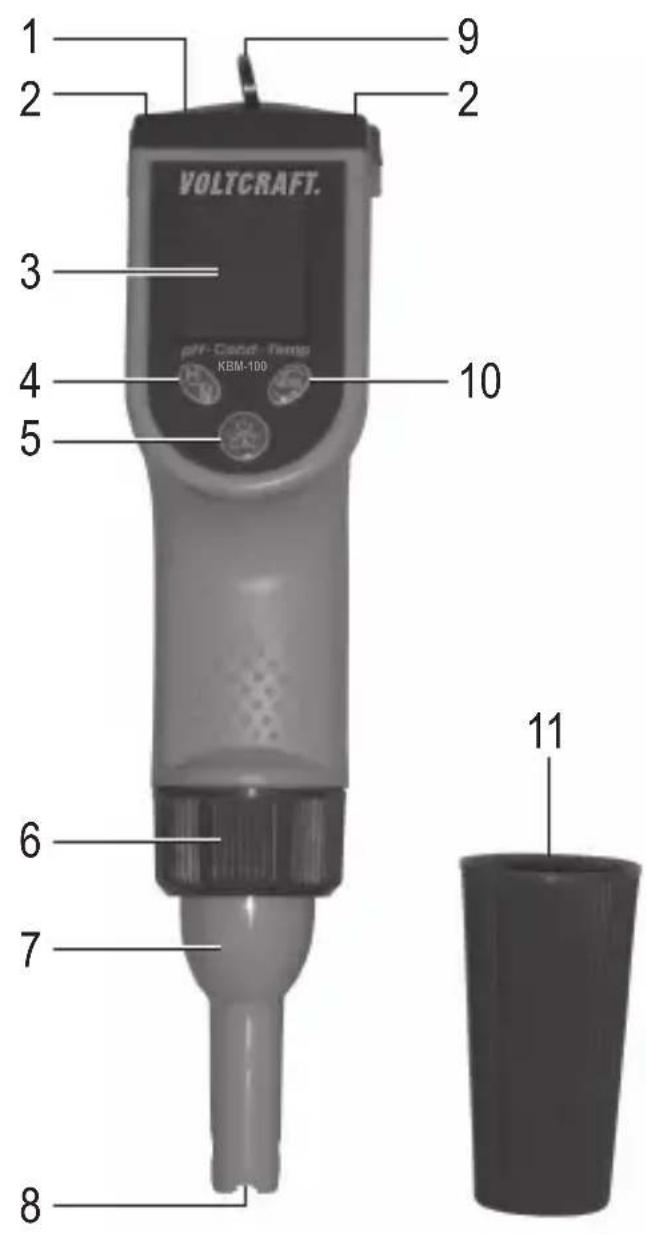
7. CONTROL ELEMENTS
1 Battery compartment lid
2 Two hexagon socket screws for fastening the battery compartment lid
3 LC display
4 Button "H/M"
5 Button " ⏻/CAL"
6 Cap nut for fastening the measuring probe
7 Replaceable measuring probe
8 Probe tip
9 Ring for fastening the carrying loop
10 Button "MODE"
11 Protective cap for measuring probe
text_image
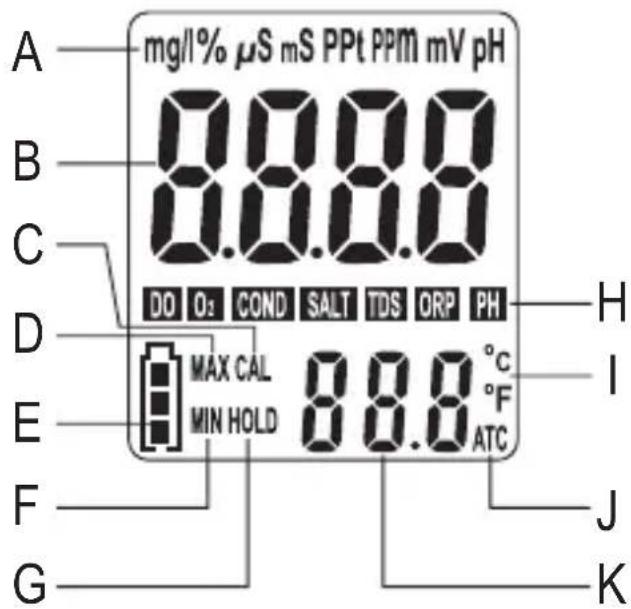
VOLTCAFT. pH-Cloud-Temp KBM-100 1 2 3 4 5 6 7 8 9 10 118. DISPLAYS
A Unit
B Measured value
C Calibration mode ("CAL")
D Maximum value ("MAX")
E Battery condition display
F Minimum value ("MIN")
G Data-Hold mode ("HOLD")
H Operating mode
I Temperature unit °C or °F
J Automatic temperature compensation - ("ATC")
K Measured temperature value
text_image
mg/1% μS mS PPt PPM mV pH A B C D E F G MAX CAL MIN HOLD 8.8.8 °C °F ATC DO O2 COND SALT TDS ORP PH H I J K9. INSERTING BATTERIES, BATTERY CHANGE
- Open the battery compartment on the top by first turning out the two screws (2) via the enclosed hexagon socket wrench and then taking off the battery compartment lid (1).
- Insert four type AAA/Micro batteries into the battery compartment in the correct polarity (observe plus/+ and minus/-). Small symbols next to the battery compartment indicate the proper alignment of the batteries when inserting.
- Attach the battery casing lid and screw it back on. Observe that the sealing ring in the battery compartment lid is placed properly.
- The batteries require changing when the display contrast is very weak or the device can no longer be switched on. For weak batteries, the symbol for the battery condition display (E) flashes as well.
a) First commissioning
The electrode of the pH measuring probe always must be kept moist to be able to deliver accurate measuring results for a long period of time.

If a small amount of liquid is in the protective cap of the pH measuring probe at delivery because of this, this is normal. If no liquid is visible, you need to fill it into the protective cap after initial commissioning.
For this, add a little bit of the enclosed storage solution into the protective cap and screw the protective cap onto the pH-measuring probe. The electrode of the pH measuring probe must not dry out anymore after initial commissioning.
The same applies to the electrode of the ORP measuring probe (not enclosed, can be ordered as an accessory).
Observe that the protective flap with the storage solution in it does not tip over. If this has happened, wipe off the liquid with an absorbent cloth and put the cloth into the regular household waste. Wash your hands with water and soap carefully.
If the storage solution is used up, you can purchase more as an accessory.

The electrode of the pH measuring probe is a wear part. Its service life is limited. For this reason, the pH measuring probe is not included in the warranty/guarantee.
b) Replacing the measuring probe
- Switch off the combination meter
- Loosen the cap nut (6) and take it off.
- Axially remove the present measuring probe from the combination meter; do not cant it. The measuring probe can be removed with very little effort; do not apply any force!
- Plug another measuring probe into the combination meter. Observe that the slot in the housing points forward to the display so that it can be pushed open easily.
- Put on the cap nut (6) in the right direction and tighten it manually. Do not use any tools and do not apply any force.
c) Switching on/off
Briefly press the button "JGAL" (5) to activate or deactivate the combination meter.

All segments of the LC display appear for a few seconds when switching on. Then a measured value is displayed depending on the measuring probe used, as well as the temperature.
The battery condition display at the lower left of the display indicates the current condition of the inserted batteries. If this display flashes, the batteries are flat and need to be replaced. See above.
The combination meter switches off on its own after 10 minutes if not used.
If the display “Err” appears in the display, no measuring probe is connected to the combination meter or the measuring probe has no connection to the connection in the combination meter.
d) Change operating mode
Brief pushing of the button “MODE” (10) permits changing the operating modes of the combination meter. The display shows the corresponding display (H).
The respective possible operating mode depends on the measuring probe used:
Measuring probe "PH":
“PH” Measurement/display of the pH value
Measuring probe "COND":
"COND" Measurement/display of the conductivity
"TDS" Measurement/display of the TDS value
"SALT" Measurement/display of the salinity
Measuring probe "ORP" (not enclosed, can be ordered as an accessory):
"ORP" Measurement/display of the ORP value
e) Selecting the Temperature Unit °C or °F
Push the button “MODE” (10) for longer to switch between the temperature unit °C (degrees Celsius and °F (degrees Fahrenheit).
f) Perform measurement
- Rinse the measuring probe with distilled water before the measurement and wipe it dry.
- Dip the tip of the measuring probe approx. 2 - 3 cm into the liquid to be measured.

Do not reach into the liquid with your hand or other body parts. This may cause injury, depending on liquid.
- Move the tip of the measuring probe back and forth slightly until the display of the measured value has stabilised. The automatic temperature compensation (“ATC”) ensures precise measured values even at different liquid temperatures.
- For the measured value to stay in the display when pulling the probe from the liquid, briefly push the button "H/M" (4). This activates the data hold function. Pressing the button "H/M" again deactivates the data hold function again.
- The combination meter also has a measuring mode for the maximum and minimum values.
Keep the button "H/M" (4) pushed for longer until the "MAX" (D) and "MIN" (F) flash in the display at the same time.
Now perform the measurement as described above. The combination meter saves the maximum and minimum value internally.
To display the saved maximum value, briefly push the button "H/M" (4). The display "MAX" (D) flashes.
To display the saved minimum value, briefly push the button "H/M" (4). The display "MIN" (F) flashes.
If you push the button "H/M" (4) again briefly, the display "MAX" (D) and "MIN" (F) flashes at the same time and you can continue measuring.
If the measuring mode for the maximum/minimum value is to be ended, keep the button "H/M" (4) pushed for a longer time until the display "MAX" and "MIN" disappears from the display.

While the combination meter is in the measuring mode for the maximum/minimum value, it cannot be switched off via the button “CAL” (5).
- The display shows dashes at the upper or lower edge (“____”) if the measured value exceeds or undercuts the permitted measuring range.
- Rinse the measuring probe with distilled water after each measurement and wipe it dry. This prevents a wrong measured value at the next measurement because the measuring probe still contains liquid residue from the preceding measurement.
g) End of operation
The pH electrode must always be kept moist to be able to deliver accurate measuring results for a long period of time. The same applies to the ORP electrode.

If a small amount of liquid is in the protective cap of the pH electrode at delivery because of this, this is normal. If no liquid is visible, you need to fill it into the protective cap after initial commissioning.
For this, add a little bit of the enclosed storage solution into the protective cap and screw the protective cap onto the pH-electrode. The pH electrode must not dry out anymore after initial commissioning.
The same applies to the ORP electrode (not enclosed, can be ordered as an accessory).
Observe that the protective flap with the storage solution in it does not tip over. If this has happened, wipe off the liquid with an absorbent cloth and put the cloth into the regular household waste. Wash your hands with water and soap carefully.

It is not necessary to calibrate the combination meter before each measurement. It is recommended to perform a calibration before every tenth measurement or every two weeks. If the enclosed buffer/calibration solutions are used up, you can purchase more as an accessory.
a) Measuring probe for the pH-value
- Insert the measuring probe into the combination meter if you have not done so yet. Switch on the combination meter The operating mode "PH" must be displayed now.
- Carefully rinse the tip of the measuring probe with distilled water to remove the liquid residue of the preceding measurements. Wipe the measuring probe dry.
- Put the measuring probe into the buffer solution with pH value 7, so that the tip of the measuring probe submerses by about 2 - 3 cm. Move the tip of the measuring probe back and forth in the buffer solution a bit.
Wait for at least 30 seconds until the display of the measured value in the display stabilises a little.
- Keep the button “☐/CAL” (5) pushed (approx. 3 seconds), until “CAL” (C) appears at the bottom of the display and the value “7.00” flashes in the display (or a value according to the liquid temperature; see print on the buffer solution).
Calibration starts now.
A brief push of the button “☐/CAL” (5) interrupts calibration prematurely.
- When calibration is completed, the display shows “SA” (“Save”) and then “End”; then the display shows the measured pH value.
- Pull the measuring probe from the buffer solution. Rinse the tip of the measuring probe with distilled water and wipe it dry.
- Put the measuring probe into the buffer solution with pH value 4, so that the tip of the measuring probe submerses by about 2 - 3 cm. Move the tip of the measuring probe back and forth in the buffer solution a bit.
Wait for at least 30 seconds until the display of the measured value in the display stabilises a little.
- Keep the button "CAL" (5) pushed (approx. 3 seconds), until "CAL" (C) appears at the bottom of the display and the value "7.00" flashes in the display (or a value according to the liquid temperature; see print on the buffer solution).
Calibration starts now.

A brief push of the button “CAL” (5) interrupts calibration prematurely.
- When calibration has been completed, the display shows “%” and the PTS-value (“percentage of slope”) for the electrode. For a value below 70% or above 130%, the measuring probe must be replaced. A value of 100% is best.
Then “SA” (“Save”) and “End” appear, then the display shows the measured pH value.

The display “SA” does not appear if calibration fails. In this case, pull the measuring probe from the buffer solution and rinse the tip of the measuring probe carefully with distilled water. Wipe the measuring probe dry.
Then perform another calibration, check if the tip of the measuring probe has actually been fully submersed in the buffer solution.
Always perform a calibration with the buffer solution with pH value 7 first and only then with the buffer solution with pH-value 4 (or alternatively with a buffer solution with pH value 10, which is not enclosed).
Buffer solutions with any other pH values than pH 4, pH 7 and pH 10 cannot be used for calibrating the combination meter.
b) Measuring probe for conductivity
- Insert the measuring probe for conductivity into the combination meter if you have not done so yet. Switch on the combination meter The operating mode “COND” must be displayed now.
- Carefully rinse the tip of the measuring probe with distilled water to remove the liquid residue of the preceding measurements. Wipe the measuring probe dry.
- Put the measuring probe into the calibration solution (1413 S/cm), so that the tip of the measuring probe submerses by about 2 - 3 cm. Move the tip of the measuring probe back and forth in the calibration solution a bit.
Wait for at least 30 seconds until the display of the measured value in the display stabilises a little.
- Keep the button "CAL" (5) pushed (approx. 3 seconds), until "CAL" (C) appears at the bottom and the display "1413 S/cm" flashes in the display.
Calibration starts now.
→ A brief push of the button “CAL” (5) interrupts calibration prematurely.
- When calibration is completed, the display shows “SA” (“Save”) and then “End”; then the display shows the measured conductivity.

The display “SA” does not appear if calibration fails. In this case, pull the measuring probe from the calibration solution and rinse the tip of the measuring probe with distilled water carefully. Wipe the measuring probe dry.
Then perform another calibration, check if the tip of the measuring probe has actually been fully submersed in the buffer solution.
For a measurement in liquids with very high conductivity, use a calibration solution with 12.88 mS/cm (not enclosed).
Calibration solutions with a different conductivity than 1413 S/cm or 12.88 mS/cm cannot be used for calibrating the combination meter.
- If the tip of the measuring probe is not submersed into a liquid and if the display does not show a measured value of 0 μS/cm, start calibration. Keep the button “☐/CAL” (5) pushed (approx. 3 seconds), as described above until “CAL” (C) appears at the bottom and the display “0 μS/cm” flashes in the display.
When calibration is completed, the display shows “SA” (“Save”) and then “End”; then the display shows the measured conductivity (this should now be 0 S/cm).
12. MAINTENANCE AND CLEANING
The product requires no servicing apart from replacing the rechargeable battery and cleaning of the measuring probes. Do not disassemble the product (except for the work described in these operating instructions, such as for exchanging the measuring probes).
Clean the product with care, e.g. with a soft, clean cloth. Do not push on the display too much; this will not only cause scratches but may also damage the display.
Only use distilled water (or deionised water) to clean the tips of the measuring probes, since the measured values may otherwise be influenced. Use only paper tissues to dab dry/dry the measuring probes.
Do not use any aggressive cleaning agents for cleaning, do not use any alcohol or even chemicals; this may cause not only discolouration but also damage to the product.
13. DISPOSAL
a) General Information
Electronic devices are recyclable and should not be disposed of in household waste.
At the end of its service life, dispose of the product according to the relevant statutory regulations.
Remove any inserted batteries/rechargeable batteries and dispose of them separately from the product.
b) Batteries and Rechargeable Batteries
You as the end user are required by law (Battery Ordinance) to return all used batteries. Disposing of them in the household waste is prohibited.
Batteries and rechargeable batteries containing hazardous substances are marked with the adjacent symbol to indicate that disposal in the household waste is prohibited.
You may return used batteries/rechargeable batteries free of charge at the official collection points of your community, in our stores, or wherever batteries/rechargeable batteries are sold!
You thus fulfil your statutory obligations and contribute to the protection of the environment.
14. TECHNICAL DATA
Power supply 4 type AAA/Micro batteries
Protection type IP57
Floating .... yes
Ambient conditions .... Temperature 0 °C to +50 °C; humidity <85%
Dimensions ...... Combination meter: 195 x 40 x 36 mm (L x W x H)
Storage case: 230 x 205 x 50 mm (W x D x H)
Weight 135 g (with batteries)
| pH ORP Temperature | |||
| Measuring range -2 ~ 16.00 | -1000 ~ 1000 0 ~ 90.0 °C | ||
| Accuracy ±0.01 + 1 digit | ±2 + 1 digit ±0.2 °C | + 1 digit | |
| Resolution 0.01 pH 1 mV | 0.1 °C | ||
| Automatic temperature compensation (ATC) | 0 ~ 90 °C | ||
| Calibration | 4.00, 7.00, 10.01 |
| Conductivity | TDS | Salinity | |
| Measuring range 0 ~ 2000 | μS | 0 ~ 1300 ppm | 0 ~ 1000 ppm |
| 2.00 ~ 20.00 mS | 1.30 ~ 13.00 ppt | 1.00 ~ 12.00 ppt | |
| Accuracy ±2% FS | ±2% FS | ±2% FS | |
| Resolution 1 μS/0.01 mS | 1 ppm/0.01 ppt | 1 ppm/0.01 ppt | |
| Automatic temperature compensation (ATC) | 0 ~ 50 °C | 0 ~ 50 °C | 0 ~ 50 °C |
| Calibration | 0 μS, 1413 μS, 12.88 mS | ||

The ORP measuring probe is not enclosed in the scope of delivery; it can be ordered as an accessory.
Page
France (email): technique@conrad-france.fr
text_image
mg/1% μS mS PPt PPM mV pH A B C D E F G MAX CAL MIN HOLD 8.8.8 °C °F ATC H I J K9. INSERTION ET REMPLACEMENT DES PILES
text_image
mg/1% μS mS PPt PPM mV pH A B C D E F G MAX CAL MIN HOLD 8.8.0 °C °F ATC H I J K9. BATTERIJEN PLAATSEN, BATTERIJEN VERVANGEN
© Copyright 2015 by Conrad Electronic SE.
GB Legal Notice
This is a publication by Conrad Electronic SE, Klaus-Conrad-Str. 1, D-92240 Hirschau (www.conrad.com).
All rights including translation reserved. Reproduction by any method, e.g. photocopy, microfilming, or the capture in electronic data processing systems require the prior written approval by the editor. Reprinting, also in part, is prohibited. This publication represents the technical status at the time of printing.
© Copyright 2015 by Conrad Electronic SE.
© Copyright 2015 by Conrad Electronic SE.
NL Colofon
© Copyright 2015 by Conrad Electronic SE. V2_0215_02/VTP