
WB-90 - Measuring equipment VOLTCRAFT - Free user manual and instructions
Find the device manual for free WB-90 VOLTCRAFT in PDF.

| Product type | Thermal camera |
| Brand | Voltcraft |
| Model | WB-90 |
| Weight | 260 g |
| Power supply | 5 V/DC, 2.0 A via USB-C® |
| Battery type | Lithium-ion 3.7 V, 2000 mAh, integrated and non-replaceable |
| Charging time | 4 h |
| Infrared resolution | 96 x 96 pixels |
| Display resolution | 320 x 240 pixels (2 inches) |
| Temperature range | -20 to +550 °C |
| Accuracy | ±2 °C or ±2 % (above 0 °C) |
| Field of view | 50° x 50° |
| Thermal sensitivity | < 0.05 °C @ +30 °C (50 mK) |
| Frame rate | 25 Hz |
| Image modes | IR, visual, picture-in-picture, auto fusion |
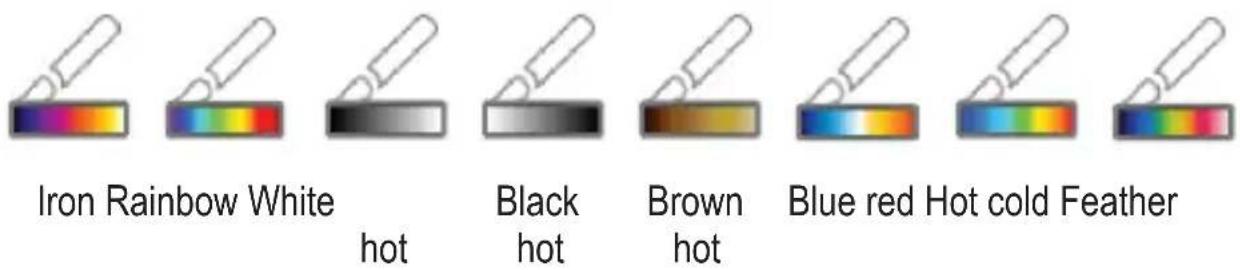
| Color palettes | Iron, rainbow, white hot, black hot, brown hot, red blue, hot and cold, plume |
| Internal storage | 3.5 GB EMMC |
| Recording formats | JPEG (images), MPEG-4 (videos) |
| Protection rating | IP54 |
| Operating temperature | -15 to +50 °C |
| Storage temperature | -30 to +55 °C |
| Interface | USB-C® (data transfer and live video) |
| Compatible software | Windows® 7 or higher |
| Package contents | Camera, carrying case, USB-C cable, software CD, instruction manual |
| Maintenance | Clean with a dry, lint-free cloth; lens: specific swab |
| Safety | Do not immerse; avoid shocks; do not use in explosive atmosphere |
| Repairability | Do not repair yourself; contact a specialist |
Frequently Asked Questions - WB-90 VOLTCRAFT
User questions about WB-90 VOLTCRAFT
0 question about this device. Answer the ones you know or ask your own.
Ask a new question about this device
Download the instructions for your Measuring equipment in PDF format for free! Find your manual WB-90 - VOLTCRAFT and take your electronic device back in hand. On this page are published all the documents necessary for the use of your device. WB-90 by VOLTCRAFT.
USER MANUAL WB-90 VOLTCRAFT
GB Operating Instructions
WB-90 Thermal Imaging Camera
Item no: 3338132
F Mode d'emploi
natural_image
Empty white rectangle with black border (no text or symbols)
natural_image
Blank gray rectangle with black border (no text or symbols)
natural_image
Abstract geometric shape with white and gray triangular sections (no text or symbols)IR = Infrarotbild
1 Introduction.... 40
2 Operating Instructions for download.... 40
3 Intended use.... 40
4 Delivery contents 41
5 Description of symbols.... 41
6 Safety instructions 41
6.1 General.... 41
6.2 Handling.... 42
6.3 Li-ion battery.... 42
6.4 Operating environment.... 42
6.5 Operation....42
6.6 Measurement accuracy on low-emissivity surfaces 43
7 Product overview 44
7.1 Thermal imager 44
7.2 Display.... 46
8 Getting started 47
8.1 Charging the battery.... 47
8.2 Powering on and off 47
8.3 Setting the date and time 47
8.4 Setting the language 47
8.5 Setting auto power off 48
9 Taking measurements 48
9.1 Taking measurements.... 48
9.2 Focusing the image.... 48
9.3 Locking the scene zoom.... 49
9.4 Restricting the temperature measurement range.... 49
9.5 Recording video 49
9.6 Viewing the image and video gallery.... 49
10 Visualizing measurements.... 50
10.1 Toggling min and max temperature display 50
10.2 Limiting the temperature display range for better visualization .... 50
10.3 Using visual temperature alarms.... 50
10.4 Choosing an image mode 51
10.5 Setting color palettes.... 52
10.6 Transforming images.... 52
10.7 Increasing image resolution 53
10.8 Aligning camera and infrared image.... 53
11 Improving measurement accuracy.... 54
11.1 Setting the ambient temperature.... 54
11.2 Setting the emissivity.... 55
11.3 Setting the reflected temperature.... 55
11.4 Setting the measuring distance.... 56
11.5 Understanding emissivity 56
11.6 Understanding Instantaneous Field of View (IFOV)...... 57
12 Image and video storage 58
12.1 Transferring records to a computer.... 58
12.2 Deleting individual records 58
12.3 Deleting all records.... 58
13 Live measurements via Windows® Software 59
13.1 Installing the software.... 59
13.2 Connecting software and product.... 59
14 Troubleshooting.... 59
15 Cleaning and care....60
15.1 Housing....60
15.2 Infrared lens 60
16 Disposal.... 62
17 Technical data 63
17.1 Power supply.... 63
17.2 Imaging and optical data 63
17.3 Measurement 63
17.4 Image presentation.... 64
17.5 Digital camera 64
17.6 Measurement analysis 64
17.7 Storage.... 64
17.8 Data transfer.... 65
17.9 Interfaces....65
17.10 Environment 65
17.11 Others....65
17.12 Software....65
17.13 Emissivity table.... 66
18 Default settings....66
1 Introduction
Thank you for purchasing this product.
If there are any technical questions, please contact:
www.conrad.com/contact
2 Operating Instructions for download

Use the link www.conrad.com/downloads (alternatively scan the QR code) to download the complete operating instructions (or new/current versions if available).
Follow the instructions on the web page.
3 Intended use
The product is a thermal imaging camera. Some uses include e.g., finding hot spots, energy leaks, structural defects, pipe blockages, and HVAC faults.
The product has an IP54 ingress protection rating. It is splash proof and suitable for outdoor use. Do not submerge in water.
Ingress protection is only guaranteed if all ports are properly sealed.
If you use the product for purposes other than those described, the product may be damaged.
Improper use can result in short circuits, fires, or other hazards.
The product complies with the statutory national and European requirements.
For safety and approval purposes, you must not rebuild and/or modify the product.
Read the operating instructions carefully and store them in a safe place. Make this product available to third parties only together with the operating instructions.
All company names and product names are trademarks of their respective owners. All rights reserved.
USB4®, USB Type-C® and USB-C® are registered trademarks of USB Implementers Forum.
4 Delivery contents
Product
Carrying bag
USB-C® to USB-A cable
Software CD
- Operating instructions
5 Description of symbols
The following symbols are on the product/appliance or are used in the text:

The symbol warns of hazards that can lead to personal injury.
6 Safety instructions

Read the operating instructions carefully and especially observe the safety information. If you do not follow the safety instructions and information on proper handling, we assume no liability for any resulting personal injury or damage to property. Such cases will invalidate the warranty/guarantee.
6.1 General
The product is not a toy. Keep it out of the reach of children and pets.
Do not leave packaging material lying around carelessly. This may become dangerous playing material for children.
If you have questions which remain unanswered by this information product, contact our technical support service or other technical personnel.
- Maintenance, modifications and repairs must only be completed by a technician or an authorised repair centre.
6.2 Handling
- Handle the product carefully. Jolts, impacts or a fall even from a low height can damage the product.
6.3 Li-ion battery
The rechargeable battery is permanently built into the product and cannot be replaced.
■ Never damage the rechargeable battery. Damaging the casing of the rechargeable battery might cause an explosion or a fire!
- Never short-circuit the contacts of the rechargeable battery. Do not throw the battery or the product into fire. There is a danger of fire and explosion!
- Charge the rechargeable battery regularly, even if you do are not using the product. Due to the rechargeable battery technology being used, you do not need to discharge the rechargeable battery first.
6.4 Operating environment
- Do not place the product under any mechanical stress.
- Protect the appliance from extreme temperatures, strong jolts, flammable gases, steam and solvents.
- Protect the product from high humidity and moisture.
■ Protect the product from direct sunlight.
6.5 Operation
- Consult an expert when in doubt about the operation, safety or connection of the product. - If it is no longer possible to operate the product safely, take it out of operation and protect it from any accidental use. DO NOT attempt to repair the product yourself. Safe operation can no longer be guaranteed if the product:
– is visibly damaged,
– is no longer working properly,
– has been stored for extended periods in poor ambient conditions or
– has been subjected to any serious transport-related stresses.
6.6 Measurement accuracy on low-emissivity surfaces

WARNING
Emissivity ( ) values below 0.60 can significantly affect accuracy
Risk of burns, fire, or other hazards!
- Use alternative measuring methods for critical applications.
7 Product overview
7.1 Thermal imager
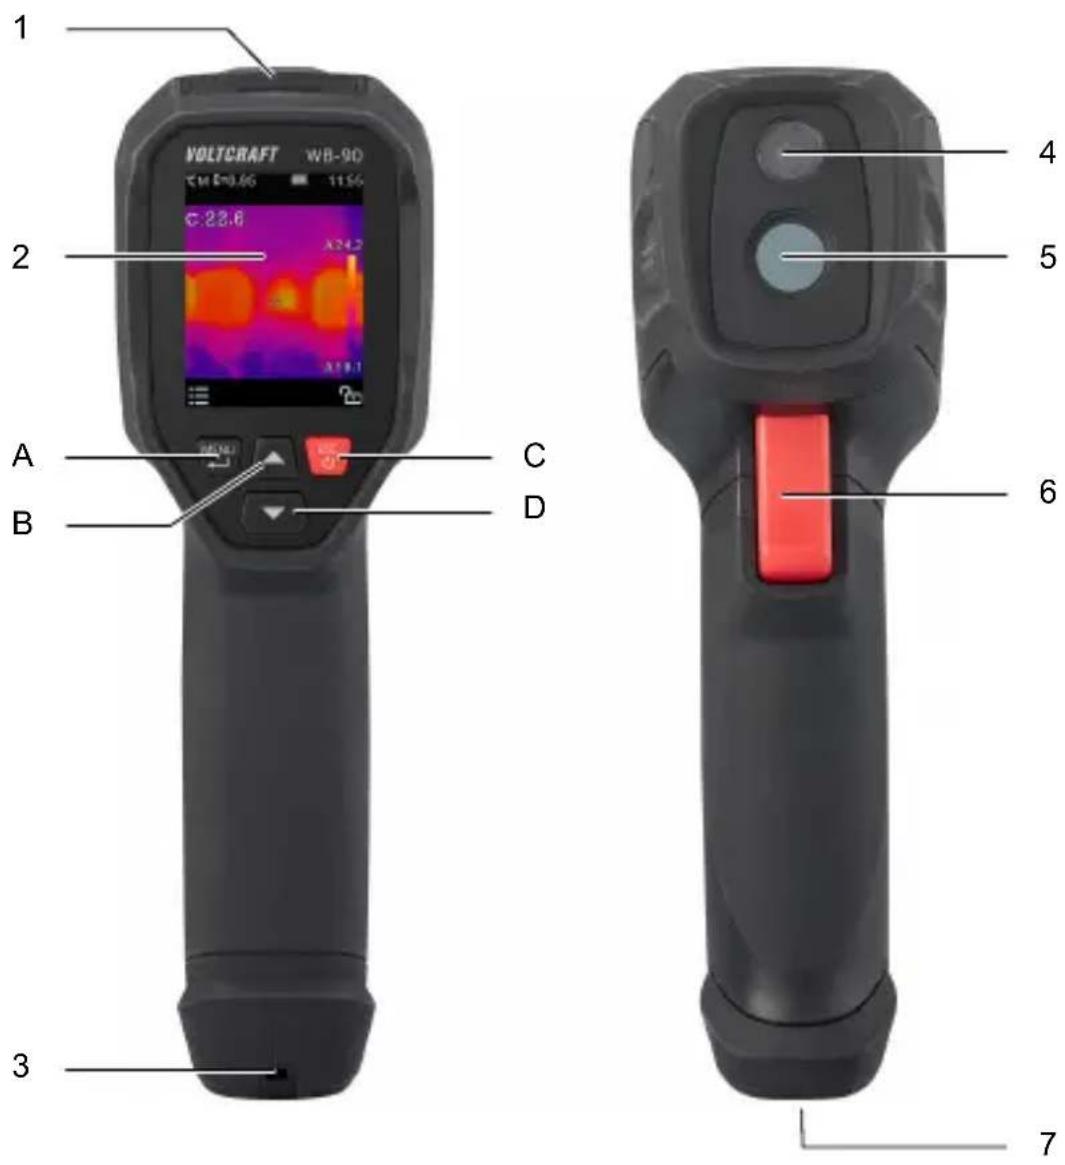
1 Charging port 5 Infrared camera lens
2 Display 6 Trigger
3 Lanyard hole 7 Tripod attachment (6.35 mm,
4 Visual camera
Menu and setting controls
| Component Description/Function | |
| A Menu | button Enter the settings menuNavigate down the menu tree (enter a menu item)Select menu itemsConfirm a process |
| B Up button | Navigate the menuChange settingsZoom in |
| C Power | button Press and hold to switch on/offNavigate up the menu tree (leave a menu item)Cancel a process |
| D Down | button Navigate the menuChange settingsZoom out |
7.2 Display
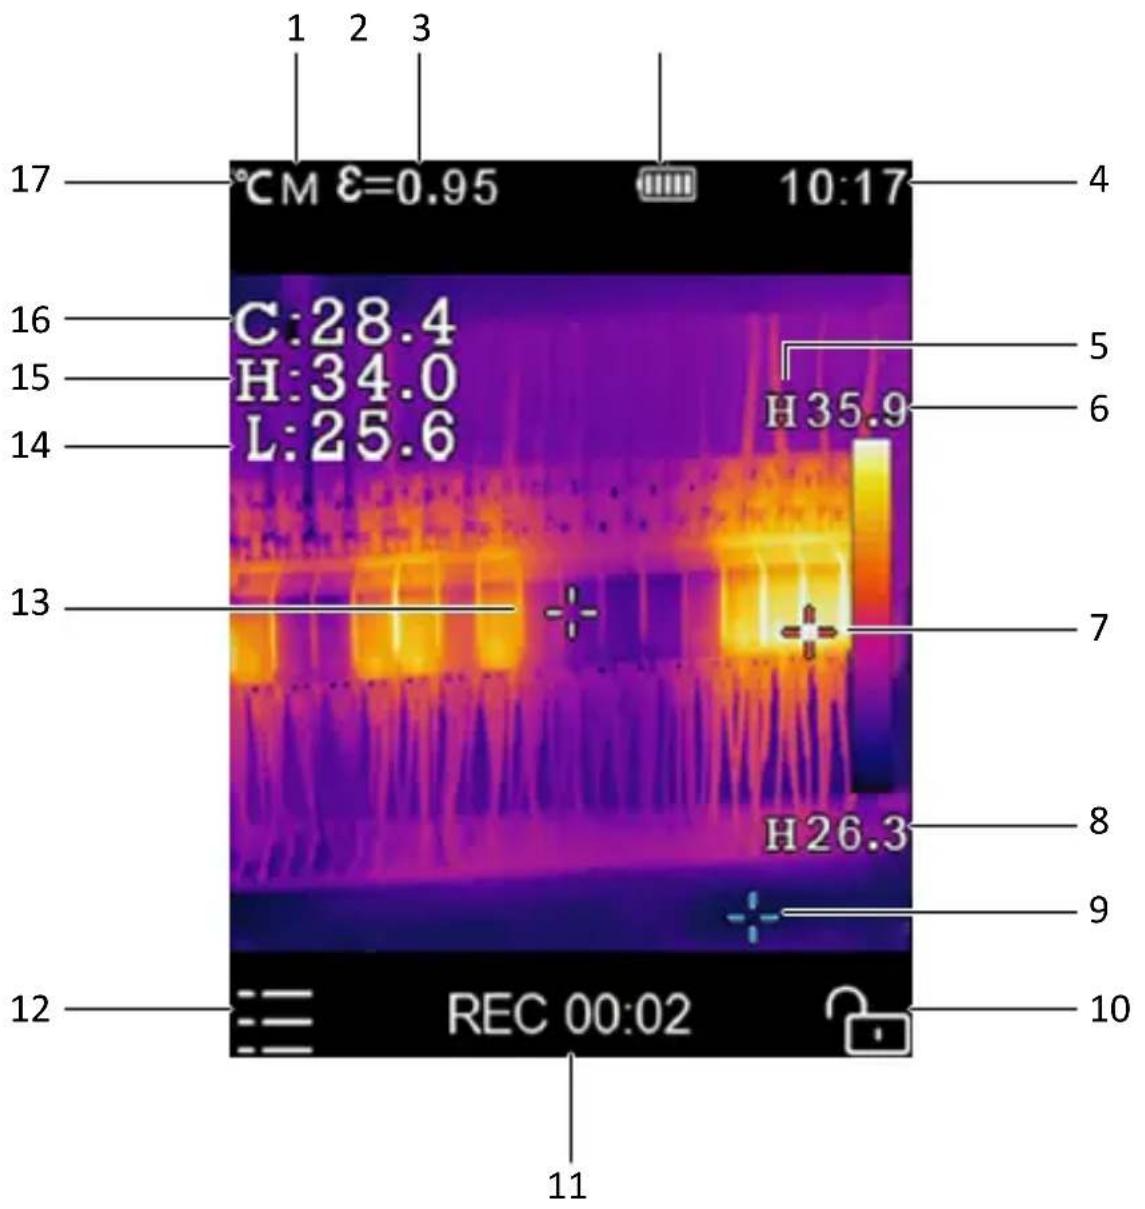
1 Distance unit 2 Emissivity
3 Rechargeable battery status 4 Time
5 Transformation indicator (A=Auto/H=HG)
6 Max temperature of current scene
7 Max temperature point 8 Min temperature of current scene
9 Min temperature point 10 Zoom lock
11 Video recording time 12 Menu
13 Centre point 14 Min temperature point reading
15 Max temperature point reading 16 Centre point temperature reading
17 Temperature unit
8 Getting started
8.1 Charging the battery
- Remove the cover from the charging port.
- Connect the USB-C® charging cable to the charging port.
→ The display shows the charging status. - Disconnect the cable when the rechargeable battery is fully charged.
- Attach the cover to the charging port to protect the port from dust and water.
8.2 Powering on and off
- Press and hold the power button to turn on the product.
- To turn the product off, press and hold the power button until the display is off.
8.3 Setting the date and time
- Press the menu button.
- Go to "Device settings > Date/Time".
- Set the date and time settings.
- Press the menu button to save settings.
- Use the power button to exit the menu.
8.4 Setting the language
- Press the menu button.
- Go to "Device settings > Language".
- Select the desired language.
- Press the menu button to save settings.
- Use the power button to exit the menu.
8.5 Setting auto power off
With the auto power off function, you determine if and after what time interval the product turns off automatically.
- Press the menu button.
- Go to "Device settings > Auto Power Off".
- Repeatedly press the menu button to select the desired time interval in minutes. Select "OFF" to keep the product on at all times.
- Use the power button to exit the menu.
9 Taking measurements
9.1 Taking measurements
- Point the product at the target object using the center crosshairs.
- Quickly press the up and down buttons to zoom in and out. For fine zoom adjustments, press and hold the up and down buttons.
→ The display indicates the magnification level.
- Press the trigger to take a measurement.
→ A measurement snapshot and its associated metadata is displayed on the display for review.
-
Press the menu button to store the measurement to the gallery --OR-- press the trigger or the power button to discard the measurement.
-
Continue taking measurements.
9.2 Focusing the image
For more accurate measurements, focus the image on the target object. By default, the product tries to focus automatically. If the automatic focus fails, you can manually refocus the image.
- Point the product at the target object.
- Press and hold the menu button to focus the image.
→ The display shows "IR calibrating...".
→ You have manually focused the image.
9.3 Locking the scene zoom
The scene zoom lock prevents accidental changes to the zoom level.
- Press the power button to lock the zoom.
→ The display shows the lock symbol in the locked position.
- Press the power button again to unlock the zoom.
→ The display shows the lock symbol in the unlocked position.
9.4 Restricting the temperature measurement range
Measuring in a more narrow temperature range improves the accuracy. If you know within which temperature range you measure, set the temperature range accordingly.
- Press the menu button.
- Go to "Measure Settings > Temp. Range".
- Select the required temperature range.
- Press the menu button to save settings.
- Use the power button to exit the menu.
9.5 Recording video
- Press and hold the trigger for approx. 2 seconds to start recording video.
- To stop recording and save the recording to memory, press the trigger again.
Note:
You cannot discard a video recording. All video recordings are saved to memory.
9.6 Viewing the image and video gallery
- Press the menu button.
- Go to "Gallery".
- Use the up and down buttons to navigate through the gallery. Play and pause videos with the trigger.
10 Visualizing measurements
10.1 Toggling min and max temperature display
By toggling the min and max temperature display, you show or hide the minimum and maximum temperature values of the scene on the display.
- Press the menu button.
- Go to "Measure Setting".
-
Select "Max/Min Temp".
-
Press the menu button to enable/disable a setting.
→ The cross-hairs and display values show/hide accordingly.
10.2 Limiting the temperature display range for better visualization
By limiting the temperature temperature range considered for visualization you can improve the sensitivity. For example, small temperature differences are visualized more starkly.
- Repeatedly press the power button until the zoom lock on the display is locked.
- Set the temperature span by adjusting the maximum temperature using the up and down buttons.
10.3 Using visual temperature alarms
By setting temperature alarms you are alerted if certain temperature conditions are met. After setting an alarm type, the corresponding temperature indications on the display turn red if the alarm is triggered.
The following types of alarms are available:
| Alarm type Trigger condition | |
| OFF All alarms disabled. | |
| Zone alarm If the object temperature is between the upper and lower values. | |
| Above alarm If the object temperature exceeds the upper value. | |
| Below alarm If the object temperature falls below the lower value. | |
| Alarm type Trigger | condition |
| Above and below alarm | If the object temperature falls outside of the upper and lower set values. |
To set alarms:
- Press the menu button.
- Go to "Measure Setting > Alarm mode".
- Select the alarm type and press the menu button.
→ The temperature setting field(s) shows.
- Set the temperature values that trigger the alarm. Confirm settings with the menu button.
- Press the menu button to save settings.
- Use the power button to exit the menu.
10.4 Choosing an image mode
Choose an image mode that best visualizes the temperature measurements for your use case.
A B C D
natural_image
Empty white rectangle with black border (no text or symbols)
natural_image
Blank gray rectangle with black border (no text or symbols)
natural_image
Abstract geometric shape with white and gray triangular sections (no text or symbols)IR = Infrared image
A = Picture in picture, B = Camera only, C = Thermal image only, D = Auto-fusion
- Press the menu button.
- Go to "Image Settings > Image mode".
- Select the desired image mode.
- Press the menu button to save settings.
- Use the power button to exit the menu.
10.5 Setting color palettes
Pallets change the false-color presentation of infrared images displayed or captured. A variety of palettes are available for specific applications.
- Press the menu button.
- Go to "Image Settings > Palette".
- Press the menu button to open the preview mode.
- Use the up and down buttons to select the desired setting.
- Press the power button to save settings and exit the preview mode.
10.6 Transforming images
Image transformation enhances the visual representation of temperature differences in the image.
| Mode Description | When to Use | |
| AUTO (Automatic) | Level and span are determined based on minimum and maximum temperature.The relationship between temperature and color is linear, which may improve detail and contrast. | Best for routine inspections and standard monitoring where temperature ranges are predictable. |
| HG (Histogram) | The represented image is enhanced by a histogram algorithm.The relationship between temperature and color is not linear. | For complex scenes when inspecting materials with subtle temperature differences or when looking for small thermal anomalies. |
- Press the menu button.
- Go to "Image Settings > Image Transform".
- Repeatedly press the menu button to toggle between settings.
- Use the power button to exit the menu.
→ The corresponding transformation mode indicator shows on the display (A=Auto/H=HG)
10.7 Increasing image resolution
The product is equipped with a resolution upscaling function that enhances low quality images. Upscaling is automatic as soon as the function is activated.
- Press the menu button.
- Go to "Image Settings."
- Select "Image Super Resolution" and enable or disable the function with the menu button.
- Use the power button to exit the menu.
10.8 Aligning camera and infrared image
A misalignment between the camera and infrared image can lead to incorrect visual interpretations. If you notice that the infrared image is not aligned with the camera image, adjust the alignment.
- Press the menu button.
- Go to "Image Settings > Image Align."
- Use the up and down buttons to adjust the x-coordinate of the image.
- Press the trigger to switch to the y-coordinates.
- Use the up and down buttons to adjust the y-coordinates of the image.
- Press the menu button to save settings.
11 Improving measurement accuracy
By configuring the following settings, you can significantly improve the accuracy of measurements:
■ Ambient temperature
Emissivity
■ Reflected temperature
■ Measuring distance
For more information on accuracy, see Understanding emissivity [▶ 56] and Understanding Instantaneous Field of View (IFOV) [▶ 57].
11.1 Setting the ambient temperature
Set the ambient temperature to the current room temperature to increase the accuracy of the measurements.
Note:
Allow the product to reach room temperature before you set the ambient temperature.
| Setting Values | |
| Ambient temperature -10 to +50 °C |
- Press the menu button.
- Go to "Measure Setting > Ambient Temperature".
- Use the up and down buttons to adjust the ambient temperature.
- Press the menu button to save settings.
- Use the power button to exit the menu.
11.2 Setting the emissivity
Set the emissivity to match the material of the target object. The emissivity of an object affects the accuracy of the measured temperature.

WARNING
Emissivity ( ) values below 0.60 can significantly affect accuracy
Risk of burns, fire, or other hazards!
- Use alternative measuring methods for critical applications.
For values refer to the reference table Emissivity table [▶ 66].
- Press the menu button.
- Go to "Measure Setting > Emissivity".
- Use the up and down buttons to select a value. To define a custom value, select "User defined" and enter the value.
- Press the menu button to save settings.
- Use the power button to exit the menu.
11.3 Setting the reflected temperature
Objects naturally reflect surrounding infrared energy, which can cause measurement errors that especially occur with low-emissivity materials.
While reflected energy typically matches ambient temperature, compensation is needed when high-temperature sources are nearby.
Setting the reflected temperature is a two-step process:
- Determine the reflected temperature.
- Set the reflected temperature.
Determining the reflected temperature
- Set the emissivity to 1.00.
-
Adjust the optical lens to near focus.
-
Looking in the opposite direction away from the object, press the trigger to take a measurement.
- Press the power button to lock the display.
- While still looking in the opposite direction, take at least another 4 measurements and note down the measured temperature.
- Calculate the average of the measured temperatures. This is the reflected temperature.
Setting the reflected temperature
- Press the menu button.
- Go to "Measure Setting > Reflection temperature".
- Enter the calculated reflected temperature value.
- Press the menu button to save settings.
- Use the power button to exit the menu.
11.4 Setting the measuring distance
Many substances in the air can absorb infrared rays, which can affect the accuracy of measurements. By setting the measuring distance, you can compensate for this effect. Always set the shortest possible distance.
| Setting Values | |
| Distance 0.1 - 2000 m |
- Press the menu button.
- Go to "Measure Setting > Distance".
- Use the up and down buttons to adjust the measuring distance.
- Press the menu button to save settings.
- Use the power button to exit the menu.
11.5 Understanding emissivity
Thermal imagers detect infrared energy to measure surface temperature. Measurement accuracy depends on material emissivity:
■ High-emissivity materials ( ≥ 0.90): painted metal, wood, water, skin, cloth
■ Low-emissivity materials (<0.60): shiny surfaces, unpainted metals
Low-emissivity surfaces require emissivity correction for accurate readings. Note that measurements might remain unreliable even after adjustment.
11.6 Understanding Instantaneous Field of View (IFOV)
The IFOV is the smallest object for which the temperature can be measured accurately. The IFOV is important for setting the measuring distance.
The IFOV is determined by the distance between the product and the target object.
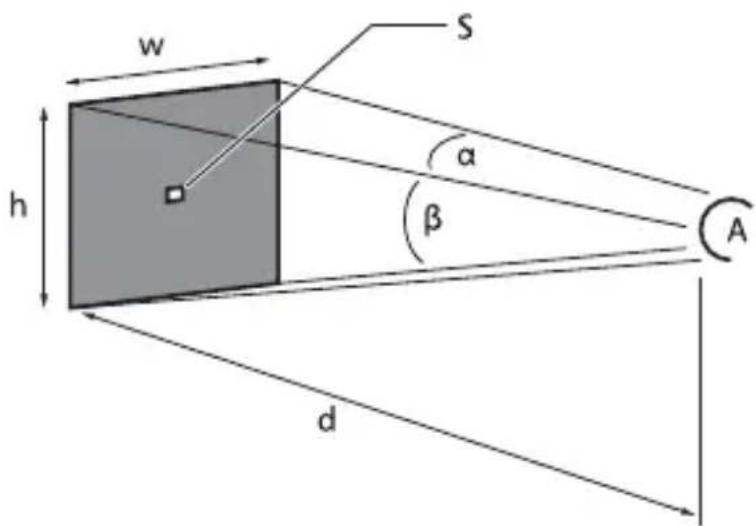
S = Spot size, A = Lens
w = 96 m, h = 96 m, d = 112 m, = 50^ , = 50^ , S = 100 cm x 100 cm (based on IFOV)
Formula
The IFOV is calculated by the below formula:
IFOV = (pixel size)/(lens focal length)
Example:
Lens = 9 mm, pixel size = 17 μm, FOV (horizontal)
= 41.5°, FOV (vertical) = 31.1°
=> IFOV = 17 μm/9 mm = 1.89 mrad
D:S Ratio
D:S theoretical (=1 / IFOV theoretical) is the calculated spot size based on the pixel size of the detector array and lens focal length. The D:S measure (= 1 / IFOV measure) is the spot size needed to provide an accurate temperature measurement.
D:S measure is typically 2 to 3 times smaller than D:S theoretical. This means the temperature measurement area of the target needs to be 2 to 3 times larger than that determined by the calculated theoretical D:S.
12 Image and video storage
12.1 Transferring records to a computer
Via the charging port you can transfer records to a computer. You can transfer records to Windows®, Linux, and macOS computers.
- Connect a USB-C® data cable to the charging port on the product and the other end to the computer.
→ The display shows "USB CONNECTED".
- Confirm the connection by pressing the menu button.
→ Product lists as a drive on the computer. - Enter the drive and copy records to the computer.
- After copying, eject the drive from the computer before disconnecting the cable.
12.2 Deleting individual records
- Press the menu button.
- Go to "Gallery".
- Locate the image in the gallery you want to delete using the up and down buttons.
- Press the menu button to flag the record for deletion.
- Press the menu button to confirm the action.
12.3 Deleting all records
Format the storage to delete all records at once.
- Press the menu button.
- Go to "Reset".
- Select "Format Memory".
- Press the menu button to confirm the action.
13 Live measurements via Windows® Software
13.1 Installing the software
Preconditions:
√ Windows® 7 or later
.NET Framework 4.5 or later
- Use the included software CD or download the software from www.conrad.com/downloads.
- Install the software on your computer.
13.2 Connecting software and product
- Connect a USB-C® data cable to the charging port on the product and the other end to the computer.
- Press the menu button.
- Go to "Device Setting > USB Mode".
- Select "PC Software" and confirm with the menu button.
- Start the software on the computer.
→ The software shows the live view of the product.
14 Troubleshooting
| Problem Possible cause Suggested solution | ||
| Product does not switch on. | Rechargeable battery is depleted. | Charge the rechargeable battery. |
| Power switches off during use. | No power Charge the rechargeable battery. | |
| Temperature readings are not accurate. | An incorrect emissivity value is set. | Check the emissivity values are correct for the material being measured. |
| Poor image contrast Incorrect color palette selection or poor lighting conditions | Choose a different color palette that enhances contrast or modify the lighting conditions if possible. | |
| Image artifacts Dirty lens Clean the lens. | ||
15 Cleaning and care
15.1 Housing
Important:
- Do not use aggressive cleaning agents, rubbing alcohol or other chemical solutions. They damage the housing and can cause the product to malfunction.
-
Do not immerse the product in water.
-
Clean the product with a dry, fibre-free cloth.
15.2 Infrared lens
Important:
- The lens has an anti-reflective coating that can get damaged if not cleaned correctly.
- Do not use abrasive materials and/or chemicals to rub/clean the lens.
- Do not use the following abrasive materials as they may damage the anti-reflective coating (e.g., micro fiber cloths, kitchen towels, toilet paper, towels, shirt cuffs etc.
To reduce calibration errors and maximize accuracy, the lens should be free from dirt and debris.
- Inspect the lens for dirt, dust, fingerprints etc.
- Use a non-contact cleaning method first (e.g., manual pump air blower).
- If further cleaning is required, use a fine tipped optical sensor cleaning swab.
→ Do not apply lens cleaning solution as this may damage / stain the lens. - Carefully wipe once across the lens (do not apply pressure).
→ To avoid scratches, wipe across the lens once and then discard the swab. - Repeat steps 2-4 as needed.
16 Disposal
This symbol must appear on any electrical and electronic equipment placed on the EU market. This symbol indicates that this device should not be disposed of as unsorted municipal waste at the end of its service life.
Owners of WEEE (Waste from Electrical and Electronic Equipment) shall dispose of it separately from unsorted municipal waste. Spent batteries and accumulators, which are not enclosed by the WEEE, as well as lamps that can be removed from the WEEE in a non-destructive manner, must be removed by end users from the WEEE in a non-destructive manner before it is handed over to a collection point.
Distributors of electrical and electronic equipment are legally obliged to provide free take-back of waste. Conrad provides the following return options free of charge (more details on our website):
in our Conrad offices
■ at the Conrad collection points
at the collection points of public waste management authorities or the collection points set up by manufacturers or distributors within the meaning of the ElektroG
End users are responsible for deleting personal data from the WEEE to be disposed of.
It should be noted that different obligations about the return or recycling of WEEE may apply in countries outside of Germany.
17 Technical data
17.1 Power supply
Input 5 V/DC, 2.0 A via USB-C®
Rechargeable battery .... 3.7 V, Li-ion battery, 2000 mAh, Type 18650
Recharge time .... 4 hours
Support for tethered operation.. Yes
17.2 Imaging and optical data
Field of view (FOV).... 50° x 50°
Minimum focus distance..... 0.5 m
Spatial resolution (IFOV) ...... 8.89 mrad
Thermal sensitivity/NETD..... < 0.05°C @ +30°C (+86°F) / 50 mK
Image frequency...... 25 Hz
Focus mode.... Focus free
Focal length.... 1.35 mm
Focal plane array...... Uncooled microbolometer
Spectral range 7.5–14 μm
IR resolution 96 x 96 pixels
Zoom capability 32x
17.3 Measurement
Temperature unit ..... °C / °F
Object temperature range..... -20 to +550°C (-4 to +1022°F)
Resolution.... 0.1 °C / 0.1 °F
Distance unit...... m / ft
Measuring distance .... max. 2000 m (calculation based on Instantaneous Field of View (IFOV))
Accuracy.... ±2 °C or ±2 % of environment temperature +10 to +35 °C with target object temperature >0 °C
17.4 Image presentation
Display..... LCD display, 50.8 mm (2")
Display resolution 320 x 240 pixels
Image modes...... IR image, Visual image, Picture in picture, Auto fusion
Color palettes .... Iron, Rainbow, White hot, Black hot, Brown hot, Blue-red, Hot-cold, Feather
17.5 Digital camera
Resolution.... 2 MP
FOV....65°
17.6 Measurement analysis
Spot.... Center spot
Automatic detection.... Auto hot or cold markers
Measurement corrections...... Emissivity, Reflected temperature
17.7 Storage
Storage media 3.5 GB internal EMMC
Video format ...... MPEG-4 (.mp4), 240x320@30fps
Video duration .... max. 60 min. per video
Image format ...... Standard JPEG with HIR files including measurement data
Image capacity .... approx. 6000 pictures
Storage modes ...... IR/visual images; simultaneous storage
17.8 Data transfer
Transfer via USB cable...... Yes
Operating system support ...... Windows®
17.9 Interfaces
Connection type..... USB-C®
Functions...... Data transfer and Live video with PC
17.10 Environment
Ingress protection rating...... IP54
Operating temperature ...... -15 to +50°C
Storage temperature...... -30 to +55°C
Drop test.... 2 m
Bump.... 25 g (IEC60068-2-29)
Vibration 2 g (IEC60068-2-6)
17.11 Others
Weight 260 g
Dimensions (W × H × D)...... 58 × 185 × 81 mm
17.12 Software
Operating system ...... Windows® 7 or later
Requirements ...... NET Framework 4.5 or later
17.13 Emissivity table
| Material Emissivity Material Emissivity | |||
| Water 0.96 Tape 0.96 | |||
| Stainless steel 0.14 Brass plate 0.06 | |||
| Aluminium plate 0.09 Human skin 0.98 | |||
| Asphalt 0.96 PVC plastic 0.93 | |||
| Concrete 0.97 Polycarbonate 0.80 | |||
| Cast iron 0.81 Oxidized copper 0.73 | |||
| Rubber 0.95 Rust 0.80 | |||
| Wood 0.81 Paint 0.90 | |||
| Brick 0.75 Soil 0.93 | |||
18 Default settings
| Category Setting Value | ||
| Measurement | Center spot measurement | On |
| Hot spot measurement | Off | |
| Cold spot measurement | Off | |
| Measurement parameters | Emissivity | 0.95 |
| Reflective temperature | 25 °C | |
| Image | Mode | Infrared |
| Palette | Iron | |
| Adjustment Auto | ||
| System Setting | Language | English |
| USB Mode USB Driver |

Sommaire
France (email): technique@conrad-france.fr
natural_image
Empty white rectangle with black border (no text or symbols)D

natural_image
Blank gray rectangle with black border (no text or symbols)
natural_image
Abstract geometric shape with white and gray triangular sections (no text or symbols)IR = Image infrarouge
Spot..... Point central
Dimensions (I x H x P).... 58 x 185 x 81 mm
17.12 Logiciel
11.6 IFOV begrijpen (Instantaneous Field of View = instant gezichts- 121 veld)....
natural_image
Empty white rectangle with black border (no text or symbols)
natural_image
Blank gray rectangle with black border (no text or symbols)
natural_image
Abstract geometric shape with white and gray triangular sections (no text or symbols)11.6 IFOV begrijpen (Instantaneous Field of View = instant gezichtsveld)
S = Spotgrootte, A = Lens
b = 96 m, h = 96 m, d = 112 m, α = 50 °, β = 50 °, S = 100 cm x 100 cm (geba-seerd op IFOV)
Formule
√ Windows® 7 of later
.NET Framework 4.5 of later
-
Gebruik de meegeleverde software-cd of download de software van www.conrad.com/downloads.
-
Installeer de software op uw computer.
Trilling.... 2 g (IEC60068-2-6)
17.11 Overige
Gewicht.... 260 g
Afmetingen (B x H x D).... 58 x 185 x 81 mm
17.12 Software
Besturingssysteem ...... Windows® 7 of later
Vereisten ...... NET Framework 4.5 of later
Copyright by Conrad Electronic SE
*3338132_V3_0325_jh_mh_de 54043197421812875-1 I7/O3 en

This is a publication by Conrad Electronic SE, Klaus-Conrad-Str. 1, D-92240 Hirschau (www.conrad.com).
All rights including translation reserved. Reproduction by any method (e.g. photocopying, microfilming or the capture in electronic data processing systems) requires prior written approval from the editor. Reprinting, also in part, is prohibited. This publication reflects the technical status at the time of printing.
Copyright by Conrad Electronic SE
*3338132_V3_0325_jh_mh_en 54043197421812875-2 I7/O3 en

Copyright by Conrad Electronic SE
*3338132_V3_0325_jh_mh_fr 54043197421812875-3 I7/O3 en

Copyright by Conrad Electronic SE
*3338132_V3_0325_jh_mh_nl 54043197421812875-4 l7/O3 en
- Introduction
- Operating Instructions for download
- Intended use
- Delivery contents
- Description of symbols
- Safety instructions
- General
- Handling
- Li-ion battery
- Operating environment
- Operation
- Measurement accuracy on low-emissivity surfaces
- WARNING
- Product overview
- Thermal imager
- Menu and setting controls
- Display
- Getting started
- Charging the battery
- Powering on and off
- Setting the date and time
- Setting the language
- Setting auto power off
- Taking measurements
- Taking measurements
- Focusing the image
- Locking the scene zoom
- Restricting the temperature measurement range
- Recording video
- Note:
- Viewing the image and video gallery
- Visualizing measurements
- Toggling min and max temperature display
- Limiting the temperature display range for better visualization
- Using visual temperature alarms
- Choosing an image mode
- Setting color palettes
- Transforming images
- Increasing image resolution
- Aligning camera and infrared image
- Improving measurement accuracy
- Setting the ambient temperature
- Setting the emissivity
- Emissivity ( ) values below 0.60 can significantly affect accuracy
- Setting the reflected temperature
- Determining the reflected temperature
- Setting the reflected temperature
- Setting the measuring distance
- Understanding emissivity
- Understanding Instantaneous Field of View (IFOV)
- Formula
- D:S Ratio
- Image and video storage
- Transferring records to a computer
- Deleting individual records
- Deleting all records
- Live measurements via Windows® Software
- Installing the software
- Preconditions:
- Connecting software and product
- Troubleshooting
- Cleaning and care
- Housing
- Important:
- Infrared lens
- Disposal
- Technical data
- Power supply
- Imaging and optical data
- Measurement
- Image presentation
- Digital camera
- Measurement analysis
- Storage
- Data transfer
- Interfaces
- Environment
- Others
- Software
- Emissivity table
- Default settings
- Sommaire
- Logiciel
- IFOV begrijpen (Instantaneous Field of View = instant gezichtsveld)
- Formule
- Overige
Brand : VOLTCRAFT
Model : WB-90
Category : Measuring equipment