KE4V - Food Processor Sammic - Free user manual and instructions
Find the device manual for free KE4V Sammic in PDF.
| Product Type | Professional food processor (vegetable cutter/cutter) |
| Model | Sammic KE4V |
| Power supply | 230V 50-60 Hz 1~ (120V 50-60 Hz 1~ available) |
| Power | 1100 W (1.5 HP) for 230V / 1400 W (2 HP) for 120V |
| Variable speed (rpm) | 300 - 3000 rpm (cutter mode); 300 - 1000 rpm (vegetable cutting mode) |
| Bowl capacity (cutter) | 4.4 liters |
| External dimensions (W x D x H) | 252 x 309 x 434 mm |
| Net weight | 11.9 kg |
| Motor body material | Stainless steel and robust alloy |
| Main functions | Chopping, dicing, grating, slicing, purées, sauces, doughs, breadcrumbs |
| Operating modes | Cutter (10 speeds) and Vegetable cutter (5 speeds); automatic programs P1, P2, P3 |
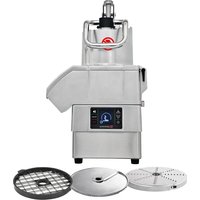
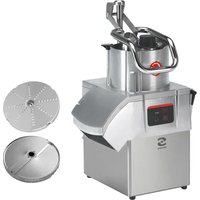
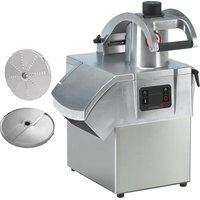
| Supplied accessories | Disks (A), grids (G), pusher (B), tamper (D), ejector (I), chute (H), lid (E, F, M), blade (N), container (O) |
| Control panel | Digital display with icons, Force Control, timer, counters |
| Safety | Lid and pusher lock; automatic stop 15s after opening; thermal protection; accessory detection |
| Noise level | Less than 70 dB(A) at 1 m |
| Maintenance and cleaning | Wash food contact parts with soapy water; do not use abrasive detergents; do not clean with water jet |
| Spare parts and repairability | Blades, disks and grids can be sharpened; replacement by SAMMIC authorized technical service |
| General information | Professional use (catering, restaurants); manufactured by SAMMIC S.L. (Spain) |
Frequently Asked Questions - KE4V Sammic
User questions about KE4V Sammic
0 question about this device. Answer the ones you know or ask your own.
Ask a new question about this device
Download the instructions for your Food Processor in PDF format for free! Find your manual KE4V - Sammic and take your electronic device back in hand. On this page are published all the documents necessary for the use of your device. KE4V by Sammic.
USER MANUAL KE4V Sammic
Vegetable preparation machine - cutter
MANUAL DE INSTRUÇÕES
INSTRUKCJA OBSŁUGI
ES
EN
DE
FR
IT
PT
PL
natural_image
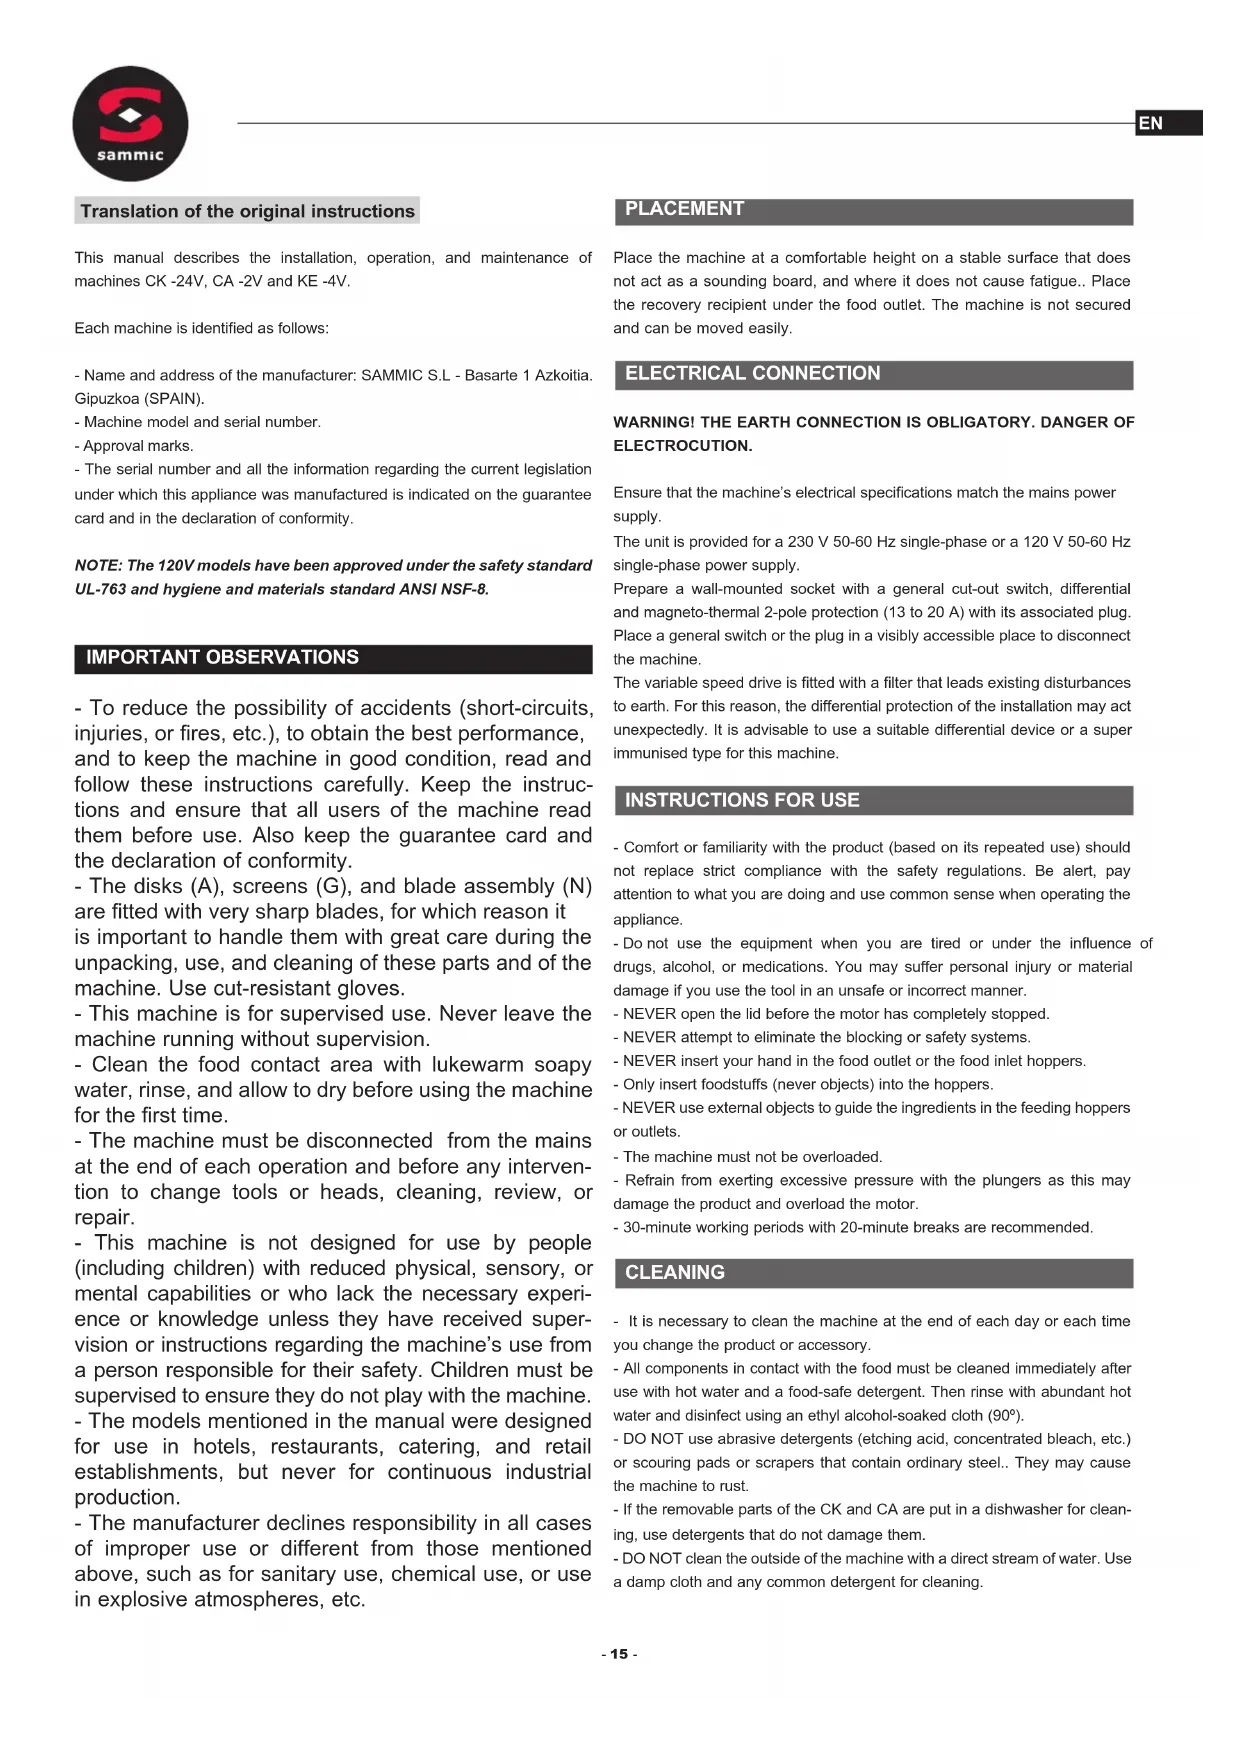
Two black square kitchen appliances with control panel and display screen, no visible text or symbols on the devices themselves.FIG 1
text_image
1 2 3 4 5 6 7 8 9 10 88 88:88 RPM 88:88"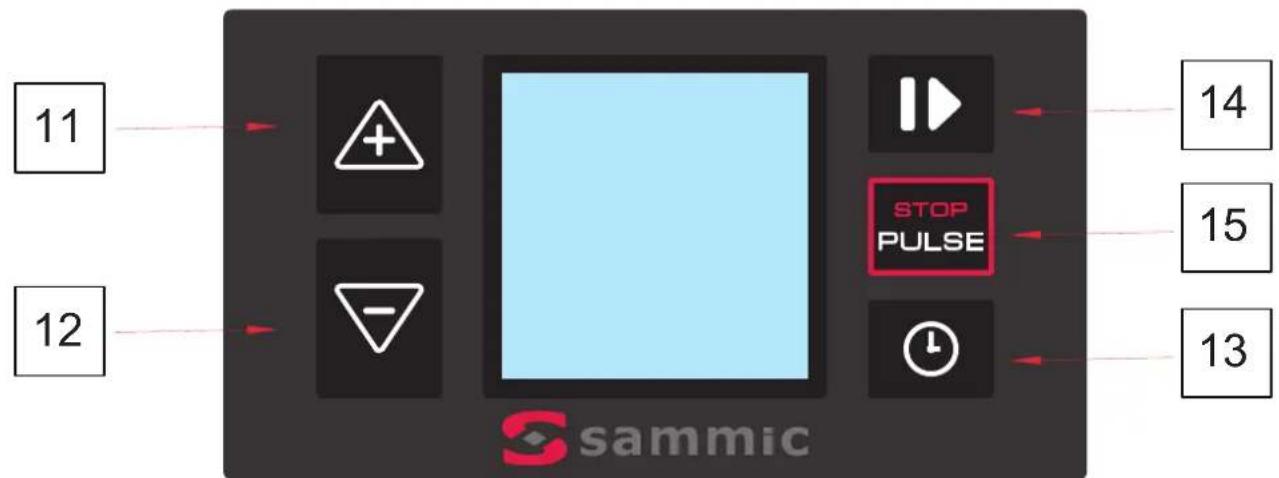
flowchart
graph TD
    A["11"] --> B["+"]
    C["12"] --> D["-"]
    B --> E["STOP PULSE"]
    D --> E
    E --> F["14"]
    E --> G["15"]
    E --> H["13"]
FIG 2
text_image
Technical diagram of a mechanical device with labeled parts and exploded view, including internal components like fans, gears, and control knobs.FIG 3
natural_image
Technical line drawing of two identical industrial equipment units with control panels and mounting brackets (no text or symbols)FIG 4
natural_image
Technical line drawings of a mechanical device with two views showing internal components and adjustment arrows (no text or symbols)FIG 5
natural_image
Technical line drawings of a mechanical device with two views showing internal components and control buttons (no text or symbols)FIG 6
FIG 7
natural_image
Technical line drawings of two mechanical devices with rotating components and directional arrows indicating motion (no text or symbols)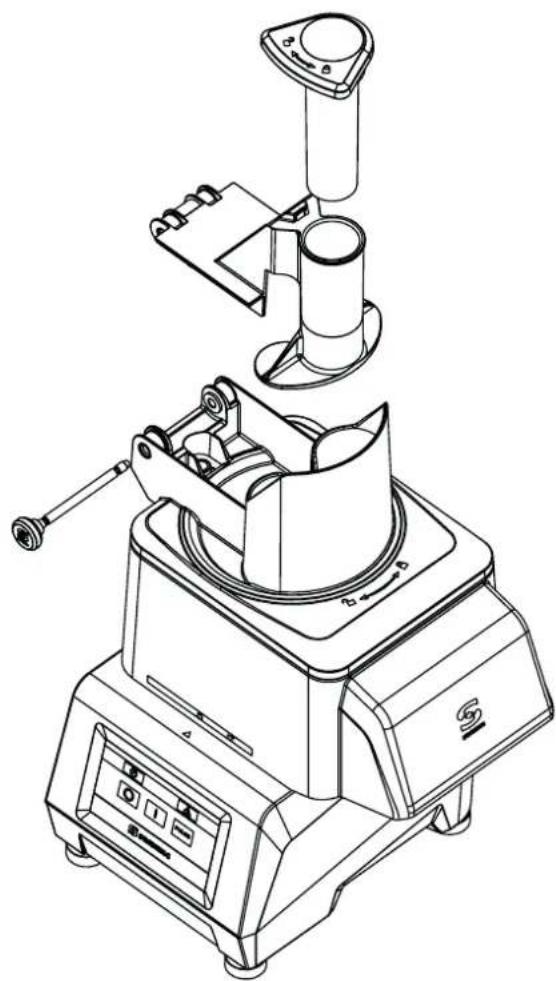
natural_image
Technical line drawing of a mechanical device with no visible text or symbolsFIG 1
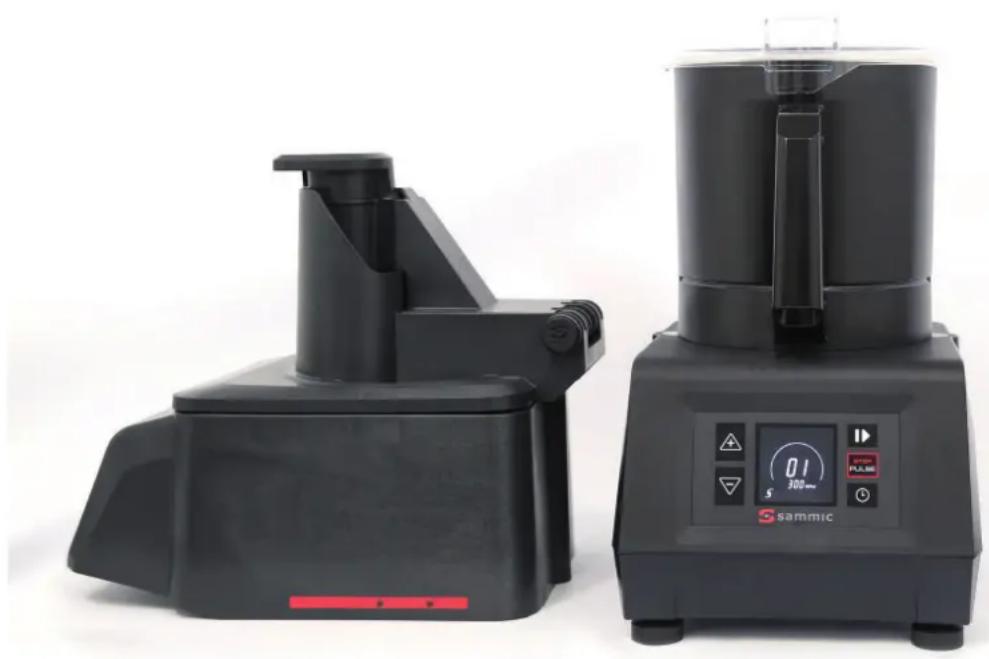
1 - Informative text.
2 - Time display. Cutter mode only.
3 - FORCE CONTROL display.
5 - Detection of cutter head and shaft rotation. Cutter mode only.
6 - Time display. Cutter mode only.
7- Detection of cutter head and shaft rotation. Cutter mode only. 8 - Speed level and associated RPM.
9 - Pause.
10 - Alert and error indicator.
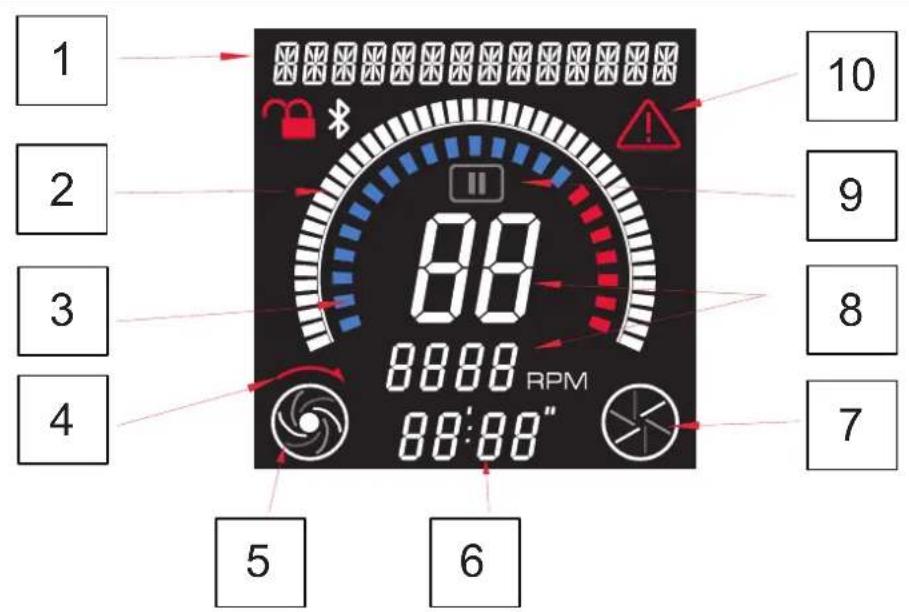
| Function Initial settings | |||
| Cutter Cutter | |||
| 11 | Up Software version | ||
| 12 | Down Hardware version | ||
| 11+12 | Real-time parameter display. | ||
| 13 | Timer | FORCECONTROL | Icons display screen |
| 14 | Motor ON / Motor OFF Counter display | ||
| 15 | PRESS / STOP Selection of parameters | ||
| 13+15 | Demo Force control | ||
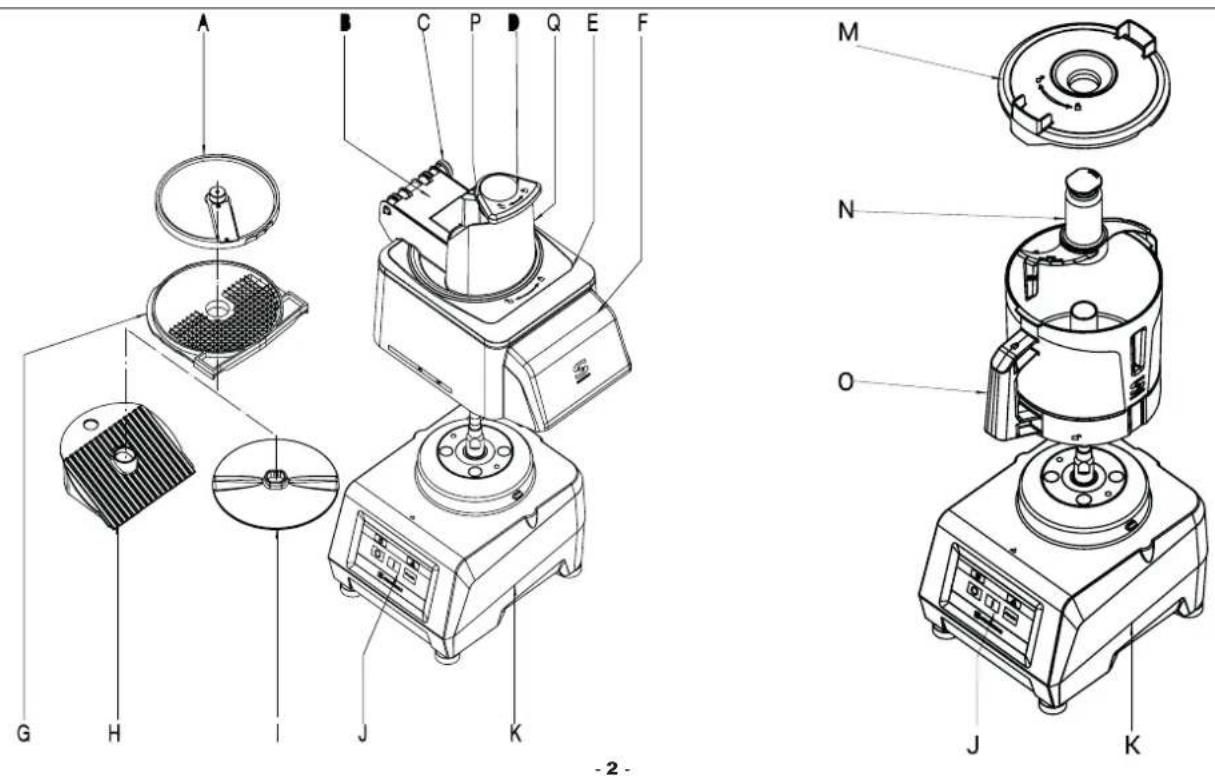
FIG 2 - Technical description
A - Disk
B - Plunger
C - Removable pin
D - Mallet
E - Lid
F - Lower lid
G - Screen
H - Ramp
I - Ejector
J - Keyboard
K - Motor block
M - Pressure pot lid
N - Blade
O - Pressure pot
| Operation Maximum amount | Cutter | Speed Blade recommended | Notes |
| Raw meat in general 1-1.5 kg l or 3-6 Smooth | |||
| Cooked meat or boiled ham 2-2.5 kg l or 3-7 Smooth Recommendation | Press | ||
| Pâtés 1-1.5 kg l or 3-6 Smooth or micro-toothed | |||
| Fish | 1.5-2 kg l or 3-7 Smooth | ||
| Dough and pasta | 1-1.5 kg l or 3-5 Smooth or micro-toothed | ||
| Breadcrumbs | 0.5-1 kg | l or 5-10 Micro-toothed | |
| Purées, sauces, soups | 1 litre | l or 7-10 Micro-toothed | |
| Mayonnaise | 3 litres | l or 7-10 All | |
| Icing sugar | 1-1.5 kg | l or 8-10 Smooth | |
| Chop onion, garlic, parsley | 1 kg | l or 1-4 Smooth or micro-toothed | Recommendation: Press |
Translation of the original instructions
This manual describes the installation, operation, and maintenance of machines CK -24V, CA -2V and KE -4V.
Each machine is identified as follows:
- Name and address of the manufacturer: SAMMIC S.L - Basarte 1 Azkoitia. Gipuzkoa (SPAIN).
- Machine model and serial number.
- Approval marks.
- The serial number and all the information regarding the current legislation under which this appliance was manufactured is indicated on the guarantee card and in the declaration of conformity.
NOTE: The 120V models have been approved under the safety standard UL-763 and hygiene and materials standard ANSI NSF-8.
IMPORTANT OBSERVATIONS
- To reduce the possibility of accidents (short-circuits, injuries, or fires, etc.), to obtain the best performance, and to keep the machine in good condition, read and follow these instructions carefully. Keep the instructions and ensure that all users of the machine read them before use. Also keep the guarantee card and the declaration of conformity.
- The disks (A), screens (G), and blade assembly (N) are fitted with very sharp blades, for which reason it is important to handle them with great care during the unpacking, use, and cleaning of these parts and of the machine. Use cut-resistant gloves.
- This machine is for supervised use. Never leave the machine running without supervision.
- Clean the food contact area with lukewarm soapy water, rinse, and allow to dry before using the machine for the first time.
- The machine must be disconnected from the mains at the end of each operation and before any intervention to change tools or heads, cleaning, review, or repair.
- This machine is not designed for use by people (including children) with reduced physical, sensory, or mental capabilities or who lack the necessary experience or knowledge unless they have received supervision or instructions regarding the machine's use from a person responsible for their safety. Children must be supervised to ensure they do not play with the machine.
- The models mentioned in the manual were designed for use in hotels, restaurants, catering, and retail establishments, but never for continuous industrial production.
- The manufacturer declines responsibility in all cases of improper use or different from those mentioned above, such as for sanitary use, chemical use, or use in explosive atmospheres, etc.
PLACEMENT
Place the machine at a comfortable height on a stable surface that does not act as a sounding board, and where it does not cause fatigue.. Place the recovery recipient under the food outlet. The machine is not secured and can be moved easily.
ELECTRICAL CONNECTION
WARNING! THE EARTH CONNECTION IS OBLIGATORY. DANGER OF ELECTROCUTION.
Ensure that the machine's electrical specifications match the mains power supply.
The unit is provided for a 230 V 50-60 Hz single-phase or a 120 V 50-60 Hz single-phase power supply.
Prepare a wall-mounted socket with a general cut-out switch, differential and magneto-thermal 2-pole protection (13 to 20 A) with its associated plug. Place a general switch or the plug in a visibly accessible place to disconnect the machine.
The variable speed drive is fitted with a filter that leads existing disturbances to earth. For this reason, the differential protection of the installation may act unexpectedly. It is advisable to use a suitable differential device or a super immunised type for this machine.
INSTRUCTIONS FOR USE
- Comfort or familiarity with the product (based on its repeated use) should not replace strict compliance with the safety regulations. Be alert, pay attention to what you are doing and use common sense when operating the appliance.
- Do not use the equipment when you are tired or under the influence of drugs, alcohol, or medications. You may suffer personal injury or material damage if you use the tool in an unsafe or incorrect manner.
- NEVER open the lid before the motor has completely stopped.
- NEVER attempt to eliminate the blocking or safety systems.
- NEVER insert your hand in the food outlet or the food inlet hoppers.
- Only insert foodstuffs (never objects) into the hoppers.
- NEVER use external objects to guide the ingredients in the feeding hoppers or outlets.
- The machine must not be overloaded.
- Refrain from exerting excessive pressure with the plungers as this may damage the product and overload the motor.
- 30-minute working periods with 20-minute breaks are recommended.
CLEANING
- It is necessary to clean the machine at the end of each day or each time you change the product or accessory.
- All components in contact with the food must be cleaned immediately after use with hot water and a food-safe detergent. Then rinse with abundant hot water and disinfect using an ethyl alcohol-soaked cloth (90°).
- DO NOT use abrasive detergents (etching acid, concentrated bleach, etc.) or scouring pads or scrapers that contain ordinary steel.. They may cause the machine to rust.
- If the removable parts of the CK and CA are put in a dishwasher for cleaning, use detergents that do not damage them.
- DO NOT clean the outside of the machine with a direct stream of water. Use a damp cloth and any common detergent for cleaning.
MAINTENANCE
- Verify before each use that the machine's safety devices are working properly. Call the SAMMIC authorised technical service if you detect any anomaly.
- Check the condition of the drive shaft seal on a weekly basis to ensure that this area remains water-tight. Installation of a new seal is recommended every time the drive shaft is loosened for maintenance.
- If the power cable is damaged, a new one must be installed before the machine is used again. Only a SAMMIC authorised technical service may perform this replacement.
- If the engine block (K) or any other part is damaged, the affected parts must be replaced before the machine is used again. Only a SAMMIC authorised technical service may perform this change.
- The noise level in operation (according to EN ISO 11201:1995) is less than 70 dB(A) with the machine placed at a height of 1.6 m and a distance of 1 m. Background noise: 32 dB(A).
FUNCTIONS AND OPERATION OF THE ELECTRONIC CONTROL
ON/OFF (14):
Starts the motor if all the safety devices permits it. Pressing a second time stops the motor.
PRESS (15):
The motor starts and runs as long as this key is held down and stops when it is released.
In Cutter mode.
- If the machine is in continuous operation, pushing PRESS (15) stops it and deactivates the timer.
- If a programme is running and you push PRESS (15), the machine stops and the timer returns to the initial point.
UP (11)
Each time the key is pressed the setting on the display increases.
DOWN (12)
Each time the key is pressed the setting on the display decreases.
TIMER (13)
Cutter mode:
Press to activate the countdown function. Use the UP (11) or DOWN (12) buttons to adjust the time. After selecting the time, a second press confirms the selection.
Veg. slicer mode:
Press and hold for three seconds to access the FORCE CONTROL function.
OPERATION
When the machine is switched on, the "Viewer" (1) displays two central lines (wait). Icon number 7 (representing a cutting disk) is displayed on the Viewer if the "Vegetable Cutter" accessory is mounted and Icon number 5 (representing a rotor) is displayed if the "Cutter" is mounted, Indicating that
the control plate has identified each accessory. The speed level and the associated RPM are also displayed.
Ten different speeds (1 to 10) and programmes P1, P2 and P3 can be selected in "Cutter" mode and five different speeds (1 to 5) can be selected in "Vegetable Cutter" mode.
- Time control: Only available in "Cutter" mode. The countdown time and automatic shut-down can also be programmed.
- If the Start button is pushed when any of the safety devices is out of position, an associated indicative text will appear on the screen.
START-UP AND GENERAL OPERATION
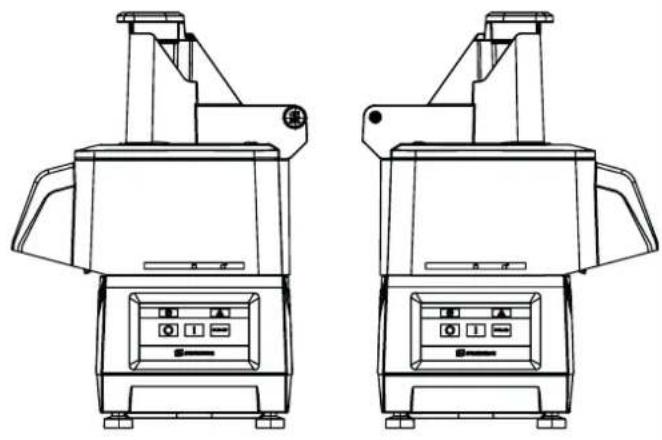
"Vegetable Cutter" operating mode (CK-24V, CA-2V)
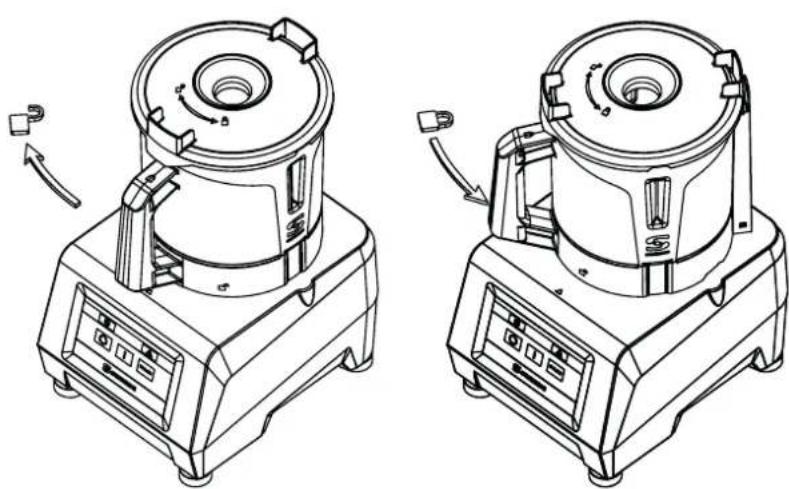
The “Vegetable Cutter” accessory (F) can be positioned in two different directions (FIG 3) so that the outlet for the products faces one direction or the other.
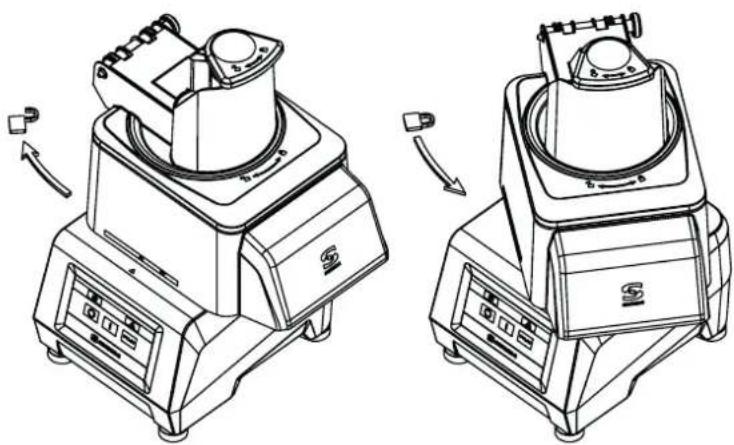
With the machine disconnected from the mains:
- Place the "Vegetable Cutter" accessory on the motor block and turn it anticlockwise as shown in the drawings (Fig.4).
- The lid (E) must be fitted as shown in the drawings by turning it anticlockwise (Fig. 5)
- Place the plunger (B) as shown in the drawings and fasten it in position with the pin (C). (Fig.6)
Installation of disks (A) and screens (G)
- Remove the lid (E) - plunger (B) assembly by turning it clockwise (Fig.5).
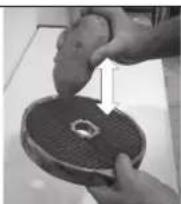
- Place the ejector (I) in its housing on the drive shaft or discharge ramp (H).
- The screen (G) is inserted into the lid cavity (F) when required by the process.
- Fit a disk (A) on the drive shaft. Disks that work with screens need to be fastened in position.
- Reinsert the lid (E) - plunger (B) assembly by turning it anticlockwise (Fig. 5).
Start the machine and the screen will display the Icon number 7 (represented by a cutting disk), the speed level, and its associated RPM. The speed can be adjusted with the motor running or stopped.
Pressing "Start" (7) with the lid (E) closed and the plunger (B) down will start the motor. The Icon No. 7 will begin to rotate, indicating that the motor is in movement.
The "Pause" icon will be displayed if "Start" (7) is pressed with the motor stopped, the hinged lid (E) closed, and the plunger (B) up, indicating that the plunger must be lowered. The motor will start when the plunger (B) is lowered.
The running motor will stop if the plunger (B) is raised. When the plunger (B) is lowered, the motor restarts automatically. The running motor will stop if the hinged lid (E) is opened. When the hinged lid (E) is closed, it starts up again.
If the plunger (B) is not lowered or the lid is not closed for more than 15 seconds, the "Start" button (7) must pressed again to start the motor.
If the machine is left running with the plunger (B) in the lowered position, the machine will stop automatically after 30 minutes.
If the Start (7) button is pushed when any of the safety devices is out of position, an associated indicative text will appear on the screen.
The PRESS button (15) also works in cutter mode: the motor starts while it is held down and stops when it is released.
FORCE CONTROL function:
- With the motor running, ring 3 on the screen indicates the load under which the motor is working. When the indicator approaches the red zone, it means that the motor is nearing overload. This level varies depending on the features of the product being processed and the force exerted by the plunger.
- An acoustic and visual signal can be configured to warn that a certain level of force has been reached. This is useful to ensure that constant force is applied to obtain uniform cutting.
- Lower the plunger and increase the load until the acoustic signal sounds or the bar can be seen, indicating that the desired level of force has been reached. Maintain this force level to obtain uniform cutting throughout the process.
- To access the FORCE CONTROL function, press and hold the TIME button (13) for 3 seconds. Use the UP (11) and DOWN (12) keys to select the desired level, then press TIME (13) again to exit.
Operation with the normal intake hopper (P) and plunger (B). CK-24V and CA-2V.
- The mallet (D) must be housed and locked in its hole. Rotate it anti-clockwise to do so.
- Start the cutter.
- Raise the plunger (B). The motor stops.
- Introduce the products into the normal hopper (P).
- The motor starts and the cutting process begins when the plunger starts to lower (B). Push the product by gently lowering the plunger (B). Repeat the process as many times as required.
- Press "Stop" (14) to terminate the production.
Operation with cylindrical hopper (P). CK-24V, CA-2V.
This 47 mm ∅ hopper is used to cut long, cylinder-shaped vegetables such as carrots, endives, cucumber, etc.
- Start the cutter.
- Release the mallet (D) by rotating it clockwise.
- Insert the products through the hole and push them gently with the "Mallet" (D). Repeat the process as many times as required.
- Press "Stop" (14) to terminate the production.
IMPORTANT Leave the mallet (D) inside the cylindrical hopper when the latter is not in use.
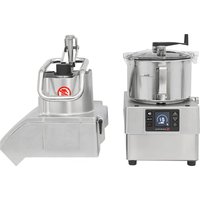
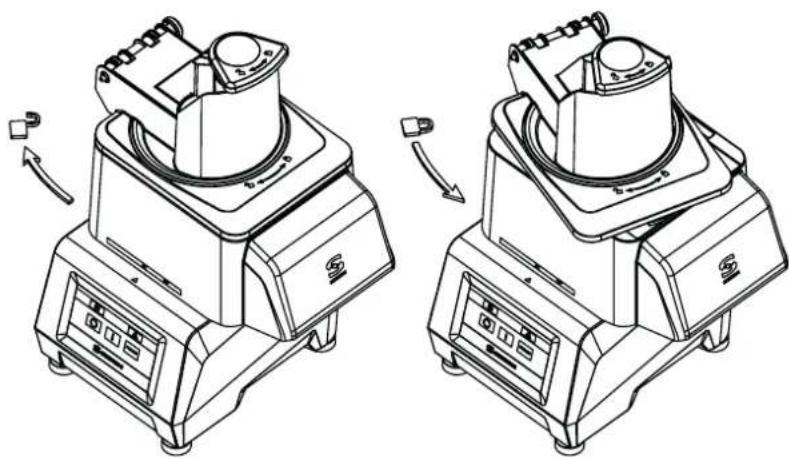
"Cutter" operating mode. (CK-24V and KE-4V):
With the machine disconnected from the mains:
- Place the "Cutter" accessory on the motor block and turn it anticlockwise as shown in the drawing. The handle must be located just above the keypad for the machine to operate. (Fig. 7)
Place the "Blade assembly" (N) and close the lid (M) by turning it anticlockwise until it is engaged and locked. The lid (M) has a hole for inserting the product while the machine is running..
When the machine is switched on, the screen will display the Icon No. 5 (represented by the rotor) together with the speed level and the associated RPM. The speed can be adjusted with the motor running or stopped.
It can be started by pressing the START key (14) and stopped by pressing the same key again or the PRESS key (15). It also starts and continues to operate while the PRESS button (15) is held down. With the motor running, icon No. 5 rotates.
Each time the START button (14) is pressed, a counter appears that counts the time taken for each process. The time is reset by pressing the PRESS button (15) or if the machine is stopped for one minute in pause mode (9).
The countdown time can be programmed by pressing the CLOCK TIME
(13) key when fitting the pot. By pressing the same key again or starting the motor, the countdown will then start. The timer has an associated indicator circle that provides a visual reference of the time remaining until the end of the process. When the time reaches zero, the motor stops and a "beep" is emitted.
Dedicated programmes
With the motor stopped, press the DOWN button (12) until you reach the dedicated programmes P1 (dense texture), P2 (light texture), and P3 (pulses). P1 and P2 are automatic programmes used to obtain a fine and consistent grind. The pre-set time can be changed by pressing the TIME button (13) (when the engine is stopped). P3 is a pulse program:; change the number of pulses to be realized with the TIME button (13). Press the START button (14) to start it up.
P1 (dense texture) for banana-type products.
P2 (light texture) for tomato-type products.
Motor power display
When the motor is running, ring 3 on the screen indicates the load under which it is working. When the indicator approaches the red zone, it means that the motor is nearing overload. This level varies depending on the features of the product being processed.
CLEANING
Cleaning the "Vegetable Cutter" accessory CK-24V and CA-2V:
- Unlock the lid (E) by turning it clockwise as shown in the drawing and remove it.
- Remove the disk (A) by turning it clockwise and carefully pulling it upwards. Remove the screen (G) and the ejector (I) or the discharge ramp (H).
- The plunger (B) and the hinged lid (F) can be removed for cleaning.
WARNING: To remove any product embedded in the screens (G), simply tap them with an elongated potato or a whole carrot in the cutting direction. This prevents damage to the screen (G). Be careful with the edge of the screen (G). Never use hard objects to hit the screen (G).
Cleaning the "Cutter" accessory CK-24V and KE-4V:
- If the deposits are dry and adhere to the pot and the blades, put hot water and detergent into the pot and switch the machine on to soften the residue.
- To avoid splashes, remove the pot (O) with the blade (N) inside once the product has been processed.
Cleaning the CK motor block:
The outside of the machine must NEVER be cleaned with a direct jet of water. Use a damp cloth and any common detergent for cleaning. DO NOT use abrasive detergents (etching acid, concentrated bleach, etc.) or scouring pads or scrapers that contain ordinary steel as they may cause damage and rust to the machine.
"Vegetable Cutter" attachment: Operation of disks (A) and screens (G).
- Disks (A):
- Disks (A) FCS-1 and FCS-2 to cut potato chips or thin slices of 1 and 2-mm.
- Disks (A) from FCS-3 to FCS-12 to obtain 3 to 12-mm slices of potatoes, carrots, beets, cabbage, cucumbers, zucchini, onions, radishes, etc.
- SHS-type grater disks (A), from 2-7 mm to shred vegetables and grate cheese, bread, nuts, almonds, etc.
Use disks (A) FCES to cut potato "matchsticks", and strips of carrots, celery, beetroot, etc.
- Disks (A) SHSF and SHSG to grate bread, cheese, chocolate, etc.
- Disks (A) and screens (G). Possible combinations:
- Disks (A) FCS-8, FCS-10, and FCS-12 combined with screens (G) FFS-8 and FFS-10 to obtain chip-style potatoes.
- Disks (A) FCS-8, FCS-10, and FCS-12 combined with screens (G) FMS-8, FMS-10, and FMS-12 to obtain fingers and/or cubes of potatoes of 8 to 12 mm for omelettes, of vegetables and fruit for fruit salads, Russian salads, etc.
Ejector (I) and ramp (H)
- Ejector: to extract the cut product rapidly and maintain a large production.
- Ramp: the product falls out gradually due to gravity. To avoid damage to the cut product.
"Cutter" attachment
Using the "Cutter" accessory you can:
CHOP: parsley, garlic, onion, cheese, cooked ham, cooked meat, etc.
SAUCES: tomato, mayonnaise, tartar, garlic mayonnaise, green sauce, gazpacho, etc.
PURES: legumes, vegetables, compotes, etc.
PASTA: prawns, mussels, oysters, meat, sausages, etc.
SOUPS / CREAMS: seafood, garlic, vegetables, legumes, meat, etc..
FLAVOURED BUTTERS: garlic, parsley, fine herbs, anchovies, etc. in pastries:
CHOP: almonds, hazelnuts, chocolate, raisins, fruit for fruit salad, etc.
PREPARE: powdered sugar, almond paste, whipped cream; creamed chocolate, vanilla, coffee, strawberries, and fruit in general, etc.
SHARPENING THE BLADES
ATTENTION: Disks (A), screens (G) and the blade assembly (N) have very sharp blades and must be handled with extreme care.
The disc blades (A) and blade assembly (N) can be removed easily for sharpening. Always use soft stones to sharpen them, maintaining the blades' cutting angle.
DISPOSAL
PACKAGING
Follow current environmental protection standards in your country to dispose of the packaging.
MACHINE
This machine is subject to the provisions of European Directive 2012/19/EU on waste electrical and electronic equipment (WEEE). The machine is marked with the WEEE symbol:
- Do not dispose of this machine with the normal household waste.
- Dispose of the machine at an authorised waste management centre or through municipal waste disposal entities. Comply with the applicable regulations.
You can obtain information about waste disposal and the location of your nearest recycling centre, for example, from your municipal cleaning service.
OPERATING INCIDENTS
The machine fails to start on pressing "Start" (7), when it is ready for operation and the message indicating the action to be performed appears on the display. The associated sensor may not be working.
- The screen fails to turn on: The flat cable that connects the power and control boards is loose or damaged or the electronic control panel is faulty.
- The machine was running and stopped without any key being pressed. With the machine running, and without any action on any device, it will stop automatically after 30 minutes.
In Vegetable Cutting mode the motor will not start when the plunger (B) is lowered.
- If the plunger (B) is left open for more than 15 seconds, it is necessary to press "Start" (7) again to reset the cutter.
- The hopper may be too full and the plunger (B) may not activate the microswitch. Reduce the amount of product in the hopper and try again.
- If the CK noise from the machine is excessive, disk (A) or the blade assembly (N) is rubbing somewhere. The main shaft bearings have probably deteriorated.
- If the machine vibrates excessively, check the condition of disk (A) or the blade (N). A piece of food may be stuck, unbalancing them.
- Check that all of the components are in position.
- If the problem persists after revising the previous point, there is a problem with one of the safety devices. Call a SAMMIC authorised technical service.
- To verify that the keypad is working properly, press the keys with an accessory fitted and verify that the plate emits a beep and the display is activated. If this doesn't work, change the keyboard.
The unit has its own protection devices that are activated to protect itself and prevent damage to important components. These protections are represented by a red triangle (1) and a circle (2) lit simultaneously with the indicative text. Display of these indicators does not mean that the equipment has been damaged but that it has detected a status that triggers the programmed protection. Press Start (14) again to reset the protection system. Contact the authorised SAMMIC technical service if the alert persists and does not permit normal operation of the machine. These alerts are recorded in a log that can be consulted.
In addition to the FORCE CONTROL function that enables users to monitor the status of the motor, it is possible to display some of the machine's parameters while it is running. If you press and hold the UP and DOWN keys at the same time, 4 numbers appear at the top of the display, which, from left to right, indicate: motor current, motor power, IGBT module temperature, and the temperature inside the machine.
Motor current: tenths of an ampere.
Motor power: W
IGBT temperature: °C
Internal temperature: °C
If any of the alerts persists or exceeds the values indicated in the manual, check and assess if the work being done is proportional and try to adjust the load and rest period to keep the parameters within the proper ranges to avoid
tripping the protections. If you consider there is an anomaly in the machine, contact Sammic's authorised technical service.
INITIAL SETTINGS
The following parameters can be changed on the machine:
1- Language
2- Maintain cutter speed: If enabled, the initial cutter speed will be the one used last time.
3- Maintain FORCE CONTROL: FORCE CONTROL is always active.
4- Maintain programme time: the change of time of a programme is permanent.
5- Programmes (see section "Programmes").
6- Factory settings: reset the machine to return it to its factory settings.
To change these settings:
- Switch on the machine and keep the PRESS button (15) pressed during the first three seconds.
- Use the UP (11) or DOWN (12) buttons to move from one setting to another and choose the one you want to change with the START button (14). If you make a mistake, push the PRESS button (15) once to return to the previous level.
- On the next level, use the UP (11) or DOWN (12) buttons to move from one value to another and confirm with the START button (14). By accepting the change, the machine returns to the previous level. If you make a mistake, push the PRESS button (15) once to return to the previous level.
To exit the settings, push the PRESS button (15)..
CHANGE OF LANGUAGE
- Switch on the machine and keep the PRESS button (15) pressed during the first three seconds.
- Select LANGUAGE with the START button (14).
- Select the language using the UP (11) or DOWN (12) keys and select it with the START button (14).
- Press the PRESS button (15) twice to make the change.
MACHINE COUNTERS
Switch on the machine and keep the START button (14) pressed during the first three seconds: this will access the counters that record the level of machine usage. Pressing UP (11) and DOWN (12) displays the following::
0 HPOW: Hours connected to the power supply.
1 HCUT: Hours with the motor running in Cutter mode.
2 HCOR: Hours with the motor running in Vegetable Cutting mode.
3 NARR: Number of motor starts.
4 NMTERM: Number of thermal manoeuvres of the motor
5 NMCIER: Number of bayonet closing manoeuvres.
6 NMTAPA: Number of manoeuvres of the vegetable cutting lid.
7 NMPCA: Number of manoeuvres of the vegetable cutter plunger and the cutter lid.
Press and hold the Start/Stop button for 3 seconds to reset the counters.
TIMER (13): Turns on all the icons on the screen.
BAJAR (12) The panel version is shown.
SUBIR (11) The program version is shown.
PROGRAMMES
CREATE A NEW PROGRAM
- Unplug the machine and wait 20 seconds before reconnecting.
- Plug in the machine and, within 3 seconds, press and hold the PRESS button (15), which accesses the parameters menu.
- Use the UP keys (11) until you reach the PROGRAMMES parameter and press the START button (14) to access the creation or modification of a program.
- The programmes are called C1, C2, C3... and up to 9 programs can be configured (C9). Use the UP (11) or DOWN (12) keys to locate the program you want to create or modify (C1, C2, C3...).
- Once the program is located, press the START button (14) to start modifying it.
-
Once you have accessed the program configuration:
-
The screen shows in the upper left the name of the program (C1, C2, C3...) and the phase (1.2,3...) you are configuring.
-
To configure a phase press the START button (14).
-
Find the function you want to programme (speed, pulse, ...) with the UP (11) and DOWN (12) buttons. Access the selected function with the START button (14). The machine has the following functions:
-
SPEED. Select a speed and the time it will be running:
-
Use the UP (11) and DOWN (12) buttons to select the working speed (it will be flashing) and press the START button (14) to set it.
- Determine how long you will work at that speed (it will be flashing). Use the UP (11) and DOWN (12) buttons to change the time and the START button (14) to set it.
- The configuration of the function has concluded. Press START (14) to start defining the next phase (1.2,3...).
- PRESS. Select the number of pulses (one second cycles while running) to be performed.
- The number of pulses will appear flashing. Use the UP (11) and DOWN (12) buttons to determine the pulses to be realized and the START button (14) to set it.
- The configuration of the function has concluded. Press START (14) to start defining the next phase (1.2,3...).
- REST. The machine will be stopped for the time you indicate.
- A flashing time will appear on the display. Use the UP (11) and DOWN (12) buttons to determine the stop time and the START button (14) to set it.
- The function is finished. Press START (14) to start defining the next phase (1.2,3...)
- PAUSE The machine will be stopped until the user presses the START button (14).
- The function is finished. Press START (14) to start defining the next phase (1.2,3...).
• END Closes the program.
• To end the program:
- Configure the last phase of the program and choose the END function.
- If you want to exit the machine parameter configuration, push the PRESS (15) twice until the SAMMIC symbol appears.
• To access the new program:
- The new program can be accessed with the (DOWN) arrows 12. It will be configured with the chosen name (C1, C2, C3...). To run the program, press the START button (14).
DELETE A PROGRAM (C1, C2, C3,...)
- Unplug the machine and wait 20 seconds before reconnecting.
- Plug in the machine, and within 3 seconds, press and hold the PRESS button (15), which accesses the parameters menu.
- Use the UP keys (11) until the PROGRAMMES parameter is reached, then press the START button (14) to access the creation or modification of a programme.
- Use the UP (11) or DOWN (12) keys to locate the programme you want to delete (C1, C2, C3...).
- Once the programme is located, press the START button (14).
- Once you have accessed the programme configuration:
- The screen shows us, in the upper left, the name of the program (C1, C2, C3...) and the phase (1.2,3...) that you are configuring.
- Enter the stage 1 configuration with the START button (14).
- Find the End function using the UP (11) or DOWN (12) buttons and press START (14). You have successfully deleted the program.
- If you want to exit the machine parameter configuration, push the PRESS button (15) twice until the SAMMIC symbol appears.
| PROPERTIES CK-24V | |
| Production / hour 50 - 350 kg. - 110 | - 772 lbs. |
| Electrical power supply 230V / 50-60 Hz / 1~ | 120V / 50-60 Hz / 1~ | |
| Electric power 1100 W - 1.5 HP | 1400 W - 2 HP | |
| Variable speed (RPM) 300 - 1000 | |
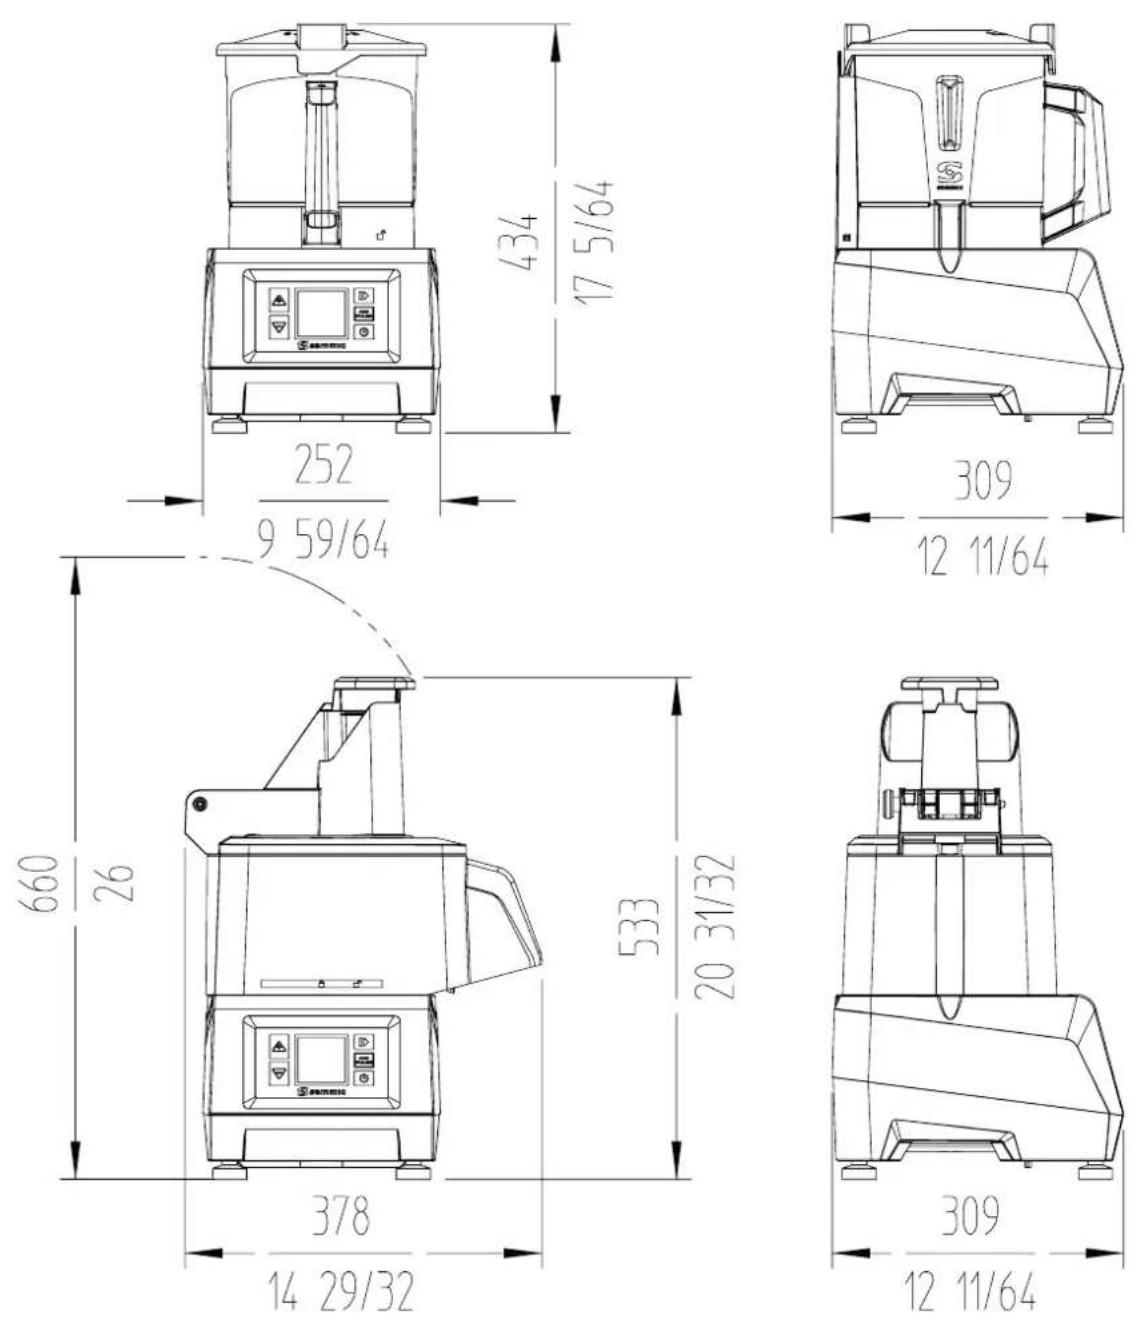
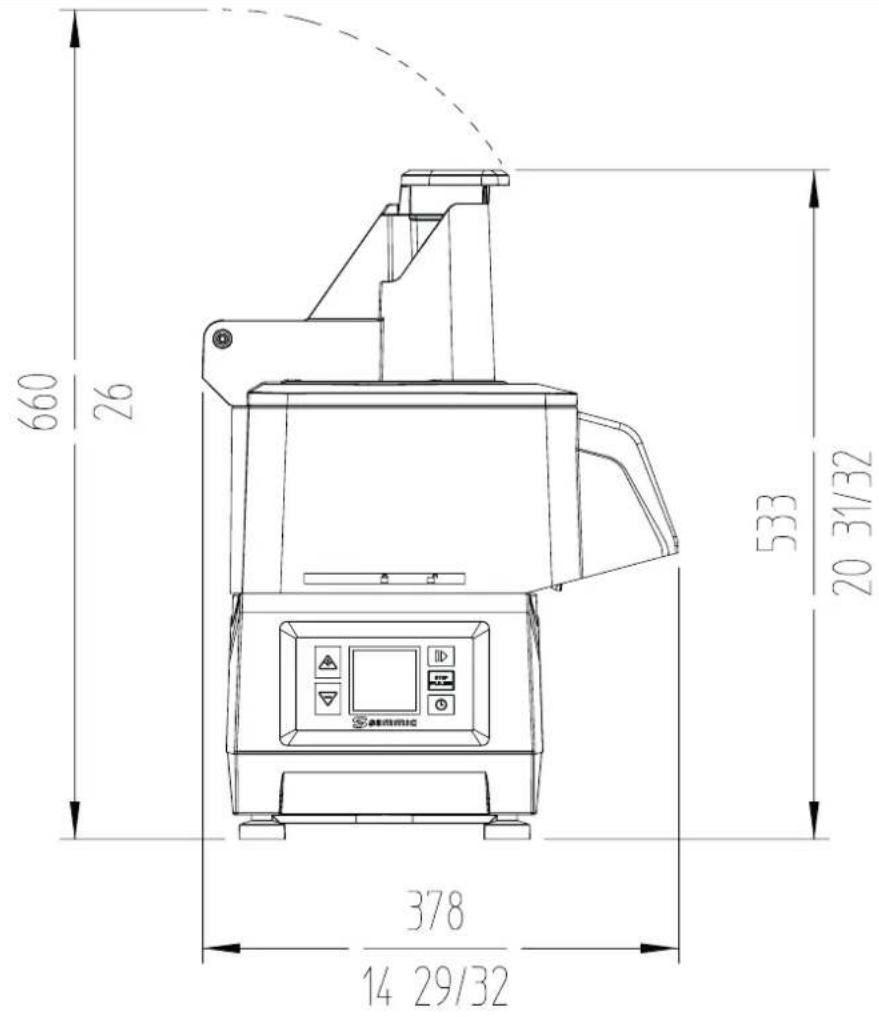
| External dimensions- Width 378 mm. / 14 29/32"- Depth 309 mm. / 12 11/64"- Height 533 mm. / 20 31/32" | |
| Net weight 13 kg. / 28.66 lbs. | |
CA-2V
text_image
660 26 533 20 31/32 378 14 29/32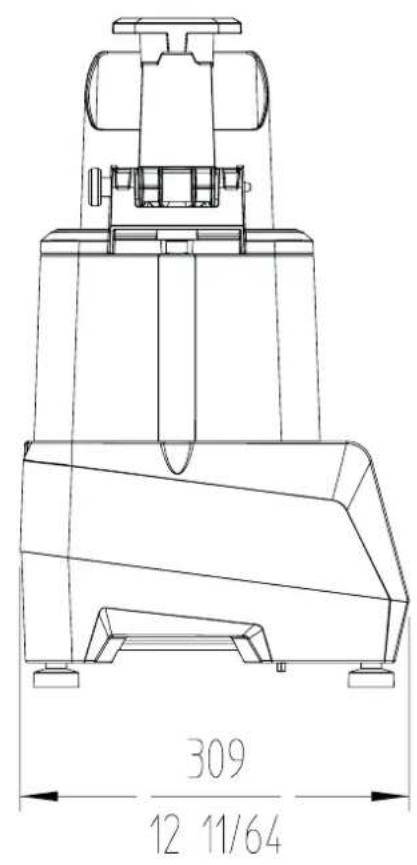
text_image
309 12 11/64| PROPERTIES CA-2V | |
| Production / hour 50 - 350 kg. - 110 | - 772 lbs. |
| Electrical power supply 230V / 50-60 Hz / 1~ | 120V / 50-60 Hz / 1~ | |
| Electric power 1100 W - 1.5 HP | 1400 W - 2 HP | |
| Variable speed (RPM) 300 - 1000 | |
| External dimensions- Width 378 mm. / 14 29/32”- Depth 309 mm. / 12 11/64”- Height 533 mm. / 20 31/32” | |
| Net weight 13 kg. / 28.66 lbs. | |
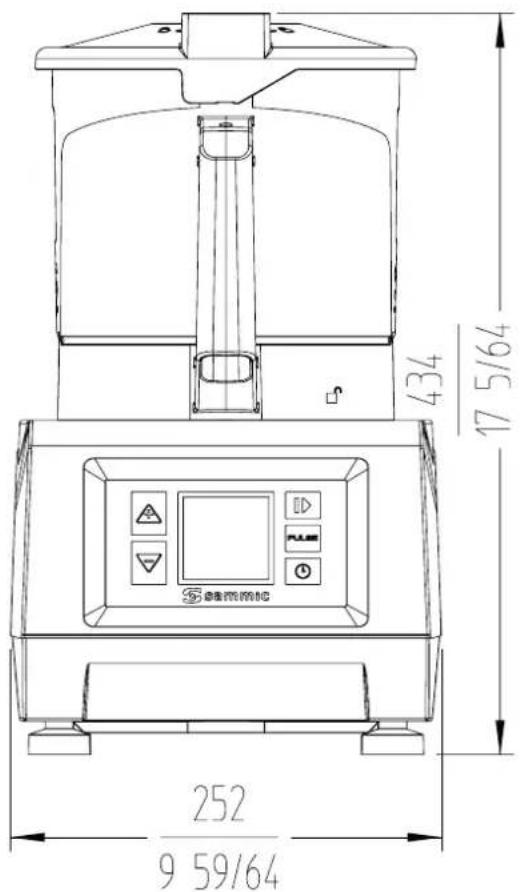
text_image
434 17 5/64 252 9 59/64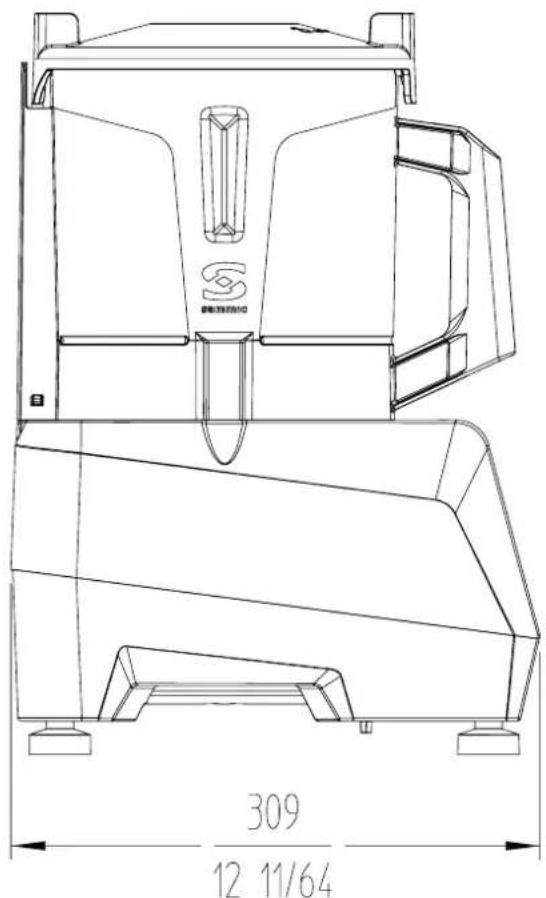
text_image
309 12 11/64| PROPERTIES KE-4V | |
| Electrical power supply 230V / 50-60 Hz / 1~ | 120V / 50-60 Hz / 1~ | |
| Electric power 1100 W - 1.5 HP | 1400 W - 2 HP | |
| Variable speed (RPM) 300 - 3000 | |
| Tank capacity 4.4 l / 4.65 qt. | |
| Tank dimensions mm 193 ∅ x 161 h | |
| External dimensions- Width 252 mm. / 9 59/64"- Depth 309 mm. / 12 11/64"- Heigth 434 mm. / 17 5/64" | |
| Net weight 11.9 kg. / 26.2 lbs. | |
ABB. 1
1 - Hinweistext
IGBT-Temperatur in °C
Innentemperatur in °C