VCC 34803 AD - Vacuum Cleaner BEKO - Free user manual and instructions
Find the device manual for free VCC 34803 AD BEKO in PDF.
| Product type | Canister vacuum cleaner |
| Brand | Beko |
| Model | VCC 34803 AD |
| Power | 800 W |
| Supply voltage | 220-240 V ~ 50-60 Hz |
| Noise level | 80 dB(A) |
| Dust bin capacity | 2.1 L |
| Operating radius | 7.5 m |
| Filter type | HEPA filter + motor protection filter |
| Turbo brush | Included (model VCC 34803 AD) |
| Parquet/carpet brush | Included with hard floor/carpet adjustment |
| Telescopic tube | Length adjustable |
| Cable rewinder | Yes, rewinding button |
| Power adjustment | On the device and on the handle |
| Included accessories | Turbo brush, parquet/carpet brush, crevice tool, furniture brush, dusting brush |
| Maintenance | Disposable dust bag (replace according to indicator), washable filters |
| Safety | Circuit breaker, overheat protection, protection class II |
| Weight | Approximately 4.5 kg (estimate) |
Frequently Asked Questions - VCC 34803 AD BEKO
User questions about VCC 34803 AD BEKO
0 question about this device. Answer the ones you know or ask your own.
Ask a new question about this device
Download the instructions for your Vacuum Cleaner in PDF format for free! Find your manual VCC 34803 AD - BEKO and take your electronic device back in hand. On this page are published all the documents necessary for the use of your device. VCC 34803 AD by BEKO.
USER MANUAL VCC 34803 AD BEKO
Please read this manual first!
Dear Valued Customer,
Thank you for preferring this Beko appliance. We hope that you get the best results from your appliance which has been manufactured with high quality and state-of-the-art technology. For this reason, please read this user manual and all other provided documents carefully before using the appliance and keep it as a reference for future use. If you hand over the appliance to someone else, give the user manual as well. Follow the instructions by paying attention to all the information and warnings in the user manual.
Remember that this user manual may also apply to other models. Differences between models are explicitly described in the manual.
Meanings of the Symbols
Following symbols are used in various sections of this manual:

Important information and useful hints about usage.

WARNING:Warnings against dangerous situations concerning the security of life and property.

Protection class for electric shock.
CONTENTS
| ENGLISH | 4-12 |
| DEUTSCH | 13-24 |
| FRANÇAIS | 25-34 |
| ESPAÑOL | 35-46 |
| ROMANIAN | 47-60 |
| ITALIANO | 61-72 |
| POLSKI 73-84 | |
| SLOVENŠČINA 85-94 | |
| ČESKY 95-104 | |
| BULGARIAN 105-114 | |
| MAGYAR 115-124 | |
| NEDERLANDS 125-134 | |
| SERBIAN 135-143 | |
| HRVATSKI 144-152 | |
| ALBANIAN | 153-163 |
1 Important safety and environmental instructions
This section contains safety instructions that will help protect from risk of personal injury or property damage.
Failure to follow these instructions invalidates the granted warranty.
1.1 General safety
- This appliance complies with the international security standards.
- This appliance is not intended for use by persons (including children) with reduced physical, sensory or mental capabilities, or lack of experience and knowledge, unless they have been given supervision or instruction concerning use of the appliance by a person responsible for their safety.
- This appliance can be used by children aged from 8 years and above if they have been given supervision or instruction concerning use of the appliance in a safe way and understand the hazards involved.
Cleaning and user maintenance shall not be made by children unless they are aged from 8 years and above and supervised. Keep the appliance and its cord out of reach of children aged less than 8 years.
Children should be supervised to ensure that they do not play with the appliance.
- If the supply cord is damaged, it must be replaced by the manufacturer or its agent or similarly qualified person in order to avoid hazard.
- Do not use it if the power cable or the appliance itself is damaged. Contact an authorized service.
- Your mains power supply should comply with the information supplied on the rating plate of the appliance.
The mains supply of the appliance must be secured with a minimum 16 A fuse.
- Do not use the appliance with an extension cord.
1 Important safety and environmental instructions
In order to prevent the power cable from getting damaged, make sure that it doesn't get stuck, twisted or rub against sharp surfaces.
- Do not touch the appliance or its plug when it is plugged if your hands are damp or wet.
- Do not pull the power cable when unplugging the appliance.
- Do not vacuum flammable materials and when vacuuming cigarette ashes make sure that it got cold.
- Do not vacuum water or other liquid materials.
- Protect the appliance from rain, humidity and heat sources.
- Never use the appliance in or near to combustible or inflammable places and materials.
- Unplug the appliance before cleaning and maintenance.
- Do not dip the appliance or its cable in water to clean it.
- Check the hose of the appliance regularly. Do not use if it is damaged and contact an authorized service.
- Do not attempt to dismantle the appliance.
- Only use the original parts or parts recommended by the manufacturer.
- The plug must be removed from the socket-outlet before cleaning or maintaining the appliance.
- If heavily used for cleaning dust such as cement or grout the dust indicator will lit earlier then expected, in such case replace the dust bag even it is empty.
- Do not use the appliance without filters; otherwise it can get damaged.
- Keep fingers, hair and loose clothing from moving parts and openings whilst using the vacuum cleaner.
- When vacuuming the stairs, the appliance should be located below the user.
1 Important safety and environmental instructions
- If your store the package material, keep it out of the reach of children.
1.2 Compliance with WEEE Directive and Disposing of the Waste Product
This product complies with EU WEEE Directive (2012/19/EU). This product bears a classification symbol for waste electrical and electronic equipment (WEEE).
This symbol indicates that this product shall not be disposed with other household wastes at the end of its service life. Used device must be returned to
official collection point for recycling of electrical and electronic devices. To find these collection systems please contact to your local authorities or retailer where the product was purchased. Each household performs important role in recovering and recycling of old appliance. Appropriate disposal of used appliance helps prevent potential negative consequences for the environment and human health.
1.3 Compliance with RoHS Directive
The product you have purchased complies with EU RoHS Directive (2011/65/EU). It does not contain harmful and prohibited materials specified in the Directive.
1.4 Package information
Packaging materials of the product are manufactured from recyclable materials in accordance with our National Environment Regulations. Do not dispose
of the packaging materials together with the domestic or other wastes. Take them to the packaging material collection points designated by the local authorities.
2 Your vacuum cleaner
2.1 Overview
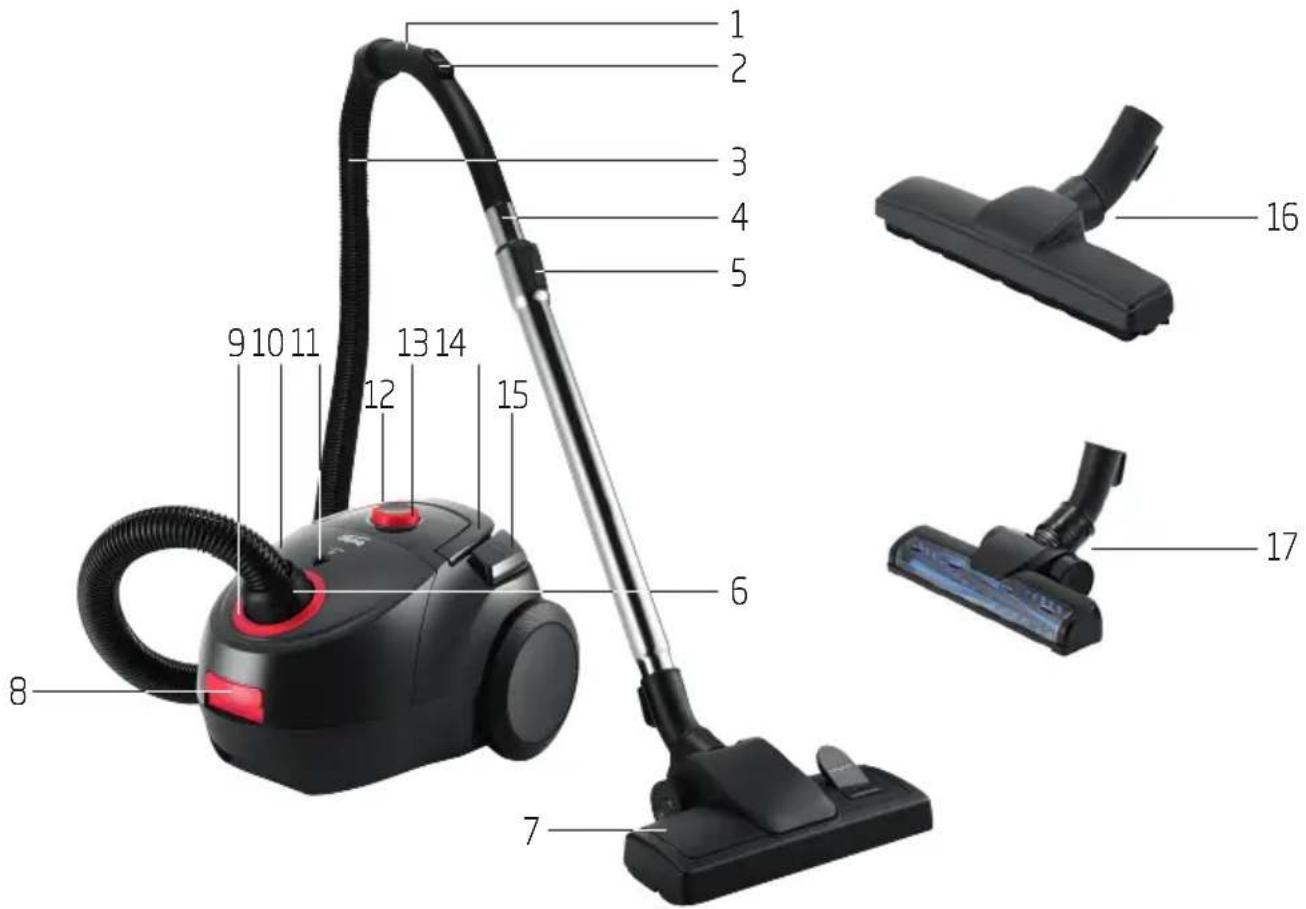
- Handle
- Vacuum adjustment control
- Hose
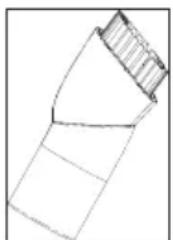
- Telescopic tube
- Telescopic tube adjustment latch
- Suction nozzle
- Parquet/carpet brush
- Dust container opening latch
- Hose cap
- Top lid
- Dust indicator
- Power cable winding button
- Suction power adjustment knob
- Carriage handle
- On/Off button
- Parquet/hard floor brush (VCC34802AB)
- Turbo brush (VCC34803AD)
2.2 Technical data
Power : 800W
Supply voltage: 220-240V\~,50-60Hz
Sound level : 80 dbA
Dust capacity : 2.1L
Operating radius : 75m
Dust collecting
Rights to make technical and design changes are reserved.
The values which are declared in the markings affixed on your appliance or other printed documents supplied with it represent the values which were obtained in the laboratories pursuant to the pertinent standards. These values may vary according to the usage of the appliance and ambient conditions.
3 Usage
3.1 Intended use
The appliance has been designed for household use and is not suitable for industrial use.
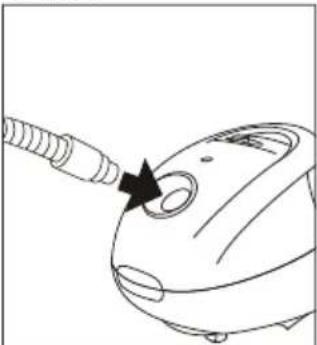
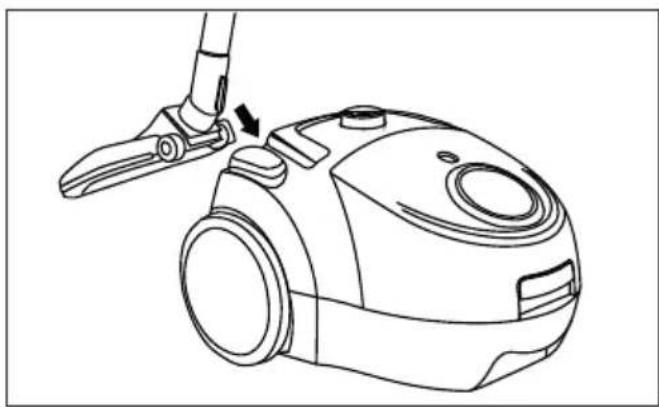
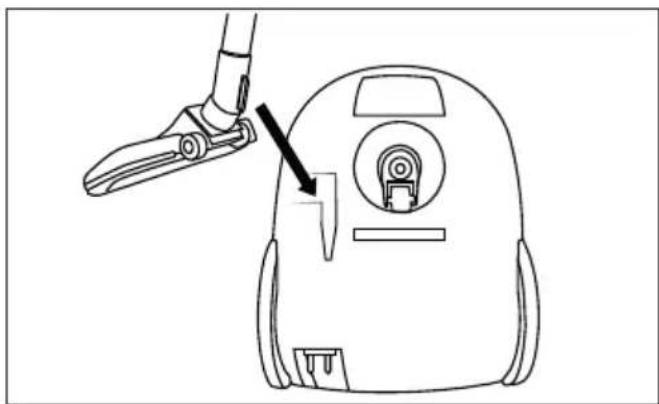
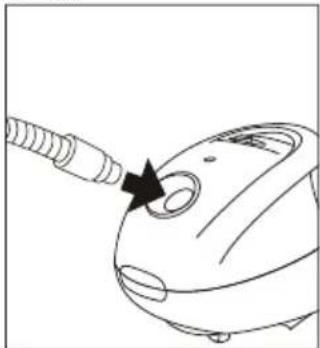
3.2 Attaching/removing the hose
- Insert the hose in the coupling on the appliance and press as far as it will go.
- To remove the hose press the buttons on the sides of the hose.
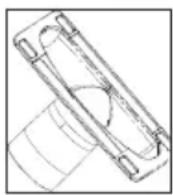
3.3 Attaching/removing the telescopic tube
- Attach the telescopic tube (4) to the handle (1).
- Pull the telescopic tube (4) from the handle (1) to remove it.
- Push the telescopic adjustment latch (5) in the arrow direction and pull the telescopic tube (4) to adjust its length.

3.4 Attaching/removing the parquet/carpet brush
You can install/remove the narrow end of the telescopic tube (4) from/to the parquet/carpet brush (7).
3.5 Adjusting the parquet/ carpet brush
Perform the following actions on the adjustment latch located on the parquet/carpet brush (7);
- Use position for hard floors and parquet.
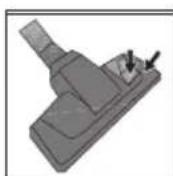
- Use "" position for rugs and carpets.

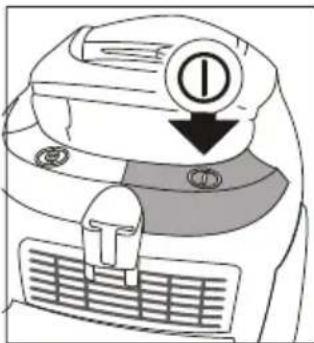
3.6 Operation
- Plug in the appliance after pulling the power plug located at the back of the appliance.
- Press the on/off button (15) to switch on your appliance.
3 Usage
3.6.1 Adjusting the suction power
- You can adjust the suction power using the suction power adjustment knob (13) found on the appliance. Rotating in the clockwise direction will increase the suction power and in counterclockwise direction will decrease the suction power.
- You can lower the suction power of the parquet carpet brush by pulling backward the vacuum adjustment control (2) located on the handle (1) without the need to use the suction power adjustment knob (13) found on the appliance.
3.6.2 Dust indicator
Dust indicator (11) indicates the fullness of the dust bag. When the indicator displays red zone more than 50% , replace the dust bag. (see 4.1).
3.7 Accessories
Upholstery tool
Suitable for cleaning the floorings, stair steps, inside of the cars, sofas, armchairs etc.
Dust brush
Suitable for cleaning the curtains, and sensitive and fragile objects.
Crevice tool
Suitable for the cleaning of the surfaces which are difficult to clean, such as the areas remaining under the sofas and furniture.

WARNING: Do not perform cleaning tasks using the end part of the handle (1).
3.8 Additional brushes
3.8.1 Parquet/Hard floor brush (VCC34802AB)
The hard floor brush (16) was developed for use on hard floors such as tile, ceramic, parquet, wooden floors etc.
It prevents potential scratches while cleaning hard floors thanks to its specially-developed soft hair.
3.8.2 Turbo brush (VCC34803AD)
The turbo brush (17) allows you to clear the hair on carpets in a faster and more efficient way. Thus you can even remove the hair -which is hard to remove such as dog hair or cat hair- easily.
3 Usage
3.9 Switching off and parking the appliance
- Switch off the appliance with the on/off button (15) and unplug it.
- Wind the power cable by pressing the power cable winding button (12).
Vertical parking feature
Insert the parking hook of the parquet/carpet brush into the parking groove located at the bottom section of the appliance.
Horizontal parking feature
Insert the parking hook of the parquet/carpet brush into the parking groove located at the rear section of the appliance.
4 Cleaning and care
Switch off and unplug the appliance before cleaning it.

WARNING: Never use gasoline, solvent, abrasive cleaning agents, metal objects or hard brushes to clean the appliance.
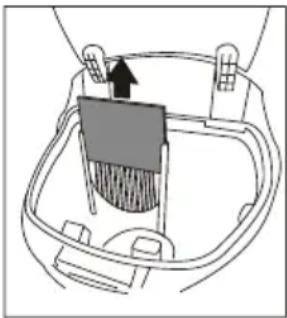
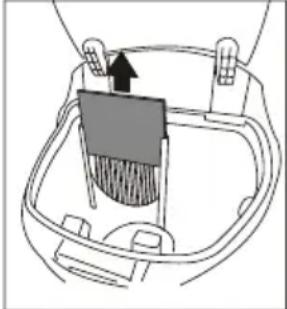
4.1 Replacing the dust bag
- Open the top lid by pressing the dust container opening latch (8).
- Remove the full dust bag from its guide, sliding it in upwards direction.
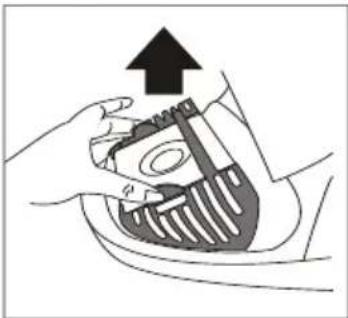
- Dispose the full dust bag.
- Insert the new dust bag holding it in the arrow direction indicated on it. Ensure that it is fully seated.
- Close the appliance's top lid (10).

WARNING: Do not force the top lid (10) to close it, otherwise the plastic sections can be damaged.

WARNING: Dust bags purchased from locations other than the authorized dealers and services are not original. Unoriginal dust bags have a lesser quality and they become torn in a shorter period and render your appliance nonoperational. Faults caused due to using unauthentic dust bags are not covered within the warranty.

WARNING: Do not wash the dust bag.
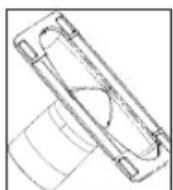
4.2 Cleaning the filters
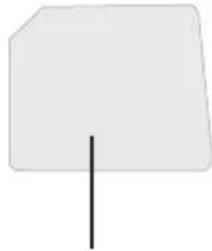
Motor Protection Filter
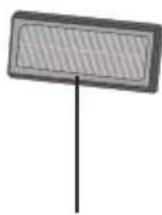
HEPA filter
After each 5 dust bag replacement (may vary depending on the frequency and area of usage), clean the filters.

WARNING: Do not use appliances producing hot air such as hair dryer or heater to dry the filters.

WARNING: Do not install the filters without completely drying them; otherwise, smell of moisture may occur during use, water can leak from the back of the appliance or the filters may get damaged.

WARNING: Attach the filters into their places after they have dried.
4 Cleaning and care
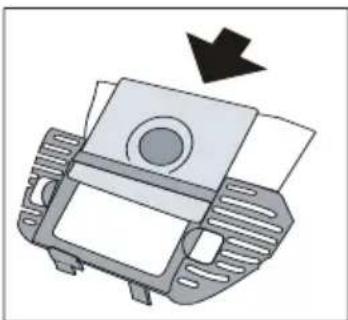
4.2.1 Motor protection filter
- Open the top lid by pressing the dust container opening latch (8).
- Press down on the latch of the filter cassette to remove the cassette.
- Remove the motor protection filter from the cassette inside.
- After washing the motor protection filter under running water, wring it out slightly and let it dry (for 24 hours minimum).
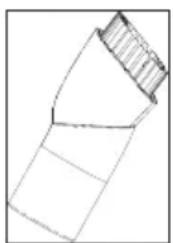
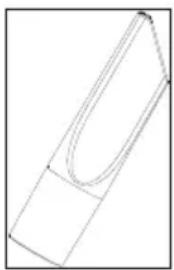
4.2.2 HEPA filter
- Raise the filter cap in the arrow direction to open it.
- Remove the HEPA filter by pulling it from its handle.
- Shake off the HEPA filter to eliminate the dusts on it. After that, you can wash it by holding its clean side under running cool water.
- If you wash the HEPA filter, dry it at room temperature (for 24 hours minimum). Do not use it before ensuring that it is completely dry.
4.3 Storage
- If you do not intend to use the appliance for a long time, store it carefully.
- Unplug the appliance.
- Keep the appliance out of the reach of children.
4.4 Handling and transportation
- During handling and transportation, carry the appliance in its original packaging. The packaging of the appliance protects it against physical damages.
- Do not place heavy loads on the appliance or on the packaging. The appliance may get damaged.
- Dropping the appliance may render it non-operational or cause permanent damage.
Chere cliente, cher client,
3.6.1 PerylnpaHe Ha BCMyKaTeJHaTa MOUHOCT
- Moxe Ta perynapate BcmykatenHa ta MOHOC, n3noJI3BaIKN 6yToHa 3a perylnpaHe Ha cMykatenHa TMOHoc (13) Ha npaxocmykaCkata. Bbpteho no nocoka Ha yacobnKOBaTa CTpeIka ige yBeIuHc CMykATEHATA MOHOC IN B o6paTHa Ha yacobnKOBaTa CTpeIka Nocoka ige HamaIIc CMykATEHATA MOHOC.
- Moxete Da HamaInTe CmyKaTeHHaTa MOuHocT Ha YetKaTa 3a NapKeT N KJINM C DbPnaHe Ha3aHa YnpaBHeHnETo 3a HAcTpOJa Ha BaKyUma (2), HAmnPauo Ce Ha DpBxKata (1), 6e3 Da e Heo6XoDmO Da n3NoI3BaTe KOyeto 3a peryInpaHe Ha CmyKaTeHHaTa MOuHocT (13) Ha ypeDa.
3.6.2 Инданкатор за прах
Инданкаторьт 3а прах (11) поka3Ba, Колko nbлha e Top6чkaTа 3a прах. Korato ИndикаторьТ поka3Ba черва зона поеве от 50%, сmedete Top6чkaTа. (Вин 4.1)
3.7 Akcecoapn
PpncTabka 3a tanuipanm me6eI
Iodxodiae3aNouchTbaHeHa MOKETn,CTbnaHa Ha CTbJ6n, caIOnaHa aBTOMO6nIn,INBaHn, FOtboNn nDpyn.
Yetka 3a npax
IopxOJa e 3a nouchBaHe Ha 3aBeCN, N YBCTBNTEN N UynnBn PpeMEn.
HaKpaHnK c Tecen npocen
IopxOJa3a Tpydno nouNCTBaunCe NOBbpxHOCTn, KaTo Obnactn IOnMacn n Me6eenn.

ПЕДУПЕЖДEHNE: He nouchte, n3noJ3BaKn KpaHata qact Ha dpjxkata (1).
3.8ДоьнTeHnЧETKN
3.8.1 TbBpda yeTka 3a napKeT/ noi (VCC34802AB)
Tbpyata yeTa 3a noi (16) e npedHa3NayeHa 3a ynoTpe6a Bbypxy TBbpNIOBbpxHOCTN, TAKBa KaTO PNOUKN, KepAMnKa, NapKeT, DbPBeH NODObe I T.H.
BlaorapenHe Ha HeHata MeKa YeTnHa, TnnpedotbpaTBA eBeHTyaHn HndpackBaHn npnNoHCtBaHe Ha nOda.
3.8.2 Typ6o ueTka (VCC34803AD)
Typ6o YETkata (17) Bn DaBa Bb3MOxHOCT da NOUcTBaTe KOCMn OT KNJIMN NO-6bp3O I NOepeKTHBHO. No To3n HauIN MOKeTe Da NOUcTNTe IecHO DOpN KOCMn, KOINTO e TpydHO da ce NOUcTt, KaTO HApPmEp TaKnBa OT Kyue N KOTKa.
3 ynoTpe6a
H3CyUbaHe HaФИTpIte, He H3NoI3BaIte ypeN, Cb3daBauN NOTOK OT TOnbI Bb3dYx, HApPIMep CeIooapN.

ПЕДУПЕЖДЕНЕ: He
noCTabRnTe fHHTPte, aKo He ca HAnbJHo N3cbXHaJI; B IpOTnBEH CnyaH e Bb3MOxHO da ce o6pa3yBa MmN3Ma Ha Bnara No BpeMe Ha yNoTpe6a. Bb3MOxHO e, n3TuHaHe Ha BOda OT 3aHata cTpHa Ha UpeDa nnn NobpeDa BB fHHTPte.

PNEyPExEHE: CneI KaTO ca n3cbxHaJIu FnIITpnte, NOCTaBeTe rHa MeCTaTa IM.
4.2.1 3aunteh pntbnp ha MOTOPA
- OTbopete rophna Kanak, kato haTnchete KIOUaKata Ha KOHTeHepa 3a npax (8).
- Hatnche TaHOny KIOUaKata Ha Kacetata C HnTbpa 3a OTcPahBaHe Ha Kacetata.
- Otrcpahe Te pntbpa 3a 3aunTa Ha MOTopa, KATO rN3TeTnTe OT kaceTata OTBbTpe.
- CneI KaTo I3MnTe ΦnITbpa 3a 3aunTa Ha MOTOPa NOI O6NIHO TeuAua BOda, IN3eJeTe rO BHIMATEHNO I RO OCTaBeTe Da IN3CbXHe (3a HaimaJIko 24 Yaca).
4.2.2 HEPA φилтьр
- BdHHeTe kanaKata Ha qnTbpa no nocKaHa CTpeIkata, 3a da r OTBOpnte.
- Otrpahe HEPA qntbpa, kato ro n3ternite 3a npkKaTa My.
3.ИЗТРБСКАЕ HEPA ФиNTьра 3a ВхODЯ; ВьЗДУХ, 3a Да ИЗПадHe npaxa OT Hero. Сnéд TOВА мОжЕТа Го ИЗМпeTe ПОД Teча; СтУДЕнA BОДa, КATO ГО ДьрЖИte 3a УИСТаТа My СТРаНa.
4.Ako MneTe HEPA fntbpa, n3cwyte ro npn cTainHa TemnepaTypa (3a Han-ManKo 24 yaca). He ro n3noJ3BaIte npedn da ce y6eIte, ye e Toi e Hapblno cyx.
4.3 CbxaheHne
Ako He Bb3HaMepBaTe Da n3nOJ3BaTe ypeDa 3a npoDbJxNtEnH nepNoD OT BpMe, ro CbxpaHeTe BHIMaTeJHo.
- I3KJIIOUeTe ypeDa ot eIeKtpnueckata MpeKa.
- PataTe ypeDa daJeU ot deua.
1 Important safety and environmental instructions
- Ne usisavajte vodu ili drugetečnosti.
- Zašitite urežaj od kiše, vlage i izvora toplote.
- Nikada ne koristite uredaj unutar ili u blizini zapaljivih mesta ili materijala.
- Iskljucite uredaj iz struje pre ciscenja i odrozavanja.
- Ne uranjajte uredaj ili strujni kabli u vodu kada ga cistite.
Redovno proveravajte crevo. Ne koristite ga ako je oštećeno i kontaktirajte ovlasćeni servis. - Ne pokušavajte da razmontirate urežaj.
- Koristite samo originalne delove ili delove koje je preparucio proizvodač.
- Ako se urežaj Često koristi za usisavanje prasine poput cementa ili fuga mase, indicator prasineće se ukljuciti ranije nego inače, pa u tom slučaju zamenite kesu za prasinu,Čak i ukolko je prazna.
-
Ne koristite uredaj bez filtera;\ moze se ošetiti.
-
Kada usisavate stepenište, urežaj se mora nalaziti ispod korisnika.
- Ako Čuvate ambalažu urečaja, držite je van domašaja unde.
1.2 Usaglašenost sa WEEE direktivom i bacanje starog urežaja
Ovaj uredaj ne sadrži štete i zabranjene materijale navedene u "Regulativi za superviziju elektricnih i elektronskih otpadnih uredaja" koju je izdalo
Ministarstvo za okolinu i urbano planiranje. Usaglasen je sa WEEE Direktivom. Ovaj uredaj je proizveden od visoko kvalitetnih delova i materijala koji se mogu ponovo koristiti i reciklirati. Zato ne bacajte uredaj sa obicnim opadom iz domacinstva na kraju veka trajanja. Odnesite ga na mesto za priukpljanje reciklažnog elektricnog i elektronskog opada. Upitajte lokalne nadležne za Vašu oblast o ovakvim mestima. Pomozite u zašiti okoline i prirodnih resursa takao štoćete reciklirati upotrebljavani uredaj.
1.3 Informacije o ambalaži

Ambalaža urežaja je proizvedena od materijala koji se mogu reciklirati u skladu sa nacionalnim regulativama o okruženju.
Nemojte bacati ambalažu zajedno sa obćnim OTPadom iz domacinstva. Odnesite je na mesto odrešeno od strane lokalne nadležnosti na kome se prikupla ambalaža.
2 Vaš usisivač

2.1 Pregled
- Drška
- Kontrola za podešavanje vakuuma
- Crevo
- Teleskopska cev
- Bravica za podesavanje teleskopske cevi
- Cev za usisavanje
- Četka za parket/tepih
- Bravica za otvaranje posude za prašinu
- Poklopac za crevo
- CornjiPoklopac
- Indikator prase
- Dugme za namotavanje kabla za napajanje
- Dugme za podešavanje snage usisavanja
- Drška za nošenje
- Dugme za uključivanje/isključivanje
- Četka za parket/tvrdi pod (VCC34802AB)
- Turbo Četka (VCC34803AD)
2.2 Tehnički podaci
Snaga :800W nom.
Napon :220-240V\~,50-60Hz
Nivo buke : 80 dbA
Kapacitet prăsine : 2.1L
Duzina kabla za
napajanje :7,5m
Zadržavamo pravo na tehnicke i modifikacje u dizajnu.
Vrednosti koje su date na oznakama postavljenim na vaš aparat ili drugim štampanim materijalima koje ste dobili sa aparatom, predstavljau vrednosti koje su dobijene u laboratorijama, u skladu sa važecim standardima. Ove vrednosti mogu da variraju prema upotrebi aparata i uslovima sredine.
3 Upotreba
3.1 Namena
Aparat je dizajniran za korišćenje u kućama i nije za industrijsku upotrebu.
3.2 Postavljanje/uklanjanje creva
- Ubacite crevo u spojnicu na uredaju i pritisnite ga do kraja.
- Da biste uklonili crevo, pritisnite dugmad na stranama creva.
3.3 Postavljanje/uklanjanjetelesckopske cevi
- Povežite teleskopsku cev (4) sa drškom (1).
- Povucite teleskopsku cev (4) sa drske (1) da biste je uklonili.
- Možete proširititeleskopskucev(5) pomeranjem kizne bravice za podesavanje teleskopske cevi napred i nazad.

3.4 Postavljanje/uklanjanječetke za parket/tepih
- Možete da postavite/uklonite uzak kraj teleskopske cevi (4) na/sa Četku/-e za parket/ tepih (7).
4.4 Prenos i transport
- Tokom prenosa i transporte, nosite aparat u njegovom originalnom pakovanju. Pakovanje aparata ga stiti od fizickih ostecenja.
- Nemojte stavljati teske predmete na aparat ili njegovo pakovanje. Aparat se moze oštetiti.
- Ako vam aparat ispadne, to moze izazvati trajno ostecenje, odnosno aparat moze postatinefunkcionalan.
Prvo pročitajte korisnički prisučnik!
Poštovani korisnici,
Zahvaljujemo Sto ste kupili ovaj Beko uredaj. Nadamo se da cete dobiti najbolje rezultate sa svojim uredajem, proizvedenim koristjenjem Najnovije technologije visoke kvalitete. Prije uporabe uredaja pažljivo procitajte cijeli korisnički prisucnik i sve popratne dokumente te ih sačuvajte za slučaj da vam zatrebaju u budućnosti. Ako uredaj dajete nekome drugome, uz uredaj dajte i uputstvo za upotrebu. Slijedite sva upozorenja i informacije u prisucniku.
Objašnjenje simbola
U uputama za uporabu koriste se sljedeci symboli: