FT120C - Heating Perel - Free user manual and instructions
Find the device manual for free FT120C Perel in PDF.
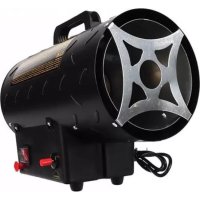
| Product type | Direct combustion hot air generator |
| Brand and model | Perel FT120C |
| Dimensions | 750 x 315 x 415 mm |
| Weight | 14 kg |
| Power supply | 220-240 V~, 50 Hz, 230 W |
| Thermal power | 20 kW (68 240 BTU/h) |
| Tank capacity | 19 L |
| Heating area | 220-300 m² |
| Air flow | 550 m³/h |
| Fuel | Diesel or kerosene (prefer 1-K kerosene) |
| Protection rating | IPX4 |
| Main functions | Electronic thermostat, automatic ignition, temperature adjustment, digital display |
| Temperature control | Electronic with thermostat |
| Safety | Overheat protection, automatic shutdown in case of flame failure, lock-out, fault detection |
| Maintenance | Regular cleaning of air filters, nozzle and ignition electrodes |
| Included accessories | Handle, wheels, axle, screws, washers, mounting bracket |
| Repairability | Spare parts available: nozzle, filters, electrodes, capacitor, temperature probe |
| Installation | Place vertically on a flat, fire-resistant surface; observe safety distances (0.6 m lateral, 1 m air intake, 1.5 m above, 3 m air outlet) |
| Usage | Professional or outdoor use; do not use as primary heating |
| Warranty | 24 months for private individuals in the EU, subject to conditions |
Frequently Asked Questions - FT120C Perel
User questions about FT120C Perel
0 question about this device. Answer the ones you know or ask your own.
Ask a new question about this device
Download the instructions for your Heating in PDF format for free! Find your manual FT120C - Perel and take your electronic device back in hand. On this page are published all the documents necessary for the use of your device. FT120C by Perel.
USER MANUAL FT120C Perel
This product is not suitable for primary heating purposes.
To all residents of the European Union
Important environmental information about this product
This symbol on the device or the package indicates that disposal of the device after its lifecycle could harm the environment. Do not dispose of the unit (or batteries) as unsorted municipal waste; it should be taken to a specialized company for recycling. This device should be returned to your distributor or to a local recycling service. Respect the local environmental rules.
If in doubt, contact your local waste disposal authorities.
Thank you for choosing Perel! Please read the manual thoroughly before bringing this device into service. If the device was damaged in transit, do not install or use it and contact your dealer.
2. Safety Instructions

Read and understand this manual and all safety signs before using this appliance.
Warning: In order to avoid overheating, do not cover the heater.
This device can be used by children aged from 8 years and above, and persons with reduced physical, sensory or mental capabilities or lack of experience and knowledge if they have been given supervision or instruction concerning the use of the device in a safe way and understand the hazards involved. Children shall not play with the device. Cleaning and user maintenance shall not be made by children without supervision.
If the external flexible cable or cord of this appliance is damaged, it shall be exclusively replaced by the manufacturer or his service agent or a similar qualified person in order to avoid a hazard.
Do not use this appliance in the immediate surroundings of a bath, a shower or a swimming pool. Do not install this appliance immediately below a socket.
Some parts of this product can become very hot and cause burns. Do not touch the appliance when in use or shortly after use. Do not rest the power cable on the appliance when hot.
This appliance must not be supplied through an external switching device, such as a timer, or connected to a circuit that is regularly switched on and off by the utility.
The use of an extension lead or multi-plug adaptor is not advised when connecting this appliance to the mains. Connection through these devices could lead to a risk of overloading, overheating and even fire at the extension lead or adaptor due to inadequate connection quality.
Install the appliance in a vertical position and at a distance of minimum 0.5m away from furniture and other objects. Never operate the appliance near inflammable or explosive materials or gases.
The first time you use the appliance, a little smoke and smell due to the protective substances applied to the heating element before transport may be given off. This is normal and should not be considered a fault.
Unvented portable heaters use air (oxygen) from the area in which it is used. Adequate combustion and ventilation air must be provided.
Do not store or use gasoline or other flammable vapours and liquids near this device. Keep solid combustibles such as building materials, paper or cardboard, at a safe distance from the device. Never use the device in spaces, which do or may contain volatile or airborne combustibles, or products such as gasoline, solvents, paint thinner, dust particles or unknown chemicals.
Direct-fired heaters may cause carbon monoxide (CO) poisoning when incorrectly used, for example indoors without adequate air circulation, or if not properly working. Carbon monoxide poisoning may lead to death.
Not for use in recreational vehicles and other motor vehicles or trailers equipped with living space and amenities.
The electrical system to which the device is connected must comply with the current legislation. Installation requires a residual current circuit breaker (RCCB) in the main electrical distribution board.
Unplug the device before performing any maintenance operations.
Always check the power cable before using the device. It must not be bent, taut, stretched, crushed or damaged. If the external flexible cable or cord is damaged, it shall be replaced by a special cord or cord exclusively available from the manufacturer or his service agent.
Do not touch the front outlet as it is very hot during operation.
Failure to comply with the precautions and instructions in this manual can result in death, serious bodily injury and damage from fire, explosion, burn, asphyxiation, carbon monoxide poisoning, and/or electrical shock.
3. General Guidelines
Refer to the Velleman® Service and Quality Warranty on the last pages of this manual.
All modifications of the device are forbidden for safety reasons. Damage caused by user modifications to the device is not covered by the warranty.
Only use the device for its intended purpose. Using the device in an unauthorised way will void the warranty.
Damage caused by disregard of certain guidelines in this manual is not covered by the warranty and the dealer will not accept responsibility for any ensuing defects or problems.
Nor Velleman nv nor its dealers can be held responsible for any damage (extraordinary, incidental or indirect) - of any nature (financial, physical...) arising from the possession, use or failure of this product.
Keep this manual for future reference.
4. Assembly
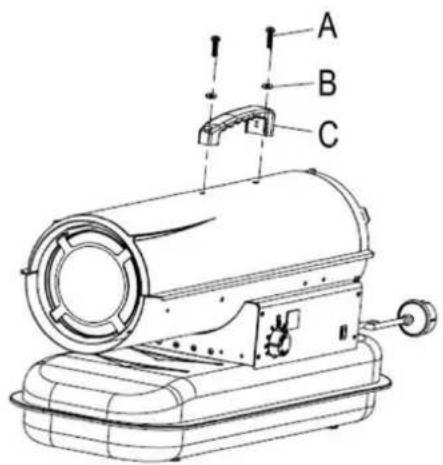
| A | 2x screw |
| B | 2x plain washer |
| C | 1x handle |
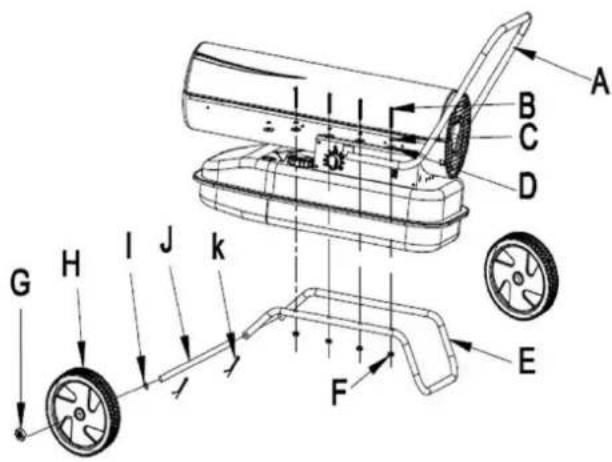
| A | 1x handle |
| B | 6x or 8x screw |
| C | 6x or 8x spring washer |
| D | 6x or 8x plain washer |
| E | 1x feet |
| F | 6x or 8x M5 nut |
| G | 2x M12 nut |
| H | 2x wheel |
| I | 2x Ø 12 plain washer |
| J | 1x wheel shaft |
| K | 2x cotter pin |
5. Installation
Install vertically on a flat, dry, stable and non-slippery surface.
Direct-fired heaters are intended for use in open outdoor areas or in well-ventilated indoor spaces. For indoor use, provide permanent ventilation of at least 25~cm^2/kW , equally distributed between floor and high level, with a minimum of 250~cm^2 .
| FT120C | FT130C |
| 600 cm² | 800 cm² |
Install the device in a normal upright position.
Do not place the device near walls, in corners or under low ceilings. Do not place the device below a socket outlet. Do not place the device on moving vehicles or where it can tip over.
Keep the device away from flammable, combustible, explosive or corrosive materials. Do not place the device in the immediate surroundings of a bath, shower or swimming pool. Keep the device away from curtains or similar materials that could block the air inlet and outlet. Never block or restrict the air inlet and outlet for any reason.
Keep the power cable away from heat sources, sharp edges, cutting and moving parts.
Do not expose directly to weather or to excessive humidity.
Install and operate the device on fireproof floors.
Do not connect the direct-fired heater to an air duct.
Follow the general and special fire safety regulations in force in all fields of applications. In any case, ensure the following minimum safety clearances from materials or objects in the surroundings of the device.
| side | 0.6 m |
| air inlet side | 1 m |
| top | 1.5 m |
| hot air outlet side | 3 m |
| floor | 0 m |
6. Fuel
Diesel heaters work with paraffin or diesel. Paraffin gives the cleanest combustion. Be aware that the more dust and dirt that is contained in the fuel, the more ventilation will be required! Use the cleanest fuel possible.
Paraffin may only be stored in blue containers. Red containers are associated with petrol.
Never use other fuels such as petrol, alcohol, oil compounds or similar in this heater. This could lead to fire or explosion.
Never store paraffin in direct sunlight of near a source of heat.
Do not store paraffin in living/work areas but in a well-ventilated area such as a shed, storage area or similar.
Never use paraffin from the previous season. Paraffin deteriorates in quality and will not burn properly as a result.
If you can, use 1-K paraffin in this heater. Other premium quality paraffin may also be used.
7. Operation
7.1 Start-Up
- Fill the tank with the appropriate fuel. The fuel gauge on top of the tank allows you to check the level.
- Next, connect to an earthed mains socket.
- The power indicator will light and the display will show the ambient temperature.
- Flick the power switch to the on position. If the thermostat control knob temperature is set higher than the ambient temperature, the device will start. The device will stop if the ambient temperature is reached.
7.2 Cold Start-Up
At low ambient temperatures, keep a finger on the air vent hole during the ignition. In case of malfunction (flame failure, reduced airflow, bad combustion), the device will stop and the indicator light starts flashing (lockout mode).
7.3 Manual Reset/Re-Start
If the device is in lockout mode, check and resolve the lockout problem before re-starting. To reset, flick the on-off switch to the off position and then again to the on position.
In case of repeated malfunction, please contact your dealer.
7.4 Switching Off
Flick the on-off switch to the off position and disconnect from the mains.
8. Cleaning and Maintenance
General
Before cleaning, switch of the appliance, disconnect from the mains and allow to cool completely.
Never immerse the appliance in water or any other liquid. Protect it from splashes and spraying liquid.
Occasionally wipe with a damp cloth to keep it looking new. Do not use harsh chemicals, cleaning solvents or strong detergents.
Keep the air inlet and fan free from dust and dirt. To clean inner parts, gently blow compressed air through the air inlet.
Before storing, make sure the device is perfectly cool and dry. Cover the device with a plastic bag and store in a dry, well-ventilated place.
Qualified personnel must carry out the following checks before every seasonal use:
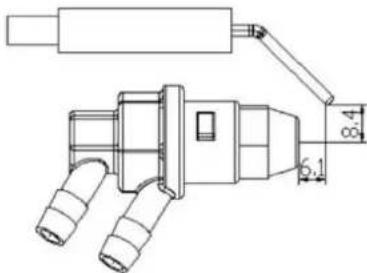
Nozzle
Carefully unscrew the nozzle fitting. Blow compressed air through the nozzle orifice to free it from dirt. Replace the nozzle if necessary.
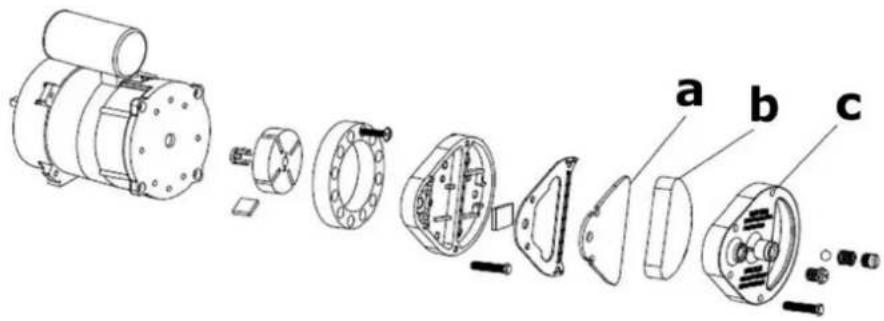
Air Filters
Clean the air filters. Remove the filter end cover [c], wash the air intake filter [b] using a light detergent, and dry it thoroughly before re-installing. Replace the air delivery filter [a] once a year.
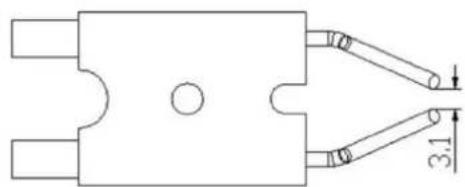
Ignition Electrodes
Clean, adjust and, if necessary, replace the ignition electrodes.
Compressor Pressure Adjustment
The compressor pressure is factory-set and must be checked and adjusted by qualified technicians only. Tampering with the unit may be dangerous.
Remove the pressure gauge cap [a]. Connect a pressure gauge on the pressure measuring port on the rear guard. Start the device and read the air pressure value. If necessary, adjust the pressure to the correct value turning the adjusting screw (the air vent hole [b]) clockwise to increase, or anticlockwise to decrease the pressure.
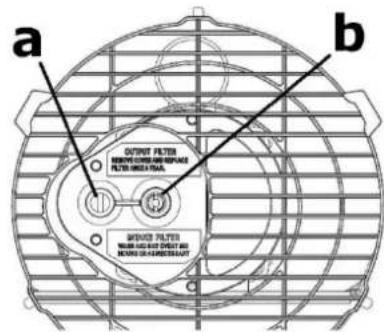
a pressure gauge cap
b air vent hole
Electrical
Inspect all cables, electrical parts and connections.
9. Troubleshooting
| Problem | Cause | Remedy |
| Motor does not start. → E1 is displayed | No power or low voltage. | Check power line and voltage. |
| Check fuse and replace if needed. | ||
| Faulty or damaged power cord. | Check and replace if needed. | |
| Faulty motor/capacitor. | Check and replace if needed. | |
| Lock-out of appliance due to previous overheating. | Detect the cause of overheating. Switch off the appliance. Check air inlet and outlet. Wait some minutes and restart the appliance. | |
| → E2 is displayed | The temperature probe is faulted or the connector for temperature probe is loose. | Check and replace the temperature probe if needed. |
| Check and replace the PCB if needed. | ||
| Motor runs, but the heater does not ignite and locks out after a short time. → E1 is displayed | Empty fuel tank, dirty or wrong fuel. | Remove wrong or dirty fuel. Fill the tank with clean diesel or kerosene. |
| Fuel filter clogged. | Clean or replace fuel filter. | |
| Air leaks in oil line. | Check hoses, tighten connections and replace if needed. | |
| Burner nozzle clogged. | Clean nozzle blowing compressed air and replace if needed. | |
| Fuel viscosity increased at low temperature. | Mix diesel with 10-20 % kerosene. | |
| Flames come out of flue outlet. → E1 is displayed | Insufficient airflow into combustion chamber. | Check air inlet, fan and motor. |
| Compressor pressure too high. | Check air pressure and adjust if needed. | |
| Heater stops during operation. → Ambient temperature is displayed | The room temperature set on room thermostat has been reached. | Normal operation. To start, turn the temperature control knob clockwise on a higher setting. |
| Heater stops during operation. → E1 is displayed | Flame failure. | Check and remove the cause(s) of malfunction. To reset, switch to 0 and then to I. Call technical service if the problem persists. |
| Bad combustion. | ||
| Reduced airflow. | ||
| Overheating. |
10. Technical Specifications
power supply 220-240 V\~, 50 Hz, 230 W
fuel . diesel/kerosene
IP rating . IPX4
FT120C
power. 20 kW
heat output. 68240 BTU/h
fuel tank capacity 19 L
heating surface 220-300 m²
fuel consumption 1.94 L/h
air flow. 550 m³/h
dimensions 750 x 315 x 415 mm
weight 14 kg
Information requirements for gaseous/liquid fuel local space heaters
| Model identifier(s): FT120C | |||||||||
| Indirect heating functionality: no | |||||||||
| Direct heat output: 20 (kW) | |||||||||
| Indirect heat output: N.A. (kW) | |||||||||
| Fuel | Space heating emissions (*) | ||||||||
| NOx | |||||||||
| Select fuel type | liquid | kerosene | 79 [mg/kWhinput] (GCV) | ||||||
| Item | Symbol | Value | Unit | Item | Symbol | Value | Unit | ||
| Heat output | Useful efficiency (NCV) | ||||||||
| Nominal heat output | Rnom | 20.0 | kW | Useful efficiency at nominal heat output | ηth,nom | 100 | % | ||
| Minimum heat output (indicative) | Pmin | N.A. | kW | Useful efficiency at minimum heat output (indicative) | ηth,min | N.A. | % | ||
| Auxiliary electricity consumption | Type of heat output/room temperature control (select one) | ||||||||
| At nominal heat output | elmax | 0.002 | kW | single stage heat output, no room temperature control | no | ||||
| At minimum heat output | elmin | N.A. | kW | two or more manual stages, no room temperature control | no | ||||
| In standby mode | elsB | N.A. | kW | with mechanical thermostat room temperature control | no | ||||
| with electronic room temperature control | yes | ||||||||
| with electronic room temperature control plus day timer | no | ||||||||
| with electronic room temperature control plus week timer | no | ||||||||
| Other control options (multiple selections possible) | ||||||||
| room temperature control, with presence detection | no | |||||||
| Room temperature control, with open window detection | no | |||||||
| with distance control option | no | |||||||
| with adaptive start control | no | |||||||
| with working time limitation | no | |||||||
| with black bulb sensor | no | |||||||
| Permanent pilot flame power requirement | ||||||||
| Pilot flame power requirement (if applicable) | Ppilot | 0 | kW | |||||
| Contact details | Velleman NV Legen Heirweg, 33 9890 Gavere, Belgium | |||||||
| (*) NOx = nitrogen oxides | ||||||||
FT130C
power 30 kW
heat output. 10236 BTU/h
fuel tank capacity 38 L
heating surface 320-420 m²
fuel consumption 2.80 L/h
air flow. 720 m³/h
dimensions 880 x 456 x 590 mm
weight 21 kg
Information requirements for gaseous/liquid fuel local space heaters
| Model identifier(s): FT130C | |||||||||
| Indirect heating functionality: no | |||||||||
| Direct heat output: 30 (kW) | |||||||||
| Indirect heat output: N.A. (kW) | |||||||||
| Fuel | Space heating emissions (*) | ||||||||
| NOx | |||||||||
| Select fuel type | liquid | kerosene | 69 [mg/kWhinput] (GCV) | ||||||
| Item | Symbol | Value | Unit | Item | Symbol | Value | Unit | ||
| Heat output | Useful efficiency (NCV) | ||||||||
| Nominal heat output | Pnom | 30.0 | kW | Useful efficiency at nominal heat output | ηth,nom | 100 | % | ||
| Minimum heat output (indicative) | Pmin | N.A. | kW | Useful efficiency at minimum heat output (indicative) | ηth,min | N.A. | % | ||
| Auxiliary electricity consumption | Type of heat output/room temperature control (select one) | |||||||
| At nominal heat output | elmax | 0.002 | kW | single stage heat output, no room temperature control | no | |||
| At minimum heat output | elmin | N.A. | kW | two or more manual stages, no room temperature control | no | |||
| In standby mode | elsb | N.A. | kW | with mechanical thermostat room temperature control | no | |||
| with electronic room temperature control | yes | |||||||
| with electronic room temperature control plus day timer | no | |||||||
| with electronic room temperature control plus week timer | no | |||||||
| Other control options (multiple selections possible) | ||||||||
| room temperature control, with presence detection | no | |||||||
| Room temperature control, with open window detection | no | |||||||
| with distance control option | no | |||||||
| with adaptive start control | no | |||||||
| with working time limitation | no | |||||||
| with black bulb sensor | no | |||||||
| Permanent pilot flame power requirement | ||||||||
| Pilot flame power requirement (if applicable) | P pilot | 0 | kW | |||||
| Contact details | Velleman NV Legen Heirweg, 33 9890 Gavere, Belgium | |||||||
| (*) NOx = nitrogen oxides | ||||||||
Use this device with original accessories only. Velleman nv cannot be held responsible in the event of damage or injury resulting from (incorrect) use of this device. For more info concerning this product and the latest version of this manual, please visit our website www.VELLEMAN.eu. The information in this manual is subject to change without prior notice.
© COPYRIGHT NOTICE
The copyright to this manual is owned by Velleman nv. All worldwide rights reserved. No part of this manual may be copied, reproduced, translated or reduced to any electronic medium or otherwise without the prior written consent of the copyright holder.
HANDLEIDING
1. Inleiding
consummation 1.94 L/h
consummation 2.80 L/h
Velleman® Service and Quality Warranty
Since its foundation in 1972, Velleman® acquired extensive experience in the electronics world and currently distributes its products in over 85 countries.
All our products fulfil strict quality requirements and legal stipulations in the EU. In order to ensure the quality, our products regularly go through an extra quality check, both by an internal quality department and by specialized external organisations. If, all precautionary measures notwithstanding, problems should occur, please make appeal to our warranty (see guarantee conditions).
General Warranty Conditions Concerning Consumer Products (for EU):
-
All consumer products are subject to a 24-month warranty on production flaws and defective material as from the original date of purchase.
-
Velleman® can decide to replace an article with an equivalent article, or to refund the retail value totally or partially when the complaint is valid and a free repair or replacement of the article is impossible, or if the expenses are out of proportion. You will be delivered a replacing article or a refund at the value of 100% of the purchase price in case of a flaw occurred in the first year after the date of purchase and delivery, or a replacing article at 50% of the purchase price or a refund at the value of 50% of the retail value in case of a flaw occurred in the second year after the date of purchase and delivery.
- Not covered by warranty:
-
all direct or indirect damage caused after delivery to the article (e.g. by oxidation, shocks, falls, dust, dirt, humidity...), and by the article, as well as its contents (e.g. data loss), compensation for loss of profits;
-
consumable goods, parts or accessories that are subject to an aging process during normal use, such as batteries (rechargeable, non-rechargeable, built-in or replaceable), lamps, rubber parts, drive belts... (unlimited list);
-
flaws resulting from fire, water damage, lightning, accident, natural disaster, etc...
-
flaws caused deliberately, negligently or resulting from improper handling, negligent maintenance, abusive use or use contrary to the manufacturer's instructions;
-
damage caused by a commercial, professional or collective use of the article (the warranty validity will be reduced to six (6) months when the article is used professionally);
-
damage resulting from an inappropriate packing and shipping of the article;
-
all damage caused by modification, repair or alteration performed by a third party without written permission by Velleman®.
-
Articles to be repaired must be delivered to your Velleman® dealer, solidly packed (preferably in the original packaging), and be completed with the original receipt of purchase and a clear flaw description.
-
Hint: In order to save on cost and time, please reread the manual and check if the flaw is caused by obvious causes prior to presenting the article for repair. Note that returning a non-defective article can also involve handling costs.
-
Repairs occurring after warranty expiration are subject to shipping costs.
-
The above conditions are without prejudice to all commercial warranties.
The above enumeration is subject to modification according to the article (see article's manual).
NL
-性和 costs for the use of a product in general, such as: