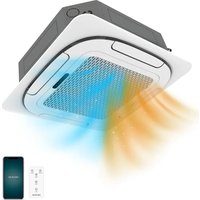
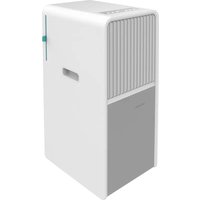
ForceClima 9050 - Air Conditioning CECOTEC - Free user manual and instructions
Find the device manual for free ForceClima 9050 CECOTEC in PDF.

| Product type | Monoblock mobile air conditioner |
| Brand | Cecotec |
| Model | ForceClima 9050 |
| Product reference | 05261 |
| Power supply | 220-240 V ~ 50 Hz |
| Electrical power (cooling mode) | 1010 W |
| Cooling capacity | 9000 BTU/h (2.64 kW) |
| Refrigerant | R290, 220 g |
| Airflow | 350 m³/h |
| Maximum allowable pressure | 3.0 MPa |
| Operating modes | Cooling, Dehumidification, Ventilation, Night |
| Temperature setting | 16 °C to 31 °C |
| Timer | 1 to 24 hours (automatic on/off) |
| Remote control | Yes, with AAA batteries (not included) |
| Condensation tank | With automatic evaporation system and full alarm |
| Filters | EVA filter + CON filter, cleaning every 2 weeks |
| Exhaust hose length | 280 to 1500 mm |
| Recommended placement area | Room of at least 7 m², distance >50 cm from walls |
| Warranty | 2 years (excluding improper use) |
| Weight | Approximately 20 kg (estimate) |
| Dimensions | Approximately 30 x 30 x 70 cm (estimate) |
| Country of origin | Made in China, designed in Spain |
Frequently Asked Questions - ForceClima 9050 CECOTEC
User questions about ForceClima 9050 CECOTEC
0 question about this device. Answer the ones you know or ask your own.
Ask a new question about this device
Download the instructions for your Air Conditioning in PDF format for free! Find your manual ForceClima 9050 - CECOTEC and take your electronic device back in hand. On this page are published all the documents necessary for the use of your device. ForceClima 9050 by CECOTEC.
USER MANUAL ForceClima 9050 CECOTEC
Local air conditioner

- Parts and components / 05
- Safety instructions / 23
3.Before use /28
4.Product assembly 28 - Operation /29
- Cleaning and maintenance /33
- Troubleshooting / 35
- Technical specifications /36
- Disposal of old electrical appliances / 37
- Technical support service and warranty /37
INDICE
- Top cover
- Control panel
- Side housing B
- Air inlet/outlet
- Front housing B
- Rear housing B
- Caster
- Base
- EVA filter
- Continuous drainage hole
- Cord-winder accessory
- Air outlet
- CON filter
- Drainage hole
- Exhaust hose
- Window sealing support
- Butterfly screw
FR
2. SAFETY INSTRUCTIONS
Read these instructions thoroughly before using the appliance. Keep this instruction manual for future reference or new users.
- Make sure that the mains voltage matches the voltage stated on the rating label of the appliance.
- Do not immerse the cord, plug, or any non-removable part of the appliance in water or any other liquid, nor expose the electrical connections to water. Make sure your hands are dry before handling the plug or switching on the appliance.
- This product is designed for domestic use only, do not use it for commercial or industrial purposes.
WARNING: if the appliance falls accidentally in water, unplug it immediately. Do not reach into the water!
- Check the power cord regularly for visible damage. If the cord is damaged, it must be replaced by the official Technical Support Service of Cecotec, in order to avoid any type of danger.
- Do not pull or carry the appliance by the cord. Do not use the cord as a handle. Do not pull the cord along sharp edges or corners. Do not run appliance over the cord. Keep the cord away from hot surfaces.
WARNING: do not use the appliance if its cord, plug, or housing is damaged, nor after it malfunctions or has been dropped or damaged in any way.
- Do not use the appliance in confined spaces with explosive
or toxic vapours.
- Keep your local air conditioner away from heat sources.
- The appliance is not intended to be used by children under the age of 8. It can be used by children over the age of 8, as long as they are given continuous supervision.
- This appliance is not intended to be used by persons with reduced physical, sensory, or mental capabilities, or lack of experience or knowledge, unless they have been given supervision or instruction concerning the use of the appliance in a safe way by a person responsible for their safety, and understand the hazards involved.
- Supervise young children to make sure that they do not play with the appliance. Close supervision is necessary when the appliance is being used by or near children.
- Keep the appliance and its cord out of reach of children under the age of 8.
- Do not leave the appliance unattended while in use. Unplug it from the mains supply when you finish using it or when you leave the room.
- Do not try to repair the appliance by yourself. Contact the official Technical Support Service of Cecotec for advice.
-
Switch off and unplug from wall outlet when not in use, when moving the appliance from one location to another or before assembling or disassembling parts. To avoid a tripping hazard, safely coil the cable.
-
Cleaning and maintenance must be carried out according to this instruction manual to make sure the appliance functions properly. Turn off and unplug the appliance before cleaning it.
- Cleaning and maintenance tasks must not be carried out by children.
- Store the appliance and its instruction manual in a safe and dry place when not in use.
- Place the machine in a flat and dry place and keep a distance of above 50cm between the machine and the surrounding objects or walls.
- After the local air conditioner is installed, ensure that the power plug is intact and firmly plugged into the power outlet and place the power cord orderly to prevent someone from being tripped or pulling out the plug.
- Do not put any object into the air inlet and outlet of the local air conditioner. Keep the air inlet and outlet free from obstructions.
- When drainage pipes are installed, ensure that the drainage pipes are properly connected, and are not distorted or bended.
- While adjusting the upper and lower wind-guide strips of the air outlet, pluck it with hands gently to avoid damaging wind-guide strips.
-
When moving the machine, make sure that it is in an upright position.
-
Do not install and use the local air conditioner in the bathroom or other humid environments
- Do not use insecticide sprays or other flammable substances near the local air conditioner.
- Do not pierce or burn the cylinder.
- Be aware that refrigerants may not have an odour.
- The appliance shall be installed, operated and stored in a room larger than 12m^2
- The appliance shall be stored in a well-ventilated area where the room size corresponds to the room area as specified for operation.
- The local air conditioner is only suitable for indoor use and is not suitable for other uses.
- Make sure the device is placed at a minimum distance of 5 cm from walls and other objects.
- Do not disassemble or modify the appliance, this could cause malfunctions and damage to persons and properties. To avoid danger, contact the Technical Support Service of Cecotec for help or reparation.
- The appliance must be installed in accordance with low tension electrical regulations.on manual in a safe and dry place when not in use.
-
Place the machine in a flat and dry place and keep a distance of above 50cm between the machine and the surrounding objects or walls.
-
After the air conditioning is installed, ensure that the power plug is intact and firmly plugged into the power outlet, and place the power cord orderly to prevent someone from being tripped or pulling out the plug.
- Do not put any object into the air inlet and outlet of the air conditioning. Keep the air inlet and outlet free from obstructions.
- When drainage pipes are installed, ensure that the drainage pipes are properly connected, and are not distorted or bended.
- While adjusting the upper and lower wind-guide strips of the air outlet, pluck it with hands gently to avoid damaging wind-guide strips.
- When moving the machine, make sure that it is in an upright position.
- Do not install and use the air conditioning in the bathroom or other humid environments
- Do not use insecticide sprays or other flammable substances near the air conditioning.


3. BEFORE USE
WARNING: before using the mobile air conditioner, keep it in an upright position for at least two hours.
The air conditioner can be easily moved around the room. Always move and transport it in an upright position and install it on a flat and stable surface. Do not install the air conditioner in bathrooms or wet environments.
4.PRODUCT ASSEMBLY


Img.2
Img.3
Img.1
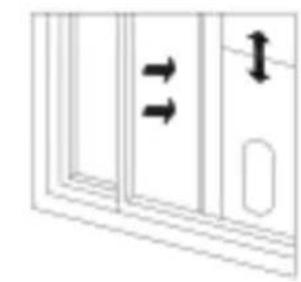
- Screw the exhaust pipe adapter to one of the exhaust pipe's end by turning it clockwise.
- Screw the window adapter to the other end of the exhaust pipe.
- Introduce the butterfly screw in the window-sealing support's hole.
- Slide the window-sealing support through the window-sealing support's inner part, making sure the screw is introduced in the support adjustment's guide.
- Fix the screw with its butterfly and adjust it to the desired measure.
- Use the screws provided to fix the window adapter to the window-sealing support's hole.
- Install the whole window-sealing unit vertically or horizontally, depending on the type of window and adjust it to the window's measure.
- Close the window and make sure that the window-sealing unit fits properly.
- Youtube link: https://youtu.be/8aj8BcB2bKA
WARNING:
- The flat end of the exhaust pipe joints must be fitted into place.
- Do not deform or turn the pipe excessively (over 45^ ). Keep the exhaust pipe's inlet and outlet clear.

Img.4

Img.5

Img.6
Note:
The length of the exhaust pipe shall be 280~1500 mm, and this length is based on the specifications of the air conditioner. Do not use extension tubes or replace it with other different hoses, or this may cause a malfunction. The exhaust outlet must not be blocked, otherwise this could cause overheating.
5. OPERATION
Remote control

- Fan: press to select high or low wind speed.
- Up: press to increase temperature and timing
set value.
3. Mode: press to switch between cooling, dehumidifying and fan mode.
4. Down: press to reduce temperature and timing set value.
5. Timer: press to get timing.
6. Sleep mode (night): press to turn on the sleep mode.
7. Power: Press to turn the machine on or off.
a) Inserting Batteries into Remote Control
The remote control is operated by 2 × 1.5V AAA batteries (not included). Please insert 2 × 1.5V batteries (not included with the product) when operating the appliance for the first time.
- To insert the batteries, open the battery compartment by sliding the battery compartment cover (J) on the back of the remote control in direction of the arrow. Insert the batteries with the correct polarity (+/-). Follow the polarity signs inside the battery compartment. Close the battery compartment.
- Replace the batteries as soon as the product no longer responds to commands from the remote control.
- Only use batteries of the same or equivalent type. Remove all batteries, if you are not going to use the appliance for a while to prevent damage. Then close the battery compartment. Ensure that the cover clicks into place correctly. Follow the safety information when handling batteries/rechargeable batteries
Control panel

-
Timer
-
Down
-
Fan speed button
-
Sleep
3.Up
7.Mode button
-
Display
-
Power button
b) Use
- Aim the remote control directly at the product when using it.
- Make sure that there are no obstructions between the remote control and the appliance. e.g. furniture, that could block the signal.
Setup and operation
Settings can be changed on the appliance's control panel (3) directly or using the remote control supplied with the product
a) Turning on and off
-
If the mains power is connected, push the POWER button (8) or the icon (I) on the remote control to switch the appliance on and off. The appliance can be pre-set. When you switch it on, the pre-set temperature of 22^ is shown on the display (4). The low fan speed is also pre-set.
-
The compressor does not immediately switch on once the appliance has been switched on. It switches on after a delay of approx. 3 minutes to prevent damage to the compressor. This happens after a restart as well.
b) Basic operating
- Adjust the vertical direction of the airflow through air outlet openings (2) with your hand. Caution! Do not break the fan blades by pressing too hard.
- Adjust the horizontal direction of the air flow horizontally using the movable airflow direction flaps.
- Press the MODE button on the appliance (7) or the MODE button on the remote control to switch between COOL, dehumidifier and fan modes.
c) Cool mode
To select the "COOL" mode, press the MODE button on the appliance (7) or the button on the remote control. The light will turn on.

- Press the UP and Down buttons (3, 5) or buttons on the remote control to adjust the temperature within the 16^ to 31^ range.
- Press the ≈ FAN SPEED button (2) on the appliance or the ≈ button on the remote control to set a high or low speed. The HIGH indicates a high fan speed. LOW indicates a low fan speed.
- The air conditioner switches off automatically if the room temperature is lower than the temperature set. The compressor switches off. The appliance's fan continues to run. If the room temperature increases, the air conditioner switches on again
- Keep doors and windows closed during air conditioning. In the event that direct sunlight shines on the room being cooled, e.g. on windows and doors facing the sun, close any curtains or blinds.
d) Dehumidifier mode
-
Press the 1) MODE on the device (7) or the 1) button on the remote control to select the dehumidifier mode. The "DEHUM" indicator will light up.
-
The Sleep mode cannot be set while the device is operating in dehumidifier mode. During this mode, it only works at slow speed. It cannot be changed. The temperature setting cannot be modified either.
e) Fan mode
- Press the ≈ MODE button on the appliance (7) or the ≈ button on the remote control to select "fan" mode. The FAN indicator will light up. Only the fan operates. There is no air conditioning or dehumidification.
- Press the ≈ SPEED button (2) on the appliance or the ≈ button on the remote control to set high or low fan speed.
The temperature and sleep mode cannot be set during operation in "fan" mode
f) Sleep mode (sleep)
- In sleep mode, the appliance increases the temperature set by a total of 2^ and generally runs at low fan speed. If you have selected sleep mode, the temperature set is increased by 1^ after 1 hour, by another 1^ after another hour and then remains constant.
- Select "COOL" mode. Sleep mode is only possible in "COOL" mode.
- Press the SLEEP button (6) on the appliance or the button on the remote control (C) to switch to sleep mode. The fan speed is set to low and cannot be changed. The SLEEP indicator lights up.
- Press the SLEEP button (6) on the appliance or the button on the remote control (C) to exit sleep mode.
- The sleep mode only works in "COOL" mode. Sleep mode is automatically switched off when the condensate tank is full (the WATER FULL lamp lights up) or when the appliance is switched to standby mode.
g) Timer
It is possible to switch the appliance on and off automatically. You can set the desired operating time before the appliance turns automatically off from standby mode or until it switches off while the appliance is on.
Automatic switching on in standby mode
- The appliance is switched off and in standby mode.
- Press the TIMER button (1) on the appliance or the button (H) on the remote control to set the desired time interval (1 - 24 hours).
- Press the TIMER button (1) on the appliance or the button (H) on the remote control, several times if necessary, until the desired time is set. Once the time has been set, the display (4) switches back to the temperature display after a few moments.
- To view a set time, briefly press the TIMER button (1) on the appliance or the button (H) on the remote control. The set time will be displayed. The display (4) switches back to the temperature display after a few moments.
- The appliance switches on automatically after the preset time has elapsed.
Automatic switching off while the appliance is in operating
-
The appliance is switched on.
-
Press the TIMER button (1) on the appliance or the button (H) on the remote control to set the desired time interval (1 - 24 hours). The clock icon appears in the display (4).
- Press the TIMER button (1) on the appliance or the button (H) on the remote control, several times if necessary, until the desired switching time is set. Once the time has been set, the Display (4) switches back to the temperature display after a few moments.o view a set switching time, briefly press the TIMER button (1) on the appliance or the button (H) on the remote control. The switching time will be displayed. The Display (4) switches back to the temperature display after a few moments.
- The appliance switches off automatically after the preset time has elapsed.
h) Auto shutdown when the condensate tank is full
This product has an automatic evaporation system. This re-uses the condensate for air conditioning to save energy and increase the cooling efficiency.
- If the condensate tank is full, the WATER FULL lamp is on and the appliance switches to standby after 8 seconds. An alarm sounds, the compressor and all operating keys will be locked. This status lasts until the condensate tank is emptied. Please refer to chapter 15. Maintenance a) Emptying the condensate tank.
- Unplug the plug in mains socket after the auto shutdown to reset the appliance. Insert the mains cable with plug back into the socket again. Press the POWER button (8) to switch the appliance on again.
6. CLEANING AND MAINTENANCE
CLEANING
a) General cleaning
Never use aggressive detergents, rubbing alcohol or other chemical solutions, as these could damage the casing or stop the product from
operating properly.
- Always disconnect the product from the power supply before cleaning it.
- Use a damp, lint-free cloth to clean the product.
- Never hold the appliance under running water or immerse it in water or any other liquid during cleaning. Water must not get inside the appliance.


b) Cleaning the air filter
Clean the air filters regularly every 2 weeks to ensure that the air conditioner remains efficient.
- First pull the upper air filter on the back out to the side. Then remove the lower air filter.
- Clean the air filters with a vacuum cleaner. If the filters are very dirty, wash them with warm water (approx. 40^ ) and a mild detergent. Allow them to dry before installing them again.
- Then re-install the air filters correctly.
MAINTENANCE
Switch off the appliance before all maintenance and remove the mains cable (11) with plug from the mains socket.
a) Emptying the condensation tank
-
Empty the condensation tank if the warning alarms (warning sound and flashing of the backlight) indicate this is necessary or if you are planning not to use the product for a long period of time.
-
Unplug the mains plug from the mains socket.
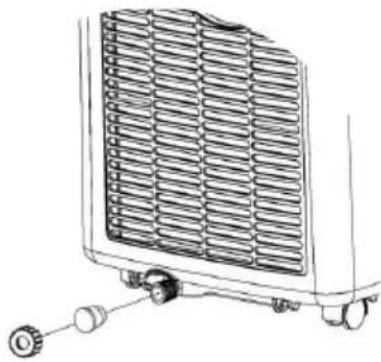
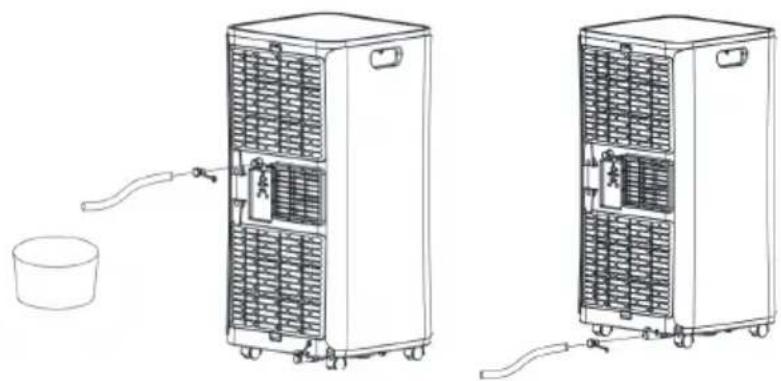
- Remove the cover from the drainage hole.
- Remove the rubber cap from the drainage hole. The water flows out immediately. Allow all the water to flow out. If necessary, use a drain hose or place a container under the drainage hole. Neither of these are included with this product.
- Drain the water into a suitable container, outdoors or into another suitable drain.
Only allow condensation to run directly onto the floor if there is a good floor drain and the floor is water resistant (avoid wooden floors).
b) Thorough cleaning before storage (at the end of the season)
- Remove the cover. Remove the rubber cap from the drainage hole. The water flows out immediately. Allow all the water to flow out. If necessary, tilt the appliance slightly to one side to allow all the water to come out.
- Refer to the maintenance section, paragraph a) Emptying the condensation tank.
- Run the appliance at low fan speed half a day after it has been fully emptied until it has fully dried. This prevents the formation of mould in the interior of the appliance during storage.
- Then switch the appliance off with the POWER button (8) and unplug the mains plug from the mains socket.
Wind the mains cable carefully, fasten it with a suitable tie (wire, string) and put the plug
in the plug holder.
- Remove all air hoses etc. and store them in such way that they are protected and dry.
- Cover the appliance and store it in a dry place. Use the original packing material for this, if necessary, to protect it from the environment.
- Remove the batteries from the remote control and store them safely or recycle them according to the local regulations.
7. TROUBLESHOOTING
Do not repair or disassemble the air conditioning by yourself. Unqualified reparations will void the warranty, and may cause damage to users or their properties.
| Problems Reasons Solutions | ||
| There is no electricity. Turn it on after connecting it to a socket with electricity. | ||
| The overflow indicator displays "FL". | Drain water inside. | |
| The room temperature is too low or too high. | Recommend to use the machine in places where temperature is between 7-35 °C (44- 95 °F). | |
| In cooling mode, the room temperature is lower than the set temperature. | Change the set temperature. | |
| In dehumidification mode, the ambient temperature is low. | The machine is placed in a room with a room temperature above 17 °C (62 °F). | |
| The cooling effect is not good. | There is direct sunlight. Avoid direct sunlight. | |
| Doors or windows are open; there are a lot of people; or in cooling mode, there are other sources of heat. | Close doors and windows, and add new air conditioning. | |
| The filter screen is dirty. | Clean or replace the filter screen. | |
| The air inlet or outlet is blocked. Clear obstructions. | ||
| Big Noise. | The air conditioning is not placed on a flat surface. | Put the air conditioning on a flat and hard place (to reduce noise). |
| Compressor does not work. | Overheat protection is activated. Wait for 3 minutes until the temperature is lowered, and then restart the machine. | |
| The remote control does not work. | The distance between the machine and the remote control is too far. | Let the remote control get close to the air conditioning, and make sure that the remote control directly faces to the direction of the remote control receiver. |
| The remote control is not aligned with the direction of the remote control receiver. | ||
| Batteries are dead. Replace batteries. | ||
| Displays 'E2'. | The pipe temperature sensor does not operate properly. | Check the pipe temperature sensor and related circuitry. |
| Displays 'E1'. | The room temperature sensor does not operate properly. | Check the room temperature sensor and related circuitry. |
NOTE: If problems not listed in the table occur or recommended solutions do not work, please contact the Technical Support Service of Cecotec.
8. TECHNICAL SPECIFICATIONS
Model:ForceClima9050
Product reference: 05261
Rated input power: 1010 W
Voltage and frequency: 220 - 240V 50Hz
Cooling capacity: 9000 BTU/h | 2270 Fri/h | 2.64 kW
Refrigerant: R290/350g
Operating pressure | Suction: 0.6 MPa | Discharge: 1.8 MPa
Maximum pressure: 3.0 MPa
Air flow: 350m^3 /h
Made in China | Designed in Spain
9. DISPOSAL OF OLD ELETRICAL APPLIANCES
The European directive 2012/19/EU on Waste Electrical and Electronic Equipment (WEEE), specifies that old household electrical appliances must not be disposed of with the normal unsorted municipal waste. Old appliances must be collected separately, in order to optimize the recovery and recycling of the materials they contain, and reduce
the impact on human health and the environment.
The crossed out "wheeled bin" symbol on the product reminds you of your obligation to dispose of the appliance correctly. If the product has a built-in battery or uses batteries, they should be removed from the appliance and disposed of appropriately.
Consumers must contact their local authorities or retailer for information concerning the correct disposal of old appliances and/or their batteries.
10. TECHNICAL SUPPORT AND WARRANTY
This product is under warranty for 2 years from the date of purchase, as long as the proof of purchase is submitted, the product is in perfect physical condition, and it has been given proper use, as explained in this instruction manual.
The warranty will not cover the following situations:
- The product has been used for purposes other than those intended for it, misused, beaten, exposed to moisture, immersed in liquid or corrosive substances, as well as any other fault attributable to the customer.
- The product has been disassembled, modified, or repaired by persons, not authorised by the official Technical Support Service of Cecotec.
- Faults deriving from the normal wear and tear of its parts, due to use.
- The warranty service covers every manufacturing defects of your appliance for 2 years, based on current legislation, except consumable parts. In the event of misuse, the warranty will not apply.
If at any moment you detect any problem with your product or have any doubt, do not hesitate to contact Cecotec Technical Support Service at +34 963 210 728.
2. INSTRUCTIONS DE SECURITÉ
d) Mode Deshumidification
Made in China | Designed in Spanien