Fidi Free - Breast pump Lionelo - Free user manual and instructions
Find the device manual for free Fidi Free Lionelo in PDF.
| Product Type | Portable electric breast pump (cordless) |
| Brand | Lionelo |
| Model | Fidi Free |
| Power | Rechargeable lithium-ion battery, charges via USB-C, 5V/1A adapter (not included) |
| Battery life | Approximately 2 hours initial charge; battery life not specified, but sufficient for multiple sessions |
| Operating modes | Massage mode (9 intensity levels) and expression mode (9 intensity levels) |
| Functions | Touch screen, timer, memory settings, automatic shut-off after 30 min, automatic pause after 5 min of inactivity |
| Care and cleaning | Parts in contact with milk washable in hot water with mild detergent and sterilizable in boiling water (10 min). Main body to clean with a dry cloth |
| Safety | Automatic shut-off, overheat protection, keep out of reach of children, not suitable for tired or pregnant individuals |
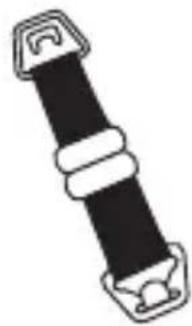
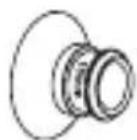
| Included parts | Silicone funnels (15, 17, 19, 21, 24 mm), diaphragm, suction valve, junction, milk collector, main body, USB-C cable, bra strap |
| Repairability | Authorized service center; battery not user-replaceable |
| Operating conditions | Ambient temperature max. 30°C; charge between 5°C and 35°C |
| Serial number / Manufacturer | See full manual; contact: help@lionelo.com |
Frequently Asked Questions - Fidi Free Lionelo
User questions about Fidi Free Lionelo
0 question about this device. Answer the ones you know or ask your own.
Ask a new question about this device
Download the instructions for your Breast pump in PDF format for free! Find your manual Fidi Free - Lionelo and take your electronic device back in hand. On this page are published all the documents necessary for the use of your device. Fidi Free by Lionelo.
USER MANUAL Fidi Free Lionelo
natural_image
Line drawing of a lionelo brand digital water meter with control buttons and display (no text or symbols beyond branding)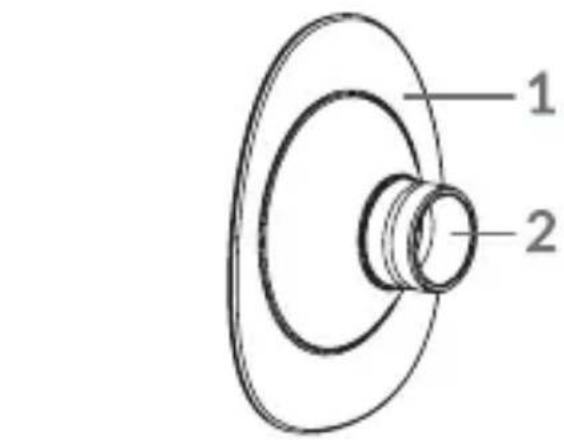
text_image
1 2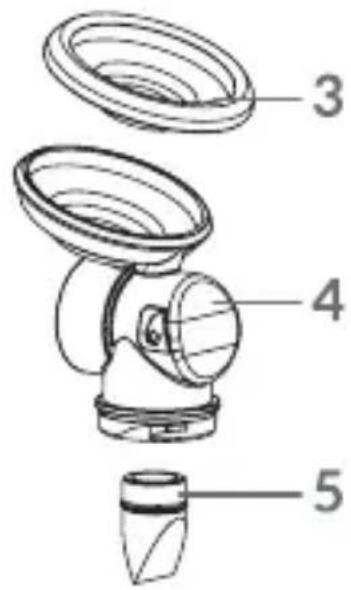
text_image
Technical diagram of a hairdryer with labeled parts 3, 4, and 5
text_image
7 6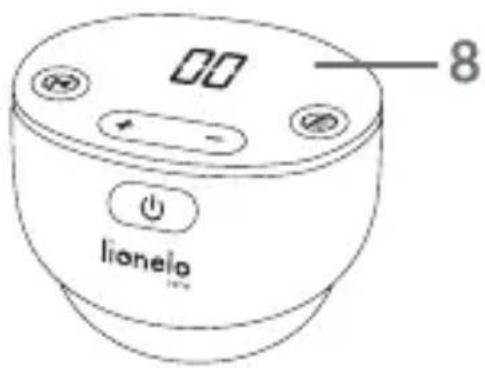
text_image
lionelio 8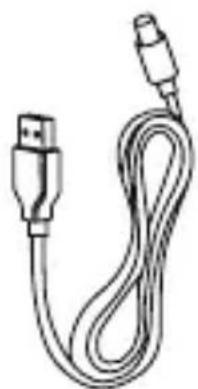
natural_image
Illustration of a USB cable with two connectors (no text or symbols)9
natural_image
Simple line drawing of a black and white belt buckle (no text or symbols)10
11
12
13
14
A

text_image
1 2 3 4 5 lionelo B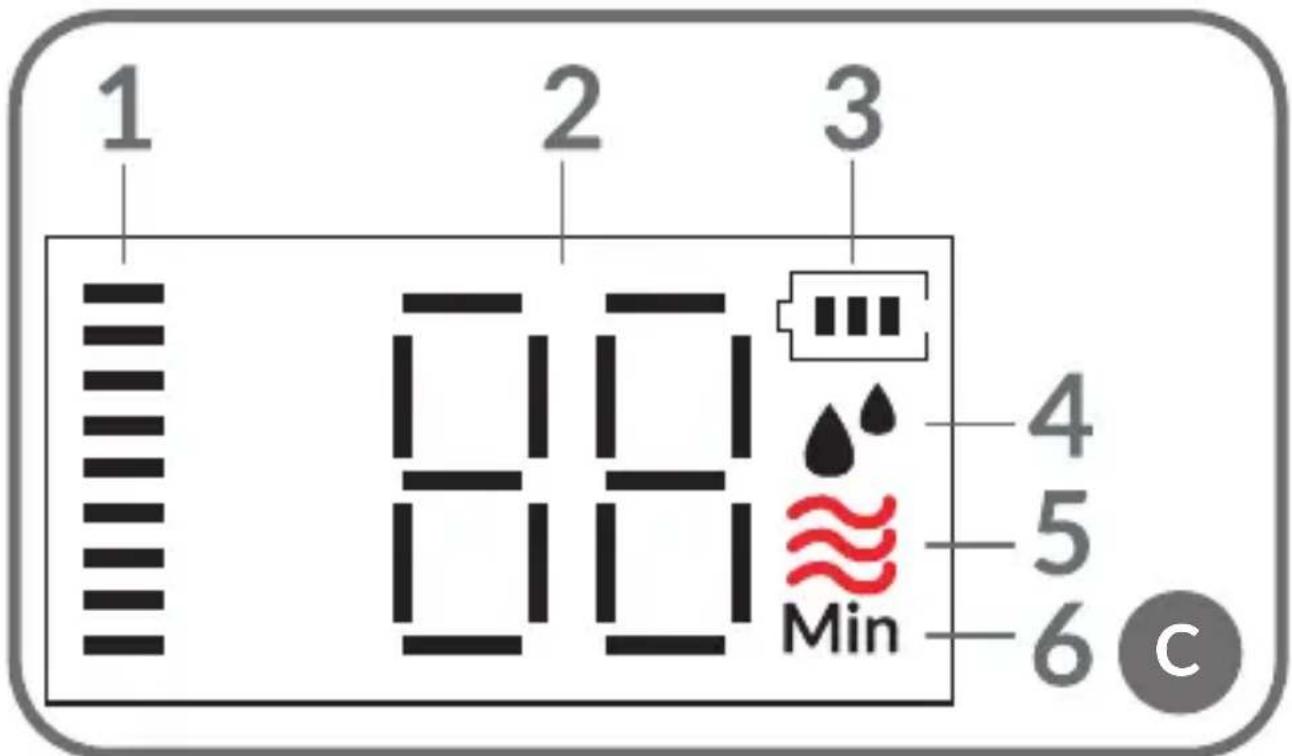
text_image
1 2 3 80 Min 4 5 6 C
natural_image
Diagram showing a mechanical assembly with a cylindrical component and an upward arrow, no text or symbols present.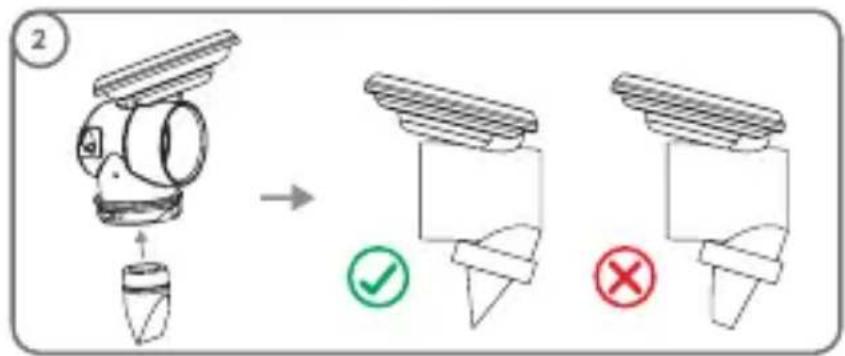
text_image
Diagram illustrating robot arm joint operation with checkmark and cross symbols indicating correct and incorrect states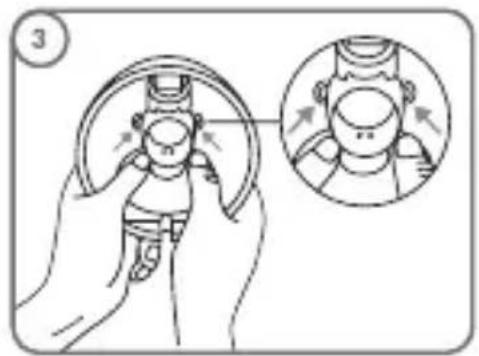
text_image
Diagram illustrating hand positioning and head movement, showing a finger pressing a circular component with arrows indicating direction.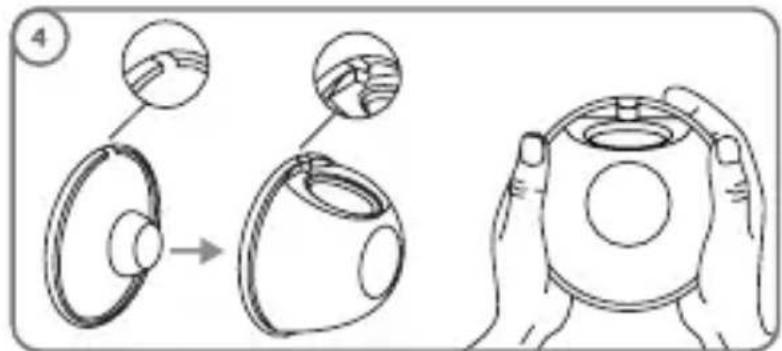
text_image
Diagram illustrating a mechanical assembly process with labeled steps and magnified views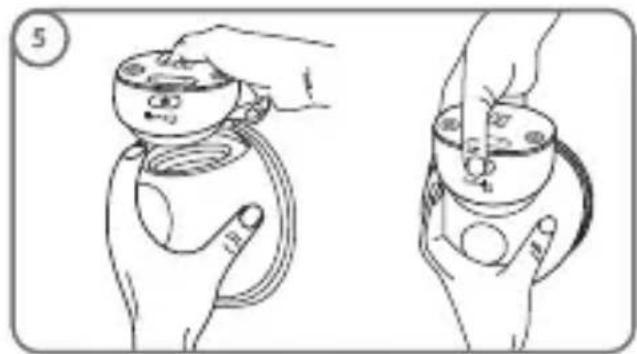
text_image
Diagram showing two hands holding a device with labeled parts, likely illustrating a physical or mechanical setup.
text_image
1 88 lionejo 2 - + - - - - - - - - - - - - - - - - - - - - - - - - - - - - - - - - - - - - - - - - - - - - - - - - - - - - - - - - - - - - - - - - - - - - - - - - - - - - - - - - - - - - - - - - - - - - - - - - - - - - -
text_image
Medical procedure diagram showing steps to undergo breast surgery with magnified views of the procedure.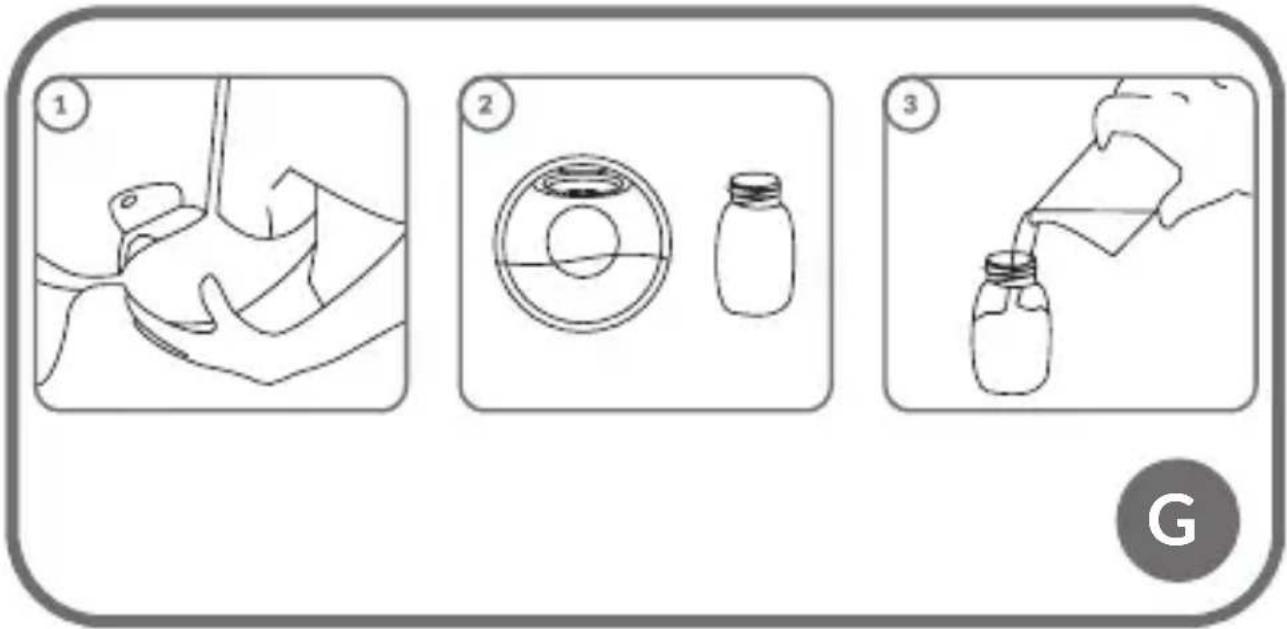
text_image
Three-step diagram illustrating a medical procedure: surgical tool, circular component with cap, and spray bottle pouring.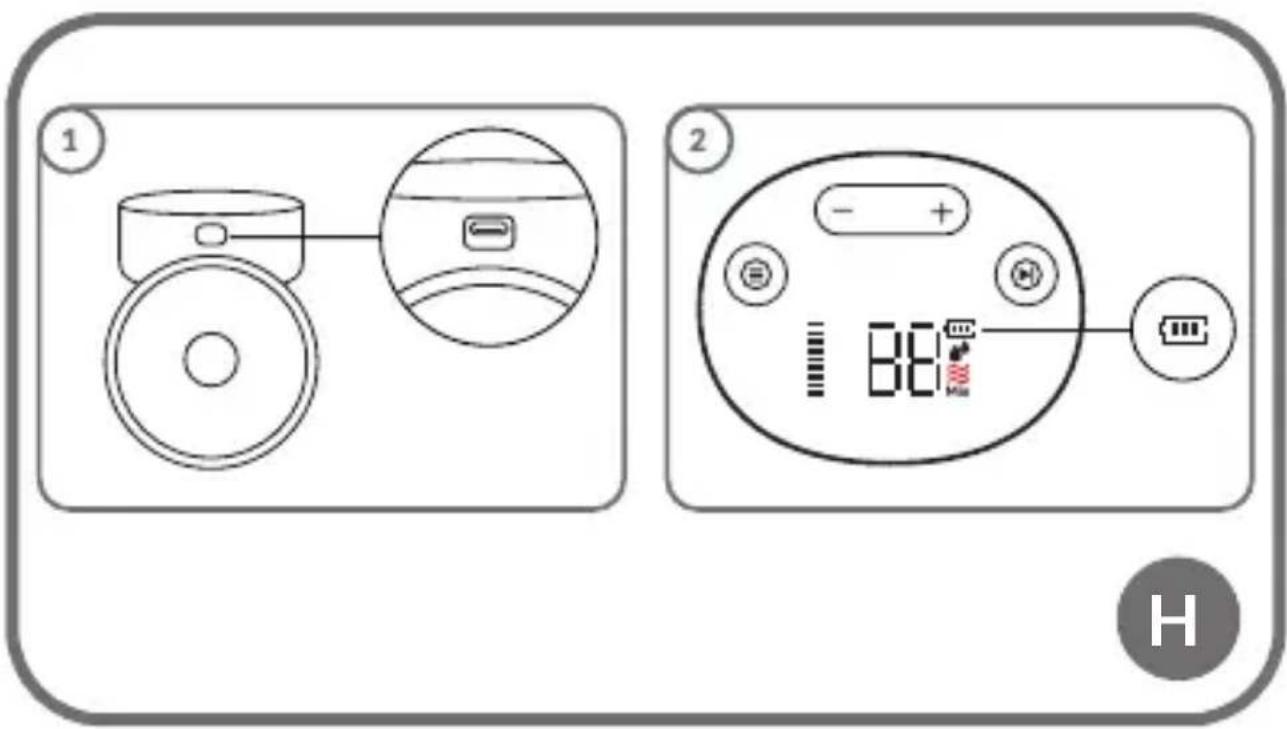
text_image
Diagram showing two different home control panel designs with labeled buttons and indicators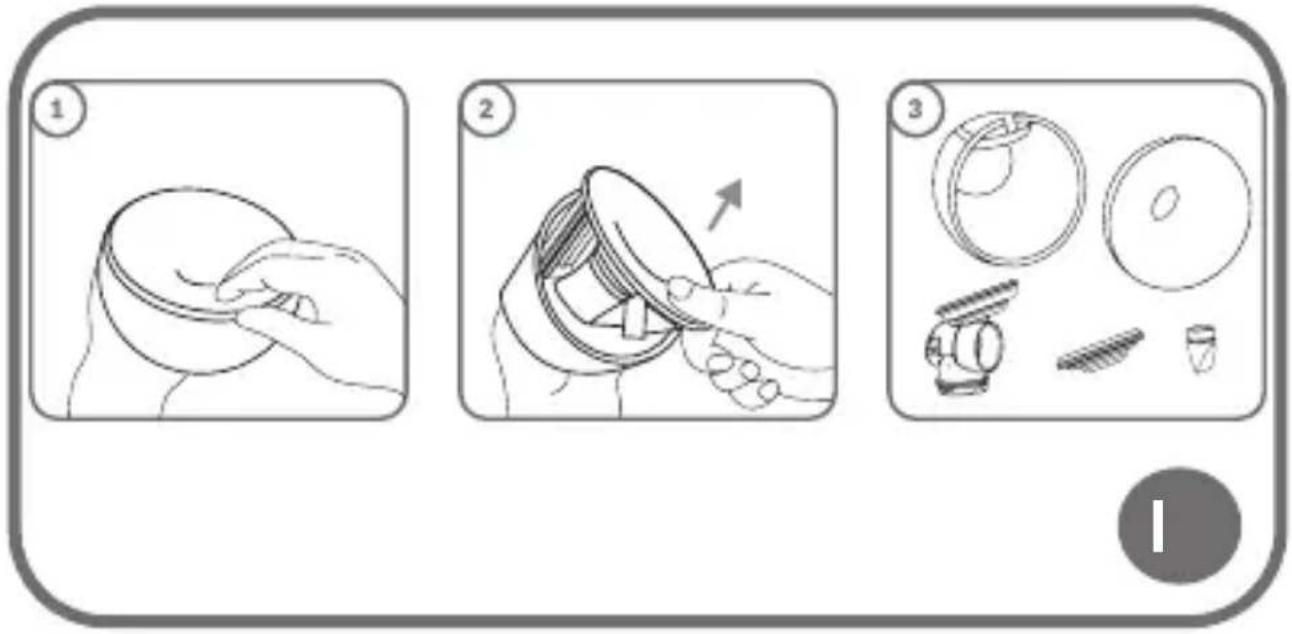
text_image
Three-step diagram illustrating a hand turning a circular object, then adjusting a ring and using a tool to adjust the final ring.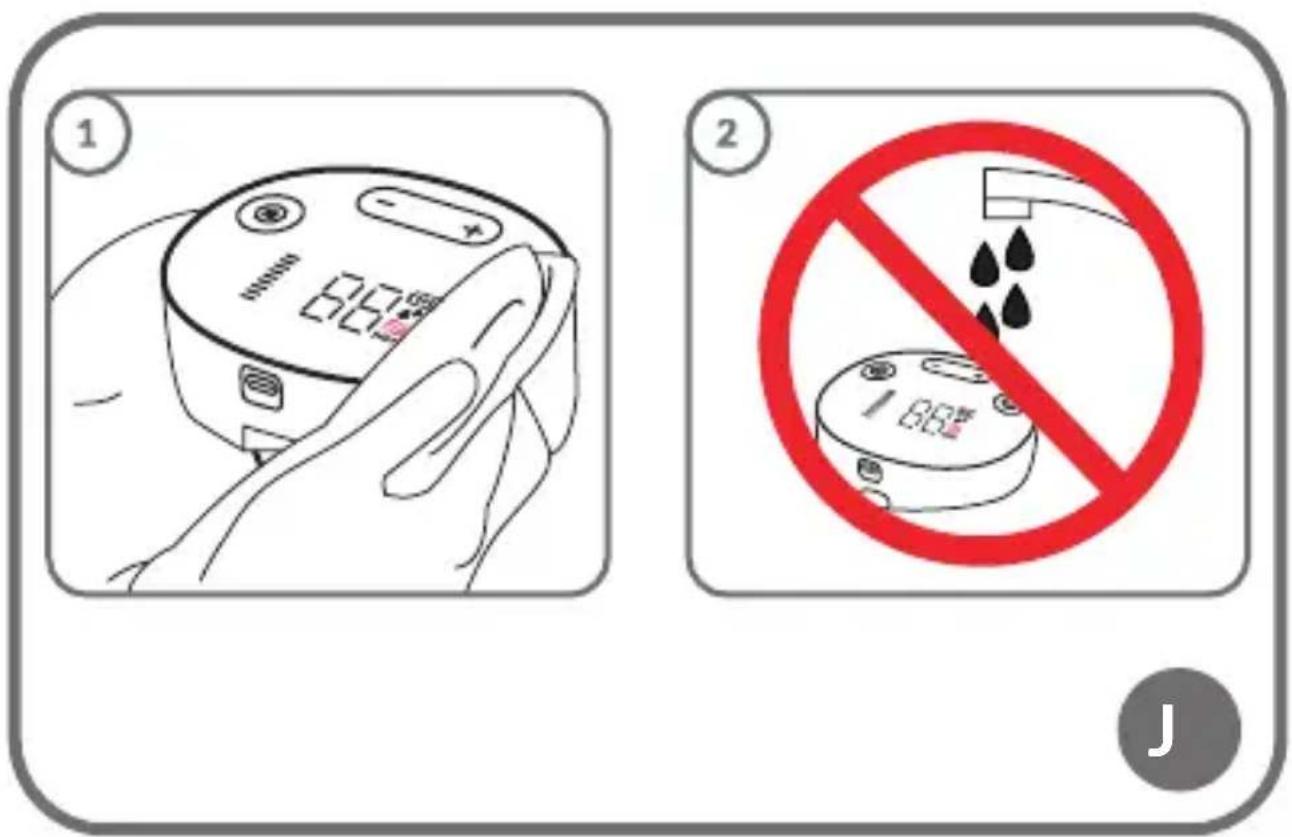
text_image
Medical warning illustration showing two steps: one with a digital thermometer and blood pressure monitor, the other without a prohibition symbol.Dear Customer!
If you have any comments or questions about the product you have purchased, please contact us: help@lionelo.com
Manufacturer:
BrandLine Group Sp. z o.o.
Please read this manual before using the product to familiarize yourself with its functions and use it as intended.
Failure to follow the safety instructions and use not in accordance with the instructions may cause harm to health.
Keep this instruction manual for future reference.
-
The device may be used by children at least 8 years old and persons with reduced physical, sensory or mental capabilities, as well as persons without relevant knowledge and experience in the use of the device, if they are supervised or have been previously instructed in the safe use of the device and the risks involved.
-
This device is not a toy. Do not allow children to play with it. Keep the device out of the reach of children. Cleaning and maintenance should not be performed by children without adult supervision.
-
Do not repair or modify the device. These operations can only be performed by an authorized service center. Use only original spare parts.
-
Do not start the device if you notice any damage. This applies both to the device itself and its accessories, such as the USB cable.
-
Do not use the device if it begins to malfunction, has been dropped or submerged in water, becomes excessively hot, discoloration or bulging appears, or if other abnormal phenomena occur. Contact the manufacturer's authorized service center.
-
Never leave the device plugged into a power outlet unattended.
-
The device is not resistant to high temperatures. Use the device away from heat sources, high temperatures, hot surfaces, direct sunlight, sources of sparking, open flames, oils and sharp edges.
- Do not use chemicals to clean the device. Do not wash the main motor unit with water.
- Turn off the device after each use.
- Do not immerse the entire device in water or other liquids. Do not use near water.
- Do not use the device improperly.
- Do not use the device or touch the power supply with wet or damp hands. Make sure all breast pump components are dry before assembling the device.
- Before cleaning or moving the device, turn it off and disconnect it from the power source.
- Before and after each use, wash and disinfect all parts that will adhere to the body and come into direct contact with milk.
- Thoroughly dry each item before use and storage.
- For hygienic reasons, the device should be used by one person.
- If using the breast pump causes discomfort or pain, stop using the device immediately.
- Do not use the device throughout your pregnancy.
- Do not use the device if you are tired or while sleeping.
- Special care is required when using the device near children.
- Do not use the device while lying down or while engaged in strenuous exercise or activities that could cause injury.
- If breast milk does not appear for more than 5 minutes while using the device, stop using the breast pump and consult a doctor.
- If you have an implanted pacemaker or other electrical device, it is recommended that you consult your doctor before using the device.
- If you use the device at the highest permissible ambient temperature (30°C) for 30 minutes, the silicone insert can reach 45°C.
-
It is recommended to replace the components in contact with milk every about 3-6 months, depending on the frequency of use, and when the device is not used for a long time.
-
Do not expose the device and its batteries to extreme temperatures. The acceptable temperature range for charging the battery is 5^ C - 35^ C.
- After the battery is fully charged, immediately unplug the device from the power outlet.
- Do not use milk from bottles or containers that have signs of damage on them.
- The batteries used in this device are non-replaceable.
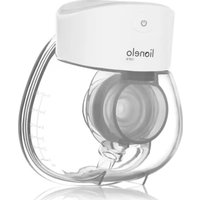
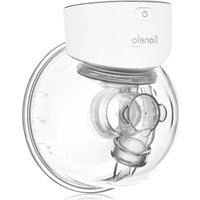
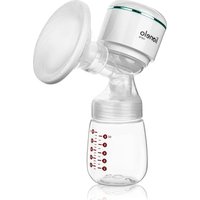
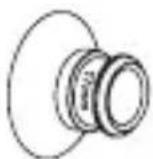
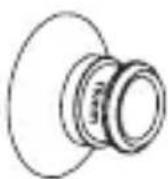
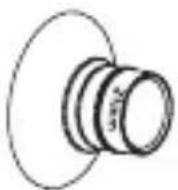
Device diagram (fig. A)
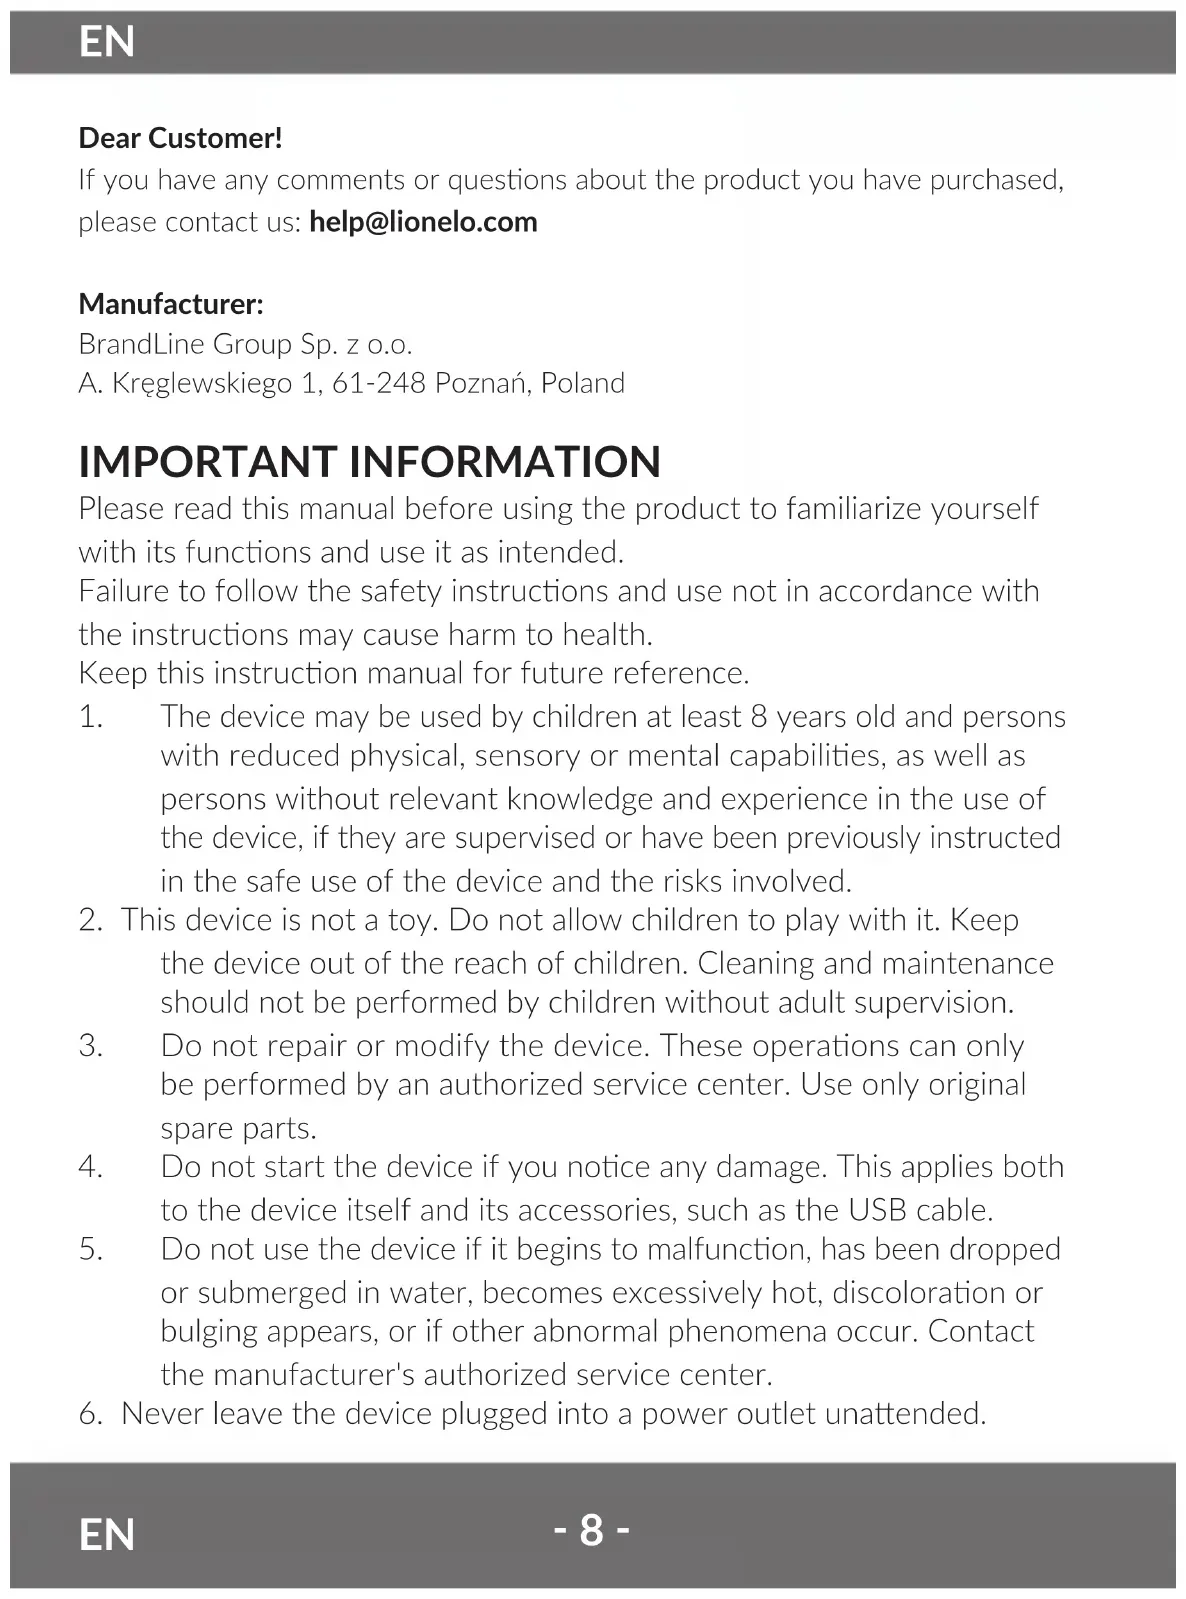
- Silicone funnel (24 mm) 8. Main body
- Nipple tunnel 9. USB cable
- Silicone diaphragm 10. Bra clasp
- T-piece of the breast pump 11. Funnel (15 mm)
- Suction valve 12. Funnel (17 mm)
- Milk container 13. Funnel (19 mm)
- Milk pouring hole 14. Funnel (21 mm)
Main body diagram (fig. B)
- On/off switch
- Reduction of intensity level
- Pause/start button 5. Switching the operating
- Increase of intensity level mode
Touch screen diagram (fig. C)
- Mode intensity level 4. Milk pumping mode
indicator - Operating time indicator 6. Operating time unit
- Battery level indicator
Breast pump modes
- Massage mode – 9 levels. Massage simulates the initial sucking phase of the baby during breastfeeding.
- Pumping mode - 9 levels. This mode simulates the deeper sucking phase of the baby during breastfeeding.
Installation of the breast pump (fig. D)
NOTE
Make sure that all parts of the device in contact with milk are washed and disinfected. To avoid damage to the device, all parts must be completely dry. Wash your hands before assembly. Avoid touching with your hands the inner surfaces of the device and its parts that come into contact with milk and your body.
- Place the silicone membrane (3, fig. A) on the breast pump T-piece (4, fig. A). Make sure that the collar of the diaphragm is properly hooked and does not slip when using the breast pump (1, fig. D).
- Insert the suction valve (5, fig. A) into the lower opening of the breast pump T-piece (4, fig. A). Make sure the valve is inserted all the way in and facing the right direction (2, fig. D).
- Insert the assembled breast pump T-piece into the milk container (6, fig. A), so that its part with “wings” is placed inside the tabs on the back wall of the container. Press with both hands the part of the T-piece with the silicone membrane to the opening on the main body so as to ensure a complete seal. Make sure the T-piece is properly installed (3, fig. D).
- Install the silicone funnel (1, fig. A) into the milk container (6, fig. A). Fit the deflector of the silicone funnel to the milk pouring hole (7, fig. A) on the milk container (6, fig. A). Make sure that the funnel collar and the nipple tunnel (2, fig. A) are properly hooked (4, fig. D). You can also choose one of the four funnels: 15, 17, 19 or 21 mm (11, 12, 13 or 14, respectively, fig. A) to insert into the silicone funnel (1, fig. A).
- Connect the main body (8, fig. A) to the milk container (6, fig. A). Make sure that the body is installed correctly (5, fig. D).
Fitting the device (fig. E)
- Make sure the selected funnel is a snug fit and the nipple is in the nipple tunnel (2, fig. A) and centered. Place the device in the bra (1, fig. E). Taking milk should not be painful. If using the breast pump causes discomfort or pain, stop using the device immediately.
- Make sure that the device is well-fitted to the breast, and that there is no free space between the breast and the silicone funnel. A poor fit will affect the amount of breast milk pumped.
The device can be worn with a standard nursing bra, either sitting or standing. Be careful that the position of the device does not change during operation. This may cause the device to stop working. Do not bend over while using the device. For rigid and inflexible bras, use the included bra clasp (10, fig. A). To do this, unfasten the bra strap, then attach the clasp and adjust the length according to your preference (2, fig. E).
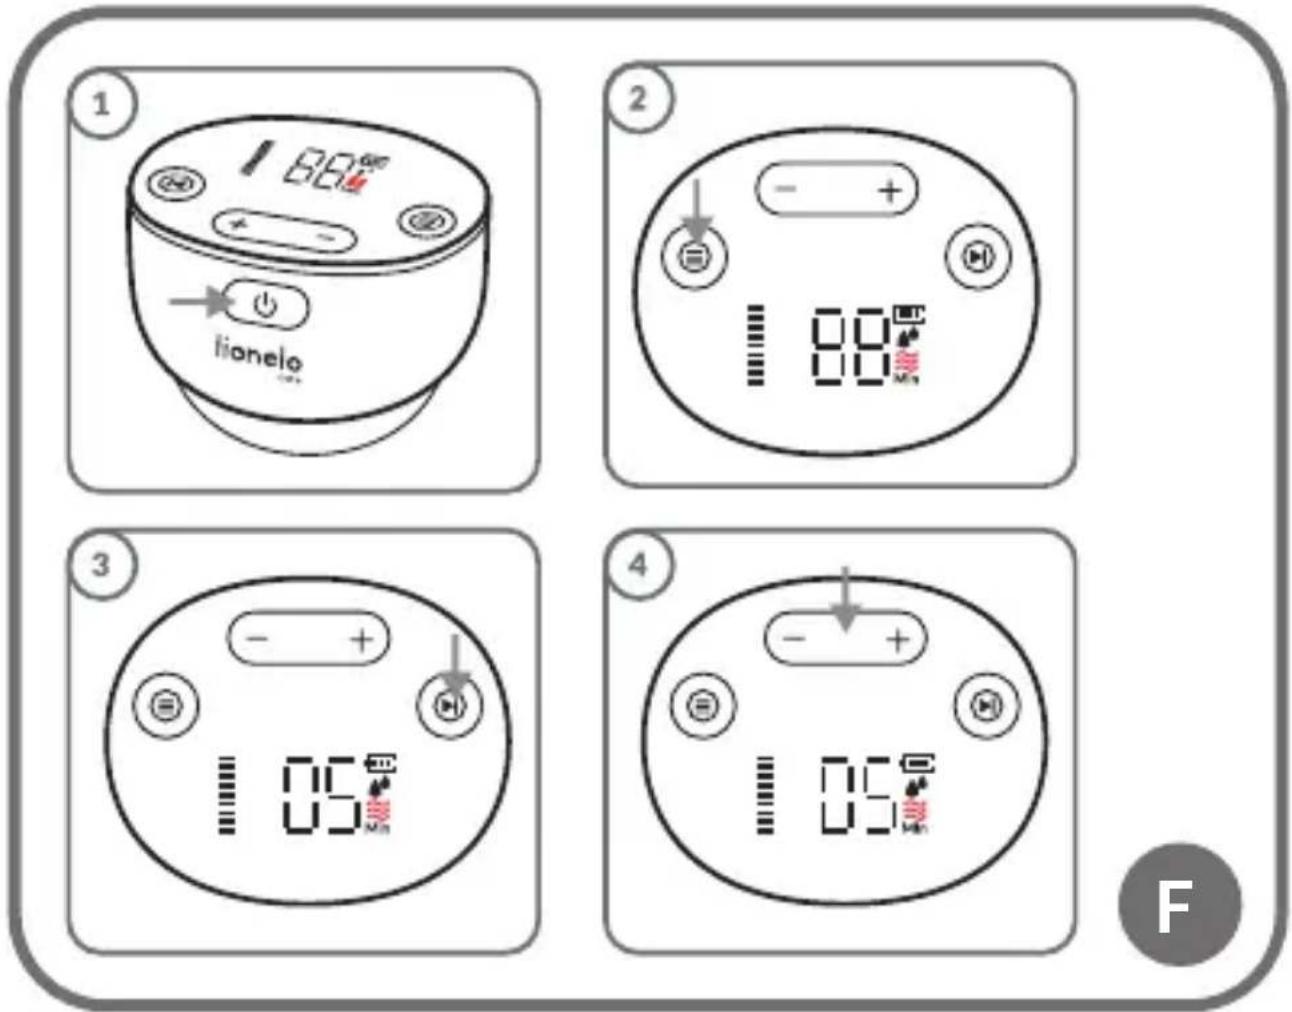
Method of use (fig. F) NOTE
Charge the device for 2 hours before first use.
Wash your hands before use. Make sure that all parts of the breast pump are properly installed according to the installation instructions, and that the device itself is properly fitted to your body.
Do not use too high an intensity level, causing discomfort or pain.
- To turn the device on, hold down the on/off switch (1, fig. F). The device will turn on in the last mode in which it operated in the previous session.
- To change the mode during use, press the mode switch button (2, fig. F).
- Press the pause/start button to stop the device (pause mode). Press again to resume its operation (3, fig. F). If the pause mode is maintained for a longer time, the device will automatically turn off after 5 minutes.
-
The mode intensity level indicator displays the current operating level of the device. Press the decrease and increase intensity level buttons to toggle mode intensity levels from 1 to 9 (4, fig. F).
-
To turn off the device, briefly press the on/off switch (1, fig. F).
The device will automatically turn off after 30 minutes of operation and no action taken.
The product has a memory function. When you turn off or change the mode, the device automatically remembers the intensity level of the mode from the previous use.
The time indicator (2, fig. C) displays the current usage time of the device. If the device is stopped (pause mode), the current usage time will be displayed until the device resumes operation or is turned off. If you want to start a new pumping session, turn the device off and on by pressing the on/off switch twice.
To adjust the appropriate intensity level of a particular mode, increase it until you feel mild discomfort (not pain!), then decrease the level by one.
Pouring milk (fig. G)
- While the device is running, gently lean forward to make sure all milk from the nipple tunnel has drained into the container (1, fig. G). Turn off the device.
- Gently remove the device from the bra and disconnect the main body from it (2, fig. G).
- Tilt the milk container so that its rounded part is at the bottom. Then, using the milk pouring hole (7, fig. A), pour the milk into the bottle or container in which it will be stored (3, fig. G).
NOTE
Do not use the device to store milk. Do not store the device in the refrigerator.
Storage and heating of milk
Storage
- At room temperature (16-25°C), milk can be stored for up to 4 hours (up to 6 hours under very clean collection conditions).
- In the refrigerator ( 4^ C), milk can be stored for up to 3 days (up to 5 days in case of very clean intake conditions).
- In the freezer (-18°C), milk can be stored for up to 6 months (up to 9 months under very clean intake conditions).
- Do not store milk on the refrigerator door.
Defrosting and reheating
- Freeze milk in food-grade plastic bottles or milk storage bags.
- To freeze milk, fill the container 34 full, as milk expands in volume when frozen.
-
To preserve the nutritional value of milk, thaw it naturally in the refrigerator (up to 24 hours) or at room temperature (up to 2 hours). You can also thaw milk under warm running water with a maximum temperature of 37^ C. Milk should then be used immediately after thawing.
-
Before feeding, shake the milk container gently to mix the milk evenly.
NOTE
Always check the temperature of the milk before serving it.
Do not defrost frozen milk in the microwave or boiling water to avoid losing nutritional value and burning your baby.
Never re-freeze milk that has already been defrosted once and store it either at room temperature or in the refrigerator.
Charging (fig. H)
-
Connect the plug of the USB-C cable to the device's power socket on the side of the main body (1, fig. H), and the other end with the USB plug to the USB adapter (not included).
-
During charging, the battery level indicator flashes (2, fig. C). When it stops flashing, it means that the device is fully charged (2, fig. H).
NOTE
Charge the device for 2 hours before first use.
To preserve long battery life, store the device in a cool place, charge it before the battery runs out to zero, and fully charge the device before storing it.
Use a 5V DC 1A adapter for charging.
Removing the device (fig. I)
-
After removing the main body, open the milk container from the bottom by pulling the silicone funnel (1, fig. I).
-
Pulling the silicone funnel, pull out the assembled breast pump T-piece (2, fig. 1) from the container.
-
Separate the silicone funnel, silicone diaphragm and suction valve from the breast pump T-piece (3, fig. 1).
Cleaning and disinfection of the device
NOTE
Do not clean or disinfect the main body or power cord of the device. These parts do not come into contact with food.
Wash all parts in contact with the body and milk separately immediately after use to avoid drying out food residue and prevent bacterial growth. Do not wash any parts of the device in the dishwasher.
Before the first use
Before using the device for the first time, wash with detergent and then sterilize with boiling water all its parts that will come into contact with milk (milk container, T-piece, valve, diaphragm, and funnels), except the main body. Follow the cleaning and disinfection instructions below.
After each use
- After use, disassemble the main body and clean it with a dry and soft cloth (fig. J).
- After each use, disassemble the device into its individual parts and rinse with cool water all separated parts in contact with the body and milk to remove food residues.
- Wash all separated parts in warm water with mild detergent, then rinse thoroughly under clean running water.
- To disinfect, place all items in boiling water for at least 10 minutes. Make sure all parts are immersed in the water and none is directly touching the bottom of the pot.
- Leave all parts of the device to dry on a clean towel or paper towel.
- Store the device parts in a clean bag, container or other clean place until the next use. If the parts are still wet, do not store them in a tightly sealed container.
NOTE
Clean the parts that have been in contact with the body once a day and after each use. Be careful not to damage the device when cleaning it.
Do not use sharp tools to clean silicone components, as this may result in damage to them.
Be careful not to damage the suction valve and silicone diaphragm when cleaning.
If they are damaged, the device will not work properly.
Remove the suction valve from the device carefully. When cleaning it, rinse in clean water without inserting your finger or any objects into it, as this may result in damage.
Do not use disinfectants to clean the device.
If you notice a white deposit on the parts of the device after sterilization in
water, it may mean that the water used is hard. Wipe off the residue using a clean towel and let the parts dry on their own.
Troubleshooting
| Problem Solution | |
| The device does not switch on | · The device's battery may have discharged or entered a protective state caused by long storage. Connect the device to the adapter to activate the battery.· Fully charge the battery before using the device for the first time and after long-term storage. |
| Operating time is not counted down when the pause/start button is pressed | · Contact the authorized service of the device. |
| The device stopped pumping (main body does not work) after pressing the pause / start button | · Make sure that the device is turned on.· Contact the authorized service of the device. |
| Insufficient strength or no suction | · Check that all parts of the device are clean, dry, properly and fully installed. Especially pay attention to the correct direction of installation of the suction valve.· Check that the T-piece is properly seated in the container and the diaphragm is tightly fitted to the top opening of the container.· Check that the silicone funnel of the device fits snugly to the breast.· If the suction power has not improved, contact an authorized service center for the device.· Check the parts of the device for cracks and defects. |
| Pain or discomfort | Adjust the intensity level or change the mode of operation.Change the position or alignment of the breast.In the event of unremitting pain or discomfort, consult a doctor. |
The photos are for reference only, the actual look of the products may differ from the ones shown in the pictures.
PL
Drogi Kliencie!
BrandLine Group Sp. z o.o.
BrandLine Group Sp. z o.o.
BrandLine Group Sp. z o.o.
BrandLine Group Sp. z o.o.
BrandLine Group Sp. z o.o.
BrandLine Group Sp. z o.o.
BrandLine Group Sp. z o.o.
A. Kręglewskiego 1, 61-248 Poznań (Poznanė), Lenkija
SVARBI INFORMACIJA:
BrandLine Group Sp. z o.o.
BrandLine Group Sp. z o.o.
BrandLine Group Sp. z o.o.
BrandLine Group Sp. z o.o.
BrandLine Group Sp. z o.o.
A. Kręglewskiego 1, 61-248 Poznań, Puola
TÄRKEITÄ TIETOJA
EN: The product complies with the requirements of European Union directives. In accordance with Directive 2012/19/EU, this product is subject to separate collection. The product should not be disposed of with municipal waste as it may pose a risk to the environment and human health. Return the used product to the recycling centre for electrical and electronic equipment.
Detailed warranty conditions are available on the website: