SS14555 - Other kitchen appliances Sogo - Free user manual and instructions
Find the device manual for free SS14555 Sogo in PDF.

| Product type | Multi-function cooking robot |
| Brand | Sogo |
| Model | SS14555 |
| Rated voltage | 220-240V ~ 50-60Hz |
| Heating power | 1000W |
| Mixing power | 500W (max 1100W) |
| Bowl capacity | 2.0 L max |
| Measuring cup capacity | 200 ml + 100 ml |
| Speeds | L to 10 (11 speeds) including L for slow stirring |
| Main functions | Mixing, chopping, grinding, kneading, cooking, steaming, electronic weighing |
| Temperature range | 30°C to 120°C in 5°C increments |
| Timer | 1 second to 60 minutes |
| Electronic scale | 0 to 3000 g with tare function |
| Safety | Automatic shut-off, overheat protection, lid and bowl detection, child lock |
| Maintenance and cleaning | Automatic cleaning with butterfly rod (speed ≤4), hand wash accessories, do not immerse the body |
| Spare parts and repairability | Contact authorized after-sales service via www.sogosat.com or 0034 902 222 161. Do not disassemble yourself |
| Materials | Stainless steel bowl, stainless steel blades, plastic body |
| Approximate dimensions | 30 x 25 x 35 cm |
| Approximate weight | 5 kg |
| Origin | Made in P.R.C, designed by SOGO according to European standards |
| Included accessories | Steamer, tray, food scraper, butterfly rod, spoon, measuring cup, additional sealing ring |
| Compliance | Low Voltage Directive 2014/35/EU, EMC 2014/30/EU, RoHS 2011/65/EU, Ecodesign 2009/125/EC |
Frequently Asked Questions - SS14555 Sogo
User questions about SS14555 Sogo
0 question about this device. Answer the ones you know or ask your own.
Ask a new question about this device
Download the instructions for your Other kitchen appliances in PDF format for free! Find your manual SS14555 - Sogo and take your electronic device back in hand. On this page are published all the documents necessary for the use of your device. SS14555 by Sogo.
USER MANUAL SS14555 Sogo
natural_image
Black SOGO SOO kitchen with digital display showing 88:88:9 and 88:88.1, no visible text or symbols on the device itself.
ROBOT MULTIFUNCIÓN MULTIFUNCTION COOKER CUISEUR MULTIFONCTION FOGÃO MULTIFUNÇÕES MULTIFUNKTION SKÓCHER CUFFIA MULTIFUNZIONE
natural_image
Illustration of two laboratory devices with a hand performing a test (no text or symbols)Fig. 1

natural_image
Two laboratory devices with digital displays and control panels, no visible text or symbolsFig. 2
natural_image
Line drawings of kitchen appliances including a blender and a digital kitchen fan (no text or symbols)Revolver / Aplastar / Moler Amasar masa / Saltear / Revolver
flowchart
graph TD
    A["1. Raw material preparation"] --> B["2. Processed kitchen appliance"]
    B --> C["3. Production of kitchen oven"]
    C --> D["4. Product assembly with fan, fan blade, and fan blade"]
    D --> E["End"]
natural_image
Illustration of a kitchen mixer with a digital display and control panel (no text or symbols)
natural_image
Line drawing of a toaster with digital display and control panel (no text or symbols)
natural_image
Illustration of a hand pressing down on a kitchen appliance with a digital display (no text or symbols)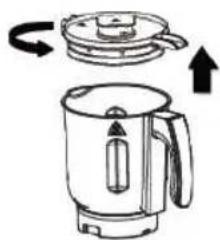
natural_image
Line drawing of a kitchen blender with a lid and side view showing rotation (no text or symbols)natural_image
Diagram showing two views of a kitchen blender with lid and side view, no text or symbols presentnatural_image
Line drawing of a kitchen appliance with a blender and digital display (no text or symbols)natural_image
Line drawing of a spacecraft or spacecraft with a top view and internal components (no text or symbols)| Componente | Componente | ||||||
 | V |  | X |  | Inter V/Outer X | Inter V/Outer X | |
 | V | Y | V |  | V | V | V |
 | V | Y | V |  | X | X | V |
- This instruction manual can also be downloaded from our web page www.sogo.es
- Read these instructions before using the appliance and keep this manual at hand for future reference. When acquired by a new owner the manual should accompany the appliance.
- This appliance is intended to be used in household and similar applications such as: Staff kitchen areas in shops, offices and other working environments; Farm houses; By clients in hotels, motels and other residential type environments; Bed and breakfast type environments.
- Switch off the appliance and disconnect from supply before changing accessory or approaching movable parts.
- Care shall be taken when handling the sharp cutting blades and emptying jar during cleaning.
- Always disconnect the appliance from the power supply if it is left unattended, before assembling, disassembling or cleaning of its moving parts.
- Pls be warned of potential injury to user of this appliance due to any misuse.
- Pls be warned of that the heating element surface is subject to residual heat after use.
- This appliance shall not be used by children. Keep the appliance and its cord out of reach of children
• Appliances can be used by persons with reduced physical, sensory or mental
capabilities or lack of experience and knowledge if they have been given supervision or instruction concerning use of the appliance in a safe way and if they understand the hazards involved.
• Children shall not play with the appliance.
- Cleaning and user maintenance shall not be made by children without supervision.
- Please do not immerse the machine into water directly, this will cause short circuit. Any damage to product this way will not be covered by the warranty.
- It is not allowed to operate the machine without any material such as water, ice or fruit, this will cause the knife to break, and shorten the machine life
- Do not use this appliance with a programmer, counter, remote control or another device which can automatically turn it on because if the appliance is covered or incorrectly positioned there is a danger of fire or serious injury.
- Never carry the unit by its power cord.
- This product belongs to Class1 appliance, please use well earthed connect plug during operation.
- Please make sure the machine is on “OFF” status before you place the jar on the body of the machine. Please wait till the motor completely stops before taking out the jar.
- Be careful if hot liquid is poured into the food processor or blender as it can be ejected out of the appliance due to a sudden steaming.
WARNINGS:
Be alert of any risk of causing serious personal injury, heavy property loss or the like.
- Make sure the cup is rotated to place before working.
- DO NOT open the cup lid in the process of working.
- Please be cautious of steam and cup body which would be scalding.
- DO NOT immerse the stainless-steel stirring cup in water for a long time.
- Be sure to wipe dry the bottom of steel cup after cleaning.
- DO NOT touch the blade with your hand.
CAUTIONS:
natural_image
Illustration of two laboratory devices with test tubes and a hand performing a test (no text or symbols)Fig. 1
natural_image
Two laboratory devices with digital displays and control panels, no visible text or symbolsFig. 2
Be alert to any potential risk of personal injury or property damage.
-
In the process of working, DO NOT lift up the cup body so as not to interrupt the normal work.
-
In the process of being powered and working, DO NOT contact the blade, motor or any movable part so as to avoid personal injury or product damage.
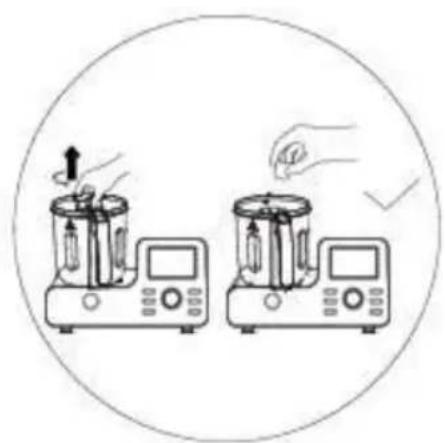
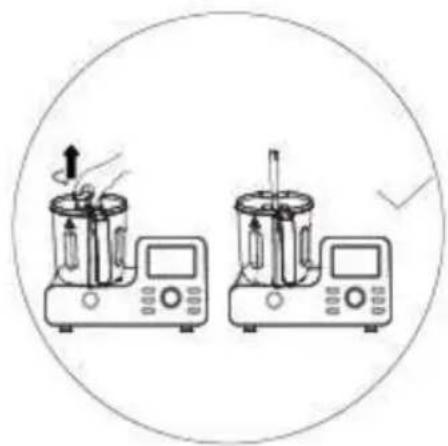
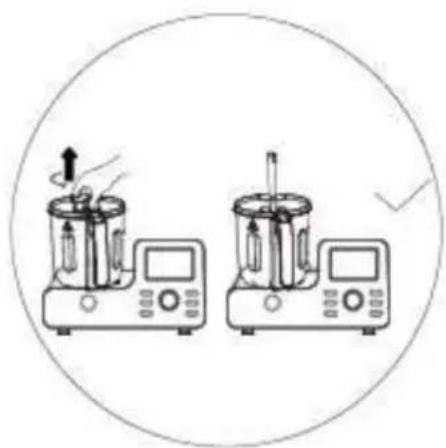
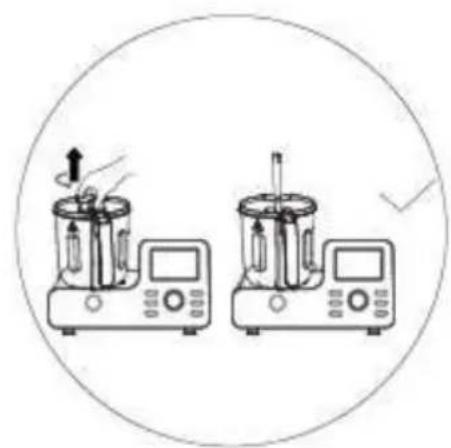
- In the process of working, DO NOT open the cup lid to add any ingredient, otherwise, splashing would occur to cause injury accident or property loss, and the proper method is to open the measuring cup in the middle of the cup lid and then feed the ingredient through the cup hole. (see Figure 1)
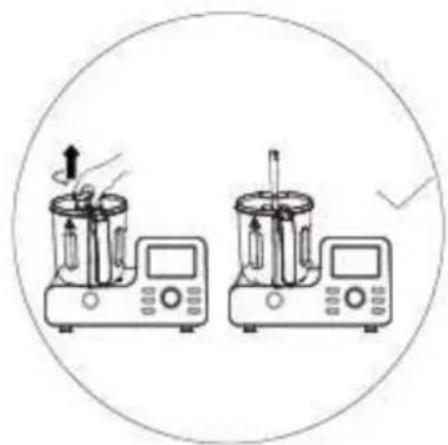
- DO NOT have the food rake stretch into the mixing cup, otherwise, the rake would damage the blade and motor and the splashing or short circuit occurred would cause injury accident or property loss, and the proper method is to open the measuring cup in the middle of the cup lid and then have the rake stretch into the mixing cup through the cup hole. (See Figure 2)
- DO NOT use any attachment and component other than this Product so as to avoid causing fire or personal injury.
- DO NOT remove or reconstruct this Product without authorization.
- No idling (i.e. no food in the cup) or overload service is allowed.
- After the food is processed, this Product will produce five warning tones of "Click"; then please DO NOT remove the cup body, cup lid and the like detachable component until the blade has stopped rotating and the power is disconnected so as to avoid danger.
- Please add the specified dosage of ingredient in accordance with the instructions or recipe,
excessive addition might damage the motor and cause splashing or failure in cooking.
- DO NOT touch the blade, especially when this Product is powered on, the blade will be very sharp.
- When you pour hot liquid into the mixer, sudden hot gas produced would cause the liquid splashing.
PRECAUTIONS FOR DAILY OPERATIONS
- This product is only suitable for domestic use and needs to be used in accordance with the guideline of this Manual and may not be used for any other purpose.
- This Product should not be used in any region 2,000m above sea level.
- Before this Product is connected, please make sure the cup body and other parts have been installed to avoid danger.
- This Product shall use power supply of 220-240V \~ 50-60Hz, so please make sure it is correct before your use.
- DO NOT insert/pull out the power plug with a wet hand and avoid causing electric shock.
- DO NOT use any other device for direct heating each component of this Product.
- DO NOT make this Product close to any high-temperature, strong magnetic field or anything inflammable and explosive (such as natural gas, methane, etc.) so as to avoid damage, failure or fire.
- Please use this Product on a horizontal table, not on any tilt or unstable platform or on the carpet, towel and the like, and keep away from
the edge of table so as to avoid any injury accident or damage this Product.
-
If the blade is stuck, in order to avoid scratching or damaging this Product, please pull out the power plug and clear away the ingredient blocking the blade.
-
This product has the function available for adjusting the working speed and time, which is only applicable to making any special dietary.
-
Stirring Time: please operate the machine in strict compliance with the working time rating, the continuous stirring time will not exceed 6 min; the machine shall pause for 1 min after working for 6 min, which should be deemed as one cycle; and shall shall pause for 15 min after working for 3 cycles for the motor is cooled down. For the specific time available for each step, please refer to the recipe description and the instruction on display.
-
Grinding Time: please operate the machine in strict compliance with the working time rating, the continuous working time will not exceed 90s; the machine shall pause for 1 min after working for 90s at most, which should be deemed as one cycle; and shall shall pause for 30 min after working for 2 cycles till the motor is cooled down. For the specific time available for each step, please refer to the recipe description and the instruction on display.
-
Heating Time: please operate the machine in strict compliance with the working time rating and the continuous working time will not exceed 40min.
-
In the work process, DO NOT move this
Product so as to avoid food spillover and causing scald or electric shock.
-
This Product's failure to work in the process of operation may be caused by the temperature control protection of motor, please disconnect the power and keep cooling for 20\~30min before re-operation.
-
If power for this Product is interrupted in the process of making hot drink, please replace the ingredient for remaking before re-energizing, DO NOT press the button to keep working, otherwise, the food would become sticky.
-
This Product shall be controlled with intelligent chip and it is normal for this Product to produce intermittent sound which would become fast or slow suddenly in the process of mixing.
-
Please disconnect the power before removing, installing or calibrating any part of this Product.
-
Any power cord, if damaged, should be replaced by the manufacturer or his maintenance department or similar professional so as to avoid danger.
-
Before using this Product, please check the power cord, plug and any other component for damage; if found damage, please stop using this Product, contact the customer service department without delay, and DO NOT disassemble or repair without authorization so as to avoid danger.
-
DO NOT have the stainless steel stirring cup immersed in water or any other liquid, nor flush the handle and base of such stainless steel stirring cup so as to prevent water from flooding the handle and base heating plate and avoid short-circuit and resulting in danger.
-
If this Product is left unused for a long time, please unplug the power plug in time so as to avoid short circuit or causing the like injury.
- DO NOT wash and disinfect any part of this Product in a dishwasher, microwave oven and a disinfector cabinet so as to avoid damage.
- The material of any part of this Product in contact with food should be FG-certified, clean, hygienic and reliable.
- this Product should be stored to in any place where it is not easily accessible for children. DO NOT let any person (including children) with reduced physical, sensory or mental capabilities or lacking of experience and knowledge use or play with this Product.
- When you discard this Product or this Product package, please contact qualified agencies for recycling; when you discard this Product, please cut off the power cord.
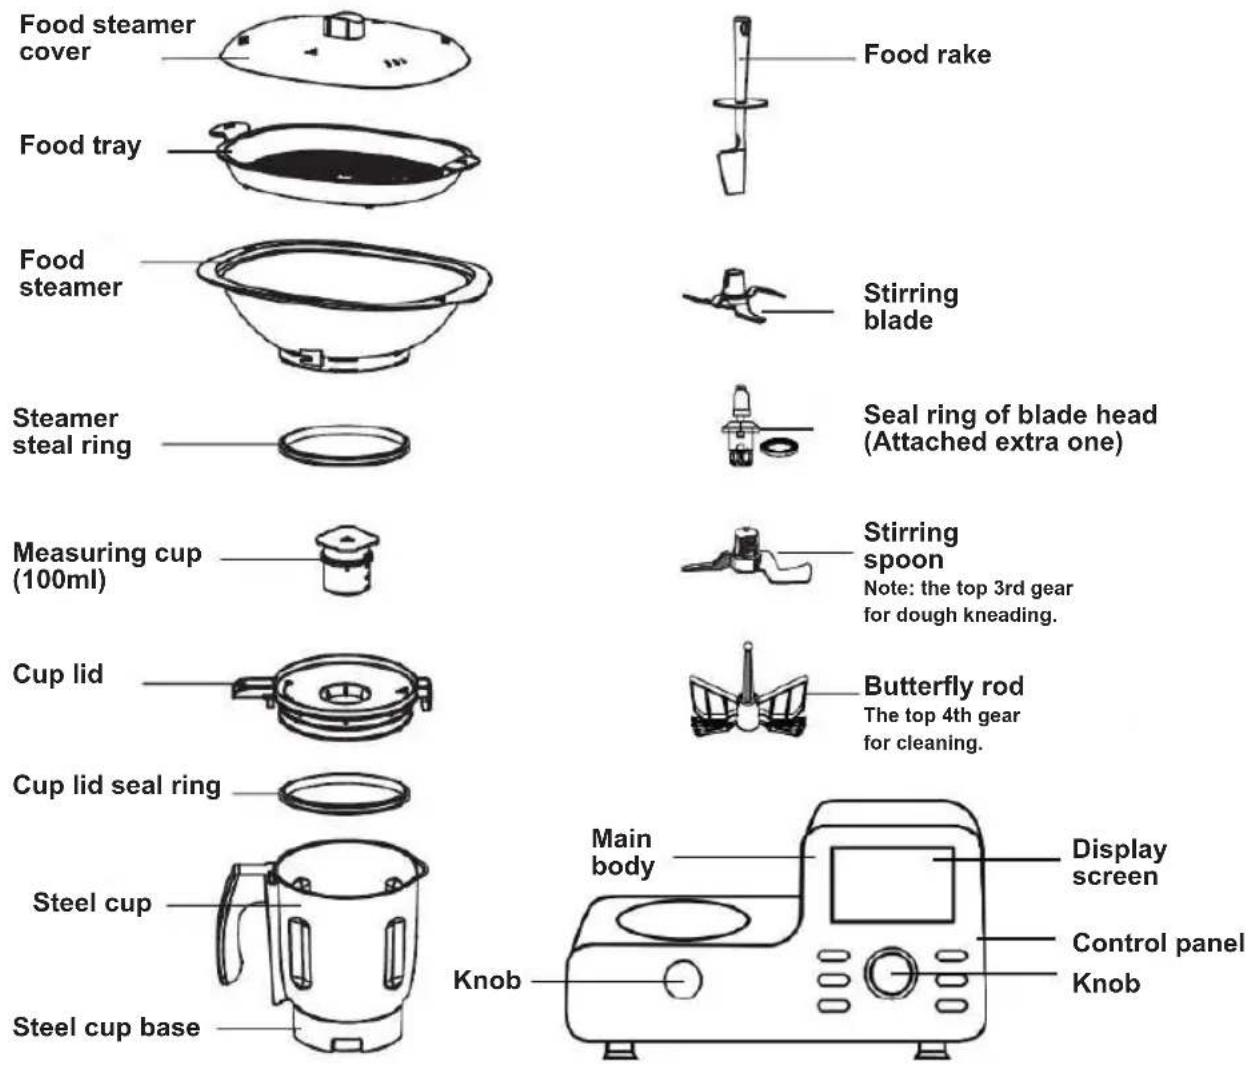
PARTS AND COMPONENTS
text_image
Food steamer cover Food tray Food steamer Steamer steal ring Measuring cup (100ml) Cup lid Cup lid seal ring Steel cup Steel cup base Food rake Stirring blade Seal ring of blade head (Attached extra one) Stirring spoon Note: the top 3rd gear for dough kneading. Butterfly rod The top 4th gear for cleaning. Main body Knob Display screen Control panel KnobNote: This Product picture is only for your reference, please subject to the physical object in the package!
OPERATING INTERFACE AND FUNCTION INTRODUCTION
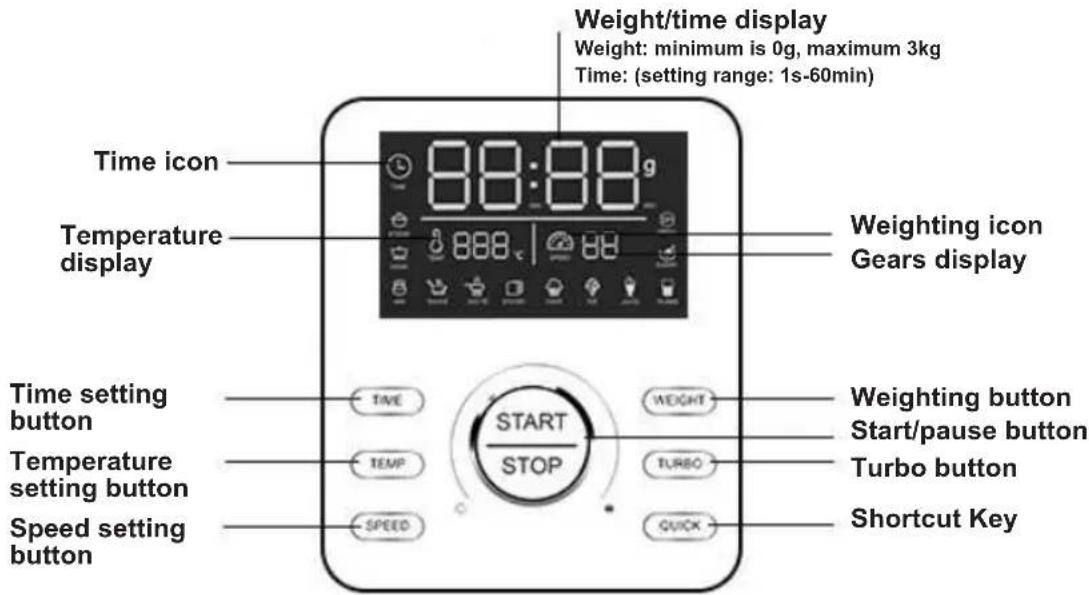
text_image
Weight/time display Weight: minimum is 0g, maximum 3kg Time: (setting range: 1s-60min) Time icon 88:88g Temperature display Weighting icon Gears display Time setting button TIME TEMP SPEED START STOP WEIGHT TURBO QUICK Weighting button Start/pause button Turbo button Shortcut Key- LED screen: display the cooking and mixing time, weighing and status icon.
- Time (TIME): the time setting key, touch the time setting key for access to the timing function, turn the knob to adjust the minute (clockwise for increasing; counter clockwise for decreasing, and the set range is 0\~60 min), after the minute value is adjusted, touch the time setting button to confirm the minute setting, then automatically access to the second setting, after the time value adjustment is completed, touch any other function key to confirm. If you need to reset the time, retouch the time setting key for adjustment and then repeat the process as mentioned above. in the process of setting, touching any other function key will have all previous settings automatically stored, and the set increasing or decreasing interval is 1 min and 1 second.
- Temperature (TEMP): the temperature setting key, touch the temperature setting key for access to the temperature setting function, turn the knob to adjust the temperature (clockwise for increasing; counter clockwise for decreasing, and the set range is 0\~120°C), after the temperature value is adjusted, touch any other function key to confirm, if you need to reset the temperature, retouch the temperature setting key for adjustment and then repeat the process as mentioned above. The default initial minimum temperature is 30°C, and then 5°C will be taken as one gear for increasing or decreasing.
- Speed (SPEED): the speed setting key, touch the speed setting key for access to the speed setting function, turn the knob to adjust the speed (clockwise for increasing; counter clockwise for decreasing), after the speed value is adjusted, touch any other function key to confirm, If you need to reset the speed value, retouch the speed setting key for adjustment and then repeat the process as mentioned above. Increasing or decreasing will be set with one gear at the unit, i.e. from Gear L to Gear 10, there are 11 gears in total. There are two modes: (1) under the heating mode, the speed can only be set on Gears L\~4, other high-speed gears cannot be set, and then after the heating value is set, the time must be set, otherwise, the set speed gears could not work; (2) under the non-heating mode, the speed can be set on Gears L\~10. Note: Gear L is for low-speed stirring and commonly used to stir-fry and simmer,
- Weight (WEIGHT): under the standby status, touch the electronic balance key for access to the weighing function, what is displayed on the time domain is 0000 and Sign G, and the range is 0\~3,000g. Once the weighing is completed, retouch the weighing key to exit the electronic balance function and return to the time display. If you need to reuse the weighing function, retouch the weighing key, and touching the key for 3s can access to the zero-clearing function.
- Pulse (PULSE): Touch the PULSE key for working at the speed of Gear 10; this function could only be enabled if not heated and the temperature detected is not higher than 60^ C. The time for touching and holding such key should not be longer than 30s. In the process of stirring on Gears L\~9; touching or holding the PULSE key can work on Gear 10; after releasing the PULSE key, the machine will restore to the previous speed status.
- Shortcut Key (QUICK): After touching the shortcut key, the first shortcut mode menu will start flickering; turning the knob can realize switching of shortcut menu in turn; clicking the Start/Stop key will enable the setup mode and start the process of countdown, and after the work is over, the buzzer will produce 3 sounds at the frequency of 1s, and then the screen will return to home.
- Start/Stop Button: touching the key can control the machine's start-up, pause or stop.
INSTALLATION PROCEDURES AND USE METHOD
1. Introduction to the combination of functions
(Prior to initial use of this Product, please thoroughly clean any part or component in contact with ingredient).
natural_image
Line drawings of kitchen appliances including a blender and a microwave oven, with no text or symbols present.Stirring/smashing/grinding Knead dough/stir-fry/stirring
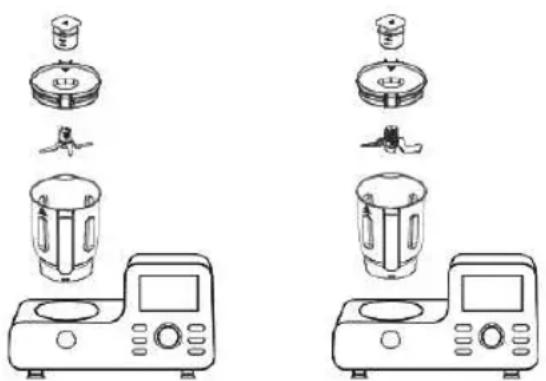
2. Operation Steps (taking the stirring/mixing function as an example):
text_image
Technical diagram showing three stages of a mechanical device with labeled components and directional arrows indicating motion.3.4.
natural_image
Illustration of a kitchen appliance with a cylindrical container and digital display (no text or symbols)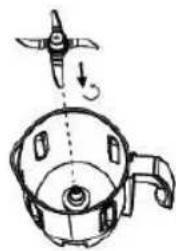
natural_image
Diagram of a helicopter rotor assembly with an arrow indicating rotation direction (no text or labels)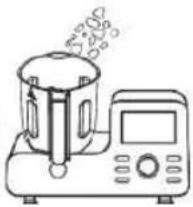
natural_image
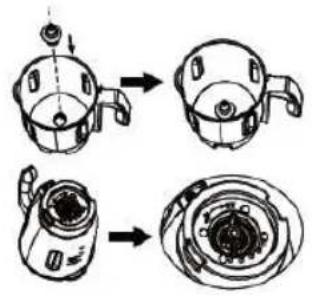
Line drawing of a toaster oven with steam rising from the top (no text or symbols)- Align the snap joint of blade holder with the bottom notch of steel cup and insert the blade holder into the bottom circle hole (Note: the nut of holder should be unlocked).
- Turn the nut rightward for screwing down and fastening to be aligned with the locking position.
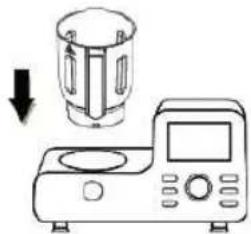
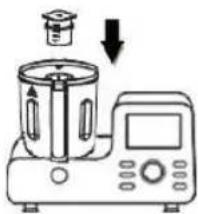
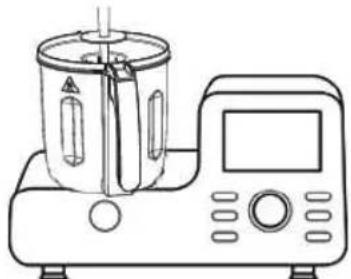
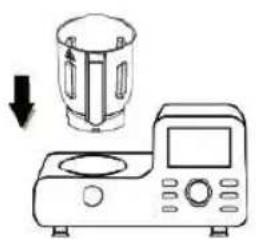
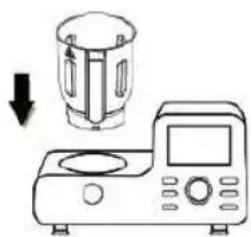
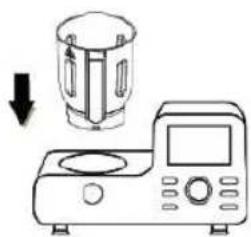
- As shown above, put the steel cup vertically on the main body, press down with force, and hearing a sound of "click" means that the steel cup has been installed.
- As shown above, put the stirring blade into the steel cup and rotate slightly to the left to fix the blade on the bottom of cup to finish the installation, and put the ingredient with appropriate size into the steel cup. Remove the stirring blade: mount the steel cup on the main body, turn the blade for dismantling. DO NOT touch the blade with your hand.
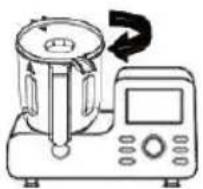
- As shown below, place the cup lid with the seal ring installed on the cup and then clockwise turn to the slot of cup handle for firmly securing, and then put the measuring cup on the cup lid.
-
Turn machine on, select function and press START/STOP.
-
natural_image
Line drawing of a kitchen blender with a digital display and control panel (no text or symbols)
natural_image
Line drawing of a kitchen appliance with a digital display and a tool inserted into the air (no text or symbols)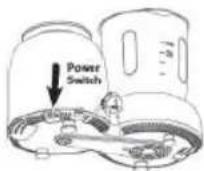
-
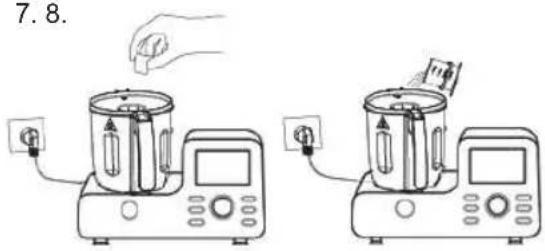
If you need to add any ingredient to the machine in operation, press down the Start/Stop Key, take down the measuring cup, feed the ingredient from the position where the measuring cup is placed, if you need to add liquid, please use the measuring cup, and then after pressing down the Start/Stop Key, the machine will continue to work.
-
After the ingredient is processed, the machine will automatically stop working and produce 5 tons of "tick", prompting that the ingredient processing is finished, then unplug the power, use one hand to hold down the disassembling button on the left of the machine and the other hand to hold the handle of steel cup and lift upward to take the cup out. Then counter clockwise turn to open the cup lid to pour out the ingredient.
7.8.
text_image
7.8.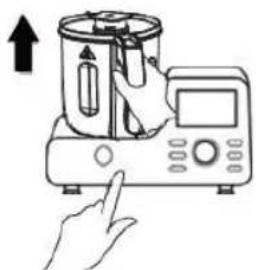
natural_image
Illustration of a kitchen appliance with a hand pointing to the button (no text or symbols)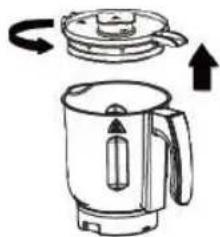
natural_image
Diagram of a kitchen blender with a lid and rotating arrow indicating rotation (no text or symbols)3. How to use the steamer
When the steel cup is used for cooking food, a steamer and a food tray can be used for cooking food such as fish, meat, steamed stuffed bun, sausage, etc., and the steamer and the food tray can also be used for steaming different kinds of food, i.e. one machine can serve several purposes. (Note: for 30-min steaming there should be at least 500ML water in the steel cup and for steaming ingredient the temperature should be set to 105°C or above.)
1.2.
natural_image
Line drawing of a kitchen blender with internal panes and lid (no text or symbols)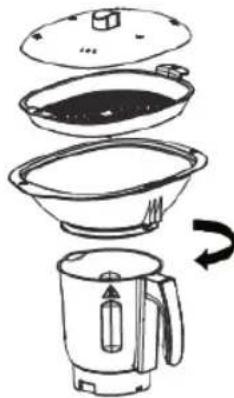
natural_image
Diagram of a kitchen appliance showing internal components and a rotating arrow indicating rotation (no text or symbols)-
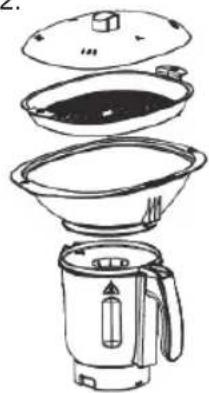
Position the steamer on a steel cup with lid for steaming (see Figure 1).
-
Place the steamer on a steel cup and turn the steamer clockwise to fasten it in the slot of cup handle for subsequent steaming (see Figure 2).
4. How to use the food rake
natural_image
Line drawing of a kitchen appliance with a digital display and control panel (no text or symbols)When the machine is working, you take down the measuring cup and stretch the food rake into the steel cup and scrape the food on the cup wall.
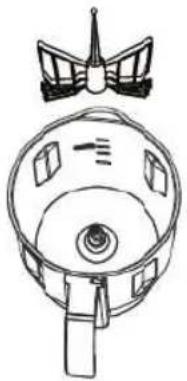
5. How to use the butterfly rod
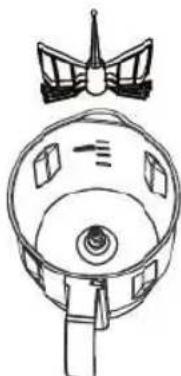
natural_image
Line drawing of a mechanical component with a top view and internal features (no text or symbols)Put the butterfly rod directly on the blade holder of the steel cup, then the butterfly rod will twirl rapidly with the machine quickly to beaten eggs. It can also be used to make butter, soy sauce and so on easily and practically. It can be used for automatic cleaning after the cleaning cloth is installed.
Then the speed should not be higher than Gear 4.
WARNING:
(1) This machine could not be started until the butterfly rod is fully installed.
(2) DO NOT cook any food which would damage or choke the butterfly rod while twirling.
TABLE OF FOOD PROCESSING REFERENCE
| Time Weight Gear (Speed) | |||||
 |  | Onion | 5 x 1s | 500g | 10 |
 | Tumeric root | 5 x 1s | 500g | 5 | |
 | Celery | 30s | 50g | 10 | |
| [85ED] | Nut | 60s | 250g | 10 | |
| [SAAK] | Ice block | 45s | 250g | 10 | |
| [SXCK] | Nutmeg | 30s | 200g | 10 | |
 | [X06A] |   |  |  IL IL | 2 |
MAINTENANCE AND SERVICE
- Before cleaning this Product, please be sure to turn off the switch and unplug the power;
- Please wash this Product in time after use.
- Use wet cloth to wipe the outer surface of main body; DO NOT put the body into water or any other fluid nor rinse it under water or another fluid so as to avoid electric leakage or device damage.
- In the process of cleaning, wash the cup body and accessories with clear water and wipe them dry; the blade is very sharp, so please be cautious to avoid being cut by the sharp blade and wear protective gloves.
- Before storing this Product, make sure this Product is clean and dry.
- This Product should be stored in a dry place not directly exposed to ultraviolet ray.
Table of Contrasts of Cleaning Portions
(washable: indicated with V; unwashable: indicated with X)
| Component Component | |||||||
 | V | V | X |  | Inter V/Outer X | Inter V/Outer X | |
 | V | V | V |  | V | V | V |
 | V | V | V |  | X | X | V |
Product Safety Indicators
| Rated Voltage 220-240V ~ 50-60Hz | |
| Power | Heating power 1000W |
| Blending Power 500W (Max 1100W) | |
| Steel cup capacity | MAX: 2.0L |
| Measuring cup capacity | 200ml + 100ml |
| ANNEX Instruction Manual | |
FAILURE ANALYSIS AND TROUBLESHOOTING
- Error code
| Code Meaning | |
| E01 The steaming & stewing mug is not properly installed. | |
| E02 The Motor's Overheat Protection/Control Speed Main board Fault | |
| E03 The cup lid is not tightened. | |
| E04 For any other question, please contact the authorized maintenance service center. |
2. Fault Categories and Troubleshooting Methods
This Chapter summarizes problems which are most likely encountered in the use of this Product. If you cannot solve the problem according to information listed below, please contact the customer service center.
| Problems Troubleshooting | Methods. |
| The motor does not work or suddenly stops working. | You are recommended to check whether this Product has been powered on. |
| Check whether the steel cup lid and the transparent lid have been sealed well or whether the stirring cup has been connected. | |
| If your problem could not be solved with the above-mentioned method, please contact the nearest service center. | |
| What should I do if any blade part or the motor was blocked in the process of blending? | Close this Product and scrape off the food blocking the blade component with a spatula. |
| In addition, you are recommended to reduce the weight of food and cut the hard food into pieces. | |
| When I use the food processor for the first time, the motor started smoking and smelled. | In the first use, a new motor will emit a small amount of smog and produce odor. This is a normal phenomenon. After use for several times, this phenomenon will disappear. |
| In addition, please use this Product within the recommended time limit:Dough kneading: 30-180s;Chopping and mixing: 30-60s. | |
| After one working cycle, no next work should proceed until the machine is cooled down to room temperature. | |
| When the screen does not display? | Verify whether the switch is turned on. |
Note:
The aforesaid is only common fault analysis and troubleshooting method, for any other fault, please contact the customer service department of this Company or send the machine to the service outlet designated by the Company. DO NOT disassemble and repair without authorization.
MESURES DE SÉCURITÉ IMPORTANTES
natural_image
Illustration of two laboratory devices with test tubes and a hand performing a test (no text or symbols)Fig. 1
natural_image
Two identical laboratory devices with digital displays and control knobs, no visible text or symbolsFig. 2
text_image
Technical diagram showing three stages of a mechanical component with directional arrows indicating assembly or assembly sequence.3.4.
natural_image
Diagram of a kitchen appliance with a lid and control panel, showing a downward arrow (no text or symbols)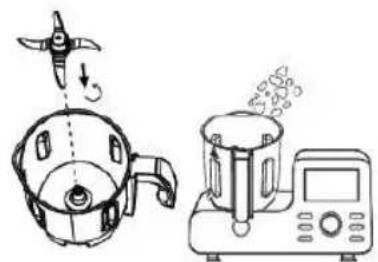
natural_image
Line drawing of a kitchen appliance with a fan, motor, and digital timer (no text or symbols)natural_image
Line drawing of a kitchen appliance with a digital display and a downward arrow indicating motion (no text or symbols)
natural_image
Line drawing of a kitchen appliance with a digital display and a stand (no text or symbols)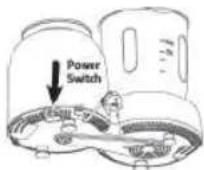
natural_image
Illustration of a hand pressing down on a kitchen appliance with a digital display (no text or symbols)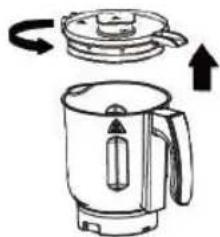
natural_image
Line drawing of a kitchen blender with a lid and arrow indicating rotation (no text or symbols)natural_image
Exploded view diagram of a kitchen appliance showing internal components (no text or labels)
natural_image
Exploded view diagram of a kitchen appliance showing internal components and a rotating fan (no text or labels)natural_image
Line drawing of a kitchen appliance with a blender and digital display (no text or symbols)5. How to use the butterfly rod
natural_image
Line drawing of a mechanical component with a butterfly-shaped top and internal components (no text or symbols)| Composant | [IMAGE] | [IMAGE] | [IMAGE] | [IMAGE] | [IMAGE] | [IMAGE] | |
 | V | V | X |  | InterV/Outer X | InterV/Outer X | |
 | V | V | V |  | V | V | V |
 | V | V | V |  | X | X | V |
natural_image
Illustration of two laboratory devices with a hand performing a test using a pen (no text or symbols present)Fig. 1
natural_image
Two laboratory devices with digital displays and a hand performing a test (no text or symbols visible)Fig. 2
natural_image
Line drawings of kitchen appliances including a blender and digital kitchen unit (no text or symbols)Mexa/esmague/moa Sove a massa/frite/mexa
text_image
Technical diagram showing three stages of a mechanical device with labeled components and directional arrows indicating process flow.3.4.

natural_image
Simple line drawing of a kitchen appliance with a cylindrical container and digital display (no text or symbols)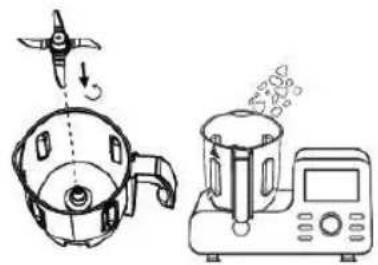
natural_image
Line drawing of a portable kitchen appliance and a digital kitchen tower with a digital display (no text or symbols)natural_image
Illustration of a kitchen mixer with a digital display and control panel (no text or symbols)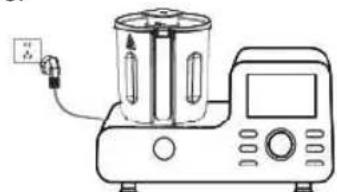
natural_image
Line drawing of a kitchen appliance with a digital display and a small meter connected to the top (no text or symbols)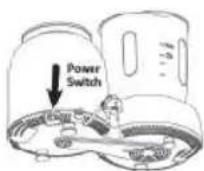
text_image
Diagram showing a kitchen appliance with hand gesture and two views of the device, illustrating step-by-step assembly or cleaning process.natural_image
Diagram showing two views of a kitchen blender with lid and side view, no text or symbols presentnatural_image
Line drawing of a kitchen appliance with a digital display and control panel (no text or symbols)natural_image
Line drawing of a spacecraft's internal components, including a top view and cockpit (no text or symbols)| Componente | Componente | ||||||
 | V |  | X |  | Inter V/Outer X | Inter V/Outer X | |
 | V | V | V |  | V | V | V |
 | V | V | V |  | X | X | V |
natural_image
Illustration of two laboratory devices with test tubes and a hand performing a test (no text or symbols)Fig. 1
natural_image
Two laboratory equipment setups with control panels and a central brush, enclosed in a circle (no text or symbols visible)Fig. 2
natural_image
Illustration of a kitchen appliance with three views showing different kitchenware and components (no text or symbols)text_image
Technical diagram showing three stages of a mechanical device with labeled components and directional arrows indicating assembly or transformation.3.4.
natural_image
Illustration of a kitchen appliance with a cylindrical container and digital display (no text or symbols)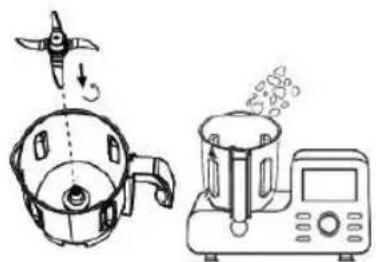
natural_image
Line drawing of a kitchen appliance and a toaster with steam rising (no text or symbols)natural_image
Illustration of a kitchen appliance with a digital display and control panel (no text or symbols)
natural_image
Line drawing of a kitchen appliance with a digital display and a downward arrow indicating motion (no text or symbols)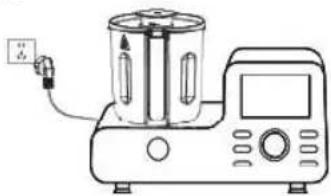
natural_image
Line drawing of a kitchen appliance with a digital display and a stand (no text or symbols)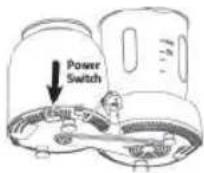
natural_image
Illustration of a hand pressing down on a kitchen appliance with a digital display (no text or symbols)
natural_image
Line drawing of a kitchen blender with a lid and arrow indicating rotation (no text or symbols)natural_image
Exploded view diagram of a kitchen appliance showing internal components (no text or labels)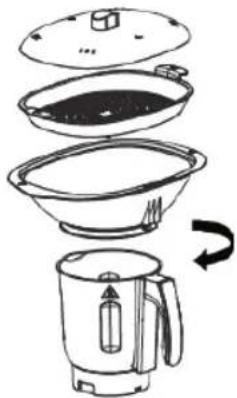
natural_image
Exploded view diagram of a kitchen appliance showing internal components and a rotating fan (no text or symbols)natural_image
Line drawing of a kitchen appliance with a blender and digital display (no text or symbols)natural_image
Technical line drawing of a mechanical component with a top view and internal features (no text or symbols)natural_image
Illustration of two laboratory devices with a hand performing a test (no text or symbols present)Fig. 1

natural_image
Two laboratory devices with digital displays and control knobs, no visible text or symbolsFig. 2
natural_image
Line drawing of a kitchen appliance with exploded view showing components like blender, fan, and digital kitchen (no text or labels)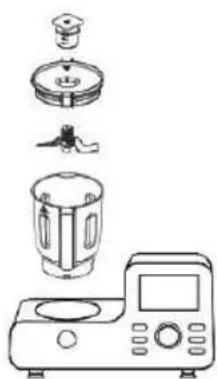
natural_image
Line drawing of a kitchen appliance with exploded view showing kitchenware and control panel (no text or symbols)text_image
Technical diagram showing three stages of a mechanical device with labeled components and directional arrows indicating assembly or transformation.3.4.
natural_image
Illustration of a kitchen appliance with a lid and control panel, showing a downward arrow (no text or symbols)
natural_image
Illustration of a portable kitchen setup with a fan, blender, and toaster (no text or symbols)natural_image
Illustration of a kitchen appliance with a digital display and control panel (no text or symbols)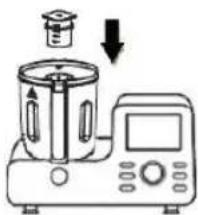
natural_image
Illustration of a kitchen appliance with a digital display and a cooking pot, showing no text or symbols.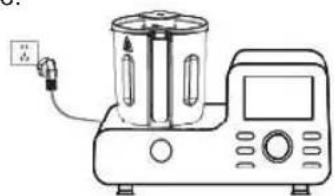
natural_image
Line drawing of a toaster with digital display and control panel (no text or symbols)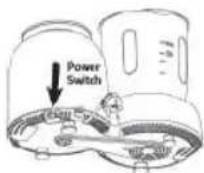
natural_image
Illustration of a hand pressing down on a kitchen appliance with a digital display (no text or symbols)
natural_image
Line drawing of a kitchen blender with a lid and side view showing rotation (no text or symbols)natural_image
Diagram showing two views of a kitchen blender with lid and side view, no text or symbols presentnatural_image
Line drawing of a kitchen appliance with a blender and digital display (no text or symbols)natural_image
Line drawing of a mechanical device with a top-mounted fan and internal components (no text or symbols)DECLARATION OF CONFORMITY
This device complies with Low Voltage Directive 2014/35/EC, Electromagnetic Compatibility Directive 2014/30/EU, Directive 2011/65/EU on the restriction of the use of certain hazardous substances in electrical and electronic equipment and Directive 2009/125/EC on the eco-design requirements applicable to energy-related products.
DÉCLARATION DE CONFORMITÉ
This symbol means that in case you wish to dispose of the product once its working life has ended, take it to an authorised waste agent for the selective collection of waste electrical and electronic equipment (WEEE).

Imported by:
Sanysan Appliances S.L, NIF: B98753056, C/ Barcas 2, 2
46002 Valencia, Spain
Product made in P.R.C. – Designed by SOGO based on the European Quality Standards
Customer Service: www.sogosat.com / sogosat@sogosat.com / 0034 902 222 161