E7 - Coffee machine Ceado - Free user manual and instructions
Find the device manual for free E7 Ceado in PDF.

| Product type | Professional coffee grinder with doser |
| Brand | Ceado |
| Model | E7 |
| Usage | Professional |
| Doser capacity | Approximately 300 g of ground coffee |
| Grind adjustment | Manual by lever (finer or coarser) |
| Dosing range | 5.5 g to 9 g per dose |
| Coffee type | Whole beans only (not ground coffee) |
| Power supply | Single-phase, voltage according to product label |
| Main functions | Grinding and dosing of coffee beans |
| Operating mode | Manual or automatic depending on model (E7 manual) |
| Safety | Amperometric circuit breaker; safety grid (model E15) |
| Maintenance | Clean with damp cloth; do not immerse |
| Doser cleaning | Brush or small brush for hard-to-reach areas |
| Wear parts | Burrs |
| Warranty | 3 years |
| Included accessories | Tamper (on certain models) |
| Certification | CE |
Frequently Asked Questions - E7 Ceado
User questions about E7 Ceado
0 question about this device. Answer the ones you know or ask your own.
Ask a new question about this device
Download the instructions for your Coffee machine in PDF format for free! Find your manual E7 - Ceado and take your electronic device back in hand. On this page are published all the documents necessary for the use of your device. E7 by Ceado.
USER MANUAL E7 Ceado
natural_image
Illustration of a Cearla coffee maker with a conical funnel and base (no text or symbols)E7
E8
E9
E15
MACINADOSATOREE7-E8-E9-E15
Likeallappliances, it should be used with particular care to avoid injury to personnel and damage to the appliance.
It is essential to read these instructions carefully before using the appliance and to follow the safety recommendations.
ItispossibletoobtaintheCEdeclarationofconformitybycontactingthemanufactureratthe addressshownontheproductdataplate.

Donotusetheapplianceifyouhavenotreadandunderstoodtheseinstructions!
GB
Page16
MOULINDOSEURE7-E8-E9-E15
text_image
Labeled diagram of a portable electric shaver with numbered parts for identificationFig.1

text_image
Labeled diagram of a device showing internal components with numbered parts from 1 to 10Fig.2
text_image
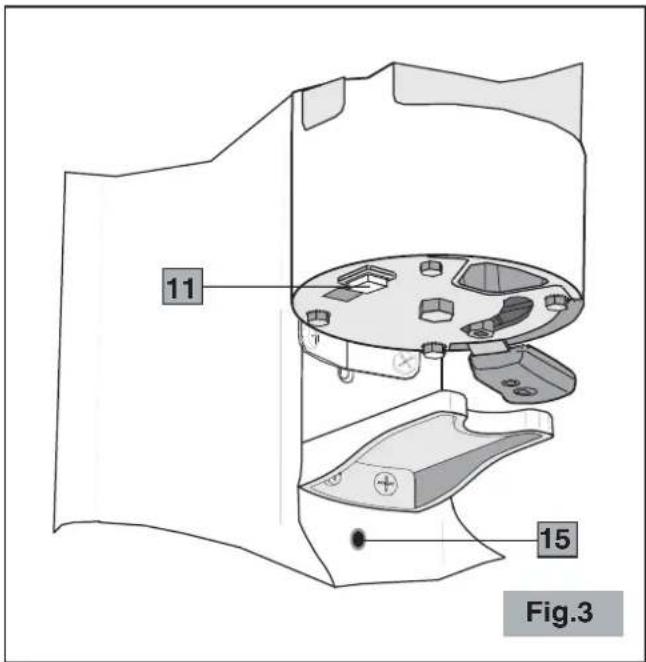
11 15 Fig.3
natural_image
Technical line drawing of a mechanical device with a funnel and base component, labeled 'Fig.4' (no text or symbols on the diagram itself)NORMEDISICUREZZA AVVERTENZEGENERALI
natural_image
Diagram of a mechanical device with a funnel and base, labeled Fig.7 (no text or symbols on the diagram itself)natural_image
Illustration of a hand using a tool to clean or inspect a mechanical component (no text or symbols visible)
natural_image
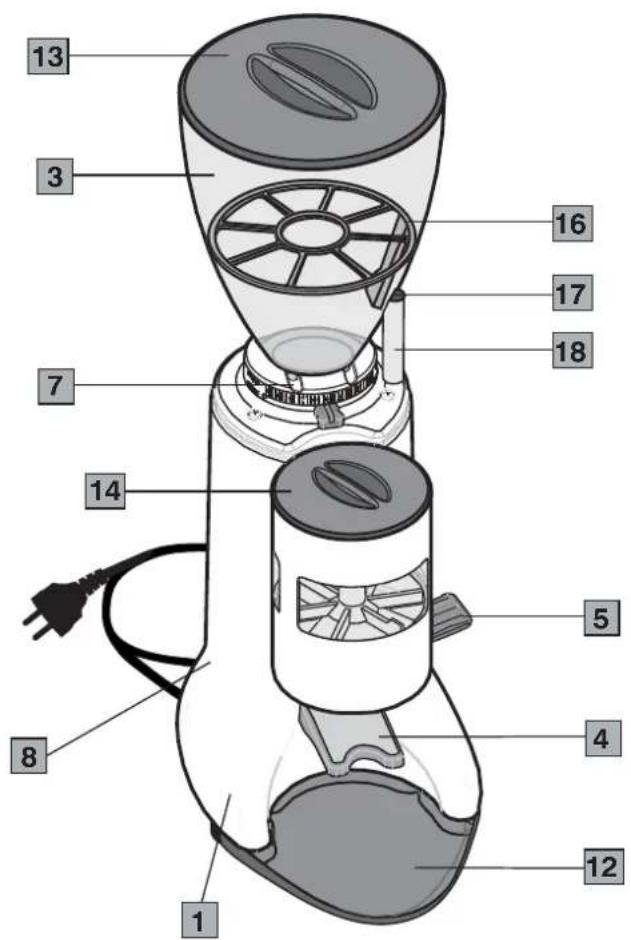
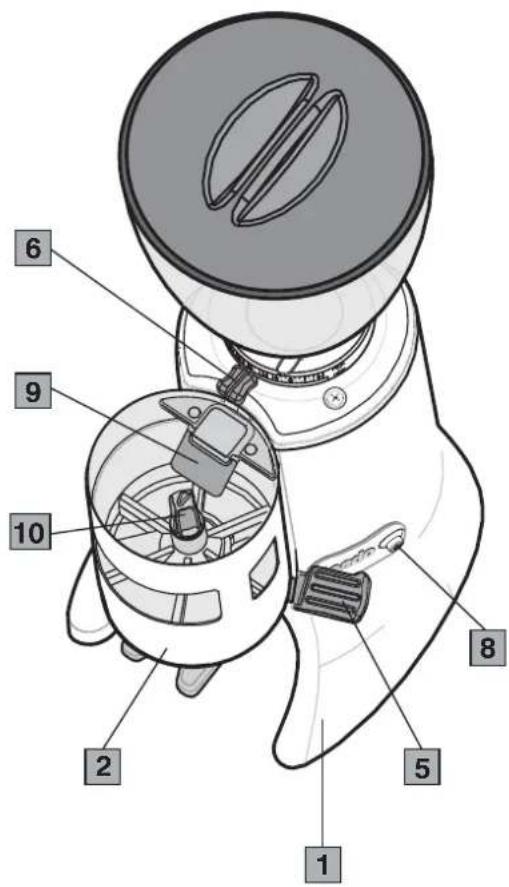
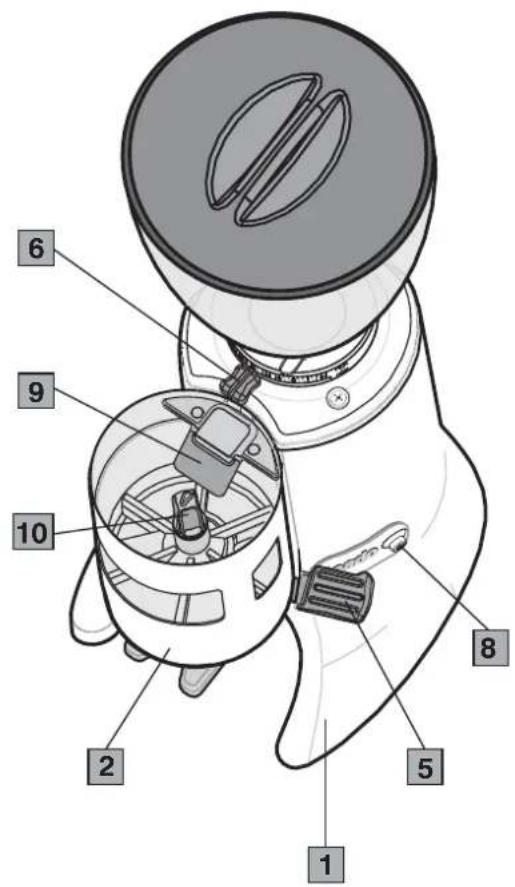
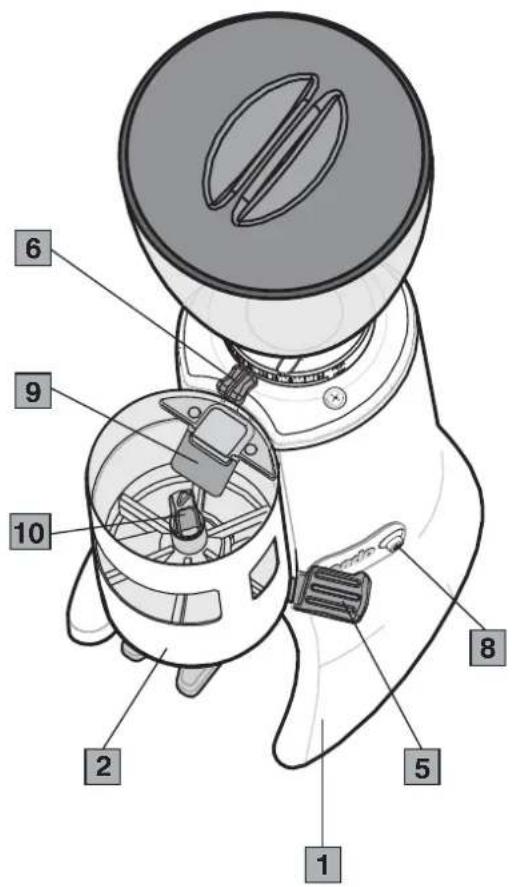
Symbol of a trash bin crossed with a diagonal line, representing no waste or discharge (no text or labels)Mainparts(Fig.1, Fig.2, Fig.3, Fig.4)
1 Motorhousing
2 Doser
3 Beanhopper
4 Supportfork
5 Dosinglever
6 Grindregulatinglever
7 Beanhoppershutter
8 ON-OFF(I-O)switch
9 Stoppingblade *
10 Doseregulatingknob
11 Startbutton *
12 Tray
13 Hopperlid
14 Doserlid
15 Amperometriccircuitbreaker (ifavailable)
SpecialfeaturesofmodelE15
16 Safetygrid
17 Magneticsensor
18 Safetyarm
*Onlyonautomaticmodels
text_image
Labeled diagram of a coffee maker with numbered parts for identificationFig.1
text_image
6 9 10 2 5 8 1Fig.2
SAFETYRECOMMENDATIONS GENERALINSTRUCTIONS
- Read the following instructions carefully before using the appliance.
- Installation and maintenances should be carried out by qualified personnel only.
- This appliance is intended for professional use, and should therefore be used by adults and qualified personnel only.
CLOSEADULTSUPERVISIONISNECESSARYWHENCHILDRENARENEARTHE APPLIANCE.
-
This appliance is not intended for use by persons (including children) with reduced physical, sensory or mental abilities, or without experience and knowledge, unless they have been instructed in the use of the appliance and are under the supervision of a person who is responsible for their safety. Children must be supervised to ensure that they don't play with the appliance.
-
Never use this appliance for purposes other than grinding coffee beans and dosing portions of groundcoffee.Anyotheruseisdangerous.Donotusethedoserfordosingfoodstuffsother thangroundcoffee.
-
Alwaysworkundersafeconditions: donotusetheappliance with wethandsorfeet. Donot useoutdoors.
-
Keep the original package for possible future use. It is most suitable protection against damaged during transport.
8.IncaseoffireuseCO 2 extinguishers.Donotusewaterorpowderextinguishers.
-
Never placethe appliance in water!
-
Donotdisassembletheapplianceorattempttoperformanyrepairsinsideit.
-
Alwaysunplugtheappliancebeforeperforminganymaintenanceorcleaningandwhenitisnotinuse.
-
Never pull the appliance by the cord to move it. Never unplug it by pulling the cord or touching it withwethands.

If the powercable is damaged it must bere placed by the manufacturer or by the technical assistance service, or at any rate by a person with similar qualifications, so astopreventall risks.
-
WARNING: Never place any utensils, metal or other hard materials, in the doser and in the beanhopper. This is dangerous and could cause damage.
-
Do not use the appliance if it is damaged or has loose parts. Immediately contact an authorized ServiceCenter.
The appliance complies with European regulation CE1935/2004 and subsequent updates.
Note: Duetostatisticaltestsontheproductinthefactory, somecoffeegroundsmaybefoundintheappliance.
SAVETHESEINSTRUCTIONS!
CE
The EC declaration of conformity for this appliance is available in the Products section of our website www.ceado.com.
INSTALLATION
Complywiththesafetyrecommendationsindicatedaboveandhereafterwheninstallingthe appliance.
Fortheinstallationoftheappliance,qualifiedpersonnelmustbepresentwhoareabletocheckthe finenessofthegrind.
-
Makesurethatthemainsvoltageisasindicatedontheratinglabeloftheapplianceandthat theelectricalsystemisgroundedandequippedwithaswitch.
-
Install the appliance in a DRY, PROTECTED place, far from water sprays or splashes, heat sources, openflames and inflammables substances.
Placetheapplianceonaflat, horizontal, stablesurfacewhereitcannottipover.
- Putthetrayunderthedosertokeeptheworkareaascleanaspossible.

Before connecting the plug to the power socket, make sure that the ON-OFF switch (8Fig.2)isinposition"0"(OFF).
-
Plug the power cable into asocket protected by asuitably rated circuit breaker (MCB) or fuses. Donot use an adaptor plug.
-
Stretch the power cable out to full length. Do not let it pass over sharp edges or hot surfaces. Do not let oil spill on it. Do not let the power cable hang loose from the counter on which the appliancestands.
-
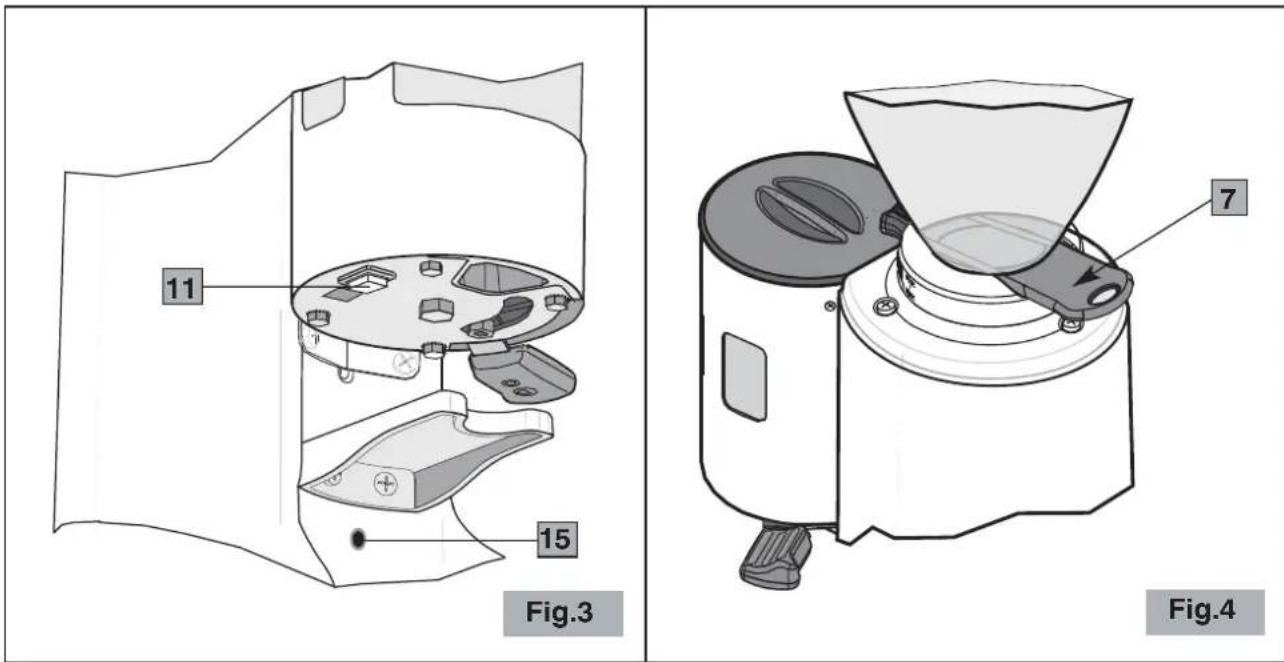
Makesurethatthebeanhopperiscorrectlypositionedandthatitsshutterisopen(7Fig.4).
-
Tofitthecoffeepress, if provided, seetheenclosedillustrated leaflet.
PREPARATIONANDUSE
SWITCHINGON
1 Fillthehopperwithcoffeebeansandclosethelid.

Besuretokeepthelidofthedoserunitclosedduringoperationoftheappliance.
2 TurntheON-OFFswitchtoposition"1".
Manualmodel
The appliance will start working and must best be stopped by the operator by means of the ON-OFF switch on each desired amount of coffee has been obtained.
Automaticmodel
3 Pressthestartbutton(11Fig.3).Theappliancewillstartworking,grindingasufficientamount ofbeanstofillthedoseruptoitsmaximumlevelwhichconsidersacapacityofabout300gof groundcoffee;oncethishasbeenreached,aswitchdevicestopsthemotor.Furthercoffee grindingwillresumeautomaticallyaftersixdosesofgroundcoffeehavebeenextracted.
REGULATINGGRINDING
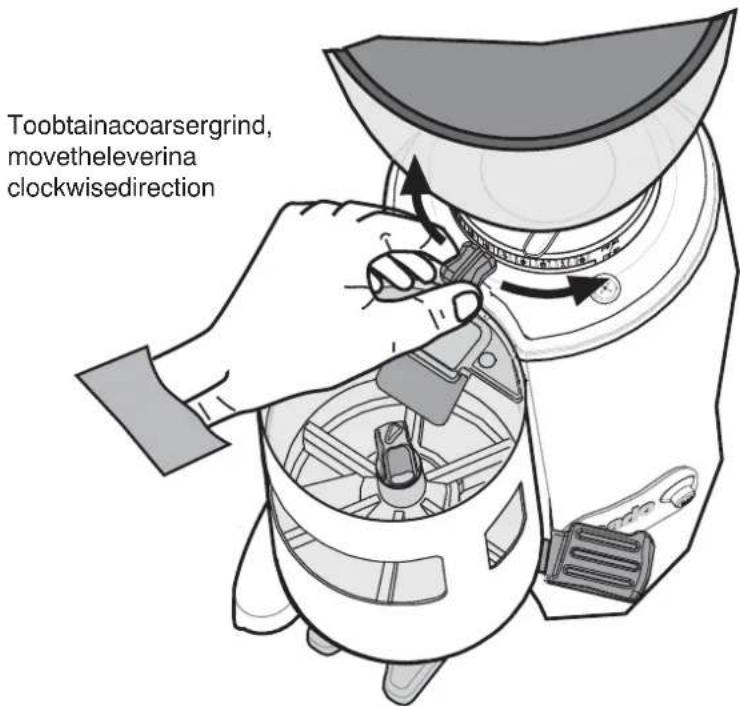
Whenitleavesthefactorythemachinehasastandardsetting,butmaybenecessarytoadjust grindingfurtherduetovariousexternalfactorssuchasthetypeofmixtureused,thehumidity,temperature,ortheparticulardistributionrequirementsoftheespressocoffeemachine.
The degree of grinding may be further corrected by shifting the special lever (6Fig.2) at the base of the hopper (see Fig.5).

Alwaystakecaretomovetheleverwiththemotorturningandempty(withoutcoffeebetween theburrs).
Todothisyoucanoperatetheshutteratthebaseofthehoppertostoporresumethedroppingof thecoffeebeansintothegrindingmechanism.
• Toobtainafinergrind, movetheleverinacounter-clockwisedirection.
• Toobtainacoarsergrind, movetheleverinaclockwisedirection.
Remember that the grind is related to the coffee extraction time which must be 25-30 seconds for a cup of 25-30 ml. If the extraction time is too long, the grind must be coarser; if it is too short, the grind must be finer.
NOTE!Itisrecommendedtogrindsmallamountsofcoffee,lettingtheburrseempty withevery regulatingattempt,byopeningandclosingtheshuttereachtime.
text_image
Toobtainacoarsergrind, movetheleverina clockwisedirectionToobtainafinergrind, movetheleverina counter-clockwise direction
Fig.5
REGULATINGDOSING
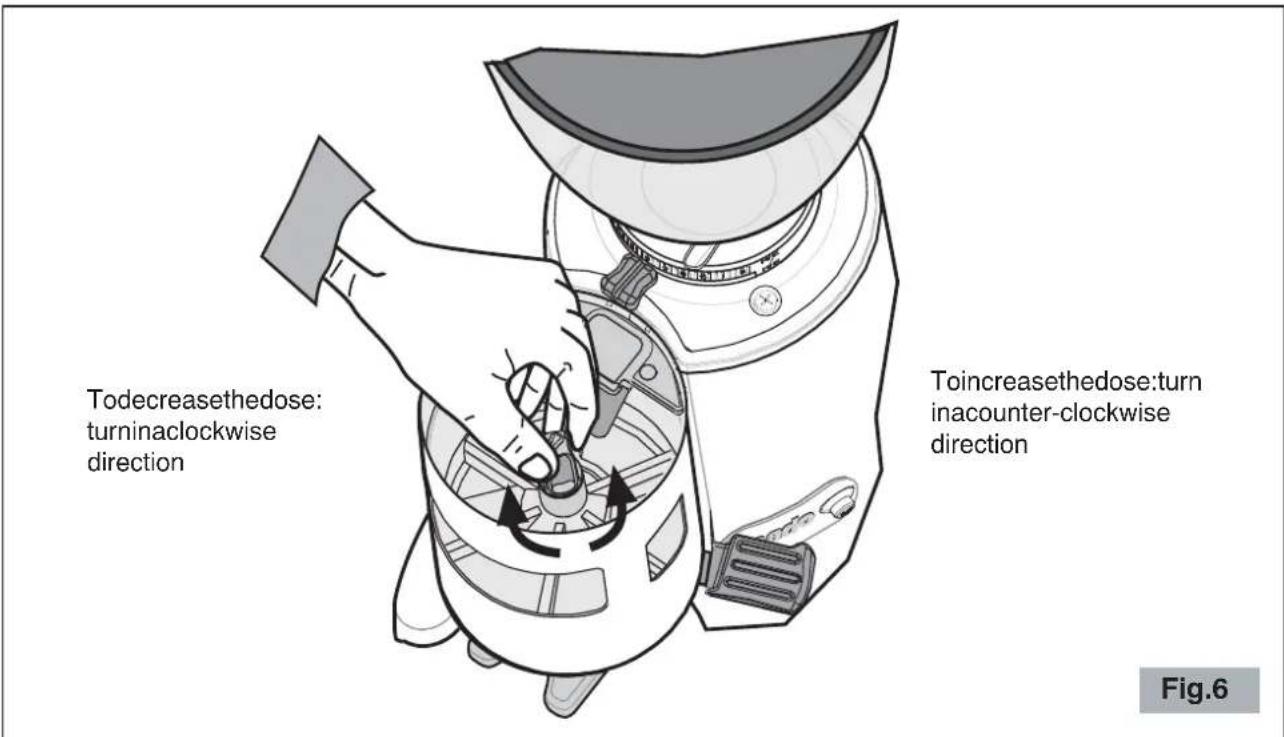
Whenitleavesthefactorythemachineisregulateddatabout7grams, butitispossibletoturnthe doseregulatingknob (10Fig.2) toadjustthisamountbetweenabout5.5grams and9grams (see Fig.6).
Eachcompleteturnoftheknobcorrespondstoabout0.5gramsofgroundcoffee:turnitclockwise todecreasethedose,turnitcounter-clockwisetoincreasethedose.
text_image
Todecreasethedose: turninaclockwise direction Toincreasedose:turn inacounter-clockwise direction Fig.6TAKINGOUTTHECOFFEE
Restthefilter-holderofthecoffeemachineonthesupportforkandpullthedoserleveralltheway onceortwicetoextractoneortwodosesofgroundcoffee.
Theleverhasastrongreturnspringsothereisnoneedtorepositionitaftereverydose.
Todistributethegroundcoffeeevenlyinthefilterusethespecialpress,ifsupplied,holdingitparallel tothefilterandpressingdownthecoffeeaspreferred.
WARNINGSANDSUGGESTIONS
Insidethedoserthereisastoppingblade(9Fig.2) connectedtoaswitchwhich,whenraisedbythenewly groundcoffee,cutsoutthemotor.

Never operatethebladebyhandasthiswould riskfillingthedosertoexcessordamagingit.

Neveroperatewithouthopperandlidinplace.

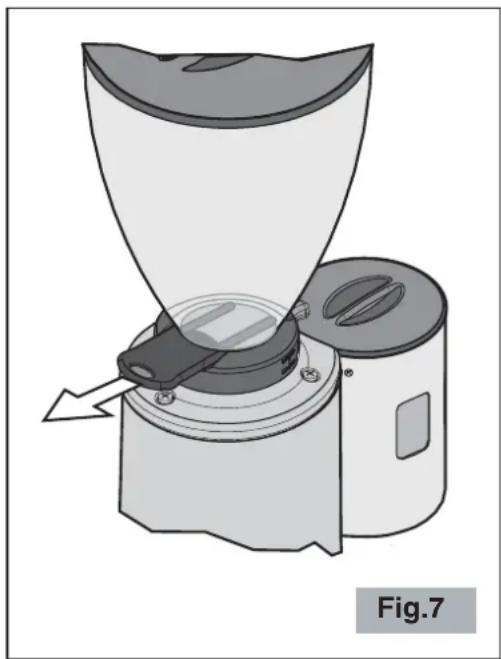
Makesurethatshutteriscompletelyopen(to thelastclick)(seeFig.7).
Donotletthegrinder-doserrunlongwithoutcoffeebeans inthehopper;ifthisweretohappenitwouldcausetripping ofthemotorthermaloverloadprotection.Inthatcaseitis necessarytowaituntiltheoverloadprotectionisreset beforestartingtogrindcoffeeagain.
Forthisreason, neverleavethepackofcoffeebeans sittinginthehopperasthispreventsyouseeinghowmany coffeebeansareleft.
natural_image
Mechanical device diagram showing a funnel-like component inserted into a cylindrical housing, with no visible text or symbols.Whenthegrinder-doserisnottobeusedduringthetimewhenthebusinessisclosed,itshould alwaysbeswitchedoffwiththemainswitch.

Putonlycoffeebeansinthehopper, notready-groundcoffeeorothersubstances.
SAFETYGRIDE15
ElectronicspressocoffeegrindermodelE15isequippedwitharemovablesafetygrid(16Fig.1). Beforeoperatingthegrinder, placethesafetygridinsidethebeanhopper, slottingitintotheonly positionsothatthemagneticsensor(17Fig.1)isincontactwiththeendofthesafetyarm(18Fig.1).
Note: Coffeegrinderwillnotstartifsafetygridisnotproperlyinplace.

Anyattempttoby-passthesafetydeviceandusethecoffeegrinderwithoutitssafety gridinplacemaycausepersonalinjuryand/ordamagetotheappliance.
CLEANING
It is important to keep the appliance clean and good working order to ensure optimum quality of the products and long life of the appliance.

Always disconnect the plug of the appliance from the powersocket before cleaning it.

Cleanthemotorhousingandthetraywitha clothdampenedwithwateroralcoholorwitha sprayneutralsolution.
Wipewithadrycloth.

Neverputtheapplianceunderrunningwater andneverimmerseinwater.
Oncethehopperhasbeenremoveditcanbe washedwithlukewarmwaterandneutralsoap, thenrinseitanddrywell.

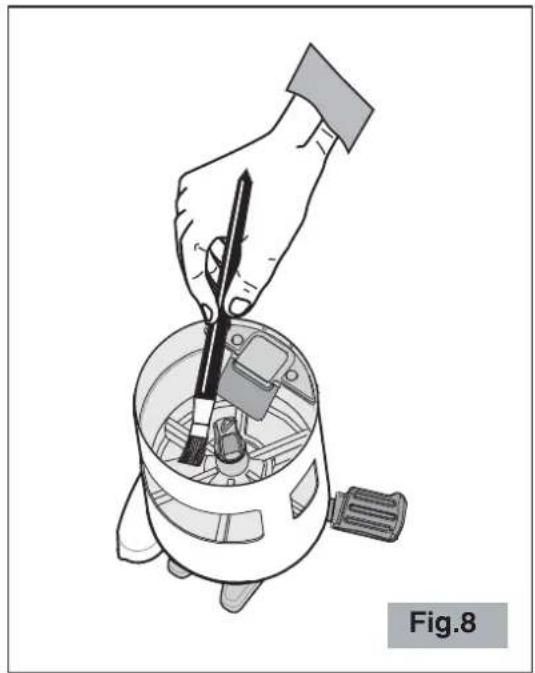
Cleaningthedoserunitrequiresgreatcare becauseinsideitthereisanelectromechanicaldevicewhichcouldgetdamaged.
-Useabrushorapaintbrush(Fig.8)tocleanthemosthiddenareasinsidetheunitandadry clothfortheothersurfaces.
natural_image
Illustration of a hand using a tool to clean or inspect internal components (no text or symbols)MAINTENANCE

Maintenancemustbecarriedoutexclusivelybyqualifiedtechnicalpersonnel.
Careforthemechanicalandelectricalpartsoftheapplianceisindispensableinordertoguarantee theirsafetyandefficiency.Ifanypartsneedreplaced,authenticsparepartsmustalwaysbeused.
ASSEMBLYOFPRESS

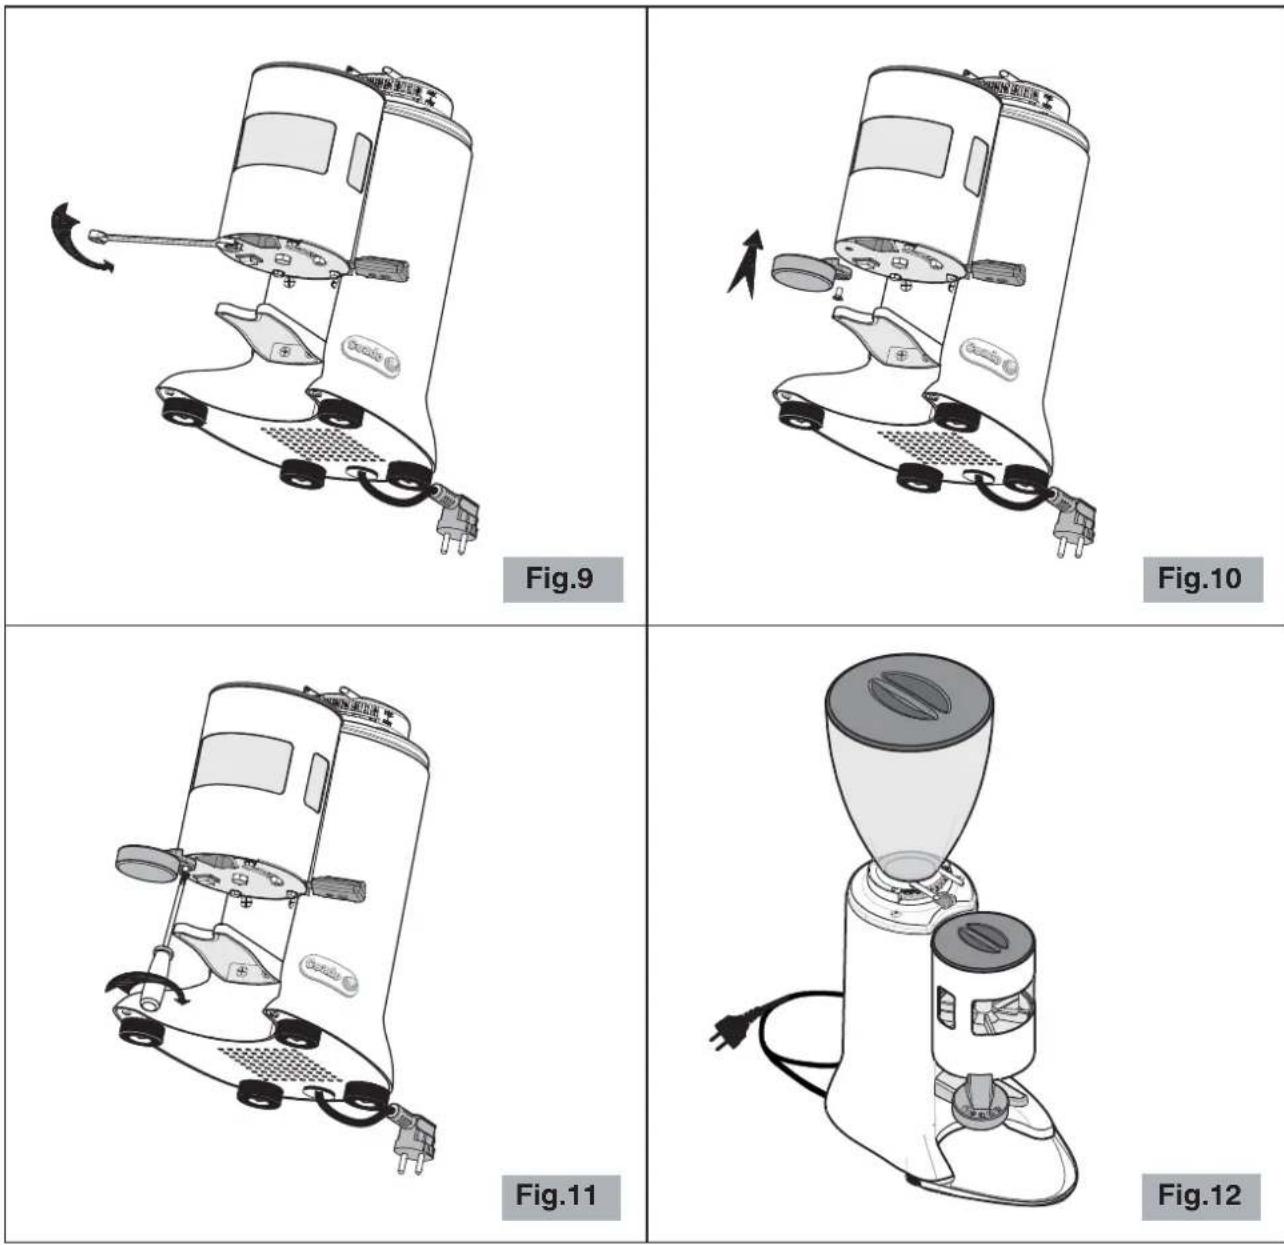
Beforeperforminganyassemblyoperations,unplugtheappliance.
Toinstallthepresssupplied,proceedasfollows:
1 LoosenthescrewatthebottomofthedoserasshowninFig.9withano.10wrench.
2 Position the press and fastenit with it's screw (Fig. 10).
3 Tightenthefasteningscrew(Fig.11).

Alwaysassemblethepressonthesideoppositethedosinglever.
Return the appliance to the working position (Fig. 12).
TROUBLESHOOTING
(SeeTableonthenextpage)
Incaseofanymalfunction, defectoftheapplianceorifyoususpectanybreakageafterafall, unplug theapplianceimmediately.
If you are unable to solve the problem referring to the table below, contact an Authorized Service Centre.
Onlyqualifiedexpertsshouldrepairtheappliance.
Wearenotliableforanydamagecausedbyrepairsnotmadecorrectlyand/orbyunauthorized personnel.Inthesecasesthewarrantydoesnotapply.
| Problem | Solution |
| Theappliancedoesnotturn on. | Makesureitispluggedin.Makesurethesafetycircuitbreakerisclosed.CheckthatthemainswitchoftheapplianceisON.Iftheproblemoccursitselfafteralongperiodofintensive use,themotorcouldbeinthermalprotectionlock!Waitat least20minutesandtryagain.Thewaitingtimecan be reducedbyputtingtheapplianceinacoolplace.Iftheproblemoccursafteranoverload,thecircuitbreaker onthemotormayhavebeentripped!Pushthecircuit breakerbutton(15 Fig.3)underthesupportforkofthe appliance(notstandardequipmentonallmodels).Automaticmodel:Checkthatthedoserisnotatmaximum capacity.Ifitis,movethedoserlevertoextractatleastsix dosesandcheckthatitstartsoperatingafterhaving removedacertainamountofgroundcoffee.Automaticmodel:Checkthatthestoppingbladeisfreeto move. |
| Thecoarsenessofthegrind isnotuniform. | Trygrindingverycoarselyforafewseconds,thenreturn to thecorrectsetting.CalltheTechnicalAssistanceServicetocheckandchange theburrs. |
| Thecoffeeisnotcomingout ofthedosercorrectly. | Disconnecttheplugandcheckforthepresenceofforeign bodiesinthedoser.Checkkthattheholewherethecoffeecomesoutofthedoser isfree. |
| Themotorgetsblocked. | Ifthemotorgetsblockedduetoincorrectregulationof grindingortothepresenceofaforeignbodyintheburrs, tryincreasingtothecoarsestgrainsizebyturningthe regulatingleverclockwise(6Fig.2).Ifthisisnotenough,switchofftheappliance,disconnect theplugfromthesocketandconsulttechnicallyqualified personnel. |
| AutomaticmodelThecoffeeoverflowsfrom thedosingunit. | Checkthatthestoppingblade(9Fig.2)isfreetomove.Iftheproblempersists,calltheTechnicalAssistance Service. |
DISPOSAL
Correctdisposalofthisproduct(wasteelectricalandelectronicequipment)
(Applicable in the European Union and other countries with separate collections systems in conformity with European Directive 2002/96/EC)
Thisproducthasbeenmadefromhigh-qualitypartsandmaterials,which canbere-usedandrecycled.
Therefore, donotthrowtheproductawaywithnormalhouseholdwaste attheendofitsworkinglife. Takeittoacollectionpointforrecycling electricalandelectronicdevices. This is indicated by this symbol on the product and in the operating manual.
Pleasecontactyourlocalgovernmentofficeforinformationaboutthe exactlocationoftheclosercollectionpoint.
natural_image
Symbol of a trash bin crossed out by two diagonal lines (no text or numbers present)WARRANTY
Thisproducthasbeenmanufacturedtoahighqualitystandard.
Thisproductisguaranteedagainstfaultymaterialsandworkmanshipforaperiodofthreeyearsfrom the date of purchase when it is used according to the instructions in this instruction and maintenance manual.
Pleaseretainanyreceiptasproofofpurchase
During the warranty period, this product can either berepaired or replaced, at the manufacturer's discretion, at no additional cost.
If the products needs maintenance or repairs during the warranty period, contact your retailer for shipping instructions. The product should be shipped in its original package or others suitable packing.
Thewarrantydoesnotapplyincaseofneglect,misuse,abuseorunauthorizedrepairs.This warrantydoesnotapplytopartssubjecttodeteriorationthroughnormalusesuchastheburrs.This warrantydoesnotapplytodamagecausedbyforeignobjects,substancesoraccident
Thewarrantyislimitedtothecostsofrepairorreplacementoftheproductoritsdefectiveparts,or anamountequivalenttothepricepaidforitspurchase.Noadditionalrequestsofdamageswillbe availabletothepurchaser.
Thisguaranteeisinadditiontoanddoesnotaffectyourstatutoryrights.
Themanufacturerwillnotacceptanyliabilityandthewarrantywillbeinvalidatedifthereisa failuretofollowtheseinstructionsandthetechnicaland/orsafetystandardsinthecountrywhere theapplianceistobeused.
Inanycasetheseinstructionscannotcovereverypossibleeventandtheuserisrecommendedto usetheapplianceresponsibly.
THEMANUFACTURERRESERVESTHERIGHTTOMAKEANYALTERATIONSTO THEAPPLIANCEWITHOUTNOTICE
MOULINDOSEUR
Composantsprincipaux(Fig.1, Fig.2, Fig.3, Fig.4)
text_image
Labeled diagram of a device showing internal components numbered 1 to 10Fig.2

text_image
11 15 Fig.3
natural_image
Technical illustration of a mechanical device with a funnel and base component, labeled 'Fig.4' (no text or symbols on the diagram itself)NORMESDESÉCURITÉ INSTRUCTIONSGÉNÉRALES
natural_image
Mechanical device diagram showing a funnel-like component inserted into a cylindrical housing, with no visible text or symbols.natural_image
Illustration of a hand using a tool to clean or inspect a mechanical component (no text or symbols visible)
natural_image
Symbol of a trash bin crossed out by two diagonal lines, representing no waste or discharge (no text or labels)CONDITIONSDEGARANTIE
text_image
Labeled diagram of a portable blender with numbered parts for identificationAbb.1
text_image
Labeled diagram of a device showing internal components numbered 1 to 10Abb.2

text_image
11 15 Abb.3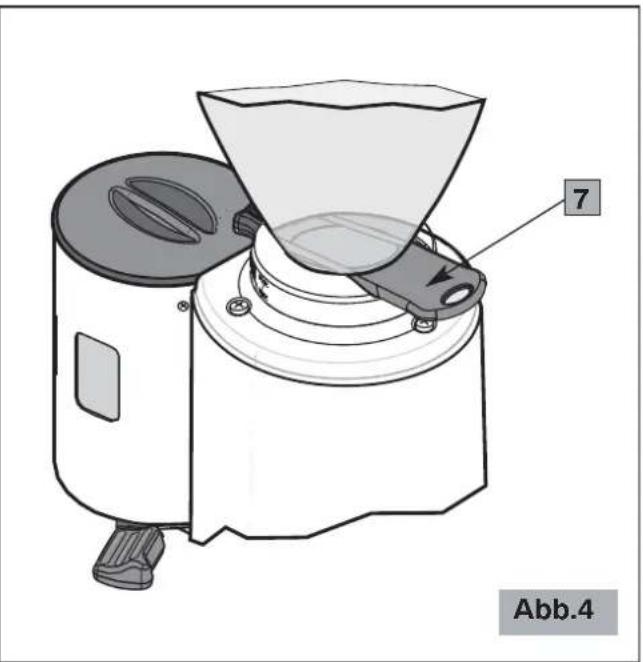
natural_image
Technical illustration of a mechanical device with a funnel and base, labeled Abb.4 (no text or symbols on the diagram itself)natural_image
Mechanical device diagram showing a funnel-like component inserted into a housing, with no visible text or symbols.natural_image
Illustration of a hand using a tool to clean or inspect a mechanical component (no text or symbols visible)
natural_image
Symbol of a trash bin crossed with a diagonal line, representing no waste or discharge (no text or labels)GARANTIEBEDINGUNGEN
text_image
Labeled diagram of a portable blender with numbered parts for identificationFig.1
text_image
Labeled diagram of a portable device with numbered parts for identificationFig.2

text_image
11 15 Fig.3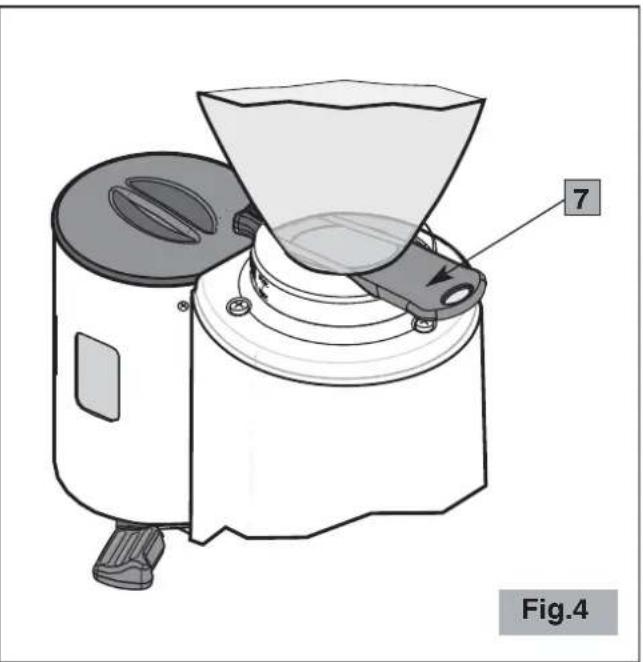
natural_image
Technical illustration of a mechanical device with a funnel and base component, labeled 'Fig.4' (no text or symbols on the diagram itself)natural_image
Diagram of a device with a funnel and mechanical components, labeled Fig.7 (no text or symbols on the diagram itself)
Enlatolvaesobligatorioioverterexclusivamentecaféengranosynocaféyamolidou otrasustancia.
PARRILLADESEGURIDADE15
ElmolinillodecaféexpresomodeloE15estádotadodeunaparrilladeseguridaddesmontable(16 Fig.1)situadaenelinteriordelatolva.
natural_image
Illustration of a hand using a tool to clean or inspect a mechanical component (no text or symbols visible)