E6X - Coffee machine Ceado - Free user manual and instructions
Find the device manual for free E6X Ceado in PDF.
| Product Type | Professional dosing grinder for coffee beans |
| Brand | Ceado |
| Model | E6X |
| Usage | Grinding and dosing coffee beans for professional espresso |
| Grinding Mechanism | Burrs (type not specified, with grind size adjustment) |
| Grind Adjustment | Adjustment ring with lock, from fine to coarse |
| Dose Adjustment | Adjustment knob, from 5.5 g to 9 g per dose |
| Doser Capacity | 200 g of ground coffee (E6X model) |
| Model Types | Manual, automatic (stop paddle), timed (timer 5-60s) |
| Power Supply | Check product label (mains voltage) |
| Motor Power | Not specified, with thermal and amperometric protection |
| Safety | Automatic stop (auto models), thermal protection, amperometric circuit breaker |
| Cleaning | Unplug before cleaning; bell washable with warm water; base and tray with damp cloth; do not immerse |
| Maintenance | For qualified technical personnel only; use original parts |
| Warranty | 3 years from purchase date, excluding abuse and normal wear (burrs) |
| Compliance | CE (Regulation EC1935/2004, Directive 2002/96/EC) |
| Disposal | Do not dispose with household waste; recycle via WEEE collection center |
Frequently Asked Questions - E6X Ceado
User questions about E6X Ceado
0 question about this device. Answer the ones you know or ask your own.
Ask a new question about this device
Download the instructions for your Coffee machine in PDF format for free! Find your manual E6X - Ceado and take your electronic device back in hand. On this page are published all the documents necessary for the use of your device. E6X by Ceado.
USER MANUAL E6X Ceado
natural_image
Illustration of a modern coffee maker with lid and side panel (no text or symbols)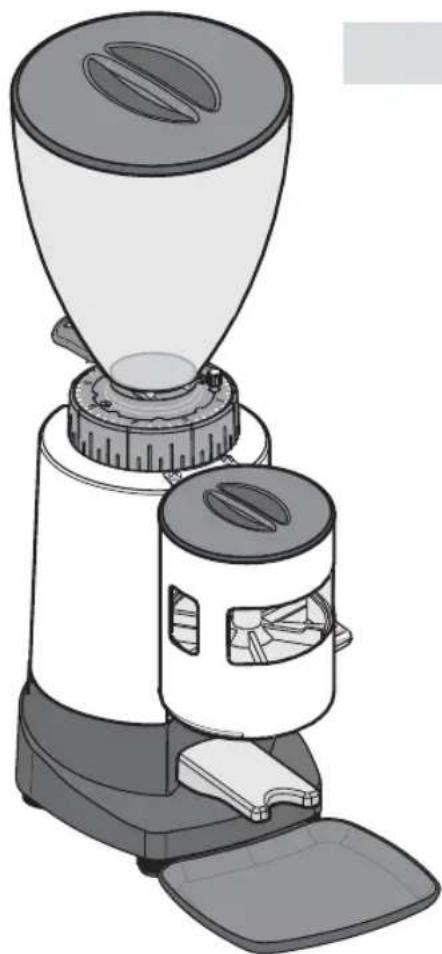
natural_image
Illustration of a modern blender with a conical lid and side panel (no text or symbols)Likeallappliances, it should be used with particular care to avoid injury top personnel and damage to the appliance.
It is essential to read these instructions carefully before using the appliance and to follow the safety recommendations.
ItispossibletoobtaintheCEdeclarationofconformitybycontactingthemanufactureratthe addressshownontheproductdataplate.

Donotusetheapplianceifyouhavenotreadandunderstoodtheseinstructions!
GB
Page14
MOULINDOSEURE6X-E7X
text_image
Labeled diagram of a coffee maker with numbered parts for identificationFig.1

text_image
Labeled diagram of a portable device with numbered parts for identificationFig.2

text_image
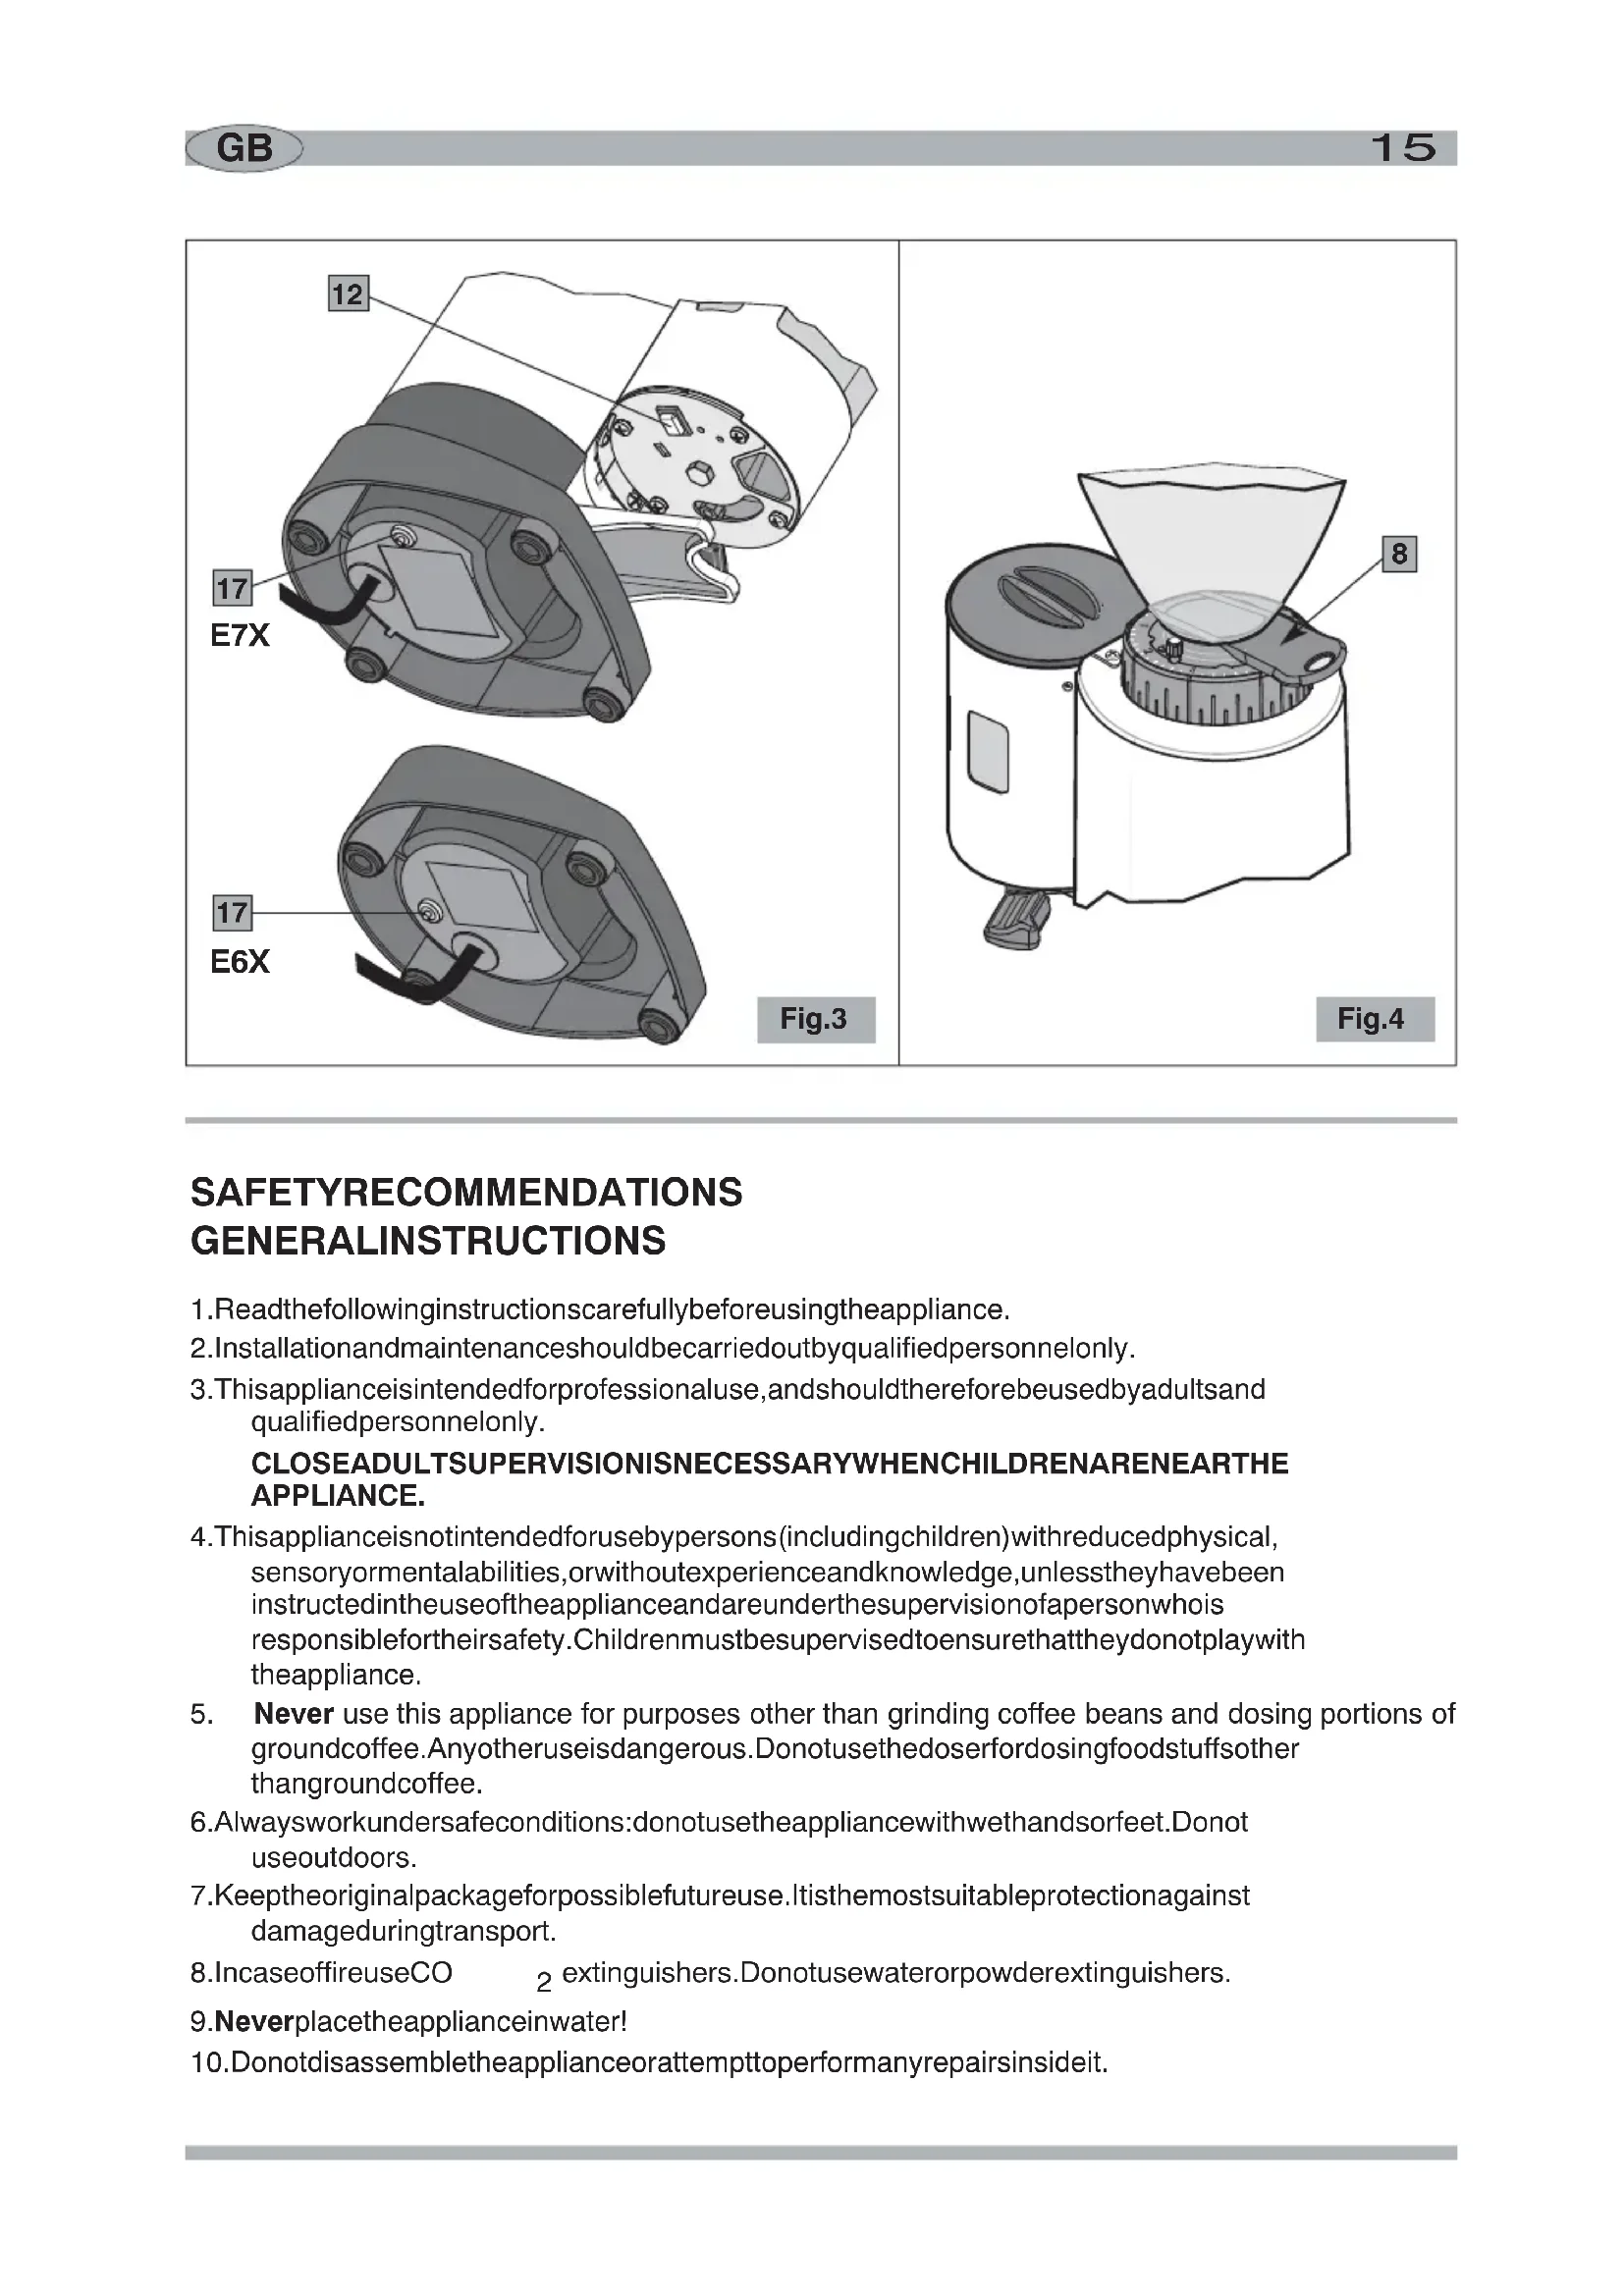
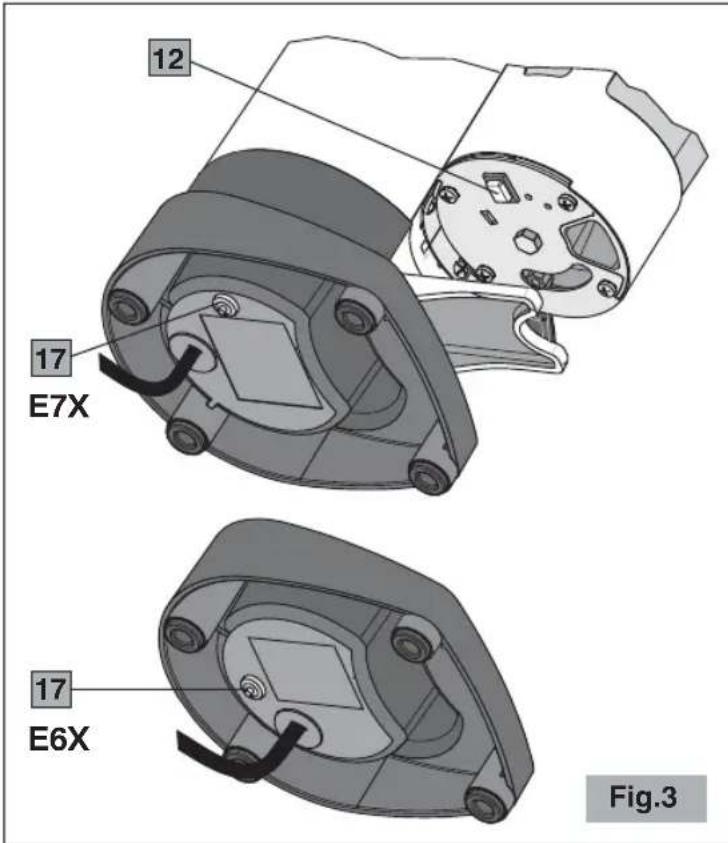
12 17 E7X 17 E6X Fig.3
natural_image
Technical illustration of a kitchen grater with labeled component 8, shown in exploded view (no text or symbols beyond label)NORMEDISICUREZZA AVVERTENZEGENERALI
natural_image
Diagram of a blender with a funnel and lid, showing internal components and a tool (no text or symbols)natural_image
Illustration of a hand using a tool to clean or inspect internal components of a mechanical device (no text or symbols)MANUTENZIONE

text_image
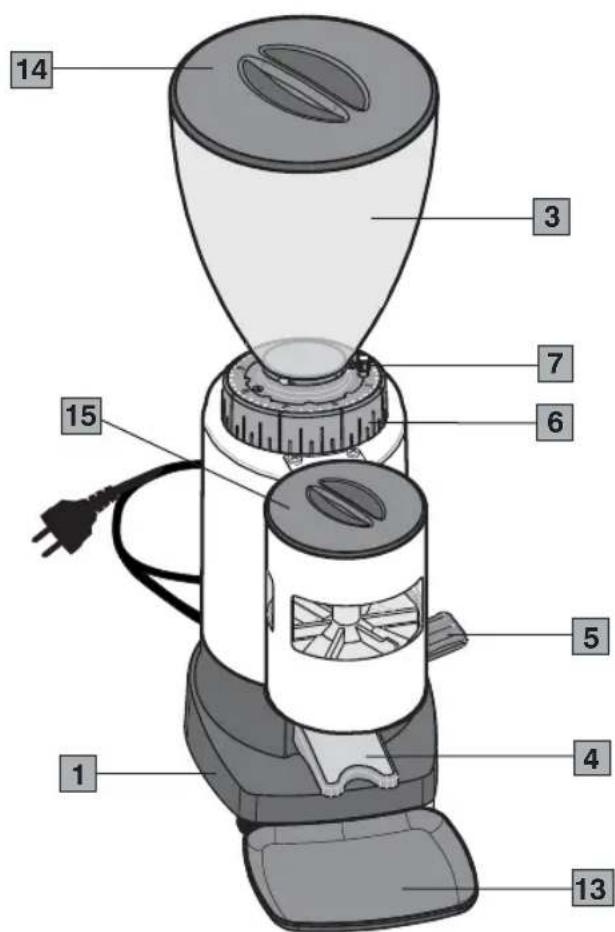
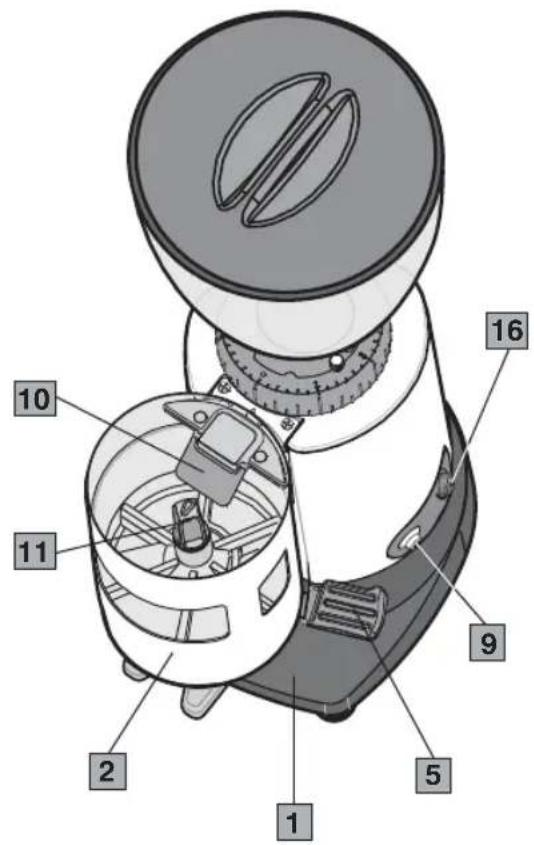
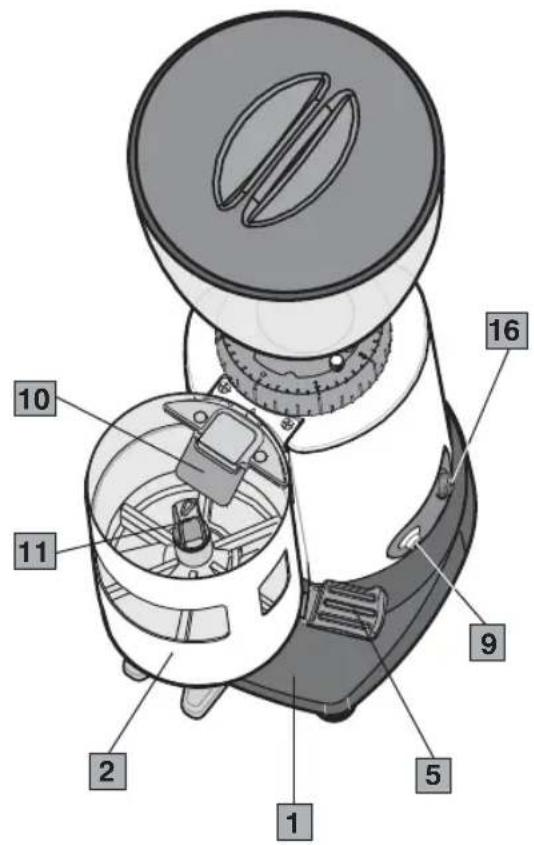
Prohibition sign with crossed-out trash bin and no text, indicating no waste or dischargeMainparts(Fig.1, Fig.2, Fig.3, Fig.4)
1 Motorhousing
2 Doser
3 Beanhopper
4 Supportfork
5 Dosinglever
6 Grindingadjustmentdisc
7 Disclockingknob
8 Beanhoppershutter
9 ON-OFF(I-O)switch
10 Stoppingblade *
11 Doseregulatingknob
12 Startbutton */**
13 Tray
14 Hopperlid
15 Doserlid
16 Timesettingknob**
17 Amperometriccircuitbreaker (ifavailable)
*Onlyonautomaticmodels
**Onlyontimedmodels
text_image
Labeled diagram of a coffee maker with numbered parts for identificationFig.1

text_image
Labeled diagram of a portable device with numbered parts for identificationFig.2

text_image
12 17 E7X 17 E6X Fig.3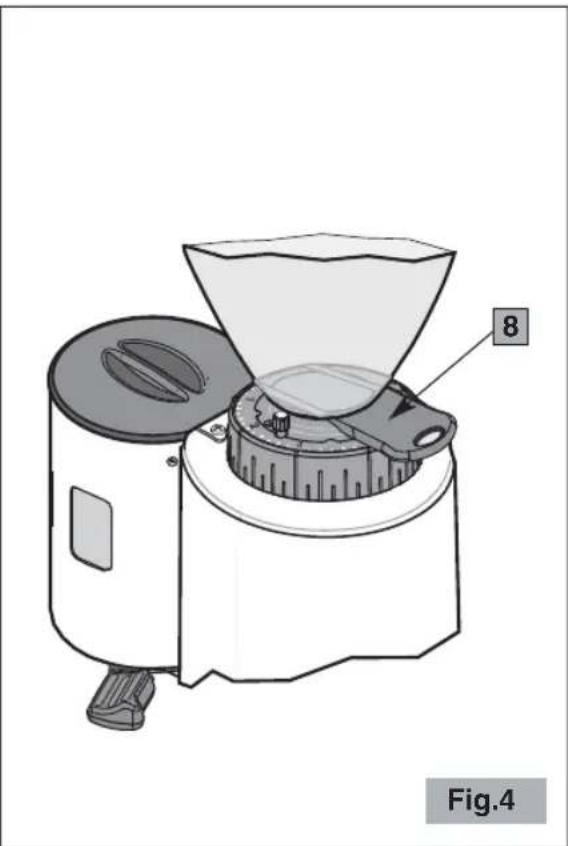
natural_image
Technical illustration of a kitchen grater with labeled component 8, shown in exploded view (no text or symbols beyond label)SAFETYRECOMMENDATIONS GENERALINSTRUCTIONS
- Read the following instructions carefully before using the appliance.
- Installation and maintenances should be carried out by qualified personnel only.
- This appliance is intended for professional use, and should therefore be used by adults and qualified personnel only.
CLOSEADULTSUPERVISIONISNECESSARYWHENCHILDRENARENEARTHE APPLIANCE.
- This appliance is not intended for use by persons (including children) with reduced physical, sensory or mental abilities, or without experience and knowledge, unless they have been instructed in the use of the appliance and are under the supervision of a person who is responsible for their safety. Children must be supervised to ensure that they don't play with the appliance.
- Never use this appliance for purposes other than grinding coffee beans and dosing portions of groundcoffee.Anyotheruseisdangerous.Donotusethedoserfordosingfoodstuffsother thangroundcoffee.
- Alwaysworkundersafeconditions: donotusetheappliance with wethandsorfeet. Donot useoutdoors.
- Keep the original package for possible future use. It is the most suitable protection against damaged during transport.
8.IncaseoffireuseCO 2 extinguishers.Donotusewaterorpowderextinguishers. - Never placethe appliance in water!
-
Donotdisassembletheapplianceorattempttoperformanyrepairsinsideit.
-
Always sun plug the appliance before performing an annual maintenance or cleaning and when it is not in use.
-
Never pull the appliance by the cord to move it. Never unplug it by pulling the cord or touching it withwethands.

If the powerercable is damaged it must bere placed by the manufacturer or by the technical assistance service, or at any rate by person with similar qualifications, so astopreventall risks.
-
WARNING: Never place any utensils, metal or other hard materials, in the doser and in the beanhopper. This is dangerous and could cause damage.
-
Do not use the appliance if it is damaged or has loose parts. Immediately contact an authorized ServiceCenter.
TheappliancecomplieswithEuropeanregulationCE1935/2004andsubsequentupdates.
Note: Duetostatisticaltestsontheproductinthefactory, somecoffeegroundsmaybefoundintheappliance.
SAVETHESEINSTRUCTIONS!
CE
The EC declaration of conformity for this appliance is available in the Products section of our website www.ceado.com.
INSTALLATION
Comply with the safety recommendations indicated above and hereafter when installing the appliance.
Fortheinstallationoftheappliance,qualifiedpersonnelmustbepresentwhoareabletocheckthe finenessofthegrind.
-
Makesure that themains voltage is as indicated on the rating label of the appliance and that the electrical system is grounded and equipped with as switch.
-
Install the appliance in a DRY, PROTECTED place, far from water sprays or splashes, heat sources, openflames and inflammables substances.
Placetheapplianceonaflat, horizontal, stablesurfacewhereitcannottipover.
- Putthetrayunderthedosertokeeptheworkareaascleanaspossible.

Beforeconnectingtheplugtothepowersocket, makesurethattheON-OFFswitch (9Fig.2)isinposition"0"(OFF).
4.Plugthepowercableintoasocketprotectedbyasuitablyratedcircuitbreaker(MCB)orfuses.
-
Stretch the power cable out to full length. Do not let it pass over sharp edges or hot surfaces. Do not let oil spill on it. Do not let the power cable hang loose from the counter on which the appliancestands.
-
Makesurethatthebeanhopperiscorrectlypositionedandthatitsshutterisopen(8Fig.4).
-
Tofitthecoffeepress, if provided, seetheenclosedillustrated leaflet.
PREPARATIONANDUSE
SWITCHINGON
1 Fillthehopperwithcoffeebeansandclosethelid.

Besuretokeepthelidofthedoserunitclosedduringoperationoftheappliance.
2 TurntheON-OFFswitchtoposition"1".
Manualmodel
The appliance will start working and must best be stopped by the operator by means of the ON-OFF switch on each desired amount of coffee has been obtained.
Automaticmodel
3 Pressthestartbutton(12Fig.3).Theappliancewillstartworking,grindingasufficientamount ofbeanstofillthedoseruptoitsmaximumlevelwhichconsidersacapacityofabout300g (200gformodelE6X)ofgroundcoffee;oncethishasbeenreached,aswitchdevicestopsthe motor.Furthercoffeegrindingwillresumeautomaticallyaftersixdosesofgroundcoffeehave beenextracted.
Timedmodel
3 Setthedesiredoperatingtime(5-60seconds)usingthesettingknob(16Fig.2)andpressthe startbutton(12Fig.3).Theappliancewillbegintoworkandwillstopautomaticallyaftertheset time.
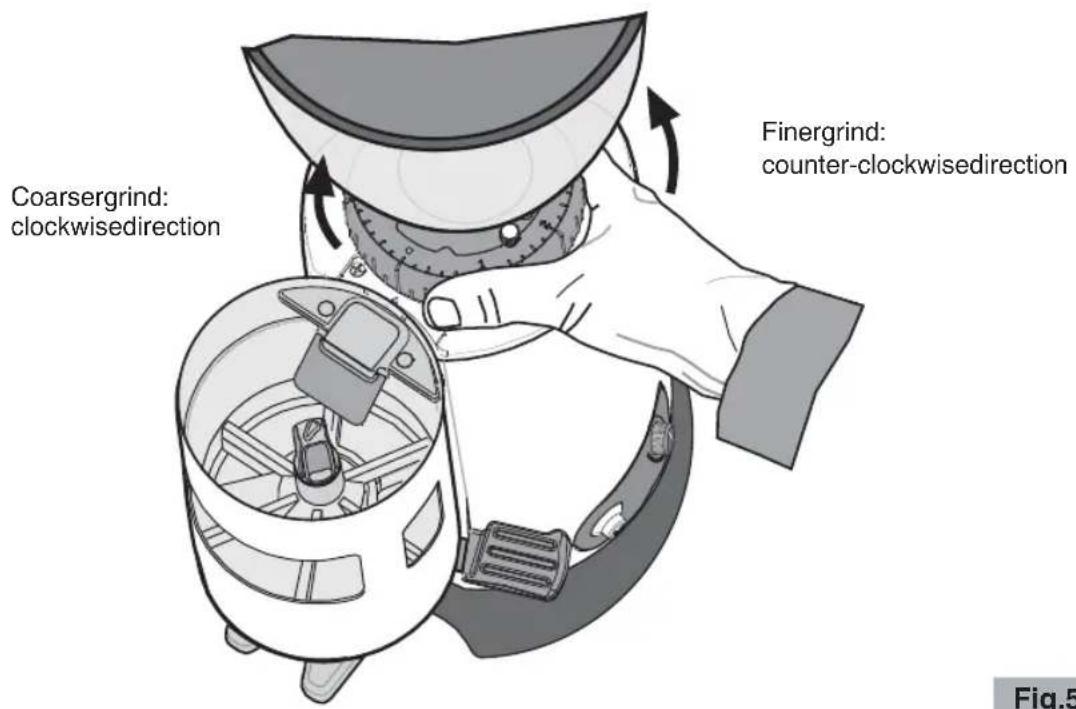
REGULATINGGRINDING
Whenitleavesthefactorythemachinehasastandardsetting,butmaybenecessarytoadjust grindingfurtherduetovariousexternalfactorssuchasthetypeofmixtureused,thehumidity, temperature,ortheparticulardistributionrequirementsoftheespressocoffeemachine.
The degree of grinding may be further corrected by shifting the grinding adjustment disc (6 Fig. 1) at the base of the hopper (see Fig. 5) after having released it, by unscrewing the locking knob (7 Fig. 1) on the grinding adjustment disc.
• Toobtainafinergrind, movethegrindingadjustmentdiscinacounter-clockwisedirection.
• Toobtainacoarsergrind, movethegrindingadjustmentdiscinaclockwisedirection.

Alwaystakecaretomovethediscwiththemotorturningandempty(withoutcoffeebetween theburrs).

Ensure, afterdesiredgrindingadjustmentisset, totightenbackthelockingknobby completelyscrewingit.
NOTE!Itisrecommendedtogrindsmallamountsofcoffee,lettingtheburrempty withevery regulatingattempt,byopeningandclosingtheshutter(8Fig.4)eachtime.
text_image
Coarsergrind: clockwisedirection Finergrind: counter-clockwisedirection Fig.5Fig.5
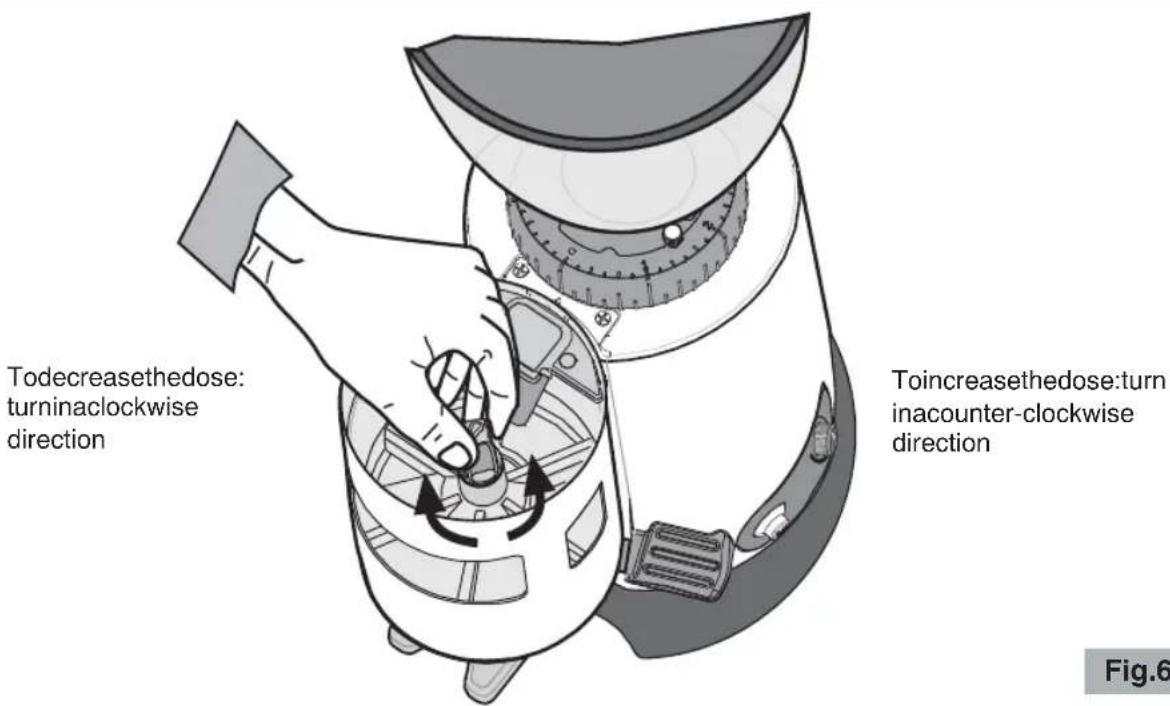
REGULATINGDOSING
Whenitleavesthefactorythemachineisregulateddatabout7grams, butitispossibletoturnthe doseregulatingknob (11Fig.2)toadjustthisamountbetweenabout5.5gramsand9grams (see Fig.6).
Eachcompleteturnoftheknobcorrespondstoabout0.5gramsofgroundcoffee:turnitclockwise todecreasethedose,turnitcounter-clockwisetoincreasethedose.
text_image
Todecreaseasedose: turninaclockwise direction Toincreaseasedose:turn inacounter-clockwise direction Fig.6TAKINGOUTTHECOFFEE
Restthefilter-holderofthecoffeemachineonthesupportforkandpullthedoserleveralltheway onceortwicetoextractoneortwodosesofgroundcoffee.
Theleverhasastrongreturnspringsothereisnoneedtorepositionitaftereverydose.
Todistributethegroundcoffeeevenlyinthefilterusethespecialpress,ifsupplied,holdingitparallel tothefilterandpressingdownthecoffeeaspreferred.
WARNINGSANDSUGGESTIONS
Intheautomaticmodel,insidethedoserthereisastopping blade(10Fig.2)connectedtoaswitchwhich,whenraised bythenewlygroundcoffee,cutsouthemotor.

Never operatethebladebyhandasthiswould riskfillingthedosertoexcessordamagingit.

Neveroperatewithouthopperandlidinplace.

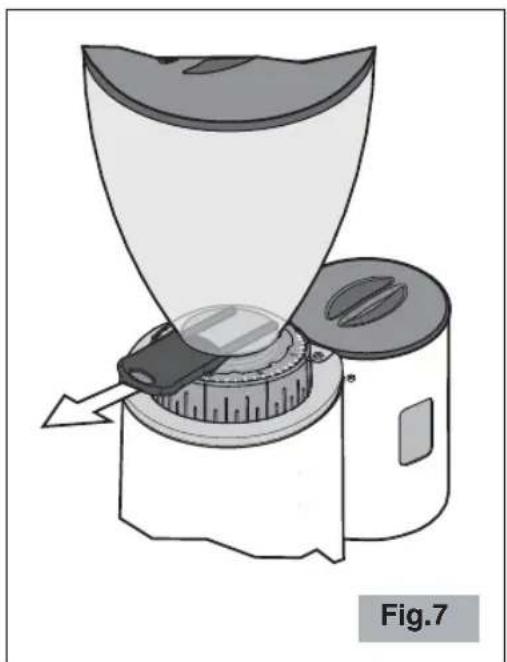
Makesurethatshutteriscompletelyopen(to thelastclick)(seeFig.7).
Donotletthegrinder-doserrunlongwithoutcoffeebeans inthehopper;ifthisweretohappenitwouldcausetripping ofthemotorthermaloverloadprotection.Inthatcaseitis necessarytowaituntiltheoverloadprotectionisreset beforestartingtogrindcoffeeagain.
Forthisreason,neverleavethepackofcoffeebeans sittinginthehopperasthispreventsyouseeinghowmany coffeebeansareleft.
natural_image
Diagram of a device with a funnel and mechanical components, labeled Fig.7 (no text or symbols on the diagram itself)Whenthegrinder-doserisnottobeusedduringthetimewhenthebusinessisclosed,itshould alwaysbeswitchedoffwiththemainswitch.

Putonlycoffeebeansinthehopper,notready-groundcoffeeorothersubstances.
CLEANING
It is important to keep the appliance clean and good working order to ensure optimum quality of the products and long life of the appliance.

Alwaysdisconnecttheplugoftheappliancefromthepowersocketbeforecleaningit.

Cleanthemotorhousingandthetray withaclothdampenedwithwateroralcohol orwithasprayneutralsolution. Wipewithadrycloth.

Neverputtheapplianceunderrunning waterandneverimmerseinwater.
Oncethehopperhasbeenremoveditcan bewashedwithlukewarmwaterandneutral soap,thenrinseitanddrywell.

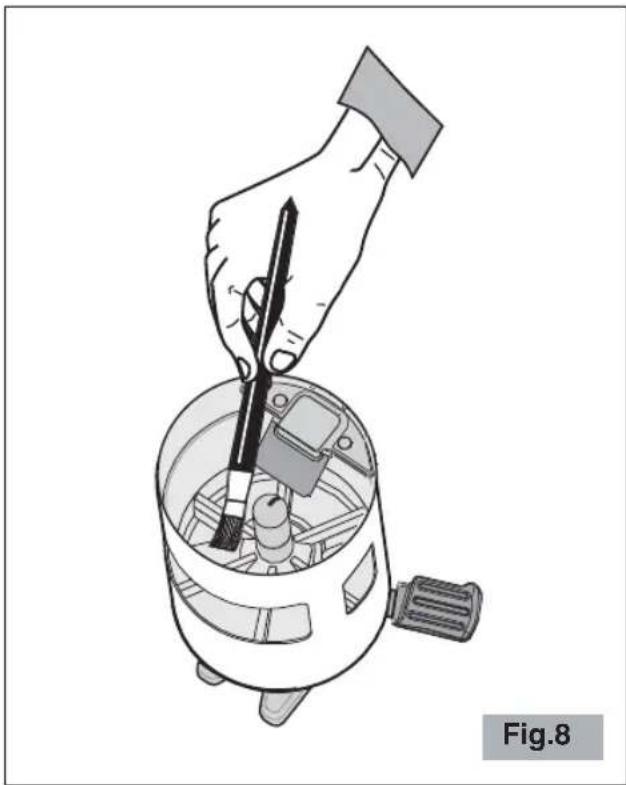
Cleaningthedoserunitrequiresgreat carebecauseinsideitthereisan electromechanicaldevicewhichcouldget damaged.
-Useabrushorapaintbrush(Fig.8)toclean themosthiddenareasinsidetheunitanda dryclothfortheothersurfaces.
natural_image
Illustration of a hand using a tool to clean or inspect internal components of a mechanical device (no text or symbols)MAINTENANCE

Maintenancemustbecarriedoutexclusivelybyqualifiedtechnicalpersonnel.
Careforthemechanicalandelectricalpartsoftheapplianceisindispensableinordertoguarantee theirsafetyandefficiency.Ifanypartsneedreplaced,authenticsparepartsmustalwaysbeused.
TROUBLESHOOTING
(SeeTableonthenextpage)
In caseofanymalfunction, defectoftheapplianceorifyoususpectanybreakageafterafall, unplug theapplianceimmediately.
If you are unable to solve the problem referring to the table below, contact an Authorized Service Centre.
Onlyqualifiedexpertsshouldrepairtheappliance.
We are not liable for any damage caused by repairs not made correctly and/or unauthorized personnel. In these cases the warranty does not apply.
| Problem | Solution |
| Theappliancedoesnotturn on. | Makesureitispluggedin.Makesurethesafetycircuitbreakerisclosed.CheckthatthemainswitchoftheapplianceisON.Iftheproblemoccursitselfafteralongperiodofintensive use,themotorcouldbeinthermalprotectionlock!Waitat least20minutesandtryagain.Thewaitingtimecan be reducedbyputtingtheapplianceinacoolplace.Iftheproblemoccursafteranoverload,thecircuitbreaker onthemotormayhavebeentripped!Pushthecircuit breakerbutton(17Fig.3)underthemotorhousingofthe appliance(notstandardequipmentonallmodels).Automaticmodel:Checkthatthedoserisnotatmaximum capacity.Ifitis,movethedoserlevertoextractatleastsix dosesandcheckthatitstartsoperatingafterhaving removedacertainamountofgroundcoffee.Automaticmodel:Checkthatthestoppingbladeisfreeto move. |
| Thecoarsenessofthegrind isnotuniform. | Trygrindingverycoarselyforafewseconds,thenreturnto thecorrectsetting.CalltheTechnicalAssistanceServicetocheckandchange theburrs. |
| Thecoffeeisnotcomingout ofthedosercorrectly. | Disconnecttheplugandcheckforthepresenceofforeign bodiesinthedoser.Checkthattheholewherethecoffeecomesoutofthedoser isfree. |
| Themotorgetsblocked. | Ifthemotorgetsblockedduetoincorrectregulationof grindingortothepresenceofaforeignbodyintheburrs, tryincreasingtothecoarsestgrainsizebyturningthe grindingadjustmentdiscclockwise(6Fig.1).Ifthisisnotenough,switchofftheappliance,disconnect theplugfromthesocketandconsulttechnicallyqualified personnel. |
| AutomaticmodelThecoffeeoverflowsfrom thedosingunit. | Checkthatthestoppingblade(10Fig.2)isfreetomove.Iftheproblempersists,calltheTechnicalAssistance Service. |
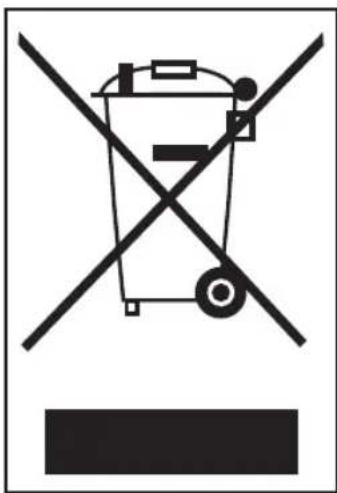
DISPOSAL
Correctdisposalofthisproduct(wasteelectricalandelectronic equipment)
(Applicable in the European Union and other countries with separate collections systems in conformity with European Directive 2002/96/EC and subsequent updates)
Thisproducthasbeenmadefromhigh-qualitypartsandmaterials, whichcanbere-usedandrecycled.
Therefore, donotthrowtheproductawaywithnormalhouseholdwaste attheendofitsworkinglife.Takeittoacollectionpointforrecycling electricalandelectronicdevices.Thisisindicatedbythissymbolonthe productandintheoperatingmanual.
Pleasecontactyourlocalgovernmentofficeforinformationaboutthe exactlocationoftheclosercollectionpoint.
text_image
Prohibition sign with crossed-out trash bin and no text, indicating no waste or dischargeWARRANTY
Thisproducthasbeenmanufacturedtoahighqualitystandard.
Thisproductisguaranteedagainstfaultymaterialsandworkmanshipforaperiodofthreeyearsfrom thedateofpurchasewhenitisusedaccordingtotheinstructionsinthisinstructionandmaintenance manual.
Pleaseretainanyreceiptasproofofpurchase
During the warranty period, this product can either berepaired or replaced, at the manufacturer's discretion, at no additional cost.
If the products needs maintenance or repairs during the warranty period, contact your retailer for shipping instructions. The product should be shipped in its original package or others suitable packing.
Thewarrantydoesnotapplyincaseofneglect,misuse,abuseorunauthorizedrepairs.This warrantydoesnotapplytopartssubjecttodeteriorationthroughnormalusesuchastheburrs.This warrantydoesnotapplytodamagecausedbyforeignobjects,substancesoraccident
Thewarrantyislimitedtothecostsofrepairorreplacementoftheproductoritsdefectiveparts,or anamountequivalenttothepricepaidforitspurchase.Noadditionalrequestsofdamageswillbe availabletothepurchaser.
Thisguaranteeisinadditiontoanddoesnotaffectyourstatutoryrights.
Themanufacturerwillnotacceptanyliabilityandthewarrantywillbeinvalidatedifthereisa failuretofollowtheseinstructionsandthetechnicaland/orsafetystandardsinthecountrywhere theapplianceistobeused. Inanycasetheseinstructionscannotcovereverypossibleeventandtheuserisrecommendedto usetheapplianceresponsibly.
THEMANUFACTURERRESERVESTHERIGHTTOMAKEANYALTERATIONSTO THEAPPLIANCEWITHOUTNOTICE
MOULINDOSEUR
Composantsprincipaux(Fig.1, Fig.2, Fig.3, Fig.4)
text_image
Labeled diagram of a coffee maker with numbered parts for identificationFig.1
text_image
Labeled diagram of a portable device with numbered parts for identificationFig.2
text_image
12 17 E7X 17 E6X Fig.3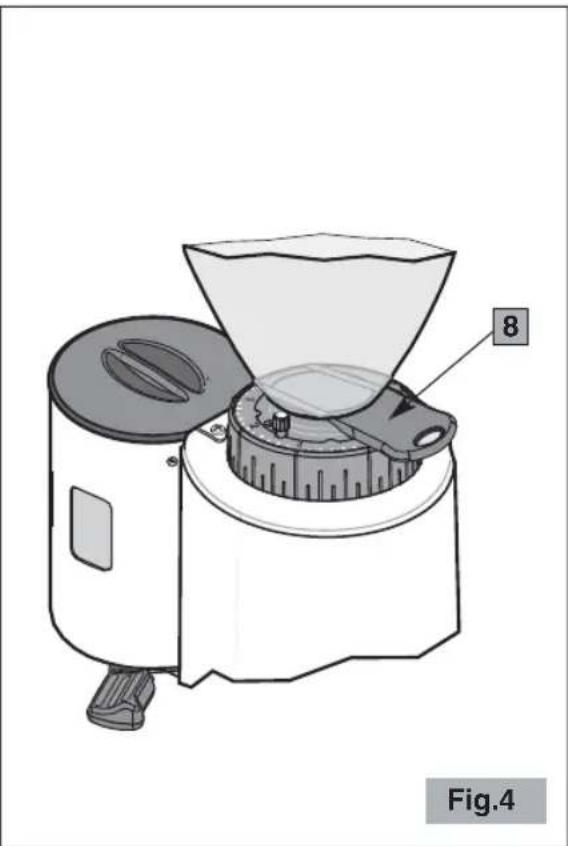
natural_image
Technical illustration of a kitchen grater with labeled component 8, shown in exploded view (no text or symbols beyond label)NORMESDESÉCURITÉ INSTRUCTIONSGÉNÉRALES
natural_image
Diagram of a blender with a funnel and lid, showing internal components and a tool (no text or symbols)natural_image
Illustration of a hand using a tool to clean or inspect internal components of a mechanical device (no text or symbols)ENTRETIEN

text_image
Prohibition sign with crossed-out trash bin and no text, indicating no waste or dischargeCONDITIONSDEGARANTIE
text_image
Labeled diagram of a coffee maker with numbered parts for identificationAbb.1

text_image
Labeled diagram of a portable device with numbered parts for identificationAbb.2

text_image
12 17 E7X 17 E6X Abb.3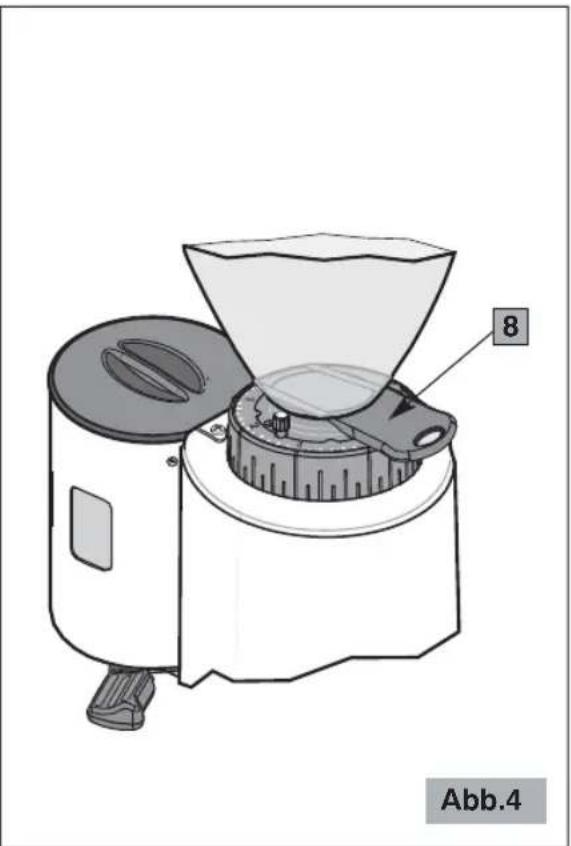
natural_image
Technical illustration of a mechanical device with labeled component 8, no readable text or symbols beyond labelnatural_image
Diagram of a blender with a funnel and control knob, labeled Abb.7 (no text or symbols on the diagram itself)natural_image
Illustration of a hand using a tool to clean or inspect internal components of a mechanical device (no text or symbols)WARTUNG

text_image
Prohibition sign with crossed-out trash bin and no text, indicating no waste or dischargeGARANTIEBEDINGUNGEN
text_image
Labeled diagram of a coffee maker with numbered parts for identificationFig.1
text_image
Labeled diagram of a portable device with numbered parts for identificationFig.2

text_image
12 17 E7X 17 E6X Fig.3
natural_image
Technical illustration of a kitchen grater with labeled component 8, shown in exploded view (no text or symbols beyond label)natural_image
Illustration of a blender with a funnel and lid, showing internal components (no text or symbols)natural_image
Illustration of a hand using a tool to clean or inspect internal components of a mechanical device (no text or symbols)MANTENIMIENTO