E6P - Coffee machine Ceado - Free user manual and instructions
Find the device manual for free E6P Ceado in PDF.
| Product type | Professional coffee grinder |
| Brand | Ceado |
| Model | E6P |
| Use | Professional, for whole bean coffee |
| Grind adjustment | Adjustment ring at the base of the hopper, motor must be running |
| Dose types | Single dose (13) and double dose (14) |
| Dispensing modes | Automatic (via start button) and manual (start/stop) |
| Programming | Grind time (0.1 s increment), pulse function ON/OFF |
| Display | Screen with keypad (10) |
| Dose counter | Total (non-resettable) and partial, with single/double cup distinction |
| Power supply | Mains, voltage per label (230V typical) |
| Noise level | Less than 70 dB |
| Food contact materials | Compliant with EC 1935/2004 |
| Safety | Grounding, residual-current circuit breaker, motor thermal protection, automatic shutdown in case of overload |
| Cleaning | Damp cloth or alcohol, do not immerse, wash hopper with warm water and mild soap |
| Maintenance | By qualified technical personnel, genuine spare parts |
| Warranty | According to country, excludes abuse, unauthorized repairs, and wear parts (burrs) |
| Compliance | CE, WEEE (2012/19/EU) |
| Installation conditions | Flat, stable, horizontal surface, dry, away from heat and water, minimum height 1.5 m under the hopper |
Frequently Asked Questions - E6P Ceado
User questions about E6P Ceado
0 question about this device. Answer the ones you know or ask your own.
Ask a new question about this device
Download the instructions for your Coffee machine in PDF format for free! Find your manual E6P - Ceado and take your electronic device back in hand. On this page are published all the documents necessary for the use of your device. E6P by Ceado.
USER MANUAL E6P Ceado
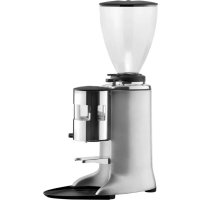
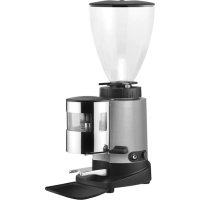
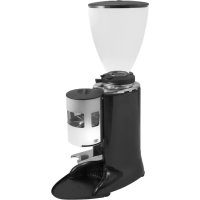
The coffee grinder E5P - E6P - E7P is a professional machine for grinding coffee and distributing through a discharge opening.
Like all appliances, it should be used with particular care to avoid injury to personnel and damage to the appliance.
It is essential to read these instructions carefully before using the appliance and to follow the safety recommendations.

Do not use the appliance if you have not read and understood these instructions!
GB
Page 24
MOULIN À CAFÉ E5P - E6P - E7P
natural_image
Diagram of a coffee maker with labeled parts, showing a conical funnel and mechanical base (no text or symbols on the device itself)
text_image
1 2 6 10 5 4 3 8 1 12 11Fig. 1
text_image
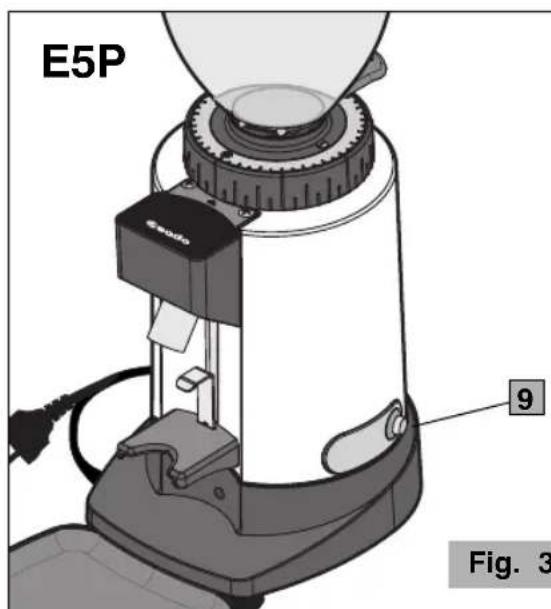
E5P 9 Fig. 3E6P - E7P
text_image
Ceado Display 10 13 15 16 14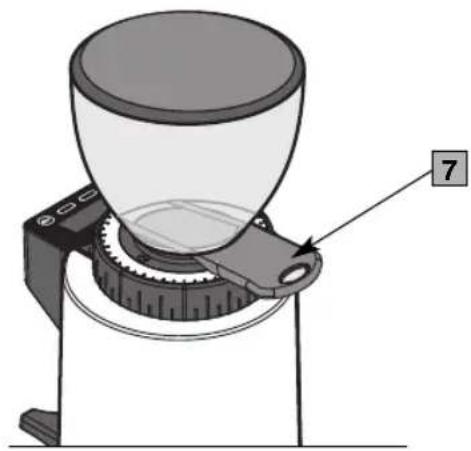
natural_image
Diagram of a coffee maker with a conical cup and mechanical base, labeled with number 7 (no text or symbols on the diagram itself)17

Fig. 5Fig. 4
NORME DI SICUREZZA AVVERTENZE GENERALI
natural_image
Mechanical assembly diagram showing a tool interacting with a mechanical component (no text or symbols visible)Fig. 15
AVVERTENZE E SUGGERIMENTI

natural_image
Diagram of a coffee maker with a funnel and belt, showing mechanical components and a directional arrow (no text or symbols)PULIZIA
natural_image
Illustration of a hand using a screwdriver to adjust or install a mechanical component (no text or symbols visible)
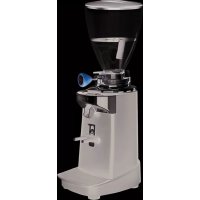
1 Motor housing
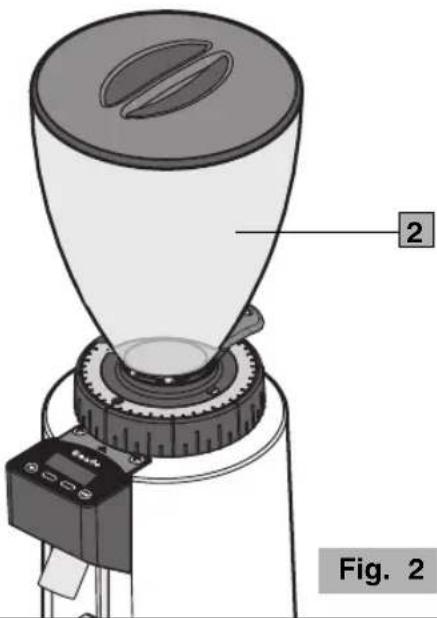
2 Bean hopper
3 Support fork
4 Filter-holder support
5 Discharge opening
6 Grinding adjustment disc
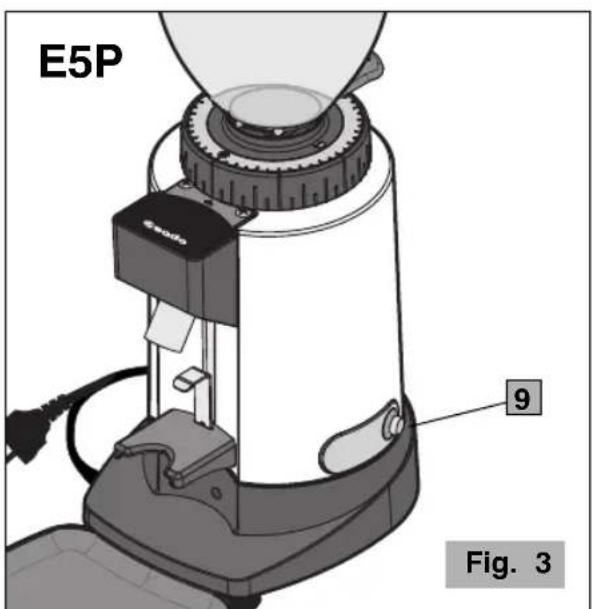
7 Bean hopper shutter
8 ON-OFF (I-O) switch (E6P - E7P)
9 Dispensing button (start) (E5P)
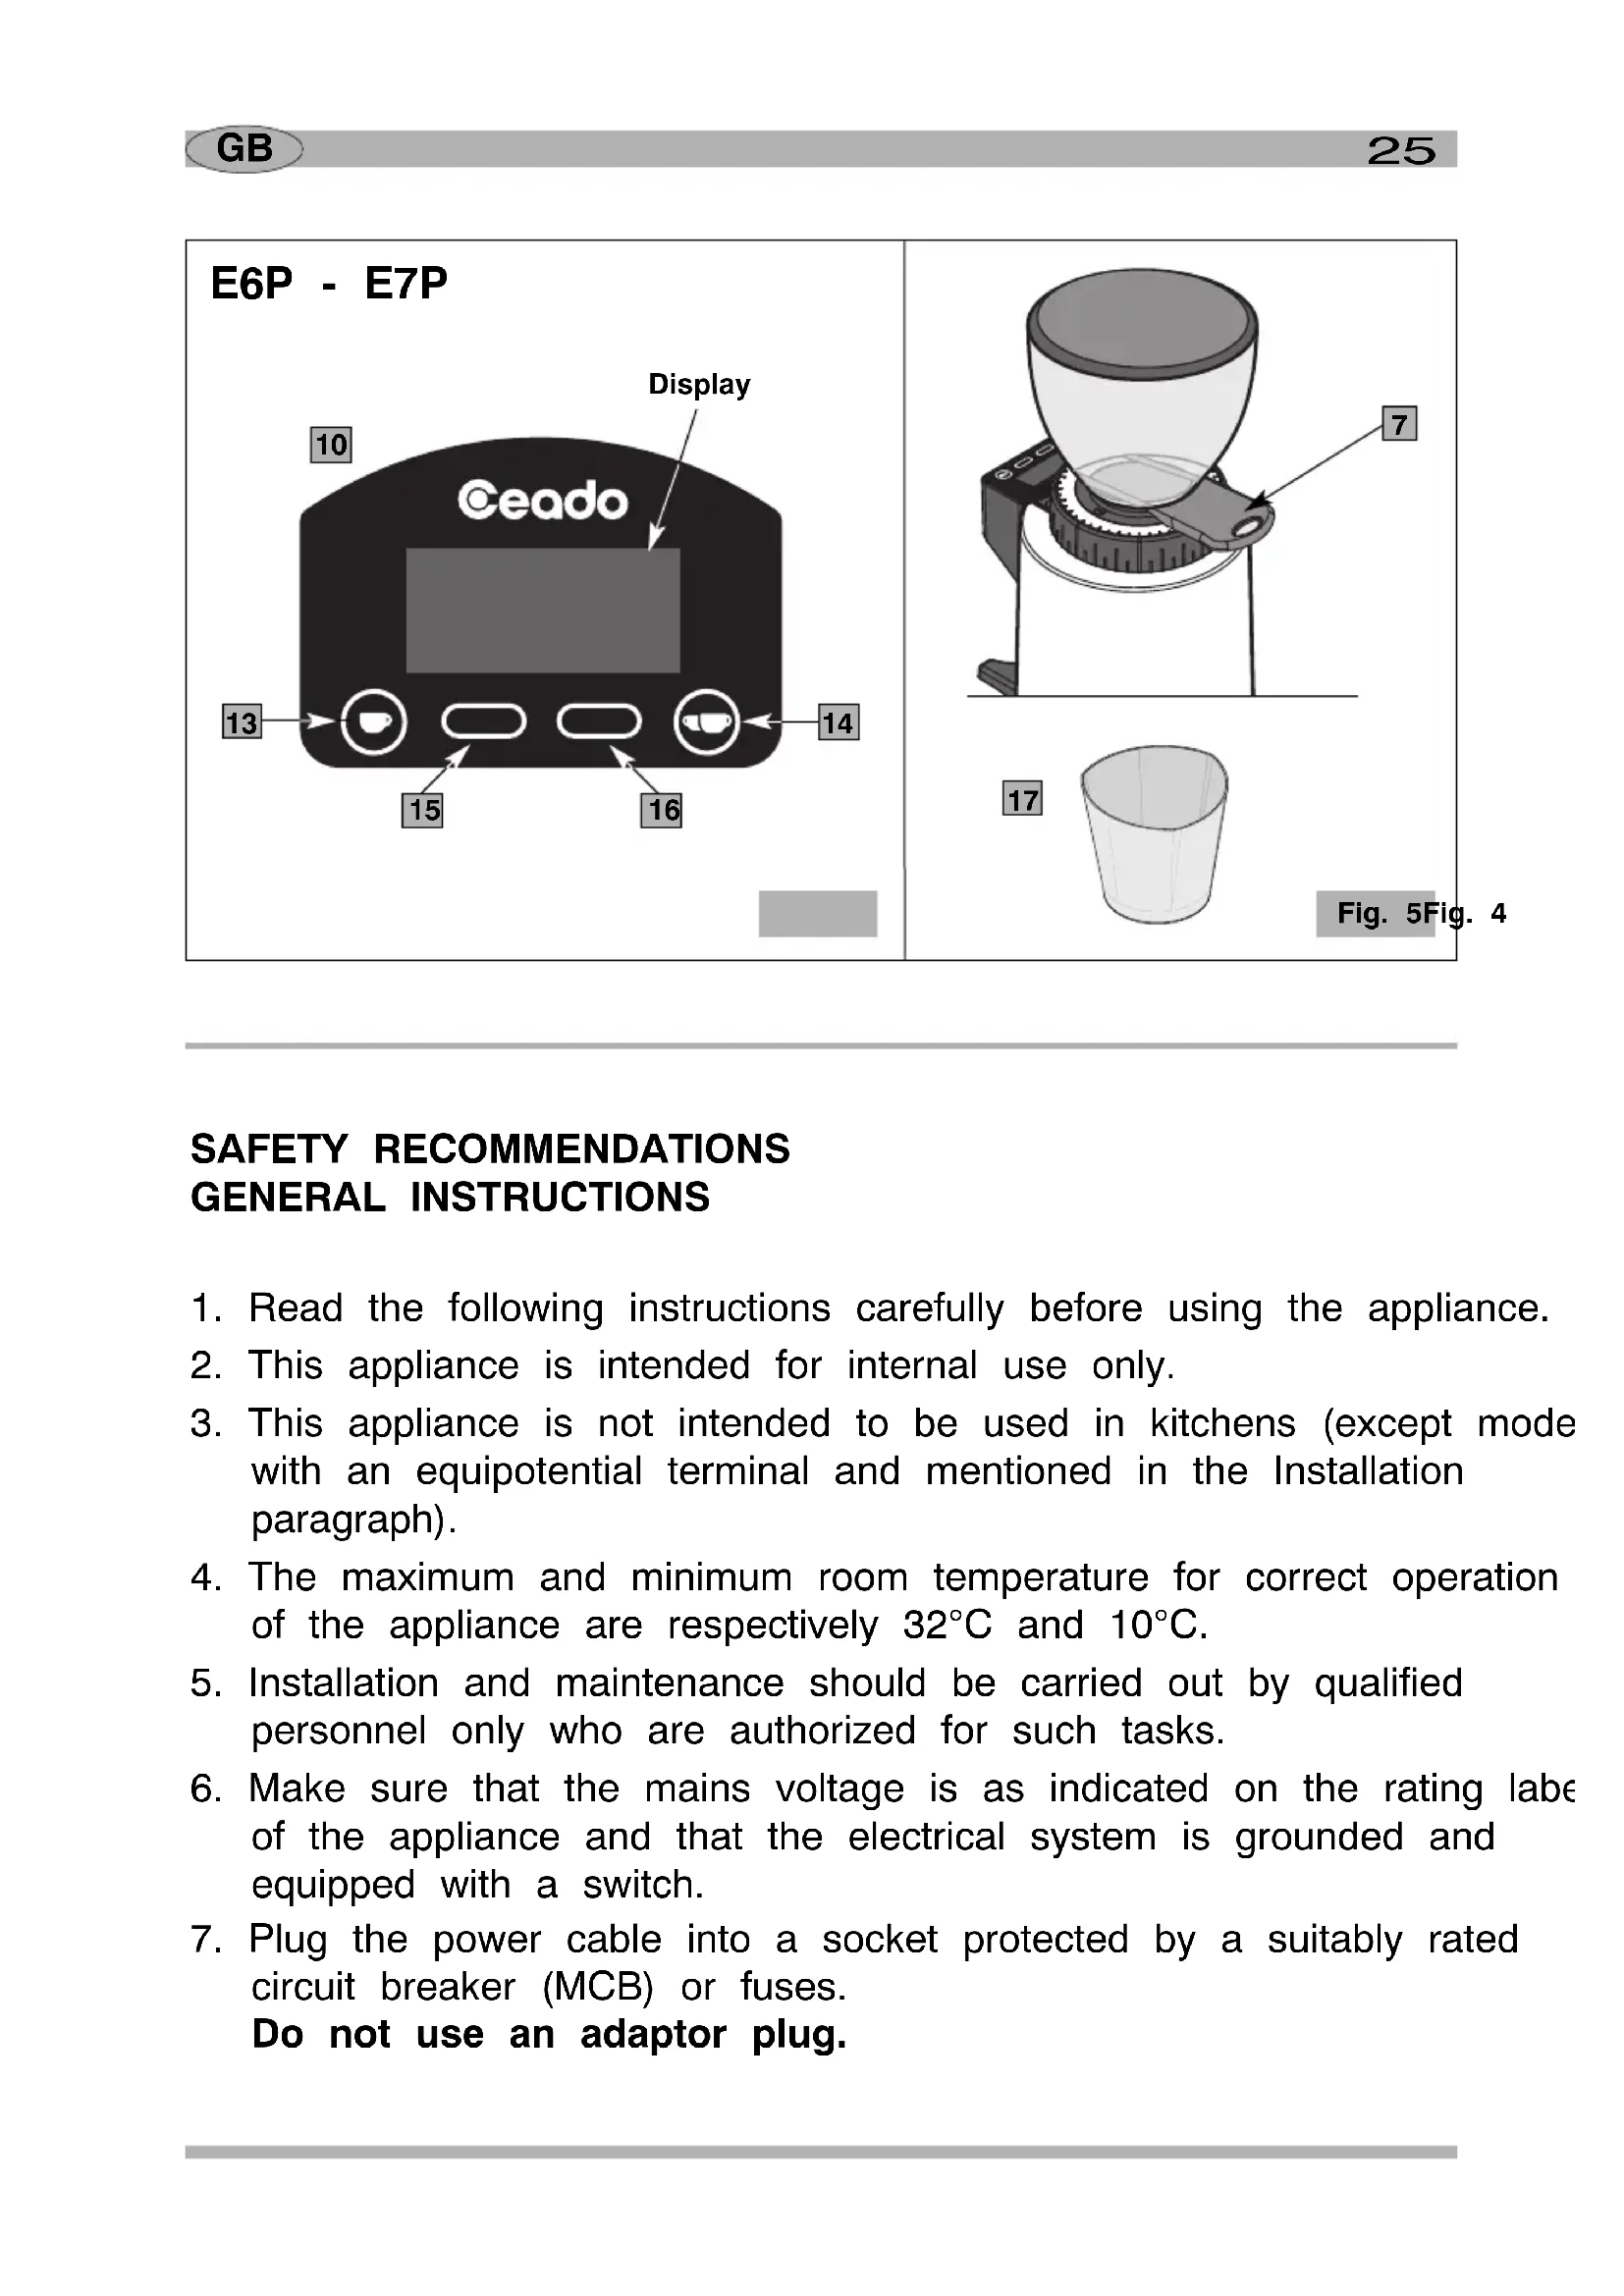
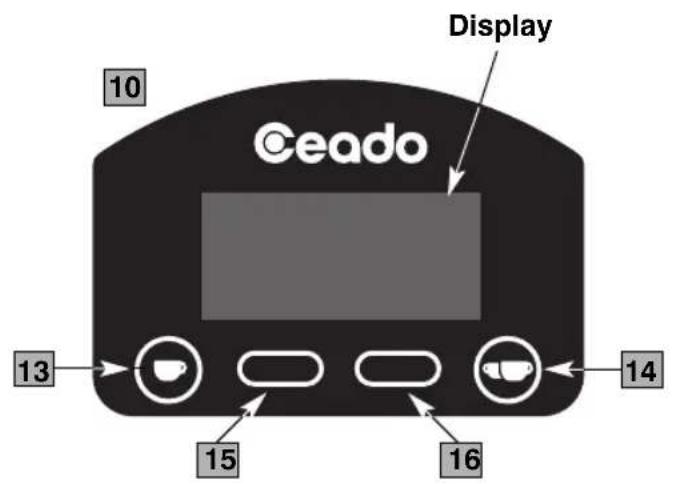
10 Control panel (E6P - E7P)
11 Hopper lid
12 Tray
13 Single shot selection (start)
14 Double shot selection (start)
15 Left multifunction button
16 Right multifunction button
17 Container (only in filter models)
E7P
natural_image
Diagram of a coffee maker with labeled parts, showing a conical funnel and mechanical base (no text or symbols on the device itself)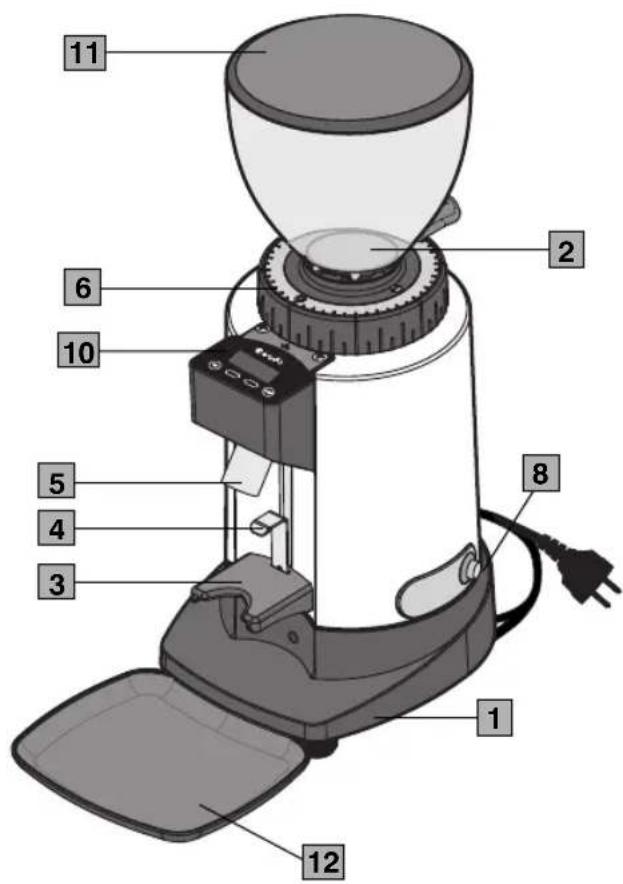
text_image
1 2 6 10 5 4 3 8 1 12 11Fig. 1
text_image
E5P 9 Fig. 3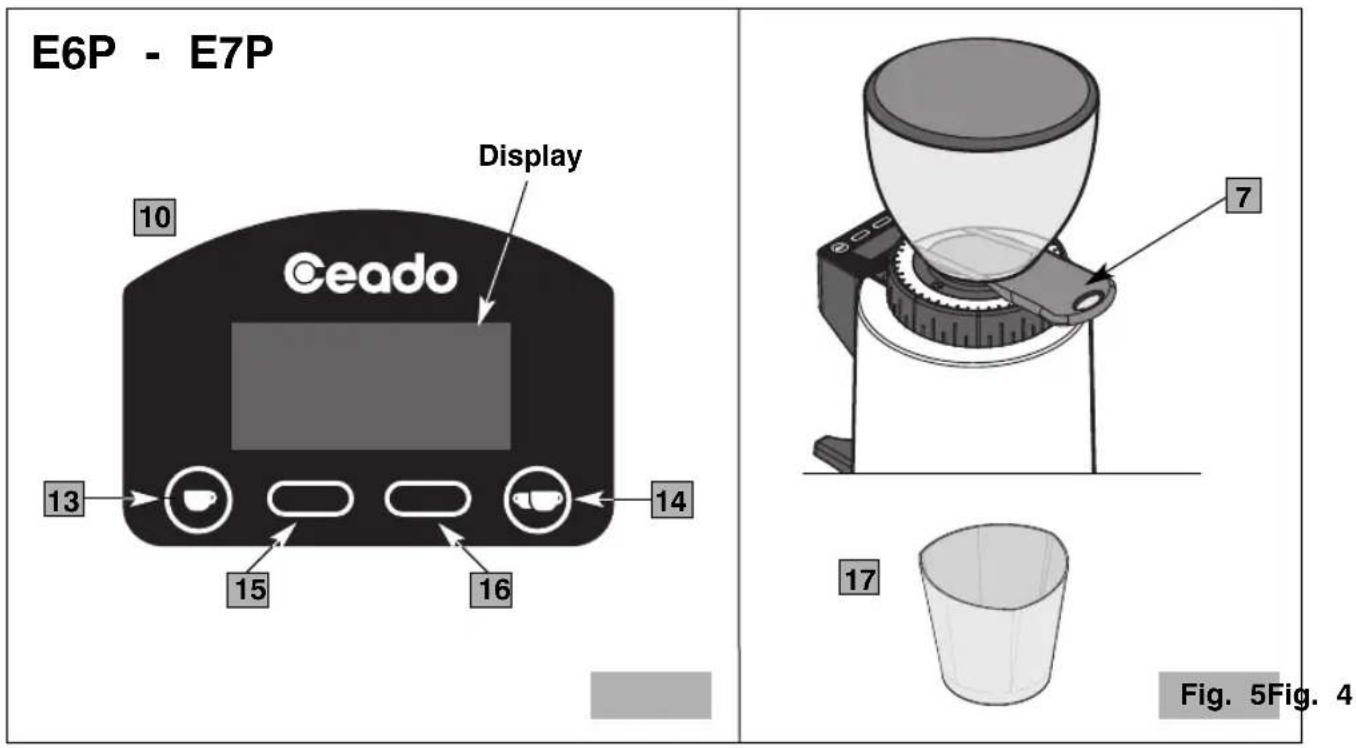
SAFETY RECOMMENDATIONS GENERAL INSTRUCTIONS
- Read the following instructions carefully before using the appliance.
- This appliance is intended for internal use only.
- This appliance is not intended to be used in kitchens (except mode with an equipotential terminal and mentioned in the Installation paragraph).
- The maximum and minimum room temperature for correct operation of the appliance are respectively 32^ C and 10^ C.
- Installation and maintenance should be carried out by qualified personnel only who are authorized for such tasks.
- Make sure that the mains voltage is as indicated on the rating label of the appliance and that the electrical system is grounded and equipped with a switch.
-
Plug the power cable into a socket protected by a suitably rated circuit breaker (MCB) or fuses. Do not use an adaptor plug.
-
Install the appliance in a DRY, PROTECTED place, far from water sprays and jets, heat sources, open flames and inflammable substances.
-
Place the appliance on a flat, horizontal, stable surface where it cannot tip over. The highest resting surface (bean hopper) must be at a height of not less than 1.5 m.
-
This appliance is intended for professional use, and should therefore be used by experienced personnel only who are trained for this purpose. This appliance is NOT intended for industrial food processing in mass production.
-
This appliance is not intended for use by persons (including children) with reduced physical, sensory or mental abilities, or without experience and knowledge, unless they have been instructed in the use of the appliance and are under the supervision of a person who is responsible for their safety.
CHILDREN SHOULD BE SUPERVISED SO AS TO ENSURE THAT THEY DO NOT PLAY WITH THE APPLIANCE.
-
Never use this appliance for purposes other than grinding coffee beans. Any other use is dangerous. Do not operate without hopper and lid in place.
-
Always work under safe conditions: do not use the appliance with wet hands or feet. Do not use outdoors.
-
Keep the original package for possible future use. It is the most suitable protection against damage during transport.
-
In case of fire use 2 Extinguishers. Do not use water or powder extinguishers.
-
Never place the appliance in water!
-
Do not disassemble the appliance or attempt to perform any repairs inside it.
-
Always unplug the appliance before performing any maintenance or cleaning and when it is not in use.
-
Never pull the appliance by the cord to move it. Never unplug it by pulling the cord or touching it with wet hands.

If the power cable is damaged it must be replaced by the manufacturer or by the technical assistance service, or at any rate by a person with similar qualifications, so as to prevent all risks.
- WARNING: Never place any utensils, metal or other hard materials in the bean hopper. This is dangerous and could cause damage.
- Do not use the appliance if it is damaged or has loose parts. Immediately contact an authorized Service Center.
- Noise: the appliance does not exceed 70 dB.
The appliance complies with European regulation CE 1935/2004 and subsequent updates.
Note: Due to statistical tests on the product in the factory, some grounds may be found in the appliance.
SAVE THESE INSTRUCTIONS
To consult these instructions on-line, visit the site www.ceado.com
CE
The EC declaration of conformity for this appliance is available in the Products section of our website www.ceado.com.
INSTALLATION
Comply with the safety recommendations indicated above and hereafter when installing the appliance.
For the installation of the appliance, qualified personnel must be present who are able to check the fineness of the grind.
-
Make sure that the mains voltage is as indicated on the rating label of the appliance and that the electrical system is grounded and equipped with a switch.
-
Install the appliance in a DRY, PROTECTED place, far from water sprays and jets, heat sources, open flames and inflammable substances.
Place the appliance on a flat, horizontal, stable surface where it cannot tip over.
- Put the tray in its housing to keep the work area as clean as possible.

Before connecting the plug to the power socket, make sure that the ON-OFF switch (8 Fig. 1) is in position "0" (OFF).
-
Plug the power cable into a socket protected by a suitably rated circuit breaker (MCB) or fuses. Do not use an adaptor plug.
-
Stretch the power cable out to full length. Do not let it pass over sharp edges or hot surfaces. Do not let oil spill on it. Do not let the power cable hang loose from the counter on which the appliance stands.
-
Make sure that the bean hopper is correctly positioned and that its shutter (7 Fig. 5) is completely open (to the last click).
PREPARATION AND USE

Before first use: rinse all of the parts that will have contact with food in running water i.e.: bean hopper, lid, shutter, tray.
SWITCHING ON
1 Fill the hopper with coffee beans and close the lid.
MODEL E5P
2 Position the filter-holder on the fork (3 Fig. 1) blocking it under the support (4 Fig. 1), adjust beforehand according to the model of filter-holder used.
3 Press the dispensing button (9 Fig. 3).
4 Hold down the button until the desired amount of coffee has been ground.
MODEL E6P - E7P
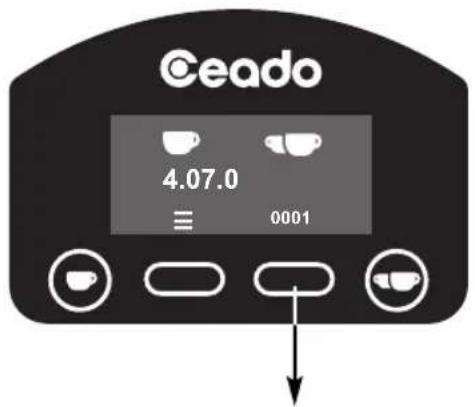
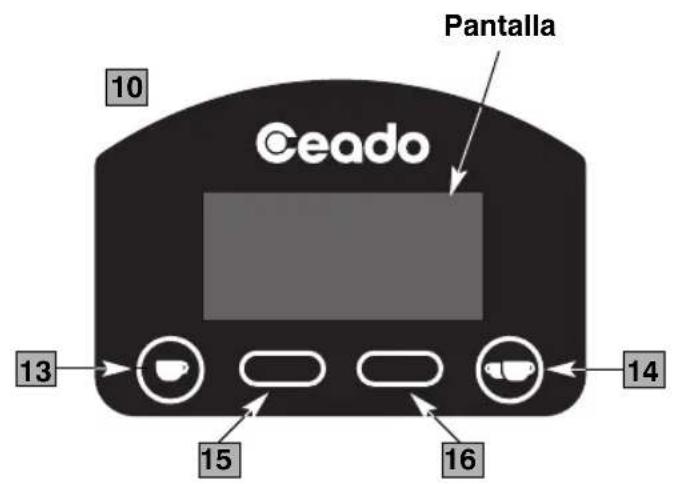
2 Turn the ON-OFF switch to position "I" (8 Fig. 1). The control panel display (10 Fig. 1) lights (see Fig. 6).
3 Position the filter-holder on the fork (3 Fig. 1) blocking it under the support (4 Fig. 1), adjust beforehand according to the model of filter-holder used.
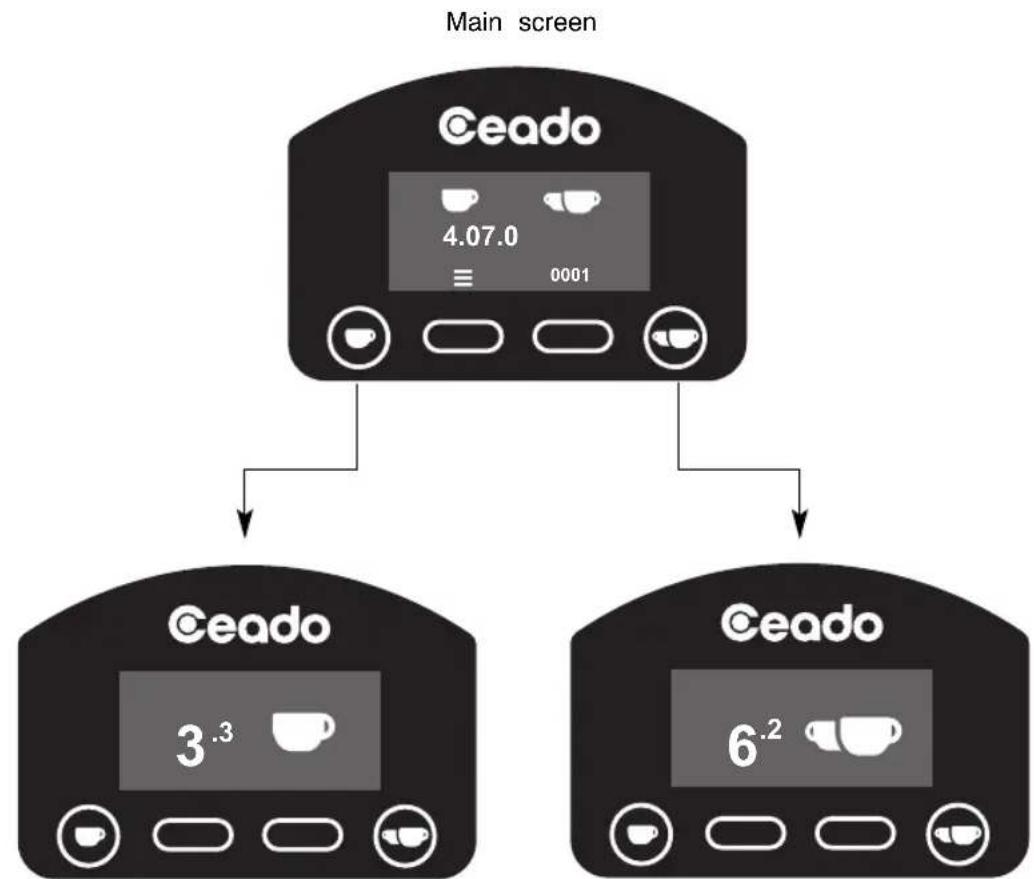
Main screen

text_image
Ceado 4.07.0 ≡ 0001Fig. 6
Automatic operation (see Fig. 7)
4 Press the button (13 Fig. 4) to grind the amount of coffee necessary for a single shot or the button (14 Fig. 4) for a double shot.
flowchart
graph TD
    A["Main screen"] --> B["CEado"]
    B --> C["3.3 cup icon"]
    B --> D["6.2 cup icon"]
    B --> E["0001 weight icon"]
    B --> F["4.07.0 weight icon"]
Single shot dispensing Double shot dispensing
Fig. 7
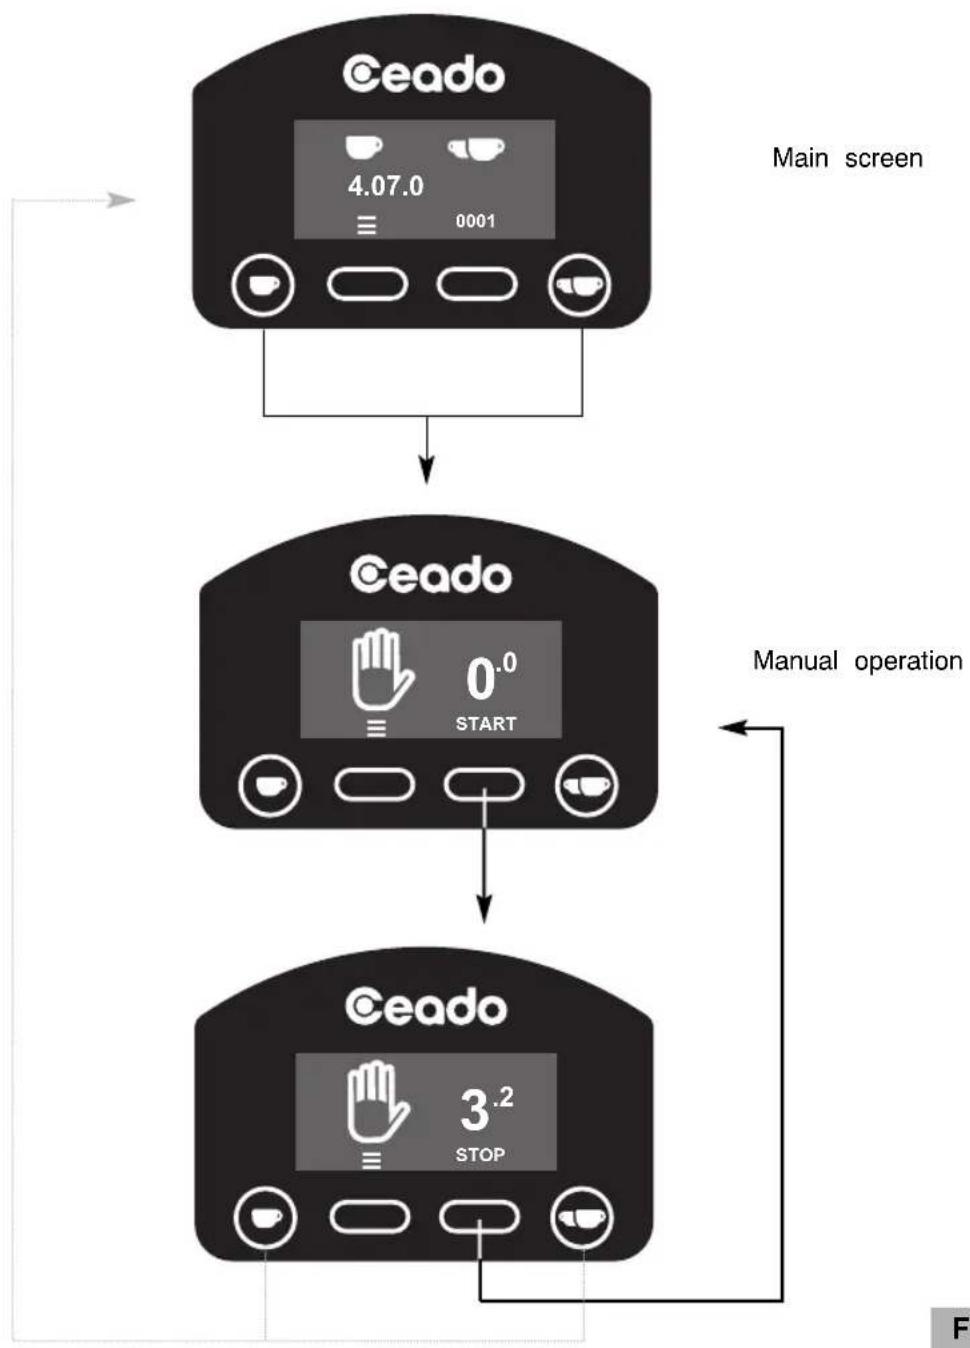
Manual operation (see Fig. 8)
4 To grind coffee continuously, without any time setting, press the buttons and


(13, 14 Fig. 4) simultaneously to switch to the manual operation screen.
5 Press the "START" button to grind.
6 When the desired quantity of coffee has been ground, press the "STOP" button.
NOTE! Keep the filter-holder in position until dispensing is completed!
7 To exit the manual operation screen, press one of the buttons and


flowchart
graph TD
    A["Main screen"] --> B{Step 1}
    B -->|Start| C["Manual operation"]
    B -->|Stop| D["Ceado"]
    C --> E["End"]
Fig. 8
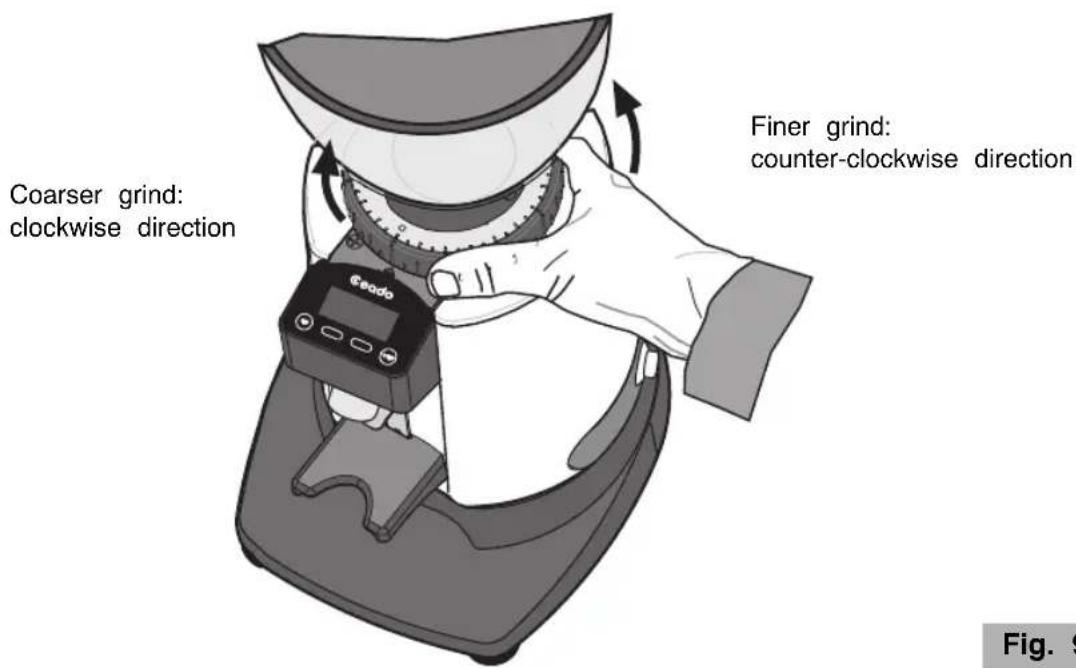
REGULATING GRINDING
When it leaves the factory the machine has a standard setting, but it may be necessary to adjust grinding further due to various external factors such as the type of mixture used, the humidity, temperature, or the particular distribution requirements of the espresso coffee machine.
The degree of grinding may be further corrected by shifting the grinding adjustment disc (6 Fig. 1) at the base of the hopper (see Fig. 9).
• To obtain a finer grind, move the grinding adjustment disc in a counter-clockwise direction.
• To obtain a coarser grind, move the grinding adjustment disc in a clockwise direction.

Always take care to move the disc with the motor turning and empty (without coffee between the burrs).
NOTE! It is recommended to grind small amounts of coffee, letting the burrs empty with every regulating attempt, by opening and closing the shutter (7 Fig. 5) each time.
text_image
Coarser grind: clockwise direction Finer grind: counter-clockwise direction Fig. 9Fig. 9
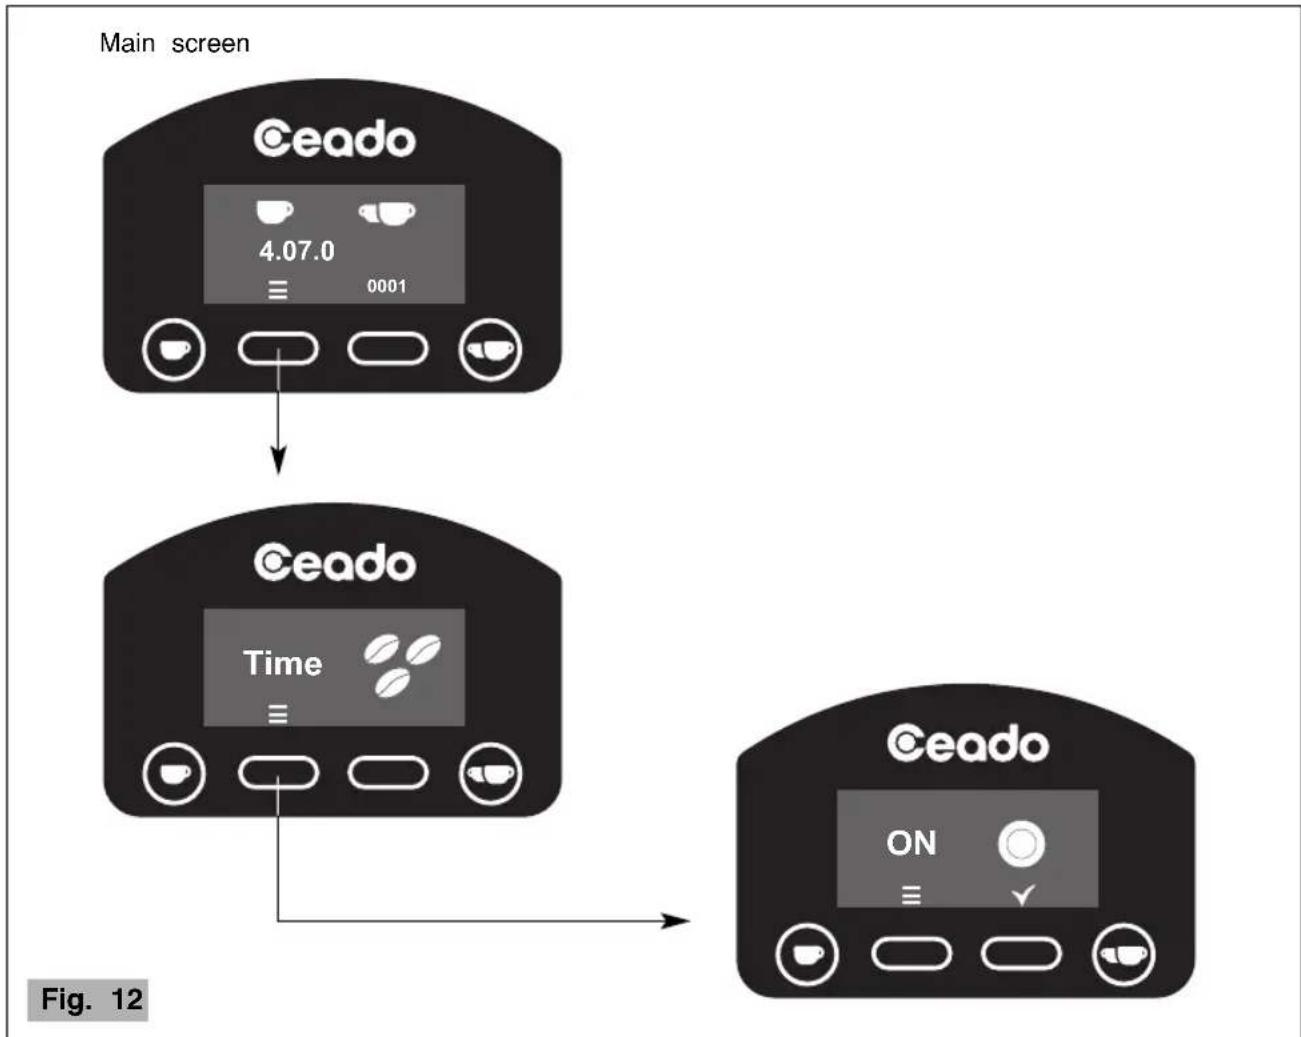
SETTING THE GRINDING TIMES (E6P - E7P) - see Fig. 10 and Fig. 11
Note: Due to the shape and design of the burrs, for the first use only, a short run-in period of grinding coffee beans is necessary to obtain a consistent weight of the shot.
To change the grinding time of both shots, you must enter the "Time" mode by pressing the button
(15 Fig. 4) in the main screen (in the "Time" screen, if nothing is pressed, after three
seconds you return to the main one).
To set the single shot press the button (13 Fig. 4), and for the double shot press the button

(14 Fig. 4).
Once you are in setting mode, pressing button decreases the time by 0.1 seconds while
pressing button increases it by 0.1 seconds.
After 3 seconds of inactivity (time bar decreases until it disappears), the confirmation screen appears confirming that the setting has been carried out correctly and the coffee grinder is ready operate with the new set time and you return to the main screen.
If you want to quit without waiting 3 seconds, press the relative


Main screen
text_image
Ceado 4.07.0 ≡ 0001
text_image
Ceado Time ≡Fig. 10

flowchart
graph TD
    A["Ceado"] --> B["Time bar (3 seconds)"]
    B --> C["Ceado 3.7 - +"]
    B --> D["Ceado 6.4 - +"]
    C --> E["Ceado"]
    D --> E
    E --> F["Ceado 4.07.0 ≡ 0001"]
Fig. 11
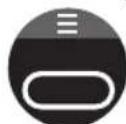
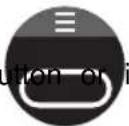
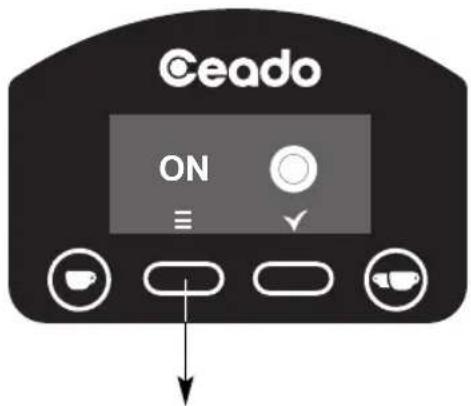
START BUTTON SETTING (E6P - E7P) - see Fig. 12 and Fig. 13
According to the factory setting (pulse mode ON), the appliance distributes coffee with the simple
pressing of the start button (1) Fig. 4) for the single shot and (14) Fig. 4) for the
double shot.
If this button is pressed again while dispensing a shot, the motor stops, the system goes into pad status and the display shows the time remaining to complete the shot. At this point, to complete dose just press the relative start button again (13 or 14 Fig. 4).
If, instead, you want no longer to end the shot, for that single press the button of the double sh and for the double the button of the single one.
However, it is possible to change this function by programming the start button so that the coffee dispensed as long as the relative start button remains pressed and stops when it is released (pulse mode OFF).
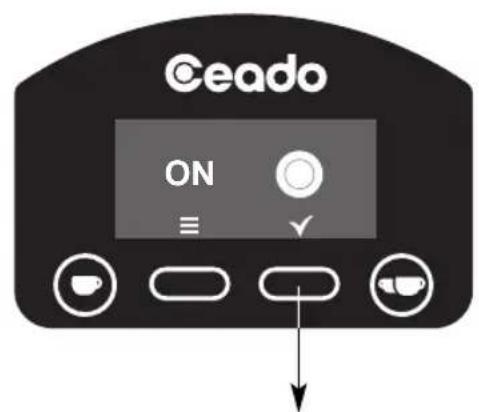
For change the operating mode of the start button, press the button (15 Fig. 4) in the
main screen twice to enter the start button screen (if nothing is pressed, you will return to the main screen after three seconds).
text_image
Main screen Ceado 4.07.0 ≡ 0001 Ceado Time ≡ Ceado ON ≡ ✓ Fig. 12In the start button screen, pressing the button "OFF".

you can set the pulse function "ON" or Once the desired mode has been selected, quit by pressing the button or if nothing is pressed, after three seconds you return to the main screen.
text_image
Ceado ON ≡ ✓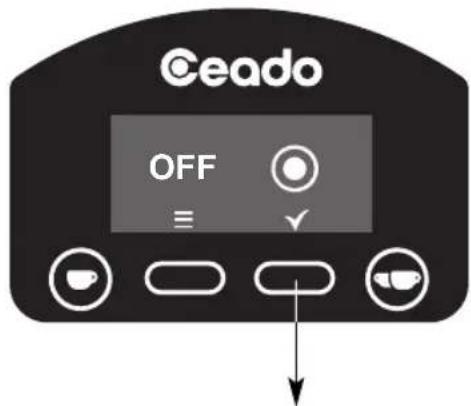
text_image
Ceado OFF ≡ ↓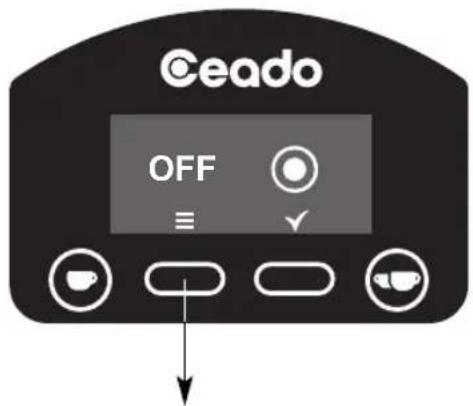
text_image
Ceado OFF ≡ ✓Main screen Main screen
text_image
Ceado ON ≡ ✓Fig. 13
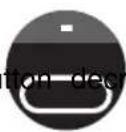
DISTRIBUTED SHOT COUNTERS (E6P - E7P) - see Fig. 14
The coffee grinder has a general counter in which it stores the number of shots distributed since it left the factory (this value cannot be reset) and a partial counter for the number of shots distributed since it was last reset by the user. For each type of counter, a distinction is made between the number of single and double shots.
Note: Due to statistical tests on the product in the factory, some of the counters n different from zero.
- Reading the counters
Press the button (16 Fig. 4) in the main screen to enter the counters screen (if nothing is pressed, you will return to the main screen after three seconds).
- The display will show first the partial counter of the total shots (single shots + double shots) distributed since the last reset.
By continuing to press the button (16 Fig. 4), the display will show the following screens
in sequence:
- the partial counter of the single shots distributed since the last reset;
- the partial counter of the double shots distributed since the last reset;
- the general counter of total shots (single shots + double shots);
- the general counter of single shots;
- the general counter of double shots.
With a further touch, you return to the main screen.
To reset a partial counter, hold down the button for 3 seconds.

text_image
Ceado 4.07.0 ≡ 0001
text_image
Ceado 16 0001RESET
text_image
Ceado 6 0001RESET
text_image
Ceado 10 0001RESET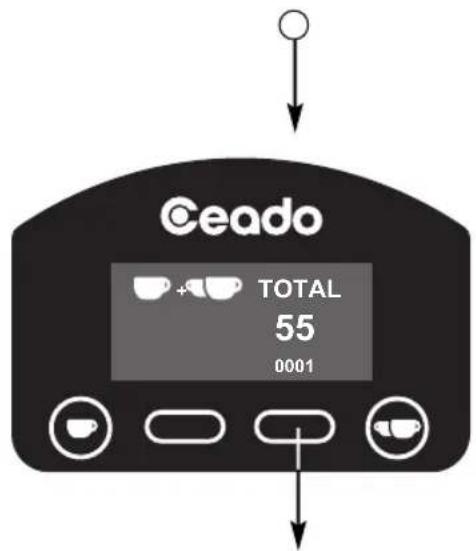
text_image
Ceado TOTAL 55 0001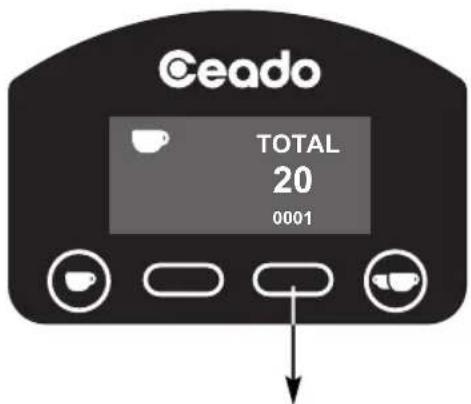
text_image
Ceado TOTAL 20 0001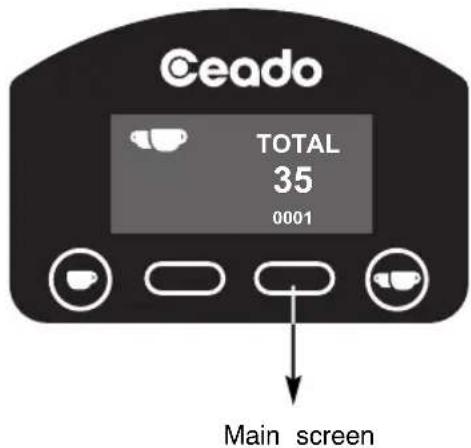
text_image
Ceado TOTAL 35 0001 Main screenFig. 14
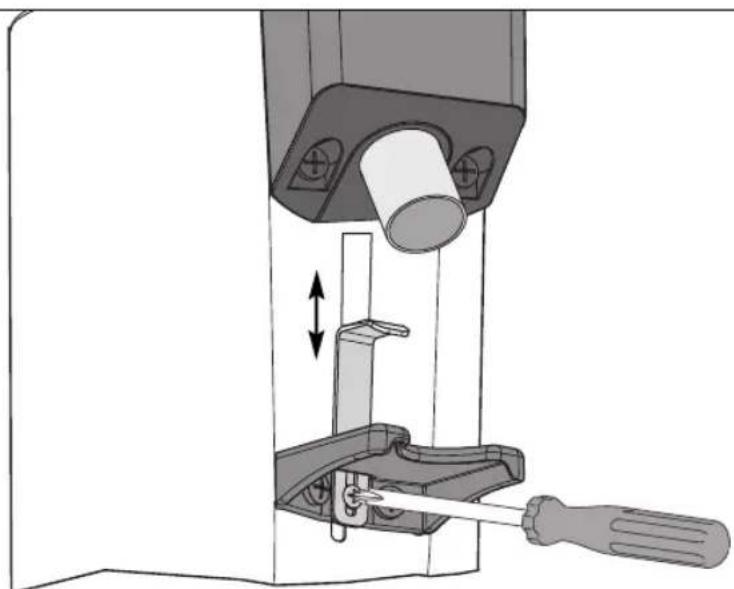
ADJUSTING THE FILTER-HOLDER SUPPORT
The filter-holder support has been designed to work with the different holders found on the most widespread coffee machines on the market and, in the "filter coffee" versions, it allows you to have the special container provided.
Using a medium size Phillips screwdriver, slacken the support retaining screw, adjust its height and then tighten the screw again (see Fig. 15).
The optimum adjustment is the one that supports the filter-holder in a perfectly horizontal position.
natural_image
Mechanical assembly diagram showing a tool interacting with a mechanical component, no text or symbols presentFig. 15
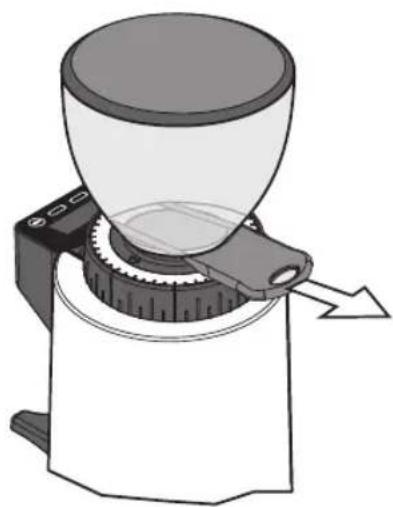
WARNINGS AND SUGGESTIONS

Never operate without hopper and lid in place.

Make sure that shutter is completely open (to the last click) (see Fig. 16).
When the grinder is not to be used during the time when the business is closed, it should always be switched off with the main switch.

Put only coffee beans in the hopper, not ready-ground coffee or other substances
natural_image
Diagram of a coffee maker with a funnel and mechanical base, showing a cutting tool (no text or symbols present)Fig. 16
CLEANING
It is important to keep the appliance clean and good working order to ensure optimum quality the products and long life of the appliance.
Cleaning of the appliance must be carried out by persons with knowledge and practical experience of the appliance.
At the end of each working day, clean the outer surfaces dirty with coffee (motor housing, tray, discharge opening etc.). Clean the appliance completely at least once a week.

Always disconnect the plug of the appliance from the power socket before cleaning it.

Clean the motor housing and the tray with a cloth dampened with water or alcohol. Wipe with a dry cloth.

Never put the appliance under running water and never immerse in water.
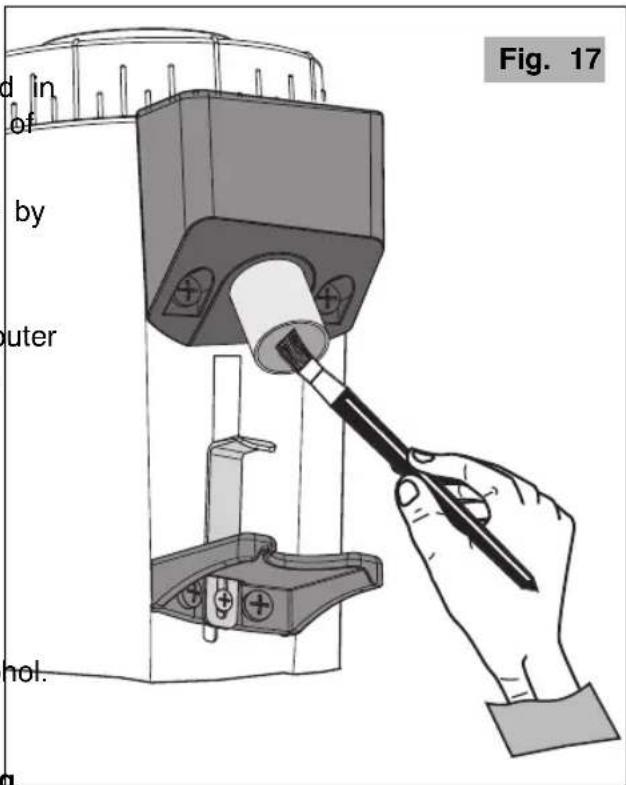
text_image
d in of by outer hol. Fig. 17Once the hopper has been removed it can be washed with lukewarm water and neutral soap, then rinse it and dry well.
- Use a brush or a paintbrush (Fig. 17) to clean the most hidden areas inside the unit and a dry cloth for the other surfaces.
MAINTENANCE

Maintenance must be carried out exclusively by qualified technical personnel.
Care for the mechanical and electrical parts of the appliance is indispensable in order to guarantee their safety and efficiency. If any parts need replaced, authentic spare parts must always be used.
TROUBLESHOOTING
(See Table on the next page)
In case of any malfunction, defect of the appliance or if you suspect any breakage after a fall, unfit the appliance immediately.
If you are unable to solve the problem referring to the table below, contact an Authorized Service Centre.
Only qualified experts should repair the appliance.
We are not liable for any damage caused by repairs not made correctly and/or by unauthorized personnel. In these cases the warranty does not apply.
| Problem | Solution |
| The appliance does not turn on. | Make sure it is plugged in.Make sure the safety circuit breaker is closed.Check that the main switch of the appliance is ON.If the problem occurs itself after a long period of intensive use or overfilling, the motor could be in thermal protection lock! Wait at least 20 minutes and try again. The waiting time can be reduced by putting the appliance in a cool place. |
| The coarseness of the grind is not uniform. | Try grinding very coarsely for a few seconds, then return to the correct setting.Call the Technical Assistance Service to check and change the burrs. |
| The coffee is not coming out of the discharge opening correctly. | Check that the cafee discharge opening is free. |
| The motor gets blocked. | If the motor gets blocked due to incorrect regulation of grinding or to the presence of a foreign body in the burrs, try increasing to the coarsest grain size by turning the grinding adjustment disc clockwise (6 Fig. 1).If this is not enough, switch off the appliance, disconnect the plug from the socket and consult technically qualified personnel. |
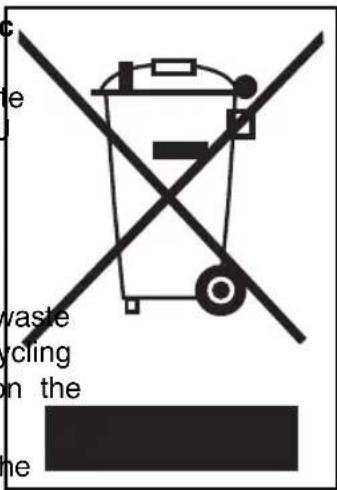
DISPOSAL
Correct disposal of this product (waste electrical and electronic equipment)
(Applicable in the European Union and other countries with separate collection systems in conformity with European Directive 2012/19/EU and subsequent updates)
This product has been made from high-quality parts and materials, which can be re-used and recycled.
Therefore, do not throw the product away with normal household waste at the end of its working life. Take it to a collection point for recycling electrical and electronic devices. This is indicated by this symbol on the product and in the operating manual.
Please contact your local government office for information about the exact location of the closer collection point.
text_image
e vaste crcling in the meWARRANTY
This product is guaranteed against faulty materials and workmanship.
The warranty period may vary according to local laws or commercial uses of the country where the product is marketed. Therefore, please contact the retailer from whom the product was purchased.
During the warranty period, this product can either be repaired or replaced, at the manufacturer's discretion, at no additional cost only if it has been used according to the instructions in this use a maintenance manual.
If the products needs maintenance or repairs during the warranty period, contact your retailer for shipping instructions. The product should be shipped in its original package or other suitable packing.
The warranty does not apply in case of neglect, misuse, abuse or unauthorized repairs. This warranty does not apply to parts subject to deterioration through normal use such as wear to the burrs and to the electrical parts.
The warranty is limited to the costs of repair or replacement of the product or its defective parts, an amount equivalent to the price paid for its purchase. No additional requests of damages will be available to the purchaser.
The manufacturer will not accept any liability and the warranty will be invalidated if there is a failure to follow these instructions and the technical and/or safety standards in the country where the appliance is to be used.
In any case these instructions cannot cover every possible event and the user is recommended to use the appliance responsibly.
THE MANUFACTURER RESERVES THE RIGHT TO MAKE ANY ALTERATIONS TO THE APPLIANCE WITHOUT NOTICE
MOULIN À CAFÉ E5P - E6P - E7P
Composants principaux (Fig. 1, Fig. 2, Fig. 3, Fig. 4, Fig. 5)
natural_image
Diagram of a coffee maker with labeled parts, showing a conical funnel and mechanical base (no text or symbols on the device itself)
text_image
1 2 6 10 5 4 3 8 1 12 11Fig. 1

text_image
E5P 9 Fig. 3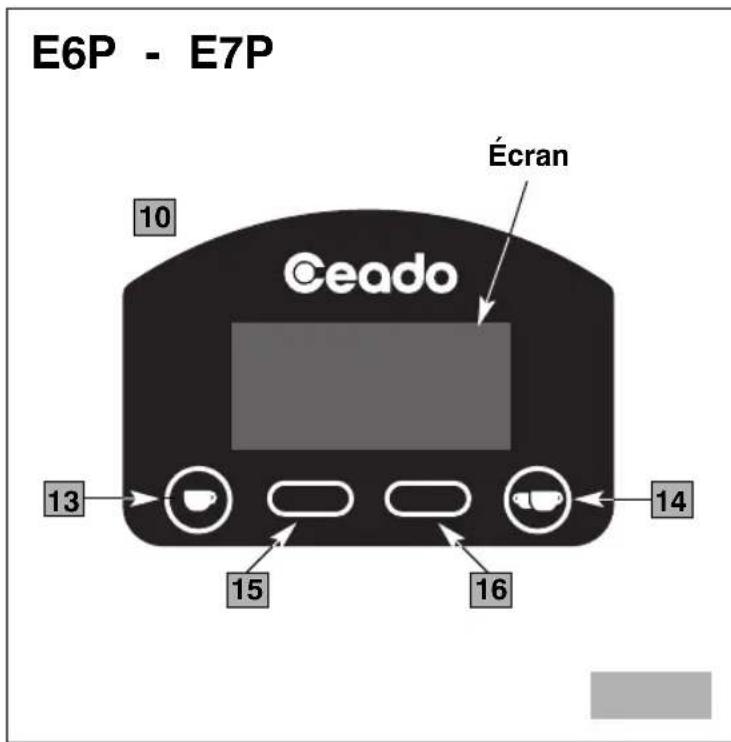
text_image
E6P - E7P 10 Écran Ceado 13 14 15 16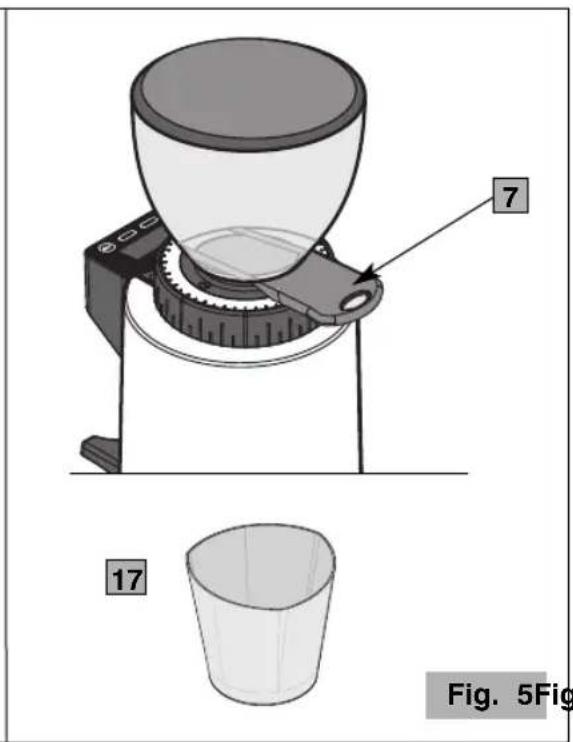
text_image
7 17 Fig. 5FigNORMES DE SÉCURITÉ INSTRUCTIONS GÉNÉRALES
natural_image
Mechanical assembly diagram showing a tool interacting with a mechanical component, no text or symbols presentFig. 15
AVERTISSEMENTS ET CONSEILS

CONDITIONS DE GARANTIE
natural_image
Diagram of a coffee maker with a conical cup and mechanical base, labeled with number 7 (no text or symbols on the diagram itself)17

Abb. 5Abb. 4
natural_image
Mechanical assembly diagram showing a tool interacting with a mechanical component (no text or symbols visible)Abb. 15
WARNUNGEN UND TIPPS

natural_image
Diagram of a mechanical device with a conical funnel and rotating base, showing no text or symbolsAbb. 16
REINIGUNG
natural_image
Diagram of a coffee maker with labeled parts, showing a conical funnel and mechanical base (no text or symbols on the device itself)
text_image
1 2 6 10 5 4 3 8 1 12 11Fig. 1

text_image
E5P 9 Fig. 3E6P - E7P
text_image
Pantalla 10 Ceado 13 14 15 16
natural_image
Mechanical device diagram showing a conical funnel mounted on a base with a labeled component (no text or symbols present)17
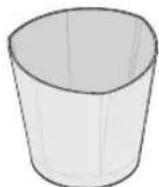
Fig. 5Fig. 4
natural_image
Mechanical assembly diagram showing a tool interacting with a mechanical component (no text or symbols visible)Fig. 15
natural_image
Diagram of a coffee maker with a funnel and mechanical base, showing a rotating handle (no text or symbols)Fig. 16