Niki kid - High chair Osann - Free user manual and instructions
Find the device manual for free Niki kid Osann in PDF.



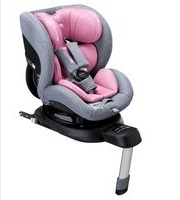
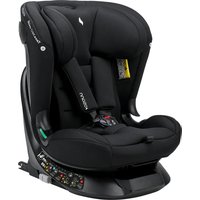
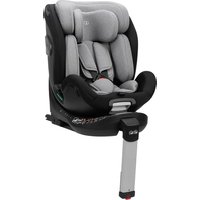
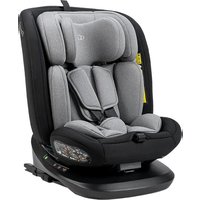
| Product Type | Child Restraint System (car seat) |
| Brand | Osann |
| Model | Niki kid |
| Category | i-Size universal |
| Child height | 76 to 150 cm |
| Child weight | Up to 18 kg (5-point harness) / up to 36 kg (3-point belt) |
| Minimum age (forward-facing) | 15 months |
| Installation | Isofix + support leg or 3-point belt |
| Mounting direction | Rear-facing (76-105 cm) and forward-facing (76-150 cm) |
| Rotation | Yes, 360° swivel seat |
| Recline positions | 1 rear-facing position, 4 forward-facing positions (depending on height) |
| Side protection | Foldable side protection |
| Harness | Integrated 5-point harness (up to 105 cm), then vehicle 3-point belt |
| Headrest | Height adjustable |
| Support leg | Telescopic, height adjustable |
| Isofix | Isofix connectors with green indicators |
| Seat weight | Approx. 12 kg (estimate) |
| Dimensions (L x W x H) | Approx. 65 x 45 x 70 cm (estimate) |
| Cleaning | Machine wash at 30°C, delicate cycle |
| Cover material | Washable fabric |
| Standards | ECE Regulation No. 129 (i-Size) |
| Warranty | 2 years (according to legislation) |
Frequently Asked Questions - Niki kid Osann
User questions about Niki kid Osann
0 question about this device. Answer the ones you know or ask your own.
Ask a new question about this device
Download the instructions for your High chair in PDF format for free! Find your manual Niki kid - Osann and take your electronic device back in hand. On this page are published all the documents necessary for the use of your device. Niki kid by Osann.
USER MANUAL Niki kid Osann
natural_image
Close-up of a smiling child with curly hair and teeth, wearing a black jacket with white logo (no text or symbols on the child or background)natural_image
Illustration of a baby car seat with a red arrow indicating the seat area (no text or symbols present)
natural_image
Illustration of a car seat with airflow arrows and a close-up inset showing the seat being adjusted (no text or symbols)natural_image
Diagram of two mechanical clamping or bracketing mechanisms with red directional arrows indicating motion (no text or symbols)
natural_image
Diagram showing a mechanical assembly with a down force applied to a seatbelt (no text or symbols present)natural_image
Diagram of a mechanical or architectural component with no visible text, numbers, or symbols
natural_image
Hand holding a black electronic device with a red indicator light, inside a vehicle (no text or symbols visible)natural_image
Illustration of a baby car seat with a red upward arrow indicating compression or lifting (no text or symbols present)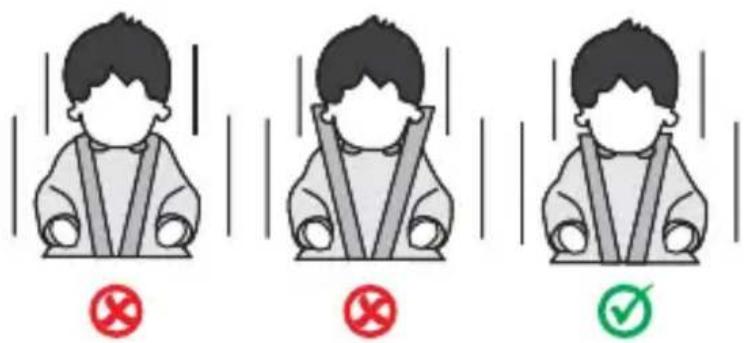
natural_image
Illustration of a baby car seat with a red arrow pointing to the seat area (no text or symbols present)Standfuß
natural_image
Diagram showing a belt buckle and its bidirectional lock mechanism (no text or symbols)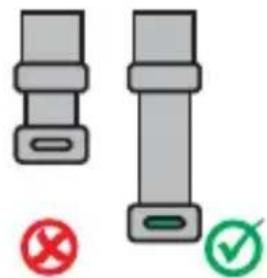
natural_image
Two gray belt buckle designs with red and green checkmarks indicating selection or confirmation (no text or symbols)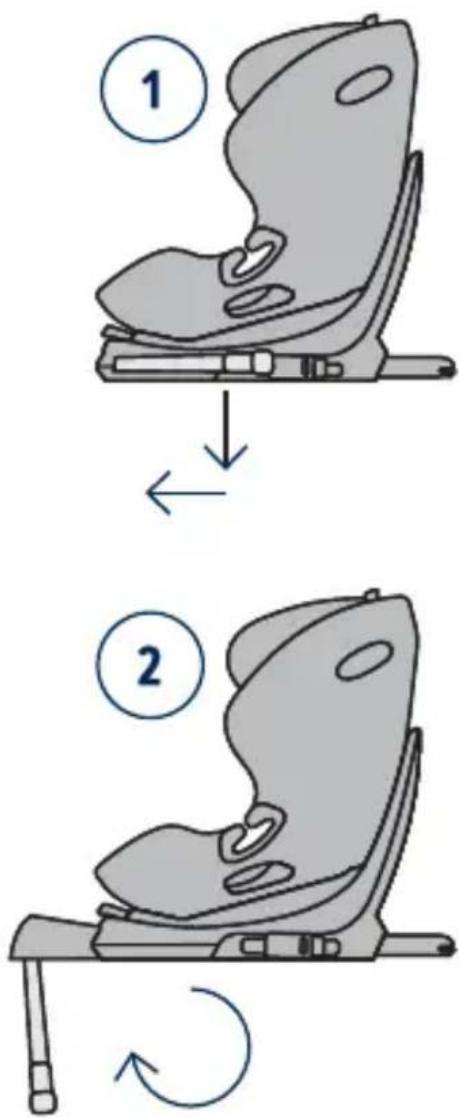
Isofix-Konnektoren

natural_image
Circular diagram with a green arrow pointing to a curved structure, labeled 'a' (no text or symbols beyond the label)
natural_image
Diagram of a mechanical component with a green vertical line and label 'b' (no text or symbols beyond the label)natural_image
Orange line drawing of a stylized bird perched on a branch (no text or symbols)
natural_image
Abstract pattern of downward and upward arrows forming a grid-like structure (no text or symbols)Thank you for choosing our Niki kid child car seat.
If you need help with this product, please contact our customer service.
USE
- This product is suitable for children of a height of 76 to 150 cm .
- Rear-facing installation for children between 76 to 105cm in height takes place with the help of the Isofix connectors and the support leg. The child is strapped in with the child car seat's 5-point belt.
- Forward-facing installation for children between 76 and 105 cm in height and a minimum age of 15 months takes place with the help of the Isofix connectors and the support leg. The child is strapped in with the child car seat's 5-point seat belt.
- Forward-facing installation for children between 100 to 150 cm in height takes place with the help of the Isofix connectors. The support leg is not needed in this size class. The child is strapped in with the car's 3-point seat belt. Alternatively, the child car seat in the 100-150 cm size class can also be fitted with the 3-point belt only. Connection with the Isofix connectors is not mandatory, but it is recommended.
IMPORTANT
DO NOT USE THE CHILD CAR SEAT FACING IN THE DIRECTION OF TRAVEL UNTIL THE CHILD HAS REACHED THE AGE OF 15 MONTHS.
EXTREME DANGER
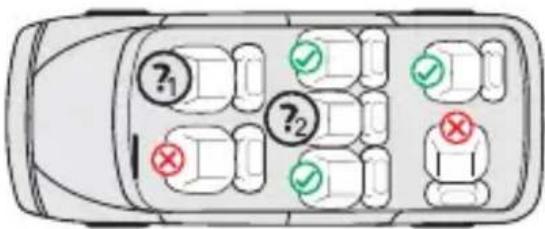
We recommend installing the child car seat on the rear seat of the vehicle. DO NOT attach the child car seat for rear-facing use in the 76 to 105 cm height class to the front seat, where there is an airbag. It may be used on the front seat if the airbag can be deactivated. Please refer to the vehicle manual for more information on this.
WARNING
- This is a child restraint system in the “i-Size” category. This is approved in accordance with ECE Regulation No. 129 for use in i-Size-compatible vehicle seat positions according to the information provided by the vehicle manufacturer in the vehicle user manual.
- This child car seat is only suitable for vehicles that feature Isofix anchor points in accordance with ECE R16 or other equivalent standards.
- For size class 100-150 cm: It is only suitable for vehicles with fixed or automatic 3-point safety belts which comply with UN/ECE Regulation No 16 (or equivalent).
If in doubt, please contact the car seat manufacturer or the retailer.
-
This only applies if the airbag can be deactivated, Isofix anchor points are available and the seat is recognised as i-Size-compatible in the vehicle manual.
-
This only applies if Isofix connectors are available and the seat is recognised as i-Size-compatible in the vehicle manual.
The following table provides information about the fastening devices and methods:
| Size class | Installation direction | Installation Type | Child safety device | |
| 76-105 cm | Rear-facing | Isofix connectors & support leg | i-Size Universal Isofix | 5-point seatbelt for the child seat |
| 76-105 cm | Forward-facing | Isofix connectors & support leg | i-Size Universal Isofix | 5-point seatbelt for the child seat |
| 100-150 cm | Forward-facing | Isofix connectors & 3-point car seat belt | i-Size Booster seat | 3-point car seatbelt |
| 100-150 cm | Forward-facing | 3-point car seatbelt | i-Size Booster seat | 3-point car seatbelt |
WARNING
- Please read through these instructions carefully before use in order to guarantee the safety of your child. Retain the manual. Non-compliance with the instructions in this manual may result in serious injuries to your child.
- The child seat can only be used with its own 5-point belt system for children who weigh under 18 kg and are less than 105 cm in height.
- The child seat CANNOT be used with its own 5-point belt system for children who weigh over 18 kg and are taller than 105 cm.
- The child seat can be installed in rear-facing and forward-facing positions with the Isofix connectors and the support leg. When used with a support leg, the maximum height is 105 cm and the maximum weight is 18 kg. Important: Do not install the child car seat in a forward-facing position until the child is at least 15 months old.
- For Isofix installation: Be sure to read the car manufacturer's manual.
- Do not use load-bearing contact points other than those described in the instructions and marked in the child restraint system.
- Do not use this child car seat at home. It has been designed exclusively for use in a car.
- Do not leave your child unsupervised in the seat at any time.
- Do not place the rear-facing child car seat on the front seat with an activated airbag. This could lead to serious injuries or death.
- The child seat must be replaced if it is exposed to heavy impact in an accident.
- For safety reasons, the child car seat must be secured in the vehicle even when there is no child sitting in the child car seat.
- Always make sure that all belts that attach the child car seat to the vehicle are secure and that all belts that restrain the child are adjusted to fit the child's body. Ensure that the belts are not twisted.
- Items of luggage or other objects that could cause injury in the event of a collision must be properly secured.
- The rigid items and plastic parts of a child restraint system must be positioned and installed so that they cannot get caught by a movable seat or a vehicle door.
- It is important that belts that sit low hold the child's pelvis firmly in place. To avoid the risk of falling, your child should always be strapped in.
- It is dangerous to make changes or additions to the product without approval from the responsible authority. Non-compliance with the installation instructions provided by the manufacturer of the child restraint system is also associated with risks to the safety of your child.
- This child seat is designed for children with a maximum height of 150 cm. Never overload the child seat by transporting more than one child or additional loads in it.
- The child restraint system must not be used without the seat cover.
- The seat cover must not be replaced by a cover other than that recommended by the manufacturer, as this seat cover is an important component of the restraint performance.
SEAT PARTS
Front view
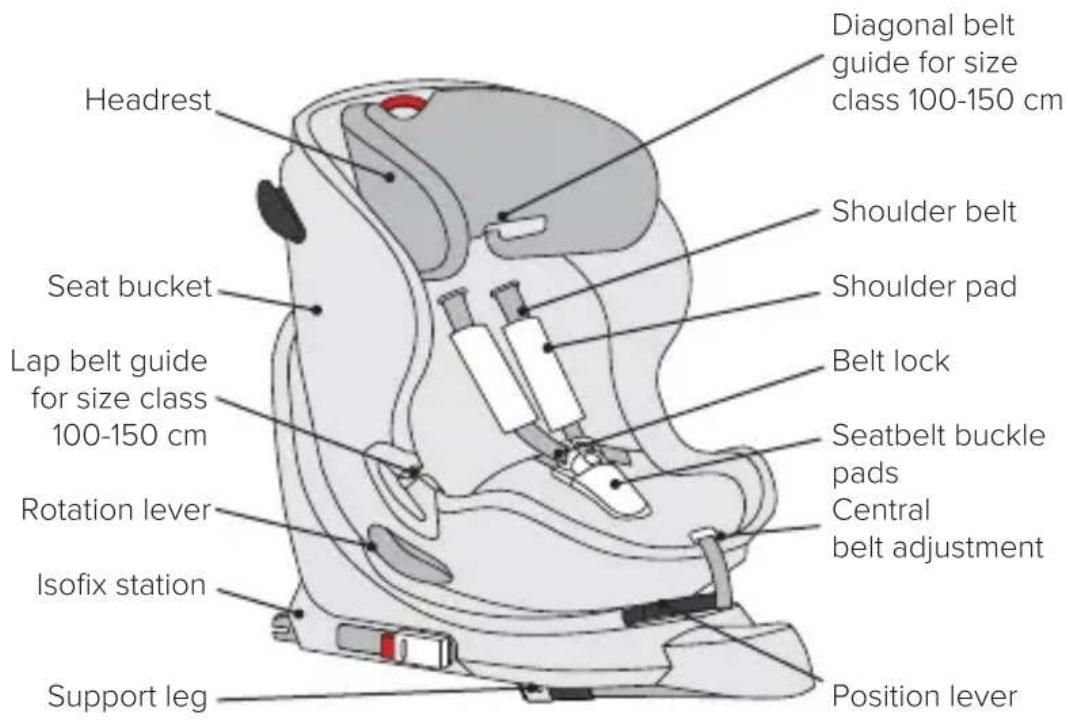
Rear view

USE OF THE CHILD CAR SEAT
Setting the child car seat tilt angle
- Activate the angle adjustment lever on the lower front side of the seat bucket with one hand.
- Hold the seat bucket with your other hand and adjust the angle.
The following seat positions are possible:
(Please see the label on the child car seat)
Rear-facing,
Body height 76-105 cm:
1 position (R)
Forward-facing,
Height 76-105 cm,
min. 15 months:
4 positions (1-4)
Forward-facing, Body size:
100-125 cm: 4 positions (1 to 4)
126-150 cm: 1 position (1)

natural_image
Illustration of a baby car seat with a red arrow indicating the seat area (no text or symbols present)Turning the child car seat
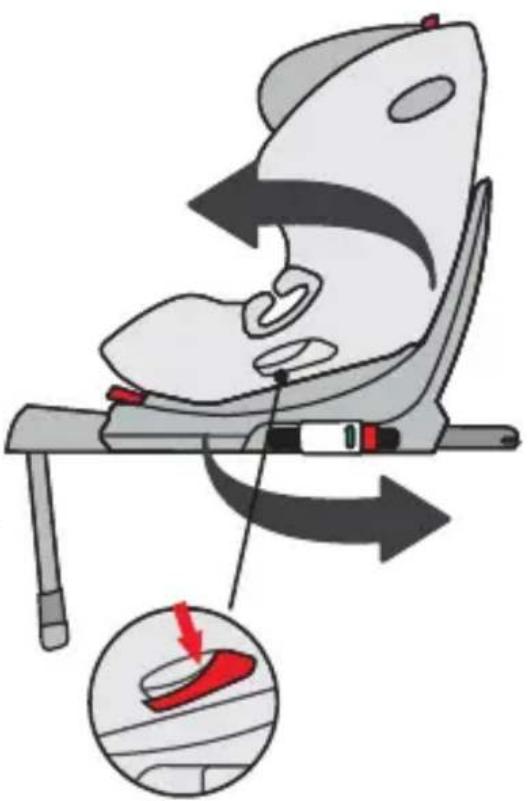
- The child car seat has a rotation lever on both sides of the seat bucket. To rotate the child car seat when it is installed, press the rotation lever facing you and rotate the child car seat to the rear- or forward-facing position.
- The forward-facing position is only suitable for children at least 15 months old and a minimum of 76 cm in height. The rear-facing position is designed for children from 76 to 105 cm tall and a maximum weight of 18 kg.
Adjusting the belt
- To loosen the belt, press the belt adjustment button in the seat area with one hand. Hold the belt buckle with the other hand and carefully loosen the attached straps.
- Pull the front adjustment strap to tighten the belts. Ensure that the straps are not twisted.

Opening/closing the belt
- To unlock the belt, press the button on the belt buckle, pull out the buckle tongues and separate them.
- To lock the belt, first of all connect both tongues of the buckle and then insert them together into the belt buckle.

natural_image
Diagram of two mechanical clamping or bracketing mechanisms with red directional arrows indicating motion (no text or symbols)
natural_image
Diagram showing a mechanical assembly with a down force applied to a seatbelt (no text or symbols present)Stowing the 5-point harness for size class 100-150 cm
- Open the shoulder pads by their press studs and unthread them from their hooks so that you can completely remove the shoulder pads from the child seat.
- Open the cover in the back area using the press studs and fold it away downwards. Also fold the lower part of the headrest cover to the side.
- Open the harness system and stow the shoulder straps including buckles in the recess (Fig. 1).
- Fold back the lower part of the headrest cover and fold up the backrest cover again and close it with its press studs.
- Remove the seat belt buckle pad.
- Carefully pull off the cover in the seat area so that you can pass the seat belt buckle through the opening in the seat cover.
- Stow the seat belt buckle in the recess in the seat area (Fig. 2).
- Put the cover back over the seat area, making sure that the cover is in its slot.
- Keep the removed pads in a safe place for later use.

natural_image
Mechanical component diagram showing a highlighted section with number 1, no readable text or symbols present
natural_image
Hand holding a black electrical switch with a red indicator light, no visible text or symbolsHeadrest adjustment
- Release the belt and pull the lever to adjust the headrest on the back of the child car seat. Move the headrest until it engages at the correct height.
- Make sure the shoulder straps are positioned just above your child's shoulders when they come out of the child car seat.
- Release the lever and ensure that the headrest is engaged.

natural_image
Illustration of a baby car seat with a red upward arrow indicating compression or lifting (no text or symbols present)
Side impact protection
• There are fold-out side impact protectors on both sides of the child car seat.
- Fold out the protector on the car door side every time. The protector on the inside does not have to be folded out.
• To fold the protector in, pull it backwards and push it in gently.

natural_image
Illustration of a baby car seat with red arrows indicating seat direction (no text or symbols)Support leg
- Fold out the support leg underneath the child car seat and slide it into the front slot. Ensure that the support leg is properly engaged in the front slot. For children under 105 cm in height, the child car seat may only be used with the Isofix support leg folded out together with the Isofix connectors.
- Pull up the support leg height adjustment knob and extend the telescopic support leg. Make sure that this is fully in contact with the footwell of your vehicle.
- Ensure that the indicator on the support leg is showing green.
- Size class 100-150 cm: The support leg is not needed in this size class. Please fold in the support leg and push it into the rear notch so that it is completely under the child car seat.

natural_image
Diagram showing a belt buckle and its bidirectional lock mechanism (no text or symbols)
natural_image
Two gray buttons with selection handles and checkmarks, no text or symbols present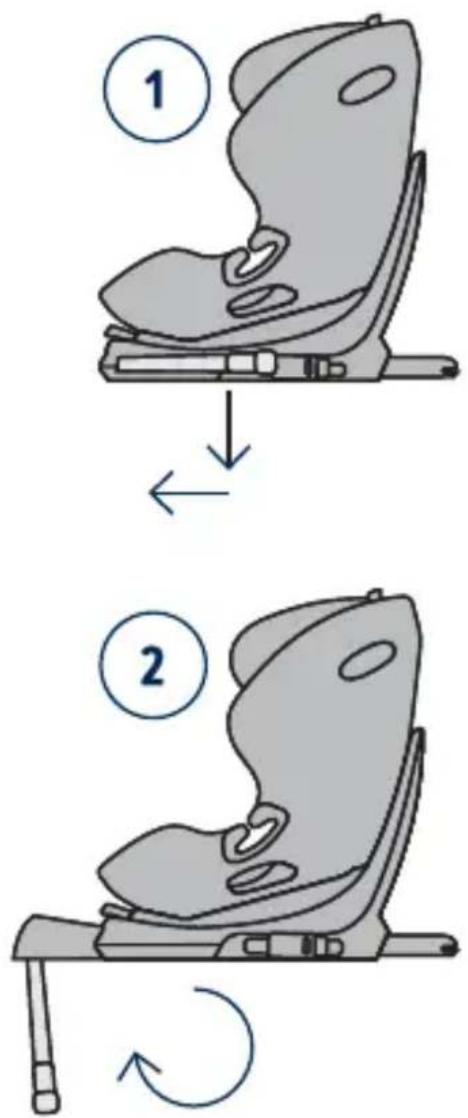
Isofix connectors
- Push the insertion aids through the slot in the cushion between the backrest and seat into the Isofix anchor points.
- When doing this, the flat side of the insertion aids must be facing downwards. This step is not necessary if the vehicle already has fixed insertion aids.
- Press the two lateral Isofix connector buttons in order to extend the length of the Isofix connectors.
- Push the Isofix connectors into the insertion aids until you hear them click into place.
- Push the child car seat in until it rests securely against the backrest of the car seat. Ensure that both Isofix indicators are switched to green.

INSTALLATION OF THE CHILD CAR SEAT
1) Height class 76-105 cm, max. 18 kg, rear-facing

-
Set the child car seat to the maximum reclining position and turn it until it is in rear-facing seat position R.
-
Press the two lateral Isofix connector buttons to extend the Isofix connectors.
-
Fold out the support leg as described above.
-
Guide the Isofix connectors onto the Isofix anchor points on the seat of the vehicle and ensure that they lock into position.
-
Push the child car seat in until it rests securely against the backrest of the seat of the vehicle. Ensure that both Isofix indicators are showing green.
-
Adjust the height of the support leg and ensure that this is fully in contact with the footwell of your vehicle.
-
Ensure that the indicator on the support leg is switched to green.
-
When placing your child in the child car seat, turn the car seat towards the car door for convenience.
-
Unfasten the belt buckle on the child car seat and place the belts on the outside of the seat.
-
Put your child in the child car seat.
-
Adjust the height of the headrest as described above.
-
Fasten the belt buckle again until you hear a click.
-
Pull the front adjustment strap to tighten the belts. Ensure that the straps are not twisted.
-
Turn the seat into the rear-facing position. Check that the child car seat is locked in this position.
2) Size class 76–105 cm, min. 15 months, max. 18 kg, forward-facing

IMPORTANT: DO NOT USE THE CHILD CAR SEAT IN THE DIRECTION OF TRAVEL UNTIL THE CHILD'S AGE IS GREATER THAN 15 MONTHS.
-
Press the two lateral Isofix connector buttons to extend the Isofix connectors.
-
Fold out the support leg as described above.
-
Guide the Isofix connectors onto the Isofix anchor points on the seat of the vehicle and ensure that they lock into position.
-
Push the child car seat in until it rests securely against the backrest of the seat of the vehicle. Ensure that both Isofix indicators are switched to green.
-
Adjust the height of the support leg and ensure that this is fully in contact with the footwell of your vehicle.
-
Ensure that the indicator on the support leg is showing green.
-
When facing in the direction of travel, the child car seat offers four adjustable seat positions.
-
When placing your child in the child car seat, turn the car seat towards the car door for convenience.
-
Unfasten the belt buckle on the child car seat and place the belts on the outside of the seat.
-
Put your child in the child car seat.
-
Adjust the height of the headrest as described above.
-
Fasten the belt buckle again until you hear a click.
-
Pull the front adjustment strap to tighten the belts. Ensure that the straps are not twisted.
-
Turn the seat into the forward-facing position. Check that the child car seat is locked in this position.
INSTALLATION OF THE CHILD CAR SEAT
3) Size class 100-150 cm, forward-facing

- First fold in the support leg and retract it completely. The support leg is not needed in this size class.
- The 5-point harness of the child car seat must be stowed as previously described. It is not needed in this size class.
- Press the two lateral Isofix connector buttons to extend the Isofix connectors.
- Guide the Isofix connectors to the Isofix anchor points on the car seat and snap them into place.
- Push the child car seat in until it rests securely against the backrest of the seat of the vehicle. Ensure that both Isofix indicators are switched to green.
- Thread the diagonal belt of the 3-point belt in the car through the diagonal belt guide on the headrest of the child car seat.
- Thread the lap belt of the car's 3-point belt through the first lap belt guide in the seat area of the child car seat.
- When placing your child in the child car seat, turn the car seat towards the car door for convenience.
- Put your child in the child car seat.


natural_image
Circular diagram with a green arrow pointing to a curved structure, labeled 'a' (no text or symbols beyond the label)
natural_image
Diagram of a mechanical component with a green vertical line and label 'b' (no text or symbols beyond the label)- Adjust the height of the headrest so that the child's head is fully in the headrest and the diagonal belt comes out through the belt guide at the level of the child's shoulders.
- Turn the seat into the forward-facing position. Check that the child car seat is locked in this position.
- Close the belt buckle of the 3-point belt until you hear a click.
- Make sure that both the diagonal belt and the lap belt run through the second lap belt guide on the child car seat, which faces the car's seat belt buckle.
- Pull on the diagonal strap to tighten it. Make sure that the straps are not twisted.
- The child car seat has the following adjustable seat positions in the direction of travel: 100-125 cm: 4 positions (1 to 4); 126-150 cm: 1 position (1).
Installation without Isofix:
Alternatively, the child car seat in the 100-150 cm size class can also be fitted with the 3-point belt only. Attaching the seat with the Isofix connectors is not absolutely essential but is recommended.
CLEANING
To guarantee long-term usage of your child car seat, do not use any solvents, abrasives or aggressive cleaning agents to clean the car seat. Check the stability of the fabric and of the seams after each wash. When washing the fabric, carefully follow the instructions on the label (see below).

Wash at 30 °C, delicate cycle

DO NOT iron

DO NOT bleach

DO NOT dry clean
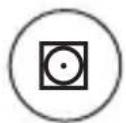
Tumble dry at low temperature
MAINTENANCE
Regularly check the condition of the product for any damage. In the event of damage, do not use the product and keep it out of the reach of children.
In case of any issues, please contact
Osann Customer Service on +49 (0) 7731/970077.

natural_image
Orange line drawing of a stylized bird perched on a branch (no text or symbols)
natural_image
Abstract pattern of downward and upward arrows forming a grid-like structure (no text or symbols)natural_image
Illustration of a baby car seat with a red arrow indicating the seat area (no text or symbols present)
natural_image
Illustration of a car seat with a red-labeled foot and arrow indicating motion, showing the seat being adjusted (no text or symbols present)natural_image
Diagram showing three stages of a car seatbelt buckle being adjusted, with arrows indicating movement (no text or symbols present)natural_image
Mechanical component diagram showing a highlighted section with number 1, no visible text or symbols
natural_image
Hand holding a black electrical switch with a red indicator light, inside a device casing (no text or symbols visible)natural_image
Illustration of a baby car seat with a red upward arrow indicating vertical motion (no text or symbols)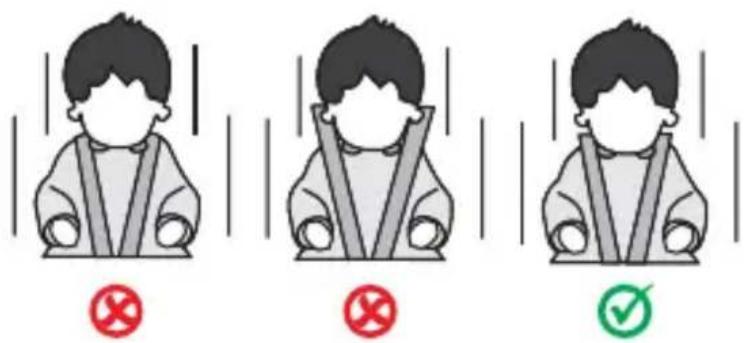
natural_image
Illustration of a baby car seat with red arrows indicating seat direction (no text or symbols)Pied de support
natural_image
Diagram showing a belt buckle and its bidirectional lock mechanism (no text or symbols)
natural_image
Two gray belt buckle symbols with red and green checkmarks below (no text or labels)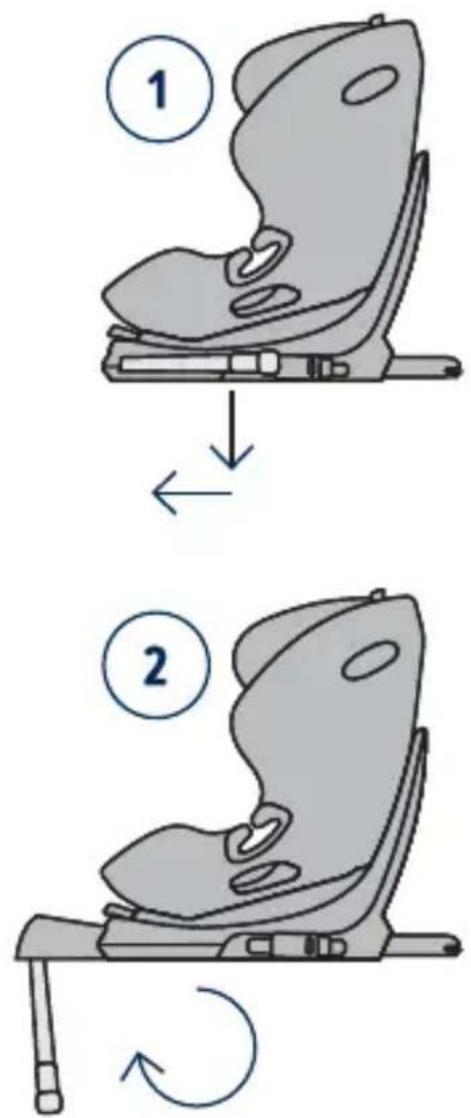
Connecteurs Isofix
IMPORTANT : N'UTILISEZ PAS LE SIÈGE AUTO POUR ENFANT DANS LE SENS DE LA MARCHE, AVANT QUE L'ÂGE DE L'ENFANT N'AIT DÉPASSÉ 15 MOIS.

natural_image
Circular diagram with a green arrow pointing to a curved structure, labeled 'a' (no text or symbols beyond the label)
natural_image
Diagram of a mechanical component with a green vertical line and label 'b' (no text or symbols beyond the label)natural_image
Simple line drawing of an orange bird perched on a branch (no text or symbols)
natural_image
Abstract pattern of downward and upward arrows forming a grid-like structure (no text or symbols)natural_image
Illustration of a baby car seat with a red arrow indicating the seat area (no text or symbols present)
natural_image
Illustration of a car seat with a red-handled button, showing the seat being adjusted for motion (no text or symbols present)natural_image
Diagram of two mechanical clamping or bracketing mechanisms with red directional arrows indicating motion (no text or symbols)
natural_image
Diagram showing a mechanical assembly with a down force applied to a seatbelt (no text or symbols present)natural_image
Abstract diagram with geometric shapes and a numbered circle (1), no readable text or symbols present.
natural_image
Hand holding a black electronic device with a red indicator light, no visible text or symbolsnatural_image
Illustration of a baby car seat with red directional arrows indicating movement or pressure (no text or symbols)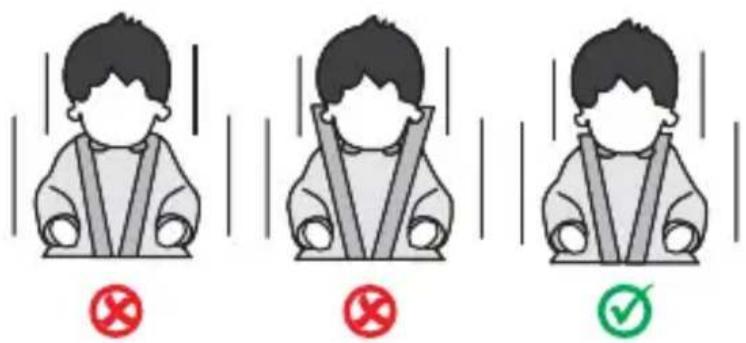
natural_image
Illustration of a baby car seat with red arrows indicating seat direction (no text or symbols)Base di sostegno

Connettori Isofix
natural_image
Diagram showing a mechanical assembly with two labeled components and three circular insets highlighting specific parts (no text or symbols present)
INSTALLAZIONE DEL SEGGIOLINO AUTO PER BAMBINI
IMPORTANTE: NON UTILIZZARE IL SEGGIOLINO AUTO PER BAMBINI NELLA DIREZIONE DI MARCIA FINO A QUANDO IL BAMBINO NON ABBIA RAGGIUNTO I 15 MESI DI ETÀ.

natural_image
Circular diagram with a green arrow pointing to a curved structure, labeled 'a' (no text or symbols beyond the label)
natural_image
Diagram of a mechanical component with a green vertical line and label 'b' (no text or symbols beyond the label)natural_image
Simple line drawing of an orange bird perched on a branch (no text or symbols)
natural_image
Abstract pattern of downward and upward arrows forming a grid-like structure (no text or symbols)natural_image
Illustration of a baby car seat with a red arrow indicating the seat area (no text or symbols present)
natural_image
Illustration of a car seat with airflow arrows and a magnified inset showing a red button (no text or symbols)Gordel instellen
natural_image
Diagram of two mechanical clamping or bracketing mechanisms with red directional arrows indicating motion (no text or symbols)
natural_image
Diagram showing a mechanical assembly with a down force applied to a seatbelt (no text or symbols present)natural_image
Mechanical component diagram showing a highlighted section with number 1, no readable text or symbols present
natural_image
Hand holding a black electrical switch with a red indicator light, no visible text or symbolsnatural_image
Illustration of a baby car seat with a red upward arrow indicating compression or lifting (no text or symbols present)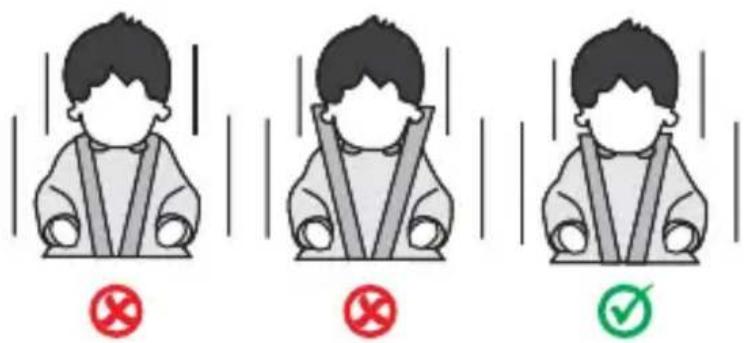
natural_image
Illustration of a baby car seat with red arrows indicating seat direction (no text or symbols)Steunpoot
natural_image
Diagram showing a belt buckle and its bidirectional lock mechanism (no text or symbols)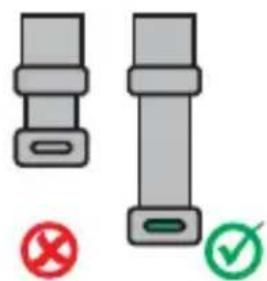
natural_image
Two gray buttons with selection handles and checkmarks, no text or symbols present
Isofix-connectoren
natural_image
Diagram showing two mechanical components with magnified views of their features (no text or symbols present)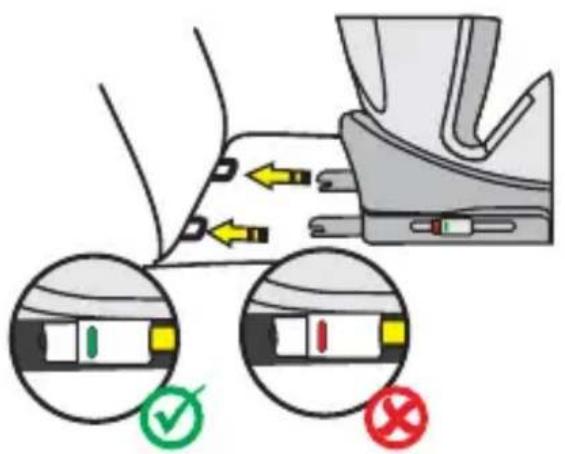
MONTAGE VAN HET AUTOSTOELTJE
1) Lengteklasse 76-105 cm, max. 18 kg, achterwaarts gericht

BELANGRIJK: GEBRUIK HET AUTOSTOELTJE NIET IN DE RIJRICHTING ALS HET KIND JONGER IS DAN 15 MAANDEN.

natural_image
Circular diagram with a green arrow pointing to a curved structure, labeled 'a' (no text or symbols beyond the label)
natural_image
Diagram of a mechanical component with a green vertical line and label 'b' (no text or symbols beyond the label)natural_image
Simple line drawing of a stylized bird perched on a branch (no text or symbols)
natural_image
Abstract pattern of downward and upward arrows forming a grid-like structure (no text or symbols)natural_image
Illustration of a baby car seat with a red arrow indicating the seat area (no text or symbols present)
natural_image
Illustration of a car seat with a red arrow indicating clockwise motion, showing the seat being adjusted and then moving (no text or symbols present)Ajustar el cinturón
natural_image
Diagram of two mechanical clamping mechanisms with red arrows indicating motion direction (no text or symbols)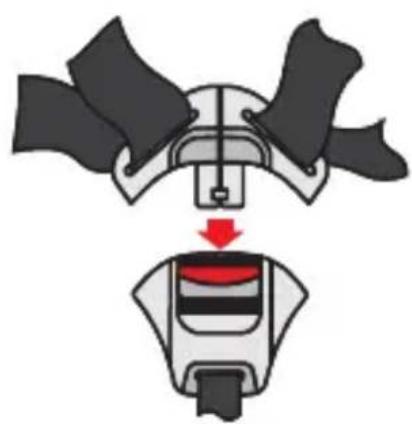
natural_image
Diagram showing a mechanical assembly with a belt and belt switch, no text or symbols presentnatural_image
Mechanical component diagram showing a highlighted section with number 1, no readable text or symbols present
natural_image
Hand holding a black electrical switch with a red indicator light, inside a device casing (no text or symbols visible)natural_image
Illustration of a baby car seat with red directional arrows indicating movement or pressure (no text or symbols)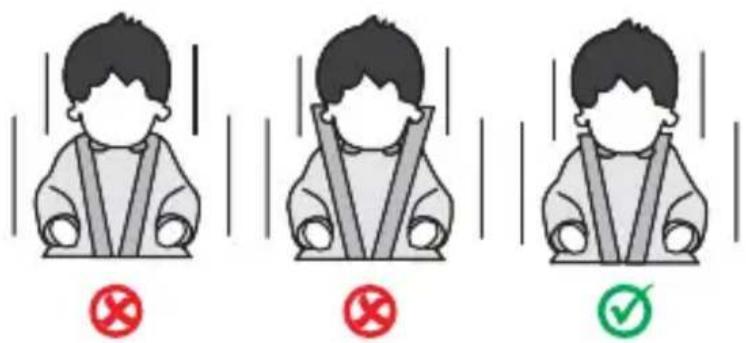
Protectores contra impactos laterales
natural_image
Illustration of a baby car seat with red arrows indicating seat direction (no text or symbols)Pie de apoyo
natural_image
Diagram showing a belt buckle and its bidirectional lock mechanism (no text or symbols)
natural_image
Two gray belt buckle symbols with red and green checkmarks below (no text or labels)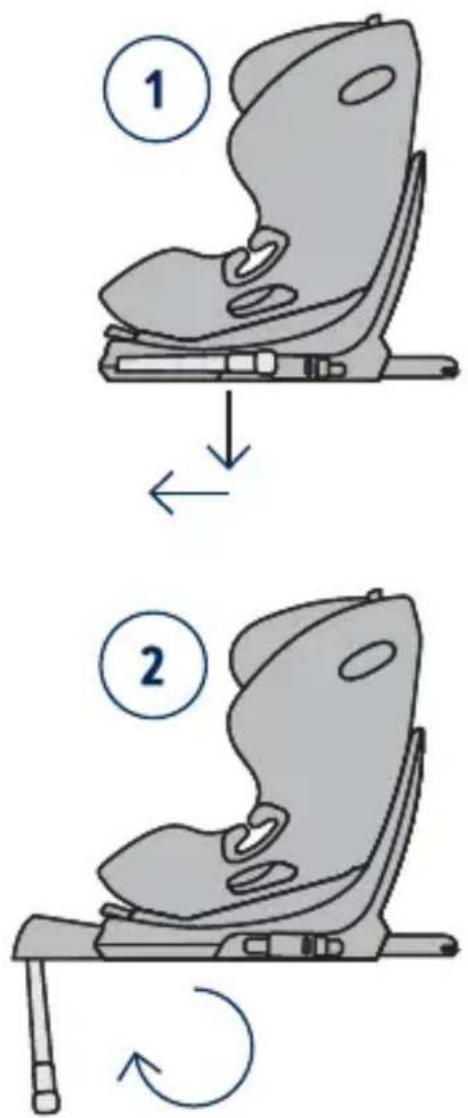
Conectores Isofix
natural_image
Diagram showing a mechanical component with two circular insets highlighting specific parts (no text or symbols present)
IMPORTANTE: NO UTILICE EL ASIENTO INFANTIL EN EL SENTIDO DE LA MARCHA, SI EL NIÑO AÚN NO HA CUMPLIDO 15 MESES.

natural_image
Circular diagram with a green arrow pointing to a curved structure, labeled 'a' (no text or symbols beyond the label)
natural_image
Diagram of a mechanical component with a green vertical line and label 'b' (no text or symbols beyond the label)natural_image
Simple line drawing of an orange bird perched on a branch (no text or symbols)
natural_image
Abstract pattern of downward and upward arrows forming a grid-like structure (no text or symbols)natural_image
Illustration of a baby car seat with a red arrow indicating the seat area (no text or symbols present)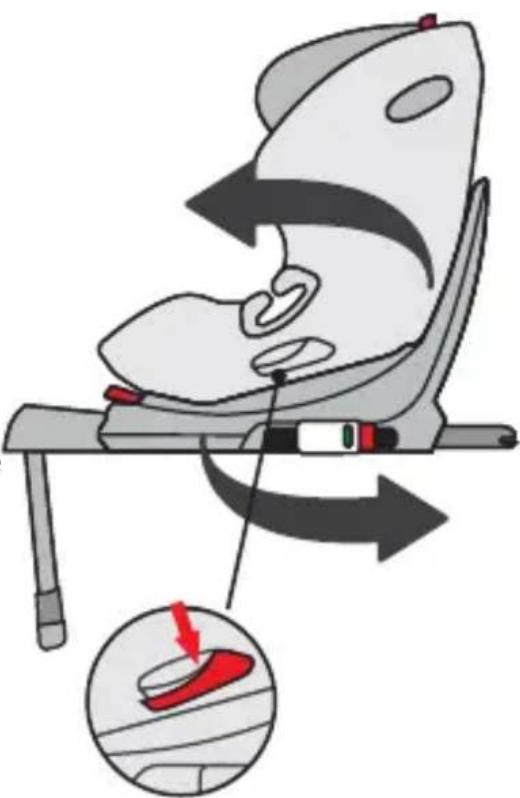
natural_image
Illustration of a car seat with a red button, showing the seat being adjusted for a seatbelt (no text or symbols present)Nastavení pásu
natural_image
Mechanical component diagram showing a highlighted section with number 1, no readable text or symbols present
natural_image
Hand holding a black electrical switch with a red indicator light, inside a device casing (no text or symbols visible)natural_image
Illustration of a baby car seat with red directional arrows indicating movement or pressure (no text or symbols)
natural_image
Illustration of a baby car seat with red arrows indicating seat direction (no text or symbols)Opěrná patka
natural_image
Diagram showing a belt buckle and its bidirectional lock mechanism (no text or symbols)
natural_image
Two gray belt buckle symbols with red and green checkmarks below (no text or labels)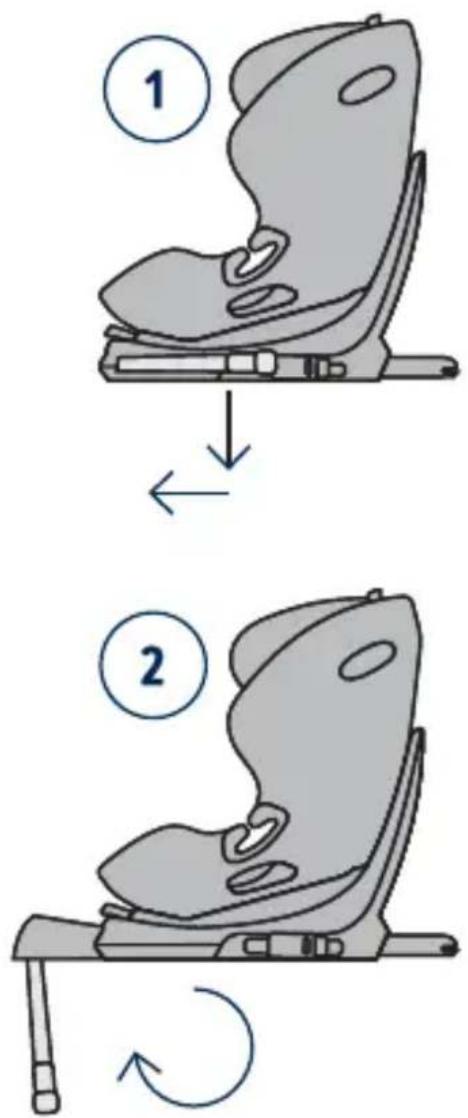
Konektory Isofix
DŮLEŽITÉ: NEPOUŽÍVEJTE DĚTSKOU AUTOSEDAČKU VE SMĚRU JÍZDY, DOKUD VĚK DÍTĚTE NEPŘESÁHNE 15 MĚSÍCŮ.

natural_image
Circular diagram with a green arrow pointing to a textured region, labeled 'a' (no text or symbols within the diagram itself)
natural_image
Diagram of a mechanical component with a green vertical line and label 'b' (no text or symbols beyond the label)natural_image
Simple line drawing of an orange bird perched on a branch (no text or symbols)
natural_image
Abstract pattern of downward and upward arrows forming a grid-like structure (no text or symbols)natural_image
Illustration of a baby car seat with a red arrow indicating the seat area (no text or symbols present)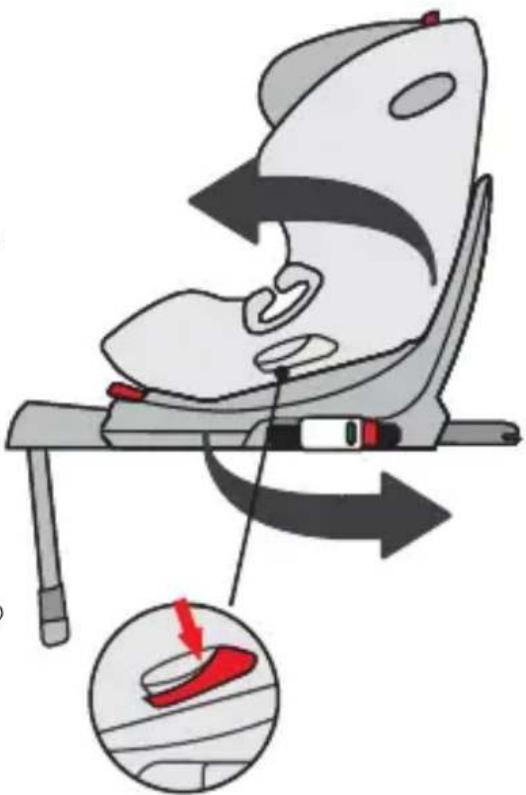
natural_image
Illustration of a car seatbelt with a red button, showing the seatbelt being adjusted and then removed (no text or symbols present)Regulacja pasa
natural_image
Diagram showing three stages of a mechanical assembly with arrows indicating motion, no text or symbols present.natural_image
Mechanical component diagram showing a highlighted section with number 1, no visible text or symbols
natural_image
Hand holding a black electrical switch with a red indicator light, no visible text or symbolsRegulacja zagłówka
natural_image
Illustration of a baby car seat with a red upward arrow indicating pressure or movement (no text or symbols present)
natural_image
Illustration of a baby car seat with a red arrow pointing to the seat area (no text or symbols present)Podpórka
natural_image
Diagram showing a belt buckle and its bidirectional lock mechanism (no text or symbols)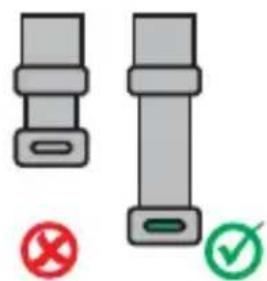
natural_image
Two gray belt buckle symbols with red and green checkmarks below (no text or labels)

natural_image
Illustration of a baby car seat with a numbered label and rotation arrow (no text or symbols beyond the number)Łączniki ISOFIX
natural_image
Diagram showing two mechanical components with magnified views of their parts, no text or symbols present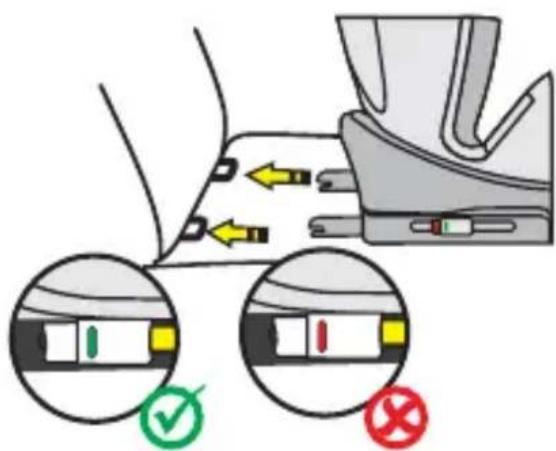
MONTAŻ FOTELIKA DZIECIĘCEGO
WAŻNA INFORMACJA: FOTELIKA DZIECIĘCEGO NIE NALEŻY UŻYWAĆ W PO-ZYCJI PRZODEM DO KIERUNKU JAZDY, DOPÓKI DZIECKO NIE UKOŃCZY WIEKU 15 MIESIĘCY.

natural_image
Circular diagram with a green arrow pointing to a curved structure, labeled 'a' (no text or symbols beyond the label)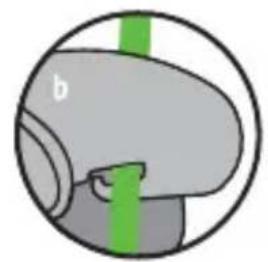
natural_image
Diagram of a biological structure with a green vertical line and label 'b' (no text or symbols beyond the label)natural_image
Simple line drawing of a stylized bird perched on a branch (no text or symbols)
natural_image
Abstract pattern of downward and upward arrows forming a grid-like structure (no text or symbols)natural_image
Illustration of a baby car seat with a red arrow indicating the seat area (no text or symbols present)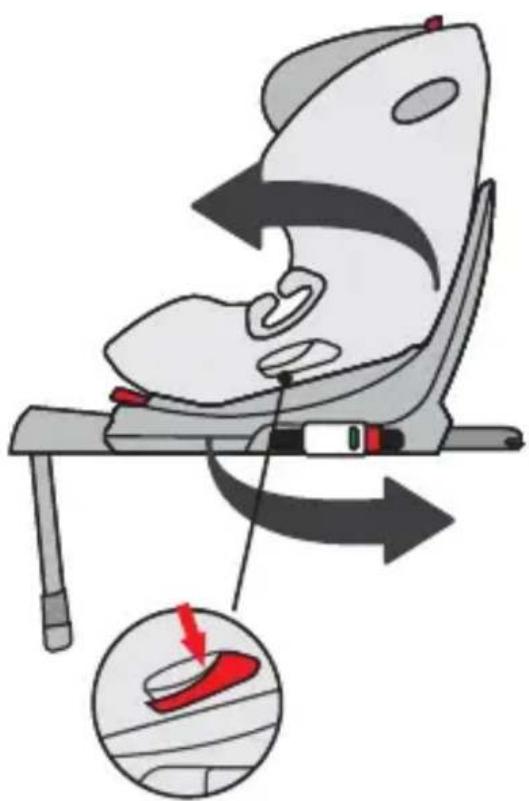
natural_image
Illustration of a car seat with a red button, showing the seat being adjusted for motion (no text or symbols present)Nastavenie pásu
Otvorenie/zatvorenie pásu
natural_image
Diagram showing two mechanical components with arrows indicating motion, no text or symbols presentnatural_image
Mechanical component diagram showing a highlighted section with number 1, no readable text or symbols present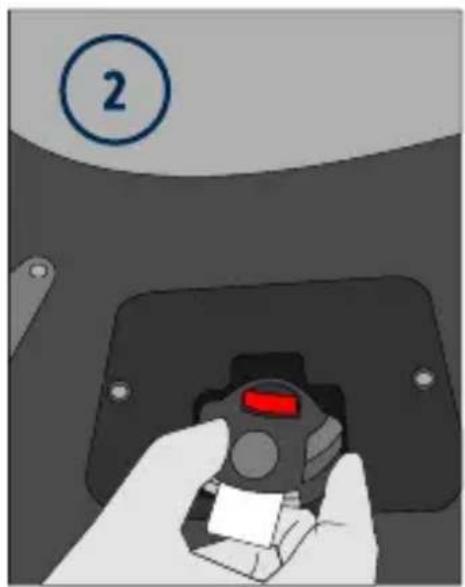
natural_image
Hand holding a black electrical switch with a red indicator light, inside a device casing (no text or symbols visible)natural_image
Illustration of a baby car seat with red directional arrows indicating movement or pressure (no text or symbols)
natural_image
Illustration of a baby car seat with red arrows indicating seat direction (no text or symbols)Stojan
natural_image
Diagram showing a belt buckle and its bidirectional lock mechanism (no text or symbols)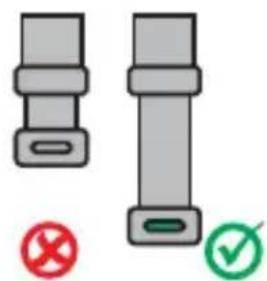
natural_image
Two gray belt buckle symbols with red and green checkmarks below (no text or labels)
Konektory Isofix
natural_image
Diagram showing two mechanical components with magnified views of their features (no text or symbols present)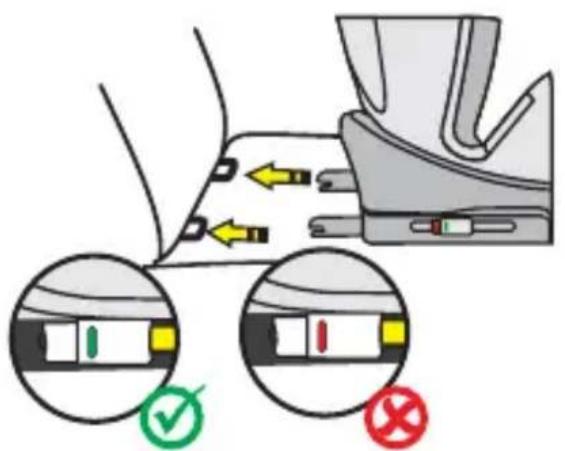
MONTÁŽ DETSKEJ AUTOSEDAČKY
1) Výšková kategória 76 – 105 cm, max 18 kg, s orientáciou dozadu

DÔLEŽITÉ: DETSKÚ AUTOSEDAČKU NEPOUŽÍVAJTE V SMERE JAZDY, POKIAL VEK DIĚTÁTA NEPREKROČIL 15 MESIACOV.

natural_image
Circular diagram with abstract lines and green diagonal bands, no visible text or symbols
natural_image
Diagram of a mechanical component with a green vertical line and label 'b' (no text or symbols beyond the label)natural_image
Simple line drawing of an orange bird perched on a branch (no text or symbols)
natural_image
Abstract pattern of downward and upward arrows forming a grid-like structure (no text or symbols)STORCHENMÜHLE

Osann GmbH
Gewerbestraße 22
D-78244 Gottmadingen

- Standfuß
- Isofix-Konnektoren
- USE
- IMPORTANT
- EXTREME DANGER
- WARNING
- SEAT PARTS
- USE OF THE CHILD CAR SEAT
- Setting the child car seat tilt angle
- The following seat positions are possible:
- Turning the child car seat
- Adjusting the belt
- Opening/closing the belt
- Stowing the 5-point harness for size class 100-150 cm
- Headrest adjustment
- Side impact protection
- Support leg
- Isofix connectors
- INSTALLATION OF THE CHILD CAR SEAT
- 1) Height class 76-105 cm, max. 18 kg, rear-facing
- IMPORTANT: DO NOT USE THE CHILD CAR SEAT IN THE DIRECTION OF TRAVEL UNTIL THE CHILD'S AGE IS GREATER THAN 15 MONTHS.
- 3) Size class 100-150 cm, forward-facing
- Installation without Isofix:
- CLEANING
- MAINTENANCE
- Pied de support
- Connecteurs Isofix
- IMPORTANT : N'UTILISEZ PAS LE SIÈGE AUTO POUR ENFANT DANS LE SENS DE LA MARCHE, AVANT QUE L'ÂGE DE L'ENFANT N'AIT DÉPASSÉ 15 MOIS.
- Base di sostegno
- Connettori Isofix
- INSTALLAZIONE DEL SEGGIOLINO AUTO PER BAMBINI
- Gordel instellen
- Steunpoot
- Isofix-connectoren
- MONTAGE VAN HET AUTOSTOELTJE
- 1) Lengteklasse 76-105 cm, max. 18 kg, achterwaarts gericht
- BELANGRIJK: GEBRUIK HET AUTOSTOELTJE NIET IN DE RIJRICHTING ALS HET KIND JONGER IS DAN 15 MAANDEN.
- Ajustar el cinturón
- Protectores contra impactos laterales
- Pie de apoyo
- Conectores Isofix
- IMPORTANTE: NO UTILICE EL ASIENTO INFANTIL EN EL SENTIDO DE LA MARCHA, SI EL NIÑO AÚN NO HA CUMPLIDO 15 MESES.
- Nastavení pásu
- Opěrná patka
- Konektory Isofix
- DŮLEŽITÉ: NEPOUŽÍVEJTE DĚTSKOU AUTOSEDAČKU VE SMĚRU JÍZDY, DOKUD VĚK DÍTĚTE NEPŘESÁHNE 15 MĚSÍCŮ.
- Regulacja pasa
- Regulacja zagłówka
- Podpórka
- Łączniki ISOFIX
- MONTAŻ FOTELIKA DZIECIĘCEGO
- Nastavenie pásu
- Otvorenie/zatvorenie pásu
- Stojan
- MONTÁŽ DETSKEJ AUTOSEDAČKY
- 1) Výšková kategória 76 – 105 cm, max 18 kg, s orientáciou dozadu
- DÔLEŽITÉ: DETSKÚ AUTOSEDAČKU NEPOUŽÍVAJTE V SMERE JAZDY, POKIAL VEK DIĚTÁTA NEPREKROČIL 15 MESIACOV.
- STORCHENMÜHLE
Brand : Osann
Model : Niki kid
Category : High chair